1
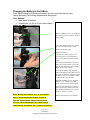
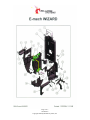
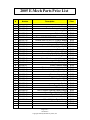
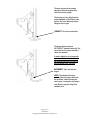
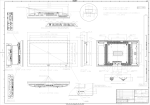
E-Mech
User Manual
Page 1 of 7
182-0050-C
Copyright 2004 by Bellatrix Systems, Inc.
Introducing the E-Mech Electronic Coin Mechanism
The E-Mech (ST-710) is designed to fit into your current “K” mech style newsrack. The
E-Mech accepts nickels, dimes, quarters and dollar coins (it does not accept pennies or
half-dollar coins)
Contacting Technical Support
Technical support is available through Bellatrix Systems, Inc. at 1-800-451-9753 Monday
through Friday from 8:00am to 5:00pm (Pacific Time).
Installing
The E-Mech installs into any “K” style newsrack without newsrack modifications, utilizing
the rack’s existing latch and door tongue assembly. As with the ST-110 make sure that
the latch lever clears the spring catch on the E-Mech return lever and that the racks coin
return chute isn’t interfering with the mech’s plastic cash or return door.
Setting Prices
The E-Mech stores one or two prices. Following are descriptions for setting prices.
Setting Two Prices
1. Gain access to the E-Mech body.
2. Press and hold the blue Reset Button for about five seconds until the red LED
lights up.
3. Release the blue Reset Button and verify that the red LED stays lit.
4. Drop the Large Price-Set Token.
5. Drop coins totaling the new Large Price-Set Token price (e.g. if the new price is
$1.50, you could drop six quarters). DO NOT PUSH THE RETURN BUTTON.
6. Drop the Small Price-Set Token.
7. Drop coins totaling the new Small Price-Set Token price (e.g. if the new price is
$0.50, you could drop two quarters).
8.
Press the Coin Return Button twice. This will load in the two new prices, return
your coins and tokens, turn off the red LED and unlock the news rack.
Page 2 of 7
182-0050-C
Copyright 2004 by Bellatrix Systems, Inc.
Setting One Price
1. Gain access to the E-Mech body.
2. Press and hold the blue Reset Button for about five seconds until the red LED
lights up.
3. Release the blue Reset Button and verify that the red LED stays lit.
4. Drop coins totaling the new price (e.g. if the new price is $0.75, you could drop
three quarters).
Press the Coin Return Button twice. This will load in the new price, return your coins,
turn off the red LED and unlock the news rack.
Changing Prices
Changing prices only applies to an E-Mech that has been loaded with two prices.
1. Drop the Price-Set Token for the desired price (i.e. if you want to change the
price to that loaded for the Small Price-Set Token, drop the Small Price-Set
Token; otherwise drop the Large Price-Set Token).
2. Press the Coin Return Button twice. This will change the price, return your Token
and unlock the news rack.
Note: Dropping the Price-Set Token for the price that is already active (or in an E-Mech
that is loaded with one price) can be done to unlock the news rack without changing the
price (see the section “Unlocking the News Rack”).
Unlocking the News Rack
Dropping the Price-Set Token for the price that is already active (or in an E-Mech that is
loaded with one price) can be done to unlock the news rack without changing the price.
1. Drop the Price-Set Token for the current price.
2. Press the Coin Return Button twice. This will return your Token and unlock the
news rack.
Page 3 of 7
182-0050-C
Copyright 2004 by Bellatrix Systems, Inc.
Changing the Battery in the E-Mech
The E-Mech is designed to maximize its battery life. In the rare event that you must
change the battery, the following steps describe the process.
Tools Needed:
• Small Blade Screwdriver
•
Duracell Ultra 123 2/3 AA 3-Volt Lithium Battery
Gain access to the E-Mech body.
Remove the Battery Cover by squeezing
the top and bottom to release it and then
lifting it off.
Use a small blade screwdriver to gently
pry one end of the Battery Clip up.
Remove the Battery Clip.
Remove the battery.
Insert the new battery being sure to
orient the positive end of the battery
closest to the Mounting Plate of the EMech.
Press the Blue Reset Button (DO NOT
hold, just press and release) and verify
that the Red LED flashes once and the
Paper-Access Door unlocks.
Reinstall the Battery Clip. Align the
ends of the Battery Clip with the slots in
the center of the battery holder and push
the Battery Clip over the battery until it
clicks into place on both ends.
Reinstall the Battery Cover. Align the
Battery Cover with the cutout and
gently push it in until it snaps in place.
Press the Blue Reset Button (DO NOT
hold, just press and release) and verify
that the Red LED flashes once and the
Paper-Access Door unlocks.
Note: During any transport, e.g., in your vehicle
Battery replacement is now complete.
And/or when shipping the E-Mech be sure to
have the Yellow plastic damper tab inserted in
the coin path so the damper lever doesn’t move
and discharge the battery. OR > remove the battery.
Page 4 of 7
182-0050-C
Copyright 2004 by Bellatrix Systems, Inc.
Page 5 of 7
182-0050-C
Copyright 2004 by Bellatrix Systems, Inc.
2005 E-Mech Parts Price List
Item
#
1
2
3
4
5
6
7
8
9
10
11
12
13
14
15
16
17
18
19
20
21
22
23
24
25
26
27
28
29
30
31
32
33
Part
Number
639-0002-05
650-0003-00
639-0006-07
304-0002-00
611-0015-00
050-0024-00
504-0017-00
607-0048-00
607-0047-01
661-0009-00
607-0049-00
617-0027-00
661-0009-01
617-0028-00
070-0023-02
612-0003-08
070-0024-02
650-002-03
070-0049-01
611-0016-00
649-0006-07
630-0003-02
630-0015-01
615-0004-00
649-0005-10
706-0002-00
660-0010-00
630-0004-02
630-0005-03
660-0002-00
660-0006-00
050-0018-00
618-0008-00
Misc
Misc
Part
Description
Lock-in Bracket
Push-in Fastener, Large, (x2)
Mounting Plate
Deltrol Solenoid
Counter Housing, Right
Token WIZARD PCB/LED Board Assembly
Duracell Ultra 123 2/3 A 3-V Lithium Battery
Keystone 1029 Battery Clip
Cover Deflector
Screw, # 8 x 5/8, (x2) Type 25 PPH
Battery Cover
4-40 Long Housing Screw
Screw, # 8 x 5/8, (x2) Type 25 PPH
4-40 Short Housing Screw
Return Door Assembly With magnet
Coin-Retain Door
Damper With Magnet
Push-in Fastener Small
Trip Lever Assembly, Includes # 18
Counter Housing, Left With Magnet
Return Lever
Extension Spring (Light)
Compression Spring (x2)
ESNA Nut, # 4-40 (x2)
Return Catch
Bushing
Screw, Type 25, # 6 x 3/4
Torsion Spring
Lee LE-024B-9 Extension Spring (Heavy)
Screw, Type 25, # 6 x1/4, PPH
Screw, Type 25, # 6 x3/8 PPH
Lock-in Wireform
6-32 x 3/16 Nylon Patch, Machine
Service Tokens Large
Service Token Small
Page 6 of 7
182-0050-C
Copyright 2004 by Bellatrix Systems, Inc.
2005
Price
$2.60
$0.25
$4.75
$7.45
$2.50
$57.50
$6.50
$1.25
$5.50
$0.20
$1.35
$0.20
$0.20
$0.20
$1.75
$1.75
$1.40
$0.25
$1.40
$2.75
$2.60
$0.70
$0.25
$0.25
$1.35
$0.45
$0.20
$0.80
$0.65
$0.20
$0.20
$0.30
$0.20
$0.40
$0.25
The door tongue must be properly
adjusted so that the newsrack door
locks and unlocks properly.
The top picture (to the left) shows the
proper installation of the E-Mech. Note
that the Trip Lever falls freely without
hitting the door tongue.
CORRECT: Trip Lever moves freely.
The bottom picture shows an
INCORRECT installation where the Trip
Lever hits the door tongue and fails to
unlock the newsrack.
If needed, adjust the door tongue with
spacers so that it extends farther into
the newsrack and does not affect the
free movement of the Trip Lever.
INCORRECT: Trip Lever hits door
tongue.
NOTE: This adjustment involves
extending the door tongue farther into
the newsrack—without lowering the
door tongue. Lowering the door tongue
may affect the proper locking of the
newsrack door.
Page 7 of 7
182-0050-C
Copyright 2004 by Bellatrix Systems, Inc.