1
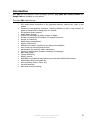
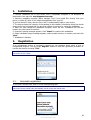
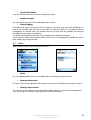
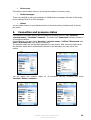
User Guide IM+ For S60 v.3 Phones Introduction With IM+ the most popular instant-messaging systems: ICQ, MSN, AOL, Yahoo, Jabber and Google Talk are available on your device. The main IM+ features are: IM+ makes direct connection to the supported services, without any "gate" in the middle. Contact list management functions, including facilities to add a new contact, to delete a contact and to change nick of a contact. Full presence status support; Global status change; Custom info messages at status change in Jabber; Storage of Contact List information on respective servers; Groups in contact list; Alerts setting management; Smileys (emoticons); Different font sizes in Contact list and dialogs are available; Auto connect to all configured services; Authorization for presence status subscription; Support of all European character encodings in messages; Auto away option; Typing notification; History options; Highlighting of hyperlinks and surfing over them with default web browser; Downloading files from hyperlinks; Files uploading (Photos, Voice, etc.) Layout awareness; Auto start at device booting. Copyright © 2002-2006, SHAPE Services www.shapeservices.com 2 Table of contents 1. Installation 2. Registration 2.1. Automatic registration 2.2. Manual registration 3. Setup 3.1. Google Talk setup 3.2. ICQ setup 3.3. AOL setup 3.4. MSN setup 3.5. Yahoo setup 3.6. Jabber setup 4. Settings 4.1. General Settings 4.2. Alerts 4.3. Auto away options 4.4. History 5. Connection and presence status 5.1. Custom status Messages in Jabber 6. Contact List 6.1. Operation with Contact List 7. Contact List management 7.1. Adding user 7.2. Deleting user 7.3. Contact Nick Changing 7.4. User Info 7.5. Incoming request for authorization 8. Contact List view 8.1. Hide offline mode 8.2. Groups in Contact List 8.3. Contact List Zooming 9. Carrying out dialog with user 9.1. Emoticons 9.2. Typing notification 9.3. Surfing URLs 9.4. Dialog zooming 10. Message history 10.1. How to view message history 10.2. How to clear message history 10.3. History in Offline 11. Files uploading 12. Sending photo 13. Voice messages sending 14. Layout awareness 15. Sending to Background 16. Help & About 17. Support Copyright © 2002-2006, SHAPE Services www.shapeservices.com 3 1. Installation 1. Transfer installation file on your device from a compatible computer or via Bluetooth or download it from wap site: wap.shapeservices.com 2. Start the installation program (Either Manager Tool, if you install IM+ directly from your phone, or Nokia PC Suite, if you install the application from your PC). If you use Nokia PC Suite, save the file in the ‘C:\nokia\installs’ folder in your device. 3. The device checks the integrity of the package to be installed. Information about the checks being carried out is showed and you are given options to continue or cancel the installation. 4. After you have started the installation program, select the IM+ installation file from the location you have saved it to before. 5. A security warning message appears. Click ‘Install’ to continue the installation. 6. Select installation target message appears, select system memory or memory card and click ‘Next’. 7. Installation is finished. 2. Registration If an unregistered version of program is started you see message about using of trial or unregistered program. You can press ‘Register’ button to start the registration procedure or use the trial version choosing ‘Trial’. Note: There is no difference between trial and commercial version in work and design. You may use the trial version for full 7 days. 2.1. Automatic registration If you have a license code, enter it in the corresponding field. Note: Every online-shop gives its own name to such code. That’s why inside our application and in this manual we call any unlock code automatically sent by a shop the license code. Copyright © 2002-2006, SHAPE Services www.shapeservices.com 4 After you have entered the license code, please wait few minutes until IM+ connects to the registration server and registers the program. (If you have no active Internet connection IM+ will offer to establish it). If you don’t have the licence code (e.g. because you have updated the older version of IM+ or the shop where you purchased IM+ doesn’t support this feature) please contact [email protected] with the licence you have used earlier for IM+. 2.2. Manual registration Manual registration is only needed, if you cannot register automatically with your licence code for some reason. In this case you can use the build-in manual registration (type word ‘manual’ in the field for license code). Installation key will be shown. You must send it to [email protected] to receive the manual registration Key. Don’t forget to include your license code and your phone’s IMEI number to your email. After ‘OK’ [Left Softkey] button is pressed you will be prompted to enter the manual registration code. If you haven't receive the registration key yet, press ‘Cancel’ [Right Softkey]. If the manual registration code/license code is correct the following message is shown: 3. Setup You should setup account information for each service you wish to work with. The usual and most convenient way is using IM+ with just the same ICQ, AOL, MSN, Yahoo, Google Talk and Jabber accounts that you use on your desktop PC. Copyright © 2002-2006, SHAPE Services www.shapeservices.com 5 You can create a new account and get additional information about the IM system on the respective home sites: Google Talk Instant Messaging ICQ 2001b/2002a (ICQ) AOL Instant Messaging (AOL) MSN Instant Messaging (MSN) Yahoo! Instant Messaging (Yahoo) Jabber Instant Messaging www.talk.google.com www.icq.com www.aol.com www.msn.com www.yahoo.com www.jabber.org Note: IM+ does provide facilities to create new account from only for Jabber IM, on any Jabber server only through SSL. Other services (e.g., ICQ) support a lot of configuration options for privacy, authorization mode and so on. IM+ does not support control for such options, so we recommend use a standard desktop client for this kind of adjustments. 3.1. Google Talk setup Choose the menu item Services / Google Talk/ Preferences There’re main and advanced settings. Login: Your GMail account, which you’ve received after the registration for this service (e.g.: [email protected]) Password: Your Google Talk password Reconnection attempts: Number of connection attempts to be done before the connection would regard as failed. As a rule, two attempts will be enough. If your network connection is unstable it may be desirable to increase this setting. Autoconnect: This option starts service automatically at program launch. Resource: You can denote the resource name in this strip (E.g. IM+). Host: By default it is talk.google.com. Port: Standard Google Talk port is 5223 3.2. ICQ setup Choose the menu item Services / ICQ / Preferences Login: Your ICQ UIN. This is a digital value from 7 to 11 figures, which you have received after the registration for ICQ service Password: Your ICQ password Reconnection attempts: Number of connection attempts to be done before the connection would regard as failed. As a rule, two attempts will be enough. If your network connection is unstable it may be desirable to increase this setting. Autoconnect: This option starts service automatically at program launch. Host: By default it is login.icq.com. Copyright © 2002-2006, SHAPE Services www.shapeservices.com 6 If you are going to setup IM+ for a corporate ICQ server then you should contact your system administrator for this setting. Port: Standard ICQ port is 5190, but ICQ server really accept connections to any port. 3.3. AOL setup Choose the menu item Services/ AOL/ Preferences Login: Your «screen name», which you’ve received after the registration for this service (e.g.: «BobSmith») Password: Your AOL password Reconnection attempts: Number of connection attempts to be done before the connection would regard as failed. As a rule, two attempts will be enough. If your network connection is unstable it may be desirable to increase this setting. Autoconnect: This option starts service automatically at program launch. Host: By default this is login.oscar.aol.com. Port: Standard AOL port is 5190, but AOL server (just as ICQ) really accepts connection on any port 3.4. MSN setup Choose the menu item Services / MSN / Preferences Login: Your e-passport, which you’ve received after the registration for this service (e.g.: «[email protected]») Password: Your MSN password Autoconnect: This option starts service automatically at program launch. Reconnection attempts: Number of connection attempts to be done before the connection would regard as failed. As a rule, two attempts will be enough. If you network connection is unstable it may be desirable to increase this setting. 3.5. Yahoo setup Choose the menu item Services / Yahoo / Preferences Login: Your Yahoo ID, which you’ve received after the registration for this service (e.g.: “Adam”) Password: Your Yahoo password Reconnection attempts: Number of connection attempts to be done before the connection would regard as failed. As a rule, two attempts will be enough. If your network connection is unstable it may be desirable to increase this setting. Host: As a rule this is scs.msg.yahoo.com. Port: Standard Yahoo port is 5050 Autoconnect: This option starts service automatically at program launch. 3.6. Jabber setup Choose the menu item Services/ Jabber / Preferences. Login: Your Jabber account, which you’ve received after the registration for this service (e.g.: “Adam”) Password: Your password Resource: You can denote the resource name in this strip (E.g. IM). Reconnection attempts: Number of connects attempts to be done before the connection would regard as failed. As a rule, two attempts will be enough. If your network connection is unstable it may be desirable to increase this setting. Autoconnect: This option starts service automatically at program launch. Host: Jabber.org is one of the well-known servers. Copyright © 2002-2006, SHAPE Services www.shapeservices.com 7 Port: Standard Jabber port is 5222 Enable SSL: If enable this option, your messaging becomes secure. 4. Settings There are several separate settings sections in application. You can open each of them choosing the menu item ‘Settings’. If selecting one of the settings sections (‘General’, ‘Alerts’, etc.) you’re able to leaf through all other settings sections as they are arranged in tab manner. To move to another settings section you should press Right/Left joystick buttons of your device. 4.1. General Settings Choose ‘Settings’ / ‘General’ menu item to open this section and to find next preferences items: Encoding You can select the encoding which corresponds to your language Prompt for billable events At this section you can enable or disable the query about connection permission. Default access point You may choose Access Point, which will be used for connection to all services, not asking you at every connection. For manual selecting of Access Point choose 'None'. Copyright © 2002-2006, SHAPE Services www.shapeservices.com 8 Secure file transfer Your files will be transferred secure if enabling this option. Downloads path You can denote the path for files uploading at this section. Enable logging If enabling this option, the log file will be created to record all your work with application. In case of any troubles with IM+ you’re freely able to send the log file to our support team for investigation of occurred issue. You should send the log right upon the problem has occurred and before the new start of application. You will be informed about the path for log creation while enabling the option. If this option is enabled the program works slower. So it is recommended to disable this option after sending log to support team. 4.2. Alerts At this section you can set various alerts options: Alerts You can enable/disable alerts or just enable them in foreground using this option. Message alert sound The type of the sound, played at new message arrival, can be selected freely using this option. Message alert volume You may set up the volume of sound that will be played when you receive new message from user. (Choosing the minimum sound level turns off the notification.) Copyright © 2002-2006, SHAPE Services www.shapeservices.com 9 Online alert sound The type of the sound, played at users’ coming online, can be selected freely using this option. Online alert volume You may set up the volume of sound that will be played when user from Contact List changes his status from 'offline' to another (e.g. 'online', 'away' or 'invisible'). (Choosing of minimum sound level turns off the notification) Vibra state Vibration on new message receipt can be enabled or disabled here. Default Here you can retrieve all your alert settings to settings assigned by default. Note: Application sounds and vibra alert will function correspondingly to the set phone profile. (E.g. At ‘Silent mode’ no sounds or vibra will sound.) 4.3. Auto away options Using the menu item ‘Settings’/’Auto away’ you can set the time, on the expiry of which, your status automatically will be changed to Away/Not Available. 4.4. History You can enable or disable history keeping at ‘Settings’/ ‘History’ section. Copyright © 2002-2006, SHAPE Services www.shapeservices.com 10 Drive in use This option controls where history is stored (phone memory or memory card). Visible messages There is a possibility to set up the quantity of Visible History messages- the value of this string can be changed from 20 to 200 messages. Delete You can delete history for any selected service or the whole history simultaneously if choose this option. 5. Connection and presence status Connection to the certain service can be initiated by choosing the menu item ‘Services’/ <service name>/ ‘Available’/’Connect’. The menu item ‘Connect all’ initiates connect to all configured services. Correspondingly, the menu items ‘Services’/ <service name>/ ‘Offline’/’Disconnect’ and ‘Main’/’Disconnect all’ close active connections. The presence status can be adjusted separately for each service. After connect to each server the presence status will be automatically restored to the last status you have set for this service. You can assign one common status for all connected services, choosing from menu ‘Services’/’Status’/<status>: Copyright © 2002-2006, SHAPE Services www.shapeservices.com 11 5.1. Custom Status Messages in Jabber When choosing status in Jabber you can create your own info messages. You should select from the menu ‘Services’/’Jabber’/<Status>/’Add…’ and enter the text of your message. There is a possibility to create several messages for every proper moment. All these messages will be saved, so you can select one of them, to add a new one or to delete any message you want. While scrolling your Contacts, a momentary pop-up message will be displayed for highlighted buddy, informing you about user’s status message. You can also discover which status message your buddy has entered, choosing in dialog window ‘Options’/’Show info’: 6. Contact List All supported services allow storing contacts information (address book) on the server side. It means that you desktop PC client and IM+ can easily share the same contact list and no synchronization IrDA port or Bluetooth is required. So, if you have a lot of friends in your MSN contact list don’t worry that you have to register all of them in IM+ manually – it receives the list from the MSN server. After connection to each server IM+ loads the client’s contacts and includes them to the common contact list, which is always displayed in the main window. After disconnection from the server IM+ excludes related contacts from the list. Each contact in the common contact list is marked with the icon, which indicates current presence status and service system of the contact - please look through the table as following: Copyright © 2002-2006, SHAPE Services www.shapeservices.com 12 Icon Current presence status Service Online Free For Chat (Chat) Do Not Disturb (DND) Away Invisible Extended Away (N/A) Offline ICQ ICQ ICQ ICQ ICQ ICQ ICQ Online Offline Away Invisible AOL AOL AOL AOL Online Do Not Disturb (DND) Away Invisible Extended Away (N/A) Offline MSN MSN MSN MSN MSN MSN Online Offline Extended Away (N/A) Invisible Do Not Disturb (DND) Away Yahoo Yahoo Yahoo Yahoo Yahoo Yahoo Away Do Not Disturb (DND) Invisible Offline Online Extended Away (N/A) Jabber Jabber Jabber Jabber Jabber Jabber Online Away Busy Offline 6.1. When 7. Google Google Google Google Talk Talk Talk Talk Operation with Contact List the contact list is displayed in the window, following buttons are available: Up / Down — move around the contact list Right Softkey — open the user's context menu ‘OK’ Button — open a dialog window with selected user Contact List management IM+ supports such facilities as adding user in your contact list, deleting the contact list item and changing nick of the user. IM+ also processes incoming request for authorization. Note: IM+ saves the contact list information on the server side, so you have to be connected to the corresponding server to manipulate your contact list entries. Copyright © 2002-2006, SHAPE Services www.shapeservices.com 13 7.1. Adding user To add new user to the contact list you need open the menu ‘Contacts’ / ‘Add to…’/ <service name>: Note: If you have no any groups yet, IM+ will create the group ‘General’ automatically. 7.2. User ID - the unique identification of the user you want to add. Format of this field depends on service : (e.g. MSN e-passport - [email protected]) Nick name – name you like to associate with the user in your contact list. This is a string, which you can select freely. Deleting user In order to delete user from your contact list select ‘Remove user’ from user’s context menu. 7.3. Contact Nick Changing In order to rename the user, select ‘Change nick’ from user’s context menu.You can select the nick freely. 7.4. User info You may look for User’s info choosing ‘Show info’ from user’s context menu. Copyright © 2002-2006, SHAPE Services www.shapeservices.com 14 7.5. Incoming request for authorization In case of incoming request for authorization the dialog is displayed. You can permit or forbid it (Yes [Left Softkey] / No [Right Softkey]). If the user, who requests authorization, isn't at your contact list, you get an offer to add him to the contact list. If you agree the adding user form is opened. 8. Contact List view The application allows you to arrange your Contacts into groups, to select zoom level of the Contacts and to hide offline users. 8.1. ‘Hide offline’ mode If you don't like to overload your contact list with the "offline" status users you can initiate ‘Hide offline mode’. In this case only the users, whose status is not "offline" or whose messages are not read yet are displayed in the contact list. The mode is initiated by choice the menu ‘View’/’Hide offline users’. 8.2. Groups in Contact List You can enable or disable group mode choosing from the menu ‘View’/’Enable CL groups’: Copyright © 2002-2006, SHAPE Services www.shapeservices.com 15 8.3. Contact List Zooming This feature allows you to select the proper zoom level for Contact List: 9. Carrying out a dialog with user To open a dialog window with the selected user from your contact list, select ‘Open dialog’ from the user’s context menu or use Joystick’s ‘OK’ button. Once the dialog opened, you can start writing - a box for text input will appear automatically right after you press any key on your device. To close the dialog window use Right Softkey that’s ‘Close’ button. If you have many messages in each dialog window, you can look this message history with Joystick Up/Down keys. You will receive a notification message on new message receipt and the new tab with open dialog will appear in your Contact List. Copyright © 2002-2006, SHAPE Services www.shapeservices.com 16 You can freely move to the new opened dialog pressing Right Joystick button. To switch between all opened dialog windows and contact list window use Joystick Left and Right keys. While in dialog window, you can easily pass to other open dialogs or to contact list window using Joystick Left and Right keys. You can also press ‘Options’ button and choose the corresponding menu items. If choosing ‘Dialogs’ item, the list of open dialogs appears letting you to choose one of the open dialogs you want to pass to. While writing a message you are able to switch to another dialog remaining unremoved the text you are writing currently, so that you could return to this dialog later and finish writing. To perform this, you should press the Upper Joystick key to display tabs with open dialogs and switch to one of them. Afterwards you can return back to your dialog to resume writing. Pressing any key will open the editor with your untouched text. 9.1. Emoticons There is an opportunity to insert emoticons into the message. You should press the Joystick OK key and choose necessary emoticon in the following window: 9.2. Typing notification You receive a typing notification in dialog which signifies that your buddy is in process of typing a message to you. Copyright © 2002-2006, SHAPE Services www.shapeservices.com 17 9.3. Surfing URLs URLs become highlighted in dialog: You can move through hyperlinks in open dialog. There is a possibility to open links in browser or to download files from selected URLs. You should choose one of the highlighted links in dialog and select the appropriate menu item ‘Open in browser’ or ‘Download’ according to your intentions. 9.4. Dialog zooming You can set the convenient zoom level in dialog using ‘View’/’Dialog zoom’. Copyright © 2002-2006, SHAPE Services www.shapeservices.com 18 10. Message history IM+ supports message history. By default, message dialog shows only messages that have been written during latest online session. IM+ provides support for keeping and viewing of all sent and received messages. You should enable History saving choosing the menu item ‘Settings’/’ History’. There is a possibility to set the quantity of Visible History messages- the value of this string can be changed from 20 to 200 messages. ‘Drive in use’ option controls where history is stored (phone memory or memory card). 10.1. How to view message history To show the message history for particular user, first select the user in the contact list, choose from user’s options ‘Open dialog’ –the history of communication will be displayed in dialog window. Messages written in previous sessions will be displayed in grey color: Only definite number of messages will be displayed in dialog, accordingly to your settings in History options. 10.2. How to clear message history You can clear message history for all services simultaneously or for any selected service choosing from the menu ‘Settings’/ ‘History’/ ‘Delete’. In this window you can also see History size for every service. Copyright © 2002-2006, SHAPE Services www.shapeservices.com 19 To clear the message history for particular user you should select ‘Delete History’ from the User Options. 10.3. History in Offline At disconnect of the one selected service, users whose history is saved, will still be displayed in your Contact List until you remove their history. You can look through user’s history, choosing ‘Open dialog’ from user’s menu- the history will be displayed in dialog window. Note: This option works only if ‘Show offline users’ is enabled. 11. Files uploading You can upload files to the selected user choosing from User options ‘Send’/’File’. The list of files appears; you can select the proper one and send it to your contact. Copyright © 2002-2006, SHAPE Services www.shapeservices.com 20 12. Sending Photo You can send photo to the selected user choosing from User options ‘Send’/ ‘Photo’. First select the object you want to photo. Before photo capturing you can change picture dimensions choosing ‘Options’/’Size’. You should choose ‘Capture’ and send your picture or choose ‘Cancel’ from Options to return to the Contact List. 13. Voice messages sending You’re able to record a voice message so that to send it to your buddies like any other file. Choose from user’s options ‘Send’/ ‘Voice’ item, press ‘Start’ button and enter the name of the record. Right after you press ‘OK’ button, the record will start. Pressing ‘Stop’ button will terminate the record, notifying you that your record was saved. You can then select ‘Options’/’Send’ in order to send the voice message as any other file or ‘Back’ to return to Contact list. 14. Layout awareness The application automatically renews the user interface if changing the layout during the program work: Copyright © 2002-2006, SHAPE Services www.shapeservices.com 21 15. Sending IM+ to Background The application can be send to background letting you to stay active and to receive messages while working with other applications. In order to send IM+ to background you should just press red button on your device. 16. Help& About To use the integrated Help function select ‘Help’/’Help’ from the main menu. To view the information about IM+ version and its creators choose the menu item ‘Help’/’About’. 17. Support If you have any questions or some problems with the installation or usage of the application, you can use our end user support services. SHAPE Services offers several types of the user support. First of all we try to make our manuals as thorough as possible, so you can find answers to most questions here in this document. Otherwise, you can find answers to the most common questions in the FAQ Section of our website here: http://www.shapeservices.com/en/faq/sections/implus.php?platform=s60v3 You can download the latest version form our site here: http://www.shapeservices.com/en/products/try.php?product=im&platform=s60v3 In case of any problems with application please fill our support form located here: http://www.shapeservices.com/en/support/support.php?form=s60&platform=s60v3 Our Support Team will answer your email within two business days. Copyright © 2002-2006, SHAPE Services www.shapeservices.com 22