1
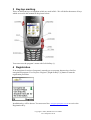
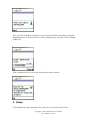
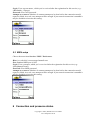
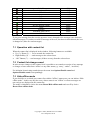
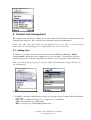
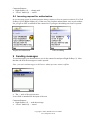
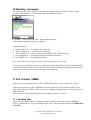
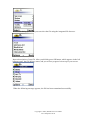
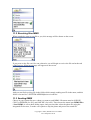
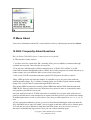
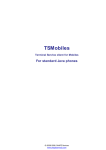
IM+
Multi-system Mobile Instant Messenger for
Nokia 7650/3650
Version 2.14
Copyright © 2002, SHAPE Services GmbH
www.shapeservices.de
1 Introduction
With IM+ the most popular instant-messaging systems: ICQ, MSN and AOL are available on
your Nokia 7650/3650.
The main IM+ 2.0 features are:
• IM+ makes direct connection to the supported services, without any «gate» in the middle.
It’s very important, because it means that you connected to your favourite services as a
full rights user. So, your connection will never be blocked out because of some
«difficulties» between target service and the «gate» operator!
• File transfer through ICQ and AOL to and from other IM+ clients (IM+ for Win 32 and
IM+ 2.0 for Nokia 7650). E.g. now you don’t have to pay the expensive MMS traffic,
you can just send your photos via ICQ for normal GPRS tariff!
• You can send and receive Instant MMS (IMMS) messages to other IM+ clients on ICQ
and AOL (IM+ for win 32 or IM+ 2.0 for Nokia 7650)
• Contact list management functions, including facilities to add a new contact, to delete a
contact and to change nick of a contact.
• IM+ keeps the contact list information on the respective servers. So, IM+ and your
convenient desktop client always use just the same contact list. You can add new user in
your contact list with IM+ and you will see this user on next connection with your
desktop client.
• Simultaneous connection to all selected systems
• Full presence status support
• Authorization for presence status subscription.
• Traffic counter
• Sound alert
2 Installation
Read the chapter 12 of your Nokia 7650/3650 User’s Guide first to learn, how to install new
software on your Nokia 7650/3650 using “Manager” tool or PC Suite installation tool.
1. Start the installation program (Either Manager Tool, if you install IM+ directly from your
7650/3650 phone, or PC Suite installation tool, if you install IM+ from your PC)
2. After you have started the installation program, select the IM+ installation file from the
location you have saved it to before. If you haven’t renamed it, the file name should be
“implus.SIS”.
3. A security warning message appears. Click install to continue the installation.
4. A Certificate message appears. Click “next” to continue the installation.
5. A choose language message appears. Select your language and click “next” to continue the
installation.
6. Select installation target message appears, select “C” and click next.
7. Installation is finished.
Copyright © 2002, SHAPE Services GmbH
www.shapeservices.de
3 Key-top marking
There are different keys of telephone which are used in IM+. We will define the names of keys
which are used in this manual in the picture below:
You can access the program’s menu with Left Softkey (1).
4 Registration
If an unregistered version of program is started you see message about using of trail or
unregistered program. You can press ‘Register’ [Right Softkey (2)] button to start the
registration procedure.
Installation key will be shown. You must send it to [email protected] to receive the
Registration Key.
Copyright © 2002, SHAPE Services GmbH
www.shapeservices.de
After Next [Left Softkey(1)] button is pressed you'll find the proposition to enter the
Registration Key. If you haven't receive the registration key yet, press ‘Cancel’ [Right
Softkey(2)].
If the registration key is correct the following message is shown:
5 Setup
You should setup login information for each service you wish to work with.
Copyright © 2002, SHAPE Services GmbH
www.shapeservices.de
The usual and most convenient way is using IM+ with just the same ICQ, AOL and MSN
accounts that you use on your desktop PC.
You can create a new account and get additional information about the IM system on the
respective home sites:
ICQ 2001b/2002a (ICQ)
AOL Instant Messaging (AOL)
MSN Instant Messaging (MSN)
www.icq.com
www.aol.com
www.msn.com
Note:
IM+ does not provide facilities to create new account from itself. Some service (e.g., ICQ)
supports a lot of configuration options for privacy, authorization mode and so on. IM+ does not
support control such options, so we recommend use a standard desktop client for this kind of
adjustments.
5.1 ICQ setup
Choose the menu item Services / ICQ / Preferences.
Host: By default it is login.icq.com.
If you are going to setup IM+ for a corporate ICQ server then you should contact you system
administrator for this setting
Port: Standard ICQ port is 5190, but ICQ server really accept connections to any port
Login: Your ICQ UIN. This is a digital value from 7 to 11 figures, which you have received
after the registration for ICQ service
Password: Your ICQ password
Attempts to reconnect: Number of connects attempts to be done before the connection would
regard as failed. As a rule, two attempts will be enough. If you network connection is unstable it
may be desirable to increase this setting.
5.2 AOL setup
Choose the menu item Services / AOL / Preferences.
Host: By default this is login.oscar.aol.com.
Port: Standard AOL port is 5190, but AOL server (just as ICQ) really accept connection on any
port
Copyright © 2002, SHAPE Services GmbH
www.shapeservices.de
Login: Your «screen name», which you’ve received after the registration for this service (e.g.:
«BobSmith», «Tiptop»)
Password: Your AOL password
Attempts to reconnect: Number of connects attempts to be done before the connection would
regard as failed. As a rule, two attempts will be enough. If you network connection is unstable it
may be desirable to increase this setting.
5.3 MSN setup
Choose the menu item Services / MSN / Preferences.
Host: As a rule this is a messenger.hotmail.com.
Port: Standard MSN port is 1863
Login: Your e-passport, which you’ve received after the registration for this service (e.g.:
«[email protected]»)
Password: Your MSN password
Attempts to reconnect: Number of connects attempts to be done before the connection would
regard as failed. As a rule, two attempts will be enough. If you network connection is unstable it
may be desirable to increase this setting.
6 Connection and presence status
Copyright © 2002, SHAPE Services GmbH
www.shapeservices.de
Connection to the certain service can be initiated by choosing the menu item Services / <service
name> / Connect. The menu item Services / Connect all initiates connect to all configured
services.
Correspondingly, the menu items Services / <service name> / Disconnect and Services /
Disconnect all close active connections.
The menu item Services / <service name> include submenu in which you can input your
presence status in the concrete IM- system by default:
The presence status in AOL
The presence status in ICQ and MSN
The presence status is adjusted separately for each service. After connect to each server the
presence status will be automatically restored to the last status you have set for this service.
7
Contact list
All supported services (ICQ, AOL, MSN) allow storing contacts information (address book) on
the server side. It means that you desktop PC client and IM+ can easily share the same contact
list and no synchronization IrDA port or Bluetooth is required. So, if you have a lot of friends in
your ICQ contact list don’t worry that you have to register all of them in IM+ manually – IM+
receive the list from the ICQ server.
Note: Some old versions of desktop ICQ and AOL software save the contact list on the client side
rather then on the server side. In this case it might be useful to upgrade the desktop client
software.
After connection to each server IM+ loads the client’s contacts and includes them to the common
contact list, which is always displayed in the main window. After disconnection from the server
IM+ excludes related contacts from the list.
Each contact in the common contact list is marked with the icon, which indicates current
presence status and service system of the contact - please look through the table as following
Icon
Current presence status
Online
Free For Chat (Chat)
Do Not Disturb (DND)
Away
Copyright © 2002, SHAPE Services GmbH
www.shapeservices.de
Service
ICQ
ICQ
ICQ
ICQ
Invisible
Extended Away (N/A)
Offline
ICQ
ICQ
ICQ
Online
Offline
AOL
AOL
Online
Do Not Disturb (DND)
Away
Invisible
Extended Away (N/A)
Offline
MSN
MSN
MSN
MSN
MSN
MSN
If you get a message from the user the presence icon is changed to the message icon: (there are
unread messages). If you have read all of message of the user, but haven't deleted them, the icon
is changed to: (there are read messages).
7.1 Operation with contact list
When the contact list is displayed in the window, following buttons are available:
• Up (3) / Down (5) — move around the contact list
• Right Softkey (2) — send message to the selected user
• “OK” Button (7) — read messages (if there are any) from the selected user
7.2 Contact list change sound
In order to trace changes in the contact list it is possible to use sounds on receipt of new message
or changes of user status from ‘offline’ to any other status(e.g. ‘away’, ‘online’, ‘invisible’).
For initiation/ deactivating sounds choose the menu item Options/Enable sound and
Options/Disable sound correspondingly.
7.3 Hide offline mode
If you don't like to overload your contact list with the "offline" status users you can initiate “Hide
offline mode”. In this case only the users, whose status is not "offline" or whose messages are
not read yet are displayed in the contact list.
The mode is initiated by choice the menu Roster/Hide offline mode and cut off by choice
Roster/Show offline mode.
Copyright © 2002, SHAPE Services GmbH
www.shapeservices.de
8 Contact List management
IM+ supports such facilities as adding user in your contact list, deleting the contact list item and
changing nick of the user. IM+ also processes incoming request for authorization.
Please note: IM+ saves the contact list information on the server side, so you have to be
connected to the corresponding server to manipulate your contact list entries.
8.1 Adding user
To add new user to the contact list you need open the menu Roster / Add User / Add to
<service name>. Before the form “Adding user to <service name>” is opened the list of the
groups of this service is shown, and you have to choose one of the groups to add this user to.
Note: if you haven't got any group yet, IM+ for Nokia 7650/3650 makes group ‘General’ for
you automatically.
The list of the groups before adding.
•
Adding to ICQ
User ID - the unique identification of the user you want to add. Format of this field depends
on service:
ICQ: UIN – a digital value from 7 to 11 figures (e.g.: 123456789).
AOL: «Screen name» (e.g.: BobSmith)
MSN: e-passport (e.g.: [email protected])
Copyright © 2002, SHAPE Services GmbH
www.shapeservices.de
•
Nick name – name you like to associate with the user in your contact list. This is a string,
which you can select freely.
Please note: AOL does not support this facility. So, for AOL user Nick always just the same
as the User ID
Command buttons:
• Right Softkey (2) — add the user
• “Green” button (9) — cancel
8.2 Deleting user
To delete user from the contact list you need choose the menu item Roster / Remove User.
This deletes the active item from your contact list.
8.3 Contact Nick Changing
To rename user in your contact list you need choose the menu item Roster / Change Nick and
enter desirable name in field New nick. You can select the nick freely.
Please note: AOL does not support this facility. So, for AOL user Nick always just the same as
the User ID
Copyright © 2002, SHAPE Services GmbH
www.shapeservices.de
Command buttons:
• Right Softkey (2) — change nick
• “Green” button (9) — cancel
8.4 Incoming request for authorization.
In case incoming request for authorization the dialog is displayed. You can permit or forbid it (Yes [Left
Softkey(1)]/No [Right Softkey(2)]). If the user, who requests authorization, isn't at your contact
list, you get an offer to add him to the contact list. If you agree the adding user form is opened.
Offer to adding
Request for authorization
9 Sending messages
To send messages you should select a user in the contact list and press Right Softkey (2). After
that the edit form for messages to send is opened.
Note: you can't send messages to AOL users, whose presence status is offline.
• To: — nick of the recipient user.
Lower field is intended for the input of the text.
Command buttons:
• Right Softkey (2) — send the message
• “Green” button (9) — cancel
Copyright © 2002, SHAPE Services GmbH
www.shapeservices.de
10 Reading messages
If a message of the user comes you can read it by choosing the user in your contact list and
pressing “OK” button (7). Then the message read dialog is opened.
• From: — nick name of the user who send this massage
Lower field contains the message of this user.
Command buttons:
• Right Softkey (2) — to return to the contact list
• “Green” button (9) — to answer to the message.
• “OK” button (7) — to read messages from another user (if there are any)
• Left (6)/Right (4) — to read previous/next message of this user.
• Up (3)/Down (5) — the scroll the message.
Info: at the end of the message you will see the time when it was received.
If you receive a message from the user, who isn't in your contact list, you will be asked whether
you'd like to add this person to the contact list. If you agree, the form of adding of the user to the
contact list is opened. Otherwise the message will be ignored.
11 File Transfer / IMMS
In IM+ 2.0 you can send and receive file or IMMS with ICQ or AOL to other IM+ clients.
You can sent and receive files or IMMS to/from IM+ Win32 on your desktop or IM+ 2.0 on
other mobile device. In «IM+ to IM+ mode» file exchange in supported even if both partners are
behind firewalls.
IM+ for Win32 can be downloaded from www.shapeservices.de. It’s free.
11.1 Sending Files
Choose in your contact list user, whom you want to send file. His status must be ONLINE,
CHAT or HIDDEN (for ICQ) and ONLINE (for AOL). Then choose the menu item IMMS/Files
/ Send file.
Copyright © 2002, SHAPE Services GmbH
www.shapeservices.de
A select file dialog opens, and you can select the file using the integrated file browser.
Input a description of your file. After you did this press OK button, which appears in the left
bottom corner, the file delivery starts, and you will see progress bar on top of your screen.
When the following message appears, the file has been transmitted successfully.
Copyright © 2002, SHAPE Services GmbH
www.shapeservices.de
11.2 Receiving files/IMMS
When somebody starts to sent file to you, this message will be shown on the screen.
If you press no the file won’t be sent, otherwise you will begin to receive the file and at the end
of this process following message will appear on the screen.
And you can find receiving file in the folder which contain sending user ID in the name, and this
folder is located in C:\SYSTEM\APPS\IMplus\receivedFiles\
11.3 Sending IMMS
Choose in your contact list user, whom you want to send IMMS. His status must be ONLINE,
CHAT or HIDDEN (for ICQ) and ONLINE (for AOL). Then choose the menu item IMMS/Files
/ Send IMMS. A select photo dialog opens, and you can either select the photo file using the
integrated file browser, or make a new photo or skip the photo and proceed to sound file.
Copyright © 2002, SHAPE Services GmbH
www.shapeservices.de
If you select making a photo yourself, you will see a preview window. Focus it on the object you
want to take a picture of and then click on “photo”.
Then a select sound dialog opens, and you can either select the sound file using the integrated
file browser, or record a new sound or skip the sound file.
If you select recording your file, record will begin immediately; you can finish it by pressing
“stop”. Note the sound will be recorded as WAV and can be played on any computer. The .arm
sounds can be played only on IM+ 7650.
Input a description of your IMMS. After you did this press OK button, which appears in the left
bottom corner, the file delivery starts, and you will see progress bar on top of your screen.
You will be told if the message was transmitted successfully or transmitting has failed.
12 Showing of the expended traffic.
You can easily check volume of the traffic, generated by IM+.
These modes are available:
• Showing of the general traffic — choose the menu item Traffic / Show global
• Showing of the service traffic (since last reset of statistics) — choose the menu item
Traffic/<service name>/Show total
• Showing of the service traffic within last session — choose the menu item Traffic/<service
name>/Show by session
You can cleaned statistics for the chosen service with menu item [Traffic/<service
name>/Reset].
Copyright © 2002, SHAPE Services GmbH
www.shapeservices.de
13 Menu About
You can see information about IM+ version and its creator by choosing the menu item About.
14 FAQ: Frequently Asked Questions
IM+ for Nokia 7650/3650 reports "connection to server failed"
A: This may have many reasons:
1. You have no active connection. IM+ normally offers you to establish a connection through
available access points. Just select the access point.
2 You just have left Bluetooth or IrDA connection area, so Nokia 7650 “thinks” it is still
connected to Internet through Bluetooth or GPRS. Just exit the program wait a little bit and try to
connect again, now you should be able to select your access point
3. IM+ needs TCP/IP connection and some opened TCP/IP ports to be able to connect.
Many GPRS provider may limit the number of available services for price plans with low/
without monthly charge. E.g. Vodafone Germany limits it to WAP for plans without monthly
charge. IM+ won't be able to connect through GPRS in this case.
This normal GPRS connection is usually called GPRS Data and the WAP limited connection
GPRS WAP. Some providers have two different access points for these to connections; make
sure you have selected the correct one.
Ask your mobile Provider if TCP/IP connection is available for your price plan, which access
point you should choose and which ports are opened. Put these ports in your connection settings.
If standard ports do not work, try one of these ones, they are often opened: 80, 443, 110, 25, 143, 53,
8080
4. If the connection suddenly was lost, or you were disconnected during the login operation the
ICQ/AOL/MSN server may still “think” you are logged in and don’t allow you to connect again.
To avoid this just select disconnect from the connection menu, so he server now receives a
disconnect command and logs you out. Now you can connect normally again.
Copyright © 2002, SHAPE Services GmbH
www.shapeservices.de
5. If GPRS connection is not constant though GPRS icon is on. It may happen during a storm or
thunder in some regions.
In this case IM+ may not be able to download the contact list, because it contains much data and
some IP Packages may be lost.
Just try to reconnect several times, or wait until the connection is constant again.
IM+ reports "You have to configure ... transport first"!
A: You have to setup ICQ/MSN/AOL access data before you use the program. Just put the same
access data as you have on your desktop PC. Read the setup section of the user's manual for
more information.
Copyright © 2002, SHAPE Services GmbH
www.shapeservices.de