1
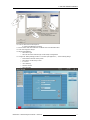
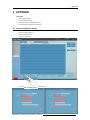
Error! Use the Home tab to apply Titre 1 to the text that you want to appear here.Error!
Use the Home tab to apply Titre 1 to the text that you want to appear here.
Theater Management Software V5.6
Installation manual
Theater Management Software
V5.6
R595905178/06
18/12/2012
R5905178/00 Theater Management Software 06/04/2012
1
1. TMS SOFTWARE Installation
Barco nv Entertainment Division
Noordlaan 5, B-8520 Kuurne
Phone: +32 56.36.82.11
Fax: +32 56.36.883.86
Support: www.barco.com/esupport
Visit us at the web: www.barco.com
Printed in Belgium
R5905178/04 Theater Management Software 18/12/2012
0
1. TMS SOFTWARE Installation
1. TMS SOFTWARE INSTALLATION
About the TMS Software
The TMS software is an application that offers a centralized management of all SMS, libraries and providers in a theater.
This application is part of a set of programs called "TMS software suite".
About this manual
This manual describes the procedure and conditions for the installation of the TMS software, version 5.6.
Overview
•
Required configuration
•
Plan your TMS Software Installation
•
Clean up your library
•
Verify the network configuration of CineStore Solo G3 servers.
•
Verify certificates
•
Install the software
•
Update the library
•
Providers configuration
1.1 Required configuration
Requirements
The software can only be installed on a Plaza Catcher in version 5.5.4 (or higher) with the hardware upgrade kit installed
(update kit art. nr: R8762424K). Installing this software on any other platform or on a Plaza Catcher in another version will
not work. Contact your provider to upgrade your Plaza Catcher to the proper version if necessary.
Note: Updating a machine already in version 5.6 is possible with this setup. In this case the procedure is
greatly simplified (see above in the chapter 1.2 “how to update a machine already in version 5.6”).
SMS recommendations
If the theater contains CineStore Solo G3 SMS, version 5.7.4 of the Solo application is recommended for full integration with
the TMS. Earlier version of the Solo SMS are supported with limited functionalities.
1.2 How to update a machine already in version 5.6
The following update procedure must be used only when you need to update a machine that’s already in
version 5.6. In this particular case, and only in this case, the rest of the procedure described in this
document shall not be performed. The applications settings and the content are preserved.
Particular case of a server already in version 5.6
Some servers have already been updated with the first issues of version 5.6 (v5.6.x). In this case the procedure is simplified
because it is not necessary to convert content on the library into a format that’s compatible with the new version (v5.6). It has
already been done.
The only constraint is a new function that automatically removes the unused KDM at startup. This new feature increases the
system performance in terms of speed and volume backup, but sometimes unfortunately it blocks the application startup
when the volume of KDM is too important. Assuming that most KDM on the machine are often obsolete, we will remove the
entirety of the KDM, upgrade the machine, and then reintroduce progressively the KDM that are still valid. In order to stop
the automatic recovery process of the database, we will take care to disconnect the SMS servers from the network during
the completion of this operation.
R5905178/04 Theater Management Software 18/12/2012
1
1. TMS SOFTWARE Installation
What has to be done?
•
Stop the TMS application and manually move all KDM to an USB media.
•
Disconnect SMS servers from network.
•
Perform TMS software V5.6 installation.
•
Reconnect one by one the SMS servers.
•
Ingest the KDM that are still valid and that was not regenerated by the SMS reconnection.
Necessary part
•
USB media (not provided by Barco)
Stop the TMS application and manually move all KDM to an USB media.
Move all KDM from the machine to the USB media into a “support" Windows account.
•
Stop the server and restart into a “support" Windows account. See appendix 2.3 (Start into the “Support” Windows OS
account).
•
Connect the USB media to the server.
•
Launch a Windows explorer (Press simultaneously the keys « Windows » + « e »).
•
Go to the directory: D:\CineStore\data\content\kdm
•
Move all files and directories present in this directory to the UBS media. The location on the USB media is not important.
You can put all to root directory or in a new directory.
•
Check that there are no remaining KDM in the directory “D:\CineStore\data\content\kdm”.
Disconnect SMS servers from network.
Due to the mechanism of DB recovery, it is very important to disconnect all SMS from the network. The automatic detection
of missing KDM in the TMS would initiate an immediate copy of KDM from the SMS servers. This large number of copy
would block the TMS application.
•
Unplug each SMS from the Management network.
•
Unplug each SMS from the Media network.
Perform TMS software V5.6 installation.
•
Place the setup file and its security key file in the usual update folder.
or
•
Connect a USB media with the installation file and its security key file to the server.
•
Start the server in normal mode.
•
Wait a few seconds and press the exit button in the TMS application.
•
When the Logout panel appears, push on the “Update” button.
•
The TMS application stops.
•
The installation procedure runs automatically. This installation may take several minutes.
Note: If the update does not start automatically, please start the process manually by clicking
“START MENU> Programs> UPDATE”.
•
After the installation, the server and the TMS application restart automatically in the new version. If this is not the case,
restart the server manually by pressing the “reset” button on the front panel.
Reconnect the SMS servers one by one.
You must plug the previously disconnected SMS to the network and ensure their correct configuration. The procedure may
vary depending on the type of SMS.
R5905178/04 Theater Management Software 18/12/2012
2
1. TMS SOFTWARE Installation
The procedure must be applied one SMS at a time. Do not connect all SMS at the same time. A large
number of transactions would block the TMS application.
•
Connect one SMS to the Media and Management network.
•
Make sure it is automatically detected by the TMS after a few moments or set the SMS manually in the “TMS
configuration” module if it is not a Doremi or CineStore SoloG3 server.
•
Check the “Jobs” module and wait for all jobs (concerning this SMS) to complete. It could take several minutes
depending on the number of transfers required for updating.
•
When all jobs concerning this SMS are completed repeated the process for the next SMS.
This procedure is complete when all machines on the network are configured and their KDM arrived on the TMS 5.6.
Ingest the KDM that are still valid.
Use the TMS application to ingest KDM that are still valid on the USB media.
•
Start the server in normal mode.
•
Plug the USB media that contains the backed-up KDM into the server.
•
Ingest KDM (For more information, see the user manual). The application will automatically select and ingest valid KDM,
eventually not yet copied during the reconnection operation of the SMS.
1.3 Plan your TMS Software Installation
Impact on the theater organization
Because the cleanup, installation and reconfiguration of your server may take several hours, it is very important to carefully
plan this operation. The time required for the installation depends on the quantity of content already present on the Library.
During installation, the TMS server is no longer operational. You must ensure that the SMS have what they need to operate
without the TMS, specifically that they have all the necessary content for the planned playbacks.
1.4 Clean up your library
Why is important to clean up your library?
First it is important to remove the unused old DCP present on your Lib to improve performance. Removing unnecessary
content saves time during transfers (copy process) and improves data management on the machine.
Second, after the installation process all the content on the library will be converted from the old version of TMS software to
the new one. The removal of unnecessary content speeds up this operation.
Finally, if a swap or spare library is not used during content conversion, 50% of free disk space is required on the library.
You must either use a second (swap or spare) library, or free 50% of the disk space to allow the conversion.
Otherwise the conversion from the old to the new library will fail and you will lose all your content.
What has to be done?
Use the TMS application in order to:
• Clean up all your unused DCPs.
If a second library is not used:
•
Clean up DCPs stored on the lib that are present on another source (other lib, SMS, External HDD).
•
If necessary, temporarily move or delete some content that can be reloaded later in order to release at least 50% of disk
space.
R5905178/04 Theater Management Software 18/12/2012
3
1. TMS SOFTWARE Installation
1.5 Verify the network configuration of TMS and CineStore Solo G3 servers
If the theater contains CineStore Solo G3 servers, it is necessary to verify their network configuration.
What has to be done?
•
Start the PeerFinder Visualizer.
•
Check the TMS network configuration.
•
Check every CineStore Solo G3 network configuration.
Start the PeerFinder Visualizer
•
•
•
On the TMS, go to the following directory with Windows Explorer:
D:\CineStore\app\bin\Rd3.Packages.PeerFinder
Run the following file (double-click):
Rd3.Packages.PeerFinder.Visualizer.exe
This will start the PeerFinder Visualizer.
Check the TMS network configuration
•
The list on the left displays all detected servers on the network. Select the TMS.
•
Verify in the bottom right list if the both networks, control and content, are correctly configured. Each local network must
have a valid IP address on networks of the theater. If it is not the case, the TMS is not properly configured or connected.
Please contact your integrator.
Check every CineStore Solo G3 network configuration
Perform this operation for every Solo G3 listed on the left.
• Select the Solo G3 SMS
R5905178/04 Theater Management Software 18/12/2012
4
1. TMS SOFTWARE Installation
•
Verify in the bottom right list if the both networks, control and content, are correctly configured. Each local network must
have a valid IP address on networks of the theater. If it is not the case, the SMS is not properly configured or connected.
Please contact your integrator.
Note: It is possible that the network configuration on the Solo G3 is correct, but the configuration file of the
communication tool (PeerFinder) is not up-to-date on the SMS. The following file might need to be updated
on the Solo G3:
D:\CineStore\app\bin\Rd3.Packages.PeerFinder\ PeerFinder.cfg.xml
For the complete procedure please refer to the CineStore Solo G3 documentation or contact support for
assistance in configuring the SMS properly.
•
Repeat for the next Solo G3 in the list.
1.6 Verify Certificates
If the TMS does not contain the appropriate certificates, it may not work after upgrade.
How to verify the certificates of the TMS are correct.
•
•
•
•
Go to the following directory with Windows Explorer:
E:\CineStore\app\data\ca\certs
Verify that this certificate file is present, where XXXXX is the serial number of the TMS:
XDC.PLAZAG3-TMS.V6.XXXXX_cert.pem
Go to the following directory:
E:\CineStore\app\data\ca\private
Verify that this certificate file is present, where XXXXX is the serial number of the TMS:
XDC.PLAZAG3-TMS.V6.XXXXX_prkey.pem
Note: You will find the TMS serial number on the label at rear of the server, or under the icon at the top left
of the desktop (computer name).
Plaza-G3
00079
If the certificates are not present, or if the serial number does not match, contact your integrator.
1.7 Install the software
What has to be done?
•
Disconnect SMS from network.
•
Perform TMS software V5.6 installation.
•
Reintroduce the previous application settings, automatically saved in a backup configuration file.
•
Connect and configure SMS.
Disconnect SMS from network.
Due to performance reasons during installation of the new version, it is very important to disconnect all SMS from the
network. The automatic detection of these machines during installation would result in the execution of a large number of
KDM transfer process.
•
Unplug each SMS from the Management network.
•
Unplug each SMS from the Media network.
WARNING: Make sure you unplug the SMS from the network and not the TMS.
R5905178/04 Theater Management Software 18/12/2012
5
1. TMS SOFTWARE Installation
Perform the new version installation.
•
Place the setup file and its security key file in the usual update folder.
or
•
Connect a USB media with the installation file and its security key file to the server.
•
Wait a few seconds and press the exit button in the TMS application.
•
When the Logout panel appears, push on the “Update” button.
•
The TMS application stops.
•
The installation procedure runs automatically. This installation may take several minutes.
Note: If the update does not start automatically, please start the process manually by clicking
“START MENU> Programs> UPDATE”.
•
After the installation, the server and the TMS application restart automatically in the new version. If this is not the case,
restart the server manually by pressing the “reset” button on the front panel.
At this point, the TMS application starts in the updated version. User accounts were preserved, so you can
log in the same way as in the previous version.
Some features were added or modified in this new version. For a detailed explanation of user interface
changes, please refer to the TMS user guide available on the BarcoZone intranet and on the secured
Partner Zone (URL: https://my.Barco.com - Registration is necessary).
Reintroduce the previous application settings.
Almost all previous configuration settings are removed during the installation. Users, certificates and licenses (Lobby Eyes,
Lobby Theater, R-TMS) are preserved. The other parameters were saved in a file. It is necessary to reintroduce them
manually in the setup of the application.
Below are the steps you should follow in order to find these parameters:
•
In the “Tools” module click on “Document viewer”.
•
Select “TMS documents” as the source.
•
Select the “backup_V5.5_configuration.html” file.
•
In this file you will find all the necessary information to reintroduce the previous settings (auditorium name, SMS,
Libraries, ...)
R5905178/04 Theater Management Software 18/12/2012
6
1. TMS SOFTWARE Installation
.
•
You have to enter this information in the TMS configuration module. The settings for the library (in “Library Server List”)
are detailed in the next chapter. Other settings are straightforward. For more information, refer to the user guide
available on the BarcoZone intranet and on the secured Partner Zone (URL: https://my.Barco.com - Registration is
necessary).
Connect and configure SMS.
After installing the new version, you must plug the previously disconnected SMS to the network and ensure their correct
configuration. The procedure may vary depending on the type of SMS.
Doremi and CineStore Solo G3 SMS:
The procedure for Doremi and CineStore SMS must be applied one SMS at a time. Do not connect all SMS
at the same time.
•
Connect one SMS to the Media and Management network.
•
Make sure it is automatically detected by the TMS after a few moments.
•
Check the “Jobs” module and wait for all jobs to complete. It could take several minutes depending on the number of
KDM transfers.
•
When all jobs are completed repeated the process for the next SMS.
This procedure is complete when all machines on the network are configured and their KDM arrived on the TMS 5.6.
Doremi ShowVault SMS:
• Connect one Doremi Showvault SMS to the Media and Management network.
•
Make sure it is automatically detected by the TMS after a few moments.
There are two possibilities:
-
The SMS appears in the “Players” panel.
-
Or in the “Unidentified” panel.
R5905178/04 Theater Management Software 18/12/2012
7
1. TMS SOFTWARE Installation
• Select the newly detected SMS in one of these panels.
• Click on Modify button.
• Set the two IP address (Management, Media) and valid de modification (OK + Save)
• If the server had appeared in the “Unidentified” panel, it disappears and reappears in the panel “Players” after a few
moments.
• Check the “Jobs” module and wait for all jobs to complete. It could take several minutes depending on the number of KDM
transfers.
• When all jobs are completed repeated the process for the next SMS.
This procedure is complete when all machines on the network are configured and their KDM arrived on the TMS 5.6.
Dolby SMS:
(Indicative procedure for not supplied hardware by Barco).
• Plug all Dolby SMS on the Media and Management network.
•
Set one Dolby SMS manually in the “TMS configuration” module.
•
Check the “Jobs” module and wait for all jobs to complete. It could take several minutes depending on the number of
KDM transfers.
•
When all jobs are completed repeat the process for the next Dolby SMS.
This procedure is complete when all machines on the network are configured and their KDM arrived on the TMS 5.6.
1.8 Update the library
About the updating procedure
The goal of this procedure is to convert content on the library into a format that’s compatible with the new version of the
TMS. There are three methods to update the library. You must choose and apply one of the three methods.
The first method is a conversion of the content directly on the library. This does not require additional hardware but it
requires at least 50% free disk space. If you want to keep more content on the library, you can use the second method,
which requires a spare library during the operation. A third method is proposed if you upgrade the old library to a new
(physical) one.
You only need to apply one of the three methods.
Overview
•
Method 1: direct conversion.
•
Method 2: with spare library.
•
Method 3: swap to new library.
1.8.1 Method 1: direct conversion
This method converts content directly on the library. It requires 50% free disk space on the library to store the converted
content.
What has to be done?
•
Create and configure a new library with the TMS 5.6 software.
•
Check the free disk space of the library.
•
Ingest content already (previously) present on the library.
•
Remove content already present before the migration.
•
Transfer/reload content previously deleted during the cleaning stage.
Create and configure a new library with the TMS 5.6 software.
•
To configure the library, see appendix 2.1 (How to configure a library). You must enter the configuration parameters of
the new library. The old parameters were saved in the configuration backup file (see above in “how to reintroduce the
previous application settings).
When creating the library, be sure to set a specific path for the library. This will allow you to identify what
folder holds the content in the new format.
R5905178/04 Theater Management Software 18/12/2012
8
1. TMS SOFTWARE Installation
Check the free disk space of the library.
•
To check free space, see appendix 2.4 (How to check the free disk space of the library).
Note: you must have at least 50% free disk space. If that isn’t the case, you must remove some of the
content, or you can use the second library update method (requires a spare library).
Ingest content already present on the library.
•
Add a Generic manual content provider with the path set to lib root (shares/plazalib on Open-E NAS, previous encoded
path (on 5.5.X TMS configuration) on smartjog). See appendix 2.2 (How to configure a provider).
•
Transfer all content from this provider to the library with the “content browser”. Check the “Jobs” module and wait for all
jobs to complete. It could take several hours depending on content size.
If a job seems frozen (the progress percentage doesn’t change in 10 minutes) you should abort the job.
Select the job and press the "Abort" button. This action will allow the ingest process to continue. When all
other jobs are complete, you can manually resume the aborted jobs (use the "retry" button).
Do not use the “clear all” button before all jobs are done, or you won’t be able to resume the aborted jobs.
•
Delete the provider from the server configuration (select the provider in the “Providers” panel and press “Remove”).
Remove content already presents before migration.
•
Connect to the library using an FTP Client and delete all content in the old path except the new library content.
WARNING: do not delete the folder holding all the new library content. That folder is the path you set in
the first step, “create and configure a new library with the TMS 5.6 software”.
Transfer/reload content previously deleted during the cleaning stage.
•
If you temporarily moved content, you can now transfer it to the library through the TMS application.
1.8.2 Method 2: with spare library
This method uses a spare library to temporarily store converted content before it is copied back to the original library.
What has to be done?
•
Configure the spare library as “library” and the old library as “provider” in the TMS.
•
Ingest content from the provider (old library) to the spare library.
•
Delete content from the provider (old library).
•
Configure the spare library as “provider” and the old library as “library” in the TMS.
•
Ingest content from the provider (spare library) to the old library.
•
Remove the provider (spare library).
Configure the spare library as “library” and the old library as “provider” in the TMS.
•
Make sure the spare library is connected to the content theater network.
•
To configure the spare library as “Library”, see appendix 2.1 (How to configure a library).
•
To configure the old library as “Provider”, see appendix 2.2 (How to configure a provider).
Ingest content from the provider (old library) to the spare library.
•
Use the “content browser” to ingest the content from the provider to the spare library.
•
Check the “Jobs” module and wait for all jobs to complete. It could take several hours depending on content size.
If a job seems frozen (the progress percentage doesn’t change in 10 minutes) you should abort the job.
Select the job and press the "Abort" button. This action will allow the ingest process to continue. When all
other jobs are complete, you can manually resume the aborted jobs (use the "retry" button).
R5905178/04 Theater Management Software 18/12/2012
9
1. TMS SOFTWARE Installation
Do not use the “clear all” button before all jobs are done, or you won’t be able to resume the aborted jobs.
Delete content from the provider (old library).
Once all transfer jobs are complete, all content on the provider can be deleted. This operation must be done with the
Windows OS because the TMS application cannot delete content on a provider.
Note: Alternatively to the following procedure you can use a FTP client (or the library web interface) on a
laptop connected to the theater network.
•
Stop the TMS application and restart into Windows OS account. See appendix 2.3 (Start into the “Support” Windows OS
account).
•
Use Windows Explorer to delete the old library content.
o
Press Windows+E to open a new explorer window.
•
o
In the address bar, type: ftp://[username]:[password]@[ip]/ For example, if the username for FTP
connection to the library is “lib”, the password is “123” and the IP of the library is 1.2.3.4 you must type the
address: ftp://lib:[email protected]/
o
Press enter
o
For each directory to delete, select the directory and press the “delete” key.
Restart the TMS server in the normal application mode:
o
Start Menu>Logoff.
o
Wait a few second the automatic logon and the startup of the application.
Configure the spare library as “provider” and the old library as “library” in the TMS.
•
Disconnect the spare library from the theater network. This will protect the content during the next step.
•
Remove the configuration of the spare library. (Select the spare library in the “Libraries” panel and press “Remove”).
•
Remove the configuration of the old library. (Select the old library in the “Providers” panel and press “Remove”).
•
Reconnect the spare library to the theater network.
•
Configure the old library as “Library”. See appendix 2.1 (How to configure a library).
•
Configure the spare library as “Provider”. See appendix 2.2 (How to configure a provider).
Ingest content from the provider (spare library) to the old library.
•
Use the “content browser” to ingest the content from the provider to the old library.
•
Check the “Jobs” module and wait for all jobs to complete. It could take several hours depending on content size.
If a job seems frozen (the progress percentage doesn’t change in 10 minutes) you should abort the job.
Select the job and press the "Abort" button. This action will allow the ingest process to continue. When all
other jobs are complete, you can manually resume the aborted jobs (use the "retry" button).
Do not use the “clear all” button before all jobs are done, or you won’t be able to resume the aborted jobs.
Remove the provider (spare library).
•
Remove the configuration of the spare library. (Select the spare library in the “Providers” panel and press “Remove”).
1.8.3 Method 3: swap to new library
Use this method to replace the old library with a new one. Content will be converted during the copy to the new library.
What has to be done?
•
Configure the new library as “library” and the old library as “provider” in the TMS.
•
Ingest content from the provider (old library) to the new library.
•
Remove the provider (old library).
Configure the new library as “library” and the old library as “provider” in the TMS.
•
Make sure the new library is connected to the theater network.
•
To configure the new library as “Library”, see appendix 2.1 (How to configure a library).
•
To configure the old library as “Provider”, see appendix 2.2 (How to configure a provider).
R5905178/04 Theater Management Software 18/12/2012
10
1. TMS SOFTWARE Installation
Ingest content from the provider (old library) to the new library.
•
Use the Content Browser to ingest the content from the provider to the new library.
•
Check the Jobs module and wait for all jobs to complete. It could take several hours depending on content size.
If a job seems frozen (the progress percentage doesn’t change in 10 minutes) you should abort the job.
Select the job and press the "Abort" button. This action will allow the ingest process to continue. When all
other jobs are complete, you can manually resume the aborted jobs (use the "retry" button).
Do not use the “clear all” button before all jobs are done, or you won’t be able to resume the aborted jobs.
Remove the provider (old library).
•
Remove the configuration of the old library. (Select the old library in the “Providers” panel and press “Remove”).
1.9 Providers configuration
What has to be done?
•
Connect the providers to the network.
•
Configure the providers.
•
Configure the “Delivery manager”.
Connect the providers.
Connect different providers such as satellite receivers, third party library and other content providers to the network.
Configure the providers.
•
Configure the content provider as “Provider”. See appendix 2.2 (How to configure a provider).
•
Check the “Jobs” module and wait for all jobs to complete. It could take several minutes depending on the number of
CPL transfers.
Configure the “Delivery manager”.
Use the following procedure to install the "Delivery Manager":
1. Go to the following directory with Windows Explorer:
C:\Program Files\FileZilla Server
2. Run the following file (double-click):
FileZilla Server Interface.exe
3. This will start the FileZilla Server Interface application. It will show as an “FZ” icon in the Windows System Tray on the
bottom right of the screen:
4. Double-click on that icon to open the application.
5. In the top menu, click on the “Users” icon. This will open the user configuration window.
6. Press the “Add” button to create a new user.
R5905178/04 Theater Management Software 18/12/2012
11
1. TMS SOFTWARE Installation
7. Set the name to DcDelivery and the group to <none>. Press “OK”.
8. Enable the password and set it to 123456
9. Select the page named “Shared folders”.
R5905178/04 Theater Management Software 18/12/2012
12
1. TMS SOFTWARE Installation
9
11
10
10. Press the “add” button and set the path to:
F:\DcDeliveryManager\Incoming
11. Be sure that the “Files” and “Directories” checkboxes are as in the illustration above.
12. Press “OK” to apply the changes.
13. Start the TMS application:
•
Start menu >Logoff
•
Wait a few second the automatic logon and the startup of the application.
14. Configure the “Delivery Manager provider” as a “Provider” (See appendix 2.2 ). Use the following settings:
•
Model: Generic automatic content provider
•
Server Name: Use the name you want
•
IP: 127.0.0.1
•
User: DcDelivery
•
Password: 123456
•
Path: leave blank
R5905178/04 Theater Management Software 18/12/2012
13
1. TMS SOFTWARE Installation
WARNING: Though there is a model called “XDC Delivery Manager Provider”, you must not use that model.
Be sure to use the model called “Generic automatic content provider”.
15. Click on OK.
16. Click on “Apply changes”.
17. Use the “Providers” panel to display the new provider and his configuration status (“Online”).
R5905178/04 Theater Management Software 18/12/2012
14
2. Appendix
2. APPENDIX
Overview
•
How to configure a library.
•
How to configure a provider.
•
Start into the “Support” Windows OS account.
•
How to check the free disk space of the library
2.1 How to configure a library
•
Click on the TMS Configuration module.
•
Click in the right tab "Servers".
•
Select the “Libraries” panel.
•
Click on the “Add” button.
•
You can create a predefined Library or a Generic Library
R5905178/04 Theater Management Software 18/12/2012
15
2. Appendix
•
Fill the other fields according to the settings of the Library.
2.2 How to configure a provider
•
Click on the TMS Configuration module.
•
Click in the right tab "Servers".
•
Select the “Providers” panel.
•
Click on the “Add” button.
•
You must use the “Generic manual content provider” model.
•
Fill the other fields according to the settings of the Provider.
R5905178/04 Theater Management Software 18/12/2012
16
2. Appendix
2.3 Start into the “Support” Windows OS account
When the machine is stopped
1.
2.
3.
4.
Press the power button on the front face.
Keep down the "Shift" key on the keyboard during the server start-up.
It takes a few minutes to the server to finish its start-up phase (starting the operating system, verification of hard disks,
applications launching).
The XP logging window is displayed.
5.
Use the “support” login and his associated password provided by your integrator.
When the machine is already started
1.
2.
Push on "power" button in the upper right corner of the GUI.
The "Exit" pop-up is displayed.
3.
4.
5.
6.
Push on “Restart” button.
The application stop.
Keep down the "Shift" key on the keyboard during the server start-up.
(Continue the procedure described above in step 3.)
2.4 How to check the free disk space of the library
•
Click on the “Content Browser” module button.
•
Select the “Central” tab.
•
The library present on the Plaza Catcher is displayed. Its size and its total capacity (in GB) are displayed in the column
named "Disk usage".
R5905178/04 Theater Management Software 18/12/2012
17
2. Appendix
R5905178/04 Theater Management Software 18/12/2012
18


![Overview cPR67 and cPR84 [v00]](http://vs1.manualzilla.com/store/data/005648847_1-d158a5d3d4b92d14c7a3179652b88ffd-150x150.png)
![FLM integration rod replacement + adjustment [v00]](http://vs1.manualzilla.com/store/data/005734078_1-ffddbeaec5f2fd08f6ea79cefb7ee063-150x150.png)