1
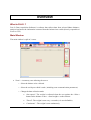
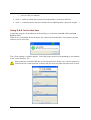
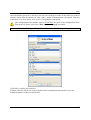
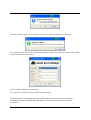
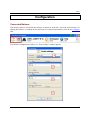
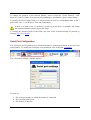
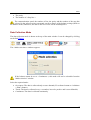
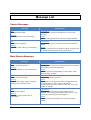
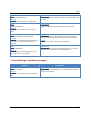
User Manual
March 2010
SUMMARY
OVERVIEW...........................................................................................................................................3
What is D.A.S. ? ................................................................................................................................................ 3
Main Window................................................................................................................................................... 3
Using D.A.S. for the first time........................................................................................................................... 4
CONFIGURATION ...............................................................................................................................7
Balance connected ........................................................................................................................................... 7
Serial Port Configuration.................................................................................................................................. 8
Data Collection Mode ...................................................................................................................................... 9
GENERAL USE................................................................................................................................... 10
Button Descriptions ....................................................................................................................................... 10
Restoring data if software stops working ...................................................................................................... 11
MESSAGE LIST ................................................................................................................................. 12
Generic Messages .......................................................................................................................................... 12
Main window Messages................................................................................................................................. 12
"Scale settings" window Messages ................................................................................................................ 13
i
OVERVIEW
What is D.A.S. ?
D.A.S. (Data Acquisition Software) is software that collects data from selected Ohaus balances,
analyzes and stores the information extracted from the balance into a table (directly exportable to
Excel or CSV)
Main Window
The main window is split in 3 zones:
• Zone 1: A summary zone allowing the user to
o Select the balance to be collected
o Select the serial port which is used ( including some communication parameters)
o Change the data collection mode
“On request”: The weight is collected when the user pushes the « Print »
button on the balance or the « « Send weight » on the software
“Timed”: The weight is sent every x seconds (x is user-definable)
“Continuous” : The weight is sent continuously
3
o Access to the user manual.
• Zone 2: A table in which data extracted from the balance is stored in real-time.
• Zone 3: A control panel to interact with the software (Backup table, request for weight,…)
Using D.A.S. for the first time
Launch the program via the shortcut on the desktop or via the Start menu ► All Programs ►
►Ohaus DAS.
When D.A.S. is launched for the first time, the software detects that there is no balance selected
and asks you to select one.
The « Scale settings » window appears. Select the proper protocol corresponding to your balance
in the “Scale Protocol” list.
Some protocols are subdivided into several sub-protocols. In this case, once the protocol is
selected, the list of sub-protocols is shown and you must select the sub-protocol to be used.
4
Index
Once the balance protocol is selected, you can select and put in order of the fields you want to
actually extract from the balance for each of the 3 modes of transmission (On request, Timed or
continuous). For more details, refer to the « Configuration » paragraph.
The configuration of the balance must be EXACTLY the same as the configuration of the
DAS protocol. Please refer to the “DAS Configuration.pdf” document
(Default : C:\Program Files\OHAUS DAS\docs\DAS Configuration.pdf)
Click OK to confirm your selection.
Then the software asks if you want to implement the communication parameters as per the
default parameters of the selected balance.
5
Then, the software asks you to select the serial port to which the balance is connected.
The window for the serial port configuration appears; Select the serial port number and modify
the other parameters if necessary.
Click on OK to confirm your selections.
The software is ready to receive the data from the balance.
When the software is launched again, the balance and the selected serial port settings are
automatically reloaded with the same parameters. It will not be necessary to re-enter all
parameters
6
Index
Configuration
Connected Balance
The balance which is selected in the software is shown on at the left - top of the main window. To
change this balance, or modify the list and order of extracted information, click on the Configure
link.
The balance configuration window or « Scale setting » window appears.
7
To change the protocol of the selected balance, select it from the « Scale Protocol / SubProtocol » (zone1). If there is no protocol corresponding to your balance, please contact Ohaus.
To modify the list of output fields, it is only necessary to click on corresponding lines in the 3
parts of the zone 2: (On Request, Time and Continuous).
If there is no field on the « Continuous » mode (as per the above screenshot), this means
the connected balance cannot support this mode.
To change the displayed order of the fields, just click on the field and modify its position by
clicking «Up » or « Down »
Serial Port Configuration
The Serial port and its parameters to which the balance is connected is shown at the top of the
main window. To modify the serial port or its parameters, click on the link Configure.
The « Serial port settings » window appears.
You can set :
• The serial port number to which the balance is connected.
• The communication speed.
• The number of data bits.
8
Index
• The parity.
• The number of « Stop bits ».
The communication speed, the number of bits, the parity and the number of the stop bits
selected in the software must correspond exactly to those of the balance settings (Refer to
the balance menu). Otherwise, the data is not received or will be misinterpreted
Data Collection Mode
The data collection mode is shown at the top of the main window. It can be changed by clicking
on the link Change.
The « Mode selection » windows appears.
If the balance cannot be set to « Continuous », this mode will not be selectable from the
“Mode selection” window
Select the required mode :
• On request: The data is collected only on user demand (Via software button or via balance
« Print » button).
• Timed: The data is collected every x seconds (x has to be positive and is user-definable)
• Continuous: The data is collected continuosly.
9
General Use
Button descriptions
Read / Pause : Start receiving data / Pause receiving data
These buttons are available only if the « data Collection Mode » is set to « Timed » or
« Continuous ».
By clicking on “Read”, the software will start collecting the transmitted data.
By clicking on “Pause” the software stops collecting the data.
Save:
The « Save » button saves the contents of the table into and Excel or CVS file. This
command is active if the table contains at least one line.
By default, files are saved in the My Documents folder. If you want to save the file to
another location, this new location will be stored and automatically used for the next
backup.
Delete:
The « Delete » button allows the user to clear the contents of a table. This command is
active if the table contains at least one line.
Instant Weight :
The « Instant Weight » button requests the weight value on the balance and receives it
instantaneously (whether stable or not). This command is available only if the balance
is able to answer the command.
10
Index
Stable Weight :
The « Stable Weight » button requests the weight value on the balance and receives the
next stable weight. This command is available only if the balance is able to answer to
the command.
Restoring data if software stops working
In the case of an unexpected closure of the software (following a power failure, a Windows
problem or a software problem), the data received and stored in the table is not lost. It will be
reloaded automatically the next time you launch the application.
11
Message List
Generic Messages
Message
Explanation
Title
Start application failed
Message
D.A.S. application is already running.
Explanation
The application cannot be launched twice on the same
computer.
Action
Make sure the application has not been already launched.
Title
Communication problem
Message
Start scale failed. Check your parameters.
Explanation
The application cannot establish communication with the
balance.
Action
Check the connection of the balance with the computer and
the communication parameters (speed, data bits, ...)
Main Window Messages
Message
Explanation
Title
There is no balance defined
Message
Choose the balance you are connected to.
Explanation
This may be the first time the application has been launched
and no balance has been defined yet.
Action
Select the protocol corresponding to your balance in the
“Scale Settings” window.
Title
Default serial port settings
Message
Do you want to apply default serial port
setting of the selected protocol?
Explanation
Choose a new balance protocol
Action
If you wish, you can apply the default settings defined in
the chosen protocol. These settings include the
communication speed, the number of data bits, parity and
number of stop bits.
Title
No serial port defined
Message
Choose the serial port the scale is
connected to
Explanation
This may be the first time the application has been
launched. After having selected the balance protocol, you
must choose the serial port and configure it.
Action
Select the serial port number in the serial port settings
window.
12
Index
Title
Data successfully saved.
Message
Do you want to clear the received data
Explanation
After saving data, the software offers to automatically clear
the chart.
Title
Delete confirmation.
Message
Are you sure to want to clear received
data ?
Explanation
Simple confirmation to avoid clearing received data.
Title
Maximum number of lines reached
Message
You have reached the maximum number of
lines limit (…) No more data will be
received.
Explanation
For technical reasons, the number of rows of the table is
limited. This message appears when the limit is reached.
Action
To receive new data, you must clear the table.
Title
Close confirmation
Message
There is unsaved received data. Are you
sure you want to close D.A.S. ?
Explanation
The table contains data not saved when you try to exit the
software. This warns you to avoid losing data.
« Scale Settings » window messages
Message
Title
Incorrect selection
Message
You have to select at least one field of the
data.
Explication
Explanation
Whatever the chosen protocol, you must select at least one
field of received data.
13