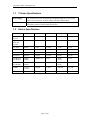
1
T-Series Positioning Products
User’s Manual
Firmware 5.00 and up
Covers models T-CD, T-HLA, T-LA, T-LS, T-LLS, T-MM, T-NM, T-LSR
Last Update: 2007-04-04
Visit www.zaber.com for more recent updates
Zaber Technologies Inc.
2891 Steveston Hwy
Richmond, BC, V7E 2J1
Canada
Copyright © Zaber Technologies Inc.
1
ZABER T-SERIES POSITIONING PRODUCTS........................................................................... 4
1.1
1.2
T-SERIES SPECIFICATIONS............................................................................................................ 5
DEVICE SPECIFICATIONS .............................................................................................................. 5
2
FIRMWARE VERSION INFORMATION...................................................................................... 7
3
CAUTION............................................................................................................................................ 7
4
INITIAL SETUP AND TESTING..................................................................................................... 7
5
INSTALLATION................................................................................................................................ 8
5.1
5.2
5.3
CONNECTION TO A COMPUTER ..................................................................................................... 8
LINEAR ACTUATOR PRODUCTS (T-LA AND T-HLA SERIES)........................................................ 9
VACUUM COMPATIBLE DEVICES .................................................................................................. 9
6
CONTROL THROUGH THE RS-232 PORT................................................................................ 10
7
COMMAND QUICK REFERENCE .............................................................................................. 11
8
DETAILED COMMAND REFERENCE ....................................................................................... 14
8.1
8.2
8.3
8.4
8.5
8.6
8.7
8.8
8.9
8.10
8.11
8.12
8.13
8.14
8.15
8.16
8.17
8.18
8.19
8.20
8.21
8.22
8.23
8.24
8.25
8.26
8.27
8.28
8.29
8.30
9
REPLY-ONLY REFERENCE......................................................................................................... 31
9.1
9.2
9.3
9.4
10
RESET (#0) ................................................................................................................................. 14
HOME (#1) ................................................................................................................................. 14
RENUMBER (#2) ......................................................................................................................... 14
STORE CURRENT POSITION (#16) ............................................................................................... 15
RETURN STORED POSITION (#17)............................................................................................... 15
MOVE TO STORED POSITION (#18)............................................................................................. 15
MOVE ABSOLUTE (#20) ............................................................................................................. 16
MOVE RELATIVE (#21) .............................................................................................................. 16
MOVE AT CONSTANT VELOCITY (#22)....................................................................................... 16
STOP (#23) ................................................................................................................................. 17
READ/WRITE EEPROM (#35) ................................................................................................... 18
RESTORE / LOCK / UNLOCK SETTINGS (#36) .............................................................................. 18
SET MICRO-STEP RESOLUTION (#37) ......................................................................................... 19
SET RUNNING CURRENT (#38) ................................................................................................... 20
SET HOLD CURRENT (#39) ......................................................................................................... 21
SET DEVICE MODE (#40) ........................................................................................................... 21
SET TARGET VELOCITY (#42) .................................................................................................... 25
SET ACCELERATION (#43).......................................................................................................... 25
SET RANGE (#44) ....................................................................................................................... 26
SET CURRENT POSITION (#45) ................................................................................................... 26
SET MAXIMUM RELATIVE MOVE (#46)...................................................................................... 27
SET HOME OFFSET (#47)............................................................................................................ 27
SET ALIAS (#48)......................................................................................................................... 27
RETURN DEVICE ID (#50) .......................................................................................................... 28
RETURN FIRMWARE VERSION (#51)........................................................................................... 28
RETURN POWER SUPPLY VOLTAGE (#52) .................................................................................. 28
RETURN SETTING (#53).............................................................................................................. 29
RETURN STATUS (#54)............................................................................................................... 29
ECHO DATA (#55) ...................................................................................................................... 29
RETURN CURRENT POSITION (#60) ............................................................................................ 30
REPLY #8 – POSITION TRACKING DURING INSTRUCTED MOVE .................................................... 31
REPLY #9 – ACTUATOR STOPPED ............................................................................................... 31
REPLY #10 – POSITION TRACKING DURING MANUAL MOVE ........................................................ 31
REPLY #255 – ERROR ................................................................................................................. 32
ERROR CODES ............................................................................................................................... 32
Page 2 of 49
Copyright © Zaber Technologies Inc.
11
DEVICE SPECIFIC INFORMATION........................................................................................... 34
11.1
11.2
11.3
11.4
11.5
11.6
11.7
11.8
T-CD SERIES – CHOPPER DRIVE STEPPER CONTROLLERS .......................................................... 34
T-HLA SERIES – HEAVY DUTY LINEAR ACTUATORS ................................................................ 35
T-LA SERIES – LINEAR ACTUATORS .......................................................................................... 35
T-LLS SERIES – LONG TRAVEL LINEAR SLIDES......................................................................... 36
T-LS – LINEAR STAGES ............................................................................................................. 36
T-LSR – MOTORIZED LINEAR STAGE WITH BUILT-IN CONTROLLERS ........................................ 37
T-NM – NEMA STEPPER MOTORS WITH BUILT-IN CONTROLLERS ............................................ 38
T-MM – 2-AXIS MOTORIZED MIRROR MOUNTS ........................................................................ 39
12
MANUAL CONTROL AND LED INDICATORS ........................................................................ 40
13
TROUBLESHOOTING ................................................................................................................... 41
14
DATA CABLE PINTOUT DIAGRAM .......................................................................................... 43
15
WARRANTY .................................................................................................................................... 44
16
REPAIRS........................................................................................................................................... 44
17
EMAIL UPDATES ........................................................................................................................... 44
18
DISCLAIMER .................................................................................................................................. 44
19
TECHNICAL SUPPORT AND CONTACT .................................................................................. 44
20
APPENDIX A: DEVICE ID AND SETTINGS .............................................................................. 45
20.1
20.2
21
DEVICE-SPECIFIC DEFAULTS....................................................................................................... 45
DEFAULTS COMMON TO ALL T-SERIES ACTUATOR DEVICES .................................................... 46
APPENDIX B: PERIPHERAL ID AND SETTINGS .................................................................... 47
21.1
21.2
21.3
21.4
LMR SERIES .............................................................................................................................. 47
NA SERIES ................................................................................................................................. 48
NM SERIES................................................................................................................................. 48
DEFAULTS COMMON TO ALL PERIPHERALS: .............................................................................. 49
Page 3 of 49
Copyright © Zaber Technologies Inc.
1
ZABER T-SERIES POSITIONING PRODUCTS
T-LA Series – Linear Actuators
T-HLA Series – Heavy Duty Linear Actuators
T-LS Series – Linear Stages
T-LLS Series – Long Travel Linear Slides
T-LSR Series – Motorized Linear Stage
T-NM Series – Steppers with built-in Controllers
T-MM Series – Motorized Mirror Mounts
T-CD Series – Chopper Drive Stepper Controller
T-JOY Series – Programmable Joystick Controller
T-CON Series – Stand-alone Controller
Product Updates: If you would like to receive our quarterly email newsletter with product updates and
promotions, please sign up at http://www.zaber.com (news section)
Page 4 of 49
Copyright © Zaber Technologies Inc.
1.1
T-Series Specifications
Power Supply:
12V nominal (12V to 16V acceptable) DC unregulated supply on 2.1 mm, center
positive power connector. Note that voltage will affect available thrust.
Communications:
RS232, 9600 baud, no parity, one stop bit on 6-pin mini din cable (PS/2) male
towards the computer, female towards the next unit
1.2
Device Specifications
Part #
Range
Resolution
Repeatability
Accuracy
Backlash
T-LA13A
T-LS13
13 mm
0.1 um
< 0.4 um
< 12 um
< 4 um
T-LA28A
T-HLA28
T-LS28
28 mm
0.1 um
< 0.4 um
< 12 um
< 4 um
T-LA60A
60 mm
0.1 um
< 0.4 um
< 16 um
< 4 um
T-LS80
80 mm
0.1 um
< 0.4 um
< 16 um
< 4 um
T-LLS105
105 mm
0.16 um
< 0.5 um
< 16 um
< 16 um
T-LLS260
260 mm
0.16 um
< 0.5 um
< 20 um
< 16 um
T-LSR150A
T-LSR300A
150mm
300mm
0.049609 um
2.5 um
< 30 um
< 50 um
< 5 um
T-LSR150B
T-LSR300B
150mm
300mm
0.24805 um
2.5 um
< 30 um
< 50 um
< 5 um
T-MM2
-5.272° to
+5.272°
1.5 urad
< 7 urad
< 180 urad
< 15 urad
T-NM
N/A
0.028°
< 0.1°
< 1.0°
N/A
Page 5 of 49
Copyright © Zaber Technologies Inc.
Part #
Stall Load *
Max Speed *
Current
Draw
Mounting Interface
Manual
Control
T-LS13
T-LS28
T-LS80
60N
4 mm/s
320 mA
1/4-20 or M6 holes
Yes
T-LA13A
T-LA28A
T-LA60A
40N
4 mm/s
320 mA
3/8-32 threaded
shank
Yes
T-HLA28
60N
4 mm/s
500 mA
3/8-32 threaded
shank
Yes
T-LLS105
T-LLS260
93N
6 mm/s
800 mA
#5-40 holes
Yes
T-LSR150A
T-LSR300A
200N
4 mm/s
800 mA
M6 and 8-32 holes on
top of stage
Yes
T-LSR150B
T-LSR300B
200N
20 mm/s
800 mA
M6 and 8-32 holes on
top of stage
Yes
T-MM2
40N
60 mrad/s
600 mA
1/4-20 (M6 adaptor
available)
Yes
T-NM
2100 g-cm
180 rpm
800 mA
M3 hole, 5mm shaft
Yes
T-XXXX-S
All part numbers are available with the “-S” suffix. These parts are
identical to the standard part except that they have no manual control.
No
* Thrust is a function of speed. These values cannot both be achieved simultaneously (i.e. at maximum
speed, the unit will stall at a load of about 1/3 the indicated stall load).
Page 6 of 49
Copyright © Zaber Technologies Inc.
2
FIRMWARE VERSION INFORMATION
The version of firmware installed on any Zaber T-Series device can be determined by issuing command
#51. A three-digit number will be returned. Assume 2 decimal places (ex a reply of 293 indicates firmware
version 2.93). This user’s manual applies only to devices with firmware version 5.00 and up.
Newer firmware versions may be available. Due to the addition of new features, newer versions of
firmware may not be 100% compatible with older versions. For more information on firmware versions
that may have been released since the printing of this manual, please check the support section of Zaber’s
website where user’s manuals for all versions of firmware are posted for download.
You may also wish to read the document “Zaber T-Series Firmware History and Migration” which should
be posted on Zaber’s website as well and updated regularly. This document specifies what version of
firmware currently ships standard on each device, as well as outlining the changes that have taken place
from one firmware version to the next and indicating what options are available if you wish to upgrade or
downgrade the firmware on your devices.
3
CAUTION
Zaber’s positioning devices are precision instruments and must be handled with care. In particular,
leadscrews must be treated with care. Axial loads in excess of the stall load, axial and radial impact, dust
and other contaminants and damage to the leadscrew thread will reduce the performance of the unit below
stated specifications. Performance depends very much on the condition of the leadscrew. On actuators
such as the T-LA and T-HLA series, the plunger should always be left in the fully retracted position (home)
when not in use. This protects the leadscrew from the environment. The leadscrew may be cleaned
periodically for best results. To clean the screw, first use methanol to dissolve old grease and
contaminants. There are plastic components that may be damaged by some strong solvents. A small
amount of silicon based grease should be applied to reduce friction, backlash and sticktion. For vacuum
applications we recommend NyeTorr 5300 silicon based vacuum grease available from
www.nyelubricants.com.
4
INITIAL SETUP AND TESTING
If you are unfamiliar with T-series devices, you may wish to perform a few simple steps to familiarize
yourself with their operation. First you will need a power supply. If you ordered one with your device you
shouldn’t have any problems. If not, you will require a power supply with output voltage between 12 and
16V. The power input accepts a standard 2.1mm center positive connector. Most 12V AC to DC adapters
output around 16V under light current draw, dropping to 12V at their rated current. Some may output
higher voltages and will not be suitable. The chosen power supply must also be rated to handle the
maximum total current draw of the devices connected to it. For example, if you have two T-LA units
chained together with a single power supply, you will need at least 640 mA (320 mA per actuator, x 2).
When powering long chains of devices, we recommend connecting a power supply to at least every 2nd
device in the chain to reduce the current through the data cables.
When connecting several units in a daisy-chain, first connect the units to one another. Then only apply
power when all of the units are connected properly.
Once you have a working power supply, you can test the operation of your device. If you have a device
with manual adjustment, turn the potentiometer counterclockwise to home the device. When operating
manually, you must home the device every time you disconnect or turn off the power. You will not be able
to achieve the maximum travel until you have homed the device. After the unit retracts completely it will
stop automatically and you can turn the potentiometer clockwise to extend the device.
If you have a T-xxxx-S model you cannot control the unit manually. Instead you must install the device on
a computer. See the next section for information on how to do this.
Page 7 of 49
Copyright © Zaber Technologies Inc.
5
5.1
INSTALLATION
Connection to a Computer
Step 1. Plug the Mini-DIN to D-Sub serial adapter into your
computer’s serial port and plug the device’s data cable into the
adapter. You may need to use a cable extension to reach your
computer.
There is no need to power-down or reboot the computer.
USB-to-RS232 converters are available if you have no RS232 serial
port.
Step 2. Connect the power plug of your power supply (2.1mm center
positive) to the power connector of the device. The green LED should
light indicating the unit has power.
Step 3. Install a demo program from the included CD, or download
one from the support section of our website http://www.zaber.com.
Follow the instructions in the readme file to install and run the
program.
As a simple first test, try entering these instructions:
Unit
Cmd
Data
Description
0
2
0
Renumber
1
1
0
Home
Additional Devices. Additional
units can simply be daisychained to the first. For long
chains, a power supply should
be connected at every 2nd or 3rd
unit. A renumber command
needs to be issued after a new
unit is connected before it can
be controlled independently
from the demo program.
Page 8 of 49
Copyright © Zaber Technologies Inc.
5.2
Linear Actuator Products (T-LA and T-HLA Series)
When mounting linear actuators, care must be taken not to over-constrain the leadscrew. At the point of
contact of the leadscrew with the object to be moved there are 6 degrees of freedom which can be
constrained: translation along xyz axes and rotation about those axes. The load should constrain only the
axial translation of the leadscrew. The simplest way to achieve this is to have the lead screw press against a
flat surface perpendicular to the axis of the leadscrew. Any further constraint (such as rigidly fixing the
leadscrew to the load) may result in an over-constrained system that will reduce thrust or cause the
leadscrew to bind.
5.3
Vacuum Compatible Devices
Zaber’s vacuum compatible devices (devices with the suffix “-V” in the part number are identical in
appearance and function to their non-vacuum compatible counterparts with the following exceptions:
Lubrication: All lubricated interfaces (motor bearings, leadscrews, leadnuts, etc) are cleaned and regreased using a vacuum compatible lubricating gel (NyeTorr 5300, vapor pressure ~5x10⁻⁹ Torr at 25°C).
We make every effort to remove all trace of the original greases (some components arrive from our
manufacturers pre-assembled, and pre-greased) but for best results we recommend degassing the units
before use in the final application.
Power: No power connectors are provided on vacuum compatible devices. Instead, the power must be
supplied through the data cable lines. A special serial adapter with power input is provided.
Data cable extensions: Vacuum compatible devices use the same mini-din cable extensions as our
standard devices; however, the cable jacket is stripped back to the connectors to expose the individual
wires. The mini-din connectors are left attached to facilitate easy testing. In your final application you can
cut the wires and splice them to a feed-through on your vacuum chamber. Communication lines can be
wired back to the appropriate mini-din connector outside your vacuum chamber. Power lines can be wired
to any appropriate power supply. See the table below for pinouts. If you have multiple units inside the
same vacuum chamber you may connect them using the attached mini-din connectors, or for improved
vacuum compatibility you may remove the connectors and permanently wire the units together.
Page 9 of 49
Copyright © Zaber Technologies Inc.
6
CONTROL THROUGH THE RS-232 PORT
Your communications settings must be: 9600 baud, no hand shaking, 8 data bits, no parity, one stop bit.
The amber LED will light when there is activity on the RS232 lines. You can use this feature to try to
determine which COM port you are connected to. We recommend using the sample Visual Basic program
included with Zaber products. It also contains source code that you can use as an example for writing your
own code to control your specific system.
Important: After power-up, the units in the chain will each initialize themselves as unit #1 and thus they
will each execute the same instructions. To assign each unit a unique identifier you must issue a renumber
instruction after all the units in the chain are powered up and every time you add or remove a unit from the
chain. You must not transmit any instructions while the chain is renumbering or the renumbering routine
may be corrupted. Renumbering takes less than a second, after which you may start issuing instructions
over the RS232 connection.
All instructions consist of a group of 6 bytes. They must be transmitted with less than 10 ms between each
byte. If the unit has received less than 6 bytes and then a period longer than 10 ms passes, it ignores the
bytes already received. We recommended that your software behave similarly when receiving data from
the devices, especially in a noisy environment like a pulsed laser lab.
The following table shows the instruction format:
Byte 1
Unit #
Byte 2
Command #
Byte 3
Data (Least
Significant
Byte, LSB)
Byte 4
Data
Byte 5
Data
Byte 6
Data (Most
Significant
Byte, MSB)
The first byte is the unit number in the chain. Unit number 1 is the closest unit to the computer and unit
number 2 is next and so forth. If the number 0 is used, all the units in the chain will execute the
accompanying command simultaneously.
The second byte is the command number. Bytes 3, 4, 5, and 6 are data in long integer, 2’s complement
format with the least significant byte transmitted first. How the data bytes are interpreted depends on the
command. Complete details are given in the command reference on the following page.
Examples:
Renumber all units: 0x00, 0x02, 0x00, 0x00, 0x00, 0x00
Home all units: 0x00, 0x01, 0x00, 0x00, 0x00, 0x00
Move unit #1 to an absolute position (command 20) of 257 micro-steps:
0x01, 0x14, 0x01, 0x01, 0x00, 0x00
Move unit #2 to a relative position (command 21) of -1 micro-step:
0x02, 0x15, 0xFF, 0xFF, 0xFF, 0xFF
If you are using Zaber’s demo software, you will only see 3 entry fields: Unit#, Command#, and Data. The
Unit# and Command# fields accept integer values while the value you enter into the Data field can be
signed. The value in the data field is converted by the software to 4 separate bytes and then gets sent to the
unit.
Most instructions cause the unit to reply with a return code. It is also a group of 6 bytes. The first byte is
the device #. Byte #2 is the instruction just completed or 255 (0xFF) if an error occurs. Bytes 3, 4, 5 and 6
are data bytes in the same format as the instruction data byte.
Page 10 of 49
Copyright © Zaber Technologies Inc.
7
COMMAND QUICK REFERENCE
The command quick references below provide a list of available commands at a glance. A Detailed
description of each command is given in the following section.
Command Reference for Firmware Version 5.xx:
#
Command
Data Bytes
Reply Data
Page
0
Reset
Ignored
None
14
1
Home
Ignored
Absolute Position
14
2
Renumber*
0 or desired Device Address
Device ID
14
16
Store Current Position*
Position save slot 0 – 15
Echo of Command Data
15
17
Return Stored Position
Position save slot 0 – 15
Absolute Position
Saved
15
18
Goto Stored Position
Position save slot 0 – 15
Reply as a Move
Absolute Command
15
20
Move Absolute
Absolute Position
Absolute Position
16
21
Move Relative
Absolute Position
Absolute Position
16
22
Move at Constant Velocity
Velocity
Echo of Command Data
16
23
Stop
Ignored
Absolute Position
17
35
Read / Write EEPROM*
See Detailed Reference
See Detailed Reference
18
36
Restore Default Settings*
0 or Peripheral ID
Echo of Command Data
18
37
Set Micro-Step Resolution*
Micro-Steps per Step
Echo of Command Data
19
38
Set Running Current*
Running Current Setting
Echo of Command Data
20
39
Set Hold Current*
Hold Current Setting
Echo of Command Data
21
40
Set Device Mode*
Mode Configuration (see
below)
Echo of Command Data
21
42
Set Target Velocity*
Maximum Velocity
Echo of Command Data
25
43
Set Acceleration*
Maximum Acceleration
Echo of Command Data
25
44
Set Maximum Travel Range*
Range in Microsteps
Echo of Command Data
26
45
Set Current Position
New Current Position
Echo of Command Data
26
46
Set Maximum Relative Move*
Maximum Relative Move
Echo of Command Data
27
47
Set Home Offset*
Home Offset in Microsteps
Echo of Command Data
27
48
Set Alias*
Alias Unit Number
Echo of Command Data
27
Page 11 of 49
Copyright © Zaber Technologies Inc.
50
Return Device ID
Ignored
Device ID
28
51
Return Firmware Version
Ignored
Firmware Version
28
52
Return Power Supply voltage
Ignored
Power Supply Voltage
28
53
Return Setting
Setting Command Number
Setting Value
29
54
Return Status
Ignored
Move Status
29
55
Echo Data
User defined
Echo of Command Data
29
60
Return Current Position
Ignored
Absolute Position
30
* The settings for these commands are saved in non-volatile memory, i.e. the setting persists even if the
device is powered down. To restore all settings to factory default, use command 36.
Command #40, “Set Mode” Options for Firmware Version 5.xx.
Data Bits
Option Name
Effect
0 (1s)
Disable Auto-reply
Disable ALL replies except to command 50 and
higher.
1 (2s)
Enable Anti-backlash
Enable the anti-backlash mode.
2 (4s)
Enable Anti-sticktion
Enable the anti-sticktion mode.
3 (8s)
Disable Potentiometer
Disable the potentiometer.
4 (16s)
Enable Position Tracking
Enable position replies during constant speed
commands.
5 (32s)
Disable Manual Position Tracking
Disable automatic position replies during manual
moves.
6 (64s)
Enable Logical Channels
Communication Mode
Enable the Logical Channels Communication
Mode (see manual for more details).
7 (128s)
Home Status
Read-only. Cleared on power up. Gets set
automatically when device homes or position is
set with command #45.
8 (256s)
Disable Auto Home Feature
Disables monitoring of the home limit sensor
during moves except for a home instruction.
Useful for allowing multiple revolutions on
rotational devices.
9 (512s)
Reserved
This bit is not used at this time.
10 (1,024s)
Reserved
This bit is not used at this time.
11 (2,048s)
Enable Circular Phase Microstepping
Selects circular or square phase micro-stepping.
12 (4,096s)
Home Active High
Enable active high detection of home switch.
13 (8,192s)
Reserved
This bit is not used at this time.
14 (16,384s)
Disable Power (Green) LED
Disables the power LED during operations.
15 (32,768s)
Disable Serial (Yellow) LED
Disables the serial LED during operations.
Page 12 of 49
Copyright © Zaber Technologies Inc.
Reply-Only Commands for Firmware Version 5.xx.
Reply
#
Data Bytes
Reply Data
Page
Constant speed position tracking
8
N/A. Reply-only.
Current absolute position
31
Actuator stopped
9
N/A. Reply-only.
Current absolute position
31
Manual move position tracking
10
N/A. Reply-only.
Current absolute position
31
Command data out of range
255
N/A. Reply-only.
Current absolute position
32
Page 13 of 49
Copyright © Zaber Technologies Inc.
8
DETAILED COMMAND REFERENCE
Note that these commands apply only to firmware versions 5.00 and up. To determine which version of
firmware you have simply issue the “return firmware version” (command 51). Many of the commands
described below will work with other firmware versions, however behavior may differ. See the appropriate
user’s manual for the version of firmware on your device.
8.1
Reset (#0)
Firmware Version:
Version 5.00 and up
Command Number:
0
Data Bytes:
Ignored
Reply Data:
None
This sets the device to its power-up condition. It has the same effect as unplugging and restarting the unit.
The position stored in the device prior to this command will be lost, so you must save it and reload it if it is
important. All non-volatile settings (i.e. Unit Number, Target Velocity, etc.) are saved and are not affected
by reset or power-down.
8.2
Home (#1)
Firmware Version:
Version 5.00 and up
Command Number:
1
Data Bytes:
Ignored
Reply Data:
Absolute Position (in this case, 0)
The device retracts until it triggers its internal home switch. It then moves forward several steps to avoid
accidentally triggering the home switch during use. If a home offset has been specified with the “Set Home
Offset”, the device will extend the additional distance specified. It will then stop and call this position 0.
8.3
Renumber (#2)
Firmware Version:
Version 5.00 and up
Command Number:
2
Data Bytes:
If issued to all units: Ignored.
If issued to a single unit: new number.
Reply Data:
Each unit affected replies with its device ID after renumbering.
Note:
The unit number is stored in non-volatile memory and will persist after powerdown or reset.
If issued with a 0 in Byte 1, the data bytes are ignored and all units will renumber. The unit closest to the
computer becomes number 1. The next unit becomes number 2 and so forth. If issued with a number other
than 0 in byte 1, the specified unit will reassign itself the unit number specified in the data bytes.
Renumbering takes about 1/2 a second during which time the computer must not send any further data.
Page 14 of 49
Copyright © Zaber Technologies Inc.
The unit number is stored in non-volatile memory so you can renumber once and not worry about issuing
the renumber instruction on each power-up.
8.4
Store Current Position (#16)
Firmware Version:
Version 5.04 and up
Command Number
16
Data Bytes:
0 to 15 indicting position register in which to save the position
Reply Data:
Echo of Command Data
Note:
Positions stored in the position registers are non-volatile and will persist after
power-down or reset. All position registers are cleared by the Restore Factory
Settings (#36) command.
The device saves its current absolute position in one of its 16 position registers (0 thru 15) as indicated by
the data bytes. This command is used in conjunction with the Return Stored Position (#17) and Move To
Stored Position (#18) commands.
8.5
Return Stored Position (#17)
Firmware Version:
Version 5.04 and up
Command Number
17
Data Bytes:
0 to 15 indicting position register from which to return the position
Reply Data:
Absolute position stored in the specified register
Note:
Positions stored in the position registers are non-volatile and will persist after
power-down or reset. All position registers are cleared by the Restore Factory
Settings (#36) command.
The device returns the position stored in one of its 16 position registers (0 thru 15) as indicated by the data
bytes. This command is used in conjunction with the Store Current Position (#16) and Move To Stored
Position (#18) commands.
8.6
Move To Stored Position (#18)
Firmware Version:
Version 5.04 and up
Command Number
18
Data Bytes:
0 to 15 indicting position register containing the target position to move to
Reply Data:
Absolute position after move is finished.
Note:
Command may pre-empt, or be pre-empted by commands 18, 20, 21, 22 and 23.
The device moves to the position stored in the position register (0 to 15) specified by the data. This
command is used in conjunction with the Store Current Position (#16) and Return Stored Position (#17)
commands. All move commands are pre-emptive. If a new move command is issued before the previous
move command is finished, the device will immediately move to the new position. The target speed and
acceleration during a move can be specified using commands 42 and 43 respectively.
Page 15 of 49
Copyright © Zaber Technologies Inc.
8.7
Move Absolute (#20)
Firmware Version:
Version 5.00 and up
Command Number:
20
Data Bytes:
Absolute position in micro-steps.
Reply Data:
Absolute position after move is finished.
Note:
Command may pre-empt, or be pre-empted by commands 18, 20, 21, 22 and 23.
The device moves to the position given by the data bytes. The position must be within the acceptable range
for the device or an error code will be returned. All move commands are pre-emptive. If a new move
command is issued before the previous move command is finished, the device will immediately move to
the new position. The target speed and acceleration during a move absolute instruction can be specified
using commands 42 and 43 respectively.
8.8
Move Relative (#21)
Firmware Version:
Version 5.00 and up
Command Number:
21
Data Bytes:
Relative position (can be negative) in micro-steps.
Reply Data:
Absolute position after move is finished.
Note:
Command may pre-empt, or be pre-empted by commands 18, 20, 21, 22 and 23.
The device moves to the position given by its position before the command plus the value in the data bytes.
The final position must be within the acceptable range for the device or an error code will be returned. All
move commands are pre-emptive. If a move relative command is issued while the device is currently
moving due to a previous command, the device will immediately set a new target position equal to the
current position (at the instant the command was received) plus the specified relative position. The target
speed and acceleration during a move relative instruction can be specified using commands 42 and 43
respectively.
8.9
Move at Constant Velocity (#22)
Firmware Version:
Version 5.00 and up
Command Number:
22
Data Bytes:
Data corresponding to the desired speed based on the formula:
Speed [microsteps/second] = 9.375 * Data
Negative values cause retraction. Positive values cause extension.
Reply Data:
The unit will immediately echo the command data.
The unit may be set to return its position continuously during the move using the
set mode command (#40) bit 4. Position tracking is a reply-only command #8.
If the unit runs into zero position or maximum range, the unit stops and the new
position is returned via reply-only command #9.
Note:
Command may pre-empt, or be pre-empted by commands 18, 20, 21, 22 and 23.
Page 16 of 49
Copyright © Zaber Technologies Inc.
This instruction specifies a direction and a speed to move, rather than a target position. When this
instruction is issued the device will accelerate (at a rate determined by command #43 Set Acceleration) to
the speed specified by the instruction data. The device will continue moving at this speed until a limit is
reached or a pre-empting instruction is issued. Negative speeds cause retraction while positive speeds cause
extension.
To determine the speed that will result from a given data value, the following formulas may be used:
Speed
9.375 × Data
9.375 × Data
=
R
562.5 × Data
=
R×S
=
[microsteps/sec] or
[steps/sec] or
[revolutions/min]
Where: Data is the absolute value of the Constant Speed Move instruction data
R (micro-steps/step) is the micro-step resolution (command 37)
S (steps/revolution) is the number of steps per revolution of the motor
For example, if S = 48, R = 64, and the Constant Speed Move instruction is issued with Data of 2922, then
the device will move forward at a speed of approximately 535 revolutions per minute. For linear devices
consult the section on Device Specific Information to determine the linear distance corresponding to a
single step or revolution.
The maximum Data allowable is 512*R. Note that although the maximum data allowable depends on the
resolution, the maximum speed possible is independent of the resolution. This can be seen by substituting
Data = 512*R into the second formula above, giving a maximum speed (regardless of resolution) of 4800
steps/sec.
8.10 Stop (#23)
Firmware Version:
Version 5.00 and up
Command Number:
23
Data Bytes:
Ignored
Reply Data:
Current absolute position
Note:
Command may pre-empt, or be pre-empted by commands 18, 20, 21, and 22.
This instruction can be used to pre-empt any move instruction. The unit will decelerate (at a rate
determined by command #43 Set Acceleration) and stop.
Page 17 of 49
Copyright © Zaber Technologies Inc.
8.11 Read/Write EEPROM (#35)
Firmware Version:
Version 5.00 and up
Command Number:
35
Data Bytes:
Byte 3 specifies the address and action to be performed (read or write). Byte 4
specifies the data to write (it is ignored for reads). Bytes 5 and 6 are ignored.
Reply Data:
The reply data is simply an echo of the command data except that byte 4 contains
the data read from the specified address
Note:
These settings are stored in non-volatile memory and will persist after powerdown or reset.
This command is used to read or write a byte of non-volatile memory. 128 bytes of EEPROM memory are
available for user data. For example, the user may want to save some custom data such as a serial number,
a name string, or data that uniquely identifies a particular device. Data written is not cleared by power
down or reset. The most significant bit of byte 3 specifies whether the instruction is a read (0) or a write
(1). The least significant 7 bits of byte 3 specify the address to read/write (0 to 127). Byte 4 specifies the
value to be written.
8.12 Restore / Lock / Unlock Settings (#36)
Firmware Version:
Version 5.00 and up
Command Number:
36
Data Bytes:
0 or Peripheral ID, or password to lock / unlock settings.
Reply Data:
Reply data is simply an echo of the command data
Note:
All settings affected by this instruction are stored in non-volatile memory and
will persist after power-down or reset.
All T-series devices except T-CD series motor controller:
On devices with built-in motors, this command should be issued with Data of 0 to return the device to
factory default settings. This command is very useful for troubleshooting. If the unit does not appear to
function properly, it may be because some of the settings have been changed. Command 36 will restore the
settings to default values.
See Appendix A for a list of Device IDs and corresponding default settings.
T-CD series motor controller:
On devices such as the T-CD motor controller that can be used with multiple motors or actuators, this
command can be issued with Data equal to the Peripheral ID of the specific motor or actuator connected in
order to return the device to the factory default settings for the motor or actuator in question.
For example, if a T-CD2500 is connected to an LMR58, the user can issue command 36 with data of 1258.
This will automatically set all non-volatile parameters (range, mode, running and hold currents) to values
that will work with the LMR58.
Page 18 of 49
Copyright © Zaber Technologies Inc.
See Appendix B for a list of Peripheral IDs and corresponding default settings.
If command 36 is issued with data of 0 on a T-CD motor controllers, the controller will reset to its lowest
running current possible. This is the safest setting that prevents damage to any motor connected to the TCD, but it also means that the “default” setting of T-CD may not work with the peripheral actuator that you
intend to run. We recommend first using command 36 with the Peripheral ID listed in Appendix B to get
the device working. Then adjust individual parameters as needed to improve performance in your
application.
Locking Settings
Sometimes it is desirable to lock all non-volatile settings and prevent them from being changed
inadvertently. After changing all settings as desired, settings can be locked by calling command 36 with
data of “2768033”, the password to lock the settings. Subsequent attempts to change any non-volatile
setting (i.e. changing the speed, command 42) will result in an error code of 3600 (settings locked). This
lock applies to normal applications of command 36 as well.
Unlocking Settings
To unlock non-volatile settings, issue the command 36 with data of “3308672”. After receiving the unlock
command, the unit should allow changing of any parameters, including restore to factory default.
8.13 Set Micro-Step Resolution (#37)
Firmware Version:
Version 5.00 and up
Command Number:
37
Data Bytes:
Valid data are: 1, 2, 4, 8, 16, 32, 64, 128
Reply Data:
Reply data is simply an echo of the command data
Note:
This setting is stored in non-volatile memory and will persist after power-down
or reset.
This setting changes the number of micro-steps per step. Valid data are 1, 2, 4, 8, 16, 32, 64, and 128. The
default on most devices is 64. All position data sent to or received from T-Series products is in units of
micro-steps. Note that when you change the micro-step resolution using this command, other position
related settings are changed automatically to adjust for the new micro-step size. The table below gives an
example showing how other settings are affected when the micro-step resolution is changed from 128 to 64.
Example of settings affected when Micro-step Resolution is changed from 128 to 64
Setting
Before
After
Target Speed *
2922
1461
Maximum Travel Range *
280000
140000
Current Position
10501 **
5250 **
Maximum Relative Move *
20000
10000
Home Offset *
1000
500
Acceleration *
100
50
Page 19 of 49
Copyright © Zaber Technologies Inc.
* The setting for these command is saved in non-volatile memory, i.e. the setting persists even if the device
is powered down. To restore all non-volatile settings to factory default, use command 36.
** Note that if a number is divided by two, it is rounded down to the nearest whole number. The only
exception to this is if acceleration would become 0 (because 0 for acceleration indicates infinite
acceleration). If acceleration would become 0, it will instead be set to 1 which is the lowest acceleration
possible.
8.14 Set Running Current (#38)
Firmware Version:
Version 5.00 and up
Command Number:
38
Data Bytes:
Value for the running current.
Range: 0, 10 – 127
Reply Data:
Reply data is simply an echo of the command data
Note:
This setting is stored in non-volatile memory and will persist after power-down
or reset.
The current is related to the data by the formula: DriveOutpu t =
DriveCapac ity × 10
Data
Data (least significant byte only used) can be either 0 (no current) or 10 (maximum current) through 127
(minimum current). Note that values of 1 through 9 are not accepted. DriveCapacity is the hardware’s
maximum rated output (ex 2500mA on our T-CD2500). DriveOutput is the current that the drive will
actually output to each phase of the motor.
For example, suppose you connect a stepper motor rated for 420mA per phase to a T-CD2500. Reversing
the equation above and using 420mA as DriveOutput gives:
Data
= 10 * DriveCapacity / DriveOutput
= 10 * 2500mA / 420mA
= 59.5 (round to 60)
Therefore 60 should be the minimum data used with command 38 (running current limit) for continuous
operation of a 420mA rated motor with a T-CD2500 controller. If your application does not require high
torque, it is best to decrease the DriveOutput to reduce power consumption, vibration, and motor heating.
Trial and error should suggest an appropriate setting. If higher torque is required, it is generally safe to
overdrive motors as long as they are not operated continuously. Motor temperature is typically the best
indication of the degree to which overdriving can be employed. If the motor gets too hot to touch (>75°C),
you should reduce the drive current.
Note that the running current limit and hold current limit apply to all products, not just current limiting
devices such as the T-CD series. On voltage controlled products, the DriveCapacity is simply the power
supply voltage and the DriveOutput is the effective voltage being applied to the motor. For example, if a
product uses a 5V motor and has a 15V supply, the running current may be set as follows:
Data
= 10 * DriveCapacity / DriveOutput
= 10 * 15V / (5V)
= 30
Page 20 of 49
Copyright © Zaber Technologies Inc.
8.15 Set Hold Current (#39)
Firmware Version:
Version 5.00 and up
Command Number:
39
Data Bytes:
Value for the hold current.
Range: 0, 10 – 127
Reply Data:
Reply data is simply an echo of the command data
Note:
This setting is stored in non-volatile memory and will persist after power-down
or reset.
The formula for the hold current works the same way as for running current (see command #38 for details).
It is typical to run stepper motors at their rated current only during moves (for highest torque) and reduce
the current when idle just to hold the position.
Typically the hold current can be set to around 25-50% of the running current. If the running current is set
to 24, the hold current may be set to 48 to provide 50% hold. In some applications, the friction of the drive
system alone is sufficient to hold the microstep position of the motor, and the hold current can be turned off
completely. The hold current can be turned off by issuing the “Set Hold Current” command with data of 0.
When the unit is moving, it applies running current to the motor. When the unit stops moving, running
current is applied for an additional 0.1 second before hold current takes over.
8.16 Set Device Mode (#40)
Firmware Version:
Version 5.00 and up
Command Number:
40
Data Bytes:
Each bit of the data bytes enables or disables a specific option.
Reply Data:
Reply data is simply an echo of the command data
Note:
All settings are stored in non-volatile memory and will persist after power-down
or reset.
This command allows setting several options. Each option is controlled by a single bit within the data
bytes. Most software you will encounter, including most of our demo software, represents all 4 data bytes
as a single decimal value rather than specifying each bit individually. To determine what decimal value to
use requires a basic understanding of how the data is represented in binary. The data bytes may be
considered as a single 32-bit binary value. The least significant bit is bit_0, the next is bit_1, the next is
bit_2, and so on up to the most significant bit_31. Each bit may have a value of either 1 or 0.
The corresponding decimal representation of this 32-bit data is given by:
Decimal value = (bit_0 * 1) + (bit_1 * 2) + (bit_3 * 4) + … + (bit_n * 2n) + … + (bit_31 * 2 31)
Each bit controls a single mode option as described in the table below. To determine the data value to use
with the Set Device Mode command, simply determine the desired value of each bit (1 or 0), and calculate
the decimal value using the above formula. Note that not all 32 bits are currently used. Any unused or
reserved bits should be left as 0.
Page 21 of 49
Copyright © Zaber Technologies Inc.
For example, suppose you want all mode bits to be 0 except for bit_3 (disable potentiometer), bit_14
(disable power LED), and bit_15 (disable serial LED). The Set Device Mode instruction should be sent
with data calculated as follows:
Data value
= 23 + 214 + 215
= 8 + 16384 + 32768
= 49160
Note that each instance of the Set Device Mode command overwrites ALL previous mode bits. Repeated
commands do not have a cumulative effect. For example, suppose you send a Set Device Mode command
with data of 8 to disable the potentiometer. If you then send another Set Device Mode command with data
of 16384 to disable the power LED, you will re-enabled the potentiometer since bit_3 in the 2nd instruction
is 0.
Most devices have a default mode setting of 0 (all bits are 0), however, there are some exceptions. See
APPENDIX A: DEVICE ID AND SETTINGS for a table of default settings for all devices.
Bit_n
2n
Description
bit_0
1
Disable Auto-reply
A value of 1 disables ALL replies except those to “return” commands (commands 50
and higher). The default value is 0 on all devices.
bit_1
2
Enable Anti-backlash Routine
A value of 1 enables anti-backlash. On negative moves (retracting), the device will
overshoot the desired position by 640 microsteps (assuming 64 microsteps/step), reverse
direction and approach the requested position from below. On positive moves
(extending), the device behaves normally. Care must be taken not to crash the moving
payload into a fixed object due to the 640 microsteps overshoot on negative moves. The
default value is 0 on all devices. See note on anti-backlash and anti-sticktion below. *
bit_2
4
Enable Anti-sticktion Routine
A value of 1 enables the anti-sticktion routine. On moves less than 640 microsteps
(assuming 64 microsteps/step), the device will first retract to a position 640 microsteps
less than the requested position and approach the requested position from below. Care
must be taken not to crash the moving payload into a fixed object due to the 640
microsteps negative move. The default value is 0 on all devices. See section on antibacklash and anti-sticktion below this table. *
bit_3
8
Disable Potentiometer
A value of 1 disables the potentiometer preventing manual adjustment of the device. The
default value is 0 on all devices.
bit_4
16
Enable Constant Speed Position Tracking
A value of 1 enables position tracking during constant speed commands. The unit will
return its position periodically when a constant speed command is executed. The Disable
Auto-Reply option above takes precedence over this option. The default value is 0 on all
devices.
bit_5
32
Disable Manual Position Tracking
A value of 1 disables automatic position replies during manual moves. The Disable
Auto-Reply option above takes precedence over this option. The default value is 0 on all
devices.
bit_6
64
Enable Logical Channels Mode
A value of 1 enables the Logical Channels Mode. In this mode of communication, only
bytes 3 thru 5 are used for data. Byte 6 is used as an ID byte that the user can set to any
value they wish. It will be returned unchanged in the reply. Logic Channel Mode allows
the user application to monitor communication packets individually to implement error
Page 22 of 49
Copyright © Zaber Technologies Inc.
detection and recovery. The default value is 0 on all devices.
bit_7
128
Home Status
This bit is set to 0 automatically on power-up or reset. It is set automatically when the
device is homed or when the position is set using command #45. It can be used to detect
if a unit has a valid position reference. It can also be set or cleared by the user.
bit_8
256
Disable Auto-Home
A value of 1 disables auto-home checking. Checking for trigger of home sensor is only
done when home command is issued. This allows rotational devices to move multiple
revolutions without retriggering the home sensor.
bit_9
512
Reserved
bit_10
1,024
Reserved
bit_11
2,048
Enable Circular Phase Micro-stepping
Square phase micro-stepping is employed by default. A value of 1 enables circular phase
micro-stepping mode. The differences are:
Circular Phase:
- constant torque
- smoothest operation
- better microstep accuracy
- only 70% torque (and lower power consumption)
Square Phase:
- non constant torque
- less smooth operation
- poorer microstep accuracy
- 100% torque achieved (and higher power consumption)
bit_12
4,096
Set Home Switch Logic
Some devices have active high home limit switches. A value of 1 must be set for these
devices for the device to home properly. On devices with built in motors and home
sensors, the factory default settings will be correct. However, some devices, such as the
T-CD series can accept a variety of motors and home sensors. On these devices, this bit
may need to be changed from the default setting in order for the home sensor to function
correctly. See the recommended settings for your particular device. Damage to the
home sensor or actuator may result if this bit is set improperly.
bit_13
8,192
Reserved
bit_14
1,6384
Disable Power LED
A value of 1 turns off the green power LED. It will still blink briefly, immediately after
powerup.
bit_15
32,768
Disable Serial LED
A value of 1 turns off the yellow serial LED.
* Anti-backlash and Anti-sticktion routines are designed to compensate for backlash and sticktion. The
solution to backlash is to always approach a position from the same direction. The solution to sticktion is
to move the unit far enough away from the final position to break free of sticktion before attempting the
final move. The operation of the two features are dependent on each other, and the interaction of enabling
one or both of the features is described in the diagram below:
Page 23 of 49
Copyright © Zaber Technologies Inc.
In each setting scenario described above, the starting position is denoted by the solid vertical line and the
final position is denoted by the dotted vertical line. There are four possible moves for each scenario: long
move positive, long move negative, short move positive and short move negative. The arrows show the
path that would be traversed for each scenario.
Page 24 of 49
Copyright © Zaber Technologies Inc.
8.17 Set Target Velocity (#42)
Firmware Version:
Version 5.00 and up
Command Number:
42
Data Bytes:
Data corresponding to the desired speed based on the formula:
Speed [microsteps/second] = 9.375 * Data
Reply Data:
Reply data is simply an echo of the command data
Note:
This setting is stored in non-volatile memory and will persist after power-down
or reset.
When a move absolute or move relative instruction is issued, the device will accelerate at a rate determined
by the acceleration setting up to a maximum speed determined by this command, “Set Target Velocity”.
To determine the speed that will result from a given data value, the following formulas may be used:
Speed
9.375 × Data
9.375 × Data
=
R
562.5 × Data
=
R×S
=
[microsteps/sec] or
[steps/sec] or
[revolutions/min]
Where: Data is the absolute value of the Constant Speed Move instruction data
R (micro-steps/step) is the micro-step resolution (command 37)
S (steps/revolution) is the number of steps per revolution of the motor
For example, if S = 48, R = 64, and the Constant Speed Move instruction is issued with Data of 2922, then
the device will move forward at a speed of approximately 535 revolutions per minute. For linear devices
consult the section on Device Specific Information to determine the linear distance corresponding to a
single step or revolution.
The maximum Data allowable is 512*R. Note that although the maximum data allowable depends on the
resolution, the maximum speed possible is independent of the resolution. This can be seen by substituting
Data = 512*R into the second formula above, giving a maximum speed (regardless of resolution) of 4800
steps/sec.
The target velocity may be changed on-the-fly even when the unit is in the middle of a move. The unit will
automatically adjust the velocity, but still target the final position specified in the original move.
8.18 Set Acceleration (#43)
Firmware Version:
Version 5.00 and up
Command Number:
43
Data Bytes:
Data corresponding to the desired acceleration based on the formula:
Acceleration [microsteps/second^2] = 11250 * Data
Reply Data:
Reply data is simply an echo of the command data
Note:
This setting is stored in non-volatile memory and will persist after power-down
or reset.
Page 25 of 49
Copyright © Zaber Technologies Inc.
When a move absolute or move relative instruction is issued, the device will accelerate at a rate determined
by this command “Set Acceleration” up to a maximum speed determined by the target velocity. To
determine the acceleration that will result from a given data value, the following formulas may be used:
Acceleration
11250 × Data
11250 × Data
=
R
=
[microsteps/sec^2] or
[steps/sec^2]
Where: Data is the absolute value of the Constant Speed Move instruction data
R (micro-steps/step) is the micro-step resolution (command 37)
The maximum Data allowable is 512*R. This is the same as the maximum allowable data for velocity,
which means that the device will reach maximum velocity immediately. If acceleration is set to 0, it is as if
acceleration is set to 512*R. Effectively acceleration is turned off and the unit will always get up to target
speed immediately.
The acceleration may be changed on-the-fly even when the unit is in the middle of a move. The unit will
still target the final position specified in the original move.
8.19 Set Range (#44)
Firmware Version:
Version 5.00 and up
Command Number:
44
Data Bytes:
The desired new range in micro-steps.
Reply Data:
Reply data is simply an echo of the command data
Note:
This setting is stored in non-volatile memory and will persist after power-down
or reset.
Use this command to limit the range of travel to a value other than the default. Exercise caution since using
this command it is possible to set the range to a value greater than the physical limits of the device.
8.20 Set Current Position (#45)
Firmware Version:
Version 5.00 and up
Command Number:
45
Data Bytes:
Absolute position
Reply Data:
Absolute position (in this case the position that was just set)
Note:
Position data is volatile and will not persist after power-down or reset.
The internal register that holds the position is set to the value given by the data bytes. The phase of the
stepper motor is controlled by the least significant byte of the position, thus the device may move by +/- 2
full steps unless the new position corresponds to the true current position of the device. This command is
useful if you want to turn off the system without losing position. Simply save the position in the controlling
computer before powering down. After powering up, set the position back to the saved value. In this way
you can continue without having to home the device.
Page 26 of 49
Copyright © Zaber Technologies Inc.
8.21 Set Maximum Relative Move (#46)
Firmware Version:
Version 5.00 and up
Command Number:
46
Data Bytes:
The desired maximum relative move in micro-steps
Reply Data:
Reply data is simply an echo of the command data
Note:
This setting is stored in non-volatile memory and will persist after power-down
or reset.
Use this command to limit the maximum range of travel for a relative move command. For example, if
maximum relative move is set to 1000, and the user requests a relative move (#21) of 800, then the device
will move 800 microsteps. However, if the user requests a relative move of 1200, then the device will
reply with an error code. Most applications can leave this unchanged from the default.
8.22 Set Home Offset (#47)
Firmware Version:
Version 5.00 and up
Command Number:
47
Data Bytes:
The desired home offset distance in micro-steps
Reply Data:
Reply data is simply an echo of the command data
Note:
This setting is stored in non-volatile memory and will persist after power-down
or reset.
When the home command is issued, the unit will retract until the home sensor is triggered, then move
forward until the home sensor is no longer triggered, then move forward by the Home Offset value (in
micro-steps) and call this position 0.
Note that the home offset command also changes the range. For example, if the initial home offest is 0 and
the range is 500,000, and the user changes the home offset to 70,000, then the range is automatically
adjusted to be 430,000. However, changing the range does not affect the home offset.
8.23 Set Alias (#48)
Firmware Version:
Version 5.00 and up
Command Number:
48
Data Bytes:
Alias unit number. Valid numbers are between 0 and 254. To avoid confusion, it
is best to choose an alias greater than the number of units connected. However
this is not required.
Reply Data:
Reply data is simply an echo of the command data
Note:
This setting is stored in non-volatile memory and will persist after power-down
or reset.
Page 27 of 49
Copyright © Zaber Technologies Inc.
This creates an alternate unit number for a device (in addition to its actual unit number). By setting several
aliases to the same value, you can control groups of units with a single instruction. When you send an
instruction using an alias unit number, all devices with that alias will execute the instruction and reply
using their actual unit numbers. To remove an alias, simply set it to zero.
8.24 Return Device ID (#50)
Firmware Version:
Version 5.00 and up
Command Number:
50
Data Bytes:
Ignored
Reply Data:
Device ID
This causes the unit to return an identification code indicating the type of device connected. See Appendix
A for a table of Device IDs.
8.25 Return Firmware Version (#51)
Firmware Version:
Version 5.00 and up
Command Number:
51
Data Bytes:
Ignored
Reply Data:
Firmware version
This causes the unit to return its firmware version number. A decimal is assumed before the last two digits.
For example, reply data of 502 indicates firmware version 5.02.
8.26 Return Power Supply Voltage (#52)
Firmware Version:
Version 5.00 and up
Command Number:
52
Data Bytes:
Ignored
Reply Data:
Power supply voltage.
This causes the unit to return the voltage level of its power source. A decimal is assumed before the last
digit. For example, reply data of 127 indicates 12.7 V. Note that the voltage is only an approximation.
Page 28 of 49
Copyright © Zaber Technologies Inc.
8.27 Return Setting (#53)
Firmware Version:
Version 5.00 and up
Command Number:
53
Data Bytes:
Setting command number (command number of the desired “Set …” instruction).
Reply Data:
Setting command number in Byte 2. Current setting value in data bytes.
This causes the unit to return the current value of the setting number specified in the data. Valid setting
numbers are the command numbers of any “Set …” instruction. The unit will reply with the setting number
in Byte2, as if a command to change the setting had just been issued, however the setting will not be
changed.
For example, command #43 is the “Set Acceleration” instruction. Therefore if you wish to return the
current value of the acceleration setting of unit 1, simply send unit 1 command 53 and data of 43. Unit 1
will reply with command #43 and data equal to the setting value.
8.28 Return Status (#54)
Firmware Version:
Version 5.00 and up
Command Number:
54
Data Bytes:
Ignored
Reply Data:
Status Code. See below for details.
This causes the unit to return a status code indicating the instruction it is currently executing (if any). The
status codes are as follows.
0 – Idling, not currently executing a command.
1 – executing a home instruction
10 – executing manual move (i.e. the manual control knob is turned)
20 – executing move absolute instruction
21 – executing move relative instruction
22 – executing move at constant speed instruction
23 – executing a stop command (i.e. decelerating)
8.29 Echo Data (#55)
Firmware Version:
Version 5.04 and up
Command Number:
55
Data Bytes:
Any arbitrary user-defined data
Reply Data:
The reply is simply an echo of the command.
This causes the unit to echo back the same data that was sent.
Page 29 of 49
Copyright © Zaber Technologies Inc.
8.30 Return Current Position (#60)
Firmware Version:
Version 5.00 and up
Command Number:
60
Data Bytes:
Ignored
Reply Data:
Current absolute position
This causes the unit to return its current position in micro-steps.
Page 30 of 49
Copyright © Zaber Technologies Inc.
9
REPLY-ONLY REFERENCE
In general, a T-series device will reply to an instruction using the same command number as the instruction
itself. However, there are occasions (such as when the user turns the potentiometer) when the device may
transmit data without first receiving a request from the controlling computer. This type of reply may be
considered to be a triggered reply as opposed to a requested reply. In this case the device uses a “replyonly” command number to distinguish the reply from those requested by the controlling computer. The
meanings of these replies and their corresponding data are given below.
9.1
Reply #8 – Position tracking during instructed move
Firmware Version:
Version 5.00 and up
Reply Number:
8
Reply Data:
Current absolute position in microsteps
The unit has been set to position tracking mode (see Set Mode instruction) and given a move instruction. In
this mode, the unit sends this reply at regular intervals updating the current position during any move.
9.2
Reply #9 – Actuator stopped
Firmware Version:
Version 5.00 and up
Reply Number:
9
Reply Data:
Current absolute position in microsteps
The unit stopped moving because it reached either limit (home or away). For example, if the unit following
the “move at constant velocity” command, and it reaches 0 position, then it will reply with this command
number and 0 in the data bytes.
9.3
Reply #10 – Position tracking during manual move
Firmware Version:
Version 5.00 and up
Reply Number:
10
Reply Data:
Current absolute position in microsteps
The unit has been moved manually (the knob is turned). If enabled with the Set Mode instruction, the unit
sends this reply at regular intervals updating the current position during manual moves.
Page 31 of 49
Copyright © Zaber Technologies Inc.
9.4
Reply #255 – Error
Firmware Version:
Version 5.00 and up
Reply Number:
255
Reply Data:
Error code
An error has occurred. The error code returned in the data indicates the type of error. The unit may send
an error code as a reply to an invalid instruction, or it may autonomously send an error code as a triggered
reply (i.e. not in response to an instruction). Please see the next section on error codes for a full table of
possible error codes.
10 ERROR CODES
Whenever a T-Series device returns 255 in byte 2 of a reply, it indicates an error has occurred. The data
(byte 3 – 6) will contain the error code, which identifies the cause of the problem. The error code is
typically the command number of the instruction that caused the error, but not always. The following is a
table of all possible error codes:
Error Code
Description
14
Power supply voltage too low.
15
Power supply voltage too high.
20
Move Absolute – Target position out of range.
21
Move Relative – Target position out of range.
22
Constant velocity move. Velocity out of range.
36
ActuatorID is invalid. Please use one of the actuator IDs, or 0 for default.
It can also mean that the password entered to lock or unlock settings in invalid.
37
Invalid resolution. Resolution may only be 1, 2, 4, 8, 16, 32, 64, 128.
38
Run current out of range. Run current may be 0, or 10 – 127.
39
Hold current out of range. Hold current may be 0, or 10 – 127.
40
One or more of the Mode Bits is invalid.
42
Target velocity out of range. The range of target velocity is determined by the resolution.
43
Target acceleration out of range. The range of target acceleration is determined by the
resolution.
44
The maximum range may only be set between 0 and the resolution limit of the stepper
controller, which is 16,777,215
45
Current position out of range. Current position must be between 0 and the maximum
range.
46
Max relative move out of range. Must be between 0 and 16,777,215.
47
Home offset out of range. Home offset must be between 0 and maximum range.
48
Alias out of range. Alias must be between 1 and 254
Page 32 of 49
Copyright © Zaber Technologies Inc.
53
Data entered is not a valid setting command number. Valid setting command numbers are
the command numbers of any “Set …” instructions.
64
Command number not valid in this firmware version
255
Another command is executing right now and cannot be pre-empted by the new command.
Please wait till the old command is finished executing, or stop the old command, before
trying again.
2146
Move Relative (command 20) exceeded maximum relative move range. Either move
shorter distance, or change maximum relative move (command 46).
3600
Settings locked out.
Must unlock with command 36 first. See command 36 for details.
4008
Mode Bit invalid (Disable Auto Home)
This is a linear actuator; Disable Auto Home is used for rotary actuators only.
4009
Mode Bit 9 invalid (Reserved bit 9 is non-zero)
4012
Mode Bit invalid (Home Active High)
This unit has integrated home sensor with preset polarity; mode bit 12 cannot be changed
by the user.
4013
Mode Bit invalid (Reserved bit 13 is non-zero)
Page 33 of 49
Copyright © Zaber Technologies Inc.
11 DEVICE SPECIFIC INFORMATION
Zaber T-Series positioning devices are driven by stepper motors using a micro-stepping controller with up
to 128 micro-steps per step. All position data sent to or received from Zaber T-Series devices must be in
units of micro-steps (your software must convert position data entered by the user to micro-steps before
sending it to your device). The linear or angular displacement corresponding to a single micro-step of travel
depends on the device. The following section gives this and other information specific to each T-Series
product.
11.1 T-CD Series – Chopper Drive Stepper Controllers
T-CD1000 and T-CD2500 default settings
Setting Description
Command
Default Value
Resolution
37
64
Running Current
38
127
Hold Current
39
0
Device Mode
40
3584
Target Velocity
42
2922
Acceleration
43
111
Range
44
8388863
Maximum Relative Move
46
8388863
Home Offset
47
0
The T-CD series stepper motor controllers are intended to drive a wide variety of motors. It is not possible
to choose factory default settings that will work with every motor that may be connected. Therefore, you
will need to change some of the settings from the default values to match the motor you are driving. The
information in Appendix B provides device resolution and suggested changes to the T-CD default settings
for each device compatible with it. See the detailed command reference section for information on how to
modify the settings.
The wiring diagram below shows the motor connector pinouts as seen looking into the connector on the TCD1000 or T-CD2500 housing. This information will be needed if you wish to drive your own motor. Note
that Pin 4 is reserved for a maximum limit sensor which has not yet been implemented.
Page 34 of 49
Copyright © Zaber Technologies Inc.
11.2 T-HLA Series – Heavy Duty Linear Actuators
Motor:
96 steps / revolution
Device motion:
609.6 um / revolution
6.35 um / step
Default settings:
Mode: 0
Microstep Resolution: 64
Target Velocity: 2922
Acceleration: 111
Running Current: 10
Hold Current: 0
11.3 T-LA Series – Linear Actuators
Motor:
48 steps / revolution
Device motion:
304.8 um / revolution
6.35 um / step
Default settings:
Mode: 0
Microstep Resolution: 64
Target Velocity: 2922
Acceleration: 111
Running Current: 10
Hold Current: 0
Page 35 of 49
Copyright © Zaber Technologies Inc.
11.4 T-LLS Series – Long Travel Linear Slides
Motor:
200 steps / revolution
Device motion:
2 mm / revolution
Default settings:
Mode: 0
Microstep Resolution: 64
Target Velocity: 2922
Acceleration: 111
Running Current: 10
Hold Current: 0
11.5 T-LS – Linear Stages
Motor:
48 steps / revolution
Device motion:
304.8 um / revolution
6.35 um / step
Default settings:
Mode: 0
Microstep Resolution: 64
Target Velocity: 2922
Acceleration: 111
Running Current: 10
Hold Current: 0
T-LS linear stages contain a spring which applies a light load against the leadscrew. Typically these stages
are used in a horizontal orientation, and the only force experienced by the leadscrew is the spring force,
which serves to keep the load on the leadscrew always in the same direction, thus reducing backlash. If
used in a vertical orientation, the spring is not needed to reduce backlash since the load (the weight of the
stage and whatever may be mounted to it) is always in the same direction by default. In fact, if the load is
greater than the minimum spring force and less than the maximum spring force, the existence of the spring
will actually introduce backlash since there will be a point in the stage travel where the load on the
leadscrew changes direction. Therefore, when using T-LS stages in a vertical orientation, we recommend
removing the spring from the stage. This can be done relatively easily using a small hook fashioned from a
paperclip to slip the spring off its mounting posts and slide it out of the stage. It may help to fully extend
the stage prior to spring removal.
Page 36 of 49
Copyright © Zaber Technologies Inc.
11.6 T-LSR – Motorized Linear Stage with built-in Controllers
Motor:
200 steps / revolution
Device motion:
1.8° / step
Default settings:
Mode: 2048
Microstep Resolution: 64
Target Velocity: 2922
Acceleration: 111
Running Current: 10
Hold Current: 12
Page 37 of 49
Copyright © Zaber Technologies Inc.
11.7 T-NM – NEMA Stepper Motors with built-in Controllers
Motor:
200 steps / revolution
Device motion:
1.8° / step
Default settings:
Mode: 0
Microstep Resolution: 64
Target Velocity: 2922
Acceleration: 111
Running Current: 10
Hold Current: 0
Most Zaber positioning products have built-in home sensors. However, on the NM and T-NM series of
devices, the home sensor is optional. Depending on the user’s application, the home sensor may or may not
be required. Therefore, the home sensor on these devices is removable (note: this may not be the case on
some older models).
The purpose of the home sensor is to set a reference or zero position to “sync” the controller position to the
actual device position. On power-up, the default reference position assumed by the controller is typically
the maximum range setting. In certain applications (for example continuous rotation at controlled
velocities), position synchronization isn’t required, and the home sensor may not need to be installed.
If you choose not to install the home sensor, then DO NOT ISSUE A HOME INSTRUCTION (command
#1). If you do, the motor will reverse indefinitely waiting for the non-existent home senor to be triggered.
Instead you can set the initial position using the Set Current Position instruction (command #45).
The home sensor consists of a hall switch connected to a cable which plugs into the motion control device.
A small magnet (included) activates the home sensor when it approaches within about 0.5mm of the face of
the hall switch. If you choose to install the home sensor, you must mount the hall switch and magnet in the
orientation shown. Experiment to determine the correct way around for the magnet as it will only work in
one orientation. Simply issue the home command, and move the magnet in front of the hall switch as
shown in the image below, if the motor does not stop, turn the magnet around and try again. Typically the
easiest way to install the hall switch and magnet is to glue them in place as shown in the image below. Be
sure that the hall switch is mounted to a fixed part, and the magnet to a moving part, and that negative
motion of the motor (ex a negative relative move, negative constant speed move, or counterclockwise turn
of the manual control knob) brings the magnet closer to the hall sensor.
Page 38 of 49
Copyright © Zaber Technologies Inc.
11.8 T-MM – 2-Axis Motorized Mirror Mounts
Motor:
48 steps / revolution
Device motion:
304.8 um / revolution
6.35 um / step
Default settings:
Mode: 0
Microstep Resolution: 64
Target Velocity: 2922
Acceleration: 111
Running Current: 10
Hold Current: 0
Zaber positioning products generally accept only positive position data ranging from 0 up to the maximum
range of the device. The T-MM2, however, can accept negative position data. This simplifies the
calculations required to convert from linear to angular dimensions. Acceptable positions for the T-MM2
axis actuators are in the range from –62000 micro-steps (the home or fully retracted position) to +62000
micro-steps (the maximum extended position). A linear position of zero micro-steps corresponds to an
angular position of zero urad. In this position, the plane of the moveable plate on which the optics are
mounted should be approximately parallel to the front face of the mirror mount housing. The distance
from the actuator contact points to the pivot point is 66.66 mm.
Using the approximation dΦ =
dp
where dp is linear displacement of the actuator and dΦ is angular
l
displacement of the mounting plate yields an angular resolution of 15 micro-radians per um of linear travel.
This approximation is good for positions near zero but introduces an error up to 300 urad at the minimum
and maximum travel.
If better accuracy is desired over the full range of motion then the equation
p
⎛ Φ ⎞
tan ⎜
⎟ = 0.09921875 ⋅ should be used where p is the actuator position in micro-steps, l is
l
⎝ 1000 ⎠
66,660 um, and Φ is the desired angular position in mrad.
T-MM2 Position Table – Dimensional Cross-Reference for firmware version 5.05 and up
Microstep Position
Microns
mrad (using 15 urad/um
approximation)
mrad (using tangent
equation)
-62,000 (min / home)
-6,151.56
-92.273
-92.022
0
0
0
0
+62,000 (max)
+6,151.56
+92.273
+92.022
T-MM2 Position Table – Dimensional Cross-Reference before firmware version 5.05
Microstep Position
Microns
mrad (using 15 urad/um
approximation)
mrad (using tangent
equation)
-65,536 (min / home)
-6,502.4
-97.536
-97.238
0
0
0
0
+60,671 (max)
+6,019.7
+90.296
+90.060
Page 39 of 49
Copyright © Zaber Technologies Inc.
12 MANUAL CONTROL AND LED INDICATORS
Turning the potentiometer knob (on units so equipped) will make the device move. It is not necessary to
have a computer connected to use the device in manual mode. However, without a computer connected
you have no means to initialize the device with a starting position. Therefore you must retract it completely
after each power up in order to home the device. You will not be able to extend it fully until you have first
retracted it completely to set the home position. Clockwise rotation of the knob produces positive motion
(extension) and counter clockwise rotation produces negative motion (retraction).
The speed of retraction or extension will be directly related to the amount to which the knob is turned from
its center detent position (turning the knob to its center position will stop the unit from moving). During
manual moves, the unit constantly returns its position so a computer can track the position even when you
are controlling the unit manually. Manual control can be disabled with a mode setting.
The speed of the potentiometer-controlled manual moves is also determined by the Set Target Velocity
command (#42). When the knob is fully turned to either limit, the unit will move at the maximum velocity
set by command #42. Any intermediate position of the knob will move the unit at a velocity proportional
to how far the knob has been turned. If the velocity is set to be very small, it may appear that turning the
knob produces no movement. The way to verify that the actuator is moving is to connect it to a computer
and monitor the replies back to the computer.
During operation if the plunger is extended or retracted against a force greater than its thrust capability the
unit will stall and there will be “missed steps”. This can result in an apparent malfunction in that the device
believes its position to be other than it actually is and will not extend or retract the plunger past a given
position. Without connecting a computer to home the device or set its position, the only solution is to
retract the plunger until it activates the internal home switch, which will automatically zero the device at
the home position. A problem arises if the device incorrectly believes its position to be zero since it will not
retract to the home position. In this case you must disconnect and reconnect the power before manually
homing the device.
The green LED is on whenever there is power to the device. A constant blinking (2Hz) of the green LED
indicates that the power supply is out of range. The green LED may be disabled by a mode bit (see
command #40)
The amber LED flashes when there is traffic packet on the RS232 line. It also stays constantly on while the
device is moving. When the potentiometer is turned, the amber LED will blink at a rate that is proportional
to how far the potentiometer is turned. The further the knob is turned away from center detent, the faster
the amber LED will blink. If the unit reaches either the home or the away limit while under manual move,
the amber LED will blink slower (2Hz) to indicate that the unit cannot move any further.
Page 40 of 49
Copyright © Zaber Technologies Inc.
13 TROUBLESHOOTING
Symptom
Check
The unit is not
communication or responding
to computer control. The
yellow LED may be blinking
If the actuator has a manual control knob, make sure the knob is centered.
Turn it back and forth until you feel a click or detent. Leave the knob at
the center detent position. Then turn unit off and on, and try again.
The unit is moving very
slowly. It used to behave
differently.
Make sure that the unit’s settings have been restored to factory default.
The speed settings may have been changed inadvertently. The easiest way
is to use command 36 to restore all settings to factory default.
Green LED does not come on
Check the A/C wall plug, the 12V adapter and its connection to the device.
If the power is coming over the data cable, check the mini din connector
for bent or broken pins.
Unit starts turning as soon as
the power is on or amber
LED blinks all the time
The potentiometer is probably not centered. Turn the knob slowly until
you feel the center detent. The amber light should turn off.
Green LED flashes
The power supply voltage is outside the range of 10 to 16V. It may either
be too low or too high. Some unregulated 12 V adapters may produce in
excess of 16 V. If the number of devices connected on a single 12 V
adapter exceeds its current capability, the voltage may drop below 10 V.
You may experience this problem when many motors on a single supply
move together. The load may exceed the maximum current available,
causing the voltage to drop too low. If you experience this problem with a
single device on a single unregulated 12V supply rated at over 300 mA,
then the problem is probably that the supply voltage is too high.
Turning the potentiometer
causes no motion
You may be at the end of travel. This can happen due to missed steps even
if the device does not appear to be fully extended. Turn the knob the other
way. If the unit makes noise but does not move you may be in a stall
condition (especially if the device appears to be fully extended). See “Stall
Condition” below. The amber light should blink when turning the knob, if
not, try turning the power off and then on again. You may also have set
the Target Velocity (command #42) so low that it doesn’t produce any
visible motion. Try using command #36 to reset the device to default
settings and try again.
Communications do not seem
to work, the amber light does
not come on or flash
Make sure that you are on the correct com port. Check the baud rate, hand
shaking, parity, stop bit, etc. Check the cable and adapter for bent or
broken pins. Make sure you do not have a null modem adapter or cable in
the line. The serial to mini-din adapter comes in many varieties and many
have different pin connections. Check the adapter for continuity on the
proper pins by consulting the adapter pin-out diagram below. If you
encounter the problem when trying to control the device with your own
software, try using one of the demo programs from our website to verify
that the hardware is functioning properly.
The amber light comes on
briefly when sending a
command, but the device
does not move and does not
return codes.
Check baud rate, hand shaking, parity, stop bit, etc. Make sure that your
software does not transmit any control characters like line feed, spaces or
something else. The unit numbers may not be what you think they are.
Issue a renumber command, make sure that the computer does not transmit
anything else while the units renumber. Check that you transmit 6 bytes
and that the unit number and command are valid. If you encounter the
Page 41 of 49
Copyright © Zaber Technologies Inc.
problem when trying to control the device with your own software, try
using one of the demo programs from our website to verify that the
hardware
The unit does not send replies
but otherwise works.
If you encounter the problem when trying to control the device with your
own software, try using a demo program from our website to verify that
the hardware is functioning properly. Make sure that the receiving part of
your code or commercial package is correct. Check baud rate, etc. Check
connectors for bent or broken pins.
The unit sometimes returns
fewer than 6 bytes.
This problem usually indicates a problem with the settings for your serial
port. Some serial ports are set to automatically recognize and remove
specific control characters such as carriage returns when they appear in the
RS232 receive buffer. When this happens, it appears as though the device
has not sent enough bytes, but really the controlling computer has just
removed some before you could read them. You will need to change the
serial port settings to fix the problem.
Stall condition: The unit
makes noise but does not
move.
Try removing all external loads. If the unit now extends and retracts
normally, the problem is excessive load. Try to reduce the load or change
step time and acceleration parameters to ensure the load is less than the
maximum thrust. If the unit is stalled in its fully extended position and
remains stalled without any external load applied it means the lead screw
has been over extended and is stuck. You can usually get the lead screw
unstuck by pushing on it after issuing the home command. If the unit is
stalled (with no external load) in a position that is not fully extended then
it requires servicing.
Poor repeatability or the unit
does not extend or retract
smoothly or makes louder
than normal noise during
travel.
You may be skipping steps. When skipping, the unit will loose position in
increments of 4 steps. This condition happens if the thrust needed is more
than the thrust available from the device. Check that the force on the
device is less then the maximum thrust. Check the voltage using the
voltage command. Voltage less then 12 V will reduce the unit’s maximum
thrust. Try a slower target velocity (command #42) as stepper motors
produce more thrust when moving slowly. Lead screw conditions greatly
affect the performance of the unit. Dirt, damaged threads, no grease or too
heavy grease will degrade performance and may contribute to a stall. A
black residue appears on the lead screw after extended use. This can
increase friction and reduce trust. Clean the screw and re-grease it. In
general if you try to move a large payload or have a large static axial load
(like lifting something vertically) you will have more problems. For
vertical motion the use of a counterweight, spring or rubber band can help
reduce the static load and improve the performance of the device. The
default value of the acceleration and target velocity are good for small to
medium loads and medium speeds. For very light loads and higher speeds,
or heavy loads at lower speeds, these parameters can be tuned. Trial and
error is the best tuning technique.
The device extends and
retracts smoothly but will not
retract to the home (zero)
position.
The device will not retract below what it believes to be the zero position.
If the unit has missed steps due to a previous stall condition or if the unit
has been set to an incorrect position, the device may incorrectly believe it
is at the zero position. You can solve the problem by issuing the home
command, or by turning the unit on and off and manually homing it.
Page 42 of 49
Copyright © Zaber Technologies Inc.
14 DATA CABLE PINTOUT DIAGRAM
The tables below show the pin-outs of communications connections on the device and on the serial adapter.
Device Pin Configuration
Female PS2 Pin-outs
(Towards next unit)
Male PS2 Pin-outs
(Towards computer)
1
Not Connected
Not Connected
2
Receive (from next unit)
Transmit (toward computer)
3
Ground
Ground
4
+12V Power
+12V Power
5
Not Connected
Not Connected
6
Transmit (to next unit)
Receive (from computer)
Serial Adaptor Pin Configuration
Mini-Din 6
DB9
Function
2
2
Device Transmit, Computer Receive
3
5
Ground
6
3
Device Receive, Computer Transmit
All Other
Not Connected
Page 43 of 49
Copyright © Zaber Technologies Inc.
15 WARRANTY
All Zaber products are backed by a one-month satisfaction guarantee. If for any reason you are not satisfied
with your purchase, send it back to Zaber Technologies Inc. within one month of the purchase date for a
complete refund.
T-series devices are also guaranteed for one year or 50,000 cycles, whichever comes first. During this
period Zaber will repair or replace faulty units free of charge. Customers are responsible for shipment back
to Zaber.
For complete details of our warranty and other policies please see our website.
16 REPAIRS
If your unit needs repairs, please:
-
Contact us to obtain an RMA number.
On units with exposed leadscrews (i.e. T-LA series), if possible, retract the lead screw fully into
the housing. This way the lead screw is protected from damage during shipping.
Pack the unit well.
Email us the tracking number of the shipment (i.e. FedEx or UPS)
17 EMAIL UPDATES
If you would like to receive our quarterly email newsletter with product updates and promotions, please
sign up online at http://www.zaber.com (news section).
18 DISCLAIMER
Zaber’s devices are not intended for use in any critical medical, aviation, or military applications or
situations where product malfunction or failure could cause personal injury or death, or damage to
equipment. Zaber disclaims any and all liability for injury or other damages resulting from the use of its
products.
19 TECHNICAL SUPPORT AND CONTACT
You can contact Zaber Technologies Inc. for technical assistance by on one of the following methods:
Phone:
1-604-276-8033 (direct)
1-888-276-8033 (toll free in North America)
Fax:
1-604-648-8033
Mail:
2891 Steveston Hwy, Richmond, BC, Canada, V7E 2J1
Web:
http://www.zaber.com (for up to date information on all Zaber products)
Email:
Please visit our website for up to date email contact information.
Page 44 of 49
Copyright © Zaber Technologies Inc.
20 APPENDIX A: DEVICE ID AND SETTINGS
The following table shows the default non-volatile settings for all T-series devices:
20.1 Device-specific defaults
Device
ID
Product Name
Mode (#40)
Microstep
Resolution
(#37)
Running
Current
(#38)
Hold
Current
(#39)
Range (#44)
[ initial
position ]
13
T-LA13A
T-LA13A-S
T-LA13A-SV
0
64
10
0
131072
1013
T-LA13B
T-LA13B-S
T-LA13B-SV
2048
128
17
50
131072
28
T-LA28A
T-LA28A-S
T-LA28A-SV
0
64
10
0
282624
1028
T-LA28B
T-LA28B-S
T-LA28B-SV
2048
128
17
50
282624
60
T-LA60A
T-LA60A-S
T-LA60A-SV
0
64
10
0
606208
1060
T-LA60B
T-LA60B-S
T-LA60B-SV
2048
128
17
50
606208
113
T-LS13-I
T-LS13-M
T-LS13-SI
T-LS13-SM
0
64
10
0
131327
1113
T-LS13B-I
T-LS13B-M
T-LS13B-SI
T-LS13B-SM
2048
128
17
50
131327
128
T-LS28-I
T-LS28-M
T-LS28-SI
T-LS28-SM
0
64
10
50
282879
1128
T-LS28B-I
T-LS28B-M
T-LS28B-SI
T-LS28B-SM
2048
128
17
50
282879
180
T-LS80-I
T-LS80-M
T-LS80-SI
T-LS80-SM
0
64
10
0
806399
Page 45 of 49
Copyright © Zaber Technologies Inc.
1180
T-LS80B-I
T-LS80B-M
T-LS80B-SI
T-LS80B-SM
2048
128
17
50
806399
228
T-HLA28
T-HLA28-S
T-HLA28-SV
0
64
10
0
282879
302
T-MM2-I
T-MM2-IV
T-MM2-M
T-MM2-MV
0
64
10
0
126207
601
T-NM17A200
T-NM17A200-S
T-NM17C200
T-NM17C200-S
0
(256 before
version
5.05)
64
10
0
8388863
[419181]
701
T-LLS105
T-LLS105-S
0
64
10
0
672255
[336127]
702
T-LLS260
T-LLS260-S
0
64
10
0
1664255
[832127]
4151
T-LSR150A
2048
64
10
12
1526940
4301
T-LSR300A
2048
64
10
12
3038763
4152
T-LSR150B
2048
64
10
12
305624
4302
T-LSR300B
2048
64
10
12
607740
901
T-CD1000
3072
64
127
0
8388863
902
T-CD2500
3072
64
127
0
8388863
3003
T-JOY3
0
N/A
N/A
N/A
N/A
20.2 Defaults Common to All T-Series Actuator Devices
Setting
Default
Resolution (#37)
64
Target Velocity (#42)
2922
Acceleration (#43)
111
Maximum Relative Move (#46)
= Range (#44 in table above)
Home Offset
0
Antibacklash / Antisticktion Distance
10 x Resolution = 10 x 64 = 640 microsteps
Page 46 of 49
Copyright © Zaber Technologies Inc.
21 APPENDIX B: PERIPHERAL ID AND SETTINGS
Peripheral ID is the identifier given to actuators and motors that can be driven by T-CD1000 or T-CD2500
chopper drivers. The T-CD series of actuators has built-in knowledge of the following stepper motor
actuators. Command 36 can be used with peripheral ID number to load the default settings listed in the
tables below. Alternately the settings may be modified individually using appropriate instructions.
21.1 LMR Series
Peripheral ID
Product Name
Mode (#40)
Range (#44)
[ initial
position ]
T-CD1000
Run / Hold
Current
T-CD2500
Run / Hold
Current
1240
LMG40
7168
170000
20 / 40
50 / 100
1260
LMG60
7168
102400
20 / 40
50 / 100
1215
LML15
7168
192000
20 / 40
50 / 100
1225
LML25
7168
640000
20 / 40
50 / 100
1250
LML50
7168
1280000
20 / 40
50 / 100
1239
LMR39
7168
(7424 before
version 5.05)
1536000
[768000]
20 / 40
50 / 100
1258
LMR58
7168
(7424 before
version 5.05)
1843200
[921600]
20 / 40
50 / 100
1282
LMR82
7168
(7424 before
version 5.05)
1843200
[921600]
20 / 40
50 / 100
Page 47 of 49
Copyright © Zaber Technologies Inc.
21.2 NA Series
Peripheral ID
Product Name
Mode (#40)
Range (#44)
T-CD1000
Run / Hold
Current
T-CD2500
Run / Hold
Current
30816
NA08A16
3072
340000
40 / 127
100 / 127
30830
NA08A30
3072
630000
40 / 127
100 / 127
30916
NA08B16
3072
170000
40 / 127
100 / 127
30930
NA08B30
3072
315000
40 / 127
100 / 127
31116
NA11B16
3072
165000
20 / 100
50 / 127
31130
NA11B30
3072
310000
20 / 100
50 / 127
31160
NA11B60
3072
620000
20 / 100
50 / 127
31416
NA14B16
3072
170000
40 / 127
100 / 127
31430
NA14B30
3072
315000
40 / 127
100 / 127
31460
NA14B60
3072
630000
40 / 127
100 / 127
21.3 NM Series
Peripheral ID
Product Name
Mode (#40)
Range (#44)
[ *** ]
T-CD1000
Run / Hold
Current
T-CD2500
Run / Hold
Current
2081
NM08A
3072
8388863
25 / 100
60 / 127 *
2082
NM08B
3072
8388863
25 / 100
60 / 127 *
2111
NM11A
3072
8388863
20 / 40
50 / 100
2112
NM11B
3072
8388863
20 / 40
50 / 100
2113
NM11C
3072
8388863
20 / 40
50 / 100
2171
NM17A
3072
8388863
20 / 40
50 / 100
2172
NM17B
3072
8388863
20 / 40
50 / 100
2173
NM17C
3072
8388863
20 / 40
50 / 100
2231
NM23A
3072
8388863
20 / 40
50 / 100
2232
NM23B
3072
8388863
20 / 40
50 / 100
2233
NM23C
3072
8388863
20 / 40
50 / 100
2341
NM34A
3072
8388863
10 ** / 20
25 / 50
2342
NM34B
3072
8388863
10 ** / 20
25 / 50
2343
NM34C
3072
8388863
10 ** / 20
25 / 50
Page 48 of 49
Copyright © Zaber Technologies Inc.
* When using NM08 series motors with a T-CD2500, even at the minimum hold current, the motor tends to
get quite hot. We recommend using a T-CD1000 with these motors if possible, or setting the hold current to
zero if your application does not require a hold current.
** Using NM34 motors with a T-CD1000 is not recommended since the T-CD1000 is only capable of
driving 1A per phase which is half the rated current of the motor.
*** All initial positions at powerup in the NM series are equal to half of maximum range = 8388863 / 2 =
4194431.
Note that Peripheral IDs are not the same as Device ID. Any T-Series device (T-LA28A, T-CD1000)
would have a Device ID. Any motor or actuator that does not have a “T” prefix, but is designed to connect
to T-CD1000 or T-CD2500 would have a Peripheral ID. Command 50 returns Device ID, while Peripheral
IDs are used with command 36 on T-CD1000 or T-CD2500 to set various defaults to work with a particular
motor or actuator.
21.4 Defaults Common to All Peripherals:
Setting
Default
Resolution (#37)
64
Target Velocity (#42)
2922
Acceleration (#43)
111
Maximum Relative Move (#46)
= Range (#44 in table above)
Home Offset
0
Antibacklash / Antisticktion Distance
10 x Resolution = 10 x 64 = 640 microsteps
Page 49 of 49