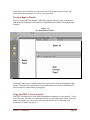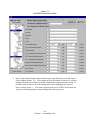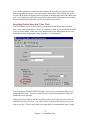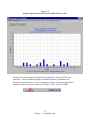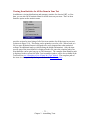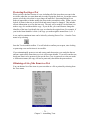
1
User’s Manual for
FastTEST 2.0
Item Banking and Test
Development System
- ii -
Contact Information
Assessment Systems Corporation
2233 University Avenue, Suite 200
St. Paul, Minnesota 55114
Voice: (651) 647-9220
Fax: (651) 647-0412
E-Mail: [email protected]
www.assess.com
Table of Contents
To view the Table of Contents for this manual, select the Bookmark tab on the left side of the
Acrobat window. The bookmark entries are hyperlinks that will take you directly to any section
of the manual that you select.
License
Unless you have purchased multiple licenses for FastTEST 2, your license is a single-user license.
You may install FastTEST 2 on a single computer and one additional computer, provided that
there is no possibility that both copies will be in use simultaneously.
Technical Assistance
If you need technical assistance using FastTEST 2, please visit the Support section of our Web
site, www.assess.com. If the answer to your question is not posted, please email us at
[email protected]. Technical assistance for FastTEST 2 is provided for as long as you
maintain the then current version. Please provide us with the invoice number for your license
purchase when you request technical assistance.
Citation
Weiss, D.J. (2010). User’s Manual for FastTEST 2.0. St. Paul MN: Assessment Systems
Corporation.
No part of this publication may be reproduced, stored in a retrieval system, or transmitted in
any form or by any means—electronic, mechanical, photocopying, recording, or otherwise—
without the prior written consent of the publisher.
Copyright © 2010 by Assessment Systems Corporation
All Rights Reserved
- iii -
Table of Contents Chapter 1: Preliminaries ................................................................................................... 1 Your FastTEST 2.0 License and Unlocking Your Copy....................................................................... 1 Transferring a FastTEST 2.0 License to Another Computer ................................................................ 3 Security for Your Item Banks and Tests ............................................................................................... 7 Chapter 2: Workspaces ...................................................................................................... 8 The FastTEST Main Window.................................................................................................. 8 Workspaces........................................................................................................................................... 9 Passwords............................................................................................................................................ 11 The Item Banker Window................................................................................................................... 12 Using FastTEST 2.0 on a Network ........................................................................................ 12 Moving Item Banks and Tests between Workspaces........................................................... 14 Moving an Item Bank ......................................................................................................................... 14 Moving a Test ..................................................................................................................................... 15 Chapter 3: Creating and Working with Item Banks....................................................... 16 Creating Structured Item Banks ........................................................................................... 16 Creating Your Bank Structure............................................................................................................. 18 Adding Items to Your Banks.................................................................................................. 20 Creating Items Directly in FastTEST’s Item Editor............................................................................ 20 Importing Items by Copy and Paste .................................................................................................... 21 Importing Single Items as RTF Files .................................................................................................. 21 Importing Multiple Items From a Word Processor or Text File ......................................................... 21 Creating and Editing Items.................................................................................................... 22 Creating a New Item With the Item Editor ......................................................................................... 22 Moving and Copying Items................................................................................................................. 25 Deleting an Existing Item ................................................................................................................... 26 Editing an Existing Item ..................................................................................................................... 26 The Item Editor ................................................................................................................................... 27 Inserting Special Characters................................................................................................................ 32 Information Tab .................................................................................................................................. 33 Statistics Tab....................................................................................................................................... 34 Notes Tab............................................................................................................................................ 37 Quantile Plots Tab............................................................................................................................... 38 Closing an Item ................................................................................................................................... 39 Saving or Printing All the Information on an Item ............................................................. 39 Checking Spelling.................................................................................................................... 39 Selecting One or More Operational Dictionaries ................................................................................ 39 Running the Spell Checker ................................................................................................................. 40 Creating Dictionaries for the Spell Checker ....................................................................................... 40 User Dictionaries ................................................................................................................................ 41 Searching for Items................................................................................................................. 41 Importing Item Statistics........................................................................................................ 42 Step 1: Specifying the Type of Statistics File to be Imported............................................................ 43 Step 2: Specify Columns..................................................................................................................... 45 Step 3: Assigning Identifiers to Your Data ........................................................................................ 47 Step 4: Options.................................................................................................................................... 50 Import Results Report ......................................................................................................................... 51 Importing Item Statistics from ITEMAN, RASCAL, and XCALIBRE ............................................. 53 Moving a Bank from One Workspace to Another ............................................................... 56 Chapter 4: Assembling Tests ........................................................................................... 57 Selecting Items for a Test ....................................................................................................... 57 - iv -
Selecting Items by Browsing .............................................................................................................. 57 Selecting Items Randomly .................................................................................................................. 59 Selecting Items by Searching.............................................................................................................. 61 Assembling Tests Using IRT Criteria ................................................................................................. 67 Inserting Instructions into Your Tests .................................................................................. 71 Examining the Statistical Characteristics of Your Test ...................................................... 72 Graphic and Tabular Summaries of Item Statistics............................................................................. 72 Viewing Item Statistics for All the Items in Your Test....................................................................... 75 Reordering the Items in Your Test and Creating Alternate Forms ................................... 77 Deleting Items from Your Test .............................................................................................. 77 Protecting/Locking a Test ...................................................................................................... 78 Obtaining a List of the Items in a Test.................................................................................. 78 Obtaining a Listing of Information in the Item Bank Fields for the Items in a Test........ 79 Copying Tests to a Different Workspace .............................................................................. 81 Chapter 5: Preparing Tests for Printing ......................................................................... 82 Adding Headers and Footers and Other Formatting .......................................................... 83 Refining the Appearance of Your Test ................................................................................. 85 Previewing Your Test and Changing Page Layout.............................................................. 86 Saving Your Test as a File...................................................................................................... 87 Protecting/Locking a Test ...................................................................................................... 88 Navigating to Other FastTEST Windows ............................................................................. 89 Chapter 6: Utilities ........................................................................................................... 90 Compacting Databases ........................................................................................................... 90 Importing FastTEST Item Banks from Earlier Versions of FastTEST............................. 90 Importing FastTEST Tests from Earlier Versions of FastTEST ....................................... 91 Appendix A: Preparing Your File With Item Text for Importing.................................. 92 Required Separators ............................................................................................................... 93 The Item Identifier Separator.............................................................................................................. 93 The Begin and End Text Separators.................................................................................................... 94 Additional (Optional) Lines of Information ......................................................................... 96 Notes ................................................................................................................................................... 96 Author ................................................................................................................................................. 97 Source ................................................................................................................................................. 97 Description.......................................................................................................................................... 97 Keywords ............................................................................................................................................ 97 Date Created ....................................................................................................................................... 98 Item Type............................................................................................................................................ 98 Score Item ........................................................................................................................................... 99 Number of Answers ............................................................................................................................ 99 Keyed Answer................................................................................................................................... 100 IRT Model and a, b, c Parameters .................................................................................................... 100 Classical Test Theory Parameters ..................................................................................................... 102 User Statistics ................................................................................................................................... 102 Multi-Item Examples ............................................................................................................ 103 Appendix B: Using FastTEST 2.0 with Right-to-Left Languages ............................... 105 -v-
Chapter 1: Preliminaries
Your FastTEST 2.0 License and Unlocking Your Copy
Unless you have purchased a network or multiple-computer license, your license for
FastTEST is a single-computer license. If you would like to use FastTEST on a network
or on more than one computer, please contact us to arrange for the appropriate number of
additional licenses.
FastTEST 2.0 is shipped as a 30-day trial copy. Using the trial copy, you can create item
banks, create items, and create printed tests from those items for 30 days from the date of
installation. The number of days left in your trial period will be displayed each time you
start FastTEST.
We can permanently unlock your trial copy by e-mail or fax. To unlock your copy, we
will need a valid credit card number and expiration date, an institutional purchase order
(in the U.S.), or payment by wire transfer or a check in advance.
In addition, we will need two numeric codes that are unique to your copy of FastTEST
2.0. To obtain these two codes, when FastTEST 2.0 starts click on the “Yes” button in
answer to the question, “Would you like to unlock FastTEST now?”
This screen can also be reached by opening the License menu and selecting “Unlock”
when FastTEST is running.
FastTEST 2.0 Manual Page 1 From the following screen you will need to send the two blue Computer ID and Session
ID numbers.
For your convenience ,click on the “Copy ID’s to Clipboard” button. This will copy both
IDs to the Windows clipboard along with a brief message and the e-mail address to which
to send your payment information. This can then be pasted into an e-mail message, filled
in, and sent to [email protected]. If you have already paid for your FastTEST license,
please send your invoice number and customer number in your email message.
When we receive these codes from you, we will respond with a numeric Unlock Code
that you will need to enter into this same window from which you obtained your IDs.
FastTEST 2.0 should be run in administrator mode while entering the Unlock Code.
Otherwise the program may not fully unlock. There are two different methods for this
To run FastTEST 2.0 as Administrator:
Windows XP, Method 1: Login to an administrator account, run FastTEST 2.0.
Windows XP, Method 2:Right click on FastTEST 2.0 or the short cut to it, and
select “Run As…”
Then enter or select an Administrator account:
FastTEST 2.0 Manual Page 2 Windows Vista or 7:
• Right click on FastTEST 2.0 or shortcut to FastTEST.
• Select “Run As Administrator”. Then a User Account Control window
will open.
• Click on “Allow” in the User Account Control Window.
Once you enter the code that we send you, your copy will be unlocked – with all your
banks, items, and tests intact.
Transferring a FastTEST 2.0 License to Another Computer
If you find that you need to use FastTEST 2.0 on a different computer than the one on
which it was originally installed, you can transfer the license to another computer. This
can be done between computers running the same or different versions of FastTEST 2.0.
Both instances of FastTEST 2.0 should be run in administrator mode (see above), to fully
complete the license transfer. A transfer can be done by carefully following these steps:
•
•
•
Step 1: Install FastTEST 2.0 on the new computer. The license transfer will begin
on the new installation computer.
Step 2: Insert a USB flash drive or thumb drive into the computer to which you
want to transfer the license (i.e., the NEW computer).
Step 3: Open FastTEST on the NEW computer (as Administrator, see above), and
on the License menu choose the “Start Transfer” option under the “Transfer
License” submenu. Follow instructions to start the transfer, and select USB
flash/thumb drive. The following pictures illustrate this flow in Windows XP.
FastTEST 2.0 Manual Page 3 FastTEST 2.0 Manual Page 4 •
Step 4: Safely eject the USB flash/thumb drive from the NEW computer. Insert
USB flash/thumb drive into the OLD computer that has a valid license. Open
FastTEST on the OLD computer (as Administrator, see above). From the
FastTEST License menu choose the “Transfer This License” option under the
“Transfer License” submenu, and follow the instruction screens. Please note that
the OLD computer will revert to a trial version, and FastTEST 2.0 will show an
alert about this. The following pictures illustrate this flow in Windows Vista.
FastTEST 2.0 Manual Page 5 •
Step 5: Insert the USB flash drive or thumb drive back into the NEW computer.
From the License menu, choose the “Complete Transfer” option from the
“Transfer License” submenu, and follow the instruction screens. The following
pictures illustrate this flow in Windows XP.
FastTEST 2.0 Manual Page 6 Transfer of the license should now be complete.
Once the license transfer is complete, you can move your item banks and tests. All item
banks and tests are stored in the workspace databases. Go to the Workspaces folder of
your original FastTEST installation and copy all the files in that folder (they should have
an .FDB extension). If you have stored other workspaces in other locations you will want
to find them and move them as well. For easiest access in your new FastTEST
installation, you should copy all the .FBD files into the Workspaces folder on the new
computer. If you have created any external Key files they will be in the Keys folder and
any tests you have saved as RTF files will be in the Tests folder.
Security for Your Item Banks and Tests
FastTEST 2.0 stores your items and tests in its workspace databases. Two security
features are designed to protect your items and tests:
1. Each workspace can have its own password.
2. All information on items and tests in a workspace is encrypted.
FastTEST 2.0 Manual Page 7 Chapter 2: Workspaces
FastTEST 2.0 is a 32-bit item banker and test assembly system for creating conventional
tests (i.e., tests comprised of a fixed set of items), surveys, and questionnaires. It allows
you to create as many structured item banks as you desire with an unlimited number of
items in each bank. Extensive item bank search capabilities help you efficiently create
instruments that meet your needs. If your item banks include item statistics –
conventional, item response theory, or your own item statistics – you can monitor the
statistical and psychometric characteristics of your tests as you assemble them.
The FastTEST Main Window
All functions of FastTEST are available to you from the Main Window, shown in Figure
1-1.
Figure 1-1
FastTEST 2.0’s Main Window on Opening the System
The Navigation Panel
The section on the left of the Main Window is FastTEST’s Navigation Panel. This
allows you to access Workspaces, Item Banks, Items, Tests, and Utilities. Other panels
FastTEST 2.0 Manual Page 8 open on the Main Window for performing different functions in FastTEST. All panels
are sizable (within limits) and the Main Window is always accessible from the View
menu at the top of any window by selecting Item Banker or Test Assembler, or by using
one of these buttons:
Workspaces
Workspaces are where you keep your banks, tests, and items. You can have as many
workspaces as you like. You can create separate workspaces for different users, different
projects, different classes, or different applications. And, for security purposes, you can
have a separate password on each workspace.
How you define your workspaces is entirely up to you. In creating your workspaces,
keep in mind that you can freely move items across banks within a workspace and move
entire sections of banks (categories and/or subcategories) both within and between banks.
So if you have related banks, you might want to keep them in a common workspace, in
case you decide to transfer items or item sets among those banks. You will also want to
keep banks together within a workspace if you plan to draw items from those banks to put
into the same test or tests. If you later determine that you want to move item banks or
tests that you have created from those banks between workspaces, export/import utilities
are provided that accomplish this (see the Navigation Panel in Figure 1-1).
To create a workspace or open an existing workspace, select the workspace icon
or select “Workspaces from the Workspace pull-down menu.
FastTEST 2.0 Manual Page 9 You will then be presented with the Window in Figure 1-2
Figure 1-2
Opening a Workspace
If you choose “Open Existing Workspace,” the displayed list shows all workspaces that
have previously been opened in FastTEST that are still available (Figure 1-3). The
default extension for a workspace is .FDB.
FastTEST 2.0 Manual Page 10 Figure 1-3
Selecting an Existing Workspace from the Default Folder
If you saved workspaces in other folders, you can access them by selecting “More
files…”. Use the standard file dialog box that appears to select the drive and folder in
which your workspaces have been saved. If you move or copy a FastTEST workspace
from one computer to another, copy the workspace into the Workspaces folder within
your main FastTEST folder. Then open it the first time using the "More files" option to
locate the file. Once opened in this manner, the workspace will then be listed under
existing workspaces on future use.
To help you keep track of the currently open workspace, the name of the workspace you
are using is shown in the blue title bar at the top of the FastTEST window.
Passwords
When you create a workspace, you can provide a password to protect access to your
banks and tests. Each workspace can have a separate password. You can change your
password at any time from within a workspace. To ensure that only someone who knows
the current workspace password is changing it (in case you left a workspace open and
FastTEST 2.0 Manual Page 11 someone else tries to change your password) you will be asked to provide the “old”
password for that workspace, as well as a new password.
The Item Banker Window
Figure 1-4 shows the Item Banker window that appears when you open a Workspace,
with the three main panels (other than the Navigation Panel) labeled according to their
function.
Figure 1-4
The Item Banker Window
The Banks Panel can be expanded from left to right (up to a limit) by dragging its right
border. The border between the Item List and the Item Preview Panel can similarly be
moved vertically (within limits) by dragging.
Using FastTEST 2.0 on a Network
FastTEST is designed to be used either on standalone computers or on a network. To use
it on a network, you must first install the software on each workstation. Then, when you
create a workspace you can create it on a networked drive by first selecting New
Workspace as shown in Figure 1-2.
FastTEST 2.0 Manual Page 12 A standard file dialog box will open and allow you to select the location for the
workspace. Then select the drive and folder in which you want to store the workspace on
the network. For example,
In this example, the workspace will be stored in the FT2Share folder on the M: drive. It
will then be accessible to anyone on the network that has access to that drive and knows
the password for that workspace. To access the workspace from any workstation for the
first time, the local user must use the “More files” option in the workspace window to
locate the drive and folder in which the workspace has been stored.
Once the workspace has been opened in this manner on a given workstation, the
workspace will then be listed among available workspaces, and its path will be displayed.
FastTEST 2.0 Manual Page 13 If a workspace has been developed on a workstation but not on a network drive, it can be
shared on the network by moving it to a network drive. Once moved, it can then initially
be accessed from any workstation using the “more files” option as described above.
After accessing the workspace initially in this manner, it will then be listed, along with its
path, as an Existing Workspace and can be selected directly.
Moving Item Banks and Tests Between Workspaces
FastTEST provides a way to move item banks and tests from one workspace to another,
thus allowing you to restructure your workspaces relatively easily. This process uses an
Export/Import procedure to make a copy of the bank or test, first writing the contents of
the bank/test into a temporary file, then reading that file and writing its contents into the
new workspace.
Moving an Item Bank
To move an item bank, open the Workspace pulldown menu and select Export Bank. Or
select “Export Bank” from the Navigation Panel. Then select the name of the bank that
you want to move to a new workspace. You will then be asked to provide a folder and
name for the exported item bank. The file will then be written in the designated folder
with the extension .BEX.
FastTEST 2.0 Manual Page 14 To import that bank into a new workspace, open the workspace into which
you want to move the bank. Then select Import Bank from the Workspace
menu or “Import Bank” from the Navigation Panel. A message will inform
you when the import is complete.
Finally, if you do not want to have the bank in two different workspaces,
when you are sure that the bank has been properly and completely copied
to the new workspace return to the original workspace from which the
bank was copied. Open the bank you copied, select the bank in the Banks
panel, and select Delete Bank from the Banks pulldown menu. To insure
that you have not accidentally requested deletion of a bank, you will be
asked to confirm this action. Note, however that you cannot delete a bank
if there are any tests in the workspace that use items from that bank. If
such tests exist, you will have to either delete all items from the bank from
each test, or delete the tests that use items from the bank.
Moving a Test
To move a test, you must first make a copy of the bank(s) that are used in
the test in the workspace into which you want to move the test. You make
a copy of the bank(s) by exporting the bank(s) into the new workspace, as
described above.
Once the relevant banks have been copied to the new workspace, open the
Workspace pulldown menu and select Export Test, or select “Export Test”
from the Navigation Panel. Then select the name of the test that you want
to move to a new workspace. You will then be asked to provide a folder
and name for the exported test. The file will then be written in the
designated folder with the extension .TEX. To import that test into a new
workspace, open the workspace into which you want to move the test.
Then select Import Test from the Workspace menu or select “Import Test”
from the Navigation Panel; then select the .TEX file for your test. A
message will inform you when the import is complete. In order to
successfully import a test, the item identifiers and bank structure must
match exactly between the two workspaces. The item identifiers should
also be unique within the bank structure or an error message will be
displayed and the import will fail.
Finally, when you are sure that the test has been properly and completely
copied to the new workspace, return to the original workspace from which
the test was copied. Open the workspace with the test you copied, open the
test, and then select Delete Test from the Tests pulldown menu or select the
button shown on the right from the Test Assembler toolbar. To insure that
you have not accidentally requested deletion of a test, you will be asked to
confirm this action.
FastTEST 2.0 Manual Page 15 Chapter 3: Creating and
Working with Item Banks
Creating Structured Item Banks
Having created a workspace to store your items and tests, the next step is to open one or
more banks into which you will save your questions/items and from which you will draw
items to create your tests.
You can access (or create) your item banks by selecting “Item Banks” on the Navigation
Panel, or by using the pulldown Banks menu
Figure 2-1
Item Bank Options Available on the Dropdown Menu
Selecting Item Banks on the Navigation Panel results in the bank
options shown in Figure 2-1 (the same options are available on
the Banks pulldown menu). If you select “Show All,” a display
of all of the banks that you have in the selected workspace will
appear in the Banks Panel, as shown in Figure 2-2
- 16 Chapter 2. Item Banking
Figure 2-2
The Banks Panel of the Main FastTEST Window with Three Banks Shown
If you have a large number of banks in your workspace with many categories and
subcategories, it might be less confusing if you work with just a single bank showing.
Selecting "Show Bank" will display a dialog box that lists all the banks available in the
workspace, from which you can select a single bank to open.
To create a new bank, select
from either the Navigation Panel or the toolbar at the top of the Item Banker Preview
window, or Select New Bank from the Banks pulldown menu..
A dialog box will then open in which you name your bank and provide a description of it
(Figure 2-3).
Figure 2-3
Creating a New Bank
Bank names are limited to 15 characters and may include spaces and most punctuation.
Bank descriptions can be up to 80 characters long. The descriptions are displayed at the
bottom of the Banks Panel when a bank is selected (see Figure 2-2).
- 17 Chapter 2. Item Banking
Creating Your Bank Structure
FastTEST's item banks are designed to accommodate hierarchical structures so that your
banks can reflect the structure of a curriculum, the needs of large item banking projects,
or any other application for which structured item banks are useful. FastTEST will allow
you to create banks that are up to 10 or more levels deep, with multiple categories at each
level. (The actual limit to the number of levels depends on the maximum total length of
all category and subcategory names for the path to the lowest level category; you can
have a deeper bank structure if you use shorter category names.) You can also place
items in any category of the hierarchical bank structure. Items can be freely moved (by
drag-and-drop) among the categories within a bank or between banks within a
workspace. In addition, bank categories (including all the items in them and
subcategories below them) can also be moved both within and between banks by dragand-drop.
To create your bank structure, first select a bank by clicking on its name in the Banks
Panel (e.g., Figure 2-2). To create categories within a bank, select
from the Navigation Panel or New Category from the Banks pulldown menu
Then enter a category name (15 characters maximum) and a description (80 characters
maximum) in the dialog box that appears. As for bank descriptions, category descriptions
will appear at the bottom of the Banks Panel when a category is selected. If you later
decide you want to change the name or description of a category (or a bank), select the
category (or bank) and right-click it to edit the category (or bank) properties (or select
Edit Category Properties from the Banks menu).
- 18 Chapter 2. Item Banking
Figure 2-4 shows a workspace with three banks – Intro Msmt, IRT Course, and Statistics.
The “+” shown for the first bank indicates that the bank has one or more subcategories
defined in its structure. The second and third banks (IRT Course and Statistics) have no
subcategories defined.
Figure 2-4
A Workspace With Three Banks
Once you have created the main categories for your bank, you will likely want to create
categories under those categories to implement your hierarchical structure. The process
of adding subcategories is the same as adding categories — select the category under
which you want to add subcategories, and then select New Category from either the
Navigation Panel or the Banks menu, or select the New Category button from the Item
Banker toolbar:
You can then add categories under those subcategories by selecting subcategories and
repeating this process.
Double-clicking on the category name of a bank (or a category within a bank) will
display the subcategories (or hide them if they are already displayed). Figure 2-5 shows
that the Intro Msmt bank has three major categories that define the three major sections
of a course on introduction to psychological measurement. The first two categories (Inst
Const and Reliability), which are preceded by a “+,” have additional categories under
them, whereas Validity does not.
Figure 2-5
The Three Banks With the First Level of the Intro Meas Bank Structure Shown
Figure 2-6 shows the Intro Msmt bank with a subcategory structure for Reliability that is
five levels deep to reflect the structure of that portion of the course.
- 19 Chapter 2. Item Banking
Figure 2-6
The Intro Msmt Bank With Some Subcategories Added
Adding Items to Your Banks
FastTEST 2 provides four ways for you to enter items into your banks: (1) directly
though the Item Editor, (2) by copy and paste from word processor or text files, (3) from
single-item RTF files, or (4) by importing multiple-item files of items using the item
import utility.
Creating Items Directly in FastTEST’s Item Editor
The Item Editor is a full-featured word processor that gives you complete control over the
layout and font characteristics of your test items. You can select a default font
configuration that will be used for all items that you create. Details on direct entry of
item text and other item characteristics are in the next section of this chapter.
- 20 Chapter 2. Item Banking
Importing Items by Copy and Paste
Item text, including graphics, can be copied and pasted from your word processor or text
editor, using the Windows clipboard. Open your document with test items in one
window and your FastTEST 2 bank in another, and use the copy and paste functions in
each window to transfer your items into your FastTEST 2 banks.
Importing Single Items as RTF Files
If you have a small number of items in a word processor file, you can save each item as
an RTF file and then import each item’s RTF file directly into an open FastTEST item by
using the following button on the Item Editor toolbar.
Importing Multiple Items From a Word Processor or Text File
If you have a large number of items in one or more word processor or text files, it would
be quickest to use FastTEST’s Item Text Import Utility. The Item Text Import Utility
will import RTF files (saved from a word processor) and ASCII (text) files into
FastTEST 2 item banks. Item text (and optionally other data) is entered by the import
program into the appropriate location in your item banks. If the bank structure already
exists, items will be placed in the appropriate locations in the structure. If the bank
structure, or elements of it, does not exist, the import program will create the item bank
structure required.
The Item Text Import Utility is accessed from the Utilities menu
or from the Utilities section of the Navigation Panel. To import
your items, the import utility must know where each item begins
and ends, and where the next item begins. It also lets you specify
where you want each item placed in your bank structure – both
the name of the bank and each item’s location in the subcategories
of your bank. The import program also gives you the opportunity
to provide an item identifier for each item and to import all the
additional information on each item that is stored in the FastTEST
2 item bank. There is no limit to the number of items that can be
imported from a single import file.
- 21 Chapter 2. Item Banking
Detailed instructions for preparing your item text file for import are in Appendix A.
Creating and Editing Items
Creating a New Item With the Item Editor
You can add items to your bank at any level of the bank structure. Select the section of
the bank where you want your item to be. Then select “Items” from the Navigation Panel,
and then
or select
from the Item Banker toolbar, or New Item from the Items pulldown menu. This will
open the Item Editor, shown in Figure 2-7, which is an editable full-screen version of the
Item Preview Panel on FastTEST's Main Window.
Figure 2-7
The Item Editor Window for a New Item
- 22 Chapter 2. Item Banking
Similar to bank and category names, item identifiers can be a maximum of 15 characters;
item descriptions can be up to 80 characters. Keywords can be used to locate items using
the Search for Items option on the Items menu (and on the Navigation Panel). You can
search for items when you are working on your banks to locate specific items or subsets
of items, or you can search for items in the process of creating tests. See below for more
information about searching for items.
The toolbar in the Item Editor implements a number of functions. The buttons,
respectively, update the current item, create a new item and delete the currently open item
in the Item Editor. These functions can also be performed using the pulldown Items
menu in the Item Editor.
Two buttons help you navigate to other FastTEST functions. The
button displays the Item Banker window and the
button opens the Test Assembler window. These two functions can also be accessed
from the View menu. You can also toggle among the open windows by using CTRL + F6
on your keyboard.
As each item is saved, it appears in the Item List panel of the Item Banker window, as
shown in Figure 2-8.
Figure 2-8
The Item List for the Reliability\Calculations Section of the Intro Meas Bank
- 23 Chapter 2. Item Banking
When you select an item in the Item List, a complete preview of the item is available in
the Item Preview Panel immediately below the Item List (Figure 2-9). Using that panel
you can preview (but not edit) the item text and all other information on the selected item
(except its usage history in previous tests) by clicking on the tabs for the various
categories of information.
Figure 2-9
The Item Preview Panel for an Item With the Identifier Tab Active
You can browse through the items in the Item List by selecting their identifier or
description in the Item List with the mouse or by using the arrow keys on your keyboard.
You can also use the green arrows above the Item Preview Panel to move up and down
through the Item List.
If you have a test open, the green “+” can be used to add the selected item to the current
open test. If multiple items are selected (using ctrl/click or shift/click) they all will be
added to the test when the green “+” is selected. Items can also be added to your test
using the Add Selected Items(s) to Test option on the Items menu.
- 24 Chapter 2. Item Banking
The list of items in a bank shown above the Preview Panel in Figure 2-9 includes
columns for the Item Identifier, Item Description, Bank Path, and Date Created. An
additional field can be made visible by grabbing the last column separator on the right
with the mouse and moving it further right.
This column then displays a unique item identification number within the FastTEST
database than can be used to quickly locate and display an item using FastTEST’s
extensive search capabilities.
Moving and Copying Items
Items created in one section of a bank can easily be copied or moved to any other section
of the same bank, or to any section of any other bank in the same workspace. To move
an item, select the item with the mouse and hold down the left button. Then drag the item
to its new location in any bank that is active in the Banks Panel of the Main Screen. After
moving an item you might want to make sure that its Item Identifier is unique in the new
location in your bank, since an identifier you used in one part of the bank might already
exist in the new section of the bank into which the item has been moved. If the Item
Identifier is a duplicate, simply change it to a new identifier.
You can also make copies of items, either in the same section of a bank or in a different
section of the same or a different bank. One reason for making a copy of an item would
be to create a variation of the item by making some changes in it, without having to
retype the text and other information on the item.
To copy the complete item record (i.e., make a duplicate of the item text, statistics,
keywords, and other information), select the item(s) with the mouse in the item list in the
Item Banker window, and then right click on the item(s). A menu will appear with Copy
and Paste options. Select Copy. Then go to the section of the item bank in which you
want to create a copy. Click anywhere in the item list for that portion of the bank, then
right click and select Paste from the popup menu. Note that the Item Identifier of the new
item might duplicate that of an existing item in that part of the bank; if it does, it should
be changed so that it is unique within that portion of the bank.
- 25 Chapter 2. Item Banking
Deleting an Existing Item
An item can be deleted only if it does not appear in any tests. If you want to delete an
item and it appears in one or more tests, you will first have to either delete the test(s) or
delete that item from the tests in which it appears. A list of tests in which an item appears
can be seen on the Identifier tab in the Item Editor when the item is opened for editing.
Editing an Existing Item
After selecting an existing item in the Item List, you can open it for editing in any of four
ways:
1. Double-click on the item identifier in the Item List.
2. Select Edit/Item from the Items menu
3. Select
from the Navigation Panel
4. Click the
button in the toolbar of the Item Preview Panel.
Note that FastTEST has an option for “protecting” or “locking” tests and their items. The
purpose of this option to is ensure that a final version of a test cannot be changed,
including all of the items in the test. This protects the future integrity of the test and its
items. If an item is locked, the phrase “Item Protected” appears when the item is opened.
When a test is “protected,” all of the items in that test are also protected from further
substantive changes. That is, the text of the item cannot be changed, but changes can be
- 26 Chapter 2. Item Banking
made to character and paragraph formatting, and blank lines can be added and deleted
using the following two buttons on the toolbar of the Text Tab of the Item Editor:
To make a substantive change to a protected/locked item so that you can use a
modification of the protected item in a new test, use the “copy an item” procedure
described above to create a new item, and then make the changes to the new item. If you
do this, you might want to use a similar identifier to keep the item related to the original
item. For example, if your original item was item 002, you might want to name the new
item 002-1.
The Item Editor
The Item Editor allows you to enter item text and other information on your items. The
Item Editor has two menus and up to eight active buttons:
The Item menu includes options to open a New item, and to Update (save but leave
open), Close, or Delete the currently open item. The first three buttons on the toolbar
respectively perform the update, create a new item, and delete the current item functions.
The
button closes the Item Editor. If the item has been modified, you will be asked if
you would like to update the item before the window closes.
Two additional options on the Item menu allow you to print or save all the information on
the open item. These options are described in more detail below.
The View menu of the Item Editor allows you to navigate to the following FastTEST
windows if they are active: Item Banker, Test Assembler, Test Formatter, and Item
Search. The remaining four buttons on the Item Editor toolbar access these same
functions, respectively.
As shown in Figure 2-7 (and 2-9) the five tabs of the Item Editor are:
Item Identifier
The Identifier tab for each item is used to provide an item identifier for the item, a brief
description, and keywords relating to that particular item. The item identifier is typically
an item number (15 characters maximum), which is nested within the full bank path of
the item, to identify the item in the bank. However, alphanumeric strings can be used as
item identifiers in addition to numbers. Although duplicate item identifiers are allowed, it
is recommended that you keep item identifiers unique within a workspace. The
- 27 Chapter 2. Item Banking
description (80 characters maximum) can hold any information you desire to describe the
contents of the item. The keyword field can be used to specify specific topics that relate
to that particular item. The item identifier, description, and keyword fields can be
searched in the process of building tests.
As Figure 2-10 shows, when the Identifier tab is open for editing, it also includes a
complete list of the use of the item in existing tests. This includes Test Name, Test
Description, the date the test was created, whether the test is protected (i.e., locked from
further modification), the item number of the item in the test (Test Order), and the date
the item was added to the test.
Figure 2-10
The Identifier Tab of an Open Item
Item Text
The Text tab holds the text of your items. FastTEST's text editor is a standard Windows
word processing editor with the functions you need to create items with whatever format
you desire. When you create a test from your items, they will appear exactly as they are
entered, including all special characters, formatting, and graphics.
All of the buttons on the Item Editor’s toolbar control standard editing functions, and
each has an explanation attached to it that can be accessed by pointing at the button.
Many of the same functions are available through the pulldown menus.
- 28 Chapter 2. Item Banking
You can, of course, enter and format your text directly in FastTEST’s Item Editor You
can also import text from RTF files created by another application by selecting Import
from the File menu, opening the Insert menu and selecting File, or by selecting the
button. You can also copy and paste item text through the Windows clipboard.
To save the text of an item as an external RTF file, select
in the Text tab of the Item
Editor window, or select the File menu on the editing toolbar of the item Text tab,
followed by Save As. In either case, in the dialog box that appears select the folder for
your file and provide a name for it. The RTF file for that item then can be used in your
word processing software.
Three entries on the File menu of the Item Editor are used for printing the printed version
of the item that is currently open – Print, Print Preview, and Page Setup:
Note that these are used only for printing a single item. Chapter 4 describes how tests are
prepared for printing.
Setting a default set of font preferences
You can instruct FastTEST to use a particular set of font characteristics for all of your
items, and easily change those default values at any time. With any item open in the Item
Editor, select the Text tab. Select the item font characteristics that you want to use as the
defaults, either from the toolbar in the Text Editor
or from the font dialog box (which also allows you to change font color),
- 29 Chapter 2. Item Banking
which is accessed from the
button or by selecting Font on the Format menu
After you specify your font preferences, open the Format menu and select Set Current
Font as Default
Click the Use Default Font for New Items entry to place a check next to it. All new items
created will then start out using this default font configuration for the item text. It is
recommended that the same font and paragraph settings be used for all items that may
appear in a single test, otherwise reformatting will be required to get the printed test to
appear in a uniform font.
Checking spelling
The Item Editor includes a spelling checker and tools to create your own spell-check
dictionaries or to select one or more operational dictionaries. The spell checker can be
run from the
button in the Item Editor, or from the Tools pulldown menu.
See below for detailed information on using the spell checker.
- 30 Chapter 2. Item Banking
Adding Graphics to Your Items
Your test items can include graphic images (pictures) as well as text. FastTEST allows
you to insert JPEG Image Files (.JPG and .JPEG extensions), Bitmaps (.BMP), Icons (.ICO).
Enhanced Metafiles (.EMF) and Windows Metafiles (.WMF). Graphics in FastTEST are
in-line graphics, i.e., they function as paragraphs.
To insert a graphic, open the Insert menu and select Image, or select the Insert Picture
button
from the Item Editor toolbar. When you select your file, you will see a preview of the
graphic to help insure that you have selected the correct file:
You can see a larger version of your picture by selecting the
button in the upper right-hand corner of this window.
After you have inserted a picture into your item, right clicking on the picture gives you
the following options:
- 31 Chapter 2. Item Banking
To make a copy of the picture, select Copy. Then place the cursor where you want it, in
the same item or in another item, and press Ctrl and V simultaneously on the keyboard.
If you select Alignment, you will be given the choice of Centered or Baseline.
Selecting Edit Picture opens the following window:
Using the options on this window, you can resize your picture or select a new picture.
Inserting Special Characters
FastTEST’s Item Editor makes it easy to insert special characters into your items, using
any Windows fonts that are available on your computer. To insert special characters, first
place the cursor in your item at the location at which you want the special characters.
Then open the Insert menu and select Special Character... or select the
button. The following window will then open:
- 32 Chapter 2. Item Banking
To insert one or more special characters, first select the font from which you want to
select. In this example, the Symbol font has been selected in order to insert Greek
symbols. Second, select the character you want to insert. An enlarged view of the
selected character is shown to the right of the font selection box. If you have selected the
correct character, click the Add button at the top. This will add the selected character to
the string of special characters to be inserted into your item. That string appears to the
right of the Add button.
To insert a string of multiple special characters, continue selecting characters from the
selected font and adding them to the string until you have completed the string you want
to insert. In the example above, seven characters were selected. When you have
completed the string, select OK and string of characters will be inserted into your item at
the current cursor location. Once the characters are inserted into your item, they can be
formatted and edited like any other characters to meet your needs.
Information Tab
The Information tab (Figure 2-11) allows you to enter the item’s Author and Source.
Author is limited to 40 characters and Source is limited to 80 characters. The Date that
the item was originally created is supplied by FastTEST; its format depends on the date
format settings in Windows. All three of these fields are searchable either in the Item
Editor or the Test Assembler.
The Information tab also is where you specify the type of item response, whether the item
is to be scored, the number of answers to the item, the correct or keyed answers, and
whether the answer is alphabetic (A, B, C, …) or numeric (1, 2, 3, …). Multiple-choice,
multiple-response, and survey items can have up to 9 responses. A multiple-choice item
requires a single response and has only one correct answer; a multiple-response item can
- 33 Chapter 2. Item Banking
have more than one response and more than one can be correct. Survey items (e.g., a
Likert type of item), free response items, and instructional items do not have
correct/keyed responses.
Figure 2-11
The Item Information Tab of the Item Editor
For example, the item shown in Figure 2-11 is a multiple-correct response item with five
alternatives, and alphanumeric correct answers of “a” and “e”.
Statistics Tab
The Statistics tab is where you record item statistics on your item (Figure 2-12). There
are fields for
• Classical item difficulty (proportion correct) and item discrimination (item-total
point-biserial or biserial correlations)
• Item response theory (IRT) parameter estimates for the 1-, 2-, or 3-parameter
dichotomous IRT models.
• Two fields for other user-defined statistics.
All fields are searchable in ranges.
- 34 Chapter 2. Item Banking
When an IRT model is selected and parameter estimates are entered, the point of
maximum information for the item is calculated and displayed below the IRT Parameters
Panel. To display (or update) that information, click the calculator icon below the IRT
Parameters Panel (see Figure 2-12). This information is updated when the item is closed
if you save the changes made to the item, but it should be updated any time you change
the parameter estimates.
Figure 2-12
The Item Statistics Tab for an Open Item with IRT Parameter Estimates Entered
Also, when an IRT model is selected, the “View IRT Item Functions” button in the righthand panel is activated. Clicking this button results in graphic displays of the IRT item
information function (Figure 2-13) and the item response function Figure (2-14). If you
have just changed or entered IRT parameter estimates, be sure to update the calculations
to ensure that the graphs are correct. Once the “View IRT Item Functions” button is
- 35 Chapter 2. Item Banking
toggled, it will remain on as you move from item to item until the “Hide Graphics”
button in the graphics panel is clicked.
Figure 2-13
The Item Statistics Tab of an Open Item With the
Item Information Function Displayed
As Figures 2-13 and 2-14 show, both the item information and item response functions
can be printed or saved as files. In addition, the computed values for both functions can
be printed or saved as files. These values are computed at 121 values of θ, in .05
intervals from θ = -3.0 to θ = +3.0. The files for these two functions are space-delimited
text files that are easily imported into spreadsheets and other graphics software.
- 36 Chapter 2. Item Banking
Figure 2-14
The Item Statistics Tab of an Open Item with the
Item Response Function Displayed
Notes Tab
The Notes tab is a large open window in which you can keep any additional information
you want about an item. In the example in Figure 2-15, the Notes tab includes
information about when the item was last used (since, in this case, the test that used that
item was not assembled in FastTEST 2.). This item was a short-answer item, so a sample
answer is also stored in the Notes tab. Limited editing capability is provided (copy, cut,
paste, and undo) to facilitate use of the information stored in Notes. Font formatting
capability is also provided. The Notes tab is not searchable.
- 37 Chapter 2. Item Banking
Figure 2-15
The Notes Tab of an Open Item with Prior Usage Information and a Sample Answer
Quantile Plots Tab
The Quantile Plots tab is a large open
area like the Notes tab, but intended to
provide a place to store an item quantile
plot. The item quantile plot is arguably
the best way to depict the performance
of an item with classical statistics, and
is calculated by specialized classical
software like Lertap and Iteman 4.
Because it is based on classical
statistics, this tab does not become
visible until a classical statistic is
entered on the Statistics Tab.
The Quantile Plots tab allows you to
add notes or comments about the item
that you want to have associated with
the plot.
- 38 Chapter 2. Item Banking
Closing an Item
To close and item, click on the X box on the item toolbar. If
you have made any changes to the item or the information
associated with the item, you will be given the opportunity
to save those changes. You will then be returned to the item
list as shown in Figure 2-9.
Saving or Printing All the Information on an Item
You might want to obtain a complete printed record of all the
information available on an item for archival or other
purposes. FastTEST allows you to print or save as a file all
the information on all the tabs for an item in a concise
formatted document. To do this, open an item. Then, with the
Item Editor open, select the Item menu and then select either
of the last two options on that menu. The Print option sends
the report on that item directly to the printer. The Save Entire
Item to File option allows you to save the report as either an
RTF file or a text file. This file can then be opened in your
word processor, reformatted as desired, and saved and/or
printed for archival purposes.
Checking Spelling
FastTEST comes with several spell-checker dictionaries on the installation CD (in the
\Dictionaries folder), including American English, British English, Moby English (a
general purpose English dictionary, excluding proper names, acronyms, and compound
words and phrases, but including archaic words and spelling variations), Dutch, German,
Italian, French, Spanish, and Czech. Also provided are Legal and Medical dictionaries in
English. As additional specialized dictionaries become available they will be announced
on, and made available from, the FastTEST page of our Web site, www.assess.com. You
can also create your own dictionaries.
Selecting One or More Operational Dictionaries
You can have multiple dictionaries open – FastTEST will check words in all open
dictionaries. To open a dictionary, on the Text tab of any item open the Tools pulldown
menu and select Dictionaries. The following window will appear:
- 39 Chapter 2. Item Banking
Select the dictionaries you want to use on the left side and click Add. To remove a
dictionary, select it in the right-hand list and click Remove. The dictionaries that you
have listed in the right-hand list will remain active until you change them.
To install additional dictionaries, copy the dictionary files from the CD into the main
FastTEST installation directory. Those dictionaries will then be listed under Dictionaries
Available.
Running the Spell Checker
To check spelling in an item, with the Text tab active open the Tools pulldown menu and
select Spell Checker or select
from the toolbar. The following window will appear if there are any words in your item
that are not in the open dictionaries.
Use the buttons on the right side of this window to make your spelling selection for each
word that is not found in the dictionaries.
Creating Dictionaries for the Spell Checker
FastTEST includes a utility called MAKEDAWG.EXE that allows you to create your own
dictionaries. To create a dictionary, enter the words that you want in your dictionary into
a text file created with a text editor such as Notepad or Wordpad, one word per line (you
may also use a word processor such as Microsoft Word, but be sure to save the file as a
Text file). When you have completed your word list, submit the file to makedawg.exe
and save the new dictionary in your FastTEST main folder. It will then appear in the list
of dictionaries from which you can select when you configure the spell checker.
- 40 Chapter 2. Item Banking
User Dictionaries
When you add words to the dictionary while you are checking spelling, those words are
written into a text file named USERDCT.TXT, one line per word. This dictionary file is
automatically searched by FastTEST when you run the spell checker. If you later want to
delete a word from USERDCT.TXT, edit it with a text editor such as Notepad or Wordpad
and delete the entire line for each word that you want to delete.
If your user dictionary text file gets large, you can improve the performance of the spell
checker by creating your own dictionary following the instructions above and using
USERDCT.TXT as your input file. You then will need to select your new dictionary as an
active dictionary using the option on the Tools menus in the Item Editor (Text tab).
Searching for Items
FastTEST 2.0 has extensive item search capabilities. You can search for items that you
want to find for editing purposes, or if you have a test open you can search for items to be
added to a test.
The item search options are accessed from the pulldown Items menu
or from the Items options on the Navigation Panel .
Selecting this option results in the Item Search Window, shown in Figure 2-16.
Figure 2-16
- 41 Chapter 2. Item Banking
The Item Search Window
Item searches are described in more detail in Chapter 3.
Importing Item Statistics
Item statistics output from item analysis software can easily be imported into FastTEST
using the Item Statistics Import Wizard from a variety of file formats, including spacedelimited files, comma separated values (CSV) files, tab separated values files, and files
with semicolon separators,. Item statistics files with data that are in fixed-width columns
can also be easily imported.
Your item statistics file can include any combination of classical item statistics
(proportion correct and item-total biserial or point-biserial correlations), IRT item
parameter estimates (discrimination, difficulty, pseudo-guessing) and two user-defined
- 42 Chapter 2. Item Banking
statistics. All statistics to be imported for a given item must appear on a single line of the
data file from which they are to be imported, although they may be in any order.
In addition to the item statistics to be imported, each line must include the unique item
identifier (Unique ID) assigned by FastTEST to each item. The Unique ID is different
than the item path in the FastTEST item bank. The Unique ID is a sequential number of
from one to five or six digits (depending on the number of items in the bank) assigned to
each item by FastTEST. You can see the Unique ID for your items in the item list panel
of the Item Banker window or in the item list panel of the Test Assembler. The Unique
ID also is written to the .KEY files that can be created for a test as an option in the
Printed Test Options window. If your tests were analyzed by ITEMAN, a special utility
program will create the item statistics file to be imported into FastTEST.
In Figure 2-17, the last column displays the unique identifiers 30, 31, 38, and 65 for the
four items shown. If the column is not visible, hold down the mouse button to grab the
vertical separator following “date created” (you will see a double-sided arrow with a
double vertical bar) and pull it to the right to make the column of unique identifiers
visible. To prepare your item statistics for import, add this unique identifying number to
each line of the item statistics file in a separate column, or following the appropriate
separator.
Figure 2-17
Unique ID Numbers for Items in a Portion of the Bank
To begin the import process, open the Statistics menu and select
“Import Item Statistics.” A standard file dialog box will then
request the name of the file with your item statistics to be
imported. The Import Statistics Wizard that will guide you
through the process will then open.
Step 1: Specifying the Type of Statistics File to be Imported
The Wizard attempts to evaluate the structure of your file and selects the file type option
accordingly.
- 43 Chapter 2. Item Banking
Delimited Files
If the Wizard determines that the file is a delimited file, the Step 1 screen will look like
Figure 2-18.
Figure 2-18
Step 1 of the Item Import Wizard for Delimited Data Files
In Figure 2-18, the Wizard correctly determined that the file was a CSV file, with
commas separating the numerical entries. Such a file might have been exported from
statistical software, or a spreadsheet using an item analysis program such as Lertap. If
your file was not correctly identified by the Wizard, you can of course select the
appropriate file type.
Data in Columns
If the Wizard does not find any delimiters, it will suggest that the data are
(approximately) in columns and show a screen like Figure 2-19 [note that the data in this
- 44 Chapter 2. Item Banking
example could have been imported as a space-delimited file, but for purposes of the
example it has been treated as data that are (approximately) in columns]:
Figure 2-19
Step 1 of the Item Import Wizard for Files with Data in Columns
If your data do not begin at row 1, select the appropriate starting row. This allows you to
have information at the beginning of the data file that you might want to skip because it
may be field names, instructions, or other important information that is not to be
imported.
Step 2: Specify Columns
Delimited Data
In Step 2 for delimited data you simply confirm (or change) the separator/delimiter.
- 45 Chapter 2. Item Banking
Data in Columns
In Step 2 for data on columns, the Wizard displays data that are in columns with
separator lines. If your data are not perfectly aligned in columns, the first set of separators
displayed by the Wizard might not completely separate the data values, as shown in
Figure 2-20.
Figure 2-20
Step 2 of the Item Statistics Import Wizard for Data in Columns
You can delete any vertical separator line by double-clicking while pointing at (or just to
the right of) the line, and create a new line by pointing at the location you desire and
clicking the mouse, as shown in the Figure 2-21.
- 46 Chapter 2. Item Banking
Figure 2-21
Step 2 of the Item Statistics Import Wizard for Data in Columns
After the Column Separators are Reset
To be sure that all values are properly in columns, you should scroll through the data file
and check the placement of the lines.
Step 3: Assigning Identifiers to Your Data
Step 3 is the same for delimited data and for data in columns. In Step 3, you assign
names to the fields of your data file so FastTEST knows where in the item record for
each item to store the data for that item. You accomplish this by clicking on the button
above each column of data and selecting from the pull-down list that appears the
descriptor that is appropriate for each column of data in your import file.
In the example in Figure 2-22, the first column of the data file includes the unique
identifier for each item, so UniqueID is selected for that column.
- 47 Chapter 2. Item Banking
Figure 2-22
Assigning Field Names to Your Import Data in Step 3
of the Item Statistics Import Wizard
Repeat this process for the remainder of the fields in your data file. The only constraints
in this process are (1) there must be a unique ID for each import file and (2) each type of
field can be selected only once. If the file includes extraneous columns of information,
these columns can be skipped by leaving them identified as “<none>".
The result for this data file is Figure 2-23, in which each column of data has been
assigned a FastTEST item statistics identifier.
- 48 Chapter 2. Item Banking
Figure 2-23
Step 3 of the Item Statistics Import Wizard With Field Names Assigned
Figure 2-24 shows the results of Step 3 for the Data File with Item Statistics in Columns
- 49 Chapter 2. Item Banking
Figure 2-24
Results of Step 3 for the Data File with Item Statistics in Columns
Note that each column of the data file is now identified with the name of the statistic to
be imported. You should, again, scroll through the file to be sure that all data values are
correctly displayed.
Step 4: Options
Step 4 is also the same for both types of import files.
Step 4, shown in Figure 2-25, provides some options that affect the import process. The
first option informs the Wizard as to how you want to handle “upgrading” of IRT models
(which are separately maintained for each item by FastTEST). The second option allows
you to control the updating of item statistics for items that are “protected” (i.e., locked to
further changes in their item text, item statistics, and other fields). Select “do not change
values” if you want item statistics for these items to remain unchanged.
- 50 Chapter 2. Item Banking
Figure 2-25
Step 4 of the Item Statistics Import Wizard
Once you have completed these options and selected “finish” the import process will
proceed.
Import Results Report
When the import process is complete, you will have the option of viewing a report on the
importing of your item statistics. This report provides an item-by-item report based on
each line of your item statistics file. The report is written to a file that is named by
appending “ - Import results.txt” to the name of your item statistics file.
If the import for a given item was successfully completed, the report shows for each item
statistic the original value in the item bank and the new value. This information is
provided so that you have a record of the values that were replaced, in case an error was
made in your import file (e.g., an incorrect unique item ID). If the Import Wizard detects
any errors in the import file (for example, missing IDs, blank numerical fields, values that
are out of the allowed range for a given statistic) a message is provided in the report
describing the nature of the problem.
- 51 Chapter 2. Item Banking
A portion of a sample report is shown in Figure 2-26.
Figure 2-26
A Portion of a Sample Report from the Item Statistics Import Wizard
If, after importing an item statistics file, you would like to access a specific item in the
bank, use the Search for Items option in the Items section of the Navigation Panel, or
select Search for Items from the Items menu. Enter the unique ID of the item after
selecting the appropriate option and click on OK. The item will then be viewable in the
Search Results browser.
To edit the item in the Item Editor, double-click on the item identifier in the item list of
the Search Results window.
- 52 Chapter 2. Item Banking
If the statistics that you imported pertain to a test created in FastTEST, you can open the
test in the Test Assembler and view all the changes for the individual items in the test
browser, or view the test information and response functions and distributions of IRT
item parameters to see how the updated statistics have affected your test.
Importing Item Statistics from ITEMAN, RASCAL, and XCALIBRE
ITEMAN
Item statistics can be imported from Version 3.x of ITEMAN (and earlier versions) after
extracting the relevant data from the ITEMAN item statistics output file (a new version of
ITEMAN currently under development will simplify this process). ITEMAN optionally
creates a .PAR file with the item statistics for a test it analyzes. Because this file includes
a considerable amount of information in a format that would be difficult to use by the
FastTEST Item Statistics Import Wizard, a utility program is provided that extracts the
relevant data from the ITEMAN .PAR file and formats it for import into the FastTEST
item bank.
This program, ITEMSTAT.EXE is installed in your main FastTEST folder. Double-click
on ITEMSTAT.EXE and the window shown in Figure 2-27 will open:
Figure 2-27
The ITEMSTAT Window
- 53 Chapter 2. Item Banking
The input file for ITEMSTAT is the .PAR file output from ITEMAN. Because the
structure of the .PAR is different for dichotomous and multipoint items, you must
indicate which type of items were analyzed. The output file from ITEMSTAT is the file
with item statistics to be imported into FastTEST. Note that the number of rows/lines to
be skipped in Step 1 of the Import Wizard is specified in the file. Figure 2-28 shows a
portion of a sample output file from ITEMSTAT.
Figure 2-28
A Portion of a Sample Output File From ITEMSTAT
As indicated at the top of the file, the blank spaces on the left of each line must be filled
in with the Unique ID for each item so that FastTEST can properly import them.
If your test was originally created in FastTEST 2.0, you can optionally save the .KEY file
that includes the Unique ID for each item. When running ITEMSTAT to extract the item
statistics from the ITEMAN .PAR file, you have the option of selecting the FastTEST 2.0
.KEY file for a test analyzed by ITEMAN (the .KEY file can be created for a test in
- 54 Chapter 2. Item Banking
FastTEST as an option in the Printed Test Options window). When you use the
FastTEST option in ITEMSTAT, the resulting output file from ITEMSTAT includes the
Unique ID for each item. The output file from ITEMSTAT is ready for import into
FastTEST . Simply specify in Step 1 of the Import Wizard that the indicated number of
rows/lines are to be skipped (18, in this example). A portion of a sample output file from
this option in ITEMSTAT is shown in Figure 2-29.
Figure 2-29
A Portion of an Output File From ITEMSTAT When the FastTEST 2.0 Option is Used
RASCAL and XCALIBRE
RASCAL and XCALIBRE both have options to create an external statistics file. For
RASCAL, the external statistics file is a text file with the only the difficulty parameter
estimate for each item, one item per line. For XCALIBRE, the file is also a text file with
the IRT a, b, and (optionally) c parameters, also one item per line. To prepare these files
for import into FastTEST, simply add the Fastest Unique ID for each item to the file,
following its item parameters. If the test was created in FastTEST, open the FastTEST
- 55 Chapter 2. Item Banking
Key file and copy the column of Unique IDs, then paste them into the item parameter file
following the parameter estimates.
To copy a column in Microsoft Word, click at the upper left of the column to be copied (
leave a few blank spaces before the Unique ID to separate the columns) and hold down
the Alt key while dragging the cursor over the columns of data you want to copy. When
the highlight covers the entire set of columns, release the mouse button and either select
the copy button on the Word toolbar, or press Ctrl/C on the keyboard. To paste the
copied column into the item parameter file, press Ctrl/V. Then be sure to save the file as
a text file.
Moving a Bank from One Workspace to Another
If you decide that an item bank that you created should be in another workspace, use the
Bank Import/Export facility described in Chapter 1.
- 56 Chapter 2. Item Banking
Chapter 4: Assembling Tests
Selecting Items for a Test
Selecting Items by Browsing
You can assemble a test using any of the banks in an open workspace by selecting items
from any of the categories in those banks. First select a category of a bank in the Banks
Panel. Then select
from the Navigation Panel. Next, select
and, in the dialog box that appears provide a test name (50 characters maximum) and a
description for your test (maximum 80 characters).
Once you have named your test, you are ready to select the items. Click Items on the
Navigation Panel or click the Items pulldown menu, or select the View Item Banker icon
from the toolbar
to return to the Item Banker Window.
Select any item in the Item List Panel and examine its text and other information in the
Preview Panel. To add the item to the test, click the green "+" at the top of the Preview
Panel
A green check mark will appear in the item list and the item will be inserted into your
test. You can then continue navigating your banks and select additional items. When you
- 57 Chapter 3. Assembling Tests
are in a section of a bank, you can move through the items in order by using the green
arrows at the top of the Preview Panel in the Item Banker Window.
You can view the test list at any point by selecting Tests from the Navigation Panel,
selecting the Tests pulldown menu, selecting the View Test Assembler button
from the toolbar, or by pressing Ctrl + F6 on the keyboard until the Test Assembler
appears. When a test is opened, the numbered list of items is shown in the upper panel of
the Test Assembler Window.
The lower panel of the Test Assembler Window is the Item Preview Panel that again
allows you to view all the information on your items, including the text, in the context of
the test you have created. You move through the test by selecting items in the test list, or
by using the green arrows at the top of the Preview Panel. To delete an item from the
test, select the item in the top panel and click the red minus sign
at the top
- 58 Chapter 3. Assembling Tests
of the Preview Panel. Items and item information can be edited while you are in the Test
Assembler. Open an item by double-clicking its identifier or description.
You can also easily add to your test all the items in a selected category of the item bank.
After selecting the category, open the Items pulldown menu and select either Select All
or Select All Excluding Items in Test. The items will be selected as shown by the
highlight. Then click the green
sign at the top of the Item Preview Panel to add the
items to your test. If you Select All and one or more items is already in the test, a dialog
box will inform you of potential duplicate items and give you the opportunity to include
or exclude the duplicate items.
You can also select all the items in a given category of the item bank (or any subset of
contiguous items) by selecting the first item in the Item List, then selecting the last item
while holding down the Shift key. Similarly, you can select a non-contiguous subset of
items in the Item List by selecting the items with the mouse while holding down the Ctrl
key. In either case, after selecting the subset of items you want to include in the test,
click the green “+” sign to insert the items into the test.
Selecting Items Randomly
In addition to selecting items individually or in subsets, you can also randomly select
items for your test within any category. Open the Items pulldown menu and choose
Select Random Excluding Items in Test. You will be asked how many items you want to
randomly select, and the appropriate number will be randomly selected (if a sufficient
number of new items is available in the selected portion of the bank). You can, of course,
repeat random item selection in as many sections of the bank as you like to create a test
that has specified numbers of randomly selected items within a number of bank
categories.
The item search capability of FastTEST also provides a method for randomly selecting
items from larger subsets of one or more item banks, rather than just a single category.
This is a two-step process:
1. First, open the Items menu and select Search for Items, or select
“Search For Items…” from the Navigation Panel. The Item Search
window shown in Figure 3-1 will appear. Select “All Items Within
Selected Folders.” Then select from the left-hand Folders to Search
panel the portions of the bank from which you want to select items. In
Figure 3-1, both Reliability and Validity have been selected as the
portions of the bank from which to retrieve items. Note also that the
option at the bottom of the bank structure panel is checked, specifying
that the search should “Include Subfolders.” By using this option and
the “All Items Within Selected Folders” option, FastTEST will retrieve
all items in the Reliability and Validity portions of the bank, including
all items in all subfolders under those bank headings. In this case, the
result was a Search List of 62 items (Figure 3-2).
- 59 Chapter 3. Assembling Tests
Figure 3-1
FastTEST's Item Search Fields
2. Next, in the Search Results window that will open, open the Select menu and choose
Select Random (Figure 3-2). You can then specify the number of items to be selected
randomly from the list of items (62 in this example) that resulted from the search. To
add those items to the test, once the random process has highlighted the selected
items, click the green “+”. If an item is already in the test, FastTEST will inform you
and give you the opportunity to skip including that item in your test.
- 60 Chapter 3. Assembling Tests
Figure 3-2
The Search Results Window
Selecting Items by Searching
You can also select items for your test by having FastTEST search your item banks for
items meeting criteria that you specify. You can access the search criteria screen by
selecting Search for Items... from the Items menu or
from the Navigation Panel Items options.. Figures 3-1 and 3-3 shows the fields on which
FastTEST can search your banks.
- 61 Chapter 3. Assembling Tests
Selecting the portion of the bank to search
The Folders to Search panel on the left-hand side of the search screen allows you to select
the range of the search. You can search an entire workspace (which might include
several unrelated banks) by checking the box at the top of the panel. If that box is
unchecked, you can limit the range of the search by selecting the portions of the bank you
want to search.
To select an entire bank, click on the top-level bank name and then check the box at the
bottom of the panel to “include subfolders”. You can similarly select whole sections of
the bank at any level by selecting the highest-level descriptor for that section and
checking the “include subfolders” box.
To select contiguous sections of a bank, click on the first section, then hold down the
Shift key while clicking on the last section you want to search. To select non-contiguous
sections of a bank (or of more than one bank) select one section, then hold down the Ctrl
key while you select other sections of the same or other banks.
Structuring your search
To structure your search, select the search variables you want to use and enter the search
values in the spaces provided. Your search will return all items that meet the combination
of criteria selected (a conjunctive search). For example, the criteria specified in Figure 33 will search the entire Intro Msmt bank and select all items with keywords of "essay”
that were authored by “djw” (the date will not be searched because it is not checked).
- 62 Chapter 3. Assembling Tests
Figure 3-3
An Example Search for Items
There are two kinds of “or” (disjunctive) searches. For the five search fields that allow
text input, as shown below
- 63 Chapter 3. Assembling Tests
you can search for items that have one term or another by separating the terms by the
word “or”. For example, the search above will find all items that have either “essay” or
“compare” entered in their Keywords field.
To do an "or"-type (disjunctive) search that uses two or more separate fields on the search
window, do successive searches with single search criteria. To select items that either
have keywords of "essay" or were authored by “djw,” do separate searches for "essay,"
followed by an additional search for “djw.” To add new items to the results of a previous
search, select Additional Search from the Search menu in the Search Results window.
The result of your search will be a list of items that meet your criteria in a format similar
to the Item List Panel of the Item Banker, with a preview panel (Figure 3-4), including
the number of items that met your search criteria. If you have a test open, you can then
browse the item list and insert items into your test using the green “+”. To insert multiple
noncontiguous items in your test, hold down ‘Ctrl’ as you select the items in the search
list, then insert them all with the green “+”. To select multiple contiguous items, select
the first item, then hold down the shift key as you select the last item.
- 64 Chapter 3. Assembling Tests
Figure 3-4
Results of the Search Specified in Figure 3-3
To add items to your test, highlight them in the test list (either singly or in subsets), or
choose Select All from the Select menu, then click the green plus sign.
Randomly selecting items from the search results
After doing a search of the item bank to select items that meet specified criteria, you
might want to randomly select a subset of these items to include in your test. To do this,
open the Select menu in the window that provides the results of the item search (labeled
"FastTest Search Results”) and select "Select Random." You will then see the dialog box
in Figure 3-5, which will request the number of items you want to randomly select from
the list. You can select up to the number of items minus 1.
- 65 Chapter 3. Assembling Tests
Figure 3-5
The Random Select Dialog Box
The selected items will then be highlighted in the item list (Figure 3-6). If an item that is
selected randomly is already in the test, you will receive a warning message with
appropriate options. To add the randomly selected items to an open test, click the green
plus sign below the item list.
Figure 3-6
Results of Randomly Selecting Items from a List of Items Identified in a Search
- 66 Chapter 3. Assembling Tests
Assembling Tests Using IRT Criteria
If your items have IRT parameter estimates, you can use the search capabilities of
FastTEST to assemble a test with a desired test information function (TIF). The TIF
shows the precision/information for a test as a function of the IRT θ (trait) variable. Test
information is the sum, conditional on θ, of the item information functions for all items in
the test.
Suppose you wanted to create a test that was to be used to make a dichotomous
classification of examinees. Such a test might be used to measure mastery in an
educational environment, or to select applicants in a personnel selection environment. In
IRT terms, such a test should have its highest information at the mastery/selection point
on the θ continuum.
The item search capabilities of FastTEST allow you to easily identify those items. Using
the item search window (Figure 3-3), first select the portion(s) of the item bank from
which you want to select items. Then specify a narrow range of θ around your θ
mastery/selection value. For example, suppose you wanted to specify θ = 1.5 as your
mastery/selection value. You might specify your first search range as
This search will extract from the selected portions of the item bank all items that have
their maximum information between θ = 1.25 and θ = 1.75. To review the resulting test
information function, and the associated test standard error functions and response
functions, select IRT Information from the Statistics pulldown menu
or select the View IRT Functions button
from the Test Assembler toolbar.
Figure 3-7 shows the window that results. FastTEST provides the test information
function, the test standard error of measurement function, and the test response function
as both expected number correct and expected proportion correct. For each of these four
- 67 Chapter 3. Assembling Tests
functions, you can save the graphic as a file or print it. You can also save the numerical
values from which the graphic is plotted as a file or print them. These values are
computed at 121 levels of θ from –3.0 to +3.0 in intervals of .05. The files are in a form
that can easily be imported into other software for further analysis or plotting.
Figure 3-7
Test Information Function for 9 Items With Their Maximum Value
of Information Between θ of 1.25 and 1.75
This search identified 10 items that had their maximum information between θ of 1.25
and 1.75. You might want to restrict your item search to only items that provide a
minimum amount of information within a specified range of θ, to see if there is a smaller
number of items that provides almost the same information function. This would be
equivalent to selecting items that have a difficulty in the specified range of θ and that
have high discriminations (a). Table 3-1 shows the maximum information values
associated with the given values of the IRT discrimination parameter (these values are
lower for the given levels of a if the c parameter is greater than 0.0).
- 68 Chapter 3. Assembling Tests
Table 3-1
Values of Maximum Information for
Various Values of the a Parameter
(Assuming c = 0.0)
Maximum
a Parameter
Information
3.0
6.503
2.5
4.516
2.0
2.890
1.5
1.626
1.0
.723
.5
.130
The following search would, in effect, select items with their difficulties in a range of
±.25 θ units around θ = 1.50 and discriminations above about 1.5,
thus selecting the subset of items that provide maximum information in the specified
range of θ. Figure 3-8 shows the resulting test information for the six items that met
these criteria. Note that only a small amount of information was lost by reducing the test
length from nine to six items, since items with low discrimination/information were not
included in the second test.
- 69 Chapter 3. Assembling Tests
Figure 3-8
Test Information Function for 6 Items With Maximum Information of
1.62 or Higher in the θ Interval From 1.25 to 1.75
You can build a test to approximate any given information function you desire, assuming
that you have a sufficient number of items with appropriate parameter values in your
bank, by doing successive searches of this type from your item bank. To add new items
to the results of a previous search, select Additional Search from the Search menu in the
Search Results window.
- 70 Chapter 3. Assembling Tests
You can then add the new items from the search to the currently open test by selecting
them using either the mouse or the entries on the Select menu, then clicking the green +.
A green check mark will appear next to each item to indicate that it has been added to the
test. As you add new items to the test (or delete them) the IRT functions and associated
files are automatically updated (as are the test statistics; see below).
Inserting Instructions into Your Tests
FastTEST makes it easy to insert pages or paragraphs of instructions into your tests.
First, create your instructions as “items” in a separate section of your item bank (to make
it easy to access them). When you create instructions, on the Information tab for each
instruction screen, designate the “Item Response” as “Instructional.”
This designation informs FastTEST that this “item” is not a test question that is to be
numbered and scored. Therefore, when the test is formatted, instructions will not be
numbered as test questions.
Instructions can be entered into the test like any other “item” and moved to whatever
location in the test you desire. You can also have as many instructional items in your
tests as you like. If you want to start a new page before an instructional “item” simply
- 71 Chapter 3. Assembling Tests
insert a page break at the appropriate location when viewing your test in the Test
Formatter.
This approach can also be applied to test items that consist of a passage of information,
followed by a number of questions about that passage, such as reading comprehension
items. For this type of item, create a separate item for the passage and separate items for
each question to be asked about the passage. It would, of course, be appropriate to store
all of these items in a subsection of a bank so they can all be selected at once for
inclusion in the test. Then designate the passage as an “instructional” item so that it will
not be numbered or scored. When your test is printed, the passage will have no number
but will be followed by a set of numbered questions that continue the numbering from
previous questions in your test.
Examining the Statistical Characteristics of Your Test
Graphic and Tabular Summaries of Item Statistics
In addition to displaying the IRT functions for your tests, FastTEST will also provide you
with distributional statistics on the items in a test as you assemble it. In this way, you can
monitor the statistical characteristics of your test items as you add (and delete) items from
your test, until you are satisfied that it has the statistical characteristics that you desire.
You can view item statistics for IRT item parameters, classical/conventional item
statistics, and the two fields of user statistics that you can use for any statistical data that
you desire (User 1 and User 2). All statistics and displays are automatically updated as
you add or delete items from your test.
Before you view the item statistics for a test, you will probably want to set the frequency
intervals for the graphic and tabular distribution displays. Open the Statistics menu while
in the Test Assembler Window, and choose Select Frequency Intervals….
The following window will be displayed:
- 72 Chapter 3. Assembling Tests
The intervals for each variable can be in the ranges shown,
Once you close this window with your frequency preferences entered, they will be used
for all item statistics summaries you display until you change them to new values. If you
change these interval values while a statistics display is open, the display will be
automatically updated.
To view statistical data on the items in your test at any point in the process of assembling
your test, use the following buttons on the Test Assembler toolbar
or their corresponding entries on the Statistics menu.
The first button, discussed above, displays IRT test functions. The second (green) button
displays conventional/classical item statistics. These include both graphic and tabular
frequency distributions and descriptive statistics for both item difficulty and item
discrimination. All displays can be saved as files or printed.
Figure 3-9 shows the tabbed window that displays the conventional item statistics
summary. Note that at the bottom of the frequency graphic, FastTEST displays summary
statistics for the items in your test. The same information displayed in the graphic is also
available in tabular form by selecting the “Table” tab for the appropriate statistic.
- 73 Chapter 3. Assembling Tests
Figure 3-9
Graphic Display of Conventional Item Difficulties for a Test
The third (red) button displays distributions and descriptive statistics for IRT item
parameters. These include both graphic and tabular frequency distributions and
descriptive statistics for the a, b, and c parameters. Finally, the fourth (purple) button
displays statistical data for the entries in FastTEST’s User 1 and User 2 fields.
- 74 Chapter 3. Assembling Tests
Viewing Item Statistics for All the Items in Your Test
In addition to viewing distributions and summary statistics for classical, IRT, or User
data, you can also list all statistical data for all the items on your tests. The List Item
Statistics option on the statistics menu
provides an item-by-item listing of all of the item statistics for all the items in your test,
as shown in Figure 3-10. This listing can be printed or saved as a file. When saved as a
file, its space-delimited format is designed to be easily imported into other statistical
software for additional analyses (after deleting the header information). Only the itemspecific part of the item identifier is displayed in this file, since the complete path of an
item identifier can be quite long (up to 240 characters). The complete item identifier path
is displayed in the test item list in the Test Assembler window, and is also available in the
Test Item List (see “Obtaining a List of Items In a Test” below). The complete path of
the items in a test optionally can be provided on the Test Scoring Key.
- 75 Chapter 3. Assembling Tests
Figure 3-10
FastTEST’s Listing of the Item Statistics for The Items in a Test
On occasion you might want to obtain a listing of all of the items in a bank or given
portions of a bank, along with all their statistical data. This can easily be accomplished
by creating a new “test” that includes all the items in the relevant portion(s) of the bank,
using the options on FastTEST’s Item Search window, then using the List Item Statistics
option to obtain the information that you want. Once you have created a “test” with the
appropriate portions of an item bank, if you have IRT item parameters for that “test” you
can also then examine the information and response functions for those portions of a
bank.
- 76 Chapter 3. Assembling Tests
Reordering the Items in Your Test and Creating Alternate Forms
There are two ways to reorder the items in your test – randomly and manually. Either
method can be used to make scrambled alternate forms of a test. When assembling a test,
the items that you add and delete are automatically saved in the database as you add or
delete them. When scrambling or reordering test items, however, you must manually
update the test. After you have the items in the order you want them for one form of the
test, save that test under another name of your choice (e.g., My Test, Form B). To do
this, from the Tests menu, select “Save Test As….” Then reorder the items by either
method and update the test. Repeat this process as many times as you like for any test to
create any number of scrambled alternate forms. You can then later open these tests,
format and print them, and optionally save them as RTF files (see Chapter 4).
To randomly scramble the item order for a test, from the Tests menu select “Scramble
Test Items.” This will result in a randomly scrambled reordering of your test items.
To manually reorder your test items, select an item in the upper panel of the Test
Assembler window and hold down the left mouse button. Drag the item to another
location in the test list and point the arrow at the item that you want to follow the item
that you are moving (that item will be highlighted in blue). When you release the mouse
button, the moved item will appear above the item that you pointed at when you released
the mouse button.
If you have a long test, you can expand the item list part of the Test Assembler window
by grabbing the separator bar at the bottom of that window with the left mouse button,
and dragging it downward to display more items. If you need to move an item to the top
or bottom of the list, or above or below the visible portion of the list, grab the item with
the mouse and pull the cursor above the top of the list or below the bottom. The list will
scroll, and you can stop the scroll by moving the cursor back onto the list. Then point at
the location in the list to which you want to move the item. To move an item to the top of
the list, scroll to the top and then place the point of the cursor arrow just above the top
item and release the mouse button. To move an item to the bottom of the list, scroll the
list to the bottom and release the cursor when the point of the pointer is just below the last
item.
Deleting Items from Your Test
As you assemble and refine your test, you might decide to delete an item from your test.
To delete an item from a test while in the Test Assembler, select the item in the test list,
and then click on the red minus sign below the test list. To be sure that you wanted to
delete that item, you will be asked to confirm the deletion. You can also delete an item
by selecting the item in the test list then selecting Delete Item From Test on the Tests
menu.
- 77 Chapter 3. Assembling Tests
Protecting/Locking a Test
When you have the final version of a test, including all of the items that you want in the
test in the order that you want them and are ready to print the final test, you might want to
protect or lock the test so that it can no longer be modified. Protecting/locking a test
makes it impossible to further modify the items in the test and their order. When a test is
locked, all items in the test are also locked and can no longer be changed. This includes
all item information as well as the item text. The only way to modify a locked item is to
make a copy of it and then edit the copy. If you do this, you would want to change the
identifier of the item, but identify the copy as related to the original item For example, if
your locked item identifier is Item 1, the copy you make might be named Item 1, rev. 1.
A test, and its constituent items can be locked by selecting Protect Test… from the Tests
menu or by selecting
from the Test Assembler toolbar. You will asked to confirm your request, since locking
or protecting a test and its items is irreversible.
If you unintentionally protect a test and want to undo that action, you can delete the test
and once again all the items that were in it will become editable. If you still want the test,
but do not want it to be protected, first use the Save Test As option to save the test under
a different test name (the copy will not be protected), then delete the protected test.
Obtaining a List of the Items in a Test
You can obtain a list of the items in your test either as a file or printed by selecting from
the Tests menu,
- 78 Chapter 3. Assembling Tests
The test list includes test and bank identification and, for each item, the item number in
the test, the item identifier, the item description you entered for each item, the date the
item was added to the test, its full path in the item bank, and its unique item number in
the bank.
Obtaining a Listing of Information in the Item Bank
Fields for the Items in a Test
You can obtain a list of the information in selected (or all) fields for the items in any open
test. This list can be saved as a file or printed. To obtain this list, select “Print/Save
Selected Fields” from the Test menu:
The following field selection window will then open, allowing you to easily select all the
fields for the items in your test, or any subset that you desire. Note that in most cases you
will likely want to include at least the Item Identifier field to identify your item, and
possibly the Bank Path and Workspace fields as well.
- 79 Chapter 3. Assembling Tests
After you select OK in this window, a report like the following will open in a new
window:
- 80 Chapter 3. Assembling Tests
This report is in RTF format, with each item separated by a line of asterisks. Use the Print
or Save options on the File menu to save and/or print the report.
You can use this report to obtain a listing of information in the item fields for portions of
your item bank, by creating a temporary test with those items, obtaining this report for
the fields that you desire, then deleting the test. To easily create a test with whole
sections of your item bank, (1) use the Search for Items option under Items on the
Navigation Panel, (2) in the search window select the portions of the bank that you want
in your report, and (3) check All Items Within Selected Folders.
Copying Tests to a Different Workspace
If you create a test in one workspace and want to move it to
another, use the Export/Import options on the Workspace menu
or
from the Workspaces section of the Navigation Panel.
First select Export and the test you want to export. Then save the exported file in a folder
you select. Next, open the new workspace into which you want to import that test and
select Import from the Workspace menu. Select the name of the exported test file, and
the import process will then complete. After you complete the export/import process, you
will likely want to return to the original workspace in which the test existed and delete it
so that you do not have the same test in two different places.
- 81 Chapter 3. Assembling Tests
Chapter 5: Preparing Tests
for Printing
Once you have finished selecting items for your test, you will want to prepare it for
printing. To do this, select Format Printed Test from the Tests menu.
or select the Format Printed Test button from the Test Assembler toolbar
This will open the Test Formatter window that has your test almost ready to print. All
items will be numbered in the order in which you inserted them in the test. Each item
will appear with the font and margins that it had in the item bank. The font and margins,
and other formatting aspects of your test, can be changed in the test formatting process.
These functions are accessed from the Test Formatter menus and/or toolbar
- 82 Chapter 4. Printing Tests
Adding Headers and Footers and Other Formatting
To further prepare your test for printing, you might want to add headers and footers,
space between items, or page breaks. You can access these functions by selecting the
Printed Test Options button from the Test Formatter toolbar,
or by opening the Edit menu in the Test Formatter and selecting Printed Test Options
Printed Test Options can also be accessed by selecting Printed Test Options from the
Tests menu in the Test Assembler:
Selecting Printed Test Options will open the window in Figure 4-1
- 83 Chapter 4. Printing Tests
Figure 4-1
The Printed Test Options Windows
The settings in this window are universal and will affect all printed tests until you change
them. This window allows you to select the entries you want to have in your headers and
footers (TESTNAME, TESTDATE, etc.), and to place whatever text you want to use
between (or in place of these entries). The buttons below the initially blank header and
footer boxes insert the indicated variable entries in the header/footer at the current cursor
position. The variable entries will be replaced with the appropriate information when the
printed test is formatted. You can add blank spaces and/or text between (or in place of)
these entries.
In the example in Figure 4-1, the <TESTNAME> button was selected for the header,
“Midsemester Exam” was entered, and the <Date> button was selected, with appropriate
spacing added between these entries. Then the entire header was designated to be
centered on the page by selecting “Center” for the header in the Alignment options. The
- 84 Chapter 4. Printing Tests
footer resulting from the options in Figure 4-1 will also be centered, and will include the
page number and total number of pages on each page of the printed test. You can specify
the font of the headers and footers by selecting the Choose Font buttons.
In addition, the options selected in this window will place three blank lines between each
item and will output a key file for use with future versions of our Item and Test Analysis
Package. The key file will contain the full path defining each item’s location in the bank,
the scoring key for each item, and the unique item identifier that is assigned to each item
by FastTEST (this unique identifier is an identifier for each item that is maintained by the
system – it allows you to move items within or between banks and change their
identifiers, yet still have a means of uniquely identifying each item). By selecting the
Keyfile Directory button, you can save these keyfiles wherever you like. If you do not
make a selection, they will be saved in the Keys folder in your FastTEST folder.
The answer key printed at the end of the test can be used for scoring the printed test. In
this example, it will contain the full path defining each item’s location in the bank
because it is checked, but not the unique item identifier that is assigned to each item by
FastTEST because it is unchecked. The option of whether you want an answer key can
be changed individually for each test by the Edit Test Properties option under the Tests
menu.
You can preview your test and the headers and footers by selecting Preview from the
Tests menu, or by selecting the
Button in either the Test Assembler or the Test Formatter. All selections you make in the
Printed Test Options window will remain set as you specified them until you change
them.
Refining the Appearance of Your Test
The following buttons on the Test Formatter toolbar allow you to further format your test:
The first button inserts a page break at the current cursor location; the second button
removes a page break (if there is one) in the current cursor location. The third button
inserts a blank line at the cursor location, and the fourth button deletes a blank line.
You can also change the font for all or part of your test and/or change the paragraph
formatting, using the following buttons:
- 85 Chapter 4. Printing Tests
The first button changes the font. It is activated by selecting some or all of the items in
your test. When selected, this button opens a standard font dialog box allowing you to
select font style, size, color, and other font characteristics. The second button allows you
to format one or more paragraphs.
Previewing Your Test and Changing Page Layout
To preview your printed test, in the Test Formatter select the Preview button from the
toolbar
You will then be able to page through the preview of your printed test, showing all the
items complete with headers, footers, and page numbers
You can further refine the printed format of your test by selecting the Page Setup button
from the Test Formatter toolbar
or Page Setup from the File menu. The resulting window (Figure 4-2) will allow you to
set overall margins, paper size, and print orientation (portrait or landscape). It will also let
you select your printer and printer options.
- 86 Chapter 4. Printing Tests
Figure 4-2
The Page Setup Window
When you have completed all the editing that you want to do on your test, you can then
print your test by selecting File/Print or the printer button on the toolbar
while your test is viewable in the Test Formatter.
Saving Your Test as a File
When you finish formatting your test for printing and subsequently print it, it will be
printed exactly as you have formatted it. FastTEST automatically saves your test in its
database so that you can recreate it at a later date, but it does not save any final
formatting that you might have done in the Test Formatter. Although FastTEST provides
you with extensive control over the printed format of your test, there might be situations
in which you might want to save your test as an RTF file for further formatting in your
word processor or for other purposes. To save your test as an RTF file, select
- 87 Chapter 4. Printing Tests
from the File menu in the Test Formatter window. You will also be offered the
opportunity to save your test as an external file if you select Reformat Test from this
menu or select the Format Printed Test button
in either the Test Formatter or the Test Assembler.
If you do not save your test to an external file, the formatting changes that you made in
the Test Formatter will be lost and the formatted test will be refreshed with the items as
they are in the database. It is, therefore, a good idea to be consistent with the fonts and
paragraph settings in an item bank so that a limited amount of changes will need to be
made in the Test Formatter to create a printed test with a consistent appearance.
It is not necessary for you to save the test as an external file unless you want to further
format it in your word processor or keep it in electronic form for other purposes. If you
then further format the test in your word processor, note that it is not a good idea to
change the text of the items since the items in your test will then be different items than
the items in your bank.
Protecting/Locking a Test
FastTEST provides an option for you to protect or lock (or finalize) a test. This option is
accessed from the Protect Test button on the Test Assembler toolbar
or from the Tests menu.
When you protect/lock a test, all the items in the test are protected/locked so that they
cannot be changed. The test is also protected/locked and cannot be further edited in
FastTEST. This allows you to have a permanent record of exactly what comprised your
test in case you need to refer back to it at a later time. It also creates a subset of items
that cannot be changed after they have been administered in the test.
- 88 Chapter 4. Printing Tests
Although items cannot be edited when they are
protected/locked, they can be copied in case you want
to modify any of the items that had been used in a
protected test for possible use in another test. To copy
an item, right click on the item identifier in the Item
List panel of the Item Banker and select Copy, then
place the cursor in the Item List of the section of the
bank in which you want the copy (this can be the same
section of the bank or a different section); then right
click and select Paste.
The copy of a protected item can then be freely modified.
Note that the copy will initially have the same identifier
as the original item, so it would be appropriate to change
that identifier to indicate that it was a variation of the
protected item. You could add a .1, .2 or –1 –2, etc. to
each modified item to relate it to the original item but
indicate that it is a modification. For example, a
protected item with an identifier of Item 1could have its
duplicate renamed to Item 1-1. Note that the modified
item will have a different unique internal item number
from the original, which can later be used to differentiate
them if the identifier is not changed. The internal item
number can optionally be output on the test answer key. It
can also be viewed by holding down the left mouse
button and grabbing the last divider on the right in the
Item List header, then dragging it to the right.
Navigating to Other FastTEST Windows
The remaining buttons on the Test Formatter toolbar
allow you to navigate to the active Item Banker, Test Assembler, Item Editor, and Item
Search windows. You can also use Ctrl + F6 on the keyboard to quickly switch to the
other open windows.
- 89 Chapter 4. Printing Tests
Chapter 6: Utilities
FastTEST has utility functions for compacting databases, moving item banks from one
workspace to another, moving tests from one workspace to another, and importing item
banks and tests from earlier versions of FastTEST.
Compacting Databases
When you delete an item from a FastTEST item or test bank, the item record and all its
information still resides in the database, but it is inactivated so it cannot be accessed.
After deleting a number of items, you might want to reduce the size of your item banks
by compacting them. To compact the banks in your database, from the Navigation Panel
select Utilities, then Compact Database
or Compact Database from the Utilities pulldown menu in the Item Banker. The
compacting utility will compact the database for the currently open workspace, and will
create a backup in the same folder, with the same name and the extension .bak.
Importing FastTEST Item Banks from Earlier Versions of
FastTEST
If you have created item banks in earlier versions of FastTEST, they
are easily imported into FastTEST. First, open the FastTEST
workspace into which you want to import the item bank from the
earlier version of FastTEST. Next, open the pulldown Utilities menu
and select Import Old FastTEST Item Bank, or select “Import FT1
Bank” from the Navigation Panel. Then go the main folder of the
earlier version of FastTEST and select the .bnk file you want to
import. Note that when the import process is complete, the bank
categories might be in a different order in FastTEST 2.0 than in the
earlier version of FastTEST. This is because FastTEST 2.0
alphabetizes bank categories and subcategories, whereas in the earlier
version categories remained in the order in which they were created.
- 90 Chapter 4. Utilities
Importing FastTEST Tests from Earlier Versions of FastTEST
If you have created tests in earlier versions of FastTEST,
they are easily imported into FastTEST 2.0. First, open the
FastTEST 2.0 workspace into which you want to import the
test from the earlier version of FastTEST. Next open the
pulldown Utilities menu and select Import Old FastTEST
Tests, or select “Import FT1 Tests” from the Navigation
Panel. Then go the main folder of the earlier version of
FastTEST and select the .ts* file you want to import. All
FastTEST Version 1 tests of the same name (e.g., Test.ts1,
Test.ts2, Test.ts3, …) that can be found will be imported
simultaneously. Because of the way FastTEST 1 stored the
items, the item banks for these tests will also be imported at
this same time. After the test file has been imported and
you have made any changes you would like to make, create
a new printed test using the option on the Tests pulldown
menu or on the Test Formatter toolbar.
- 91 Chapter 4. Utilities
Appendix A:
Preparing Your File With
Item Text for Importing
The Item Text Import Program uses separator lines to tell it when each item begins and
ends, and to provide the information necessary to locate the item (and the optional item
information) in your item bank. To prepare your items for import, open your file of item
text in your word processor (or text editor, if it is a text file). Insert the required separator
lines (and optional item information lines) into your file at the start and end of each item,
then save your file. If you are using a word processor (e.g., Word or WordPerfect) save
the file as an .RTF file. If you are using a text editor (e.g., Notepad or Wordpad) save the
file as a .TXT file. Inserting the separator/information lines is easiest by repeatedly
pasting a set of basic separator/information lines at the beginning of each item, then
editing those lines accordingly for each item. All text input on the separator/information
lines is case insensitive (i.e., it can be lower case or upper case, or mixed).
Items imported from RTF files will be imported with the same font configuration they
had in the RTF file. If you want to change the font configuration for all the items in your
RTF file, format the item text the way you want it to appear in the item bank before you
save the file as an RTF file. When you import a TXT file, you will be given the
opportunity to use the default font configuration you have previously selected for your
item banks, or you can specify other font characteristics for your items before the import
process begins, using a standard font dialog window.
The item text import program has the following additional characteristics:
•
•
•
•
Blank lines in the file are ignored, unless they appear in the Item Text or
Notes fields. Then they are imported as blank lines.
Once the appropriate coding is added to a Word (or other word processor) file,
you must save it as an RTF file to be imported.
Text files require no further modification other than insertion of the
appropriate separator and optional information lines.
You can import items into multiple item banks from the same file, as long as
the item banks are in the same workspace.
You should make a backup copy of your FastTEST workspace before running the item
text import program.
- 92 Appendix A. Importing Items
Required Separators
Each item must begin with a minimum of two separator lines and end with a single
separator line. Additional information lines can be used as desired by the user to import
additional information on each item.
All separator and additional information lines must begin with @@ in the first column.
Note that there should be no space on either side of the = that follows the @@.
The Item Identifier Separator
This is the first required separator line. Its format is:
@@ID=
Without this separator , no items will be found when the file is processed. This
separator uses the following format:
@@ID=<Bank Path>:<Item Identifier>
i.e., the Bank Path followed by the Item Identifier, separated by a colon (":").
•
•
•
This can be a full path, including the item identifier, or just a bank name, or
just @@ID=.
o If @@ID= is used with no information following it (i.e., the bank path or
even a bank name is not included), then all items using only @@ID= will
be placed in a Bank named "Imported".
e.g., @@ID=
o If the @@ID= line includes just a bank name, the items will be placed in
the main section of the bank and their item identifiers will all be <none>.
e.g., @@ID=MyBank
o In either of these situations, you can then later change these item
identifiers, and can drag and drop items into the full bank structure once
you create it.
If you provide an item identifier (as shown above), the item identifier follows
the bank path, separated by a colon (:).
e.g., @@ID=MyBank:Item 13
You can specify the specific location of an item in your bank structure on the
ID line, by specifying the complete path of the item in the hierarchical
structure.
o The Bank Path can consist of a series of bank name and sub-folder names
separated by the backslash character ("\"). In FastTEST 2.0 the bank name
is considered to be the folder before the first backslash.
o E.g., @@ID=MyBank\Category 1\subcategory 3:item 37
o FastTEST 2.0 limits bank, sub-folder, and item identifiers to 15 characters
in length. Bank and folder names longer than 15 characters will be
truncated to 15 characters without warning.
- 93 Appendix A. Importing Items
•
•
o The following characters are not allowed in bank and folder name: asterisk
("*"), percent ("%"), forward slash ("/") and vertical line ("|"). If used in
the bank path, the forward slash ("/") will be replaced with a backslash
("\").
o Leading spaces are also not allowed and will be removed.
o Ordinarily the colon (":") can be used in a bank or folder name. However,
because the @@ID= separator uses the colon to separate the Bank Path
from the Item Identifier, do not use the colon in the bank path because
anything beyond the colon will be considered to be the Item Identifier.
If the bank path that you provide already exists in the
workspace that you import to, that bank path will be used. Otherwise the bank
path will be created.
If the Item Identifier provided already exists in the workspace
it will not be overwritten, but a new item will be created with the same name.
The Begin and End Text Separators
The second required separator lines identify the text of each item. Because the Item Text
field will likely contain more than one line of text, two separators are needed. These
separator lines enclose the text of each item. The required format (beginning in column
1) is the Begin Text separator
@@BT
This marks the beginning of the item text.
and
@@ET
When the item text is complete use the End Text separator. Place the End Text
separator on a separate line following the item text.
Any blank lines between the Begin Text and End Text separators will be included
in the Item Text field. Do not place any separator or information lines used by this
import utility between @@BT and @@ET because any "@@" combination of
characters will result in any item text beyond this combination of characters to be
ignored. On the extremely rare occasions that you need to use two Commercial At
("@") characters together between the Begin Text and End Text separators, place a
space between them and make a note to yourself to use the FastTEST 2.0 Item
Editor to remove the space after the item has been imported.
- 94 Appendix A. Importing Items
Example 1:
@@ID=bank2
@@BT
Item text appears here – any number of lines
@@ET
This will create an item identified as <none> in the top level of Bank2, because
there is no : followed by an item identifier
Example 2:
@@ID=math\grade11\algebra\intro
@@BT
Item text appears here – any number of lines
@@ET
Because there is no : with an identifier following it, this will create item
<none> in the "intro-algebra-grade11" subsection of the Math item bank.
Example 3:
@@ID=bank1\level2\level33\level444:item1
@@BT
This is the text of Item 1. It can have as many lines as required, and can
include graphics in addition to item text. All blank spaces and formatting
will be imported as it appears in your import file.
@@ET
This will place the item text (between the @@BT and @@ET lines) as
Item 1 in the subcategory level2/level33/level444 of bank1. If the
complete bank structure you specify does not exist, it will be created by
the import program.
Additional items in the same file to be imported each begin with a new @@ID line. If
additional item information is imported for each item, each type of information is
identified by its own type of additional information line.
Default Value: Blank.
- 95 Appendix A. Importing Items
Additional (Optional) Lines of Information
Additional lines of information provide information to be stored in the other fields in
each item’s record in the item bank.
Additional @@ lines are optional, with each beginning on a new line. Spaces are not
allowed around = signs. Additional lines can appear in any order. They can precede or
follow a text block. All additional information lines are assumed to be associated with
the last @@ID= line that they follow.
Notes
Because the Notes field can contain more than one line of text, two separators are needed.
The Begin Notes separator is:
@@BN
This marks the beginning of the Notes text. Place this separator on a separate line. When
the Notes text is complete use the End Notes separator:
@@EN
Place the End Notes separator on a separate line following the notes text. Neither the
@@BN nor the @@EN separator lines have any further information on them.
Any blank lines between the Begin Notes and End Notes separator will be imported into
the Notes field.
Example:
@@BN
This is a difficult item. It requires the student to apply three different
operations in
a particular sequence, and then recognize the fact that the resulting answer
is a prime
number.
@@EN
Do not place any separator or information lines between @@BN and @@EN because
any "@@" combination of characters will result in any Notes text beyond this
combination of characters to be ignored. On the extremely rare occasions that you need to
use two Commercial At ("@") characters together between the Begin Notes and End
Notes separators, place a space between them and make a note to yourself to use the
FastTEST 2.0 Item Editor to remove the space after the item has been imported.
- 96 Appendix A. Importing Items
Default Value: Blank.
Author
The Author information line is:
@@AU=
Place the author text after the equal sign ("=") in the Author information line. The
Author field may contain up to 40 characters. Text past 40 characters will be
truncated to 40 characters.
Example:
@@AU=John Jones
Default Value: Blank.
Source
The Source information line is:
@@SO=
Place the source text after the equal sign ("=") in the Source information line. The
Source field can contain up to 80 characters. Text past 80 characters will be truncated
to 80 characters.
•
Example: @@SO = This question was taken from page 27 of the textbook, Intro to
algebra, Third Edition
Default Value: Blank.
Description
The Description information line is:
@@DE=
Place the description text after the equal sign ("=") in the Description information
line. The Description field can contain up to 80 characters. Text past 80 characters
will be truncated to 80 characters.
Example: @@DE = Intermediate algebra with prime number
Default Value: Blank.
Keywords
The Keywords information line is:
- 97 Appendix A. Importing Items
@@KW=
Place the keywords text after the equal sign ("=") in the Keywords information line.
The Keywords field can contain up to 80 characters. Text past 80 characters will be
truncated to 80 characters. You may separate keywords with either commas or spaces.
The keywords will be imported as they appear following the equals sign.
Example: @@KW=addition, subtraction, prime number, division
Default Value: Blank.
Date Created
The Date Created information line is:
@@DT=
Place the date you want entered into the Date Created field following the equals sign.
Use the date format as chosen under Regional Settings in the Windows Control Panel.
If the date used in the Date Created information line is invalid or cannot be
interpreted, the default value will be used.
Examples:
@@DT = 06/13/04 (U.S.format)
@@DT = 13/06/04 (European format)
Default Value: The date the file is imported..
Item Type
The Item Type information line is:
@@TY=
Place the two-letter item type following the equals sign. The following six two-letter
types are allowed:
MC : Multiple Choice
MR : Multiple Response
TF : True/False
FR : Free Response
IN : Instructional
SU : Survey
Example: @@TY=TF
If the Item Type information line is not provided, not one of the above, or otherwise
cannot be interpreted, the default value will be used.
- 98 Appendix A. Importing Items
Default Value: MC
Score Item
The Score Item information line is:
@@SC=
Place the following characters after the equals sign: "Y" or "y" for Yes, or "N" or "n"
for No.
Example: @@SC=Y
The Free Response and Instructional Item Types are not allow to be scored, so
providing any value other than "N" or "n" will cause it to be rejected.
If the Score Item information line is not provided, not one of the above, incorrectly
specified for that Item Type or otherwise invalid the default value will be used.
Default Value by Item Type:
MC: Y
MR: Y
TF: Y
FR: N
IN: N
SU: Y
Number of Answers
The Number of Answers information line is:
@@NA=
Place a single number character after the equals sign. The Free Response and
Instructional Item Types do not allow for any answers, so providing any value will
cause it to be rejected. The True/False Item Type allows for only 2 answers, any other
value will be rejected. Multiple Choice, Multiple Response and Survey Item Types
must be in the range of 2 to 9.
If the Number of Answers information line is not provided, not a single-digit number,
incorrectly specified for that Item Type or otherwise invalid, the default value will be
used.
Default Value by Item Type:
MC: 4
MR: 4
TF: 2
FR: 0
- 99 Appendix A. Importing Items
IN: 0
SU: 4
Keyed Answer
The Keyed/Correct Answer information line is:
@@KA=
Keyed answers are not allowable for the Free Response, Instructional and Survey
Item Types. A single value is allowed for the Multiple Choice and True/False Item
Types. The Multiple Response Item Type allows for multiple keyed answers.
For Numeric answers, place a single number between the range of 1 to number of
answers following the equals sign. For example, if @@NA=4 for that particular item,
the @@KA= value must be between 1 and 4 inclusive. "@@KA=3" would be
acceptable, "@@KA=6" would be outside of the acceptable range.
For Alphabetic answers, place a single letter between the range of A to the letter of
the alphabet corresponding to the number of answers following the equals sign. For
example, if @@NA=4 for that particular item, the @@KA= value must be between
"A" and "D" inclusive— "D", being the fourth letter of the alphabet. "@@KA=C"
would be acceptable, "@@KA=F" would be outside of the acceptable range.
For the Multiple Response Item Type, you may provide more than one correct
answer. Place the string of acceptable answers separated by commas (",") or spaces
following the equal sign. As before, the values must be in the range of "1" to the
number of answers for numeric answers, or between "A" and the letter of the alphabet
corresponding to the number of answers for alphabetic answers. Values outside of the
acceptable range will be ignored.
If the Keyed Answer information line is not provided, the value is not in acceptable
range, is incorrectly specified for the Item Type or otherwise invalid the default value
will be used.
Default Value: none
IRT Model and a, b, c Parameters
The IRT Model information line is:
@@IR=
Place the IRT model specifier following the equals sign, and follow it with the a, b,
and c parameters.
The IRT model specifier consists of one of the following:
- 100 Appendix A. Importing Items
1P
- 1 parameter (Rasch) model
2P
- 2 parameter model
3P
- 3 parameter model
Follow the IRT model specifier with a comma (",") followed by the a, b and c
parameters separated by commas. The IRT Model information line should follow the
format:
@@IR=<IRT Model specifier>, <a Parameter>, <b Parameter>, <c Parameter>
You may also skip the unnecessary a, b, or c parameters that are not required for that
particular model.
The 1-parameter model only allows for the b parameter to be entered. You can supply
only the necessary b parameter value or you may leave the unused values blank. For
instance, the following example for the 1-parameter model may be entered as either:
@@IR=1P, 1.2
or
@@IR=1P, , 1.2,
The 2-parameter model allows for the a and b parameters to be entered. You may
supply only the necessary a and b parameter values or you may leave the unused c
value blank. For instance, the following example for the 2-parameter model may be
entered as either:
@@IR=2P, 2.2, 1.2,
or
@@IR=2P, 2.2, 1.2
For the 3-parameter model the a, b, and c parameters must be entered. The following
is an example for the 3-parameter model:
@@IR=3P, 2.2, 1.2, 0.25
For all IRT Models, the a, b and c parameters must be in the proper ranges:
The a parameter must be in the range 0.0001 to 4.000
The b parameter must be in the range -5.000 to 5.000
The c parameter must be in the range 0 to 0.9999
If the IRT Model information line is not provided, the values are not in acceptable
range, are incorrectly specified, or otherwise invalid, the default values will be used.
Default Values:
IRT Model: None
a Parameter: 1.0
- 101 Appendix A. Importing Items
b Parameter: 0.0
c Parameter: 0.0
Classical Test Theory Parameters
The Classical Test Theory Statistics information line is:
@@CT=
Place the classical test theory statistics in the order p-value and item-total correlation,
separated by a comma after the equals sign. Skip a parameter by leaving it blank. If
only one parameter is included it will be presumed to be the p-value.
Examples:
@@CT=0.83, -0.23
@@CT=0.83
@@CT= , -0.23
The p-value and item-total correlation must be in the correct ranges.
The range for the p-value must be between 0 and 1 inclusive.
The range for the item-total correlation must be between -1 and +1 inclusive.
If the classical test theory statistics are not provided, the values are not in acceptable
range, or are otherwise invalid the default values will be used.
Default Values:
p-value: 0.0
item-total correlation: 0.0
User Statistics
The User Statistics information line is:
@@US=
Place the User 1 and User 2 statistics separated by a comma after the equals sign.
Skip a statistic by leaving it blank. If only one statistic is present, it will be presumed
to be the User 1 statistic.
Examples:
@@US=5.63, 4.52
@@US= , 4.52
@@US=5.63
If the User 1 and User 2 statistics are not provided, are not a number, or are otherwise
invalid the default values will be used.
- 102 Appendix A. Importing Items
Default Values:
User 1: 0.0
User 2: 0.0
Multi-Item Examples
Example 4: The following example is for two items with no additional information
other than the item identifier.
@@ID=math\grade11\algebra\intro:item 200
@@BT
This is the text of Item 200 from the Intro subsection of the algebra part
for grade 11 of the math item bank. Following are the answers to the
question:
a. Answer 1
b. Answer 2
c. Answer 3
d. Answer 4
@@ET
@@ID=math\grade11\algebra\intro:item 201
@@BT
This is item 201 from the same bank, and here are its answers:
a. Answer 1
b. Answer 2
c. Answer 3
d. Answer 4
Any blank lines or other text between BT and ET will be imported as part
of the item
@@ET
Example 5: The following example is for two the same two items with some
additional information in addition to the item identifier.
@@ID=math\grade11\algebra\intro:item 200
@@BN
This is a very difficult item,. It was used in last year’s exam, and only
10% of the class answered it correctly. But it’s very useful for sorting out
the high ability kids in the class.
@@EN
@@KA=c
@@SO=taken from the textbook, page 312
- 103 Appendix A. Importing Items
@@IR=3p, 1.6,2.75,. 22
@@TY=mc
@@SC=y
@@BT
This is the text of Item 200 from the Intro subsection of the algebra part
for grade 11 of the math item bank. Following are the answers to the
question:
a. Answer 1
b. Answer 2
c. Answer 3
d. Answer 4
@@ET
@@ID=math\grade11\algebra\intro:item 201
@@KA=a
@@SO=from class assignment, third week of the semester
@@IR=3p, 1.0,-1.6,. 20
@@TY=mc
@@SC=y
@@BN
A moderately easy item. Maybe they just remembered the solution to it.
Maybe next time we use this in an exam we should change the numbers a
bit to see if they are remembering the answer or if they are really learning
how to solve this type of problem,
@@EN
@@BT
This is item 201 from the same bank, and here are its answers:
a. Answer 1
b. Answer 2
c. Answer 3
d. Answer 4
Any blank lines or other text between BT and ET will be imported as part
of the item
@@ET
Each file to be imported continues with as many items as necessary, each beginning with
an @@ID= line.
- 104 Appendix A. Importing Items
Appendix B: Using FastTEST
2.0 with Right-to-Left Languages
FastTEST 2.0 is shipped for use with left-to-right languages (such as English, Spanish,
French, and German) but can optionally be used with right-to-left languages such as
Arabic and Hebrew. To use FastTEST 2.0 with these latter languages, select the BiDirectional Mode option from the File menu of the Main Window at any time.
When this option is selected and the appropriate language fonts are also selected,
keyboard input will result in right-to-left entry of text but left-to-right entry of numbers.
Once Bi-Directional mode has been selected, to return to left-to-right language entry,
uncheck the Bi-Directional Mode option.
- 105 Appendix A. Importing Items