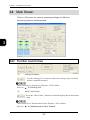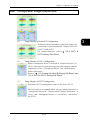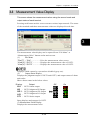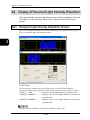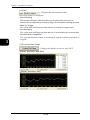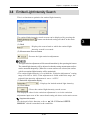
1
Ultra High-Speed, High-Accuracy
Laser Displacement Sensor
HL-C2 Series
User's Manual
Intelligent Monitor AiM
ME-HLC2AIM-13
2015.4
panasonic.net/id/pidsx/global
Preface
Thank you for purchasing Ultra High-Speed, High-Accuracy Laser Displacement
Sensor “HL-C2 Series”.
To fully use this product safely and properly, please read this manual carefully.
Please check our website(http://panasonic.net/id/pidsx/global) about new info
of the product and new version of the user’s manual.
■ Note
1. Please notice that illustrations in this manual might be little different from the actual
product.
2. Contents of this manual will be changed without notice due to improvements.
3. This manual and software must not be partially or totally copied or reprinted.
4. If there are any questions, mistakes, paging disorder, or missing pages in this
manual, please contact our sales office nearest you.
5. We have no responsibility of any results of operations regardless of the above.
Preface
Whole USER’S MANUAL Construction
The HL-C2 Series is prepared for the following user’s manuals.
Read them as necessary.
The application software “Adobe Reader” is required for viewing the files.
The latest application (Adobe Reader ® 11.0 as of May, 2013) can be freely
downloaded from the following URL.
http://www.adobe.com/downloads/
HL-C2 Series USER’S MANUAL: Intelligent Monitor AiM (PDF)
Ultra High-Speed, High-Accuracy
Laser Displacement Sensor
HL-C2 Series
User's Manual
Intelligent Monitor AiM
ME-HLC SAIM-08
2013.6
panasonic.net/id/pidsx/globa l
This manual
This manual is included as a PDF file in the Intelligent
Monitor AiM, which can be downloaded on our Internet
website.
This manual describes installation method, operation
method, functional details and error messages of the
software.
It also describes an evaluation analysis of HL-C2 Series or
use of buffering function and received light intensity
waveform display function, which are useful for optimum
system setting.
HL-C2 Series USER’S MANUAL (PDF)
Ultra High-Speed, High-Accuracy
Laser Displacement Sensor
HL-C2 Series
User's Manual
This manual describes cautions for using HL-C2 Series, and
installation method, operation method, function details,
specifications, maintenance and inspection method of
system components (controller, sensor head compact
console).
ME-HLC 2-09
2013.6
panasonic.net/id/pidsx/globa l
HL-C2 Series USER’S MANUAL: RS-232C Communication Control (PDF)
Ultra High-Speed, High-Accuracy
Laser Displacement Sensor
HL-C2 Series
User's Manual
The manual describes various commands for controlling the
system by sequencer or PC using RS-232C
communication.
RS-232C Communication Control
ME-HLC SRS-09
2013.6
panasonic.net/id/pidsx/globa l
1
Preface
HL-C2 Series USER’S MANUAL: USB Communication Control (PDF)
Ultra High-Speed, High-Accuracy
Laser Displacement Sensor
HL-C2 Series
The manual describes API for controlling the system by
sequencer or PC using USB communication.
User's Manual
USB Communication Control
ME-HLC SUSB-08
2013.6
panasonic.net/id/pidsx/globa l
HL-C2 Series USER’S MANUAL: Ethernet Communication Control
(PDF)
Ultra High-Speed, High-Accuracy
Laser Displacement Sensor
HL-C2 Series
User's Manual
Ethernet Communication Control
This manual explains various settings to acquire
measurement information of the HL-C2 system by PLC
using Ethernet communication.
ME-HLC SEN-02
2013.6
panasonic.net/id/pidsx/globa l
2
Preface
Manual Construction
Preface
This chapter provides cautions for safe and correct
operation of the product. Be sure to read this
chapter.
1
Prior to Use
This chapter provides the information about the
product that users should know prior to use, such as
general description of product, operating conditions
and instruction for installation.
1
2
Operating
Instructions
This chapter describes basic operating procedures
such as start-up of Intelligent Monitor AiM.
2
3
Explanation of
Functions
This chapter explains various functions installed on
the application.
3
4
Error Message
This chapter explains “error messages” that are
indicated at failure occurrence during use.
4
Appendix Appendix
This chapter provides index and revision history of this
manual.
3
Apx
Preface
Contents
Whole USER’S MANUAL Construction 1
Manual Construction······················· 3
Contents ······································ 4
3-2-5 OUT1 & OUT2 Setting Tab Sheet
······································3-13
3-2-6 Common Setting Tab Sheet ··3-14
Safety Precautions ························ 6
3-3 Measurement Value Display··· 3-15
3-4 Display of Received Light Intensity
Waveform ······························· 3-18
■ Symbol Indications··························· 6
For Correct Use ···························· 7
Correct Handling··························· 7
Cautions on Handling Laser Light ····· 7
Standards···································· 7
Use Condition ······························ 8
3-4-1 Received Light Intensity Waveform
Screen ·····························3-18
3-4-2 Received Light Intensity Waveform
Setting Screen ···················3-23
3-5 Buffering Display ················· 3-26
3-5-1 Buffering Screen ················3-26
3-5-2 Buffering Control Tab Sheet ··3-29
3-5-3 Vertical (Horizontal) Axis Measure
Tab Sheet ·························3-31
3-5-4 Buffering Setting Screen ······3-32
3-5-5 Buffering Information Display
Screen ·····························3-37
1 Prior to Use ······················· 1-1
1-1 General Description ···············1-2
1-2 Instruction for Installation ········1-2
1-3 Operating Environment ···········1-2
1-4 Application Installation ············1-3
1-5 Note ···································1-4
1-6 HL-C2 Functions····················1-4
3-6 Emitted Light Intensity Search 3-38
3-7 Calibration ························· 3-39
3-8 Analog Scaling ···················· 3-40
3-9 Setting List························· 3-41
2 Operating Instructions·········· 2-1
3-9-1 Setting List Screen ·············3-41
2-1 Operating Procedures: Startup to
Measurement ·····························2-2
Operating
Procedures
to
Measurement using AiM ···················2-2
■ Basic Operation and Function of AiM··2-3
■ Common Functions of AiM Screens ···2-5
3-10 Controller System Setting ···· 3-43
3-11 Software Operation Setting ·· 3-45
3-12 Version Display ················· 3-50
3-13 Capture Function ··············· 3-51
3 Explanation of Functions ······ 3-1
4 Error Message ·················· 4-1
3-1 Menu Bar ·····························3-2
4-1 Dialog Display ······················ 4-2
3-1-1 File Menu ·························· 3-2
4-2 Error Description ··················· 4-3
■
■Double click the AiM configuration file
to start AiM ···································3-5
4-2-1
4-2-2
4-2-3
4-2-4
Management File Read Error · 4-3
Management File Write Error·· 4-3
Communication Time Out ······ 4-3
Communication Response Error
······································· 4-4
4-2-5 File Read Error ··················· 4-4
4-2-6 File Write Error ··················· 4-4
4-2-7 Out of Memory···················· 4-5
4-2-8 RS-232C Open Error ············ 4-5
4-2-9 RS-232C Send Error ············ 4-5
4-2-10 RS-232C Communication Device
Error ································· 4-6
3-1-2 Window Menu ···················· 3-6
3-1-3 System Menu ····················· 3-6
3-1-4 Help Menu························· 3-6
3-2 Main Screen ·························3-7
3-2-1 Function Launch Area ·········· 3-7
3-2-2 Controller Setting Area ········ 3-10
3-2-3 Configuration Image Output Area
······································ 3-11
3-2-4 Head A & Head B Setting Tab
Sheet······························· 3-12
4
Preface
4-2-11 USB Send Error················· 4-6
4-2-12 USB Open Error ················ 4-7
4-2-13 USB Communication Device Error
······································· 4-7
4-2-14 Value Exceeds Its Range ····· 4-7
4-2-15 Failed to execute Emitted Light
Intensity Search. ················· 4-8
4-2-16 Printer Not Found ·············· 4-8
4-2-17 Buffering in progress ·········· 4-8
4-2-18 Send After Setting Command of
Memory Change Priority Setting
······································· 4-9
4-2-19 Failed to Create dialog. ······· 4-9
4-2-20 ~ is used by HL-C2AiM. ···· 4-9
Appendix ······························· 1
1 Index ······································· 2
Revision history ··································· 4
5
Preface
Safety Precautions
This product is intended to detect the objects and does not have the control
function to ensure safety such as accident prevention.
Do not use the product as a sensing device to protect human body.
Please use the products that comply with local laws and standards for human
body protection specified by e.g., OSHA, ANSI and IEC.
Please read this manual carefully before using the product and use it
correctly.
■ Symbol Indications
This manual uses symbols to indicate safety precautions, instructions, and
reference.
Before reading this manual, fully understand the meanings of these
indications.
“WARNING” indicates the possibility that death or serious
injury could result if a handling error occurs.
“CAUTION” indicates the possibility that the user could
be injured or property could be damaged if a handling
error occurs.
“CHECK” indicates any instructions or precautions for
using the system.
“REFERENCE” indicates any hints for operation, detail
explanations, or references.
“TECHNIQUE” indicates useful conditions or techniques
(know-how) for operation of the system.
● Install a fail-safe device when the product is used for the purpose that
has a possibility of physical injury or serious extended damage.
● Do not use the product in the atmosphere of flammable gas, to prevent
explosion.
● Use the product within specifications.
Abnormal heat or smoke generation may occur.
● Do not disassemble or remodel the product. Electrical shock or smoke
generation may occur.
● Connect the electric wire securely with the terminal screws.
Imperfect connection may cause abnormal heat or smoke generation.
● Do not touch the terminal during energization of the product, to prevent
electrical shock.
6
Preface
For Correct Use
This manual explains the HL-C2 AiM (Advanced Intelligent Monitor)*.
For installation and use of the system, refer to “HL-C2 Series USER’S
MANUAL” (separate volume).
* The software “HL-C2 AiM” is hereinafter referred to as “AiM”.
Correct Handling
For the items listed below, refer to “HL-C2 Series USER’S MANUAL”
(separate volume).
・ Installation Environment
・ Use Environment
・ Measures to Noise
・ Warming Up Time
・ Insulation Resistance and Voltage Resistance
・ Power Supply
・ Instantaneous Power Failure
・ Grounding
・ Installation
Cautions on Handling Laser Light
Refer to “HL-C2 Series USER’S MANUAL”.
Standards
Refer to “HL-C2 Series USER’S MANUAL”.
7
Preface
Use Condition
B-E-20120101
Software License Agreement
Panasonic Industrial Devices SUNX Co., Ltd. (“PIDSX”) grants to you a license
to use this Software on condition that you accept this Agreement. You must
read this Software License Agreement (this “Agreement”) carefully before using
this Software. Only in case that you accept this Agreement, you may start your
use of this Software.
Your unsealing the package of this Software, or your downloading, installing or
launching this Software or the like shall be deemed as your acceptance of this
Agreement.
Article 1 Grant of License
PIDSX hereby grants to you a non-exclusive license to use this
Software only in combination with PIDSX product(s) specified in the
manual of this Software (the “Product”) in accordance with the terms
of this Agreement. You may not use this Software in connection with
products of any third party other than PIDSX.
Article 2 Restrictions
You may NOT:
(1)Modify, reverse engineer, decompile, or disassemble this Software,
(2)Use this Software by methods or for purposes other than those
specified in the manual of this Software provided by PIDSX, nor
(3)Distribute, rent, lease or otherwise transfer this Software to any
third party; provided, however, that you may assign the rights to use
this Software under this Agreement along with the Product on the
condition that the assignee agrees to be bound by all the terms of this
Agreement. In the case of such assignment, you must deliver any and
all the copies of this Software and all the accompanying materials to
the assignee and you may not retain any copies of this Software
including backups.
Article 3 Disclaimer
3-1. PIDSX HEREBY DISCLAIMS ALL OTHER WARRANTIES ON THIS
SOFTWARE, EITHER EXPRESS OR IMPLIED, INCLUDING BUT
NOT
LIMITED
TO
THE
IMPLIED
WARRANTIES
OF
8
Preface
MARCHANTABILITY, FITNESS FOR PARTICULAR PURPOSE, AND
NON-INFRINGEMENT OF THIRD PARTY RIGHTS.
3-2. UNDER NO CIRCUMSTANCES SHALL PIDSX BE LIABLE FOR ANY
DAMAGES (INCLUDING DIRECT, INDIRECT, INCIDENTAL,
CONSEQUENTIAL OR SPECIAL OR WHATSOEVER) ARISING OUT
OF THE USE OF THIS SOFTWARE, INABILITY TO USE THIS
SOFTWARE, DEFECTS IN THIS SOFTWARE (e.g., BUGS,
SECURITY HOLES, AND MALFUNCTION), OR OTHERWISE IN
CONNECTION WITH THIS SOFTWARE.
Article 4 Term
4-1. This Agreement shall come into effect upon your unsealing the
package of this Software, or your downloading, installing or
launching this Software or the like.
4-2. PIDSX may terminate this Agreement immediately, if you breach any
of the provisions of this Agreement.
4-3. You shall, at your own costs, return, delete or destroy this Software
and any of its copies within four (4) weeks after termination of this
Agreement.
Article 5 Export Control
You shall comply with all laws and regulations regarding export control
under any competent jurisdiction, including but not limited to the
Japanese Foreign Exchange & Foreign Trade Control Law, the export
control regulations based on resolutions of the United Nations
Security Council, etc. If any license or appropriate approval from a
governmental authority is required under the applicable laws, you may
not export this Software without such approval to any countries either
directly or indirectly. Furthermore, you shall neither use nor sell this
Software for military purposes either directly or indirectly.
Article 6 Intellectual Property Rights
All intellectual property rights in this Software, including the copyright,
belong to PIDSX and/or the licensors of PIDSX.
Article 7 Upgrade of this Software
7-1 Release of future upgrades or updates of this Software is not
guaranteed and left to the sole discretion of PIDSX. Furthermore,
PIDSX may charge fees for upgrading or updating of this Software.
7-2. If any upgrades or updates are provided to you either for fees or for
free, such upgrades or updates shall be deemed as a part of this
Software and shall be governed by this Agreement, unless PIDSX
9
Preface
designates otherwise at the time of provision of such upgrades or
updates.
Article 8 Limitation on Liability
AGGREGATE LIABILITIES OF PIDSX IN CONNECTION WITH THIS
AGREEMENT OR THIS SOFTWARE SHALL IN NO EVENT EXCEED
TEN THOUSAND (10,000) YEN.
Article 9 Governing Law and Jurisdiction
9-1. This Agreement shall be governed by the laws of Japan.
9-2. Should any dispute arise from or in connection with this Agreement,
Nagoya District Court, Japan shall exclusively have the jurisdiction
over such dispute.
10
1
1
Prior to Use
1-1 General Description ············ 1-2
1-2 Instruction for Installation ····· 1-2
1-3 Operating Environment········ 1-2
1-4 Application Installation········· 1-3
1-5 Note ······························· 1-4
1-6 HL-C2 Functions ················ 1-4
1-1
Chapter 1
1-1
Prior to Use
General Description
The HL-C2 AiM (Advanced Intelligent Monitor) is function configuration
software available in the controller HL-C2C for ultra high-speed,
high-accuracy laser displacement sensor HL-C2 Series.
It performs the following functions. Be sure to connect the controller to the
USB cable or RS-232C cable.
1
• Settings of various measurement conditions and displays of measurement
value
• Measurement value monitoring (display of measurement value and status)
• Monitoring of received light intensity data (waveform display, file
save/loading, and snap function)
• Buffering data monitoring (waveform display and file save/loading)
1-2
Instruction for Installation
• Before installing the software, please read the “Software License Agreement”.
• By installing the software, you are agreeing to be bound by the terms of
“Software License Agreement”.
1-3
Operating Environment
The below operating environment is required for operating the intelligent
monitor AiM.
Operating environment
OS
Microsoft Windows® Vista Business 32bit SP2 or more
Microsoft Windows® 7 Professional 32bit/64bit
Microsoft Windows® 8 Pro 32bit/64bit
(Japanese, English, Chinese, Korean)
CPU
Pentium compatible CPU 1GHz or more *1
Hard Disc
50MB or more of available memory
Memory
2GB or more *1
Graphics
XGA (1024x768, 256 colors) or more
USB Port
USB 2.0 Full Speed(USB 1.1 compatible)compliant
Serial Port
RS-232C-compliant, Communication speed: 115.2kbps
*1 It depends on the operation environment of OS.
*Windows is a registered trademark of Microsoft Corporation in the
United States and other countries.
Pentium is a registered trademark of Intel Corporation.
1-2
Chapter 1
1-4
Prior to Use
Application Installation
In case of installing AiM of Ver 2.05 or later onto a PC that has AiM of Ver
2.04 or older installed already, it is necessary to uninstall the AiM and USB
driver of Ver 2.04 or older.
For uninstallation of USB driver
Refer to “HL-C2 series USER’S MANUAL USB Communication
Control (PDF)” – “1-2-1 Uninstallation of Old USB Driver”.
1
Execute the “setup.exe” in the downloaded data
2
Follow the instructions on the setup screen.
Administrator authority is required to install or uninstall the AiM application.
3
Connect the controller and PC with the dedicated USB port connecting
cable.
4
Turn on the power of HL-C2C.
5
When an USB port is used for connection, install the USB driver.
Refer to
“Installation of USB Driver” in the “HL-C2 Series USER’S
MANUAL: USB Communication Control (PDF)”
1-3
1
Chapter 1
1-5
1
Prior to Use
Note
• Configure the settings for CSV first when using CSV file output on the AiM. If not,
the CSV file output may not be loaded.
“3-11 Software Operation Setting” for the method of CSV
* Refer to
settings.
1-6
HL-C2 Functions
For the functions of HL-C2 Series controller, refer to
“HL-C2 Series
USER’S MANUAL” (PDF file) recorded in the attached setup CD-ROM.
1-4
2
Operating Instructions
2-1Operating Procedures: Startup to Measurement ·····
··············································· ········· 2-2
■ Operating Procedures to Measurement using AiM 2-2
■ Basic Operation and Function of AiM················· 2-3
■ Common Functions of AiM Screens ··················· 2-5
2-1
2
Chapter 2 Operating Instructions
2-1 Operating Procedures: Startup to Measurement
■ Operating Procedures to Measurement using AiM
1
Start up the AiM.
2
Press the “Online” button.
available.
The “Main screen” appears.
2
Communication with the controller is
: Offline (black)
: Online (red)
If an USB open error is displayed and the system fails to go online state,
check if the destination of connection is correct.
“3-11 Software Operation Setting”.
Refer to
Do not initiate communication before the startup of controller is completed.
Press the “Online” button after the laser lights up and the system is ready for
measurement.
3
The screen displays the type and version name of the system only
when the controller and PC are connected correctly.
Check the “Controller Type*”, “Version Name*”
and “Sensor Head Type*.
* The display varies depending on the unit currently
used.
4
Press the “Load” button.
in the AiM.
The settings in the controller are reflected
: Pressing the “Load” button initiates the reception of settings.
The settings in the controller are not loaded to the AiM until the “Load”
button is pressed.
2-2
Chapter 2 Operating instructions
5
Display the “Measurement Value Screen”.
: Press the “Meas Value” button.
The Measurement Value Screen appears.
2
This completes the preparation for basic measurement using the AiM.
“3-3 Measurement Value Display”.
Refer to
■ Basic Operation and Function of AiM
1
The AiM is equipped with various functions for advanced analysis or
measurement.
: Press the “Received LI Wave” button to confirm the received light
status of line sensor the sensor head received. It is displayed as a
waveform.
Refer to
“3-4 Display of Received Light Intensity
Waveform”.
: Press the “Buffering” button to confirm the measurement value as a
graphic display.
Refer to
“3-5 Buffering Display”.
: Press the “Setting List” button to confirm the values set on the AiM
and memory in the controller. They are displayed by a list.
Refer to
2
“3-9 Setting List”.
Execute measurement using the functions set on the AiM.
Almost all functions on the mini console can be set in the five pages shown below.
“Head A”: Functions of sensor head A can be specified on this page.
“Head B”: Functions of sensor head B can be specified on this page.
“OUT1”: Functions of OUT1 can be specified on this page.
“OUT2”: Functions of OUT2 can be specified on this page.
“Common”: Functions of common settings can be specified on this page.
For the details of these functions, refer to
MANUAL” supplied with the controller.
2-3
“HL-C2 Series USER’S
Chapter 2 Operating Instructions
3
Send the settings on the AiM to the controller.
: The settings on the AiM are not reflected in the controller in real
time. Press the “Send” button to include them as measurement
conditions.
Refer to
“(6) Send Button” in “3-2-1 Function Launch Area”.
4
Save the settings sent in the controller.
The settings sent from the AiM are saved in the controller by pressing the
“Save” button.
2
: Press the “Save” button to save the measurement conditions loaded
by the “Send” button to the controller.
The controller will start up with the settings saved previously
at the next power-on if it is turned off without saving the
current setting conditions.
Refer to
“(1) Save” in “3-2-2 Controller Setting Area”.
5
Initialize the settings of controller.
Pressing the “Init” button at “Initialization” can initialize the functions set in
the controller.
: Press the “Init” button to initialize the measurement
conditions set in the controller.
The controller will start up with the settings saved previously
at the next power-on if it is turned off without saving
initialization. Press the “Save” button after initialization to
start up the controller with initialized state at the next
power-on.
6
Initialize the settings of AiM.
Initialize the settings of controller and then load it to initialize the AiM.
Press the “Init” button at “Initialization” and then press the
“Load” button
7
.
Terminate the AiM.
Make the system off-line (
button
) and close the AiM by pressing the “×”
.
If an open file is changed, the dialog to confirm saving the
data is displayed.
For details, refer to "3-1-1 File menu".
2-4
Chapter 2 Operating instructions
■ Common Functions of AiM Screens
(1)
(5)
(2)
2
(4)
(3)
Window Title (1)
This area indicates the title of screen.
Field Component (2)
Moving the mouse on a button displays the image for operating status or
function explanation of corresponding screen.
Status Bar (3)
Operating status or function explanation of screen is displayed in the text.
Capture Function (4)
When the “Capture” button appears on a screen, the screen can be captured
and output.
Refer to “3-13 Capture Function”.
Grayout Function (5)
By this function, the screen displays the buttons/indicators of currently
unused, unnecessary, or disabled functions/settings in gray.
2-5
Chapter 2 Operating Instructions
MEMO
2
2-6
3
3
Explanation of Functions
3-1 Menu Bar························· 3-2
3-1-1
3-1-2
3-1-3
3-1-4
File Menu ·························
Window Menu ····················
System Menu ····················
Help Menu ························
3-5 Buffering Display ············· 3-26
3-2
3-6
3-6
3-6
3-5-1 Buffering Screen ···············3-26
3-5-2 Buffering Control Tab Sheet ·3-29
3-5-3 Vertical (Horizontal) Axis Measure
Tab Sheet ························3-31
3-5-4 Buffering Setting Screen······3-32
3-5-5 Buffering Information Display
Screen····························3-36
3-2 Main Screen ····················· 3-7
3-2-1 Function Launch Area·········· 3-7
3-2-2 Controller Setting Area········ 3-10
3-2-3 Configuration Image Output Area
····································· 3-11
3-2-4 Head A & Head B Setting Tab
Sheet ····························· 3-12
3-2-5 OUT1 & OUT2 Setting Tab Sheet
····································· 3-13
3-2-6 Common Setting Tab Sheet·· 3-14
3-6 Emitted Light Intensity Search
································ 3-37
3-7 Calibration ····················· 3-38
3-8 Analog Scaling ················ 3-39
3-9 Setting List ····················· 3-40
3-9-1 Setting List Screen·············3-40
3-10 Controller System Setting · 3-42
3-11 Software Operation Setting 3-44
3-12 Version Display·············· 3-49
3-13 Capture Function ··········· 3-50
3-3 Measurement Value Display 3-15
3-4 Display of Received Light
Intensity Waveform ··········· 3-18
3-4-1 Received Light Intensity
Waveform Screen·············· 3-18
3-4-2 Received Light Intensity
Waveform Setting Screen ··· 3-23
3-1
Chapter 3
Explanation of Functions
3-1 Menu Bar
This is a menu for screen display settings, operation settings, and file
savings of HL-C2 AiM.
[1]
3
“AiM Setting File” is a management file in which various settings for AiM
are stored. This file named “hl-c2.aim” is automatically created at time of
AiM installation.
The file is stored in the folder where AiM is installed.
Currently using filename is displayed at “Windows title (1)”.
Supplemental remarks
“HL-C2 Series USER’S
For the detail of each function, refer to
MANUAL” which is attached to the controller.
3-1-1 File Menu
Open File
Reads “AiM setting file” which is stored in the external memory such as a
hard disc in PC.
If a new file is opened with an open file changed, the dialog to confirm saving
the data is displayed.
“Yes”: The change is saved in the
current file and a new file is opened.
“No”: The change is discarded and a
new file is opened.
“Cancel”: "Open" process is cancelled.
3-2
Chapter 3
Explanation of Functions
Save As File
Saves the currently set conditions of AiM in a hard disc in PC as “AiM setting
file”.
This “Save” command will not save the set conditions in the controller. To
save the set conditions in the controller, execute the command “Save to
Controller.”
Save to Controller
Saves the conditions currently-set on the controller into the controller.
This command will save the conditions currently set on the controller. The
conditions to be saved therefore may differ from the conditions set on the
HL-C2 AiM.
To save the conditions set on the HL-C2 AiM, execute the command “Send
All Memory to Controller” first, and then execute this command.
Initialize Controller
Initializes the contents of all selected memory numbers in the controller.
Initialization of memory means that the setting values in a memory is reset to the
default values at factory shipping.
Load All Memory from Controller
Loads setting values of all 16 memories in the controller to AiM.
When “Load” is executed, the numbers of selected controller memory number
become the selected memory numbers for AiM memory change, and the
setting values of all selected memory numbers are automatically loaded to
each corresponding screen.
Send All Memory to Controller
Sends the setting values of all 16 memories in AiM to the controller. When
this command execution is successfully completed, the selected memories in
the controller become the selected memories for memory change.
Initialize All Memory in Controller
Initializes the setting values of all 16 memories in the controller and the
system settings.
For saving the initialized setting value in the controller, execute “Save to
Controller.” If not doing so, the controller operates at the setting conditions
previously saved when powered on.
3-3
3
Chapter 3
Explanation of Functions
Exit
Exits from the HL-C2 AiM.
If reactivating AiM after once AiM was exited, AiM activates at the latest
setting conditions.
3
If AiM is exited with an open file changed, the dialog to confirm saving the
data is displayed.
“Yes”: The change is saved in the file
and exit AiM.
“No”: The change is discarded and exit
AiM.
“Cancel”: Exit AiM is cancelled.
3-4
Chapter 3
Explanation of Functions
■Double click the AiM configuration file to start AiM
The AiM configuration file and the AiM extended connection can be operated.
By selecting and clicking the following two items from the System (S) menu,
each function can be executed and the connection can be operated.
If a file of (- .aim) has connection in other file, the connection is lost.
Extension association update
AiM configuration file (- .aim) is connected to HL-C2AiM.
Double click the AiM configuration file to start AiM.
Extension association cancel
Connection of the AiM configuration file (-.aim) with HL-C2AiM is cancelled.
AiM does not start by double clicking the AiM configuration file.
3-5
3
Chapter 3
Explanation of Functions
3-1-2 Window Menu
Measurement Value Display
This function is to take the measurement data from the controller and display them.
“3-3 Measurement Value Display”.
Refer to
Received Light Intensity Waveform Display
3
This is a function to display the status of the received light intensity of sensor
head with waveform.
“3-4 Display of Received Light Intensity Waveform”.
Refer to
Buffering Display
The data buffering is displayed in graph.
“3-5 Buffering Display”.
Refer to
Setting List Display
The setting values for AiM and the controller memory are displayed.
“3-9 Setting List”.
Refer to
3-1-3 System Menu
Controller System Setting
Sets the operating conditions of the controller.
“3-10 Controller System Setting”.
Refer to
Software Operation Setting
Refer to
“3-11 Software Operation Setting”.
3-1-4 Help Menu
Version
Refer to
“3-12 Version Display Screen”.
3-6
Chapter 3
Explanation of Functions
3-2 Main Screen
This is a Top menu for various operating settings for AiM and
performing various measurements.
3
3-2-1 Function Launch Area
(1)
Setting List button
: Use the “Setting List” button to check the setting values for AiM
and the controller memory.
Same function as “Setting List Display” of File Menu.
“3-9 Setting List”.
Refer to
(2)
Meas Value button
: Press the “Meas Value” button to load and display the measurement
data.
Same function as “Measurement Value Display” of File Menu.
“3-3 Measurement Value Display”.
Refer to
3-7
Chapter 3
Explanation of Functions
(3)
Received LI Wave button
: Use “Received LI Wave” button to check the received light status
of the head of line sensor with a waveform. The received light
status of the line sensor subjected to light in a sensor head can be
confirmed in a waveform.
Same function as “Received Light Intensity Waveform” of Window Menu.
“3-4 Display of Received Light Intensity Waveform”.
Refer to
(4)
Buffering button
: Use “Buffering” button to check the buffered measurement value in graph.
3
Same function as “Buffering Display” of File Menu.
Refer to
(5)
“3-5 Buffering Display”.
Load button
: Load the setting values of all 16 memories in the controller into AiM.
When “Load” is executed, the numbers of selected controller memory number
become the selected memory numbers for AiM memory change, and the
setting values of all selected memory numbers are automatically loaded to
each corresponding screen.
This is a same function as the “Load All Memory from Controller” command
of File Menu.
(6)
Send button
: Sends the setting values of all 16 memories in AiM to the controller.
When this command execution is successfully completed, the selected
memories in the controller become the selected memories for memory change.
This is a same function as the “Send All Memory to Controller” of File
Menu.
(7)
Online button
Use this button to start communication with the controller.
Each time you click this button, the status of the button will be changed as
follows:
If the word “Online” is red, the system is now communicating (Online
status) with the controller.
Controller Type
Sensor Head Type
3-8
Chapter 3
Explanation of Functions
Controller Ver
Displays the “controller type”, “version name”, and
connected “sensor head type”.
Displays “All ***” during offline.
(11) Memory Change selection
Shows “memory No.” and “memory name” of all 16 memories in the
drop-down list. Select a memory No. to be set.
“Memory name” of “Memory No.” can be set at “Software Operation Setting”.
“3-11 Software Operation Setting”.
Refer to
Just selecting the “Memory No.” from Memory Change drop display cannot
change the operating “Memory No.” in the controller. To change the selected
“Memory No.”, send the command to the controller by pressing “Send”
button.
“(6) Send button”.
Refer to
(12) Hide Settings▲/Display Settings▼button
Switch display/hide of the controller setting area of the “Main Screen”.
To a display status of the controller setting area, the word of the button
changes as follows:
• When the controller setting area is displayed······ “Hide Settings▲”
• When the controller setting area is not displayed ···· “Display Settings▼”
This button can be changed only when the “Main Screen” is in active status.
3-9
3
Chapter 3
Explanation of Functions
3-2-2 Controller Setting Area
(1)
Save button
: Saves the current settings to the controller.
Same function as “Save to Controller” of File Menu.
3
(2)
Init button
: Initializes the selected memory in the controller.
・When All Memory is not selected:
: Initializes only selected memory in the controller.
Same function as “Initialize Controller” of File Menu.
・When All Memory is selected:
: Initializes all 16 memories in the controller.
Same function as “Initialize All Memory in Controller” of File Menu.
3-10
Chapter 3
Explanation of Functions
3-2-3 Configuration Image Output Area
(1)
Image Display of Head/OUT Configuration
: Delineates the measurement status that changes by
connection of sensor heads and “Output Selection”
of OUT1 and OUT2.
“3-2-5 OUT1 &
For Output Selection, refer to
OUT2 Setting Tab Sheet”.
(2)
Image Display of OUT1 Configuration
: When a transparent object is selected at “Output Selection” of
OUT1, delineates the measurement point that changes with the
combination of the “Transparent Object” and “Measurement
Surface Reference”.
“3-2-4 Head A & Head B Setting Tab Sheet” and
Refer to
“3-2-5 OUT1 & OUT2 Setting Tab Sheet”.
(3)
Image Display of OUT2 Configuration
Ex
: Delineates OUT2 configuration same as the above OUT1.
The left image is an example when setting “Output Selection” to
“Transparent Object B”, “Measurement Surface Reference” to
“Near”, and “Transparent Object” to “1st Surface – 4th Surface”
for OUT2.
3-11
3
Chapter 3
Explanation of Functions
3-2-4 Head A & Head B Setting Tab Sheet
3
(1)
Measurement Condition
Use this tab sheet to set the measurement conditions for the sensor heads.
• Installation mode
• Alarm Delay Times
• Measurement Mode
• Measurement Surface Reference
• Peak Sensitivity
• Emission Adjustment
• Calibration
• Measuring Range
• Median Filter
These settings cannot be reflected to the controller as the measurement
conditions in real time until pressing “Send” button.
Supplemental remarks
“HL-C2 Series USER’S
For the detail of each function, refer to
MANUAL” which is attached to the controller.
(2)
Emission Adjustment Area (a,b)
You can specify an emission auto adjustment area. The light intensity
feedback function operates between the two from Emission Adjustment Area
a to Emission Adjustment Area b.
(3)
Emitted Light Intensity Search button
: Displays the emitted light intensity search
screen.
Refer to
(4)
“3-6 Emitted Light Intensity Search”.
Execute Calibration button
: Displays the calibration screen.
Refer to
“3-7 Calibration”.
3-12
Chapter 3
Explanation of Functions
3-2-5 OUT1 & OUT2 Setting Tab Sheet
3
(1)
Measurement Condition
Use this tab sheet to set the output conditions for OUT.
・Output Selection
・Output Selection: Transparent
Object
・Output Selection: Refractive Index
Calculation
・Output Selection: Refractive Index
・Judgment Output: Upper/Lower
Limit Value
・Judgment Output: Upper Hysteresis
・Judgment Output: Lower Hysteresis
・Filter Operation: Filter Selection
・Filter Operation: Average Times
・Filter Operation: Cutoff Frequency
・Analysis Mode
・Analog Scaling
・Analog Output: Analog Output at Alarm
・Analog Output at Alarm: Fixed Value
・Analog Output: Analog Output at Data Unfixed
・Digital Output: Digital Output at Alarm
・Alarm Output Delay
・Digit Number of Measurement Value
・Operation Coefficient
・Offset
・Zero Set
Those settings cannot be reflected to the controller as the measurement
conditions at real time until pressing “Send” button.
Supplemental remarks
“HL-C2 Series USER’S
For the detail of each function, refer to
MANUAL” which is attached to the controller.
(2)
Analog Scaling Execution button
: Displays the analog scaling screen.
Refer to
“3-8 Analog Scaling”.
3-13
Chapter 3
Explanation of Functions
3-2-6 Common Setting Tab Sheet
3
(1)
Common Measurement Condition
Use this tab sheet to set the functions for the common settings.
• Sampling Cycle
• Interference Prevention
• Terminal Input Control
• Chattering Prevention for Terminal Input
• Judgment Output Off Delay
These settings cannot be reflected to the controller as the measurement
conditions in real time until pressing “Send” button.
Supplemental remarks
“HL-C2 Series USER’S
For the detail of each function, refer to
MANUAL” which is attached to the controller.
3-14
Chapter 3
Explanation of Functions
3-3 Measurement Value Display
This screen shows the measurement values using the sensor heads and
output status of each terminal.
Pressing each button on this screen executes various input controls. The status
of the terminals and those measurement values are displayed in real time.
3
The measurement value display can be opened from “File Menu” or
“Measurement Value” button on the main screen.
(1)
File Menu
“File(F)” – “Exit” ············· Exits the measurement value screen.
“View(V)”-“OUT1” ··········· Displays the measurement value of OUT1.
“View(V)”-“OUT2” ··········· Displays the measurement value of OUT2.
Displays which cannot be executed are disabled (gray out).
(2)
Output Status Display
Displays the judgment output of OUT1 and OUT2, and output status of alarm
and strobe.
Shows those status in the below colors:
Display
AL1 :
HI1 :
GO1 :
LO1 :
ST1 :
Output
OUT1 Alarm output
OUT1 Judgment HI Output
OUT1 Judgment GO Output
OUT1 Judgment LO Output
OUT1 Strobe output
Same displays and outputs for OUT2
(3) Measurement Value Display
Displays the measurement value.
3-15
Off
On
Chapter 3
Explanation of Functions
(4) Zero Set button
Off
On
: Zero set function is turned on/off each time you press
the button.
(5) Zero Set Amount Display
: Offset amount is displayed when zero set is executed.
(6) Timing button
Off
On
: Timing input is turned on/off each time you press the
button.
(7) Reset button
3
: Reset function is executed each time you press the button.
(8) Hold button
Off
On
: Hold input is turned on/off each time you press the button.
(9) Alarm contents indication
: Alarm contents are displayed.
The summary of alarm contents is displayed when you match mouse cursor with an
alarm cord (figure example 01).
Supplemental remarks
Please refer to "a HL-C2 series USER’S MANUAL" bundling with a
controller for the details of alarm contents.
(10) All Button Control
If selected, the zero set button, timing button, reset button, and hold button
become effective on both OUT1 and OUT2.
(11) Head/Laser Control (Emission A/B button)
Stop
Emission
: Laser emission starts/stops each time you press the
button. Same function for the sensor head B.
• The measurement value and output status are displayed for the currently
selected memory of the controller.
• The hold function of AiM is an original function in AiM. With this function,
the measurement indication of AiM is on hold but the controller does not
stop the measurement.
3-16
Chapter 3
Explanation of Functions
To stop the measurement, press the timing button of AiM or the console, or
carry it out by the terminal input of the controller.
Supplemental remarks
“HL-C2 Series USER’S
For the detail of each function, refer to
MANUAL” which is attached to the controller.
3
3-17
Chapter 3
Explanation of Functions
3-4 Display of Received Light Intensity Waveform
The received light intensity waveform screen can be displayed from the
“File Menu” or by pressing “Received LI Wave” button on the main
screen.
3-4-1 Received Light Intensity Waveform Screen
The received light intensity waveform is displayed in a graph on this screen.
You can snap the data and compare them.
3
(1) File Menu
You can choose whether the screen shows the received light intensity
waveform of the sensor head A and the sensor head B or only either of them.
“File(F)” – “Exit” ············· Exits the received light intensity waveform screen.
“View(V)”-“Head A” ········· Displays the received light intensity waveform of
sensor head A.
“View(V)”-“Head B” ········· Displays the received light intensity waveform of
sensor head B.
Displays which cannot be executed are disabled (gray out).
3-18
Chapter 3
Explanation of Functions
(2) Emission Adjustment Area
The area which displays the Emission Adjustment Area a and Emission
Adjustment Area b is shown by penetrated blue on the AiM received light
intensity wavelength screen.
Regarding the Emission Adjustment Area, refer to the "HL-C2 series
USER’S MANUAL"
(3) Measuring Range
The measuring range is specified with Measuring Range Point a and
Measuring Range Point b, and is indicated with a yellow line on the received
light wave pattern screen of AiM.
Regarding the Measuring Range, refer to the "HL-C2 series USER’S
MANUAL"
(4) Display of received light intensity of Sensor Head A/B
Displays the received light intensity of the sensor head A and B in a graph.
The peak recognition sensitivity of the head set point is displayed in a red line
by a display
The display can be enlarged and returned to its original size.
• Enlargement method
Drag the mouse from the upper left corner to the lower right corner to show
the desired size.
• Undoing method
In the graph display area, drag the mouse from the lower right to the upper
left at any position.
• Scrolling method
Drag with the right button of the mouse to scroll the display screen.
(5) Indicator
Loads data on the AiM until the indicator is fully loaded.
The display can be moved to the desired position by dragging the cursor of
the indicator.
The total amount of data loaded is shown in the right box of data amount.
(6) Received Light Intensity of Head A/B (Received LI A/B)
Displays the received light intensity at peak of the sensor head A and B.
The measurement data is on hold when loading of received light intensity is stopped.
3-19
3
Chapter 3
Explanation of Functions
(7) Emitted Light Intensity of Head A/B (Emitted LI A/B)
Displays the emission intensity when the emission adjustment of the sensor
head A and B is set to AUTO. The measurement data is on hold when loading
of received light intensity is stopped.
While the emission adjustment is set to a fixed value, the display of the emission
intensity becomes gray out (disabled).
(8) Received Light Intensity Data Load Function
Replays the received light intensity waveform by loading them from the
controller.
3
[1] Load button
: Loads the received light intensity data from the controller.
[2] (Reverse) Play button
Shows the received light intensity data in the inside buffer.
: Replay (forward direction) the received light intensity data.
: Reverse (backward direction) the received light intensity data.
• The mouse operation is invalid (gray out status) when the received intensity
waveform data is not loaded or now in loading.
• When the received light intensity data has been already loaded, this function
is available even in offline status.
[3] (Reverse) Frame Advance Play button
: Replay the received light intensity data in frame advance (forward direction).
: Replay the received light intensity data in reverse frame advance (backward
direction).
Displays the received light intensity data in the internal buffer in frame advance.
Frames are advanced forward or played back by clicking these buttons.
• The mouse operation is invalid (gray out status) when the received intensity
waveform data is not loaded or now in loading.
• When the received light intensity data has been already loaded, this function
is available even in offline status.
3-20
Chapter 3
Explanation of Functions
[4] Stop button
: Stops replaying the received light intensity data.
Click the button while the received light intensity data in internal buffer is
replayed or reversed.
• This button is valid only when the received light intensity data is replayed or
reversed.
[5] Replay Speed Selection
You can choose the speed of replay or reverse data.
(9) Snap function
A snap (still image) of a received light intensity waveform in loading can be acquired.
[1] Snap Display ON/OFF
You can choose whether the acquired snap waveform is displayed or not.
If the function is selected, the snap waveform is displayed.
From the left, Display 1 (red), Display 2 (light blue), Display 3 (green), and
currently loaded and replayed received light intensity waveform (white)
• When a snap waveform is not acquired, mouse operation is disabled (gray out state).
[2] Snap Target Selection button
: Selects a snap target display number.
Up to three snap waveforms for each sensor head can be loaded. The snap of
selected number as a target can be loaded after the Load button (Load Head A /
Load Head B / Load Both) is pressed.
[3] Load Head A (B) button
: Loads the snap of the received light intensity waveform data of
sensor head A.
: Loads the snap of the received light intensity waveform data of
sensor head B.
By clicking the button, the snap waveform of the number selected as a snap
target can be loaded.
3-21
3
Chapter 3
Explanation of Functions
[4] Load Both button
: Loads the snap of the received light intensity waveform data of
both sensor heads A and B.
By clicking the button, the snap waveform of the number selected as a snap
target can be loaded.
(10) Data Clear button
: Clears the loaded received light intensity data.
All of loaded received light intensity data, received light intensity waveform
display, and snap waveform are reset.
(11) Display of Received Light Intensity waveform Setting Screen button
: Displays the received light intensity waveform setting screen.
3
“3-4-2 Received Light Intensity Waveform Screen” for the
Refer to
setting screen.
(12) Docking button
: Moves the setting screen right under the received light
intensity waveform screen.
• This button is valid only when the received light intensity waveform setting
screen is displayed.
• The received light intensity waveform setting screen goes out from a screen
at docking of two screens if the received light intensity waveform screen is
displayed at the position of the downward border of the desktop screen. In
this case press the docking button after moving the received light intensity
waveform screen above.
3-22
Chapter 3
Explanation of Functions
3-4-2 Received Light Intensity Waveform Setting Screen
The setting of the display method of the received light intensity waveform,
saving the loaded received light intensity data to a file, and readout of the
data from the file can be executed.
3
This screen can be displayed by pressing the “Setting Screen” button on the received
light intensity waveform screen.
(1) Chart Setting
[1] Data Load Interval of Received Light Intensity Graph
Specifies the update interval of the received light intensity graph. The unit is
millimeters second [ms].
• Due to the processing capacity of PC or any applications starting at the same time,
the specified update interval might not always match the setting value.
• This is a common setting for both sensor head A and B.
[2] Rectangular Graph Display Check
If selected, the waveform can be displayed in a rectangular graph.
3-23
Chapter 3
Explanation of Functions
[3] Surface Number display “Head A” “Head B”
If selected, numbers are given to the detected points as peak position of
received light intensity. This is convenient when “Specular reflection mode”
or “Transparent object” is selected. When “Transparent object” is selected,
the given numbers for the measurement surface are shown in red, and others
are shown in white. In other setting, the peak received light intensity
waveform is shown in red.
3
• This can be set respectively on the sensor head A and B.
(2) Surface Information “Head A” “Head B”
Up to eight items can be displayed as information acquired for each sensor head A
and B.
The information to be displayed is cell position and received light intensity
for each surface number.
(3) Data File
[1]Save button
Saves the received light intensity waveform data in a file (extension: lwd).
• When saving data, specify the file name to be saved on an appeared dialog
of the OS standard.
[2]Load button
Loads the received light intensity waveform data file (extension: lwd),
displays them on the received light intensity waveform screen.
• When loading data, specify the file name to be loaded on an appeared dialog
of the OS standard.
3-24
Chapter 3
Explanation of Functions
(4) File Comment Input
Any comments can be put in the received light intensity waveform data file.
The comment you put is displayed when the data file is loaded.
When saving the file, the input contents are written as a comment in the file.
(5) Setting Read button
When pressing this button, the already set measurement conditions for AiM
are affixed as character string at the head position of the file comment input
area. This is convenient for recording the setting conditions of the loaded
waveform data.
3-25
3
Chapter 3
Explanation of Functions
3-5 Buffering Display
Buffering screen can be displayed from the “File Menu” or “Buffering”
button on the main screen.
3-5-1 Buffering Screen
The measured data can be displayed in a graph and saved on the buffering
screen.
Furthermore, the measured data can be analyzed by using the major function.
3
About the buffering function
The measured data can be temporarily accumulated in the controller memory.
The accumulated data can be taken from the controller to PC.
For the detail of buffering, refer to
“HL-C2 Series USER’S MANUAL”
which is attached to the controller.
• The buffering function operates on the currently selected memory in the
controller.
“HL-C2 Series
• For the maximum accumulation amount, refer to
USER’S MANUAL”.
• Note that the data buffering function may restrict the sampling cycle.
3-26
Chapter 3
Explanation of Functions
(1) File Menu
“File(F)” – “Exit(X)” ········· Exits the measurement value screen.
• The buffering screen is closed when executing “Exit(X)” command. In the
same time, the buffering setting screen and the buffering information display
screen are also closed if they are displayed.
• AiM does not exit by executing the command.
“View(V)”-“OUT1 Display” … Displays the graph screen of OUT1 only.
“View(V)”-“OUT2 Display”… Displays the graph screen of OUT2 only.
• Displays which cannot be executed are disabled (gray out).
(2) Buffering Data Display Function
3
[1]Graph Display
Loads the accumulated buffering data of each OUT1 and OUT2 and displays
them in graph.
[2]Data Display
Displays the accumulated buffering data of each OUT1 and OUT2 in a table
format. Line numbers and measured values are displayed. The line number
corresponds to X axis, and the measured value corresponds to Y axis of the
graph.
[3]Accumulated Amount Display
: Displays the number of the accumulated data.
3-27
Chapter 3
Explanation of Functions
[4] Status
3
: Displays the accumulation status.
The below status are displayed:
• Non-buffering
This message will appear when the buffering is not started after powered-on or
initialization, or stopped during waiting for trigger after starting the buffering operation.
• Wait for Trigger
The system starts buffering operation and now in waiting for trigger status.
• Accumulating
The system starts buffering operation and now in accumulating the measured data.
• Accumulation completed
The specified number of data is accumulated, and the buffering operation is
stopped.
[5] Waveform/Data Change
: Changes the display screen for each OUT.
“Display Waveform and Data”
“Display Waveform only”
3-28
Chapter 3
Explanation of Functions
3-5-2 Buffering Control Tab Sheet
Buffering control and saving and readout of the measured data can be executed
on this sheet.
Furthermore, the setting screen and information screen can be opened from this
sheet.
[1] Start button
: Sends a command to the controller to start buffering operation.
[2] Stop button
: Sends a command to the controller to stop buffering operation.
[3] Load button
: Loads the buffering data accumulated in the controller.
This button is valid only in online mode.
[4] Self-stop
: Automatic and can stop buffering movement
A buffering mode is invalid for the timing fashion.
[5] Data Clear button
: Deletes the currently displayed buffering graph.
[6] Information screen button
: Displays the buffering information screen.
Refer to
“3-5-5 Buffering Information Display Screen”.
[7] Setting screen button
: Displays the buffering setting screen.
Refer to
“3-5-4 Buffering Setting Screen”.
[8] Docking button
: Moves the setting screen right under the buffering screen, and
moves the information display screen to upper left position of
the desktop.
3-29
3
Chapter 3
Explanation of Functions
• This button is valid only when the buffering setting screen or the buffering
information display screen is displayed.
• The buffering setting screen goes out from a screen at docking of two
screens if the buffering setting screen is displayed at the position of the
downward border of the desktop screen. In this case press the docking button
after moving the buffering screen above.
[9] Load button
: Loads a buffering data file (extension: bfd).
The loaded data is displayed on the buffering screen.
3
• When loading data, specify the file name to be loaded on an appeared dialog
of the OS standard.
[10] Save button
: Saves a buffering data in a file (extension: bfd).
• When loading data, specify the file name to be loaded on an appeared dialog
of the OS standard.
3-30
Chapter 3
Explanation of Functions
3-5-3 Vertical (Horizontal) Axis Measure Tab Sheet
Vertical Axis Measure of OUT 1(2)
The major line moves when moving the cursors of the top and bottom
Horizontal Axis Measure of OUT1 (2)
The major line moves when moving the cursors of the right and left
3
[1] Display
If selected, the measure is displayed on the displayed graph.
[2] Upper (red straight line) and Bottom (red dashed line)/Right (light blue
straight line) and Left(light blue dashed line)
• When enlarging or reducing the display of the vertical axis, the top and
bottom measure is overlapped to the axis of the top and bottom and hard to
be seen. It is displayed when moving the cursor of the top and bottom.
3-31
Chapter 3
Explanation of Functions
3-5-4 Buffering Setting Screen
Buffering accumulation method and chart setting for a graph display can be
specified. Furthermore, already loaded buffering data can be saved and read.
3
(1) Buffering Mode
: Selects a buffering mode.
• Continuous mode
Data accumulation in the controller memory will be started when
buffering operation is started, and will be stopped when the specified
amount of data is accumulated or when the Stop command is entered.
• Timing mode
After starting the buffering operation, the timing input becomes standby
mode. When the timing input turns off from on during the standby mode,
data accumulation in the controller memory will be started.
Accumulation will be stopped if the status is switched to the timing input on,
the specified amount of data is accumulated, or the Stop command is entered.
• Trigger Mode
When buffering operation starts, the trigger generation is turned to stand-by status.
The measurement data before and after the trigger point where the trigger is
generated is accumulated into the controller memory.
Accumulation stops when the accumulation amount has reached the setting
value or when buffering operation stops.
3-32
Chapter 3
Explanation of Functions
• Sample Trigger Mode
When buffering operation starts, the trigger generation is turned to stand-by status.
Accumulation of the measurement data for the setting sample trigger
accumulation amount starts after the setting trigger condition is generated.
After completion of sample trigger accumulation, the trigger generation is turned
to stand-by status again.
(In this case, the status is indicated as “Wait for trigger”.)
When the setting trigger condition is generated again, accumulation of the setting
sample trigger amount starts.
Accumulation operation stops when the accumulation amount has reached the
setting value or when buffering operation stops.
(2) Buffering Type Selection
: Selects a data accumulation target.
• OUT1
: Accumulates the measured data of OUT1 only.
• OUT2
: Accumulates the measured data of OUT2 only.
• OUT1&OUT2 : Accumulates the measured data of both OUT1 and OUT2.
(3) Specification of Data Accumulation: Accumulation Amount
Specify the number of data to be accumulated in the range of 1 to (Maximum
Accumulated Amount).
“HL-C2 Series USER’S MANUAL” for the details of Maximum
Refer to
accumulation amount.
(4) Sample Trigger Accumulation Amount
When the buffering mode is set to sample trigger mode, the sample trigger
accumulation amount can be set at every trigger generation.
Setting range is 1 to setting “accumulation amount”. The initial value is set to “1”.
Be sure to set the sample trigger accumulation amount so that (accumulation
amount) ÷ (sample trigger accumulation amount) is an integer value.]
(5) Buffering Rate Selection
: Sets the data accumulation interval.
Specifies the data accumulation interval for the measurement data that is
measured in accordance with the specified sampling cycle. Select among
x1(same as sampling period),x2, x4, x8, x16, x32, x64, x128, x256, x512,
x1024, x2048, x4096, x8192, x16384, and x32768.
Supplemental remarks
•If you set the buffering rate, all the measurement data can be accumulated.
In addition, if the data does not vary, you can prolong the accumulation
intervals and can accumulate data for a long time.
3-33
3
Chapter 3
Explanation of Functions
(6) Accumulation Time
Output time to need it for accumulation at day, time by an instant, the field
of the millimeters second.
But a buffering mode displays time to need it for sample trigger
accumulation in the case of the sample trigger mode.
(7) Max Number of Trigger
3
Displayed the number of the greatest trigger to accumulation completion.
The displayed value becomes ÷ (the number of the sample trigger
accumulation) (the number of the accumulation).
(8) Trigger Condition OUT1
Select a trigger condition of OUT1. You can set a buffering mode in the case
of a trigger mode or a sample trigger mode.
• At HI
• At LO
• At HIorLO
• When HI turns to GO
• When LO turns to GO
• When HIorLO turns to GO
• At an alarm occurred
• At an alarm released
(9) Trigger Condition OUT2
Select a trigger condition of OUT2. You can set a buffering mode in the case
of a trigger mode or a sample trigger mode.
• At HI
• At LO
• At HIorLO
• When HI turns to GO
• When LO turns to GO
• When HIorLO turns to GO
• At an alarm occurred
• At an alarm released
3-34
Chapter 3
Explanation of Functions
(10) Buffering Trigger Point
When the buffering mode is set to trigger mode, the measurement data can be
loaded by setting the data at the trigger generated as a trigger point. Setting
range is 1 to setting “accumulation amount”. The initial value is set to“10000”.
• If the “trigger point” is set to a larger value than the setting “accumulation
amount”, accumulation cannot be started.
• When the “Trigger Delay” function is set, the measurement data from the
trigger delayed data point after the setting trigger is generated can be loaded.
(11) Buffering Trigger Delay
This function is used for delaying the timing of trigger detection when the buffering
mode is set to trigger mode or sample trigger mode. Sets number of sampling times
as the trigger delay value. Setting range is 0 to 100000000. The status during the
trigger delay is indicated as “Accumulating”. The initial value is set to “0”.
For trigger mode: Loads the measured data from the actual trigger generated
point to the delayed trigger point that has been set for this function.
For sample trigger mode: Starts accumulation of the measured data from the
delayed trigger point that has been set for this function after the trigger was
generated. The function ignores even if a new trigger is generated during the
trigger delay operation.
When the buffering rate is already set, the trigger delay is counted with the
extended sampling in accordance with the setting.
(12) Buffering Setting Load button
: Loads the buffering setting from the controller.
(13) File Comment
Any comments can be put in the received light intensity waveform data file.
The comment you put is displayed when the data file is loaded. When saving
the file, the input contents are written as a comment in the file.
(14) Setting Read button
: Inputs the measurement conditions in the file comment.
When pressing this button, the already set measurement conditions for AiM are
affixed as character string at the head position of the file comment input area. This
is convenient for recording the setting conditions of the loaded waveform data.
If the button is pressed many times successively, the setting contents for the
number of times that you pressed the button are input.
3-35
3
Chapter 3
Explanation of Functions
3-5-5 Buffering Information Display Screen
3
The below values for OUT1 and OUT2 are displayed at this screen. Maximum
value, minimum value, average value, and medium value are calculated from
the buffering data.
(1)
All Data: Top/Bottom/Average Value/Medium Value
Maximum value, minimum value, average value, and medium value of the
buffering dada are displayed.
(2)
Vertical Axis Measure: Top/Bottom/Difference
Vertical axis measure position at top and bottom side and difference between
vertical axis measures are displayed.
This is displayed only when the vertical measure is displayed on status.
(3)
Horizontal Axis Measure: Left/Right/Difference
Horizontal axis measure position at left and right side and difference between
horizontal axis measures are displayed.
This is displayed only when the horizontal axis measure is displayed on status.
(4)
Between Horizontal Axis Measures: Top/Bottom/Average
Value/Medium Value
Maximum value, minimum value, average value, and medium value between
horizontal axis measures of the buffering data are displayed.
This is displayed only when the horizontal measure is displayed on status.
(5)
Trigger Counter Readout
When the buffering mode is set to sample trigger mode, the number of times
of the final trigger generation can be read out.
When readout of the trigger counter is performed, stop the data accumulation
operation and confirm the “Final Data Point”. If the result of “Status
Readout” is indicated as accumulation completed and the “Final Data Point”
is any values other than “0”, readout of the trigger counter can be started.
3-36
Chapter 3
Explanation of Functions
3-6 Emitted Light Intensity Search
This is a function to optimize the emitted light intensity.
The emitted light intensity search screen can be displayed by pressing the
button on the head setting tab sheet in the main
screen.
(1) Head
: Displays the sensor head to which the emitted light
intensity search is executed.
(2) Measurement Execute button
: Execute the light emission adjustment.
• The light emission adjustment will be started immediately after pressing the button.
The emitted light intensity will be adjusted so that the setting measurement surface
can be measured adequately. (When two or more surfaces are selected, the surface
with fewest emitted light intensity will be optimized.)
• The emitted light intensity is set within the “Emission Adjustment” setting
range of 0.04% to 100%. If the adjustment is failed within this range, the
emitted light intensity adjustment is set to “AUTO”.
(3) Emission Adjustment display
: Displays the loaded emitted light intensity.
(4) Close button
: Closes the emitted light intensity search screen.
The displayed value for the emission adjustment is set in the emission
adjustment input area of the sensor head setting tab sheet on the main screen.
Supplemental remarks
“HL-C2 Series USER’S
For the detail of this function, refer to
MANUAL” which is attached to the controller.
3-37
3
Chapter 3
Explanation of Functions
3-7 Calibration
This is a function to specify measurement value and correct value on any two points by
using arbitrary teaching method and calibrate them.
3
The calibration execution screen can be displayed by pressing the
: button on the head setting tab sheet in the main screen.
(1) Head
: Displays the sensor head to which calibration is executed.
(2) Measurement Value A/a
: First measurement value out of two teaching points
: Specifies the correct value to measurement value A.
(3) Measurement Value B/b
: Second measurement value out of two teaching points
: Specifies the correct value to measurement value B.
(4) Load A/B button
: Loads the measurement value of sensor head A.
: Loads the measurement value of sensor head B.
The measurement value is displayed in each area of sensor head A/B by pressing these buttons.
(5) Execute button
: Executes calibration.
(6) Cancel button
: Closes the calibration screen.
The previous loaded (or displayed) value will be deleted when this command is executed.
Supplemental remarks
“HL-C2 Series USER’S
For the detail of this function, refer to
MANUAL” which is attached to the controller.
3-38
Chapter 3
Explanation of Functions
3-8 Analog Scaling
This is a function to specify measurement value and voltage on any two
points by using arbitrary teaching method and execute the analog scaling with
the controller.
The analog scaling execution screen can be displayed by pressing the
: button on the OUT setting tab sheet in the main screen.
(1) Output
Displays the output of a target for analog scaling.
(2) Measurement Value A/a
: First measurement value out of two teaching points
: Specifies the voltage to measurement value A.
(3) Measurement Value B/b
: Second measurement value out of two teaching points
: Specifies the voltage to measurement value B.
(4) Load A/B
: Loads the measurement value of sensor head A.
: Loads the measurement value of sensor head B.
The measurement value is displayed in each area of sensor head A/B by pressing these buttons.
(5) Execute button
: Executes analog scaling.
(6) Cancel button
: Closes the analog scaling screen.
The previous loaded (or displayed) value will be deleted when this command
is executed.
Supplemental remarks
“HL-C2 Series USER’S
For the detail of each function, refer to
MANUAL” which is attached to the controller.
3-39
3
Chapter 3
Explanation of Functions
3-9 Setting List
The setting list shows the AiM memory contents and captures them.
3-9-1 Setting List Screen
Current contents of the memory in AiM are displayed.
3
The setting list can be displayed from “Setting List” of File Menu or by
pressing the smart icon on the main screen.
If the setting value becomes error, the value is displayed in red.
(1) Selection Memory
: Displays the selected memory number in green.
When alias of memory are not specified, only memory numbers are displayed
here.
3-40
Chapter 3
Explanation of Functions
(2) Display Memory Check
You can select whether hide or display the contents of M0 to M15(16
memories).
Select the memory you want to display.
When the setting list is displayed, only currently selected memory and error
memory are selected here as default.
(3) All Memory Check
: Selects all memories to display the contents.
: Releases the selection of all memories.
(4) Memory Contents List
Displays the memory contents in table format. Red items in the table have any
errors on a tolerance value, etc. If any, set the item again.
When an error occurs, there is the case that a memory in AiM may be out of
“HL-C2 Series USER’S
the setting range. For the setting range, refer to
MANUAL” which is attached to the controller.
(5) Update button
: Updates the display of the memory contents list.
(6) Capture button
: Displays the output screen to output the memory contents list.
Refer to
“3-13 Capture Screen”.
(7) Close button
: Closes the setting list screen.
3-41
3
Chapter 3
Explanation of Functions
3-10 Controller System Setting
This is a function to load and send the controller system setting.
3
The controller system setting screen can be displayed from the “Controller
system setting” of the system menu on the main screen.
(1)System Set: Load button
: Loads the system setting value for the controller from the controller.
(2)System Set: Send button
: Sends the system setting value for the controller to the controller.
(3)RS-232C
Executes RS-232C communication setting at the controller side and used for
performance setting of the measurement data output from RS-232C to
an external device.
Baud rate ······· ···················
Data length ····· ···················
Parity ············ ···················
RS-232C Output mode ··········
RS-232C Output type ············
3-42
Default:115200bps
Default:8 bit
Default:None
Default:Handshake
Default:OUT1
Chapter 3
Explanation of Functions
Press the "Save" button on the main screen after changing the settings, and
then restart the power supply of the controller to enable the settings.
Supplemental remarks
“HL-C2 Series USER’S
For the detail of this function, refer to
MANUAL” which is attached to the controller.
(4) Console
Executes setting for the console.
Display update cycle of measurement value
·································
Start up screen ··············
Panel lock ····················
Default:2(standard)
Default:Display OUT1
Default:OFF
The settings done on this tab sheet are not reflected in real time, they are
reflected as a measurement condition by pressing the system setting "Send"
button.
Supplemental remarks
“HL-C2 Series USER’S
For the detail of each function, refer to
MANUAL” which is attached to the controller.
(5) Priority Setting of Memory Change
: Executes memory change priority setting.
Select “Command” or “Terminal” for memory change priority setting.
If not selecting “Command”, the “Send All Memory to Controller” function
on the main screen becomes invalid.
(6) Remote Interlock Status
Displays the current remote interlock status.
“Open” or “Close” is displayed here.
(7) Close button
: Closes the controller system setting screen.
3-43
3
Chapter 3
Explanation of Functions
3-11 Software Operation Setting
Operation conditions of AiM can be set on this screen.
3
The software operation setting screen can be displayed from “Software
Operation Setting” of the system menu on the main screen.
(1)
Communication Type
Selects the connection method between AiM and the controller.
USB ·············· Specifies USB connection (Default).
RS-232C ········ Specifies RS-232C connection.
This function is valid only in offline mode.
3-44
Chapter 3
(2)
Explanation of Functions
RS-232C
Changes the communication settings when using RS-232C connection.
COM Port ········ Select COM port for connecting AiM and the controller.
Select among “COM1”, “COM2”, “COM3”, “COM4”,
“COM5”, “COM6”, “COM7”, “COM8” and “COM9”.
Default:COM1
Baud Rate ······ Select among “9600bps”, “19200bps”, “38400bps” and
“115200bps”.
Default:115200bps
Data Length ···· Select from “7 bit” or “8 bit”.
Default:8 bit
Parity ············ Select among “None”, “Even” and “Odd”.
Default:None
These settings can be configured only when RS-232C connection is selected
and the system is in offline mode.
(3) Common Setting
Time Out ········ Set the time-out length in case that the communication error
occurs between the controller and AiM.
Select among “1s”, “2s”, “3s”, “5s” and “10s”.
Default:10s
(4) Initialize
: Initializes the communication setting.
By pressing the “Initialize” button, whole selected communication settings
are initialized. However, the destination of USB connection is not initialized
in this case.
3-45
3
Chapter 3
Explanation of Functions
(5)
USB
Selects the destination of USB connection.
All selectable USB ID and its alias (if you set it) are displayed here.
• First registered USB ID is shown as a default.
• The destination of USB connection can be selected only when USB is
selected as the communication type and in offline mode.
• If there is no destination to be selected, carry out appropriate USB driver installation.
(6)
Copy Memory in AiM
Copies the memory status in AiM.
3
All selectable memory numbers and their code name (if you set it) are
displayed.
Copy starts by specifying the copy source and copy destination and pressing
Execute button.
Copy From······ Select the memory number of the copy source.
Copy To ········· Select the memory number of the copy destination.
Copy ············· Executes memory copy.
This function is valid only when the copy source and copy destination are selected.
Moreover, it becomes invalid when the same memory is selected to both of the
copy source and copy destination. If the currently selected memory number is
selected as the copy destination, the setting is reflected to corresponding screens.
(7)
CSV Setting
Sets the output specification of CSV format from AiM.
Separator setting··· Select a separator character.
Select among comma “,”, semicolon “;”, and tab.
Default: comma “,”
Decimal point setting Select decimal point character.
Select period “.” or comma “,”.
Default: period “.”
3-46
Chapter 3
Explanation of Functions
(8) Alias Setting of Controller
Sets alias (proper name) to the controller which is connected to AiM.
Alias can be input by double-clicking on the alias-input area.
If selected “Display All”, all controllers saved in the management file can be
displayed. If not selected here, the controller that PC detected when AiM
started-up is displayed.
When you did not input any alias or when you delete the preset alias, they are
not saved in the management file.
(9) Alias Setting of Memory in Controller
Sets alias (proper name) to the memory number in the controller.
This is convenient for future use if used application or setting conditions are
registered here.
You can input alias to “M0 to M15” in this list.
Alias can be input by double-clicking on the alias-input area.
When you did not input any alias or when you delete the preset alias, they are
not saved in the management file.
If you want to delete the input alias, double-click on the alias-input area and
delete them.
3-47
3
Chapter 3
Explanation of Functions
(10) Policy
You can set the priority of send/receive between AiM and the controller in PC.
In case that any other applications are in operation in low-spec PC, setting
here to higher priority might make smooth operation.
Priority of Send/Receive·····Sets the priority of communication.
Select among “Very Low”, “Low”,
“Medium(standard)”, and “High”.
Default:Medium (standard)
(11) Setting
3
: Reflects the changed settings for the Software Operation Setting.
(12) Cancel
: Cancels the setting change, and closes the screen.
(13) Change Indication Unit
This function is used for changing the indication unit of the measurement value
Select among “mm unit”, “um unit”.
(14) Display Update Cycle of Measurement Value
Select the display update cycle of measurement value that is displayed on the
measurement value display screen of AiM.
Select among “2s”, “1s”, “0.5s”, and “0.1s”.
3-48
Chapter 3
Explanation of Functions
3-12 Version Display
Information on the device connected to AiM and the management file are
displayed here.
[1]
[2]
[3]
[5]
[4]
[6]
The version display screen can be displayed from “Version” of Help menu on
the main screen.
[1] Type and Version Information of AiM
Displays the version information of this application software (HL-C2 AiM).
[2] Type and Version Information of Controller
Displays the type and version information of a connected controller.
This is displayed only in online mode.
[3] Information of Sensor Head A
Displays the type of the sensor head that is connected as a sensor head A.
This is displayed only in online mode.
[4] Information of Sensor Head B
Displays the type of the sensor head that is connected as a sensor head B.
This is displayed only in online mode.
[5] Manage File Information
Displays the file information of the management file that is used in AiM.
[6] Close
Closes this screen.
3-49
3
Chapter 3
Explanation of Functions
3-13 Capture Function
This is a function to capture and output the display screen (window with
capture button).
[1]
[2]
3
The capture function screen can be displayed by pressing “Capture” button at
the bottom of each screen.
(1) Capture Setting
[1] Output Classification
Selects the output destination when executing the function.
Print ········· Outputs to a printer.
File··········· Outputs an image file (jpg or bmp format) by pressing “Execute”
button.
*Outputs CSV file for the setting list screen.
Clip Board ·· Outputs to a clipboard by pressing “Execute” button.
Supplemental remarks
A dialog will be displayed when selecting a file and pressing “Execute”
button. Select a file to be saved on the dialog box.
[2] Print Setting
This command is valid only when the output classification is set to
“Print”.
Number of Copies ················· Sets the number of copies.
: Executes printer setting.
(2) Execution
: Executes output corresponding to the selected output classification.
(3) Cancel
: Cancels the output and closes this screen.
3-50
4
Error Message
4-1 Dialog Display ············ 4-2
4-2 Error Description ·········· 4-3
4-2-1 Management File Read Error ··4-3
4-2-2 Management File Write Error ··4-3
4-2-3 Communication Time Out ·····4-3
4-2-4 Communication Response Error4-4
4-2-5 File Read Error··············4-4
4-2-6 File Write Error ··············4-4
4-2-7 Out of Memory ··············4-5
4-2-8 RS-232C Open Error ·········4-5
4-2-9 RS-232C Send Error ·········4-5
4-2-10 RS-232C Communication Device
Error ···························4-6
4-2-11 USB Send Error ············4-6
4-2-12 USB Open Error ············4-7
4-2-13 USB Communication Device Error
·······························4-7
4-2-14 Value Exceeds Its Range ····4-7
4-2-15 Failed to execute Emitted Light
Intensity Search. ················4-8
4-2-16 Printer Not Found··············4-8
4-2-17 Buffering in progress ········4-8
4-2-18 Send After Setting Command of
Memory Change Priority Setting ··4-9
4-2-19 Failed to Create dialog. ······4-9
4-2-20 ~ is used by HL-C2AiM. ····4-9
4-1
4
Chapter 4
4-1
Error Message
Dialog Display
The dialog shown below appears on the screen if an error occurs during use of
AiM.
A message corresponding to respective errors is
displayed on the “Error Message”.
Error Messages on the AiM and their cause and corrective actions will be
described in the following pages.
4
4-2
Chapter 4
4-2
Error Message
Error Description
4-2-1 Management File Read Error
Error Message
“Management File Read Error”
[Cause]
• The file is being used in other program.
• The file does not exist.
[Corrective Action]
• Make sure that that the file is not being used in other programs.
• Confirm the file name.
4-2-2 Management File Write Error
Error Message
“Management File Write Error”
[Cause]
• The file is being used in other program.
• The file is write-inhibited.
• Insufficient free space
[Corrective Action]
• Make sure that the file is not being used in other programs.
• Enable write into the file.
• Reserve sufficient free space.
4-2-3 Communication Time Out
Error Message
“Communication Time Out”
[Cause]
• Controller power is off.
• Wrong COM port/USB device is specified in the setting of communication
condition.
• Controller is not connected to the connected COM port/USB device.
• Time out period specified in the communication condition is too short.
• Data transmission time from the controller is too long.
• Data is destroyed by electrical noise.
4-3
4
Chapter 4
Error Message
[Corrective Action]
• Turn on the power of controller.
• Specify the appropriate COM port/USB device.
• Connect the controller.
• Specify longer time out period.
• Remove electrical noise.
4-2-4 Communication Response Error
Error Message
“Communication Response Error”
[Cause]
• Data transmission time from the controller is too long.
• Data is destroyed by electrical noise.
4
[Corrective Action]
• Specify longer time out period.
• Remove electrical noise.
4-2-5 File Read Error
Error Message
“File Read Error”
[Cause]
• The file is being used in other program.
• The file does not exist.
[Corrective Action]
• Make sure that the file is not being used in other programs.
• Confirm the file name.
4-2-6 File Write Error
Error Message
“File Write Error”
[Cause]
• The file is being used in other program.
• The file is write-inhibited.
• Insufficient free space
4-4
Chapter 4
Error Message
[Corrective Action]
• Make sure that the file is not being used in other programs.
• Enable write into the file.
• Reserve sufficient free space.
4-2-7 Out of Memory
Error Message
“Out of Memory”
[Cause]
• Insufficient memory
[Corrective Action]
• Quit other applications if executed.
• Increase memory.
4-2-8 RS-232C Open Error
Error Message
“RS-232C Open Error”
[Cause]
• Wrong COM port is specified in the setting of communication condition.
[Corrective Action]
• Specify the appropriate COM port.
4-2-9 RS-232C Send Error
Error Message
“RS-232C Send Error”
[Cause]
• Controller power is off.
• Wrong COM port is specified in the setting of communication condition.
• Controller is not connected to the connected COM port.
• Data is destroyed by electrical noise.
[Corrective Action]
• Turn on the power of controller.
• Specify the appropriate COM port.
• Connect the controller.
• Remove electrical noise.
4-5
4
Chapter 4
Error Message
4-2-10 RS-232C Communication Device Error
Error Message
“RS-232C Communication Device Error”
[Cause]
• Controller power is off.
• Wrong COM port is specified in the setting of communication condition.
• Controller is not connected to the connected COM port.
• Data is destroyed by electrical noise.
• Time out period specified in the communication condition is too short.
• Data transmission time from the controller is too long.
[Corrective Action]
4
• Turn on the power of controller.
• Specify the appropriate COM port.
• Connect the controller.
• Remove electrical noise.
• Specify longer time out period.
4-2-11 USB Send Error
Error Message
“USB Send Error”
[Cause]
• Controller power is off.
• Wrong USB device is specified in the setting of communication condition.
• Controller is not connected to the connected USB device.
• Data is destroyed by electrical noise.
[Corrective Action]
• Turn on the power of controller.
• Specify the appropriate USB device.
• Connect the controller.
• Remove electrical noise.
4-6
Chapter 4
Error Message
4-2-12 USB Open Error
Error Message
“USB Open Error”
[Cause]
• Wrong USB device is specified in the setting of communication condition.
[Corrective Action]
• Specify the appropriate USB device.
• Install the USB driver.
4-2-13 USB Communication Device Error
Error Message
“USB Communication Device Error”
[Cause]
• Controller power is off.
• Controller is not connected to the connected USB device.
• Time out period specified in the communication condition is too short.
• Data transmission time from the controller is too long.
• Data is destroyed by electrical noise.
[Corrective Action]
• Turn on the power of controller.
• Specify the appropriate USB device.
• Connect the controller.
• Specify longer time out period.
• Remove electrical noise.
4-2-14 Value Exceeds Its Range
Error Message
“Value Exceeds Its Range”
[Cause]
• Data value exceeds the input range.
[Corrective Action]
• Reenter the data to keep it within the range.
• Reenter the data value indicated in red in the setting list screen.
4-7
4
Chapter 4
Error Message
4-2-15 Failed to execute Emitted Light Intensity Search.
Error Message
“Failed to execute Emitted Light Intensity Search.”
[Cause]
• Emitted light intensity is specified within the range from “0.04% Fixed” to
“100% Fixed” in the “Emission Adjustment” function. If the optimum
setting of emission light intensity is not acquired within the range described
above, the “Emission Adjustment” is switched to “Auto” and the search may
fail.
[Corrective Action]
• When emitted light intensity search fails, check the received light waveform
and manually adjust it.
4
4-2-16 Printer Not Found
Error Message
“Printer Not Found”
[Cause]
• Printer is not connected.
[Corrective Action]
• Connect the printer.
4-2-17 Buffering in progress
Error Message
“Buffering in progress”
[Cause]
• The application terminated while the controller is executing buffering.
• The controller is executing buffering from the application other than the
AiM.
[Corrective Action]
• Reexecute after the current buffering process is completed.
4-8
Chapter 4
Error Message
4-2-18 Send After Setting Command of Memory
Change Priority Setting
Error Message
“Send After Setting Command of Memory Change Priority Setting.”
[Cause]
• “Priority Setting of Memory Change” on the controller is specified to
“Terminal”.
[Corrective Action]
• Change the setting of “Priority Setting of Memory Change” to “Command”
on the Controller System Setting Screen and send the system setting
(“System Setting: Send”).
4-2-19 Failed to Create dialog.
Error Message
“Failed to Create dialog.”
[Cause]
• ActiveX control cannot be initialized.
• Dynamic link library cannot be initialized.
• Insufficient memory
[Corrective Action]
• Reinstall the application.
• Quit other applications if executed.
• Increase memory.
4-2-20 ~ is used by HL-C2AiM.
Error Message
“~ is used by HL-C2AiM.”
[Cause]
• The specified AiM configuration file is already in use.
[Corrective Action]
•・Edit on the AiM screen of which the AiM configuration file is already
opened.
• If the specification is incorrect, specify the correct AiM configuration file.
4-9
4
Chapter 4
Error Message
MEMO
4
4-10
Appendix
Apx
1 Index ·······································2
1
Appendix
1
Index
A
F
Analog Scaling ........................... 3-40
Application Installation.................. 1-3
Failed to Create dialog. ................ 4-9
Failed to execute Emitted Light
Intensity Search........................ 4-8
File Menu ..................................... 3-2
File Read Error............................. 4-4
File Write Error ............................. 4-4
For Correct Use............................... 7
Function Launch Area .................. 3-7
B
Buffering Control Tab Sheet........ 3-29
Buffering Display ........................ 3-26
Buffering in progress .................... 4-8
Buffering
Information
Display
Screen .................................... 3-37
Buffering Screen......................... 3-26
Buffering Setting Screen............. 3-32
Apx
G
General Description...................... 1-2
C
H
Calibration .................................. 3-39
Capture Function ........................ 3-51
Cautions on Handling Laser Light.... 7
Common Setting Tab Sheet ........ 3-14
Communication Response Error... 4-4
Communication Time Out ............. 4-3
Configuration Image Output Area 3-11
Contents .......................................... 4
Controller Setting Area ............... 3-10
Controller System Setting ........... 3-43
Correct Handling ............................. 7
Head A & Head B Setting Tab Sheet
............................................... 3-12
Help Menu.................................... 3-6
HL-C2 Functions .......................... 1-4
I
Instruction for Installation.............. 1-2
M
Main Screen ................................. 3-7
Management File Read Error ....... 4-3
Management File Write Error ....... 4-3
manual construction ........................ 3
Measurement Value Display....... 3-15
Menu Bar ..................................... 3-2
D
Dialog Display .............................. 4-2
Display of Received Light Intensity
Waveform................................ 3-18
N
E
Note ............................................. 1-4
Emitted Light Intensity Search .... 3-38
Error Description........................... 4-3
Error Message.............................. 4-1
Explanation of Functions .............. 3-1
O
Operating Environment ................ 1-2
Operating Instructions .................. 2-1
Operating Procedures
2
Appendix
Startup to Measurement ...........2-2
Out of Memory ............................. 4-5
OUT1 & OUT2 Setting Tab Sheet3-13
P
Setting List Screen......................3-41
Software Operation Setting .........3-45
Standards ........................................7
Symbol Indications...........................6
System Menu................................3-6
Printer Not Found......................... 4-8
Prior to Use.................................. 1-1
U
R
USB Open Error............................4-7
USB Send Error ............................4-6
Use Condition ..................................8
Received Light Intensity Waveform
Screen.................................... 3-18
Received Light Intensity Waveform
Setting Screen........................ 3-23
RS-232C Open Error.................... 4-5
RS-232C Send Error ...... 4-5, 4-6, 4-7
V
Value Exceeds Its Range ..............4-7
Version Display ...........................3-50
Vertical (Horizontal) Measure Tab
Sheet.......................................3-31
S
W
Safety Precautions ...........................6
Send After Setting Command of
Memory Change Priority Setting4-9
Setting List ................................. 3-41
Whole
Instruction
Manual
Construction .................................1
Window Menu ...............................3-6
3
Apx
Appendix
Revision history
Released date
Revision No.
November 2007
May 2008
September 2009
June 2010
February 2011
October 2012
December 2012
June 2013
September 2013
July 2014
April 2015
First release
Second release
Third release
Forth release
Fifth release
Sixth release
Seventh release
Eighth release
Ninth release
Tenth release
Eleventh release
Apx
4
Please contact ..........
■ Overseas Sales Division (Head Office): 2431-1 Ushiyama-cho, Kasugai-shi, Aichi, 486-0901, Japan
■ Telephone: +81-568-33-7861
■ Facsimile: +81-568-33-8591
panasonic.net/id/pidsx/global
For sales network, please visit our website.
April, 2015 PRINTED IN JAPAN
© Panasonic Industrial Devices SUNX Co., Ltd. 2015
ME-HLC2AIM-13