1
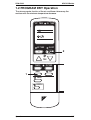
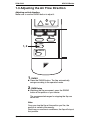
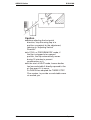
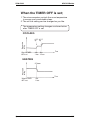
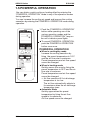
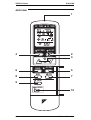
ARC412 Series
Si10-416A
ARC412A6
1
OFF TIMER
ON TIMER
HR.
HR.
C
OFF TIMER
ON / OFF
2
3
4
TEMP
CANCEL
ON TIMER
5
6
MODE
8
FAN
7
SWING
9
POWERFUL
10
60
Remote Controllers
Si10-416A
ARC412 Series
1. SIGNAL TRANSMITTER
Send signals to the air conditioner.
2. ON/OFF button
Press once to start operation.
Press once more to stop operation.
3. ROOM TEMPERATURE
ADJUSTING buttons
Use these buttons to set the room temperature as you
like.
Temperature setting range
COOL ... 18°C - 32°C
HEAT ... 14°C - 28°C
AUTO ... 18°C - 28°C
4. TIMER OFF SETTING button
5. TIMER ON SETTING button
6. TIMER CANCEL button
7. AIR FLOW ADJUSTING button
Five choices are available for airflow setting. "AUTO",
the computer changes the air flow automatically
according to the room temperature.
8. OPERATION MODE SELECTOR button
9. SWING button
10. POWERFUL mode button
Note:
Display monitor function :
You can check or change settings when the air
conditioner is stopped. To check, press once the button
for the setting you are checking. To change the setting,
press the same button again while the display is ON.
Unit operation panel and display panel
OPERATION indicator lamp
(green)
Lights up on system activation
irrespective of operation mode.
TIMER indicator lamp
(green)
Lights up when “TIMER ON” or “TIMER
OFF” countdown is in progress.
Temperature sensor
monitors room temperature.
ON/OFF button
Signal receiver
Receives signals from the remote controller.
Remote Controllers
61
Si10-416A
ARC412 Series
1. ARC412 Series
1.1 Preparation Before Operation
Setting dry batteries
Remote controller
Address switch
(Address switch is
normally set to 1)
Operation
183
ARC412 Series
Si10-416A
Setting dry batteries
1. Slide the back cover of the remote controller in the direction of
the arrow and take it off.
2. Set two dry batteries in accordance with the indications of (+) and (–).
Note on batteries
1Use two LR03 (AAA) batteries.
1Never mix new and old batteries or different type of batteries.
1Never try to charge the batteries.
1Used-up batteries must be taken out all at once and disposed-off properly.
1In case the remote controller will not be used for a long time take
out all batteries in order to prevent liquid leak from the batteries.
1Batteries life is about a year under normal use conditions.
Replace the batteries with new ones when, on pressing a button,
the display shows all figures at the same time and the remote
controller does not send signals to the air conditioner.
Address switch
1Address switch is used for the installation of 2 units in one room.
Contact the shop you purchased this DAIKIN room air conditioner
if you would like to have 2 units/room.
1Signals cannot be received if the address switch selects a signal
different from that of the main unit.
184
Operation
Si10-416A
ARC412 Series
Use
1When using, aim the signal transmitter at
the air conditioner.
The operative distance between the
remote controller and the air conditioner
is about 7 m on a straight line.
1A “peep” sound is heard when the unit
receives a signal from the remote controller.
1If there is an obstruction between the
signal transmitter and the receiver, such
as curtains or doors, the air conditioner
will not operate.
1Signal may not be received in a room with
an electronic ballast type fluorescent
lamp. Please consult with your dealer
before buying a new fluorescent lamp.
1If another electric appliance is operated by
the remote controller, move the appliance
away, or consult with your dealer.
Operation
185
ARC412 Series
Si10-416A
Caution
1Never throw the remote controller nor strongly shock it.
Do not get it wet, either.
1Take care not to let children play with the buttons.
If installed on a wall, etc.
1To prevent loss or damages of the remote
controller, fix it on a wall or pillar using a
remote controller holder. First, check that
the signals from the remote controller in
the place you chose can reach the air
conditioner, and then fix it in the place.
1Avoid fixing the remote controlelr at such
corner as marked by
in the
figure, near a heater, or in a place
exposed to sun light.
186
Operation
Si10-416A
ARC412 Series
1.2 PROGRAM DRY Operation
The microcomputer function of the air conditioner takes away the
moisture with the minimum temperature decrease.
OFF TIMER
ON TIMER
OFF TIMER
ON / OFF
2
TEMP
CANCEL
MODE
ON TIMER
FAN
1
SWING
POWERFUL
Operation
187
ARC412 Series
Si10-416A
1. Set the mode to “
” (PROGRAM DRY).
2. Press ON/OFF button.
The OPERATION indicator lamp lights up.
To stop
Press ON/OFF button.
The OPERATION indicator lamp goes out.
The microcomputer functions determining the
appropriate room temperature and humidity, and the
operating cycles of the external compressor and
interior fan, which allow maintaining these levels
based on the ambient temperature and humidity at the
time of switching on this function.
Note:
The PROGRAM DRY function is designed primarily
for dehumidification and not for lowering room
temperature – but remember a dehumidified room will
always “feel” cooler than a humid one.
PROGRAM DRY operation is not possible in ambient
below 18°C.
There is no need to set the THERMOSTAT SETTING
selector or FAN SPEED selector as PROGRAM DRY
operates independently of them.
188
Operation
Si10-416A
ARC412 Series
1.3 Adjusting the Air Flow Direction
Adjusting vertical direction:
Make sure to use the SWING button to adjust it.
TEMP
CANCEL
MODE
ON TIMER
FAN
SWING
1, 2
POWERFUL
1. SWING
Press the SWING button. The flap automatically
swings according to the operation mode.
2. SWING stop
Watching the flap movement, press the SWING
button at the position of your choice.
The recommended ranges for stopping the flap are
shown left.
Note:
Once you stop the flap at the position you like, the
position is saved in the memory.
Next time you use the air conditioner, the flap will stop at
that position.
Operation
189
ARC412 Series
Si10-416A
Caution
1Before adjusting the horizontal
direction, stop the swing flap at a
position convenient for the adjustment,
referring to “Adjusting Vertical
Direction”.
1In COOL or PROGRAM DRY mode, if
the flap is stopped at an upward
position, the flap automatically moves
during 15 minutes to prevent
condensation on it.
1At the start of HEAT mode, human bodies
feel uncomfortable if directly exposed to the
air flow even if it is warm.
So DAIKIN has adopted the THREE-STEP
Flow system, to provide a comfortable warm
air around you.
190
Operation
Si10-416A
ARC412 Series
THREE-STEP Flow system
Operation
191
ARC412 Series
Si10-416A
Step 1 ......
At the start of HEAT mode, the air blows out horizontally.
Step 2 ......
When the air temperature has risen, the unit starts
warming up the floor.
Step 3 ......
When the flow and the walls are warmed up, the warm
air starts blowing toward the area around people.
Left/Right air flow direction adjustment
The vertical louvers may be adjusted as you please.
Note:
If adjustment is carried out during flap swing, the flap
may strike your hand. Make adjustments once the swing
has completely stopped at the appropriate position.
192
Operation
Si10-416A
ARC412 Series
1.4 Operation of TIMER
OFF TIMER
ON TIMER
HR.
HR.
C
OFF TIMER
ON / OFF
1
TEMP
CANCEL
ON TIMER
3
2
MODE
FAN
SWING
POWERFUL
Operation
193
ARC412 Series
Si10-416A
1.TIMER OFF
Stops operation at the desired time.
The time setting advances one hour each time you
push the timer off button. You can program operation
to be switched off up to nine hours in advance. When
the timer is set, the timer lamp on the unit indicator
panel lights.
2.TIMER ON
Starts operation at the desired time.
The time setting advances one hour each time you
push the timer on button. You can program operation
to be switched on up to twelve hours in advance.
When the timer is set, the timer lamp on the unit
indicator panel lights.
TIMER OFF and ON can also be used in combination.
3.To cancel
Press the TIMER CANCEL button.
When you use the unit by the timer ON/OFF functions,
it is likely that the actual operative time span varies
from that set by the user (Maximum approx.: 10
minutes).
194
Operation
Si10-416A
ARC412 Series
When the TIMER OFF is set;
1. The microcomputer controls the room temperature
to ensure your comfortable sleep.
2. The air flow setting can be changed as you like.
The temperature setting changes as shown below
after TIMER OFF is set.
COOLING
Temperature
setting
0.5˚C 0.5˚C
up
up
Time
When the TIMER
OFF is set
after after
1 hour 1.5 hour
HEATING
Temperature
setting
2˚C down
Time
When the TIMER
OFF is set
Operation
after
1 hour
195
ARC412 Series
Si10-416A
1.5 POWERFUL OPERATION
You can obtain a quick cooling or heating effect by entering the
“POWERFUL OPERATION” mode in any of the operation modes
during operation.
You can increase the cooling air speed and improve the cooling
sensation by entering the POWERFUL OPERATION mode during
operation.
1. Push the “POWERFUL OPERATION”
button while operating one of the
various operation modes and the
“POWERFUL OPERATION” lamp on
the unit’s indicator panel lights.
1To cancel POWERFUL OPERATION,
push the POWERFUL OPERATION
button once more.
POWERFUL OPERATION
1When in cooling/dry mode
Increase the cooling sensation by
fixing the preset temperature to 18˚C
and the air flow rate to maximum.
Preset temperature and air flow speed
cannot be changed.
1When in heating mode
Quickly warms the room by fixing the
preset temperature to 28˚C and the air
flow rate to maximum.
Preset temperature and air flow speed
cannot be changed.
→ Air flow remains still if air discharge
temperature is too low.
The air flow automatically adjusts to
its maximum when the air discharge
temperature rises.
1Automatic Mode
Quickly approaches the preset
temperature by fixing the air flow
speed to its maximum.
Air flow speed cannot be changed.
196
Operation