1
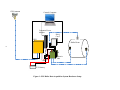
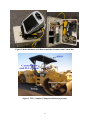
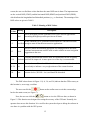
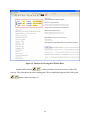
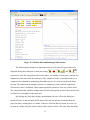
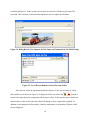
2. Government Accession No. 1. Report No. Technical Report Documentation Page 3. Recipient's Catalog No. FHWA/TX-12/0-6992-1 4. Title and Subtitle 5. Report Date DEVELOPMENT OF TTI’S ASPHALT COMPACTION MONITORING SYSTEM Published: July 2012 6. Performing Organization Code 7. Author(s) 8. Performing Organization Report No. Wenting Liu, Tom Scullion, and Emad Kassem Report 0-6992-1 9. Performing Organization Name and Address 10. Work Unit No. (TRAIS) Texas Transportation Institute The Texas A&M University System College Station, Texas 77843-3135 11. Contract or Grant No. 12. Sponsoring Agency Name and Address 13. Type of Report and Period Covered Texas Department of Transportation Research and Technology Implementation Office P. O. Box 5080 Austin, Texas 78763-5080 Technical Report: September 2010–August 2011 Project 0-6992 14. Sponsoring Agency Code 15. Supplementary Notes Project performed in cooperation with the Texas Department of Transportation and the Federal Highway Administration. Project Title: Development of Practical Field Guidelines for the Compaction of HMA or WMA URL: http://tti.tamu.edu/documents/0-6992-1.pdf 16. Abstract In recent years, the Texas Department of Transportation has made significant progress with the development and implementation of new technologies to measure the uniformity of new hot mix asphalt layer construction. Early studies focused on the development of the Pave-IR system for checking temperature uniformity during mat placement. In Project 0-6992, researchers took this check one step further by developing an accurate global positioning system tracking system for compaction rolling so that the compaction effort applied can be monitored for 100 percent of the new surface. Additional sensors were also included in the system, including two temperature sensors and an accelerometer, to monitor whether the roller is vibrating. The new system can be mounted on any roller in a matter of minutes, and it provides the roller operator with real-time color displays of: The number of passes of the entire mat. The compaction effectiveness (this study found that better compaction was found directly under the center portion of the roller than at the roller edges). The temperature at the first pass of the roller. This report presents details of the hardware and software developed in this study. The system was field tested on a number of new overlay projects in Texas. Those results will be reported in later reports from this study. 17. Key Words 18. Distribution Statement HMA Compaction, Mat Temperatures, Compaction Effectiveness, Air Voids, QC/QA Testing No restrictions. This document is available to the public through NTIS: National Technical Information Service Alexandria, Virginia 22312 http://www.ntis.gov 19. Security Classif. (of this report) 20. Security Classif. (of this page) 21. No. of Pages Unclassified Unclassified 52 Form DOT F 1700.7 (8-72) 22. Price Reproduction of completed page authorized DEVELOPMENT OF TTI’S ASPHALT COMPACTION MONITORING SYSTEM by Wenting Liu, P.E. Associate Research Engineer Texas Transportation Institute Tom Scullion, P.E. Senior Research Engineer Texas Transportation Institute and Emad Kassem Associate Research Scientist Texas Transportation Institute Report 0-6992-1 Project 0-6992 Project Title: Development of Practical Field Guidelines for the Compaction of HMA or WMA Performed in cooperation with the Texas Department of Transportation and the Federal Highway Administration Published: July 2012 TEXAS TRANSPORTATION INSTITUTE The Texas A&M University System College Station, Texas 77843-3135 DISCLAIMER The contents of this report reflect the views of the authors, who are responsible for the facts and the accuracy of the data presented herein. The contents do not necessarily reflect the official view or policies of the Federal Highway Administration (FHWA) or the Texas Department of Transportation (TxDOT). This report does not constitute a standard, specification, or regulation, nor is it intended for construction, bidding, or permit purposes. The United States Government and the State of Texas do not endorse products or manufacturers. Trade or manufacturers’ names appear herein solely because they are considered essential to the object of this report. The researcher in charge was Tom Scullion, P.E. (Texas, #62683). v ACKNOWLEDGMENTS This project was made possible by the Texas Department of Transportation in cooperation with the Federal Highway Administration. In particular, the guidance and technical assistance provided by the project director, Jeremy Dearing, P.E., of TxDOT’s Lubbock District, and the program coordinator, Dr. German Claros, P.E., proved invaluable. Many thanks to the technical staff of the Bryan, Yoakum, Austin, and Waco Districts who provided excellent field support when conducting the field testing in this project. vi TABLE OF CONTENTS Page List of Figures .............................................................................................................................. viii List of Tables .................................................................................................................................. x Chapter 1. Introduction ................................................................................................................... 1 Chapter 2. System Components ...................................................................................................... 3 Chapter 3. Installing the System on a Typical Roller ..................................................................... 7 Chapter 4. Collecting Data with the Asphalt Compaction Monitoring System ............................ 11 Chapter 5. Post-Processing and Display Software ........................................................................ 23 Single File Post Processing ............................................................................................... 27 Loading and Processing the Data from Multiple Files in a Folder ................................... 34 Chapter 6. Using the Data Generated by the Compaction Monitoring System ............................ 37 Examples of Different Outputs Obtained ......................................................................... 37 Next Steps in System Implementation .............................................................................. 40 vii LIST OF FIGURES Page Figure 1. GPS Roller Data Acquisition System Hardware Setup. .................................................. 5 Figure 2. Roller Hardware with Data Acquisition Computer and Control Box. ............................ 6 Figure 3. TTI’s Complete Compaction Monitoring System. .......................................................... 6 Figure 4. Diagram of Sensor Location in the TTI Asphalt Compaction System. ........................... 7 Figure 5. Infrared Sensor Installation. ............................................................................................ 8 Figure 6. Accelerometer Mounting Example.................................................................................. 9 Figure 7. The CompactView Main Menu Screen for Field Data Collection. ............................... 11 Figure 8. Field-Testing Toolbar Button. ....................................................................................... 12 Figure 9. GPS Serial Port Parameters Setup Screen. .................................................................... 13 Figure 10. Finding the COM Port on the Computer. .................................................................... 13 Figure 11. GPS Satellites Available to the System. ...................................................................... 14 Figure 12. Function of Viewing the GPS Raw Data..................................................................... 16 Figure 13. GPS Raw Data and Running Path Function. ............................................................... 17 Figure 14. Dialog Box for User Input of the File Name and Comments for the Field Testing............................................................................................................................... 18 Figure 15. Use of Browse Button to Select File from Folder. ...................................................... 18 Figure 16. Real-Time Display of Compaction Effectiveness. ...................................................... 19 Figure 17. Sensor Display from Data Acquisition Screen. ........................................................... 19 Figure 18. GPS Location Accuracy Chart. ................................................................................... 21 Figure 19. Color-Coded Compaction Effort Map—Real-Time Displayed. ................................. 22 Figure 20. Post-Processing Toolbar and Main Interface. ............................................................. 23 Figure 21. Standard Effectiveness Factor Chart for 7 ft Wide Roller. ......................................... 25 Figure 22. Roller Effectiveness Factor Model Selection Dialog Box. ......................................... 26 Figure 23. Recommended Roller Effectiveness Distribution Based on Project 0-6992. .............. 27 Figure 24. Selection of the Test File to Be Processed. ................................................................. 28 Figure 25. First Display Screen Showing the Entire Section Length. .......................................... 28 Figure 26. Compaction Effort Color Map View of the entire Loaded Data File. ......................... 29 Figure 27. Highlighting the Area to Zoom Into. ........................................................................... 30 Figure 28. Zoomed View of Color-Coded Compaction Effort. .................................................... 30 Figure 29. Point-Specific Compaction Data. ................................................................................ 31 Figure 30. Transverse Distribution of Compaction Data at User-Selected Location. .................. 32 Figure 31. Details of the Transverse Distribution Data. ............................................................... 32 Figure 32. Paths Taken by the Roller in the Compaction of This Segment.................................. 33 Figure 33. Resetting the Color Scale. ........................................................................................... 34 Figure 34. Loading the Project-Level Data by Selecting the Folder Name. ................................. 34 Figure 35. Project-Level Roller Path Chart. ................................................................................. 35 Figure 36. Variations in Roller Paths............................................................................................ 38 viii Figure 37. Variations in Compaction Effectiveness. .................................................................... 39 Figure 38. Variations in Temperature on First Roller Pass. ......................................................... 40 ix LIST OF TABLES Page Table 1. Toolbar Functions List. ................................................................................................... 12 Table 2. Meaning of DOP Values. ................................................................................................ 15 Table 3. Meaning of Post-Processing Toolbar Buttons. ............................................................... 24 x CHAPTER 1. INTRODUCTION In TxDOT Project 0-6992, “Development of Practical Field Guidelines for the Compaction of HMA or WMA,” an asphalt compaction monitoring system (CMS) was built and field tested to measure the uniformity of hot mix asphalt (HMA) overlays under the steel-wheel breakdown roller. This system uses the latest global positioning system (GPS) technologies to provide 100 percent coverage of the new mat. The system produces color-coded maps showing: The number of roller passes. The compaction effectiveness (number of passes × effectiveness factor). The mat temperature on the first pass of the roller. The complete system was demonstrated on a number of new overlay projects in Texas, and typical results are shown in Chapter 5. In this report: Chapter 2 describes the system components. Chapter 3 provides detailed information on how to install the system on a typical steel-wheel vibratory roller. Chapter 4 presents a user’s manual for the operator on how to collect data in the field; the roller operator can view in real time the mat coverage and temperature. Chapter 5 describes the post-processing software that can be used to review the data in the field or in the office. 1 CHAPTER 2. SYSTEM COMPONENTS The following items were integrated into the Texas Transportation Institute’s (TTI’s) asphalt compaction monitoring system for this project: A high-accuracy GPS. Two infrared (IR) sensors for measuring the asphalt surface temperature. One accelerometer for detecting if the roller is in vibratory mode. A Toughbook computer for collecting and viewing the data. A battery for the power supply. A data acquisition (DA) system for converting the analog signals to digital data. One important component of the system is the high-accuracy GPS system. In the first year of Project 0-6992, multiple tests were conducted on different commercially available systems at TTI’s Riverside Campus to check the repeatability and accuracy of the latest generation of GPS transponders. Based on this work, the Trimble SPS 852 model was selected, and the accuracy determined by the research team for this unit is ±4 inches. This system also has a serial port for connecting to the data acquisition computer. The power requirement for the system is low—3 W—with the unit requiring 12 VDC. For measuring the temperature, two infrared sensors were installed on either side of the roller. The sensors are made by Raytek and are MI Series infrared temperature sensors. Although small in size, they have a ±1 percent accuracy and a fast response time. The sensor response time is 150 milliseconds, so if the roller is running at 3 mph, the distance between readings will be about 8 inches. The measured temperature range is between −40°F to 1112°F. In this project, we selected a new type of accelerometer that uses the latest sensor technology of micro-electro-mechanical systems (MEMS). These sensors are known for their exceptionally high measurement accuracy and outstanding overload and shock durability. The most attractive feature of this accelerometer is the fact that it only requires 5 VDC for the power supply; it directly outputs analog data, and therefore no additional signal conditioning is required. For the data acquisition device, the National Instrument (NI) USB-6009 data acquisition card was selected. This card has four different channels and a maximum data collection rate of 48,000 samples per second. The USB interface with the computer is another advantage of this card. 3 Another component in this roller system is the rugged computer used for collecting the data in the hostile environment on top of the breakdown roller. The computer must withstand strong vibrations, hot temperatures, and water spray. Based on these operation conditions, the Panasonic Toughbook H1 field model was selected. Another useful feature of this tough computer is that it has two battery packs and the user can swap the batteries without interrupting the computer. A fully charged battery lasts seven hours, which is adequate for most paving projects. Figure 1 shows the complete system schematically. Figure 2 shows the control box and the data acquisition computer. All of the connectors and controllers were installed inside the control box, as shown in the photo at the right of Figure 2. The two green boxes are the infrared sensor control boxes. The black box is the power adapter to convert 12 VDC to 110 VDC for the computer. The white box is the data acquisition card, and a USB cable will connect this box to the computer. The GPS receiver box and computer are located outside the control box for easy access and operation. Special high-damping rubber feet were installed under the box to absorb some of the roller vibrations. The whole package weight is around 50 lb, and most of the weight is from the battery. There is a switch on the top of the box to power up the system. The computer is locked to the docking station. Figure 3 shows the final assembled system. 4 GPS Antenna Control Computer Computer Power Adapter DAQ Card GPS Roller Drum 5 IR Electric Box 12 V Battery Figure 1. GPS Roller Data Acquisition System Hardware Setup. Figure 2. Roller Hardware with Data Acquisition Computer and Control Box. Figure 3. TTI’s Complete Compaction Monitoring System. 6 CHAPTER 3. INSTALLING THE SYSTEM ON A TYPICAL ROLLER In this chapter, the installation of the system on any steel-wheel asphalt roller is described. The design is based on the need for rapid field installation with no permanent mounts on the roller. The goal is to have a system that can be installed and operational in less than 10 minutes. Figure 4 illustrates the sensor locations. The infrared sensors are installed on each side of the roller body, typically in a recessed area. The installation height is around 2 to 3 ft. As the infrared sensor has an optical angle of 10:1 to the target area, the target diameter is around 3 inches. This area is large enough for measuring the surface temperature. These IR sensors have strong magnets for easy installation. Figure 5 shows how to install the infrared sensors onto the roller sides. Accelerometer in the center of the axis Infrared Intelligent compaction system box Roller drum Roller drum Infrared Roller operator Figure 4. Diagram of Sensor Location in the TTI Asphalt Compaction System. 7 Infrared sensor location Figure 5. Infrared Sensor Installation. The accelerometer is used to determine if the drum is vibrating or not during compaction. Figure 6 provides an example of how to install the accelerometer. Under ideal conditions, the sensor is mounted inside the rubber vibration isolators. The accelerometer is installed onto the inside frame with the use of a magnet. The GPS transmitter is installed on the roof of the roller, directly in the center of the roller, as shown earlier in Figure 3. 8 Inside rubber isolator— this part vibrates with the roller drum Drum rotating Accelerometer Outside rubber isolator Figure 6. Accelerometer Mounting Example. 9 CHAPTER 4. COLLECTING DATA WITH THE ASPHALT COMPACTION MONITORING SYSTEM After the hardware installation is complete, the system is ready to collect data. The intention is that the compaction system will eventually be operated by the roller operator. The operator can view in real time a color-coded map showing the total mat coverage for the area being compacted; the same data can be saved and post processed to document the effectiveness and uniformity of the compaction process. The first step is to power up the entire system by switching on the control box, the GPS control unit (located under the computer), and the computer. The data acquisition computer uses the Windows® XP operating system. Once the system boots up, the CompactView icon, , appears on the desktop. The operator should double click this icon to start the program, and the main menu screen shown below in Figure 7 will be displayed. Figure 7. The CompactView Main Menu Screen for Field Data Collection. There is a toolbar at the top of this screen. All of the functions related to the field test are triggered by this toolbar. Figure 8 shows the detailed images of the toolbar items. Table 1 lists all the functions related to each toolbar button. 11 Figure 8. Field-Testing Toolbar Button. Table 1. Toolbar Functions List. Button Image Explanation of Each Button Switch to post-processing toolbar menus for analysis of field data. GPS setup function shows a dialog box for setting the serial port parameters. Once setup is complete, this screen will show the GPS receiver’s status and satellite information. View the GPS raw data. Before collecting data, the user can click this button to check if the GPS receiver is working. View the GPS raw data, and draw the chart to show the roller path. (For system checking only) Create demo data for testing the software. Before collecting data, if the user creates the demo data, the demo data will be replayed on the screen. This is the data collecting button. Clicking this will result in the user being asked to input the file name, and then the compaction map will show the current compaction effectiveness status. Same as the above button, except the number of roller passes is shown on the screen. Same as the above button, except the temperature at the first pass of the roller in a color map is shown on the screen. This button is used to select the location of cores for validation testing. The GPS coordinates of the proposed cores are listed and shown graphically. This function is still under development and not ready for use. Stop button. Stop data acquisition, and close file. 12 Details of the screens activated on the main menu screen are described below. The following sequence describes the setup functions for the GPS system. By clicking the toolbar button, the user will see the GPS setup dialog box for setting the serial port parameters, as shown in Figure 9. Figure 9. GPS Serial Port Parameters Setup Screen. Most of the commercially available GPS systems use the serial port (or COM port) as the main interface when communicating with the computer. If the user does not know which port should be selected, he or she should click Control Panel, then System Properties, and then Device Manager; under the Ports (COM & LPT), it is possible to find a list of all the available ports, as shown in Figure 10. Figure 10. Finding the COM Port on the Computer. 13 If the settings (such as the Baud Rate or Data Bits) are not changed, then the default values in Figure 9 are used. By clicking the OK button, the user will see the GPS status and the active satellite information, as Figure 11 illustrates. Figure 11. GPS Satellites Available to the System. As an example, in Figure 11, there are 10 satellites in the current view. In the left column, summary information about the current location is displayed. In the middle part of the screen, the location of each satellite is displayed, with individual signal strengths displayed as a bar chart. If a satellite has good signal strength, this value should be higher than 40. Since 1978, the United States has launched 72 satellites; however, currently, the number of operational satellites is only 31. Typically, in rural areas of Texas, we can see more than 10 satellites. If the number of active satellites is less than five, the GPS location data will not have sufficient accuracy for this application. Another key requirement is to install the antenna as high as possible on the roller (at least on the roof of the cab) to get the best access to satellite signals. Dilution of precision (DOP) is a special term used by the GPS industry. This value is used to estimate the accuracy of the reported GPS location. On the bottom left corner of the 14 screen, the user can find three values that have the same DOP term in them. The important ones are the vertical DOP (VDOP), and the horizontal DOP (HDOP) and positional DOP (PDOP), which indicate the longitudinal and latitudinal positions (x, y, z directions). The meanings of the DOP values are given in Table 2. Table 2. Meaning of DOP Values. DOP Value Rating Description This is the highest possible confidence level, to be used for applications demanding the highest possible precision at all times. 1 Ideal 1–2 At this confidence level, positional measurements are considered accurate Excellent enough to meet all but the most sensitive applications. This level marks the minimum appropriate for making business decisions. Positional measurements could be used to make reliable en-route navigation suggestions to the user. 2–5 Good 5–10 Positional measurements could be used for calculations, but the fix quality Moderate could still be improved. A more open view of the sky is recommended. 10–20 Fair This is a low-confidence level. Positional measurements should be discarded or used only to indicate a very rough estimate of the current location. >20 Poor At this level, measurements are inaccurate by as much as 300 m with a 6 m accurate device (50 DOP × 6 m) and should be discarded. The DOP values shown in Figure 11 (1.0, 2.4, and 2.6) indicate that the GPS accuracy at this location is, on average, excellent. The user can click the button on the toolbar area to exit this screen and go back to the main screen (see Figure 7). Next, the user can click the button to view the GPS raw data, as shown in Figure 12. This function was designed for testing the accuracy of the GPS unit. Normally, the operator does not use this function. It is a tool for the system developer to debug the software in case there is a problem with the GPS system. 15 Figure 12. Function of Viewing the GPS Raw Data. Another toolbar button, , is also provided to check the accuracy of the GPS receiver. This chart shows the roller running path. The screenshot that appears after clicking the button is shown in Figure 13. 16 Figure 13. GPS Raw Data and Running Path Function. The following three buttons are important and are used to select the type of data to be displayed during data collection (or data processing); , , and , respectively, show the compaction effectiveness index, the number of roller passes, and the mat temperature at the time of the first roller pass. The compaction index, as described earlier, is a computed value obtained by multiplying the number of passes by a factor based on the drum location. The temperature and number of passes is continuously stored, and the compaction effectiveness value is computed. These buttons permit the operator to view any of these items. The compaction index would be perhaps most useful for the operator to ensure that similar levels of effort have been applied to the entire mat. By clicking any of the three display option buttons, the user will see the dialog box shown in Figure 14 and can input the file name of the data set and any comments about the project location, starting place, or weather. If the user clicks the Browse button, he or she can navigate to a folder where the collected data will be stored or select a file name from that folder, 17 as shown in Figure 15. In this system, the raw data are stored in a file that is given the GPS extension. This extension is automatically added once the user inputs the file name. Figure 14. Dialog Box for User Input of the File Name and Comments for the Field Testing. Figure 15. Use of Browse Button to Select File from Folder. After the user clicks the Open button shown in Figure 15, the system begins to collect data, and the screen shown in Figure 16 is displayed. If the user selects the button, a current color map shows the compaction effectiveness values. As the operator moves backward and forward over the section, the color chart will change as more compaction is applied. In addition to the compaction effectiveness, either the temperature or the number of passes could also be displayed. 18 Figure 16. Real-Time Display of Compaction Effectiveness. The right side of the screen is the color scale for this map. The numbers at the top and bottom of the scale (5 and 0) are the range displayed in the figure. With an effectiveness index (number of passes × effectiveness factor), a final value of 5 in the effectiveness scale would be red, and close to 0 would be blue. On the bottom left of the screen, the user can see all the information from the system sensors and GPS receiver. This display is shown below in Figure 17. Figure 17. Sensor Display from Data Acquisition Screen. 19 In Figure 17, the top box shows the GPS information. The most important information is the latitude and longitude of the current position of the roller. The installed GPS system is very accurate, as demonstrated below in Figure 18, which shows the accuracy for each displayed digit. The last digit represents 1 mm (0.04 inches). Under the GPS box, the computed distance from the start of the run and infrared temperature readings are displayed in real time. This distance is a calculated distance based on the GPS position readings. The left and right side of the temperature readings are shown in degrees Fahrenheit. This is typical of a first pass of the system where the left side reading is 86°F and the right side is 217°F. As with most roller operations, the first pass runs down one edge of the mat, which results in one of the sensors not being on hot asphalt. The display system takes this into consideration; if there is more than a 30°F temperature difference from the two sensors, then the system assumes that one sensor is off the mat. The high value is used and displayed on the color plot. However, if reasonable readings are found on both sensors, then the system averages these values and saves the averaged value for the entire width of the roller (typically 7 ft) at that location. On the right side of Figure 17, there is a sine wave showing the current vibration amplitude of the roller. If the operator turned off the vibration, this chart would show a flat line. Currently, we collect accelerometer data and save it to a file, but with this prototype system, these data are currently not processed or displayed. Figure 18 shows the GPS accuracy scale for both the longitudinal and latitudinal displays. 20 Latitude Accuracy Chart of Roller Moving Distance for Each Digital Change DD.DDDDDDDDD 0.111 mm 1.11 mm 11.09 mm 11.09 cm 1.1085 m 11.085 m 110.852 m 1.108525 km 11.085328 km Longitude Accuracy Chart of Roller Moving Distance for Each Digital Change DD.DDDDDDDDD 0.0962 mm 0.96 mm 9.65 mm 9.65 cm 0.9648 m 9.649 m 96.486 m 96863 m 9.6486276 km Figure 18. GPS Location Accuracy Chart. Figure 19 is an enlarged view of the compaction effectiveness display from Figure 16. This information is displayed in real time for the roller operator to view the coverage on the mat 21 that is being compacted. Displays such as this should be useful to ensure that uniform effort is being applied to all areas of the mat. Figure 19. Color-Coded Compaction Effort Map—Real-Time Displayed. If the user starts the data acquisition by selecting either the or button, then the real-time number of roller passes or mat temperature of the first pass will be displayed for the operator to view. 22 CHAPTER 5. POST-PROCESSING AND DISPLAY SOFTWARE This chapter presents the steps required to post process the field data. The data are stored in the field computer with a user-defined name, for example US87.GPS. The data file can then be downloaded from the field computer to the office computer. The CompactView software is activated as described in Figure 7, but this time, the button is selected to enter the post-processing mode; the main toolbar in this mode is shown in Figure 20. Figure 20. Post-Processing Toolbar and Main Interface. Due to the fact that a single paving project could last several days or could have data collected on several adjacent lots or sub-lots, two methods were incorporated into the CompactView system to process files. The first method allows the user to process a single data file at a time. The second method allows the user to open a folder that may contain several data 23 files; the system then opens all of the files and displays them in a single display. Table 3 lists the options available for post processing the field data. Table 3. Meaning of Post-Processing Toolbar Buttons. Button Image Explanation of Each Button Load a single file to perform single file processing. Load one project folder and perform group file processing. Show the compaction effort color map chart on the display screen. Show the number of roller passes color map chart on the display screen. Show the first rolling temperature color map chart on the display screen. Show a line diagram with the roller paths. Show the rolling path chart for all files in the project folder. Show the previous file in the project. Show the next file in the project. Zoom into the data to fit the screen. Change the roller compaction effectiveness chart. These relate the compaction effectiveness for different lateral locations on the roller drum, where the edge is less effective than the center of the drum. The field studies conducted in Project 0-6992 demonstrated that the center of the roller has better compaction effectiveness than the edge. This is believed to be based on the lack of confining the mat at the edges of the roller. This non-uniformity of roller compaction effort will affect the final density of the mat. Based on this and earlier studies, the model shown in Figure 21 has been proposed to explain the variations in air voids found in the field after mat compaction. As seen in the figure chart, for a 7 ft wide roller drum, there is 3 ft in the middle section of the drum that achieves the full compaction strength (value is defined as 1.0). At the edge of the roller drum, the effectiveness factor is only 0.1, or 10 percent, of that in the middle of the drum. This is the key calculation made by the CompactView system. The GPS tracks the 24 position of the roller and calculates the compaction effectiveness for each pass by multiplying the number of passes by the effectiveness factor index from Figure 21. 1 0.8 0.6 0.4 0.2 0 0 0.5 1 1.5 2 2.5 3 3.5 4 4.5 5 5.5 6 6.5 7 Figure 21. Standard Effectiveness Factor Chart for 7 ft Wide Roller. The CompactView software provides the user with several options for selecting the shape of the compaction effectiveness chart. These options are activated by clicking the button on the toolbar; the roller effectiveness factor model selection dialog box is shown in Figure 22. 25 Figure 22. Roller Effectiveness Factor Model Selection Dialog Box. From the dialog box shown in Figure 22, the user can select the roller effectiveness model using the radio buttons. The standard distribution from Figure 21 is the one displayed in Figure 22. However, in year one of Project 0-6992, a similar but slightly modified pattern was recommended based on testing of control sections built at TTI’s Riverside Campus. Figure 23 shows this new TTI Distribution. In the new distribution, the effectiveness of the roller edge was found to be closer to 30 percent than the 10 percent found in the initial work. For the time being, the TTI Distribution is recommended for all current data processing. 26 Figure 23. Recommended Roller Effectiveness Distribution Based on Project 0-6992. This dialog box also permits the user to control the graphical display of the color map by changing the max and min limits on each of the color maps. For example, for the temperature map, the lower limit (blue color) is 80°F and the upper limit (red color) is 300°F. These values can be changed in this dialog box. SINGLE FILE POST PROCESSING To process a single file, the user must click the button; then the dialog box shown in Figure 24 opens, allowing the user to select the file to process. The *.GPS extension is used by the data collection system, and the user provides the file name. 27 Figure 24. Selection of the Test File to Be Processed. After the user selects the file to be processed, a screen similar to Figure 25 is displayed, showing the length in feet of the complete section tested (over 2300 ft for this example section). The user has the option to zoom into any location in the data set. Figure 25. First Display Screen Showing the Entire Section Length. 28 The user can then click any one of the buttons to display compaction effectiveness ( ), number of passes ( ) and first pass temperature ( example of what is displayed when user selects the ). Figure 26 shows an button. Clicking the button will return the display to Figure 25. Figure 26. Compaction Effort Color Map View of the Entire Loaded Data File. The width of the paved lane is typically 12 ft, which is relatively small compared with the length of the section. Therefore, reviewing the display of the complete section to find problem areas is very difficult. For this reason, an option was included to permit the user to zoom into any part of the project. To zoom in, the user puts the cursor in the required location and, while holding down the left mouse button, drags the mouse. As shown in Figure 27, a black rectangle is superimposed on top of the project. When the user releases the mouse button, the information from this section only is displayed, as shown in Figure 28. 29 Figure 27. Highlighting the Area to Zoom Into. Figure 28. Zoomed View of Color-Coded Compaction Effort. 30 Some very useful information can be generated and displayed by the user simply placing the cursor on any location in the color display. For example, when the user places the cursor at the location of the X shown in Figure 29, the following data appear in the boxes at the top of the screen: Longitudinal position from GPS: 30.01208. Latitudinal position from GPS: −96.167853. Compaction effectiveness: 6.32. Number of passes of roller over this location: 8. Temperature at the first roller pass: 239°F. Figure 29. Point-Specific Compaction Data. By clicking the mouse at a location of interest, the user is able to see the transverse distribution of compaction, number of passes across the mat, and temperature data across the mat, as shown in the box in the upper left corner of Figure 30 and in detail in Figure 31. The upper chart is the compaction effectiveness index, the middle chart is the number of passes placed across the mat, and the lower chart is the temperature profile during the first pass over the mat. The width shown in Figure 31 is 15 ft, but the paving width is only 12 ft. This means that there was at least a 1.5 ft overlap of the roller off each side of the mat. Clicking the button at any time will redraw the screen and zoom back to the full section display shown in Figure 25. 31 Figure 30. Transverse Distribution of Compaction Data at User-Selected Location. Compaction effectiveness distribution Number of roller passes Temperature at first roller pass X-axis is the width in feet Figure 31. Details of the Transverse Distribution Data. 32 If there is any uncertainty about the number of passes placed over any section of the mat, then the user should click the button from the main menu screen to display the path of the roller over that segment. An example is shown in Figure 32. The normal rolling pattern is typically two passes on either side of the mat with a final pass down the center of the mat. Clearly, in this case, the center pass was not made, and at this location, the effectiveness of compaction in the middle of the mat is in question. Figure 32. Paths Taken by the Roller in the Compaction of This Segment. One last option available to the user is to modify the color display by using the mouse to change the upper limit of the color scale. To do this, the mouse is placed over the red arrow and this arrow is dragged down to a different level, as shown in Figure 33. The two numbers at the top of the screen are the maximum values used in the initial setup menu screen. In this case, the max temperature (300°F) is the surface temperature, which is displayed as the color red. By moving the red triangle, the upper level has been reset to 260°F, as shown. In this case, the red color will be associated with temperatures at or above 260°F. The color display is automatically changed to reflect the color associated with the new level. The lower end of the temperature scale can also be changed, as can the compaction effectiveness and number of passes charts. 33 Figure 33. Resetting the Color Scale. LOADING AND PROCESSING THE DATA FROM MULTIPLE FILES IN A FOLDER If there are several test sections in one project, the user can put all of the corresponding files in one folder. These data can be analyzed by processing a single file from this folder, as explained earlier, or the user can display multiple adjacent segments by simply inputting the folder name. By clicking the button on the toolbar, the user will see the folder selection dialog box, as Figure 34 displays. Figure 34. Loading the Project-Level Data by Selecting the Folder Name. 34 After the user selects the folder, the roller paths for the whole folder will be displayed, as illustrated in Figure 35. Figure 35. Project-Level Roller Path Chart. By clicking any of the following buttons— , , , or —the user can view the selected compaction color map screen for the first file. If the user clicks the button, the screen will go back to the display seen in Figure 35, and if the user clicks , the system will go to the previous or next file in this project folder. 35 or CHAPTER 6. USING THE DATA GENERATED BY THE COMPACTION MONITORING SYSTEM EXAMPLES OF DIFFERENT OUTPUTS OBTAINED During the course of this study, several different TxDOT projects were tested, and details of the results of these monitoring efforts are presented in the final report of this study. The adequacy of compaction can be judged in terms of: The consistency of the rolling sequence: Most jobs determine a rolling pattern for the breakdown roller, for example, two passes on the left side, two on the right side, and then one down the middle. Figure 36 shows the paths taken by the roller during compaction and illustrates both good and bad sections of projects. The pattern in Figure 36a is judged as ideal, where in the middle it is clear that the roller is placing two passes on either side of the mat and then one down the middle. This is to be compared with the pattern in Figure 36b, where there is an area where only one pass was made. Consistency in the compaction effectiveness: The rolling pattern shown in Figure 36 can be converted to compaction effectiveness color maps, as shown in Figure 37. Figure 37a shows that the minimum compaction effectiveness (number of passes × compaction effectiveness index) is 3.9. This means that all areas of this mat had a minimum of four full passes under the center of the roller. This is to be compared with Figure 37b, where the compaction index ranged from 0.9 to 4. Clearly, higher air voids would be anticipated in the locations that received only one roller pass. Temperature uniformity: Examples of varying temperatures are shown in Figure 38. One of the simplest indications of compaction uniformity is related to the temperature where the breakdown roller first hits the mat. This is the surface temperature of the mat and is the temperature that an inspector would measure with a handheld temperature gun. However, the temperature at mid-depth in the mat will be higher. Throughout the monitoring completed in this study, these temperatures were consistently lower than anticipated, given that the suggested mix placement temperatures ranged from 260°F to 280°F. Figure 38a shows a typical pattern where in the right side of the figure, the roller is catching up with the paver where the temperatures were measured at 236°F. The roller 37 operator then waited for the paver to place more HMA. Once he had placed between 100 and 150 ft, the roller operator started his rolling sequence again. In this case, the temperatures were between 190°F and 216°F for the first pass. There were no major variations from one side of the mat to the other. Figure 38b shows interesting first temperature data from a thin overlay (1 inch thick) being placed under very hot summer temperatures in Texas (air temp > 100°F). Even under these ideal temperatures, there was substantial cooling of the mat, as observed by the measured temperatures under a single breakdown roller placing two passes on each side of the mat, with one side being above 240°F and the other side being at 190°F. This is disturbing, as the binder used in the mat was a PG 76-22 with a target placement temperature of 280°F. a) Ideal roller paths with a wait area at the end of each sequence b) Less-than-ideal sequence with only one pass in the indicated area Figure 36. Variations in Roller Paths. 38 a) Good compaction effectiveness color display b) Poor uniformity of compaction index Figure 37. Variations in Compaction Effectiveness. 39 a) Uniform temperature over mat b) Significant variations in temperature from both sides of the mat Figure 38. Variations in Temperature on First Roller Pass. NEXT STEPS IN SYSTEM IMPLEMENTATION The compaction monitoring system described in this report provides TxDOT and the contractor with very useful information on the uniformity of the mat being placed. The contractor can use this information to judge if changes are needed to the rolling pattern or the number of rollers being applied to any placement operation. The proposed system is the logical follow up to the Pave-IR system that is operational in Texas. The Pave-IR system is mounted behind the lay down machine, and allowable temperature variations are defined. If the 40 temperature differentials are more than 25°F, a warning is issued, and if they are more than 50°F, paving can be suspended. Similar criteria need to be developed for the compaction monitoring system described in this report. The following steps are recommended for TxDOT to continue the implementation of the CMS: 1. Establish pilot acceptable criteria for any project, for example: a. Minimum temperature on first roller pass is 240°F. b. Maximum variation within a mat is 50°F. c. Minimum compaction effectiveness index is 3.0. 2. Develop post-processing software to determine how much of the project is outside of these operational tolerances. Provide GPS coordinates of major defect areas so that validation cores can be taken in these areas. Provide standard reports on a fixed-length interval (perhaps 150 ft, as done by Pave-IR). 3. Coordinate closely with the construction division and district to conduct a series of demonstration projects with the CMS and the performance criteria described above. Share all data with the local contractor. 4. Modify the mounting of the CMS system so the roller operator can view the temperature and coverage color-coded maps in real time as he or she is compacting the mat. Train the roller operator to read the map and get his or her input of the usefulness of the output. 5. Get TxAPA involved with the proposed system. It is important be open with the contracting industry and to get their evaluation of the system as soon as possible. 6. Contact a commercial manufacturer to make and sell ruggedized versions of the CMS system (similar to the MOBA arrangement to make Pave-IR). 41