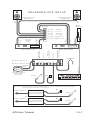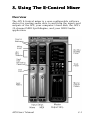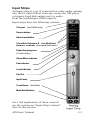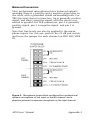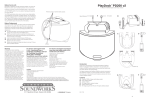
1
Audio Production
Studio
&
APS E-Card
Installation and Operation
Manual
P/N FI650 Rev. A
August 1998
©1998 EMU SYSTEMS, INC.
All Rights Reserved
i
APS Manual written by Tim Tully
With portions by Mike Guzewicz and Duane Ford
Edited by Denis Labrecque, Duane Ford,
Mike Guzewicz & Riley Smith
Credits
EMU10K1 VLSI Team
Dan O’Laughlin, Tom Savell, Carl Wakeland, Scott Fuller
and Dave Rossum
Board Design Team
Mark Connors, Brent Elder, Dan Freeman, Brian Hess,
Jeannie Morgan, Chuck Pagano
Mechanical Engineering Team
John Fertig, Steve Thompson
Synthesizer & Device Driver Software Team
John F. Kraft IV, Eric W. Lange, Michael Preston, Daev
Roehr, Steve Verity and Mike Guzewicz
Effects Engine Software Team
Luke Dahl, Sam Dicker, Steve Hoge, Donna Murray,
Vincent Vu, Scott Wardle
Applications Software
Nikhil L. Hoskeri, Wayne Jackson, Satheesh Kumar,
Srinivasan Sathish and Kurt Thywissen
Program Artwork/GUI Design
Michael Stewart for Republic of Ambition
Additional Art
Brent Silveria and Denis Labrecque
Program Manager
Aime McNamara
Product/Marketing Manager
Denis Labrecque
Sound Design
Ed Dickie, Derick Joy and Tim Swartz
ii
Help Documentation
Lynn Flink
Production Test Team
Tom Hendricks, Gary Hull
Software Quality Assurance Team
Kevin Moore, WR Parker, Stuart Ponder, Rob Pratt, Frank
Preuss, Will Puckett, Andrew Rath and Ed Rudnick
Project Team
Duane Ford, Alan Grattan, Dale Holland, Andrew
Longhurst, Dana Massie, Daniel McDermott,
Whitney Preston, Mike Price, Lee Ray, Brian Sanford,
Bill Snow and Matt Ward
E-mu APS “Powered by E-mu” Movie
Steve Verity
Special Thanks to:
Creative Labs Graphics Dept. - Christine W. Chatham,
David Dykzeul and Juli Spicer, Barry Raskin, CL-OK Test
Lab - Charles Cagle, Randy Clapp, Bryan E. Cummings,
Shawn Eary, Kirk A. Fore, Matthew M. Hall, Nathan Head
Steven C. Lamberti and Shelly Taylor, Vincent Cheng,
Chia Kok Leong, The Software R&D Team at Creative
Technology Singapore, Daniel Barnes, Tyson Dobrinen,
Mitch Dale, Brent Elder, Dan Freeman, Gregory S. Gates,
Derk Hagedorn, Joe Indresano, Koryn Johnson, Kevin
Kent, Barbara Hosler, Andrew Longhurst, Wendy Miller,
Kevin Monahan, Sandi Morgenthaler, Michelle Ney, Lisa
O’Malley, Darragh O’Toole, Paul Scheidt, Todd Shires,
Dan Skweir, Mike Struble, Lisa Summers, Brian
Tankersley, Margie Van Dorn, Kent Verderico, Valerie
Viviani and Ashley Witt and Terrilynn Williams.
E-mu Systems, Inc.
P.O. Box 660015,
Scotts Valley, CA USA,
95067-0015
Tel: 831.438.1921
Fax: 831.438.8612
Internet: www.emu.com
E-mu London Sales Office
Pinewood Studios
Pinewood Road, Iver,
Buckinghamshire, SLO ONH
ENGLAND
Tel. +44 175 363 0808
iii
Warranty
NOTICE: SOFTWARE HEREIN FROM E-MU SYSTEMS, INC.
(“E-MU”) (“SOFTWARE”), IS LICENSED, NOT SOLD, TO
YOU, FOR THE TERM OF AND SUBJECT TO APPLICABLE
COPYRIGHT, PATENT, AND OTHER INTELLECTUAL
PROPERTY LAWS, AND THE PROVISIONS BELOW MADE
EFFECTIVE UPON OPENING THE PACKAGE. IF
UNACCEPTABLE, E-MU IS UNWILLING TO LICENSE THE
SOFTWARE, WHICH SHOULD THEN BE RETURNED
UNOPENED FOR A FULL REFUND.
“Software” includes, without limitation, executable
programs, SoundFont banks, drivers, libraries, data files
and firmware, and error corrections, updates, and
enhancements thereto. Following are prohibited, except
at applicable law: redistribution or other transfer or
assignment; reverse engineering or other source code
derivation; modification, merging, or creation of
derivative works; disturbance of any included legends or
notices. E-mu or its suppliers retain ownership of the
Software. E-mu may seek injunctive relief without posting
of security, or terminate this Agreement, upon your
material breach. California law applies, excluding choice
of law principles.
E-mu warrants, for 90 days from your receipt of the
Software, that it will substantially conform to its
documentation.
E-MU’S ENTIRE LIABILITY AND OBLIGATION, AND YOUR
SOLE REMEDY, FOR BREACH OF THE FOREGOING
WARRANTY, IS, AT E-MU’S SOLE OPTION, TO REPAIR OR
REPLACE THE SOFTWARE, OR REFUND YOUR PAYMENT
THEREFOR.
E-MU DOES NOT WARRANT RESULTS OF THE SOFTWARE’S
USE. E-MU MAKES NO OTHER EXPRESS OR IMPLIED
WARRANTIES OR CONDITIONS, AND SPECIFICALLY
EXCLUDES ANY WARRANTY OR CONDITION OF
UNINTERRUPTED OR ERROR-FREE OPERATION,
iv
NONINFRINGEMENT, MERCHANTABILITY, SATISFACTORY
QUALITY, AND FITNESS FOR A PARTICULAR PURPOSE.
IN NO EVENT WILL E-MU OR ITS SUPPLIERS BE LIABLE FOR
ANY INCIDENTAL, INDIRECT, SPECIAL OR
CONSEQUENTIAL DAMAGES IN CONNECTION WITH THIS
AGREEMENT OR THE SOFTWARE, INCLUDING WITHOUT
LIMITATION ANY LOSS OF REVENUE OR BUSINESS
INFORMATION, BUSINESS INTERRUPTION, OR USE OR
INABILITY TO USE THE SOFTWARE, EVEN IF PRE-ADVISED
OF THEIR PROSPECT.
SOME JURISDICTIONS DISALLOW THE EXCLUSION OF
IMPLIED WARRANTIES OR CONDITIONS, LIMITATIONS ON
DURATION OF IMPLIED WARRANTY OR CONDITION,
AND/OR EXCLUSIONS OF THE AFOREDESCRIBED
DAMAGES, SO THE ABOVE LIMITATIONS MAY NOT APPLY.
THIS WARRANTY GIVES YOU SPECIFIC LEGAL RIGHTS.
YOU MAY HAVE OTHER RIGHTS WHICH VARY AMONG
DIFFERENT JURISDICTIONS.
The Software was developed at private expense; if
acquired under agreement with the USA government or
its contractor, it is acquired as “commercial computer
software” subject to the provisions hereof, as specified in:
(a) 48 CFR 12.212 of the FAR; and (b) if acquired for
Department of Defense units, 48 CFR 227-7202-2 of the
DoD FAR Supplement; or, sections succeeding thereto.
This is our entire agreement on these subjects, and
supersedes any prior agreement or communications
relating thereto.
E-mu, the E-mu logo and SoundFont are registered
trademarks of E-mu Systems.
All other brand and product names are trademarks or
registered trademarks of their respective holders.
v
Troubleshooting
The E-mu Systems APS website listed on the following
page, posts know incompatibilities, common problems,
driver updates and operational tips. If you can, please
check this site before calling tech support.
The E-mu APS Website
For the latest E-mu APS information, software and driver
updates, and demos.
http://www.emudtm.com/ecard.html
Tech Support
Please read this manual before calling Tech Support.
E-mu Systems has contracted the very experienced
Creative Labs Tech support organization to help you in
the event of problems with installation or operation of
the E-mu Audio Production Studio.
If you do need to call, please have your serial number
ready for verification.
On-Line Technical Assistance
http://www.creativehelp.com
vi
Visit our other Web Sites!
E-mu Systems Home Page
http://www.emu.com
E-mu Systems Desktop Music Page
http://www.emudtm.com
E-mu Systems Official SoundFont® Page
http://www.soundfont.com
Creative Labs Home Page
& Vienna SF Studio upgrade information
http://www.creativelabs.com
Serial Number
Important - Before you install the E-Card, write
your serial number here for future reference.
Serial #__ __ __ __ - __ - __ __ - __ __ __ __
* The serial number is located on the back of the E-Card
vii
Table of Contents
1. Introduction ............................
1-1
............................1
Overview .......................................................................... 1-1
Hardware ................................................................... 1-1
Software ..................................................................... 1-1
APS Input and Output Connectors ................................ 1-2
E-Card Inputs and Outputs: ..................................... 1-2
E-Drive Inputs and Outputs: .................................... 1-3
E-Drive Microphone Configuration ........................ 1-3
APS General Operation ................................................... 1-4
The E-Control Mixer ................................................. 1-5
External MIDI Interface ............................................ 1-5
The APS SynthEngine ...................................................... 1-6
MIDI ............................................................................ 1-7
General MIDI ............................................................. 1-7
Default MIDI Bank ........................................................... 1-7
Other SoundFont Banks .................................................. 1-8
Quickstart ........................................................................ 1-8
System Requirements ..................................................... 1-9
Online Help ...................................................................... 1-10
2. Installation and Setup .............
2-1
.............2
System Preparation - Software Requirements .............. 2-1
Installing the APS Hardware .......................................... 2-2
QUICKSTART - Installing the APS Hardware .......... 2-2
E-Drive Microphone configuration ......................... 2-3
Step-By-Step Hardware Installation .............................. 2-4
Tools You’ll Need. ..................................................... 2-4
Before You Begin: ...................................................... 2-4
Install the E-Drive ..................................................... 2-4
Connect the Cables ................................................... 2-5
Install The E-Card ..................................................... 2-5
viii
Install The MIDI Bracket .......................................... 2-5
Putting It All Back Together .................................... 2-6
Installing Software - Driver Installation ....................... 2-6
1. Automatic Install (Recommended) ..................... 2-6
2. Wizard Driver Install (for experienced PC users) 2-6
Installing Software - Application Installation .............. 2-7
Installing Software - Troubleshooting .......................... 2-8
How to Verify Your Software Installation .............. 2-8
Connecting the APS to MIDI/Audio Programs ............. 2-10
Input Ports & Drivers ............................................... 2-10
APS WAVE IN ......................................................... 2-10
APS MIDI IN ........................................................... 2-10
Output Ports & Drivers ............................................ 2-11
APS Synth A ........................................................... 2-11
APS Synth B ........................................................... 2-11
APS MIDI OUT ........................................................ 2-11
WAVE OUT ............................................................. 2-11
Connecting the APS to your External Equipment ........ 2-12
3. Using The E-Control Mixer .......
3-1
.......3
Overview .......................................................................... 3-1
Input Strips ................................................................ 3-2
Master Output Strip .................................................. 3-2
Input Strips ...................................................................... 3-3
Trim pot (on A1&A2 only) ................................................ 3-3
Source button ..................................................................... 3-3
Inline Insert button ............................................................ 3-3
2 Aux Bus Selectors & Aux BusSend Amount controls
(horizontal indicators) ................................................. 3-3
Fader Grouping icon
(2 chain links)................................................................ 3-3
Stereo/Mono indicator ...................................................... 3-3
Pan indicator ...................................................................... 3-3
Level indicator .................................................................... 3-3
Pan Pot ................................................................................ 3-3
Input Fader ......................................................................... 3-3
Track Name (text field) ..................................................... 3-3
ix
Mute/Solo Buttons ............................................................. 3-3
Input Strip Types ...................................................... 3-4
Digital Input Strips select input from: ............... 3-4
Adding Analog and Digital Input Strips ................. 3-5
Deleting Input Strips ................................................ 3-5
MIDI Strips ....................................................................... 3-6
Main MIDI Strip ......................................................... 3-6
MIDI Submix Strips ................................................... 3-6
MIDI Submix Configuration ..................................... 3-7
Adding MIDI Submix Strips ..................................... 3-7
Deleting MIDI Submix Strips ................................... 3-8
Reassigning MIDI Submix Strips .............................. 3-8
The Clear All Button ................................................. 3-8
Input Strip Controls .................................................. 3-9
The Trim Control (A1&A2) ...................................... 3-9
The Source Button .................................................... 3-9
Listening to Digital Audio from a CD ..................... 3-9
The Inline Insert Button ........................................... 3-10
The Inline Insert Popup Strips ................................ 3-10
Placing Effects into an Insert Strip ......................... 3-11
Changing the Order Of The Effects ......................... 3-11
Effects Wet/Dry Mix ................................................. 3-11
Changing Effects parameters ................................... 3-11
The Aux Busses .......................................................... 3-12
Quickstart -How to Use the Aux Bus: ...................... 3-12
Aux Bus Selectors .................................................. 3-12
Asssigning Effects to an Aux Bus ............................. 3-13
Drag and Drop ...................................................... 3-13
Assign Effects ......................................................... 3-13
Sending Signals to an Aux Bus: ............................... 3-14
To Send a Signal from an Input Strip to an Aux Bus:
3-14
To set the Signal Amount from the Input Strip to
the Aux Bus: ........................................................... 3-14
To set the Amount of Processed Signal returned to
x
the Master Output Strip: ...................................... 3-14
Routing to an External Device through an Aux Bus3-15
Re-recording Selected Tracks Via an Aux Bus ....... 3-17
Other Strip Controls ................................................. 3-18
Fader Grouping ..................................................... 3-18
Stereo/Mono indicator ......................................... 3-18
Panning (Mono Strip)/Balance (Stereo) ............. 3-18
Level ....................................................................... 3-18
Track Name ........................................................... 3-18
Mute/Solo Buttons ................................................ 3-18
The Master Output Strip ................................................ 3-19
Stereo Aux Bus Router Panel ................................... 3-20
Aux Bus Physical Return .......................................... 3-21
Disk Record Pot ......................................................... 3-21
Record Sources .......................................................... 3-21
The Record Sources .................................................. 3-22
Tools Panel ................................................................ 3-23
Effects Panel .......................................................... 3-23
SoundFont Bank Manager .................................... 3-23
MIDI Submix Configuration Button
(Yellow Button) ..................................................... 3-24
Add Analog Submix Strip Icon ............................ 3-24
Add Digital Strip Icon ........................................... 3-24
Add MIDI Submix Strip Icon (Blue Button) ........ 3-24
Master Mute Button .............................................. 3-24
Show/Hide Icon ..................................................... 3-24
Master Output Faders ............................................... 3-25
Meters ......................................................................... 3-25
Output Destination Button ...................................... 3-25
4.The SoundFont Bank Manager . . ..4
4-1
To Load Additional SoundFont Banks into RAM
from your Hard Disk: ........................................... 4-1
The SoundFont Bank Manager ....................................... 4-2
xi
The Keyboard Display .............................................. 4-2
Memory Used ........................................................ 4-2
Bank ........................................................................ 4-3
Preset ...................................................................... 4-3
Sustain .................................................................... 4-3
Drum Kit .................................................................... 4-3
MIDI In ....................................................................... 4-3
MIDI In - Advanced ................................................... 4-4
MIDI Channel ......................................................... 4-4
Multi-Channel mode ............................................. 4-5
Controllers ................................................................. 4-5
GM........................................................................... 4-5
E-mu ....................................................................... 4-5
User ......................................................................... 4-5
MIDI Reset .................................................................. 4-6
Default Sound Set (MIDI Bank 0) Controls ................... 4-6
Mode ........................................................................... 4-6
User Set ............................................................................ 4-8
Lock ............................................................................ 4-8
Preset .......................................................................... 4-8
Browse ........................................................................ 4-8
To Load a New Preset: .......................................... 4-9
Restore ....................................................................... 4-9
Variation Sound Sets (Banks 1-127) controls .............. 4-9
Bank ............................................................................ 4-9
Browse ........................................................................ 4-10
Restore ....................................................................... 4-10
5. Recording and Playing Audio . . ..5
5-1
Overdubbing .................................................................... 5-2
Using Effects .................................................................... 5-2
System Performance ....................................................... 5-3
xii
6. Using Effects ............................
6-1
............................6
Introduction .................................................................... 6-1
The APS’s Built-in Effects ............................................... 6-1
How to Route the Effects ................................................ 6-2
How to Save and Load Effects Presets ........................... 6-2
How to Use Effects Control Panels ................................. 6-3
Reverb .............................................................................. 6-3
Chorus .............................................................................. 6-6
Flanger ............................................................................. 6-8
Echo/Delay ...................................................................... 6-10
Auto Wah ......................................................................... 6-12
Pitch Shifter ..................................................................... 6-13
Distortion ......................................................................... 6-14
Compressor (Limiter) ..................................................... 6-15
Shelf EQ (4 Stereo) .......................................................... 6-17
Parametric EQ (4 Stereo) ................................................ 6-18
Appendix .................................... A - 1
Microphone Configuration ............................................ A-1
Using SoundBlaster Type Microphones ................. A-1
Using Dynamic and Condenser Microphones ....... A-2
Dynamic Microphones ......................................... A-2
Condenser Microphones - Phantom Powered .... A-2
Balanced Connectors ................................................ A-3
General MIDI Patches ..................................................... A-4
MIDI IMPLEMENTATION CHART .................................... A-6
Creating and Editing SoundFont® Sounds with Vienna A-7
Glossary ...................................................... A - 1 4
Index ....................................................... Index-1
xiii
xiv
1. Introduction
Overview
The E-mu Audio Production Studio (APS) is designed for
musicians, multimedia content developers, sound
designers, in fact anyone who needs a high-quality
system for creating digital audio and MIDI-based music.
The APS lets you record, edit, process and play back
multiple tracks of digital audio and high-quality
synthesized sounds for personal songs, CD-ROM audio,
game soundtracks, DVD/video soundtracks or any other
desktop audio.
The APS also performs most of the functions of a
standard multimedia PC sound card, supporting third
party
applications that play and/or record audio and MIDI
files, using Microsoft’s Multimedia System (MMSystem).
The APS supports most 3rd party audio production
software including MIDI/Audio sequencers, audio editors
and sound design programs.
The Audio Production Studio consists of the following::
Hardware
• The E-Card
d, a PCI card that includes: analog and
digital I/O, analog-to-digital and digital-to-analog
converters, two 16-channel MIDI synthesizer/
samplers, and real time Digital Signal Processing.
Features shown in GREY refer to the full APS system.
(ECard plus EDrive)
The E-Drive
e, a module that fits into a PC drive bay,
also offering analog and digital I/O and analog-todigital and digital-to-analog converters; as well as
input level controls and a headphone jack.
Software
• T h e E - C o n t r o ll, an on-screen mixer that routes,
mixes, and adds effects to streamed digital audio, the
output of the APS SynthEngine™ and external inputs.
APS Users’ Manual
1-1
• T h e S o u n d F o n t B a n k M a n a g e rr, a sound control
center for loading and auditioning SoundFont samples
used by the APS.
• S o u n d F o n t B a n k s (preset sound banks) and other
sound design and audio/MIDI sequencing software for
your use.
APS Input and Output Connectors
The APS analog connectors are balanced, 1/4” TRS (tip/
ring/sleeve) connectors, using recording studio-quality
digital/analog and analog/digital converters.
Balanced cables provide the most noise-free signal
possible when used with other balanced equipment, but
standard 2-wire 1/4” tip/sleeve cables work just fine.
E-Card Inputs and Outputs:
• A n a l o g I n 1 + 2 (L+R)
• A n a l o g O u t 1 + 2 (L+R)
• D i g i t a l I n 1 (Stereo, S/PDIF)
• D i g i t a l O u t 1 (Stereo, S/PDIF)
The S/PDIF digital connectors are high-quality RCA plugs.
IN
OUT
Analog IN 1-A1-Left
Analog IN 2-A2-Right
Analog OUT 1-Left
Analog OUT 2-Right
Digital
Connector
for
MIDI IN &
MIDI Out
Cable
S/PDIF IN 1-Stereo
S/PDIF OUT 1-Stereo
E-Card Main Output
1-2
E-Card MIDI Bracket
Introduction
MIDI connections are made via a 15 pin “gameport”
connector on a separate bracket (no PCI slot required)
and a MIDI cable (with MIDI In and Out ).
The analog connectors on the E-Drive are switchable
between microphone and line level and use studioquality preamps with trim control.
E-Drive Inputs and Outputs:
• D i g i t a l I n 2 (Stereo, S/PDIF)
• D i g i t a l O u t 2 (Stereo, S/PDIF)
• A n a l o g I n 3 + 4 ( L + R ) Switchable between mic and
line; Studio-quality attenuator
• S t e r e o H e a d p h o n e J a c k with volume control
E-Drive Microphone Configuration
Jumpers inside the E-Drive configure the inputs to
operate with SoundBlaster compatible microphones,
professional dynamic microphones, or a large number of
phantom-powered professional condenser microphones.
NOTE: These jumpers should be set before
installing the E-Drive. Please see the Appendix
for more on Microphone configuration.
When phantom power is On, the inputs should
not be used for non-powered inputs such as
guitar or distortion could result.
APS Users’ Manual
1-3
APS General Operation
The APS works in conjunction with MIDI/Audio software
programs such as Cubase VST, Sound Forge, Cakewalk
and many others. These programs allow you to record
and playback audio and/or MIDI data to the hard disk on
your computer.
The MIDI interface allows you to connect MIDI keyboard
instruments or sound modules to your computer.
Connecting a MIDI keyboard turns your computer into a
powerful musical instrument and composition tool.
Audio/MIDI Program
Stereo
Audio Mix
MIDI
Synth A
MIDI
Synth B
1 Reverb
D1
WAVE
A1
Reverb
Reverb
Reverb
Chorus
Chorus
Chorus
Mix
2 Chorus
Mix
MIDI
MIDI 2
Reverb
Reverb
Chorus
Chorus
MIDI
In/Out
3 None
None
4 None
0
0
-6.8 dB
None
0
0
E-Control
(APS Software Mixer)
-6.8 dB
-6.8 dB
-6.8 dB
Disk
Rec
+
Src
Mix
+
0
-6.8 dB
+
+
-
-6.0 dB -6.0
Digital
M
S
WAVE
M
S
Analog 1
M
S
Analog Out 1+2
MIDI 1
MIDI 2
M
M
S
S
CD- ROM S/ PDIF
AUDIO DRIVE
E -M U S Y S T E M S , IN C .
GA ME P ORT
DI GITA L A UDIO CA RD
ECARD
S/PDIF IN
LEFT CHANNEL
GAIN
MIC/LINE
RIGHT CHANNEL
GAIN
MIC/LINE
HEADPHONES
MIDI Bracket
E-CARD
E-DRIVE
(Optional)
S/PDIF OUT
1-4
Introduction
As a host program plays digital audio data from the disk
to the APS, the E-Control mixes the audio and processes it
with its numerous built-in effects processors, then
outputs it as both analog and digital audio.
The audio output of the internal MIDI synthesizer - the
“SynthEngine” - is routed through the E-Control mixer
and can be processed, mixed and output, just like digital
audio files. To provide the SynthEngine with sounds, the
APS includes an enormous library of SoundFont Banks
with which you can produce professional-quality music.
Together with third-party MIDI/audio applications, the
APS is a full featured MIDI/audio production tool.
The E-Control Mixer
The E-Control works like a sub-mixer that sits between
the input and output of a MIDI/Audio application
program and the Audio Production Studio hardware.
The E-Control uses familiar input, output and insert
“strips” that use faders and knobs to set levels, program
inserts and aux sends, mute, solo, and so on. The
E-Control routes, processes and mixes sources to various
destinations, operating similar to semi-pro
audio mixers.
External MIDI Interface
The E-Control also supports a built-in MIDI interface that
lets you control up to 16 MIDI channels on external MIDI
instruments. The MIDI input lets you connect a MIDI
keyboard or other MIDI controller.
When you set up the MIDI Out ports of your sequencer,
you’ll see three MIDI ports: A and B, for the internal
SynthEngine, and an external port for any external
synthesizers.
Synth A
Sequencer
Synth B
External
APS Users’ Manual
1-5
The APS SynthEngine
The APS comes with an internal sample based MIDI
Synthesizer Engine that you can use to compose, play and
record music. Using MIDI (the Musical Instrument Digital
Interface), you can play sounds from the SynthEngine
just as you would any hardware synthesizer costing
hundreds or thousands of dollars.
Hardware music synthesizers are actually built around
specialized computer microprocessors and software. The
hardware (the keyboard, knobs and buttons) lets the user
play the synthesizer, and to store and control its sounds.
The APS contains this specialized hardware and uses your
computer’s system RAM and hard disk for storing and
playing back sounds. The EMU10K1 SynthEngine
hardware handles pitch interpolation, filtering, envelope
shaping and effects, freeing your computer to perform
less time consuming tasks.
The APS SynthEngine can play up to 64 dynamically
allocated notes (voices) simultaneously. (This is called
“64-voice polyphony”.) The SynthEngine can play up to
32 channels from your MIDI sequencer or MIDI keyboard
using the APS’s two internal MIDI ports (Synth A and
Synth B).
NOTE: GM (General MIDI) .MID file players will
only play back 16 MIDI channels.
The APS SynthEngine uses up to 32 MB of your
computer’s RAM to store sample data, from which sounds
are generated. The SynthEngine supports 8-bit or 16-bit
digital sounds at any sample rate. The file format for
these samples is the most popular form of downloadable
sounds, the SoundFont® format. More on this in Chapter
4 - “The SoundFont Bank Manager”.
Connecting a keyboard MIDI controller or keyboardequipped hardware synth to the E-card transforms your
computer into a professional quality musical instrument.
It’s much easier and more fun to play music on a
keyboard. Any MIDI keyboard (99% of those on the
market today) will allow you play the APS synthesizer.
1-6
Introduction
MIDI
The APS SynthEngine is controlled by MIDI. The MIDI
specification is a language by which computers and music
synthesizers can communicate. What’s important to
understand is that no actual sounds are transferred
through the MIDI cable. MIDI messages are simple 1, 2, or
3 byte commands that tell the synthesizer such things as
which notes to play, what volume to play them, which
sound to play, etc.
MIDI enables you to play one synthesizer from the
keyboard of another and lets you record multiple musical
performances on your computer, edit them and have the
computer play them back together.
General MIDI
General MIDI (GM) is a subset of the MIDI spec and
provides that a specific set of sounds be loaded at
specific memory locations and with specific names. This
way a song written on a General MIDI synth, will play
back correctly on any other General MIDI synthesizer.
See the Appendix for a General MIDI Patch Map.
General MIDI assigns drum sounds to MIDI channel 10,
with different drum sounds on different notes of the
keyboard. This drum channel plays each sound at its
original pitch, contrary to a melodic preset, which
transposes sounds to get a full range of pitches.
Default MIDI Bank
When you boot your PC, a 2MB General MIDI bank is
loaded into computer’s RAM and assigned to both
SynthEngines A and B. Whenever you play a MIDI file
(.MID)-from your desktop, from a Web page, within a
game or CD-ROM title or from a MIDI sequencer-the APS
SynthEngine will use these sounds. If you want higher
quality sounds, you can load the 8MB GM bank. See
Chapter 4 - “The SoundFont Bank Manager”.
APS Users’ Manual
1-7
Other SoundFont Banks
You can also copy additional SoundFont Banks from the
APS CD-ROM, or from optional CD-ROMs you can
purchase from E-mu. The Sounds in all these banks are
taken from the immense E-mu sample library, and are the
same sounds used in products such as the Proteus,
Vintage Keys, and Planet Phatt. They consist of a wide
variety of acoustic and electronic instrument sounds and
sound effects.
Quickstart
You might want to start making sounds immediately. If
you just can’t wait to get started, use the following
guidelines:
1. Install the E-Card, MIDI bracket and optional E-Drive
(Chapter 2).
2.
Connect your MIDI keyboard to the MIDI In cable on
the back of the E-Card. (Also see Chapter 2).
3.
Install the APS software using the enclosed CD-ROM.
4.
Copy the additional Demo SoundFont Banks not
installed with the normal installation to your hard
disk.
5.
Restart your computer.
6.
Double-click on the E-mu icon located in the right
hand corner of the TaskBar, and the E-Control will
open.
7.
Choose the Launch>SoundFont Bank Manager menu.
The SoundFont Bank Manager opens, from where
you can audition the APS Synth sounds.
8.
Play the piano by clicking on its keys. It sounds
good, but wait ‘til you hear the piano in the 8MB GM
set!
9.
Click the Preset drop-down above the keyboard to
audition other presets from the 2MB Standard
General MIDI bank that loads when you boot your
computer.
1-8
Introduction
10. Click the Browse button again to navigate to the
other SoundFont Banks.
11. Go back to the E-Control, and below the two green
arrows in the MIDI Strip, click Reverb, and Show
Effect Panel from the drop down menu. Twist some
knobs and see how the effect affects the sound. Cool,
huh?
12. Open your favorite MIDI/Audio sequencer, set it to
use the APS port drivers and rock ‘n’ roll.
If you have problems with the installation, please refer to
Chapter 2: Installation & Setup for complete instructions.
System Requirements
• PC with Windows 95 or 98 and hard disk drive
• CD-ROM drive for software installation
• PCI slot +open bracket space for MIDI connector
• Open drive bay for E-Drive installation(optional)
• Minimum System*
- Pentium 133 with at least 24MB RAM
- Monitor resolution - 800x600 256 color
• Recommended System
- Pentium 200 with 64 MB RAM
- Monitor - 1024x768 Hi Color (16-bit)
System performance, especially the number and quality
of SoundFont samples, is VERY dependent on system
RAM. We highly recommend that you have at least 16MB
of additional system RAM (over the 16MB of system RAM
necessary to run Windows) for quality performance of
the Audio Production Studio. Also note that the number
of audio tracks available for playback is dependent on
the capabilities of the application software, hard disk
bandwidth and CPU performance.
APS Users’ Manual
1-9
Online Help
This section was a simple introduction to the usage of
The Audio Production Studio. For detailed information,
continue to read this manual and refer to the APS
On-Line Help found under the Help Menu of the APS
E-Control Mixer. The APS has extensive and complete
documentation describing all of the features and how to
use them in detail.
Please note that On-Line Help is sometimes more up to
date than this manual, due to the fact that software
revisions can happen faster than manual printings!
1-10
Introduction
2. Installation and Setup
System Preparation - Software Requirements
BEFORE installing the E-mu APS Hardware, please make
sure your computer meets the following software
requirements:
• Microsoft Windows 95 or 98 is fully installed.
(Sorry, APS will not yet work with Windows NT.)
• All Multimedia options for Windows 95 or 98 are
installed.
To verify this, do the following:
1. Start->Settings->Control Panel
2. Add/Remove Programs
3. Windows Setup
4. Scroll down until you see the Multimedia Options
checkbox. This should be a white checkbox that is
selected. If the checkbox is not selected, or if it is a
grey checkbox that is selected, take the following
additional steps:
a. Select Multimedia Options
b. Click on Details
c. Check each component in the new list box you see
in front of you.
d. Click on OK, then OK again.
e. Follow the instructions Windows gives you until
all software is properly installed.
Your system is ready to have the APS hardware installed.
NOTE: The installation program does not load everything that
is on the CD. The APS CD also contains ‘Demo Software’ that
has more SoundFont banks, demo files and other “extra”
goodies. If you have the space, these files will provide you
with useful and interesting demos, and a whole bunch of
great new sounds. You can, of course, also load the SoundFont banks directly from the CD as you need them.
APS Users’ Manual
2-1
Installing the APS Hardware
The Audio Production Studio hardware consists of 3 main
parts and several connecting cables.
If you are very familiar with PC hardware installation
read the Quickstart section, otherwise go on to the StepBy-Step Hardware installation on the next page.
This hardware installation is relatively easy on most PCs,
however if you feel uncomfortable inside your computer
or have difficulty installing the hardware, please have a
qualified technician help you.
QUICKSTART - Installing the APS Hardware
1 . T h e E - C a r d - this can be installed in any open PCI
slot. Place the supplied “Input/Output label” on your
PC next to the card slot.
2 . T h e M I D I B r a c k e t - Connected via a cable “C” to the
E-Drive, the MIDI bracket can be placed in any
available open bracket space.
3 . T h e E - D r i v e - this should be installed in any open
drive bay. Depending on your PC case style, this may
involve removing one or more other components.
Placement is up to you, but if possible we suggest that
the E-Drive be placed under your CD-ROM drive so as
not to interfere with the CD tray opening if you have
cables plugged into the E-Drive.
There are 2 supplied cables that connect the E-Drive to
the E-Card. Cable “A” is an audio cable that carries the
headphone signal from the E-Card to the E-Drive. Cable
“B” is a flat ribbon cable that carries all the other signals.
Note: You can connect the digital output of a CDROM drive directly to the E-Drive. This cable is
supplied, and also comes with most CD-ROM
Drives. Note, however, that not all CD-ROM
drives have a digital audio output.
2-2
Installation & Setup
E-Drive Microphone configuration
Jumpers inside the E-Drive configure the inputs to
operate with either standard powered or un-powered
SoundBlaster compatible microphones, professional
dynamic microphones, or a large number of phantompowered professional condenser microphones.
NOTE: These jumpers should be set before
installing the E-Drive. Please see the Appendix
for more on microphone configuration.
Microphone
Selector See Appendix
E-Drive
Note - The white
Headphone
connector is
currently unused
Black
HeadPhone
Connector
E-Card
Connector
E-Drive
Ribbon Cable
"B"
Headphone
Cable "A"
Digital Connector
to CD-ROM
HeadPhone
Connector
E-Drive
Connector
E-Card
MIDI Bracket
Connector
MIDI
Bracket/Cable
"C"
Future Expansion
Connector
(unused)
MIDI I/O
Cable "D"
In
Out
The Audio Production Studio
Hardware/Cable Diagram
APS Users’ Manual
2-3
Step-By-Step Hardware Installation
The APS system installs inside your PC. You will need one
available drive bay, an available PCI card slot, and an
additional open bracket space for the MIDI I/O
connector.
Tools You’ll Need.
• Phillips head screwdriver (Don’t use a screwdriver
with a magnetized tip!!!)
Before You Begin:
1. Turn off and unplug the computer before attempting
to install the APS.
2. Remove the computer cover to gain access to the
inside. Be sure to save the screws!
3. Touch the power supply cover or other metal surface
to discharge any static electricity stored in your
body. Static charges can damage the circuit board.
4. Locate the necessary bay, card slot, and bracket
space. Some computers may require you to remove
one or more components in order to install the
E-drive in an available bay. Refer to the owners
manual that came with your computer for more
information. Remove the bay cover from the front of
the computer.
Install the E-Drive
It’s best if you can install the E-drive below the CD ROM
drive to ensure the cabling doesn’t interfere with the CD
ROM drawer. Once you have located and prepared the
bay you want to use, install the drive:
1. Ground yourself and remove the drive from its
anti-static bag.
2. Orient the drive so the knobs and connectors face
toward the front of the computer. (They will stick
out in place of the bay cover you removed earlier).
2-4
Installation & Setup
3. Configure the Microphone jumpers to your most
commonly used microphone type. See the Appendix
for more information on microphone selection.
4. Carefully slide the drive into the empty bay. Take
care not to pinch any cables or force the drive into
the bay. It should slide in fairly easy.
5. Secure the drive to the bay.
Connect the Cables
There are three cables included with the APS that connect
all the components. All of the cables are “keyed” so they
can be attached in the proper orientation. Install the
cables to the E-card before plugging it into the computer.
Refer to the illustration on page 2-3 for cable connections
and locations.
Install The E-Card
1. Remove the bracket cover from the free PCI Card
slot. Save the screw.
2. Remove the E-card from the anti-static wrap.
3. Position the card over the slot. Be sure to align the
card bracket with the open bracket slot, and the
bottom of the card with the card slot on the
motherboard.
4. Gently but firmly, push the card into the slot. Be
sure the card is firmly seated all the way in the slot.
5. Secure the card by using the screw removed in step 1
to attach the bracket to the computer frame.
Install The MIDI Bracket
1. Remove the bracket cover from the available bracket
space. Save the screw.
2. Locate the MIDI bracket included with the APS.
3. Place the MIDI bracket in the available space and
secure it with the screw you removed in step 1.
APS Users’ Manual
2-5
Putting It All Back Together
1. Replace any components in your computer you
removed prior to the APS installation, then double
check the cabling. Make sure there are no screws or
other loose parts inside the computer, then replace
the computer’s cover.
Installing Software - Driver Installation
When you have completed the hardware installation
section, you may turn on your Windows 95 computer.
When Windows finishes booting, it detects the new
hardware in your system and will ask you for device
drivers.
You have two options at this point:
1. Automatic Install (Recommended)
Allow the E-mu APS software installation process to
automatically install drivers for you. C l i c k o n N e x t /
Finish or Cancel until all Windows Driver Wizard
dialog boxes go away, then insert the APS CD.
You may then skip to the next section entitled “Software
Application Installation”.
2. Wizard Driver Install (for experienced PC user s)
Allow the Windows Driver Wizard to guide you through
the Device Driver Installation.
If you elect option #2, continue reading here.
1. Click on the Next button and allow Windows to
search for a driver diskette. Windows will eventually
fail to do so, and ask you to direct it to where the
device drivers exist.
2. Put the E-mu APS Software CD-ROM into your
CD-ROM drive, then select “Alternate Locations”
and then Browse to the ‘Win95’ folder on the APS
CD-ROM.
3. Windows should now find E-mu APS drivers.
4. Click on Finish.
2-6
Installation & Setup
NOTE: If you have Windows 95 OEM Service
Release 2 (OSR2) or later, Windows will fail to
find the first file. Once again, direct Windows to
the ‘Win95’ folder on the CD-ROM.
If at any point in this installation process something goes
wrong, fear not! Just install the applications and your
device drivers will automatically be reinstalled properly.
Installing Software - Application Installation
1. Insert the E-mu APS Software CD-ROM. In a few
moments, you will see the “E-mu APS Powered by
E-mu” movie show on your screen. A screen with
checkboxes will then pop up.
2. To install all software, just click on the OK button.
What will follow is the installation of a number of
applications and services, from E-mu and third party
suppliers.
3. Some of the third party applications have separate
license agreements, you need to accept each before
the install continues.
If at any time in the installation process you see Windows
Driver Wizard dialog boxes, just hit the Next button
continuously until it turns into a Finish button, then click
on Finish.
The last step of this installation process may ask you if
you want device drivers to be installed. If you see this
message box, it means you elected option (2) in the
Driver Installation Section, and may therefore click on
Cancel since the drivers are already installed.
At this point you should be all set to use the Audio
Production Studio. If you are having problems, read the
following troubleshooting sections.
APS Users’ Manual
2-7
Installing Software - Troubleshooting
If for some reason the installation program does not
automatically run, use the Run Command in the Windows
Start menu. To do this:
1. In the Windows TaskBar, click the Start button.
2. Click the Run Command.
3. Browse to the file in the APS CD-ROM:
Autorun>setup.exe.
4. Double-click on setup.exe - the install program will
run.
How to Verify Your Software Installation
If you are having problems running the APS, you may
want to confirm that the E-mu APS Software is installed
properly.
To Do This:
1. Select -> S t a r t / S e t t i n g s / C o n t r o l P a n e l .
2. Select -> S y s t e m / D e v i c e M a n a g e r / S o u n d ,
Video, Game Controllers.
3. There should be an entry for E - m u A P S E M U 1 0 K 1
A u d i o P r o c e s s o rr. This entry should NOT have an
exclamation point (!) or a red x (X) through it.
4. There should also be an entry for E - m u A P S
E x t e r n a l G a m e p o r tt. This entry may or may not
have an exclamation point (!) through it. This
depends on whether or not another gameport on
another card is already installed.
NOTE: The Joystick connector on the MIDI cable does not
currently support game/cursor functions. Do not plug a
joystick into this connector, it will not work. Note however
that future software upgrades may take advantage of this
connector. So, if you can’t get the game port working no
matter what you try, don’t worry about it.
2-8
Installation & Setup
Now, Verify Multimedia Settings:
1. Launch Multimedia Control Panel (Start/Settings/
Control Panel/Multimedia)
2. Select A u d i o
3. Under P l a y b a c k , select A P S W a v e O u t
4. Under R e c o r d i n g
g, select A P S W a v e I n
5. Under P r e f e r r e d Q u a l i t y
y, Select C D Q u a l i t y
6. Select A p p l y
7. Select M I D I
8. Select S i n g l e I n s t r u m e n t
9. Select M I D I f o r E - m u A P S M I D I / S o u n d F o n t
S y n t h e s i z e r or A P S S y n t h A (whichever of these
is listed)
10. Now, hit the A p p l y button.
11. As a last step, double-click on the E-mu logo you see
in the start-bar to launch the E-Control Mixer. Click
on H e l p then A b o u tt.
12. You should see the E-mu APS Powered by E-mu Movie
complete with streaming audio coming from your
APS hardware. This is followed up with credits
complete with MIDI audio coming from your APS
hardware. If this is what you see and hear, the E-mu
APS hardware and software are installed properly
and you are ready to enter the E-mu APS experience!
APS Users’ Manual
2-9
Connecting the APS to MIDI/Audio Programs
The first time you launch a new MIDI/Audio program,
you’ll need to get it talking to the APS.
You can usually establish such communications via a
menu in the host application that will be called
something like “Setup” or “Settings.” (Look for “MIDI”
and “Audio” devices - See your program’s manual to
learn how to do this.) These menus will let you choose
the APS ports and drivers from a list that may include
other ports and drivers.
Input Ports & Drivers
For your MIDI/Audio program to receive WAVE audio or
MIDI from any external source, you must enable (select)
the two APS input port drivers, APS WAVE IN and APS
MIDI IN in your program.
APS WAVE IN
The APS WAVE IN appears as a single (stereo) streaming
audio recording input to the host program. Once selected
in your program it will usually stay enabled. This will
then direct audio from the E-Control to your program.
To choose among the various APS hardware inputs,
including output from the synthesizer or effects engine
auxiliary sources use the E-Control Input Strips.
See Chapter 3 - Using the E-Control for specific
instructions on using the E-Control.
APS MIDI IN
Select the APS MIDI IN driver in your host application to
allow the APS to receive MIDI data from external MIDI
devices through the MIDI cable attached to the rear of
the MIDI Bracket attached to the E-Card.
2-10
Installation & Setup
Output Ports & Drivers
For your host application to send MIDI data to the APS
SynthEngine or any external MIDI device, or to output
audio to any destination, it must be communicating with
the four APS output devices:
APS Synth A
This addresses all 16 channels of internal SynthEngine A.
APS Synth B
This addresses all 16 channels of internal SynthEngine B.
• Use your program’s “port selector” to select either
APS Synth A or APS Synth B for particular tracks.
• You also control which MIDI data goes to which MIDI
channels via the host program.
• For more sophisticated use, such as extracting
individual channels from the output of the host
program and processing them separately, see Chapter
3 on how to use the MIDI Submix Strips in the EControl.
APS MIDI OUT
This addresses the physical MIDI Out port. To play
external synths, select APS MIDI OUT and connect your
external synth’s MIDI In port to the E-mu APS MIDI
Output connector on the MIDI I/O cable (cable “D”).
WAVE OUT
This addresses the APS stereo output. The audio from
here is routed to the “Wave” input strip of the E-Control
mixer
APS Users’ Manual
2-11
Connecting the APS
to your External Equipment
The APS can be configured into your setup in a variety of
ways. The following pages are suggestions for use.
BASIC APS SETUP
Powered Monitor
Speaker(R)
Bal In
Bal In
Powered Monitor
Speaker(L)
MIDI
Bracket
E-Card
A1 (R)
A2 (L)
Analog
Line In
A1 (R)
A2 (L)
Analog
Line Out
Headphone
Out (L+R)
A4 (R)
Analog
Mic/Line In
A3 (L)
Analog
Mic/Line In
D1 (R+L) Digital In
D1 (R+L) Digital Out
Headphones
E-MU
D2 (R+L) Digital In
MIDI Out
D2 (R+L) Digital Out
Guitar
Mic
MIDI Keyboard Controller
2-12
Installation & Setup
A DVA N C E D A P S S E T U P
Powered Monitor
Speaker(R)
Bal In
Bal In
Powered Monitor
Speaker(L)
MIDI
Bracket
A1 (R)
A2 (L)
Analog
Line Out
L Out
R Out
A4 (R)
Analog
Mic/Line In
A3 (L)
External Sound Module
(MIDI controlled)
Analog
Mic/Line In
External Effects Unit
(with digital I/O)
MIDI In
Analog
Line In
Headphone
Out (L+R)
Stereo
Effects
Loop
A1 (R)
A2 (L)
D1 (R+L) Digital In
D1 (R+L) Digital Out
S/PDIF
In
S/PDIF
Out
E-Card
Headphones
E-MU
D2 (R+L) Digital In
D2 (R+L) Digital Out
MIDI Out
S/PDIF
Out
D AT
S/PDIF In
Por table Digital
A u d i o Ta p e
Recorder
Guitar
Mic
MIDI Keyboard Controller
To r e c o r d m u l t i p l e p e r f o r m e r s s i m u l t a n e o u s l y w i t h a d d i t i o n a l a n a l o g i n p u t s :
Add analog-to-digital conver ters
Mic
To D 1 D i g i t a l I n
Guitar
A n a l o g - To - D i g i t a l
(A/D) Conver ter
Outputs
Inputs
Mic
To D 2 D i g i t a l I n
A n a l o g - To - D i g i t a l
(A/D) Conver ter
APS Users’ Manual
Guitar
2-13
Input trim
Physi cal
Analog
L ine In
Level
L
Aux 1 Aux 2
Pan
R
Mono Analog
Physical Input
Strip (1-4)
Physical
S/PDIF In
or CDRom
Digital Out
Stereo Digital
Physical Input
Strip (1-2)
Insert
(to one or more
chained internal
APS effects)
Level
Main L+R
Strip aux bus
Selectors 1-4*
L
Aux 1 Aux 2
Balance
R
Insert
(to one or more
chained internal
APS effects)
Strip aux bus
Selectors 1-4*
Level
APS
Wave
Out
L
Aux 1 Aux 2
Balance
R
Insert
(to one or more
chained internal
Stereo Wave
Submix Strip (1) A PS effects)
Strip aux bus
Selectors 1-4*
APS MIDI Synth
Engine Effects
Sends 1+2
Aux 1
APS MIDI Synth
Engine Dry Out
Stereo Main
MIDI Submix
Strip (1)
Balance
Insert
(to one or more
chained internal
A PS effects)
Level
Level
APS MIDI
Synth Engine
Dry Out
Stereo User
MIDI Submix
Strip (1-5)
Stereo Aux
Busses 1-4*
(summed signal
of all strip Aux
Sends)
Aux 2
L
R
Strip aux bus
Selectors 1-4*
L
Aux 1 Aux 2
Balance
Insert
(to one or more
chained internal
APS effects)
R
Strip aux bus
Selectors 1-4*
Aux Sends (to
Physical Output,
Host Record or
internal APS
effect inputs)
Aux Return
Levels
Aux Returns
(from Physical
Input or
i nternal A PS
effect outputs)
To host
record (APS
Wave In)
H ost Record Level
Switch
Ma in Stereo Mix
L+R Levels
To Physi cal Outputs
(analog or digital)
E-Control Signal Flow Diagram
2-14
Installation & Setup
3. Using The E-Control Mixer
Overview
The APS E-Control mixer is a user-configurable software
device for routing audio data to and from the inputs and
outputs of the APS, your computer’s hard disk, the APS’s
32-channel MIDI SynthEngine, and your MIDI/Audio
application.
APS Users’ Manual
3-1
The first time you launch the E-Control Mixer, you’ll see
the Master Output Strip and two Input Strips: a Wave
Strip and a MIDI Strip.
The E-Control Mixer gives you the power to configure
inputs, outputs and processing. Not only can you add
custom inputs and processing modules, but you can save
any number of “snapshots” of any configuration for
future use.
The E-Control Mixer can process audio from the physical
inputs, wave audio and MIDI audio in several ways:
• adding reverb, echo, dynamics and other effects
• altering its level
• panning it left and right
• sending it out to external processors
• bringing it back from external processor
The E-Control offers a number of controls over these
functions. These functions are found in two different
kinds of control strips:
Input Strips
Input Strips contain controls to route audio coming into
the E-Control. There are 5 types of input strips:
•
•
•
•
•
Wave Input Strip
MIDI Input Strip
Analog Input Strip
Digital Input Strip
MIDI Submix Input Strip
Master Output Strip
•
•
•
•
3-2
Aux Bus Routing Panel
Hard Disk Recording Panel
Tools Panel
Main Output Sliders (2)
Using the E-Control Mixer
Input Strips
An Input Strip is a set of controls that route audio coming
into the E-Control Mixer from any source-the APS physical inputs, hard disk audio(.wav) or audio
from the SynthEngine (MIDI output).
Input strips have the following controls:
Trim pot (on A1&A2 only)
Source button
Inline Insert button
2 Aux Bus Selectors & Aux BusSend
Amount controls (horizontal indicators)
Fader Grouping icon
(2 chain links)
Stereo/Mono indicator
Pan indicator
Level indicator
Pan Pot
Input Fader
Track Name (text field)
Mute/Solo Buttons
For a full explanation of these controls
see the section on “Input Strip Controls”
later in this section.
APS Users’ Manual
3-3
Input Strip Types
At the top of each Input Strip, a Source button indicates
the kind of audio it accepts:
• The Input Strip labeled “Wave” accepts mono or
stereo .WAV audio from your hard disk.
• The Input Strip labeled “MIDI” accepts the stereo
digital audio output of the APS SynthEngine.
• The Input Strip labeled “MIDI 1-5” accepts the mono
or stereo digital audio output of individual channels
of the APS SynthEngine - more on this later in this
chapter.
• The Input Strip labeled A(1-4)accept audio from the
APS analog inputs. You’ll notice that Analog strips 1
and 2 have a trim pot at the top. This is absent from
Analog Strips 3 and 4, because these strips accept
signals from the E-Drive (option), which has hardware
trim pots that serve this function.
Strips A3 and A4 will be greyed out if the E-Drive
(option) is not attached.
• The Input Strip labeled D (1-2, 2-CD) accept audio
from the APS digital inputs.
Digital Input Strips select input from:
• S/PDIF IN 1 from the E-Card
• S/PDIF from the CD-ROM drive on D2 only*.
`• S/PDIF IN 2 from the E-Drive (option)
Strip 2 will be greyed out if the E-Drive is not
attached or if it’s not set to CD ROM.
Note: You must connect the digital output of a CD-ROM
drive directly to the E-Card for this feature to work. This
cable is not supplied, but comes with most CD-ROM
Drives. See Ch. 2 “Hardware Installation” for more
information.
3-4
Using the E-Control Mixer
Adding Analog and Digital Input Strips
Analog and Digital Input Strips (and MIDI Submix Stripssee below) accept audio from the APS’s analog and digital
inputs.
Open your E-Control mixer now and add an analog and
digital input strip. Do this in either of two ways:
• Click Edit > Add Strip > Analog (or Digital) menu.
OR
• In the Tools Panel near the center of the
Master Output Strip, click the pale blue
button with the plus sign and sine wave to
add an analog Input Strip.
• Click the pale blue button with the plus
sign and a square wave to add a Digital
Input Strip.
Deleting Input Strips
To delete an Analog, Digital (or MIDI Submix)
Input Strip, click the Source button at the top
of the strip and choose Delete from the dropdown menu.
APS Users’ Manual
3-5
MIDI Strips
APS deals with MIDI controlled SynthEngine audio in two
distinct ways.
Main MIDI Strip
The primary MIDI strip is located to the
right of the Wave Strip, and typically
|accepts audio from all currently sounding
MIDI channels (by default). In addition to
this, the signals that enter the two aux-sends
on this MIDI strip do not behave identically
to any of the other strips (see signal flow
diagram in front of this chapter for more
information on this). Specifically, the two
aux sends on the main MIDI strip route
audio representing channelized General
MIDI effect sends 1+2 (typically for reverb
and chorus, although you can route them to
other effects in the aux bus should you
wish). This nuance of operation is for
General MIDI compatibility reasons, but also
gives you the flexibility to exert MIDI
control over aux1+2 send amounts on each
of the 32 MIDI channels that typically feed
into this strip (controllers 91+93). The two
send controls in the MIDI strip control the
overall amount of each channelized send.
MIDI Submix Strips
The second type of MIDI strip allows you to
break away from the above GM centered
behavior. Up to five of these strips can be
created and they appear to the right of the
master controls in the E-Control mixer.
These strips can be selectively used to
reroute specific midi channels for separate
processing. Also, note that the aux send
behavior of these strips is identical to all
the other strips (not channelized as
explained above). As a user, you can routed
one or more MIDI channels to any one of
3-6
Using the E-Control Mixer
these user MIDI strips. For example, you may want put
the guitar on MIDI channel 6 through a distortion effect,
in which case you reroute this channel to a new MIDI
strip. Any MIDI channel that gets rerouted to one of these
user MIDI strips is removed from the main MIDI strip
(and this breaks any expected General MIDI behavior).
MIDI Submix Configuration
The MIDI Submix Configuration Panel offers buttons that:
• Add MIDI Submix Strips
• Delete MIDI Submix Strips
• Reassign the Synth Engine and MIDI channel that have
been previously assigned to a MIDI submix Strip
• Reset MIDI Submix Strips to no settings.
Adding MIDI Submix Strips
You can create as many as five MIDI Submix Strips at
any one time, in one of three ways:
1. From the E-Control Edit menu, choose Add Strip >
MIDI Submix.
OR
2. In the Tools Panel near the
center of the Master Output
Strip, click the MIDI Submix
button (the pale blue MIDI
plug).
OR
Add MIDI Submix
Strip button
3. Simultaneously open a new MIDI Submix strip and
assign it to a synth Engine and MIDI channel.
To do this:
MIDI Submix Config button
1. In the Master Output Strip
Tools Panel, click the yellow
button labeled with a MIDI
plug.
APS Users’ Manual
3-7
add MIDI submix cont.
2. In the MIDI Submix
Configuration panel that
opens, click Add.
3. In the Synth Channel Selector
that opens, select Synth A or
B and select a MIDI channel.
4. Under Select a User Input,
select a new (or existing)
MIDI Submix Strip. Click OK.
Any Input Strips you add will be there the next time you
launch the E-Control.
Deleting MIDI Submix Strips
• In the MIDI Submix Configuration Panel, click on the
name of the strip you want to delete. Click Delete.
• You can also delete a MIDI Submix Strip by clicking on
the Source button at the top of the strip, and clicking
on the Delete Button that appears.
Reassigning MIDI Submix Strips
To reassign the Synth Engine and MIDI channel of one
MIDI Submix Strip to another:
• In the MIDI Submix Configuration Panel, click on the
name of the strip currently assigned to the synth
input and MIDI Channel you want to reassign. Click
Reassign.
• From the Select User Input drop-down, select the MIDI
Submix Strip to which you want to reassign the synth
input and MIDI Channel.
The Clear All Button
The Clear All button clears all synth and channel assignments from all open MIDI Submix Input Strips.
3-8
Using the E-Control Mixer
Input Strip Controls
Now that you know how to add and delete different kinds
of Input Strips, let’s look at the controls on an Input Strip.
The Trim Control (A1&A2)
This is the round knob at the very top of Analog Input
Strips 1 & 2 only. This knob sets the amount of input
signal coming in from the analog inputs of the E-Card.
Analog inputs 3 & 4 do not have this trim control
because their level is set by the physical controls on
the front of the E-Drive .
The Source Button
This is the text button at the very top of an Input Strip. It
lets you select the source for the Input signal for that strip.
• To select the input from which an Analog Input Strip
accepts a signal, click the Source Button at the top of
the strip (default-labeled A1) and select input 1, 2, 3,
or 4 from the drop-down menu. These correspond
respectively to the rear E-Card left and right inputs,
and the front E-Drive (option) left and right inputs.
The Source button will change from the default of A1
to reflect your selection.
• To select the input from which a Digital Input Strip
accepts a signal, click the Source Button at the top of
the strip and select input 1 or 2 from the drop-down
menu. These correspond to the rear E-Card input and
front E-Drive (option) input. The label will change
from the default of D1 or D2 to reflect your selection.
Listening to Digital Audio from a CD
The Source Button on the first Digital Input Strip you open
will be D1. The Source Button on the second Digital Input
Strip will be D2. This, or any Digital Input Strip subsequently set to D2, will have an additional digital source
available in the drop down menu: the internal CD-ROM
drive in your PC. Choosing this source will let you record
digital copies of audio from CDs. See the hardware setup
section in Ch.2 to learn how to make the connections for
this function.
APS Users’ Manual
3-9
The Inline Insert Button
The Inline Insert button lets you configure inline effects
on a single input strip. An inline effect is one where the
entire Input Strip signal is routed to one (or more) of the
APS’s built-in effects processors such as an EQ or
compressor, which then sends the entire processed signal
back to the Input Strip. The APS allows you to have all of
the effects in use at the same time! - This means you can
use some effects on individual channels and still have
others available for overall processing.
If there’s a space between the two arrows and they are
grayed out, no effects are inserted into that Inline Insert
Strip. If the arrows are connected and lit bright green, at
least one effect is inserted to that Strip. Holding the
cursor over the button will display the complete list of
assigned effects.
No
Effect
Inserted
Effect
Inserted
The Inline Insert Popup Strips
An Insert Popup Strip allows you to insert inline effects
into a particular strip in the E-Control mixer.
• Bring up this strip by selecting the Inline Insert Button located just below the Source Buttons on any
given Input Strip (labeled with two green arrows).
Effect wet/dry
mix knob
Inserted Effects
Insert Popup Strip with Effects
3-10
Using the E-Control Mixer
Placing Effects into an Insert Strip
There are two ways to insert effects :
● Using the Append Effect Button:
1. Click an Inline Insert Strip Button.
2. Click on the Append Effect button and choose the
effect you want.
● Drag and Drop the Effect:
1. In the E-Control, click the
View>Effect Patch Palette menu.
The Effects Routing Palette will
open, displaying the effects.
2. Drag any active effect (not grayed
out) to either the Inline Insert
Button on any Input Strip or, if
the popup strip is open, the
Append Effect button.
When an effect is inserted, the two
arrows in the Input Strip come together, indicating the effect is active.
Changing the Order Of The Effects
To change the order of Effects in a Insert Strip, click and
hold on any Effect and drag-and-drop to the desired
location.
Effects Wet/Dry Mix
Many of the effects show up with a mini “wet/dry” knob
that allows you to control the mix of the the effect without having to open the effects panel. This is a duplicate
of the “wet/dry” amount found in the Effects’ control
panel. A we/dry amount is not found on all effects and,
therfore, is not duplicated here.
Changing Effects parameters
Once you add the effect to the Insert Strip, you can click
on it to open a control window where you can change the
parameters of the effect. See Chapter 6, Using Effects, for
information on Effects Parameters.
APS Users’ Manual
3-11
The Aux Busses
The APS has four Aux Busses. Each one receives signals
from all Input Strips and sends them to various
destinations, typically one of the internal APS effects, but
you also have the flexibility of routing an aux bus to an
external effects unit should you so desire.
Using an Aux Bus to route a signal to an effects processor
is different from using an Inline Insert Strips. The most
important difference being that by using an Aux Bus, you
can share one effect amongst several input strips. If you
use an effect as an insert, you are limiting its use to that
one strip on which it is inserted. Each Aux Bus has a
return to mix slider control which adjusts the amount of
effected signal that joins the main mix. And by adjusting
the send amounts on each strip, you can control the
proportion of effected signal sent from each individual
strip.
Quickstart -How to Use the Aux Bus:
1. Select an effect for one of the four available buses.
2. Use Aux Send 1 or 2 from an Insert Strip to select the
Aux Bus as a signal destination.
3. Use the strip Aux Send amount control to set how
much of the strips signal you wish to send to that
effect.
Note that an Aux Send represents a split in the signal
path on a strip, so you get both a dry signal and an
effected signal entering the mix. Also note that in APS the
Aux Sends are post-fader.
Aux Bus Selectors
The two Aux Bus Selectors on each
Input Strip appear in green type
immediately below the insert
button.
You can use either or both to
route an adjustable amount of the
input signal out any of the four
Aux Bus Routers.
3-12
Using the E-Control Mixer
Asssigning Effects to an Aux Bus
Before assigning an Aux Bus Selector,
fmake sure that at least one of the four
Aux Bus Routers (located in
the Aux Bus Router Panel at
the top of the Master Output
Strip) isassigned to an effect
or other destination.
There are two ways to assign an effect
to an Aux Bus Router:
● Drag and Drop
1. Drag an effect from the Effects Routing Palette:
2. Open the Effect Patch Palette
from the View menu or by
clicking the lightning-bolt
Effects Button in the Master
Output Strip Tools Panel.
Effects Button
3. From the Effects Panel, drag the effect icon you want
to any Aux Bus Router (the green labels in the Aux
Bus Routing Panel).
● Assign Effects
Assign an effect with the Aux Bus Router Panel menu:
1. At the top of the Master Output Strip, click on Aux
Bus Router 1, which defaults to Reverb.
2. In the drop down menu, go to Effect, and choose an
effect from the submenu. The name of the effect you
chose will replace the word Reverb in the Aux Bus
Router.
3. Click the button again, and choose Show Effect Panel
from the menu. The control panel for the effect you
chose will open on your screen.
You can assign any of the four Aux Buses to any of the
APS’s built-in effects. Try routing each Aux Bus to a
different effect and opening the control panel for each
one.
APS Users’ Manual
3-13
Sending Signals to an Aux Bus:
To Send a Signal from an Input Strip to an Aux Bus:
1. On an Input Strip, click on the top Aux Bus Selector.
2. From the drop down menu, choose any of the four
effects to which you routed each of the four Aux
Buses.
3. Do the same with the second Aux Bus Selector, right
below the top one. This gives you two effects per
Input Strip, in addition to the Inline Insert effects.
To set the Signal Amount from the Input Strip to the Aux Bus:
1. Drag the Aux Bus Send Amount (the
red line below the effect names on
the Aux Bus Selectors. The farther
right you drag the red line, the more
signal goes to the Aux Bus.
To set the Amount of Processed Signal returned to the Master
Output Strip:
1. In the Aux Bus Router, click on the Aux Bus Return
Amount-the red line below the effect name.
2. The farther to the right you drag the red line, the
more signal is sent to the output mix.
Any audio (including MIDI
synth sounds) you play
through this Input Strip will
now be processed by the
effect on the assigned Aux
Bus. The processed signal is
automatically routed back to
the main output mix.
3-14
Using the E-Control Mixer
Routing to an External Device through an Aux Bus
At times, you’ll want to route one or more input strip
signals to some external device: a dedicated processor, a
tape deck (to record a submix to tape, for example), etc.
1. Assigning a Hardware Output:
The first step in doing this is to go to the Master Output
Strip Aux Bus Router and assign one of the Aux Busses to
one of the hardware outputs (Analog Out 1+2(on E-Drive
option), Digital Out 1 or Digital Out 2).
To do this:
1. Click the Aux Bus Router, and choose the Physical
Output sub menu and hardware output you want to
use.
2. Go to an Input Strip, click one of its two Aux Bus
Selectors and assign it to the hardware output you
just chose in the Aux Bus Router.
3. Drag the Aux Bus Send Amount to control how much
of the signal goes to the output.
The signal from the assigned Input Strip will be routed
through the Aux Bus to the selected output and the
external device to which it’s connected.
APS Users’ Manual
3-15
2. Setting a return input
If your external device is a tape deck, this is as far as you
need to go. But if the device is an effects processor, you
now have to route its output back to the APS.
To do this:
1. Click the Aux Bus Router Physical input (the gray tab
below the Aux Bus Return Amount) and choose the
Input you wish to use (note: one must be available).
2. Drag the Aux Bus Return Amount (the red line in the
Aux bus Router) to control how much of the signal
returns to the mix.
The output of the external processor is now routed to the
Master Output mix.
3-16
Using the E-Control Mixer
Re-recording Selected Tracks Via an Aux Bus
Most currently available Windows audio programs mix
their multiple .wav tracks to stereo before they play them
back. This means on playback, the APS will play all the
.wav tracks in your multitrack software through the
stereo Wave Input Strip. Therefore, the only time you’ll
be able to use the APS effects and bussing structure to
process an individual .wav track is while you’re recording
it.
The APS does provide a way, however, to let you add
effects to one or more already-recorded tracks. Assuming
you have the disk space, can use the Wave Input Strip’s
Aux Bus to re-record selected track(s) to a new .WAV file,
mixed and processed as you want.
To do this:
1. In your host application, mute all tracks except the
one(s) you want to re-record. Then set a new track to
record.
2. In the E-Control, use Inline Inserts to add effects
processing to the track(s).
3. In the E-Control Master Output Strip, click one of the
four Aux Bus Routers, and choose the menu item: Disk
Record.
4. The Router button will turn
red and read: “Disk Rec” and
the Disk Record Panel will
display the Aux Bus you set to
Disk Record.
5. In the Wave Input Strip, click
one of the two Aux Bus Selectors, and choose Disk Recording (through the Router you
just assigned). The Aux bus
selector button will turn red
and read: “Rec”.
See Chapter 6 for more information on using Effects.
APS Users’ Manual
3-17
Other Strip Controls
Fader Grouping
A red Fader Grouping icon (two chain links)
functions as a fader linking button.
• Click on this icon to link any number of Input
or MIDI Users Strips, and the faders will all
move together.
• Click on this icon in the Master Output Strip
to lock the left and right main output faders.
Stereo/Mono indicator
Next to the Fader Grouping icon, a double blue
loop indicates that the strip is a stereo strip.
Panning (Mono Strip)/Balance (Stereo)
Just above the fader on each strip is a pan pot.
Click and drag on this to send varying amounts
of the strip’s signal to the left or right channel
on the Main Output Strip. Double clicking the
pan pot will return the pan pot to 0. The green
numerals above the pan pot will indicate how
far left or right you pan. You can also doubleclick on these green numbers to type in the
numerical pan setting. Positive numbers send
the signal to the right, negative to the left.
Level
Below the Pan Pot is the Level Fader. Drag this all the way
up to send a signal to the Master Output Strip at its
maximum level (0dB). Drag it down to reduce the level.
Track Name
Click the rectangle below the Level fader to type in a
name for that strip
Mute/Solo Buttons
At the bottom of the Input Fader are two small buttons
labeled “M” and “S”. Click the “M” button to mute (silence) a strip’s signal; Click the “S” button to solo the
strip’s signal (silence all other strips). Multiple strips
may be soloed simultaneously.
3-18
Using the E-Control Mixer
The Master Output Strip
The Master Output Strip appears to the right of the Input
Strips. It contains the Aux Bus Router, the main output
faders and several other controls. Lets look at them all,
starting from the top of the Master Output Strip.
Stereo Aux Bus
Router Panel
Aux Bus Routers
Hard Disk
Recording
Panel
Aux Bus
Physical
Return
Return Amount
Tools Panel
Numerics
Master Faders
Peak Indicators
Master Output
Destination
APS Users’ Manual
3-19
Stereo Aux Bus Router Panel
The Stereo Aux Bus Router Panel at the top of the Master
Output Strip contains four Stereo Aux Bus Routers.
Each Stereo Aux Bus Router receives all the signals sent
from the Aux Bus Selectors of all Input Strips assigned to
that bus.
Each Stereo Aux Bus Router mixes all the signals it
receives and routes this mix to one of several possible
destinations:
• The APS internal effects processors
• External analog or digital devices.
To learn how to send an Input signal to an Aux Bus and
route it to another destination, see the discussion of Aux
Bus Selectors in Section 1 of this Chapter.
It’s important to note that the E-Control does not have a
master output level control for each Aux Bus. You can
however, control the amount of signal going from each
individual Input Strip to an Aux Bus Router, and the
amount of processed signal that comes back from an
effect into the Master Output Strip.
3-20
Using the E-Control Mixer
Aux Bus Physical Return
If an Aux Bus is routed to one of the APS internal effects,
the Aux Bus Physical Return (the gray tab below the red
Aux Bus Router Send Amount) is
labeled “Mix.” This indicates the
processed audio is automatically
returned to the main output mix.
If an Aux Bus is routed to any of
the APS’ hardware outputs, the Aux Bus Physical Return
lets you select an input by which the output of an external device (such as an effects processor) is routed back to
the APS main mix.
To do this:
1. Click the Aux Bus Router Physical Return
2. Choose the hardware input you want to use for returning the processed signal
Disk Record Pot
Below the Aux Bus Router and to the left of the Tools
Panel, are controls that let you record all or some of your
audio sources from the APS Synth, Physical Inputs and
audio software applications, to your hard disk.
Under the words Disk Rec is a level pot with
which you can set the level of the signal being
recorded to the hard drive. Click the pot and
a fader pops up with which you set the output
level to disk. 0dB is at the top, and a good
place to start.
Record Sources
Below the level pot, a source selector lets you choose a
single audio source to record to disk. The current source
is indicated by the text displayed below the “Src” indicator. A new source may be selected by clicking on the text
to bring up a pop-up menu with all of the available
sources.
APS Users’ Manual
3-21
The Record Sources
• S t e r e o M i x (Mix) - the entire mix from the Master
Output Strip
• A u x B u s > A u x B u s 1 [ 2 , 3 , 4 ] (Aux 1 [2,3,4]) - the
submix of one or multiple strips assigned to that
particular Aux Bus. The source is recorded after the
strip’s Insert section (any effects or EQs in the Insert
section will be recorded).
• Physical Input>Analog In 1[2,3,4,1+2,3+4]
(A 1 [2,3,4,1+2,3+4]) - the direct input source of the
selected individual or pair of analog Input Strip(s).
The source is recorded before the strip’s Insert section
• P h y s i c a l I n p u t > D i g i t a l I n 1 [ 2 ] (D 1 [2]) - the
direct input source of the selected stereo digital Input
Strip. The source is recorded before the strip’s Insert
section
• W a v e S u b m i x (WAVE) - the submix of all audio
streams sent from other applications to the APS’s
Windows Multi-Media System (MMS) audio port
• M I D I S u b m i x (MIDI) - the APS Synth submix of all
32 MIDI channels (minus any channels that might be
currently assigned to a MIDI User Strip)
• M I D I U s e r S u b m i x > M i d i 1 [ 2 , 3 , 4 , 5 ] (Midi 1
[2,3,4,5]) - the APS Synth submix of one or more
individual MIDI channels assigned to a particular
MIDI User Strip
• N o n e (None) - the source record is disabled
A particular record source is also indicated in the following ways: for selected strip(s) or the Master Output Strip,
a red “R” will be displayed next to the strip’s name; and
for Aux Buses, the word “Disk Rec” in red text will appear
in the appropriate Aux Bus locations.
Once you set the routing, go to your multitrack software,
click record, and you’ll record the active strip(s) or aux
bus to disk. See the previous section on disk recording in
this chapter.
3-22
Using the E-Control Mixer
Tools Panel
To the right of the Host Record pot is the Tools Panel,
containing nine buttons that give you one-click access to
various functions of the E-Control. We’ll cover each one
of these tool buttons, starting from the upper left.
Effects Panel
Click the “lightning bolt” button to open the
Effects Panel, listing all the APS’s built-in effects.
Double click on any one of these effects to open its individual control panel. Each of the control panels is discussed in detail in Chapter 7, Using Effects.
SoundFont Bank Manager
Click this button to open the SoundFont Bank
Manager, which lets you do the following:
• Audition Presets
• Load banks and presets into the Synth Engines.
• Unload banks and presets from the SynthEngine.
• Choose the modes in which the SoundFont Bank in
location 000 responds to MIDI Bank and preset
commands.
For a complete description of using the SoundFont Bank
Manager, see Chapter 4.
APS Users’ Manual
3-23
MIDI Submix Configuration Button
(Yellow Button)
The yellow MIDI Submix Configuration Button lets
you open a MIDI Submix Strip and assign it a MIDI
synth and one or more MIDI channel(s) at the
same time. Any channel(s) you assign in this way are
removed from the MIDI Input Strip, and can be routed and
processed independently. The MIDI Submix Configuration
panel also offers buttons that let you re-assign or delete a
MIDI Submix Strip or set it to the factory default.
For a complete discussion of MIDI Submix Strips, see the
Input Strip section earlier in this chapter.
Add Analog Submix Strip Icon
Click this button to open a new Analog Input Strip.
Add Digital Strip Icon
Click this button to open a new Digital Input Strip.
(Blue Button)
Add MIDI Submix Strip Icon
Click this button to open a new MIDI Submix
Master Mute Button
Click this button to mute the output of the APS.
Fader Grouping Icon
Click this button to Lock the two output faders so
when you drag one, both move.
Show/Hide Icon
Click this button to show or hide any Analog,
Digital or MIDI Submix Input Strips you’ve opened,
or to show only the Master Output Strip. Hiding an
Input Strip does not disable it, but only takes it off the
screen.
3-24
Using the E-Control Mixer
Master Output Faders
The output Faders adjust the level of the all mixed signals
from the Input Strips. Click and drag the faders to change
level.
Meters
The output strip has two high
resolution, 32-segment meters
displaying the main output
level.
Each segment of the meters
represents 3dB. When the top
yellow segment is lit, the signal
is at 0dB. When the bottom
yellow segment is lit, the signal
is at -12dB.
These meters are peak/hold
meters, which causes the
highest segment hit to stay lit.
You can click on the segment
to clear it.
Output Destination Button
The button at the bottom of the Master Output Strip lets
you select where you route your mix. Click this button to
see your options:
• Analog Outs 1 and 2
• Digital Out 1
• Digital Out 2
• None
APS Users’ Manual
3-25
3-26
Using the E-Control Mixer
4 . The SoundFont
Bank Manager
The first time you boot a computer with the APS
installed, the APS loads a 2MB General MIDI SoundFont
bank into a section of RAM (which it identifies as MIDI
Bank location 000). This SoundFont bank is used by the
APS to play MIDI files. (See Introduction - Chapter 1, for a
detailed discussion of MIDI and General MIDI). Using the
SoundFont Bank Manager. You can also load up to 32MB
of SoundFont Banks into RAM at MIDI Bank locations 001127, and control them in various ways.
The complete APS software installation puts two SoundFont Banks into the C:/Windows/System folder:
• Emuaps.sf2 (2MB GM Bank w/GS variations)
• Emuaps8.sf2 (8MB GM Bank)
These are, respectively, the 2MB standard General MIDI/
GS/MT-32 compatible SoundFont bank that loads into
RAM when you boot your computer, and the 8MB General
MIDI compatible bank you can use for its higher-quality
sounds. You can also load any of the other banks which
you copied to your hard disk from the APS CD-ROM, or
which you’ve created yourself.
To Load Additional SoundFont Banks into RAM from your Hard
Disk:
1. Launch the E-Control Mixer application
2. In the Tools Panel on the Master Output
Strip, click on the SoundFont Bank Manager
button.
or…
1. Click the Launch>SoundFont Bank Manager menu
item.
APS Users’ Manual
4-1
The SoundFont Bank Manager
In the SoundFont Bank Manager, you’ll see controls for
loading SoundFont Banks into RAM and unloading them,
auditioning presets, and choosing the modes in which the
SoundFont Bank in location 000 responds to MIDI Bank
and preset commands
The Keyboard Display
At the top of the SoundFont Bank Manager Window is a
software keyboard that lets you test sounds loaded into
the APS SynthEngine by clicking on its keys with the
mouse. Drag the Oct slider at the right to change the
range of notes the keyboard controls from C1 to G9.
Memory Used
This readout tells you how much of your computer’s RAM
is used to hold SoundFont sample data.
4-2
The SoundFont Bank Manager
Bank
This readout displays the currently selected MIDI bank:
the bank of sounds you can play. It defaults to MIDI bank
0. Click on the arrow to the right of the Bank readout to
select any other MIDI bank with presets loaded in RAM.
(If you don’t see any other banks, no others are loaded.)
Preset
This readout displays the current MIDI preset (from the
current MIDI bank) loaded into the synth. This is the
sound you’ll hear if you click the keys or play your
external MIDI keyboard.. Click on the arrow to the right
of the Preset readout to select any of the other presets in
the current bank.
Sustain
Clicking this will cause any note you play to sustain.
Drum Kit
Clicking this will cause the keyboard to play the
percussion bank(s) associated with the current Preset
Bank. These are the sounds normally associated with
MIDI Channel 10 in a General MIDI bank.
MIDI In
This button lets you open and close the MIDI port(s)
through which MIDI data is received by the APS from an
external MIDI device such as a keyboard or external
sequencer. Click this button and select the port you want
in the window that opens.
APS Users’ Manual
4-3
Click on the MIDI Input Device button to choose between
the hardware MIDI In port on the E-Card (to which you
can connect a MIDI keyboard or other input device) or an
internal virtual keyboard that may be offered with
certain software.
MIDI In - Advanced
For the advanced MIDI user, the MIDI In dialog box has
an advanced button that makes the dialog box larger. The
options provided in the advanced mode are as follows:
MIDI Channel
This is the single MIDI channel to which all MIDI channel
data coming from the outside world gets channeled into
the APS SynthEngine. By default, this is channel 16, so all
MIDI data coming from the external synthesizer is directed to MIDI channel 16.
You can use this feature to your advantage by using the
E-Control Mixer to pull out MIDI Synth A channel 16 and
put custom effects on the sounds generated with your
external controller. Then, you can use your MIDI
sequencer to play background music using MIDI Synth B.
As a result, your background music will use the standard
Reverb/Chorus effects, but your playing will use your
own custom effects, making your playing stand out in the
mix.
4-4
The SoundFont Bank Manager
Multi-Channel mode
When selected, this permits a multi-channel external
sequencer to play a 16 channel sequence using whatever
sounds are loaded in the E-mu APS SynthEngine. Also, the
MIDI Channel becomes Displayed MIDI Channel, meaning
the updating that occurs in the main panel will reflect the
MIDI channel selected.
Controllers
Below the MIDI In button are four drop down list boxes,
each with a slider below it. They are all used to change
MIDI continuous controllers in real time as you audition
presets.
The drop down list boxes let you choose which continuous controller is applied to the preset. The sliders below
them send values from zero to 127 as you move them,
changing the parameters of the controllers.
The three check boxes below the sliders determine which
continuous controllers will appear in the drop down list
boxes.
GM
Clicking this button sets the four list boxes to the four
most commonly used General MIDI controllers: M o d
W h e e l , P i t c h W h e e l , V o l u m e and P a n . You cannot
change these.
E-mu
This check box calls up the E-mu Enhancement controllers, specifically designed for SoundFont 2.1 compatible
banks. When you load a 2.1 bank, you’ll be able to
choose from up to four controllers designed into each
preset, then modify each one with the sliders. (This does
not work with banks developed in SoundFont 2.0 or
older.)
User
Clicking this check box lets you choose the controllers for
controlling a preset. These settings aren’t stored with the
bank, but are only for auditioning.
APS Users’ Manual
4-5
MIDI Reset
Sometimes MIDI devices get confused and sustain a note
or bunch of notes endlessly, to let you know they’re
annoyed. If that happens, click the MIDI Reset button to
turn off all sustaining notes and reset all controllers in
the device to zero. It provides quite an effective attitude
adjustment for your intractable computer equipment.
This is also called a MIDI Panic button.
Default Sound Set (MIDI Bank 0) Controls
These controls let you configure the SoundFont Bank in
Location 000. Changes made in this area will have an
effect on the sounds heard by any Multimedia System
compliant MIDI applications that are using the standard
(General MIDI) sound set.
Mode
This popup list box lets you choose the SoundFont bank
in MIDI Bank Location 000 (where General MIDI sounds
reside), and the way those sounds will react to MIDI
commands such as bank change and preset change (MIDI
Program Change).
The modes of operation provided with the E-mu APS are
the following:
●2M Standard
Loads the E-mu 2M GM/GS/MT-32 sound set. All MIDI
channels (except for MIDI channel 10) in both synthesizers in the standard way to bank and preset change
commands, changing banks and presets as instructed.
MIDI channel 10 is a dedicated percussion channel, which
plays drum kits only.
●2M General MIDI
Loads the E-mu 2M GM/GS/MT-32 sound set. MIDI Bank
Change commands will not effect a bank change, though
MIDI Program Change commands will change individual
presets.
4-6
The SoundFont Bank Manager
MIDI channel 10 is a dedicated percussion channel, which
plays the General MIDI standard drum kit only. Use this
bank if you’re writing or listening to music designed for a
simple GM synthesizer.
●2M MT-32
Loads the E-mu 2M GM/GS/MT-32 sound set. MIDI Bank
Change commands will not effect a bank change, though
MIDI Program Change commands will change individual
presets.
MIDI channel 10 is a dedicated percussion channel, which
plays the MT-32 drum kit only. Use this if you’re writing
or listening to music designed for a Roland MT-32.
●2M GM off
Loads the E-mu 2M GM/GS/MT-32 sound set. Behaves
just like 2M Standard except the synthesizers no longer
use MIDI channel 10 as a percussion channel, Instead,
MIDI bank 064 contains the drum kits. So, when in this
mode, any MIDI channel may be used for drum kits or
instruments.
●8M Standard
Loads the E-mu 8M GM sound set. All MIDI channels
(except for MIDI channel 10) in both synthesizers behave
in the standard way to bank and preset change
commands, changing banks and presets as instructed.
MIDI channel 10 is a dedicated percussion channel, which
plays drum kits only.
●8M GM off
Loads the E-mu 8M GM sound set which behaves just like
8M Standard except the synthesizers no longer use MIDI
channel 10 as a percussion channel. Instead, MIDI bank
064 contains the drum kits. So, when in this mode, any
MIDI channel may be used for drum kits or instruments.
APS Users’ Manual
4-7
User Set
Click this check box to select your own custom SoundFont
bank to be that loaded into MIDI bank 0. When you select
this check box, a window opens that lets you:
• S e l e c t S t a n d a r d o r G M - O f f mode of operation
• B r o w s e t o a n y S o u n d F o n t b a n k and use that as
your sound set for MIDI bank 0
• C a n c e ll, leaving the synthesizer mode unchanged
If you do not cancel, the browse button becomes enabled.
This then permits you to browse to a different SoundFont
compatible bank to be used with the Standard or GM-Off
modes of operation.
Also, the Mode list box described above now gives you
the option to quickly switch between Standard mode and
GM-Off mode, causing the most recently established
SoundFont banks for those modes of operation to be
loaded.
Lock
Clicking this button prevents any application other than
the SoundFont Bank Manager from loading sounds into
the APS. While in many situations, it may be extremely
convenient for third party programs to handle SoundFont
loading for us, there are times when you may want a bit
tighter control over what sounds you are listening to.
Preset
This overloads a new preset into any bank loaded into
bank 000, replacing whichever existing preset you
choose. This is the way you can use your own sounds in a
General MIDI bank. Any change you make will stay in
effect until you change it. One great way to use this
feature is to load a higher-quality instrument into a bank,
and still have the bank conform to the General MIDI spec.
Browse
Clicking this button lets you find and load a SoundFont
Preset.
4-8
The SoundFont Bank Manager
To Load a New Preset:
1. In the Preset list box, select the preset within MIDI
bank 000 that you wish to replace.
2. Click the Browse button and select an SF2 file containing the desired preset and click on OK.
3. In the next dialog box, select the desired preset
within the SF2 file and click on OK.
The Restore button next to this popup list box will clear
(erase) whatever presets you’ve loaded into the bank and
replace them with the default.
Restore
Clicking this buttons lets you restore the preset settings
in the current user preset or all user presets to that or
those established by the Synthesizer Mode.
Variation Sound Sets (Banks 1-127) controls
These controls let you configure the SoundFont Bank in
Locations 001 through 127.
Changes made in this area will have an effect on the
sounds heard by any Multimedia System MIDI applications that are using General MIDI Variation Sound Sets
(GS) or SoundFont based Sound Sets.
Bank
This list box lets you load a SoundFont bank or banks
into RAM. You can load as many banks as will fit into
32MB of RAM if your system has enough RAM to go
around.
APS Users’ Manual
4-9
Browse
Clicking this button lets you find and load a SoundFont
Bank into the MIDI bank selected with the Bank list box.
1. In the list box, select the MIDI variation bank location into which you want to load a new bank of
sounds.
2. Click the Browse button and navigate to a SoundFont
compatible sound bank located on your hard drive.
• Find the E-mu Sound Central, SoundFont Banks that
were saved onto your hard disk when you installed
the APS, or on the CD-ROM.
Loading a bank or banks using the Browse feature will
also associate the SoundFont bank on disk with the MIDI
bank location number you choose from the list box. Once
this association is made, the SoundFont Bank will load
into that location whenever you boot the system.
The Restore button will clear (erase) whatever bank
you’ve loaded into RAM and restore the default banks set
up by the Synthesizer Mode.
Restore
Clicking this button restores the factory settings in the
selected variation bank or all variation banks. Doing this
will wipe out all the changes you’ve made to these
settings.
4-10
The SoundFont Bank Manager
5 . Recording and Playing
Audio
By itself, the APS has no recording or playback functions.
To record and play back audio, you must use a 3rd party
digital audio application program that records audio the APS will work with any program that allows you to
properly record .wav files. Please refer to the “Recording
audio” section of your software for more detailed explanations.
In general, to record audio from the outside world into
most audio programs, do the following:
1. Set your host application to use the APS audio input
driver, APS WAVE IN. (See the section, Connecting
Your Application to the APS, in Chapter 2.)
2. Connect your analog or (S/PDIF) digital audio source
to any appropriate APS hardware input.
3. In the E-Control, add an analog or digital input strip
(depending on the nature of your source) using the
buttons in the Tools Panel.
4. At the top of the new Input Strip, click on the Input
Strip name (D1, A2, etc.), and choose the hardware
input you connected to your source. If you’re recording analog stereo, you need two input strips.
5. Adjust level and pan, and set up any Inline Inserts or
Aux Bus effects you want to use. (See Chapter 3:
Using the E-Control Mixer for details on using the
Input Strips and Master Output Strip.)
6. In the Master Controls view, set the Hard Disk record
source to ‘Mix’ and make sure the recording level is
set to maximum level.
APS Users’ Manual
5-1
7. In your host application, put a track into record
mode. The audio you send into the APS will go
through an analog or digital Input Strip and be
recorded with all the processing and mixing
parameters you set in the E-Control, as well as any
parameters of your host application.
8. From here, you can adjust your input audio level,
recording level or add effects to the sampled audio
using the standard E-Control techniques.
When you play back audio, it will use the APS’s Wave
strip.
Overdubbing
Set a new track in your host application to the APS WAVE
IN port- Set the track to record, and proceed. NOTE: Be
sure your host application permits full-duplex operation
(recording and playback of streaming audio simultaneously). Some applications enable this if you set up the
appropriate options. Other programs simply do not
permit this mode of operation.
Using Effects
Most currently available Windows multi-track audio
programs mix all their tracks to stereo before they play
them back. This means that on playback, the APS will
play all the audio tracks in a host application through
one Wave Input strip, and the MIDI through the MIDI
Input Strip(s).
With that in mind, there are two ways to use the APS
effects and bussing structure to process an individual
track:
• Process it as you record it
• Re-record one or more tracks with effects
5-2
Recording & Playing Audio
To add effects to one or more already-recorded tracks,
use the Wave Input Strip’s Aux Bus to re-record the
selected track(s) to a new .wav file.
To do this, see the section titled: “Re-recording Selected
Tracks Via an Aux Bus” In Chapter 3.
See Chapter 7 for more information on using Effects.
System Performance
The number of .wav audio tracks available for playback is
dependent on the capabilities of the application software,
hard disk bandwidth and CPU performance. Your audio
program and the performance of your system (RAM, Disk
Speed, etc.) will determine how many tracks you can
record and play back. Basically, this means keep piling on
the tracks ‘til it chokes, then back off a little. More RAM,
a faster CPU and larger, faster hard disks all help
System performance, especially the number and quality
of SoundFont samples, is VERY dependent on system
RAM. We highly recommend that you have at least 16MB
of additional system RAM (over the 16MB of system RAM
necessary to run Windows) for quality performance of
the Audio Production Studio. A 64MB system allows you
to have a full 32MB of sample RAM and plenty of overhead to run Windows, the E-Control and your application
program.
APS Users’ Manual
5-3
Input trim
Physi cal
Analog
L ine In
Level
L
Aux 1 Aux 2
Pan
R
Mono Analog
Physical Input
Strip (1-4)
Physical
S/PDIF In
or CDRom
Digital Out
Stereo Digital
Physical Input
Strip (1-2)
Insert
(to one or more
chained internal
APS effects)
Level
Main L+R
Strip aux bus
Selectors 1-4*
L
Aux 1 Aux 2
Balance
R
Insert
(to one or more
chained internal
APS effects)
Strip aux bus
Selectors 1-4*
Level
APS
Wave
Out
L
Aux 1 Aux 2
Balance
R
Insert
(to one or more
chained
internal
Stereo Wave
Submix Strip (1) A PS effects)
Strip aux bus
Selectors 1-4*
APS MIDI Synth
Engine Effects
Sends 1+2
Aux 1
APS MIDI Synth
Engine Dry Out
Stereo Main
MIDI Submix
Strip (1)
Balance
Insert
(to one or more
chained internal
A PS effects)
Level
Level
APS MIDI
Synth Engine
Dry Out
Stereo User
MIDI Submix
Strip (1-5)
Stereo Aux
Busses 1-4*
(summed signal
of all strip Aux
Sends)
Aux 2
L
R
Strip aux bus
Selectors 1-4*
L
Aux 1 Aux 2
Balance
Insert
(to one or more
chained internal
APS effects)
R
Strip aux bus
Selectors 1-4*
Aux Sends (to
Physical Output,
Host Record or
internal APS
effect inputs)
Aux Return
Levels
Aux Returns
(from Physical
Input or
i nternal A PS
effect outputs)
To host
record (APS
Wave In)
H ost Record Level
Switch
Ma in Stereo Mix
L+R Levels
To Physi cal Outputs
(analog or digital)
E-Control Signal Flow Diagram
5-4
Recording & Playing Audio
6. Using Effects
Introduction
In the Audio Production Studio, an effect is a digital
signal processing module running in real time in the APS
Effects Engine. All the APS effects are true two-channel
(stereo) and all of the effects can be used at the same
time.
The purpose of applying these effects is to mold and
manipulate an audio signal. In most cases a little bit of
this goes a long way.
In general, try to fix a sonic problem as early in the
recording chain as possible: change microphones or mic
placement to get a better sound, rather than equalizing
that signal after recording it. Record everything dry and
add your effects while you edit and mix.
The APS’s Built-in Effects
Reverb
(including early reflections, room size,
diffusion, high and low cut equalization)
Chorus
Flanger
E c h o / D e l a y (with two independent delay lines)
A u t o W a h (envelope follower/filter)
Pitch Shifter
D i s t o r t i o n (with pre- and post- equalization)
C o m p r e s s o r (& Limiter)
S h e l v i n g E q u a l i z e r s (four stereo EQs available)
P a r a m e t r i c E q u a l i z e r s (four stereo EQs available)
To add spaciousness and perspective to sound that’s been
recorded dry, use reverb, echo/delay and chorus.
To shape the overall frequency spectrum or frequency
balance of a sound, use an equalizer (EQ). Dynamic
effects such as the compressor (limiter) will smooth out
APS User’s Manual
6-1
differences between loud and soft sections of the music.
For special effects, use any of the above effects at
extreme settings, or processors such as distortion,
flanger, auto-wah or pitch shifter.
How to Route the Effects
You can use any of these effects by routing a signal to
them via an Inline Insert Strip or an Aux Bus.
The Inline Insert Strip routes an Input Strip Signal out to
one or more effects and back to the Input Strip for mixing. Inline processing is typically used for EQ or dynamics processing which outputs the entire processed signal
(not a wet/dry mix) back to the Strip.
You can also send a portion of the input signal out either
of the two Aux Bus Selectors found on every Input Strip.
Each Aux Bus Selector has an adjustable Aux Bus Send
Amount you can use to set the level of input signal
routed to any one of four Aux Bus Routers, which then
sends it to whichever effects processor is connected to
the bus. After the signal has been processed, it is
automatically returned to the Master Output Strip. You
can use the wet/dry mix pot on many of the effects
processors to set the balance of the original (dry) and
processed (wet) signal returned to the Master Output
Strip.
See the section on Input Strip Controls in Chapter 3 to
learn how to assign effects to both the Inline Inserts and
the Aux Busses.
How to Save and Load Effects Presets
All of the APS effects parameters (except for the EQs) can
be saved and loaded as presets. The List, Save and Load
Icons located in the upper right of the effects panel allow
you to control Effects presets. Simply click on the List
icon in the upper right to display a list of Effects presets.
The Save (Disk) Icon allows you to save your own
settings, while the Load (Folder) Icon allows you to recall
your own presets.
6-2
Using Effects
How to Use Effects Control Panels
Just as each effect processor has different functions, each
effects control panel has different settings. Here’s how
each one works.
Reverb
Reverb is a diffused “wash” of many reflections of a
sound source from walls, floors, and ceilings in different
kinds of spaces such as various sized rooms and halls,
stadiums, canyons and so on. It is one of the most heavily
used and most natural effects, since it simulates our
everyday environments. To create the reverb effect, the
processor creates multiple simulated reflections of the
source signal, then blends them together at varying
intensities.
As a true stereo reverb, the APS reverb maintains the
spatial placement of the panned sound and creates
proper timing of reflections according to this placement.
APS User’s Manual
6-3
Level: (0 - 100 %)
This is the percentage of reverberation (wet) signal level
to source (dry) signal level that appears at the output of
the effect. This control duplicates the function of the
Wet/Dry Mix control in the Insert strip.
Use this parameter to affect the sense of distance between
the sound and the listener. Larger values make the sound
seem more distant and blur its position in the stereo
field. In music, higher values are good for vocals or string
sections, providing legato passages with a wash of background sound. Shorter values preserve percussive,
staccato, or attack characteristics of lead instruments,
and bring them forward in the mix.
Decay Time: (1.5 - 30 s)
This is the time it takes for the reverberation to decay
60dB. Use this parameter to change the “liveness” and
size of a simulated space, from very damped (“dead”) to
very reverberant (“live”), and from very small (vocal
booth) to very large (canyon). When applying reverb to
an entire mix, use short to moderate decay times; use
longer times to isolate voices or for special effects.
Diffusion: (0 - 100 %)
This is the percentage of diffuse reflections (from uneven
surfaces) to direct reflections (from hard, smooth surfaces). Diffusion changes the reflective characteristics of
the surfaces of the simulated room, so lower values create
more discrete echoes and higher values will blur and
blend the echoes into a reverberant “bloom”.
Higher Diffusion values create smoother decay patterns.
Moderate settings generate more hard-surface reflections.
Settings near 0% create special effects. Conventional
music applications usually use 100% diffusion for the
“best” effect, but smaller values can add more edgy
qualities to the mix. Extremely low Diffusion, Decay Time
and Low Frequency Decay Factor values combined with,
high Early Reflection Level and High Frequency Decay
Factor values create a “funky” ambience with lots of slap
echoes (a really bad-sounding, very live, small room).
6-4
Using Effects
Early Reflection Level: (0 - 100 %)
This controls the amount of early reflections: reflections
from nearby surfaces, usually heard before the late
reverberation.
Use this parameter to create direct reflections from
nearby walls. Higher values with short decay times and
low reverb levels are good for simulating a small room.
Adds realism to guitar or keyboard recorded dry, or for
extra room tone on close-miked vocals. Smaller amounts
with higher reverb levels add a sense of distance or
isolation to a sound, and create a large space like a
cathedral or stadium.
Late Delay: (1 - 350 ms)
The delay between early reflections and additional clusters of reflections that constitute late reverberation.
Use this parameter to change the simulated room size,
from a living room (1ms) to a concert hall (75ms) to a
cathedral (300ms+). Increasing values add later “bloom”
to the reverb as the reflections return from increasingly
distant walls or larger simulated spaces. Typical musical
applications use values between 1 and 50ms. Stadium
effects occur in the 300ms range with moderate Decay
Time, Early Reflection and Reverb Levels, and reduced
Reverb Diffusion levels at below 50%.
High Frequency Decay Factor: (-10 - +3)
This is an additional decay factor applied to reverberation signals above 1 kHz. Negative values shorten the
decay time and positive values extend it.
Use this parameter to increase or decrease the amount of
high frequency energy present in the reverberation.
Lower values along with a shorter Decay Time effectively
simulate small spaces with absorbent wall materials, or to
cut down the metallic edge to some reverberations.
Higher levels can increase the “sizzle” in a simulated
large space, and can sweeten legato parts like string
sections or keyboard pads at long Decay Times. At short
Decay Times, higher values accentuate the edginess
created by lower Reverb Diffusion values.
APS User’s Manual
6-5
Low Frequency Decay Factor: (-10 - +3)
This is an additional decay factor applied to reverberation signals below 500Hz. Negative values shorten the
decay time and positive values extend it.
Use this parameter to increase or decrease the amount of
low frequency energy present in the reverberation tail.
Negative values roll off the low end and diminish
“boominess”. This can add clarity in a complex mix with
long-decay-time reverb. This parameter can also produce
artificially “thin” reverberation, or simulate poor
acoustics. It is only moderately effective at low Decay
Time values, though perceptible even at 1.5 seconds.
Chorus
The chorus can make a single instrument sound like
several. Chorus works by sampling a portion of the input
signal, delaying it by a regularly varying time, then
mixing it back with the source signal. The delay in the
chorus can be modulated between 10 and 20 ms by a
low-frequency oscillator (LFO). The chorus is essentially
the same effect as a flanger, though the flanger uses
shorter delay times, between 1 and 10ms.
6-6
Using Effects
Wet/Dry Mix:
An Inline Insert Strip with a Chorus button has a wet/dry
mix control. Drag this control up and down to vary the
ratio of processed (wet) signal to source (dry) signal.
Depth: (0 - 100 %)
This is the percentage by which the delay time is modulated by the LFO. Use this parameter to increase the pitch
modulation. Large values will create a “warbling” effect.
Feedback: (-99 - +100 %)
This is the percentage of the output signal fed back into
the effect’s input. A negative percentage will reverse the
phase of the feedback signal. At 100%, the identical
sample will repeat endlessly. At levels less than 100%, the
sample will repeat and fade out over time. Use this parameter to create a “cascading” chorus effect.
Frequency: (0 - 10 Hz)
The number of times per second the LFO controlling the
amount of delay, repeats itself. Higher values will increase the pitch modulation.
Waveform Switch: (Sinusoid / Triangle)
Selects the shape of the LFO waveform that represents the
amount of the delay of the sampled signal.
Delay: (0 - 20 ms)
This is the average amount of time the sample is delayed
before it is played back, and with feedback, the amount
of time between iterations of the sample.
Larger values lower the pitch. Smaller values (0 - 10 ms)
make the chorus sound like a flanger, but with different
frequency characteristics.
Phase Switch: (-180, -90, 0, +90, +1)
This changes the phase difference between the left and
right LFO’s. At 0 degrees the two LFOs are in sync.
Use this parameter to create the illusion of an expanded
stereo field of the output signal.
APS User’s Manual
6-7
Flanger
The Flanger creates a “tunneling” or “whooshing” sound
(like a jet flying overhead). It works by sampling a
portion of the input signal, delaying it by a period
modulated between 0 and 4 ms by a low-frequency
oscillator, and then mixing it with the source signal.
Technically, delays of these lengths cause cancellation
and reinforcement of various frequencies, creating a
comb filter (a set of equally spaced filter notches and
peaks). The comb filter can be swept through the
frequency spectrum by modulating the delay time with
an LFO.
Flanging is usually thought of as a type of phasing,
though phasing actually sweeps filters rather than delay
times and the spacing of the filter notches is arbitrary.
6-8
Using Effects
Depth: (0 - 100 %)
The percentage by which the delay time is modulated by
the LFO. Use this parameter to increase the pitch
modulation. Large values will make the comb filter
notches more pronounced.
Feedback: (-99 - +100 %)
This is the percentage of the output signal level fed back
into the effect’s input. A negative percentage will reverse
the phase of the feedback signal.
Use this parameter to create an “intense metallic” effect.
At 100%, the identical sample will repeat endlessly.
At less than 100%, the sample will repeat and fade out
over time.
Rate: (0 - 10 Hz)
The number of times per second the LFO controlling the
amount of delay repeats. Higher values increase the pitch
modulation.
Use this parameter to change the speed of the comb filter
sweep.
Delay: (0 - 4 ms)
The average amount of time the sample is delayed before
it is played back; with feedback, the amount of time
between iterations of the sample.
Larger values cause the pitch of the filter notches to
drop. Smaller values (0 - 10 ms) cause the chorus to act
more like a flanger, but with different frequency characteristics.
Waveform Switch: (Sinusoid / Triangle)
Selects the shape of the LFO waveform that represents the
amount of the delay of the sampled signal.
Phase Switch: (-180, -90, 0, +90, +180)
This changes the phase difference between the left and
right LFO’s. At 0 degrees the two LFOs are in sync.
Use this parameter to create the illusion of an expanded
stereo field of the output signal.
APS User’s Manual
6-9
Echo/Delay
The Echo/Delay is used to bring movement and spatial
expansion to a signal. It’s achieved by sampling the input
signal, then replaying the sample after a programmable
delay. As opposed to the reverb, it creates one or more
discrete echoes. The delay is the basic building block for
many effects, such as reverbs, choruses, and flangers.
Wet/Dry Mix:
The Echo/Delay button in an Inline Insert Strip displays a
wet/dry mix control. Drag this up and down to vary the
ratio of processed (wet) signal to source (dry) signal the
processor outputs.
Left Delay: (1 - 2000 ms)
Right Delay: (1 - 2000 ms)
These two controls set the time the sample is delayed
before playing back from the two independent channels
and, with feedback, the time between iterations of the
echoes.
This parameter can create a ping-pong effect. Set one
delay to half the value of the other. Modify this to place
the echoes at different points in the stereo field. In a
music, make the echoes occur at regular divisions of the
tempo.
6-10
Using Effects
In addition to discrete echoes, lower delay settings will
also produce flanging and chorusing effects. Get sci-fi
“robotic” effects on voices with the delay set to the flange
range (1 - 10 ms) and the Feedback set to about 75%.
Lock: (ON /OFF)
This links the Left and Right independent delay values at
their current settings.
Feedback: (0 - 100 %)
The percentage of the output signal level fed back into
the effect’s input.
Use this parameter to create “cascading” echoes. At
100%, the identical sample will repeat endlessly. Below
that, the sample will repeat and fade. Three to five repeats would help create the illusion of a large space.
Panned Switch: (On / Off)
The Panned Switch swaps the left and right channels with
each iteration of signal feedback. Use this switch to cause
each echo to come from opposite sides of the stereo field.
APS User’s Manual
6-11
Auto Wah
The Auto Wah emulates the sound of a wah-wah pedal
used with electric guitar or a mute on a brass instrument.
The Auto Wah creates the effect automatically, according
to the settings you choose. It is achieved by detecting the
attack envelope of the input signal and triggering a bandpass filter that has an adjustable center frequency.
Sensitivity: (-12 - +18 dB)
This determines how sensitive the movement of the filter
is to a given signal level.
Frequency: (80 - 2400 Hz)
This determines the base center frequency of the filter
when no input signal is present.
Attack: (0 - 500 ms)
The rate at which the filter will sweep in response to a
positive change in the input signal volume.
Release: (10 - 1000 ms)
The time for the filter to return to its base center frequency when the input signal stops.
Bandwidth: (1 - 800 Hz)
The width of the frequency band of the band-pass filter.
6-12
Using Effects
Range: (0 - 100 %)
The range - expressed as a percentage of the value in the
Bandwidth setting range - over which the filter is swept.
Direction Switch: (Up / Down)
Determines the direction of the filter sweep.
Pitch Shifter
Shifts the frequency of the input signal in real time, while
preserving harmonic relationships. The effect is achieved
by doing sample-rate conversion on the fly.
Wet/Dry Mix:
In an Inline Insert Strip, the Pitch Shifter button displays
a wet/dry mix control. Drag this control up and down to
vary the ratio of processed (wet) signal to source (dry)
signal the processor outputs.
Semitones: (-12 - +12 semitones)
This sets the number of semitones by which the pitch is
shifted. There are 12 semitones per octave. Negative
values decrease the amount of the shift, and positive
values increase it.
Cents: (-50 - +50 cents)
This is a fine tuning control calibrated in “cents”. A cent
is 1/100th of a semitone. Negative values decrease the
amount of the shift, and positive values increase it.
APS User’s Manual
6-13
Distortion
This simulates turning up (overdriving) the gain stage on
a guitar amplifier or adding a distortion pedal to an
instrument’s output. It is achieved by clipping the signal
(adding more square wave-like components) and adding
rich harmonics.
Gain: (-60 - 0 dB)
This decreases the signal level after the signal has been
distorted.
Edge: (0 - 100)
The distortion’s intensity. Higher values increase the
amount of “fuzz” in the signal.
Post EQ Center Frequency: (100 - 8000Hz)
Sets the center frequency of the range of harmonic content added to the signal.
Post EQ Bandwidth: (100 - 8000Hz)
This is the width of the frequency band that determines
the range of the harmonic content added to the signal.
Pre-Low-Pass Cutoff Filter: (100 - 8000Hz)
This reduces the number of higher harmonics introduced
by the distortion.
6-14
Using Effects
Compressor (Limiter)
A compressor works in two steps. The threshold parameter lets you set a level (threshold) such that any input
going above this threshold is decreased by a programmable ratio at the output. This not only compresses the
dynamic range of the signal, but decreases the overall
loudness too.
The second step is to boost the overall signal level. This
increases the level of quieter portions of a signal while
the louder portions (already reduced) stay below distortion.
Limiting is an extreme form of compression where the
compression ratio is 8:1 or greater, creating a hard limit
on the audio signal.
Use the compressor to: even out the volume changes
produced by vocalists randomly moving back and forth
in front of the mic; to increase the sustain of an
instrument by maintaining a constant output level while
the source signal fades out; to balance and adjust the
dynamic range of a track to match other tracks; and to
create special effects by using extreme parameter
settings.
APS User’s Manual
6-15
Ratio: (1 - 100)
This is the ratio by which audio above the threshold is
attenuated relative to the input signal.
At a 1:1 ratio, the signal is not compressed. At a ratio of
4:1, 4 dB of change in the input signal will produce 1 dB
of change in the output signal.
Use this parameter to turn the compressor into a limiter
by using a ratio of 8:1 or greater. A limiter can provide
protection against distortion from sudden loud sounds.
Output Gain: (-20 - +20 dB)
The amount by which you can increase or decrease the
signal after it has been compressed.
Use this parameter to help balance the output signal level
to input signal level.
Attack: (0 - 500 ms)
The speed at which the output is reduced by its full
compression ratio after the input rises above the threshold. This value is usually fairly short, under 100 ms.
Set this parameter to allow just enough time for the
natural attack time of the instrument to get through.
Release: (50 - 3000 ms)
This is the speed at which the output is increased to its
original starting point after the input signal drops below
the threshold. This value is usually larger than the Attack
time.
Set this value to a value longer than an instrument’s
decay time to help preserve the instrument’s sound.
Threshold: (-60 - 0 dB)
The point (in dB) at which compression begins.
Set the threshold just above the point where your loudest
level should be.
6-16
Using Effects
Pre-Delay: (0 - 500 ms)
The duration between the moment the input audio signal
crosses the threshold and when the Attack Time starts.
Use this parameter to help keep a sharp edge on highly
compressed sounds by allowing an instrument’s full
attack through before the compression starts.
Shelf EQ (4 Stereo)
The Shelf Equalizer (either high or low shelf) can mold an
instrument’s sound (timbre) to fit into a mix. It boosts or
cuts all frequencies above or below a specific cutoff
frequency.
Shelf Switch: (LO / HI)
Determines whether the EQ will
affect the frequencies above
(high-shelf) or below (low-shelf)
the cutoff frequency.
Frequency: (80 - 16000 Hz)
Determines the cutoff frequency.
Gain: (-15 - +15 dB)
The amount by which the selected
frequencies are cut or boosted.
APS User’s Manual
6-17
Parametric EQ (4 Stereo)
The Parametric Equalizer is the most versatile and flexible EQ available. It can zero in on specific frequency
ranges to fix problems in poor frequency response in
equipment or to process or mold an instrument’s sound.
The Parametric EQ lets you set a center frequency and
the width of a band of frequencies around that center,
and then boost or cut that bandwidth.
Center Frequency: (80 - 16000 Hz)
This determines the center frequency around which the
boost or cut will occur. The EQ provides maximum boost
or cut at it’s center frequency.
Use this parameter to mold a signal’s sonic texture. Use
the following values to achieve:
More Presence
Boost 6 - 8 dB @ 1.5 kHz - 3 kHz
More Fullness
Boost 6 - 8 dB @ 100 Hz - 300 Hz
More Projection
Boost 6 - 8 dB @ 800 Hz - 2 kHz
Bandwidth: (1 - 36 semitones)
This sets the width of the frequency band around the center
frequency, measured in semitones
(there are 12 semitones per octave).
Use this parameter to create a notch filter by using a very
narrow bandwidth at the frequency of a feedback or 60
Hz hum and cutting.
Gain: (-15 - +15 dB)
This controls the amount by which the frequencies
around the center frequency are either cut or boosted.
6-18
Using Effects
Appendix
Microphone Configuration
The APS E-Drive microphone inputs can accommodate a
wide range of microphone types.
Jumpers on E-Drive configure the inputs to operate with
either a standard powered or un-powered SoundBlaster
compatible microphone, a professional dynamic microphone, or a large number of phantom-powered professional condenser microphones.
Using SoundBlaster Type Microphones
To use the E-Drive with a SoundBlaster-compatible microphone, like the Telex Voice Commander™ or the Labtec
AM-242, use a 1/4" tip-ring-sleeve (TRS) to 1/8" minijack adapter to connect the microphone jack to one of
the E-Drive’s TRS inputs. Depending on whether the left
or right jack is being used for the mike, configure the left
or right jumper block on E-Drive as shown in Figure 1.
Figure 1: Microphone jumper block configured for SoundBlastercompatible microphones on both the left and the right channels.
APS Users’ Manual
Appendix-1
For these types of microphones, which are generally
condenser, or electret, types, the cable is unbalanced,
meaning there is only one signal wire and a ground. The
tip is signal, the ring is either shorted to tip or unconnected, and the sleeve is ground. Power is supplied to the
microphone through the signal wire (tip).
Using Dynamic and Condenser M
icrophones
Professional microphones can be divided into two major
categories, dynamic and condenser types.
Dynamic Microphones
Dynamic microphones generate sufficient level by themselves that they do not need a separate amplifier built
into the microphone, and therefore they do not need
phantom power to operate.
Condenser Microphones - Phantom Powered
Condenser microphones have a small, very low noise
amplifier built-in, which requires phantom power. The
most common type of phantom power is +48V, although
most condenser microphones are designed to operate
from voltages as low as +10V. The E-Drive can provide
+12V phantom power, which will suffice to power most
common professional condenser microphones. To determine whether your microphone will operate with E-Drive,
check with the manufacturer of the microphone or refer
to the phantom power minimum voltage rating on your
microphone’s data sheet.
When phantom power is turned on, it is applied to both
the positive and negative signal wires, with the power
returning from the microphone on the shield.
Note: When phantom power is On, the input should not be
used for non-powered inputs such as guitar or distortion
and noise may result.
Appendix-2
Balanced Connectors
Most professional microphones have balanced outputs,
meaning there is a positive and a negative signal wire in
the cable, with a grounded shield surrounding both. For
TRS (tip/ring/sleeve) connectors, tip is generally positive
signal, and ring is negative signal, with the sleeve connected to ground. For XLR connectors, pin 2 is generally
positive signal, pin 3 is negative signal, and pin 1 is
ground.
Note that line levels can also be applied to the microphone inputs. For this use, push in the 20 dB pad switch,
and leave the jumper for each channel on PRO MIC/LINE
IN.
Figure 2: Microphone jumper block configured for a professional
dynamic microphone or line input on the left channel, and a
phantom-powered condenser microphone on the right channel.
APS Users’ Manual
Appendix-3
General MIDI Patches
1.
2.
3.
4.
5.
6.
7.
8.
9.
10.
11.
12.
13.
14.
15.
16.
Acoustic Grand Piano
Bright Acoustic Piano
Electric Grand Piano
Honky-tonk Piano
Electric Piano 1
Electric Piano 2
Harpsichord
Clavi
Celesta
Glockenspiel
Music Box
Vibraphone
Marimba
Xylophone
Tubular Bells
Dulcimer
33.
34.
35.
36.
37.
38.
39.
40.
41.
42.
43.
44.
45.
46.
47.
48.
Acoustic Bass
Electric Bass (finger)
Electric Bass (pick)
Fretless Bass
Slap Bass 1
Slap Bass 2
Synth Bass 1
Synth Bass 2
Violin
Viola
Cello
Contrabass
Tremolo Strings
Pizzicato Strings
Orchestral Harp
Timpani
17.
18.
19.
20.
21.
22.
23.
24.
25.
26.
27.
28.
29.
30.
31.
32.
Drawbar Organ
Percussive Organ
Rock Organ
Church Organ
Reed Organ
Accordion
Harmonica
Tango Accordion
Aco Guitar (nylon)
Acoustic Guitar (steel)
Electric Guitar (jazz)
Electric Guitar (clean)
El Guitar (muted)
Overdriven Guitar
Distortion Guitar
Guitar harmonics
49.
50.
51.
52.
53.
54.
55.
56.
57.
58.
59.
60.
61.
62.
63.
64.
String Ensemble 1
String Ensemble 2
SynthStrings 1
SynthStrings 2
Choir Aahs
Voice Oohs
Synth Voice
Orchestra Hit
Trumpet
Trombone
Tuba
Muted Trumpet
French Horn
Brass Section
SynthBrass 1
SynthBrass 2
Appendix-4
65.
66.
67.
68.
69.
70.
71.
72.
73.
74.
75.
76.
77.
78.
79.
80.
Soprano Sax
Alto Sax
Tenor Sax
Baritone Sax
Oboe
English Horn
Bassoon
Clarinet
Piccolo
Flute
Recorder
Pan Flute
Blown Bottle
Shakuhachi
Whistle
Ocarina
97.
98.
99.
100.
101.
102.
103.
104.
105.
106.
107.
108.
109.
110.
111.
112.
FX 1 (rain)
FX 2 (soundtrack)
FX 3 (crystal)
FX 4 (atmosphere)
FX 5 (brightness)
FX 6 (goblins)
FX 7 (echoes)
FX 8 (sci-fi)
Sitar
Banjo
Shamisen
Koto
Kalimba
Bag pipe
Fiddle
Shanai
81.
82.
83.
84.
85.
86.
87.
88.
89.
90.
91.
92.
93.
94.
95.
96.
Lead 1 (square)
Lead 2 (sawtooth)
Lead 3 (calliope)
Lead 4 (chiff)
Lead 5 (charang)
Lead 6 (voice)
Lead 7 (fifths)
Lead 8 (bass + lead)
Pad 1 (new age)
Pad 2 (warm)
Pad 3 (polysynth)
Pad 4 (choir)
Pad 5 (bowed)
Pad 6 (metallic)
Pad 7 (halo)
Pad 8 (sweep)
113.
114.
115.
116.
117.
118.
119.
120.
121.
122.
123.
124.
125.
126.
127.
128.
Tinkle Bell
Agogo
Steel Drums
Woodblock
Taiko Drum
Melodic Tom
Synth Drum
Reverse Cymbal
Guitar Fret Noise
Breath Noise
Seashore
Bird Tweet
Telephone Ring
Helicopter
Applause
Gunshot
APS Users’ Manual
Appendix-5
MIDI IMPLEMENTATION CHART
Function
Transmitted
Received
Remarks
MIDI Chnl
No
1-16
Note #
No
0-127
Velocity
Note ON
Note Off
No
No
Key Aftertouch
Chnl Aftertouch
No
No
No
Yes
Pitch Bend (1)
No
Yes
+/- 2 octaves
Sensitivity
Recognized
Controllers (2)
0
1
2
6, 38
7
10
11
64
66
91
93
98
99
100
101
120
121
123
No
No
No
No
No
No
No
No
No
No
No
No
No
No
No
No
No
No
Yes
Yes
Yes
Yes
Yes
Yes
Yes
Yes
Yes
Yes
Yes
Yes
Yes
Yes
Yes
Yes
Yes
Yes
Bank Select
Modulation
Breath Cntrl
Data Entry
Main Volume
Pan
Expression
Damper Pedal
Soft
FX Snd1 Depth
FX Snd2 dept
NRPN LSB
NRPN MSB
RPN LSB
RPN MSB
All Sounds Off
Reset Cntrlers
All Notes Off
Program
No
9n, v=1-127
8n, V=0-127
9n, Y=0
Yes, 0-127
Notes:
1) Default power up: Bend = 2 semitones, master volume = 100
2) All Channels respond to MIDI volume (including drums)
Appendix-6
Creating and Editing
SoundFont® Sounds with
Vienna
The Vienna program from Creative Labs has, for many
years, been a standard for editing SoundFont Sounds and
is included on the APS CD. The following section is a
simple introduction to the usage of Vienna SoundFont
Studio program, but is by no means an extensive description of all features. For this, Vienna SoundFont Studio has
complete on-line help documentation describing all of
the features and how to use them in detail.
SoundFont Structure
With the APS, SoundFont Banks are stored on your hard
disk. When you want to use one with a MIDI sequence,
you must load it into System RAM using the SoundFont
Bank Manager, then author that MIDI sequence to use
play the loaded sound.
SoundFont sounds are structured in the following way:
A S a m p l e is a digital recording of a sound.
An I n s t r u m e n t is one or more samples, mapped
across a synthesizer keyboard, and/or stacked on top
of each other.
A P r e s e t is made up of one or more instruments,
mapped across a synthesizer keyboard and/or
stacked on top of each other. This is the “program”
that loads into a synth when you send a MIDI Program Change Command.
A S o u n d F o n t B a n k is a collection of Presets.
APS Users’ Manual
Appendix-7
Open a Bank
In the Vienna File menu, select Open, then navigate to
the SoundFont Bank you want to open. You can find more
SoundFont Banks on the APS install CD-ROM with a selection of sounds from the vast E-mu library.
When you first open Vienna, you’ll see a window divided
into eight panes:
U p p e r l e f t - The SoundFont Bank Tree, the file/folder
directory for the current SoundFont Banks.
In the SoundFont Bank Tree panel, you’ll see the directory structure of the currently loaded SoundFont Bank:
• The Sample Section, containing the User Sample Pool,
which contains all the User samples available to the
SoundFont Bank. The APS has no ROM samples, so
none are listed.
Appendix-8
• The Instrument Pool, listing all the available Instruments, and the samples that make up each Instrument. Each Instrument is identified by the trumpet
icon. Click on a Instrument icon to see the pitch
ranges to which its component samples are assigned,
displayed below the keyboard.
• The Preset section, containing the Melodic Pool and
Percussive Pool folders, each listing all the Presets in
the current Bank.
U p p e r r i g h t - A piano keyboard for auditioning sounds
and space for graphics indicating the pitch range(s) of
selected presets and samples.
M i d d l e l e f t - Pitch control: coarse, fine and scale
tuning.
L o w e r l e f t - Effects: This pane lets you assign values to
effects such as filter Q and cutoff, reverb, chorus and
pan.
B o t t o m l e f t m i d d l e - Volume Envelope. For changing
envelope parameters: delay, attack hold, decay, sustain,
release, keynum to hold, keynum to decay.
B o t t o m r i g h t m i d d l e - Modulation Envelope. For
changing the envelope parameters of the modulation
LFOs: delay, attack hold, decay, sustain, release, keynum
to hold, keynum to decay.
Controls to assign that envelope to pitch and filter
cutoff.
L o w e r r i g h t - Vibrato LFO. For changing parameters of
the LFOs controlling vibrato: delay, frequency and to
pitch.
M i d d l e R i g h t - Modulation LFO: Changes modulation
LFO parameters: delay, frequency and to pitch, to filter
cutoff, to volume.
APS Users’ Manual
Appendix-9
Build A Bank
Here is how to build a your own SoundFont Bank from
raw sample data:
Import a Sample:
1. In the SoundFont Bank Tree, open the Sample Section/User Sample pool folder.
2. Choose the menu item: Options>User Sample
Pool>Import User Sample(s).
3. Navigate to, and import the sample (.wav file) you
wish to use. It will appear in the User Sample Pool.
N o t e : You can create your own raw samples with any
program that can record a.wave file.
Assign a Sample to an instrument:
1. In the SoundFont Bank Tree, open the Instrument
Pool.
2. Choose the Options>Instrument Pool>New Instrument menu item, and name a new instrument.
3. From the Sample Pool that appears, choose the
sample you just imported and Click OK.
4. Loop the sample if necessary, with the loop editor.
(See Editing Samples, below.)
Your new instrument will appear in the SoundFont Bank
Tree Instrument Pool.
Create a Preset
1. In the SoundFont Bank Tree, open Preset
Section>Melodic Pool.
2. Click the Options>Melodic Pool>New Melodic Preset
menu item.
3. Name the Preset and Click OK.
4. Select the instrument you just made and click OK.
Appendix-10
Your new Preset will appear in the Melodic pool of the
SoundFont Bank Tree Instrument Pool.
To Assign the Preset Zone:
1. Select your new preset.
2. Choose the menu item: Options>New Zone.
3. Choose your new instrument.
4. Click Add.
You now have a simple new preset you can load using the
SoundFont Bank Manager and play with your MIDI
sequencer.
However, entire musical scores often require many presets, each of which may need multiple instruments, each
of which may need multiple samples. Creating these from
wave files requires many iterations of the above steps.
Because this may be a very tedious process, E-mu has
provided a plethora of fully baked and ready to go
SoundFont Banks full of presets that span a wide range of
musical styles. These presets have all of the really hard
problems solved for you, specifically the sample tuning
on the keyboard and artifact-less sample looping.
But, even with all of this work done for you, often times
your scores will still want something a little different. For
this reason, Vienna allows you to edit these banks of
presets to suit your needs.
APS Users’ Manual
Appendix-11
Editing Samples
Vienna provides a sample loop editor you can open by
double-clicking on a sample in the User Sample folder, or
in an instrument in the Instrument folder.
Loop Editor functions
• Set the sample to loop or play as a “one-shot” sound
(like a percussion instrument).
• Change the length of the loop with the Local Loop
End and Local Loop Start numeric text boxes.
• Change the amount of the sample the APS will play
with the Local Sample Start and Local Sample End
numerics at the top of the window.
Click the Edit button to edit the sample in the application
you’ve set as a Wave editor in your system preferences.
Changing the Ranges
In the SoundFont Bank Tree pane, open the Instrument
Pool, then open an instrument. You’ll see all the samples
used in that instrument click on a sample. Its pitch-range
bar will highlight below the keyboard, and two black or
white triangles will appear over the keys to which it’s
assigned. You can play the sample by clicking any of
those keys, or using the top and middle row of keys on
your computer keyboard.
Changing Synthesis Parameters
When you’ve highlighted a sample in an Instrument,
you’re ready to edit its synthesis parameters. Click on
any of the parameters in any of the six panes at the
bottom of the window and a new window will appear, in
which you can change the setting for whatever parameter
you clicked, in one of three ways:
● moving the slider
● clicking on the up and down arrows next to the
numeric readout
● selecting the number in the readout and typing in a
new number
Appendix-12
To change the settings for another controller, just click
on its icon in the appropriate pane and the control box
will change to its parameters and controls. Each time you
make a change, you can click on the keyboard to hear
your changes. When you’re done, click close.
Changing MIDI Controllers
To change the way MIDI controllers (such as the Modulator Wheel) vary synthesis parameters, right click a zone
icon and select Modulator Properties. This brings up a
dialog box that shows how all of the standard and E-mu
Enhancement MIDI controllers are routed to those parameters. You can change the scale, curvature or even what
parameter the controller influences. You can also create
new routings or remove routings that are already there.
Editing Presets
When you open a folder containing one or more presets,
you’ll see each preset represented by a icon with a
trumpet on it. Click a Preset open to see its keyboard
mapping displayed beneath the keyboard.
You can edit preset using the same techniques that were
presented in the Editing Instruments section.
APS Users’ Manual
Appendix-13
Glossary
Aux Bus
Aux buses are summed signal destinations to which each
strip can send a proportion of their audio signal to (see
Aux Send). APS has four Aux Buses that either have
internal effects associated or a physical input/output pair
useful for external processing purposes.
Aux Send
A split in the signal path on a mixer strip where a proportion of the signal can be sent to an auxiliary bus for
further processing. Aux buses typically have an effect
such as reverb or chorus assigned to them. In this way,
multiple strips can share the same effect.
Continuous Controller, MIDI
A framework in the MIDI language for sending a series of
values in real time that affect a parameter of a MIDI
device. Examples of continuous controllers are volume,
pan, modulation and pitch bend. Most MIDI devices are
set to respond to a range of values from 0 to 127 for
many, but not all, of these controllers.
General MIDI
A list of 128 preset (program) names designed to create
identical, or nearly identical, playback sounds on all
instruments. Preset one is a piano, preset eighteen is an
organ, preset eighty is an ocarina, and so forth. Since
many companies make General MIDI devices, the actual
sounds represented by those names are not all that
identical.
Inline Process
See “Insert”
Insert
A break in the signal path on a mixer strip where the
signal can be routed to an in process effect (typically EQ,
compression, distortion etc.). Inserts are different from
aux’s in that aux’s operate on a split in the signal path
and thus allow for a wet/dry balance.
Appendix-14
Master Stereo Mix Strip
Stereo main mix strip without inserts and aux capability.
MIDI
The Musical Instrument Digital Interface: a standardized
describing the language by which computers and devices
such as synthesizers and processors communicate. It also
describes the hardware and software needed to
implement this language.
MIDI Channel
One of sixteen data paths available in every MIDI
connection. Each APS Synth Engine can receive data and
play back on all sixteen channels at once (usually
referred to as 1A-16A and 1B-16B).
MIDI Sub-Mix
This is the stereo signal consisting of the entire audio
output of both Synth Engines. The level and pan (mix) of
the output of each MIDI channel is set with MIDI Pan and
Volume values in the MIDI sequencer application.
Physical Input
One of the analog or digital physical inputs supported by
the E-Card. APS has 4 mono analog and 2 stereo digital
inputs.
Physical Output
One of the analog or digital physical outputs supported
by the E-Card. APS has 2 mono analog and 2 stereo digital outs.
Pot
Short for “potentiometer.” A control, usually a rotary dial
or knob, that increases and decreases the level of a
signal.
Synth
Short for synthesizer
Synth A+B
Refers to the two SoundFont synths supported by the
E-Card, which provide a total of 32 MIDI channels.
APS Users’ Manual
Appendix-15
Synthesizer
A device for playing electronically-generated musical
sounds. It can be hardware or software based, and can
have a piano-style keyboard, or be played from another
synthesizer’s keyboard or by a software program such as
a MIDI sequencer.
Voice
A single note played by a synthesizer. An important
measure of a synthesizer’s capability is the number of
voices it can play simultaneously (“polyphony”). The APS
Synth Engines are equipped with 64 oscillators giving
them 64-voice polyphony..
Wave Sub-Mix
This is the stereo sub-mix of wave audio sent from
Window or any audio applications currently running.
MIDI for the Professional
If you are serious about MIDI-based music, we recommend MIDI for the Professional by Paul D. Lehrman and
Tim Tully. This book is a comprehensive and useful MIDI
reference. It will tell you all there is to know about MIDI
hardware and software—including sequencers,
synthesizers, controllers, MIDI Time Code and more and
explain clearly the MIDI mysteries of Sysex, Continuous
Controllers, Bank Change commands and much more.
To order “MIDI for the Professional”, send $19.95 plus
$10 shipping and handling = US$29.95 to:
Tim Tully
APS MIDI Book Offer
1020 Del Norte Avenue
Menlo Park, CA 94025 USA
Appendix-16
Index
A
Analog Input Strip 3-5
Analog Submix Strip Icon 324
Append Effect 3-11
Auto Wah 6-12
Aux Bus 3-12 , A-14
Aux Bus Router 3-13 , 3-20
Aux Bus Selectors 3-12
Aux Bus Send Amount 3-14
Aux Send A-14
B
Balance 3-18
Bank 4-3 , 4-9
Browse 4-8 , 4-10
C
CD audio 3-9
CD-ROM Audio 2-2 , 3-4
Chorus 6-6
Clear All Button 3-8
Compressor (Limiter) 6-15
Condenser microphones A-2
Continuous Controller, MIDI
A-14
Controllers
SF Bank Manager 4-5
Create a SoundFont Preset A10
Credits ii
D
Default MIDI Bank 1-7
Default Sound Set 4-6
APS Users’ Manual
Digital Input Strip 3-5
Digital Strip Icon 3-24
Disk Record Pot 3-21
Distortion 6-14
Drivers. See Input Drivers
Drum Kit checkbox 4-3
Dynamic microphones A-2
E
E-Card 1-1 , 2-2
E-Control 1-1 , 1-5
E-Control Mixer 3-1
E-Control mixer 3-1
E-Drive 1-1 , 2-2
E-Drive mic jumpers A-1
E-mu button 4-5
Echo/Delay 6-10
Editing Samples A-12
Effect Patch Palette 3-13
effects 3-11
Effects wet/dry Mix 3-11
electret microphones A-2
EMU10K1 1-6
EQ 6-17 , 6-18
External MIDI Interface 1-5
F
Fader Grouping 3-18
Fader Grouping Icon 3-24
Flanger 6-8
G
General MIDI 1-7 , 3-6 , 4-1
, A-14
GM button 4-5
I-1
H
M
headphone signal
2-2
I
inline effect 3-10
Inline Insert Popup Strip 310
Input connectors 1-2
Input Drivers 2-10
Input Ports 2-10
Input Strip
Adding 3-5
Input strip
delete 3-5
Input Strip Controls 3-9
Input Strips 3-3
Insert A-14
Inline Insert. See Inline
Insert Popup Strip
Installing
APS Hardware 2-6
Troubleshooting 2-8
Verify Installation 2-8
Instrument A-7
J
joystick
2-8
K
Keyboard Display
Master Output Strip 3-19
Memory Used 4-2
Meters 3-25
Microphone Configuration A-1
Microphone configuration
1-3, 2-3
MIDI 3-4 , A-15
MIDI Bracket 2-2
MIDI Channel A-15
MIDI Controllers A-6 , A-13
MIDI Implementation Chart
A-6
MIDI IN 2-10
MIDI In - Advanced button 4-4
MIDI In button
SF Bank Manager 4-3
MIDI OUT 2-11
MIDI Reset button 4-6
MIDI Sub-Mix A-15
MIDI Submix
adding 3-7
Reassigning 3-8
MIDI Submix Strip 3-6
MIDI Submix Strip Icon 3-24
Mode 4-6
Multi-Channel mode 4-5
Multimedia Settings 2-9
Mute Buttons 3-18
4-2
O
L
Level fader 3-18
Limiter 6-15
Load a Preset 4-9
Lock button
SF Bank Manager
Loop A-12
4-8
Online Help
APS 1-10
Output connectors 1-2
Output Destination Button
25
Output Drivers 2-11
Overdubbing 5-2
3-
P
Panning
I-2
3-18
Index
Parametric EQ 6-18
peak meters
clearing 3-25
resolution 3-25
Phantom Powered A-2
Physical Input A-15
Physical Output A-15
Pitch Shifter 6-13
Playing .wav 5-1
polyphony 1-6
Pot A-15
Preset 4-3
SF Bank Manager 4-8
SoundFont A-7
Stereo/Mono indicator 3-18
Sustain 4-3
Synth A-15
Synth A 2-11
Synth A+B A-15
Synth B 2-11
Synth Parameters
changing A-12
SynthEngine 1-6 , 3-6
T
Tech Support vi
Tools Panel 3-23
Track Name 3-18
Trim Control 3-9
trim pot 3-4
Troubleshooting vi
TRS connectors A-3
R
Restore 4-9 , 4-10
Reverb 6-3
Routing to External Device
15
3-
S
sample A-10
Sample Range
changing A-12
Samples
editing A-12
Shelf EQ 6-17
Signal Flow 2-14 , 5-4
Solo Button 3-18
SoundFont
Bank Manager
4-1
SoundFont Bank
creating A-10
SoundFont Bank Manager 1-2
, 3-23
SoundFont Sounds
creating A-7
SoundFont Structure A-7
Source Button 3-9
Source button 3-4
APS Users’ Manual
U
User button
4-5
V
Voice
A-16
W
Warranty iv
Wave 3-4
WAVE IN 2-10
WAVE OUT 2-11
Wave Sub-Mix A-16
Web Sites vii
I-3