1
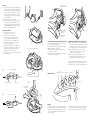
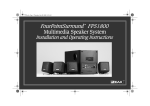
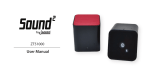
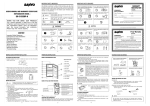
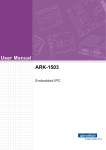
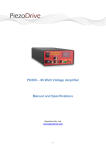
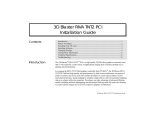
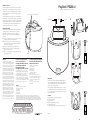
PlayDock™ PD200 v2
Battery Service Life
Recharge the PlayDock overnight whenever possible, even when the
PlayDock has been used in portable operation only for a few hours.
If storage is necessary, ensure the PlayDock battery is fully-charged,
with the POWER switch in the “out” position. Recharge the battery at
six month intervals.
for Creative® NOMAD®/Digital Audio Player Jukebox
Remove screws on side for battery access.
The PD200 automatically shuts down to protect a low-charge battery.
If the PD200 does not activate in portable operation, do not attempt to
defeat this protection feature by repeated activation cycles. Recharge
the PlayDock PD200 battery as soon as possible, preferably within 24
hours. Attempting to operate the PD200 after low-battery shutdown
may permanently reduce the service life of the battery.
Signal Miniplug
A
DC output
B
Battery Replacement
Assuming it is kept charged, the battery inside the PlayDock PD200
should last for many years. When the battery fails to operate the
PlayDock for more than two hours after a 12 hour charge cycle,
replacement is indicated. Contact Cambridge SoundWorks for a
replacement.
1) To replace the battery, remove the three screws on the left hand
endcap (the endcap without the POWER switch.)
2) Note the red wire’s connector is attached to the battery’s red
(positive) terminal. Detach both connectors from the battery terminals and slide out the battery.
3) Install a new battery inside the PlayDock PD200 player.
4) Attach the red wire’s connector to the red battery terminal.
Repeat for the other connector.
5) Replace the endcap and charge the battery for at least 12 hours
prior to portable operation.
Warranty
To the original purchaser, Cambridge
SoundWorks, Inc. will warrant the speaker system
to be free of defects in material and worksmanship for a period of one (1) year from date of purchase. With respect to defects, Cambridge
SoundWorks will, at its option, replace the product
or repair the defect in the product with no charge
to the original purchaser for parts or labor. This
warranty does not extend to abuse, accident,
faulty hookup, defective associated equipment or
use of the speaker with equipment for which it
was not intended. This warranty is valid only when
the speaker is returned to the retailer where the
PlayDock PD200 was purchased. This is the sole
and expressed warranty. This warranty is in lieu of
all other warranties, expressed or implied, of merchantability, fitness for purpose or otherwise. In no
event shall Cambridge SoundWorks be liable for
incidental or consequential damages or have any
liability with respect to defects other than the
obligations set forth above. To ensure warranty
coverage, it is incumbent upon the original purchaser to contact the retailer where the PlayDock
PD200 was purchased and inform them of the
defect within the warranty period. The only
acceptable method of establishing warranty status is a copy of the original proof of purchase
indicating customerís name and purchase date.
C
Front
D
Left
endcap
For Service and Support Inside
U.S.A., if purchased from a
Cambridge SoundWorks retail outlet, Cambridge SoundWorks
phone sales, Cambridge
SoundWorks www.hifi.com website:
If a speaker malfunctions due to a manufacturing
defect within the warranty period, just call us toll-free
at 1-800-FOR-HIFI between 9 a.m. and 10 p.m. ET
Monday through Friday; 9 a.m. and 9 p.m. ET
Saturday and Sunday and ask for a return authorization number. We will repair or replace your speaker at
no charge to you. Proof of purchase is required. After
45 days, you must pay for shipping back to us, we will
then pay the shipping costs to return it to you.
For Service and Support if purchased
from other retail outlets inside U.S.A.,
Canada and Latin America
Creative Labs Inc. Technical Support
1523 Cimarron Plaza
Stillwater, OK 74075
Tel: (405) 742-6622
Fax: (405) 742-6633
Operating hours (Central Time):
Daily 8:00 A.M.-10 P.M.
To reach Technical Support via the Internet,
visit our website at att[://www.creativehelp.com.
You can reach Customer Service by phone at
1-800-998-1000, Mon-Fri 8:00A.M.-7:00 P.M.
(Central Time).
You can also use our Faxback service at
(405) 372-5227.
In Asia
Creative Technology Ltd. Technical Support
31 International Business Park
Creative Resource
Singapore 609921
Tel: 65-895-4100
Fax: 65-569-6640
Operating hours (Singapore Time): Mon-Fri 9:00 A.M.-6:00 PM. Sat-Sun & Public Holidays closed.
To reach Technical Support via the Internet, visit our web site at http://www.creative-asia.com/support
Back
Introduction
Thank you for purchasing the Cambridge SoundWorks® PlayDock
PD200. The PlayDock PD200 is designed for use specifically with
Creative’s NOMAD Jukebox players and we provide two flexible holders (called “Gloves”) for these products.
The Signal miniplug of the PlayDock PD200 can also be connected to
the headphone minijack of a typical portable audio device. However,
the Gloves are not designed to accommodate any device other than a
Creative NOMAD Jukebox.
Bottom lip
F
E
Contents
© 2002 Cambridge SoundWorks, Inc. All rights reserved. Cambridge SoundWorks is a registered trademark of Cambridge
SoundWorks, Inc., Newton, Massachusetts USA. All other brands and products are trademarks or registered trademarks of their
respective holders.All specifications are subject to change without prior notice. Actual contents may differ from those pictured.
A)
B)
C)
D)
E)
F)
PlayDock PD200 v2 player (with battery inside)
Power Supply Adapter
Jukebox 3 Glove
5V Voltage Plug for Jukebox 3 player
Original Jukebox Glove
9V voltage plug for both 9V and 12V original Jukebox players
Bottom lip
311 Needham Street, Newton MA 02464
A
®
Company
P81-1710
Jukebox DC IN jack
(location varies with model)
First Use
1)
2)
3)
Connect the proper Voltage Plug. All original Nomad Jukebox
models (12V or 9V) use the 9V Voltage Plug. Nomad Jukebox 3
models use the 5V Voltage Plug. Align the Voltage Plug marking with the PlayDock’s DC Output (gray dot), then insert the
Plug until it snaps into place (see G). To remove a Voltage
Plug, press the small catch on the opposite side of the Plug,
then pull apart (see H).
Insert Adapter AC plug into AC outlet (see I).
Insert Adapter output plug into the PlayDock 12-14 VDC input
on the right endcap, next to the POWER button (see J).
PlayDock’s internal battery will now charge. We recommend
you charge the PlayDock PD200 for 12 hours before using it
without the AC adapter (portable operation).
J
T
E
1
Bar
Jukebox LINE Out
(location varies
with model)
Power cable junction
LU
VO
ME
PlayDock Signal
Miniplug
ID
E
Stage
Normal Operation (Power Supply Adapter connected)
Portable Operation (without Power Supply Adapter)
8)
13) Make sure the POWER switch is “in”, then press the MUTE switch
to activate portable operation. The light will glow green. The PD200
automatically turns off after about five minutes of inactivity to preserve the battery. In this case, press the Mute switch to reactivate.
14) Leave the POWER switch in its “out” position whenever the
PlayDock is not needed and AC power is not available.
This eliminates power draw on the battery.
15) Connecting the Power Supply Adapter without AC power
available prevents proper portable operation. Disconnect the AC
power adapter if Power Supply Adapter is not available.
Make sure the POWER button is pressed “in” on the right side
endcap. The MUTE light will glow green.
9) With the Jukebox playing, adjust VOLUME ▼ or VOLUME ▲.
10) Use the WIDE mode for enhanced sound.
11) Press MUTE to silence the speaker (the light glows red). Press
MUTE again to restore output.
12) We recommend you use the MUTE button to silence the speaker
whenever the AC power adapter is active.
First slip Glove lip under PlayDock stage
L
L
VO
E
UM
After a 12-hour charge, the PlayDock PD200 will operate from its internal
battery for about 10-12 hours of continuous play at moderate volume.
When the battery charge is low, the sound distorts at higher volume levels.
E
ID
W
M
TE
U
G
2
OU
LIN
TE
8)
T
E
1
U
7)
IN
2
M
6)
DC
OU
K
Identify the correct Glove for your Jukebox
(see illustrations on the first page).
Attach the Glove to the PlayDock as follows:
Locate the Stage and Bar on the PlayDock (see K).
Slip the Glove lip underneath the PlayDock’s Stage.
Press the Glove’s claws onto the PlayDock bar (see L).
Insert your Jukebox into the Glove by spreading apart
the sides of the Glove (see M).
Connect the Signal and Power as follows (see N on facing
page):Route both wires through the cable restraint. Insert the
DC Plug into the Jukebox’s DC IN jack. Insert the Signal
Miniplug into a Line Out jack on the Jukebox
Tuck the junction of the Power cable behind the cable restraint
(see O on facing page)
Voltage
plug
IN
LIN
W
5)
O
DC
Preparing the Jukebox
4)
N
I
12-14 VDC
IN POWER
Connecting the voltage plug
PlayDock Controls
Mute
(Activate portable operation)
Wide Mode
Volume Down
Then press Glove claws onto PlayDock bar
ME
U
VOL
M
Voltage plug
WID
PlayDock’s DC output
Volume Up
E
E
MUT
First spread apart
sides of Glove
LIB
EA
H
X
Removing the voltage plug
Then Slip
Jukebox
into Glove
ME
LU
VO
E
ID
W
Charging
TE
U
M
Keep the Power Supply Adapter connected to the PlayDock PD200
whenever portable operation is not needed and AC power is available.
This will keep both the Jukebox battery and PD200 battery at optimum
charge level. The PlayDock PD200 sealed battery (lead-acid type)
cannot be overcharged.
The PD200 battery will charge anytime an active AC power adapter is
connected. The POWER switch must be pressed “in” to charge the
battery in a Jukebox connected to the PD200’s DC power output.