1
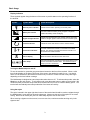
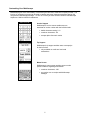
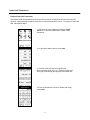
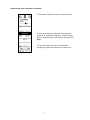
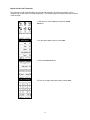
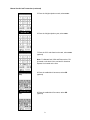
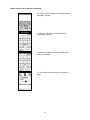
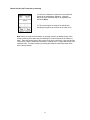
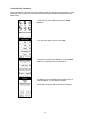
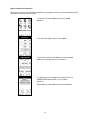
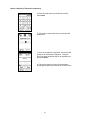
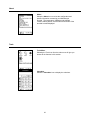
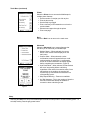
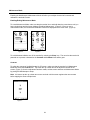
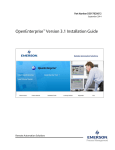
Mobilescape 3130 Rogerdale Rd, Suite 190 Houston, Texas 77042 Tel – 713-735-5500 Fax – 713-735-5503 User Guide mPowering Payments Everywhere www.mobilescape.com Table of Contents Basic Usage.............................................................................................................................................. 3 Display Indicators. ............................................................................................................................... 3 Turning the Mobilescape on and off.................................................................................................... 3 Using the stylus ................................................................................................................................... 3 Processing a transaction ..................................................................................................................... 4 Batching............................................................................................................................................... 4 Accessing the printer paper................................................................................................................. 4 Loading paper ..................................................................................................................................... 4 Customizing Your Mobilescape ............................................................................................................. 5 Credit Card Transactions........................................................................................................................ 6 Swiped Credit Card Transaction ......................................................................................................... 6 Manual Credit Card Transaction ......................................................................................................... 8 Void Credit Card Transaction ............................................................................................................ 12 Return Credit Card Transaction ........................................................................................................ 14 Pre-Authorization Credit Card Transaction ....................................................................................... 16 Force Credit Card Transaction .......................................................................................................... 18 Cash Transaction................................................................................................................................... 20 Pending................................................................................................................................................... 21 About....................................................................................................................................................... 22 Tools........................................................................................................................................................ 22 Calculator .......................................................................................................................................... 22 Printer ................................................................................................................................................ 23 Back................................................................................................................................................... 23 Advanced........................................................................................................................................... 23 Sleep. ...................................................................................................................................................... 23 Maintenance Mode................................................................................................................................. 24 Enabling/Exiting Maintenance Mode................................................................................................. 24 Contrast ............................................................................................................................................. 24 Calibrate ............................................................................................................................................ 25 Warranty. ................................................................................................................................................ 26 2 Basic Usage Display Indicators These symbols appear along the bottom of the screen to provide status on the operating functions of the terminal. Symbol or Symbol Name Symbol Description External power indicator Indicates the terminal is operating on external power. Battery life indicator Four bars indicate the battery is fully charged. A single bar indicates the battery needs recharging. Signal strength indicator Indicates the signal strength of the cellular network. More bars indicate a stronger signal. Fewer bars indicate a weaker signal. Transmit indicator Indicates an active data session over the cellular network. Connection indicators The tower indicates the terminal is connected to the cellular network. The question mark indicates that the terminal is not connected to the cellular network. Cancel display Aborts the session and returns to the main menu. Time stamp This symbol will appear only after the terminal has been turned on and a connection has been made. You must have a time stamp to process a transaction. Turning the Mobilescape on and off To turn the terminal on, press the gray power button located on the front of the terminal. When a valid time-of-day displays in the lower right corner of the screen, the terminal is ready for use. You should allow 15 to 60 seconds for the terminal to become fully functional. Please note that it may take longer depending on the local cellular coverage. The Mobilescape is designed to enter sleep mode rather than turn off. To activate sleep mode, select the Sleep icon on the main screen. To exit sleep mode, press the power button to wake up the terminal. We recommend that you activate sleep mode when the terminal is not in use to conserve battery power. The terminal will automatically enter sleep mode after five minutes of inactivity. Using the stylus The stylus is stored in the upper right hand corner of the terminal and should be used to navigate through the Mobilescape’s icons and sign electronic signatures. Always use the point of the stylus for on screen writing. Never use an actual pen, pencil or other sharp object to write on the screen. When entering a signature on the screen, be sure to use slow, continuous strokes and sign only in the signature box. 3 Processing a transaction The Mobilescape terminal processes transactions best when reception is strong. Signal strength is indicated by the number of signal bars displayed at the bottom of the screen. The more bars displayed, the stronger the signal. Once a stable connection is established, the signal strength indicator will no longer display and the transmit indicator (circling arrow) will appear in its place. To get the best signal strength, use the terminal outside whenever possible. When operated inside a building, reception may be better near a window. Credit card transactions can be entered with or without a connection to the cellular network. If a credit card transaction is processed without a connection, the Mobilescape will give you the option of moving the transaction into pending until a connection has been established. A pended credit card transaction is neither approved nor declined until the terminal is powered on and a connection is made with the cellular network. To learn more about the Mobilescape’s pending function review the Pending section of this document. Batching The Mobilescape automatically batches daily transactions that are not in pending. The terminal does not need to be plugged in or turned on for the auto batch process to take place. Accessing the printer paper Access to the paper compartment is a two movement operation. First, lift the front edge of the paper door to unlock the door. Then, continue lifting as the door swings up and back to reveal the paper compartment. Swing open. Lift here. Loading paper The Mobilescape terminal requires the use of thermal paper. For proper installation, place the roll of paper into the paper compartment making sure that the paper extends out from the bottom of the roll. Before closing the door, make sure that the paper extends beyond the compartment when the door is closed. Paper feeds from the bottom of the roll. IMPORTANT: Do not subject the terminal or paper to extreme temperature. Do not leave either in direct sunlight for long periods of time. Thermal paper is heat-sensitive and may turn black in extreme conditions. 4 Customizing Your Mobilescape Mobilescape gives users the flexibility of customizing the terminal to meet their company’s needs. The invoice, tip, and memo screens can be used to capture and report important transaction data on the receipt and in Mobilescape Manager. To turn on or off any of these screens contact the Mobilescape Helpline at 1-866-414-5600 for assistance. Invoice Support Mobilescape’s invoice screen enables users to associate an invoice number with the individual sale. default character setting 1-16 maximum characters - 80 accepts alpha & numeric entries Tip Support Mobilescape’s tip support enables users to accept tips for their services. only available on credit card and cash transactions Memo Screen Mobilescape’s memo screen enables users to make specific notations regarding a transaction. maximum characters - 250 text carries over to receipt and Mobilescape Manager 5 Credit Card Transactions Swiped Credit Card Transaction The swiped credit card transaction is the most common type of transaction and is also the most costeffective. Always attempt to swipe a credit card for the lowest transaction costs. To process a credit card sale, follow theses steps: 1. With the main menu displayed, select the Credit Card icon or swipe the credit card to initiate a sale transaction. 2. On the Select Option screen, select sale. 3. Hold the credit card with the magnetic strip down and facing away from you. Swipe the credit card from right to left through the magnetic card reader slot. 4. Enter the transaction amount (in dollars and cents), select enter. 6 Swiped Credit Card Transaction (continued) 5. The terminal contacts the server to authorize funds. 6. Once the transaction is approved, the terminal will prompt for an authorization signature. Using the stylus, have the cardholder sign in the signature box and select Done. 7. The terminal prints a receipt of the transaction, including the signature and returns to the main menu. 7 Manual Credit Card Transaction The customer’s credit card information can be manually entered if the card is not present or if the magnetic strip on the card is not scanning properly. The following steps will walk you through a manual credit card sale. 1. With the main menu displayed, select the Credit Card icon. 2. On the Select Option screen, select sale. 3. Select the enter card icon. 4. Enter the 16-digit credit card number, select enter. 8 Manual Credit Card Transaction (continued) 5. Enter the 2-digit expiration month, select enter. 6. Enter the 2-digit expiration year, select enter. 7. Enter the CVV code listed on the card, select enter. (optional) Note: For MasterCard, VISA and Discover the CVV is located on the back of the card and for American Express it is located on the front. 8. Enter the cardholder’s last name, select OK. (optional) 9. Enter the cardholder’s first name, select OK. (optional) 9 Manual Credit Card Transaction (continued) 10. Enter the street number for the billing address, select OK. (optional) 11. Enter the ZIP code for the billing address, select enter. (optional) 12. Enter the transaction amount (in dollars and cents), select enter. 13. The terminal contacts the server to authorize funds. 10 Manual Credit Card Transaction (continued) 14. Once the transaction is approved, the terminal will prompt for an authorization signature. Using the stylus, have the cardholder sign in the signature box and select Done. 15. The terminal prints a receipt of the transaction, including the signature and returns to the main menu. Note: When the credit card information is manually entered, an additional copy of the receipt containing extra space will print allowing for a manual imprint of the card to be taken. Place the blank portion of the receipt on top of the credit card. Using the flat side of the stylus, trace the cardholder information, including name, 16-digit card number, and expiration date. This feature helps in providing proof that the card was present at the time of the transaction. 11 Void Credit Card Transaction When a transaction is done incorrectly, the following steps will cancel/void the transaction. A void transaction must be performed on the same day as the original transaction and before the daily batch closes. 1. With the main menu displayed, select the Credit Card icon. 2. On the Select Option screen, select void. 3. Swipe the credit card (if available) or select the enter card icon to manually enter the card number. 4. A Warning screen will display the message “This is a VOID transaction. Do you want to proceed?” Select Yes to proceed or No to cancel the transaction. 12 Void Credit Card Transaction (continued) 5. Enter the void amount (in dollars and cents), select enter. 6. Confirm that the transaction information is correct, select Yes. 7. The terminal contacts the server to authorize the void. 8. Once the transaction is approved, the terminal will prompt for an authorization signature. Using the stylus, have the cardholder sign in the signature box and select Done. 9. The terminal prints a receipt of the transaction, including the signature and returns to the main menu. 13 Return Credit Card Transaction When items or services are unwanted, unsatisfactory, damaged or incorrect; a return transaction can be processed to credit the customer’s card. 1. With the main menu displayed, select the Credit Card icon. 2. On the Select Option screen, select return. 3. Swipe the credit card (if available) or select the enter card icon to manually enter the card number. 4. A Warning screen will display the message “This is a CREDIT/RETURN transaction. Do you want to proceed?” Select Yes to proceed or No to cancel the transaction. 14 Return Credit Card Transaction (continued) 5. Enter the credit amount (in dollars and cents), select enter. 6. The terminal contacts the server to authorize the credit/return. 7. Once the transaction is approved, the terminal will prompt for an authorization signature. Using the stylus, have the cardholder sign in the signature box and select Done. 8. The terminal prints a receipt of the transaction, including the signature and returns to the main menu. 15 Pre-Authorization Credit Card Transaction To authorize payment before a service or item is bought, a pre-authorization can be processed to ensure funds are available prior to the completion of the sale or work. The Mobilescape’s preauthorization feature is turned off by default. Note: If a transaction is pre-authorized with Mobilescape you will need to force the transaction with Mobilescape to collect the funds. 1. With the main menu displayed, select the Credit Card icon. 2. On the Select Option screen, select pre-authorize. 3. Swipe the credit card (if available) or select the enter card icon to manually enter the card number. 4. A Warning screen will display the message “This is a AUTHORIZATION ONLY transaction. Do you want to proceed?” Select Yes to proceed or No to cancel the transaction. 16 Pre-Authorization Credit Card Transaction (continued) 5. Enter the amount to be pre-authorized (in dollars and cents), select enter. 6. The terminal contacts the server to perform the pre-authorization. 7. Once the transaction is approved, the terminal will prompt for an authorization signature. Using the stylus, have the cardholder sign in the signature box and select Done. 8. The terminal prints a receipt of the transaction, including the signature and returns to the main menu. Note: The Auth Number on the receipt will be needed to force the sale and collect your funds. 17 Force Credit Card Transaction If a transaction was pre-authorized with the Mobilescape and once the service or item is accepted by the customer, a force transaction is processed to collect the pre-authorized funds. The Mobilescape’s force feature is turned off by default. 1. With the main menu displayed, select the Credit Card icon. 2. On the Select Option screen, select force. 3. Swipe the credit card (if available) or select the enter card icon to manually enter the card number. 4. A Warning screen will display the message “This is a FORCE SALE transaction. Do you want to proceed?” Select Yes to proceed or No to cancel the transaction. 18 Force Credit Card Transaction (continued) 5. Enter the transaction amount (in dollars and cents), select enter. Note: The amount being forced cannot exceed the amount that was originally pre-authorized. 6. Enter the Auth Number from the pre-authorized transaction, select OK. Note: The Auth Number is located on the pre-authorization receipt. 7. The terminal contacts the server to perform the force. 8. Once the transaction is approved, the terminal will prompt for an authorization signature. Using the stylus, have the cardholder sign in the signature box and select Done. 9. The terminal prints a receipt of the transaction, including the signature and returns to the main menu. 19 Cash Transaction Follow these steps to log a cash transaction and print a receipt with the Mobilescape. (optional) 1. With the main menu displayed, select the Cash icon. 2. Enter the cash amount (in dollars and cents), select enter. 3. On the Confirmation screen, select Yes or No to confirm the amount of cash collected is correct. 4. The terminal will prompt for an authorization signature. Using the stylus, have the customer sign in the signature box and select Done. 5. The terminal prints a receipt of the transaction, including the signature and returns to the main menu. 20 Pending When a credit card transaction is processed without a cellular connection, the Mobilescape will give you the option of pending/storing the transaction. If the transaction cannot authorize a Connection screen (Figure 1) will appear. If you select Yes on the Connection screen, the transaction will move into pending until connection has been made and the transaction can be processed. If you select No the transaction will automatically be voided. To view if your credit card transaction is still in pending or has been declined, select the Pending icon found on the main menu. (Figure 2) By selecting the radio buttons found at the bottom of the pending screen (Figure 3), all pending and declined transactions will be displayed. Once a pended transaction has been approved, the transaction detail will be removed from the pending screen. If the pending transaction is declined, an additional receipt will print out stating “declined” at the bottom. Figure 1 Figure 2 Figure 3 NOTICE ON PENDING TRANSACTIONS ================================ The Mobilescape device has the capability to store transactions in “pending” mode in the event that it cannot find a cell signal. By selecting “yes” on the appropriate screen, the device will upload stored transactions once it finds a clear cell signal. Storing transactions for future authorization is an optional feature. By selecting “yes”, you agree to hold BankServ harmless from any financial risk or liability in the event that the card is declined, transactions do not authorize correctly or are lost for any reason, including transmission errors in the cellular communication network. If you do not agree to these terms, you should select “no” to cancel the transaction. If you select “no”, you are solely responsible for the outcome of the transaction if you decide to exchange your goods or services for a card that cannot be authorized. In this situation, you may decide to write down the customer’s credit card number, or to place the card under a segment of the device’s thermal paper to rub an imprint of the card number. By doing this, you understand and agree that BankServ is not responsible for the loss or theft of this data, is not responsible for key-entered processing downgrades, and holds no responsibility if the card is stolen, closed or otherwise fraudulent. You also understand that you assume the entire risk of the transaction and that you should ask the customer for as much contact information as possible, including an address and a telephone number. If you have questions about this process, please call the Mobilescape Helpline at 1-866-414-5600 for more information. 21 About About Select the About icon to review the configuration and specific information concerning your Mobilescape terminal. The temperature, hardware and software versions, battery status, and the name and number of the terminal are also displayed. Tools Tools Menu Selecting the Tools icon from the main menu will give you access to the features in this section. Calculator Select the Calculator icon to display the calculator. 22 Tools Menu (continued) Printer Select the Printer icon to access the Mobilescape’s multiple printer features. Set the number of receipts you wish to print Print the last receipt Set the Skip Logo toggle Print a summary of all transactions run since the previous batch Advance extra paper through the printer Print a test page Back Select the Back icon to return to the main menu. Advanced Select the Advanced icon to access features that will allow you to customize your Mobilescape. Modem Status – When selected, the current status of the modem will be displayed on the main menu. Confirm Sales – When selected, a sales confirmation screen will appear before a credit card transaction is authorized. A confirmation screen for a cash transaction will always appear before completing the transaction. (Figure 4) Auto Pend Mode – When selected, all transactions will move into pending before authorizing regardless of the network connection status. Once transactions are in pending, the terminal will continuously try to authorize the transaction out of the pending queue. Skip Deposit Warning – Feature not available # of Dial Attempts – This is the number of times the terminal’s modem will attempt to establish a connection when authorizing a sale. Figure 4 Sleep Selecting the Sleep icon will put the Mobilescape terminal into sleep mode to conserve battery power. To exit sleep mode, press the gray power button. 23 Maintenance Mode Enabling the Mobilescape’s Maintenance Mode will allow you to adjust the terminal’s contrast and calibrate the terminal’s screen. Enabling/Exiting Maintenance Mode To enter Maintenance Mode, make sure that the terminal is on and hold down the power button until you hear a single beep and the screen displays “Enabling Maintenance”. (Figure 5) Once you are in maintenance mode, the Contrast and Calibrate icons will be displayed on the main menu. (Figure 6) Figure 5 Figure 6 To exit Maintenance Mode, turn off the terminal by selecting the Sleep icon. The next time the terminal is powered on to process a transaction the Contrast and Calibrate icons will be gone. Contrast To adjust the contrast of the Mobilescape’s LCD screen, make sure that the terminal is in Maintenance Mode then select the Contrast icon. Tap either the up or down arrows to adjust the contrast of the screen. (Figure 7) Once the adjustment has been made, exit the screen and then exit Maintenance Mode by putting the Mobilescape to sleep. Note: It is best to tap the up or down arrow once and wait until the screen registers the new contrast before tapping the arrow multiple times. Figure 7 24 Calibrate If the Mobilescape is ever dropped or if the LCD is not registering your selection then the screen may need to be calibrated. Once in Maintenance Mode, select the Calibrate icon from the main menu. Using the stylus, touch the center of the moving box as many times as necessary. (Figure 8) This could be up to six (6) times for full calibration. After the terminal has been calibrated, you will be redirected to the main menu where you should select the Sleep icon to exit Maintenance Mode. Figure 8 25 mPowering Payments Everywhere www.mobilescap e.com BANKSERV END CUSTOMER LIMITED WARRANTY (U.S.) GENERAL PRODUCT WARRANTY This limited warranty applies to the Mobilescape product line (“Product”). Please contact the Mobilescape Helpline at 1-866-414-5600 for questions regarding this limited warranty. Terms of the Warranty BankServ warrants the Product you have purchased from BankServ, or from an authorized BankServ reseller, against defects in materials or workmanship under normal usage for a period of one (1) year from the date of original purchase. Your sales receipt, showing the date of purchase is your proof of purchase date and is required to make a warranty claim. During the warranty period, BankServ will repair or replace defective or damaged parts with new or refurbished parts or, at the option of BankServ, refund the purchase price. All exchanged parts and Products replaced under this warranty will become the property of BankServ. Mail-in service can be obtained during the warranty period by calling 1-866-414-5600. This warranty does not cover inbound shipping charges, risk of loss during shipment, export taxes, custom duties and taxes, or any other charges associated with transportation of the Product to the repair facility. BankServ covers outbound shipping charges when returning a replacement or repair Product to the Customer. BankServ retains the right to assess all warranty claims and to determine if damages are covered by the warranty. In the case of a claim that is not covered by the warranty, you will be contacted to determine whether BankServ should repair the damage for a fee or whether the Product should be returned to Customer by BankServ. Limitations of Remedy This limited warranty excludes any Product(s) that has been damaged or rendered defective (a) as a result of accident, misuse, or abuse; (b) by operation outside the usage parameters stated in the Product’s User Guide; (c) by the use of parts not manufactured or sold by BankServ; (d) by modification of the Product; or (e) as a result of service by anyone other than an authorized BankServ service provider. If a problem develops with this Product during or after the warranty period, you may contact your dealer or the BankServ service center. If the problem is not handled to your satisfaction, write us at BankServ, 3130 Rogerdale Road, Suite 190, Houston, Texas 77042 or e-mail [email protected]. THIS WARRANTY GIVES YOU SPECIFIC LEGAL RIGHTS, AND YOU MAY ALSO HAVE RIGHTS WHICH VARY FROM STATE TO STATE (OR JURISDICTION TO JURISDICTION). BANKSERV’S RESPONSIBILITY FOR MALFUNCTIONS AND DEFECTS IN THE PRODUCT IS LIMITED TO REPAIR AND REPLACEMENT AS SET FORTH IN THIS WARRANTY STATEMENT. EXCEPT AS EXPRESSLY PROVIDED IN THIS LIMITED WARRANTY, NO WARRANTIES, EXPRESS OR IMPLIED STATUTORY OR OTHERWISE, INCLUDING ANY WARRANTIES OF MERCHANTABILITY OR FITNESS FOR A PARTICULAR PURPOSE, ARE MADE WITH RESPECT TO ANY PRODUCT. NO WARRANTY, WHETHER EXPRESS OR IMPLIED, WILL APPLY AFTER THE LIMITED WARRANTY PERIOD HAS EXPIRED. IF THIS LIMITATION IS RESTRICTED BY LAW IN CERTAIN JURISDICTIONS, THEN IT APPLIES TO THE EXTENT ALLOWABLE UNDER THE APPLICABLE LAW FOR THAT JURISDICTION. BANKSERV DOES NOT ACCEPT LIABILITY BEYOND THE REMEDIES PROVIDED FOR IN THIS WARRANTY OR FOR CONSEQUENTIAL OR INCIDENTAL DAMAGES, INCLUDING, WITHOUT LIMITATION, ANY LIABILITY FOR THIRD-PARTY CLAIMS AGAINST YOU FOR DAMAGES AS A RESULT OF PRODUCTS NOT BEING AVAILABLE FOR USE. BANKSERV IS NOT LIABLE FOR ANY DAMAGES CAUSED BY THE PRODUCT OR THE FAILURE OF THE PRODUCT TO PERFORM, INCLUDING ANY LOST PROFITS, LOST SAVINGS, INCIDENTAL DAMAGES, OR CONSEQUENTIAL DAMAGES. BANKSERV IS NOT LIABLE FOR ANY CLAIM MADE BY A THIRD PARTY OR MADE BY YOU FOR A THIRD PARTY. THIS LIMITATION APPLIES WHETHER DAMAGES ARE SOUGHT, OR A CLAIM MADE, UNDER THIS WARRANTY OR AS A LOSS CLAIM (INCLUDING NEGLIGENCE AND STRICT PRODUCT LIABILITY), A CONTRACT CLAIM, OR ANY OTHER CLAIM. THIS LIMITATION OF LIABILITY WILL BE EFFECTIVE EVEN IF BANKSERV OR AN AUTHORIZED REPRESENTATIVE OF BANKSERV HAS BEEN ADVISED BY YOU OF THE POSSIBILITY OF ANY SUCH DAMAGES. 26