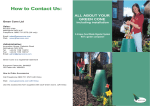
1
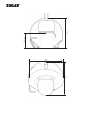
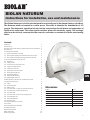
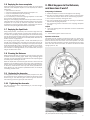
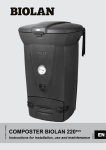
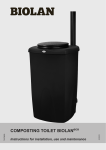
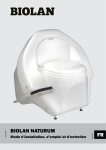
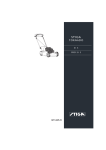
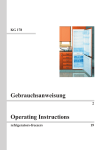
BIOLAN NATURUM
Instructions for installation, use and maintenance
Valmistenumero
Valmistuspäivä
Myyjän leima, allekirjoitus ja ostopäivä
03/2012
70571900
Kokoonpanija
830
800
470 - 490
810
BIOLAN NATURUM
Instructions for installation, use and maintenance
The Biolan Naturum is a toilet unit designed for one family and to be placed simply on the floor.
The Naturum shall be located in a warm space. The toilet is intended for households of 1-5
people. The Naturum’s operation is based on the composting of solid waste and separation of
liquid in the toilet seat. The toilet requires neither water nor electricity supply. The drainage
pipe from the toilet is connected to the sewer for collection or treatment of urine and washing
water.
Contents
Dimensions1
Component list
2
How wide must the doorway be to enable the Naturum to be taken in? 3
Parts drawing
3
1. Planning and installation
4
1.1 Space requirement of the toilet
4
1.2 Planning and installing the ventilation system for the toilet
4
1.3 Planning and installing the drainage system for the toilet
6
2. Use and maintenance of the Naturum
6
2.1 Before use
6
2.2 Using the toilet
6
2.3 If the toilet is not used year-round
6
2.4 Using the bulking material
6
2.5 Using the service rake
7
2.6 Emptying the inner receptacle
7
2.7 Emptying the liquid tank
7
2.8 Cleaning the Naturum
7
2.9 Replacing the draw wire
2.10 Tightening the draw wire
3. What happens in the Naturum, and how does it work?
7
4. Problems that may occur
8
4.1.Odour
8
4.2. Condensed water
8
4.3. Mass is moist
8
4.4. The mass slides, i.e. does not move with the drum
8
4.5. The mass forms a heap inside the drum
8
4.6. The mass clods
8
4.7. The mass does not rise into the emptying drum
8
4.8 The pedal feels stiff
8
4.9 The pedal feels loose
8
4.10 The wires slide
8
4.11 Some liquid leaks on the floor
8
4.12Insects
8
5. Post-composting the toilet waste
9
6. Utilisation of liquid
9
Disposal of the product
9
Biolan accessories
10
About the guarantee
10
EN
Dimensions
length
84 cm
width
74 cm
height
81 cm
sitting height
47 - 49 cm
weight
about 34 kg
size of the inner receptacle
7 litres
composting volume
30 litres
external diameter of the ventilation pipe
75 mm
external diameter of the drain pipe
32 mm
1
Component list
EN
Component
Denomination
Part number
Material
1
2
3
4
5
6
7
8
9
10
11
12
13
14
15
16
17
18
19
20
21
22
23
24
25
26
27
28
29
30
31
32
33
34
35
36
37
38
39
40
41
42
43
44
45
46
47
48
seat
toilet bowl
emptying door, assembled
front jacket
separating flap
separating flap shaft
separating flap spring
separating flap bracket
handle connector
handle
adjustable support, upper part
adjustable support, lower part
drum cover
inner part of drum cover
drum
hold wire
draw wire
holding spring
draw spring, assembled
drain pipe
drain trap
emptying receptacle + lid
service rake
set of drum wheels, right
set of drum wheels, left
drum bearing
drum bearing cup
upper body
upper drum cover support
lower body
pedal
pedal cover
pedal padding
pedal cap
side support of drum cover, 2 pcs.
rear jacket
bearing nut 36 mm
sheet metal nut M4, 7 pcs.
conical washer 15x7 A2, 7 pcs.
crosshead screw M4x20 A2, 7 pcs.
adjusting shoe, 2 pcs.
adjustable shoe M8x34x20, 2 pcs.
replacement air valve
lead-through rubber 75 mm
ventilation pipe 750 mm, 3 pcs.
connector sleeve of ventilation pipe
pipe bracket, white
flexible ventilation pipe, white
18700904
18719001
17719901
17719010
18719002
21719001
20719001
21719002
21719903
21719003
20080024
20080025
17719020
17719030
17719940
20719910
20719920
20719002
20719930
28719010
28719920
16719920
21574020
21719920
21719910
29719010
29719020
21719020
21719005
21719010
21719030
19719010
19719020
19557103
21719006
17719050
20020017
20020018
20050005
20040031
20557102
20080026
18780260
18001010
28704035
28575030
18704055
19704025
PE
PP
PMMA + ABS
PMMA + ABS
PMMA + ABS
RST
RST
ST Zn
RST
RST
PP
PP
PE + PU
PE
PE + PU
ST + PP
ST + PP
RST
RST + PE + EVA
PE
PP + PE + RST
PE + ST + PP
RST
ST Zn + PP
ST Zn + PP
RST
ST Zn
ST Zn
ST Zn
ST Zn
ST
EPDM
EPDM
PP
ST Zn
PMMA + ABS
ST
ST Zn
RST
RST
PP + RST
PP + RST
PP
EPDM
PP
PP
PP
PP + ST
In addition to the components illustrated in the components picture,
the package includes:
drum gasket 640 mm
drum gasket 190 mm
drum gasket 95 mm
chipboard screw 5x20 A2
fender washer A2 M6
drum brush 270 mm
drum brush 170 mm
quick reference instruction plate
user manual Finnish/Swedish
user manual in 10 languages (export products only)
first charge
19719030
19709035
19709040
20703120
20060003
20080027
20080028
27576004
27719010
27719020
EPDM
EPDM
EPDM
RST
RST
AL + PP
AL + PP
PAPER
PAPER
PAPER
70562400
PACKAGE: PE
Spare parts sales: dealers and the Biolan online shop at www.biolan.fi
2
Plastic pipe
Air outlet valve
Optional locations
of the iris-shutter
Installation example. The picture is indicative only
Parts drawing
3
1
46
17 16
45
6
47
9
7
8
10
14 13
5
28 29
48
11
19
15
12
18
4
2
20
40
44
27 26
21
35
36
34
30 31
37
23
33
32
24 25
22
39
38
43
42
41
EN
How wide must the doorway be to enable the Naturum to be taken in?
67 cm
65 cm
55 cm
Fig. 1
3
EN
1. Planning and installation
Install the Biolan Naturum at a level position on the floor. Do not
attach the toilet unit to the floor. Finely adjust the position using the
adjustable shoes under the unit's front edge.
The toilet unit is equipped with connectors for drainage and ventilation. When designing, observe explicitly whether the liquid needs to
be gathered into a collecting tank or a treatment facility, the ventilation of the sewer, and the thermal insulation of the ventilation and
drain systems in cold spaces.
The method for post-treating the solid waste should also be carefully planned, to enable easier servicing of the unit.
1.1 Space requirement of the toilet
When planning the location for the Naturum toilet, make sure to
reserve sufficient space for its operation and maintenance as well
as for routing of the ventilation pipe and drained liquids The recommended minimum floor area required for installation of the unit
perpendicular to the wall is 80 cm x 140 cm, but if set at an angle
in a corner, 130 cm x 130 cm.
Fig. 2
1.1.1 Taking through the doorway
It is possible to take the Naturum through a doorway at least 67cm wide without dismantling, provided that it is first turned onto its
side. With its front jacket removed, the unit can be taken through
a 65-cm wide doorway or, if disassembled into two parts, even
through a 55-cm wide doorway (Fig.1).
1.1.2Removal of the front jacket
• Undo the 7 attachment screws of the jacket.
• Remove the lever from the separating flap by pulling the lever
straight off the unit.
• Depress the pedal, and pull off the jacket. Reassemble in the
reverse order.
1.1.3 Disassembling into two parts
•
•
•
•
•
•
•
•
Remove the front jacket, as described above.
Loosen the screws of the drum's side supports.
Remove the screws of the upper drum cover support.
Disconnect the liquid removal pipe from the drain trap.
Undo the lower bolts of the drum cover (Fig. 2).
Detach the hold and draw springs (Figs. 3 and 4).
Pull the wires out from their groove.
Starting from the lower part, twist off the drum cover from its
place (Fig. 5).
• Lift the drum off the bearing.
• Reassemble in the reverse order.
• Finally, tighten the drum bearing under the rear air vent at the
rear of the unit (Fig. 6). The rear air vent can be removed by
turning (Fig. 7).
Fig. 3: hold spring
1.2Planning and installing the ventilation
system for the toilet
1.2.1Joining up the ventilation pipe
Join up the ventilation pipe in accordance with the parts drawing
(see page EN-5). Cut the pipe to be connected to the unit by sawing
it to the correct length so that the ventilation pipe succeeding the
flexible pipe goes upright along the wall. 1.2.2Natural ventilation
Route the ventilation pipe from the Naturum as a separate line
straight above the roof. You can also connect the ventilation pipe
to the sewer ventilation or to an unused chimney flue. So as not
to disturb the circulation of air, do not install the Naturum close
to a fireplace in active use. We recommend always using the Exhaust Ventilator (see Accessories on page EN-10) in connection
with indoor installations. This ensures that the air always flows in
the correct direction irrespective of the prevailing weather conditions. Locate the Exhaust Ventilator instead of the lower connector
sleeve (part 46).
4
Fig. 4: draw spring
1.2.3Mechanical extract ventilation
If the property is equipped with mechanical extract ventilation system, connect the Naturum to the air-exchange channel (see p. 4).
Restrict the airflow to 1-2 litres per second to prevent the Naturum
from becoming too dry. This can be achieved using, for example, an
iris-shutter (works like the aperture control of a camera). Do not use
a separate fan.
When connecting the Naturum to a mechanical extract ventilation
system, do not provide it with a separate exhaust air duct, because
the mechanical extract ventilation overrides the Naturum’s own
system.
1.2.4 Mechanical supply and extract ventilation (heat
recovery system)
Fig. 5
Because the air exchange is almost in balance, the most recommendable solution is to connect the Naturum to a ventilation channel of its own (refer to the point Natural ventilation). Boost the ventilation by means of the Exhaust Ventilator (see Accessories on page
EN-10). Make sure that there is sufficient replacement air supplied
to the toilet space either by the replacement air vent or from under
the door from the living space.
As the outlet air from the Naturum is not clean (compared, e.g, with
the kitchen), we do not recommend connecting the unit to a mechanical supply and extract ventilation system. For whatever reason, should you wish to connect the Naturum to the extract channel, restrict the airflow to 1-2 l.p.s., for example, by means of an
iris-shutter (see page EN-2).
1.2.5 In general
We recommend that plastic ventilation channels be used for dry
toilets.
The pipe should be of plastic at least all the way to the iris-shutter
or the air outlet valve.This way, the metal pipe is protected against
the corrosive compounds (acids or alkali) that evaporate from the
Naturum in small amounts. When the iris-shutter is used, the moist
air rising from the Naturum is condensed at the shutter. To drain
any condensed water, install the air pipe so that it slopes from the
shutter towards the toilet unit.
Fig. 6
In new buildings, the planning of the dry toilet system
constitutes a part of the general HVAC planning, and
building permission shall be gained by submitting a relevant plan to the local building supervision authority in
the municipality where the property is situated.
For older properties the permission procedure depends
on the extent of the renovation work required and normal practice in the municipality where the property is
situated. Consult the local building supervision authority for details.
When locating the toilet in an existing room space, advance planning is even more vital. It is recommended
that the plan be drawn up by a professional so as to
ensure the overall functionality of the system.
EN
Fig. 7
5
EN
1.3 Planning and installing the drainage
system for the toilet
Drain the liquid in a closed tank for later use, treat it together with
other wastewater from the property, or take it to the wastewater
treatment plant. When dimensioning the liquid tank and deciding where to locate it, you need to take into account that the daily
amount of liquid from the separating toilet is 1-1,5 litres per user. In
addition to plain urine, take also into account in dimensioning the
amount of washing water used.
The drain hose is connected to the rear of the unit at 8.5 cm from
the floor. The drain hose is flexible, so you can move it sideways.
The liquid must flow without obstruction all the way to the drain. Depending on the installation location, accomplish the lead-through
either as a sewer, or as a pipe leading through the wall or the floor.
The diameter of the toilet unit’s drain hose is 32 mm. Route the liquid forward from the unit through a pipe joined up from sewer pipe
parts of at least 50 cm in diameter. Buy parts for the connections
at the plumbing supply store.
You can use the facility reserved for the sewer pipe of
a WC for draining liquids from the Naturum. The sewer
may be located as recommended/required for a WC.
Connect an angular fitting of 90 degrees to Naturum'
s 32-mm drain hose, connect this to a 32-50 reducer,
and further to a 50-110 reducer.
Typical slurry tanks and closed tanks are the most suitable for
urine. These are available in various sizes and their most common
material is rotationally moulded polyethylene or glass-fibre (polyester) laminate. A 30-litre canister located under the floor is in most
cases sufficient for summerhouses, as this is sufficiently light to
carry into the forest or to spread its contents on the plants.
In year-round use, 3 cubic metres, i.e. 3000 litres should be considered as the minimum volume for a family of four. Then the tank that
is used with Naturum must be emptied on average once a year. The
tank should be fitted with a Ø200 mm pipe, which is extended by
50-70 cm above the ground surface. The pipe shall be closed with
a threaded cover equipped with a rubber gasket.
It is recommended to branch a ventilation pipe from the pipe routed
into the tank to a place, where the possible smell of urine causes
the least nuisance.
Liquids rich in nutrients must not be allowed to enter
the soil as they cause an excessively concentrated nutrient load.
2. Use and maintenance of the
Naturum
Use and maintain the Naturum in accordance with the instructions.
This makes the use and maintenance of the toilet more pleasant.
When using the unit for the first few times, verify that your own seating distance and habits are suitable for it. Also instruct your guests
on how the toilet should be used.
The Naturum is intended for composting all types of toilet waste,
including toilet paper.
But do not put into the toilet anything that could hamper post-treatment of the toilet waste, such as:
• debris, sanitary towels
• chemicals, lime
• detergents, washing water
• ash, cigarette butts, matches
6
2.1Before use
Remove the protective plastic from around the product. Note that
the separating flap (part 5) is also covered with plastic.
Before starting to use, empty a part of the first charge bag into the
toilet. A suitable amount of first charge is about 20 litres. Dose the
moist first charge mass through the seat opening into the drum
while simultaneously rotating the drum using the pedal. Moisten
the mass in advance in a separate vessel. The humidity of the mass
is suitable if a few drops of water can be squeezed from it when
clenched in the hand.
Use the rest of the first charge bag as bedding; 1 litre/user/week.
The first charge is a blend of peat and compost soil. The product
matching the first charge is Biolan Peat Soil. (see Accessories on
page EN-10) As required, you can use Biolan Peat Soil as the first
charge.
2.2 Using the toilet
You can use the Naturum in either a standing or a sitting position.
• with the separating flap in the closed position, you can urinate
into the Naturum either standing or sitting, or wash the toilet
bowl using the hand shower. This way the liquid is drained to the
sewer and does not end up in the composting drum
• open the flap and drop the paper into the composting drum even
after urination.
• before sitting for defecation, open the separating flap that closes
the drum by turning the operating lever (part 10).
• after use, depress the pedal a few times to transfer the deposit
and the paper out of sight and flush the liquid bowl with a small
amount of water.
2.3 If the toilet is not used year-round
Installed in a cold space, the toilet can freeze during winter. The
toilet unit is manufactured of frost-proof polyethylene, so freezing
does not damage it. During a period of persistent frost, the compost
mass in the Naturum can freeze and can no longer be turned in the
composting drum. In this case, use of the unit should be temporarily suspended.
As the temperature rises, the mass soon melts and use of the Naturum can be resumed as soon as the mass again collapses on top
of the waste when the drum is rotated. If the liquid is collected in a
tank susceptible to frost, empty the tank in the autumn in order to
avoid damage caused by freezing of the liquid.
2.4 Using the bulking material
Applying suitable bulking material regularly is essential for proper
operation of the toilet. As bulking material we recommend using
Biolan Ground Peat, which is non-fertilised and non-limed peat, or
the granulated Naturum Bulking Material. Do not use Biolan Compost and Toilet Bulking Material (or equivalent) in the Naturum, as
it contains coarse bark.
Add bulking material once a week. The amount of Biolan Ground
Peat to be used is one litre per user per week, and the amount of
Naturum Bulking Material is half a litre per week per user. Dose the
bulking material through the seat opening by simultaneously rotating the drum via the pedal.
Moisten the peat before putting it into the drum. The humidity of the
peat is suitable if, when clenched in the hand, a few drops of water
are squeezed from it. Dry peat repels liquid and does not absorb it.
The Naturum Bulking Material should be added as dry, but if the
compost mass also is dry, it can be moistened.
2.5 Using the service rake
Remove any mass stuck to the edges of the drum through the emptying door, using the service rake. Rotate the drum simultaneously.
During regular use, do this once a week and always after breaks in
operation. If the mass has dried out, add some moist bulking material to it while you rotate the drum.
2.6 Emptying the inner receptacle
Empty the emptying receptacle as soon as it fills up. The emptying
intervals of the receptacle depend on how frequently the toilet is
being used.
• open the door in the seat
• cover the emptying receptacle with its lid and pull it out
• empty the receptacle for post-composting
• return the receptacle to its place
It is not necessary to wash the emptying receptacle on the inside
every time the receptacle is emptied.
During use, the emptying receptacle stands open without the cover
inside the toilet unit. Keep the lid someplace other than next to the
receptacle as it may end up under the receptacle, and shift the
receptacle into the wrong position. Refer to page EN-11 for instructions about composting the solid waste from the toilet.
2.7 Emptying the liquid tank
Empty the liquid tank, if necessary. You can have a large tank emptied by means of a gully emptier, a suction tank mounted on a tractor trailer, or by pumping. The emptying intervals are determined by
the size of the liquid tank and by how often the toilet is being used.
One person produces 1-1.5 litres of urine daily. More about the utilisation of urine on page EN-11.
For emptying by pumping, thread a small submersible pump in
through the emptying pipe, and apply the urine-water mixture directly onto the spreading area. The output of the pump should preferably exceed 500 W so that it could power a sprinkler, for example,
and so that the emptying does not take too long. It pays to empty
the tank when it is raining (however, not in torrential rain). Then you
will get the dilute water "free".
3. What happens in the Naturum,
and how does it work?
Composting of solid waste
A Solid waste drops into the drum through the seat opening.
B The drum is rotated using the pedal in order to cover the fresh
waste with the compost mass and to avoid creating any odour.
C The compost is mixed by rotating the drum.
D The mass gradually drops through the opening in the division
wall into the emptying receptacle.
E The composting process continues in the emptying receptacle
(part 22).
Liquids
F Urine and washing water are separated as "clean" and drained
out of the unit.
Ventilation
G The ventilation pipe is routed to the roof.
Operation of the drum
The pedal (part 18) is fixed to the draw wire (part 17), which turns
the drum around: counter-clockwise viewed from the front. As the
pedal is released, the wire returns to its initial position. The hold
wire (part 16) keeps the drum in position, preventing it from turning
back. The other ends of the wires are fixed to the draw and hold
springs (parts 19, 18).
G
2.8 Cleaning the Naturum
Wash and clean the toilet, as necessary. You can use any commonly
available domestic cleaning agent. Avoid using scrubbing agents
and tools. You can dismantle the toilet bowl and the separating flap
to enable proper cleaning of the unit.
Wash the liquid bowl and the drain pipe with warm water and mild
detergent, and in addition at least once a year, with crystallised sodium to remove any precipitate that has been formed by the urine.
If necessary, clean also the drain trap with water/crystallised sodium dilution. You can purchase crystallised sodium, for example,
in building material stores.
C
E
2.9 Replacing the draw wire
B
To change the draw wire, open the front jacket (see point 11.2). One
end of the draw wire is attached to the pedal, and the other end as
shown in Fig. 4. The draw wire goes in the rear groove. Clean the
wire and the groove from greasy dirt with acetone.
B
F
2.10 Tightening the draw wire
The other end of the wire is adjustable (Fig. 9), and can be tightened as necessary.
A
Fig. 8
Fig. 9 Adjusting the wire Adjustment under heat shrink tubing (upper picture) Heat shrink tubing removed (lower picture)
7
4. Problems that may occur
4.1.Odour
If odour problems occur:
• check that there is no liquid on the bottom of the drum. If there
is some liquid, ensure that all users of the toilet have understood
the operation and purpose of the flap. Add bulking material to
absorb the excess liquid.
• check that the ventilation of the toilet is operational. Natural ventilation: make sure that the ventilation pipe routed from the toilet
unit to the roof, is straight and extends above the roof ridge. If
the ventilation pipe is not straight or does not extend above the
roof ridge, you can repair the installation or improve the ventilation by installing a separate Exhaust Ventilator (see Accessories
on page 6). If the property is equipped with mechanical extract
ventilation, the Naturum is connected to this system (see point
1.2.3).
• any devices that affect the pressure of the inside air, such as a
fireplace or a roof or stove extract fan, may impair the natural
ventilation by causing vacuum inside the Naturum. To avoid this,
ensure a sufficient supply of replacement air so that the replacement air is never routed via the Naturum.
4.2. Condensed water
If water leaks from the ventilation pipe to the toilet:
• check that the ventilation pipe of the toilet is properly insulated
in the cold space. If the pipe is not insulated, insulate it later,
if necessary. Add dry bulking material into the unit, and mix it
using the service rake. Simultaneously, depress the pedal (part
31).
4.3. Mass is moist
Moist mass hinders the motion of the drum, and the mass may
slide.
• check that the ventilation pipe of the toilet is properly insulated
in the cold space. If the pipe is not insulated, insulate it.
• ensure that there is nothing under the separating flap that might
prevent it from closing properly. Remove and wash the valve as
required.
• ensure that all users of the toilet have understood the operation
and purpose of the flap. Add dry bulking material into the unit,
and mix it using the service rake. Simultaneously, depress the
pedal (part 31).
4.4. The mass slides, i.e. does not move with
the drum
If the mass slides inside the drum, it is too wet.
• see point 4.3
4.5. The mass forms a heap inside the drum
Have you added too much bulking material at one time?
It is normal that, when bulking material is added, the mass heaps
up for a while inside the drum. As required, push the mass down
using the service rake (part 23), and depress the pedal (part 31).
4.6. The mass clods
If the mass clods or is difficult to turn around, it is too dry.
• rake the entire compost drum using the service rake (part 23),
and add some moist bulking material.
4.7. The mass does not rise into the emptying
drum
If the mass does not rise into the emptying drum, it is too dry.
• Moisten the mass either by adding water through the seat opening or add some moist bulking material. As necessary, mix the
moist mass with the rest of the mass using the service rake, and
simultaneously depressing the pedal.
8
4.8 The pedal feels stiff
If the pedal appears stiffer than normally:
• check whether the emptying receptacle is full; if it is, then it
must be emptied
• check that the mass is suitably moist (see point 4.3)
4.9 The pedal feels loose
If the pedal starts to feel loose, and the drum does not rotate:
• open the front jacket. Check whether the draw wire has come
loose from the pedal or is cut off. Reconnect or replace, as necessary.
• Check whether the draw spring on the wire has come loose or is
cut off. Reconnect or replace, as necessary.
• the draw wire is the one in the rear groove, which, viewed from
the front, is attached to the spring on the left-hand side (Fig. 4).
If the wires and the springs are in order, but the pedal does not rise,
or it rises too slowly, the wire has unwound.
• turn the draw wire once around the rear way, clockwise viewed
from the side, and after that reconnect it to the pedal.
4.10 The wires slide
If the wire slides in its groove, and the drum does not rotate properly.
• Clean the groove from dirt and grease. You can use acetone for
this. Be careful not to spill it on the glass-fibre parts.
• If cleaning does not help, remove the heat shrink from the end of
the wire, and tighten the wire (see Fig. 8). The other end of both
wires is adjustable.
4.11 Some liquid leaks on the floor
Any liquid ending up in the drum may leak onto the floor from under
the jacket at the front edge of the unit:
• check that the drain trap is not blocked. As necessary, clean it
with crystallised sodium and warm water.
• check that all users of the unit have understood the significance
of the separating flap. Add bulking material to absorb the excess
liquid.
4.12Insects
If the toilet unit is infested with, for example, flies:
• empty the emptying receptacle into a compost and then wash it.
• do away with any flying insects in the toilet space using pyrethrinbased spray. Repeat the treatment daily until flying insects no
longer can be spotted. Repeat the cure immediately, if insects
reappear in the space
• aside from the spray, also use an insecticide that shall be mixed
with water Make a mixture of half a litre of the insecticide, and
mix it with the mass. The liquid pesticide can also be mixed with
the peat bedding. The treatment shall be repeated once a week
until the insects no longer appear.
• consult your local garden centre to select a suitable pyrethrinbased product.
• start using granulated Naturum Bulking Material instead of Biolan Peat,
• check that when natural ventilation is applied, the ventilation
pipe is routed from the toilet unit straight to the roof, and that it
extends above the roof ridge. If the ventilation pipe is not straight
or does not extend above the roof ridge, you can repair the installation or improve the ventilation by installing a separate Exhaust
Ventilator (see Accessories on page EN-10).
Soil dwelling mites are the decomposers in the compost, They very
rarely want to leave the compost. If they run out of nutrition, they
may leave the compost, and appear as fine light dust on the floor.
Control with a pyrethrin-based spray insecticide and vacuum out.
The control must be performed several times in series within 2-3
weeks, at intervals of a few days.
5. Post-composting the toilet waste
6. Utilisation of liquid
The compost emptied from the Biolan Naturum is partially mature.
Post-composting is always recommended for the compost. If the
compost is to be used for vegetable plots or for edible plants, postcompost it for about a year in order to exterminate the microbes in
the compost mass.
You can compost the toilet waste together with garden waste and
domestic bio-waste. While composting, make sure to observe the
local regulations on waste handling and consider sufficient protective distances to neighbours, wells and nearby bodies of water.
Organise the composting so that no liquids seep from the compost
into the soil. The Biolan Garden Composter or the Biolan Biolan
Stone Composter (see Accessories on page EN-10) are suited to
the purpose.
The micro-organisms in the compost decompose organic matter under aerobic conditions. After the composting has continued for 1-3
years, the result will be compost soil. To ensure that the composting
is as efficient as possible, provide the waste-decomposing micro-organisms with favourable living conditions. The basic requirements
for compost are the presence of oxygen, moisture and nutrients.
The micro-organisms in the compost live in a humid environment,
so the compost must be suitably moist. Therefore, dampen the
compost with water or separated urine, which also provides the
compost with a good source of nitrogen supplement. To ensure
that the compost is sufficiently airy, use coarse bulking material or
branch chaff in layers among the waste. Compost that is too tightly
packed or too wet is anaerobic and starts to rot and smell.
After the addition of toilet waste or liquid, carefully cover the surface of the compost with bulking material, garden waste or peat.
When composting, follow the instructions for the composter that
you are using. Toilet waste, composted with care, makes excellent
soil conditioner for perennial plants, shrubs, trees and a vegetable
plot.
You can use the separated liquid as nitrogen fertiliser as such or
diluted with water, for example, for lawns, ornamental bushes and
perennial plants. In the spring, in connection with the initial fertilisation, it can also be used for a vegetable plot. During the growing
season urine should not be applied directly to edible plants. The
recommended storage time for urine is about 2-3 months before
it should be used in the garden. Do not apply urine to plants in the
autumn, in order to avoid disturbing the perennials' preparation
for winter.
A safe dilution ratio is 1:5, which means one litre is diluted with five
litres of water.
You can use also undiluted urine, but the area must then be carefully watered after the application to avoid early blight. Carry out
the application when it is cloudy, either early in the morning or late
in the evening, when the evaporation of nitrogen and odour-related
problems are at a minimum. During the growing season, you can
apply 1-1,5 l/m² undiluted urine in a kitchen garden.
Please consult your local waste advisor or the secretary for environmental affairs in your municipality for
regulations on composting.
Visit www.biolan.fi for more information on composting
and the utilisation of urine.
Disposal of the product
The raw materials used are presented in the list (see page 4). Dispose of each part as prescribed. Always follow the regional and
collecting-point-specific instructions.
To energy-from-waste process or recycling of
plastic:
EPDM = ethylene propylene
PE = polyethylene
PP = polypropylene
To energy-from-waste process:
PU = polyurethane
To collection of metal:
RST = stainless steel
ST Zn = hot-galvanised steel
To recycling of paper
Paper
9
Biolan accessories
Biolan Biowaste Bag 40
A biodegradable bag to be placed in the inner receptacle of the
toilet, which can be composted. Capacity about 40 litres Roll of 30
bags.
Product number: 707722001
Biolan Peat
Biolan Peat is clean, white non-fertilised or
limed sphagnum peat. It is naturally sour. Biolan Peat is suitable for, for example, storing
root crop, use as soil conditioner, and use in an
evaporating pan for seep liquid or as bedding.
Package size: a bag of 70 litres
Product number: 55544200
Biolan PeatSoil
Biolan PeatSoil is a naturally fertilised mixture
of compost soil and peat. It can can be used as
first charge in the Biolan Naturum.
Package size: 50 litres
Product number: 55543500
Biolan Garden Composter
The Biolan Garden Composter is intended
for the composting of domestic, garden
and toilet waste in a detached house or
a holiday home. Its large, hinged cover
makes the filling of the composter easier.
The hermetic structure and adjustable air
exchange prevent the compost mass from drying, and reduce the
need for maintenance.
Product number: green 70572000, grey 70576700
Biolan Stone Composter
The Biolan Stone Composter is intended
for the composting of domestic and garden waste in a detached house or holiday
home. Thanks to its large size, it is wellsuited to the composting of garden waste
and toilet waste from a summer cottage.
Biolan Stone Composter having the colour
of natural stone merges well with its surroundings, and is well-suited even to small
yards.
Product number: red granite 70573100, grey granite 70573200
Composter Biolan 220eco and 550
Biolan Compostmixer
The Biolan Compostmixer is made of glass fibre-reinforced propene,
so it neither corrodes nor oxidises even over time. The Biolan Compostmixer offers effortless mixing of the compost.
Product number: 70575200
Biolan Composters are suitable for yearround composting of domestic, garden and
toilet waste. The thermal insulation ensures
that the Composter continues operating efficiently even during the cold of winter.
Composter Biolan 220eco: product number:
green 70579000, grey 70579200
Composter Biolan 550: product number:
green 70573400, grey 70576600
Visit www.biolan.fi for the most recent product information
EN
About the guarantee
The Biolan Naturum is guaranteed for three years.
1. The guarantee is valid from the date of purchase and covers possible defects in material and workmanship. The guarantee does
not cover any indirect damage.
2. Biolan Oy retains the right to decide about repairing or replacing
damaged parts at its discretion.
3. Any damage resulting from careless or forcible handling of the
device – from failure to observe the operating instructions, or
from normal wear – will not be covered by this guarantee.
For matters related to the guarantee, please consult Biolan Oy directly.
Biolan Oy
P.O. Box 2, FI-27501 KAUTTUA
Tel. + 358 2 5491 600
Fax + 358 2 5491 660
www.biolan.fi
10