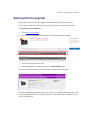
1
Avid® Application Manager 2.4.3 User’s Guide Legal Notices Legal Notices Product specifications are subject to change without notice and do not represent a commitment on the part of Avid Technology, Inc. This product is subject to the terms and conditions of a software license agreement provided with the software. The product may only be used in accordance with the license agreement. This product may be protected by one or more U.S. and non-U.S patents. Details are available at www.avid.com/patents. © 2015 Avid Technology, Inc. and its licensors. All Rights Reserved. Attn. Government User(s). Restricted Rights Legend U.S. GOVERNMENT RESTRICTED RIGHTS. This Software and its documentation are “commercial computer software” or “commercial computer software documentation.” In the event that such Software or documentation is acquired by or on behalf of a unit or agency of the U.S. Government, all rights with respect to this Software and documentation are subject to the terms of the License Agreement, pursuant to FAR §12.212(a) and/or DFARS §227.7202-1(a), as applicable. Trademarks Avid, the Avid logo, and Digidesign are trademarks or registered trademarks of Avid Technology, Inc. in the United States and/or other countries. See www.avid.com/US/aboutavid/legal-notices/trademarks for more information on Avid's trademarks. Adobe and Photoshop are either registered trademarks or trademarks of Adobe Systems Incorporated in the United States and/or other countries. Apple and Macintosh are trademarks of Apple Computer, Inc., registered in the U.S. and other countries. Windows is either a registered trademark or trademark of Microsoft Corporation in the United States and/or other countries. All other trademarks contained herein are the property of their respective owners. Avid Application Manager Guide • 9329-65610-00 REV B • 9/15 Contents Contents ....................................................................................................... 3 Using this Guide .......................................................................................... 5 Symbols and Conventions .......................................................................................... 5 If You Need Help ......................................................................................................... 6 Avid Training Services ................................................................................................ 6 1 General Information .......................................................................... 7 2 Getting Application Manager ........................................................... 7 Installing a Standalone Version of Application Manager ............................................ 7 Installing Application Manager Along with Avid Editing Application............................ 8 3 Working with Application Manager ................................................. 9 Settings .....................................................................................................................10 Application Manager Interface ..................................................................................16 The Account Tab ..................................................................................................17 The Apps Tab.......................................................................................................21 The Licensing Tab................................................................................................24 The Support Tab ..................................................................................................25 4 Product Activation .......................................................................... 26 What You Need to Activate Media Composer or Sibelius ........................................26 What You Need to Activate Pro Tools ......................................................................27 Online Activation with an Internet Connection ..........................................................28 Auto-Activation with an Internet Connection ........................................................29 Activation with a Floating License .............................................................................31 Multi-Seat Activation ............................................................................................35 Offline Activation Without an Internet Connection ....................................................40 Activation with a Hardware Key ................................................................................43 Activation with a Dongle .......................................................................................43 Activation with an iLok .........................................................................................47 Redemption to Dongle ..............................................................................................48 5 Upgrading an Avid Editing Application ......................................... 50 Upgrade Workflow .....................................................................................................51 Upgrading with an Internet Connection from an Existing Software License .............52 Upgrading with an Internet Connection from a Dongle License and Converting to a Software License .......................................................................................................53 Upgrading Without an Internet Connection to a Software License ...........................54 6 Dealing with Subscription Models ................................................. 55 Support Plan..............................................................................................................60 Grace Period .............................................................................................................63 Renewing the Subscription .......................................................................................63 Subscription Crossgrade ...........................................................................................65 7 Additional Options and Plug-Ins .................................................... 66 Purchasing Pro Tools Plug-Ins..................................................................................66 In-App Purchase ..................................................................................................66 Out-App Purchase................................................................................................67 8 Deactivating the Avid Editing Application and Plug-Ins .............. 68 9 Uninstallation Specifics .................................................................. 69 How to Uninstall the Products ...................................................................................69 How to Uninstall the Pro Tools Plug-Ins ...................................................................70 Using this User’s Guide Using this Guide Thank you for purchasing an Avid Editing System which includes Application Manager. This guide provides information on how to activate (or deactivate) your software and how to install any third-party software. You can always find the most current information in the online version of the Read Me, and should check there for the most recent release notes. The online version is updated immediately after new information becomes available. The Read Me can be found on your Account Page. Symbols and Conventions In this guide the following symbols and conventions are used: Symbol or Convention Meaning or Action A note provides important related information, reminders, recommendations, and strong suggestions. A caution means that a specific action you take causes you to lose data. Italic font Italic font is used to emphasize certain words. Courier bold font Courier bold font identifies text that you type. > This symbol indicates menu commands (and subcommands) in the order you select them. For example, File > Import means open the File menu and then select the Import command. <placeholder, variable> Angle brackets indicate placeholders or variables. UPPER CASE Indicates names of processes, process classes, data model attributes, legal lists, legal list values, states of tasks, and templates Using this User’s Guide If You Need Help If you are having trouble using your Avid product: 1. Check online for the most up-to-date documentation. Visit the Knowledge Base at http://www.avid.com/knowledgebase. 2. Check the documentation that came with your Avid software application or your hardware for maintenance or hardware-related issues. 3. Visit the online Knowledge Base at http://www.avid.com/support. Online services are available 24 hours a day, 7 days a week. Search this online Knowledge Base to find answers, view error messages, to access troubleshooting tips, download updates, and read or join online message-board discussions. Avid Training Services Avid makes lifelong learning, career advancement, and personal development easy and convenient. For information on courses/schedules, training centers, certifications, courseware, and books, please visit http://www.avid.com/support and follow the Training links, or call Avid Sales at 800-949-AVID (800-949-2843). General Information 1 General Information Application Manager is an instrument that facilitates all the operations that relate to application download and activation, subscription prolongation, and other product licensing activities. With Application Manager, you can manage your downloads, installs, updates, product activation procedures, support plan, subscription model, receive Avid news and advertisements, and try new offerings without having to go to Avid’s Web store. The Avid Subscription offering provides users the ability to rent Avid software and tools on a monthly or annual basis, as well as purchase support, receive software and maintenance updates. Application Manager involves the new Licensing and Pricing model including Subscription to Rent, to Own, Floating licenses, and Educational Pricing. 2 Getting Application Manager There are two ways to get your copy of Application Manager: Installing a standalone version of Application Manager Installing Application Manager as part of the installation process of an Avid Editing Application. Installing a Standalone Version of Application Manager You can install Application Manager without necessity of installing an Avid Editing Application (Media Composer, Pro Tools, or Sibelius). To install Application Manager, do the following: 1. Go to the Knowledge Base of the Avid.com site and search for Application Manager. 2. Scroll down to the Installers section. There are two installation files for Application Manager – for Mac OS X and Windows. Getting Application Manager 3. To install Application Manager on Windows, click to download the ApplicationManagerSetup_2.4.1_Win.zip file. 4. Unzip the installation package. 5. Run the AvidApplicationManagerSetup.exe file. 6. Follow the instructions of the installation Wizard to finish installation of Application Manager. After installation Application Manager will run automatically. Installing Application Manager Along with Avid Editing Application You can get your copy of Application Manager when installing an Avid Editing Application. For example, when you install Media Composer, Pro Tools, or Sibelius, you are prompted to install Application Manager along with it. If you have a lower version of Application Manager installed, it will be overwritten with the current one during installation of the Avid editing Application. If you already have Application Manager and want to update it, you are highly recommended not to interrupt the process of installation. Otherwise, your Application Manager will be corrupted and you will need either to reinstall the Avid Editing Application that Application Manager came along with, or get Application Manager from the Avid Download Center. The Application Manager installation process adds a Desktop icon (Windows) or Dock icon (Mac OS X), and a pointer to your Avid editing application in the Start menu (Windows). The Application Manager tray icon is always available. So even if you close Application Manager with the X Close button, it is minimized to the tray, and can be open again by clicking the tray icon. Working with Application Manager 3 Working with Application Manager Application Manager functioning can be configured according to your needs – to adjust its functions, click the Settings button window. in the upper right corner of the Application Manager Working with Application Manager Settings The Settings drop-down menu can be found in the upper right corner of Application Manager and appears as follows: Click the Settings button to open a drop-down list to choose the following: Go to My Avid.com – click to go to the MyAvid.com login page. If you save your login credentials within the browser, you will be auto logged in. Go to Knowledge Base – click to go to the Avid Knowledge base to search for solutions. Sync Account – click to manually check for updates of applications like new purchases, and feeds. If any updates available, you will get notifications about them. You must be logged in to see your products. If you are not logged in, you are redirected to the Account tab and prompted to enter your email and password to log in. Working with Application Manager Notifications – click this option to manage your notifications on product updates and advertisements. Show Apps – select this option to get notifications about product updates. Show Feeds – select this option to get notifications about Avid news and advertisement. If any of these options are selected, the desktop application is activated to show the corresponding notifications – popping up notifications appearing from the tray icon . Clicking the notification opens the corresponding tab of Application Manager, where you can then make further decisions. If both options are deselected, the application runs only as a service without showing notifications. The appearance of the notification depends on which Application Manager tab it refers to. If it refers to the Apps tab, it contains a message “There are N updates available”. If it refers to the Feeds tab, the message states “There are N new feeds”. If the notification refers to the Licensing tab, the message informs you about expirations and renewals. Working with Application Manager During the Application Manager session, each type of notifications is displayed only once except for the Licensing tab – messages about expiration are displayed according to the current state of applications listed on the tab. Allow Data Collection – select this option to allow Application Manager collecting the system and usage data. Analysis of the collected data will be used for improvement of Avid products and services. If multiple users work with Application Manager on the same machine, each of them can decide if he wants to permit collecting data. The decision of each user on allowing collecting data is registered in the registry locations (for Mac OS X user – in the user home location) specific for each user. Administration – click this option to manage the restricted mode of Application Manager. Allow Admin Functions – administrators of Application Manager use this option for preventing users to work with specific features of Application Manager. If this option is selected, all the features of Application Manager are available. If the administrator assigned you to the “Application Manager Restricted Users” OS users group and this option is unselected, you are to work with Application Manager under the restricted mode. The status of the restricted mode is added to the Application Manager title bar. You can also click this option to check if you are working under the restricted mode. Working with Application Manager Working under the restricted mode, you will experience the following restrictions: On the Apps tab: The Download / Update / Install buttons are unavailable. Working with Application Manager On the Licensing tab, any license details and operations cannot be modified: Cannot select the license activation method. Cannot edit the license and backup server in case of the floating activation method. If the product was activated before switching to the restricted mode, the license details will be hidden under the restricted mode. Working with Application Manager If the product was activated with the floating license, you can still deactivate the floating license while working in the restricted mode. On the Support tab: The Upgrade button is unavailable. To switch to the administrator’s mode, do the following: 1. Click Settings > Administration > Allow Admin Functions. 2. In the dialog box that appears provide Administrator’s login and password to enable the full functional mode. 3. Provided the administrator’s credentials you have provided are correct and you do not belong to the “Application Manager Restricted Users” local/network group, Application Manager switches to the full functional mode. The following changes will come into force: 1. All the features of Application Manager are available. 2. The Allow Admin Functions option is selected. 3. The Restricted label is removed from the Application Manager title bar. To turn the restricted mode on, do one of the following: Right-click the Application Manager system tray (or Dock) icon and choose Quit to quit from Application Manager UI. Unselect the Allow Admin Function option from the Setting menu in Application Manager. To learn about users and groups, refer to the Disk Management help topic available from the Computer Manager window (or System Preferences>Users & Groups on Mac OS X) by clicking the Help button. The two last options from the Settings menu of Application Manager are: Log Out – click to finish your user session. When you are logged out, you cannot download updates for your products except for those that can be updated without a subscription purchased (such as Application Manager), and for the products activated via Application Manager. Close – click to minimize Application Manager to the System (or Dock) tray. To open it, click the tray icon . Working with Application Manager Application Manager Interface The Application Manager interface has four tabs: Account Apps Licensing Support At the bottom of each tab there is a synchronization bar. Indicators of the bar refers only to Pro Tools First. The bar is empty as long as no synchronization between the Pro Tools First and Pro Tools Cloud is in progress. As soon as there is a new project to be synchronized, the synchronization begins. The synchronization bar displays the Synchronizing label and the Stop button for controlling the process. Click Stop to cancel the synchronization. The following sections describe the principles of working with each of the Application Manager tabs. Working with Application Manager The Account Tab On the Account tab of Application Manager, you log in to your Avid account. When you are logged in, Application Manager receives product updates, and you can install new products and plug-ins, and update the installed ones. To log in to your Avid account, do the following: 1. On the Account tab, enter email address and password in the corresponding fields. 2. Click Login. If you do not have an Avid account, click Create Account. This changes the view of the Account tab to the following: Working with Application Manager Create an Avid Master account and link it to the Download Center or Avid Video Community accounts. If you are not logged in, the following should be taken into account: The Apps tab of Application Manager displays only installed products and plug-ins. Clicking the Update button for any of the products (Application Manager, Pro Tools, Media Composer, or Sibelius) redirects you to the Account tab prompting you to log in with your email and password. The Subscriptions section As soon as you log in, the Account tab interface is changed: your name is displayed next to the Settings button and the Account tab is divided into two sections: Subscription section Feeds section The Subscription section displays the list of all purchased subscriptions. The renewal date uses the DD/MM/YYYY format. Each product icon is accompanied with a notification on the subscription status: - the subscription is far from its expiration - the subscription is about to expire a four-day grace period is in due Working with Application Manager The Feeds section The Feeds section provides information about new products, promotions, training videos, or approved 3rd party products. The feeds are displayed in the chronological order – the most recent feed is displayed at top. Click the hyperlink in the description to visit a Web page with more information. Clicking the Info button below a product name takes you to the Avid web site where you can read more about the product. Use the Category drop-down list to filter what feeds are shown. For example, if you select My Products, you will see only feeds for the products that are currently installed on your computer. Working with Application Manager The splitter that divides the Account tab into two sections is movable. You can drag it up and down to display more of the either of the sections. If the section is completely hidden, the Expand button appears. Click the Expand button to display both sections again. Working with Application Manager The Apps Tab On the Apps tab, you observe and manipulate applications available for your account for purchasing, downloading, and installing. When you are not logged in, the Apps tab looks as follows: Working with Application Manager After you log in, the appearance of the Apps tab changes. Now the tab is divided into two sections: Artist Suite – applications you have installed Plug-ins – additional options and plug-ins that have not been installed but are available for your account or already downloaded and installed. Use the Plug-Ins drop-down list to choose what options and plug-ins you want to be displayed: Show All Media Composer Plug-ins Manage the application versions you are working with from the Apps tab. For example, from this tab, you can buy or download a new application. Working with Application Manager The Apps tab controls varies depending on the current state and may have the following interface elements: What’s New? – click to expand and view a list of improvements and new features in the new version Buttons on right side change depending on the current state of the product: Update – click to download a new version of the application; Renew – click to renew your rental subscription if it has expired. Clicking Renew redirects you to the MyAvid page where you can renew your subscription or purchase a perpetual license for the application. Install – click install a new version of the product; The first time you click Install for Avid Cloud Client Services in Application Manager, no matter if Pro Tools are launched or not, you will always see the following warning: Then, the message will only appear if Pro Tools are launched and until you quit Pro Tools. Current – this label indicates that the application version is up-to-date; Buy – if the application was installed and the trial mode expired, click this button to initiate the purchasing process. Note that this button is available as the trial mode is expired. More Info – click to expand a list of the feature highlights of the application. The Download button is available if the application is ready to be downloaded. If your computer switches to the Sleep mode during the download process, you have to restart the download process when your computer awakes. Install – after the application is downloaded, it is ready for installation. Working with Application Manager The Licensing Tab On the Licensing tab, you can also activate and deactivate your products. This tab displays a list of licensed products and those that you can activate. You can also see the following product details: Activation status (Activated or Not Activated) Form of ownership for the product (trial, subscription, permanent) Renewal date The licensing information on each product is constantly updated so you always know what license is applied to a certain product. Before you purchase an Avid Editing Application or any additional options, you can test each product for a 15-day or 30-day trial period depending on the product. Any bins or projects you create during the 30-day trial will only be usable when you activate a full editing license. If you activate the product in the middle of trial period, the trial is no longer available, even if the license is deactivated and 30 days of trial have not finished yet. To purchase the Avid Editing Application during or after the 30-day trial use the Avid web store. Working with Application Manager After your trial expires, you will no longer be able to use the product or feature. The system will keep you informed of how many days you have left before the trial ends. At any time during or after the 30-day trial period, you can choose to purchase a copy of your Avid editing application from the Avid web store. If you choose not to purchase the software, your Avid editing application is deactivated when the 30-day trial expires. The Support Tab The Support tab lists the support plans available for the products you have activated. From this tab, you can go to your account page at the Avid.com to contact the Avid Community Support, manage support plans, and access the knowledge base. Product Activation 4 Product Activation Activate your Avid Editing Application to gain access to all available features. Media Composer, Pro Tools, and Sibelius are activated in different ways. What You Need to Activate Media Composer or Sibelius To activate Media Composer or Sibelius, you must have an Activation ID and System ID. They can be found on the Product Subscriptions page of the shop.avid.com after you buy the product. The Activation ID is linked to the subscription model you are using or only going to use. The System ID refers to the system you are working at. Activation ID is needed to activate your software. You can find your Activation ID in your Avid account at http://account.avid.com/. The ID is listed on the My Products page along with your downloads. You will also receive an email that contains the activation codes for each of your applications. Device ID identifies your system if you are activating your software on a system that is not connected to the Internet. This ID will be provided to you through Application Manager during the activation process. To find out your device ID, go to the Licensing tab of Application Manager, select the Offline activation method for the product, enter Activation ID, System ID or both, and you will see the licensing information along with the Device ID. Take into account that after you purchased a product, you cannot activate it right away – there must be at least 10 minutes between these two actions. Otherwise, you will encounter an error. Product Activation What You Need to Activate Pro Tools Pro Tools is authorized using an iLok USB key (2nd generation) from PACE Anti-Piracy. An iLok can hold hundreds of authorizations for all of your iLok-enabled software. After a software license is placed on an iLok, you can use the iLok to authorize that software on any computer. If you purchased a boxed version of Pro Tools, or Avid hardware bundled with a version of Pro Tools or Pro Tools HD, it includes an iLok USB key and an activation card with a printed activation code. If you are upgrading from a previous version of Pro Tools or Pro Tools HD, you will need to use your own iLok USB key. You will receive an activation code through your online Avid account. The activation procedure that involves Application Manager is described in the Activation with an iLok section. You can also find the description of the Pro Tools activation procedure in the “Pro Tools Installation Guide” and “Pro Tool | First Installation Guide”. Each of the following sections contains a note informing you what product the description relates to. Product Activation Online Activation with an Internet Connection This section is applicable to Media Composer and Sibelius. With Application Manager open, you can activate your Avid Editing Application with the Online option. If Application Manager is not open, click the tray icon the Avid Editing Application you bought. to open it or run If you exit Application Manager, the tray icon is not visible. To activate your Avid Editing Application, run it – Application Manager will be launched automatically. After you complete the activation, Application Manager will be automatically closed. Activation of all installed products can be performed on the Licensing tab of Application Manager. To activate the application with the Online option: 1. With Application Manager open, click the Licensing tab. By default, the product is not activated and you can see its status under the product’s name. If a product is activated in a trial mode, the status of the product is changed from Not activated to Trial and the expiration date is displayed. If you use a hardware key to activate the product, Application Manager detects it and shows the corresponding activation state next to the product name and license details. 2. On the list of applications, find the application you want to activate. Choose Online in the Select activation method drop-down list. 3. Enter the corresponding information in the System ID and Activation ID fields. Product Activation 4. Click the Activate button next to the product name. Application Manager verifies your information and confirms activation. As the product is activated, you can click Details to see the current license details. When the activation is complete, a message informs you that your software has been successfully activated. You can reactivate your product if it was deactivated. The license information will already be populated in the corresponding fields. While the product is deactivated, it is grayed out in Application Manager. Auto-Activation with an Internet Connection If you are connected to the Internet, Application Manager facilitates the process of activation of Media Composer or Sibelius you have purchased from the Avid shop. The main conditions for Avid Editing Application to be auto-activated are: the Computer Name (known as Activation ID at the Avid.com/shop) coincides with the one you are working at; the license you are going to use was not deactivated manually before. Note that Sibelius License Server is not auto-activated. Product Activation To have Avid Editing Application auto-activated, do the following: 1. Having bought Avid Editing Application (you can have Media Composer or Sibelius with a monthly, annual, or perpetual subscription), go to Application Manager. 2. On the Account tab, log in to Application Manager with the Avid account credentials. 3. Go to the Licensing tab of Application Manager – the license is activated automatically, without any additional actions. The procedure described above shows a very basic scenario. It can be performed without any unexpected results, if the following conditions are met: The subscription license must be a single one for the user’s account. Or a Computer Name have to be defined at the user’s account page for the license that is to be used for auto-activation on the particular computer. The Computer Name must be unique for the account for each product. If you have Media Composer or Sibelius installed and you are not logged in to the Application Manager, launch the Avid Editing Application and choose Electronic activation to activate Application Manager with the Licensing tab displayed. After you log in, the auto-activation workflow can be fulfilled. If your Avid Editing Application is in a trial mode, log in to Application Manager, and the Avid Editing Application will be auto-activated with the subscription details. The auto-activation procedure will not be performed if: you have activated the Avid Editing Application earlier and then deactivated it via Application Manager. there are subscriptions, for which a Computer Name is not defined, if there are more than one active subscriptions. all subscriptions are expired. you have one or more Avid Editing Application subscriptions (monthly/annual/perpetual), and the Computer Names, defined for them, are unique, but no one of the defined Computer Names coincides with the one you are working at now. the Avid Editing Application is activated from Application Manager under another license. you use a dongle for activation and log in on the Account tab. Product Activation Activation with a Floating License This section is applicable only to Media Composer. The Floating License model allows you to purchase “packs” (pools) of licenses to deploy at a single site. One System ID and license can run any number of systems simultaneously. Licenses are consumed only when in use, so that additional clients can connect and use a license as it becomes available. “Consuming” and “releasing” licenses You “consume” licenses by connecting to the server and decreasing the overall number of licenses by 1 per client. You “release” licenses back to server and increase the overall number of licenses back by 1 per client. Licenses can be “checked out” for a certain period of time until the checkout term is complete. To be able to check out a license, you must first deactivate the Avid Editing Application. To activate the product, do the following: 1. With Application Manager open, go to the Licensing tab. 2. On the list of applications, find the application you want to activate. Choose Floating in the Select activation method drop-down list. Product Activation 3. In the License Server field, enter the address or name for the server where Application Manager gets the floating license. 4. In the Backup Server (optional) field, enter the address or name of the server that is to be used when the main server is inaccessible for some reason. 5. Click Activate to activate the product. The server addresses are saved each time you click Save or Activate. A client system with a saved address can be used for creating a Master image which can then be deployed at any number of additional client systems. If you save the license server address by clicking the Save button or just pressing Enter, you do not have to activate the product manually. Once you launch the application that you wanted to activate, it is activated automatically. The floating license timeout period is 6 hours. If the application is closed, the license is expired after the timeout period has passed and returns to the pool. If the application is running more than 2.5 hours, the license server is checked for available licenses and if there is one, your current license will be silently renewed, so you experience no interruption. If a server is unreachable you are warned that the license is expired but you still can continue working with the Editor Application with all its options activated. If server is accessible but there are no licenses available you will be warned. Clicking OK closes the Editing Application. If the connection to the floating server is lost while working with Application Manager, you are warned about the connection problem; however, you can keep Application Manager launched. Product Activation You can “borrow” the floating license for some time, for example, if you need to work with the application on another machine or if you do not have an Internet connection. The Checkout option is shown on the dialog for the selected product only if you have a reservation made for your computer Device ID on the license server. Select the Checkout check box – the Duration drop-down field appears. Select the duration of the checkout period and click Activate. Now your license is checked out and you can start working with the application. As soon as the checkout period ends, a grace period starts. During this period, the license can be used one more time within one day after the expiration of the checkout period. To use the editing application, launch it – a floating license is automatically consumed. To review the license details: 1. Open Application Manager. 2. Click the Licensing tab. Product Activation 3. Click the Details button. Product Activation Multi-Seat Activation This section is applicable only to Sibelius. In case you need to provide a group of people with temporal licenses, use the Sibelius License Server (SLS). The SLS is used by the Application Manager administrator (e.g. a teacher) for generating the needed number of licenses that are then activated and distributed among the people in a group (e.g. students) with restricted rights. A multi-seat Sibelius license allows one Sibelius serial number to be used on multiple computers. To learn more about the multi-seat license, refer to the Installing Sibelius on Networks article available at Avid Knowledge Base. At the Avid.com/shop, you can purchase the needed number of licenses. The minimum amount is five. When activating the licenses server, you activate the whole bunch of the licenses purchased too. If, after a while, you need more licenses, purchase and activate them as another bunch of seats on the Licensing tab. After the Sibelius License Server (SLS) is installed, it is displayed on the Licensing tab. Product Activation To activate the SLS along with the seats, do the following: 1. From the Select activation method drop-down list for Sibelius License Server, choose Online. The Offline activation method is similar to the one described further in the Offline Activation Without an Internet Connection section. 2. Copy and paste the System and Activation IDs for the SLS. Click Activate. Product Activation This will activate the Sibelius License Server along with five seats. You can see the number of activated seats next to the product title. Product Activation Click Details to review all the information about the SLS activation. If you have more than five seats generated, click Activate Seats to activate an additional bunch of licenses. You will need an Activation ID to activate that bunch. Product Activation 3. Having pasted the Activate ID for another bunch of the seats, click Activate for the seats. Now the number of the activated seats is changed. Click Details to review all the information about the SLS activation. Product Activation Offline Activation Without an Internet Connection This section is applicable only to Media Composer and Sibelius. To activate your application even if you are not connected to the Internet. Do the following: 1. With Application Manager open, go to the Licensing tab. 2. On the list of applications, find the application you want to activate. Choose Offline in the Select activation method drop-down list. 3. Enter your system identification number in the System ID text box. 4. Enter your activation identification number in the Activation ID text box. Product Activation As you enter the Activation ID, the Application Manager validates it and displays the activation instructions. Follow the instructions to receive activation .bin file using the client system with an Internet connection. Product Activation 5. On a computer with an Internet connection, go to http://avid.com/license. 6. Follow the onscreen instructions on the Web page. The Activation tool confirms your system information. When the activation is complete, a message informs you that your software has been successfully activated and the button changes to Deactivate. 7. Repeat these steps for each editing application or additional option you need to activate. 8. Once you have the license.bin file, transfer it to the system where you want to activate the product. 9. At the system where you want to activate the product, in Application Manager, click Browse and navigate to the license.bin file you just brought to the system, then click Open. 10. Click the Activate button. If the editing application is open, you must exit and restart for the changes to take effect. If you are about to activate several products simultaneously you may use the latest *.bin file created for the System ID. Product Activation Activation with a Hardware Key Some Avid Editing Application can also be activated with a hardware key that is included in the Installation package. The following sections describe using a dongle (for activating Media Composer) and an iLok (for activation Pro Tools). Activation with a Dongle This section is applicable only to Media Composer. To activate the product, do the following: 1. With Application Manager open, go to the Licensing tab. If Application Manager is not open, click the icon 2. in the tray. Plug in the dongle blasted to the current product and version. Application Manager detects the dongle with the corresponding dongle ID and Serial Number. Product Activation To scan a dongle, click Dongle Info. Application Manager lists all the information available on the current dongle. 3. From the Choose Action drop-down list, select one of the options: Update or Convert. If choose Update, the system asks you to specify the dongle file (.avd) and update the product license. Product Activation As you specified the license file, the Update button becomes available. Below the License File field, you will see the license information. Click the Update button to update the dongle license. Click Dongle Info to display the dongle information. Product Activation To upgrade the license from a dongle to a software license, do the following: 1. Choose Convert from the Choose Action drop-down list. 2. Enter or paste the activation ID to the corresponding fields to apply conversion. If the activation ID is already part of the dongle information, dongle will auto populate it. 3. Click Convert - a warning message appears asking if you want to continue since during the conversion the dongle information will be erased and the dongle will become deactivated. After conversion, the product is activated with software license. Product Activation Activation with an iLok This section is applicable only to Pro Tools. To activate the product, do the following: 1. With Application Manager open, go to the Licensing tab. If Application Manager is not open, click the icon 2. in the tray. Plug in the iLok blasted to the current product and version. Application Manager detects the iLok with the corresponding iLok ID and Serial Number. As soon as you plugged in the iLok, Application Manager does the following: It detects the iLok. It changes the product status from Not Activated to Activated. It displays the type of the license used: Perpetual or Subscription. It stores the iLok information – click the Info button under the product name to display it. Product Activation Redemption to Dongle This procedure is applicable only to Media Composer. As you have bought the product, you can install and then activate it with Application Manager with the online activation using the system ID and activation ID. However, you can change the activation method and activate the product with a dongle. This option is only possible if you are upgrading from the perpetual model to the perpetual one. To redeem to dongle, do the following: 1. From My Account page, go to the My Products and Subscriptions page. 2. Click Show for the product you are going to activate with a dongle. Remember that it must be a perpetual license. 3. In the list of the applications available for downloading, click the Download Dongle Updater File button. Product Activation The Redeem to Dongle dialog appears. 4. Enter the dongle system ID and dongle serial number into the corresponding fields and click Upgrade. The system congratulates you with the upgrade. 5. Click Download to generate the dongle updater file. When you click Download, the Updater.avd file is downloaded. Use this to activate the product. The rest of the activation procedure is the same as if the product was initially activated with a dongle. The exact activation steps are provided in the Redeem to Dongle dialog. Upgrading the Avid Editing Application 5 Upgrading an Avid Editing Application You can upgrade your product in different ways depending on the application you’re going to upgrade and the way it was activated. Media Composer: You can upgrade your Avid Editing Application from either an existing software license or a dongle license. You will be informed about the available upgrades via the notification popping up in the Tray. Upgrading your dongle license to a software license disables your dongle. Once you have activated your software license, you do not need and are not able to use the dongle to run your Avid editing application. If you activate electronically with a dongle, the system assumes you are converting from a dongle license to a software license and the dongle will be disabled. Activate electronically with a dongle only if you wish to convert to software licensing. Pro Tools and audio plug-ins: These products and plug-ins are activated only via iLok – a specific USB key attached to the product when you are buying it. Customers with active Elite support plans: If you upgrade your existing license and have an active Elite support plan, please carefully read all the instructions provided on the Download Center before updating your system. For additional information, please check the “Avid Advantage Support Plans” topic on the Avid Knowledge Base. Below are high level steps you should follow if you are upgrading your Avid editing system. Upgrading an Avid Editing Application Upgrade Workflow There are two scenarios for updating/upgrading your products. You choose yours according to the product availability, licensing policies and other circumstances. Scenario 1. Whenever an upgrade is available, the Current status for a product turns to Update on the Apps tab of Application Manager. Click Update – the update download begins and you will see the progress bar. As soon as the update is downloaded, the Update button is changed to Install. Click it to install the new version of the product. After the installation is completed, you can be asked to restart your computer. After the restart, Application Manager refreshes the statuses for the products on the Apps tab. Upgrading an Avid Editing Application Scenario 2. 1. Uninstall your existing Avid editing application. Before you uninstall your Avid editing application, write down your System ID. You will need your old system ID to activate your new software. 2. Install your new Avid Editing Application. See “Installing the Avid Editing Application”. 3. Activate your Avid Editing Application. If you have a perpetual license for Media Composer, the following must be taken into account about the upgrade: If you have a perpetual license and a valid (not expired) Support Contract you can get all (minor/major/release) updates. If you have a perpetual licenses with an expired Support Contract, you cannot download any updates using Application Manager. On attempt to download an update you get the corresponding error message. To be able to get updates using the perpetual license, visit the Avid web site and renews a Support Contract for the next year. Upgrading with an Internet Connection from an Existing Software License To upgrade: 1. Open Application Manager by doing one of the following: On Windows, locate and double-click Application Manager (Start/All Programs/Avid/Application Manager) On Mac OS X, locate and double-click Application Manager (Applications/Avid/Application Manager) Clicking the Application Manager tray icon 2. If your system ID does not display, enter your system identification number in the System ID text box. 3. Enter your new activation identification number in the Activation ID text box. When the activation is complete, you are informed that your software has been successfully activated. 4. Click OK. Upgrading an Avid Editing Application Upgrading with an Internet Connection from a Dongle License and Converting to a Software License The procedure of upgrading from a dongle license via converting to a software license is described above. This section describes how to upgrade you product to its latest version using a dongle. The upgrade process corresponds with the upgrade workflow described here. The only difference from that process is that you have to obtain Activation ID and Dongle ID. To upgrade your Avid editing application with an Internet connection from a dongle license to a software license: 1. Attach your dongle to your Avid editing system. 2. You can launch Application Manager by going to the following location: On Windows, locate and double-click Application Manager (Start/All Programs/Avid/Application Manager) On Mac OS X, locate and double-click Application Manager (Applications/Avid/Application Manager) Clicking the Application Manager Tray Icon 3. If your Systems ID does not display, enter your system identification number in the System ID text box. 4. Enter your new activation identification number in the Activation ID field. 5. When asked if you want to deactivate your dongle, click OK. When the activation is complete you will receive a message indicating the software has been successfully activated. 6. Click OK. Your dongle is now deactivated and you can run the application with a software license. Upgrading an Avid Editing Application Upgrading Without an Internet Connection to a Software License To upgrade your Avid editing application to a software license without an Internet connection: 1. Launch Application Manager by going to the following location: On Windows, locate and double-click Application Manager (Start/All Programs/Avid/Application Manager) On Mac OS X, locate and double-click Application Manager (Applications/Avid/Application Manager) Clicking the Application Manager Tray Icon 2. If your Systems ID does not display, enter your system identification number in the System ID text box. 3. Enter your activation number in the Activation ID text box. 4. Click Activate. The website creates a license.bin file. This file contains license information needed to activate your Avid editing application. To find out how to get the file, refer to the Offline Activation Without an Internet Connection section. 5. Once you retrieve the license.bin file, transfer it to the system you want to activate. 6. In Application Manager, click Browse and navigate to the license.bin file on your system, then click Open. When the activation is complete, a message informs you that your software has been successfully activated 7. Repeat these steps for each editing application or option you need to activate. 8. If the Avid editing application is open, you should exit and restart for any changes to take effect. Dealing with the Subscription Models 6 Dealing with Subscription Models With Application Manager, you can have a subscription to a single application or a set consisting of an application and its options and plug-ins. Some plug-ins are part of the application, they are bought and installed along with the application. Other plug-ins must be purchased additionally. To learn more about purchasing plug-ins for Pro Tools, refer to Purchasing Pro Tools Plug-Ins. There are two types of subscription models: Individual Membership – Subscriptions (either Single Product or Suite) are purchased and managed by a single user/customer Team/Company Membership – Subscriptions (either Single Product or Suite) are purchased in volume (by seat) by a company/business and managed by their local administrator. Each team member has access to the subscription. Subscription is managed from your online portal at www.avid.com/account. You can purchase Subscription through Web store, Avid Sales, and Channel (resellers or distributors). Subscription “To Rent” The Subscription “To Rent” model is based on monthly payments. You will be notified daily about the next monthly payment by a pop-up notification within seven days – three days before the renewal date and four days after its planned renewal date, so you have an opportunity to connect to the Internet before the renewal expires. Once the Subscription ends, the application functionality is no longer available. If you start the application, it prompts you to purchase the subscription. Subscription “To Own” This Subscription model provides for full payment at the point of sale (POS). This kind of subscription provides you with a perpetual license and a Support plan only for a year. If the Support period (1 year) has ended, you can continue using your current version of the application, but no updates will be available. The Subscription update is not renewable. Dealing with Subscription Models Customer Support offerings for both subscription models (“To Rent” and “To Own”) No matter what subscription model you have, you are provided with a customer support – customers can open cases online, which will be answered within 24 hours – Standard Support plan. Additional support – Elite – can be purchased as well (via the Web). When you are buying a product from the Avid store, you are proposed several subscription models each of which accumulates a set of statements mentioned below: Month-to-Month – with this subscription model, you have to renew your subscription each month to stay up-to-date with the application updates. Annual – this subscription model is a bit cheaper in comparison with the Month-toMonth one if talking about the payment per month; if you have this model of subscription, your annual amount is divided into 12 months, and payment is made automatically each month within the year (if you have the corresponding option set). Perpetual – this subscription model is suitable, if you do not need any upgrades for the application you are buying. This model of using the product does not demand any additional payments the payment is made only once. When buying the application from the Avid’s store, you choose a subscription model along with the application. Later, you can change the subscription model. To change a subscription model, do the following: 1. Go to your account on the www.avid.com/account. 2. In the My Products section click My Products and Subscription. This brings you to the Product Subscriptions page with the products you have bought. 3. In the list of the subscriptions you bought find the one you want to change. Dealing with Subscription Models You can change a monthly subscription model to a perpetual one but not vice versa. The subscription model can be changed only on the renewal date. From the picture above, you can see that the subscription is still valid and cannot be renewed and thus changed. On this picture, the subscription needs to be renewed as it is expiring (refer to Renewing the Subscription to read about subscription renewing). If you want to change the subscription model, it is high time to do it. Dealing with Subscription Models 4. To change your subscription model, click Change below the Billing Info field. The Change Subscription page opens. 5. Choose the preferred subscription and click Add To Cart. 6. You are redirected to the Cart page. When you change the subscription model for the product, your previous subscription model will be cancelled and the new one will be obtained. 7. If you decided not the change the subscription model, click Cancel on the Change Subscriptions page. This sends you back to the Product Subscriptions page. Dealing with Subscription Models To modify the information on your credit card and payment method, click the Update button next to the Next Billing On field. The Update Payment Method dialog appears. The billing information entered here will automatically be used during the next payment. Make your changes and click Register now, or click X to close the dialog. Dealing with Subscription Models Support Plan A support plan is offered along with your subscription. Choose the support plan you want when selecting the subscription model for the product you are buying. To see the support plan information, take a look to the right column of the Product Subscriptions page. Dealing with Subscription Models Or, go to the Support tab of Application Manager. Here you can see, which support plan is active now and for which product. Note that Media Composer goes along with either Standard or Elite support plan, Pro Tools may have either Standard or ExpertPlus support plan, and Sibelius may have the Standard support plan. You can change (upgrade) the support plan on the renewal date when the subscription is approaching its expiration date. Starting one week in advance of the expiration date you are notified of the Support subscription renewal date on a daily basis by the corresponding notifications that appear from the Application Manager tray icon . Dealing with Subscription Models To change your support plan, do the following: 1. On the Avid.com site, go to your account. 2. In the My Products section, click Support Upgrades. 3. You are prompted to enter your System ID. 4. After your System ID is verified, select the support plan you want and click Add To Cart. Follow the upgrade transaction steps to complete the operation and get the new support plan. Dealing with Subscription Models Grace Period Application Manager checks whether or not your subscription is active. 15 days before the expiration date the system sends you an email with a reminder. When the subscription expires, you are notified about it with the email. If the subscription expires and you are not connected to the Internet, a four-day grace period starts. During this period, you still can run the Avid Editing Application. However, if Application Manager is launched you will get notifications every six hours reminding you that have to pay for the next month. If Application Manager is not launched, the notifications are shown once you run it. If you do not renew the Editing Application after the grace period, the subscription becomes inactive and you cannot launch the expired Avid Editing Application. Renewing the Subscription When it is time to renew your subscription, for example, your monthly subscription comes to the end or for your annual subscription with monthly payments you have the auto renewal option turned off, you do it with the Renew button available on the Subscriptions page. The next billing date can be found in the Subscription section and may be the same as the end date in the time period (in case of month-to-month subscription model). Dealing with Subscription Models If the Renew button is available, click it to open the Renew subscription and support plan dialog: Click Renew Subscription to renew your subscription and support plan, or click Cancel to go back to the Subscriptions page. As the process of renewal is completed, the corresponding message is displayed: You can turn on and off the auto renewal of your subscription. For that, click the corresponding button next to the Auto Renewal field. If your Auto Renewal option is set to On, the payment for the next billing period is performed automatically. You are notified about the successful payment for the subscription with the notification popping up from the Application Manager tray icon. The upgrade subscription expiration date is similar to the expiration date of rental or temporary licenses, but it is different for perpetual licenses because the base product does not expire, just the upgrade subscription. For example, if you purchase Media Composer on January 15, 2015, then the upgrade subscription will be set to expire on January 15, 2016. You will have an option to renew the upgrade subscription in January 2016. Dealing with Subscription Models Subscription Crossgrade If you want to move from one Avid application to another (namely, Symphony and NewsCutter) with the same System ID you can to apply for the crossgrade subscription. To crossgrade, do the following: 1. Go to www.avid.com/store. 2. Buy the Avid Editing Application with the Crossgrade Subscription model. 3. Purchase the application you want. 4. Having bought the Avid application, go to the Subscriptions page. In the list of your subscriptions, locate the Software Subscription Crossgrade. To finish crossgrading to another application, you must first validate your System ID. Click the corresponding link and specify your System ID. As the System ID is validated, you will get the crossgrade key. Additional Options and Plug-Ins 7 Additional Options and Plug-Ins In addition to activating the Avid Editing Application, there are several editing options (for Media Composer) and plug-ins (for Pro Tools) that can be purchased and activated through Application Manager. For Media Composer, you can purchase additional options by visiting the Avid web store and clicking Software Options for Video Editing. After that you can use Application Manager to activate your option. There may also be free third-party software included with your purchase. Avid Editing Applications may come bundled with 3rd-party software such as Sorenson Squeeze, Avid FX, Boris Continuum Complete, and Avid DVD. If you purchased a new copy or upgrade of the Avid Editing Application, activation codes are included in your Avid Account. If you are covered by an Elite support plan, or are a student with Avid Media Composer Academic and are within your no-charge upgrade period of 4 years, you can obtain activation codes by entering your system ID at www.avid.com/mc3party. For Pro Tools, there are two ways of purchasing the plug-ins. Read the description of each of them below. Purchasing Pro Tools Plug-Ins There are two ways on purchasing a plug-in: Directly from within Pro Tools – this way is called In-App Purchase On the Avid.com/shop web site – this way is called Out-App Purchase Both of these ways are described in details in the following sections. In-App Purchase To purchase a plug-in while working with Pro Tools, do the following: 1. Staying in Pro Tools, click Buy for the plug-in you want to have. This opens a dialog prompting you to enter your billing information. Additional Options and Plug-Ins 2. Enter your credit card number, valid address and other billing information. As soon as the information is confirmed, the iLok Web page is opened. 3. Enter your PACE credentials to enter the PACE Web page. This step is necessary to deposit the PACE license to your iLok. 4. Plug your iLok in to be able to receive the license information for the plug-in you are buying. The license is deposited to your iLok. Now Pro Tools is ready to receive the plug-in installer. The plug-in installation begins. After the installation is finished, Application Manager receives a notification about a new plug-in available and a product definition file is created (see Administrator’s guide for more information about it). 5. To display the new plug-in on the Apps tab of Application Manager, click Settings > Refresh apps. Out-App Purchase To purchase a plug-in from the Avid shop, do the following: 1. Go to the shop.avid.com and buy the plug-in in the corresponding section. The procedure of purchasing a product from the site is standard and described in the “Pro Tools Installation Guide”. 2. In Application Manager, click Refresh Apps to check for new products and plug-ins. 3. Application Manager displays the new plug-in on the Apps tab ready for downloading. 4. Click the Download button – the download process is initiated. The Download button is changed to the Install button. 5. The user clicks Install. 6. Application Manager display the new plug-in installed in the plug-in section. Now the plug-in is ready to use. Deactivating the Avid Editing Application and Plug-Ins 8 Deactivating the Avid Editing Application and Plug-Ins To deactivate your Avid Editing Application, do the following: 1. If you are working with the Avid Editing Application, you can deactivate it directly from within the application. Click the corresponding option in the application, and Application Manager opens. In the case of Media Composer, click Special > Deactivate. This opens Application Manager. If Application Manager is already running, skip this step and go to step 2. 2. In Application Manager, go to the Licensing tab. 3. Find the product you want to deactivate and click the Deactivate button next to its title. Remember that you can reactivate the product. In that case, the license information will be automatically populated to the corresponding fields. You must have an Internet connection to deactivate the software and its options. Uninstallation Specifics 9 Uninstallation Specifics Uninstallation of Application Manager, Media Composer, and Pro Tools on Windows and Mac OS X is performed in the standard way. The step-by-step instruction can be found below. The situation looks different when it comes to uninstalling the Pro Tools plug-ins on Mac OS X. The problem is that they do not have the uninstallation files on the operational system, and the incorrect uninstallation of the plug-ins leads to leaving the product definition file (read more about the product definition file in the Administrator’s Guide). If the product definition file remains on your computer, Application Manager will not show the Pro Tools update, even if you download a new version of it. Non-trivial actions should be taken to remove the plug-ins correctly and delete the file. How to Uninstall the Products To uninstall a product on Windows, for example, Application Manager, log in as a user with administrative privileges. If you are working in a shared storage environment, mount your workspaces. To uninstall Application Manager on Windows, do the following: 1. Quit all active applications and Application Manager itself. Make sure it is deactivated in the tray. 2. Access the Control Panel and select Programs and Features. Then select the Avid Application Manager and click Uninstall. To uninstall the Application Manager on Mac OS X, do the following: 1. Quit all active applications. 2. Go to Applications/Avid/Uninstallers. 3. Double-click the Application Manager uninstaller. 4. Follow the on-screen prompts. Uninstallation Specifics How to Uninstall the Pro Tools Plug-Ins The following information is for advanced users who can work with system files and the command line. When the user installs a product on the Mac OS X, the information about the installer package is recorded to the system database. BundleID of the installer package (PackageBundleID) can be specified in the Product Definition File instead of the application BundleID (or the Product Definition File can contain both of them). If the Product Definition File contains the PackageBundleID, Application Manager will search for the record about it in the system database. This record contains a version of the installer package – in Application Manager this version is shown as a version of the product. If the record about the PackageBundleID is in the system database, Application Manager operates as if the product is successfully installed and displays its name on the Apps Tab. If the product must not be available for Application Manager, the record about the installation package must be deleted from the system database on Mac OS X. To do it, use the following command: sudo pkgutil -- forget PackageBundleID