1
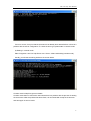
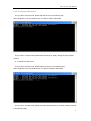
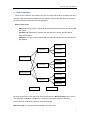
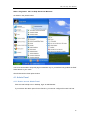
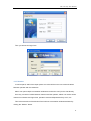
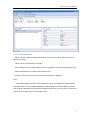
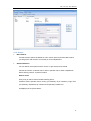
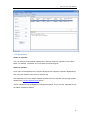
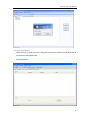
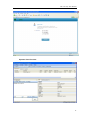
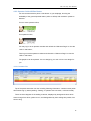
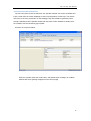
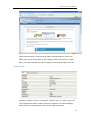
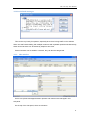
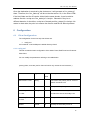
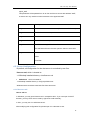
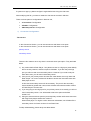
TOPCMM SOFTWARE CORP 123 Live Help Software User Manual Version 4.0 Topcmm 2008-8-8 123 Live Help User Manual MENU 1 Introduction .................................................................................................................. 1 2 Requirement ................................................................................................................ 1 2.1 Server Requirements ........................................................................................... 1 2.1.1 Supporting Platforms ................................................................................. 1 2.1.2 Hardware Requirements ........................................................................... 1 2.1.3 Java Virtual Machine (JVM) Requirements ............................................. 1 2.1.4 Port Requirements..................................................................................... 2 2.2 3 Client Requirements ........................................................................................... 2 Installation .................................................................................................................... 2 3.1 Windows Installation ............................................................................................ 2 3.1.1 Get the Free Windows Package of 123LiveHelp here: .......................... 2 3.1.2 Install 123LiveHelp in Windows................................................................ 2 3.1.3. NT Service................................................................................................. 3 3.1.4 Start the Chat Server................................................................................. 4 3.1.5 Stop the Chat Server: ................................................................................ 6 3.2 Linux Installation ................................................................................................... 7 3.2.1 Get the Free Linux Package of 123LiveHelp here: ................................. 7 3.2.2 Decompress Download File...................................................................... 7 3.2.3 Start the Server Manually ......................................................................... 7 3.2.4 Stop the Server Manually.......................................................................... 7 3.2.5 Restart the Server Manually ..................................................................... 7 3.2.6 Auto-Start Server after System Reboot ................................................... 7 3.3 Other UNIX Operating System ............................................................................ 8 I 123 Live Help User Manual 3.3.1 Install JRE 1.4.2 or above (we recommend JRE 1.5) ............................ 8 3.3.2 Get the Free other OS Package. .............................................................. 8 3.3.3 Decompress Downloaded File. ................................................................ 8 3.3.4 Set JRE Environment Variable ................................................................. 8 3.3.5 Start the Chat Server................................................................................. 8 4 User Interface .............................................................................................................. 9 4.1 Admin Panel........................................................................................................ 10 4.1.1 How to Access Admin Panel................................................................... 10 4.1.2 Monitor ....................................................................................................... 11 4.1.3 Account Manager..................................................................................... 12 4.1.4 Search ...................................................................................................... 13 4.1.5 Department............................................................................................... 14 4.1.6 Ban and Unban: ........................................................................................... 15 4.2 Operator Panel ................................................................................................... 16 4.2.1 How to Access Operator Panel .............................................................. 16 4.2.2 Operator and the Department................................................................. 16 4.2.3 Operator Online/Offline Button ............................................................... 18 4.2.4 Customer list ............................................................................................... 18 4.2.5 Proactive Chat Invitations. ........................................................................... 19 4.2.6 User Info ..................................................................................................... 20 4.2.8 Predefined messages................................................................................... 21 4.2.9 Chat Window ......................................................................................... 21 4.3 Customer Chat Client ......................................................................................... 22 4.4 Live Help Remote Controller (MSN edition) ..................................................... 24 5 Integration .................................................................................................................. 26 II 123 Live Help User Manual 6 Configuration ............................................................................................................. 30 6.1 Client Configuration ............................................................................................ 30 6.1.1 Config.xml ................................................................................................... 30 6.1.2 Init Parameter/ Client APIs .......................................................................... 32 6.2 Server Configuration .............................................................................................. 34 6.2.1 lhserver.xml ................................................................................................ 34 1) Connection Configuration .......................................................................... 35 2). Global Configuration .................................................................................... 39 3). Mail-Smtp-Server Configuration ................................................................. 41 6.2.2 Default.xml ................................................................................................. 41 1) General setting ........................................................................................... 41 2) Record-Per-Page Setting ........................................................................... 44 3) Encrypt-Message Setting ........................................................................... 44 4) Enable-Guest-Login ................................................................................... 44 5) Modules Setting .......................................................................................... 45 2. Customize Transcript Style ...................................................................................... 45 3. Expansion API ........................................................................................................... 48 III 123 Live Help User Manual 1 Introduction 123 Live Help Server Software is a full-fledged solution for your sales rep. or supporter to one-to-one chat with website visitors, to promote online sales of product or service. It shortens sales cycle and increases customers‟ satisfaction and confidence. It can also increase agent productivity and reduce service costs. 123LiveHelp makes your web site live and interactive. 2 Requirement 2.1 Server Requirements 2.1.1 Supporting Platforms Windows 95/98/NT/ME/2000/XP/Vista Solaris/Sparc 2.6, 7,8,9 Solaris/Intel 2.6,7,8,9 Compaq Tru64 IRIX HP-UX 10.20, 11 AIX 4.3.x Linux Redhat 6.2, 7.1, 7.2, 7.3, 9 Linux Caldera TurboLinux Mac OS Classic 8.1 - 9.X Mac OS X 10.0 - 10.1 Mac OS X Server 2.1.2 Hardware requirements 123 Live Help Server Software will be compatible with most server hardware. The minimum hardware requirements are as follows: 586/200 MHz or faster processor 64 MB of RAM or more 100 MB free hard disk space or more Dedicated PII/400 MHz with 256 MB RAM is eligible to handle 500 or more concurrent users. Adding extra RAM and processors will improve the performance of 123LiveHelp. 2.1.3 Java Virtual Machine (JVM) Requirements Sun™ Java© 1.4 or above is required to run 123LiveHelp. We recommend using J2SE v 1.4.2_08 or v 1.5 JRE. 1 123 Live Help User Manual For the current version of JDK, visit http://java.sun.com/. 2.1.4 Port requirements This software needs at least two free ports, and the port value can be any one that is lower than 65535 as long as it is not already taken by other application. Default ports are: 8969, 8968 1: 8969: The main port of 123LiveHelp server, all the three chat clients (admin, operator and customer panels) should connect to this port. 2: 8988: The port for the HTTP server of 123LiveHelp server. Why HTTP server is needed? Because in some network environment, the connection via proxy will fail the main port 8969, in that case HTTP server will be useful. In addition, when user needs to check the logs, HTTP server is also required. 2.2 Client Requirements The operator panel and admin panel need .NET Framework 2.0 123LiveHelp.exe or 123LiveHelp(Client).exe will detect the version of your.Net Framework in setup. If it needed, it will download from Microsoft„s website and install automatically. This will cost a little more time to setup. At least 800*600 displays resolution 3 Installation 3.1 Windows Install 3.1.1 Get the free Windows package of 123LiveHelp here: http://www.123livehelp.com/download.html Download the Windows version: 123livehelp.exe or 123livehelp(Client).exe 3.1.2 Install 123LiveHelp in Windows Double-click "123livehelp.exe" to start the installation and it will take a few minutes to install following its simple instructions. 2 123 Live Help User Manual 123LiveHelp will download the environment which will be needed. Downloading and installing the environment will cost a little more time (adjust your internet connection and computer‟s hardware). If the setup is interpreted we suggest you to download the environment and install manually. After installing environment then install the 123 Live Help. Microsoft .NET Framework 2.0 http://download.microsoft.com/download/a/a/c/aac39226-8825-44ce-90e3-bf8203e74006/d otnetfx.exe Java JDK 1.5 http://javadl.sun.com/webapps/download/AutoDL?BundleId=18675&/jre-1_5_0_15-windows -i586-p.exe 3.1.3. NT service After 123 Live Help Server Software has been installed, wait a few seconds while 123 Live Help Server( from now on we‟ll call it “ the chat server”) as a Windows NT service is started automatically ( you don't have to start it manually). 3 123 Live Help User Manual Moreover, the chat server as a Windows NT service will be loaded automatically and started each time when you reboot your server computer. 3.1.4 Start the chat server This can be done by starting the server in service mode or console mode, if it was stopped before. These modes are explained below: a) Starting in service mode: Start->Programs->123 Live Help Server 4.0-> Server->Start 123livehelp. 4 123 Live Help User Manual If an error occurs, it may be that the chat server has already been started before or there is a problem with the server configuration. To check the error type, please start in console mode. b) Starting in console mode: Start->Programs->123 Live Help Server 4.0> Server ->Start 123livehelp (console mode). Usually you will see something similar to the screen below: Console mode is helpful to get error details. Console mode does not need to be used unless there is a problem with the process of starting the chat server. After the problem has been fixed, it is recommended to stop the chat server and start again in service mode. 5 123 Live Help User Manual 3.1.5 To stop the chat server: a) If you are in service mode, please stop the server in the following way: Start->Programs->123 Live Help Server 4.0->Server->Stop 123livehelp. b) If you are in console mode, please stop the server by simply closing the pop-up DOS window. 6. To restart the chat server: a) If you are in service mode, please restart the server in the following way: Start->Programs->123 Live Help Server 4.0->Server->Restart 123livehelp. b) If you are in console mode, please close the DOS window first, and then restart the server in the following way: 6 123 Live Help User Manual Start->Programs->123livehelp ->server-> start 123livehelp (console mode) Note: After configuring the server parameter manually, you have to restart the chat server to make the changes effective. 3.2 Linux Install 3.2.1 Get the free Linux package of 123LiveHelp here: http://www.123livehelp.com/download.html Download the Linux version: 123livehelp.tar.gz You may download with this command: $ wget http://www.123livehelp.com/download/123livehelp.tar.gz 3.2.2 Decompress download file. You may use the command below to uncompress the download file. $ tar zxf 123livehelp.tar.gz 3.2.3 Start the server manually After uncompressing 123livehelp.tar.gz , you will get a folder named: "123livehelp", access this directory and start the server with the commands: $ cd 123livehelp $ ./lhserver.sh start 3.2.4 Stop the server manually After starting the chat server, you may stop the server with the command: $ ./lhserver.sh stop 3.2.5 Restart the server manually $ ./lhserver.sh restart 3.2.6 Auto-start server after system reboot Step 1: Modify lhserver.sh, find the LHSERVER_HOME section, define which directory lhserver.sh is located. For example, if you uncompressed the 123livehelp.tar.gz into /usr/local/123livehelp, make sure lhserver.sh is in the directory of /usr/local/123livehelp, and then delete the two “#” before the two rows below in lherver.sh to make them effective: FCSERVER_HOME=/usr/local/123lhserver 7 123 Live Help User Manual export FCSERVER_HOME Step 2: Modify /etc/rc.local file, add one row: /usr/local/123lhserver/lhserver.sh Just replace "/usr/local/123lhserver/ " with your FCSERVER_HOME value. 3.3 Other UNIX Operating System 3.3.1 Install JRE 1.4.2 or above (we recommend JRE 1.5) For other unix os server, you have to install a JRE 1.4.2 or above first, we recommend JRE 1.5, you may download it here: http://java.sun.com/j2se/1.5.0/download.jsp 3.3.2 Get the free other OS package. http://www.123livehelp.com/download.html Download the other OS version: 123livehelp_s.tar.gz 3.3.3 Decompress downloaded file. You may use the following command to uncompress the downloaded file. $ gzip -d 123livehelp_s.tar.gz $ tar xvf 123livehelp_s.tar 3.3.4 Set JRE Environment variable Run the java application, please set JAVA_HOME env variable and PATH env variable. For example, JRE installed in: /usr/local/java/jre , you should set: JAVA_HOME=/usr/local/java/jre;export JAVA_HOME PATH=$PATH:/usr/local/java/jre/bin;export PATH 3.3.5 Start the chat server After setting the JAVA_HOME you may start the server with the command: (Remember to put all code below in one single line.) $ java –classpath CLASSPATH:lib/lhserver.jar: jar:lib/log4j.jar:lib/jdom.jar:lib/xerces.jar com.topcmm.jchat.LHServer & 8 123 Live Help User Manual 4 User Interface There are three kinds of user interfaces of 123 Live Help: admin panel, operator panel and customer chat client. Different interfaces have different functions and will serve as entrances for users on different levels with various authorities. Various user levels - Admin has overall power to supervise all the departments/chat rooms and all the staff and clients. - Operator manages specific room(s) and offer service to clients; operator will be monitored by admin. - Customer, the end customer seeks help from operator and has the least power over the platform. Customer1 Operator1 Customer2 Customer3 Department1 Customer4 Operator2 Customer5 Customer6 Department2 Customer7 Operator3 Customer8 Customer9 Admin1 Admin2 All these three kinds of chat clients can be accessed from the Welcome Page, which can be activated when installation is finished by choosing the checkbox before the sentence: Server has been installed and started, start a client to test. Welcome Page can also be opened manually in the start menu: 9 123 Live Help User Manual Start-> Programs-> 123 Live Help Server4.0> Welcome As shown in the picture below: You‟re recommended to keep this page somewhere only to yourself and only publish the Staff status button to your users. We will discuss the three options below. 4.1 Admin Panel 4.1.1 How to access Admin Panel Click the 123LiveHelp icon in desktop, login as administrator. If you execute the admin panel for the first time, you need to configure the basic info first. 10 123 Live Help User Manual Then you will see the login form. 4.1.2 Monitor In monitor panel, admin have super power to monitor all the one-to-one communications between operator and the customers. Admin can open multiple conversation windows to monitor but can‟t join the chat directly. Once any connection is built between customer and the operator, admin can monitor online customer‟s nickname and logon time, operator‟s name and department they are in, etc. This is the screenshot of the Monitor Panel with two conversation windows activated by clicking the “Monitor” button. 11 123 Live Help User Manual 4.1.3 Account Manager Admin can add, modify and delete two kinds of accounts in this panel: admin accounts, or operator accounts. There is an account list view in this page. Click a category to view existing admin accounts, operator accounts with their status (if any). Click the add button in the right to add a new account. Choose an account name in the list view before modifying or deleting it. Note: After adding admin, you don‟t need to designate him to any department, because admin has super power over all available department; adding operator accounts is different, please bear in mind to designate him into specific department(s) at first. Or he can see no visitor at all even if he successfully logs in the operator Panel. 12 123 Live Help User Manual 4.1.4 Search Basic Search Just leave all the options as default or null in search panel to perform basic search, you will get the chat record of current day in current department. Advanced Search You can define more options before “search” to get more precise results. Choose time and/or “customer name” and/or “operator name” and/or “department” before clicking “search” to perform search. Search result: Every entry of search result includes following items: Customer name, Operator name, country (of customer), IP (of customer), Login Time (of customer), Department (if customer and Operator), Details Link. As displayed in the picture below: 13 123 Live Help User Manual 4.1.5 Department Admin to customer: You may need to create multiple departments to allocate visitors for operator to serve them better, for example, “Pre-Sales” and “Post-sales Technical Support”. Admin to operator: Once again we‟d emphasize, don‟t forget to designate new operator to specific department(s) first or the new operator can‟t see any visitors at all! One department can have multiple operator members and one operator can manage multiple departments. Like the diagram shows before. Here is a screenshot of the department management panel. As you can see, departments can be added, modified or deleted. 14 123 Live Help User Manual 4.1.6 Ban and Unban: Admin can ban or unban user‟s IP in this panel, and there is a ban list in this panel with all the banned IP being listed here. As showing below: 15 123 Live Help User Manual 4.2 Operator Panel 4.2.1 How to access Operator Panel Click the 123LiveHelp icon in desktop and login as operator This is a platform for operators to manage chat and offer live help and support to website visitors/ customers. Default test accounts: Username: staffa, password: test Username: staffb, password: test 4.2.2 Operator and the department Once logging in, the operator will automatically enter the departments he belongs to which is predefined by admin. As long as there‟s active operator member online, the department he‟s in charge will become “live” in customer‟s login page list. Whereas, departments without operator will display as offline in gray color and can‟t be chosen from the list. Screenshot of the customer’s chat client: 16 123 Live Help User Manual Operator Panel Preview: 17 123 Live Help User Manual 4.2.3 Operator Online/Offline Button You are recommended to place a chat button on your webpage, showing the availability of the general operator team (online or offline) with the built-in presence detector. If one or more operator online, If no operator online, You may log in as an operator member and refresh the “Welcome Page” to view the “online” chat button; Then log out as the operator member and refresh the “Welcome Page” to view the “offline” chat button. The graphics can be replaced. You can design by your own or hire us to design for you. 4.2.4 Customer list Top of the panel shows the user list, including following information: customer name (when does he/she log in), status (waiting, chatting, or operator lost connection, or disconnected). There are three degrees of the waiting customer, displayed by background colors which would change from white, yellow to red ; and distinguished by their waiting time period, from short to long. 18 123 Live Help User Manual 4.2.5 Proactive Chat Invitations. Top left of the panel shows the visitor list; the operator member can monitor a website and invite a visitor from the certain webpage to chat to up-sell product or offer help. The visitors won't have to click any chat button on the webpage, they will instead be greeted by some friendly notification that the operator would chat with them to offer assistance. What's more, the invitation won't be blocked by pop-up killer. As shown in the picture below. When the operator clicks the Invite button, and submit some message, an invitation window with warm greeting will appear on the client‟s page. 19 123 Live Help User Manual This is the demo page in customer panel. Admin could generate this code in the Admin panel, which can be added to your website to launch this function. In admin panel, you could customize the code, including the invite window‟s style, color, etc. 4.2.6 User Info Following information is shown in this panel: customer name, IP, country, login time, current department, status, location (to show the customer is on which webpage), client„s time zone, language (OS), and nickname (user‟s nickname). 20 123 Live Help User Manual 4.2.8 Predefined messages This can be very handy for operator, especially when there is large traffic on the website. When one staff needs dealing with multiple customers with repeated questions simultaneously, these canned answers can be extremely helpful to save time. Canned answers can be added or removed, they can also be categorized. 4.2.9 Chat window One-to-one private messages between operator and customer are managed in this sub-panel. On the top of the chat panel, there are 3 buttons. 21 123 Live Help User Manual Transfer: Operator can transfer user to another Operator across the department. Operator can kick/ban rude user out of the conversation. Kick is kick only, not accompanied with “Ban” Staff can ban user by user‟s IP 4.3 Customer Chat Client There are two shortcuts in the start menu to access customer chat client and test. 1. Choose “Customer Panel “Welcome Page”. 2. Click “Customer Chat Client” in start menu directly, if Windows users. Start-> Programs-> 123 Live Help Chat Server 4.0-> Client-> Customer Chat Client Showing below: Customer chat client is pure flash and web-based so that the customers who visit your website don‟t need to download any plug-in to chat with your staff members. The 123LiveHelp client SWF can be embedded into any webpage of a website and can be resized.(Recommended size: width>=495, height>=376.) By default client will login as unregistered guest. Customer choose department: Before logging in, the customer will be required to choose a department first so that the staff can classify the customer‟s intentions proactively. Click “submit” to wait in queue to request support and service. After an available staff accepts the request, the customer will be informed of the good news and the input area becomes functional. Customer rate operator: Once the conversation starts, the customer can rate how helpful an operator is, from one star to five stars, in a stretchable rating panel. Click the small arrow at the right of the conversation window to stretch the rating panel. As shown below: 22 123 Live Help User Manual 23 123 Live Help User Manual One operator transfer chat with a customer to another operator: If operator A transferred one customer to operator B, the customer will get notification and be aware of the process, too. History Customer can check the chat script by clicking this button. A webpage with conversation logs will pop-up. Exit Customer can quit the conversation by closing the chat panel. 4.4 Live Help Remote Controller (MSN edition) Administrator may create a robot in live help and then grant the access of the robot to the reliable person(s) to remote monitor live help via MSN. The configuration is in the “lhserver.xml” <remote-controller enable="Off"> <bot account="" password=""></bot> <language value="en"></language> </remote-controller> XML Child Parameter Type Default Description value Remote-controller enable String Off Enable or disable the remote controller function Bot account String null Robot account. For example: [email protected] Bot password String null Robot password language value String en Display language of the Robot. 24 123 Live Help User Manual Furthermore, there are four steps to configure the MSN Robot. 1) Create Robot MSN Account Room owner sign up a new Windows Live ID/ Windows Live Messenger Account as the Robot account. For example: [email protected] 2) Open the lhserver.xml Administrator opens the lhserver.xml and enters the Robot MSN account [email protected] and its password, following the instructions above. 3) Add monitor(s) Open <LiveHelp4.0 installed dir>/etc/groups/default.xml. Find the element <msn-monitor>, then add your friends‟ msn account. e.g.: <msn-monitor> <monitor>[email protected]</monitor> <monitor>[email protected]</monitor> </msn-monitor> 4) Monitor room via Bot Your friends add Bot MSN to their MSN friend list to monitor and control the room externally. Clarification: Please be aware that so far two kinds of MSN account are involved, the account of the Robot and the one of your friends‟. The previous one works as a bridge connecting the room and the room manager. The latter ones will be used to monitor chat room eventually. 5) Change the language If you want to change the language, follow the <LiveHelp4.0 installed dir>/etc/language/bot/language_en.xml, fill the new language and rename the file following this format: “language_” + your language‟s short name +”.xml”. e.g. language_fr.xml Then open the lhserver.xml, find element <remote-controller>, change the “en” into your language‟s short name. 6) Restart Live Help server 25 123 Live Help User Manual to apply the changes. Tips The following commands are available on MSN to control the live help externally. Click the nudge button to get help! Command list: /help Get the help list. /staff Get the online staff list. /con Get the online conversation list. /monitor Monitor the real time conversation. e.g. /monitor guest1 /stopmonitor Deactivate monitor the real time conversation. /search Search the message logs. e.g. /search 2008-1-1 2008-2-1 keyword After search, you can use "/view page" to browse all the result. 5 Integration Here is a quick tutorial to integrate 123 Live Help with your website. Usually it takes only a few minutes. Firstly you need to install 123 Live Help free demo version, which can be obtained freely from this page: http://www.123livehelp.com/download.html, choose one edition suits your OS, download and install it. Secondly, once you got the welcome page working locally, you can move forward to integrate the new 123livehelp chat clients with your existing website. Basically 123livehelp can integrate any kind of web server, whether apache, IIS or others. If the chat server (of 123 Live Help) and web server are located on the same server, you have two options to do so. (If not, please consult our engineer for details.) Before we proceed, please be aware that we're talking about the integration of the chat clients with your webpage, and 123 Live Help chat clients are composed of three parts, which are respectively for admin, staff and customer. Option A: Use the HTML pages in the demo installation package as chat client entrance. 26 123 Live Help User Manual Copy the "html" folder in the directory: "<123LiveHelp4.0 installed directory>/html/" to your web server path. Then the "index.html" in this folder can be the entrance of your customer/staff/admin. (Of course you can modify this page to suit your needs and style, at least don't forget to change password of admin and staffs.) Option B: Embed 123 Live Help chat clients' SWFs to your own webpage. Two steps: 1) Copy client files Copy the client components to your web server, including "client.swf", "config.xml" and "lang" folder, and keep them in the same directory. 2) Embed flash HTML code (object tag) to webpage. <script language="javascript" src="<live help server ip>:<live help server port>/live_status.js"></script> <!-- e.g <script language="javascript" src="127.0.0.1:8969/live_status.js"></script> --> <script language="javascript" src="123livehelp.js"></script> <script language="javascript"> var parameters=""; if(urlLink==undefined) { var urlLink; try { urlLink=window.location.href; 27 123 Live Help User Manual } catch(e) { try { urlLink=document.URL; } catch(e) { urlLink=""; } } } if(urlLink.indexOf("?")!=-1) { parameters=urlLink.substring(urlLink.indexOf("?")); } var urlValue="client.swf"+parameters; openSWF(urlValue,"100%","100%","livehelp","topcmm_123livehelp"); </script> <noscript> <DIV id="livehelp"> <object classid="clsid:D27CDB6E-AE6D-11cf-96B8-444553540000" codebase="http://download.macromedia.com/pub/shockwave/cabs/flash/swflash.cab #version=6,0,29,0" width="100%" height="100%" id="topcmm_123livehelp"> 28 123 Live Help User Manual <param name="movie" value="client.swf"> <param name="wmode" value="transparent" /> <param name="quality" value="high"> <embed src="client.swf" quality="high" wmode="transparent" pluginspage="http://www.macromedia.com/go/getflashplayer" type="application/x-shockwave-flash" width="100%" height="100%" name="topcmm_123livehelp"></embed> </object> </DIV> </noscript> You may configure the Staff and Admin Panels in the similar way. As to the invitation window code, please use the “generate code” page by choosing from the top menu in welcome page. Note: live_status.js It reflects the data change of the chat server at real-time, including all the online staff and their department, and all available departments. The physical destination of the JS file is flexible and defined in “default.xml”, three samples: <live-status-file enable="On"></live-status-file> <live-status-file enable="On">c:\website\live_status.js</live-status-file> <live-status-file enable="On">website\live_status.js</live-status-file> The first case is in the default client folder of the installation folder; the second is absolute address while the third is relative address. Just make sure the address can be accessed via HTTP. 29 123 Live Help User Manual Once the destination is acquired by the chat server, it will generate a “live_status.js” there. Therefore, the “live_status.js” will be on the chat server. So, in the client HTML, if the html folder and the JS can be visited via the same domain, it can be relative address like this: <script src="live_status.js"></script>. Otherwise if they‟re on different domains, it should be: <script src="domain:port/live_status.js"></script>. No matter in what case, the point is to ensure the client to read the JS without problem. 6 Configuration 6.1 Client Configuration The configuration for the live help chat clients are: config.xml It is located at <123LiveHelp4.0 installed directory>/html/ 6.1.1 config.xml This file controls the basic configuration of the Admin Panel, Staff Panel and Customer Chat Client. You can modify the parameters referring to the table below: (Among them, some are just for client.swf which only serves the end customer.) Parameter Type Default Description Value ServerHost-> Host String * The host of the primary server. It has to match the server host. ServerHost-> Port Number 8969 The port of the primary server. secondaryServerHos String * The host of the secondary server. It has t-> Host secondaryServerHos to match the server secondary host. Number 8968 The port of the secondary server. On/Off off Usually the secondary server is t-> Port Enable 30 123 Live Help User Manual unnecessary, you may turn it off. httpServerHost-> String * Host(only for The host of the build in http server of 123LiveHelp, client.swf) In some network environment, such as connection via proxy which will fail the main port 8969, http server is useful. Otherwise, when user needs to check the logs, http server is also required. httpServerHost-> Number 8988 Port(only for The port of the build in http server of 123LiveHelp, client.swf) homeUrl(only for String client.swf) http://w The web address of your homepage, ww.123 clicking logo will direct visitors to this livehelp page. .com Logo(only for String client.swf) language String 123live The logo picture of your website, jpg or helplog swf format. Recommended size: 210*40 o.swf pixels. * The language setting. By default it's "*". Language value can be either defined to "*" or a specific language. eg: "en" for English. If "*", it will automatically detect the language of every user's OS and assign a corresponding language to user from the existing language collection. message(only for String The auto messages displayed to visitors client.swf) while they're waiting in queue until some available staff to start the conversation. Message-> interval(only for Number 20 The time interval between two messages, unit: seconds. client.swf) 31 123 Live Help User Manual Message-> Boolean enable(only for true Enable or disable the auto-message feature. client.swf) Message-> m(only String for client.swf) Predefined messages for waiting customers. 6.1.2 Init Parameter/ Client APIs This is used to make client.swf to get some initialization parameter by URL. e.g.: http://localhost/client.swf?init_user=user&init_password=password There are many initial parameters used in 123livehelp4.0 in order to integrate 123livehelp swf files with web page more conveniently. 1)init_user & 2)init_password These two parameters are used for member auto-login 123livehelp. To client.swf, these two ones are not so important comparing with 123flashchat since 123livehelp is just for online sale and most customers are guest users instead of member users. 3)init_nickname This parameter is very important for customer login. Without it, customer will use a default name just like "guest_xx",and it will make staff or admin a headache. 4)init_room We now use the conception "department" instead of "room" in 123livehelp.But in order to be compatible with the old version, init_room is still used and it means initial department in fact. 5)init_key This is for swf identification. In order to identify that whether the swf is a legal file, it needs to send the key to server when beginning to connect to 123livehelp server. 6)init_root This is the root path to 123livehelp client. We can load or call the 123livehlp files which includes swf, xml,language and other files through this path. 7)init_url This is the url which customer is visiting. And this parameter will be sent to staff as one 32 123 Live Help User Manual user information item in the user info panel. 8)init_question Customer can send a question to staff before logining 123livhelp for asking help. 9)init_logo This is the file name of logo in client.swf.If you set this parameter, the logo file which maybe a jpg or a swf must be already placed in the 123livehelp root directory. 10)init_group This is the group name. In a 123livehelp host or server, there are several groups, and with some clients in each group. Any client which want to get service from 123livehelp server should join in a group or the server may refuse its connection. The default value for this parameter is "default" which can also be set in config.xml. 11)init_host & 12)init_port These two parameters can let swf connects to server through the host address and the port specified by these two ones. 13)init_secondaryHost & 14)init_secondaryPort These two ones are used after the first connection by init_host and init_port is failed. 15)init_lang This is used for configuring 123livehelp language.There are only two kinds of language now, "en" for english, "zh-CN" for simplified Chinese. More language will be realized later. 16) init_color There are five kinds of color for user selecting: red, green, blue, violet, black, and the default one is blue. 17)init_dc when staff invites a webpage visitor, it will send parameter "init_dc = 1" to client.swf, and staff will receive the "dc" attribute which just display a star in front of username in the user list. With init_dc, parameter "init_room" will not work for auto-entering department any more. In another word, init_dc can disable the function of auto-entering department. Without it, init_room will still work for auto-entering department in deed. 33 123 Live Help User Manual 18)init_staff This parameter will be passed from dc to clien.swf then to server with attribute "staff", so server can only send this invited customer to the appointed staff. Parameter Description init_host To initialize the server‟s host name(IP address or DNS name) init_port To initialize the server‟s port. init_user To initialize the user‟s name. init_password To initialize the user‟s password. init_url To initialize the login URL of the client. The staff side will know the user open the client in which URL. init_video To enable or disable the video of the client Value: True/false 6.2 Server Configuration By default, all configuration for the chat server is controlled by two files: lhserver.xml, which is located at: <123livehelp installed directory> /etc/lhserver.xml default.xml which is located at: <123livehelp installed directory> /etc/group/default.xml Windows users can also access both files from start menu. 6.2.1 lhserver.xml How to edit it? In Windows, you may open lhserver.xml in notepad to edit it. If you now open it with IE browser, you may check source code by right-click to edit it directly. In Unix, you may use vi to edit lhserver.xml. After modifying this configuration file, please open it in a browser to test. 34 123 Live Help User Manual If syntax error pop up, please configure it again before launching the chat room. After modifying this file, you have to restart the chat server to make it effective. There are three parts of configurations in lhserver.xml, <Connection> Configuration <Global> Configuration <Mail-stmp-server> Configuration 1) Connection Configuration Two servers In the Connection Section, you can set two servers and listen to two ports. In the Connection Section, you can set two servers and listen to two ports. primary-server secondary-server There are four reasons as to why there is a second server port option. They are listed below: 1) Any version before Flash Player 7 only allows access on a high port (1024-65535) due to security reasons, while a low port is forbidden. If you are okay with high port you will not need to set secondary-server. However if you need to set port lower than 1024, you will need a secondary-server. 2) If the port of your primary-server is lower than 1024 like 80, then only users with Flash Player 7 or newer versions will be able to access the chat while users with flash player 6 can‟t. In this case a secondary-server will be necessary. The port for the secondary server should be greater than 1024, which will allow users with an earlier version of Flash Player to access chat. 3) If you are going to set a high port for your primary-server, then usually you will not need a secondary-server. You will be able to leave the option as default: enable=“off”. 4) Using two servers with two ports is just a temporary solution while some users are still using Flash players earlier than version 7. When Flash player 7 or higher version becomes mainstream, we will take off the secondary-server for future versions of 123 Flash Chat. To help understanding, please study two tables below: 35 123 Live Help User Manual Parameter High port (1024-51127) Low port (<1024) >=Flash player 7 Primary server secondary server Table1 Parameter High port (1024-51127) Low port (<1024) >=Flash player 7 Primary server (unnecessary) Table2 To modify the Parameters, please refer to the table below: Parameter Type Default Value Description port Number 8969 The server port must be identical with the port value in config.xml. ip String * Set the Server address. A default “*” means the live help server will bind to all IP addresses of your server. The host value in config.xml can be a random IP address or any domain name which points to this IP address. Either way, clients will be able to connect to the server. If you set IP address of the server to the specific IP address of your server, then the live help server will only bind to this IP. 36 123 Live Help User Manual This will mean that in config.xml, to connect the live help server, you can only use this specific IP address or the domain name which points to this IP address. http-server: To modify the Parameters, please refer to the table below: Parameter Type Default Value Description port Number 8988 The server port must be identical with the port value in client.xml. ip String * Set the Server address. A default “*” means the chat server will bind to all IP addresses of your server. The host value in config.xml can be a random IP address or any domain name which points to this IP address. Either way, clients will be able to connect to the server. If you set IP address of the server to the specific IP address of your server, then the live help server will only bind to this IP. This will mean that in config.xml, to connect the live help server, you can only use this specific IP address or the domain name which points to this IP address. enable String On Enable or disable the http server documentRo String html The directory out of which you will serve ot your documents. By default, all requests are taken from <123livehelp installed directory>/html directory. 37 123 Live Help User Manual maxUPLoad Number Size 1024 Setting the max file can be uploaded to the server, if the value less than or equals to 0, this means the server will not accept any upload files. Cross-domain-policy The chat server uses the cross-domain-policy to ensure security. <cross-domain-policy> <allow-access-from domain="*" /></allow-access-from> </cross-domain-policy> By default it permits access to the connection originating from any domain. To limit access from a specific domain name, you can configure your server in the following way: <cross-domain-policy> <allow-access-from domain="www.mydomain.com" /></allow-access-from> </cross-domain-policy> To allow all URLs on mydomain.com to be accessible, you can configure your server in the following way: <cross-domain-policy> <allow-access-from domain="*.mydomain.com" /></allow-access-from> </cross-domain-policy> 38 123 Live Help User Manual To allow multiple domain names to be accessible you can configure your server in the following way: <cross-domain-policy> <allow-access-from domain="www.myfriendsdomain.com" /></allow-access-from> <allow-access-from domain="*.mydomain.com" /></allow-access-from> <allow-access-from domain="11.22.33.44" /></allow-access-from> </cross-domain-policy> 2). Global Configuration To modify the Parameters, please refer to the table below: Parameter Type Default Value Description message-han Number 10 It deals with messages. dle-workers To handle high frequency messages with over 1000 chat users in one room, please set it to a higher value. Normally you will not need to change it. listen-worker Number 5 s If the maximum number of users is over 1000, please configure it with larger number. Normally you will not need to change this. http-listen-wo Number 5 rkers The value of http-listen-workers determines on the purpose of the http server. If you use the http server to receive the upload files mainly, please set it to a bigger value (about 20~50), if you use the http server act as a proxy server, setting the value equals to the listen-workers is enough. http-message -handle-work Number 10 It can deal with messages from the HTTP server. 39 123 Live Help User Manual ers To handle high frequency messages from your HTTP chat server with over 1000 users, please set it to a higher value. Normally you will not need to change it. max-connecti Number 10000 by the license you‟ve purchased. on user-timeout The user maximum in all rooms will be limited numbers 300 If a still logged-in user does not send a request to the chat server for a predefined period of time, chat server will stop serving him and the connection will be cut. For example: If a user clicks another URL in their current browser instead of quitting 123 Flash Chat first, their connection will be cut by this setting. But if the 123 Flash Chat user is inactive inside their current browser their connection will still be kept as the flash and client will send request to the chat server at intervals to keep the connection alive. user-connecti numbers 20 on-timeout A user will get “failed to log in” error message when it exceeds the predefined period of time to try to connect to the chat server. data-path String data Sets the folder name in which following data files are stored: member folder; ban-ip list; ban-user list, etc. admin-logs-p string logs Name of the folder of admin log data files. Number 10 Connection limit of each IP. By default it is “10”. ath max-connecti ons-per-ip If configure it to “0”, then one IP can login unlimited connections, this can be used for performance test. time-zone Number 0 Set your local time zone. from -12 to 12. 40 123 Live Help User Manual For example, -5: GMT-5 , 8: GMT+8 Default is 0: GMT data-base-m String Default Set the data base mode you used with the live ode help server. Default Mysql 3). Mail-smtp-server Configuration When no staff is available and client will be suggested to send email to admin-email, you need to configure smtp server here. Parameter Type Default Value Description host String localhost Host of the smtp mail server. port Number 25 Port of the smtp mail server. auth-user String / Username of the smtp mail server, if any. auth-password String / Password of the smtp mail server, if any. ssl String Off Whether using the ssl mode to encrypt messages. 6.2.2 default.xml 1) General setting To modify the Parameters, please refer to the table below: Parameter Type Default Value Description max-connect Number 10000 Maximum connection at the same time in current ion max-messag group. Number 512 Maximum characters of a message. e-length 41 123 Live Help User Manual integrated-ot String None her-databas 123livehelp can integrate your own user database, like that of your forum, or portal system. e The modes are : None - not using any integrated database to authorize a user, can only login as a guest. Mysql - using mysql database Oracle - using oracle database ODBC - using ODBC DSN to connect database Common - using all kinds of database, advanced setting URL - using web url to authorize user's login information. If it is set to "None", when a new user click "register", he or she will register in your chat room, If set to "Mysql", "Oracle" or "common", then when user click "register", a new window will pop up and he or she will be directed to another url which is set by you in client configuration. Auth-url String / You can just leave it blank or even delete this line. It is only necessary when "integrated-other-database" is set to URL. It means the URL you use to authorize users must have 2 arguments. One is the %usename%, the other is %password%. eg: <auth-url>http://www.yourhost.com/login_chat.php ? username=%username%&password=%pass 42 123 Live Help User Manual word% </auth-url> In this URL, "&" means the character "&' in xml. That is to say when the user input username "myname" and password" mypassword", the chat server will visit "http://www.yourhost.com/login_chat.php?userna me= myname&password=mypassword" in order to get the login information which will be numbers between 0 to 7, each with a different meaning. 0 - login successfully; 1 - wrong password; 2 - the username can't be used; 3 - login error, e.g. error in connecting database; 4- username not existing; 6 - guest login not allowed; 7site-key String username banned. XH00-YPWS-T The code to validate your website. You can modify I3E-KQLW this value, but it must be the same with the siteKey value in client configuration, otherwise the client can't connect your server. admin-email String admin@ When no staff is available, client will be directed to your_domain a page to send message to this email. .com live-status-fil e-> Enable On/off on The status of the staff( online or offline) will be record in a file if enable= "On", 43 123 Live Help User Manual if enable="Off", then no record will be generated. By default it's "On". live-status-file: The path name of the staff status record file. By default it's "", indicating default html directory, and the name of the record file is "live_status.js". 2) Record-per-page Setting Parameter Type Default Value record-per-page->text number 50 Description Configuring the max record can be displayed in each page in search panel. 3) Encrypt-message Setting Parameter Type Default Value Description Configure whether or not to encrypt message. By default it's "Off", means disable this feature. encrypt-message On/Off Off ->enable Chat messages can be encrypted by using RSA, which ensure the privacy and chat security. 4) Enable-guest-login Parameter Type Default Value Description enable-guest On/off On Allow unregistered guest to log in or not. -login When its value is 'on', the client side will login the user by filling the username and password, ,this will require you to integrate the database first to validate the user account. 44 123 Live Help User Manual 5) Modules setting 5.1 Flashcom-audio-video module With flashcom-audio-video module enabled, you can add webcam and voice chat. In video-voice chat, 8k/sec bandwidth is used by default. And this bandwidth consumption is adjustable. Unlike the basic text chat, this webcam chat module is developed based on flash media server, and can fully integrate current 123livehelp. If you don't obtain the flash media server yet, you can buy directly from macromedia: http://www.macromedia.com: Flash Media Server or Flash Communication Server. Video Control The code to activate video function to 123flashchat, sample: <flashcom-audio-video targetURI="rtmp:/123livehelp" video="Off" audio="Off"></flashcom-audio-video> Parameter Type Default Description value targetURI string The Uniform Resource Identifier (URI) of the application on the Flash Media Server that should run when the connection is made. audio On/Off On Enable the audio mode video On/Off On Enable the video mode 2. Customize transcript style The apache velocity template engine is implemented to ensure that the transcript style can be customized. About how to use the apache velocity template engine to do it, please refer to the URL below: http://velocity.apache.org/engine/devel/developer-guide.html 45 123 Live Help User Manual There are three transcript velocity template in <123livehelp installed directory>/etc/groups/ admin_transcript.vm: define the transcript style for admin panel, staff_transcript.vm: define the transcript style for staff panel, visitor_transcript.vm: define the transcript style for client (and chat history email) We provide the following method for you to invoke in xxx.vm template Interface: Transcript: String getBrowserType() (return the vistor browser type) String getDepartmentName() (return the department name) String getDisplayResoultion() (return the visitor monitor display resolution) long getEndTime() (return the end time in milliseconds) String getId() (return the transcript session ID) long getPickUpTime() (return the staff pick up visitor time in milliseconds) String getPlain() (return the transcript content in JSON format) String getQuestion() (return the visitor‟s question) int getRate() (return the staff rating) String getReferUrl() (return the visitor origin URL) String getRemark() (return the staff remark) String getStaffName() (return the staff name) long getStartTime() (return the start time in milliseconds) String getVisitorCountry() (return the visitor country) String getVisitorIp() (return the visitor IP) String getVisitorName() (return the visitor name) String getVisitorNick() (return the visitor nickname) 46 123 Live Help User Manual String getVisitorProfile() (return the visitor profile) Vector<TranscriptContent> getTranscriptContentList() (return the transcript content list) int getTranscriptNum() (return transcript content number) String getStartTimeStr() (return the start time in yyyy:mm:dd hh:mm:ss format) String getEndTimeStr() (return the end time in yyyy:mm:dd hh:mm:ss format) String getPickUpTimeStr() (return the pick up time in yyyy:mm:dd hh:mm:ss format) String htmlescape(String s) (escape the HTML code) String htmlunescape(String s) (unescape the HTML code) You could invoke methods of the transcript instance by $transcript.method in xxx.vm template. TranscriptContent: String getFrom() (return the message sender) String getMessage() (return the message content) String getTo() (return the message receiver) String getDate() (return the date in yyyy:mm:dd format) String getTime() (return the time in hh:mm:ss format) int getType() (0 means staff message and 1 means visitor message) You can use “#foreach( $transcriptConent in $transcript.getTranscriptContentList().iterator())” to get the TranscriptContent instance, and use the $transcriptConent.method to invoke the methods of TranscriptContent instance. 47 123 Live Help User Manual 3. Expansion API If the data-base-mode of 123 Live Help is Mysql, you can get the message logs from the database use your own program. The message logs are saved in the Transcript table. Below is the structure of this table Column Type Description id varchar(255) Primary key group_id int(11) Flag of the group parent_session_id varchar(255) If the staff transfer the visitor to another staff, it will store the previous transcript ID visitor_name varchar(255) Visitor‟s name visitor_nick varchar(255) Visitor‟s nickname visitor_country varchar(255) Visitor‟s country visitor_ip varchar(128) Visitor „s IP address visitor_profile varchar(255) Visitor‟s profile start_time bigint(20) Store the start time when visitor enters the 123 live help. pick_up_time bigint(20) Visitor „s pickup time end_time bigint(20) Conversation‟s end time department_name varchar(255) Department name staff_name varchar(255) Staff‟s name remark varchar(255) Transcript‟s remark refer_url varchar(255) Visitor „s refer URL plain text Message details browser_type varchar(255) Visitor „s browser types display_resoultion varchar(255) Visitor‟s display resolution 48 123 Live Help User Manual rate int(11) Transcript‟s rating transcript_num int(11) Transcript „s number question text Visitor‟s question staff_response_times int(11) Staff response time staff_response_total_used_time bigint(20) Total length in time of the staff‟s response type int(11) It is not used yet Note: 1) To store the time, we use milliseconds forms which start from 1970-1-1 00:00. These columns are start_time, pick_up_time and end_time. And staff_response_total_used_time stores the conversation length (millisecond). 2) In column plain we store the message logs in JSON format. You can get the format details in http://www.json.org/. Below is the structure of the plain column. attribute Description a Main attribute a Data b Time c From d To e Message f Message type 0 staff message 1 client message 2 offline message And this is a JSON example: 49 123 Live Help User Manual {"a":[{"f":"1","d":"staffa","e":"Can you help me?","b":"13:58:52","c":"guest5","a":"2008-04-03"},{"f":"0","d":"guest5","e":"Yes","b":" 13:58:54","c":"staffa","a":"2008-04-03"}]} ---------------------- End. ---------------------- 50