1
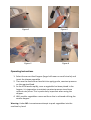
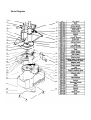
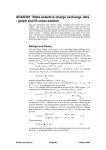
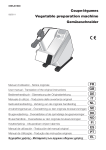
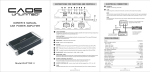
Vegetable Preparation Machine
VPM Operating Manual
Introduction
Thank you for purchasing a Pantheon Catering Equipment product. In this
booklet you will find instructions for safe operation so please read carefully
and retain for future reference.
Warnings and Precautions
The following warnings and precautions are important and must be observed:
• Ensure voltage and frequency power requirements for the vegetable
preparation machine match that of the supply.
• The machine must be earthed when used. There is a danger of electric
shock if it is not earthed.
• In case of emergency, please turn off the power switch and unplug the
machine.
• If the electric wire becomes damaged, a qualified engineer or the
manufacturer must replace it.
Pantheon Catering Equipment is not responsible for any accidents or faults
caused by amendments made to the machine or improper use by the user.
Technical Data
Specifications:
Model:
Voltage (V)
Power (W)
Disc Speed (rpm)
Weight (Kg)
Dimensions (mm)
VPM
220-240V 50Hz
500
270
23
235w x 490d x 480h
Installation
Positioning:
The installation of the unit must be performed by a qualified technician only.
Place the device on top of a solid, even, safe and stable surface that tolerates
the weight of the unit.
Ensure no flammable products are placed near the unit, as it will get hot.
Position the device appropriately so that the plug is always accessible. Also
ensure the unit isn’t placed close to any water.
Before attempting to set the unit up, ensure it is switched off and unplugged.
The Cutting Blades and Graters:
Follow the instructions below and use figures 2-4 to ensure the blades and
graters are correctly installed.
1. To open the unit, rotate the knurled locking handle and swing open the
top cover. (See fig.2)
2. Fit the ejector disc, ensuring it engages on the drive shaft via the two
pegs.
3. Locate the dicing grid if required. [N.B Dicing grids will only fit one way.
(See fig.4)]
4. Locate the slots on the cutting disc in the pegs on the drive shaft and
turn through 90 degrees to secure. (See fig.3). The cutting disc is
correctly fitted when its centre boss is flush with the head of the drive
shaft.
Warning: The cutting discs must be located /removed by handling the plastic
disc and NOT by handling the cutting blade.
5. Return the cover to its operating position and relock into position using
the knurled locking handle.
Figure 1
Figure 3
Figure 2
Figure 4
Operating Instructions
1. Select the correct feed hopper (large half-moon or small circular) and
insert the chosen vegetable
2. Then use the feed arm or feed stick to apply gentle, constant pressure
on the required food.
3. As the VPM works rapidly, once a vegetable has been placed in the
hopper, it is imperative to maintain constant pressure to achieve
uniform cuts/slices. This is particularly important when using the
chipper.
4. With smaller vegetables a more uniform slice is achieved utilizing the
smaller hopper.
Warning: Under NO circumstances attempt to push vegetables into the
machine by hand.
Maintenance
Cleaning
The unit should be cleaned after each use. Before cleaning, ensure the
machine is disconnected from the mains.
All removable parts: Ejector Disc, Cutting Blades, Dicing Grids and Feed Stick
are dishwasher safe, or may be washed in warm soapy water. Prior to placing
them back into the unit ensure they have been rinsed and dried thoroughly.
The body of the machine, including the inside of the top cover, should be
wiped over with a damp cloth. Again before operating the unit again, ensure it
has been dried thoroughly.
Do NOT use abrasives or other products, which are likely to cause damage to
the machine body.
WARNING: Never immerse the body of the machine in water or spray directly
with a jet of water.
Troubleshooting
In the event the VPM does not operate, check and try the following:
• Ensure the plug fuse is of the correct rating and type and that it has not
blown.
• Check to make sure that both the top cover and the feed arm are
correctly positioned and locked.
• Reset the machine by quickly switching OFF and then ON again.
Note: If none of the above resolves the issue, please contact the manufacturer.
Parts Diagram