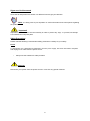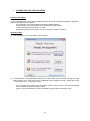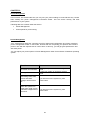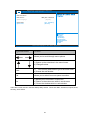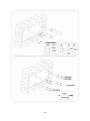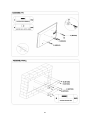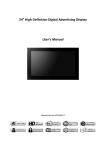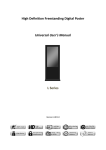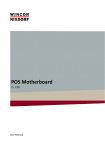
1
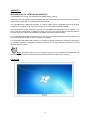
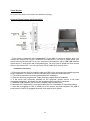
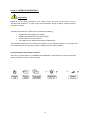
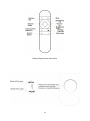
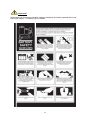
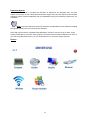
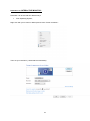
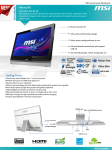
65’’ INTERACTIVE MONITOR HIT-FHD6500PC Touch LED Packing List 1x65” Interactive Monitor with PC 1x65” Interactive Monitor Wall Mount Accessories Box User Manual Quick Start Quide for Windows 8 1xStylus 1xWifi Antenna 1x1500mm HDMI Cable 1xRemote Control 1xBattery for Remote Control 1 Contents NOTE ........................................................................................................................................................ 3 System Features ...................................................................................................................................... 4 INTRODUCTION ....................................................................................................................................... 5 Signs used in this manual ........................................................................................................................ 6 Temperature & Fire ................................................................................................................................. 7 Do not expose your “INTERACTIVE MONITOR " close to fire or high heat sources“ .............................. 7 Lightning .................................................................................................................................................. 7 Servicing .................................................................................................................................................. 7 CHAPTER 1: .............................................................................................................................................. 8 CHAPTER 2: .............................................................................................................................................. 9 USING YOUR “INTERACTIVE MONITOR” INSTRUCTIONS ON USING THE PRODUCT AND ITS FUNCTIONS. ............................................................................................................................................. 9 Turning your “INTERACTIVE MONITOR” product on and off .................................................................. 9 Sound in “INTERACTIVE MONITOR” ...................................................................................................... 11 Operating System .................................................................................................................................. 14 Using the network function................................................................................................................... 18 System Restore ...................................................................................................................................... 18 Function Description ............................................................................................................................. 21 CHAPTER 3: ............................................................................................................................................ 23 Power Management .............................................................................................................................. 23 Power Management .............................................................................................................................. 23 Critical points for power saving ............................................................................................................. 24 CHAPTER 4: ............................................................................................................................................ 25 Adding peripheral units to your product............................................................................................... 25 Connecting USB devices ........................................................................................................................ 25 Updating the Internal Parts ................................................................................................................... 25 CHAPTER 5: ............................................................................................................................................ 26 SYSTEM BIOS INFORMATION ................................................................................................................ 26 Effective usage of BIOS .......................................................................................................................... 26 Using Aptio Setup Utility (BIOS) ............................................................................................................ 26 CHAPTER 8: ............................................................................................................................................ 32 2 NOTE Depending on the product’s model you have bought, the appearance of your “Interactive Monitor” may not be the same with the one displayed in this manual. 3 System Features Operating System Windows 8 Processor Intel® Core™ İ3 Processor 2310M (3 MB Intel® Smart Cache, 2.1 GHz) Chipset Intel® HM65 Express Chipset Graphics Controller Intel® HD Graphics 3000 Memory 1 x DDR3 So-Dimm 4GB (support up to 8GB) Data Storage 2.5” SATA HDD 500 GB (support up to 1TB) Panel and Resolution 65” LED panel 1920x1080 resolution Touch Screen 65” touch screen with 4-touch feature Infrared touch technology Audio High Definition Audio Built-in speakers (4 x 5W) External headphones output and external microphone input Connection 10/100/1000 Mbps internal Ethernet connection via RJ45 connector 1 x half-mini card slot for wireless connection (Integrated Wi-Fi module) Input / Output Ports 1 x USB 2.0 port (To use touch screen with an external PC) (max: 500mA) 2 x USB 2.0 port (On integrated PC) (max: 500mA) 1 x HDMI in port 1 x VGA in port 1 x Audio in port 1 x Audio out port Remote Controller User friendly remote controller Power 220V~50Hz, 1500mA, 275W 4 INTRODUCTION This instruction manual is intended to help you operate your " INTERACTIVE MONITOR " in a proper way and get a better performance. Chapter 1 Introduction to your “INTERACTIVE MONITOR” Chapter 2 Using your “INTERACTIVE MONITOR”. Instructions for using the and its functions. Chapter 3 Power management. Information about power management. Chapter 4 Touch Screen. Addition of other devices to your “INTERACTIVE MONITOR” Chapter 5 System BIOS information. Effective usage of BIOS. Chapter 6 Using your “INTERACTIVE MONITOR” more efficiently. Chapter 7 Troubleshooting. Chapter 8 Assembly Instruction For Interactive Monitor Wall Mount 5 Signs used in this manual Some words and phrases are written in a different format to get your attention. Note: It is being used to put emphasis on useful information and critical points regarding the product. Important! Important instructions are to be read carefully in order to prevent any injury to yourself, and damage to stored data and computer parts. Safety Precautions Please read the following recommended safety precautions carefully for your safety. Power To disconnect your “INTERACTIVE MONITOR” from the power supply, shut down the board's computer and unplug its AC cable from the power source. • Always use the earthed AC cable provided. Warning! Disconnect your system from the power source in case of a long period of disuse. 6 Cleaning Important! Disconnect your product from the power supply before cleaning it. Do not clean your “INTERACTIVE MONITOR” while it is switched on. Use a soft and damp cloth to clean the surface of product. Do not use chemical cleaners to clean the screen. Do not apply cleanser directly on your computer. Vent holes of your product Vent holes on the cabinet of your “INTERACTIVE MONITOR” product ensures stable performance of your computer without overheating. Do not block these openings in anyway. Important! • Do not put any objects in the vent holes of your product. This may cause fire or short circuit of the inner parts of your product. Temperature & Fire Do not expose your “INTERACTIVE MONITOR " close to fire or high heat sources“ Lightning In order to prevent a potential electrical shock, remove your product’s power cords before lightning. Servicing Please refer all servicing to qualified personnel. Do not remove the cover yourself as this may result in an electric shock. Do not jolt your “INTERACTIVE MONITOR.” Ensure that it stays in a balanced stance on its position. Do not throw or drop any object on your “INTERACTIVE MONITOR.” Do not use a sharp object on the screen. Do not keep your “INTERACTIVE MONITOR” in a humid environment. Do not keep your “INTERACTIVE MONITOR” in an extremely cold environment. Do not keep your “INTERACTIVE MONITOR” in an extremely hot environment. 7 CHAPTER 1: INTRODUCTION TO “INTERACTIVE MONITOR” Congratulations for buying our INTERACTIVE MONITOR 65” product! We believe that you will be extremely satisfied with this product and hope that you will have pleasant and productive times with your INTERACTIVE MONITOR. Your INTERACTIVE MONITOR provides a modern design that is compatible with most working conditions by combining a 65” TFT-LCD monitor, touch screen and a desktop computer. Since all essential components that comprise your INTERACTIVE MONITOR are all together, it is easy to use and user-friendly. In addition to being compact, it also supports many functional features. Some of these are; USB ports compatible with USB 2.0 and high quality speakers. Your INTERACTIVE MONITOR enables you to connect to wireless networks and internet without need for any other equipment with its built-in wireless LAN adapter Your INTERACTIVE MONITOR provides you a stunning graphical experience with high performance by providing hardware acceleration support for DirectX 10 and high definition videos with its Intel HD3000 graphics chipset Note: Information here is only for reference purposes, the INTERACTIVE MONITOR you have bought may have some differences from the definitions and images in this manual. Front view 8 CHAPTER 2: USING YOUR “INTERACTIVE MONITOR” INSTRUCTIONS ON USING THE PRODUCT AND ITS FUNCTIONS. Turning your “INTERACTIVE MONITOR” on and off • Turning on the system Hold down your product’s power button for a little while after you check that its AC cable is connected to the power supply. • Turning off your “INTERACTIVE MONITOR” After you finish your work and when you want to stop working with your product, you can turn-off. Situation Method What is required to continue Turning the system off completely In order to prevent data loss, please turn off your system by following the procedure in your operating system. In case your system does not respond to the procedural shut down because of Pressing the power button resource conflicts, you can turn off your “INTERACTIVE MONITOR” by holding down the power button for 4 seconds. Keep in mind that your unsaved data will be lost in this situation. Hibernating the Hibernate mode can be adjusted system from the operating system. Sleep mode Sleep mode can be adjusted from the operating system. 9 Pressing the power button Pressing the power button Touch Screen 65” touch screen with 4-touch feature and infrared technology. Usage of Touch Screen with External PC Touch screen is operating with integrated PC. If you want to use touch screen when you connect an external PC to your “INTERACTIVE MONITOR” via VGA or HDMI inputs, you should connect the external PC to your “INTERACTIVE MONITOR” with a USB-USB cable as shown above. Touch screen will be activated soon. You may need to install the touch screen driver to the external PC. You can use Driver CD to install touch screen driver. Installation instructions 1. Ensure the drivers such as graphics card and USB of the computer are installed properly before installation. It’s better to use the standard driver offered by manufacturers. 2. The multi-touch screen must be connected before installation. 3. Close the antivirus program and Trojan intercept program before installation 4. If the driver was previously installed on the computer, please ensure it has been uninstalled completely, and delete the old installation files manually if necessary. 5. Standard USB extension cord must be used as USB connector wire. 6. Microsoft.net Framework 2.0 must be installed first if it is Windows XP operating system. 7. After the re-plugging of VGA or HDMI port of the screen and host computer, the USB of touch screen must be re-plugged otherwise it will lead to touch failure. 10 Sound in “INTERACTIVE MONITOR” Important! Install the sound drivers included in your system before using the sound function of your “INTERACTIVE MONITOR”. In case of any sound distortions during recording, please decrease microphone volume. “INTERACTIVE MONITOR” sound function includes the following: Digital audio and analog mixer support Realtek High Definition sound codec support Sound control via function buttons Two external ports: External microphone, headphones. The methods of playing and recording sound depend on the operating system in use. Please refer to the instructions in your operating system’s support points for these methods. Function Buttons and Remote Controller: There are 7 function buttons on “INTERACTIVE MONITOR.” These buttons are shown below and remote controller is shown on the next page; 11 Battery Replacement Instructions 12 Important! When battery of the remote controller is empty, the battery should be replaced with a new same type battery. The battery type is CR2025. 13 Operating System “INTERACTIVE MONITOR” is bundled with Windows 8. Selections and language may vary with respect to the region of sale. Hardware and software support may vary with respect to the installed operating system. System instabilities and incompatibilities arising from operating systems are not warranted. Note: Any issues which are caused by customer mis-adjustment of any software including the operating system are not covered by the warranty. Driver CD is given with the “INTERACTIVE MONITOR”. Drivers in this CD are up-to-date. These drivers provide that your product works properly. Also these drivers located in HDD drive D index. If you want to update these drivers, you can download from our customer support web site. Drivers 14 Important! First of all, you should install the “Chipset” and “Graphics” drivers. After these two installations, you can install other devices’ drivers. An external ODD (Optical Disk Driver) is needed to install the drivers from Driver CD. Otherwise you can use the drivers in HDD index D. If you don’t install any driver, related device will have exclamation in Device Manager. 15 Resolution at “INTERACTIVE MONITOR” Resolution can be set with two different ways. From Operating System; Right click with your mouse on desktop and choose “Screen resolution”. Then set your resolution. (1920x1080 recommended) 16 From Graphics Control Panel; Important! If you want to use Graphics Control Panel to set the resolution, scaling must be “Maintain Display Scaling”. 17 Using the network function Connection to LAN Your “INTERACTIVE MONITOR” product has a 10/100/1000 Mbps integrated LAN module and it connects your computer to other computers on the network. It supports a data transfer rate up to 1000 Mbps. The integrated network module is accompanied by a RJ-45 connector. Wireless Network Connection Wireless network connection, which enables users to connect wireless networks, provides great convenience for data transfer. Be sure that chipset driver software is installed. Install the relevant device driver. Note: Any issues which are caused by customer mis-adjustment of any software including the operating system are not covered by the warranty. System Restore When a program or driver is not installed properly, the Windows may operate slowly or in an unexpected way. System restore can restore Windows to a previous date that your operating system operates properly. This operation does not affect your documents, pictures or other data. Before starting the System Restore, save all your open files and then close them. System restore restarts your computer. 1. Click Start then write System Restore to search section. Then click System Restore at search results. If user account password or confirmation is needed, enter the password or confirm. 2. Then follow the steps at System Restore Wizard. 18 System Recovery Push F8 button on keyboard to enter the system recovery section while your system is starting. Continue with Repair Your Computer choice as shown below. 19 Accesing BiosScreen Click “Settings” Select “Change PC Settings” PC Settings Select “General” category Click “Restart” button under “Advanced startup” Under “Choose an option” category Click Troubleshoot Under “Advanced Options” category Click UEFI Firmware Settings UEFI Firmware Settings Click Restart BIOS screen will appear 20 CALIBRATING THE TOUCH SCREEN Function Description 1) The coordinates of the touch panel and display screen should be accurately matched by calibration. 2) When will calibration be needed? a) The first time you have installed touch panel bundled software. b) Inconsistency occurred between the mouse and your finger action. c) After changing the touch panel or monitor. d) Having moved the touch panel or there is a change in monitor resolution. Operating steps 1) Click "Calibration" on Touch Service main interface. 2) Touch the center of the calibration points shown on the screen one by one with your finger in order below (Figure 4-6). In total, there are four calibration points. (Upper left corner→ upper right corner → lower right corner → lower left corner). a) The number in the center is the countdown. When it comes to zero, you will automatically exit the calibration without saving the result. b) Also, you can press ESC to exit the calibration process without saving the result. 21 3) Having touched the four calibration points, a dialogue box will pop up. Click "Yes" to save the calibration data and "No" not to. If you don’t click yes or no within 10s, you will automatically exit the calibration process without saving the data. 22 CHAPTER 3: Power Management In this section, we will describe how you may use your power settings in most effective way. Please read carefully the power management instructions below. This will ensure security and best performance of your system. Following titles are covered under this section: Power Management Critical points for power saving Power Management Your “INTERACTIVE MONITOR” supports the ACPI (Advanced Configuration and Power Interface) power management modes. In this mode, devices that are composing your product will consume power in line with the requirements of current time. In this way, you will get good performance and also save power. You can adjust your power options in Power Management under Control Panel of Windows operating system. Result Shut down the hard-disk Turning off the screen When the system is in hibernating state, HDD, screen and RAM voltages will be turned off. Status In case your system is unused for a given period In case your system is unused for a given period If you want to turn the system on, push power button. When the system is in sleep state, HDD, screen If you want to turn the system on, push and RAM voltages will be power button. turned off. 23 Note: For more information about power management configuration, please refer to the relevant operating system’s support pages. Critical points for power saving You may do the following to provide some additional power saving apart from your “INTERACTIVE MONITOR’s” automatic power saving: Enabling Power Management. Decreasing screen brightness as much as possible. Turning off your “INTERACTIVE MONITOR” when not using it. 24 CHAPTER 4: ADDING OTHER DEVICES TO YOUR “INTERACTIVE MONITOR”. Adding peripheral units to your product You can increase your “INTERACTIVE MONITOR” efficiency by adding peripheral units. Please read the instruction manuals of these peripheral units provided by their manufacturers while using them. In this section, installation of the following devices is described: USB Devices Connecting USB devices Your INTERACTIVE MONITOR has 2 USB 2.0 ports for usb devices such as keyboard, mouse, printer, scanner and digital camera. USB (Universal Serial Bus) industry standard is developed for computers. It supports PNP (Plug and Play) technology. In this way, you don’t have to shut down your INTERACTIVE MONITOR while connecting a USB device or disconnecting them. Updating the Internal Parts “When you want your HDD and "ram" modules to be changed, please consult technical service for instructions and details of this procedure to prevent any damage to your computer that may occur during this procedure. Please do not modify any part by yourself. These procedures should be carried out by technical service. Using External Sources with Interactive Monitor Plug the cable of the external source (HDMI – VGA) Plug the USB cable to transfer the data from the touch screen to external sources Important: Please connect the line in cable while using the VGA source for transferring the audio data Please use your external source’s display settings and select Interactive Monitor as a monitoring device You do not need to press “Power ON” button when you are using your “INTERACTIVE MONITOR” as a monitor device. When you connect your external source via HDMI or VGA, “INTERACTIVE MONITOR” will find this source automatically and display on the screen. Plugging AC cable of Interactive Monitor product is enough for using your external sources. If you connect two external sources, one of the sources via HDMI and the other source via VGA, you should choose the source that you prefer to display on the screen with source select button on function buttons. There is no need to turn on the Integrated PC when you want to use only the external sources. Interactive Monitor Product automatically senses the external sources. While you are using Integrated PC mode, your product can not sense the external sources automatically. For switching to external sources you should press source select button “ ”. Your product firstly selects the HDMI mode, after second press it selects VGA mode. If you want to select the Integrated PC mode please press once again. 25 CHAPTER 5: SYSTEM BIOS INFORMATION Effective usage of BIOS In this section, issues regarding INTERACTIVE MONITOR’s integrated software will be described. BIOS (Basic Input Output System) software set, which is very critical for your product, is stored in a chip on the motherboard. With this software, your system will be prepared in coordination by tuning your hardware with the selected operating system. BIOS includes both POST (Power On Self Test) and SCU (System Configuration Utility) parts. POST includes system control procedures during system start up, and SCU provides configuration of your “INTERACTIVE MONITOR”. Using Aptio Setup Utility (BIOS) System configuration, basic features and sub systems like port configuration and power management can be adjusted with SCU program set. These adjustments are stored in permanent CMOS memory and are protected even if your system is shut down. Note: Images below are used for reference. Your product may have different settings menus depending on different versions. Please rely on the BIOS information available for your product. Settings To enter BIOS, you need to pres “F2” buton when you see BIOS logo during start up. BIOS logo will be displayed only for a few seconds after your system is turned on. If your INTERACTIVE MONITOR system is on, turn it off by choosing “Restart” option and press “F2" when you see BIOS logo. BIOS main menu will show up. 26 Main Advanced Aptio Setup Utility - Copyright © 2011 American Megatrends,Inc. Chipset Boot Security Save& Exit BIOS Information BIOS Version HM65_0502 02/05/2012 System Language [English] System Date System Time [Thu 10/05/2012] [09:36:59] : Select Screen : Select Item Enter: Select +/-:Change Opt. F1: General Help F2:Previous Values F3:Optimized Defaults F4:Save&Exit ESC: Exit Version 2.13.1216. Copyright ( C ) 2011 American Megatrends, Inc . Keyboard Button Function Allows you to scroll through menu options. 1) Opens up the selections in the menu boxes. 2) Changes values. Enter 1) You need to press enter to go to the lower menu. 2) Closes the sub-window. Tab Allows you to switch from one space to another. Esc 1) Allows you to exit while in main menu. 2) Return to the main menu while in a sub-menu 3) Closes the window while in a sub-window. There are 6 main menus in the Bios Setup Utility section. These are: Main, Advanced, Chipset, Boot, Security, Save & Exit. 27 CHAPTER 6: USING YOUR “INTERACTIVE MONITOR” PRODUCT MORE EFFECTIVELY Paying attention to the following points with respect to your INTERACTIVE MONITOR will provide a stable performance and also prolong its life. Following titles are covered under this section: Ensuring security of your “INTERACTIVE MONITOR” Daily care of your product Ensuring security of your “INTERACTIVE MONITOR” The methods described here will help you protect your computer and your data. Using anti-virus software. Especially after internet and e-mail became used widespread, the computers are now harmed easily by viruses. It is essential and recommended to use anti-virus software in order to prevent this harm. You can use a standard key lock and a security cable to prevent your INTERACTIVE MONITOR from getting stolen and key lock can be obtained from a computer store. Wrap the cable on a fixed, durable object and connect it to the back of your product and turn the key of the Kensington key lock. Daily Care Environmental Factors Ambient temperature must be between 10°C - 35°C while your INTERACTIVE MONITOR is running. Do not directly expose your INTERACTIVE MONITOR to humidity, high temperature, fire, direct sun light and dust while using it. The vent holes of your INTERACTIVE MONITOR will allow it perform safer without system overheating. Do not cover these holes or do not prevent air flow with an object. Position your INTERACTIVE MONITOR at least 15 cm away from strong magnetic field generating electrical devices such as TV, refrigerator or large speakers. Do not suddenly take your product from a cold environment and suddenly put it in a warm environment. A sudden temperature change of 10°C may cause some of the internal parts to malfunction. Do not put your product on an uneven surface. General points Do not put heavy objects on your INTERACTIVE MONITOR. The screen is extremely sensitive and may be damaged. Never use hard cleaning materials on your screen. Do not touch it with your fingertips or objects like a pencil. Do not disable the “backlight” setting from power management. Its automatic turn off is one of the factors ensuring its long-life. Points to be taken into consideration while cleaning the product Your system must be turned off while cleaning your INTERACTIVE MONITOR. Please use a soft and damp piece of cloth for cleaning its surface. Do not use chemical cleansers to clean the screen. Do not directly apply the cleaning material on your computer. CHAPTER 7: 28 TROUBLESHOOTING Some troubleshooting issues are mentioned in this chapter under the following titles: Points to be checked first Frequently asked questions Restarting your system Points to be checked first When a problem occurs, it is very important to diagnose this problem correctly. Try to find out what it is. Determine what causes the problem and under which category it falls. Please check that your BIOS is up-to-date and your BIOS settings are set to optimum. Check if the device settings are correct. Check the cable connections of your external devices. Be sure that drivers of your devices are installed properly. Write down the error codes and messages displayed on the screen, if possible. Contact technical support to get support. FREQUENTLY ASKED QUESTIONS Hardware Issues Symptom: INTERACTIVE MONITOR does not recognize the new hardware Check the following: Check that the relevant driver is installed properly. Carefully read the explanations in the manual of the hardware. Ensure that all cables are connected correctly and properly. Be sure that the external device powered. Hard Disk Problems Symptom: Hard disk is not displayed in BIOS information. Check the following: Check your BIOS settings are adjusted properly or not. Hard disk data cable and power cord must be connected properly. Hard disk module may be malfunctioning. Consult technical support to get support. Symptom: Hard disk works extremely slow. Check the following: Data written on your hard disk can be defragmented by the “Defragment” in the system tools under operating system. Performing a virus scan is also important since viruses may decrease a hard disk’s performance. Symptom: Numerical characters generally on the right side of the keyboard are not working. Check the following: Make sure that the Num Lock indicator led is on. 29 Network problems Symptom: System cannot Access the network Check the following: Be sure that the network driver is installed correctly. Connect the network cable properly. Check that your system’s network settings are adjusted correctly. Make sure you enter the correct user name or password. Check that the correct network protocols and settings are activated. Consult the network manager if your problem is not solved. Power Management Problems Symptom: INTERACTIVE MONITOR cannot activate its Hibernate or Sleep modes. Check the following: If your INTERACTIVE MONITOR is connected to another computer and is transferring data, your system will not enter to Sleep or Hibernate modes. Be sure that your drivers, especially the graphics driver, are installed. Activate sleep mode under power management. Check that other devices you use in your system are supporting Hibernate and Sleep modes. Symptom: INTERACTIVE MONITOR does not activate its Hibernate or Sleep modes on time. Check the following: If INTERACTIVE MONITOR is performing an operation, generally it activates its Hibernate or Sleep modes with some delay. System will Sleep or Hibernate immediately after completing the task. Activate sleep mode under power management. Printing problems Symptom: Printer is not working. Check the following: Be sure that the printer is powered and it is ready to function. Check that both data and power cords are firmly and properly connected. Check that the printer driver is installed properly. Reading the printer's manual at this point may be helpful. Check that the printer is properly activated under the operating system. Symptom: Printer does not print the right characters. Check the following: Check that its driver is properly installed and its data and power cords are properly connected. Software Problems Symptom: Applications don’t work Check the following: Be sure that the application is installed properly. In case you receive any error messages, refer to the manual provided with the application. Search the error over the internet. This will give you a general idea about the problem. Sound Issues Symptom: No sound coming from INTERACTIVE MONITOR 30 Check the following: Be sure that sound volume is not low and sound is not muted. Ensure that the sound driver and its application are installed properly. Check that your product is not in Hibernate mode. Check cable connections in case you use an external speaker. Symptom: Recording function is not working Check the following: Adjust playback and recording volume. Be sure that the recording source device is working properly. Symptom: External microphone and auditory devices are not working Check the following: Make sure that the cables are properly and firmly connected. Check that the driver is installed. Check sound settings and whether the system is muted or not. Issues about turning on the system Symptom: System does not start, led is not on. To be checked: Be sure that AC cable is connected firmly. USB device issues Symptom: USB device is not working Check the following: Be sure that the external USB device is powered and it draws current less than 500mA. If the external USB device is drawing more current than 500mA, use a double input USB connection cable. Make sure that the correct driver is installed for the USB device. Panel Defects There may be 3 bright and 3 dark (maximum 5 pixels) defective pixels on panel. Other Issues: Symptom: System clock and date are not indicated correctly. Check the following: You can adjust system clock and date from BIOS or operating system. If the system clock and date is not displaying the value you have entered every time you turn the system on, your BIOS battery may be dead and you may need to change it. Consult to the technical service regarding this matter. Restarting the INTERACTIVE MONITOR If your INTERACTIVE MONITOR system is frozen or stops frequently because of an error, you may need to restart your system. In case the product does not respond to an attempt to shut down from the operating system, hold down the power button for 4 seconds. Important! Shutting INTERACTIVE MONITOR down as described above results in loss of all unsaved data. 31 CHAPTER 8: ASSEMBLY INSTRUCTION FOR INTERACTIVE MONITOR WALL MOUNT 32 33 34 Important! Please follow the installation instructions carefully as failure to do so may result in injury or damage to the set. If you do not feel confident in carrying out the installation yourself, please ask a specialist installer to carry out the installation for you. Use appropriate wall anchors for the wall on which the interactive monitor will be mounted. If you are unsure which anchors to use, please seek professional advice. To avoid potential injury it is advisable to have assistance from another person to carry out this installation. Hitachi assumes absolutely no responsibility for injuries or damage that may occur due to improper installation and handling. Safety Precautions Please read the following recommended safety precautions carefully for your safety. SOME DOs AND DON’Ts ON THE SAFE USE OF EQUIPMENT This equipment has been designed and manufactured to meet international safety standards but, like any electrical equipment, care must be taken if you are to obtain the best results and safety is to be assured. ************** DO read the operating instructions before you attempt to use the equipment. DO ensure that all electrical connections (including the mains plug, extension leads and inter-connections between the pieces of equipment) are properly made and in accordance with the manufacturer’s instructions. Switch off and withdraw the mains plug before making or changing connections. DO consult your dealer if you are ever in doubt about the installation, operation or safety of your equipment. ************** DO route the mains lead so that it is not likely to be walked on, crushed, chafed, or subjected to excessive wear and tear or heat. ************** DON’T remove any fixed cover as this may expose dangerous voltages. DON’T obstruct the ventilation openings of the equipment with items such as newspapers, tablecloths, curtains, etc. Overheating will cause damage and shorten the life of the equipment. DON’T allow electrical equipment to be exposed to dripping or splashing, or objects filled with liquids, such as vases, to be placed on the equipment. ************** DON’T place hot objects or naked flame sources such as lighted candles or nightlights on, or close to equipment. High temperatures can melt plastic and lead to fires. ************** DON’T use makeshift stands and NEVER fix legs with wood screws - to ensure complete safety always fit the manufacturer’s approved stand or legs with the fixings provided according to the instructions. ************** 35 DON’T listen to headphones at high volume as such use can permanently damage your hearing. ************** DON’T continue to operate the equipment if you are in any doubt about it working normally, or if it is damaged in any way - switch off, withdraw the mains plug and consult your dealer. Information for users in the EU The mark on the side is in compliance with the Waste Electrical and Electronic Equipment Directive 2002/96/EC (WEEE). The mark indicates the requirement NOT to dispose the equipment including any spent or discarded batteries as unsorted municipal waste, but use the return and collection systems available. If the batteries or accumulators included with this equipment display the chemical symbol Hg, Cd, or Pb, then it means that the battery has a heavy metal content of more than 0.0005% Mercury, or more than 0.002% Cadmium or more than, 0.004% Lead 36 502562 04 Manufacturer: Hitachi Europe Ltd., Whitebrook Park, Lower Cookham Road, Maidenhead, Berkshire SL6 8YA U.K. www.hitachidigitalmedia.com