1
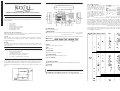
E
N
User manual
Panel instruction and basic operation
G
L
I
CTM-10 Chordfinder / Tuner / Metronome / Tone Generator
S
H
1
Precautions
Location
To avoid deformation, discoloration, or other serious damage, do not expose this unit to the
following conditions:
•
•
•
•
•
•
•
Direct sunlight
Heat sources
Magnetic fields
Extreme temperature or humidity
Excessive dusty or dirty location
High humidity or moisture
Strong vibration or shock
Interference with other electrical devices
Radios and televisions placed nearby may experience reception interference. Operate this
unit at a suitable distance from radios and televisions.
Cleaning
Clean only with a soft, dry cloth. If necessary, slightly moisten the cloth. Do not use abrasive
cleanser, cleaning alcohol, paint thinners, wax, solvents, cleaning fluids, or chemicalimpregnated wiping cloths.
Handling
Do not apply excessive force to the switches or controls. Do not let paper, metallic, or other
objects into this unit. Take care not to drop the unit, and do not subject it to shock or
excessive pressure.
Main features
•
•
•
•
•
•
60mm x 50mm LCD Display b/w
built in microphone and speaker
chord finder (2640 chords)
chromatic tuner / metronome / tone generator
6,35mm input jack for guitar or microphone
Poer supply: 1 x. 6F22 9V battery (not included)
Power supply
Power supply
Insert 1 x 6F22/9V battery into battery compartment. Note polarity of battery as assigned on
backside of device. After all connections are made use the power ON/OFF switch to turn on
the CMT-10. For placing the CMT-10 on a table pull out the bracket on backside of the
device.
.
((1) POWER ON/OFF
Turn ON / turn OFF the power.
((2) MODE/HAND SET
By pressing the key you can select the operating modes: chord finder (1) + (2) / chromatic
tuner / metronome / tone generator. The selected mode will be displayed (flashing) on the
display (A). By pressing OK button (5) the selected mode is active.
To togg
toggle between left hand and right hand display of chords press key for about 2 seconds.
MODE DISPLAY:
NAVIGATION AND OK ((3) TO (7)
Buttons to navigate through menue and settings, OK to confirm setting.
((8) INPUT
6.35mm input jack for guitar or microphone
((9) MIC
B
Built in microphone
((10) HEADPHONE
3.5mm input stereo jack for headphones
((11) VOLUME CONTROL
Volume control for headphones and built in speaker
((12) DC 9V / NETZTEIL
Input jack for 9V/DC external power supply (not included)
((13) LED DISPLAY (TUNER)
Red LED left (t
(tuning too low), green LED (tuning ok), red LED right (tuning too high)
((14) SPEAKER
Built in speaker
Chordfinder [CHORD 1] – Display Chord Position
Press MODE button until [CHORD 1] is displayed, confirm by pressing OK (5)
This operation mode will display the chord position on your fretboard. Chords can be
displayed in up to 5 differents voicings.
Find Chord Position mode:
mode
The
he LCD display will show like the left
picture. The position (A) on the LCD
shows your selected chord root. When the
chord root is flashing, you can press
button (6) and (7) to select chord root from
C to B, when your desired chord root
appears, you should press button (5) to
confirm your selecting or press button (4)
to move the flashing cursor to the next
position. When the LCD position B is
flashing, you can
press the button (6) and (7) to select the chord quality or type. When the chord type you
need appears,
appear
press button (5) to confirm your selecting or move the flashing cursor to
the next chord type selecting if the next chord type exist. If the next chord type does not
exist, pressing
press
button (5) will finish chord name setting and the chord position will be
displayed (C). How to select a chord name: The CTM-10 does contain 44 chord types for
each of the twelve chord roota. You can find your desired chord under its symbol. For
example, you want to find the chord C7b5#9, you should select the chord root as C, then
select the first chord type as 7, select the second
sec
chord type as b5,select the last chord
type as #9. The chord name selecting process does not need you to know the chords
construction, you only need to know how to spell the chord symbol. The following table
shows the CTM-10's
CTM
chord types:
E
N
G
L
I
Metronome
Chord voicings:
One chord can have many different voicings. A voicing refers to how the chord notes are
arranged,which are related to where the chord is played on the guitar, and how it's fingered.
CTM-10 provides 5 different chord voicings for each chord name. When the LCD displays
the chord position and there is no flashing cursor, press button (3) or (4) to start chord name
setting or chord voicing setting. The chord name or chord voicing will flash in the LCD. If the
chord voicing flash, press button (5) to confirm. Then press button (6) and (7) to select
voicing no. among 1 to 5. After finishing selection, press button (5) to confirm. The chord
voicing you select will be displayed in the LCD. If the Chord name flash, press button (5) to
enter new chord name setting. Repeat the previous steps.
Press MODE button until [METRONOME] is displayed, confirm by pressing OK (5)
Move cursor to „BEAT“ with buttons (3) and (4), select „BEAT“ setting (0...9) with buttons (6)
and (7), confirm by pressing (5) OK. Change parameter settings for metronome tempo
“TMP” (30 … 250 BPM) and “RHYTHM” settings accordingly. Adjust earphone/speaker
volume with volume control.
Rhythm settings:
S
H
Chordfinder [CHORD 2] – Find Chord Name
Press MODE button until [CHORD 2] is displayed, confirm by pressing OK (5)
Find chord name by editing finger settings.
2
After entering this mode, the position
“1fr” in the left picture will flash, press
button (6) and (7) to select guitar fret
(from 1 to 15). Press button (5) OK to
confirm your selection or press button
(4) to enter finger position setting of
each guitar string. For right handed
chord, the 6 vertical lines stand for
6E/5A/4D/3G/2B/1E from left to right.
For left handed chord, the 6 vertical
lines stand for 6E/5A/4D/3G/2B/1E from
right to left. When you set finger
position on the string, the cursor will
flash at the string. Press button (6) and
(7) to select the finger position of that string. “0” stands for open string, “x” stands for not
playing this string (mute), black dot stands for finger position. At this time, you can press
button (3) and (4) to move to different strings to set. If you have finished the last string (1E)
setting, press button (5) to finish chord position setting. CTM-10 will search the related
chord name according to the chord position you set. If you press button (5) when you not
have finished the last string setting, the cursor will move to the next string to start next
finger position setting. CTM-10 will begin the chord name searching only when you have
finished the last string setting and pressed button (5) to confirm.
Standard guitar chord pPosition transformation:
When you finished chord position setting, press button (5), CTM-10 will make a standard
transformation for your setting. The standard transformation has the following 2 rules:
st
st
(1) If the fret number can go back to 1 fret, CTM-10 will transform it to 1 fret, such as
picture A-A. The left picture is the position picture you set. The right picture is the chord
position picture after standard transformation. They stand for the same chord position.
(2) If the fret number is not 1st fret and can not go back to 1st fret,CTM-10 will make the
first doted fret the first line. In the below picture B-B, the left one is the chord position picture
you set. The right one is the position picture after standard transformation. They stand for
the same guitar chord position. CTM-10 will display the position picture on the LCD after
standard transformation.
Guitar chord name searching result display: CTM-10 will search in its memory the chord
name in accordance with the chord position you set. If it cannot find the related chord name,
the LCD will display the information as the above picture (A). The word “ SORRY!” will flash
standing for not finding this chord. Press button (3) or (4) to reset the chord position. Repeat
the previous steps. If the CTM-10 finds the related chord name, the LCD will display the
information as the above picture (B). Chord name will be displayed at position (C). Chord
position will be displayed at position (D).
Tone generator
Press MODE button until [TONE] is displayed, confirm by pressing OK (5)
Calibration of A4 key: see TUNER mode
By pressing keys (6) and (7) you can
select the tone being generated. 12 tones
C4 (261,63Hz) to B4 (493,88Hz) can be
selected. Display shows selected tone.
Adjust earphone/speaker volume with
volume control.
Technische Daten
power supply
If the search result includes more than one chord name, press button (3), the flashing cursor
will move to position (C). The chord name will flash. You can press button (6) and (7) to
check other chord names. The flashing cursor will move among position (C), (D) and (E).
When the flashing cursor is at position (D), pressing button (5) will stop the flashing position
(D) and position (F) will start flashing. At this time press button (6) and (7), you can check
other chord voices under this chord name. Press button (5) to confirm. When the flashing
cursor is at area (E), the whole chord position picture, press button (5), you will begin new
chord position setting. Repeat the previous steps to have a new searching. If the searching
result has only one chord name, the cursor will not move to position (C) in the LCD.
Tuner
Press MODE button until [TUNER] is displayed, confirm by pressing OK (5)
Connect your guitar or external microphone to 6.35mm input jack. By pressing keys (3) and
(4) you can move cursor to “KEY” position. By pressing buttons (6) and (7) you select from
C, Bb, Eb and F. If you move cursor to “A4” position you can adjust the A4 frequency (410480 Hz) with buttons (6) and (7). TUNING: Play single strings on your instrument to start
tuning. Tone will be displayed on LCD display (B), needle on display indicates tuning
low/ok/high. Red and green LEDs (8) indicate tuning low/ok/high. Tuning range from C1 to
C8. If there is no external instrument or microphone connected, the tuner will work with built
in microphone.
FLAT-Tuning setting: move cursor to „FLAT“ position
with buttons (3) and (4). Use buttons (6) and (7) to select
„FLAT“ settings.
automatic power off
display
chord finder
no. of chords
tuner
tuning range
tuning accuracy
calibration range
tone display
metronome
1 x. 6F22 9V Battery
or 9V/DC/150mA external PS
after 5 min. without pressing any key
LCD 60mm x 50 mm
lefthand/righthand mode
2640
chromatic
A0 (27.5Hz) bis C8 (4186.01Hz)
+/- 1%
A4 = 410 - 480 Hz
digital (needle) / LED
0..9 BEATS / 30 .. 250 BPM
rhythms
tone generator
dimensions
weight
C4 (261,63Hz) bis B4 (493,88Hz)
120mm (W) x 70mm (H) x 28mm (D)
150g incl. battery
WEEE Declaration / Disposal
Your product is designed and manufactured with materials and
components of high quality, which are recyclable and can be
reused. The symbol means that your product should be disposed
of separately from household waste when it reaches its end of life.
Please dispose of this equipment at your local collection point or
recycling center. Please help to protect the environment in which
we all live.
All specifications and appearances are subject to change without
notice. All information was correct at time of printing. Musikhaus
Kirstein GmbH does not guarantee for the accuracy or
completeness of any description, photograph or statement
contained in this manual. Printed colors and specifications may
vary slightly from product. Products from Musikhaus Kirstein
GmbH are only sold through authorized dealer. Distributors and
dealers are not agents of Musikhaus Kirstein GmbH and have no
authority to bind Musikhaus Kirstein GmbH legally in any way. This
manual is protected by copyright. Any copying or reprint, even in
excerpts, is only allowed with written consent of Musikhaus
Kirstein GmbH. The same applies to reproduction or copying of
images, even in altered form.