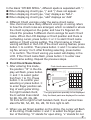
1
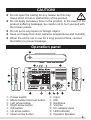
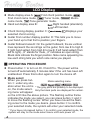
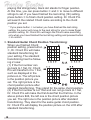
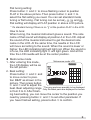
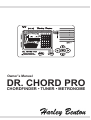
Owner’s Manual DR. CHORD PRO CHORDFINDER • TUNER • METRONOME Product description Owning one Dr. Chord Pro, you will own a chord encyclopedia, an accurate chromatic tuner, an accurate metronome and an accurate tone generator. These are Dr. Chord’s features: Find Chord Position The Dr. Chord Pro contains over 2,500 chord voicings and over 500 unique chord types. All chords are organized first by root and then by quality or type, you can find the chord position you need by this theory. Whether you are a beginner looking for your first chord, or a budding jazz guitarist searching for a new voicing, you will find what you are looking for here. Find Chord Name When you play an elegant chord on guitar, but you don‘t know what name it is, Dr. Chord Pro can tell you easily with its memory of over 2,500 chords. Chromatic Tuner Dr. Chord Pro has also chromatic tuner function. It‘s sensitive, accurate and easy to use. You can tune any musical instrument conveniently. Metronome Another function of Dr. Chord Pro is metronome. It‘s accurate with loud sound and clear display. Tone Generator One more function of Dr. Chord Pro is tone generator, giving you accurate sounding of standard notes for reference. Please read this manual thoroughly to familiarize yourself with proper usage of this unique Dr. Chord Pro. 2 CAUTION! zz Do not open the casing for any reason as this may cause short circuit or malfunction of the product. zz Do not apply excessive force to the product. In the event of the product suffering breakage, be careful not to hurt yourself with the broken pieces. zz Do not put in any liquid nor foreign object. zz Keep unit away from dust, extreme temperatures and humidity. zz When the unit is not in use for a long period of time, remove the battery to prevent leakage. Operation panel q w e r t y u Power switch Mode button hand set button Left arrow button Right arrow button OK button Up arrow button Down arrow button iInput oMIC aEarphone sVolume d DC adaptor input f LED Indicator g Dynamic Speaker 3 LCD Display zz Mode display area A: Find chord position mode, Find chord name mode, Tuner mode, Metronome mode, Tone generator mode. zz Hand set display area B: Right handed (standard). Left handed. zz Chord Voicing display position C: Displays your selected chord voicing. zz Guitar Fret number display position D: This tells you to move your hand up to that fret to position your fingers. zz Guitar fretboard area E: On the guitar fretboard, the six vertical lines represent the six strings on the guitar, from low E to high E if right hand setted, from high E to low E if left hand setted (from left to right). „X“ stands for mute, „0“ indicates an open string. Black dots indicate the finger position. Note name appearing below each string tells you which note name you played. JJ OPERATING PROCEDURE zz Press button q to turn on Dr. Chord Pro. The power will be turned off automatically 5 minutes later if the unit has been left unattended. Press this button again to turn the device off. zz Mode select: When you press butMode selecting menu ton w under any situation when the unit is * The gray parts are possibly to be displayed. on, the mode select- Only the black parts are displayed for certain. ing menu will appear on the LCD like the above picture. The flashing outline frame indicates the mode you select, you can press button e and r to move the flashing cursor. When you have moved the flashing cursor to the mode you desire ,press button t to confirm your selected mode, the system will enter your selected mode. * If you have not pressed button t to confirm your selected mode, the system will stay on the mode select menu untill auto power off. 4 zz Find Chord Position mode: 1. Under Find chord position Find Chord Position mode LCD display mode, the LCD will display like the picture to the right. The position A on the LCD shows your selected chord root. When the chord root is flashing, you can press button y and u to select chord root from C to B, when your desired chord * The gray parts are possibly to be displayed. root appears, you should Only the black parts are displayed for certain. press button t to confirm your selecting or press button r to move the flashing cursor to the next position. 2. When the LCD position B is flashing, you can press the button y and u to select the chord quality or type. When the chord type you need appears, press button t or r to confirm your selecting or move the flashing cursor to the next chord type selecting if the next chord type exist. If the next chord type does not exist, press button t to finish chord name setting. Then the chord position will be displayes in the area C . 3. How to select a chord name: The Dr. Chord Pro contains 44 chord types for each of the twelve chord root. You can find your desired chord under its symbol. For example, you want to find the chord C7b5#9, you should select the chord root as C, then select the first chord type as 7, select the second chord type as b5,select the last chord type as #9. For the chord name selecting process you do not need you to know the chord’s construction, you only need to kwon how to spell the chord symbol. The following table present the Dr. Chord Pro’s chord types: 5 CHORD CHORD CHORD CHORD ROOT TYPE1 TYPE2 TYPE3 5 6 .9 b5 7 b9 #9 #11 sus4 9 b5 sus4 11 13 sus4 6 From C to B b6 7 m 9 11 13 add9 maj7 maj sus + dim add9 6 #9 7 9 13 2 4 7 9 5 7 .9 b5 b5 maj7 #11 b9 #9 NAME SPELL 5 6 6.9 7 7b5 7b5(#9) 7b9 7#9 7#11 7sus4 9 9b5 9sus4 11 13 13sus4 m m6 m6.9 mb6 m7 m7b5 m9 m9b5 m9(maj7) m11 m13 m(add9) m(maj7) maj7 maj7#11 maj9 maj13 sus2 sus4 + +7 +7b9 +7#9 +9 dim5 dim7 add9 OTHER SPELL maj 6/9, 6add9 dom7 7-5, dom7b5 7-5(+9),dom7b5(#9) 7-9,dom7b9 7+9,dom7#9 7+11,dom7#11 7sus 9-5,dom9b5 9sus dom13 13sus min,min6,-6 m6/9 -(b6),minb6 -7,min7 -7(b5),min7-5 -9,min9 m9-5,min9b5 m9+7,-9+7 -11,min11 -13,min13 m(+7) M7 M7#11 M9 M13 5add2 sus aug.#5 7#5 7+5(b9) 7+5(#9) 9#5,9+5 ° °7 In the blank “OTHER SPELL”, different spells is separated with “,”. q When displaying chord type, “(“ and “)” does not appear. w When displaying chord type, “maj” displays as “MAJ”. e When displaying chord type, “add” displays as “Add” 4. Different Chord voicings under the same chord name: One chord can have many different voicings. A voicing refers to how the chord notes are arranged, which is related to where the chord is played on the guitar, and how it’s fingered. Dr. Chord Pro provides 5 different chord voicings for each Chord name. When the LCD displays a Chord position and there is no flashing cursor, press button e or r to start Chord name setting or Chord voicing setting. The Chord name or Chord voicing will flash in the LCD. If the chord voicing flashes, press button t to confirm. Then press button y and u to select voicing No. among 1 to 5. After finishing selecting, press button t to confirm. The Chord voicing you select will display in the LCD. If the Chord name flash, press button t to enter new chord name setting. Repeat the previous steps. zz Find Chord Name Mode: Find chord name mode LCD 1. After entering this mode, the position “1fr” in the display will flash, press button y and u to select guitar fret (from 1 to 15). Press button t to confirm your selecting or press button r to enter finger position setting of each guitar string. For right handed chord, * The gray parts are possibly to be displayed. the 6 vertical lines stand Only the black parts are displayed for certain. for 6E, 5A, 4D, 3G, 2B, 1E from left to right.For left handed chord, the 6 vertical lines stand for 6E, 5A, 4D, 3G, 2B, 1E from right to left. 2. When you set finger position on the string, the cursor will flash at the string. Press button y and u to select the finger position of that string. “0” stands for open string, “x” stands for not 7 playing this string(mute), black dot stands for finger position. At this time, you can press button e and r to move to different strings to set. If you have finished the last string (1E) setting, press button t to finish chord position setting. Dr. Chord Pro will search the related Chord name according to the chord position you set. * If you press button t not when you have finished the last string setting, the cursor will move to the next string for you to make finger position setting. Dr. Chord Pro will begin the Chord name searching only when you have finished the last string setting and pressed button t to confirm. 3. Standard Guitar Chord Position Transforming: When you finished Chord position setting, press button t, Dr. Chord Pro will make standard transforming for your setting. The standard transforming has the following 2 rules: (1) If the fret number can go back to 1 fret, Dr. Chord Pro will transform it to 1 fret, such as displayed in the picture A-A. The left picture is the position picture you set. The right picture is the chord position picture after standard transforming. They stand for the same chord position. (2) If the fret number is not 1fret and can not go back to 1 fret, Dr. Chord Pro will make the first doted fret the first line. In the above picture B-B, the left one is the chord position picture you set. The right one is the position picture after standard transforming. They stand for the same guitar chord position. Dr. Chord Pro will display the position picture on the LCD after standard transforming. 8 4. Guitar Chord Name searching result display: Dr. Chord Pro will search in its memory the Chord name in accordance with the chord position you set. If it can not find the related chord name, the LCD will display the information as the above picture A. And the word “ SORRY!” will flash standing for not finding this chord. Press button e or r to reset the chord position. Repeat the previous steps. If Dr. Chord Pro finds the related chord name, the LCD will display the information as the above picture B. Chord name will display at position C. Chord position will display at position D. If the search result includes more than one Chord name, press button e, the flashing cursor will move to position C. The Chord name will flash. You can press button y and u to check other chord names. The flashing cursor will move among position C, D and E. When the flashing cursor is at position D, presing button t will stop the flashing position D and position F will start flashing. At this time press button y and u, you can check other chord voices under this chord name. Press button t to confirm. When the flashing cursor is at area E (the whole chord position picture), press button t, you will begin new chord position setting. Repeat the previous steps to have a new searching. If the searching result has only one Chord name, the cursor will not move to position C in the LCD. 5. Right and left handed chord setting: No matter it’s under chord1 or chord2 mode, press button w for about 2 seconds, you will see Right and Left display9 ing on the LCD. The cursor will flash at the position you have chosen. Press button y and u to select the mode you need. Then press button t to confirm and leave right and left handed chord setting. zz Tuner mode: Tuner mode LCD 1. After entering this mode, Dr. Chord Pro can start tuning automatically if there is any sound input. Choose tuning with Mic or input jack: When tuning with Mic,Don’t plug any object in the input jack. Otherwise the Mic will not work. And please try to * The gray parts are possibly to be displayed. Only the black parts are displayed for certain. make the sounding part of the music instrument closer to the Mic of Dr. Chord Pro to get best tuning result. When tuning with input jack, please plug the output plug of pickup in the input jack of Dr. Chord Pro. Key selecting: Press button e and r to move the flashing cursor to the position KEY in above picture. Then press button y and u to select the key you need. You can choose among C,Bb,Eb and F. The key you selected will display at the position KEY. A4 calibration: Press button e and r to move flashing cursor to position A4 in above picture. Then press button y and u to select the A4 frequency you need. The A4 frequency will increase or decrease every time with 1 Hz step. A4 range is from 410Hz~480Hz. Keeping pressing this button will automatically increase or decrease A4 frequency continuously. A4 frequency will display at position A4 in the above LCD picture. 10 Flat tuning setting: Press button e and r to move flashing cursor to position FLAT in the above picture. Then press button y and u to select the flat setting you need. You can set standard mode tuning or flat tuning. Flat tuning can be set as , , and . Flat setting will display at FLAT position in above LCD picture. * It’s standard tuning if there is no “ ” at the position FLAT in the LCD. How to tune: When tuning, the musical instrument gives a sound. The note name of that sound will display at position A in the LCD. Adjust the sound of the musical instrument to get the desired note name in the LCD. At the same time, the needle in the LCD will move according to the sound. When the sound is lower or higher, the LED indicating light will light red. When the sound is in tune, the LED indicating light f will light green. And at this time the LCD needle will be at the center position. zz Metronome mode Metronome mode LCD 1. After entering this mode, the LCD display will be as the left picture. 2. Beat setting: Press button e and r and to move cursor to position BEAT as shown in the picture. Then press button y and u and to adjust the * The gray parts are possibly to be displayed. beat. Beat adjusting range Only the black parts are displayed for certain. is from 0 to 9. After finishing beat setting, you can move the cursor to the position you need by pressing button y and u to set other parameter. If you have finished setting, press button t to confirm. 11 3. Tempo setting: Press button e and r to move the cursor to the position TMP as in the above picture. Then press button y and u to adjust the tempo. Tempo range is from 30 to 250 BPM. If you keep button y or u pressed, you can increase or decrease tempo continuously with 1 Hz step. After finishing tempo setting, you can move the cursor to the position you need by pressing button e and r to set other parameter. If you have finished setting, press button t to confirm. 4. Rhythm setting: Press button e and r to move the cursor to the position RHYTHM as in the above picture. Then press button y and u to adjust the rhythm. After finishing rhythm setting, you can move the cursor to the position you need by pressing button e and r to set other parameter. If you have finished setting, press button t to confirm. * You need to press button t to confirm your setting every time when you finish setting. Otherwise the cursor will stay flashing. zz Tone generator mode 1. After entering this mode, the LCD display will be as the left picture. 2. Note name selecting: Press button y and u to select note name. Note name range is from C to B, total 12 notes. The selected note name will display at position NOTE as in left LCD picture. Tone generator mode LCD * The gray parts are possibly to be displayed. Only the black parts are displayed for certain. 3. Calibration: Press button e and r to move the cursor to the position A4 as in the above picture. Then press button y and u to adjust A4 frequency. The range of A4 frequency is 410Hz~480Hz. Keep12 ing pressing the button y or u will automatically increase or decrease the A4 frequency continuously with 1 Hz step. After finishing A4 setting, press button t to confirm. zz How to change the Battery: As the battery runs out, the LCD will become darker. When the LCD is not clear, you need to change the battery. Before changing battery, please turn off the unit. Please use 6F22 (9V) dry battery to replace. Please open the battery cover according to the left picture indicating when changing battery. If you will not use the unit for a long period of time, please take out the battery to avoid battery leakage damaging the unit. zz DC adaptor using instruction: You can use 9V, over 150mA DC adaptor as the power supply for Dr. Chord Pro. Plug the adaptor plug into position d. The positive and negative pole of adaptor must be . zz Using Stand When you want to put the unit on the table to get a better view effect, you can open the stand according to the above picture. Protecting the environment Disposal of the packaging material For the transport and protective packaging, environmentally friendly materials have been chosen that can be supplied to normal recycling. Ensure that plastic bags, packaging, etc. are properly disposed of. Do not just dispose these materials with your normal household waste, but make sure that they are fed to a recovery. Please follow the notes and markings on the packaging. Disposal of batteries Batteries must not be disposed of as domestic waste or thrown into fire. Dispose of the batteries according to national or local regulations regarding hazardous waste. To protect the environment, dispose of empty batteries at your retail store or at appropriate collection sites. 13 Disposal of your old device This product is subject to the European Waste Electrical and Electronic Equipment Directive (WEEE). Do not dispose with your normal household waste. Dispose this device through an approved waste disposal firm or through your local waste facility. When discarding the device, comply with the rules and regulations that apply in your country. If in doubt, consult your local waste disposal facility. 14 15 © 2010 • Musikhaus Thomann e. K. • Treppendorf 30 • 96138 Burgebrach • Germany • www.thomann.de