1
User Manual
Copyright
Copyright © 1999-2002 Destiny Media Technologies, Inc. All Rights Reserved. RadioDestiny™, Destiny Media Player™,
Clipstream™, AudioClipstream™, Clipstream™ Email, Bannerstream™, Clipstream™ AudioMail, Clipstream™ IVR Server and
VideoClipstream™ are trademarks of Destiny Media Technologies, Inc. and may be registered in some jurisdictions. All other
trademarks are the property of their respective owners.
Disclaimer and Limitation of Liability
Destiny Media Technologies, Inc. and its suppliers assume no responsibility for any damage or loss resulting from the use of this
guide.
Destiny Media Technologies, Inc. and its suppliers assume no responsibility for any loss or claims by third parties which may arise
through the use of this software. Destiny Media Technologies, Inc. and its suppliers assume no responsibility for any damage of
loss caused by the deletion of data as a result of malfunction. Be sure to make backup copies of all important data on other media
to protect against data loss.
Important
Please read the RadioDestiny End User Software License Agreement in the electronic User Guide before using the accompanying
software program(s). Using any part of the software indicates that you accept the terms of the RadioDestiny End User Software
License Agreement.
Contents
License Agreement ..........................................................................................................................2
RadioDestiny Broadcaster ..............................................................................................................4
Introduction ......................................................................................................
Features ...........................................................................................................
S ys t e m R e q u i r e m e n t s . . . . . . . . . . . . . . . . . . . . . . . . . . . . . . . . . . . . . . . . . . . . . . . . . . . . . . . . . . . . . . . . . . . . . . . . . . . . . . . . . . . . . . . .
Installing ..........................................................................................................
Uninstalling / Removing .....................................................................................
Quick Start .......................................................................................................
Broadcasting From a Playlist ..............................................................................
Broadcasting Live ..............................................................................................
Station Settings ................................................................................................
Connection Settings ...........................................................................................
B r o a d c a s t i n g f r o m L A N / D S L / P r o xy S e r ve r s . . . . . . . . . . . . . . . . . . . . . . . . . . . . . . . . . . . . . . . . . . . . . . . . . . . . . .
B r o a d c a s t i n g wi t h a R o u t e r . . . . . . . . . . . . . . . . . . . . . . . . . . . . . . . . . . . . . . . . . . . . . . . . . . . . . . . . . . . . . . . . . . . . . . . . . . . . . . . . .
Internet Connection / Listener Chart ....................................................................
Monitoring Listener Activity ................................................................................
Using W ebstream on RadioDestiny Broadcaster ....................................................
Launching From a W eb Page ..............................................................................
Broadcaster FAQ ...............................................................................................
4
4
5
5
5
6
6
8
9
11
13
15
15
16
16
19
19
Destiny Media Player .......................................................................................................................23
Introduction ......................................................................................................
Features ...........................................................................................................
S ys t e m R e q u i r e m e n t s . . . . . . . . . . . . . . . . . . . . . . . . . . . . . . . . . . . . . . . . . . . . . . . . . . . . . . . . . . . . . . . . . . . . . . . . . . . . . . . . . . . . . . . .
Q u i c k S t a r t - Tu n e s Mo d e . . . . . . . . . . . . . . . . . . . . . . . . . . . . . . . . . . . . . . . . . . . . . . . . . . . . . . . . . . . . . . . . . . . . . . . . . . . . . . . . . . .
P l a yi n g A u d i o F i l e s . . . . . . . . . . . . . . . . . . . . . . . . . . . . . . . . . . . . . . . . . . . . . . . . . . . . . . . . . . . . . . . . . . . . . . . . . . . . . . . . . . . . . . . . . . . .
P l a yi n g Mu s i c C D s . . . . . . . . . . . . . . . . . . . . . . . . . . . . . . . . . . . . . . . . . . . . . . . . . . . . . . . . . . . . . . . . . . . . . . . . . . . . . . . . . . . . . . . . . . . . .
Using the Library ...............................................................................................
Creating Playlists ..............................................................................................
Opening and Saving Playlists .............................................................................
CD Playlists ......................................................................................................
Tr a c k I n f o . . . . . . . . . . . . . . . . . . . . . . . . . . . . . . . . . . . . . . . . . . . . . . . . . . . . . . . . . . . . . . . . . . . . . . . . . . . . . . . . . . . . . . . . . . . . . . . . . . . . . . . . .
Listening to Internet Radio .................................................................................
Media Player FAQ .............................................................................................
I n s t a l l a t i o n Tr o u b l e s h o o t i n g . . . . . . . . . . . . . . . . . . . . . . . . . . . . . . . . . . . . . . . . . . . . . . . . . . . . . . . . . . . . . . . . . . . . . . . . . . . . . . . .
A u d i o P l a y b a c k Tr o u b l e s h o o t i n g . . . . . . . . . . . . . . . . . . . . . . . . . . . . . . . . . . . . . . . . . . . . . . . . . . . . . . . . . . . . . . . . . . . . . . . . .
Internet Radio Mode Troubleshooting ..................................................................
23
24
24
26
27
28
28
28
29
29
31
31
33
35
36
36
Station Directory - Finding Radio Stations Online........................................................................37
About the Station Directory................................................................................. 37
Station Directory FAQ ........................................................................................ 37
General FAQ......................................................................................................................................38
Technical Support ............................................................................................................................39
Contact Information .........................................................................................................................40
Also Available from Destiny............................................................................................................40
About Destiny Media Technologies ...............................................................................................40
RADIO DESTINY™ USER MANUAL 1
License Agreement
DESTINY SOFTWARE PRODUCTIONS INC.
END USER LICENSE AGREEMENT
FOR RADIODESTINY BROADCASTER VERSION 3 ™
IMPORTANT - READ CAREFULLY: This End User License Agreement (this "Agreement") is a legal contract between you
("Customer") and Destiny Software Productions Inc. ("Destiny"). It contains limitations on warranties and liability. The software product
and related documentation on the enclosed media (collectively the "Product") are offered to you by Destiny only for use in accordance
with the terms and conditions of this Agreement. Read before installing or using this Product.
BY CLICKING THE "I AGREE" BUTTON BELOW, OR BY ATTEMPTING TO INSTALL OR OTHERWISE USE THE PRODUCT,
YOU AGREE TO BE BOUND BY THE TERMS AND CONDITIONS OF THIS AGREEMENT. IF YOU DO NOT AGREE TO THE
TERMS AND CONDITIONS OF THIS AGREEMENT, DO NOT ATTEMPT TO INSTALL OR USE THE PRODUCT.
LICENSE GRANT. Destiny grants to Customer a non-exclusive, non-transferable, revocable license to use the object code copy of the
Software distributed with this Agreement (the "Copy") along with related documentation during the term of this Agreement on a single
CPU, which may be changed from time to time. Such license shall be terminable as provided herein.
All copies of the Product must bear all copyright and other proprietary rights notices which appear on the Product as originally provided
by Destiny. In the event that Destiny provides you with any error corrections, updates or upgrades to the Product, such error
corrections, updates or upgrades shall be considered part of the Product for the purposes of this Agreement, except as may be
otherwise indicated by Destiny.
RESTRICTIONS ON USE. Unless expressly permitted by this Agreement or otherwise by applicable law, you shall not: (i) use,
reproduce, modify, adapt, translate, update or transmit the Product, in whole or in part; (ii) sell, rent, lease, license, transfer, or
otherwise provide access to the Product; (iii) alter, remove, or cover trademarks or proprietary notices in or on the Product; (iv) export
the Product from the country in which it was provided to you by Destiny; (v) make the Product accessible to visitors on a nonauthorized web; or (vi) decompile, disassemble, decrypt, extract or otherwise attempt or assist others to reverse engineer the Product.
DISABLING SOFTWARE. THE SOFTWARE CONTAINS CODE WHICH MAY BE USED TO DISABLE SUCH SOFTWARE. THIS
DISABLING CODE MAY BE USED TO ENSURE THAT THE SOFTWARE IS NOT USED IN VIOLATION OF THIS AGREEMENT,
INCLUDING WITHOUT LIMITATION TO INFRINGE INTELLECTUAL PROPERTY RIGHTS IN THE SOFTWARE OR ANY CONTENT,
AND TO RESTRICT USAGE AFTER THE LICENSE PERIOD HAS EXPIRED. CUSTOMER AGREES AND ACKNOWLEDGES THAT
UPON ANY TERMINATION OR EXPIRATION OF THIS AGREEMENT, AND PROVIDED THAT THE PARTIES HAVE NOT AGREED
IN WRITING TO RENEW THIS AGREEMENT, THE SOFTWARE MAY, AT DESTINY’S DISCRETION, CEASE TO FUNCTION IN
SOME OR ALL RESPECTS, AND CUSTOMER MAY LOSE ACCESS TO DATA MADE WITH, OR STORED USING, THE
SOFTWARE, AS WELL AS THE ABILITY TO ENCODE AND PROVIDE AUDIO AND OTHER DATA TO THIRD PARTIES.
CUSTOMER AGREES TO INDEMNIFY DESTINY FROM ANY LIABILITY, INCLUDING LIABILITY DUE TO THIRD PARTY CLAIMS,
RESULTING FROM SUCH DISABLING OF SUCH SOFTWARE. CUSTOMER AGREES AND ACKNOWLEDGES THAT THE
DISABLING OF THE SOFTWARE IS A KEY FEATURE OF THE LICENSE RIGHTS AND RESPONSIBILITIES CONVEYED UNDER
THIS AGREEMENT.
OWNERSHIP. The Product contains copyrighted material and, in its human readable form, trade secrets and proprietary information
owned by Destiny. By paying to acquire a copy of the Product, you do not become the owner of it. Subject to the license expressly
granted above, you obtain no right, title, interest or other license in or to the Product, including but not limited to any copyright, patent,
trade secret, trade-mark, or other proprietary rights therein. All whole and partial copies of the Product remain the property of Destiny
and will be considered part of the Product for the purpose of this Agreement.
LIMITED WARRANTY. Destiny cannot warrant that the Product will function in accordance with related documentation in every
combination of hardware platform, software environment, and Product configuration. You acknowledge that software bugs are likely to
be identified when the Product is used in your particular application. You therefore accept the responsibility of satisfying yourself that
the Product is suitable for your intended use. Destiny is not responsible for media defects that result from accident or abuse. Destiny
has no obligation under this Agreement to provide maintenance, support, or training.
LIMITATIONS OF WARRANTY AND LIABILITY. EXCEPT AS EXPRESSLY WARRANTED ABOVE, THE PRODUCT AND THE
ENCLOSED MEDIA ARE PROVIDED "AS IS" WITHOUT OTHER WARRANTIES OR CONDITIONS OF ANY KIND, INCLUDING BUT
NOT LIMITED TO IMPLIED WARRANTIES AND CONDITIONS OF MERCHANTABILITY, FITNESS FOR A PARTICULAR PURPOSE
AND NON-INFRINGEMENT. YOU ASSUME THE ENTIRE RISK AS TO THE RESULTS AND PERFORMANCE OF THE PRODUCT.
NOTHING STATED IN THIS AGREEMENT WILL IMPLY THAT THE OPERATION OF THE PRODUCT WILL BE UNINTERRUPTED
OR ERROR FREE OR THAT ERRORS WILL BE CORRECTED. OTHER WRITTEN OR ORAL STATEMENTS BY DESTINY, ITS
REPRESENTATIVES, OR OTHERS DO NOT CONSTITUTE WARRANTIES OF DESTINY.
IN NO EVENT WILL DESTINY OR ITS OFFICERS, EMPLOYEES, AGENTS, SUPPLIERS, DISTRIBUTORS, OR LICENSORS
(COLLECTIVELY "ITS REPRESENTATIVES") BE LIABLE TO YOU FOR ANY INDIRECT, INCIDENTAL, SPECIAL, OR
CONSEQUENTIAL DAMAGES WHATSOEVER, INCLUDING, WITHOUT LIMITATION, LOST REVENUE, LOST OR DAMAGED
RADIO DESTINY™ USER MANUAL 2
DATA OR OTHER COMMERCIAL OR ECONOMIC LOSS, HOWEVER CAUSED, WHETHER BASED IN CONTRACT, TORT
(INCLUDING NEGLIGENCE) OR ANY OTHER THEORY OF LIABILITY, ARISING OUT OF OR RELATING TO ANY BREACH OF
THIS AGREEMENT, ANY USE OR INABILITY TO USE THE PRODUCT, OR ANY CLAIM MADE BY A THIRD PARTY, EVEN IF
DESTINY OR ITS REPRESENTATIVES HAVE BEEN ADVISED OF THE POSSIBILITY OF SUCH DAMAGE OR CLAIM.
IN NO EVENT WILL THE AGGREGATE LIABILITY OF DESTINY AND ITS REPRESENTATIVES FOR ANY DAMAGES OR CLAIMS
ARISING OUT OF OR RELATING TO THIS AGREEMENT OR THE PRODUCT, WHETHER IN CONTRACT, TORT (INCLUDING
NEGLIGENCE) OR ANY OTHER THEORY OF LIABILITY, EXCEED THE PRODUCT LICENSE FEES PAID BY YOU TO DESTINY.
DESTINY' AND ITS REPRESENTATIVES' LIMITATION OF LIABILITY IS CUMULATIVE, WITH ALL OF DESTINY'S AND ITS
REPRESENTATIVES' PAYMENTS IN SATISFACTION OF THEIR LIABILITIES BEING AGGREGATED TO DETERMINE
SATISFACTION OF THE LIMIT. THE LIMITATIONS OF THIS SECTION SHALL APPLY WHETHER OR NOT THE ALLEGED
BREACH IS A BREACH OF A FUNDAMENTAL CONDITION OR TERM, OR A FUNDAMENTAL BREACH. SOME JURISDICTIONS
DO NOT ALLOW LIMITATIONS OF LIABILITY FOR INCIDENTAL OR CONSEQUENTIAL DAMAGES, AND/OR LIMITATIONS OF
IMPLIED WARRANTIES, SO, TO THE EXTENT PROHIBITED BY APPLICABLE LAW, THE ABOVE LIMITATIONS MAY NOT APPLY
TO YOU.
TERM: This Agreement commences upon Customer’s acceptance (as described above) and will end when terminated. Customer may
terminate this Agreement at any time by destroying the Product, or by returning the Product to Destiny. It will be deemed to terminate
immediately if Customer fails to comply with any material term or condition herein. Upon termination, Customer’s license rights end
and Customer shall immediately destroy all whole or partial copies of the Product and associated License Keys in Customer’s
possession or control. The limitations set out above shall continue in force even after any termination. Destiny reserves the right to
terminate this agreement and disable the Product at Destiny’s discretion at any time.
GENERAL. This Agreement shall be governed by the laws in force in the Province of Ontario, Canada without regard to the conflict of
laws provisions therein. Customer irrevocably submits to the non-exclusive jurisdiction of the courts located in the Province of Ontario.
Customer agrees that the provisions of the United Nations Convention on Contracts for the International Sale of Goods shall not apply.
Except for any agreements with Destiny that expressly reference this Agreement, this Agreement constitutes the entire agreement
between Customer and Destiny relating to the Product and the enclosed media, and supersedes all prior or contemporaneous
agreements, understandings, negotiations, and discussions, whether oral or written. This Agreement may only be amended in writing
signed by Destiny. If any provision of this Agreement is held by a court of competent jurisdiction to be invalid, it shall be severed from
this Agreement and the remaining provisions shall remain in full force without being invalidated in any way. Any consent by Destiny to,
or waiver of, a breach by Customer, whether express or implied, shall not constitute a consent to, or a waiver of any other, different or
subsequent breach. Customer may not assign, transfer or delegate this Agreement or any right or obligation hereunder without the
prior written consent of Destiny. Destiny may assign its rights and obligations under this Agreement without Customer’s prior written
consent. This Agreement shall enure to the benefit of, and be binding upon, each party and its heirs, executors, administrators and
permitted successors and assigns. The parties have required that this Agreement and all documents relating thereto be drawn up in
English. Les parties ont demandé que cette convention ainsi que tous les documents qui s'y rattachent soient rédigés en anglais. If
you have any questions concerning this Agreement, please contact Destiny at 950-555 West Hastings Street, Vancouver, British
Columbia, V6B 4N4, Canada (Tel: (604) 609-7736; Fax: (604) 609-0611).
© 1999-2002, Destiny Software Productions Inc.., RadioDestiny Broadcaster and RadioDestiny are trademarks of Destiny Software
Productions Inc
RADIO DESTINY™ USER MANUAL 3
Introduction
RadioDestiny is a new product suite from Destiny Media Technologies that includes the RadioDestiny Broadcaster and
the Destiny Media Player. These proprietary web-based radio broadcasting and listening technologies allow nontechnical users with a minimum of equipment to broadcast and listen to their own Internet radio station.
RadioDestiny Broadcaster
Introduction
Using the RadioDestiny Broadcaster™, you can become one of the Internet radio stations pumping out new music,
talk and programming for the net-connected world. Whether you’re big or small, 24-hrs a day or just one, the
RadioDestiny Broadcaster is the quick and easy way for you to start broadcasting.
All you need is a PC with a sound card, some audio and a constant connection to the Internet and you can join the
growing base of Internet radio broadcasters. In a few easy steps you can have your station up and running on our
station directory complete with links to your email and web page.
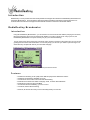
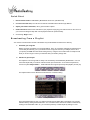
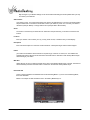
RadioDestiny Broadcaster Interface
Features
-
simultaneous streaming of CD quality stereo RD3 and 'player-less' Webstream codecs
variable bit rate streaming, adjustable on the fly
convenient live mixer for line-in and hard drive broadcasting
broadcast a live stream from within a web page, email, or banner with Webstream
broadcast CD covers and lyrics with MPE
uncensored Internet broadcasting; you are in control
convenient, intuitive listener tracking
...and more; all with the same easy-to-use functionality Destiny is known for!
RADIO DESTINY™ USER MANUAL 4
System Requirements
Minimum
-
Pentium class CPU 166 MHz or faster
Windows 95/98/2000/ME/NT/XP or higher
64 MB RAM
Minimum 56k direct Internet connection
Recommended
-
A dedicated machine for broadcasting
Dual ISDN direct Internet connection or better
Full duplex, medium to high end sound card
128 MB RAM or more
PC: Intel Pentium 266+ or AMD K6 400+ higher CPU
Mid to high end quality microphone
Clean source audio
Sufficient hard drive space for a collection of audio files if you intend on broadcasting from your hard
drive.
Installing
1.
2.
3.
Start Windows.
Find the file DestinyRD3.exe
Double Click this file and follow the onscreen install screens.
Uninstalling / Removing
The RadioDestiny Broadcaster can be uninstalled using it’s uninstall application found in the Start menu under
Destiny / RadioDestiny Broadcaster / Uninstall. If this does not work, then try:
1.
2.
3.
4.
5.
6.
Go to your Start Button (bottom left hand corner)
Choose "Settings" from the popup list when you click on it.
Choose "Control Panel"
In the Control Panels folder, launch "Add / Remove Programs"
Find "RadioDestiny Broadcaster" in the list of software programs to uninstall.
Click the "Change / Remove" button.
If the program does not show up in Add/Remove Programs, all you need do is find the folder containing the
Broadcaster and delete it and any icons that exist on your desktop.
The RadioDestiny Broadcaster does not leave anything harmful in your registry. If you are experienced in
editing your registry, you may find this key and remove it:
HKEY_CURRENT_USER\Software\Destiny\Broadcaster
WARNING: If you try to edit your registry without knowledge of what it does, you can render your system
unstable.
RADIO DESTINY™ USER MANUAL 5
Quick Start
1.
Download and install the RadioDestiny Broadcaster version 3.0. (*Windows O/S)
2.
Connect to the Internet! (You must have an Internet accessible Internet Protocol (IP) address.
3.
Adjust your station information; name, genre and other options.
4.
Grab some music! Select some audio files for your playlist or simply plug your audio source into the Line In on
your sound card. Drag and drop files onto the playlist window for quick assembly.
5.
Click the big "Begin" button.
Broadcasting From a Playlist
You must be connected to the Internet to broadcast. Only live broadcasts are listed on the directory.
1.
Assemble your song files
Before you begin a broadcast, your song files (MP3s, .wavs, etc.) should be arranged into directories that
can be easily accessed by you. If you intend to insert a song from CDs into your Playlist, have a CD in
your primary CD-ROM drive with others waiting close by. Using the line-in feature with a microphone will
allow you to intro songs or chat to your listeners while you smoothly change CDs.
2.
Add files to your Playlist
The Playlist is a list of songs that are ready to be accessed by the RadioDestiny Broadcaster 3. You can
save each Playlist that you create as a file and load it up at another time. To access the Playlist menu,
click on the yellow Playlist button. The Broadcaster also supports previously built playlists (.lst and .pls)
The Playlist window can be detached and stretched for convenient editing.
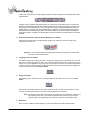
Playlist Interface
Once the Playlist window is open, you will have several ways of adding files to the playlist. You can add
individual files by clicking the Add File button. You can add the entire contents of a folder of audio files by
clicking on the Add Folder button. Or, you can load a previously created Playlist by clicking on Load.
RADIO DESTINY™ USER MANUAL 6
Another way of doing this is to simply drag and drop files, folders or playlists onto the black portion of the
Playlist window.
Playlist Buttons
Creating a series of different Playlists will allow you to easily and conveniently keep your content fresh.
Because the RadioDestiny Broadcaster will play playlists from the Destiny Media Player and other third
party players such as Winamp (.lst, .m3u), we recommend using your Destiny Media Player to do your
playlist editing. For example, the Destiny Media Player includes the extra functionality of including subdirectories when a folder/directory is added. The Destiny Media Player also has expanded sorting and
randomizing features. Multiple pre-made playlists can also be loaded into a single playlist for sequential
playback.
3.
Decide how Broadcaster plays the Playlist Default ('top to bottom')
With the repeat option selected, the Broadcaster will play your entire list over and over again upon
reaching the end of the list.
Playback Options
Random - If you press Random the Broadcaster will rearrange your playlist in a random order.
Think of it as a Randomize feature.
4.
Changing order in the Playlist
The Playlist enables you to change the order of songs in the Playlist using a few methods. You can click
down on a song title name and then drag it up to a spot and release it to insert it into another spot in the
Playlist. Or, you can highlight the song or a group of songs and use the move up and move down buttons
to shift the songs one space at a time. Removing songs To remove songs from the playlist, highlight the
song or songs and then click the Remove button.
Remove Button
5.
Saving the Playlist:
After spending many minutes (or hours!) creating a playlist you will want to save it. Click on the Save
button.
Save Button
Save the file in the Destiny folder or some other convenient location so that you know where to Load it
from later. Use descriptive names for your list to easily distinguish from other lists.
Note: It's important to know that a Playlist does not include the songs themselves. A Playlist is a
set of pointers to the files. If you create a Playlist and then move the songs from their
original locations, the Playlist will not know where to find them and will skip that slot.
6.
Broadcast!
Once you have created or loaded a playlist, go to the main interface and click the Begin button!
RADIO DESTINY™ USER MANUAL 7
Broadcasting Live
1.
Connect the Live Source to your Computer
Plug an audio device into the input of your sound card. This can be a stereo component, mixer,
microphone, etc.
Be careful while Broadcasting with Line-in... if you are monitoring your own broadcast or listening to
something else at the same time, it could be picked up by your microphone and re-broadcast causing an
echo for the listener.
Testing Microphone Input
1.
Make sure that your microphone is in the right jack. In the back of your PC is a slot that has 2 or
3 sound input jacks (the same ones as are on your Walkman or other portable radio device). One
of them is probably labelled "mic". Plug into that one. Also, while you're at it, make sure the
volume is physically set at a reasonable level so that you can hear your output on your external
speakers.
2.
In Windows go to your Volume icon on the bottom right hand corner of your screen and double
click on it. This will bring up an expanded Volume dialog box.
Windows Volume Control Screen
3.
Make sure that the Volume slider under "Microphone Balance" is set to the middle or higher and
that the Mute check box is unchecked.
4.
If no Microphone option is available, go to Options and select Properties. Look under the Adjust
Volume For section and make sure that the Recording radio button is clicked on. Then look under
the Show the following volume controls section and scroll until you find Microphone and check its
box. Click OK when you have done so. Go and adjust the Microphone levels.
5.
Close Volume and go to your START menu, then Programs -> Accessories -> Multimedia until
you find a program called "Sound Recorder". Launch it. ("Sound Recorder" may also exist in
different folder underneath Accessories on certain machines)
6.
Once Sound Recorder is launched, click on the record button (red button) and start speaking into
the microphone. Some microphones have an "on" switch or toggle that you may have to activate
before it will record. When you're finished speaking, press stop. Rewind and press play to hear
your file.
I don't hear anything! What do I do?
Solution 1: Try switching your microphone input to a different jack.
Solution 2: Check recording levels / un-mute and try again.
Solution 3: Reinstall the drivers in your sound card. If they are corrupted or that doesn't work,
check your sound card manual or get in touch with their tech support.
RADIO DESTINY™ USER MANUAL 8
Solution 4: Speak louder. You're a DJ; not a mouse.
2.
Enable Line-In function in Mixer window
From the main interface of Broadcaster 3, go to the yellow button at the bottom of the screen that says
"Mixer". Click on it to open up the Mixer window.
The Mixer menu has a series of buttons. Find the one that says "Line In" (top right) and click on it. The
button should turn red and look like it is pressed in. Now the Broadcaster will recognize line input (input
from any sound device such as a microphone or stereo deck that is hooked into your PC's sound card).
3.
Make sure volume for Line In is high enough
The volume can be set with the vertical sliders on the mixer as well as with the pre-set buttons. The
volume coming into your computer may also need to be adjusted. The vertical Volume Indicator will act as
a general guide.
4.
Ensure fader allows for Line In
There is a horizontal slider at the bottom of the Mixer window that controls how much of the output of your
broadcast is made up of the Live or Playlist levels. Using this slider you can, for example, decide how
much your microphone overrides a song being played from the playlist when you want to talk over a
portion of a song. If the slider is placed all the way to the left, it means that all of the output will be devoted
to the Playlist and none of your line input will be heard.
Tip: If you are broadcasting from a microphone be sure that you're not also monitoring your
broadcast from your speakers or else your microphone will pick it up and cause a feedback.
This will result in an annoying echo for your listeners.
5.
Hit Begin in main interface
Click the big "Begin" button and once the Broadcaster has connected you will be live on the air.
Station Settings
The Station Settings editor allows you to specify your station information so you can provide additional information
to your listeners. To access the editor, click on the yellow Settings button at the bottom of the main interface.
Settings Button
Once the Settings window drops down, click on the Change button in the Station Settings area.
Station Settings Screen
An explanation of what each field refers to appears below. This information appears when the listener tunes in to
your station on their Destiny Media Player™ or through Webstream.
RADIO DESTINY™ USER MANUAL 9
Tip: Changes to your Station Settings can be done while broadcasting but will be updated after you stop
and restart your broadcast.
Station Name
Your station's name - this name will be listed in the directory at stationdirectory.com and in the Destiny Media
Player's Radio mode. Your listeners will be able to select your station by name. You can enter your station's
call letters (example: DSNY) or a longer station name (example: Bob’s Rock Palace).
Genre
The section or format that your station fits into. Select from the pull down list; you must be connected to the
Internet.
Location
Enter your location. This could be your city, country, state of mind, or whatever else you wish display.
Description
Enter a short description to a maximum of 200 characters. A description larger than that will be clipped.
E-mail
your station email address. Allows listeners to request songs, comment on content, etc. This address will
automatically load the listener's email client when the Email button is selected on their Destiny Media Player
while listening to your station.
Web Site
Allows listeners to visit your station web site with a click on their Destiny Media Player. The URL entered here
will automatically load when the Web button is selected on the listener's Destiny Media Player
Download URL
This is a feature available to broadcasters that are broadcasting MPEs. If you are not broadcasting MPEs,
then leave this blank.
Below is an example of what the listener sees in the Destiny Media Player™.
Media Player Information Screen
RADIO DESTINY™ USER MANUAL 10
Destiny Media Player image: the Station Information entered in the RadioDestiny Broadcaster shows up like
this for the listener. Clicking Web will launch the listener's browser and go to the website that is entered in the
Web Site field. If Email is clicked, it will launch their email client with a message addressed to the broadcaster.
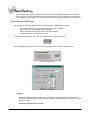
Connection Settings
Your Broadcaster Connection Settings will need to be adjusted while considering certain issues:
-
Your Internet connection; LAN, proxy, Firewall? Modem? Static IP address?
System Resources; CPU, available RAM, multitasking
Maximum allowable bit rate versus maximum number of listeners.
Enable Webstream or not, enable stereo or not
To access Broadcaster settings, click on the yellow Settings button in the main interface.
Settings Button
Once the Settings window drops down, click on the Change button in the Connection Settings window.
Connection Settings Screen
Connection Settings Window
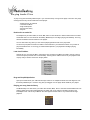
IP address
RadioDestiny Broadcaster has to know your true IP (Internet protocol) address so your listeners can
connect to your Broadcaster. By providing this information you are allowing the station directory list a valid
path to your station.
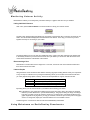
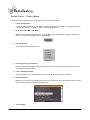
Checking Your IP Address on the Web
RADIO DESTINY™ USER MANUAL 11
If you are unable to broadcast, one of the reasons may be because you have provided the wrong
IP address. If you are on a LAN frequently there is confusion over what constitutes a true IP
address or simply the address used within the network. Go to the page below that autodetects
your true IP.
http://www.radiodestiny.com/help/broadcaster3/check_IP.shtml
You should see text similar to this:
Your IP address is:
64.251.90.22
Check the IP Address box under 'Connection' and then paste the IP address displayed above
into the field next to it. You may also need to adjust the port as necessary, in the event that you
cannot stream through port 80.
Checking Your IP Address Manually
Win 95/98 Operating Systems:
1.
2.
3.
4.
Click on the Start menu
Select "Run"
Type "winipcfg"
Click"OK"
Win NT, 2000, XP Operating Systems:
1.
2.
3.
4.
5.
Click on the Start menu
Select "Run"
Type "cmd"
Click"OK"
Type "ipconfig"
If you have a static IP address, it will only need to be entered into the broadcaster once. If your IP
address is dynamic, as many ISPs grant a new IP address from their available 'pool', you may
need to check this each time you connect to the Internet.
If you are using a router, firewall, and/or have networked your computer in some way, be sure
that your valid Internet accessible IP address in entered into the broadcaster.
Port
When an administrator wishes to allow computers inside a closed network that is protected by a firewall to
be accessible from outside computers they will make a port available through the gateway computer. The
default port ID is 80, which is the usual web server port that allows web browsers from the outside to look
up pages displayed from computers from behind a firewall. However, your network administrator may
create a different port. To change the port ID, click in the field beside Port and type in the new number.
RD3 Stream
To adjust quality settings for listeners using the regular RD3 stream (what they hear through the Media
Player), go to drop-down list beside Maximum Bitrate at RD3 Stream. Click on the list and then choose the
maximum bit rate (kbps) that you allow listeners to connect at. This is the maximum that someone may
transfer from your station; listeners on lower bandwidth will connect at a lower data rate. By bringing the
maximum kpbs lower, you allow more potential listeners to connect.
Note: Most modems do not connect at speeds faster than 40kbps. Please do not try to provide
bit rates that you cannot accommodate or problems will persist.
RADIO DESTINY™ USER MANUAL 12
Stereo (on or off)
If you are broadcasting only Talk radio or at lower bit rates, stereo may not be necessary. Broadcasting
stereo also causes higher use of your system resources. If you barely meet minimum requirements or plan
to use the broadcasting machine for other tasks while broadcasting, you may prefer to disable stereo. By
doing this you half the bit rate needed for a similar quality signal by your listeners while broadcasting a
good quality mono sound. To disable it, click in the checkbox to uncheck Stereo.
Note: Webstream is currently Mono only, due to limitations of Java. Future versions of
Webstream will use Java 2.0 that will allow Stereo.
WebStream (on or off)
Webstream is built upon the player-less technology of Clipstream. Your live Webstream broadcast can be
embedded into a web page, banner ad, etc. for player-less listening. Webstream can even be embedded
to an email and played live within the recipient's email client!
Note: At this time, the bit rate for player-less Webstream is not adjustable. Future builds of the
software will allow for more flexibility.
Set maximum listeners
Be sure to only allow the number of listeners your connection will support. To do this, simply type a
number into the field beside Maximum number of listeners. The number of listeners you can support will
be dictated by your Internet connection upload speed and the maximum bit rate that you allow each
listener.
Adjusting Listening Quality vs. Number of Listeners
When a listener begins hearing your station they are actually connecting with their computer to your
computer using both the bandwidth they have available and the bandwidth that you have available. The
more listeners attempt to hear your broadcast, the more connections your bandwidth must support.
Broadcaster 3 allows you to ration bandwidth to each listener depending upon how many you wish to
support and at what quality.
Broadcasting from LAN / DSL / Proxy Servers
LAN or Intranet
Machines on a local network or proxy server are able to browse the Internet and receive broadcasts. But
in order to be a broadcaster, they must have a direct IP (Internet Protocol) connection to the Internet. This
is because the listeners on the Internet must reach your computer directly. When local machines browse
the Internet they do so through an Internet firewall set up on the gateway computer that permits internal
users to browse the Internet, but restricts access from the outside for security reasons.
Note: Use Port 80 to get through your firewall. Using RadioDestiny Broadcaster 3.0, set up
your proxy or firewall as you would for a web server and use port 80. The broadcaster can
be configured through Settings-Connection Settings.
DSL
A broadcaster using a Digital Subscriber Line (DSL or sometimes Asymmetrical Digital Subscriber Line)
will have a direct connection to the Internet. Again, if they set up a LAN, they will need to acquire a direct
IP for their local computers if they wish to broadcast on any computer that is not the gateway.
Proxy Server
RADIO DESTINY™ USER MANUAL 13
A proxy network is a network where the gateway computer caches (or stores) all Internet requests by local
users in order to speed requests to frequently requested pages. So when another user wants to look at a
web page that previous users have requests, they are given the cached document first from a closer
location than going out into the Internet for the original document. Most cable modem services act
this way.
If a user sets up a LAN using their cable modem, the computer that is connected to the cable modem is
now a gateway computer. All other local computers hooked up to that gateway computer will have the
same problem that local computers on a LAN have. Again, special requests can be made to the cable
service to acquire a direct IP for a local computer. There is an additional problem for broadcasting through
proxy networks. Since the proxy server caches Internet documents, the station directory at Destiny will not
be current to the broadcaster.
RADIO DESTINY™ USER MANUAL 14
Broadcasting with a Router
If you are connecting one or more computers to the Internet with a router, you will need to configure the router to
redirect Broadcaster traffic to the appropriate internal server (computer using the Broadcaster). In other words,
computers on the internal network are assigned private IP addresses, and they connect to the Internet via the
router’s public IP address. Incoming connections (to services like the Broadcaster) will be accepted by the router,
which then needs to be configured to forward these requests to the appropriate private IP address. This
configuration varies between brands and models of routers (look for “virtual server”, “forwarding”, or “NAT” in your
routers documentation). Note that the Broadcaster uses protocol: TCP with default port 80.
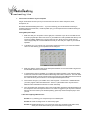
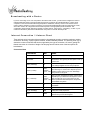
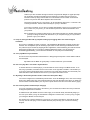
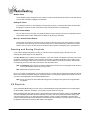
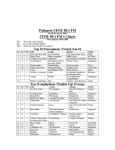
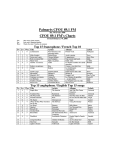
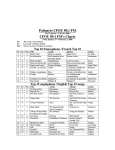
Internet Connection / Listener Chart
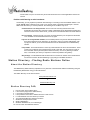
Time and time we've been asked what connection a broadcaster needs to reach the maximum number
of listeners. Obviously, it pays to gets the fastest, widest bandwidth possible. The following chart (fig. A)
shows the number of listeners that can be supported by the type of connection. Of course, getting the
fastest connection is a function of budget. On this page we will outline some of the best options for
broadcasters.
Connection Chart
Connection
Max
Notes
28.8k modem
1
Experimental use only. Uses up a phone line.
56k modem
1
Ideal conditions for 56k bandwidth rarely occur. Most
56k modems never get beyond 28.8 speed. Uses up
a phone line.
I S D N (128 Kbps)
3-5
Clean constant connection. Changes phone lines
from analog to digital. You can use your phone.
C a b l e (1.5mbs)
Uses your TV cable line / you can still waste your
varies
mind watching TV. Performance depends upon the
between
number of active users in your area. Advantage:
approx. 3-30
everyone has or can get tv.
D S L (1.544mbs)
Uses your plain old telephone system. Performance
varies
depends upon your distance from telephone central
between
office. Permits use of your voice phone as well.
approx. 1-30 Slower upload than download speed. Inexpensive.
Not available everywhere.
T1
78
Good independent broadcast base. Fast connection
and reliable.
10mbs
516
If you have a 10mbs connection to your ISP.
T3 (44.736 Mbps)
2298
Totally fast. Totally expensive.
FDDI
25806
Fibre-optic. Unless you are a major corporation;
chances are you won't be using this.
RADIO DESTINY™ USER MANUAL 15
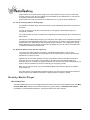
Monitoring Listener Activity
Broadcaster 3.0 allows you to easily track your listener activity in a graphic chart form or by IP address.
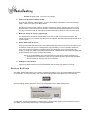
Listing Individual Listeners
Click on the yellow Listeners button in the main interface to call up your Listener monitor.
Listeners Button
The first screen (white background) displays the unique IDs of each listener who is currently connected to your
station. The ID information displayed is the individual IP of the listener. In this way you can see if you have
regulars who keep on connecting to your station.
Listener Information Screen
The listener display can be 'torn away' and adjusted by sizing. (click on the edge and drag to the desired size.
In the unlikely event that you want to boot someone from your station you can click on their ID and then click
on the Disconnect button at the bottom of the window.
Disconnecting a User
Sometimes it is useful to disconnect a single user. To do this, click on the user in the Listeners window and
then click the Disconnect button.
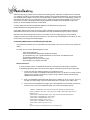
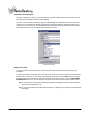
Listener Graphs
Along the bottom of the window are three buttons that bring up graphs showing listener activity over a period of
1 Day, 10 Days or Total time since you began broadcasting. When you click either of the buttons it will show
you a line graph showing spikes of activity. These lines are separated into a green, blue and red line.
green
RD3 stream (default)
blue
Streaming MP3 (currently unavailable)
red
webstream (web page streaming)
By looking at this you can see how most of your listeners are accessing your station.
Tip: If the spikes in your graphs aren't distinct (too low to be seen) this is due to the number of maximum
listeners you have allowed for in your Broadcast Settings. The graph is setting the range according to
how many you think you may be receiving at a time. If you have it set to 100 maximum listeners, the
graph range will be very high but if you only get 1 listener, it will show up as a mere pixel on the graph
screen. To change this, adjust your maximum listeners to a more realistic number.
A listener log file in .txt format can also be found in the RadioDestiny install folder.
Using Webstream on RadioDestiny Broadcaster
RADIO DESTINY™ USER MANUAL 16
Webstream technology is based upon our player-less streaming format, Clipstream. It enables users to click a link
on a webpage and call up your radio station without needing to use the Destiny Media Player. The technology uses
Java streaming which enables a clear mono sound (stereo will be available in Java 2). The advantage of using it is
that listeners who wander onto your web page can tune in whether they have a player installed or not; there is no
need to leave your site or be distracted with a lengthy download and install process. Webstream is also cross
platform to all Java-enabled browsers and email clients.
Currently, Webstream links are automatically displayed in the station directory page here:
Pirateradionetwork.com and stationdirectory.com
In the Station Directory page users can click on the title of the station to bring up the Media Player to hear the
default RD3 sound or they can click on the webstream link to hear the Webstream signal (no player required).
Webstream can also be inserted into a banner or even within an email. Imagine playing your live broadcast,
sending an email to your friend, seeing them receive it on your listener log, and blowing them away when you start
to talk to them, live, through their email message!
Customizing Webstream on RadioDestiny Broadcaster
Your Webstream broadcast can be customized to have the design of your choice, with some very simple html
editing.
To create your own custom Webstream page or email:
-
create an html document
start your RadioDestiny Broadcaster, Webstream enabled
go to stationdirectory.com or pirateradionetwork.com and launch your Webstream link
get the applet code from the page
insert the applet code into your custom page
save the page to your Destiny web folder
Detailed instruction:
To create a custom version of a Webstream broadcast, it is necessary that the author is somewhat
comfortable programming html code and/or has the ability to create html documents with an html editor.
1.
Create your html page. Make the page as you would like it to look.
If there is the intention or possibility that the page will be sent in an email, it is necessary that the
following line is inserted in the body tag . There is a bug in Outlook that this code will resolve.
<BODY onUnload="this.focus()"
2.
Start your RadioDestiny Broadcaster with W e bs t r e a m enabled. Go to t h e s t a t i o n d i r e c t o r y
and find your station listing. Click on the 'Web Stream' link to the right of your station name.
3.
View the source of the Webstream. (Right click on the Webstream html and select 'View Source'
from the menu.) Look for the Webstream applet code. It will look something like this:
<APPLET CODEBASE="http://###.###.###.###:80/" ARCHIVE="WebPlayer.zip"
CODE="webplayer.class" ALT="The web player" NAME="Web Player" WIDTH="87"
HEIGHT="45">
<param name="AudioStreamURL" value="http://###.###.###.###:80/webstream">
<param name="UseDefaultIcon" value="false">
<param name="AudioBufferSize" value="5">
<param name="AutoPlay" value="true">
<param name="AutoBitRate" value="false">
<param name="AutoLoop" value="true">
<hr>
If you were using a Java-enabled browser, you would see the
RADIO DESTINY™ USER MANUAL 17
<a href="http://www.clipstream.com/help/java.html">clipstream</a>
<hr>
</APPLET>
Highlight and copy the applet code from that page. Go back to your custom html page.
4.
Paste the applet code into your custom page as html code (not text). Be sure to save the page
in the Destiny web folder as radiodestiny.htm .
5.
Tune in to your Webstream from t h e stationdirectory again to see your new look. The resulting
file "radiodestiny.htm" can also be uploaded to your site.
NOTE: If the IP address of the computer that your RadioDestiny Broadcaster is running
on changes at any time, the Webstream link will no longer work. In the event of
a new IP address for the broadcasting machine, simply change the two
corresponding locations in the applet code.
(http://###.###.###.###)
Sending Webstream Mail
Webstream can be sent to Java and html capable mail programs such as Outlook and Eudora so that
recipients can receive your live broadcast without leaving their email client.
Sending a Webstream email can be as easy as copying and pasting your customized Webstream html into
Outlook and pressing send. The recipient must have a Java and html capable mail program.
How to send a Webstream using Outlook
1.
Construct the page.
2.
Make sure that all the reference links in the page you are about to send are absolute references.
Any images in the rest of your page you should have absolute links otherwise they will show up
as broken links.
3.
Make sure that the following code appears in the line with "<body " in it. onUnload="this.focus()"
<-- this command must appear after "<BODY" . There is a bug in Outlook that causes it to crash
if this command is not included in the original page.
4.
Select the Webstream and copy it.
5.
Paste it into the body of your message.
6.
Test it by sending it to yourself or friends.
How to send a Webstream using Eudora
1.
Follow steps 1-3 as with the Outlook examples above.
2.
To attach the Webstream in your email, make sure the "text as attachment button" is raised.
Eudora Dialog Screen
3.
Then, attach the page with the Webstream embedded in it as an attachment. Do not cut and
paste it into your message.
RADIO DESTINY™ USER MANUAL 18
4.
Test it by sending it to yourself or friends.
Launching From a Web Page
To enrich your existing web site or as an added feature while building a new one, you can add an image or text link
which will immediately launch the Destiny Media Player or player-less Webstream browser window; (version 3..0)
that connects to your station (when it is currently broadcasting).
Whenever you broadcast, your server automatically creates a file with the extension .rdl which identifies your
station at the time it is broadcasting.
Start up your broadcaster and go to the live stations at stationdirectory.com or pirateradionetwork.com. Copy the
link for your station and paste it into your html page. Upload your page.
To copy the link: Internet Explorer - hover over the station link, right click, 'Copy Shortcut'. Netscape Navigator hover over the station link, right click, 'Copy Link Location'.
Note: If you have a dynamic IP address, this link will need to be updated every time you broadcast.
More Detail:
Start up your broadcaster: Go to the live stations at Stationdirectory.com or pirateradionetwork.com.
Copy the link for your station and paste it into your html page. Upload your page.
To copy the link: Internet Explorer - hover over the station link, right click, 'Copy Shortcut'. Netscape Navigator
- hover over the station link, right click, 'Copy Link Location'.
Note: If you have a dynamic IP address, this link will need to be updated every time you broadcast.
If the listener has the Destiny Media Player™ as the default player, when they click on the hotspot, the Media
Player™ will start playing your broadcast. Player-less Webstream will launch and play as long as the listener's
browser has Java enabled, (stats indicate 90% + are enabled and able to tune in)
Broadcaster FAQ
1.
2.
3.
4.
5.
6.
7.
8.
9.
10.
11.
12.
13.
14.
15.
How do I listen to the stations?
I'd like to try my hand at broadcasting. How do I do it?
Do you list stations from other networks?
How do I contact a station?
Can you tell me when a station is going to be on?
I want to complain about a certain broadcaster. What can you do about it?
What does the Kbps column mean?
I'm a broadcaster and I am not appearing on the station directory / a friend told me to check out their
station and it's not appearing. What happened?
What is Webstream?
Why are some stations Webstreamed and some aren't?
I am broadcasting in stereo using Broadcaster 3. Why does the Webstream sound mono?
Why can't my listeners connect?
How fast of an Internet connection do I need to use Broadcaster?
I keep getting trouble trying to connect to my own station. The player freezes and then tell me that I am
connected but there is no connection. What gives?
What port does Broadcaster use?
RADIO DESTINY™ USER MANUAL 19
16. What is my present true IP address?
17. I'm having trouble connecting to the directory with my station. What could be the problem?
18. I keep on getting an error that says that my computer isn't fast enough and I have a 166 MHz (or higher)
computer!
19. Can I play MP3s on my broadcast?
20. How can I play CDs in live mode in my broadcast?
21. My listing in the directory doesn't contain a web link or description. Why?
22. How come my station address keeps changing?
23. How do I tell if my station is working okay?
24. My sound quality is lousy. How can I improve it?
1.
How do I listen to the stations?
You need the Destiny Media Player or you can listen to webstream by visiting stationdirectory.com or
pirateradionetwork.com.
2.
I'd like to try my hand at broadcasting. How do I do it?
Refer to the Broadcaster section of this document.
3.
Do you list stations from other networks?
No.
4.
How do I contact a station?
In Media Player, highlight the station's name and then click on the Info button located on the right side of
the interface. An Email button appears at the bottom. Click it and email the station. Also, a Web button
appears beside it that may link to the station's web page if they have one.
5.
Can you tell me when a station is going to be on?
No, that's entirely up to the station's broadcasters.
6.
I want to complain about a certain broadcaster. What can you do about it?
Unfortunately we do not censor for content, and cannot prevent anyone from Broadcasting.
7.
What does the Kbps column mean?
This indicates the speed (kilobytes per second) at which the broadcaster is broadcasting. It should be an
indicator of the quality of the sound of that broadcaster.
8.
I'm a broadcaster and I am not appearing on the station directory / a friend told me to check out their
station and it's not appearing. What happened?
Are you checking the right directory? Have you refreshed the page? If you are using Broadcaster 3, you
will appear in the Broadcaster 3 directory. Also, you should give it a minute or two once you start up your
broadcaster to appear on the list. Also check if you appear in the Media Player's Radio list. If you still are
not appearing, your Broadcaster may be blocked by your ISP.
9.
What is Webstream?
Webstream is a Java audio streaming technology that enables broadcasters using RadioDestiny
Broadcaster to add a live link to their webpages that will enable anyone (even those without Destiny Media
Player) to listen to their broadcast.
10. Why are some stations Webstreamed and some aren't?
RADIO DESTINY™ USER MANUAL 20
Some stations choose to disable the Webstream option to save bandwidth and CPU resources.
11. I am broadcasting in stereo using Broadcaster 3. Why does the Webstream sound mono?
Webstream is based upon Clipstream Java technology which is presently only in hi-fi mono.
12. Why can't my listeners connect?
This can be the result of a few scenarios:
- your stream is full or you have reached the maximum number of listeners that you have specified in
settings
- You are using a f i r e wa l l and actually restricting your listeners from connecting to your broadcast
- You are in a L A N and the RadioDestiny Broadcaster is not set up with the correct Internet accessible IP
address and port. Check your c o n n e c t i o n s e t t i n g s .
13. How fast of an Internet connection do I need to run Broadcaster?
Simply put: the faster the better. The minimum speed Internet connection you would require to attract
listeners is a cable modem or DSL. Users of Broadcaster using a 56k modem will be able to test their
broadcast with one or two listeners, no more.
14. I keep getting trouble trying to connect to my own station. The player freezes and then tell me that I am
connected but there is no connection. What gives?
This will occur on the listener's D e s t i n y M e d i a P l a ye r if your stream is full or unreachable for other
reasons. Ensure that you are allowing the correct maximum number of listeners for your connection
speed. The number of listeners you can support and the quality of stream you provide is dictated by your
Internet connection.
If your internet connection is poor or your settings are incorrect, your broadcast may not be reachable
though. Your ISP may also be blocking the port that you are trying to broadcast through. Try using another
port, such as 8080 and ensure that you are using the correct Internet accessible IP address.
If you are behind a firewall or in a LAN scenario, you will need to specify the correct Internet accessible IP
address and path before your listeners can connect to your stream.
15. What port does Broadcaster use?
By default Broadcaster uses Port 80. However, your network administrator may set up a different port for
web traffic. Contact your administrator to find this out. If your stream is not getting out, try another port and
be sure that you have the correct IP address entered in your S e t t i n g s .
16. How do I find out my present IP address?
Visit http://www.radiodestiny.com/help/broadcaster3/check_IP.shtml
17. I'm having trouble connecting to the directory with my station. What could be the problem?
1. Are you connected to the Internet?
Yes, I am!
2. Are you behind a f i r e wa l l o r p r o xy s e r ve r ?
Sysadmins commonly set up proxy or firewalls to prevent outside access from reaching internal
computers for security reasons or to share Internet access through a gateway computer. The IP
number for your computer is actually generated for internal use only. Proxy access through a
cable modem that you've set up to connect to your home LAN will also be a problem unless you
have your cable Internet company assign you separate IPs for your different computers in your
RADIO DESTINY™ USER MANUAL 21
LAN that you wish accessible through the Internet. Programs like Wingate or Sygate (that help
set up gateway networks that enable several computers on a small LAN to surf using one
Internet connection) assign local IPs that are not accessible from the outside. Some firewall
products can just have their filters adjusted a bit to resolve this.
Internet IPs look like this: (ex.) 243.143.23.2. An IP that looks like this 45.0.0.1 or 192.168.1.100
is missing information. That IP would most likely be a proxy or firewall IP.
In the case of a firewall, you can ask your system administrator to open up your computer to port
80. For users on a proxy server, you can sometimes purchase an Internet accessible IP from
your provider.
Tip: A possible way of getting a static IP from a cable network provider is to tell their support that
you keep on losing connection with their DHCP. If you complain enough you may be able to
get them to give you a static IP.
18. I keep on having trouble with my computer locking up or bogging down. Isn't it fast enough to
broadcast?
Do you have a 166 MHz (or higher) computer? The RadioDestiny Broadcaster 3 software is fairly CPU
intensive. This is amplified if you are streaming mp3s and/or are also streaming the Webstream codec.
The problem may be resolved by stopping all other applications, start broadcasting, and wait 20 seconds
before doing anything else. You can also try disabling Webstream. Note: If you are planning on
broadcasting professionally, you are advised to dedicate one computer just for broadcasting.
19. Can I play MP3s on my broadcast?
This is one of the major features of Broadcaster 3.0. Simply drag and drop files or whole folders of MP3s
into the Playlist.
Tip: Make sure the MP3s are good quality or it will be reflected in your broadcast!
20. How can I play CDs in live mode in my broadcast?
To stream CDs from an external player, you must enable the Line-in mixing in the Mixer window. To do
this, bring up the Mixer, and make sure the Line-in button on the right side is clicked in. This enables you
to mix in any external audio device that is connected to your sound card (including your internal CD). The
fader slider at the bottom determines how much of your output is devoted to Line-in.
21. My listing in the directory doesn't contain a web link or description. Why?
You need to configure this in RadioDestiny Broadcaster?. From the S e t t i n g s menu, click on the Change
button in the Station area. Stop your broadcast and fill in a link and description here. When you restart, the
new information should be added. (You may have to press reload to see the most current directory page.)
22. How come my station address keeps changing?
If you have a permanent connection to the Internet, your connection is live all the time and your machine
is assigned a permanent net address.
IP addresses are quite valuable and are in short supply, so an ISP will usually automatically assign you
one from a pool. When you log off, that address is assigned to someone else, so when you log on again,
you could get a different one from the pool.
One obvious way to keep an address is to not log off. You could run the station in automatic DJ mode.
You may need to enter "ping -t" from the DOS command prompt to keep your connection from being
dropped.
RADIO DESTINY™ USER MANUAL 22
Another solution is to request that they assign you the same address every time you log in rather than
choosing one from a pool. Since this address won't be available for other subscribers, you can expect to
be charged a nominal fee if that is available.
Another solution is to refer your listeners to our Station Di r e ct o r y p a g e to find your Station link.
23. How do I tell if my station is working okay?
It is possible to run Media Player on the same machine as the RadioDestiny Broadcaster, but watch for a
few issues.
You may get 'echoing' sounds due to the audio that you hear getting re-broadcasted though your
microphone, if selected.
You could overload your CPU by simultaneously compressing and decompressing, which could take your
station off-line.
Listening from your Media Player will give you an idea of the sound quality of the compressed sound after
it is passed from the RadioDestiny Broadcaster. A true test, though, is to listen to your program through a
separate phone line, downloading through a separate Internet connection, onto a separate PC playing
Destiny Media Player. Tests through a LAN are also acceptable but you must make an assumption that
your listeners are farther away than a LAN.
24. My sound quality is lousy. How can I improve it?
You can set your quality settings in the Settings -> Broadcast settings window. Here you must
compromise how many listeners you want to support with how good a signal you want to provide those
listeners who you allow to connect.
Upgrade your net connection. Quality is a function of the amount of data you are able to broadcast to
those who connect to your station. The more data you are able to push, the better sounding your
broadcast will be. Do not boost your quality beyond what your connection can handle. Watering down your
quality to allow more listeners to connect is something you must gauge yourself.
Make sure your source is clean. If you are broadcasting MP3s ensure that the quality of the original is
good to begin with.
Use a fast machine. Compressing/decompressing audio is very CPU intensive. Although our software is
made to meet low end hardware requirements, a high performance computer is optimal.
D e s ti n y M e d i a Pl a ye r
Introduction
The Destiny Media Player is an all in one digital music player that comes with an Internet Radio network. Play MP3,
CD audio, MIDI, AIFF, .wav, and video formats and listen to a growing number of web-based radio stations
broadcasting on the RadioDestiny Network™, all using the familiar home stereo interface.
RADIO DESTINY™ USER MANUAL 23
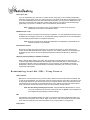
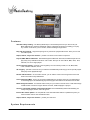
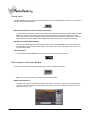
Destiny Media Player Interface
Features
Automatic library building – The Destiny Media Player™ automatically searches your drive for all your
MP3s, MIDI files and .wavs and assembles a library categorized by file format, enabling you to play
any common sound file on your PC or Mac, without searching through folders.
Drag and drop playlists – drag and drop songs of any format into a playlist without fuss. Save your mix and
then call it up later.
Simple, familiar, easy-to-use interface – just like a car stereo or home stereo component.
Play CD, MIDI .WAV and AIFF files - With added support for MIDI and .WAV files, the Media Player will now
play nearly every available sound file on a PC or Mac. Now you can mix in MP3s, MIDI, .WAV, .AIFF,
CD audio, etc. into a single playlist.
Library sorted by category - All items in the song library are now sorted by format, PC: CD, MP3, MIDI,
.WAV. and Mac: CD, MP3, Sound
CD easy-play - just slide a music CD into your CD drive and Media Player will bring up its own specific playlist.
Press play and its playlist will begin.
Rename CD information - On each CD's contents, you can edit the name of each song and the name and
artist of each CD for easy identification.
Listen to Streaming MP3 - as long as your Destiny Media Player™ has been chosen as your default player
for streaming mp3, it will automatically play streaming mp3 radio stations or selections from the web.
Radio through the modem - our software makes it easy for you to listen to smooth music or talk radio through
a 28.8k modem connection or higher without a browser, additional plugins or players.
Access to a worldwide network of Internet broadcasters in the RadioDestiny Network broadcasting in a
variety of languages, themes, and music genres.
Instant radio station updates - the complete list of live world-wide radio stations is updated every time you
switch to Radio mode or click the Refresh button.
Simple, familiar, easy-to-use interface – just like your radio tuner.
System Requirements
RADIO DESTINY™ USER MANUAL 24
Minimum
-
Windows 95, 98, 2000, Windows NT 4.0 or above
Windows95 compatible Sound Card
Intel Pentium 166Mhz+ / AMD K6 300Mhz+ CPU
32MB RAM
5MB of hard disk space
a reliable 56k (or faster) Internet connection for use with Destiny Media™ (Internet Radio
Mode)
RADIO DESTINY™ USER MANUAL 25
Quick Start - Tunes Mode
To start playing your MP3 and other song files right away, follow these quick steps:
1.
Launch the application
Launch the Destiny Media Player™ by double-clicking on the Destiny icon (located on your desktop or through
your Start Menu button -> Programs -> Destiny -> Destiny Media Player ).
2.
Go to Tunes (CD / MIDI / .wav) Mode
Make sure that the Destiny Media Player™ is in Tunes Mode (which also accesses CD / MIDI / .WAV-playing
functions. To get into Tunes Mode, click the Tunes button.
Tunes Button
3.
File -> Open Song.
Go the File Menu and select Open Song.
File Menu
4.
Find a song file on your hard drive
Browse for an MP3 or CD / MIDI / .WAV file. When you've found one, select it and click Open (or double-click
on the file itself to play it instantly).
5.
Look in the playlist window
The song will appear in the Playlist Window (if you have the Media Player interface maximized).
6.
Press PLAY button
Make sure the song name is highlighted (if not, click on the song title with the mouse) and then click on the Play
button. Double-clicking accomplishes the same function.
Playlist Window
7.
You’re playing!
RADIO DESTINY™ USER MANUAL 26
Playing Audio Files
To play a song with the Destiny Media Player™ you must first load up a song into the player. There are many ways
of doing this and many sound formats that can be played:
-
Double Click on an audio file
Load from File Menu
Drag and Drop files
Play from the Library
Play CD
Double-click on audio file
The simplest way to load an MP3, CD audio, MID, AIFFI or .WAV file file is to find the folder where it’s located
and double-click on it. This will launch the Destiny Media Player™ and begin playing it immediately. The song
will also be added as the first selection in the playlist.
You can also load a song when you don’t have a playlist generated. Click on the play button.
You are then prompted to browse for an MP3 or other audio file in your hard disk. Find the one you’d like to
play and double-click on it. The song you selected will be placed in your playlist and will begin playing
immediately.
Load from File Menu
Another way is to go to the File Menu, select Open Song, browse for the MP3 / CD / MIDI / .wav file, select it
and click on Open (or double-click on the file itself). The song will be added to the end of your playlist but will
not play until you select it and click on the play button.
File Menu
Drag and Drop Multiple Select
Open up the folder where your audio files are kept, select one or multiple sound file icons and drag them onto
the Destiny Media Player™. All of the song files you dragged on to the player will be added to your playlist.
Playing your song from the library
The Media Player can also search your entire drive for MP3, MIDI, .AIFF or .wav files and assembles them into
a library. Make sure that the Info/Playlist panel is visible. Click on the Library mode button located in the
Info/Playlist Panel. A list of all your MP3 or other files appears. Double-click on any of these files to begin
playback.
Library
RADIO DESTINY™ USER MANUAL 27
Playing Music CDs
To play your music CD, insert it. Its library category will open a listing of all its tracks. In the Library you can select a
single song and play it by pressing play. To play multiple songs, select the tracks you want to play and add them to the
playlist by clicking the Add to Playlist button. Then click on the playlist and press play. If you had previously created a
playlist Media Player would have brought up the playlist you had created. Again, press play.
Using the Library
One of the Destiny Media Player™’s more powerful features is the automatic library builder. A list of all of the audio
files currently available on your hard drive(s) is generated when you first download the Destiny Media Player™. It
can be kept current by pressing UPDATE LIBRARY as necessary after that.
In order to access the Library, make sure that the Info/Playlist panel is visible. Also, make sure that the Destiny
Media Player™ is in Tunes Mode. Now click on the Library mode button.
Creating Playlists
Start using the playlist by pressing the Playlist mode button in the expanded interface.
Playlist Button
Make sure that the Destiny Media Player™ is in tunes mode and that the interface is expanded.
A screen titled "playlist" will appear to the left.
Playlist Screen
Playlist function buttons:
Playlist Buttons
ADD Function Button
To Add a song to the playlist, click on the Add function button. The Open MP3 dialog will appear. Browse your
hard disk(s) and/or CD-ROM for an MP3 / MIDI / .wav file or CD audio track, select it and click on Open (or
double-click on the file itself) or for an MP3 file.
Alternatively, you can just select your songs straight from library mode and choose 'Add To Playlist'. This
method is also listed in the Playing MP3 / CD audio / MIDI / .wav songs section.
RADIO DESTINY™ USER MANUAL 28
Multiple Select
To add multiple songs to a playlist at once, press the contol key while selecting the tracks or hold down the left
mouse button and drag to hightlight your selections.
Adding CD Tracks
If you add CD tracks into a normal playlist, the tracks will only play if you have the same CD in the drive when
that playlist is selected. The rest of the tracks of other formats will have no trouble playing.
Delete Function Button
You can also remove a song from your playlist. Select the song by clicking on its name in the playlist and click
on the Delete function button. Delete does not delete the file from your hard drive.
Move up / down Function Buttons
Occasionally you will want to change the order in which you wish the songs to play in the playlist. To change
the sequence, select the song you want moved and then click on either the Move Up or Move Down function
buttons. Click up or down as many times as needed until the song title in the playlist is in the right sequence.
Opening and Saving Playlists
If you’ve built a playlist arrangement you like, you can also save the playlist by going to the File menu, and
selecting either Save Playlist or Save Playlist As.
Use Save Playlist if you’ve already saved the playlist or if you want to make a CD playlist (if you have never saved
the playlist, you will be prompted to enter a file name and location). Use Save Playlist As if you’re creating a new
playlist or re-arranging an existing one and wish to store it under a different name (and/or location). Save Playlist
As will prompt you to enter a file name and location. Click Save when done.
Note on CD Playlists: Don't rename CD playlists. Media Player needs to know a CD playlist's serial number in
order to automatically load it when you insert a CD.
Note: Playlist files are saved as .lst files.
Once you’ve saved your playlist files, you can then load any one of them up by choosing Open Playlist from the File
Menu, then browsing and double clicking on the desired .lst file. The arrangement appears in the playlist view once
you click on the Playlist Button in the Destiny Media Player™.
Note: Do not move tracks to other folders after saving them to a playlist or they will not be recognized within
that playlist.
CD Playlists
CDs in the Destiny Media Player can each have a customized playlist using all the features of the normal playlist
for MP3s / MIDI / .WAV files. In addition, you are able to rename tracks for every CD.
When the Media Player first loads up a CD, it will load all the CD's entries into a library category under Audio CD.
To build a CD playlist, add tracks and other audio files you want to hear to the playlist and it will be ready to play
only those tracks you like. If you select Save without defining a name, the player will default to the CD's serial
number and that playlist will be automatically launched when that CD is inserted in your drive after that. Otherwise,
the playlist functions just as it does for MP3 / MIDI / .WAV playlists.
RADIO DESTINY™ USER MANUAL 29
Customize CD Track Entries
To help you organize your CDs, you can customize their song and CD title information so that every time you
insert the CD, its individual information will be displayed.
To do this, insert a CD. When its Library category is initially displayed, it will show all the tracks of the CD as
numbers. You can rename the track titles by highlighting any track title and then pressing both left and right
mouse-buttons at the same time. This will display a new window that lists all the track titles on the CD as well
as its title and artist. You can then replace any information on the CD.
CD Customize Screen
Editing Track Titles
To replace the name of the title and artist, click in those boxes that indicate artist and title and type new
information.
To replace the names of the tracks, click on the track name of the song you want to edit in the second window
from the bottom. Then type in a new name in the field at the very bottom. Press the SET button to the right of
that field. The track name will now be changed. To save the custom CD information, click the SAVE CDROM
INFORMATION button. Now, the next time you load up that CD, all the custom information will be the same.
Tip: Do not rename the .lst files (CD serial #s) associated with CD playlists or else you will not be able to
recall the specific playlist for a CD.
Tip: Do not move tracks to other folders after saving them to a playlist or they will not be recognized within
that playlist.
RADIO DESTINY™ USER MANUAL 30
Track Info
The Destiny Media Player™ provides more information about an Internet Radio station or audio file. The Info button
is located in the expanded interface.
Track Info Button
Expanded Info about an audio file ('Song Information')
In Tunes mode you can find out more about an audio file by selecting it in the Playlist and then clicking the Info
button. The window will now display more information about the file such as the file location on your hard
drive. It can contain the bit rate; sampling frequency (8khz is sufficient for telephone quality speech; 44.1khz is
audio sampled at CD audio quality); and the WWW home page of the performer or provider of the song.
Expanded Info about Radio Stations
Once you are in Radio Mode and have selected a station, click on the Info button. The window at the bottom
will now display more information that the station has provided. It can contain a description of the station, and
its location in the world.
The Links button
In Tunes mode the Links button provides you with a list of music resources on the web.
Links Button
Listening to Internet Radio
To listen to Internet Radio on the Destiny Media Player, click on the Radio mode button.
Radio Button
Note: You must be connected to the Internet to receive Internet radio!
Station Information List
A window opens up below the standard interface called "Station Information". It shows a list of the categories
of stations currently broadcasting on the RadioDestiny Network. This list is essentially the same as the one on
StationDirectory.com.
Station Information Screen
RADIO DESTINY™ USER MANUAL 31
To listen to stations inside those categories, click on the + symbol beside each category name to expand the
list. (Click the - symbol to minimize that category)
Station Information Screen
Note: Stations listed under the heading RadioDestiny 3 Beta are broadcasting with RadioDestiny
Broadcaster 3.0 (stereo).
Then click once on the station name to listen to it.
Station Information Screen
Wait a few moments while your Media Player connects through the Internet to that station and it will begin
playing. At the bottom of the window is a status line that informs you about the connection to the station. When
it is playing it will say 'receiving'. Occasionally, because of the quality of the connection between your computer
and the station, it may have other messages.
Connecting to Stations
Connecting reliably to stations is dependent upon the quality of your Internet connection and the connection of
the broadcasting station. When you click on a station in the station list the name of the station and its station
info will come up in a window along with a status message at the bottom.
The status message can read:
Attempting Connection
Your Media Player is attempting to receive a reliable audio signal from the broadcasting station. If
it stays on this message for more than 30 seconds the connection between your Media Player
and the Station will not succeed.
Buffering (%)
Your Media Player is receiving an audio signal and is loading up a reliable stream prior to playing
the audio.
Bit Rate: ___
This estimates the broadcast connection speed of the station in kbps (kilobytes per second).
RADIO DESTINY™ USER MANUAL 32
Connected: Waiting for signal
Your Media Player has connected with the station on the Internet and is waiting for audio
information.
Receiving Transmission
You have successfully connected with a Broadcaster 2 station and should be hearing a hi-fi
mono broadcast momentarily.
Receiving Stereo Transmission
You have successfully connected with a Broadcaster 3 station and should be hearing a stereo
broadcast momentarily.
Other Radio Functions
Previous and Next Tune buttons - You can skip from station to station in each category list by clicking on
these buttons.
Previous and Next Buttons
Web button - Launches your browser to visit the station's official web page (if available).
Web Link Button
Email button - Launches your email program and start a new email addressed to the manager of the station.
Station Email Button
Stop button - Stops the current station from playing on your Media Player and will return you to the station list.
Stop Button
Info button - Provides more information about the current station and may include a description of the station
and its location in the world.
Info Button
Station button - Returns you to the station list without stopping the current station from playing.
Media Player FAQ
RADIO DESTINY™ USER MANUAL 33
1.
2.
3.
4.
5.
6.
7.
8.
9.
10.
11.
12.
13.
14.
15.
1.
Is Destiny Media Player another version of the Windows Media Player? Will it play .wmf's (Windows Media
Player Format)?
How do I uninstall Destiny Media Player?
I've uninstalled Destiny Media Player but all the file associations for my audio files are messed up. What
do I do?
Are WinAmp playlist files compatible with Media Player?
Can I feature a download link for Destiny Media Player or RadioDestiny Broadcaster on my site?
The library lists a lot of really small sound files. How do I make it list only songs?
How do I delete songs from my library?
Now that I have the Destiny Media Player, where do I find MP3s to download?
What does the Radio Button do?
I have a question regarding the stations on the network
I'd like to try my hand at broadcasting. How do I do it?
Will there be more skins for the Destiny Media Player?
The Media Player has 'taken over' any mpeg videos that I want played. How do I make it so that the mpeg
is played by the default player?
Can I put the Media Player on a CD collection or on a downloads site?
Will the radio mode be able to pick up stations from other networks such as Shoutcast?
Is Destiny Media Player another version of the Windows Media Player? Will it play .wmf's
(Windows Media Player Format)?
No, it is not and no, it does not play .wmfs.
2.
How do I uninstall Destiny Media Player?
In your start menu, under Destiny / Destiny Media Player there is an uninstall program.
3.
I've uninstalled Destiny Media Player but all the file associations for my audio files are messed up.
What do I do?
In Windows, go to your Control Panels -> Folder Options and click on the File Types tab. Then
find the common audio file types in the list and click on the Change button.
4.
Are WinAmp playlist files compatible with Media Player?
Yes. Media Player can import .m3u and .list playlist files. Do this by going to the File menu and
choosing Open playlist.
5.
Can I feature a download link for Destiny Media Player or RadioDestiny Broadcaster on my site?
Yes. This l i n k p a c k a g e p a g e found at
http://www.radiodestiny.com/broadcast/linkpackage.html has a range of buttons and banners
you can feature on your site. We ask that you do not link directly to our downloaded programs as
we need to track how many people download our program and want to ensure that everyone gets
the most current version when we make changes or fixes.
6.
The library lists a lot of really small sound files. How do I make it list only songs?
Sometimes if you have games installed on your computer it will also list very small sound effects
files or mp3s as well, taking more time. To prevent this, go to the Options -> Preferences menu
and limit or expand the size of Mp3 and .wav files the Tunes Library scans for. A typical song file
is more than 300k.
7.
How do I delete songs from my library?
The library is just a listing of files on your hard drive. If you want to delete the actual files, you
must find them on your hard drive and delete them manually. To find out where they are located,
RADIO DESTINY™ USER MANUAL 34
click once on the song in your library or playlist and then click the info button on the right side.
This will give you the path and filename of the file.
8.
Now that I have the Destiny Media Player, where do I find MP3s to download?
There are a lot of free MP3s on the Internet including many released by well-known artists.
Popular starting points for searching for MP3s are M P 3 . c o m and A u d i o G a l a xy. c o m .
9.
What does the Radio Button do?
If you are on the Internet, clicking on the Radio button will connect you to a community of users
broadcasting using the R a d i oD e s t i n y B r o a d c a s t e r . Click through the categories to listen to
the various radio stations. (Destiny is not responsible for the content or quality of any of the
stations on the network).
10. I have a question regarding the stations on the network.
Please refer to the S t a t i o n D i r e c t o r y F A Q .
11. I'd like to try my hand at broadcasting. How do I do it?
Go to our B r o a d c a s t e r s e c t i o n .
12. Will there be more skins for the Destiny Media Player?
Not at this time, no.
13. The Media Player has 'taken over' any mpeg videos that I want played. How do I make it so that the
mpeg is played by the default player?
When you install, you are prompted to select which files you would like Destiny Media Player to
be the default player for. You can change these file type associations by going to your Control
Panels -> Folder Options and click on the File Types tab. Then find the common file types in the
list and click on the Change button. Choose a new default player for your videos.
14. Can I put the Media Player on a CD collection or on a downloads site?
We prefer that you link to our own downloads section so that users have the most current version
always. If you want to put it on a CD collection, something can be arranged.
15. Will the radio mode be able to pick up stations from other networks such as Shoutcast?
No.
Installation Troubleshooting
Check system requirements first
Please check to see if your PC or Mac matches the S y s t e m R e q u i r e m e n t s first. If your system does not
match the minimum requirements, you may want to upgrade to a machine with more RAM, a better CPU or a
better connection to the Internet.
How can I install Destiny Media Player onto a computer without an internet connection?
You can install additional copies of a previously registered Destiny Media Player onto a computer without an
internet connection by copying over the Destiny.exe and the registry file of the original installed program onto
the new computer.
RADIO DESTINY™ USER MANUAL 35
Audio Playback Troubleshooting
Computers with a slow or busy CPU may have trouble with the playback of mp3s. To optimize, close other
applications and minimize the player window. If your audio files are located on your hard disk, fragmentation and
heavy disk access operations at the time of playing may affect the performance. If you are playing off a CD, your
CD-ROM drive should be 8X or higher. If your drive is too slow, try copying the files onto your hard disk. Problems
playing mp3s may be the result from poor encoding by the creator of the file or from a corrupt download.
Playlist is blank or incomplete
You must rebuild a playlist if any file is moved. Every time you generate a playlist it forms a link to the existing
location of the audio files that have been added to the playlist. If you move any of the songs from their
locations, they will disappear from the playlist. If you move every song from their locations or move the entire
directory where they are located, the playlist will be blank. Every time you move a song file you must re-ADD
that song to the playlist.
Library doesn’t list songs recently downloaded
The library must be updated if a song is added. As you download new songs, you can click on the Update
Library Function button to refresh the library. It is important to ensure the Library has been recently updated if
you are building your playlist through the Library.
Sound doesn’t play or suffers from poor performance
Check if the mute button is on or the volume is turned too low. Check to see if another application is already
using sound. Many sound cards will not support more than one sound output. The Destiny Media Player™ may
still play, but with reduced performance. Check if the volume settings for Windows or your Sound Card are
muted or too low. Check if the volume on your amp, subwoofer or speakers is muted or too low. If you are
playing a MIDI file, poor quality sound may be the result of your sound card's instruments. Check the
connections to your speakers and to your sound card. Verify that your sound card is functioning properly (see
your sound card’s manual for more information). If you are playing a CD and do not hear sound, you may be
missing a jumper from the sound card to the CD drive.
RAM Problems
Quit unneeded applications / restart windows Like all applications in Windows, the Destiny Media Player™
requires that you have available memory to launch and to perform adequately. If you are experiencing
problems, you may have to quit other applications or close windows. When all else fails, especially if your
computer has been on for some time, restart Windows and try again.
Internet Radio Mode Troubleshooting
You must be connected to the Internet The Destiny Media Player™ Internet Radio Mode requires that you have a
constant, working connection to the Internet in order for you to receive data from stations. This is called streaming
media. This is opposed to downloadable media which is also used by the Destiny Media Player™ in tunes mode
that makes use of files you have saved previously on your hard drive or CD. Accessing email or browsing the
Internet will often affect the sound of your radio reception. If you have trouble connecting to the Internet go here.
Sound doesn’t play or suffers from poor performance
- Check if the mute button is on or the volume is turned too low.
- Check the volume on your system and external speakers.
- Check to see if another application is already using sound. (Depending on your sound card, the Destiny
Media Player™ Internet Radio mode may still play, but with reduced performance)
- Check the connections to your speakers and to your sound card
- Verify that your soundcard is functioning properly (see your sound card’s manual for more information).
RADIO DESTINY™ USER MANUAL 36
- Internet traffic or a poor connection may be at fault. Discontinue use of other applications that use the
Internet.
Problems with listening to radio broadcasts
Occasionally, you may experience problems while listening or connecting to the Internet Radio stations. Just
as with AM/FM radios, interference may cause you to lose the signal. The Destiny Media Player™ Internet
Radio mode will inform you of these problems. The following error conditions may occur:
Connection Fails - too many listeners: There is a limit to how many listeners each radio
broadcaster can support (the maximum number is determined by the broadcaster's settings and
Internet connection. If the stream is full, you will have to wait until that station has fewer listeners.
Poor connection: a similar error will occur if the connection between your computer and the station
is too unreliable. Press the Refresh button and try again.
If you are in a Proxy/Firewall situation, some firewall products can just have their filters adjusted a
bit to let the stations through. Otherwise, you will need to have your system administrator open
up udp port 3456 for you to receive transmissions from the broadcasters on the RadioDestiny
network.
Lost packets - The broadcast data is “routed” by routers between the server and the listener. These
routers can occasionally get congested which results in lost data. The most common cause of
this is the traffic load of your ISP (Internet Service Provider). You can try listening at another
time, or reevaluate your ISP if you experience continuous problems. See glossary.
Grey Listings - The broadcast stream has been full for more than ten minutes or the broadcast lost
it's Internet connection while broadcasting. A grey listing is unavailable to listen to.
Station Directory - Finding Radio Stations Online
About the Station Directory
The RadioDestiny Station Directory replicates the very same list of Internet Radio stations broadcasting using the
RadioDestiny Broadcaster using your favorite browser.
The Station Directory can be found at either:
www.pirateradionetwork.com
or
www.stationdirectory.com
Station Directory FAQ
1.
2.
3.
4.
5.
6.
7.
8.
9.
10.
How do I listen to the stations there?
I don't see the popup for the stationdirectory
I can't find my favourite station
I have problems connection to stations whenever I click on them
I'm a broadcaster and I don't show up on the list
The entire stationdirectory appears to be down
What does the Kbps column mean?
What is Webstream?
Whatever Webstream is, it's not showing up
How do I listen to Webstream stations?
RADIO DESTINY™ USER MANUAL 37
11. Why are some stations Webstreamed and some aren't?
1. How do I listen to the stations there?
You need to install the D e s t i n y M e d i a P l a ye r .
2. I don't see the popup for the stationdirectory
It's possible that you disabled Java in your browser or have some utility that prevents popups.
3. I can't find my favourite station
Check the station directory list. If they're not there, they may not be broadcasting at this time. Go to the O f f
t h e A i r list and see if you can find that station there. The Off the Air List will help you get in contact with the
station's management. Also, make sure that you have refreshed the browser page displaying the
stationdirectory.
4. I have problems connection to stations whenever I click on them
Please find the answers in the FAQ for Media Player.
5. I'm a broadcaster and I don't show up on the list
If you are continually having problems appearing on the directory there is likely a problem with your internet
connection. We recommend that you have at least a cable or DSL connection to broadcast to a larger
audience. Any less is considered only for testing purposes.
6. The entire stationdirectory appears to be down
Something bad likely happened to our servers. Please help us out and send us an e m a i l .
7. What does the Kbps column mean?
This indicates the speed (kilobytes per second) at which the broadcaster is broadcasting. It should be an
indicator of the quality of the sound of that broadcaster.
8. What is Webstream?
Webstream is a java playerless technology based upon Destiny's C l i p s t r e a m that enables anyone not using
Media Player to listen to a hifi mono stream of the same radio broadcast.
9. Whatever Webstream is, it's not showing up
Webstream requires Java to be enabled to run. You will have to enable it.
10. How do I listen to Webstream stations?
You need the Destiny Media Player. Or you can click on the Webstream links (mono quality).
11. Why are some stations Webstreamed and some aren't?
Some stations choose to disable the Webstream option to save bandwidth.
General FAQ
1.
2.
3.
I'd like to try my hand at broadcasting. How do I do it?
Do you list stations from other networks such as Shoutcast?
How do I contact a station?
RADIO DESTINY™ USER MANUAL 38
4.
5.
Can you tell me when a station is going to be on?
I want to complain about a certain broadcaster. What can you do about it?
1.
I'd like to try my hand at broadcasting. How do I do it?
Go to the Broadcaster section.
2.
Do you list stations from other networks such as Shoutcast?
No.
3.
How do I contact a station?
In Media Player, highlight the station's name and then click on the Info button located on the right side of
the interface. An Email button appears at the bottom. Click it and email the station. Also, a Web button
appears beside it which may link to the station's web page if they have one.
4.
Can you tell me when a station is going to be on?
No, that's entirely up to the station's broadcasters.
5.
I want to complain about a certain broadcaster. What can you do about it?
Nothing. We do not censor for content, nor can we control who broadcasts on the network.
Technical Support
Technical Support for the Radio Destiny Broadcaster and the Destiny Media Player can be found on the
RadioDestiny website found at:
www.radiodestiny.com
and
support.dsny.com
Technical support for RadioDestiny consists of online help, downloadable electronic documentation, and email
help. Please note that email replies may not be available if answers can be found in printed and online
documentation. As per the license agreement, Destiny Media Technologies is under no obligation to provide
support beyond what is printed in this manual, and available in electronic format on the RadioDestiny website,
or as outlined in your individual license agreement.
Demonstration Software
Demonstration software does not include support. For assistance visit:
www.clipstream.com
and
www.destinympe.com
RADIO DESTINY™ USER MANUAL 39
Contact Information
Destiny Media Technologies
1040-1055 West Hastings
Vancouver, BC Canada
V6E 2E9
www.dsny.com
www.radiodestiny.com
www.clipstream.com
www.destinympe.com
www.fidgital.com
Also Available from Destiny
www.clipstream.com
Clipstream™ is a light and powerful way to play streaming audio and video on your web page, email or web
advertisement. Requiring no user-installed player, Clipstream™ uses platform-independent Java and our own
proprietary compression technology to enable even a novice web developer to stream audio and video of any length to
anyone visiting their site.
About Destiny Media Technologies
Destiny Media Technologies, Inc. (http://www.dsny.com) is a leader in developing easy-to-use tools and enabling
technologies to distribute digital media through the Internet. The company's suite of streaming and downloadable
products includes: MPE™ (http://www.destinympe.com), a complete, secure media distribution system that provides ecommerce and digital rights management directly from within an MP3-compatible multimedia file; Clipstream™
(http://www.clipstream™.com), a Java-based tool which enables web pages, e-mail and banners to stream audio
without the use of a player; VideoClipstream™ (http://www.clipstream™.com), a technology for embedding streaming
video into a web page or e-mail; and the RadioDestiny Broadcaster™ (http://www.radiodestiny.com), which allows a
user to webcast live or scripted Internet radio from a computer to anyone on the Internet. Established in 1991, the
company is headquartered in Vancouver, Canada. Destiny Media Technologies is traded as DSNY on the OTC:BB.
RADIO DESTINY™ USER MANUAL 40