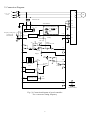
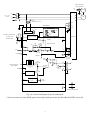
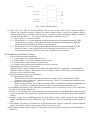
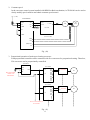
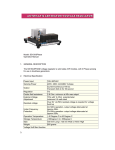
1
Speed Combination/Feed Back Regulator
Operation manual
Type:ACE-S08/09
ACE-S Series Auxiliary Controller
Type
Name
Purpose
The variation angle, tension, weight and angle bias on two axes detected by
synchronization machine can be converted as DC voltage; a converter can be
controlled to operate at the same speed, synchronous operation, constant
ACE-S02/02B/02C Position Detector
tension operation, single-to-synchronous operation.
Built-in tilt mechanism can slowly increase or decrease signals set by
frequency to reduce the mechanical impact.
Can select as a proportional/differential controller. One proportional coupler
can connect to six converters and control five proportional (differential)
Proportional/Differential
couplers.
ACE-S04/06
Coupler
Built-in tilt mechanism can slowly increase or decrease signals set by
frequency to reduce the mechanical impact.
The rotational speed of a motor can be converted as converter frequency
input through electrical signal by an RPM generator or interceptive pulse
generator.
Speed Converter/Feed Can be equipped with a potentiometer as constant tension for cloth, line or
ACE-S08/09
plastics. Linear and loose conversion can be used with an RPM generator as
Back Controller
linear control or motor constant control.
Built-in tilt mechanism can slowly increase or decrease signals set by
frequency to reduce the mechanical impact.
ACE-S10
Multi-function
Controller
ACE-S12
Signal Distributor
ACE-S13A/13B
Signal Isolation
Converter
Remote control:
Remotely control to start, accelerate, decelerate and stop a converter, and
can automatically memorize operation frequency during power failure.
Traverse control:
Used for transverse equipment, so that can move left or right.
PLC multi-step control:
Execute procedure control according to the setting phase, and recycle it.
Input current can be simultaneously delivered to five sets of output after
converted (Current or voltage output can be switched.).
For the applications of multiple conversion system, pressure signals can be
simultaneously delivered to multiple converters so that achieve constant
pressure.
Used at a place for output and input conversion (I-I, I-V, V-V and V-I) or
isolation.
ACE-S13A: The range of current output is DC 0 ~ 20mA.
ACE-S13B: The range of current output is DC 4 ~ 20mA.
2
Introduction
Thank you for purchasing ACE-S13 controller. Please carefully read this user manual before the
installation. In order to correctly operate and use, please attach this user manual on that machine so
that can provide the reference of maintenance and service or troubleshooting in the future.
Safety Notices
Please carefully read this user manual and pay attention to safety notices, symbols or text
specified in “DANGER” and “NOTE” prior to performing the installation, wiring, operation,
maintenance or troubleshooting.
DANGER: Indicates the operation could cause severe injury or death if it doesn’t execute according
to instruction on the user manual.
NOTE: Indicates the operation could minor injury or product damage if it doesn’t execute according
to instruction on the user manual.
※ Although
indicates the level of light damage, it could cause severe injury.
Only qualified staff can carry out the installation, wiring, trial run or troubleshooting.
※Qualified staff: Those who get familiar with the principle, structure, characteristic, operation procedure
and installation of ACE controller to take safety measures and avoid danger as well as
carefully read the user manual.
3
Selected power voltage must have the specifications identical to controller input
voltage. If wrong voltage is connected, internal control circuit will be burned out.
Please pay special attention to that.
Wiring between ACE controller and converter should be as short as possible (Heat
dissipation should be considered if they are in the same control panel.).
Please select appropriate line diameter when wiring main loop power.
Ground lines should conform to the third type (ground resistance below 100Ω).
Main loop power and control loop lines should be connected to ground point (PE).
Signal lines should adopt twisted pair or isolated lines to avoid noise interference,
Wiring and
and the ground items should be performed.
Installation
Signal lines should be kept away from high voltage or power lines. Don’t bundle
with high power lines.
Don’t connect control loop terminals during the power delivery to avoid damage
caused by the surge impact.
Please confirm power indicators on a panel turn off to perform the removal after the
power is disconnected.
Please connect according to terminal symbol when wiring, and lock screws to avoid
trip.
Please recover the upper cover to avoid electric shock after wiring is completed
The wiring operations must be performed by the qualified staff.
Don’t install at a place where to have high temperature, humidity, oil, lint, iron
Ambient
Environment
powder, copper powder, dust and corrosion.
Heat dissipation should be considered when installing in a control panel. The
ambient temperature should not be greater than +50℃.
4
Contents
Ⅰ.
Features ----------------------------
1
Ⅱ.
Specifications -------------------------
1
Ⅲ.
Terminal Definition ---------------------
2
Ⅳ.
Terminal Position and Dimension Diagrams --------------
4
Ⅴ.
Connection Diagram ----------------------
5
Ⅵ.
Adjustment ─------------------------
9
Ⅶ.
Installation and Wiring Notices ------------------- 11
Ⅷ.
Application Examples ----------------------- 12
5
I. Features:
The RPM of a motor is converted as electric signal by a RPM generator or photo-interception pulse
generator, which can be used for input signal of converter frequency or provide RPM feedback signal to
achieve the effects of converter constant speed and linear speed.
A feedback regulator can be equipped with a potentiometer as constant tension for cloth, line or plastics
as well as constant linear speed and rolling control of loose conversion.
Built-in tilt mechanism can slowly increase or decrease signals set by frequency to reduce the mechanical
impact.
II. Specifications:
Item
Power Voltage
Power Consumption
Frequency Input
Description
AC 100 ~ 230V, 50/60Hz
About 5VA
DC 0 ~ 10V input, input impedance 20kΩ
Tilt Time Adjustment
(adjustable range of acceleration
and deceleration)
0 ~ 36 seconds, adjustable (The default is 0 second.)
Input adjustment (R)
(VR7) adjustment: 0 ~ 3 times (the default is 1 time.)
(VR5) and (JP1) adjustment:
JP1 is adjusted to L. The adjustable range of VR5 is 0 ~ 2 times.
Instantaneous Compensation
(P)(=1/proportional zone)
(setting when equipped with a generator)
JP1 is adjusted to H. The adjustable range of VR5 is 0 ~ 10 times.
(setting when equipped with a potentiometer)
JP1 is adjusted to H; VR5 is adjusted to 2 times.
Delay Compensation Time (I)(=
integral time)
(VR6) adjustment: 5 ~ 70 seconds. The default is set as 35 seconds
AC generator input:
Output voltage will be within AC 25V ~ 75V when a RPM generator is at
max RPM.
Output frequency will be over 60Hz when an RPM generator is at min
RPM.
Magnetic polarity of an RPM generator needs 24 polarities or more
(When a RPM is 1800RPM, output frequency needs over 360Hz.)
Speed Feedback Input
DC generator input:
Output voltage will be within DC 40V ~ 110V when a RPM generator is
at max RPM.
Input impedance for RPM generator is 30kΩ±2kΩ.
Photo-interception generator:
Input of pulse frequency: 0 ~ 3.5kHz, 0 ~ 4.5kHz.
0 ~ 9kHz, 0 ~ 50kHz.
For frequency input, please refer to Table (1).
Voltage level: The Hi and Low level needs over 8.4V and below 1.4V.
Input impedance of photo-interception pulse generator is 47kΩ.
1
Remark
Item
Description
Remark
Frequency setting output:
Frequency output (CMD): DC 0 ~ 10V, 7.5mA
(15 converters can be simultaneously connected in parallel.)
Output Signal
RPM feedback output:
RPM feedback output (O/P): DC 0 ~ 10V, 7.5mA
(15 converters can be simultaneously connected in parallel.)
RPM feedback output (FBK): DC 0 ~ -10V, 1mA
Regulating power output:
DC 0 ~ 12V, 100mA (max) can be adjusted, and over-current
protection loop is equipped. The default is DC10V±0.5V. The
range of frequency can be adjusted according to frequency
setting when actually operated.
Operating location: Installed at a place where no corrosive or
conductive gas, liquid and dust exists.
Ambient temperature: -10℃ ~ +50℃ (no condensation and freeze)
Operating Environment
Storage temperature: -20℃ ~ +60℃
Humidity: 90%RH
Vibration: Below 5.9m/sec (0.6G)
Altitude: Below 1000m (3280ft)
III. Terminal Definition:
Terminal Name
AC1. AC2
PE
P15
SET-GI
CMD-GI
PHI-GI
Description
Remark
Power input terminal:
Input voltage AC 100 ~ 230V, 50/60Hz
Ground terminal for equipment
Power terminal of frequency setting input:
If the power of frequency setting input is supplied by converter
signal, this terminal will not be connected. Output current ≦15mA.
(A potentiometer is connected to P15-SET-GI terminal. The
potentiometer impedance needs ≧1kΩ)
Frequency setting input terminal:
Frequency set at 1kΩ and 1.5W, DC 0 ~ 10V input, input
impedance 20kΩ.
Frequency setting output terminal:
Signal voltage DC 0 ~ 10V; output current ≦7.5mA
(15 converters can be simultaneously connected in parallel.)
Input terminal of photo-interception pulse generator:
Signal voltage level:
The Hi and Low level needs over 8.4V (max input voltage
Note 1
12V) and below 1.4V. For frequency input, please refer to
Table (1).
Terminal input impedance 47kΩ
2
Terminal Name
TGI-GI
FBK-GO
Description
RPM generator (voltage) input terminal:
Remark
AC generator input:
Output voltage will need within AC 25V ~ 75V when a RPM
generator is at max RPM.
Output frequency will need over 60Hz when a RPM generator
is at min RPM.
Magnetic polarity of an RPM generator needs 24 polarities or Note 1
more (When a RPM is 1800RPM, output frequency needs over
360Hz.)
DC generator input:
Output voltage will be within DC 40V ~ 110V when a RPM
generator is at max RPM.
Terminal input impedance is 30kΩ±2kΩ.
RPM feedback output terminal, signal output from DC 0 ~ -10V,
output current ≦1mA. (Output load resistance needs ≧10kΩ.)
PM feedback output terminal, signal output from DC 0 ~ 10V,
O/P-GO
VP. VN
output current ≦7.5mA. (15 converters can be simultaneously
connected in parallel.)
Power output terminal for potentiometer:
VP: 7V ~ 15V, internal limit resistance 470Ω
VN: -7V ~ -15V, internal limit resistance 470Ω
A potentiometer is connected at VP – PI– VN terminals.
(Potentiometer resistance needs ≧1kΩ.)
PI-GI
Error input terminal, voltage input: DC -10V ~ 10V
CMB-GI
Bias input terminal, voltage input: DC -10V ~ 10V
VO-GO
RPM feedback output terminal, signal output from DC 0 ~ 10V,
output current ≦7.5mA. (15 converters can be simultaneously
connected in parallel.)
VRP-GO
Internal output terminal of regulating power: DC 0 ~ 12V, 100mA
(max) can be adjusted, and over-current protection loop is equipped.
The default is DC10V±0.5V. The range of frequency can be
adjusted according to frequency setting when actually operated.
VRI and VRO
External output terminal of regulating power
Note1: When photo-interception pulse signals are input to PHI-GI, DSW1 will be switched to D;
When RPM generator signals are input from TGI-GI, DSW1 will be switched to A.
3
IV. Terminal Position and Dimension Diagrams:
Terminals at lower layer
Terminals at upper
Unit: mm
Screw M4-2
Unit: mm
Fig. (1)
4
V. Connection Diagram:
AC 100 - 230V
50/60HZ
R
R
U
S
S
V
T
T
W
變壓比
Transform
ratio
1:1
FWD
ACE-S08/09
PE
AC1
VR8
ACC
P15
SMPS
電位器
SET
CMD
Signal
tilt circuit
信號傾斜電路
GI
VR7
R-GAIN
JP1
變頻器
Converter
VR9
DEC
VR10
GAIN
VN
P15
COM
Tilt 傾斜電路調整
circuit adjustment
VP
Frequency頻率設定輸入
setting input
1k ohm 1.5W
1K
ohm 1.5W
Potentiometer
REV
AC2
VR5
P-GAIN
HP
GI
Setting
設定
Vin
Gnd
比例帶
Proportion band
CMB
LP
PI
VO
VR6
I-GAIN
GI
GO
積分
Integral
TS
VR3
BIAS
DSW2
ON
VR1
PH-GAIN
PHI
1
FBK
2
Pulse脈波頻率信號
frequency signal
輸入範圍切換
Input switch
F/V
F/V
D DSW1
A
O/P
GO
GI
VR2
TGI
VRP
Level
conversion TAC-GAIN
位準轉換
可調式穩壓電源
Regulating
power
V-ADJ. REG.
0~12V
VR4
V-REG
VRI
VRO
GO
雙隔離線
Double-isolation
Fig. (2) Connection diagram of speed controller
For a converter setting frequency
5
IM
TGI
GI
AC 100 - 230V
50/60HZ
R
R
U
S
S
V
T
W
T
變壓比
Transform ratio 1:1
1:1
FWD
ACE-S08/09
PE
AC1
VP
VR8
ACC
P15
VR9
DEC
VR10
GAIN
P15
VN
SET
Signal
tilt circuit
信號傾斜電路
GI
CMD
VR7
R-GAIN
JP1
COM
Tilt傾斜電路調整
circuit adjustment
SMPS
Frequency 頻率設定輸入
setting input
1k ohm1K1.5W
ohm 1.5W
Potentiometer
電位器
REV
AC2
設定
Setting
VR5
P-GAIN
HP
Converter
變頻器
GI
Proportion band
比例帶
CMB
LP
FBK
GO
PI
VO
VR6
I-GAIN
GI
GO
Integral
Vin
Gnd
積分
TS
DSW2
ON
PHI
GI
VR1
PH-GAIN
1
at zero speed
FBK
脈波頻率信號
Pulse
frequency signal
輸入範圍切換
Input switch
F/V
F/V
D DSW1
A
O/P
GO
信號
TGI
VRP
PI
2
轉速發電機
RPM generator
signal
零速時短路
Short circuit
VR3
BIAS
Level
位準轉換
conversion
GI
VR2
TAC-GAIN
Regulating power
可調式穩壓電源
V-ADJ. REG.
0~12V
VR4
V-REG
VRI
VRO
GO
雙隔離線
Double-isolation lines
Fig. (3) Connection diagram of speed combination
Close loop control of motor RPM (RPM generator speed feedback) (DSW1 selects A)
6
TG
(PG)
IM
Photo-interceptiv
光遮斷式脈波
e pulse產生器
generator
PHI
GI
AC 100 - 230V
50/60HZ
R
R
U
S
S
V
T
T
W
變壓比
Transform ratio 1:1
1:1
AC1
頻率設定輸入
1k ohm1K1.5W
ohm 1.5W
Potentiometer
電位器
COM
Tilt 傾斜電路調整
circuit adjustment
VR8
ACC
P15
SMPS
Frequency setting input
REV
AC2
VP
IM
FWD
ACE-S08/09
PE
Encode
VR9
DEC
VR10
GAIN
P15
VN
SET
Signal
tilt circuit
信號傾斜電路
GI
CMD
VR7
R-GAIN
HP
JP1
Setting
設定
VR5
P-GAIN
變頻器
Converter
GI
Proportion band
比例帶
CMB
LP
FBK
GO
PI
VO
VR6
I-GAIN
GI
Vin
GO
Gnd
積分
Integral
ON
光遮斷式脈
Photo-interceptiv
e pulse signal
波信號
GI
VR1
PH-GAIN
1
Short circuit at
零速時短路
zero speed
VR3
BIAS
DSW2
PHI
TS
FBK
脈波頻率信號
Pulse
frequency signal
輸入範圍切換
Input switch
F/V
F/V
D DSW1
A
O/P
GO
TGI
VRP
PI
2
Level
conversion
位準轉換
GI
VR2
TAC-GAIN
Regulating
power
可調式穩壓電源
V-ADJ. REG.
0~12V
VR4
V-REG
VRI
VRO
GO
雙隔離線
Double-isolation lines
Fig. (4) Connection diagram of speed combination
Close loop control of motor RPM (photo-interception pulse generator speed feedback) (DSW1 selects D)
7
AC 100 - 230V
50/60HZ
R
R
U
S
S
V
T
W
T
變壓比
Transform ratio 1:1
1:1
FWD
ACE-S08/09
PE
AC1
AC2
VP
SET
VR8
ACC
P15
COM
VR9
DEC
VR10
GAIN
VN
CMD
Signal
tilt circuit
信號傾斜電路
GI
VR7
R-GAIN
JP1
REV
Tilt 傾斜電路調整
circuit adjustment
SMPS
P15
IM
HP
設定
Setting
VR5
P-GAIN
GI
Proportion band
比例帶
CMB
LP
PI
VO
VR6
I-GAIN
GI
GO
變頻器
Converter
Integral
積分
TS
VR3
BIAS
DSW2
ON
PHI
VR1
PH-GAIN
1
FBK
2
脈波頻率信號
Pulse
frequency signal
輸入範圍切換
Input switch
F/V
F/V
D DSW1
A
GO
GI
TGI
VRP
Frequency 頻率設定輸入
setting input
1k ohm 1.5W
1K ohm 1.5W
Potentiometer
電位器
O/P
VR2
Level
conversion TAC-GAIN
位準轉換
Regulating power
可調式穩壓電源
V-ADJ. REG.
0~12V
VR4
V-REG
VRI
VRO
GO
GO
Vin
Gnd
雙隔離線
Double-isolation lines
Fig. (5) Connection diagram of regulating power setting frequency
(VRO output can connect 50 converters in parallel.)
8
VI. Adjustment:
1. Tilt circuit adjustment:
1.1. Built-in tilt mechanism can increase (decrease) the tilt time for frequency setting signals by
adjusting VR8 (ACC) and VR9 (DEC) to reduce the mechanical impact.
1.2. VR10 (GAIN) is used to adjust the voltage level between frequency setting input (SET) and
frequency setting output (CMD). The gain is adjusted from 0.5 to 1.5. The default for gain is 1.
(When frequency setting input is DC 10V, frequency setting output is DC 10V.)
2. Selection of RPM feedback signal (DSW1):
2.1. When RPM feedback signals are input by an RPM generator or other analog signal, DSW1 will be
switched to A.
2.2. When RPM feedback signals are input by photo-interception pulses, DSW1 will be switched to D.
3. Selection of photo-interception pulse input frequency (DSW2):
3.1. When photo-interception pulse signals are input, DSW2 will be switched to the appropriate gear in
accordance with the full scale of RPM feedback frequency to ensure resolution of RPM feedback
signal.
3.2. Table (1) shows DSW2 setting and input frequency when photo-interception pulses are input.
Table (1): ACE-S08/09 photo-interception pulse input frequency
DSW2#1
DSW2#2
Input Frequency
ON
ON
0 ~ 3.5 kHz (default)
OFF
ON
0 ~ 4.5 kHz
ON
OFF
0 ~ 9 kHz
OFF
OFF
0 ~ 50 kHz
4. RPM feedback bias VR3 (BIAS):
4.1. It is recommended for bias setting to adjust VR3 (BIAS) and set output terminal O/P or FBK bias
when an RPM generator or photo-interception pulse generator stops.
4.2. Bias is adjusted as DC±3V. The default is DC 0V±0.1V.
5. RPM feedback gain VR1(PH-GAIN) or VR2 (TAC-GAIN):
5.1. When RPM feedback signals are input by an RPM generator or other analog signals (DSW1 is
switched to A), VR2 (TAC-GAIN) can be used to adjust RPM feedback gain. The default is TGI.
When DC 60V is input, O/P output signal is DC 10V±0.1V.
5.2. When RPM feedback signals are input by photo-interception pulses (DSW1 is switched to D), VR1
(PH-GAIN) can be used to adjust RPM feedback gain. The default is PHI. When 1.6 kHz is input
(DSW2 selects 0 ~ 3.5 kHz input frequency.), O/P output signal is DC 10V±0.1V.
9
6. Standard speed [R] [VR7]: The adjustment is from 0 to 3 times. The default is 1 time (no adjustment).
7. Proportional band [P gain =1/proportional band] [VR5]: Clockwise rotate to narrow the proportional
band.
If the proportional band is narrower, the control will hugely change when the feedback value has minor
change. With the narrowness of the proportional band, the response will be better. However, the excess
and vibration will take place as well stability becomes worse; when adjusting P [VR5], minor rotation
will take place so that the control will not occur instability; the proportional band is adjusted from 0 to
2 times and 0 to 10 times by [JP1]. The default is 2 times.
8. Integral time [I] [VR6]: Clockwise rotate to reduce the integral time.
The integral time is the time that reaches the same control with proportional action when performing
integral action. With the shorter integral time, the time that reaches the setting value will be faster.
However, poor stability as described in 7 will be easily occurred. The default is 35 seconds.
9. When actually operating, the larger initial proportional band and longer integral time can be set. You can
observe the system to adjust the proportional band and integral time after starting.
10. If the feedback value tested is not stable, the proportional band will be increased; the integral time is
increased, so that the full-domain operation and feedback value are stable. If the feedback value tested
is stable after starting, the proportional band and integral time can be reduced. However, the
full-domain operation and feedback value are kept stable, as shown in Fig. (6).
Error
Setting value
Feedback value
Fig. (6) Step-response diagram of PI action
10
Speed setting
Motor RPM
Motor RPM
Motor RPM
Motor RPM
Fig. (7) Speed characteristics
11. When you set as load, the speed arbitrarily selected will operate. The speed is rapidly changed to
observe the rotational response. Because the status changes owing to speed, the optimal setting is
selected within high, intermediate and low speed. If speed is greatly and rapidly changed, maximum
speed will change below 2 ~ 3% owing to the current limit, as shown in Fig. (7).
11.1. The response of A and B is normal.
11.2. The situation of C is under damping, which should increase the proportional band [P] [VR5
counterclockwise rotate]. If the normal value can’t be obtained, the integral time [I][VR6
clockwise rotate] should be increased to extend response.
11.3. The situation of D is over damping which should decrease the proportional band [P] [VR5
clockwise rotate]. If the normal value can’t be obtained, the integral time [I] [VR6
counterclockwise rotate] should be reduced to respond the time in advance.
VII. Installation and Wiring Notices:
1. Notices of potentiometer installation:
1.1. A place where less vibration impact occurs.
1.2. A place where no oil, water and metal powder exists.
1.3. A place where easily maintains a potentiometer.
1.4. Coupling with potentiometer machinery can’t have overload.
2. Swing angle when using a potentiometer:
When the distance moves from the lower limit to the upper limit, the swing angle of a potentiometer
should be within 60 degrees. When potentiometer resistance is half, it will be used as the central point
between the upper and lower limit.
3. Swing direction when using a potentiometer:
3.1. Adjustment at rolling side:
When the distance moves from the lower limit to the upper limit, a potentiometer should
clockwise rotate. At this time, resistance between pin 1 and 2 of a potentiometer should increase.
3.2. Adjustment at sending side:
When moving from the lower limit to the upper limit, a potentiometer should counterclockwise
rotate. At this time, resistance between pin 1 and 2 of a potentiometer should decrease.
4. Each RPM input terminal (TGI, PHI and GI) absolutely can’t be connected to local power. Otherwise,
internal circuit could be burned out.
5. In order to avoid voltage drop and interference, the wiring distance of each RPM input signal should be
as short as possible and isolated lines should be used, so that can correctly detect the speed and position
change.
6. If output voltage from an RPM generator has large ripple voltage, ripple voltage of speed feedback
output (terminal O/P and GO) will become large. At this time, converter speed will become instable as
well.
7. If the number of polarity is less than that of specification when using AC generator as speed feedback,
ripples of frequency setting output voltage will become large as well.
8. The length of output signal terminal [VO, GO] and converter frequency terminal [Vin, GND] should be
within 3m.
11
VIII. Application Examples:
1. RPM detected by the motor axis side as coupling control:
(A)
連動側馬達
Motors at coupling side
Main 主速馬達
speed motor
變
頻
器
變
頻
器
IM
變
頻
器
IM
Converter
Main speed
主
converter
速
IM
Converter
TAC
(PG)
變
Converter
ACE-S08/09
IM
頻
器
Fig. (8)
Note: If the acceleration and deceleration time of main speed converter is greater than that for inverters at
the coupling side, the acceleration and deceleration time of converter at the coupling side will be
based on main speed converter, so that can obtain the consistent acceleration and deceleration
characteristics.
(B)
連動側馬達
Motors
at coupling side
主速馬達
Main
speed motor
Main speed
主
converter
速
變
頻
器
變
頻
器
No.1
No.1
IM1
變
頻
器
No.2
No.2
IM2
變
頻
器
No.3
No.3
IM3
Converter
IM
Converter
Converter
TAC
(PG)
ACE-S08/09
變
Converter
頻
器
No.4
IM4
No.4
ACE-S04/06
變
頻
器
No.5
No.5
Converter
IM5
Fig. (9)
Note: If the acceleration and deceleration time of main speed converter is greater than that for inverters at
the coupling side, owing to the different proportion of each converter, the acceleration and
deceleration time of converter at the coupling side will be based on main speed converter, so that
can obtain the consistent acceleration and deceleration characteristics set by different frequencies.
12
2. Constant speed:
In the converter control system installed with RPM feedback mechanism, ACE-S08/09 can be used to
slowly modify speed variation and obtain constant speed control.
+5V (+10V)
ACE-S08/09
SET
Vo
Vin
GI
Go
Gnd
CMB
TS
PI
UVW
IM
TG
(PG)
變頻器
Converter
Short
circuit at
零速時短路
zero speed
FBK
(Power for PG)
(PG用電源)
VRP
GO
(PHI) TGI
GI
Fig. (10)
3. Proportional operation of main speed setting converter:
Each proportional controller can be connected with five converters for proportional setting. Therefore,
250 converters can be proportionally controlled.
ACE-S08/09
主
速
設
定
Main speed setting
1K 1.5W
1k ohm 1.5W
電位器
Potentiometer
ACE-S04/06
VRP
VRI
Vin
VRO
GO
GI
VO1
GO1
VO2
GO2
VO2
GO3
變
Vin Converter
Gnd 頻
器
IM
變
Vin Converter
Gnd 頻
器
IM
ACE-S04/06
Vin
GI
50 sets of最多可接50台
ACE-S04/06 can
be ACE-S04/06
connected.
Fig. (11)
13
VO1
GO1
VO2
GO2
VO2
GO3
4. Application examples of rolling control:
4.1. The sending side is the standard side. The rolling side is the track side.
Frequency
頻率設定輸入
setting input
1k ohm
1.5W1.5W
1K ohm
Potentiometer
電位器
Converter
1K
1kohm
ohm 1.5W
1.5W
電位器
Potentiometer
10kohm
ohm1.5W
1.5W
10K
Potentiometer
電位器
零速時短路
Short circuit
TS
Converter
at zero speed
Fig. (12)
4.2. The sending side is the track side:
TS
Converter
零速時短路
Short circuit
at zero peed
1K
ohm1.5W
1.5W
1k ohm
電位器
Potentiometer
Frequency setting input
1k 頻率設定輸入
ohm 1.5W
1K ohm 1.5W
Potentiometer
10kohm
ohm1.5W
1.5W
10K
Potentiometer
電位器
電位器
Converter
Fig. (13)
14
4.3. Constant speed feedback:
Frequency setting input
1k ohm
1.5W
頻率設定輸入
Potentiometer
1K ohm 1.5W
電位器
TS
Converter
零速時短路
Short circuit at zero peed
FBK
Fig. (14)
4.4. No differential speed control:
Main converter
頻率設定輸入
1K ohm 1.5W
電位器
Frequency setting input
1k ohm 1.5W
Potentiometer
TS
零速時短路
Short circuit
at zero peed
Fig. (15)
15
Converter at
following side