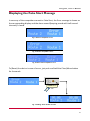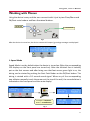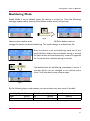
1
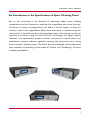
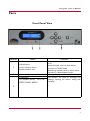
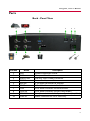
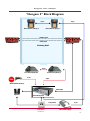
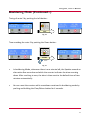
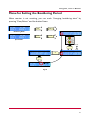
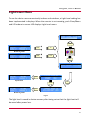
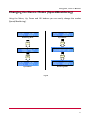
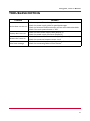
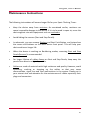
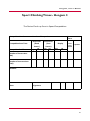
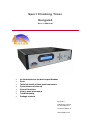
S p o r t C l i m b i n g Ti m e r Hengam3 User’s Manual Ordered by KASSA شرکت کوهنوردی کسا An introduction to the device specifications Parts Technical details of back panel connectors Connections and start-up General functions How to work with menus Troubleshooting Package contents Spring 2012 Published by: Technical Documentation Unit Version 001; Edition 1.0 Www.fdpbco.com Hengam3, User’s Manual Dear User Please read the Operation Instructions carefully before attempting to operate the device. Please protect this device and its accessories (Sensors, Display Screens, Start Push Button, cables, Audio System, etc.) against moisture and water (such as rain) especially when used outdoors. Exposure to water and moisture may result in serious damages to the device or even electric shock. Do your best to preserve and maintain the device in sport centers and avoid from crushing the cables, beating, strikingand piercing with sharp objects and also avoid replacing the connectors when connected to the device which is turned on, and protect it against moisture, water and electricity voltage fluctuation. This product is made by Iranian engineers who have put in their utmost effort to utilize state-of-the-art technology and highest quality materials so as to optimize its performance. We warmly welcome any user’s feedback and recommendations since we believe your comments will certainly help us improve our products. All design and manufacturing rights reserved by Fonoun Dadeh Parvari Basamad (FDPB) Company, and all sales rights reserved by Kassa Company. If device is opened or guarantee label removed the company may void warranty system. 2 Hengam3, User’s Manual An Introduction to the Specifications of Sport Climbing Timer Due to the increasing in the demand of organizing better sport climbing competitions and the necessity to estimate the competition time more precisely, this device has been manufactured by the effort of Iranian experts to meet the country’s need in this regard.More efforts have been done in manufacturing this device which is the third and more developed generation of its previous versions to optimize its functions using the state-of-the-art technology and highest quality materials. The optimization progress involves mechanical to optical (laser) and piezoelectric sensors, software algorithm, packing and mechanical parts, wiring and connectors, display screens. The device has been designed and manufactured with capability of operating in two modes of “Speed” and “Bouldering” for sport climbing competitions. 3 Hengam3, User’s Manual Parts Front Panel View 1 Position 2 Name 1 LED Indicators: Power indicator: Green Speed indicator: Red 2 Character LCD Display Screen Pushbuttons: UP ,DOWN ,RIGHT, LEFT, OK, START, CLEAR, MENU 3 Function Power indicator turns on when the device is on. Speed indicator turns on when device functions in "SPEED"mode. Bouldering indicator turns on when device functions in “BOULDERING”mode. Blue light background – 2 x 16 Character The buttons are used for changing the settings, opening the menus, timing and resetting 3 4 Hengam3, User’s Manual Technical specifications GENERAL DATA Model: Hengam 3 Sport Climbing System Weight: ~ 2.5 kg Power voltage: 85 to 260 voltage AC 47 to 60 Hz Approximate Dimensions: (Width*Height*Depth) 483*44*300 mm Software Upgrade Possibility: Yes Working Temperature: 10 to 50 degree centigrade 5 Hengam3, User’s Manual Parts Back - Panel View 6 5 4 3 2 1 SPEAKER 7 Position 1 2 3 4 5 6 7 8 9 10 8 Name GND FUSE ON/OFF KEY RS-232 DISPLAY START STOP STARTER SPEAKER 220V-AC 9 10 Description Ground Connection Screw 4 Ampere Glass Fuse 220 Volt Input Power Connector Future Development Gate 3- Pin Male Connector to Displays 4-Pin Male Connector to Foot Sensors 4-Pin Male Connector to Hand Sensors 2-Pin Male Connector to Start Push Button Headphone Jack to Audio System (Speaker /Amplifier) Power Connector to 220 V Electricity 6 Hengam3, User’s Manual Technical Guide for Back-Panel Connectors 1 : TX+(µ)≡RX+(Disp.) 4 : GND 3 : TX-(µ)≡RX-(Disp.) 1 : +VCC 2 : Foot1 3 : Foot2 2 : GND 4 : GND 1 : +VCC 2 : Hnd.1 3 : Hnd.2 1 : GND 2 : Key 7 Hengam3, User’s Manual “Hengam 3” Block Diagram 3 pin Hand Sensor (Stop) 2 4 pin Hand Sensor (Stop) 1 12VDC/2pin Data/3pin Display 2 Display 1 Climbing Wall 3 pin Foot Sensor(Start)2 2 pin Foot Sensor(Start)1 4 pin Starter(Push Button) Data/3pin Speaker Main-Hengam3 Long Cable 110-220 v ~ Www.fdpbco.com 2 pin 12V Power Supply 8 Hengam3, User’s Manual General Function This device has been designed and manufactured for two modes of “Speed” and “Bouldering” in sport climbing competitions. The functions of this device in these two modes are explained below. A. Speed Mode: A starter asks the climber to stand by the route at start-point and should say “AT YOUR MARKS” and then“Ready” (as mentioned in the IFSC Rules). Then the climber should hold one foot on foot sensor (Start Panel). By the time the referee pushes the start button a signal is sounded by Speaker for 0.2 second and simultaneously the timing system will be activated. A time sample is recorded from foot sensors when the start key is pushed by the referee for 0.1 second thereafter. In case foot loses contact with sensor within the said time, False Start is displayed. False Start is indicated by a blinking sign of “Err” on Display and is also accompanied by a beeping sound from the Speaker. To stop the False Start you just need to push and hold the Clear/Menu button for 4 seconds. In case False Start does not occur, the System continues timing. When the athlete touches the colorful part on the Stop Panel with hand, the timing system stops and the whole LED indicators on the panel light up. The time is recorded and will also remain on Display and LED of the main device (Unless the Clear/Menu key on the front panel is pushed and held for 4 seconds to reset the counter). B. Bouldering Mode: In bouldering mode, the foot and hand sensors are not used. After setting the trial time on the main unit routes and after pressing the OK/START button, the Audio System sounds the starting signal for five seconds and the timer starts to count down the defined time. The speaker sounds a beeping signal by the time there is only one minute left. When the time is finished the five second sound of Start is heard again which indicates the ending/start time. 9 Hengam3, User’s Manual Displaying the False Start Message In case any of the competitors commit a False Start, the Error message is shown on the corresponding display and the alarm sound (beeping sound with half second intervals) is heard. Fig. 4: Route 1 competitor’s error Fig. 5: Route 2 competitor’s error Fig. 6: Both routes competitors’ error To (Reset) the device in case of errors, just push and hold the Clear/Menu button for 4 seconds. CLEAR/MENU 4 sec. Fig. 7: Holding “Clear” Button to reset 10 Hengam3, User’s Manual Working with Menus Using the device is easy and the user can work with it just by two Clear/Menu and OK/Start main buttons and four directional buttons. OK/START CLEAR/MENU Fig.1 After the device is turned on, the device name and Company’ greetings message are displayed. Fig.2 1- Speed Mode Speed Mode is set by default when the device is turned on (After the corresponding LED displays on the front panel are turned on). After the athlete’s foot is suitably put on the foot sensors and after being sure that foot sensor green light is on, the timing can be started by pushing the Start Push Button or the OK/Start button. The timing is started with a 0.2 second sound signal. When any of the corresponding two athletes manually touch the sensors at the top of the wall, the recorded time is indicated on the front panel and the route display. Pushing the “OK/Start” button or “Push Button” Fig.3 11 Hengam3, User’s Manual Bouldering Mode Speed Mode is set by default when the device is turned on. Then the following message appears after pushing Clear/Menu button once (Left picture). OK / START Fig. 8 Now you just need to push OK/Start button once to change the device mode to Bouldering. The mode change is indicated on the Now, the device is set on bouldering mode and if you push OK/Start button the countdown timing is started for both routes and simultaneously a sound is signaled for 5 seconds that indicates timing is started. OK / START The default time for bouldering countdown is set to 2 minutes which can be changed in the device menu from 2 to 8 minutes by one-minute steps. Fig. 9 By the following keys combinations you can activate only one route if needed. Key Equivalent Right (Start) Left (Start) Combination Equivalent Up (Reset) Down (Reset) Route activation Route 1 Route 2 12 Hengam3, User’s Manual Bouldering Mode (Continued...) Timing for both routes by pushing the OK/Start button is possible: OK / START Fig. 10 (Reset)ting the time of both routes by pushing the Clear/Menu button: CLEAR/MENU 4 sec. Fig. 11 Timing of route 1 by pushing the Right button: RIGHT Fig. 12 Time (Reset)ting for route 1 by pushing the Up button: UP 4 sec. Fig. 13 13 Hengam3, User’s Manual Bouldering Mode (Continued...) Timing of route 2 by pushing the Left button: LEFT Fig. 14 Time resetting for route 2 by pushing the Down button: DOWN 4 sec. Fig. 15 In bouldering Mode, whenever there is one minute left, the Speaker sounds an alternative five-second sound while the counter indicates the time counting down. After reaching to zero, the time is then reset to the default time of two minutes automatically. You can reset the counter while countdown continued in bouldering mode by pushing and holding the Clear/Menu button for 4 seconds. 14 Hengam3, User’s Manual Menu for Setting the Bouldering Period When counter is not counting, you can reach “changing bouldering time” by pressing “Clear/Menu” and the button Down. MENU DOWN x 2 MENU DOWN Bouldering Mode Speed Mode 8 min UP/DOWN 2 min OK UP/DOWN Fig. 16 15 Hengam3, User’s Manual Light Level Menu To use the device more conveniently indoors and outdoors, a Light Level setting has been implemented in displays. When the counter is not counting, push Clear/Menu and UP buttons to access LED displays Light Level menu. RIGHT MENU UP MENU UP x2 Bouldering Mode Speed Mode LEFT OK Speed Mode DOWN OK OK Bouldering Mode Fig. 17 The light level is saved in device memory after being set so that the light level will be saved after power loss. 16 Hengam3, User’s Manual Changing the Device Modes (Speed/Bouldering) Using the Menu, Up, Down and OK buttons you can easily change the modes (Speed/Bouldering). Speed Mode Bouldering Mode MENU MENU MENU MENU Speed Mode Bouldering Mode Fig. 18 17 Hengam3, User’s Manual TROUBLESHOOTING Problem Solution Device does not turn on Make sure power flows throughthe mains Check the power supply cable for possible damages Check the existence and functionality of fuse at the device backside Check if the main power button is “ON” Displays don’t turn on Check the main power supply cable (Display 1) Check the power supply connector (Display 2) Sensors don’t turn on Check the connector to the main unit (4 pin) (Sensor 1) Check the connector between sensor 1 to 2 False Start message Check the functionality of sensors by putting a foot on them Check the connecting cables of foot sensors 18 Hengam3, User’s Manual Accessories & Package Contents: No. Item Quantity Description 1 Hengam3 Speed Timer Device (Main Unit) 1 (Including the LCD and button panels) 2 Start Push Button 1 Together with the corresponding two-strip cable 3 Stop Panel (Hand sensor) 2 Stop Panel (Activated by hand) 4 Connector of hand sensor 1 to main unit 1 Four-strip cable –25 meters 5 Connector of hand sensor 1 to 2 1 Three-strip cable 6 Start Panel (Foot sensor) 2 7 Connector of foot sensor 1 (Start Panel) to main unit 1 Four-strip cable – 15 meters 8 Connector of foot sensor 1 to 2 1 Three-strip cable 9 LED Digital display 2 Together with power cable 10 Data connector of display 1 to main unit 1 Four-strip cable – 15 meters 11 Power Supply connector of display 1 to 2 1 Four-strip cable – 15 meters 12 Data Connector of display 1 to 2 1 Three-strip cable 13 Speaker system 1 Two speakers with amplifiers 14 Manual of the Device (The present booklet) 1 15 220 V Inlet Power Cable of the Device 1 19 Hengam3, User’s Manual Maintenance Instructions The following instructions will ensure longer life for your Sport Climbing Timer: Keep the device away from moisture. As mentioned earlier, moisture can cause irreparable damage to the device. If it is to be used in open air, cover the device against rain with equipment such as sunshades. Avoid hitting the sensors (Start and Stop Panels). In rehearsals, you can remove Displays and Start Push Button, and instead use the screen and buttons on the main device front panel. This will help your device achieve a longer life. When the device is working on Bouldering modes, removing Start and Stop Panels(Sensors) is recommended. For longer lifetime of rubber foams on Start and Stop Panels, keep away the panels from direct sun light if possible. Cables are made of materials with high resistance and quality. However, avoid stretching, crushing or stepping on the cables as that may cause disconnection, signal loss and thus malfunctions in the system. Please put in your utmost care and attention for the maintenance of cables especially their plugs and connectors. 20 Hengam3, User’s Manual Guarantee Terms All parts of Sport Climbing Timer are covered by guarantee services for a one year period from product delivery date. All parts will be repaired for free during guarantee period. By the termination of Guarantee Period, users will be charged against repairs. Guarantee Policy does not include severe strikes or fire damages. Guarantee will be voided if device or any of its parts opened or guarantee label removed. 21 Hengam3, User’s Manual Sport Climbing Timer– Hengam 3 The Device Check-up Form in Speed Competitions Competition Number: Number of Competitors: Competition Start Time: Stop Panel (Hand Sensor) Competition End Time: Right Left Start Panel (Foot Sensor) Right Left Date: Place: Display Right Start Push Button Speaker Left Number of Correct Acts (OK) Number of Incorrect Acts (Fail) Remarks: User: Signature: 22 Hengam3, User’s Manual “Hengam 3” Block Diagram 3 pin Hand Sensor (Stop) 2 4 pin Hand Sensor (Stop) 1 12VDC/2pin Data/3pin Display 2 Display 1 Climbing Wall 3 pin Foot Sensor(Start)2 Foot Sensor(Start)1 2 pin 4 pin Starter(Push Button) Data/3pin Speaker Main Unit-Hengam3 220 long Cable 220 v ~ Www.fdpbco.com 2 pin 12V Power Supply 23 Hengam3, User’s Manual KASSA Mountaineering Co. Ltd. www.kassa.ir Unit2, No.27, Razi Complex, Naghdi Alley , Shariati St., Tehran 15637 I.R.IRAN Tel : +9821 77510463 -4 , Fax : +9821 77622043 FDPB Fonoun Dadeh Parvari Basamad Ltd. www.fdpbco.com Address: Unit 3 No. 2, Sarv Alley,Tohid Avenue, Tohid Sq., Tehran Tel: (+9821) 66572534 Fax: (+9821) 66934265 Documentation: [email protected] 24