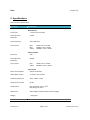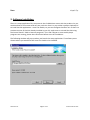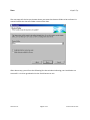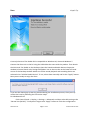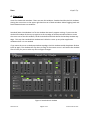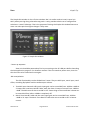
1
 User Manual PORTABLE DIGITAL STUDIO SYSTEM REAL TIME MONITORING DIGITAL RECORDING STUDIO GRADE REVERB With recording & playback features new
For Windows XP, Windows Vista and Windows 7 Operating Systems only Version 2.0.1 May, 2011 Vbox Vocal-Tec Contents _ 1.
2.
3.
4.
5.
6.
Product Description 3 Specifications 4 Software Installation 5 Operation 9 Trouble Shooting 12 Limitations 13 Version 2.0.1 Page 2 of 13 www.vocal‐tec.com Vbox Vocal-Tec 1. Product Description Thank you for purchasing your Vbox Portable Digital Studio system. We assure you will enjoy the exceptional ownership experience of the unit, which features a sleek piano black finish & a non‐glossy black top surface. That would not show finger prints easily. Vbox is a PC USB 2.0 plug and play and portable digital vocal processor and Mixer. Its sound quality is professional music studio level since it is a real digital processing system. It connects to an either Laptop or Desktop PC USB port thru a USB cable, so no external power supply is needed. The PC is installed a Vocal‐Tec Studio GUI application which provides users the digital key controller features. Those key control selected setting would be passed thru the USB cable to the Vbox to process digitally. Vbox has dual 24 bit DSP chips on board; and can provide real times Tone select, gain controls and balance controls on music and MIC channels. It provides digital echo effect with repeat, delay and volume controls. Also includes reverb effect with time, hiss and volume controls on all MIC channels. One of the most important features is its digital recording and playback capability. Vbox Portable Digital Studio system allows the PC to be a MP3, KTV or MTV media player and provide the music to it. Vbox has two 3.5mm MIC input ports and two 3.5mm audio output ports. It may support solo or dual singers to sing along to music video or karaoke tracks playing on PC. The Vbox audio output ports can hook up to a head phone and/or amplifier speaker system. On its top cover; Vbox has a 4096 color hue LED display and its color display pattern is user selectable thru the PC Vocal‐Tec Studio GUI. The color and the light intensity will change according to the music and MIC input magnitude. Vbox can be an audio device to any PC software applications which need voice input. For example, Skype internet phone calls can be recorded, then archived and emailed out. Power point and speech presentation can be enriched with its vocal effect. It is an excellent portable equipment to practice your singing or speech presentation skill. List of packing items: ‐
‐
‐
‐
Vbox unit 1 USB Type A to Mini Type B cable 1 stereo 6.3mm socket to 3.5mm male jack cable adapter 1 CD ROM contains GUI installation software & operating guide Version 2.0.1 Page 3 of 13 www.vocal‐tec.com Vbox Vocal-Tec 2. Specifications Vbox Technical Specification Parameter Input ports Total Harmonic Distortion Input Sensitivity Tone control Input port Total Harmonic Distortion Tone control Power Consumption Audio Mixer output Frequency Response Signal to Noise Ratio Temperature Dimensions Weight Specification MIC Channel 2 x 3.5mm jack sockets ‐70 dB 10mv 600 ohms Bass 100Hz ‐10 to +10 dB Mid 1000Hz ‐10 to +10 dB Treble 10000Hz ‐10 to +10 dB Music Channel USB ‐90 dB Bass 100Hz ‐10 to +10 dB Treble 10000Hz ‐10 to +10 dB System unit USB DC 5V 250mA 2 x 3.5mm jack sockets 20Hz ‐ 20KHz ± 1dB 92 dB Non‐operating ‐20 to +70 0C Operating 0 to +50 0C 90mm Width X 90mm Depth X 25mm Height < 100 grams Version 2.0.1 Page 4 of 13 www.vocal‐tec.com Vbox Vocal-Tec 3. Software Installation There is a setup application file, setup.exe in the CD‐ROM that comes with the product. Or you can download it from www.vocal‐tec.com, web site. Run it in your either Laptop or Desktop PC to install the GUI application – Vocal‐Tec Studio; so you can configure the Vbox unit. If there is a previous version of the GUI already installed in your PC, make sure to uninstall the GUI using the Control Panel’s “Add or Remove programs” first. And if Skype or some media player programs are running, please also close them before start the installation. The following window will pop up when you launch the setup application. That allows you to choose where you would like the Vocal‐Tec Studio to be installed. Version 2.0.1 Page 5 of 13 www.vocal‐tec.com Vbox Vocal-Tec The next step will also let you choose where you want the shortcut folder to be and how it is named. Default the shortcut folder name will be Vbox. After above step, you will see the following like that window indicating your installation are successful. It is OK to go ahead to hit the Finish button to exit. Version 2.0.1 Page 6 of 13 www.vocal‐tec.com Vbox Vocal-Tec Currently the Vocal‐Tec Studio GUI is compatible to Windows XP, Vista and Windows 7. Connect the Vbox unit to the PC using the USB cable that come with the product. Then launch the GUI Vocal‐Tec Studio on the Desktop. Open the Sounds and Audio Devices Properties window in Control Panel or by hitting the Speaker icon in the Icon Bar at the lower left hand corner of the Desktop window. Make sure all the sound playback and recording device are selected to be “USB PnP Audio Device”. If not, select them manually and hit the “Apply” button. Now you are ready to enjoy the Vbox. If you see the above pop up warning window during the installation process, then you may resolve the issue by following the instruction steps. For Windows XP OS: Click Control Panel ‐> Display ‐> Settings ‐> Advanced; and then select DPI setting to be “Normal size (96 DPI)”. Finally don’t forget to hit “Apply” button to finish the configuration. Version 2.0.1 Page 7 of 13 www.vocal‐tec.com Vbox Vocal-Tec For Windows 7 OS: Click Control Panel ‐> Adjust screen resolution ‐> Make text and other items larger or smaller ‐> select “Smaller”. Then click on “Apply”. Version 2.0.1 Page 8 of 13 www.vocal‐tec.com Vbox Vocal-Tec 4. Operation Vocal‐Tec Studio GUI windows: There are two GUI windows‐ Standard and Simple GUI windows. Hitting the arrow icon on the upper right hand corner of both windows allows toggling back and forth between these two windows. Standard /Main GUI Window is a fix size window that won’t support resizing. If you move the whole GUI window all the way up against to the top edge of Desktop window and then move the cursor out of the GUI window, the GUI window would hide above the Desktop window top edge. This way the standard GUI window won’t block or cover up any other application windows when it is not needed. If you move the cursor to Desktop window top edge, the GUI window would drop down & show itself up again. The window will stay there as long as the mouse cursor is still within the window. That is easily for you to make any GUI configure changes. Figure1: Standard GUI window Version 2.0.1 Page 9 of 13 www.vocal‐tec.com Vbox Vocal-Tec The Simple GUI window is also a fix size window. But it is smaller and so it won’t cover lyric easily when you sing along a karaoke song track. It only provides a basic set of configuration selections. It won’t hideaway. That is the purpose of having the Simple GUI window feature so users can make quick configure changes if they want. Figure 2: Simple GUI window ‐ Power up sequence Vbox unit should be powered up first by connecting to the PC USB port before launching the GUI application program. For whatever reasons if the unit needs to power reset, then the GUI also have to be closed and rerun again. ‐GUI manipulation The GUI functionality can be divided into 5 areas. They are MIC input, music input, vocal effect, recording & playback and the audio output volume. 1. Two MIC input channels A & B; each input gain can be controlled from ‐10dB to +10dB in 21 steps. MIC tone Bass, Mid & Treble; each also have 21 steps of control from ‐10dB to +10dB. The MIC tone can be set to ON or OFF. Same thing as the overall MIC volume can be controlled from 3dB to ‐16dB or completely off. 2. Music Tone Bass & Treble and the music input gain can be controlled from ‐10dB to +10dB in 21 steps. The Music Tone Bass & Treble also can set to ON or OFF in button control. Version 2.0.1 Page 10 of 13 www.vocal‐tec.com Vbox Vocal-Tec 3. MIC vocal effect: There are three factory preset setting selections ‐ Reverb, Echo, Reverb + Echo; and Preference. The Preference setting allows user to configure his/her reverb’s Time, Hiss and output volume values; and the echo’s delay time, repeat and its volume. The whole system vocal effect can be enabled or disabled by a button control, same as the individual either reverb or echo effect in user setting. 4. You can record your singing (by hitting the red icon button at the bottom section of the GUI), speech or music at the same time that output to the audio output ports. The recording is temporarily saved to a buffer in the PC. There are two button selections allow you to record either MIC vocal effect input, music channel input or both MIC + music inputs. The REC MIC Effect button controls the MIC input with vocal effect or not. With REC MIC Effect button off; the record of MIC input will be no vocal effect and only the raw vocal sound. But when the REC MUSIC button off; no music channel input will be recorded at all. As long as you stop the recording (by hitting the white square icon button), you may play it back from the buffer (by hitting the white > icon button). Before stop the recording, you can pause (by hitting the red || icon button) or continue the recording by hitting the same recording button on & off again. It is same thing to playback feature. You may also decide to save the buffer contents in a file after listening to it. There are buttons at the lower right hand corner of the GUI allow you to save the buffer and playback previously saved files thru a default media player utility. 5. The overall audio output volume can be adjusted by slider level control. ‐ LED The LED color display for standby and running states can be selected thru their level controls. When the unit have no both MIC and music inputs, it is in standby state. Otherwise it is in running state. User can select the LED color to indicate the state the unit is in. There are around 4K static color hues & one dynamic pattern to select from. The intensity of the LED changes according to the magnitude of the either MIC or music channel inputs. If the input level is higher, then the LED would be brighter. The “Default” button in the GUI would restore the unit configure setting back to the factory default value and the current setting value will be gone. The exit button would close the GUI program, but a warning window will pop up if the contents in the buffer have not been saved yet. The “Device:” display would show whether the device is Offline or its firmware version. At the right hand side of the GUI are the MIC & Music Input; and REC & Audio Output Level Display meters. The factory default audio output volume setting ‐10dB; is for ear bud headset or headphone output device. If output port is hooked up to speakers, then the output volume Version 2.0.1 Page 11 of 13 www.vocal‐tec.com Vbox Vocal-Tec may be set to 0dB level or higher. Please don’t use the ear bud headset for long time or set the output volume to a too high level. 5. Trouble Shooting ‐
‐
‐
‐
‐
‐
‐
No power / LED is not ON Check the USB cable plug in securely or not, and check the USB connector for any damage. No sound output Check the audio device properties. The audio & vocal recording / playback device should be USB PnP audio device. GUI has no control of the unit Close the GUI program & then launch it again. MIC have no sound output Check the MIC plug in properly or not. Also check the MIC volume output & its gain level. Audio output crack Re‐sit the USB cable and reset the GUI program. No vocal effect Check the GUI vocal effect button is ON or not. No Echo or Reverb effect Check the user setting and the echo / reverb button whether is ON or not. Version 2.0.1 Page 12 of 13 www.vocal‐tec.com Vbox Vocal-Tec 6. Limitations Ear bud headset with MIC can’t be used for voice recording. The MIC won’t work, even the headset directly plug into one of those MIC input ports. It is because the 3.5mm jack of those ear bud headset are not compatible to the device’s MIC input sockets. Those ear bud headsets can be used for the device playback function. You plug those headsets to the audio output ports for listening. Condenser MIC won’t be supported, we suggest to use the high quality dynamic microphone. Please visit www.vocal‐tec.com to select suitable microphone for yourself. Vocal‐Tec supplies high quality vocal microphones of famous brands. The Notebook or Desktop PC hardware must support USB version 2.0 or later. Vocal‐Tec warrants Vbox to be free of defects in workmanship or materials for one year. This warranty does not include damage resulting from accident or misuse. If this product should be become defective, we will replace it free of charge at our dedicated service point. For details, please visit www.vocal‐tec.com. ‐ END ‐ Version 2.0.1 Page 13 of 13 www.vocal‐tec.com