1
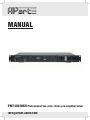
MANUAL
PM7400 MKII Professional two-zone stereo pre-amplifier/mixer
[email protected]
5
3
1
2
4
6
11
9
7
8
10
13
12
14
15
16
1. Microphone 1 TRS input jack. this jack has a XLR mirror connector at the back. You can use the XLR or the front
jack, but not both simultaneously. You can apply phantom power by closing jumper JP1 inside the device, contact a
qualified technician to do this.
2. Vox/Ext.mute switch. when this switch is pressed, you activate the vox or ‘voice-over’ mute function on mic 1,
the vox level can be set at the rear. When the switch is out, i.e. not pressed, you can activate mute with an external
switch, the ext. mute connector is also at the back.
3. Mic 1 level controller.
4. Mic 2 level controller.
5. Microphone 2 TRS input jack. this jack has a XLR mirror connector at the back,. You can use the XLR or the front
jack, but not both simultaneously. You can apply phantom power by closing jumper JP2 inside the device, contact a
qualified technician to do this.
6. Mic 1 and 2 bass tone control. for better speech intelligibility, gently cut low frequencies. A low cut filter to avoid
popping noises is already built-in and can not be deactivated.
7. Mic 1 and 2 mid tone control..
8. Mic 1 and 2 treble tone control.
9. Mains power switch and power led. when you switch the device on, the blue led will indicate that the power is on.
10. Music or line input bass tone control.
11. Music or line input mid tone control.
12. Music or line input treble tone control.
13. Music or line source volume control. Normally this level controller is turned fully clockwise, however, in some
cases it can be usefull to obtain a good loudness balance between music or line inputs and mic inputs.
14. Music or line level input selector. with this rotary switch you can select between line 1-6 stereo line level inputs.
15. Zone 1 volume control with L/R signal indicator leds. use this level controller as the main zone 1 volume controller. The leds will light up when a strong signal is present at the zone 1 output.
16. Zone 2 volume control with L/R signal indicator leds. use this level controller as the main zone 2 volume controller. The leds will light up when a strong signal is present at the zone 2 output.
2
WWW.APART-AUDIO.COM
17
21
18
19
20
23
22
25
24
27
26
28
29
30
31
32
33
17. Ground connector. Connect your system’s ground or safety ground on this connector if this is not already done
by mounting the unit in a properly grounded rack.
18. Line 1 right input on balanced XLR connector.
19. Line 1 left input on balanced XLR connector.
20. Line 2 L/R cinch or RCA connector.
21. Line 3 L/R cinch or RCA connector.
22. Line 4 L/R cinch or RCA connector.
23. Line 5 L/R cinch or RCA connector.
24. Line 6 L/R cinch or RCA connector.
25. Line 6 L/R cinch or RCA connector.
26. Mono/stereo switch. Pressing this switch, the stereo line inputs 1 to 6 are mixed to mono.
27. Ext. mute switch connector. Connect your external mute switch on this connector, do not apply any voltages on
this connector !!!
28. Vox mute level. Use this controller to set the level where the ‘vox’ mute circuitry of mic 1 will be active.
29. Zone 2 right output on balanced XLR connector.
30. Zone 2 left output on balanced XLR connector.
31. Mic 2 XLR/ TRS jack combo input. This is a copy of the front MIC 2 TRS input jack. You can use the front or
rear input, but not simultaneously. You can apply phantom power to the mic by closing jumper JP1 inside the
PM7400 MKII. Only a qualified technician can do this !
32. Mic 1 XLR/ TRS jack combo input. This is a copy of the front MIC 1 TRS input jack. You can use the front or
rear input, but not simultaneously. You can apply phantom power to the mic by closing jumper JP2 inside the
PM7400 MKII. Only a qualified technician can do this !
33. Mains inlet/mains fuse connector. Connect the supplied mains cable here. There is also a 315 mAT mains fuse
inside this connector. In case the fuse blows, replace it only with a fuse of the same rating.
3
[email protected]
How to mix music and microphone signals?
You can mix spoken microphone messages with music in different ways using the PM7400 MKII:
1. Mix the microphone signals with the music by setting the mic and line level volume controllers to an appropriate
level. In order to do this, the Vox/Ext. mute switch should not be pressed in and the mute contact at the back should
be open. You will notice that you have to push the microphone level to a very high level. This is not recommended.
2. Mix the microphone signal of mic 1 with the music using the ‘vox’ or ‘voice-over’ circuitry: The Vox/Ext. mute
switch must be pressed in, and the mute contact at the back must be open. By setting the mic 1 and vox mute level
at the back to an appropriate level, you can create an automatic music muting by talking into mic 1. This is not valid
for the mic 2 input, i.e. mic 2 signals can not activate the vox circuitry.
3. By closing the external mute contact at the back, you will mute the music signal. Now you can speak into mic 1
or mic 2. The muting circuitry will only mute the music signals and allow the mic signals to pass through. This way
you can create a microphone priority system easily. Please note that the external mute contact at the back can only
be connected to a switch. Never apply any voltages to the external mute contacts !
Technical specifications
output zone 1
unbalanced : 0 db/600 ohm
output zone 2
balanced : 0 db/600 ohm
frequency response
20 – 25000 Hz (line level inputs)
thd
<0.01%
s/n ratio
>90 db (line level inputs)
Line level input 1
balanced: 500 mV/20 Kohm
Line level inputs 2-6
unbalanced: 500 mV/20 Kohm
Mic level inputs 1 and 2
balanced: 1 mV/600 ohm
Phantom power mic 1/2
14 VDC switchable (JP1 and JP2)
Tone control bass
+/- 12 dB @ 80Hz
Tone control mid
+/- 12 dB @ 1500 Hz
Tone control treble
+/- 12 dB @ 10000Hz
Power consumption
max 10 VA
Mains voltage
230 VAC/50 Hz
Dimensions
481 x 44 x 275 mm (19”/1HE)
Net weight
3.4 kg
Shipping weight
3.8 kg
If you experience troubles with ‘hum’ or ‘buzz’, you can try to solve them by disconnecting the jumper JP3 inside the
device. This jumper acts as a ground lift switch and will disconnect the signal ground from safety ground. Contact
a qualified technician to do this. If even this action does not help, you have a serious ground loop problem. Please
switch off all devices first and solve this problem. Find the cause by starting from scratch: disconnect all sources
and other external gear first, then connect them one by one. This way you will easily find the cause of the ground
loop. Often this will be a radio tuner or similar device connected to a cable distribution network. Ground loops can
cause serious damage to audio devices and is NOT covered by warranty. APart-audio has a very wide product
range including adequate and intelligent problem solvers, such as our BUZZSTOP MKIII multifunctional ground
loop-isolator/level-converter.
Please visit our website regularly and stay in touch with the latest product updates and events.
4
WWW.APART-AUDIO.COM