1
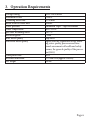
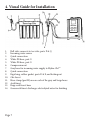
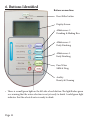
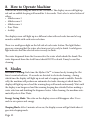
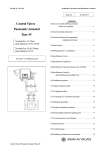
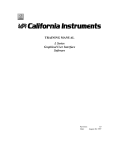
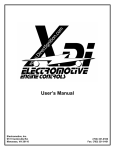
Hydro-Chi™
Water Electrolysis Machine
Instruction Manual
Tools and Supplies Needed... but Not included
Description
Teflon tape
Crescent wrench
Wire Cutters
Drill
Drill bits sizes 5/64 and 21/64
Opened end wrench size 15mm
Basin wrench
Flathead screwdriver
Flash light (to inspect for water leaks)
Paper towels (to inspect for water leaks)
Page 1
Product Contents:
Qty
Descripion
Part
1
Water Electrolysis Machine
Hydro-Chi
1
Chi faucet fixture
A
1
Acid spout
B
1
Metal ring 45mm
C
1
Hard plastic ring
D
1
Rubber gasket 42 mm
E
1
Small rubber gasket 29 mm
F
0
Small white rubber gasket 8mm
replacement acid spout (2)
G
2
Hose clamp
H
1
Mounting template
I
Image
Page 2
Qty
Descripion
Part
5
Mounting screws 30mm (Phillips-head)
J
1
Ultra filter
K
1
Instruction manual
L
1
3-stage filters set
M
1
Filter wrench
N
2
White PE hose- 59 inches each
O
1
Ball valve
P
1
Tee joint
Q
1
Tee joint gasket
R
1
Quick connect (spare)
S
Page 3
Image
Contents
1. Product Introduction ........................................... 5
2. Hydro-Chi™ Flow Chart ...................................... 5
3. Operation Requirements ..................................... 6
4. Visual Guide for Installation ................................7
5. Installation Instructions ...................................... 8
6. Buttons Identified ............................................... 11
7. Display Screen .................................................... 12
8. How to Operate Machine .................................. 13
9. Modes ................................................................... 13
10. Mineral Port ........................................................ 14
11. Adjusting Water Flow ....................................... 14
12. Optimizing the pH Settings .............................. 15
13. Water Filters ........................................................ 15
14.Warnings ............................................................. 17
15.Warranty .............................................................. 17
16.Troubleshooting ................................................. 18
Thank you for purchasing the Hydro-Chi™ water electrolysis machine. Please
thoroughly read and follow the entire usage manual before operating your
Hydro-Chi™. Refer back to this manual when questions arise.
Call 229-365-7222 for customer support.
Page 4
1. Product Introduction
The Hydro-Chi™ was designed with the capability to reach a pH maximum of 9.5
and a minimum of 6.0. Individual results will vary based upon the quality and characteristics of the well or city water being used. This machine is intended to be used
with clean well or city water only.
Any time there is a major water (or food) change in ones diet, diarrhea or constipation is a possible side effect until the body adjusts to the new diet change. Therefore,
it is recommended that one slowly introduce the water from the Hydro-Chi™ into
the diet for minimal body upset.
The more bubbles and cloudy the water coming from the alkaline faucet side, indicates the more hydrogen in the water. Since pH means, “potential Hydrogen,” this
means that the higher the “potential Hydrogen” selected on the Hydro-Chi™ , the
more bubbles and or cloudy the water should be.
2. Hydro-Chi™ Flow Chart
Page 5
3. Operation Requirements
Voltage Rating
Maximum Power
Cleansing water flow
Rated total net water flow
Water pressure
Water temperature
pH value incoming water
Electrical grade
Inlet water quality
Processed water quality
Waterproof class
External dimension
Net weight
120V±10%/60Hz
≤150W
1.5 L/min
12000L
Minimum 14psi - 58psi Maximum
36°F~103°F
6.8~7.2
I class
Tap water
Agree with the regulations of life drinking water quality processor and functional assessments of health and safety
norms, the general quality of the processor(2001)
IPx1
79.5X46X134(approx. inches)
8.8 lbs
Page 6
4. Visual Guide for Installation
1. Ball valve connects to tee valve, parts P & Q
2. Incoming water source
3.Quick-connection
4. White PE hose, part O
5. White PE hose, part O
6. Compression nut
TM
7. Gray hose for incoming water supply to Hydro-Chi
8.Quick-connection
9. Rigid ring, rubber gasket, parts D & F; and locking nut
10.Chi-faucet
11. Hose clamp (part H) one on each of the gray and beige hoses
12. Acid faucet
13. Beige acid faucet hose
14. Gooseneck faucet discharges electrolyzed water for drinking
Page 7
5. Installation Instructions
Connecting Water Supply to the 3-Stage Water Filters
1. Inventory the contents of your boxes.
2. Turn off the water to the cold water supply line that feeds water to the (kitchen) sink.
3. Make sure the gasket (part R) is inside the female side of the tee joint (part Q).
4. Connect the tee joint (part Q) to the cold water supply line.
5. Apply Teflon tape to the male end of the ball valve (part P).
6. Attach the tee joint to ball valve (part Q to part P).
7. Unscrew the nut from the ball valve (part P ).
8. Take one (1) of the white PE hoses (part O) and slide the nut over the hose
with the female threads facing the ball valve.
9. Take the hose (with the nut) and push it firmly onto the ball valve and then
securely screw the nut to the ball valve.
10. Find a sturdy wall under the sink to mount the water filters ... must be no more
than 55 inches from the water supply line.
11. Mark the holes from the mounting bracket (part M) onto the wall. Using a
5/64 drill bit, drill two pilot holes into the wood.
12. Screw in 2 mounting screws (parts J) using a no. 2 Phillips. Leave enough
screw protruding from the wall to securely hang the mounted filters.
13. Hang the mounted filters onto the 2 mounting screws.
14. Connect the loose end of the white PE hose which is connected to the water
supply line into the connection on the 3-stage water filters at the “IN” side. You will
firmly push the hose into the Quick-Connection then pull the hose backward; making sure the connection is secure. NOTE: The end of the white hose must have a
straight edge and not be crimped.
Installing Chi-faucet and Connecting to 3-stage Water Filters
15. Decide where the Chi-faucet will be installed at the sink. This water must have
Page 8
a drain to flow into (usually the sink). It can be installed on the sink in a pre-existing
accessory hole or a new hole can be added. A 21/64 inch hole is required. Drill this
hole as required.
16. Remove two (2) nuts from the end of the incoming water pipe on the Chi-faucet (from part A): the first is a compression nut, the second is a locking nut, notice
the size differences.
17. Take the metal Ring (part C) and insert it onto the incoming water pipe of the
Chi-faucet—the flat part of the ring facing upward.
18. Insert the large, thin gasket (Part E) behind the metal ring.
19. Insert the Chi-faucet (part A) into the hole on the sink (the incoming water
pipe on the Chi-faucet is the part which goes into the hole).
20. Working from under the sink, first insert the rigid plastic ring (part D) onto
the incoming water pipe on the Chi-faucet—fitting it snuggly; Secondly, insert the
small rubber gasket (part F) directly behind the rigid plastic ring, which will hold
the plastic ring in place.
21. Take the locking nut (the 2nd of the 2 nuts you removed at # 16) and screw it
securely behind the small rubber gasket you last installed.
22. Take the other white PE hose (part P) and slide the compression nut over the
hose (the 1st of the 2 nuts you removed at # 16).
23. Push the white hose securely over the barb on the end of the incoming water
pipe of the Chi-faucet.
24. Screw the compression nut securely onto the same incoming water pipe on the
Chi-faucet using a 15mm open-end wrench. Note: some installations will require a
basin wrench instead of the 15mm open-end wrench.
25. Connect the other end of the white PE hose (one end of which is connected
the incoming water pipe on the Chi-faucet) and connect it to the “OUT” end of the
3-stage water filters: firmly push the hose into the Quick-Connection then pull the
hose backward; making sure the connection is secure. NOTE: The end of the white
hose must have a straight edge and not be crimped.
Page 9
Attach Hydro-ChiTM to Water Supply & Chi-faucet
26. Remove the back cover on the Hydro-Chi. Remove the plugs from the top and
bottom of the filter housing and on the Ultra filter (part K). Follow the arrow directions on the Ultra filter (part K) to assure correct insertion. Press down on the filter
as you insert the filter into the machine then lock it into place. Replace the back
cover.
27. Slide one (1) hose clamp (part H) to each of the hoses on the Hydro-Chi: the
gray hose and the beige hose. Note: hoses may be cut to desired length before proceeding further.
28. Attach the gray hose to the bottom incoming water barb on the Chi-faucet;
tighten hose clamp (part H) with flathead screw driver.
29. Attach the beige hose to the top outgoing acid water barb on the Chi-faucet;
tighten hose clamp (part H) with flathead screw driver.
30. Push the acid spout (part B) into top of Chi-Faucet.
31. Remove the plug from the end of the gooseneck faucet.
32. DO NOT PLUG the Hydro-ChiTM into electric outlet yet.
33. Slowly turn on the water supply under the sink. Open the Chi-faucet by turning the handle counterclockwise.
34. Allow water to flow freely through Hydro-Chi for 20 minutes. This will flush
away any potential activated carbon particles.
35. Inspect all water connections; use a flashlight to look for any signs of leaks. Use
a paper towel as a wick to inspect places you are unable to see with the flashlight.
36. If leaks are detected, turn off water and tighten leaky joints.
37. Close the Chi-faucet by turning the handle clockwise. Repeat steps 33-37 until
there are no leaks.
38. Plug the Hydro-Chi into electric outlet.
39. Open the Chi-faucet by turning the handle counterclockwise. The display
should turn on.
40. Congratulations you have completed the Hydro-ChiTM installation!
Page 10
6. Buttons Identified
Buttons on machine:
• Reset Filter button
• Display Screen
• Alkalescence 3
Drinking & Making Rice
• Alkalescence 2
Daily Drinking
• Alkalescence 1
Early Drinking
• Pure Water
Milk & Drug
• Acidity
Beauty & Cleaning
• There is a small green light on the left side of each button. The light flashes green
as a warning that the water selection is not yet ready to drink. A solid green light
indicates that the selected water is ready to drink.
Page 11
7. Display Screen
(as shown above)
• PH: Potential Hydrogen content for selected water output
• TDS: Total Dissolved Solids in selected water output
• ORP: Oxidation Reduction Potential in selected water output
• Remaining Filter Life: Time left for Ultra Chi Filter
• Flow Rate: The flow rate of incoming water to the Hydro-ChiTM
Page 12
8. How to Operate Machine
Turn on the water using the knob at the Chi faucet. The display screen will light up
red and an audible beeping will sound for 3-6 seconds. Next select a water button of
either:
• Alkalescence 3
• Alkalescence 2
• Alkalescence 1
• Pure Water
• Acidity
The display screen will light up in a different color with each selection and a beep
sound is audible with each water selection.
There is a small green light on the left side of each water button. The light flashes
green as a warning that the water selection is not yet ready to drink. A solid green
light indicates that the selected water is ready to drink.
The water dispensed from the Gooseneck is the water which should be drank. The
water dispensed from the Acid Faucet should NOT be drank. It may be used for
cleaning.
9.Modes
Electrode Cleaning: Each time the Hydro-ChiTM is turned on by turning the Chi
faucet counterclockwise, 12 seconds are devoted to electrode cleaning-- during
which time the display will light up in red and a beeping sound is audible. Periodically, the machine will perform an automatic electrode cleaning at which time the
display will light up in red and the warning beep will sound continuously. Wait until
the display is no longer red and the warning beeping has subsided before making a
water selection and drinking the dispensed water. After cleaning, the machine automatically selects Pure Water.
Energy Saving Mode: The color on the display screen will disappear after 15 seconds to save power and energy.
Sleeping Mode: After 3 minutes of no use, the display screen will go blank when it
goes into sleeping mode.
Page 13
10. Mineral Port
Located on top of the Hydro-ChiTM is the mineral port. Only Chi-Minerals-- available from BioAnue Laboratories-- should be added to this port. Chi-Minerals help
increase mineral content in the water for optimal water electrolysis.
To add Chi-Minerals:
1. Unscrew the port cap and add the mineral into the port.
2. Screw the lid back in place before using.
3. Run the Hydro-Chi for 10 minutes to activate the Chi-Minerals.
To change out your Chi-Minerals for new or different type:
1. Unscrew the port cap and gently turn the Hydro-ChiTM upside down so the old
minerals can fall out of the port.
2. Turn the machine right side up and add the new Chi-Minerals.
3. Screw the port cap into place before running the machine.
4. Flush the machine 10 minutes every time new Chi-Minerals are added to activate the minerals.
11. Adjusting Water Flow
Warning beeps will sound and the display will light up red when the incoming water
flow to the Hydro-ChiTM is too fast or too slow. Notice that the current flow rate can
be observed on the display screen on the left side. A too slow flow is 0.8 liters per
minute (L/M) or lower. A too fast water flow is 2.5l/m and higher. If the warning
does not subside after 30 seconds, follow these instructions:
• Leave the faucet on and go under the sink to adjust the ball valve by turning the
handle to open or close as needed.
• When the adjustment is correct, the warning beeping will stop. Now you can turn
off the water faucet to the Hydro-Chi.
• If this adjustment does not fix a too slow water flow warning, this can mean that
the water filters under the sink require replacement.
• The recommended water flow is between 1.0-2.0L/M. The current flow rate can be
observed on the display screen.
Page 14
12.Optimizing the pH Settings
An internal pH of 0 is the lowest pH setting and will result in the lowest possible pH
output for that type of selected water. An internal pH of 9 is the highest pH setting
and will result in the highest possible pH output for that type of selected water.
Water must be turned off to the Hydro-ChiTM to change the pH number settings.
1.Press Reset Filter and Pure Water simultaneously for 3 seconds, a blank screen
appears (no words or numbers) and the yellow Indicator of Change Filter light turns
on.
2. Select either Alkalescence 3, Alkalescence 2, Alkalescence 1,or Acidity by
pressing the corresponding button to change the pH value of that selected water
(Pure Water cannot be changed).
3. Press Pure Water to change the number from 0 to 9 (after 9 it loops back to 0)
4. Press the water selection again to save (Example, if you are adjusting Alkalescence 3, press Alkalescence 3 to save your changes, a long beep will sound)
5. Press Reset Filter two times to exit (a beep will sound each time)
How to obtain the highest level of alkalinity with the Hydro-Chi.
The Gooseneck faucet will dispense acidic water when on the Acidity setting. Thus,
the water flowing out of the opposite faucet (the acidic faucet) will dispense strong
alkaline water- this is the highest alkalinity obtainable with the Hydro-ChiTM.
Note: The water dispensed from the acidic faucet is 1/3 the volume compared to the
water dispensed from the alkaline side through the Gooseneck.
13.Water Filter
Insert the Ultra water filter inside the Hydro-ChiTM for first time.
Remove the back cover on the machine. Remove the plugs from the top and bottom
of the filter housing. Follow the arrow directions on the new water filter to assure
correct insertion. Press down on the filter as you insert the filter into the machine
then lock it into place. Replace the back cover. Allow water to flow through the
Page 15
machine for 10 minutes before plugging into electric outlet. Do not drink any of the
dispensed water.
Note: Upon initial installation and any time the Chi filter has been replaced inside
the machine, allow water to flow through the Hydro-Chi for 10 minutes before
drinking any of the dispensed water.
When to Replace Water Filters
The Ultra filter inside the Hydro-ChiTM must be changed when the Remaining Filter
Life reads 0.00, OR if the 3-stage filters get clogged before the Remaining Filter Life
reads 0.00.
Insert the new filter: Follow the arrow directions on the new water filter to assure
correct insertion. Press down on the filter as you insert the filter into the HydroChiTM then lock it into place. Replace the back cover. Allow water to flow through
the machine for 10 minutes before plugging back into electric outlet.
Reset the Remaining Filter Life: (Only to be reset when filter has been replaced.)
1. Press Reset Filter and Pure Water simultaneously, a blank screen appears (no
words or numbers)
2. Press Pure Water to set the new filter to 12000L (twelve thousand liters).
Changing the 3-Stage Filters
Not all three filters must be changed at the same time. You must determine which filters to change by examining the problem.
Change all 3 filters when:
•
The water flow rate remains below .8l- this indicates that the filters are clogged
with sediment and/or other contaminates.
•
The water flow remains below .5l and the warning and beeping cannot be corrected by adjusting the ball valve.
Change the 2 Carbon Filters (filters 2 & 3) when: Chlorine can be smelled or tasted
in the drinking water- this indicates that those two filters have reached the filtration
capacity.
Upon initial installation and after the 3-stage filters have been changed, allow water to flow through the Hydro-ChiTM for 10 minutes before drinking any of the dispensed water.
Page 16
14. Warnings
1. Place machine on a level surface with adequate ventilation away from high or
freezing temperatures, direct sunlight, rain, and standing water or splashing water.
2. Surrounding temperature range should not be lower or higher than 36 F to
103 F.
3. Do not allow machine to freeze- this will damage machine.
4. Do not use water any warmer than 103 F as this can damage the machine.
5. Only clean well or city water should be used.
6. Do not carry the machine by the Gooseneck.
7. Keep the machine in an upright position.
8. Limit use to 15 minute intervals.
9. If water comes out warm, stop usage and allow machine to cool down.
10. Never add soap or any other unapproved substances to the machine .
11. Allow 10 minutes of water to run through machine if it is unused for 3 days or
more.
12. When not in use, unplug the machine.
13. Professional repairmen or mechanically-competent individuals should install
and change the filters to the machine.
14. Only factory approved representatives should repair the machine.
15.Warranty
This machine has a one year factory warranty. If the internal and expected functions
should fail during the one year from date of purchase, please contact BioAnue
Laboratories Inc. for instructions to have it repaired or replaced. Ph: 229-365-7222
Please keep your receipt to verify purchase date.
Page 17
The following will VOID the one year warranty:
•
Lack of receipt
•
Incorrect Usage
•
Accidental Damage
•
Usage of non-approved filters and parts
•
Failure to replace filters as needed
•
Power Surge damage
•
Mother-Nature such as lightning, fire, earthquake, floods, tornadoes, etc.
16.Troubleshooting
Problem
Possible Causes
Solution
Display failed to light or • Might be in energy sav- • Check for energy savturned black suddenly
ing mode
ing mode
• No electrical power
• Connect to electrical
power
Leaking
• Loose fittings
• Tighten as needed
• O rings are worn
• Apply petroleum jelly
• Replace the O ring and
apply petroleum jelly
No water comes out
• There is no water sup- • Check to confirm the
ply
inlet valve is turned on
• Water inlet valve is
• Change the water filter
turned off
• Filter is too dirty, causing a clog
Slow water flow
• Supply water is slow
• Increase the water flow
• The water pressure is
at ball valve
low
• Increase the main water
• The filter is too dirty or
pressure
overused
• Replace the filters
Water leakage from bot- • The Ultra filter is in• Install the internal filter
tom of machine
stalled incorrectly (upin correctly
side down)
Page 18
BioAnue Laboratories Inc.
123 Wood Tech Drive
Rochelle, GA 31079 USA
Phone number 229-365-7222 or [email protected]
www.bioanuelabs.com