1
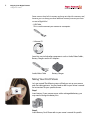
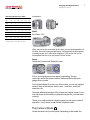
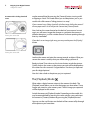
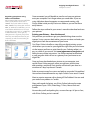
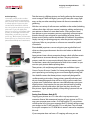
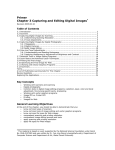
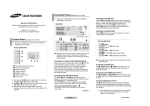
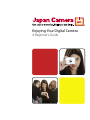
Enjoying Your Digital Camera
A Beginner’s Guide
Contents
3
5
6
10
Page 3
Introduction
Page 4
Section 1: Taking Pictures
Page 5
Getting Started and Taking Your First Picture
Out of the Box
Taking Your First Picture
The [Camera] Mode
The [Playback] Mode
The [Video] Mode
Page 10
Setting Up Your Digital Camera
Date and Time
Resolution
Compression
White Balance
Optical Zoom
Digital Zoom
Page 13
Viewing and Erasing Your Pictures
Viewing Your Pictures
Erasing Your Pictures
Picture Aspect Ratio
Page 15
Section 2: Getting Pictures Out Of Your
Digital Camera
Page 16
My Card Is Full! Now What?
Beginners Without A Computer
For Beginners With A Computer
Page 23
Closing
13
16
16
18
Enjoying Your Digital Camera
A Beginner’s Guide
3
Introduction
Congratulations on the purchase of your new digital camera!
You’ve just taken the first step towards a better way to shoot and enjoy
pictures.
This guide was designed to show that digital cameras are not
complicated and that you do not need advanced computer skills to
enjoy your digital camera.
The guide takes a unique approach. We start with the moment you
take the camera out of the box and provide step-by-step instructions
on how to take pictures and set up your camera. Most digital camera
handbooks stop there but our guide goes further. We provide advice on
how to get the pictures out of your camera and show you ways to make
photographs for your album, whether you have a computer or not.
Technology has changed but our mission has not. We are committed
to helping our customers learn the new way to capture and enjoy a
lifetime of memories.
4
Enjoying Your Digital Camera
A Beginner’s Guide
Section 1
Taking Pictures
Enjoying Your Digital Camera
A Beginner’s Guide
Getting Started and Taking Your
First Picture
Out of the Box
When taking the digital camera out of the box, make sure that you
check your owner’s manual to ensure you have received all the
appropriate parts and accessories. Each kit is different. The key
components are:
• Camera
• Battery
NiMH batteries
Lithium ion battery
• Memory Card (your digital film).
The type of memory card included vary with the camera brand and
model. See examples below:
CompactFlash
SD Card
xD-Picture Card
Memory Stick
5
6
Enjoying Your Digital Camera
A Beginner’s Guide
Some cameras have built-in memory and may not ship with a memory card,
however, you can always purchase additional memory to ensure you never
run out of digital film!
• USB Cable.
This is used to connect your camera to a computer.
• Software CD
Some kits may include other components such as Audio/Video Cables,
Battery Chargers and/or AC Adaptors.
Audio/Video Cable
Battery Charger
Taking Your First Picture
Let’s get started! The following steps will help you set up your camera
and start taking pictures. You may need to refer to your owner’s manual
for instructions for your specific camera.
Step 1
Insert battery. If your camera comes with a rechargeable battery, you
may need to charge the battery first.
Step 2
Insert Memory Card. Please refer to your owner’s manual for specific
Enjoying Your Digital Camera
A Beginner’s Guide
7
instructions.
How many pictures can I take?
Digital
Film
2Mp
16MB
14
8
6
5
5
4
32MB
30
18
14
11
10
8
64MB
61
38
30
24
20
17
128MB
122
76
61
49
41
35
256MB
246
154
123
99
82
72
512MB
494
308
247
200
165
144
1 GB
990
630
495
409
330
300
Camera Resolution
3Mp 4Mp 5Mp 6Mp
8Mp
Step 3
Turn Power “ON”.
Approximate number of photos based on high resolution setting;
may vary from model to model, and picture to picture.
When you turn on the camera for the first time, you may be prompted to set
the date, time and language of preference. Go ahead and set these options
according to your user’s manual or simply press [Ok] to skip. You can set
these options later on as we will review in a later section.
Step 4
Locate the [Camera] and [Playback] switch
At first, your digital camera may appear intimidating. The rear
viewscreen and all the buttons make it look more like an electronic
gadget than a camera.
Don’t be intimidated. If you can use a film camera, you can use a digital
camera. Many of the features are the same – auto focus, auto flash,
zoom lens, etc.
The major difference between a film camera and a digital camera is the
rear viewscreen and the ability to playback the pictures you have taken
instantly.
The key is to understand that a digital camera has two major modes of
operation—the [Camera] mode and the [Playback] mode.
The [Camera] Mode
Switch the camera to [Camera] mode. Depending on the model, this
8
Enjoying Your Digital Camera
A Beginner’s Guide
A camera with a sliding clamshell
cover.
can be accomplished by pressing the [Camera] button, turning a dial
or flipping a switch. This mode allows you to take pictures just as you
would with a film camera. Taking pictures is a snap!
If your camera has a sliding clamshell style front cover, sliding the cover all
the way open until it clicks will put the camera into [Camera] mode.
Turning the camera ON.
Now, look on the screen located on the back of your camera. In most
cases you will see an image that changes as you point the camera in
different directions, just like a video camera. No more squinting through
that tiny viewfinder!
If you don’t see an image right away, you may need to press the [Display]
button
Turning the camera OFF.
Look on the screen and point the camera towards an object. What you
see on the screen is exactly what you will be taking a picture of.
Ready to shoot? Press down on the shutter button to take the picture.
Quickly look on the screen as the picture you took will be displayed on
the screen for a few seconds. Congratulations! You have just captured
your first digital picture!
Now let’s take a look at the picture you just captured.
The [Playback] Mode
What makes a digital camera unique is the screen at the back. The
[Playback] mode allows you to view the images you have taken. These
images are stored on your memory card. The last image you captured
will be displayed on the screen.
Switch the camera to [Playback] mode. Depending on the model, this
may be accomplished by pressing the same switch as you used to put
the camera in [Camera] mode or by pressing the [Playback] button.
You may use the scroll buttons on the back of the camera to flip through
all the pictures you have taken.
Enjoying Your Digital Camera
A Beginner’s Guide
9
Now to take more pictures, simply switch back to the [Camera] mode
again!
That’s it! You have now mastered the basics of taking a picture with your
digital camera. Smile!
Now go out and experiment! Be creative! Remember, when shooting
digital, you don’t pay for additional film or photofinishing. You are free
to enjoy and shoot more pictures!
The [Video] Mode
Many digital cameras can also shoot short video clips. Some record
sound as well. These clips, often limited to 30 seconds, are not designed
to substitute full videos taken by your video camera. However, taking
a short video (e.g. baby blowing out birthday candles) and sending it
to friends and relatives via email or playing it back on your camera or
computer, is a great way to share or relive a cherished moment. Refer
to your owner’s manual for specific instructions on how to shoot and
playback videos using your digital camera.
10
Enjoying Your Digital Camera
A Beginner’s Guide
Setting Up Your Digital Camera
Now that you have taken a few pictures let’s set up your camera for
optimal performance. Switch to [Camera] mode and press the [Menu]
button. You will see a list of options. Among them you will see the
following basic settings:
Date and Time
This option sets the current date and time so that you always have
a record of when your picture was taken. The date is not necessarily
printed on the picture unless you choose to do so. However, the date
is always attached electronically to your picture. This is helpful when
searching for or filing your digital pictures in your computer or on a CD.
Resolution
The two most important factors affecting your overall print quality are
resolution and compression.
The resolution of your camera is the number of pixels or picture
elements it contains. For example, a 3 megapixel camera contains three
million tiny dots that actually make up your picture. The higher the
number of dots, the sharper your picture looks. This is the reason why
a 4x6-inch photograph taken with a 3-million pixel camera looks better
than one taken with a 1 million pixel camera — there are simply more
pixels!
Setting the resolution determines the quality of the picture you are
about to take. Digital cameras have the option of creating an extremely
Enjoying Your Digital Camera
A Beginner’s Guide
Resolution
The two pictures below illustrate the
difference between high and low
resolution settings.
11
low resolution or small size file (lower picture quality, best for emailing),
or an extremely high resolution or large size file (higher picture quality,
best for printing photos and enlargements). Prints require many pixels
to look sharp. A picture that looks clear on your computer screen may
not necessarily look sharp when printed.
Under the Resolution menu, you may see the settings for Large,
Medium and Small, referring to your file size. The larger the file size, the
higher the resolution.
We suggest that you set your resolution at the highest setting possible.
Compression
High resolution image.
Some cameras also have a compression option. Compression refers
to the way your digital picture file is compressed and stored in
your memory card. You can fit more pictures on a memory card by
compressing the picture file further by reducing the details captured in
the picture. For example, if you take a picture of your green lawn with
minimal compression, the picture maintains most of the detail captured
and you may be able to make out each blade of grass. However, on the
maximum compression setting, you may still see a nice green lawn, but
you may not be able to make out the individual blades of grass on that
lawn.
Under the compression menu, you may see settings for Normal, Fine
and Superfine. A small (or super fine) compression results in a larger file
size and sharper picture.
The key to determining which resolution and compression option to
use is understanding that to print high quality pictures, the largest
resolution combined with the lowest compression will produce the best
photo print. On the other hand, such a large file will be very difficult,
if at all possible to email to friends and family. In this case, a lower
resolution is best.
Low resolution image.
We recommend that you set the highest resolution and lowest
compression for digital cameras from 1 to 4 megapixels. For digital
cameras 5-megapixel or greater, set the resolution to the highest
setting and adjust the compression for the level of detail and size of
the print you wish to print. It’s better to be safe than sorry. You never
know when a quick snapshot becomes that special picture you want
to cherish. Remember, resolution can be reduced later using your
computer and software programs but it cannot be increased!
12
Enjoying Your Digital Camera
A Beginner’s Guide
Optical and digital zoom
The following pictures were taken with an
automatic digital camera with 3x optical
zoom and 3.7x digital zoom.
Normal lens setting
White Balance
The [White Balance] mode sets the camera to match the current type of
lighting to reproduce colours more accurately. Have you ever taken a
picture in your own home with your film camera only to have it printed
and find a yellow or orange tint? Well with digital, you can tell your
camera what type of lighting you are shooting in (for example, tungsten
for regular in house light bulbs, or fluorescent for white tube lighting) so
that the camera may produce more natural looking colours. Although
you can adjust the [White Balance] manually, we suggest beginners
leave their camera on the [Auto] setting.
Optical Zoom
An optical zoom uses your camera’s physical lens to magnify, or zoom
in, on your subject. A digital camera’s optical zoom works exactly the
same way as your film camera’s zoom lens. An optical zoom makes your
subject appear closer to you!
Digital Zoom
3x optical zoom
3.7x digital zoom, 11x combined
A digital zoom uses your cameras built-in software to crop and centre
an image. However, digital zoom comes at a cost to resolution. The
more you zoom digitally, the less resolution your picture will have. Most
people do not use the digital zoom option. Please refer to your owner’s
manual if you wish to turn off your digital cameras’s digital zoom.
Enjoying Your Digital Camera
A Beginner’s Guide
13
Viewing And Erasing Your Pictures
Now that you have enjoyed taking pictures with your digital camera,
you may have some (or quite a few!) digital pictures stored on your
memory card. Your memory card may even be full. At this point, you
may want to erase some of those “bad” shots and create room on your
memory card. Remember, unlike film, your memory card is reusable.
Let’s explore some options on how to free up your memory card so you
can shoot more pictures.
Viewing Your Pictures
Switch to [Playback] mode and using the scroll buttons on your camera,
flip through and view all the pictures you have taken. Think someone
may have blinked in one of the pictures? Want a closer look? Using the
same buttons you use to zoom in on your subject in [Camera] mode,
you can zoom in on a picture taken in [Playback] mode. Refer to your
owner’s manual for more details on viewing your pictures.
Erasing Your Pictures
Erased your pictures by accident?
Don’t worry.
If you erased your pictures by accident,
stop taking anymore pictures and visit your
local Japan Camera store. Our new digital
picture recovery service can often recover
your lost pictures for you.
You may find a few shots that you do not want to keep.
While in [Playback] mode, scroll to the picture you want to erase and
press the [Delete] button. This button will often have an icon that looks
like a trash can.
The camera will ask to confirm you want the selected picture deleted.
Select [Yes] to delete the picture. If you change your mind and do not
want to delete, select [Cancel] to cancel your initial request to delete.
14
Enjoying Your Digital Camera
A Beginner’s Guide
With some cameras, you may have to press the [Menu] button to access
the option to delete pictures.
Take full advantage of the opportunity to view and delete your pictures.
When taking group photos, take the picture and then quickly playback
the picture to see if the picture is a good one. Is everybody smiling?
Does everybody have their eyes open?
If the picture is good, you can relax. If the picture is not good, you have
a second chance to capture the moment while everybody is together
for the photo.
Picture Aspect Ratio
Don’t cut off heads! Digital cameras are great because the picture
on the back LCD viewscreen is the picture that your digital camera
records. However, most digital cameras capture a picture equivalent to
a 4.5x6 picture which is slightly bigger than the traditional 4x6 picture
captured by a film camera. As a result, when a digital picture is printed
as a standard 4x6 photo print, a small strip of the top and bottom of the
picture are cut off. To avoid any embarrassing surprises (e.g. someone’s
head has been cut off), leave a little space at the top and bottom of your
screen when taking a picture.
Enjoying Your Digital Camera
A Beginner’s Guide
Section 2
Getting Pictures Out Of Your Digital
Camera
15
16
Enjoying Your Digital Camera
A Beginner’s Guide
My Card Is Full! Now What?
How do I get pictures out of my digital camera? How do I get them into
my computer? How do I print them? What’s the best way to save or
store my pictures?
With your new digital camera, you can continue to store your pictures
in photo albums or decorate your home with framed pictures. However,
digital cameras also introduce new ways to share and enjoy your
pictures.
The options are endless. However, we recognize that different people
will handle their pictures in different ways. In this section, we offer
guidance to two basic groups—beginners without a computer, and
beginners with a computer.
Beginners Without A Computer
The Store Solution
You don’t need a computer to enjoy your digital camera.
With your film camera, you took pictures, dropped off the roll of
film at the local photo store, later picked up your photographs and
inserted them into your photo album or threw them into your shoebox
downstairs.
You can do the same with your digital camera.
Printing Your Pictures
Treat your memory card as if it was film and take it to your local Japan
Camera Centre store. Each location can make photo quality prints from
your digital camera in seconds.
The JPrints Express station is a fun and easy way to view and print your
digital pictures. Simply insert your memory card or CD into the JPrints
Enjoying Your Digital Camera
A Beginner’s Guide
The JPrints Express is fast!
Your first photo will be printed in 20
seconds!
17
Express Station. Select the pictures you wish and print.
The JPrints Express is fast! Your first photo will be printed in 20 seconds!
In addition to printing, you can also improve your pictures. You can crop,
remove red eye, adjust light and colour, and even add text and borders
to your pictures
And the best part about digital…you only print the pictures you want.
Found a bad shot in the mix? No problem, just skip it! Need doubles of
some but not others? No problem, select the quantity you wish printed
from your picture. With JPrints Express, you’re in control!
The JPrints Express Station
Saving your Pictures onto CDs – Your ‘Digital Negative’
Once you have a card full of memories, you will want to save them so
you can empty your memory card and continue taking more pictures.
We recommend copying your pictures onto a CD.
Step 1: Insert card
Step 2: Select photo
A CD is like a ‘digital negative’. By copying your digital pictures onto a
CD, you are creating a record or ‘negative’ of your digital pictures. In the
future, you can bring the CD into the store and order reprints. Each CD
comes with an index print that allows you to see what pictures have
been copied onto the CD.
Furthermore, should you decide to start using your digital pictures with
your computer, the CD is a simple way to transfer your pictures into
your computer to email to friends or improve by adding text and other
special effects.
With the JPrints Express Station, you can enjoy the benefits of your
digital camera without a computer and continue to visit your local
Japan Camera store for full service and assistance.
Step 3: Edit photo
Step 4: Print
The Home Solution
Add borders and text to your prints.
Printing Your Pictures
One of the benefits of digital photography is the opportunity to print at
home. Up until recently, home printing required the use of a computer.
However, printers that allow you to print directly from your camera are
now available.
Transfer your images to CD.
There are a number of ‘Direct Printing’ solutions. Specially designed
photo printers can be connected to a compatible digital camera
through a cable. Other models integrate a docking station for your
camera onto the top of the printer itself. There are also printers that
have built-in card readers, allowing you to simply insert your memory
card or digital film into the printer to print.
18
Enjoying Your Digital Camera
A Beginner’s Guide
The printing solutions above offer the convenience and privacy of
printing at home. Imagine taking a family picture on a Saturday evening
and passing a copy to each of your family members before they leave.
These printers, ink and photographic papers are available at
Japan Camera Centres all across Canada. Our home printing experts will
guide you in purchasing and setting up your own home digital printing
lab!
However, you should be aware that home printers are primarily
designed for smaller quantity print orders. Home printers generally
take time and do not create photographs that will last as long as prints
made from a photo store. Furthermore, when our store lab technicians
print your digital pictures, they improve the way your pictures look
by making corrections in density and colour, the same way they do
with your film pictures. Direct printing is like printing a picture with no
corrections.
In terms of saving your digital images, you are still encouraged to visit
your local Japan Camera store and have their digital pictures saved onto
a CD before deleting your cards to take more pictures.
Examples of direct-connect consumer printers.
Beginners With A Computer
By connecting your digital camera to your computer, you can discover
new ways to enjoy your digital pictures.
Transferring Your Pictures To Your Computer
In most cases, you will have to install the software that came with your
digital camera onto your computer. Follow the steps in your owner’s
manual to install the software into your computer.
Once the software is installed, connect one end of the USB cable to your
digital camera and the other end to your computer.
Enjoying Your Digital Camera
A Beginner’s Guide
Organizing your pictures using
folders and subfolders
We recommend that you create subfolders
within your My Pictures folder such as
“2004 02” for pictures taken in February
2004, “2004 03” for pictures taken in March
2004, etc. Within these subfolders, you can
create further subfolders based on major
picture taking events such as “1st Birthday”
or “20th Anniversary”. Once again, by
taking the time to organize your pictures
when they are initially transferred to your
computer, you will save time looking for
them in the future.
19
Once connected, you will be able to transfer and save your pictures
onto your computer. Don’t forget where you saved them. If you are
using a Windows based computer, we recommend creating a My
Pictures folder inside your My Documents folder so you can find them
easily later on.
Follow the steps outlined in your owner’s manual to download and save
your pictures.
Printing your Pictures – Over the Internet!
Did you know you could now get your photofinishing done over the
internet? Just as you now bank online, you can save time and order your
digital prints from the convenience of your home.
Our JPrints Online Lab offers a state of the art digital printing system
which allows you to send us your digital files right from your own home
via the internet and have us print them for you. Ordering online is as
easy as a click of your mouse. Visit www.japancamera.com/jprints and
follow the easy online instructions. You will be required to download
a small program which will act as a gateway from your home to our
digital lab.
Once you have downloaded your pictures to you computer, start
up the JPrints Online program, select your pictures, pick the sizes
and quantities, and presto! Your pictures will arrive at your door in a
minimum of 3 days anywhere in Canada.
Prefer to come to one of our stores and pick up your order? No problem!
You can have them delivered to any Japan Camera Centre across Canada.
Want to surprise someone with a photo gift? No Problem! You can send
your order to any address in Canada.
Along with regular 4x6 prints, our JPrints Online Lab can also create
enlargements up to 11X14, Photo Mugs, T-Shirts, Mouse Pads and
Puzzles.
No more busy malls and parking lots, no more line ups. At 2pm or 2am,
with JPrints Online, you’re in control!
20
Enjoying Your Digital Camera
A Beginner’s Guide
Japan Camera website: www.japancamera.com
Japan Camera JPrints Online Print Service
Printing your Pictures – At Home
One of the greatest benefit of a digital camera is by being able to see
your pictures right away. Another great feature is being able to print
your pictures right away!
Enjoying Your Digital Camera
A Beginner’s Guide
Archival printing
Home inkjet printers provide excellent
colour and convenience. However, inkjet
prints, made up of tiny coloured ink drops
accurately sprayed on paper, may fade
over time unless laminated and will not
last as long as photos printed at your local
photo store. To get your digital photo
prints to last as long as your traditional film
pictures, you must apply a laminate with
inkjet printing, or print using a dye sub
process (e.g. JPrints Express) or silver halide
chemical process (i.e. same process used to
print traditional film photos at retail stores).
21
Take that once in a lifetime picture at a family gathering that everyone
wants a copy of? Well with digital, you can give everyone a copy right
away so they can take something home with them to remember the
gathering.
With the vast variety of software now available on the market (including
software that ships with your camera), capturing, editing and printing
your pictures at home has never been easier. Once you have saved
your picture on your computer, you can use printing software to print
pictures through your computer to your bubble jet printer. Have a
picture sent to you by email or downloaded off a website? No problem,
simply start up your printing program, select the picture and print it
right away. Refer to your printer or software user manual for specific
instructions.
Photo bubble jet printers can not only print your regular black and
white or colour paper documents but also vivid colour or black and
white prints.
Inkjet/Bubble Jet Printer
Some printers have a direct connection feature which will allow certain
digital cameras to connect directly to them. They may also have
memory card slots so you can print directly from your memory card.
Furthermore, some even have optional or built-in view screens so you
can view your pictures before printing them.
These printers, ink and photographic paper are available at Japan
Camera Centres all across Canada. Our home printing experts will guide
you in purchasing and setting up your own home digital printing lab!
You should be aware that home printers are primarily designed for
smaller quantity print orders. Home printers generally take time and
do not create photographs that will last as long as prints made from
a photo store. Furthermore, when our store lab technicians print your
digital pictures, they improve the way your pictures look by making
corrections in density and colour, the same way they do with your
film pictures. Again, printing directly is like printing a picture with no
corrections.
Thermal Printer
Saving Your Pictures Onto A CD
Copying your pictures to a CD is the safest way to preserve your
memories forever. We recommend copying all your pictures to CD’s in
case your computer ever crashes. On a high-quality CD, your pictures
will always be safe. Using your computer and CD writing software, copy
your images to the CD and store the CD in a safe place. You will need
to use your computer’s or CD-ROM drive’s owner’s manual to complete
this task.
If your computer does not have a CD copying software, you are
22
Enjoying Your Digital Camera
A Beginner’s Guide
encouraged to copy your favourite pictures back to your memory card
and visit your local Japan Camera store and have those pictures copied
onto a CD before you delete your card to take more pictures.
Enjoying Your Digital Camera
A Beginner’s Guide
23
Closing
“Since I started using my digital camera…
• I take more pictures
• I show and share more pictures
• I’ve become more organized with my pictures, and
• My photo album has truly become a collection of “My Best Of” photos.
“Simply put, my digital camera had made picture taking more fun and a
better way to record and chronicle the important and not-so-important
occasions in my life.”
We hope you have found our guide helpful in learning more about the
functions and benefits of your digital camera. We are developing new
and more advanced modules to help you grow with your digital camera.
Please check www.japancamera.com regularly for updates.
Happy picture taking!
Japan Camera Digital Camera Guide Crew