Download User Manual - nu-beca

Transcript
Instruction Manual
Digital Blood Pressure Monitor
Distributor:
Fully Automatic Wrist Style
Model No:BW2015
VER:A00
Table of Contents
Before Using the Monitor
Introduction................................................................................................1
Symbols Use..............................................................................................2
Important Safety Notes..............................................................................3
Konw Your Unit.......................................................................................4-5
IHB Introduction.........................................................................................6
Before Taking A Measurement...................................................................7
Operating Instructions
Battery lnstallation/Replacement............................................................8-9
Adjusting Settings
1. To set year ......................................................................................10
2. To set date and time ...................................................................11-12
3. To set positioning system ................................................................12
4. To set displaying of the date and time ........................................13-14
3. To set unit ........................................................................................15
6. To set user .......................................................................................16
Proper Way of Measurement ...................................................................17
Take a Measurement ..........................................................................18-20
Use the Memory Function
To read the average value ...................................................................21
To read the measurement value ..........................................................22
To delete the memory value .................................................................23
Thanks for choosing the Digital Blood Pressure Monitor.
Please read this instruction manual before using your unit.
Please keep this instruction manual safe for future use.
Table of Contents
About Blood Pressure
Blood Circulation ..................................................................................24
Health and Blood Pressure ..................................................................25
Classification of Blood Pressure .....................................................26-27
Care and Maintenance
Exceptional Situations
Error Indicators ....................................................................................28
Eliminate Fault .....................................................................................29
Care and Maintenance
Care .....................................................................................................30
Maintenance ........................................................................................31
Specifications .....................................................................................32-33
Statement ................................................................................................34
Warranty Information ..........................................................................35-36
Introduction
Thank you for purchasing Fully Automatic Wrist Style Digital Blood Pressure
Monitor.
The unit uses the oscillometric method of blood pressure measurement. It
means the unit detects the movement of your blood through your brachial
artery, and converts your blood pressure into a digital reading. The unit is
simple to use because a stethoscope is not needed while using an
oscillometric monitor.
The unit stores automatically 180(2*90) sets of measurement values with the
measuring date and time. You can read the stored data conveniently by
pressing the memory button.
Symbols Use
SYMBOLS USED IN THIS INSTRUCTION MANUAL
WARNING
Indicates a potentially hazardous situation which, if not
avoided, could result in death or serious injury.
CAUTION
Indicates a potentially hazardous situation which, if not
avoided, may result in minor or moderate injury to the user or
patient or damage to the equipment or other property.
Type B applied part
AUTHORISED REPRESENTATIVE IN THE
EUROPEAN COMMUNITY
Refer to instruction manual/booklet
The unit comes with the following components:
• Main Unit
• Storage Case
• Instruction Manual printed in English
The unit have the following advanced functions:
• Displaying of the date and time
MANUFACTURER
SERIAL NUMBER
The marking of electrical and electronics devices
according to Directive 2002/96/EC.
The device,accessories and the packaging have to be disposed
of waste correctly at the end of the usage.
Please follow Local Ordinances or Regulations for disposal.
1
2
Important Safety Notes
Know Your Unit
To assure the correct use of the product basic safety measures
should always be followed including the precautions listed below:
Read all information in the instruction manual and any other
literature included in the box before using the unit.
Body & Cuff
Contact your physician for specific information about your blood pressure.
Self-diagnosis and treatment using measured results may be dangerous.Follow
the instructions of your healthcare provider.
Display
Memory Button
Start/Stop Button
Setting Button
Operate the unit only as intended. Don't use for any other purpose.
The unit is intended to use in measuring blood pressure and pulse rate for adult
only, not recommended for neonatal baby at home or medical centre.
Do not use a cellular phone near the unit. It may result in operational failure.
Please avoid using in high radiant area in order to make your measuring data
correctly.
Battery Compartment
Wrist Cuff
Do not disassemble or attempt to repair the unit or components.
Do not use the equipment where flammable gas (such as anesthetic gas,
oxygen or hydrogen) or flammable liquid (such as alcohol) are present.
3
4
Initialization
Know
Your Unit
Initialization
IHB
Introduction
Irregular Heartbeat Symbol (
Display
User Symbol
Systolic Blood
Pressure
Low Battery Symbol
Inflation/Deflation Symbol
or WHO Indication
Average Value Symbol
Memory & Times
Diastolic Blood
Pressure
Unit lndication
Pulse
Date/Time
Irregular Heartbeat
Symbol
Heartbeat Symbol
Power
2 AAA Alkaline
Batteries
Storage Case
An irregular heartbeat rhythm
is defined as a rhythm that
varies by less than 25%
from the average rhythm
or 25% more than the
average rhythm detected
while the monitor is
measuring the systolic and
diastolic blood pressure.
Irregular Heartbeat
Short Long
Pulse
Blood
pressure
6
Battery Installation / Replacement
Before Taking A Measurement
7
Pulse
Blood
pressure
If the Irregular Heartbeat Symbol (
) displays with your measurement
results, we recommend you consult your physician.
Follow the directions of your doctor.
5
1.Avoid eating,drinking alcohol, smoking, exercising and bathing for
30 minutes before taking a measurement.
2.Stress raises blood pressure.Avoid taking measurements during
stressful times.
3.The cuff can be applied to your left or right wrist.Always measure
your blood pressure on the same wrist.
4.Measurements should be taken in a quiet place.
5.Position the unit at heart level throughout the measurement.
6.Remain still and do not talk during the measurement.
7.Keep a record of your blood pressure and pulse readings for your
physician.A single measurement does not provide an accurate
indication of your true blood pressure.You need to take and record
several readings over a period of time.Try to measure your blood
pressure at the same time each day for consistency.
8.Wait 30~60 seconds between measurements.The wait time allows
the arteries to return to the condition prior to taking the blood
pressure measurement.You may need to increase the wait time
depending on your individual physiological characteristics.
)
When the unit detects an irregular rhythm two or more times during the
measurement, the Irregular Heartbeat Symbol will appear on the
display with the measurement values.
Normal Heartbeat
1
2
Remove the battery cover from the
battery compartment.
ME
M
SE
Install 2 “AAA” size batteries so the + (positive)
and - (negative) polarities match the polarities
of the battery compartment as indicated.
8
T
Battery Installation / Replacement
Adjusting Settings
1. To set year
3 Replace the battery cover.
1.1 All information will appear on the display when the batteries are installed
at the first time. After 2 seconds the year flashes on the display. Finally,
press the “SET” button and continue with step 2.
1.2 The mark of year appears and flashes after press the “SET” button
for 3~4 seconds, while the unit is off.Finally, press the “SET” button
again and continue with step 2.
Then press the “MEM” button one time for increasing one year, twice for
two years, so on and so forth. Long press the “MEM” button and the
value quickly increases.
Caution!
Use two identical 1.5V alkaline batteries type
AAA/LR03.
Do not use rechargeable batteries.
Replace both of the batteries if the symbol of
low battery appears on the display.
Never leave any low battery in the battery
compartment since they may leak and cause
damage to the unit.
The year can be set between 2009 and 2030, and it will return to 2009
when the display of year up to 2030.
10
9
Adjusting Settings
Adjusting Settings
2. To set date and time
Press the “MEM” button to change the month and press the “SET” button and
continue with next step. Then set the day, the time system conversion, the
hour and the minute by using the same way. Continue with step 3.
Month Setting
Minute Setting
Day Setting
3. To set displaying of the date and time
Press the “MEM” button and confirm whether the unit displays the date
and time after turning off.
Hour Setting
time system conversion
11
Then press the “SET” button and continue with step 4.
12
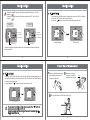
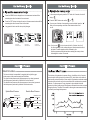
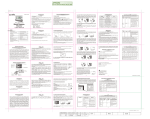
Adjusting Settings
Adjusting Settings
When the display function of the date and time is ON, the LCD will
display "
".
When the display function of the date and time is OFF, the LCD will
display "
".
12 Hour System
Conversion
4. To set unit
Then press the “MEM” button to change the current unit. (kPa or mmHg)
Press the “SET” button and return the step 1.
Press the “
” button to save the current setting and turn off.
24 Hour System
Conversion
Hour Display
Hour Display
Minute Display
Minute Display
Second Display
Second Display
Date Display
Date Display
“kPa” display
“mmHg” display
If select to display the date and time, the current date and time will display
when turned off.
14
13
Adjusting Settings
Proper Way of Measurement
1 Remove all clothes from your 2
5. To set user
Press the “SET” button and the mark of a user will appear when turned off or
the display function of the date and time is ON. Then press the “MEM” button
to change the current user.
Finally, press the “
” button to confirm user and turn off.
arm allowing the cuff to fit
directly on the skin.
Wrap the cuff tightly
around your wrist by
using the Velcro strip.
3 Sit in a chair with your feet flat on the floor.
You can stop the setting anytime when you press the “
” button to
save the current setting and turn off.
If select to display the date and time, the current date and time will
display when turned off.
15
16
1cm
(0.4'')
Take a Measurement
Take a Measurement
1
Press the “
3
” button.
All display symbols appear.
All symbols display
Deflating automatically
Start to inflate
The blood pressure and pulse rate are displayed when the
measurement completed.
The cuff is deflated automatically, and the measurement results are stored in
memory with date and time.The “
” symbol will be displayed if irregular
heartbeat is deteced.
OR
2
Measurement starts while inflating.
The hearbeat symbol “
Start to inflate
“kPa”display
” flashes once a pulse is detected.
Inflating
Heartbeat appear
Continue Inflating
Press the “
“mmHg”display
“
”display
To a fit pressure
18
17
4
OR
Take a Measurement
Use the Memory Function
” button to turn off the unit.
The unit stores the blood pressure and pulse rate in the memory after
completing a measurement every time. It can automaticallystore 90 sets
measurement values .The earliest record is deleted to save the latest
measurement value when more than 90 sets.
The unit will automatically turn off after two minutes if you have forgotten
to turn it off.
If select to display the date and time, the current date and time will display
when turned off.
The unit also calculates an average reading based on the values of the
latest 3 times measurement taken.
To read the average value
...................................
Press the “MEM” button, the average value of the latest 3 times
measurement taken of the current user will display with the average reading.
OR
Turn to next
NOTE:
To stop the inflation or measurement, press the “
” button in anytime.
the average value of the latest
3 times measurement taken
The unit will stop inflating and then release and turn off.
19
20
Use the Memory Function
To read the measurement value ..............................................
Press the “MEM” button to display the set of measurement values with the
measuring date from the oldest to the most recent.
Press the “SET” button to display the next set of measurement values with the
measuring date from the most recent to the oldest.
Long press the button and the value quickly changes.
To delete the memory value..............................................
In the memory reading mode, press the “SET” button for 4-6 seconds, the unit will
display “
”.
Press the “MEM” button and confirm “
” or “
”.
If you are sure all the data of corresponding user can be deleted, press the “
button, all the corresponding user’s data will be deleted and the unit will
turn off.
”
Forward
Backward
The 1st latest
measurement value
display
The 2nd latest
measurement value
The 90th latest
measurement value
Note: If you have set “
”, but do not press a button for 2 minutes, the unit will
turn off automatically, but the corresponding user’s blood pressure data will not
be deleted. The delete operation must be confirmed by user.
After the measurement finished and when reading the memory values,
the backlight is on about 10 seconds.
21
22
About Blood Pressure
Blood Circulation
The blood circulation is responsible for supplying the body with oxygen.
blood pressure is the pressure exerted on the arteries.
The systolic blood pressure value (higher pressure or top value) represents
the blood pressure produced by contraction of the heart muscle.
The diastolic blood pressure value (lower pressure or lower value) represents
the blood pressure produced by relaxation of the heart muscle.
Systolic Blood Pressure
Diastolic Blood Pressure
Contraction of
the heart muscle
The incidence of hypertension increases with age. In addition, a lack of exercise,
excess body fat and high levels of cholesterol (LDL), which sticks to the inside in
blood vessels, reduces elasticity of these vessels. Hypertension accelerates arterial
sclerosis which can lead to very serious conditions such as stroke and myocardial
infarction. For these reasons it is very important to know whether the blood
pressure is within a healthy range. Blood pressure fluctuates from minute to minute,
throughout the day. Therefore it is essential to take regular measurements to help
you identify an average blood pressure.
Relaxation of the
heart muscle
Extrude blood
Blood return heart
Pressure increased
to the blood vessel
Pressure decreased
to the blood vessel
Higher pressure
Lower pressure
23
24
About Blood Pressure
Classification of Blood Pressure
After each measurement is completed, the LCD display will show your position
automatically on the six segments of the bar indicator which corresponds to World
Health Organization (WHO) Blood Pressure Indicator.
Reference Material: Journal of Hypertension 1999, Vol 17 No.2
Diastolic Blood Pressur (mmHg)
Severe hypertension
110
WHO
Moderate hypertension
100
Red
Mild hypertension
90
85
80
Normal systolic value
Yellow
Green
Normal blood pressure
Optimal
blood pressure
(target value)
*Note!
120
130
140
160
180
Systolic Blood Pressure (mmHg)
When a person’s systolic and diastolic pressures fall into different categories, the
higher category should apply.
If your blood pressure reaches upper
values of 140~160 mmHg and lower
values of 90~95 mmHg in repeated
measurements over several days, you
should consult your doctor for detailed
medical examination. You can assist
the treatment prescribed by your
doctor in the following ways:
Loose weight and lower your
cholesterol level;
Reduce the consumption of alcohol;
Reduce the intake of salt;
Stop smoking;
Take regular exercise;
Monitor your blood pressure.
25
26
Exceptional Situations
Error Indicators
Eliminate Fault
The following symbol will appear on the display when measuring abnormally.
Symbol
High blood pressure can go unnoticed
for a long time, since it doesn’t cause
noticeable symptoms. The following
are all possible causes of abnormally
high blood pressure:
Overweight;
High cholesterol level;
Smoking;
Excessive alcohol consumption;
Stress and emotional upset;
Excessive consumption of salt;
Lack of physical exercise;
Genetic / hereditary predisposition;
Underlying illnesses, such as kidney
disorders or endocrine disturbance.
Cause
Correction
Wrap the cuff correctly and tightly.
The course of
inflating appears
error.
Inflate over again after ensuring.
When measurement
fails.
When the batteries
power are too low.
27
Do not move your arm and body,
and keep quiet.
Measure over again according to
correct way.
Replace both of the worn batteries
with two new ones.
Causes and Solutions
Problem
No power.
Replace both of the worn batteries
with two new ones.
No display appears on the
display screen.
Check the battery installation for proper
placement of the batteries polarities.
Measurement values
appear too high or too low.
Blood pressure varies constantly. Many
factors including stress, time of day, how
you wrap the cuff, may affect your blood
pressure. Review the sections "Proper
Way of Measurement" and "Take a
Measurement".
28
Care and Maintenance
Maintenance
Care
Do not clean the body and cuff with
naphtha, thinner or gasoline etc.
Keep the unit in the storage case
when not in use.
naphtha
Clean the unit with a soft dry cloth.
Do not use any abrasive or volatile
cleaners.
Never immerse the unit or any
components in water.
Avoid subjecting the monitor to strong shocks or vibrations, such as dropping
the nuit on the floor.
thinner
Do not wet the cuff or attempt to clean
the cuff with water.
gasoline
Store the unit in a clean and dry
location. Do not subject the unit to
extreme hot or cold temperature,
humidity and direct sunlight.
Remove the batteries if the unit will
not be used for 3 monthes or longer.
Always replace both of the batteries
with new ones at the same time.
MEM
SE
T
Use the unit consistent with the instructions provided in this manual.
Use only authorized parts and accessories.
29
30
Specifications
Specifications
Model No.
BW2015
Display
LCD Digital Display
Measuring Principle
Oscillometric Method
Measurable
Circumference of Wrist
13.5~21.5cm (5.3''~8.5'')
Electric Shock Protection
Internal power supply appliance type B
Measurement
Range
Accuracy
LCD
Indication
Pressure
Pulse
0 to 299 mmHg (0~39.9 kPa)
40 to180 Pulses/min
Pressure
3 mmHg (0.4kPa)
Pulse
5% of reading
Pressure
3 Digits Display of mmHg or kPa
Pulse
3 Digits Display
Symbol
Memory/IHB/Heartbeat/Low Battery,etc.
31
Inflation
Automatic by Internal Pump
Rapid Air Release
Automatic by Air Valve
Memory Function
Memory 180 (2*90) Sets Measurement Values
Power Source
2 AAA Alkaline Batteries;d.c.3V
Automatic Power-Off
In 2 Minutes
Gross Weight
Approx. 110g (Batteries not included)
Operating
Environment
Storage
Environment
Temperature
10 ~ 40 C (50 ~ 104 F)
Humidity
15 ~ 90%RH (Noncondensing)
Barometric Pressure
80~105 kPa
Temperature
-20 ~ 60 C (-4 ~ 140 F)
10 ~ 95%RH (Noncondensing)
Humidity
32
Statement
The intended use: The unit is intended to be used by adults at home or medical
centre to measure blood pressure and pulse rate.
The unit satisfies the requirements of IEC60601-1 Medical electrical equipment,
EN1060-1: Non-invasive sphygmomanometer, EN1060-3: Non-invasive
sphygmomanometer,IEC60601-2-30: Non-invasive sphygmomanometer.
The unit has passed the EMC Test.
Blood pressure measurements determined with this device are equivalent to
those obtained by a trained observer using the cuff/stethoscope auscultatory
method, within the limits prescribed by the American National Standard,
Manual, electronic, or automated sphygmomanometers.
The risk of patient and user can be lowered to acceptable level.
Substitution of a cuff different from that supplied might result in measurement error.
Please contact us if you need the circuit diagrams, component part lists etc.
Specifications are subject to change without notice due to improvements in
performance.
33
Warranty Information
Periodical check:
Sensitive measuring devices must be checked from time to time for accuracy
and leakage, we therefore recommend that the performance should be checked
every 2 years and after maintenance and repair.
Please contact the local distributor for details.
35
Warranty Information
Federal law restricts this device to sale by or on the order of a physician.
The unit, excluding the unit cuff, is guaranteed to be free of defects in
workmanship and materials for a period of two years from the date listed on the
purchase record, when used in accordance with the instructions provided with the
unit.The unit cuff is warranted to be free from defects in materials and
workmanship appearing within one year from the date listed on the purchase
record when the unit is used in accordance with the instructions provided with the
unit.
For repair under this warranty.Our authorized service agent must be advised of
the fault within the period of the warranty.This warranty covers parts and labor
only under normal operations.A transportation fee or freight fee that may be
incurred will be the owner’s responsibility.Any defect resulting from natural
causes, e.g.,flood,hurricane etc., is not within this guarantee.
This guarantee does not cover damage incurred by use of the unit not in
accordance with the instructions, accidental damage, or being tampered with or
serviced by unauthorized service agents.
Unit subjected to misuse, abuse, and neglect of these manual contents,
non-instructional purposes;unauthorized repair or modifications will be excluded
from this warranty. This guarantee specifically excludes expendables and
consumables, for example batteries.All warranty claims must be directed to the
distributor responsible for the sale of the device. The content of this warranty is
subject to change without further notice.
34