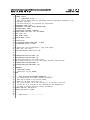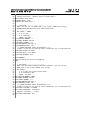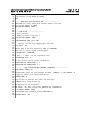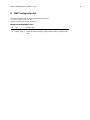
1
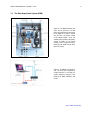
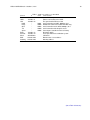
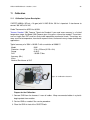
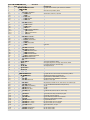
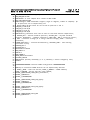
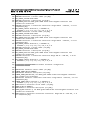
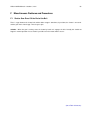
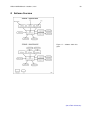
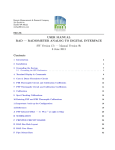
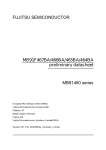
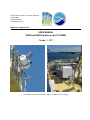
Remote Measurements & Research Company 214 Euclid Av. Seattle WA 98122 [email protected] RMR Technical Memo #1106 USER MANUAL ISAR6 and DAQ4 System on the R/V MIRAI October 1, 2011 Left: ISAR6 mounted on the foremast. Right: The DAQ4 remote unit (RU). DAQ4—ISAR6 Manual— October 1, 2011 2 Contents 1 System Description 5 1.1 General Description of ISAR . . . . . . . . . . . . . . . . . . . . . . . . . . . . . . . . . . . . . . . . 6 1.2 Rain Sensor (PPT) . . . . . . . . . . . . . . . . . . . . . . . . . . . . . . . . . . . . . . . . . . . . . 7 1.3 The Data Acquisition System (DAQ) . . . . . . . . . . . . . . . . . . . . . . . . . . . . . . . . . . . . 8 2 Installation 2.1 Installation Guidelines . . . . . . . . . . . . . . . . . . . . . . . . . . . . . . . . . . . . . . . . . . . . 9 9 3 Data Collection Quick Start 11 4 Preparation to Begin Operation 12 4.1 Turn ON the PC . . . . . . . . . . . . . . . . . . . . . . . . . . . . . . . . . . . . . . . . . . . . . . . 12 4.2 Sleepless Power Control . . . . . . . . . . . . . . . . . . . . . . . . . . . . . . . . . . . . . . . . . . 12 4.3 Set the Ethernet addresses. . . . . . . . . . . . . . . . . . . . . . . . . . . . . . . . . . . . . . . . . 13 4.4 Go to the DAQ Folder . . . . . . . . . . . . . . . . . . . . . . . . . . . . . . . . . . . . . . . . . . . . 13 5 DAQ Setup File — su06.txt 14 5.1 Edit the DAQ Setup file . . . . . . . . . . . . . . . . . . . . . . . . . . . . . . . . . . . . . . . . . . . 14 5.1.1 On BBEdit . . . . . . . . . . . . . . . . . . . . . . . . . . . . . . . . . . . . . . . . . . . . . . 14 5.1.2 edsu — Quick edit . . . . . . . . . . . . . . . . . . . . . . . . . . . . . . . . . . . . . . . . . . 15 5.1.3 Edsu — Full Edit . . . . . . . . . . . . . . . . . . . . . . . . . . . . . . . . . . . . . . . . . . . 15 5.1.4 BUsu — Backup Setup File . . . . . . . . . . . . . . . . . . . . . . . . . . . . . . . . . . . . . 15 6 Working with the ISAR 16 6.1 SSH to ISAR . . . . . . . . . . . . . . . . . . . . . . . . . . . . . . . . . . . . . . . . . . . . . . . . . 16 6.1.1 To Monitor ISAR Raw Data with SSH . . . . . . . . . . . . . . . . . . . . . . . . . . . . . . . . 16 6.2 Kill the ISAR Program . . . . . . . . . . . . . . . . . . . . . . . . . . . . . . . . . . . . . . . . . . . . 17 6.3 Exchange Files using Fetch . . . . . . . . . . . . . . . . . . . . . . . . . . . . . . . . . . . . . . . . . 17 6.4 ISAR Tools Test Program . . . . . . . . . . . . . . . . . . . . . . . . . . . . . . . . . . . . . . . . . . 18 6.5 ISAR Configuration File — isarconf.cfg . . . . . . . . . . . . . . . . . . . . . . . . . . . . . . . . . . . 18 6.5.1 Procedure to Change the Configuration file. . . . . . . . . . . . . . . . . . . . . . . . . . . . . 18 6.6 Reboot ISAR Operation . . . . . . . . . . . . . . . . . . . . . . . . . . . . . . . . . . . . . . . . . . . 20 DAQ4—ISAR6 Manual— October 1, 2011 7 Power Control 3 21 7.1 iBoot AC Power Control . . . . . . . . . . . . . . . . . . . . . . . . . . . . . . . . . . . . . . . . . . . 21 7.2 ISAR DC Power Control . . . . . . . . . . . . . . . . . . . . . . . . . . . . . . . . . . . . . . . . . . . 22 8 Ping and Confirm Operation 23 8.1 Ping commands . . . . . . . . . . . . . . . . . . . . . . . . . . . . . . . . . . . . . . . . . . . . . . . 23 8.2 I — Direct Connect to ISAR . . . . . . . . . . . . . . . . . . . . . . . . . . . . . . . . . . . . . . . . . 23 8.3 P — Direct Connect to GPS 23 . . . . . . . . . . . . . . . . . . . . . . . . . . . . . . . . . . . . . . . . 9 START Operation 24 9.1 DAQ ISAR File Structure . . . . . . . . . . . . . . . . . . . . . . . . . . . . . . . . . . . . . . . . . . 24 9.2 The START Command . . . . . . . . . . . . . . . . . . . . . . . . . . . . . . . . . . . . . . . . . . . 25 9.3 G, Begin data collection. . . . . . . . . . . . . . . . . . . . . . . . . . . . . . . . . . . . . . . . . . . 26 10 Stop data collection & Data Export 27 10.1 Terminate Data Collection . . . . . . . . . . . . . . . . . . . . . . . . . . . . . . . . . . . . . . . . . . 27 10.2 Export an Archive File . . . . . . . . . . . . . . . . . . . . . . . . . . . . . . . . . . . . . . . . . . . . 27 11 Calibration 11.1 Calibration System Description . . . . . . . . . . . . . . . . . . . . . . . . . . . . . . . . . . . . . . . 28 28 A PARTS 30 B User Interface PC — Setup 34 B.1 Technician Requirements . . . . . . . . . . . . . . . . . . . . . . . . . . . . . . . . . . . . . . . . . . 34 B.2 File structure. . . . . . . . . . . . . . . . . . . . . . . . . . . . . . . . . . . . . . . . . . . . . . . . . 34 B.3 Steps to Setup a New PC . . . . . . . . . . . . . . . . . . . . . . . . . . . . . . . . . . . . . . . . . . 35 C DAQ Setup File 37 D ISAR Configuration File 44 E BASHRC Unix Setup File 53 F Miscellaneous Problems and Procedures 58 F.1 Shutter Gear Runs Off the End of the Belt . . . . . . . . . . . . . . . . . . . . . . . . . . . . . . . . . 58 DAQ4—ISAR6 Manual— October 1, 2011 4 G Software Overview 59 H Glossary 61 DAQ4—ISAR6 Manual— October 1, 2011 1 5 System Description The Infrared Sea Surface Temperature Autonomous Radiometer (ISAR) (description on page 6) was developed at Southampton Oceanographic Center and Brookhaven National Laboratory approximately ten years ago [Donlon et al., 2008] for the purpose of providing data for satellite validation and for algorithm development. This manual describes an installation for the JAMSTEC R/V MIRAI which includes a second-generation ISAR, interface electronics, and data collection software. Note: details on the ISAR instrument are provided in the ISAR User Manual that was provided with the instrument. The manual is available on line at http://www.rmrco.com/proj/isar6daq4/isarmanual.pdf. Figure 1: The system block diagram. • ISAR. The instrument that looks at the sea surface and measures the SSTskin from the emitted infrared radiation. • PPT. A sensitive percipitation sensor that is used by ISAR to close its shutter in case of rain. • GPS. A GPS sensor to record exact position as part of the data record. The ISAR also has a GPS position. • REMOTE UNIT (RU). The electronic interface to the ISAR. The RU provides power control, ethernet connectivity, and serial connectivity to the different components. • PC. A laptop running BASH Unix. Software in the PC collect and log raw data from the different devices. Ten-minute statistics on SSTskin , position, rain, and ISAR status. • AC Power. The system runs on external AC power, 100-240 VAC & 50–60 Hz. Current drain is < 2 amps. (Go to Table of Contents) DAQ4—ISAR6 Manual— October 1, 2011 1.1 6 General Description of ISAR This section is one-page description of ISAR. See the ISAR manual for information on service and operation. Infrared Sea Surface Skin Temperature Radiometer (ISAR) The Infrared Sea Surface Skin Temperature Radiometer (ISAR) is designed to provide sea-surface skin temperature (SSST) measurements in support of satellite calibration and validation activities. ISAR will be deployed on volunteer ships in a global network and its operational goals are to make observations autonomously from a ship at sea for six-months and with an accuracy of +/-0.1 C. The tiny hole in the inner scan drum looks into a 45 degree mirror that reflects incoming infrared radiation into the infrared thermometer inside a waterproof housing, through a transparent window. The scan drum can be pointed to the sea surface at a variety of angles, at the sky, and back into two highprecision black-body cavities. This cycle allows correction for sky contamination and the system is self calibrating. A small amount of contamination can be tolerated by this open air design. ISAR incorporates a pitch-roll sensor, a flux-gate compass, and a GPS and thus is completely selfcontained. A measurement cycle can be completed as often as once per minute. The optical rain gauge (shown on the upper left side of the instrument) is an extremely sensitive detector of precipitation, and when any droplets in the air are encountered, the scan drum immediately rotates inward and the outer door closes. The outer panel is retracted and the scan drum is rotated for viewing the sea surface or sky. (Go to Table of Contents) DAQ4—ISAR6 Manual— October 1, 2011 1.2 7 Rain Sensor (PPT) RAIN SENSOR Model 5.4103.20.041 Added to it are 12-24 V converter and 1200 ohm resistor for the 4-20 mA output. Heaters are not used. Future models might add temperature control. (Go to Table of Contents) DAQ4—ISAR6 Manual— October 1, 2011 1.3 8 The Data Acquisition System (DAQ) Figure 2: The DAQ4 Remote Unit (RU). The RU enclosure uses AC power and an Ethernet connection to the DAQ PC. Features include AC line filter, AC power control via the iBoot module, +15 & +24 volt DC power modules, DC power control to ISAR via the Relay module, and a five-port Serial-toEthernet hub (ISAR, Relay, GPS, Spare tilt, open). Figure 3: The DAQ4 User Interface (UI). The UI for this installation is simply a Mac Air 11” PC. Data collection software is written in Unix BASH shell, PERL, EXPECT, and Kermit. (Go to Table of Contents) DAQ4—ISAR6 Manual— October 1, 2011 2 9 Installation Figure 4: The DAQ4 installation on the top of the foremast on MIRAI. The rain sensor is at the upper left and the GPS at the upper right. The power and Ethernet connections are available. 2.1 Installation Guidelines • View to the sea surface. The ISAR must be able to view the undisturbed sea surface at an angle, from downward, of approximately 15–55◦ . The view must be ahead of the ship wake. The most common view is directly to port or starboard. • AC Power. A stable AC power source (100-240 VAC, 50-60 Hz, > 2A). Research vessels usually provide a UPS stable power for science and this should be used. • Ethernet. An Ethernet connection to the UI PC is either a direct connection or via router into the ship LAN. Note: Before beginning the installation a set of IP addresses are required. This can be either assigned by the R/V network (best) or as a direct closed LAN. Table 1 is the set up for the MIRAI. (Go to Table of Contents) DAQ4—ISAR6 Manual— October 1, 2011 10 Table 1: A table of IP addresses for R/V MIRAI. DEVICE PC ISAR Hub ISAR Relay GPS Tilt Spare iBoot Cal Hub Mask DNS Gateway IP 128.20.8.10 128.20.8.11 128.20.8.12 “ “ “ “ “ 128.20.8.13 128.20.8.14 255.255.0.0 128.20.1.240 128.20.1.240 PORT 10001 10002 10003 10004 10005 DESCRIPTION Central DAQ computer. Ethernet connection to the ISAR. Five port Serial-to-Ethernet Hub. Serial connection to ISAR. 9600 bps, 8n1. RS485 connection to the Adam 4017 DC relay. Serial connection to the GPS. 9600 bps, 8n1. Serial connection to backup tilt sensor. Unused port. Setaside for future telemetry. AC power switch. Three-port Hub for the calibration system. LAN mask. Domain name server address. Gateway address. (Go to Table of Contents) DAQ4—ISAR6 Manual— October 1, 2011 3 11 Data Collection Quick Start 1. Check all connections. ISAR is in its frame. Rain sensor is connected. DAQ power and ethernet are connected.Check all connections are in place. 2. AC on. Turn on AC power to the DAQ. Turn on the iBoot. (Ref 7.1.) 3. Ping the hub. Use the PingHub command to confirm the DAQ hub is active. (Ref 8.1.) 4. Ping Isar. Use the PingIsar command to confirm the Isar is active. 5. If the pings are NOT good then Double-check all connections. Cycle the power with the iBoot command and the web page controls.(Ref 7.1.) 6. Check ISAR Serial. Enter the I command and be sure isar data lines are coming in correctly. (Ref 8.2.) 7. Check GPS. Enter the P command and check the GPS data records are coming properly. (Ref 8.3.) 8. Edit setup file, su06. Double check and edit the setup file. (Ref 5.1.) edsu to edit key lines. EDsu to edit the complete setup file using BBEdit. Note: Edit the setup file only as necessary. 9. Create the data set folder. Finally: if all checks out enter the START command to create the data set folder. (Ref 9.) 10. Begin data collection. Enter the G command to begin data collection. (Ref 9.3.) (Go to Table of Contents) DAQ4—ISAR6 Manual— October 1, 2011 4 4.1 12 Preparation to Begin Operation Turn ON the PC The laptop for the DAQ4 is an Apple Mac Air, 11". The computer software is written Unix with a BASH shell. The software work well in a Linux (Ubuntu) operating system using a BASH shell. Turn on the power switch. The computer boots the programs and ends as the screen below. Figure 5: The Unix terminal screen (light yellow background here) should be at the home folder. Figure 6: The DAQ Mac OS X Dock. The most important programs for general use are (from left to right): BBEdit: An excellent text editor with many features. Terminal: Opens a new UNix terminal window. Safari: Internet browser. Zterm: A serial terminal for RS232 connections. 4.2 Sleepless Power Control Normally the computer goes to sleep when the lid is closed or after a set time. Sleepless is a program that disables the sleep action. The upper right menu will look approximately like this: DAQ4—ISAR6 Manual— October 1, 2011 13 Figure 7: The upper-right side of the task bar. • Move the mouse pointer to the lightbulb on the left end of the menu above. Figure 8: The Sleepless Menu. The sleepless icon in the menu bar as shown above has a red tag when it is set properly. • In the menu select “Prevent sleep with lid closed, displays will sleep” as shown. 4.3 Set the Ethernet addresses. Refer to table 1 or one like it for the installation. Each of the devices must be set to the correct IP, mask, and router if needed. The DAQ PC must be set to the PC address. • Open Apple->System Preferences->Network. • Set up a Location for the installation. (Check to be sure a proper Location has not been already set up.) The IP assignment should be manual. • Set the IP address, Mask, and Router if that has not been assigned. 4.4 Go to the DAQ Folder Open a terminal window and enlarge it, by dragging the corner, to almost full screen size. Jump to the DAQ software folder by entering the alias gtisar. ~/$ gtisar ~/ISAR/isardaq/$ (Go to Table of Contents) DAQ4—ISAR6 Manual— October 1, 2011 5 14 DAQ Setup File — su06.txt The DAQ setup file full name is $HOME/ISAR/isardaq/setup/su06.txt It contains information for data collection and computation of SSST. Figure 9: Setup file. The setup file controls almost all of the DAQ real-time operation and real-time data processing. View the file with the Unix “less” program ~/ISAR/isardaq/$ less /setup/su06.txt A typical setup file can be found in the Appendix. A setup record line has a “tag” followed by a colon (:) followed by the datum for that line. Thus a line such as SST INTERPOLATION CORRECTION: 1.0033 has a tag, “SST INTERPOLATION CORRECTION,” and the datum (1.0033). Exact line numbers are not important. The software searches for the tag string. Note: Software searches for the tag string only. Therefore there is no penalty for adding comment lines in the file to help describe the data. The setup file shown in appendix C has many comment lines and insertions. 5.1 5.1.1 Edit the DAQ Setup file On BBEdit BBEdit is a powerful text editing program. Most of the working files in the DAQ4 system are text (ASCII) files and can be edited easily using BBEdit. To begin the editor simply double-click on DAQ4—ISAR6 Manual— October 1, 2011 15 any menu item with the BBEdit icon. Any files of type text (.txt), hypertext (.html), perl (.pl), or Expect (.ex) will open with the BBEdit text editor. There are many text editors in the Unix system. “nano”, “vi”, and others can be used for simple edits. However, we recommend highly that the operator here become familiar with BBEdit. A complete manual, “BBEdit_10_User_Manual.pdf,” is provided for for reference. However, the easiest way to learn the editor is just to use it. 5.1.2 edsu — Quick edit Runs a program to make changes to the most important lines in the setup file. 5.1.3 Edsu — Full Edit Brings up BBEdit for a full edit of the setup file. 5.1.4 BUsu — Backup Setup File Makes a backup (Go to Table of Contents) DAQ4—ISAR6 Manual— October 1, 2011 6 16 Working with the ISAR 6.1 SSH to ISAR 1. Open a DAQ terminal window. 2. SSH to ISAR. (a) From DAQ terminal command line prompt, “../$”, enter sshisar or ssh [email protected] (b) password = “arcom” (c) cd /home/isar/software 6.1.1 To Monitor ISAR Raw Data with SSH • Go to the data folder: cd \home\isar\software\data • Read the last line of the data file: \tail -f fname • To exit tail: <control>-C • To exit SSH: exit (Go to Table of Contents) DAQ4—ISAR6 Manual— October 1, 2011 6.2 17 Kill the ISAR Program 1. Enter ps -ax 2. Select the first pid (figure 10 left panel). 3. kill the program (right panel) Figure 10: Kill the ISAR program. 6.3 Exchange Files using Fetch Use the fetch command to the config file from the PC to ISAR. Start fetch to ISAR: fetch [email protected] Password: arcom (Go to Table of Contents) DAQ4—ISAR6 Manual— October 1, 2011 6.4 18 ISAR Tools Test Program Figure 11: ISAR Tools menu. 6.5 ISAR Configuration File — isarconf.cfg The ISAR configuration file is located in the software folder in the ISAR computer. /home/isar/software/isarconf.cfg This file contains information on the ISAR and ISAR operation. When the program boots up it reads the config file. Data lines in the configuration file are constructed like the lines in the DAQ setup file except an equal sign (‘=’) is used instead of the colon as a separator. E.g. START_DIAGN=0 is a typical line in the ISAR config file. A copy of the configuration file is located on the DAQ PC as $HOME/ISAR/isardaq/setup/cfg/isarconf_run.txt 6.5.1 Procedure to Change the Configuration file. 1. Copy isarconf.cfg to the DAQ PC. Do this if you are unsure if you have the current config file in the DAQ PC. Use fetch (section 6.3) to copy isarconf.cfg from ISAR to the PC. The name of the file on the PC is isarconf_run.txt. 2. Edit isarconf on the DAQ PC. Use BBEdit or other editor. Use BBEdit to edit isarconf_run.txt on the PC. 3. Copy isarconf_run.cfg to ISAR. DAQ4—ISAR6 Manual— October 1, 2011 19 4. Replace isarconf.cfg with the new version. cp isarconf_run.txt isarcong.cfg 5. Alternate: Edit isarconf.cfg directly in ISAR. Edit the isarconf.cfg file directly in the ISAR. Make use of the text editor “vi” in Unix. Any other available (in the ISAR OS) text editor (e.g. nano) will do. As an example in this procedure we will edit the line tagged “ORG_MEAN_LIMIT=1.1” which sets the threshold for the rain sensor to actuate the shutter. This is an archive file. We will edit this then copy it to isarconf.cfg. (a) vi isarconf_run.txt (b) Find the line ORG_MEAN_LIMIT=1.1 (c) Change to ORG_MEAN_LIMIT=1.5 (d) Move the cursor to 1.1 (e) ’R’ and enter 1.5<esc> (f) Save and exit: :wq<return> Alternate method of direct edit. configuration file. A single command can be used to change a single line in the DAQ4—ISAR6 Manual— October 1, 2011 6.6 20 Reboot ISAR Operation 1. Quit the SSH connection and return to the DAQ terminal. Enter exit. 2. Quit data collection if necessary. At the DAQ window, enter ^c. 3. From the command line ($) enter IsarOff. See figure 8.1. 4. Wait 10 minutes for battery backup to discharge. 5. Enter IsarOn (Go to Table of Contents) DAQ4—ISAR6 Manual— October 1, 2011 7 21 Power Control 7.1 iBoot AC Power Control Figure 12: iBoot Log On window • Enter the command iBoot or • Enter the command Safari http://128.20.8.12 or • From Safari, enter URL http://128.20.8.12. Name: user Password: daq4 After entering the Name and Password the main iBoot menu will appear. Figure 13: iBoot power control window. • Check the Main checkbox. • Press the power control button to turn power ON or OFF. NOTE: The ISAR has an internal power backup so the “Cycle Power” function is not useful to reboot ISAR. Instead, to reboot ISAR, • Press the “Power On” button. • Wait three minutes. • Press the “Power On” button. (Go to Table of Contents) DAQ4—ISAR6 Manual— October 1, 2011 7.2 22 ISAR DC Power Control The ISAR DC power passes through a DC relay (Adma 4017) so the operator can cycle power to the ISAR alone without effecting other devices. Figure 14: Recycle DC power to ISAR. (Go to Table of Contents) DAQ4—ISAR6 Manual— October 1, 2011 8 23 Ping and Confirm Operation Before beginning data collection a series of tests are used to assur that all of the different modules are connected and operational. 8.1 Ping commands We “ping” each component to be sure the ethernet links are all working. Figure 15: Pinging a module on the network. The ping command can be entered in a command window simply as (in the case of the hub) ping 128.20.8.12 where the IP address is the one assigned and shown in table 1. PingHub Pings the hub module. PingiBoot Pinfs the iBoot AC power module. PingCal During a calibration setup pings the Hart Readout module. PingIsar Pings the ISAR instrument ethernet connection. PingMe Pings the DAQ PC. 8.2 I — Direct Connect to ISAR The “I” command runs a kermit program to make a direct connection to the ISAR via its RS232 serial connection. The raw output from the ISAR will be displayed. This connection can be used to terminate the ISAR operation by entering “T”. Terminate an I session by entering ‘<control>-\’ followed by ‘Q’. 8.3 P — Direct Connect to GPS Enter “P” to connect to the GPS. The output should be a GPRMC string every ten seconds. Terminate a P session by entering ‘<control>-\’ followed by ‘Q’. (Go to Table of Contents) DAQ4—ISAR6 Manual— October 1, 2011 9 9.1 24 START Operation DAQ ISAR File Structure The "ISAR" folder has the following structure. The top four folders are data: contains all data sets. A "data set" is all the data files and setup files for a particular data collection run. export: is a repository for compressed archive folders. Data sets are moved here before distribution or archive. isardaq: contains all software for the DAQ4. refs: Contains this manual, the ISAR manual, and other useful data. www: are the html and other files that make up the DAQ4 description. (Go to Table of Contents) DAQ4—ISAR6 Manual— October 1, 2011 9.2 25 The START Command A data set is a block of observations with the same setup files and with the a common scientific purpose. A data set is defined by time. A data set is initialized by the "START" command. When the START command is entered the following folder is created Definition of a “Data Set”. ISAR/data/data_20110617T194516Z When the STARTCAL command is entered a calibration data set is created ISAR/data/datacal_20110617T194516Z The START command. (Go to Table of Contents) DAQ4—ISAR6 Manual— October 1, 2011 9.3 26 G, Begin data collection. G Command. Data Collection Screen. (Go to Table of Contents) DAQ4—ISAR6 Manual— October 1, 2011 10 27 Stop data collection & Data Export 10.1 Terminate Data Collection 10.2 Export an Archive File The Export folder. The export command. (Go to Table of Contents) DAQ4—ISAR6 Manual— October 1, 2011 11 11.1 28 Calibration Calibration System Description CASOTS 4000l/hr (67l/min = 16 gpm) with 24 VAC 50 Hz. 50 Hz is important. A transformer to convert 100 VAC to 24 VAC Probe Thermometrics #225 Hart #1504 Tweener Readout 1504 Tweener Thermistor Readout If you need more accuracy in a limited temperature range, the Model 1504 Tweener gives it to you as a thermistor readout. Thermistors are less fragile than PRTs and less likely to be impacted by mechanical shock. Thermistors are more sensitive to temperature, have faster response times, and come in many shapes for different applications. Typical accuracy of a 1504 is ś0.002 C with a resolution of 0.0001 C. Model Diameter x Length Range Drift Accuracy (Mfr.) Wires Nominal Resistance at 25 C 5642 3.18 x 229 mm (0.125 x 9 in) 0–60 C ś 0.002 C/Year Figure 16: Calibration electronics. Prepare for the Calibration. 1. Remove ISAR from the foremast. Leave all cables. Wrap unconnected cables in a plastic bag to protect from weather. 2. Service ISAR as needed. See service procedure. 3. Place the ISAR in front of the CASOTS bath. DAQ4—ISAR6 Manual— October 1, 2011 29 4. Connect the ISAR test cable. Make sure all connections to the cal system are correct. 5. Turn on AC power to the calibration system. Check the lights on the switch, hub to be sure power is on to all devices. 6. Connect the Mac Air (or a calibration PC if different) ethernet connection to the network switch on the calibration circuit. 7. Ping the calibration hub with the PingCalHub command. The ping must be successful. 8. Connect to the ISAR with the Ic command. The ISAR data lines should be correct. Note: For the calibration the ISAR view angles are 325, 280, 25, and 90 degrees. 9. Turn on the Hart temperature readout. Check that the probe is inserted into the bath properly. Check that the temperature readout is degC. 10. Check the temperature probe with the B terminal command. The readout should produce temperature records each 2 seconds. Begin the Calibration. 11. Add ice to the bath water to cool the bath to at least 10 degC. 12. Use the B terminal command and check the start temperature is low enough. End the connection with <control>-\ followed by Q; 13. If everything checks out enter STARTCAL to setup the calibration data folder (datacal...). 14. Begin data collection with the terminal command Gc. Ending the Calibration. 15. End the calibration when the water temperature exceeds 35 degC. Enter <control>-C to terminate the data collection. (Go to Table of Contents) DAQ4—ISAR6 Manual— October 1, 2011 A PARTS (Go to Table of Contents) Indented Part List Full Parts Spreadsheet Test Full Parts Spreadsheet 30 ISAR6-DAQ4 INDENTED PART LIST pn 1 1.1 1.1.1 1.1.2 1.1.3 1.1.4 1.1.5 2011 08 15 ECCN 1 2 3 4 5 6 ISAR-DAQ COMPLETE SYSTEM ISAR6 SYSTEM ISAR BLACK BODY ASSEMBLY THERMISTORS HEATER BLACK CONE PLASTIC SLEEVE CONNECTOR 1.2 1.2.1 1.2.2 1.2.3 1.2.4 1.2.4.1 1.2.4.1 1.2.4.2 SHUTTER ASSEMBLY SHUTTER MOTOR SHUTTER GEAR DRIVE BELT SHUTTER SWITCH ASSEMBLY SWITCH BLOCK SWITCH, HALL EFFECT MAGNETS 1.3 1.3.1 1.3.2 1.3.3 1.3.4 1.3.5 SCAN DRUM ASSEMBLY SCAN DRUM MOTOR ENCODER, SCAN DRUM ENCODER CONNECTION CABLE MIRROR 1.4 1.5 1.5.1 1.5.2 1.5.3 1.5.4 1.6 1.7 1.8 1.9 1.10 1.11 1.12 1.13 1.14 4 4.1 4.1.1 4.1.2 4.1.3 INFRARED RADIOMETER ELECTRONICS PACKAGE COMPUTER STACK, PC104 CONNECTION BOARD POWER CONTROL BOARD ANALOG, THERMISTOR BOARD SYSTEM THERMISTOR SET TILT-FLUXGATE COMPASS GPS PRECIP SENSOR CABLE I1 CABLE I2 UPS BOARD ANTENNA, GPS WINDOW, IR DAQ4 DATA INTERFACE RU - REMOTE UNIT GPS GPS cable POLE GPS MOUNTING DESCRIPTION Complete Isar6 and DAQ4 system delivered to JAMSTEC Isar instrument provided by SOES 3 thermistors, YSI46xxx, in each BB Gold mirror Thies Clima (modified by SOES) Lemo pigtail, length=3m, main plug, GPS, Ethernet, RS232. Lemo pigtail, length=3m, rain sensor plug Uninteruptable circuit Complete data and control interface manufactured by RMR co. Weatherproof enclosure mounted with isar Garman GPS17X, NMEA GPRMC, 10 sec rate Provided with the GPS. Modified for 3-wire rs232. Schedule 40 PVC nipple 4.1.4 4.1.5 4.1.6 4.1.7 4.1.8 4.1.9 ENCLOSURE MOUNTING PLATE BOLT, PLATE FASTENER (4) WASHER, FLAT (4) WASHER, LOK, SPLIT DIN RAILS (3 EA) Polycarbonate, 440x389x170 mm, twist latches, non-metallic hinges VJ 1614 ALUMINUM MOUNTING PLATE (MP1614A) 4.1.21 4.1.23 4.1.24 4.1.25 4.1.26 4.1.27 4.1.28 4.1.29 POWER STRIP FILTER, LINE HUB, ETHERNET DC RELAY SWITCH, NETWORK POWER SUPPLY, 15 VDC POWER SUPPLY, 24 VDC AC POWER SWITCH Three outlet power strip, International plug style AC line filter, 250 VAC, 50/60 Hz Serial to Ethernet, four RS232 and one RS485. RS485 relay module, RS485 controlled. Five port Ethernet switch DC power module, 15 V, 0.67 A output DC power module, 24 V, 2.5A output Web enabled switch, one port 4.1.40 4.1.41 TERMINAL DIN BLACK (6) TERMINAL DIN RED (2) Din rail contact module Din rail contact module 316 SS 316 SS 316 SS 316 SS DIN rails, 300 mm, 300 mm, 160 mm long 4.1.42 4.1.43 4.1.44 4.1.45 4.1.46 4.1.47 4.1.48 4.1.49 4.1.50 TERMINAL DIN ORANGE (3) TERMINAL DIN GREEN (3) TERMINAL DIN YELLOW (3) TERMINAL DIN BLUE (4) TERMINAL, DIN, GROUND (2) END CLAMPS, DIN (7) DISCONNECT, DIN TERMINAL DISCONNECT END SECTION JUMPERS, TERMINAL Din rail contact module Din rail contact module Din rail contact module Din rail contact module Din rail contact module Din clamp, screw down. 4.1.60 4.1.61 4.1.62 4.1.63 4.1.64 SCREW, DIN FASTENER (10) WASHER FLAT (10) WASHER, SPLIT LOK (10) NUT, DIN FASTENER (20) MOUNTING CLIP, DIN 316SS, M4 316SS, M4 316SS, M4 316SS, M4 Din rail mounting clip for terminal strip 4.1.70 4.1.71 4.1.72 4.1.73 4.1.75 RECEPTACLE, ETHERNET RECEPTACLE POWER CABLE FEED-THROUGH (2 EA) CABLE, AC POWER, PIGTAIL CABLE, ETHERNET, EXTERNAL Waterproof RJ45 receptacle Underwater Impulse MCBH-3MP (male pins) Heyco® Liquid Tight Cordgrips Straight-Thru, PG Hubs, 4.1.80 IRIDIUM MODEM (option) Short DIN terminals together. Molded MCIL-3FS Impulse, 1 m short pigtail to spplice onto ships cable. Weatherproof mate for RJ45 receptacle. 4.2 4.2.1 UI - USER INTERFACE COMPUTER, LAPTOP Computer and network interface components operates the RU. Mac Air laptop, OS X, Unix 4.3 4.3.1 4.3.2 CI - CAL INTERFACE BATH, CASOT CABLE I2 Temperature probe, network components,. Mates with the CASOTS bath. Water bath (from SOES) Lemo pigtail, length=3m, same as 1.1.3 but no GPS. 4.3.10 4.3.12 4.3.14 READOUT TEMPERATURE PROBE, THERMISTOR CABLE, SERIAL READOUT 4.3.16 4.3.18 4.3.20 4.3.22 4.3.28 HUB, SERIAL-TO-ETHERNET CABLE, CAT5, HUB CABLE, CAT5, COMPUTER SWITCH, ETHERNET POWER SUPPLY, 24V 4.3.30 DIN RAIL 4.4 MOUNTING FRAME Hart digital readout Hart precision probe RS232 cable, DB9 to pig tail for HUB Ethernet cable connect hub to switch Ethernet cable connect switch to PC or Ship network Power for the isar Mounting hardware and components for calibration DAQ4—ISAR6 Manual— October 1, 2011 33 (Go to Table of Contents) DAQ4—ISAR6 Manual— October 1, 2011 B 34 User Interface PC — Setup (Go to Table of Contents) This document provides a general overview of the complete installation of the Infrared Seasurface Temperature Autonomous Radiometer (ISAR) instrument and data acquisition hardware and software for the R/V MIRAI. B.1 Technician Requirements The DAQ4 PC is basically a Unix application. The operators need to be familiar with the following: • Unix/Linux and specifically the BASH shell. • Mac OS X • Basic networking principals using Unix/Linux. • Become familiar with the text editor program BBEdit. B.2 File structure. (Go to Table of Contents) The UI PC file structure should be as follows: home /data /data_20110812T041450Z /export /data_20110810T094232Z.tar.gz /isardaq /kt15 /proc /proc_cal /setup /cfg /bash /simulate /tools /perltools /socket /www /parts /AllParts /1_ISAR /4_DAQ4 daq4_spreadsheet.pdf Data folders. Typical data folder name. Tar-zip archive of data folders. Typical name of a compressed data folder. All software and setup files Heitronics bandpass data. Post-deployment processing code. Post-calibration processing code. DAQ setup files (su06 and su06c) \isar\ operation configuration files. Unix .bashrc files. Simulation software and simulate data files. Processing software modules PERL code modules. Code for TCP/IP socket. Web page for quick reference Parts spreadsheets and information. All information on parts listed in the part list. ISAR parts, manuals, etc. DAQ4 parts, manuals, etc. Complete spreadsheet for the DAQ4 system. DAQ4—ISAR6 Manual— October 1, 2011 ISAR-DAQ4_IndentedParlList.pdf /refs /slideshow /training /UserDocs B.3 35 Indented (quick look) spreadsheet. Reference documents, papers. Slideshow describing the DAQ4 system and operation. Training slide show. All user documentation used in the web pages. Steps to Setup a New PC User files install the latest user files. These can be obtained from RMR Co. It is suggested that these be provided directly from RMR Co. by email/ftp data transfer. Xcode Tools The programmer’s package “Xcode Tools” must be downloaded from the Apple Xcode Web site. It costs a small amount for the package (≈$10). The download file is very large (approx 800 MB) so allow plenty of time for the transfer. Xcode installer After the Xcode Tools package is installed, and this could take a few hours, you must run the installer package. Go to the Applications folder and double-click the “Install Xcode” application. Reboot At this time reboot the computer so the Xcode package is loaded into the operating system. MacPorts The MacPorts package is a method for downloading and installing software packages, ‘ports’, automatically and easily. Go to the MacPorts download page and follow the instructions. A good user guide is available on line. • Check the install is successful by entering “port and the reply should look like “MacPorts 1.9.2” followed by a prompt. Enter “quit” to end the port application. Terminal Configure the Terminal (Unix shell) application. • Run the Terminal window. In preferences, under the “Window” tab, set “Window Size” to Columns=155 and Rows=32. Number of rows set to 10000. • Under the “Shell” tab, Startup:Run Command field is blank. • All other settings such as color or keyboard settings can remain default. • From a terminal window use the “nano” application to edit the file named “~/.profile” so the last line containes the command “bash”. Kermit Install the Kermit software. A good site for this is via the MacUpdate site. • Download the Kermit package, kermit80212, and place it in the ~\sw\ folder. • cd to the kermit folder and run “make macosx”. • Next run the command “cp wermit /usr/bin/kermit” to place the program in the correct location. • Using ‘nano’ or other text editor create a file ~\.kermrc in the home directory with the line “prompt k>>”. • Check the install by entering “kermit” in a terminal window. You should see a prompt, “k>>”. Enter “version” and the reply should include a line with something like “C-Kermit 8.0.212 Dev.26, 20 Dec 2006, for Mac OS X 10.5.7”. • Quit kermit with the “quit” command. TeXShop The TeXShop package is useful for upgrading documentation. • TeXShop can be downloaded and installed from TexShop Home Page. DAQ4—ISAR6 Manual— October 1, 2011 36 • Additional packages are needed. Create a folder in the Unix home directory (“cd ~/”) called “~/tex/” • Copy the RMR Co. folders texstyles and texinput into this folder. These are available from RMR Co.. R The statistics and plotting package called “R” is used in some presentation and processing software. The program can be downloaded from the R Homepage. Tcl Install the Tcl/Tk package. • Use the MacPorts to install the current version. From the Terminal window enter “sudo port install tchsh8.5” • Check the install by entering “tclsh” and you should see the prompt “\%”. Enter “^C” to quit. Sharing Certain system sharing packages must be configured. From under the Apple symbol opne “System Preferences” and then, under “Internet & Wireless” open the “Sharing” folder. • Set the Computer Name to “isar6”. • Turn “Screen Sharing” on. • Under Screen Sharing go to “Computer Settings...”, select “VNC viewers may control screen with password:”, and set the password to “isar06”. • Also set “Allow access for:” to “All users.” • Next, under “Sharing,” turn “Remote Login” on and “Allow access for:” set to “All users.” Zterm Install the open source Mac terminal program Zterm. • We use the UC232A USB to RS232 driver. This is a popular and common piece of essential hardware. • The UC232A requires a driver which can be found on line. The driver comes as a ‘.rar’ file and requires a rar converter. Download the application UnRarX online. (Go to Table of Contents) DAQ4—ISAR6 Manual— October 1, 2011 C 37 DAQ Setup File NO. TAG DESCRIPTION 16 17 21 SST INTERPOLATION CORRECTION CALIBRATION OFFSET SCAN VIEW ANGLES 43 84 SERIAL HUB URL GPS HUB COM NUMBER Interpolation value from calibration. Offset value from calibration. Scan angles: BB1, BB2, Sky, Sea. These must agree with the ISAR configuration file. Hub IP number on the LAN. The hub port number (1-5) plus 10000 for the GPS serial input. Actually, unless the ISAR position on the ship is moved, only lines 16 & 17 need to be adjusted as a result of calibration. /Users/rmr/swmain/apps/ISAR4/isardaq/setup/su06.txt Saved: 11 08 12 00 40 15 1 2 3 4 … 5 6 7 8 9 10 11 12 13 14 15 16 17 18 19 20 21 22 23 24 25 26 27 28 29 30 31 32 33 34 35 36 37 38 39 40 41 42 43 44 45 46 47 Page 1 of 5 Printed For: MIke THIS FILE: su06.txt 110809, 0343Z -‐-‐-‐-‐-‐-‐-‐ EXPERIMENT SETUP -‐-‐-‐-‐-‐-‐-‐-‐-‐-‐-‐-‐ This section identifies the experiment and the experiment parameters. The instrument location, and orientation on its platform are identified. EXPERIMENT NAME: CINDY GEOGRAPHIC LOCATION: MIRAI INDIAN OCEAN PLATFORM NAME: MIRAI LOCATION ON PLATFORM: FOREMAST HEIGHT ABOVE SEA LEVEL (m): 20 APPROX SHIP TYPE: M/V SHIP NAME: MIRAI CRUISE NAME: K234-‐6 #Calibration SST INTERPOLATION CORRECTION : 1.0033 CALIBRATION OFFSET: 0.1085 # Agree with the configuration (.cfg) view angles (bb1, bb2, sky, sea) SCAN VIEW ANGLES: 280 325 35 145 MINIMUM EXPECTED LATITUDE: -‐90 MAXIMUM EXPECTED LATITUDE: 90 ## make longitude in the range 0-‐360 ## we expect the ship to be in the range [min,max] else missing MINIMUM EXPECTED LONGITUDE: 0 MAXIMUM EXPECTED LONGITUDE: 360 COMMENTS: ISAR6 DAQ4 SYSTEM Calibration i6_cal_110809 END -‐-‐-‐-‐ DATA ACQUISITION PROGRAM PARAMETERS -‐-‐-‐-‐-‐-‐-‐-‐ For testing save data with software. Normally data can be saved in an archive folder. NOTE: To set this device one can use a web browser. Go to the current IP. If you don't know the current IP it is easiest to use a Windows PC and VXComm.exe. You need to always know the current IP address. SERIAL HUB URL: 128.20.8.12 SERIAL HUB OFFSET: 10000 -‐-‐-‐-‐ DATA FILES -‐-‐-‐-‐-‐-‐-‐-‐-‐-‐-‐-‐-‐-‐-‐-‐-‐-‐-‐-‐-‐ /Users/rmr/swmain/apps/ISAR4/isardaq/setup/su06.txt Saved: 11 08 12 00 40 15 48 49 50 51 52 53 54 55 56 57 58 59 60 61 62 63 64 65 66 67 68 69 70 71 72 73 74 75 76 77 78 79 80 81 82 83 84 85 86 87 88 89 90 91 92 93 94 95 Page 2 of 5 Printed For: MIke Data are written into a subdirectory under the current working directory. Usually this is called "data." DATA OUTPUT PATH: data MISSING VALUE: -‐999 ISAR-‐RT OUT PATH: data -‐-‐-‐-‐ TCM SETUP -‐-‐-‐-‐-‐-‐-‐-‐-‐-‐-‐-‐-‐-‐-‐-‐-‐-‐-‐-‐-‐-‐ NOTE: Set the tcm for 9600 baud, 1-‐sec output, NMEA only string. $HCHDM,310.0,MP5.4R0.1X7.75Y15.11Z51.87T25.6*2D Hub number = 10004 -‐1 if no TCM 0 to simulate, '10004' for daq4 TCM HUB COM NUMBER: -‐1 TCM MODEL NUMBER: GPS17X TCM SERIAL NUMBER: ??? TCM MIN SAMPLES FOR AVG: 3 TCM AVERAGING TIME: 120 === FIXED POSITION (Under development) ==== If HUB = 0 then we can specify exact coordinates for a fixed position. TCM FIXED PITCH: 47.60329 TCM FIXED ROLL: -‐122.28797 TCM FIXED AZIMUTH: 18.1 TCM COMMENTS We are adding the TCM to the DAQ box. END -‐-‐-‐-‐ GPS SETUP -‐-‐-‐-‐-‐-‐-‐-‐-‐-‐-‐-‐-‐-‐-‐-‐-‐-‐-‐-‐-‐-‐ NOTE: Use the Garmin-‐supplied Windows program to set the 17x for 9600 baud, 5-‐sec output, GPRMC only string. Hub number = -‐1 if no GPS, Use fixed values below. 0 to simulate a GPS, '10003' for daq4 GPS HUB COM NUMBER: 10003 GPS MODEL NUMBER: GPS17X GPS SERIAL NUMBER: ??? GPS MIN SAMPLES FOR AVG: 3 GPS AVERAGING TIME: 120 === FIXED POSITION (Under development) ==== If HUB = 0 then we can specify exact coordinates for a fixed position. GPS FIXED LATITUDE: 47.60329 GPS FIXED LONGITUDE: -‐122.28797 Magnetic variation, + = East GPS FIXED VARIATION: 18.1 /Users/rmr/swmain/apps/ISAR4/isardaq/setup/su06.txt Saved: 11 08 12 00 40 15 96 97 98 99 100 101 102 103 104 105 106 107 108 109 110 111 112 113 114 115 116 117 118 119 120 121 122 123 124 125 126 127 128 129 130 131 132 133 134 135 136 137 138 139 140 141 142 143 Page 3 of 5 Printed For: MIke GPS COMMENTS The receiver is the GPS17X by Garmin. END -‐-‐-‐-‐-‐-‐ ADAM 4060 SETUP ON PDS752 HUB -‐-‐-‐-‐-‐-‐-‐-‐-‐-‐-‐-‐-‐-‐-‐-‐-‐-‐ Adam 4060 is a relay switch that controls power to the Isar. Set the hub address to 10002 485 HUB COM NUMBER: 10002 -‐-‐-‐-‐ ISAR SETUP -‐-‐-‐-‐-‐-‐-‐-‐-‐-‐-‐-‐-‐-‐-‐-‐-‐-‐-‐-‐ 0 for simulate. 10001 connected to hub port x ISAR HUB COM NUMBER: 10001 ISAR AVERAGING TIME (sec): 600 #Set up a tty port for logging data real time TTY OUTPUT: YES #Which side is the Isar mounted on. PORT or STARBOARD #Use this to compute actual viewing angle. PLATFORM SIDE: STARBOARD # (0,1,...) index. Use for calibration case CALIBRATION VIEW : 3 We want to only process certain thermistors. PROCESSING BB1 THERMISTORS: 1 2 PROCESSING BB2 THERMISTORS: 1 2 -‐-‐-‐-‐-‐-‐-‐-‐-‐-‐ ISAR CALIBRATION AND INTERNAL PARAMETERS -‐-‐-‐-‐-‐-‐-‐-‐-‐-‐-‐-‐-‐-‐-‐-‐ ISAR SERIAL NUMBER: 06 Verbose mode prints out test messages and data. VERBOSE = 1, NOT VERBOSE = 0 avgisar.pl makes a file called data/tmp.txt. VERBOSE MODE: 0 #If you want to simulate then name a raw data file. SIMULATE FILE: simulate/isar.txt ## Specifics on the Instrument ## isar01 : 01, 4832, kt15_filter_15854832.dat, I01V0555.txt ## isar04 : 04, 5339, kt15_filter_15855339.dat, I04V0355.txt KT15 SERIAL NUMBER: 10200 KT15 FILTER FILE: kt15/kt15_filter_158510200.txt MISSING VALUE: -‐999 /Users/rmr/swmain/apps/ISAR4/isardaq/setup/su06.txt Saved: 11 08 12 00 40 15 144 145 146 147 148 149 150 151 152 153 154 155 156 157 158 159 160 161 162 163 164 165 166 167 168 169 170 171 … 172 173 174 175 176 177 178 179 180 181 182 183 184 185 186 187 188 189 190 Page 4 of 5 Printed For: MIke #CAL EMIS: 0 = field use, compute e from angle, ~=1 = calibration mode CALIBRATION EMISSIVITY: 0 SEA EMISSIVITY (UNCORRECTED): 0.9870975 BLACK BODY EMISSIVITY : 1.0 APERATURE EMISSIVITY : 0.95 ## Determined during calibration. Adjusts the BB slope. CALIBRATION FILE: i04cal_101013_apl ## set Vref to 0 and the values from the 2*adc12-‐7 will be used. BB THERM VREF: 0 BB TEMP Ref R: 10000 Resistances from testing with precision resistances. See notes 090909. BB RESISTORS: 10000, 10000, 10000, 10000, 10000, 10000 # Rref for wintemp and tt8temp APPERATURE THERM REF RESISTOR: 10000 REF VOLTAGE FOR 12 BIT ADC: 4.0928 # Rref2 for four ysi apperature therms ## ISAR-‐01: 9995 9984 9997 9997 ## ISAR-‐04: 10000 10000 10000 10000 APPERATURE THERMS REF RESISTANCES: 10000 10000 10000 10000 RAW FILE RECOGNITION STRING (not case sensitive, recognize a raw data file): ^ISAR5.+\.RAW$ MAXIMUM NUMBER OF AVERAGES (Set to 1e20 for final run) : 1e20 MIN SAMPLES FOR AVG: 2 SELF-‐HEAT FLAG: 1 -‐-‐-‐-‐ SBD SETUP -‐-‐-‐-‐-‐-‐-‐-‐-‐-‐-‐-‐-‐-‐-‐-‐-‐-‐-‐-‐-‐ The sbd is connected to port 10003. If the RAD is not connected enter '0' 0 Simulate 1000x connected SBD HUB COM NUMBER: 0 SBD MODEL NUMBER: NAL_9601-‐D The serial number is written on the circuit board. UMiami unit = 300034012200640 SBD SERIAL NUMBER: 0 ## If you want to simulate SBD modem the say 'YES' ## For standard processing with a real modem say 'NO' SBD SIMULATE FLAG: NO /Users/rmr/swmain/apps/ISAR4/isardaq/setup/su06.txt Saved: 11 08 12 00 40 15 191 192 193 194 195 196 197 198 199 200 201 202 203 204 205 206 207 208 Set the SBD data TX time. When the time since the last tx > sbdsecs we transmit. SBD TX TIME SECS: 1700 Time in secs to wait before recording no data. SBD error messages at this rate. Typically 3600 NO DATA WAIT TIME: 3600 SBD COMMENTS: Iridium SBD unit for DAQ4 There is no modem in daq4 at this time. END END SETUP FILE Page 5 of 5 Printed For: MIke DAQ4—ISAR6 Manual— October 1, 2011 43 (Go to Table of Contents) DAQ4—ISAR6 Manual— October 1, 2011 D ISAR Configuration File At startup the ISAR reads an internal configuration file named ~/isar/software/isarconf.cfg which is refered to here as the “config” file. IMPORTANT OPERATIONAL LINES NO. TAG DESCRIPTION 52 53 SCAN_POS_3 SCAN_POS_4 Set the Sky view angle (35) and the number of sample to take (10) Set the Sea view view angle (145) and the number of sample to take (40) 44 /Users/rmr/swmain/apps/ISAR4/isardaq/setup/cfg/isarconf_run.txt Saved: 11 08 21 13 24 42 1 2 3 4 5 6 7 8 9 10 11 … 12 13 14 15 16 17 18 19 20 21 22 23 24 25 26 27 28 … 29 … 30 … 31 32 33 34 35 36 37 38 39 40 41 42 43 44 Page 1 of 7 Printed For: MIke # ######### ISAR configuration file for isar linux v2.x.x code base ######### General format: # comment followed by 1 line data (KEYWORD=DATA) ######### DO NOT DELETE ANY LINES FROM THIS FILE # ######### ######### 2011-‐06-‐08: W Wimmer Version 2.0.0, Revision 1 # ################### Contact information ##################### # #### Title for this deployment/configuration stating purpose of this isarconf file (str[255]) TITLE=ISAR6 OPERATION ON MIRAI, 110809 #### ICF author name, e-‐mail and telephone number (str[255]) AUTHOR=M. Reynolds [email protected] PHONE=+1 206 701 6659 #### Last Edit date of this icf file yyyy-‐mm-‐dd (str[15]) EDITDATE=2011-‐08-‐10 # LOGFILE_PATH=/data/ ################### General instrument configuration ############### # #### ISAR-‐5D serial number (int) ISARID=6 #### Date and details of last ISAR-‐5D instrument calibration date (str[255]) CALDATE=Expected bath on Mirai 110809 #### USER FLAGS: 1=condition set; 0=condition not set. # LOG_DATA -‐ log to flashcard; CALC_SST -‐ compute SSTskin; START_DIAGN -‐ diagnostic data at boot; RAW_PNI -‐ output onboard compass data; # RAW_GPS -‐ output onboard GPS data; MEAN_REC -‐ output $IS5MR data record; CAL_REC -‐ output $I5CAL record; XTEMP -‐ run BB crossing temperature routine; # ROLL_PITCH_STOP -‐ shutdown ISAR if roll or pitch limits exceeded; FREEZING -‐ shutdown ISAR if ambient temp falls below 273.15K; # ORG_WARMING -‐ wait 30 measurement cycles before measurement loops starts # For more details see manual section 7.x LOG_DATA=1 CALC_SST=0 START_DIAGN=0 RAW_PNI=0 RAW_GPS=0 MEAN_REC=0 CAL_REC=1 XTEMP=0 ROLL_PITCH_STOP=0 FREEZING=0 ORG_WARMING=1 #### Number of cycles (n) to wait after rain event has finished (time is ~n*2 /Users/rmr/swmain/apps/ISAR4/isardaq/setup/cfg/isarconf_run.txt Saved: 11 08 21 13 24 42 44… 45 46 47 48 … 49 50 51 52 53 54 55 … 56 … 57 … 58 59 60 61 62 63 64 65 66 67 68 69 70 71 72 … 73 74 75 76 77 78 79 80 81 82 83 84 85 86 Page 2 of 7 Printed For: MIke secs. Lab=60 Field= ~350) (int) ORG_OPEN_DELAY=100 #### Number of scan samples when closed on BB1 & BB2 ORG_SCAN_SAMPLES=500 #### Configure ISAR measurement angles (angle in degrees, number of samples). Up to 10 positions can be sequentially set. # Angles 280.0 & 325.0 must be set for BB on position 1 and 2. SCAN_POS_1=280.0,30 SCAN_POS_2=325.0,30 SCAN_POS_3=35.0,10 SCAN_POS_4=145.0,40 #### Defining variables that will be used to calculate SSTskin temperature; # SEAVIEW_POS -‐ seaview scandrum position; SKYVIEW_POS -‐ skyview scandrum position; EMISSIVITY -‐ seawater emissivity; RMR_CORR -‐ RMR x correction factor; # VREF -‐ reference voltage (0 if using internal voltage); RREF -‐ reference resistance; #INTBB_EMISSIVITY -‐ internal BB emissivity; SELFHEAT_CORR -‐ self heating correction on/off; SEAVIEW_POS=3 SKYVIEW_POS=2 EMISSIVITY=0.991635 RMR_CORR=1.0 VREF=0.0 RREF=10000.0 INTBB_EMISIVITY=0.9993 SELFHEAT_CORR=0 #### Heated (Active) blackbody (1 or 2; Normally 2 unless changed by user) HOTBB=2 # ################### External RS485 configuration ############### # #### Up to 8 External RS485 devices can be sequentially defined. # RS485_n_NAME -‐ label for device; RS485_n_ADDRESS -‐ RS485 address; RS485_n_COMMAND -‐ device specific read command; #RS485_1_NAME=RhoPD_D1102_CM11_Solarimeter, #RS485_1_ADDRESS=4 #RS485_1_COMMAND=$4RD # #RS485_2_NAME=RhoPD_D1102_PIR_Eppley #RS485_2_ADDRESS=T #RS485_2_COMMAND=$TRD # #RS485_3_NAME=RhoPD_D5132_PIR_Eppley #RS485_3_ADDRESS=U #RS485_3_COMMAND=$URB # #RS485_4_NAME=RhoPD_D5112_PAR #RS485_4_ADDRESS=A /Users/rmr/swmain/apps/ISAR4/isardaq/setup/cfg/isarconf_run.txt Saved: 11 08 21 13 24 42 87 88 89 90 91 92 93 94 95 96 97 98 99 100 101 102 103 104 105 106 107 … 108 109 … 110 111 112 113 114 115 116 117 118 119 120 121 122 123 124 125 126 127 128 129 130 131 132 Page 3 of 7 Printed For: MIke #RS485_4_COMMAND=$ARD # #RS485_5_NAME=AD_Converter #RS485_5_ADDRESS=01 #RS485_5_COMMAND=#01 ################### PNI compass configuration ############### # #### PNI sensor pitch warning limit (deg) (float) PITCH_LIMIT=20.0 #### PNI sensor roll warning limit (deg) (float) ROLL_LIMIT=20.0 #### PNI compass serial number (str[80]) PNI_SN=9824_(v2.82) # ################### ORG configuration ############### # #### Optical rain guage serial number (str[80]) ORG_SN=0508501 #### SCTI Optical rain guage description (str[128]) ORG_MODEL=Thies 5.4103.20.041 #### Optical rain guage rain voltage threshold below which shutter is closed (float). Lab=1.0, Field= ~0.054 ORG_MEAN_LIMIT=1.5 #### Optical rain guage rain voltage standard deviation above which shutter is closed (float). Lab=1.0, Field= ~0.002 ORG_SD_LIMIT=0.25 #### ORG history (str[128]) ORG_COMMENT=new model # ################### A2 Encoder configuration ############### # #### US-‐DIGITAL A2 Encoder serial number (str[80]) ENCODER_SN=21363 #### A2 encoder reference position (float,deg) ENCODER_REF=0.0 #### A2 encoder park angle (normally over lower blackbody) (float,deg) ENCODER_PARK=280.0 ENCODER_BAUD=9600 ENCODER_RESOLUTION=14400 # ################### Optical component configuration ############### # #### ISAR-‐5D mirror serial number (str[80]) MIRROR_SN=OFR-‐MR-‐25-‐20 (2011-‐05-‐30) #### ISAR-‐5D window serial number (str[80]) WINDOW_SN=CRYSRTAN-‐ZNSE bbar batch 24827 (2011-‐07-‐22) # ########################## Motor configuration ################### /Users/rmr/swmain/apps/ISAR4/isardaq/setup/cfg/isarconf_run.txt Saved: 11 08 21 13 24 42 133 134 135 136 137 138 139 140 141 142 143 144 145 146 147 148 149 150 151 152 153 154 155 … 156 157 … 158 159 … 160 … 161 … 162 … 163 164 … 165 166 167 168 169 170 171 172 173 Page 4 of 7 Printed For: MIke # #### ISAR-‐5D scan drum drive motor and gearbox serial number (str[80]) SCAN_MOTOR=MAXON-‐A-‐Max 110926 Installed on: 2011-‐04-‐21 #### ISAR-‐5D shutter drive motor and gearbox serial number (str[80]) SHUTTER_MOTOR=MAXON-‐A-‐Max 110926 Installed on: 2011-‐04-‐21 # ########################## GPS configuration ################### # #### Trimble GPS board serial number (str[80]) GPS_SN=85843798 (Lassen SK8) GPS_BAUD=4800 # ########################## KT15 configuration DO NOT ALTER !!################### # #### KT15.85D Serial number (int) KT15_SN=10200 #### Date and details of KT15.85D last calibration (str[255]) KT15_CAL=2010-‐27-‐11, Polynomials for R2T & T2R: TJ Nightingale #### KT15 emissivity setting command (0.001 -‐> 1.000) (str[15]) KT15_CMD_EMISIVITY=EPS 1.000 #### KT15 response setting command (0.05, 0.1, 0.3, 1 3 or 10 seconds) (str[15]) KT15_CMD_RESP=RESP 1.0 #### KT15 analog output setting command (DO NOT ALTER WITHOUT CONSIDERATION TO CONSEQUENCES) (str[30]) KT15_CMD_ANALOG=ANALOG -‐100.0 50.0 C 3 #### KT15 serial interface setting (DO NOT ALTER WITHOUT CONSIDERATION TO CONSEQUENCES) (str[20]) KT15_CMD_SERIAL=COM 96 8 1 n #### KT15 Temperature to Radiance coefficients based on kt15 filter response (-‐1 not used) (double[9]) KT15_COEFF_T2R=-‐22.925646e0,65.196703e0,-‐81.215855e0,56.792568e0,-‐21.105313e0,3. 2575460e0,-‐1.0,-‐1.0,-‐1.0 #### Radiance to Temperature coefficients based on kt15 filter response (-‐1 not used) (double[9]) KT15_COEFF_R2T=273.15973e0,54.529628e0,10.634341e0,2.0172007e0,3.6480705e-‐1,5. 7776974e-‐2,6.5293295e-‐3,3.5814663e-‐4,-‐1.0 # ########################## Electronics configuration DO NOT ALTER !!################### #### CPU BOARD CPU_BOARD_DESC=ARCOM TITAN CPU_BOARD_SN=2 #### COM BOARD COM_BOARD_DESC=DIAMOND SYSTEMS EMM COM_BOARD_SN=2 #### AD BOARD AD_BOARD_DESC=DIAMOND SYSTEM DMM AD_BOARD_SN=2 /Users/rmr/swmain/apps/ISAR4/isardaq/setup/cfg/isarconf_run.txt Saved: 11 08 21 13 24 42 174 175 176 177 178 179 180 181 182 183 184 185 186 187 188 189 190 191 192 … 193 … 194 … 195 196 197 198 … 199 … 200 … 201 202 203 204 … 205 … 206 … 207 208 209 210 211 212 Page 5 of 7 Printed For: MIke #### POWER BOARD POWER_BOARD_DESC=NOCS POWER_BOARD_SN=P2-‐RevB #### THERM BOARD THERM_BOARD_DESC=NOCS THERM_BOARD_SN=T2-‐RevB #### Serial number of CFCard (char[10]) e.g., SOC001 FLASHCARD=NOC005F # ########################## Black body #1 configuration ################### # #### BB1 serial number (int) BB1_SN=11 #### BB1 description (str[128]) BB1_DESC=See ISAR-‐BB-‐Configuration.doc for history #### BB1 thermistor 1 serial number (str[80]) BB1_THERM1_SN=ISAR-‐TH10-‐11032 #### BB1 Thermistor 1 description (str[128]) BB1_THERM1_DESC=YSI NASA grade 46041 0.05K intercahngable thermistor with standard YSI calibration #### BB1 Thermistor 1 calibration coeficients: Range 268.16 -‐>338.16K, -‐1.0 not used(double[10]) BB1_THERM1_COEFF=1.0271173e-‐3, 2.3947051e-‐4, 1.5532990e-‐7,-‐1.0,-‐1.0,-‐1.0,-‐1.0,-‐1.0,-‐1.0,-‐1.0 #### BB1 thermistor 2 serial number (str[80]) BB1_THERM2_SN=ISAR-‐TH11-‐11032 #### BB1 Thermistor 2 description (str[128]) BB1_THERM2_DESC=YSI NASA grade 46041 0.05K intercahngable thermistor with standard YSI calibration #### BB1 Thermistor 2 calibration coeficients: Range 268.16 -‐>338.16K, -‐1.0 not used(double[10]) BB1_THERM2_COEFF=1.0271173e-‐3, 2.3947051e-‐4, 1.5532990e-‐7,-‐1.0,-‐1.0,-‐1.0,-‐1.0,-‐1.0,-‐1.0,-‐1.0 #### BB1 thermistor 3 serial number (str[80]) BB1_THERM3_SN=ISAR-‐TH12-‐11032 #### BB1 Thermistor 3 description (str[128]) BB1_THERM3_DESC=YSI NASA grade 46041 0.05K intercahngable thermistor with standard YSI calibration #### BB1 Thermistor 3 calibration coeficients: Range 268.16 -‐>338.16K, -‐1.0 not used(double[10]) BB1_THERM3_COEFF=1.0271173e-‐3, 2.3947051e-‐4, 1.5532990e-‐7,-‐1.0,-‐1.0,-‐1.0,-‐1.0,-‐1.0,-‐1.0,-‐1.0 # ########################## Black body #2 configuration ################### # #### BB2 serial number (int) BB2_SN=12 #### BB2 description (str[128]) /Users/rmr/swmain/apps/ISAR4/isardaq/setup/cfg/isarconf_run.txt Saved: 11 08 21 13 24 42 213 214 215 216 217 … 218 … 219 … 220 221 222 223 … 224 … 225 … 226 227 228 229 … 230 … 231 … 232 233 … 234 235 236 237 238 … 239 … 240 … 241 242 243 244 … 245 … Page 6 of 7 Printed For: MIke BB2_DESC=See ISAR-‐BB-‐Configuration.doc for history #### BB2 thermistor 1 seriall number (str[80]) BB2_THERM1_SN=ISAR-‐TH04-‐11032 #### BB2 Thermistor 1 description (str[128]) BB2_THERM1_DESC=YSI NASA grade 46041 0.05K intercahngable thermistor with standard YSI calibration #### BB2 Thermistor 1 calibration coeficients: Range 268.16 -‐>338.16K, -‐1.0 not used(double[10]) BB2_THERM1_COEFF=1.0271173e-‐3, 2.3947051e-‐4, 1.5532990e-‐7,-‐1.0,-‐1.0,-‐1.0,-‐1.0,-‐1.0,-‐1.0,-‐1.0 #### BB2 thermistor 2 serial number (str[80]) BB2_THERM2_SN=ISAR-‐TH05-‐11032 #### BB2 Thermistor 2 description (str[128]) BB2_THERM2_DESC=YSI NASA grade 46041 0.05K intercahngable thermistor with standard YSI calibration #### BB2 Thermistor 2 calibration coeficients: Range 268.16 -‐>338.16K, -‐1.0 not used(double[10]) BB2_THERM2_COEFF=1.0271173e-‐3, 2.3947051e-‐4, 1.5532990e-‐7,-‐1.0,-‐1.0,-‐1.0,-‐1.0,-‐1.0,-‐1.0,-‐1.0 #### BB2 thermistor 3 serial number (str[80]) BB2_THERM3_SN=ISAR-‐TH06-‐11032 #### BB2 Thermistor 3 description (str[128]) BB2_THERM3_DESC=YSI NASA grade 46041 0.05K intercahngable thermistor with standard YSI calibration #### BB2 Thermistor 3 calibration coeficients Range 268.16 -‐>338.16K, -‐1.0 not used(double[10]) BB2_THERM3_COEFF=1.0271173e-‐3, 2.3947051e-‐4, 1.5532990e-‐7,-‐1.0,-‐1.0,-‐1.0,-‐1.0,-‐1.0,-‐1.0,-‐1.0 # ########################## Instrument Thermistor configuration ################### # #### Window thermistor serial number (str[80]) WINDOW_THERM_SN=LOT:04A0423 #### Window thermistor description (str[128]) WINDOW_THERM_DESC=Window; YSI NASA grade 46041 0.05K interchangable thermistor with standard YSI calibration #### Window thermistor calibration coeficients: Range 268.16 -‐>338.16K, -‐1.0 not used(double[10]) WINDOW_THERM_COEF=1.0271173e-‐3, 2.3947051e-‐4, 1.5532990e-‐7,-‐1.0,-‐1.0,-‐1.0,-‐1.0,-‐1.0,-‐1.0,-‐1.0 #### Channel A thermistor serial number (str[80]) THERM_A_SN=LOT:04A0423 #### Channel A thermistor description (str[128]) THERM_A_DESC=Channel A; YSI NASA grade 46041 0.05K interchangable thermistor with standard YSI calibration #### Channel A thermistor calibration coeficients: Range 268.16 -‐>338.16K, -‐1.0 not used(double[10]) /Users/rmr/swmain/apps/ISAR4/isardaq/setup/cfg/isarconf_run.txt Saved: 11 08 21 13 24 42 246 … 247 248 249 250 … 251 … 252 … 253 254 255 256 … 257 … 258 … 259 260 261 262 … 263 264 … 265 266 267 Page 7 of 7 Printed For: MIke THERM_A_COEF=1.0271173e-‐3, 2.3947051e-‐4, 1.5532990e-‐7,-‐1.0,-‐1.0,-‐1.0,-‐1.0,-‐1.0,-‐1.0,-‐1.0 #### Channel B thermistor serial number (str[80]) THERM_B_SN=LOT:04A0423 #### Channel B thermistor description (str[128]) THERM_B_DESC=THERM_A_SN=Channel B; YSI NASA grade 46041 0.05K interchangable thermistor with standard YSI calibration #### Channel B thermistor calibration coeficients: Range 268.16 -‐>338.16K, -‐1.0 not used(double[10]) THERM_B_COEF=1.0271173e-‐3, 2.3947051e-‐4, 1.5532990e-‐7,-‐1.0,-‐1.0,-‐1.0,-‐1.0,-‐1.0,-‐1.0,-‐1.0 #### Channel C thermistor serial number (str[80]) THERM_C_SN=LOT:04A0423 #### Channel C thermistor description (str[128]) THERM_C_DESC=Channel C; YSI NASA grade 46041 0.05K interchangable thermistor with standard YSI calibration #### Channel C thermistor calibration coeficients: Range 268.16 -‐>338.16K, -‐1.0 not used(double[10]) THERM_C_COEF=1.0271173e-‐3, 2.3947051e-‐4, 1.5532990e-‐7,-‐1.0,-‐1.0,-‐1.0,-‐1.0,-‐1.0,-‐1.0,-‐1.0 #### Channel D thermistor serial number (str[80]) THERM_D_SN=LOT:04A0423 # KT15 !!! #### Channel D thermistor description (str[128]) THERM_D_DESC=Channel D; YSI NASA grade 46041 0.05K interchangable thermistor with standard YSI calibration #### Channel D thermistor THERM_D_COEF=1.0271173e-‐3, 2.3947051e-‐4, 1.5532990e-‐7,-‐1.0,-‐1.0,-‐1.0,-‐1.0,-‐1.0,-‐1.0,-‐1.0 # ######################## EOF ###################################### DAQ4—ISAR6 Manual— October 1, 2011 52 (Go to Table of Contents) DAQ4—ISAR6 Manual— October 1, 2011 E 53 BASHRC Unix Setup File (Go to Table of Contents) The DAQ software makes much use of the >bashrc setup file. A set of alias commands and environmental variables are used for the software. /Users/rmr/swmain/apps/ISAR4/isardaq/setup/bash/bashrc_air.txt Saved: 11 08 12 00 40 15 1 2 3 4 5 6 7 8 9 10 11 12 13 14 15 16 17 18 19 20 21 22 23 24 25 26 27 28 29 30 31 32 33 34 35 36 37 38 39 40 41 42 43 44 45 46 47 48 Page 1 of 3 Printed For: MIke export PS1='\w/$ ' # ~/.bashrc # executed by login and subshells alias myalias='less ~/.bashrc' #====== ISAR =========================================================== # The path might be to the mem stick. "/Volumes/TD04/ISAR" "$HOME/ISAR" export ISARFOLDER="/Volumes/TD04/ISAR" # NETWORK export IPPC="128.20.8.10" export IPISAR="128.20.8.11" export IPHUB="128.20.8.12" export IPIBOOT="128.20.8.13" export IPCAL="128.20.8.14" export MYMASK="255.255.0.0" export MYGATEWAY="128.20.1.240" export MYDNS="128.20.1.1" # PERL LIBRARY export MYLIB=$ISARFOLDER"/tools" export MYDATAPATH=$ISARFOLDER"/data" export MYDAQPATH=$ISARFOLDER"/isardaq4" # SETUP FILE NAME # 'c' is a calibrate version export SETUPFILE=$MYDAQPATH"/setup/su06.txt" export SETUPCALFILE=$MYDAQPATH"/setup/su06c.txt" export RUNSETUPFILE=$SETUPFILE; # PATH CALLS isarpath=$MYDAQPATH alias gtisar='cd $isarpath' alias gtdaq4='cd $isarpath' # SETUP EDIT CALLS # BACKUP SETUP alias BUsu="cp $SETUPFILE $SETUPFILE.bu" alias EDsu='open -‐a BBEdit.app $SETUPFILE' alias edsu='cd $isarpath; ./ChangeSetup.pl' alias EDsuc='open -‐a BBEdit.app $SETUPCALFILE' alias edsuc='cd $isarpath; ./ChangeCalSetup.pl' /Users/rmr/swmain/apps/ISAR4/isardaq/setup/bash/bashrc_air.txt Saved: 11 08 12 00 40 15 49 50 51 52 53 54 55 56 57 58 59 60 61 62 63 64 65 66 67 68 69 70 71 72 73 74 75 76 77 78 79 80 81 82 83 84 85 86 87 88 89 90 91 92 93 94 95 96 Page 2 of 3 Printed For: MIke # START CALLS alias START="cd $isarpath; ./PrepareForRun.pl; export RUNSETUPFILE=\`cat tmp\`" alias STARTCAL="cd $isarpath; ./PrepareCalRun.pl; export RUNSETUPCALFILE=\`cat tmp\`" # RUN CALLS alias G='cd $isarpath; ./G.ex $RUNSETUPFILE' alias Gc='cd $isarpath; ./Gc.ex $RUNSETUPCALFILE' # EXPORT alias Export="cd $MYDATAPATH; perl $MYDAQPATH/TarDataSet.pl;" # PROCESS CALIBRATION #alias ProcCal="cd $isarpath/proc_cal; ./0_ProcCal.sh; export PROCCALPATH=`cat tmpcalfolder`" # TEST CALLS alias I='cd $isarpath; ./term_to_isar.ex $SETUPFILE' alias Ic='cd $isarpath; ./term_to_isar.ex $SETUPCALFILE' alias N='cd $isarpath; ./term_to_nal.ex $SETUPFILE' alias P='cd $isarpath; ./term_to_gps.ex $SETUPFILE' alias B='cd $isarpath; ./term_to_bath.ex $SETUPCALFILE' alias iBoot="Safari http://192.168.1.2" alias IsarOn="cd $isarpath; ./IsarPwr.ex $Setup ON" alias IsarOff="cd $isarpath; ./IsarPwr.ex $Setup OFF" alias IsarCycle="cd $isarpath; ./IsarPwr.ex $Setup CYCLE" alias IsarState="cd $isarpath; ./IsarPwr.ex $Setup state" alias PingHub="ping $IPHUB" alias PingiBoot="ping $IPIBOOT" alias PingCal="ping IPCAL" alias PingIsar="ping $IPISAR" alias PingMe="ping $IPPC" #========================================================================== # RUN APPS alias Safari='open -‐a Safari' alias Bbedit='open -‐a /Applications/BBEdit.app' alias me='Bbedit' alias Finder='open -‐a Finder.app ' alias Finder4='open -‐a Finder.app $isarpath' ## HELP FILES alias mh='less ~/swmain/Unix/myhelp/myhelp_general' # EDIT HELP FILES /Users/rmr/swmain/apps/ISAR4/isardaq/setup/bash/bashrc_air.txt Saved: 11 08 12 00 40 15 97 98 99 100 101 102 103 104 105 106 107 108 109 110 111 Page 3 of 3 Printed For: MIke alias rcedit='me ~/.bashrc' # UTILITIES alias ll='ls -‐ltF' alias shutdn='expect ~/swmain/expect/misc/Shutdown.ex' alias reboot='expect ~/swmain/expect/misc/Reboot.ex' alias Top="top -‐u -‐s5" alias Ps="ps -‐axrf | more" # NOTE FILES #notepath='/Volumes/mike6440/RMRCO/NOTES'; #alias isar6notes="cd /Volumes/mike6440/RMRCO/PRODUCTS/isar6_system; echo -‐-‐-‐-‐-‐-‐-‐-‐-‐-‐-‐-‐-‐-‐-‐ >> isa DAQ4—ISAR6 Manual— October 1, 2011 57 (Go to Table of Contents) DAQ4—ISAR6 Manual— October 1, 2011 F F.1 58 Miscellaneous Problems and Procedures Shutter Gear Runs Off the End of the Belt There is a gap between the shutter belt and the rubber stopper. Sometimes, by accident, the shutter is run too far and the gear moves into the gap. Then the gear spins. Solution. When the gear is turning, move the shutter by hand so it engages the belt. Actually this should not happen in normal operation. In test mode it is possible to run the motor until this occurs. (Go to Table of Contents) DAQ4—ISAR6 Manual— October 1, 2011 G 59 Software Overview Figure 17: gram. Software block dia- (Go to Table of Contents) DAQ4—ISAR6 Manual— October 1, 2011 60 Figure 18: Calibration Software block diagram. DAQ4—ISAR6 Manual— October 1, 2011 H 61 Glossary ASCII CASOTS The American Standard Code for Information Interchange is a character-encoding scheme based on the ordering of the English alphabet. The same as a ‘text’ file. The portable water bath calibration system developed by SOES. CLIENT/SERVER Client/server describes the relationship between two computer programs in which one program, the client, makes a service request from another program, the server, which fulfills the request. Although the client/server idea can be used by programs within a single computer, it is a more important idea in a network. DAQ4 The data acquisition hardware and software developed by RMR Co. to support installation of ISAR6 and provide computed SSST to local data collection. DIN DIN is an acronym for Deutsche Institute fuer Normung, a German standardization body and member of the International Standards Organization (ISO). DIN rails and mounting hardware are standard mounting equipment for a variety of electronic components, including terminal blocks to connect wiring. DIN rails and DIN mounting hardware are internationally approved, industry standard hardware for a vast array of components made by computer manufacturers. DIN rail terminal blocks also offer grounding and disconnecting capability and provide self-locking clamps to ensure a tight connection. DIN Rail A DIN rail is a metal rail of a standard type widely used for mounting circuit breakers and industrial control equipment inside equipment racks. The term applies to multiple similar standards. EXPECT Expect is a Unix automation and testing tool, written by Don Libes as an extension to the Tcl scripting language, for interactive applications such as telnet, ftp, passwd, fsck, rlogin, tip, ssh, and others. It uses Unix pseudo terminals to wrap up subprocesses transparently, allowing the automation of arbitrary applications that are accessed over a terminal. HUB A HUB in the DAQ is a device that concentrates several serial communication lines (RS232, RS422, RS485) into a single Ethernet IP port. ISAR Infrared Seasurface Temperature Autonomous Radiometer (ISAR) ISAR6 The particular ISAR system introduced after ISAR SN# 6. KERMIT Kermit software offers interactive and scripted file transfer and management, terminal emulation, Unicodeaware character-set conversion, and/or Internet security MATLAB Matlab is a numerical computing environment and fourth-generation programming language. Developed by MathWorks, MATLAB allows matrix manipulations, plotting of functions and data, implementation of algorithms, creation of user interfaces, and interfacing with programs written in other languages, including C, C++, and Fortran. MODEM The “modem” is an interface to the Iridium SBD data system. The DAQ4 has all connectors and software to add the NAL 9602 modem. NIST The National Institute of Standards and Technology (NIST), known between 1901 and 1988 as the National Bureau of Standards (NBS), is a measurement standards laboratory which is a non-regulatory agency of the United States Department of Commerce. PERL Perl is a high-level, general-purpose, interpreted, dynamic programming language. Since it was developed in the mid-eightys, it has undergone many changes and revisions and become widely popular amongst programmers. The language provides powerful text processing facilities without the arbitrary data length limits of many contemporary Unix tools, facilitating easy manipulation of text files. RU The RU is the remote Unit of the DAQ4. It is located in an unsheltered area close to the ISAR and provides an interface between the ISAR and the User Interface (UI). SBD SETUP FILE SOES Southampton Ocean and Environment School. The company that makes the ISAR. SSST Sea surface skin temperature. The temperature of the, approximately, 10µm of the ocean surface. SWITCH UI A network switch or switching hub is a computer networking device that connects network segments. The User Interface (UI) is the part of the DAQ4 that controls the RU, collects and processes data, and computes SSST for the data system. (Go to Table of Contents) DAQ4—ISAR6 Manual— October 1, 2011 62 References Donlon, C., I. Robinson, M. Reynolds, W. Wimmer, G. Fisher, R. Edwards, and T. Nightingale, An infrared sea surface temperature autonomous radiometer (isar) for deployment aboard volunteer observing ships (vos)), Journal of Atmospheric and Oceanic Technology, 25(1), 93–113, 2008. (Go to Table of Contents)