1
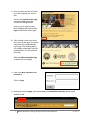
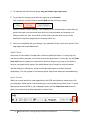
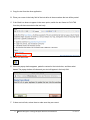
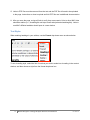
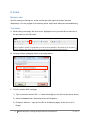
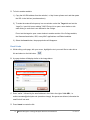
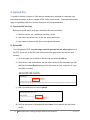
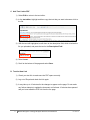
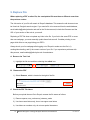
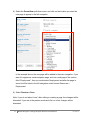
Drupal Basics User Manual
Mount Holyoke College
7/29/2013
Author: Theresa Chamberland
This user manual describes how to use Drupal to update your section of the Mount
Holyoke College website and covers topics such as logging in, creating new webpages,
and the basic information you need to use Drupal successfully.
Contents
1. Overview ................................................................................................................................ 3 Why this CMS is called Drupal .............................................................................................. 3 2. Help........................................................................................................................................ 4 Access ................................................................................................................................... 4 Workshops ............................................................................................................................. 4 Login .................................................................................................................................... 4 Off-Campus Login ................................................................................................................. 4 On-Campus Login ................................................................................................................. 4 3. Regions .................................................................................................................................. 6 4. Find Content .......................................................................................................................... 7 5. Edit Content ........................................................................................................................... 8 Edit Existing Pages ................................................................................................................ 8 Spell Check ......................................................................................................................... 10 Input Format ........................................................................................................................ 10 Text Styles ........................................................................................................................... 12 6. Links..................................................................................................................................... 13 Broken Links ........................................................................................................................ 13 Text Links ............................................................................................................................ 13 Email Links .......................................................................................................................... 14 7. Images ................................................................................................................................. 15 Images on Standard Pages ................................................................................................. 15 8. Upload File ........................................................................................................................... 16 9. Replace File ......................................................................................................................... 18 10. Revisions ........................................................................................................................... 19 11. Content Types.................................................................................................................... 20 12. Create New Standard Page ............................................................................................... 21 13. Log Out .............................................................................................................................. 23 14. Conclusion ......................................................................................................................... 23 15. Glossary ............................................................................................................................. 23 2
Mount Holyoke College Drupal Basics User Manual
07/29/13
1. Overview
Drupal is the Web content management system, which the College uses to update and maintain
official College websites. When visitors view a page, Drupal pulls the relevant bits of content
from the database and composes all of the components of the page in a template. This makes it
easy to quickly add or change content, without requiring knowledge of HTML or other Web
technologies on the part of the user (person providing the content). Most of the content on a
Drupal-based site is stored in a database. Users fill in forms via a web browser to add text and
images or to upload files such as PDF’s or documents.
Download the most recent version of this user manual: http://www.mtholyoke.edu/web/
This MHC Drupal User Manual contains proprietary information. It is the express property of
Mount Holyoke College and is to be used exclusively for creating, updating, and expanding
Mount Holyoke College websites by authorized MHC community only. This document is not for
distribution in any form outside the College without permission.
Why this CMS is called Drupal
Drupal is an English rendering of the Dutch word "druppel", which means "drop" (as in "a water
droplet"). The name was taken from the now-defunct Drop.org website, whose code slowly
evolved into Drupal. Dries Buytaert [the developer) wanted to call the site "dorp" (Dutch for
"village") for its community aspects, but mistyped it when checking the domain name and
thought the error sounded better. [Source: Wikipedia]
3
Mount Holyoke College Drupal Basics User Manual
07/29/13
2. Help
If you need help in Drupal, email the College Web Team: [email protected] rather than
writing to one individual, as the mail list goes to the full web team (LITS and Communications)
and our students.
Access
To obtain access to Drupal, send an email to: [email protected]; include the name of the
department(s) you maintain. You must attend an Introduction to Drupal workshop before you will
be given access to Drupal.
Workshops
Information about Drupal workshops is available online: www.mtholyoke.edu/go/drupalworkshop
Login
Before you can add or edit content on your section of the College website, you need to attend
Drupal training. If you work on more than one section of the College site, inform the trainer so
they will give you access to all the sections you maintain on the College website.
Off-Campus Login
To access Drupal off-campus, you will log into Drupal the same way you do on-campus.
On-Campus Login
You may use any platform (i.e., PC or Mac) and any Web browser (i.e., Firefox, Internet
Explorer, Safari, Chrome, etc.) to work in Drupal.
To log into Drupal, from on or off campus, follow the instructions on the next page.
4
Mount Holyoke College Drupal Basics User Manual
07/29/13
A. Once you have access to Drupal,
go to the webpage you want to
edit.
Scroll to the bottom of the page,
and select login (below the
contact the College details.
Note: you may login from any
MHC webpage that has includes
login at the bottom of the page.
B. After clicking on the login link at
the bottom of the page, you will be
redirected to the authentication
login page. This landing page is
five-college collaboration used for
authentication, do not bookmark
this page.
Select the Mount Holyoke logo
at the bottom of the page.
C. Enter your MHC username and
password.
Click on login.
D. After you click on login, you should see your workbench screen, which looks
similar to this:
5
Mount Holyoke College Drupal Basics User Manual
07/29/13
3. Regions
To help you find your way around in Drupal, become familiar with the regions assigned to each
section of the page. Each webpage is broken down into regions, such as:
•
•
•
•
Banner image (not all sections of the MHC site have banner images)
Left navigation
Body/Content
Third column/Callouts
6
Mount Holyoke College Drupal Basics User Manual
07/29/13
4. Find Content
Once logged into Drupal, you should be able to navigate to any page in your menus to edit/view
your pages. Some pages may not be linked to a menu item, such as your left navigation.
To get to a specific page, you may navigate to the page as you would in a web browser or you
can search for your content:
A.
Select Find Content
B.
In the Find content display, complete one or more of these fields:
A.
B.
C.
D.
Title = About (add key word if you don’t know exact title)
Type = Standard Page (you also may choose Any)
Sections = About MHC (you leave this blank)
Select Apply (required)
C. Add a key word or title in the Title field, i.e. Why a Woman’s College?
A
B
C
D
D. You are now ready to edit the page; select edit to go directly to the edit section of the page
to make changes or select the page title link to view the page.
7
Mount Holyoke College Drupal Basics User Manual
07/29/13
5. Edit Content
This section covers making changes to existing content on the website.
When editing a page, there are several components that may be updated, including:
•
•
•
•
•
•
Title
Section
Body (where the main content is locate)
Revision information
File attachments
Images
Edit Existing Pages
Time Out Warning: there is a time-out feature that may log you out while editing a page in
Drupal. When using the text editor on a single page for more than an hour, Drupal may log you
out. If you need to do a lot of edits to a page, save the page after 15 minutes or long to avoid
being logged out.
When you are logged into Drupal, you will see an edit tab on pages that you are authorized to
edit. If you do not see the edit tab, you do not have access. Email [email protected] to
request access.
A. Navigate to the page you want to change and select the Edit tab; the results will look similar
to this:
8
Mount Holyoke College Drupal Basics User Manual
07/29/13
B. Scroll down to the Body section and use the text editor to make your changes.
9
Mount Holyoke College Drupal Basics User Manual
07/29/13
C. To make the text editor window larger, drag the bottom right edge corner.
D. To preview your change, scroll down the page and select Preview.
This is optional; you may chose to select SAVE and then review your page.
Use the “Preview” feature carefully. Your changes will not automatically be saved after you
preview the page; you must select save after you have previewed your changes or all
changes will be lost. Also, do not click on links while in preview mode, as you will be
directed off the preview page and your changes will be lost.
E. Once you are satisfied with your change, if you selected Preview, scroll to the bottom of the
page again and hit the Save button.
Spell Check
At this time, the text editor in Drupal does not have a spellcheck feature. You may copy text
from the text editor and paste it into Word and use that spell check. If you do this, use the Paste
from word feature to paste your content from Word into Drupal or you may end up with the
fonts on your page looking messy. See details below (Input Format) for more information.
We offer training in Siteimprove, a web tool that provides reports on broken links and
misspellings. You may register for this training online: https://www.mtholyoke.edu/web/training
Input Format
When you cut and paste from other applications, the HTML produced may cause havoc with
your web page, which results in fonts showing up in your content that you don’t want. To avoid
adding fonts and bad HTML to your webpages, always use the Paste from word feature to
paste your content from another application, such as Word.
10
Mount Holyoke College Drupal Basics User Manual
07/29/13
A. Copy the text from the other application.
B. Place your cursor in the body field of the text editor in the area where the text will be pasted.
C. If the Word icon does not appear in the menu option, switch the text format to Full HTML
from the pull-down menu below the text body.
D. Select the Word icon.
E. When the popup window appears, paste the content in the text window, and then select
insert. The popup window will close and your text will appear in the body field.
F. If there are text links, review them to make sure they are correct.
11
Mount Holyoke College Drupal Basics User Manual
07/29/13
G. Links to PDF files must be removed from the text and the PDF file will need to be uploaded
to the page. Instructions on how to upload and link PDF files are in additional documentation.
H. After you save the page, review all links to verify they are accurate. Links to other MHC sites
should be relative (i.e., /acad/English not https://www.mtholyoke.edu/acad/english). Links to
non-MHC affiliated websites should open in a new window.
Text Styles
When entering headings in your articles, use the Format drop down menu as shown below:
To set a heading style, select the line of text that you wish to make into a heading in the content
window, and then choose a style from the format drop down box.
12
Mount Holyoke College Drupal Basics User Manual
07/29/13
6. Links
Broken Links
We offer training in Siteimprove, a web tool that provides reports on broken links and
misspellings. You may register for this training online: https://www.mtholyoke.edu/web/training
Text Links
A. While editing a site page, with your cursor, highlight the text you would like to make into a
link and select on the link button.
B. A popup window will display similar to the image below:
C. To link to another MHC webpage:
1) Type or paste the relative URL; i.e. /about/visit/lodging, in the link box (as shown above).
2) Select the Insert button; the popup window will disappear.
3) Exception: Athletics – copy the full URL for all Athletics pages, as this site is not in
Drupal.
13
Mount Holyoke College Drupal Basics User Manual
07/29/13
D. To link to another website:
1) Copy the full URL/address from the website; i.e. http://www.nytimes.com/ and then paste
the URL in the link box (as shown above).
2) To make the external link open up in a new window: select the Target tab and set the
“target” to “open link in new window”. MHC Protocol is to open a new window or tab
when linking to a site that is not affiliated to the College.
Do not set the target to open a new window to another section of the College website,
the Alumnae Association, ISIS, or any MHC applications or affiliated websites.
3) Select the Insert button; the popup window will disappear.
Email Links
A. While editing a site page, with your cursor, highlight the text you would like to make into a
link and select on the link button.
B. A popup window will display similar to the image below:
C. Enter “mailto:” followed by the email address in the field to the right of Link URL; i.e.
mailto:[email protected] (see above image). No spaces are allowed; otherwise the
email link will not work.
D. Press Insert to create the link.
14
Mount Holyoke College Drupal Basics User Manual
07/29/13
7. Images
Images on Standard Pages
You have two options for adding an image a standard page:
1.
2.
At the top of the page, which will align left of your text
At the bottom of the page, which will align to the left and has an optional caption field
(text will show below the image)
The process for adding the image is the same for both locations. However, an image at the top
of the page will automatically reduce in size to fit the image and text side by side.
To add an image to a page:
A. Browse for the image.
B. Select Upload. An alternative text box will appear after you select upload.
C. Add alternative text in the dialogue box below the image – this is required for all images.
This text will be used by "screen reader" software, so that a person who is listening to the
content of a webpage (for instance, a person who is blind) can interact with this element.
The College is required to add alternative text to be compliant with website guidelines under
Title II of the ADA (Americans with Disabilities). Search engines also use this text when the
image cannot be loaded.
15
Mount Holyoke College Drupal Basics User Manual
07/29/13
8. Upload File
To update or replace a version of a file that has already been uploaded to a webpage, see
instructions on page 3 on how to replace a PDF with a newer version. These instructions also
apply for uploading other files, such as Word docs or Excel spreadsheets.
A. Check the PDF file name
Before you upload the file to Drupal, rename the file name as follows:
1) Remove spaces; use_underscore_between_words
2) Use lower-case letters only; do not use upper-case letters
3) Use letters or numbers only; do not use special characters
B. Upload PDF
You will upload the PDF, save the page, and then go back into the edit mode to link to
the PDF. Do not link to the PDF until after you save the page or the link may not work
correctly.
1) Go to the page you would like to attach a file and select the edit tab.
2) Scroll down to the section below the text editor window to the area where you can
add files and select Browse and go to the document (on your computer, etc.) you
would like to upload
3) After you select your file, select Upload.
4) Scroll to the bottom of the page and select Save. Do not add the text link before
saving.
16
Mount Holyoke College Drupal Basics User Manual
07/29/13
C. Add Text Link to PDF
1) Select Edit to return to the text editor.
2) In the text editor, highlight and then copy the text that you want to become a link to
the file.
3) With the text still highlighted, scroll down to the description field, which is below the
file you uploaded, and paste the text in the Description Field.
4) Select Insert.
5) Scroll to the bottom of the page and select Save.
D. Test the New Link
1) Check your text link to make sure the PDF opens correctly.
2) Log out of Drupal and check the link again.
3) It may take up to 10 minutes for the changes to appear on the page. Do not make
any further attempts to update the document until at least 10 minutes have passed
and you have tested the PDF link from the live page.
17
Mount Holyoke College Drupal Basics User Manual
07/29/13
9. Replace File
When replacing a PDF or other file, the new/updated file must have a different name than
the previous version.
The old version of your file will remain in Drupal’s database. This means the old document can
be found via Google’s search engine. If you need a file to be removed from the web/database,
email [email protected] and ask for the file be removed, include the file name and the
URL of your section of the web in your email.
Replacing a PDF file does not update any links to the file. If you link to the same PDF on more
than one webpage, you must manually update those links as well. Consider pointing to one
page which links to one page listing your PDF’s.
Always check your live webpage after logging out of Drupal to make sure the file is 1)
working/downloading, and 2) the correct version of your file. If you experience problems with
this process, email [email protected] for assistance.
A. Remove the Text Link
1) Highlight the link text and then selecting the unlink icon.
B. Remove the PDF
1) Select Remove, which is located to the right of the file.
C. Check the PDF File Name
Before you upload the new file to Drupal, rename the file name as follows:
1) Remove spaces; use_underscore_between_words
2) Use lower-case letters only; do not use upper-case letters
3) Use letters or numbers only; do not use special characters
18
Mount Holyoke College Drupal Basics User Manual
07/29/13
D. Upload the new PDF – See instructions earlier in this manual.
E. Link to the PDF – See instructions earlier in this manual.
F. Test the New Link
1) See instructions earlier in this manual.
2) Also test the link logged out of Drupal.
3) It may take up to 10 minutes for the changes to appear on the page. Do not make any
further attempts to update the document until at least 10 minutes have passed and you
have tested the PDF link from the live page.
10. Revisions
This option allows you to retain old versions of content. If you make a mistake during your
updates, you can always revert back to a previous version.
19
Mount Holyoke College Drupal Basics User Manual
07/29/13
11. Content Types
When creating new pages, there are several types of content that may be available on your
website; however, not all content types are available for all sites.
Art Museum Basic and Home Page – for Art Museum use only.
Campus Police Basic Page – for Campus Police only.
Embedded Media – use for embedding video and photos from YouTube, Vimeo, or Flickr. This
page may contact both videos and Flickr slideshows. See how to create or edit an embedded
media page in the Beyond Basics User Manual.
Image with text – used to create a page with an unlimited set of images and text. Images will
automatically resize to a maximum width and align to the left of the text. See how to create or
edit an image with text page in the Beyond Basics User Manual.
People Pages– used for faculty, staff, student or alumnae “people pages”. See how to create or
edit a people page in the Beyond Basics User Manual.
Random Text Callout – rotating featured person used on the academic department websites.
This feature is being phased out. If you need an image removed, email
[email protected] for assistance. New images are not longer being added to these
image banks.
Standard Page – used for most webpages. See next section for instructions on how to create
or edit a new standard page.
Video Gallery – used to make a list of embedded videos (YouTube, Vimeo). Each video will
display in a lightbox and should contain a brief description. See how to create or edit a video
gallery page in the Beyond Basics User Manual.
Webform – for forms or questionnaires. You must attend a webform workshop before you may
edit or create webforms. We encourage to use Drupal for your forms rather than other
applications, such as Google forms. We provide Drupal support and we can help you update the
form, change the form owner, and retrieve the data, etc. See the Webform User Manual .
20
Mount Holyoke College Drupal Basics User Manual
07/29/13
12. Create New Standard Page
A. Select Add Content.
Once you have logged-in, you should find link called Add content at the top of your
personal menu.
Select this and you'll see a list of the types of content you can create. This list reflects the
privileges assigned to your user account or to the role your account is part of.
B. Select Standard Page from the list of content types.
1) Add the Title.
2) Select the Section.
3) The Featured Image option is not yet available.
4) Add content to the Body. Follow the steps you used to edit a page.
5) Select the Parent Item pull-down menu, and click on the location you want the
new page to appear in the left navigation.
6) Scroll to the bottom of the page and check the box to the left of Provide a menu
link; located next to Menu settings;
7) More options will appear.
21
Mount Holyoke College Drupal Basics User Manual
07/29/13
8) Select the Parent Item pull-down menu, and click on the location you want the
new page to appear in the left navigation.
In the example above, the new page will be added to the main navigation. If you
want it to appear as a sub-navigation page, such as a sub-page of the section
titled “Employment”, then you would select Employment and after the page is
saved it will be listed in the left navigation under Human Resources >
Employment.
9) Select Preview or Save.
Note: if you do not select “save” after editing or creating a page, the changes will be
discarded. If you are in the preview mode and click on a link, changes will be
discarded.
22
Mount Holyoke College Drupal Basics User Manual
07/29/13
13. Log Out
Once you have finished all of your site updates and work, log out of the system. You will find the
Log out link in the menu bar. Select the Logout link and the system will log you out.
It’s a good idea to make your edits, log out and review them when you are not logged into your
website.
14. Conclusion
There is a lot more functionality in Drupal than covered in this starter manual. This manual will
continue to expand over time.
15. Glossary
Content Management System (CMS): CMS refers to the MHC Web Content Management
System. It is the program (Drupal) that we use to create a framework for the content of our
website.
Section: The College is one website – each office, department, or program is a section of the
College website. When writing about the web (i.e., in the catalogue) you may continue to refer to
your website.
Versions: Any time a change is made to a content page, Drupal automatically saves a version
of that content, which allows content to be reverted to an earlier version.
Workbench: The workbench where you work on sections you have access, where you will find
your recent edits, and where you can search for content.
23
Mount Holyoke College Drupal Basics User Manual
07/29/13