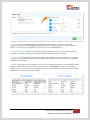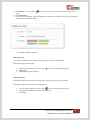
1
CUSTOMER RELATIONSHIP MANAGEMENT USER MANUAL INDEX. Sr.No 1. 2. 3. 4. 5 6. 7. 8. Topic Getting Started Free trail Login Configuring HomePage Setting up Organizational details Choose modules Modify dropdown fields Configure fields Setup Users Import existing data. List of Modules List of Settings Lead Module Entering a lead manually Quick Create Import Existing lead Capturing leads from websites Creating lead record from your email Contacts What is a contact? Creating contacts manually Quick Create Import existing data Converting leads Mapping Fields Managing Contacts Organizations What is an Organization? Creating organizations manually Quick Create Import existing data Converting leads Managing Organizations Opportunities What is an Opportunity? Converting an opportunity from a lead. Creating an opportunity from existing customer. Creating an opportunity for a new customer Creating opportunities manually Quick create Import existing data Forecast Amount Workflows Invoices What is an invoice? Creating an invoice individually Creating Invoice from a quote CRM. DONE SIMPLY. Page No. 7 8 10 12 28 40 51 65 Contact us at: [email protected] | 2 (adapted from vtiger CRM 6.0.0Beta© 2004-2013) CRM. DONE SIMPLY. 9. Quotes Creating Invoice from a sales order Creating Invoice from an opportunity Tagging Records Item details block Associating Invoice with other records What is a quote? Creating quotes individually Operations you can perform on quotes. Item details block Associating quotes with other record 69 10 Sales Orders What are sales orders? Creating sales orders individually Creating sales orders from a quote Operations you can performon sales orders Item details block Recurring Invoice Associating sales orders with other records 71 11. Purchase Orders What is a purchase order? Creating a purchase order manually Operations you can perform on purchase orders Item details block Associating purchase order with other record Home What is a Home? Widgets Report What is a Report? Creating a report Customizing report Exporting report 75 14 Campaigns What is a campaign? Creating campaigns manually Quick create Create emailing list 83 15 Projects What is a Project? Creating projects manually Quick create Importing projects from existing Exporting projects to external source Managing projects Associating projects with other records 84 12 13 77 78 Contact us at: [email protected] | 3 (adapted from vtiger CRM 6.0.0Beta© 2004-2013) CRM. DONE SIMPLY. 87 16 Products What is a Product? Create product manually Quick create Import existing data Managing products Exporting products from external source Dealing with Currencies Product Bundles 17 Services What is a Service? Create services manually. Quick create Import existing data Getting started 99 18 Price Books What is a price book? Create price book manually Quick Create Managing price books Working with price books 110 19 Trouble Tickets What is a trouble ticket? Create trouble tickets manually Quick Create Importing trouble tickets from existing files Exporting trouble tickets to external source. 112 20 Assets 115 21 Service Contracts What is a service contract? Create service contracts manually Quick Create Associate service contracts with other records Calculation of service instances 117 22 Vendors What is a vendor? Creating vendors individually Quick create Import existing data Getting started Exporting vendors to external source 119 What is an asset? Create assets manually Quick create Exporting assets to external source Managing assets Contact us at: [email protected] | 4 (adapted from vtiger CRM 6.0.0Beta© 2004-2013) CRM. DONE SIMPLY. Operations you can perform in vedors module 23 Calendar What do I see in Calendar Module? What are default views in calendar module? How do I create new Activities? Working with calendar module Calendar settings Creating custom event type 128 24 Documents What is a document? Manage Documents Working with documents Creating Folders Creating Documents Download Document 135 25 Recycle Bin What is a recycle bin? Working with recycle bin 137 26 Users 138 27 Profiles What are profiles? Creating Profiles Deleting Profiles 140 28 Roles 144 29 Sharing Rules What are sharing rules? Features Configuring organization wide sharing rules Setting up custom sharing rules 146 30 Groups 149 31 Fields & Layout Editor What is a field & a layout editor? Who are users? Adding new users Deleting users What are roles? Creating roles Assigning roles to users What are groups? Key features Creating groups Editing groups Deleting groups 151 Contact us at: [email protected] | 5 (adapted from vtiger CRM 6.0.0Beta© 2004-2013) CRM. DONE SIMPLY. Through Settings Through corresponding module Getting Started Adding custom fields Creating custom block Editing field properties Arranging related tabs 32 Module Manager What is a module manager? Deactivating module manager Activating module manager Configuring modules 161 33 Picklist Editor What is a picklist editor? Creating a custom picklist field Working with picklist fields Getting started 163 34 Picklist dependency setup What is a picklist dependency setup? Configuring picklist dependency Working 170 35 Menu Editor What is a Menu Editor? Configuring desired modules Email Templates What are email templates Creating email templates 173 37 38 Company Details Taxes What are taxes? Adding a new tax Editing Existing taxes Enabling/ Disabling Existing taxes Shipping & Handling taxes 176 177 39 Inventory terms & conditions What are inventory terms & conditions? Getting started Working with inventory terms & conditions 180 40 Announcements What are announcements? Getting started 182 41 Currencies What are currencies? Getting Started Adding new Currencies 184 36 174 Contact us at: [email protected] | 6 (adapted from vtiger CRM 6.0.0Beta© 2004-2013) CRM. DONE SIMPLY. Configuring desired currencies Modifying Product price 42 Customizing record numbering 188 43 Workflows What are workflows? Setting up workflows Customer Portal What is a customer portal? Getting Started 189 Account Settings Changing your password User login & role Calendar settings Currency & Number Field Configuration More Information User Address User Photograph. 197 44 45 193 Contact us at: [email protected] | 7 (adapted from vtiger CRM 6.0.0Beta© 2004-2013) Getting Started.. CRM. DONE SIMPLY. New to Prism SalesPRO CRM? Follow these steps to sail smoothly.. 1. 2. 3. 4. 5. 6. 7. 8. 9. Free Trail Login with the credentials. Configure your Homepage as per your needs. Setup Organization details. Choose Modules Modify the dropdown fields. Configure fields Set up Users. Import existing data. Discover Prism SalesPRO’s Modules & Settings. Contact us at: [email protected] | 8 (adapted from vtiger CRM 6.0.0Beta© 2004-2013) MODULES. CRM. DONE SIMPLY. 1. Leads Lead is an unqualified customer; with systematic follow ups and earnest efforts, you can identify prospects. 2. Contacts Contact is a qualified sales lead. Contacts also represent the people that are conducting business with you. 3. Organizations Organization represents a company or an institution that has multiple employees associated with it. 4. Opportunities Opportunities provide strategy to follow up prospective customers who are likely to successfully finish the sale. 5. Invoice Invoice is a non negotiable itemized statement issued for the Products and Services rendered to the customer. 6. Quotes Quote is a formal statement issued by a seller to the prospective buyer upon inquiry or request for a quotation. 7. Sales Orders Sales Order is used to track all the products/services that should be manufactured or shipped to customers 8. Purchase Orders Purchase order is a legal document handled over to vendor to purchase Products or Services. 9. Home Home page widgets provide graphical representation of current status and key performance indicators. 10. Reports Reports provide your sales team the ability to extract only data relevant to them from thousands of records. 11. Campaigns Campaigns offer your marketing team the ability to schedule and execute mass marketing campaigns. Contact us at: [email protected] | 9 (adapted from vtiger CRM 6.0.0Beta© 2004-2013) CRM. DONE SIMPLY. 12. Projects Project is a planned work that involves specific goals, start date and target end date, budgets, progress etc. 13. Products Products represent stock of goods in inventory. Products can be procured from suppliers or rendered to customers 14. Services Services refer to the free or paid assistance you would offer to benefit your customers. 15. Price Books Price Books gives you the ability to attribute different prices for products in your inventory 16. Tickets Trouble Tickets, also called as Cases, are post-sales support requests generated by your customers. 17. Assets Assets help your support center to audit individual product items, and cases resolved upon them. 18. Service Contracts Service Contract is a negotiated agreement to offer service to products procured to your customers. 19. Vendors Vendor is a person or organization that supplies Products or Services to your company. 20. Calendar Calendar module gives you the ability to schedule, share, track and follow-up events and to-dos 21. Documents Documents are internal or external files you upload and save in your Prism SalesPRO CRM account 22. Recycle Bin Recycle Bin acts like an archive for all deleted records and helps you restore them when required. Contact us at: [email protected] | 10 (adapted from vtiger CRM 6.0.0Beta© 2004-2013) SETTINGS CRM. DONE SIMPLY. 1. Users Users represent people that will be able to log into Prism SalesPRO and access records according to the permissions defined to them. 2. Profiles Profiles are used to control actions that users can perform on records, and restrict their access to fields, modules and features. 3. Roles Roles are used to create user hierarchy. User's position in role hierarchy will decide which of the records he/she can access. 4. Sharing Rules Sharing Rules is used to configure data sharing rules across users in role hierarchy. 5. Groups Group is combination of multiple users, roles and groups to manage common set of records. 6. Edit Fields Layout Editor allows you to add new custom fields, re-arrange fields, edit field properties, and move fields inside and across blocks. 7. Module Manager Module Manager helps you to enable, disable and configure the settings for existing modules, and import new modules. 8. Picklist Editor Picklist is a drop-down field with list of options available, within which, only one option can be selected. 9. Picklist Dependency Setup Picklist Dependency setup helps you to select values in target picklist field more accurately depending upon values in source picklist fields. 10. Menu Editor Menu Editor helps you to place most frequently accessed modules on Menu bar. You can also rearrange them according to your requirements 11 .Email Templates Email Templates helps you to create customized email templates and select them while sending out emails from your Prism SalesPRO CRM account Contact us at: [email protected] | 11 (adapted from vtiger CRM 6.0.0Beta© 2004-2013) CRM. DONE SIMPLY. 12. Company Details Company Details enables you to personalize your Prism SalesPRO CRM by uploading your company logo and details. The information is used while generating Invoices, Quotes, Sales Orders and Purchase Orders 13.Tax Calculations Tax Calculations enables you to manage national and international taxes while generating Invoices, Quotes, Sales Orders and Purchase Orders 14.Inventory Terms and Conditions This feature enables you to define inventory terms and conditions in the form of text that is populated in Invoices, Sales Orders, Purchase Orders and Quotes. 15. Announcements Announcements, like message boards, are used to convey your message to users across Prism SalesPRO CRM. 16. Currencies This feature enables you to configure national and international currencies to help you in dealing business operations with your customers around the globe. 17. Customize Record Numbering This feature helps you to customize numbering of records across different modules in Prism SalesPRO CRM according to your requirements. 18. Workflows Workflows streamline your business by automating operations like sending emails, creating activities, updating fields, etc. 19. Customer Portal The self-service channel offers your customers the ability to generate tickets and refer to faqs. You can also share Documents, Products, Projects, Invoices, Quotes etc 21. Webforms Create and integrate webforms in your website to capture website visitors as lead records in Prism SalesPRO 22. Account Settings. Manage your account’s password, time zone, themes etc. Through “My Preferences”. Contact us at: [email protected] | 12 (adapted from vtiger CRM 6.0.0Beta© 2004-2013) CRM. DONE SIMPLY. 1. Lead Module Creating a lead: In CRM, Lead is an unqualified customer; with systematic follow ups and earnest efforts, you can identify potential prospects. Generating Leads is supposedly the first step of Sales Process in CRM. A Lead record maintains information of a person, and the company he is associated with. You might generate Leads from trade shows, purchase lists, advertisements, websites, business cards, or through a referral. The responsibility of sales agents is to introduce Leads into the system, organize, filter and qualify the prospects. In B2B model, lead represents a company where as in B2C model, lead represents a person. Lead generation methods in Prism SalesPRO CRM a. Entering Leads Manually You can enter lead details manually from Leads Module. This might come handy if you will have to enter Lead details individually. Follow few simple steps to create Leads manually 1. 2. 3. 4. 5. Click All drop-down Click Leads Click Add Record button In the create lead view, fill necessary fields Click Save Contact us at: [email protected] | 13 (adapted from vtiger CRM 6.0.0Beta© 2004-2013) CRM. DONE SIMPLY. b. Quick Create Quick create helps you to create lead records with basic details. This might be helpful if you are running out of time. Follow few simple steps to create lead records through Quick create 1. 2. 3. 4. Click plus icon in top right corner Click Lead In the create lead view, fill necessary fields Click Save c. Import existing lead If you have your data in .csv or .vcf format, you can import thousands of records instantly and effectively. Prism SalesPRO CRM supports importing data into different modules including Leads, Contacts, Organizations, Opportunities, etc Check List 1.Mandatory Fields Make sure your file addresses all mandatory fields. For instance, Last Name and Company fields are mandatory in Leads module. You cannot proceed with importing until or unless you have a value within these fields of your .csv file. If the value of mandatory fields is empty, they will be set to '????'. 2.File Size Make sure the file to be imported do not exceed 5 MB size 3.Permissions Admin users can disable import access to non-admin users from Profile level. If you can't find the Import option, you should contact your Administrator to enable import permission for your profile Getting Started This tutorial will walk you through different steps involved in importing records into your Prism SalesPRO CRM account. The entire process is simple and straightforward. Follow few simple steps to import data into Prism SalesPRO CRM 1. Click [Module] tab. Eg: Leads, Contacts, etc 2. Click Actions > Import Step 1: Select File In the first step of importing process, you'll need to browse and upload your import file from your machine. Here's how to select your.csv file Contact us at: [email protected] | 14 (adapted from vtiger CRM 6.0.0Beta© 2004-2013) CRM. DONE SIMPLY. Click on the Choose File button, browse for desired file that is to be imported. Csv and vcf are the two file formats currently supported. Step 2: Specify Format In the second step of importing process, you'll need to specify import file properties. The details of each property are explained below. a. File Type : Prism SalesPROsupports two different file types namely: .csv and .vcf. Select the appropriate value from the File Type dropdown that describes the format of the file you've selected in Step:1. For instance, if you've uploaded .csv file, select .csv from File Type field. b. Character Encoding : Make sure you select the right character set in which your import file has been encoded. You'll need to select right encoding of the file irrespective of the file contents. c. Delimiter : Prism SalesPRO CRM supports comma (,) and semicolon(;) as field delimiters. The fields in your .csv file are recognized only if they are separated with delimiters. More often, in a csv file, fields are separated with commas(,). Contact us at: [email protected] | 15 (adapted from vtiger CRM 6.0.0Beta© 2004-2013) CRM. DONE SIMPLY. d. Header : While importing, the header of your .csv file is compared with fields in Prism SalesPRO CRM. Having a header makes it easy for you to map fields. Click on Has Headercheckbox if your file has a header. First row of your csv file is considered as a header. Please make sure that you uncheck the Has Header field if your file doesn't have a header. Step 3: Duplicate Record Handling This is an optional step and comes into play if you would enable the checkbox in Step-3 of the import process. This option will help you in tracing out duplicate records. You can also configure the actions to be performed on duplicate records: skip, overwrite and merge. And finally, select desired fields for duplicate lookup by moving fields from the list of Available Fields to Fields to be matched on by using the right and left arrows. Following actions can be performed on duplicate records Skip : After import, duplicate records are identified based on fields criteria. If your CRM and .csv file have records in common, to avoid redundant data, duplicate records in .csv file are not imported into Prism SalesPRO CRM. Overwrite :After import, duplicate records are identified based on fields criteria. If your CRM and .csv file Contact us at: [email protected] | 16 (adapted from vtiger CRM 6.0.0Beta© 2004-2013) CRM. DONE SIMPLY. have records in common, to avoid redundant data, the records in .csv file are imported and replaced with records in Prism SalesPRO CRM. Merge : After import, duplicate records are identified based on fields criteria. Merge, unlike overwrite and skip, checks for duplicate records first and then captures only useful information from your .csv file and updates it in your CRM. Step 4: Map CRM Fields In the final step of import process, you will need to map import file Header/Column to fields in Prism SalesPRO CRM. Fields will be automatically mapped if your csv file's header matches with Prism SalesPRO CRM field label. Here's a list of before you get started. You can provide default values for mapping fields which will be picked up in case if the value for any field in file will be empty. Also, frequently used mappings can be saved and reused. Contact us at: [email protected] | 17 (adapted from vtiger CRM 6.0.0Beta© 2004-2013) CRM. DONE SIMPLY. Saved mappings will be accessible across all users. You can delete the saved mappings by clicking on Trash icon. After successfully mapping fields, click Import button. Import Results After successfully importing records into Prism SalesPRO CRM, the import results are displayed in tabular format Import More Lets you start all new import again Last Imported Records Displays records imported lately with the help of paging support. Undo Last Import Deletes all records that are created during the last import session. Reference records related to other modules will not be deleted. Contact us at: [email protected] | 18 (adapted from vtiger CRM 6.0.0Beta© 2004-2013) CRM. DONE SIMPLY. d. Capturing leads from website(s). Webforms Your website visitors are no strangers anymore. Instead, they will be Lead records in your Prism SalesPRO CRM. Generate webform and copy it to your website; As a result, your user's information will be captured as leads in Prism SalesPRO CRM. You can create a new form or enable a existing form in your website to capture Leads into the system. This might interest your sales and marketing team members as it plays an important role in lead generation. Creating Webforms A website with a webform is said to be easiest way to implement lead capturing strategy. To create one for yourself, you'll need to fill in few fields — fields that are displayed in the webform and fields that are hidden intentionally. Follow few simple steps to create a Webform 1. 2. 3. 4. Click gear icon icon in the top right Click CRM Settings Click 'Other Settings' drop-down in the left Click Webforms. You can click on pin icon next to it to add a shortcut to your settings home page 5. Click Add Record button You'll be navigated to Creating new webform view. You'll find fields in two different blocks in this view. The fields in 'Webform Information' block are listed below. a. Webform Name : Provide an unique Webform name. This is just for your reference. b. Return URL : Provide a URL to which your users should be navigated after successfully submitting details. c. Status : Click on checkbox to make the webform active. You can disable the check-box if you decide not to use the webform. d. Description : To provide more details about webform. This is just for your reference. Contact us at: [email protected] | 19 (adapted from vtiger CRM 6.0.0Beta© 2004-2013) CRM. DONE SIMPLY. e. Module : Select a module in which records should be captured. Prism SalesPROonly supports capturing leads. f. Assigned to : Select an user or a group to whom records should be assigned. The fields you'd select in 'Lead Field Information' block will be displayed on your webform when you integrate it in your website, unless you've removed the code from the HTML file. You can select fields — to be displayed on your webform — by clicking on text space provided next to Add Fields field. Notes! Mandatory fields are automatically selected. a. Mandatory : Enable the checkbox to make corresponding field mandatory for the users to fill in b. Field Name : Fields selected in Add Fields field are displayed in this column c. Override Value : The value you would provide here will override the value entered by users d. Webforms Reference Field : This will come handy while mapping with other CMS like Wordpress. The field name must match the Webform Reference Field Notes! 1.If you would like to map existing forms with PrismSalesPro, the field names in your existing forms should be changed according to the Webforms Reference Field name. The values will be found in detail view of your webform record in Prism SalesPRO CRM. For instance, First Name will be termed as firstname in Webforms reference Field. 6. Now click Save to update changes. After save, two fields are automatically updated in the list view. 1. Public Id : The value in this field is used to establish connection between the existing form and Prism SalesPROforms 2. Post URL : The value in this field specifies the location of the module where information should be submitted Contact us at: [email protected] | 20 (adapted from vtiger CRM 6.0.0Beta© 2004-2013) CRM. DONE SIMPLY. Generating ready-to-use HTML content After successfully creating a webform, you will be navigated to the detail view of Webform. Click on Show Form button and copy the HTML content to your website. Done! Your website visitors are now gonna be Lead records in Prism SalesPRO CRM. Integrating Existing Webforms You might be getting your work done with different webforms on your website already. To integrate your existing webforms with PrismSalesPro, you'll need to establish a relationship between your existing forms and PrismSalesPro. This is where Public Id and Post URL will come in handy. They are automatically generated after you would successfully create a webform in PrismSalesPro. You can find them in detail view of your webform record Public Id Builds the relationship between the existing form and PrismSalesPro <input type="hidden" name="publicid" value="Paste Your Public Id Here"></input> Post URL Specifies the location of the module where information should be submitted <form name="Place Your Webform Name Here" action="Paste Your Post URL Here" method="post" accept-charset="utf-8"> Contact us at: [email protected] | 21 (adapted from vtiger CRM 6.0.0Beta© 2004-2013) CRM. DONE SIMPLY. Modifying field names in your existing Webform Your existing form might have different field names. The names should be changed according to the Webforms Reference Field name. The values will be found in detail view of your webform record in Prism SalesPRO CRM. For instance, First Name will be termed as firstname in Webforms reference Field. Integrating Wordpress Forms This feature enables you to integrate Wordpress forms with Prism SalesPROto get leads right away into your Prism SalesPRO CRM account. Step 1: Mapping the fields The process of mapping fields is made simple and straightforward. You'll need to map fields according to webforms reference fields as shown in the picture below. Follow few simple steps to map fields Install cforms in your wordpress account. Create a form, Add fields and set them according to Prism SalesPRO CRM Webform Reference Fields. Include Public Id along with the fields. For instance, If I have fields like First Name, Mobile, Last Name, Organization and Email in my wordpress form. The Webforms reference fields will be firstname, phone, lastname, company and email respectively. Contact us at: [email protected] | 22 (adapted from vtiger CRM 6.0.0Beta© 2004-2013) CRM. DONE SIMPLY. Step 2: Provide Post URL Under the Core Form Admin / Email Options, enable the following check-boxes 1. Use custom input field NAMES & ID's. 2. Send form data to an alternative page, and paste your Post URL in the text field provided. 3. Click Save and Update form Settings. Notes! Public Id and Post URL will be found in the detail view of your webform record in Prism SalesPRO CRM. Attention! 1. Publicid should be hidden while creating a cform. 2. Webform reference field should be copied from Prism SalesPROwebform to cforms. 3. The Webform reference field for Public Id field should be publicid. 4. The general syntax during the field mapping is Your_Desired_Field_Name[id:paste your webforms reference field name] How it works After setting the things up, you have to create a post to see the wordpress webform. You can embed the webform in your website and capture the Leads into Prism SalesPRO CRM, automatically. 1. 2. 3. 4. Click Posts > Add New( This can be found on your wordpress side bar) Click cforms Icon Select your form and click insert. Click on Publish If you would click on view post, you should be able to see your form. Your website visitors are no strangers anymore. They will be your Lead records instead Contact us at: [email protected] | 23 (adapted from vtiger CRM 6.0.0Beta© 2004-2013) CRM. DONE SIMPLY. Step 2: Provide Post URL Under the Core Form Admin / Email Options, enable the following check-boxes Use custom input field NAMES & ID's. Send form data to an alternative page, and paste your Post URL in the text field provided. Click Save and Update form Settings. Notes! Public Id and Post URL will be found in the detail view of your webform record in Prism SalesPRO CRM. Attention! Publicid should be hidden while creating a cform. Webform reference field should be copied from Prism SalesPROwebform to cforms. The Webform reference field for Public Id field should be publicid. The general syntax during the field mapping is Your_Desired_Field_Name[id:paste your webforms reference field name] How it works After setting the things up, you have to create a post to see the wordpress webform. You can embed the webform in your website and capture the Leads into Prism SalesPRO CRM, automatically. Click Posts > Add New( This can be found on your wordpress side bar) Contact us at: [email protected] | 24 (adapted from vtiger CRM 6.0.0Beta© 2004-2013) CRM. DONE SIMPLY. Click cforms Icon Select your form and click insert. Click on Publish If you would click on view post, you should be able to see your form. Your website visitors are no strangers anymore. They will be your Lead records instead. e. Creating lead record from your email Mail Manager Mail Manager is an integrated email client that allows users to perform CRM related actions on incoming email. It helps you create Leads, Contacts, Organizations, Trouble Tickets and To Dos from the emails that you receive in your inbox. Should sender's email id match with a record in Prism SalesPRO CRM, you can perform more actions like, Attaching email, Adding To do, Comment and Ticket. Additionally, you can manage composing, replying, forwarding emails etc. Step 1: Configuring your incoming mail server Select your email provider to receive all emails right in your Prism SalesPRO CRM. If your email provider is either Gmail, Yahoo, or Fastmail, then mail server name will be automatically populated. Otherwise, you will have to provide server name or IP address manually. Follow few simple instructions to configure email provider: 1. Click Mail Manager tab. You will be navigated to Settings 2. Under Settings tab, Select your email provider Contact us at: [email protected] | 25 (adapted from vtiger CRM 6.0.0Beta© 2004-2013) CRM. DONE SIMPLY. 3. 4. 5. 6. Mail Server Name will be automatically populated for Gmail, Yahoo and Fast mail Provide your user name and password Provide Refresh time Click Save Note! 1.If your mailbox is not configured yet, you'll be navigated to Settings. In case if you'r mailbox is already configured, you can find Settings in the left. If your email provider name is not listed (Eg: Aol), click on Select Organization Type drop-down and select Other Attention! Prism SalesPRO CRM only supports IMAP. POP3 is not supported yet. Step 2: Creating new records from your emails If the email you receive doesn't match the email field of existing records in your Prism SalesPRO CRM, you can create either Leads, Contacts, Organizations, or a Trouble Tickets from within your email. Contact us at: [email protected] | 26 (adapted from vtiger CRM 6.0.0Beta© 2004-2013) CRM. DONE SIMPLY. Follow few simple instructions to create records from within your email 1. 2. 3. 4. 5. 6. Click on your email to open On the right side of page, under Related Records, look up is made basing upon email id If email does't match, click on Actions drop-down Click on either Add Leads or Add Organizations or Add Contacts or Add Tickets Modify values in the pop up, if necessary Click Save Step 3: Updating existing record from within your email If email matches with the existing record in your Prism SalesPRO CRM, you can associate a To do, Trouble Ticket, add a Comment, or attach an email to the record. Follow few simple instructions to update record from within your email 1. 2. 3. 4. 5. 6. Click on your email to open On the right side of page, under Related Records, look up is made basing upon email id If email matches, click on Actions drop-down Click on either select Add To do, Add Trouble Ticket, Add Comment or Attach Email Modify values in the pop up, if necessary Click Save Step: 4 More Actions Apart from managing operations on incoming emails, you can perform more operations like sending out emails, replying and forwarding emails, searching, grouping all emails sent from Prism SalesPROunder different folders, saving drafts etc. Custom filters in your personal email account will also be displayed. You can move emails in and across those folders. Sending out emails Follow few simple instructions to send out emails from Mail Manager 1. Click Mail Manager tab 2. Click Compose 3. Enter recipient's email in To Field. Click on folder next to To field to search for email ids across records in Prism SalesPRO CRM 4. You can also attach files to your email. Click Upload to attach files from your machine, click Select Documents to attach files saved in your Documents module. 5. Click Save Now to save your email in Drafts. You can send out those emails later. 6. Click Select Email Template to populate previously saved email templates Contact us at: [email protected] | 27 (adapted from vtiger CRM 6.0.0Beta© 2004-2013) CRM. DONE SIMPLY. 7. You can also have rich text, images, tables etc in email body 8. After composing email, click Send Attention! You will have to first configure your Outgoing Server before sending out emails from Mail Manager Emails will be sent from your personal email id in My Preferences. Sent Mails All the emails that will be transferred from Prism SalesPRO CRM will be displayed under Send Mails. It groups emails sent to Leads, Contacts, Organizations and Users under different folders. Attention! The emails displayed in Sent Mails will not necessarily be sent from Mail Manager. Emails that were sent through any email sending channel in Prism SalesPRO CRM will be displayed in Sent Mails. Contact us at: [email protected] | 28 (adapted from vtiger CRM 6.0.0Beta© 2004-2013) CRM. DONE SIMPLY. 2. Contacts What is a Contact? Contact can be represented as a qualified sales lead. Contacts differentiate qualified customers from the huge list of unqualified customers. Contacts also represent the people that are conducting business with you. They could be acting individually or representing an Organization. Creating Contacts Manually You can enter Contact details manually from Contacts Module. This might come handy if you will have to enter Contact details individually. Steps to create Contact records manually 1. In Contacts tab, click on Add Contact button 2. In the Create Contact view, fill in the Contact details 3. Click Save Quick Create You can enter basic details of Contact record through Quick create. This might be helpful if you are running out of time. Steps to create Contact records through Quick create 1. 2. 3. 4. Click (+) Icon on top right corner Click Contact In the Create Contact view, fill in the Contact details Click Save Import existing data If you have your data in .csv or .vcf format, you can import thousands of records instantly and effectively. Prism SalesPRO CRM supports importing data into different modules including Leads, Contacts, Organizations, Opportunities, etc. Contact us at: [email protected] | 29 (adapted from vtiger CRM 6.0.0Beta© 2004-2013) CRM. DONE SIMPLY. Check List 1. Mandatory Fields Make sure your file addresses all mandatory fields. For instance, Last Name and Company fields are mandatory in Leads module. You cannot proceed with importing until or unless you have a value within these fields of your .csv file. If the value of mandatory fields is empty, they will be set to '????'. 2. File Size Make sure the file to be imported do not exceed 5 MB size 3. Permissions Admin users can disable import access to non-admin users from Profile level. If you can't find the Import option, you should contact your Administrator to enable import permission for your profile Getting Started This tutorial will walk you through different steps involved in importing records into your Prism SalesPRO CRM account. The entire process is simple and straightforward. Follow few simple steps to import data into Prism SalesPRO CRM 1. Click [Module] tab. Eg: Leads, Contacts, etc 2. Click Actions > Import Step 1: Select File In the first step of importing process, you'll need to browse and upload your import file from your machine. Here's how to select your.csv file Click on the Choose File button, browse for desired file that is to be imported. Csv and vcf are the two file formats currently supported. Contact us at: [email protected] | 30 (adapted from vtiger CRM 6.0.0Beta© 2004-2013) CRM. DONE SIMPLY. Step 2: Specify Format In the second step of importing process, you'll need to specify import file properties. The details of each property are explained below. a. File Type: Prism SalesPROsupports two different file types namely: .csv and .vcf. Select the appropriate value from the File Type dropdown that describes the format of the file you've selected in Step:1. For instance, if you've uploaded .csv file, select .csv from File Type field. b. Character Encoding: Make sure you select the right character set in which your import file has been encoded. You'll need to select right encoding of the file irrespective of the file contents. c. Delimiter: Prism SalesPRO CRM supports comma (,) and semicolon (;) as field delimiters. The fields in your .csv file are recognized only if they are separated with delimiters. More often, in a csv file, fields are separated with commas (,). d. Header: While importing, the header of your .csv file is compared with fields in Prism SalesPRO CRM. Having a header makes it easy for you to map fields. Click on Has Header checkbox if your file has a header. First row of your csv file is considered as a header. Please make sure that you uncheck the Has Header field if your file doesn't have a header. Contact us at: [email protected] | 31 (adapted from vtiger CRM 6.0.0Beta© 2004-2013) CRM. DONE SIMPLY. Step 3: Duplicate Record Handling This is an optional step and comes into play if you would enable the checkbox in Step-3 of the import process. This option will help you in tracing out duplicate records. You can also configure the actions to be performed on duplicate records: skip, overwrite and merge. And finally, select desired fields for duplicate lookup by moving fields from the list of Available Fields to Fields to be matched on by using the right and left arrows. Following actions can be performed on duplicate records Skip: After import, duplicate records are identified based on fields criteria. If your Prism SalesPRO CRM and .csv file have records in common, to avoid redundant data, duplicate records in .csv file are not imported into Prism SalesPRO CRM. Overwrite: After import, duplicate records are identified based on fields criteria. If your Prism SalesPRO CRM and .csv file have records in common, to avoid redundant data, the records in .csv file are imported and replaced with records in Prism SalesPRO CRM. Merge: After import, duplicate records are identified based on fields criteria. Merge, unlike overwrite and skip, checks for duplicate records first and then captures only useful information from your .csv file and updates it in your Prism SalesPRO CRM. Contact us at: [email protected] | 32 (adapted from vtiger CRM 6.0.0Beta© 2004-2013) CRM. DONE SIMPLY. Step 4: Map CRM Fields In the final step of import process, you will need to map import file Header/Column to fields in Prism SalesPRO CRM. Fields will be automatically mapped if your csv file's header matches with Prism SalesPRO CRM field label. You can provide default values for mapping fields which will be picked up in case if the value for any field in file will be empty. Also, frequently used mappings can be saved and reused. Contact us at: [email protected] | 33 (adapted from vtiger CRM 6.0.0Beta© 2004-2013) CRM. DONE SIMPLY. Saved mappings will be accessible across all users. You can delete the saved mappings by clicking on Trash icon. After successfully mapping fields, click Import button. Import Results After successfully importing records into Prism SalesPRO CRM, the import results are displayed in tabular format Import More Lets you start all new import again Last Imported Records Displays records imported lately with the help of paging support. Undo Last Import Contact us at: [email protected] | 34 (adapted from vtiger CRM 6.0.0Beta© 2004-2013) CRM. DONE SIMPLY. Deletes all records that are created during the last import session. Reference records related to other modules will not be deleted. Notifications Import Scheduled! If you have more than 1000 records in your file, your import will be scheduled on cron which is configured to run once in every 15 minutes. If you have configured your Outgoing Server and Email id properly, an email notification will be sent to you after successful import Data Corruption Error This error shows up when the import is interrupted for various reasons like crashing in between, or canceled by a user etc. This error indicates that the import table still has records to be imported into the system, but all the information related to the import (like mapping, default values, merge criteria) are all lost. So these records can no more be imported and the user needs to clear this data before starting any other import. Import Locked Error This error will be displayed if the import has been already been started on the same module by any other user in Prism SalesPRO CRM. The details of the module, the user, and the time at which the Import has been locked is detailed within the error message itself. Import Interrupted Error If an Admin user is performing import and if a non-admin user tries to start an import on the same module, he will get to see the Import Locked error. If non-admin user is doing import, and Admin user attempts to import on the same module, same time, he can be able to see the status of the current import and he will even have powers to cancel the current import; Consequently, the Import Interrupted Error will be displayed to non-admin user. Attention! 1.If you would start importing in one particular module, you cannot import records into the same or any other module in Prism SalesPRO CRM. 2.If you would trigger import on a particular module, neither you nor any other user in Prism SalesPRO CRM can import records into the same module. However, other users can import records into other modules in Prism SalesPRO CRM. Contact us at: [email protected] | 35 (adapted from vtiger CRM 6.0.0Beta© 2004-2013) CRM. DONE SIMPLY. Converting Leads Once a Lead is qualified and determined to be a potential sale, the Lead can be converted to an Opportunity. A Contact record and Organization record will be created simultaneously to store the personal information and company information. Steps to convert a Lead 1. 2. 3. 4. 5. Click on the Lead record you intend to convert In the detail view, Click Convert Lead Button In the convert Lead pop-up, you can modify the existing values and transfer related records. If there is a chance of immediate sale, un-check Opportunity check-box. Click Save Notes 1. You can transfer related records (Documents, Emails etc) to either Organization or Contacts by selecting the radio button during the Lead Conversion. 2. Lead record will no more be available after Lead Conversion. 3. After conversion, Contact, Organization or Opportunity records cannot be reverted to the previous state. B2C Model If you are dealing business only with a Contact, you can remove the mandatory status of Company field in Leads Module and un-check Organization check-box in Lead Conversion pop-up; As a result, only a contact record will be created upon Lead conversion. Mapping Fields Prism SalesPRO CRM allows you to map Standard fields and Custom fields before converting a lead to Contact and Organization, or an Opportunity. The field values will be transmitted to the selected target fields. This will ensure that the data will not be lost upon Lead conversion. Standard fields will be automatically mapped but the custom fields should be mapped manually. Steps to modify the existing fields or map custom fields 1. 2. 3. 4. 5. 6. 7. 8. Click Settings Icon > CRM Settings Click Module Manager Locate Leads and Click Leads Settings Icon (Hammer icon) Click Leads Field Mapping Click Edit button modify existing field settings Click Add Mapping button; Consequently, new set of fields will be added to map custom fields. Select the source field and map it to the target field accordingly. Click Save Contact us at: [email protected] | 36 (adapted from vtiger CRM 6.0.0Beta© 2004-2013) CRM. DONE SIMPLY. Notes 1. Target Field type should be identical to the Source Field type. For instance, If Source Field is a Picklist, the Target Field should also be a Picklist Field. 2. The Target Field size should be greater than or equal to the Source Field. 3. Target Field values should only be mapped once. Exporting Contacts to External Source If you ever want your data in the form of a spreadsheet, you can export your Contacts records right away. Steps to export your data 1. Click Contacts tab 2. Click Actions button > Export 3. In the Export Records page, you will find the following options Click on the radio button to export the records selected in List view Export selected records Click on the radio button to export all the records that are on the current list view page Export data in current page Click on the radio button to export all records in Contacts module Export all data 4. Click Export Contacts button. Managing Contacts List of operations you can perform on records in Contacts Home page 1. Create Custom Filters to classify records as per your requirements. You can be able to limit your search to selected columns and search criteria 2. Search desired records 3. Click on Actions drop-down to perform following operations Select Edit to modify selected record(s) Select Delete to delete selected record(s) Select Add Comment to add a comment on selected record(s) Contact us at: [email protected] | 37 (adapted from vtiger CRM 6.0.0Beta© 2004-2013) CRM. DONE SIMPLY. Select Send email to send out emails to selected record(s) Select Send SMS to send out SMS to selected record(s) 4. Click Settings button to perform following operations Select Edit Fields to configure fields and customize the layout of fields through Layout Editor Select Edit Workflows to view / create new Workflows on Contacts module Select Edit Picklist values to modify picklist values through Picklist Editor List of operations you can perform on detail view of Contact record 1. Click Edit to modify existing content 2. Click Send Email to send email to existing contact record 3. Click on More drop-down to perform following operations on Contact record 1. Select Delete to delete the existing contact record 2. Select Duplicate to clone existing contact record 3. Select Add Document to attach a document to existing contact record 4. Select Send SMS to send out sms to existing contact record. First Name Provide the first name of the Contact Last Name Provide the Last name of the Contact. This is a mandatory field Organization Name Select the Organization that is related to the Contact Primary Email Provide email address of the Contact Date of Birth Provide date of birth of the Contact Reports to Select from the list of Contacts to whom the Contact reports Email opt out Select the check-box to remove the contact from mailing list. That means the contact will not be able to receive emails from Prism SalesPRO CRM anymore Assigned to Select any user(s) to make him/her the owner of Contact record Portal User Enable the check-box to grant customer portal access to Contact record Contact us at: [email protected] | 38 (adapted from vtiger CRM 6.0.0Beta© 2004-2013) CRM. DONE SIMPLY. Support Start Date Customer can log into Customer portal from this date Support End Date Customer can log into Customer portal until this date 5. Select Add Event to schedule a Call or Meeting and Select Add Task to schedule a Todo Fields Information Information of fields in the Contacts module. Associating Contacts with Other Records This will display all-round view of relations of Contacts module with other modules and maintains log of complete history.You can keep track of following details in Contacts module Comments To view the Comments related to the Contact record Updates To view the modifications done on Contact record Opportunities To track the Opportunity records associated with Contact record Activities To view or create Events and To-dos on a Contact record Emails To view the emails sent to Contact record Tickets To view the Trouble Ticket records related to the Contact record Quotes To view the Quotes related to the Contact record Purchase Order To view the Purchase Orders related to the Contact record Sales Order To view the Purchase Orders related to the Contact record Products To view the Products related to Contact record. You can have here the products that might interest your customer Activity History To view all Events and To-dos that are completed or status changed as Held Documents To view the documents related to the Contact record Campaigns To view the Campaigns related to the Contact record Invoice To view the Invoices related to the Contact record Contact us at: [email protected] | 39 (adapted from vtiger CRM 6.0.0Beta© 2004-2013) CRM. DONE SIMPLY. Service Contracts To view the Service Contracts related to the Contact record Services To view the Services related to Contact record. You can have here the Services that might interest your customer Projects To view the Projects that are related to the Contact record Contact us at: [email protected] | 40 (adapted from vtiger CRM 6.0.0Beta© 2004-2013) CRM. DONE SIMPLY. 3. Organizations What is an Organization? Organization represents a company or an institution that has multiple employees associated with it. Contacts, as in employees, can be directly related to an Organization record. Organization need not always be a existing customer. You will track the business deal through Opportunities. If the deal is won, Organization will represent existing customer. If the deal is lost, you can always have archive of dead Organizations in your Prism SalesPRO CRM with an intention of having business with them some time in future. Creating Organizations Manually You can enter Organization details manually from Organizations Module. This might come handy if you will have to enter Organization details individually. Steps to create Organization records manually 1. In Organizations tab, click on Add Organization button 2. In the Create Organization view, fill in the Organization details 3. Click Save Quick Create You can enter basic details of Organization record through Quick create. This might be helpful if you are running out of time. Steps to create Organization records through Quick create 1. 2. 3. 4. Click (+) Icon on top right corner Click Organization In the Create Organization view, fill in the Organization details Click Save Import existing data If you have your data in .csv or .vcf format, you can import thousands of records instantly and effectively. Prism SalesPRO CRM supports importing data into different modules including Leads, Contacts, Organizations, Opportunities, etc. Contact us at: [email protected] | 41 (adapted from vtiger CRM 6.0.0Beta© 2004-2013) CRM. DONE SIMPLY. Check List 1. Mandatory Fields Make sure your file addresses all mandatory fields. For instance, Last Name and Company fields are mandatory in Leads module. You cannot proceed with importing until or unless you have a value within these fields of your .csv file. If the value of mandatory fields is empty, they will be set to '????'. 2. File Size Make sure the file to be imported do not exceed 5 MB size 3. Permissions Admin users can disable import access to non-admin users from Profile level. If you can't find the Import option, you should contact your Administrator to enable import permission for your profile Getting Started This tutorial will walk you through different steps involved in importing records into your Prism SalesPRO CRM account. The entire process is simple and straightforward. Follow few simple steps to import data into Prism SalesPRO CRM 1. Click [Module] tab. Eg: Leads, Contacts, etc 2. Click Actions > Import Step 1: Select File In the first step of importing process, you'll need to browse and upload your import file from your machine. Here's how to select your.csv file Click on the Choose File button, browse for desired file that is to be imported. Csv and vcf are the two file formats currently supported. Contact us at: [email protected] | 42 (adapted from vtiger CRM 6.0.0Beta© 2004-2013) CRM. DONE SIMPLY. Step 2: Specify Format In the second step of importing process, you'll need to specify import file properties. The details of each property are explained below. a. File Type: Prism SalesPROsupports two different file types namely: .csv and .vcf. Select the appropriate value from the File Type dropdown that describes the format of the file you've selected in Step:1. For instance, if you've uploaded .csv file, select .csv from File Type field. b. Character Encoding: Make sure you select the right character set in which your import file has been encoded. You'll need to select right encoding of the file irrespective of the file contents. c. Delimiter: Prism SalesPRO CRM supports comma (,) and semicolon(;) as field delimiters. The fields in your .csv file are recognized only if they are separated with delimiters. More often, in a csv file, fields are separated with commas(,). To know more about delimiters, click here d. Header: While importing, the header of your .csv file is compared with fields in Prism SalesPRO CRM. Having a header makes it easy for you to map fields. Click on Has Headercheckbox if your file has a header. First row of your csv file is considered as a header. Please make sure that you uncheck the Has Header field if your file doesn't have a header. To know more about headers, click here Contact us at: [email protected] | 43 (adapted from vtiger CRM 6.0.0Beta© 2004-2013) CRM. DONE SIMPLY. Step 3: Duplicate Record Handling This is an optional step and comes into play if you would enable the checkbox in Step-3 of the import process. This option will help you in tracing out duplicate records. You can also configure the actions to be performed on duplicate records: skip, overwrite and merge. And finally, select desired fields for duplicate lookup by moving fields from the list of Available Fields to Fields to be matched on by using the right and left arrows. Following actions can be performed on duplicate records Skip: After import, duplicate records are identified based on fields criteria. If your Prism SalesPRO CRM and .csv file have records in common, to avoid redundant data, duplicate records in .csv file are not imported into Prism SalesPRO CRM. Overwrite: After import, duplicate records are identified based on fields criteria. If your Prism SalesPRO CRM and .csv file have records in common, to avoid redundant data, the records in .csv file are imported and replaced with records in Prism SalesPRO CRM. Merge: After import, duplicate records are identified based on fields criteria. Merge, unlike overwrite and skip, checks for duplicate records first and then captures only useful information from your .csv file and updates it in your Prism SalesPRO CRM. Step 4: Map CRM Fields In the final step of import process, you will need to map import file Header/Column to fields in Prism SalesPRO CRM. Fields will be automatically mapped if your csv file's header matches with Prism SalesPRO CRM field label. Contact us at: [email protected] | 44 (adapted from vtiger CRM 6.0.0Beta© 2004-2013) CRM. DONE SIMPLY. You can provide default values for mapping fields which will be picked up in case if the value for any field in file will be empty. Also, frequently used mappings can be saved and reused. Saved mappings will be accessible across all users. You can delete the saved mappings by clicking on Trash icon. Contact us at: [email protected] | 45 (adapted from vtiger CRM 6.0.0Beta© 2004-2013) CRM. DONE SIMPLY. After successfully mapping fields, click Import button. Import Results After successfully importing records into Prism SalesPRO CRM, the import results are displayed in tabular format Import More Lets you start all new import again Last Imported Records Displays records imported lately with the help of paging support. Undo Last Import Deletes all records that are created during the last import session. Reference records related to other modules will not be deleted. Contact us at: [email protected] | 46 (adapted from vtiger CRM 6.0.0Beta© 2004-2013) CRM. DONE SIMPLY. Notifications Import Scheduled! If you have more than 1000 records in your file, your import will be scheduled on cron which is configured to run once in every 15 minutes. If you have configured your Outgoing Server and Email id properly, an email notification will be sent to you after successful import Data Corruption Error This error shows up when the import is interrupted for various reasons like crashing in between, or canceled by a user etc. This error indicates that the import table still has records to be imported into the system, but all the information related to the import (like mapping, default values, merge criteria) are all lost. So these records can no more be imported and the user needs to clear this data before starting any other import. Import Locked Error This error will be displayed if the import has been already been started on the same module by any other user in Prism SalesPRO CRM. The details of the module, the user, and the time at which the Import has been locked is detailed within the error message itself. Import Interrupted Error If an Admin user is performing import and if a non-admin user tries to start an import on the same module, he will get to see the Import Locked error. If non-admin user is doing import, and Admin user attempts to import on the same module, same time, he can be able to see the status of the current import and he will even have powers to cancel the current import; Consequently, the Import Interrupted Error will be displayed to non-admin user. Attention! 1.If you would start importing in one particular module, you cannot import records into the same or any other module in Prism SalesPRO CRM. 2.If you would trigger import on a particular module, neither you nor any other user in Prism SalesPRO CRM can import records into the same module. However, other users can import records into other modules in Prism SalesPRO CRM Converting Leads Once a Lead is qualified and determined to be a potential sale, the Lead can be converted to an Opportunity. A Contact record and Organization record will be created simultaneously to store the personal information and company information. Steps to convert a Lead 1. 2. 3. 4. 5. Click on the Lead record you intend to convert In the detail view, Click Convert Lead Button In the convert Lead pop-up, you can modify the existing values and transfer related records. If there is a chance of immediate sale, un-check Opportunity check-box. Click Save Contact us at: [email protected] | 47 (adapted from vtiger CRM 6.0.0Beta© 2004-2013) CRM. DONE SIMPLY. Notes 1.You can transfer related records (Documents, Emails etc) to either Organization or Contacts by selecting the radio button during the Lead Conversion. 2.Lead record will no more be available after Lead Conversion. 3.After conversion, Contact, Organization or Opportunity records cannot be reverted to the previous state. B2C Model If you are dealing business only with a Contact, you can remove the mandatory status of Company field in Leads Module and un-check Organization check-box in Lead Conversion pop-up; As a result, only a contact record will be created upon Lead conversion. Mapping Fields Prism SalesPRO CRM allows you to map Standard fields and Custom fields before converting a lead to Contact and Organization, or an Opportunity. The field values will be transmitted to the selected target fields. This will ensure that the data will not be lost upon Lead conversion. Standard fields will be automatically mapped but the custom fields should be mapped manually. Steps to modify the existing fields or map custom fields 1. 2. 3. 4. 5. 6. 7. 8. Click Settings Icon > CRM Settings Click Module Manager Locate Leads and Click Leads Settings Icon (Hammer icon) Click Leads Field Mapping Click Edit button modify existing field settings Click Add Mapping button; Consequently, new set of fields will be added to map custom fields. Select the source field and map it to the target field accordingly. Click Save Notes 1. Target Field type should be identical to the Source Field type. For instance, If Source Field is a Picklist, the Target Field should also be a Picklist Field. 2. The Target Field size should be greater than or equal to the Source Field. 3. Target Field values should only be mapped once. Contact us at: [email protected] | 48 (adapted from vtiger CRM 6.0.0Beta© 2004-2013) CRM. DONE SIMPLY. Exporting Organizations to External Source If you ever want your data in the form of a spreadsheet, you can export your Organizations records right away. Steps to export your data 1. Click Organizations tab 2. Click Actions button > Export 3. In the Export Records page, you will find the following options Export selected records Click on the radio button to export the records selected in List view Export data in current page Click on the radio button to export all the records that are on the current list view page Export all data Click on the radio button to export all records in Organizations module 4. Click Export Organizations button. Managing Organizations List of operations you can perform on records in Organizations Home page 1. Create Custom filters to classify records as per your requirements. You can be able to limit your search to selected columns and search criteria 2. Search desired records 3. Click on Actions drop-down to perform following operations Select Edit to modify selected record(s) Select Delete to delete selected record(s) Select Add Comment to add a comment on selected record(s) Select Send email to send out emails to selected record(s) Select Send SMS to send out SMS to selected record(s) 4. Click Settings button to perform following operations Select Edit Fields to configure fields and customize the layout of fields through Layout Editor Contact us at: [email protected] | 49 (adapted from vtiger CRM 6.0.0Beta© 2004-2013) CRM. DONE SIMPLY. Select Edit Workflows to view / create new Workflows on Organizations module Select Edit Picklist values to modify picklist values through Picklist Editor List of operations you can perform on detail view of Organization record 1. Click Edit to modify existing content 2. Click Send Email to send email to existing Organization record 3. Click on More drop-down to perform following operations on Organization record 1. Select Delete to delete the existing Organization record 2. Select Duplicate to clone existing Organization record 3. Select Add Document to attach a document to existing Organization record 4. Select Organization Hierarchy to view administrative body with each Organization subordinate to the one above 5. Select Send SMS to send out sms to existing Organization record 6. Select Add Event to schedule a Call or Meeting and Select Add Task to schedule a Todo Fields Information Information of fields in the Organizations module. Organization Name Specify the name of the Organization Website Specify company's website URL Member Of Select or create parent company for existing Organization record Ticker Symbol Specify company's ticker symbol Primary Email Specify email address of the Organization Ownership Specify the ownership type of the company Employees Specify the number of employees working in the company Industry Specify the type of industry from the pick-list Assigned to Select any user(s) to make him/her the owner of Organization record Description Details Specify additional details about the Organization Contact us at: [email protected] | 50 (adapted from vtiger CRM 6.0.0Beta© 2004-2013) CRM. DONE SIMPLY. Associating Organizations with Other Records This will display all-round view of relations of Organizations module with other modules and maintains log of complete history.You can keep track of following details in Organizations module Comments To view the Comments related to the Organization record Updates To view the modifications done on Organization record Contacts To view the contacts that are related to the Organization record Opportunities To view the opportunities that are related to the Organization record Quotes To view the Quotes related to the Organization record Sales Order To view the Purchase Orders related to the Organization record Invoice To view the Invoices related to the Organization record Activities To view or create Events and To-dos on a Organization record Emails To view the emails sent to Organization record Activity History To view all Events and To-dos that are completed or status changed as Held Documents To view the documents related to the Organization record Tickets To view the Trouble Ticket records related to the Organization record Products To view the Products related to Organization record. You can have here the products that might interest your customer Service Contracts To view the Service Contracts related to the Organization record Services To view the Services related to Organization record. You can have here the Services that might interest your customer Campaigns To view the Campaigns related to the Organization record Assets To view the Assets related to the Organization record Projects To view the Projects that are related to the Organization record Contact us at: [email protected] | 51 (adapted from vtiger CRM 6.0.0Beta© 2004-2013) 3. Opportunities CRM. DONE SIMPLY. What is an Opportunity? Opportunity represents prospect with plentiful chances of generating revenues. Opportunities provide strategy to follow up prospective customers who are likely to successfully finish the sale. It helps you track the potential of prospects through the sales cycle. An opportunity represents a potential sale. Customers who are very likely to purchase your product can be termed as Opportunities. They hold a lots of importance as they present complete information of sales process from beginning to the end. The journey of sales process may begin at different stages 1. Creating an Opportunity for a Lead 2. Creating an Opportunity for an Existing Contact/Organization 3. Creating an Opportunity for a New Customer Converting an Opportunity from a Lead A Lead can also be converted to an Opportunity to track the Sales process from Lead Qualification to End of sale (Deal won or Deal Lost) The things you can exclusively do only with Opportunities 1. 2. 3. 4. Track Sales Stages, Forecast Amount etc Schedule Product presentations, Calls, Meetings etc Sending Quote Price negotiations Creating an Opportunity for an Existing Customer Existing customer is the one that is already dealing business with you. Details of customer are stored in your Prism SalesPRO CRM as Contact or an Organization record. If you have gotten the same customer as a new lead to deal a new business, you can create an Opportunity record and associate with existing Contact/Organization. Creating an Opportunity for a New Customer New customer is the one that doesn't have any records history in your Prism SalesPRO CRM. If you will have to deal business with new person or a company, you can create related Contact/Organization record in Prism SalesPRO CRM and associate it with new opportunity record. Contact us at: [email protected] | 52 (adapted from vtiger CRM 6.0.0Beta© 2004-2013) CRM. DONE SIMPLY. Creating Opportunities Manually You can enter Opportunity details manually from Opportunities Module. This might come handy if you will have to enter Opportunity details individually. Steps to create Opportunity records manually 1. In Opportunities tab, click on Add Opportunity button 2. In the Create Opportunity view, fill in the Opportunity details 3. Click Save Quick Create You can enter basic details of Opportunity record through Quick create. This might be helpful if you are running out of time. Steps to create Opportunity records through Quick create 1. 2. 3. 4. Click (+) Icon on top right corner Click Opportunity In the Create Opportunity view, fill in the Opportunity details Click Save Import existing data If you have your data in .csv or .vcf format, you can import thousands of records instantly and effectively. Prism SalesPRO CRM supports importing data into different modules including Leads, Contacts, Organizations, Opportunities, etc. Check List 1. Mandatory Fields Make sure your file addresses all mandatory fields. For instance, Last Name and Company fields are mandatory in Leads module. You cannot proceed with importing until or unless you have a value within these fields of your .csv file. If the value of mandatory fields is empty, they will be set to '????'. 2. File Size Make sure the file to be imported do not exceed 5 MB size 3. Permissions Admin users can disable import access to non-admin users from Profile level. If you can't find the Import option, you should contact your Administrator to enable import permission for your profile Contact us at: [email protected] | 53 (adapted from vtiger CRM 6.0.0Beta© 2004-2013) CRM. DONE SIMPLY. Getting Started This tutorial will walk you through different steps involved in importing records into your Prism SalesPRO CRM account. The entire process is simple and straightforward. Follow few simple steps to import data into Prism SalesPRO CRM 1. Click [Module] tab. Eg: Leads, Contacts, etc 2. Click Actions > Import Step 1: Select File In the first step of importing process, you'll need to browse and upload your import file from your machine. Here's how to select your.csv file Click on the Choose File button, browse for desired file that is to be imported. Csv and vcf are the two file formats currently supported. Step 2: Specify Format In the second step of importing process, you'll need to specify import file properties. The details of each property are explained below. Contact us at: [email protected] | 54 (adapted from vtiger CRM 6.0.0Beta© 2004-2013) CRM. DONE SIMPLY. a. File Type : Prism SalesPROsupports two different file types namely: .csv and .vcf. Select the appropriate value from the File Type dropdown that describes the format of the file you've selected in Step:1. For instance, if you've uploaded .csv file, select .csv from File Type field. b. Character Encoding : Make sure you select the right character set in which your import file has been encoded. You'll need to select right encoding of the file irrespective of the file contents. c. Delimiter Prism SalesPRO CRM supports comma (,) and semicolon(;) as field delimiters. The fields in your .csv file are recognized only if they are separated with delimiters. More often, in a csv file, fields are separated with commas(,). d. Header : While importing, the header of your .csv file is compared with fields in Prism SalesPRO CRM. Having a header makes it easy for you to map fields. Click on Has Headercheckbox if your file has a header. First row of your csv file is considered as a header. Please make sure that you uncheck the Has Header field if your file doesn't have a header. Contact us at: [email protected] | 55 (adapted from vtiger CRM 6.0.0Beta© 2004-2013) CRM. DONE SIMPLY. Step 3: Duplicate Record Handling This is an optional step and comes into play if you would enable the checkbox in Step-3 of the import process. This option will help you in tracing out duplicate records. You can also configure the actions to be performed on duplicate records: skip, overwrite and merge. And finally, select desired fields for duplicate lookup by moving fields from the list of Available Fields to Fields to be matched on by using the right and left arrows. Following actions can be performed on duplicate records Skip : After import, duplicate records are identified based on fields criteria. If your Prism SalesPRO CRM and .csv file have records in common, to avoid redundant data, duplicate records in .csv file are not imported into Prism SalesPRO CRM. Overwrite : After import, duplicate records are identified based on fields criteria. If your Prism SalesPRO CRM and .csv file have records in common, to avoid redundant data, the records in .csv file are imported and replaced with records in Prism SalesPRO CRM. Merge : After import, duplicate records are identified based on fields criteria. Merge, unlike overwrite and skip, checks for duplicate records first and then captures only useful information from your .csv file and updates it in your Prism SalesPRO CRM. Contact us at: [email protected] | 56 (adapted from vtiger CRM 6.0.0Beta© 2004-2013) CRM. DONE SIMPLY. Step 4: Map CRM Fields In the final step of import process, you will need to map import file Header/Column to fields in Prism SalesPRO CRM. Fields will be automatically mapped if your csv file's header matches with Prism SalesPRO CRM field label. You can provide default values for mapping fields which will be picked up in case if the value for any field in file will be empty. Also, frequently used mappings can be saved and reused. Saved mappings will be accessible across all users. You can delete the saved mappings by clicking on Trash icon. Contact us at: [email protected] | 57 (adapted from vtiger CRM 6.0.0Beta© 2004-2013) CRM. DONE SIMPLY. After successfully mapping fields, click Import button. Import Results After successfully importing records into Prism SalesPRO CRM, the import results are displayed in tabular format Import More Lets you start all new import again Last Imported Records Displays records imported lately with the help of paging support. Undo Last Import Deletes all records that are created during the last import session. Reference records related to other modules will not be deleted. Contact us at: [email protected] | 58 (adapted from vtiger CRM 6.0.0Beta© 2004-2013) CRM. DONE SIMPLY. Notifications Import Scheduled! If you have more than 1000 records in your file, your import will be scheduled on cron which is configured to run once in every 15 minutes. If you have configured your Outgoing Server and Email id properly, an email notification will be sent to you after successful import Data Corruption Error This error shows up when the import is interrupted for various reasons like crashing in between, or canceled by a user etc. This error indicates that the import table still has records to be imported into the system, but all the information related to the import (like mapping, default values, merge criteria) are all lost. So these records can no more be imported and the user needs to clear this data before starting any other import. Import Locked Error This error will be displayed if the import has been already been started on the same module by any other user in Prism SalesPRO CRM. The details of the module, the user, and the time at which the Import has been locked is detailed within the error message itself. Import Interrupted Error If an Admin user is performing import and if a non-admin user tries to start an import on the same module, he will get to see the Import Locked error. If non-admin user is doing import, and Admin user attempts to import on the same module, same time, he can be able to see the status of the current import and he will even have powers to cancel the current import; Consequently, the Import Interrupted Error will be displayed to non-admin user. Attention! 1. If you would start importing in one particular module, you cannot import records into the same or any other module in Prism SalesPRO CRM. 2. If you would trigger import on a particular module, neither you nor any other user in Prism SalesPRO CRM can import records into the same module. However, other users can import records into other modules in Prism SalesPRO CRM. Exporting Opportunities to External Source If you ever want your data in the form of a spreadsheet, you can export your Opportunities records right away. Steps to export your data 1. Click Opportunities tab 2. Click More button > Export 3. In the Export Records page, you will find the following options Contact us at: [email protected] | 59 (adapted from vtiger CRM 6.0.0Beta© 2004-2013) CRM. DONE SIMPLY. Export selected records Click on the radio button to export the records selected in List view Export data in current page Click on the radio button to export all the records that are on the current list view page Export all data Click on the radio button to export all records in Opportunities Module 3. Click Export Opportunities button. Forecast Amount The Forecast field in Opportunities module helps you in anticipating the scope of business that can be done with the Opportunity record. The values will be populated automatically depending upon Amount and Probability fields. The following calculation is done in Workflows Forecast Amount = Amount * Probability. For instance, if Amount = 1000 and Probability = 20% then the Forecast Amount= 200 The formula has been configured under the workflow Opportunities : Calculate or Update forecast amount. Click on edit icon and modify or disable the workflow according to your requirements Workflows Workflows will streamline your business by automating operations like sending emails, creating activities, updating fields, etc. As tasks are performed automatically, you need not have to execute them manually. Follow few simple steps to setup a workflow 1. 2. 3. 4. Click gear icon icon in the top right Click CRM Settings Click 'Other Settings' drop-down in the left Click Workflows. You can click on pin icon next to it to add a shortcut to your settings home page 5. Click New Workflow Step 1: Scheduling workflow You'll need to provide basic details that include selecting a module and scheduling workflow. Workflows gives you the ability to perform different operations on the selected module such as: sending an email, updating fields, creating a whole new record in another module, creating an event or todo, etc. This answers the question why should we select a module here?. We will discuss the actions that are triggered by the workflows in detail in Step-3. Contact us at: [email protected] | 60 (adapted from vtiger CRM 6.0.0Beta© 2004-2013) CRM. DONE SIMPLY. You'll need to specify when would you like to run the workflow. Workflow running conditions are all predefined and you only have to choose the condition that suite your requirements. 1. Only on the first save- Triggers workflow on your first save ie., when you create a new record. 2. Until the first time the condition is true- Triggers workflow if your condition(Step-2) will be true. Once executed, your workflow will not trigger on the same record again. However, it will trigger actions on other records in the selected module. 3. Every time the record is saved- Triggers workflow every time you will save your record— including first save. 4. Every time the record is modified- Triggers workflow every time you edit and save your record—excluding first save. 5. Schedule -Triggers workflow on a certain date Complicated? Umm, let me give you a few examples for a better understanding Only on first save For instance, I am Rahul, sales agent in ABC company. I manage to send a warm welcome note to new customers through email. I will create a workflow for this purpose and my workflow running condition will be Only on the first save. This will trigger workflow only when new record is created. Until the first time the condition is true Records with 'Sales Stage' equals to 'Closed Won' should be automatically assigned to me. This happens only once in the sales cycle of a record. For that reason, I will create a workflow and have the condition Until the first time the condition is true. Once the workflow is executed, it's not going to perform the same operation on that record again. Every time the record is saved When a deal is won, 5 % share of the total amount goes to the sales agent. I do not waste my time in calculations. I would rather create a workflow. This should execute every time record is saved; as a result, values will be automatically updated. Contact us at: [email protected] | 61 (adapted from vtiger CRM 6.0.0Beta© 2004-2013) CRM. DONE SIMPLY. Every time the record is modified I want Prism SalesPRO CRM to trigger me an email if someone modifies information in 'Amount' field in Opportunities module. I will create a workflow and have the condition Every time the record is modified. This workflow will execute every time edit+save operation will be performed on a record. Adding Condition(s) Workflows will be executed on the records in the selected module. More often, you might only need to perform operations on selected records in that module. This is where conditions will come into play. Workflow will only be executed on the records that satisfy the condition specified by you. For instance, I would like to create a workflow on Leads module. I want the workflow to execute operations on records with 'Lead Status' equals 'Hot'. So, my condition will be Lead Status is Hot You'll find two different options while defining conditions. The functionality of the conditions is described below with an example Contact us at: [email protected] | 62 (adapted from vtiger CRM 6.0.0Beta© 2004-2013) CRM. DONE SIMPLY. 1. All Conditions : Filters records based on AND condition. For instance, Condition 1 AND Condition 2 AND Condition 3 Displays the results if and only if ALL conditions are matched. If one condition is failed, other queries will not be executed. 2. Any Conditions : Filters records based on OR condition.For instance, Condition 1 OR Condition 2 OR Condition 3 Displays the results if at-least ONE condition is matched. If one query is failed, other queries will be executed. Notes! 1. By default, AND condition is enabled between ALL conditions and ANY conditions. This will help you in grouping the two conditions, altogether. 2. You can provide existing or custom criteria while defining conditions. 3. You can define multiple conditions for a workflow by clicking on Add Condition button. After defining conditions, click Next Adding Task(s) The actions that should be executed with the help of workflows can be configured through tasks, while previously defined steps are just to provide directions and inputs. Click Add Task button and select desired task Contact us at: [email protected] | 63 (adapted from vtiger CRM 6.0.0Beta© 2004-2013) CRM. DONE SIMPLY. 1. Send Mail - To send an email notification 2. Invoke Custom Function- To update target fields of records in a module when actions are performed on source field in a different module 3. Create Event - To create a new calendar event 4. Create To do - To create a new calendar task 5. Update fields - To updates field(s) of selected module 6. Create Entity - To create or update records when conditions are satisfied on parent record 7. SMS Task - To send SMS notification Managing Opportunities Following is the list of Operations you can perform on records in Opportunities Home page. 1. Create Custom filters to classify records as per your requirements. You can be able to limit your search to selected columns and search criteria. 2. Click on Mass Actions button and perform actions on desired records like: Edit, Delete and Add comments. 3. Click Settings button > Edit Fields to configure fields and customize the layout of fields through LayoutEditor. 4. Click Settings button > Edit Worlflows to view / create new Workflows on Opportunities. 5. Click Settings button > Edit Picklist values to modify picklist values through Picklist Editor. 6. Search desired records. Set up Top Deal Notifications Be vigilant! Get notified every time you have a big deal. Automate Email alerts for sharing the top deal details with your team members, colleagues or other office staff. Steps to set up email alerts 1. Click Opportunities tab Contact us at: [email protected] | 64 (adapted from vtiger CRM 6.0.0Beta© 2004-2013) CRM. DONE SIMPLY. 2. 3. 4. 5. 6. Click Settings button > Edit Workflows Click New Workflow button Select Opportunities from drop down and click Create button Provide a Description (This is only for future reference) Select a condition to run the workflow. For instance, I will select Only on the first save for my workflow 7. Click New Condition Group button and provide desired condition. For instance, Amount Greater than 10000 is my condition 8. Click Save 9. After Save, click New Task button and select Send Mail as task type and click Create button 10. Provide Task Title (This is only for your reference) 11. Select the Recipients from drop-down or enter manually. 12. Provide the Subject, Email body and click Save. Associate Opportunities with Other Records This will display all-round view of relations of Opportunities module with other modules and maintains log of complete history. You can keep track of following details in Opportunities Module Comments To view the comments exchanged between different users Activities To Schedule an Activity Contacts To associate existing Contact records Products To associate existing products. Basically the products the opportunity record might be interested in. Documents To associate existing documents the opportunity might be interested in. Quotes To view already created quotes or create new quote. Sales Order To view already created Sales Order or to create a new Sales Order. Activity History Displays all the Events and To dos that are completed or status changed as Held Services To associate existing services Contact us at: [email protected] | 65 (adapted from vtiger CRM 6.0.0Beta© 2004-2013) 5. Invoices CRM. DONE SIMPLY. What is an Invoice? An invoice, or a bill, is a non negotiable itemized statement issued for the Products and Services rendered to the customer. It usually contains the Products or Services details, Prices and Taxes, Dates, Parties involved, Address information, Terms and Discounts, and payment methods. Creating an Invoice individually You can easily create an Invoice by entering information in the fields provided. Follow few simple steps to create an Invoice 1. 2. 3. 4. Click All drop-down Click Invoice In the list view of Invoices module, click Add Invoice Provide necessary information the fields, and click Save Creating Invoice from a Quote After the Quote is approved, you can create an Invoice record out of it. Automatically, the information in Quote record is transferred to Invoice record. Follow few simple steps to create an Invoice from Quote record 1. 2. 3. 4. 5. Click All drop-down Click Quotes In the list view of Quotes module, click on desired quote record In the detail view of that quote record, click More drop-down and click Generate Invoice Modify details, if necessary, and click Save Creating Invoice from a Sales Order After the Sales Order is successfully created, you can create an Invoice record out of it. Automatically, the information in Sales Order record is transferred to Invoice record. Follow few simple steps to create an Invoice from Sales Order record 1. 2. 3. 4. 5. Click All drop-down Click Sales Order In the list view of Sales Orders module, click on desired sales order record In the detail view of that sales order record, click More drop-down and click Create Invoice Modify details, if necessary, and click Save. Contact us at: [email protected] | 66 (adapted from vtiger CRM 6.0.0Beta© 2004-2013) CRM. DONE SIMPLY. Creating Invoice from an Opportunity After winning a deal, you can create an Invoice record out of an opportunity record. Automatically, the information in Opportunity record is transferred to Invoice record. Follow few simple steps to create an Invoice from Sales Order record 1. 2. 3. 4. 5. Click All drop-down Click Opportunities In the list view of Opportunities module, click on desired opportunity record In the detail view of that opportunity record, click More drop-down and click Create Invoice Modify details, if necessary, and click Save Operations you can perform in list view of Invoices module List view of the Invoices module enables you to perform mass actions like editing, deleting and filtering records in bulk. In addition, you can also edit fields, workflows and picklist values. Follow few simple steps to manage operations in the list view of Invoices module Click All drop-down Click Invoices Click on checkboxes of desired Invoice records beforehand performing edit and delete operations Click Actions > Edit to modify invoice record(s) in bulk Click Actions > Delete to delete invoice record(s) in bulk Click All Invoices dropdown > Create New Filter to create a new view and sort desired records in one bucket 7. Click wrench icon > Edit Fields to configure fields through Layout Editor 8. Click wrench icon > Edit Workflows to set up workflows through Workflows 9. Click wrench icon > Edit Picklist Fields to configure picklist fields through Picklist Editor. 1. 2. 3. 4. 5. 6. of Invoice record enables you to perform actions like editing, deleting, cloning, exporting the existing record in PDF format, etc Operations you can perform in detail view of Invoice record Detail view of Invoice record enables you to perform actions like editing, deleting, cloning, exporting the existing record in PDF format, etc Follow few simple steps to manage operations in detail view of Invoices module Click All drop-down Click Invoices Click on desired invoice record Click Edit to modify field information Click More > Delete to delete the invoice record Click More > Duplicate to clone an invoice record Click More > Export to PDF to export the invoice record in the default PDF format offered by Prism SalesPRO CRM 8. Click More > Export to PDF to export the invoice record in the default PDF format and export to selected recipients 1. 2. 3. 4. 5. 6. 7. Contact us at: [email protected] | 67 (adapted from vtiger CRM 6.0.0Beta© 2004-2013) CRM. DONE SIMPLY. 9. Click on Export button below PDF Maker drop-down on the left to export customized invoice records 10. Click Tag Cloud drop-down on the left to tag current invoice record. Tagging Records If a particular record holds a lot of importance, you can make it stand out from the list of other records. You can simply tag a record, and view it in Tag Cloud home page widget Follow few simple steps to tag desired record 1. 2. 3. 4. 5. Click desired module(Eg: Leads, Contacts, etc) Click on desired record In the detail view of that record, click on Tag Cloud label in the left side Provide unique name in the text space Click Tag this Record The list of all tagged records can be viewed in Tag Cloud widget in Home page. Points to remember! 1. You can't provide same tag label to same record while different tag labels to same record are accepted 2. Interestingly, when multiple records are tagged with same label, the tag in Tag Cloud widget grows bigger 3. By clicking on a tag you can view all the records that were tagged under it Item Details Block Item Details block in the Invoices module gives you the flexibility to add Products/Services, manage different prices through Price Books, and offer discounts. Follow few simple steps to manage operations in the Item Details block 1. Click All drop-down 2. Click Invoices 3. In the create view or edit view of the existing invoice record, you can locate the Item Details block 4. The operations you can manage in the Item Details block are depicted in the diagram below Contact us at: [email protected] | 68 (adapted from vtiger CRM 6.0.0Beta© 2004-2013) CRM. DONE SIMPLY. Associating Invoice with other records This will display all-round view of the relations of Invoice module with other modules and maintains a log of complete history. Updates To track all modifications done on Invoice record Activities To schedule a task Documents To associate documents with current invoice record Assets To associate assets with current invoice record Payments To accept incoming payments online. You can view all payments done on current invoice record Note! 1.If you generate an Invoice on a product, the stock units will be reduced and values will be updated in the Quantity in the Stock field of that product record Contact us at: [email protected] | 69 (adapted from vtiger CRM 6.0.0Beta© 2004-2013) 6. Quotes CRM. DONE SIMPLY. What is a quote? A Quote is a formal statement issued by a seller to the prospective buyer; basically, upon inquiry or request for a quotation. It contains the detailed list of Products and Services, Prices and Taxes, Dates, Parties involved, Address information, Terms and Discounts etc. Creating Quotes Individually You can easily create Quotes by entering information in the fields provided. Follow few simple steps to create a Quote 1. 2. 3. 4. Click All drop-down Click Quotes In the list view of quotes module, click Add Quote Provide necessary information in the fields, and click Save Operations you can perform in list view of Quotes module List view of Quotes module enables you to perform mass actions like editing, deleting and filtering records in bulk. In addition, you can also edit fields, workflows and picklist values. Follow few simple steps to manage operations in list view of Quotes module 1. 2. 3. 4. 5. 6. Click All drop-down Click Quotes Click on checkboxes of desired quote records beforehand performing edit and delete operations Click Actions > Edit to modify quote record(s) in bulk Click Actions > Delete to delete quote record(s) in bulk Click All Quotes dropdown > Create New Filter to create a new view and sort desired records into one bucket 7. Click wrench icon > Edit Fields to configure fields through Layout Editor 8. Click wrench icon > Edit Workflows to set up workflows through Workflows 9. Click wrench icon > Edit Picklist Fields to configure picklist fields through Picklist Editor. Operations you can perform in detail view of quote record Detail view of quote record enables you to perform actions like editing, deleting, cloning, exporting the existing record in PDF format, etc Follow few simple steps to manage operations in detail view of Quotes module 1. 2. 3. 4. Click All drop-down Click Quotes Click on desired quote record Click Edit to modify field information Contact us at: [email protected] | 70 (adapted from vtiger CRM 6.0.0Beta© 2004-2013) CRM. DONE SIMPLY. 5. Click More > Delete to delete quote record 6. Click More > Duplicate to clone present quote record 7. Click More > Export to PDF to export the quote record in default PDF format offered by Prism SalesPRO CRM 8. Click More > Export to PDF to export the quote record in default PDF format and export to selected recipients 9. Click on Export button under PDF Maker drop-down in the left to export customized quote records 10. Click Tag Cloud drop-down in the left to tag current quote record. More details Item Details block Item Details block in Quotes module gives you the flexibility to add Products/Services, manage different prices through Price Books, and offer discounts. Follow few simple steps to manage operations in Item Details block 1. 2. 3. 4. Click All drop-down Click Quotes In the create view or edit view of existing quote record, you can locate the Item Details block The operations you can manage in Item Details block are depicted in diagram below Associating Quotes with other records: This will display all-round view of relations of Quotes module with other modules and maintains log of complete history. Updates To track all modifications done on quote record Activities To schedule a task Documents To associate documents with current quote record Contact us at: [email protected] | 71 (adapted from vtiger CRM 6.0.0Beta© 2004-2013) CRM. DONE SIMPLY. 7. Sales Orders What is a sales order? Sales Order is an Internal document generated within the company after the Purchase Order is received. It helps your sales team track all the Products or Services that should be manufactured, shipped etc according to the agreed prices and dates. Sales Order comprise Sales Order number, Purchase Order, Recurring Invoice, Billing and Shipping Address, Products or Services, Prices and Taxes etc. Creating Sales Order individually You can easily create a sales order by entering information in the fields provided. Follow few simple steps to create an sales order 1. 2. 3. 4. Click All drop-down Click Sales Orders In the list view of sales order module, click Add Sales Order Provide necessary information the fields, and click Save Creating Sales Order from a Quote After the quote is approved, you can create sales order record out of it. Automatically, the information in quote record is transferred to sales order record. Follow few simple steps to create sales order from quote record 1. 2. 3. 4. 5. Click All drop-down Click Quotes In the list view of Quotes module, click on desired quote record In the detail view of that quote record, click More drop-down and click Generate Sales Order Modify details, if necessary, and click Save Operations you can perform in list view of Sales Orders module List view of Sales Orders module enables you to perform mass actions like editing, deleting and filtering records in bulk. In addition, you can also edit fields, workflows and picklist values. Follow few simple steps to manage operations in list view of Sales Orders module 1. Click All drop-down 2. Click Sales Orders 3. Click on checkboxes of desired sales order records beforehand performing edit and delete operations 4. Click Actions > Edit to modify sales order record(s) in bulk 5. Click Actions > Delete to delete sales order record(s) in bulk Contact us at: [email protected] | 72 (adapted from vtiger CRM 6.0.0Beta© 2004-2013) CRM. DONE SIMPLY. 6. Click All Sales Orders dropdown > Create New Filter to create a new view and sort desired records in one bucket 7. Click wrench icon > Edit Fields to configure fields through Layout Editor 8. Click wrench icon > Edit Workflows to set up workflows through Workflows 9. Click wrench icon > Edit Picklist Fields to configure picklist fields through Picklist Editor. Operations you can perform in detail view of sales order record Detail view of sales order record enables you to perform actions like editing, deleting, cloning, exporting the existing record in PDF format, etc Follow few simple steps to manage operations in detail view of Sales Orders module Click All drop-down Click Sales Orders Click on desired sales order record Click Edit to modify field information Click More > Delete to delete sales order record Click More > Duplicate to clone current sales order record Click More > Export to PDF to export the sales order record in default PDF format offered by Prism SalesPRO CRM 8. Click More > Export to PDF to export the sales order record in default PDF format and export to selected recipients 9. Click on Export button under PDF Maker drop-down in the left to export customized sales order records 10. Click Tag Cloud drop-down in the left to tag current sales order record. More details 1. 2. 3. 4. 5. 6. 7. Item Details block Item Details block in Sales Orders module gives you the flexibility to add Products/Services, manage different prices through Price Books, and offer discounts. Follow few simple steps to manage operations in Item Details block 1. Click All drop-down 2. Click Sales Orders 3. In the create view or edit view of existing sales order record, you can locate the Item Details block 4. The operations you can manage in Item Details block are depicted in diagram below Contact us at: [email protected] | 73 (adapted from vtiger CRM 6.0.0Beta© 2004-2013) CRM. DONE SIMPLY. Recurring Invoice Your organization might have to create invoices periodically depending upon the businesses you deal. Prism SalesPRO CRM gives you the flexibility to generate recurring invoices from sales order records. Follow few simple steps to create recurring invoices 1. 2. 3. 4. Click All tab on menu bar Click Sales Orders Click on desired sales order record In the detail view of a sales order record, you can find Recurring Invoice Information' block 1. Enable Recurring : Enable the check-box to initiate generating invoices periodically 2. Start Period : Specify or select a date on which your first invoice should be generated 3. Payment Duration : Select the number of days within which your customer is supposed to make payment. Also, in the invoice record, Due Date is calculated asInvoice generated date + Payment Duration 4. Frequency : Invoice generating cycle depends on frequency you set. For instance, if you select Monthly, invoice is generated once in every month after Start Date 5. End Period : Specify or select a date on which you want your invoice to stop generating 6. Invoice Status : The newly created invoice record picks up this status automatically. Contact us at: [email protected] | 74 (adapted from vtiger CRM 6.0.0Beta© 2004-2013) CRM. DONE SIMPLY. Associating Sales Orders with other records This will display all-round view of relations of Sales Orders module with other modules and maintains log of complete history. Updates To track all modifications done on sales order record Activities To schedule a task Documents To associate documents with current sales order record Invoice To view the invoice record created from current sales order record Contact us at: [email protected] | 75 (adapted from vtiger CRM 6.0.0Beta© 2004-2013) 8. Purchase Orders CRM. DONE SIMPLY. What is a Purchase Order? A purchase order is a legal document handled over to a vendor to purchase Products or Services. It offers you a channel to explain your requirements and intentions explicitly. Purchase Orders comprise the purchase order number, vendor details, product or service details, terms and conditions, prices, etc. Creating Purchase Order individually You can easily create a purchase order by entering information in the fields provided. Follow few simple steps to create a purchase order 1. 2. 3. 4. Click All drop-down Click Purchase Orders In the list view of the purchase order module, click Add Purchase Order Provide necessary information the fields, and click Save Operations you can perform in list view of Purchase Orders module List view of the Purchase Orders module enables you to perform mass actions like editing, deleting and filtering records in bulk. In addition, you can also edit fields, workflows and picklist values. Follow few simple steps to manage operations in the list view of the Purchase Orders module 1. Click All drop-down 2. Click Purchase Orders 3. Click on the checkboxes of desired purchase order records beforehand performing edit and delete operations 4. Click Actions > Edit to modify purchase order record(s) in bulk 5. Click Actions > Delete to delete purchase order record(s) in bulk 6. Click All Purchase Orders dropdown > Create New Filter to create a new view and sort desired records in one bucket 7. Click wrench icon > Edit Fields to configure fields through Layout Editor 8. Click wrench icon > Edit Workflows to set up workflows through Workflows 9. Click wrench icon > Edit Picklist Fields to configure picklist fields through Picklist Editor Operations you can perform in detail view of purchase order record Detail view of the purchase order record enables you to perform actions like editing, deleting, cloning, exporting the existing record in PDF format, etc Follow few simple steps to manage operations in detail view of the Purchase Orders module 1. 2. 3. 4. 5. 6. Click All drop-down Click Purchase Orders Click on desired purchase order record Click Edit to modify field information Click More > Delete to delete purchase order record Click More > Duplicate to clone a current purchase order record Contact us at: [email protected] | 76 (adapted from vtiger CRM 6.0.0Beta© 2004-2013) CRM. DONE SIMPLY. 7. Click More > Export to PDF to export the purchase order record in the default PDF format offered by Prism SalesPRO CRM 8. Click More > Export to PDF to export the purchase order record in the default PDF format and export to selected recipients 9. Click on Export button below PDF Maker drop-down on the left to export customized purchase order records 10. Click Tag Cloud drop-down on the left to tag current purchase order record. More details Item Details block Item Details block in the Purchase Orders module gives you the flexibility to add Products/Services, manage different prices through Price Books, and offer discounts. Follow few simple steps to manage operations in the Item Details block 1. Click All drop-down 2. Click Purchase Orders 3. In the create view or edit view of existing purchase order record, you can locate the Item Details block 4. The operations you can manage in the Item Details block are depicted in the diagram below Associating Purchase Orders with other records This will display all-round view of relations of Purchase Orders module with other modules and maintains a log of complete history. Updates To track all modifications done on purchase order record Activities To schedule a task Payments To view payments done on current purchase order record Documents To associate new or existing documents with the current purchase order record Contact us at: [email protected] | 77 (adapted from vtiger CRM 6.0.0Beta© 2004-2013) 9. Home CRM. DONE SIMPLY. What is a Home? Prism SalesPRO CRM offers different home page widgets that will provide graphical representation of current status and key performance indicators. As complete analysis of data is displayed on one single screen, decisions and conclusions can be monitored at a glance. List of widgets displayed on Home page Admin users can deny normal user's access to Home page through Profiles. Widgets History It displays the operations performed on records in modules such as Create and Edit. It also displays the comments made on a record. As it displays complete history, it will help the administrators to track the changes made on records. History is a default widget and cannot be deleted. Upcoming Activities It displays the list of Events and to dos that are scheduled to be done in future. Upcoming Activities is a default widget and cannot be deleted. Funnel It displays the list of Opportunity records according to their Sales stages. Opportunities by Stage It displays the graphical representation of Opportunity records of different users according to Sales stages. Total Revenue Pie diagram of revenues brought by different Sales reps are displayed Top Opportunities Detailed list of Opportunity records and revenues are displayed. Notes Opportunities with sales stage "Closed Won" and "Closed Lost" are not displayed. Leads by Status Graphical representation of Leads are displayed according to the Lead Status. Leads by Source Graphical representation of Leads are displayed according to the Lead Source. Leads by Industry Graphical representation of Leads are displayed according to the Industry they belong to. Overdue Activities Displays the list of pending events and to dos. Tickets by Status Graphical representation of Trouble Tickets is displayed according to their Status. Open Tickets Pie diagram displays open tickets assigned to different users in your Prism SalesPRO CRM account. Contact us at: [email protected] | 78 (adapted from vtiger CRM 6.0.0Beta© 2004-2013) CRM. DONE SIMPLY. 10. Reports What is a Report? Reports provides your sales team the ability to extract only data relevant to them from thousands of records. You may use these report features to get an overview of customer related activities and to draw conclusions on how to improve your sales process. You can generate reports based on desired criteria by using filters. Creating a Report You can group records of a kind in Folders. By default, all reports will be stored in All Reports folder. You can also create a custom folder to store your reports. Follow few simple steps to create a new report 1. Click All dropdown 2. Click Reports tab 3. Click Add Report button Step 1: Report Details In Step 1 of creating reports, you'll need to provide a few basic details. The information of fields that are displayed in Step 1 are tabulated below 1. Report Name Provide desired label for your report 2. Report Folder Select from the existing folders to store your report 3. Description Provide report description. This is just for future reference 4. Primary Module Select a module to create report on records of that module Contact us at: [email protected] | 79 (adapted from vtiger CRM 6.0.0Beta© 2004-2013) 5. Select Related Modules CRM. DONE SIMPLY. Select maximum two related modules to include fields of those modules while creating a report Notes! You can also proceed without selecting any related modules 4. Click Next button Step 2: Select Columns The second step in creating reports enables you to select columns to be displayed in your report, group by a particular field in ascending or descending order, and perform calculations on integer and currency fields. 5. Select desired columns to be displayed on your report Selecting columns You can select fields from selected module to be displayed in your report. You'll need to click on text space provided to select fields. Additionally, you can also select fields from related modules you've selected in Step 1. Group By While generating reports, more often, the information is not uniformly distributed. The information under same field is scattered and it makes the report cumbersome to handle. This feature enables you to group information basing on selected field. You can group them either in ascending or descending order of alphabets. For instance, consider multiple contacts that are related to same organization. While creating a report on Contacts module, the results can be scattered. Contact us at: [email protected] | 80 (adapted from vtiger CRM 6.0.0Beta© 2004-2013) CRM. DONE SIMPLY. We can group the report by Organization Name Organization name is now grouped making the report look so clear and understandable Calculations Select check-boxes to perform calculations on Currency and Numeric fields. 5. Click Next button Step 3: Filters Records filtering conditions has been made very simple. Conditions are grouped into two blocks. 6. Provide condition to filter selected records. You can skip this step if you'd like to create report on all existing records in selected module. 1. All Conditions : Filters records based on AND condition. For instance, Condition 1 AND Condition 2 AND Condition 3 Contact us at: [email protected] | 81 (adapted from vtiger CRM 6.0.0Beta© 2004-2013) CRM. DONE SIMPLY. Displays the results if and only if ALL conditions will be matched. If one condition is failed, other queries will not be executed. 2.Any Conditions : Filters records based on OR condition. For instance, Condition 1 OR Condition 2 OR Condition 3 Displays the results if at-least ONE condition is matched. If one query is failed, other queries will be executed. Notes! 1. By default, AND condition is enabled between ALL conditions and ANY conditions. This will help you in grouping the two conditions. 2. You can also filter the records on custom and existing date fields. You can provide existing or custom criteria to filter records. 3. The conditions are dynamic. For instance, Today as filter condition will display all the records on current day. It will not display the same records tomorrow. It will display the records of present day instead. You can also proceed without creating any filter. That will display all the records of selected module. 7. Click Generate Report button Customizing Report If you want to modify the same report all over again, you can click on Customize Report button in the detail view of the report. Contact us at: [email protected] | 82 (adapted from vtiger CRM 6.0.0Beta© 2004-2013) CRM. DONE SIMPLY. Exporting Report This feature gives you the flexibility to export your reports to .csv or .xlsx files. You'll need to click on corresponding icon in the detail view of the record to export it. Additionally, you can also print your reports by clicking on print icon in the detail view of the report. Contact us at: [email protected] | 83 (adapted from vtiger CRM 6.0.0Beta© 2004-2013) 11. Campaigns CRM. DONE SIMPLY. What is a campaign? Campaigns offers your marketing team the ability to schedule and execute mass marketing campaigns. Prism SalesPRO CRM helps you create effective marketing campaigns with selected list of leads, contacts, opportunities and Organizations. Creating Campaigns Manually You can enter Campaign details manually from Campaigns Module. This might come handy if you will have to enter Campaign details individually. Steps to create Campaign records manually 1. In Campaigns tab, click on Add Campaign button 2. In the Create Campaign view, fill in the Campaign details 3. Click Save Quick Create You can enter basic details of Campaign record through Quick create. This might be helpful if you are running out of time. Steps to create Campaign records through Quick create 1. 2. 3. 4. Click (+) Icon on top right corner Click Campaign In the Create Campaign view, fill in the Campaign details Click Save Create Emailing List You can send emails to selected list of Leads, Contacts and Organization records. You can select records from existing list, filters, or you can create records manually. Steps to create an Emailing list 1. 2. 3. 4. 5. 6. Click on Campaigns tab In the detail view of desired Campaign record, click on Contacts from related modules list Click Select One drop-down to select from existing filters, and click Load List button Click Select Contacts button to select from existing records Click Add Contact to add from existing Contacts After your list is finalized, click Send email button to start sending emails Contact us at: [email protected] | 84 (adapted from vtiger CRM 6.0.0Beta© 2004-2013) CRM. DONE SIMPLY. 12. Projects What is a Project? Project is a planned work that involves specific goals, start date and target end date, budgets, progress etc. Comments will help you to collaborate among users. You can also track the issues identified and fixed by associating projects with Tickets module. Creating Projects Manually You can enter Project details manually from Projects Module. This might come handy if you will have to enter Project details individually. Steps to create Project records manually 1. In Projects tab, click on Add Project button 2. In the Create Project view, fill in the project details 3. Click Save Quick Create You can enter basic details of Project record through Quick create. This might be helpful if you are running out of time. Steps to create Project records through Quick create 1. 2. 3. 4. Click (+) Icon on top right corner Click Project In the Create Project view, fill in the project details Click Save Importing Projects from Existing files Prism SalesPRO CRM supports importing Projects from external sources such as .csv and vcf files. As it saves lots of time and efforts, it might come in really helpful for your team to import thousands of records instantly. Exporting Projects to External Source If you ever want your data in the form of a spreadsheet, you can export your Projects records right away. Steps to export your data 1. Click Projects tab 2. Click Actions button > Export 3. In the Export Records page, you will find the following options Contact us at: [email protected] | 85 (adapted from vtiger CRM 6.0.0Beta© 2004-2013) CRM. DONE SIMPLY. Export selected records Click on the radio button to export the records selected in List view Export data in current page Click on the radio button to export all the records that are on the current list view page Export all data Click on the radio button to export all records in Projects Module 4.Click Export Projects button. Managing Projects # List of operations you can perform on records in Projects Home page 1 Create Custom filters to classify records as per your requirements. You can be able to limit your search to selected columns and search criteria. 2 Click on Actions button and perform actions on desired records like: Edit and Delete 3 Click Settings button > Edit Fields to configure fields and customize the layout of fields through Layout Editor 4 Click Settings button > Edit Workflows to view / create new Workflows on Projects 5 Click Settings button > Edit Picklist values to modify picklist values through Picklist Editor 6 Search desired records # List of operations you can perform on records in detail view of Project record 1 Click Edit button to modify existing content. 2 Click More > Delete to delete the existing Project record 3 Click More > Duplicate to clone existing Project record 4 Click More > Add Project Task to start creating a Project Task 5 Click More > Add Note to start creating a new document 6 Click More > View History to see the list of operations done on Project record Contact us at: [email protected] | 86 (adapted from vtiger CRM 6.0.0Beta© 2004-2013) CRM. DONE SIMPLY. Fields Information Information of fields in the Projects module. Project Name Provide name of the project. This field is mandatory. Start Date Specify the project start date Target End Date Provide tentative project end date Actual End Date Provide actual end date after the project is completed Status Provide the status of the project Progress Provide the progress on project advancement Target Budget Provide anticipated revenues for the project Associating Projects with Other Records This will display all-round view of relations of Projects module with other modules and maintains log of complete history. You can keep track of following details in Projects Module Comments To view all the comments exchanged across different users Updates Displays history of actions performed on Project record like Project Tasks, Project Milestones, Tickets etc Project Tasks View existing Project Tasks or create new Project Task and associate with Project record Project Milestones View existing Project Milestones or create new Project Milestones and associate with Project record Documents Notes added to Project record will be displayed as Documents. Trouble Tickets To view cases(Trouble Tickets) associated with Project record Charts To view graphical representation on how Project is advancing Events and To Do To view activities scheduled to accomplish a Project Note!.The Charts in the Projects module are displayed basing upon the Progress field in Project Tasks module. Contact us at: [email protected] | 87 (adapted from vtiger CRM 6.0.0Beta© 2004-2013) 13. Products CRM. DONE SIMPLY. What is a Product? Products represent stock of goods in your Inventory. Products can be either procured from your suppliers or rendered to your customers depending upon nature of your Organization. Interestingly, if your company manages both selling and purchasing goods, Products module will act as a bridge between Sales and Purchase departments. Create Products Manually You can enter Product details manually from Products Module. This might come handy if you will have to enter Product details individually. Steps to create Product records manually 1. In Products tab, click on Add Product button 2. In the Create Product view, fill in the Product details 3. Click Save Quick Create You can enter basic details of Product record through Quick create. This might be helpful if you are running out of time. Steps to create Product records through Quick create 1. 2. 3. 4. Click (+) Icon on top right corner Click Product In the Create Product view, fill in the Product details Click Save Import existing data If you have your data in .csv or .vcf format, you can import thousands of records instantly and effectively. Prism SalesPRO CRM supports importing data into different modules including Leads, Contacts, Organizations, Opportunities, etc. Check List 1. Mandatory Fields Make sure your file addresses all mandatory fields. For instance, Last Name and Company fields are mandatory in Leads module. You cannot proceed with importing until or unless you have a value within these fields of your .csv file. If the value of mandatory fields is empty, they will be set to '????'. 2. File Size Make sure the file to be imported do not exceed 5 MB size 3. Permissions Contact us at: [email protected] | 88 (adapted from vtiger CRM 6.0.0Beta© 2004-2013) CRM. DONE SIMPLY. Admin users can disable import access to non-admin users from Profile level. If you can't find the Import option, you should contact your Administrator to enable import permission for your profile Getting Started This tutorial will walk you through different steps involved in importing records into your Prism SalesPRO CRM account. The entire process is simple and straightforward. Follow few simple steps to import data into Prism SalesPRO CRM 1. Click [Module] tab. Eg: Leads, Contacts, etc 2. Click Actions > Import Step 1: Select File In the first step of importing process, you'll need to browse and upload your import file from your machine. Here's how to select your.csv file Click on the Choose File button, browse for desired file that is to be imported. Csv and vcf are the two file formats currently supported. Step 2: Specify Format In the second step of importing process, you'll need to specify import file properties. The details of each property are explained below. Contact us at: [email protected] | 89 (adapted from vtiger CRM 6.0.0Beta© 2004-2013) CRM. DONE SIMPLY. a. File Type: Prism SalesPROsupports two different file types namely: .csv and .vcf. Select the appropriate value from the File Type dropdown that describes the format of the file you've selected in Step:1. For instance, if you've uploaded .csv file, select .csv from File Type field. b. Character Encoding: Make sure you select the right character set in which your import file has been encoded. You'll need to select right encoding of the file irrespective of the file contents. c. Delimiter: Prism SalesPRO CRM supports comma (,) and semicolon(;) as field delimiters. The fields in your .csv file are recognized only if they are separated with delimiters. More often, in a csv file, fields are separated with commas (,). d. Header: While importing, the header of your .csv file is compared with fields in Prism SalesPRO CRM. Having a header makes it easy for you to map fields. Click on Has Headercheckbox if your file has a header. First row of your csv file is considered as a header. Please make sure that you uncheck the Has Header field if your file doesn't have a header. Step 3: Duplicate Record Handling This is an optional step and comes into play if you would enable the checkbox in Step-3 of the import process. This option will help you in tracing out duplicate records. You can also configure the actions to be performed on duplicate records: skip, overwrite and merge. And finally, select desired fields for duplicate lookup by moving fields from the list of Available Fields to Fields to be matched on by using the right and left arrows. Contact us at: [email protected] | 90 (adapted from vtiger CRM 6.0.0Beta© 2004-2013) CRM. DONE SIMPLY. Following actions can be performed on duplicate records Skip: After import, duplicate records are identified based on fields criteria. If your Prism SalesPRO CRM and .csv file have records in common, to avoid redundant data, duplicate records in .csv file are not imported into Prism SalesPRO CRM. Overwrite: After import, duplicate records are identified based on fields criteria. If your Prism SalesPRO CRM and .csv file have records in common, to avoid redundant data, the records in .csv file are imported and replaced with records in Prism SalesPRO CRM. Merge: After import, duplicate records are identified based on fields criteria. Merge, unlike overwrite and skip, checks for duplicate records first and then captures only useful information from your .csv file and updates it in your Prism SalesPRO CRM. Learn more Here's a sample image that depicts how all these properties work Step 4: Map CRM Fields In the final step of import process, you will need to map import file Header/Column to fields in Prism SalesPRO CRM. Fields will be automatically mapped if your csv file's header matches with Prism SalesPRO CRM field label. Here's a list of helpful tips before you get started. Contact us at: [email protected] | 91 (adapted from vtiger CRM 6.0.0Beta© 2004-2013) CRM. DONE SIMPLY. You can provide default values for mapping fields which will be picked up in case if the value for any field in file will be empty. Also, frequently used mappings can be saved and reused. Saved mappings will be accessible across all users. You can delete the saved mappings by clicking on Trash icon. After successfully mapping fields, click Import button. Import Results After successfully importing records into Prism SalesPRO CRM, the import results are displayed in tabular format Contact us at: [email protected] | 92 (adapted from vtiger CRM 6.0.0Beta© 2004-2013) CRM. DONE SIMPLY. Import More Lets you start all new import again Last Imported Records Displays records imported lately with the help of paging support. Undo Last Import Deletes all records that are created during the last import session. Reference records related to other modules will not be deleted. Notifications Import Scheduled! If you have more than 1000 records in your file, your import will be scheduled on cron which is configured to run once in every 15 minutes. If you have configured your Outgoing Server and Email id properly, an email notification will be sent to you after successful import Data Corruption Error This error shows up when the import is interrupted for various reasons like crashing in between, or canceled by a user etc. This error indicates that the import table still has records to be imported into the system, but all the information related to the import (like mapping, default values, merge criteria) are all lost. So these records can no more be imported and the user needs to clear this data before starting any other import. Import Locked Error This error will be displayed if the import has been already been started on the same module by any other user in Prism SalesPRO CRM. The details of the module, the user, and the time at which the Import has been locked is detailed within the error message itself. Import Interrupted Error If an Admin user is performing import and if a non-admin user tries to start an import on the same module, he will get to see the Import Locked error. If non-admin user is doing import, and Admin user attempts to Contact us at: [email protected] | 93 (adapted from vtiger CRM 6.0.0Beta© 2004-2013) CRM. DONE SIMPLY. import on the same module, same time, he can be able to see the status of the current import and he will even have powers to cancel the current import; Consequently, the Import Interrupted Error will be displayed to non-admin user. Attention! 1.If you would start importing in one particular module, you cannot import records into the same or any other module in Prism SalesPRO CRM. 2.If you would trigger import on a particular module, neither you nor any other user in Prism SalesPRO CRM can import records into the same module. However, other users can import records into other modules in Prism SalesPRO CRM. Managing Products # List of operations you can perform on records in Products Home page 1 Create Custom filters to classify records as per your requirements. You can be able to limit your search to selected columns and search criteria. 2 Click on Mass Actions button and perform actions on desired records like: Edit and Delete 3 Click Settings button > Edit Fields to configure fields and customize the layout of fields through Layout Editor 4 Click Settings button > Edit Workflows to view / create new Workflows on Products 5 Click Settings button > Edit Picklist values to modify picklist values through Picklist Editor 6 Search desired records # List of operations you can perform on records in detail view of Product record 1 Click Edit button to modify existing content. 2 Click More > Delete to delete the existing Product record 3 Click More > Create Quote to start creating a new Quote on the Product record 4 Click More > Create Invoice to start creating a new Invoice on the Product record 5 Click More > Create Sales Order to start creating a new Sales Order on the Product record 6 Click More > Create Purchase Order to start creating a new Purchase Order on the Product record Contact us at: [email protected] | 94 (adapted from vtiger CRM 6.0.0Beta© 2004-2013) CRM. DONE SIMPLY. Exporting Products to External Source If you ever want your data in the form of a spreadsheet, you can export your Products records right away. Steps to export your data 1. Click Products tab 2. Click More button > Export 3. In the Export Records page, you will find the following options Export selected records Click on the radio button to export the records selected in List view Export data in current page Click on the radio button to export all the records that are on the current list view page Export all data Click on the radio button to export all records in Products Module 4. Click Export Products button. Fields Information Information of fields in the Products module. Product Name Provide name of the product. This field is mandatory. Product Active Enable the check-box if product is available Sales Start Date Specify start date of sales Sales End Date Specify sales end date Support Start Date Specify the support start date Support End Date Specify the support end date Vendor Name Select the name of the product vendor Unit Price Specify the price of the Product. You can imply different taxes and work with different currencies. Learn more Handler Select from the users or group to specify Product owner Contact us at: [email protected] | 95 (adapted from vtiger CRM 6.0.0Beta© 2004-2013) CRM. DONE SIMPLY. Qty. in Stock Specify the Quantity of stock present in the Inventory Product Image Provide a image to your product Note! The Quantity in Stock field shows the units of stock present in inventory. If you would generate an Invoice on the product, the quantity in the stock will be reduced. If you would generate a Purchase Order on the product and status has reached to Received Shipment, the Quantity in the Stock field will be increased and field values will be updated automatically. Select Products While creating Invoices, Sales Orders, Purchase Orders and Quotes, click on Products Icon, highlighted below, to select from existing products. Also, click on Add Products button to include more products. Dealing with Currencies and Taxes Manage International Currencies In the create view of a Product, you can be able to set multiple currencies for its use while generating Invoices, Sales Orders, Purchase Orders and Quotes. To achieve this, fill Unit Price field and click on more currencies link. You can find it under Pricing Information block. Product Prices popup will be displayed on your screen. This will display the list of different currencies. Contact us at: [email protected] | 96 (adapted from vtiger CRM 6.0.0Beta© 2004-2013) CRM. DONE SIMPLY. Currency Displays the list of currencies you configured. Enable the checkbox to manage operations on desired currency Price Prices are updated according to the conversion rates. However, you can modify the prices according to your requirements Conversion Rate Displays the values according to conversion rates Reset Price Reverts back the modified currency values to default values according to conversion rates Base Currency Select the radio button of desired currency to make it a base currency. Comes handy while managing international currencies In the create view of Invoices, Sales Orders, Purchase Orders and Quotes, select desired currency. Automatically, the values modified lately in the Product will be updated instead of updating the values according to conversion rates. Imply Taxes In the create or edit view of a Product, you can find the taxes under Pricing Information block. Values will be automatically populated if you would enable the check-boxes. You can make modifications in tax values for products individually. Contact us at: [email protected] | 97 (adapted from vtiger CRM 6.0.0Beta© 2004-2013) CRM. DONE SIMPLY. This feature comes into action if you would select Tax Mode as Individual while creating Invoices, Sales Orders, Purchase Orders and Quotes. The tax values modified lately in Product record will be displayed instead of populating taxes from Tax Calculations. Product Bundles This feature helps you to have sub-products for products. While creating Sales Orders, Purchase Orders, Invoices and Quotes, upon selecting parent product, all sub products are automatically selected into the cart. Selecting sub-products under parent product Follow few simple steps to select sub-products under parent product 1. 2. 3. 4. 5. Click All drop-down in menu bar Click Products Click on desired product. (The parent product) In the detail view of parent product, click Product Bundles in the right Click on Add Product or Select Products to create new product, and select from existing products respectively Contact us at: [email protected] | 98 (adapted from vtiger CRM 6.0.0Beta© 2004-2013) CRM. DONE SIMPLY. After successfully creating a product bundle, the parent product and sub-products under it are ready for selection under Invoices, PO, SO and Quotes. For instance, we will add product bundle on an invoice record 1. Click All drop-down 2. Click Invoices 3. In the Item Details block, select parent product. All sub-products associated with parent product are added automatically. Notes! 1. Price of sub-products doesn't affect the Net Price in Invoices, Quotes, SO and PO 2.The quantity of sub products is reduced when an invoice is generated on parent product Contact us at: [email protected] | 99 (adapted from vtiger CRM 6.0.0Beta© 2004-2013) CRM. DONE SIMPLY. 14. Services What is a Service? Services refer to the free or paid assistance you would offer to benefit your customers. In general, services are non-stock items rendered to your customers. Services do not have bundles. Create Services Manually You can enter Service details manually from Services module. This might come handy if you will have to enter Service details individually. Steps to create Service records manually 1. In Services tab, click on Add Service button 2. In the Create Service view, fill in the Service details 3. Click Save Quick Create You can enter basic details of Service record through Quick create. This might be helpful if you are running out of time. Steps to create Service records through Quick create 1. 2. 3. 4. Click (+) Icon on top right corner Click Service In the Create Service view, fill in the Service details Click Save Import existing data If you have your data in .csv or .vcf format, you can import thousands of records instantly and effectively. Prism SalesPRO CRM supports importing data into different modules including Leads, Contacts, Organizations, Opportunities, etc. Check List 1. Mandatory Fields Make sure your file addresses all mandatory fields. For instance, Last Name and Company fields are mandatory in Leads module. You cannot proceed with importing until or unless you have a value within these fields of your .csv file. If the value of mandatory fields is empty, they will be set to '????'. 2. File Size Make sure the file to be imported do not exceed 5 MB size 3. Permissions Admin users can disable import access to non-admin users from Profile level. If you can't find the Import option, you should contact your Administrator to enable import permission for your profile Contact us at: [email protected] | 100 (adapted from vtiger CRM 6.0.0Beta© 2004-2013) CRM. DONE SIMPLY. Getting Started This tutorial will walk you through different steps involved in importing records into your Prism SalesPRO CRM account. The entire process is simple and straightforward. Follow few simple steps to import data into Prism SalesPRO CRM 1. Click [Module] tab. Eg: Leads, Contacts, etc 2. Click Actions > Import Step 1: Select File In the first step of importing process, you'll need to browse and upload your import file from your machine. Here's how to select your.csv file Click on the Choose File button, browse for desired file that is to be imported. Csv and vcf are the two file formats currently supported. Step 2: Specify Format In the second step of importing process, you'll need to specify import file properties. The details of each property are explained below Contact us at: [email protected] | 101 (adapted from vtiger CRM 6.0.0Beta© 2004-2013) CRM. DONE SIMPLY. a. File Type: Prism SalesPROsupports two different file types namely: .csv and .vcf. Select the appropriate value from the File Type dropdown that describes the format of the file you've selected in Step:1. For instance, if you've uploaded .csv file, select .csv from File Type field. b. Character Encoding: Make sure you select the right character set in which your import file has been encoded. You'll need to select right encoding of the file irrespective of the file contents. c. Delimiter: Prism SalesPRO CRM supports comma (,) and semicolon(;) as field delimiters. The fields in your .csv file are recognized only if they are separated with delimiters. More often, in a csv file, fields are separated with commas(,) d. Header: While importing, the header of your .csv file is compared with fields in Prism SalesPRO CRM. Having a header makes it easy for you to map fields. Click on Has Headercheckbox if your file has a header. First row of your csv file is considered as a header. Please make sure that you uncheck the Has Header field if your file doesn't have a header. Step 3: Duplicate Record Handling This is an optional step and comes into play if you would enable the checkbox in Step-3 of the import process. This option will help you in tracing out duplicate records. You can also configure the actions to be performed on duplicate records: skip, overwrite and merge. And finally, select desired fields for duplicate lookup by moving fields from the list of Available Fields to Fields to be matched on by using the right and left arrows. Contact us at: [email protected] | 102 (adapted from vtiger CRM 6.0.0Beta© 2004-2013) CRM. DONE SIMPLY. Following actions can be performed on duplicate records Skip : After import, duplicate records are identified based on fields criteria. If your Prism SalesPRO CRM and .csv file have records in common, to avoid redundant data, duplicate records in .csv file are not imported into Prism SalesPRO CRM. Overwrite : After import, duplicate records are identified based on fields criteria. If your Prism SalesPRO CRM and .csv file have records in common, to avoid redundant data, the records in .csv file are imported and replaced with records in Prism SalesPRO CRM. Merge : After import, duplicate records are identified based on fields criteria. Merge, unlike overwrite and skip, checks for duplicate records first and then captures only useful information from your .csv file and updates it in your Prism SalesPRO CRM. Duplicate Merge Importing Sometimes finding and eliminating duplicates is not your agenda. Skip and overwrite options do not simply meet your requirements because their operation is based on records as whole. What if your records on either ends(csv file and PrismSalesPro) have duplicates but also have important information on those duplicates? That's exactly when merge comes really helpful. Merge feature finds out duplicates and converge information in .csv file and Prism SalesPRO CRM; that makes it only one record with complete information. Let's look at an example: Lookup is done to check whether records have same field information. If field values are all same, records in csv file are not imported into Prism SalesPRO CRM. Besides that, interestingly, if same field on csv file and Prism SalesPROhas different values, csv file wins. That means the information on csv file will be updated in Prism SalesPRO CRM. Also, if Prism SalesPROhas a field with null(empty) value, the field value from csv file will be updated in Prism SalesPRO CRM. Contact us at: [email protected] | 103 (adapted from vtiger CRM 6.0.0Beta© 2004-2013) CRM. DONE SIMPLY. Step 4: Map CRM Fields In the final step of import process, you will need to map import file Header/Column to fields in Prism SalesPRO CRM. Fields will be automatically mapped if your csv file's header matches with Prism SalesPRO CRM field label. Here's a list of before you get started. You can provide default values for mapping fields which will be picked up in case if the value for any field in file will be empty. Also, frequently used mappings can be saved and reused. Saved mappings will be accessible across all users. You can delete the saved mappings by clicking on Trash icon. Contact us at: [email protected] | 104 (adapted from vtiger CRM 6.0.0Beta© 2004-2013) CRM. DONE SIMPLY. After successfully mapping fields, click Import button. Import Results After successfully importing records into Prism SalesPRO CRM, the import results are displayed in tabular format Import More Lets you start all new import again Last Imported Records Displays records imported lately with the help of paging support. Undo Last Import Deletes all records that are created during the last import session. Reference records related to other modules will not be deleted. Contact us at: [email protected] | 105 (adapted from vtiger CRM 6.0.0Beta© 2004-2013) CRM. DONE SIMPLY. Notifications Import Scheduled! If you have more than 1000 records in your file, your import will be scheduled on cron which is configured to run once in every 15 minutes. If you have configured your Outgoing Server and Email id properly, an email notification will be sent to you after successful import Data Corruption Error This error shows up when the import is interrupted for various reasons like crashing in between, or canceled by a user etc. This error indicates that the import table still has records to be imported into the system, but all the information related to the import (like mapping, default values, merge criteria) are all lost. So these records can no more be imported and the user needs to clear this data before starting any other import. Import Locked Error This error will be displayed if the import has been already been started on the same module by any other user in Prism SalesPRO CRM. The details of the module, the user, and the time at which the Import has been locked is detailed within the error message itself. Import Interrupted Error If an Admin user is performing import and if a non-admin user tries to start an import on the same module, he will get to see the Import Locked error. If non-admin user is doing import, and Admin user attempts to import on the same module, same time, he can be able to see the status of the current import and he will even have powers to cancel the current import; Consequently, the Import Interrupted Error will be displayed to non-admin user. Attention! If you would start importing in one particular module, you cannot import records into the same or any other module in Prism SalesPRO CRM. If you would trigger import on a particular module, neither you nor any other user in Prism SalesPRO CRM can import records into the same module. However, other users can import records into other modules in Prism SalesPRO CRM. Managing Services # List of operations you can perform on records in Services Home page 1 Create Custom filters to classify records as per your requirements. You can be able to limit your search to selected columns and search criteria. 2 Click on Mass Actions button and perform actions on desired records like: Edit and Delete 3 Click Settings button > Edit Fields to configure fields and customize the layout of fields through Layout Editor Contact us at: [email protected] | 106 (adapted from vtiger CRM 6.0.0Beta© 2004-2013) 4 CRM. DONE SIMPLY. Click Settings button > Edit Workflows to view / create new Workflows on Services 5 Click Settings button > Edit Picklist values to modify picklist values through Picklist Editor 6 Search desired records # List of operations you can perform on records in detail view of Service record 1 Click Edit button to modify existing content. 2 Click More > Delete to delete the existing Service record 3 Click More > Create Quote to start creating a new Quote on the Service record 4 Click More > Create Invoice to start creating a new Invoice on the Service record 5 Click More > Create Sales Order to start creating a new Sales Order on the Service record 6 Click More > Create Purchase Order to start creating a new Purchase Order on the Service record Exporting Services to External Source If you ever want your data in the form of a spreadsheet, you can export your Services records right away. Steps to export your data 1. Click Services tab 2. Click More button > Export 3. In the Export Records page, you will find the following options: Export selected records Click on the radio button to export the records selected in List view Export data in current page Click on the radio button to export all the records that are on the current list view page Export all data Click on the radio button to export all records in Services module Contact us at: [email protected] | 107 (adapted from vtiger CRM 6.0.0Beta© 2004-2013) CRM. DONE SIMPLY. 4. Click Export Services button. Fields Information Information of fields in the Services module. Select Services While creating Invoices, Quotes, Sales Orders, and Purchase Orders, click on Services Icon, highlighted below, to select from existing services. Also, click on Add Services button to include more services. Dealing with Currencies and Taxes Manage International Currencies In the create view of a Service, you can be able to set multiple currencies for its use while generating Business Orders. To achieve this, fill Price field and click on more currencies link. You can find it under Pricing Information block. Service Prices popup will be displayed on your screen. This will display the list of different currencies. Currency Displays the list of currencies you configured. Enable the check-box to manage operations on desired currency Contact us at: [email protected] | 108 (adapted from vtiger CRM 6.0.0Beta© 2004-2013) Price CRM. DONE SIMPLY. Prices are updated according to the conversion rates. However, you can modify the prices according to your requirements Conversion Rate Displays the values according to conversion rates Reset Price Reverts back the modified currency values to default values according to conversion rates Base Currency Select the radio button of desired currency to make it a base currency. Comes handy while managing international currencies In the create view of Invoices, Quotes, Sales Orders, and Purchase Orders, select desired currency. Automagically, the values modified lately in the Service will be updated instead of updating the values according to conversion rates. Imply Taxes In the create or edit view of a Service, you can find the taxes under Pricing Information block. Values will be automatically populated if you would enable the check-boxes. You can make modifications in tax values for services individually. Contact us at: [email protected] | 109 (adapted from vtiger CRM 6.0.0Beta© 2004-2013) CRM. DONE SIMPLY. This feature comes into action if you would select Tax Mode as Individual while creating business orders. The tax values modified lately in Service record will be displayed instead of populating taxes from Tax Calculations. Contact us at: [email protected] | 110 (adapted from vtiger CRM 6.0.0Beta© 2004-2013) 15. Price Books CRM. DONE SIMPLY. What is a Price Book? Price Books gives you the ability to attribute different prices for products. As it gives control over the pricing, you can vary prices at any time; As a result, you can always offer best price to delight your customers. Create Price Books Manually You can enter Price Book details manually from Price Books Module. This might come handy if you will have to enter Price Book details individually. Steps to create Price Book records manually 1. In Price Books tab, click on Add Price Book button 2. In the Create Price Book view, fill in the details 3. Click Save Quick Create You can enter basic details of Price Book record through Quick create. This might be helpful if you are running out of time. Steps to create Price Book records through Quick create 1. 2. 3. 4. Click (+) Icon on top right corner Click Price Book In the Create Price Book view, fill in the Price Book details Click Save Managing Price Books # List of operations you can perform on records in Price Books Home page 1 Create Custom filters to classify records as per your requirements. You can be able to limit your search to selected columns and search criteria. 2 Click on Mass Actions button and perform actions on desired records like: Edit and Delete 3 Click Settings button > Edit Fields to configure fields and customize the layout of fields through Layout Editor 4 Click Settings button > Edit Workflows to view / create new Workflows on Price Books 5 Click Settings button > Edit Picklist values to modify picklist values through Picklist Editor 6 Search desired records Contact us at: [email protected] | 111 (adapted from vtiger CRM 6.0.0Beta© 2004-2013) CRM. DONE SIMPLY. # List of operations you can perform on records in detail view of Price Book record 1 Click Edit button to modify existing content. 2 Click More > Delete to delete the existing Price Book record 3 Click More > Duplicate to clone the existing Price Book record Working with Price Books You can modify the list price of Product or a Service to suite different customer groups. 1. Unit Price: Predefined price fixed by manufacturer. 2. List Price: Price that can be varied by the Seller. Steps to associate Price Books with Products and Services. 1. 2. 3. 4. 5. Click desired Price Book record. Click Products in related modules list in detail view Click Select Products button Click check-box of desired product and modify List Price Click Add to Price Books button. While creating Invoices, Sales Orders, Purchase Orders and Quotes, you can select the price books by clicking on icon highlighted below. This can be found in Item Details block. Contact us at: [email protected] | 112 (adapted from vtiger CRM 6.0.0Beta© 2004-2013) 16. Trouble Tickets CRM. DONE SIMPLY. What is a Trouble Ticket? Trouble Tickets, also called as Cases, are post-sales support requests generated by your customers. It offers your sales team the flexibility to create, communicate, edit, and close the case after the right solution is delivered to your customers. Create Trouble Tickets Manually You can enter Trouble Ticket details manually from Trouble Tickets Module. This might come handy if you will have to enter Trouble Ticket details individually. Steps to create Trouble Ticket records manually 1. In Trouble Tickets tab, click on Add Trouble Ticket button 2. In the Create Trouble Ticket view, fill in the Trouble Ticket details 3. Click Save Quick Create You can enter basic details of Trouble Ticket record through Quick create. This might be helpful if you are running out of time. Steps to create Trouble Ticket records through Quick create 1. 2. 3. 4. Click (+) Icon on top right corner Click Trouble Ticket In the Create Trouble Ticket view, fill in the Trouble Ticket details Click Save Getting Started Trouble Tickets provides a great way to handle cases. You might need to create a case upon a Product, Contact or an Organization. You can do all that while Creating a new Trouble Ticket or Editing an existing Ticket. Tickets are automatically assigned to the user that creates it. If you are not the concerned person, you can simply assign it to internal team through Assigned to field. You can set the working stages of a ticket through Status field in Trouble Tickets tab. Comments can be exchanged to communicate with your customers. These comments are sorted in chronological order. Automatic Email Notifications Interestingly, Email notifications are sent to Assigned to user, and related Contact and Organization. Notifications are sent when Ticket is created, Comments are exchanged or Status is changed to Closed. These emails are configured in Workflows. Contact us at: [email protected] | 113 (adapted from vtiger CRM 6.0.0Beta© 2004-2013) CRM. DONE SIMPLY. Importing Trouble Tickets from Existing files Prism SalesPRO CRM supports importing Trouble Tickets from external sources such as .csv and vcf files. As it saves lots of time and efforts, it might come in really helpful for your Sales Team to import thousands of records instantly. Managing Trouble Tickets # List of operations you can perform on records in Trouble Tickets Home page 1 Create Custom filters to classify records as per your requirements. You can be able to limit your search to selected columns and search criteria. 2 Click on Mass Actions button and perform actions on desired records like: Edit and Delete 3 Click Settings button > Edit Fields to configure fields and customize the layout of fields through Layout Editor 4 Click Settings button > Edit Workflows to view / create new Workflows on Trouble Tickets 5 Click Settings button > Edit Picklist values to modify picklist values through Picklist Editor 6 Search desired records # List of operations you can perform on records in detail view of Trouble Ticket record 1 Click Edit button to modify existing content. 2 Click More > Delete to delete the existing Trouble Ticket record 3 Click More > Duplicate to clone the existing Trouble Ticket record 4 Click More > Convert as FAQ Exporting Trouble Tickets to External Source If you ever want your data in the form of a spreadsheet, you can export your Trouble Ticket records right away. Steps to export your data 1. Click Trouble Tickets tab 2. Click More button > Export 3. In the Export Records page, you will find the following options Contact us at: [email protected] | 114 (adapted from vtiger CRM 6.0.0Beta© 2004-2013) CRM. DONE SIMPLY. Export selected records Click on the radio button to export the records selected in List view Export data in current page Click on the radio button to export all the records that are on the current list view page Export all data Click on the radio button to export all records in Trouble Tickets Module 4. Click Export Trouble Tickets button. Associating Trouble Tickets with Other Records. This will display all-round view of relations of Trouble Tickets module with other modules and maintains log of complete history. You can keep track of following details in Trouble Tickets Module Activities To schedule an Activity Documents To associate existing documents with Trouble Ticket record Activity History Displays all the Events and To dos that are completed or status changed as Held Services To Associate existing Services with Trouble Ticket record Projects To associate existing Projects with Trouble Ticket record Service Contracts To associate existing Service Contracts and track customer support Instances Contact us at: [email protected] | 115 (adapted from vtiger CRM 6.0.0Beta© 2004-2013) 17. Assets CRM. DONE SIMPLY. What is an Asset? Assets are tangible or intangible resources that are rendered to your customers. When products are shipped to customers, information of individual product item like: Product Number, Serial Number, Date Sold, Customer Name etc are stored in Prism SalesPRO CRM as Asset records. With Assets, it becomes easy for your support center to audit individual product items, and cases resolved upon them. Create Assets Manually You can enter Asset details manually from Assets Module. This might come handy if you will have to enter Asset details individually. Steps to create Asset records manually 1. In Assets tab, click on Add Asset button 2. In the Create Asset view, fill in the details 3. Click Save Quick Create You can enter basic details of Asset record through Quick create. This might be helpful if you are running out of time. Steps to create Asset records through Quick create 1. 2. 3. 4. Click (+) Icon on top right corner Click Asset In the Create Asset view, fill in the Asset details Click Save Exporting Assets to External Source If you ever want your data in the form of a spreadsheet, you can export your Assets records right away. Steps to export your data 1. Click Assets tab 2. Click More button > Export 3. In the Export Records page, you will find the following options Contact us at: [email protected] | 116 (adapted from vtiger CRM 6.0.0Beta© 2004-2013) CRM. DONE SIMPLY. Export selected records Click on the radio button to export the records selected in List view Export data in current page Click on the radio button to export all the records that are on the current list view page Export all data Click on the radio button to export all records in Assets Module 4. Click Export Assets button. Managing Assets # List of operations you can perform on records in Assets Home page 1 Create Custom filters to classify records as per your requirements. You can be able to limit your search to selected columns and search criteria. 2 Click on Mass Actions button and perform actions on desired records like: Edit and Delete 3 Click Settings button > Edit Fields to configure fields and customize the layout of fields through Layout Editor 4 Click Settings button > Edit Workflows to view / create new Workflows on Assets 5 Click Settings button > Edit Picklist values to modify picklist values through Picklist Editor 6 Search desired records List of operations you can perform on records in detail view of Asset record Click Edit button to modify existing content. Click More > Delete to delete the existing Asset record. Click More > Duplicate to clone the existing Asset record. Contact us at: [email protected] | 117 (adapted from vtiger CRM 6.0.0Beta© 2004-2013) 18. Service Contracts CRM. DONE SIMPLY. What is a Service Contract? Service Contract is a negotiated agreement for the products rendered to your customers. As per the agreed contracts, your support center is supposed to offer service for the product for agreed period of time. It boosts level of customer satisfaction and builds healthy trading relationships. Create Service Contracts Manually You can enter Service Contract details manually from Service Contracts Module. This might come handy if you will have to enter Service Contract details individually. Steps to create Service Contract records manually 1. In Service Contracts tab, click on Service Contract button 2. In the Create Service Contract view, fill in the Contract details 3. Click Save Quick Create You can enter basic details of Service Contract record through Quick create. This might be helpful if you are running out of time. Steps to create Service Contract records through Quick create 1. 2. 3. 4. Click (+) Icon on top right corner Click Service Contract In the Create Service Contract view, fill in the Contract details Click Save Fields Information Information of fields in the Service Contract create view. Organizations/ Contacts This field will be automatically updated with the Organization or Contact related to Services module if Service Contract will be added from Invoces, Sales Orders, POs, and Quotes Start Date Provide service start date Due Date Provide service expected end date Tracking Unit Select the desired tracking unit from the picklist accordingly. When a theTrouble Ticket related to a Service Contract is closed, lookup is done in Hours and Days fields of the Trouble Tickets record and Used Units field in Service Contracts will be updated accordingly Total Units Specify number of service instances you would offer Information about fields in the Service Contract detail view Contact us at: [email protected] | 118 (adapted from vtiger CRM 6.0.0Beta© 2004-2013) Used Units CRM. DONE SIMPLY. Automatically updated when Status field of Trouble Ticket associated with Service Contract is set to Closed End Date Automatically updated when Status is set to Complete, or Used Units reaches, or exceeds Total Units Planned Duration Automatically updates when Service Contract will come to an end. Calculated as Due date - Start Date Actual Duration Time taken, in days, to complete the Service Contract. Calculated as End date Start Date Progress(%) Automatically updated when the Used Units field is updated. Calculated as Used Units/Total Units * 100 Note! 1. A few fields are not listed in create view of the Service Contracts record. Values for these fields are autocomputed in detail view based on the values of other fields. Associate Service Contracts with Other Records This will display all-round view of relations of Service Contracts module with other modules and maintains a log of complete history. You can keep track of following details in the Service Contracts Module Service Requests To associate existing Trouble Ticket records Documents To associate existing documents with Service Contract record Note! 1. If the Related to field in the Trouble Ticket record is empty, the Contact / Organization information from the Service Contracts module will be populated after associating a Trouble Ticket record with the Service Contract record. Calculation of Service Instances Used Units field in the Service Contracts module defines the number of Service Instances resolved by your Support center. The field value is computed based upon Status field of the Trouble Tickets module, and Tracking Unit field for the Service Contracts module. Tracking Unit Ticket Status Used Units. Contact us at: [email protected] | 119 (adapted from vtiger CRM 6.0.0Beta© 2004-2013) 19. Vendors CRM. DONE SIMPLY. What is a vendor? Vendor is a person or organization that supplies Products or Services to your company. Vendor can also be a manufacturer or a re-seller. Creating vendors individually You can easily create a vendor record by entering information in the fields provided. Follow few simple steps to create a vendor record 1. 2. 3. 4. Click All drop-down Click Vendors In the list view of Invoices module, click Add Vendor Provide necessary information the fields, and click Save Quick Create You can enter basic details of Vendor record through Quick create. This might be helpful if you are running out of time. Follow few simple steps to create Vendor records through Quick Create 1. 2. 3. 4. Click (+) Icon on top right corner Click Vendor In the Create Vendor view, fill in the vendor details Click Save Import existing data If you have your data in .csv or .vcf format, you can import thousands of records instantly and effectively. Prism SalesPRO CRM supports importing data into different modules including Leads, Contacts, Organizations, Opportunities, etc. Check List 1.Mandatory Fields Make sure your file addresses all mandatory fields. For instance, Last Name and Company fields are mandatory in Leads module.You cannot proceed with importing until or unless you have a value within these fields of your .csv file. If the value of mandatory fields is empty, they will be set to '????'. 2. File Size Make sure the file to be imported do not exceed 5 MB size 3. Permissions Admin users can disable import access to non-admin users from Profile level. If you can't find the Import option, you should contact your Administrator to enable import permission for your profile Contact us at: [email protected] | 120 (adapted from vtiger CRM 6.0.0Beta© 2004-2013) CRM. DONE SIMPLY. Getting Started This tutorial will walk you through different steps involved in importing records into your Prism SalesPRO CRM account. The entire process is simple and straightforward. Follow few simple steps to import data into Prism SalesPRO CRM 1. Click [Module] tab. Eg: Leads, Contacts, etc 2. Click Actions > Import Step 1: Select File In the first step of importing process, you'll need to browse and upload your import file from your machine. Here's how to select your.csv file Click on the Choose File button, browse for desired file that is to be imported. Csv and vcf are the two file formats currently supported. Contact us at: [email protected] | 121 (adapted from vtiger CRM 6.0.0Beta© 2004-2013) CRM. DONE SIMPLY. Step 2: Specify Format In the second step of importing process, you'll need to specify import file properties. The details of each property are explained below. a. File Type: Prism SalesPROsupports two different file types namely: .csv and .vcf. Select the appropriate value from the File Type dropdown that describes the format of the file y ou've selected in Step:1. For instance, if you've uploaded .csv file, select .csv from File Type field. b. Character Encoding: Make sure you select the right character set in which your import file has been encoded. You'll need to select right encoding of the file irrespective of the file contents. c. Delimiter: Prism SalesPRO CRM supports comma (,) and semicolon(;) as field delimiters. The fields in your .csv file are recognized only if they are separated with delimiters. More often, in a csv file, fields are separated with commas(,). d. Header: While importing, the header of your .csv file is compared with fields in Prism SalesPRO CRM. Having a header makes it easy for you to map fields. Click on Has Headercheckbox if your file has a header. First row of your csv file is considered as a header. Please make sure that you uncheck the Has Header field if your file doesn't have a header. Contact us at: [email protected] | 122 (adapted from vtiger CRM 6.0.0Beta© 2004-2013) CRM. DONE SIMPLY. Step 3: Duplicate Record Handling This is an optional step and comes into play if you would enable the checkbox in Step-3 of the import process. This option will help you in tracing out duplicate records. You can also configure the actions to be performed on duplicate records: skip, overwrite and merge. And finally, select desired fields for duplicate lookup by moving fields from the list of Available Fields to Fields to be matched on by using the right and left arrows. Following actions can be performed on duplicate records Skip: After import, duplicate records are identified based on fields criteria. If your Prism SalesPRO CRM and .csv file have records in common, to avoid redundant data, duplicate records in .csv file are not imported into Prism SalesPRO CRM. Overwrite: After import, duplicate records are identified based on fields criteria. If your Prism SalesPRO CRM and .csv file have records in common, to avoid redundant data, the records in .csv file are imported and replaced with records in Prism SalesPRO CRM. Merge: After import, duplicate records are identified based on fields criteria. Merge, unlike overwrite and skip, checks for duplicate records first and then captures only useful information from your .csv file and updates it in your Prism SalesPRO CRM. Duplicate Merge Importing Sometimes finding and eliminating duplicates is not your agenda. Skip and overwrite options do not simply meet your requirements because their operation is based on records as whole. What if your records on either ends(csv file and PrismSalesPro) have duplicates but also have important information on those duplicates? That's exactly when merge comes really helpful. Merge feature finds out duplicates and converge information in .csv file and Prism SalesPRO CRM; that makes it only one record with complete information. Contact us at: [email protected] | 123 (adapted from vtiger CRM 6.0.0Beta© 2004-2013) CRM. DONE SIMPLY. Let's look at an example: Lookup is done to check whether records have same field information. If field values are all same, records in csv file are not imported into Prism SalesPRO CRM. Besides that, interestingly, if same field on csv file and Prism SalesPROhas different values, csv file wins. That means the information on csv file will be updated in Prism SalesPRO CRM. Also, if Prism SalesPROhas a field with null(empty) value, the field value from csv file will be updated in Prism SalesPRO CRM. Step 4: Map CRM Fields In the final step of import process, you will need to map import file Header/Column to fields in Prism SalesPRO CRM. Fields will be automatically mapped if your csv file's header matches with Prism SalesPRO CRM field label. You can provide default values for mapping fields which will be picked up in case if the value for any field in file will be empty. Contact us at: [email protected] | 124 (adapted from vtiger CRM 6.0.0Beta© 2004-2013) CRM. DONE SIMPLY. Also, frequently used mappings can be saved and reused. Saved mappings will be accessible across all users. You can delete the saved mappings by clicking on Trash icon. After successfully mapping fields, click Import button. Import Results After successfully importing records into Prism SalesPRO CRM, the import results are displayed in tabular format Contact us at: [email protected] | 125 (adapted from vtiger CRM 6.0.0Beta© 2004-2013) CRM. DONE SIMPLY. Import More Lets you start all new import again Last Imported Records Displays records imported lately with the help of paging support. Undo Last Import Deletes all records that are created during the last import session. Reference records related to other modules will not be deleted. Notifications! Import Scheduled! If you have more than 1000 records in your file, your import will be scheduled on cron which is configured to run once in every 15 minutes. If you have configured your Outgoing Server and Email id properly, an email notification will be sent to you after successful import Data Corruption Error This error shows up when the import is interrupted for various reasons like crashing in between, or canceled by a user etc. This error indicates that the import table still has records to be imported into the system, but all the information related to the import (like mapping, default values, merge criteria) are all lost. So these records can no more be imported and the user needs to clear this data before starting any other import. Import Locked Error This error will be displayed if the import has been already been started on the same module by any other user in Prism SalesPRO CRM. The details of the module, the user, and the time at which the Import has been locked is detailed within the error message itself. Import Interrupted Error If an Admin user is performing import and if a non-admin user tries to start an import on the same module, he will get to see the Import Locked error. If non-admin user is doing import, and Admin user attempts to import on the same module, same time, he can be able to see the status of the current import and he will Contact us at: [email protected] | 126 (adapted from vtiger CRM 6.0.0Beta© 2004-2013) CRM. DONE SIMPLY. even have powers to cancel the current import; Consequently, the Import Interrupted Error will be displayed to non-admin user. Heads Up! If you would start importing in one particular module, you cannot import records into the same or any other module in Prism SalesPRO CRM. If you would trigger import on a particular module, neither you nor any other user in Prism SalesPRO CRM can import records into the same module. However, other users can import records into other modules in Prism SalesPRO CRM. Exporting Vendors to External Source If you ever want your data in the form of a spreadsheet, you can export your vendor records right away. Follow few simple steps to export your data 1. Click Vendors tab 2. Click More button > Export 3. In the Export Records page, you will find the following options Export selected records Click on the radio button to export the records selected in list view Export data in current page Click on the radio button to export all the records that are on the current list view page Export all data Click on the radio button to export all records in Vendors module 4. Click Export Vendors button. Operations you can perform in list view of Vendors module List view of Vendors module enables you to perform mass actions like editing, deleting, importing and filtering records in bulk. In addition, you can also edit fields, workflows and picklist values Follow few simple steps to manage operations in list view of Vendors module 1. Click All drop-down 2. Click Vendors 3. Click on checkboxes of desired vendor records beforehand performing edit and delete operations 4. Click Actions > Edit to modify vendor record(s) in bulk 5. Click Actions > Delete to delete vendor record(s) in bulk 6. Click Actions > Send Email to send emails to selected records Contact us at: [email protected] | 127 (adapted from vtiger CRM 6.0.0Beta© 2004-2013) CRM. DONE SIMPLY. 7. Click All Vendors dropdown > Create New Filter to create a new view and sort desired records in one bucket 8. Click wrench icon > Edit Fields to configure fields through Layout Editor 9. Click wrench icon > Edit Workflows to set up workflows through Workflows 10. Click Editor wrench icon > Edit Picklist Fields to configure picklist fields through Picklist Operations you can perform in detail view of Vendor record Detail view of vendor record enables you to perform actions like editing, deleting, cloning, exporting the existing record in PDF format, etc Follow few simple steps to manage operations in detail view of vendor record 1. 2. 3. 4. 5. 6. 7. 8. Click All drop-down Click Vendors Click on desired vendor record Click Edit to modify field information Click Send Email to send email to your vendor Click More > Delete to delete vendor record Click More > Duplicate to clone current vendor record Click More > Create Purchase Order to create a new purchase order record by having vendor details automatically populated in it. Associating Vendors with Other Records This will display all-round view of relations of Vendors module with other modules and maintains log of complete history. You can keep track of following details in Vendors module. Products To view the Products associated with Vendor record Purchase Order To view the Purchase Orders associated with Vendor record Contacts To view the Contacts associated with Vendor record Contacts To view the emails sent to Vendor record Contact us at: [email protected] | 128 (adapted from vtiger CRM 6.0.0Beta© 2004-2013) 20. Calendar CRM. DONE SIMPLY. A typical day of a sales person includes managing, tracking and following up activities that are scheduled to be done on present day. You can do all that with one single Calendar application in Prism SalesPRO CRM. What do I see in Calendar Module? You can see a list of activities that are scheduled by you, and shared with you. 1. 2. 3. 4. 5. 6. Events To Dos Opportunities (Expected close date) Support End Date (Contact's support end date) Date of Birth (Contact's date of birth) Invoice (Invoice due date) What are default views in Calendar Module? You can see activities in three different views. 1. Month (Activities scheduled on current month) 2. Week (Activities scheduled on current week) 3. Day (Activities scheduled on current day) How do I create new Activities? In addition to the auto-populated activities, you can also create new activities in Prism SalesPRO CRM 1. 2. 3. 4. Click Calendar tab Click Add Event / Task button Select Event or Task and fill the details Click Save Note! 1.To create activities instantly, click on desired Calendar date, fill up details in pop up and click Save 2.You can also create events and to dos by clicking on Activities in detail view of [Module] record. Eg. Contacts Working with Calendar module It's easy to schedule, invite, share, and Organize your events with the help of Calendar module in Prism SalesPRO CRM. Hi, I am Shareef. I am a sales rep in ABC company. I undertake web conferencing with our customers on 1st day of every month. To schedule an event, I will Contact us at: [email protected] | 129 (adapted from vtiger CRM 6.0.0Beta© 2004-2013) CRM. DONE SIMPLY. 1.Click on Calendar tab 2.Click Add Event / Task button on top right 3.Enter Subject, Start Date and Time, End Date and Time, Status and other details. Reminder I deal with thousands of business operations every day. I will set up a Reminder so that I will not get lost in too many activities. To set up a Reminder, I will 1. Click on check-box next to Send Reminder in 'Reminder Details' block 2. I want the system to remind me 1 hour and 15 minutes before commencement of the event. I will select 0 Days 1 Hour 15 Minutes This will send me an email reminder one hour 15 minutes before the commencement of the event Repeat I plan to organize web conferencing every month until a period of time in future. So, I would like to enable Repeat. To enable Repeat, I will 1. Click on check-box next to Repeat in 'Recurrence Details' block 2. I undertake web conferencing once in every month until 2015 I will select Repeat once in every 1 Month Until 01-01-2015 Contact us at: [email protected] | 130 (adapted from vtiger CRM 6.0.0Beta© 2004-2013) CRM. DONE SIMPLY. 3. I will continue providing the web conference on day basis ie., on 1st day of every month I will select the radio button, and enter on 1 day of every month Relate I am addressing a targeted list of Contacts as a part of Web conferencing. I will populate those contacts into my event so that I can view complete list of activities scheduled on them at later stages. To relate the event with other Contacts, I will 1. Click search icon within Contact Name field 2. Choose from existing Contact records and click Select Notes! 1.You can also relate events to Leads, Organizations, Opportunities, Tickets and Campaigns but only one record at a time. 2.You can relate multiple Contacts at one shot Invite I also want one of my team mates to be a part of web conference. I will send invite and automatically an email notification will be sent to her. To invite users, I will 1. Click on text space provided next to Invite Users field within 'Invite' block 2. Select from list of available users Contact us at: [email protected] | 131 (adapted from vtiger CRM 6.0.0Beta© 2004-2013) CRM. DONE SIMPLY. Note! You can only send invitations to existing users in your Prism SalesPRO CRM I will click Save. I am done. This is so simple! Calendar Settings I wish I could configure my Calendar like the way I wanted it to be. I follow few simple steps to set up Calendar to match my preferences. To configure Calendar settings, I will 1. Click on Calendar Settings icon on top right of Calendar home page Once an event reminder popup shows up on my screen, I want it to display again only within 5 minutes after I close it. I get back to work on Mondays after drowsy weekends. I want my calendar to begin from Mondays, too. My job is to follow up events that are scheduled to be done on present day. I will make Today as my Default Activity view. I will select traditional date format that is widely accepted in my Country. I am supposed to be at my office by 8 AM. So, my day starts at 8 AM. Contact us at: [email protected] | 132 (adapted from vtiger CRM 6.0.0Beta© 2004-2013) CRM. DONE SIMPLY. Our company is located in India. So, I will select Indian time zone here. Events like Meetings, Web Conferences etc consume much time, say 30 minutes. I will end up Calls within 5 minutes. I can configure default event duration in Settings, so that I'll need not have to set up End Date and Time while creating events. I can share my calendar with all other users in our company, share with only selected users, or completely hide all events from viewing by other users. Different options that are available to share my calender 1. Private: No one can view my events 2. Public: Every one can view my events. 3. Selected Users: Only selected users can view my calendar Here's my shared calendar page. The events shared by all other users in my Prism SalesPRO CRM account are displayed in here. We stay connected on one single page. Contact us at: [email protected] | 133 (adapted from vtiger CRM 6.0.0Beta© 2004-2013) CRM. DONE SIMPLY. Notes! When I share my calendar with Public or Selected Users, the events with Visibility set as Private will be displayed as Busy* for shared users 1.Events shared with you can be viewed in Shared Calendar tab. 2.Events that are created by you or assigned to you can be viewed in My Calendar tab. 3.Events that belong to you, and events belong to users in your lower hierarchy can be viewed in List View tab. Attention! For instance, consider that A and B are two users in upper and lower hierarchy respectively. If A and B shared calendars mutually, B can view A's event but cannot make any modifications on event record. Not only does A view B's shared event, but he can also make modifications on it. 2. I click Save. Note! You can also configure Calendar Settings from My Preferences page. Creating Custom Event Type Event types such as Call and Meeting are provided by default along with Prism SalesPRO CRM package. You can create custom event types to schedule events that meet your organization's or personal requirements. For instance, Meetups, Hangouts, etc Follow few simple steps to create custom event types 1. 2. 3. 4. 5. 6. 7. 8. Click gear icon in the top right Click CRM Settings Click 'Studio' drop-down in the left Click Picklist Editor. You can click on pin icon next to it to add a shortcut to your settings home page Select Calendar from Select Module dropdown Select Activity Type from Select Picklist in Calendar dropdown Available values in Activity Type field are displayed under All Values tab Click Add Value button on the right to add a custom event type Contact us at: [email protected] | 134 (adapted from vtiger CRM 6.0.0Beta© 2004-2013) CRM. DONE SIMPLY. 9. Provide a label to your custom event, select desired roles and click Save 10.After save, your custom event type will be available for selection in Activity Type field in create or edit view of events. Contact us at: [email protected] | 135 (adapted from vtiger CRM 6.0.0Beta© 2004-2013) 21. Documents CRM. DONE SIMPLY. What is a Document? Documents are the files you save in Prism SalesPRO CRM. You can either upload files directly or provide an external link to download the file again. Files can be classified by grouping them under different folders. Manage Documents You can perform different operations on records in list view of Documents 1. Create Custom filters to classify records as per your requirements. 2. Click on Actions drop-down to perform following operations Select Delete to delete selected records Select Move to shuffle records across folders Select Export to transfer records to spreadsheets 3. Click Settings button to perform following operations Select Edit Fields to customize layout of fields through Layout Editor Select Edit Picklist Values to modify picklist values through Piicklist Editor Working with Documents Documents module is more like a drive. You might sometimes need to save your work related files, personal files, Images etc. You can upload all such files in Documents. Note! The maximum file upload limit is 5 Mb. Creating Folders Documents module gives you the flexibility to create folders and save documents in selected folder. To create a custom folder, 1. 2. 3. 4. Click Documents tab Click Add Document button Enter folder name and description Click Save Contact us at: [email protected] | 136 (adapted from vtiger CRM 6.0.0Beta© 2004-2013) CRM. DONE SIMPLY. Note! Folders will be displayed to all users in your Prism SalesPRO CRM. If you do not want files to be displayed to other users, enable permissions(Eg: Private) from Sharing Access. Creating Documents This feature enables you to create documents and share them with other users in your Prism SalesPRO CRM account. To create a new document, 1. Click Add Document button 2. Enter title, select folder and assign to Sales team 3. Select Download Type as Internal if you wish to attach a downloadable document from your system 4. Select Download Type as External to provide an URL of your external file location from where the file can be downloaded 5. Click Choose File in File Name field and upload files from your drive 6. Click Save Note! Prism SalesPROsupports two types of documents. 1. Internal: Upload a file from the drive and download or send email as attachment when required. 2. External: Provide an URL of external file location from where the file can be downloaded. Download Document Now that the file is assigned to the Sales team, her team members can download the file by clicking on File Name field. Download Count field in detail view of document displays the number of times the file has been downloaded Contact us at: [email protected] | 137 (adapted from vtiger CRM 6.0.0Beta© 2004-2013) 22. Recycle Bin CRM. DONE SIMPLY. What is a Recycle Bin? Records that are deleted from different modules are stored in Recycle Bin. It acts like an archive for all deleted records and helps you restore them when required. Working with Recycle Bin Sometimes, accidentally, we delete records that hold a lots of importance. Such mistakes can cost us a lot. Recycle Bin in Prism SalesPRO CRM will help you to restore deleted records back in actual position. For instance, if you delete records in Leads module, 1. 2. 3. 4. Click Recycle Bin tab Select Leads from Select Module drop-down Select desired record(s) by clicking on check-boxes Click Restore button Note! 1.Only administrators will have access to Empty Recycle Bin button 2. Empty Recycle Bin option will permanently remove all the deleted records from the database Attention! 1. If you delete an Organization record, or a Contact record, Opportunity record associated with it will also be deleted. If you would restore both the records back from Recycle bin, you can have the relation between two records back. 2. If you delete an Organization record, Contact records associated with the Organization will not be deleted. But it will break the relation between them. 3. If you delete a Contact record associated with any Organization, it will only delete the Contact record. Organization will remain the same. You can see the relation back if you would restore the Contact record from Recycle bin. Contact us at: [email protected] | 138 (adapted from vtiger CRM 6.0.0Beta© 2004-2013) 1. Users CRM. DONE SIMPLY. Who are users? Users are employees in your organization who can log into their Prism SalesPRO CRM accounts, access information, and perform tasks according to permissions that have been defined to them. In PrismSalesPRO, admin users have the ability to create user accounts. Prism SalesPRO CRM supports two types of users: admin users and standard users. Adding New Users Users with admin rights have the ability to add new users. The process of adding new users has been revamped. Here's how to add new users in Prism SalesPRO CRM 1. Click gear icon in the upper right. 2. Click Manage Users 3. Click Add User. 4. In the User Name field, provide desired user name. 5. Enable the Admin check-box to grant admin privileges. 6. In the Password field provide appropriate password which will be emailed to that user. After logging in, users can change their corresponding passwords. 7. In the Confirm Password field, re-enter the password you've provided earlier. 8. In the Primary Email field provide user's unique email address that hasn't been used before. After the account creation, an email will be sent on this email address. 9. In the Status field, select Active to have the users log in and access their accounts; select Inactive to restrict users from accessing their Prism SalesPRO CRM accounts. 10. In the First Name and Last Name fields, provide users' first and last names respectively 11. In the Default Lead View field 12. In the Role field, select appropriate appropriate role of the user in role hierarchy. 13. After filling up the fields, click Save Deleting Users You can delete user accounts to terminate their access to Prism SalesPRO CRM. After delete, users will not be able to log into Prism SalesPRO CRM anymore. Here's how to delete users : 1. Click gear icon in the upper right. Contact us at: [email protected] | 139 (adapted from vtiger CRM 6.0.0Beta© 2004-2013) CRM. DONE SIMPLY. 2. Click Manage Users 3. In the list view of users, click on icon to delete corresponding user 4. In the detailed view of the user to be deleted, change the Status from “Active” to “Inactive” 5. Click Save. Contact us at: [email protected] | 140 (adapted from vtiger CRM 6.0.0Beta© 2004-2013) 2. Profiles CRM. DONE SIMPLY. What are profiles? Profiles are used to control actions that users can perform on records. In addition, profiles can be used to restrict access to specific fields, modules, and features such as import, export, etc. When a profile is associated to a role, the access rights defined in the profile will be applied across all users in that role. Notes! Users in higher hierarchy can always view records of users in lower hierarchy. Step 1 : Creating Profiles You can create different profiles and associate with roles in Prism SalesPRO CRM. For instance, you can create different profiles for your Sales team, Support team, etc Follow few simple steps to create a profile 1. 2. 3. 4. 5. 6. 7. 8. Click gear icon in the upper right Click CRM Settings Click 'User and Access Control' drop-down in the left Click Profiles. You can click on pin icon next to it to add a shortcut to your settings home page Click Add Profile Provide Profile Name and Description. These fields are only for your reference Define privileges for your profile. (We will discuss this in next step) Click Save Step 2 : Defining Permissions Profiles give you the flexibility to define privileges on your profile. This makes sure that you've total control on operations your users can perform on records. The fine grained access control allows you to enable or disable Modules, Fields, and tools such as Import, Export, Duplicates Handling, etc. Additionally, you can also promote or revoke access to View, Edit/Create, and Delete operations on fields and modules in Prism SalesPRO CRM. Disable or enable the highlighted checkboxes to revoke or grant access to appropriate operation(View, Create/Edit, Delete) on all available modules in Prism SalesPRO CRM. For instance, if you do not want your sales reps to delete records, you can disable Delete checkbox. As a result, your sales reps will be able to create/edit and view records but can't delete. To disable a specific module, you'll need to uncheck the checkbox corresponding to that module. Contact us at: [email protected] | 141 (adapted from vtiger CRM 6.0.0Beta© 2004-2013) CRM. DONE SIMPLY. To disable permissions on a specific module, you'll need to uncheck the checkbox under corresponding tab. For instance, if you don't want your support team to Create/EditContacts, you'll need to uncheck the checkbox next to Contacts and under Create/Edit tab Defining permissions on fields and tools We've discussed about the permissions that can be defined on modules available in Prism SalesPRO CRM. Apart from that, Profiles also enables you to define access permissions on the fields and tools: Import, Export, Duplicates Handling, etc, that available within those modules. To define privileges, you'll need to click on the drop-down under 'Field and Tool Privileges' of your desired module You can move the ball beside the fields to define privileges. 1. Green represents Write. That means user can be able to modify the value in the fields 2. Orange represents Read Only. That means user can only view but cannot make any modifications on the field value 3. Black represents Invisible. That means field is completely hidden and not visible for the users Profiles also gives you the flexibility to assign privileges on features that are related to the module. For instance, you can restrict your users from importing or exporting records in Prism SalesPRO CRM. Contact us at: [email protected] | 142 (adapted from vtiger CRM 6.0.0Beta© 2004-2013) CRM. DONE SIMPLY. Under the 'Tools' section, click on checkboxes to enable/disable corresponding feature. Step 3 : Assigning users to a profile Profile cannot be directly linked with users. You'll need to associate a profile with a role; as a result, privileges are affected to all users across that role. Here's how to do it 1. 2. 3. 4. 5. Click gear icon in the top right Click CRM Settings Click 'User and Access Control' drop-down in the left Click Roles. You can click on pin icon next to it to add a shortcut to your settings home page Select desired role and select corresponding profile Notes! 1. You can associate multiple users and profiles for the same role. 2. When you associate multiple users for same role, the users under the role will not be able to see each others' records. 3. A role always work with respect to Profiles and Sharing Access. Contact us at: [email protected] | 143 (adapted from vtiger CRM 6.0.0Beta© 2004-2013) CRM. DONE SIMPLY. Deleting a Profile If existing profiles doesn't meet your requirements, you can delete them right away. Before deleting, responsibilities of that profile should be transferred to another existing profile. Follow few simple steps to delete an existing profile 1. In the list view of Profiles, click trash icon to the right of your desired profile 2. In the popup, transfer responsibilities to another existing profile 3. Click Save Contact us at: [email protected] | 144 (adapted from vtiger CRM 6.0.0Beta© 2004-2013) 3.Roles CRM. DONE SIMPLY. What are Roles? You can mimic your organization-wide hierarchy in Prism SalesPRO CRM with the help of Roles. You can assign identical designations to your employees like Sales Manager, Support Engineer, etc. User's position in hierarchy will decide which of the records he/she can access. Notes! 1. When Sharing Rules are set to Private, users can always view their own records and their subordinates' records, whereas non-admin users can not view records of their superiors and peers Creating Roles This feature enables you to create new roles for your users to mimic your organization-wide hierarchy in Prism SalesPRO CRM. Roles like CEO and Sales Manager are provided by default along with Prism SalesPRO CRM package. You can now define access privileges while you create a role. The idea is to reduce clicks and navigation. Having privileges defined on a role eliminates the necessity to create a different profile and associate it to a role. Additionally, you need not have to visit individual profiles to view or modify privileges you've defined earlier. Follow few simple steps to create roles 1. 2. 3. 4. 5. Click gear icon in the upper right Click CRM Settings Click 'User and Access Control' drop-down in the left Click Roles. You can click on pin icon next to it to add a shortcut to your settings home page Hover mouse over the existing roles and click on (+) icon to create a new role a Name Provide desired label for your role b Reports To This field is auto-selected. The role superior to current role is displayed here. Contact us at: [email protected] | 145 (adapted from vtiger CRM 6.0.0Beta© 2004-2013) c Assign Privileges directly to a role CRM. DONE SIMPLY. The access privileges can be defined here without having to create a new profile and assign it to your role. d Assign privileges from existing profiles Select from existing profiles to imply privileges defined on selected profile e Copy privileges from If you've already defined permissions in an existing profile, you can populate them by selecting desired profile from the dropdown 6. Click Save Assigning Roles to users This feature enables you to associate roles to users to fit them in your role hierarchy. When you create a new user, Sales Manager profile will be designated by default. Follow few simple steps to assign a role to user 1. 2. 3. 4. Click gear icon in the upper right Click CRM Settings Click 'User and Access Control' drop-down in the left Click Users. You can click on pin icon next to it to add a shortcut to your settings home page 5. Click edit icon to the right of your desired user 6. Locate Role field, select desired role for the user 7.Click Save Notes! 1. You can associate multiple users and profiles for the same role. 2. When you associate multiple users for same role, the users under the role will not be able to see each others' records. 3. A role always work with respect to Profiles and Sharing Access. Contact us at: [email protected] | 146 (adapted from vtiger CRM 6.0.0Beta© 2004-2013) 4. Sharing Rules CRM. DONE SIMPLY. What are Sharing Rules? Sharing Rules are used to configure data sharing rules across users in role hierarchy. In Prism SalesPRO CRM, the default access for CRM records is set to public, which enables everyone to see all records. When sharing rules are set to private, users can only view records assigned to them and records of users below them in role hierarchy. Sharing Rules also help you to set custom sharing rules to share data with specific role, role and subordinate, and group. Notes! Admin users can view all records irrespective of roles, profiles and sharing rules Features Sharing Rules enables you to configure following permissions across users in Prism SalesPRO CRM. 1 Private Users can only view records assigned to them, and records that are assigned to users with a role below them. 2 Public Read only Everyone can view all records but cannot modify and delete the records. 3 Public Read, Create/Edit Everyone can view and modify all records but cannot delete the records. 4 Public: Read, Create/Edit, Delete Everyone can view, modify and delete every one else's records. Configuring organization-wide sharing rules This feature enables you to configure sharing rules across your organization. The default sharing rules offered by Prism SalesPRO CRM are set to Public. However, you can change the sharing rules according to your requirements. Follow few simple steps to configure sharing rules 1. 2. 3. 4. Click gear icon in the upper right Click CRM Settings Click 'User and Access Control' drop-down Click Sharing Rules. You can click on pin icon next to it to add a shortcut to your settings home page 5. Click radio buttons to configure new set of sharing rules 6. Click Apply New Sharing Rules to update changes Notes! Please make sure you click on Apply New Sharing Rules button after making modifications. If not, your changes will not be affected. Setting up custom sharing rules Custom sharing rules are used to allow subordinates to perform operations on superiors' records. In other words, you, as a user on upper hierarchy, can grant access to your subordinates to view your records. Contact us at: [email protected] | 147 (adapted from vtiger CRM 6.0.0Beta© 2004-2013) CRM. DONE SIMPLY. This can also be achieved by setting up Sharing Rules to Public, but the intention here is to only grant access to selected group, role and, role and subordinates that are below you in role hierarchy. For instance, Sales Manager is on a role hierarchy above Sales Person. As sharing rules are set to private, Sales Manager can view Sales Person's records but not the other way around. Sales Manager wants to give access on his records to his Sales Person. Now setting sharing rules to Public will let everyone view Sales Manager's records. Setting up custom sharing rules gives Sales Manager the flexibility to exclusively grant access to Sales Person role. Follow few simple steps to define custom sharing rules 1. In Sharing Rules view, click drop-down under 'Advanced Sharing Rules' tab 2. Click Add Custom Rule button 3. In the popup, define custom sharing rules Contact us at: [email protected] | 148 (adapted from vtiger CRM 6.0.0Beta© 2004-2013) CRM. DONE SIMPLY. a. Select a value to specify whose records should be accessed (Superior) b. Select a value to specify who will be accessing the records of superior (Subordinate) c. Select privileges that users have on records 4. Click Save to update changes Similarly, you can configure custom sharing rules to share data with role, roles and subordinates and group. Notes! You will have to define custom sharing rules for every module individually. Contact us at: [email protected] | 149 (adapted from vtiger CRM 6.0.0Beta© 2004-2013) 5.Groups CRM. DONE SIMPLY. What are groups? Groups can be combination on different users, roles, roles and subordinates and groups within an organization. Groups will help you to build teams to share common set of records. Key features When records are assigned to a group, all members associated with the group can perform operations on the record. This will help your users to work together as a team. For instance, If a support team member is on leave for the day, there is a chance that trouble ticket(case) assigned to him will not be resolved in time. Should the ticket be assigned to a group, all members associated to the group will get email notification and any one can handle the issue. A group supports following combinations 1. Users : Selected users will be part of the group 2. Roles: All users associated with a role will be part of the group 3. Roles and subordinates : All users associated with the role, and its subordinates will be part of the group 4. Group: All users associated with selected group will be part of the group Notes! 1.Groups will also help you to define custom sharing rules. You can define data sharing rules to make a certain role, role and subordinates, or a group view records of another role, role and subordinates, or a group. Creating Groups You can create different groups to manage common set of operations within your organization Follow few simple steps to create a group 1. Click gear icon in the upper right 2. Click CRM Settings 3. Click 'User and Access Control' drop-down in the left Contact us at: [email protected] | 150 (adapted from vtiger CRM 6.0.0Beta© 2004-2013) CRM. DONE SIMPLY. 4. Click Groups. You can click on pin icon next to it to add a shortcut to your settings home page 5. Click Add Group 6. Provide label, description, and select appropriate entities as members of the group. Colours are illustrated to differentiate entities. 7. Click Save to update changes Editing Groups This feature enables you to modify existing groups to meet your requirements. Few simple steps to edit a group 1. In the list view of groups, click on pencil 2. Modify fields 3. Click Save to update changes icon to the right of desired group Deleting Groups This feature enables you to delete existing group if it doesn't meet your requirements. Follow few simple steps to delete an existing group 1. In the list view of groups, click on pencil icon to the right of desired group 2. Transfer responsibilities to another existing group 3. Click Save Contact us at: [email protected] | 151 (adapted from vtiger CRM 6.0.0Beta© 2004-2013) CRM. DONE SIMPLY. 6. Fields and Layout Editor What is a field and a layout editor? Prism SalesPRO CRM offers a set of default fields. Fields and Layout Editor feature enables you to create custom fields, rearrange fields, edit field properties, and move fields inside and across blocks. The fields you create are accessed by all users across your Prism SalesPRO CRM account, unless you've defined permissions through Profiles. You can navigate to Edit Fields and Layout Editor in two different ways. Through settings 1. 2. 3. 4. Click gear icon in the top right corner Click CRM Settings Click 'Studio' drop-down in the left Click Edit Fields. You can click on pin icon next to it to add a shortcut to your settings home page 5. Select a module from the drop-down in top-right Through corresponding module 1. 2. 3. 4. Click desired module Eg: Leads Click on desired record in the selected module Click wrench icon in the top right corner Click Edit Fields Getting Started We've discussed different methods of reaching to Edit Fields and Layout Editor. If you reach Fields and Layout Editor through Settings page, you'll need to select desired module from the drop-down; As a result, all the fields in that module will be displayed. This will help you to perform different operations on those fields. On the other hand, however, if you'd reach Edit Fields and Layout Editor by clicking on Edit Fields in a selected module, you can ignore this step. Follow few simple steps to select a module 1. 2. 3. 4. Click gear icon in the top right corner Click CRM Settings Click 'Studio' drop-down in the left Click Edit Fields. You can click on pin icon next to it to add a shortcut to your settings home page 5. Select a module from the drop-down in top-right Contact us at: [email protected] | 152 (adapted from vtiger CRM 6.0.0Beta© 2004-2013) CRM. DONE SIMPLY. Adding Custom Fields This feature enables you to add custom fields in addition to default fields offered by Prism SalesPRO CRM. Follow few simple steps to add custom fields in selected module 1. Click Add Custom Field button in the top right 2. Select desired data type from the Select Field Type drop-down. Provide field name in Label Name field, and specify field length in Length field 3. To update changes, click Save Contact us at: [email protected] | 153 (adapted from vtiger CRM 6.0.0Beta© 2004-2013) CRM. DONE SIMPLY. Custom Fields Table Prism SalesPRO CRM offers a wide variety of choices in creating custom fields to accord your business requirements. The following table gives complete information of custom Fields that are supported in Prism SalesPRO CRM. Field Type Description Fields Information Text To add text Label: Provide field name Length: Provide field size Maximum Characters: 255 Decimal To add decimals Label: Provide field name Length: Provide field size Decimal: Provide number of decimal places Maximum Characters: 59 Integer To add integers Label: Provide field name Length: Provide field size Maximum Characters: 255 Percent To add percentage Label: Provide field name Currency To add currency values Label: Provide field name Length: Provide field size Maximum Characters: 255 Email To add email address Label: Provide field name Phone To add Phone number Label: Provide field name Pick List To add drop-down fields Label: Provide field name Picklist values: Provide picklist values URL To add website address Label: Provide field name Check-Box Enable check-box for true. Disable for false Label: Provide field name Text Area To add long text Label: Provide field name Multi-Select Combo Box Add picklist field to select multiple values Label: Provide field name Picklist Values: Provide picklist values Contact us at: [email protected] | 154 (adapted from vtiger CRM 6.0.0Beta© 2004-2013) CRM. DONE SIMPLY. Skype To add skype id Label: Provide field name Time To add time Label: Provide field name Creating Custom Block This feature enables you to create new blocks in addition to default blocks offered by Prism SalesPRO CRM. You can also Follow few simple steps to create a new custom block 1. Click Add Custom Block 2. It brings up a pop-up. Provide label in Block Name and select a block from Add After drop-down to place your next to selected block. 3. Click Save to update changes Rearranging Fields Prism SalesPRO CRM gives you the flexibility to rearrange the arrangement of the fields according to your business requirements. Click on desired field and drag it on to any selected location in and across blocks. Contact us at: [email protected] | 155 (adapted from vtiger CRM 6.0.0Beta© 2004-2013) CRM. DONE SIMPLY. Follow few simple steps to reorganize fields 1.In Fields and Layout Editor of selected module, click on desired field 2.Drag the field to desired location.(You can move fields in all possible directions: left, right, up, and down) 3.After rearranging fields, click Save Field Sequence button in the top-right Editing Field Properties This feature helps you to configure basic preferences of fields in Prism SalesPRO CRM. You can also enable/disable fields across Modules, Quick Create, Summary View and Mass Edit. Follow few simple steps to edit field properties 1.Click pencil icon next to your desired field 2. It brings up a pop-up that has set of options that can be configured on selected module Contact us at: [email protected] | 156 (adapted from vtiger CRM 6.0.0Beta© 2004-2013) CRM. DONE SIMPLY. Field Property Functionality Mandatory field To make the field mandatory for the Users to fill in Active To enable or hide the field for all users Quick Create To make the field available in Quick Create popup Summary View To display the field in summary view of the record Mass Edit To make the field available during mass edit Default Value To set default value for the field 3. After modifying field properties, click Save Note! Some Checkboxes are disabled in some fields because their properties cannot be edited (which otherwise can lead to inconsistency in the CRM) Deleting Fields If custom fields created by you do not meet your requirements, you can delete them permanently. Deleting custom fields will also delete data associated with it. In contrary to delete option, you can also hide specific field, so that it is not used by other users. Follow few simple steps to delete custom fields 1. Hover your mouse pointer to the right of your custom field 2. Click on Trash Icon In the alert message click Yes Notes! You can only delete custom fields. Default fields can't be deleted Hiding Fields This feature enables you to hide fields, so that they are not used by users in Prism SalesPRO CRM. This has an advantage over delete field option because hiding fields will not delete data associated with it and hidden fields can be restored when required. Contact us at: [email protected] | 157 (adapted from vtiger CRM 6.0.0Beta© 2004-2013) CRM. DONE SIMPLY. Follow few simple steps to hide fields 1.Click pencil icon next to your desired field 2. It brings up a pop-up that has set of options that can be configured on selected module 3. Uncheck the Active checkbox to hide specific field 4. Click Save to update changes Notes! You can hide both custom and default fields Arranging Related Tabs Related tabs are the modules that are directly or indirectly related to parent module. The idea is to organize data and project information at one place and reduce clicks. You can view related tabs of a parent module in detail view of selected record in any module. Contact us at: [email protected] | 158 (adapted from vtiger CRM 6.0.0Beta© 2004-2013) CRM. DONE SIMPLY. This feature enables you to configure related tabs list according to your requirements. You can either rearrange the tabs or disable them. Follow few simple steps to configure related tabs 1. Click Arrange Related Tabs tab in Fields and Layout Editor 2. To rearrange related tabs, click on desired module and drag it to selected location among other modules 3. To remove related tab, click Close icon to the right of any module 4. Select modules from Select Module To Add field to add them back to list 5. Click Save to update changes Making Fields Mandatory/Non-mandatory Mandatory fields are fields that you should fill in. You cannot create or import records without filling or mapping mandatory fields. You have complete power over fields across modules in Prism SalesPRO CRM. You can make desired fields mandatory or non-mandatory according to your requirements. Here's how to make desired fields mandatory 1. Click gear icon in the top right corner Contact us at: [email protected] | 159 (adapted from vtiger CRM 6.0.0Beta© 2004-2013) CRM. DONE SIMPLY. 2. Click CRM Settings 3. Click 'Studio' drop-down in the left 4. Click Edit Fields. You can click on pin icon next to it to add a shortcut to your settings home page 5.Select a module from the drop-down in top-right 6. Hover your mouse pointer over desired field and click on pencil icon next to it. Say Mobile Phone field in Leads module 7. Now enable the Mandatory Field checkbox to make it mandatory 8. Click Save 9. To make any field NON-MANDATORY, follow same procedure up to #6. In step #7, disable the checkbox Mandatory Field to make it non-mandatory Contact us at: [email protected] | 160 (adapted from vtiger CRM 6.0.0Beta© 2004-2013) CRM. DONE SIMPLY. Notes! 1.You cannot make few fields non-mandatory. Eg: Last Name in Contacts module. These fields are made mandatory to establish relation between modules in Prism SalesPRO CRM Contact us at: [email protected] | 161 (adapted from vtiger CRM 6.0.0Beta© 2004-2013) 7. Module Manager CRM. DONE SIMPLY. What is a module manager? Prism SalesPRO CRM includes over 20 modules covering Sales, Support, Marketing, Inventory, Projects, Calendar and many more. Module Manager gives you the flexibility to enable, disable and configure settings of different modules available in Prism SalesPRO CRM. Deactivating Module(s) Module Manager displays the list of all modules available in your Prism SalesPRO CRM account. You can disable the modules that doesn't meet your business requirements by un-checking the checkboxes beside them. Unlike Profiles, if modules are disabled in Module Manager, they will not be available for use for all users across your Prism SalesPRO CRM account. However, you can easily enable the modules to bring them back in action by clicking on the checkbox beside that module. Follow few simple steps to disable modules in Prism SalesPRO CRM 1. 2. 3. 4. Click gear icon in upper right corner Click CRM Settings Click 'Studio' drop-down in the left Click Module Manager. You can click on pin icon next to it to add a shortcut to your settings home page 5. Uncheck the checkbox next to specific field to disable it Activating Modules If you've ever decided to bring deactivated module into action again, you'll have to simply enable the checkbox beside that module. Contact us at: [email protected] | 162 (adapted from vtiger CRM 6.0.0Beta© 2004-2013) CRM. DONE SIMPLY. Note! If you want to limit users' access to modules, you can use Profiles in the 'Users Management' section under Settings Configuring Modules This feature enables you to configure settings related to modules in Prism SalesPRO CRM. The key preferences with respect to the modules can be configured right through Module Manager. Settings that can be configured in Module Manager are illustrated below. The wide variety of options include : 1 Edit Fields Navigates you to Fields and Layout Editor where you can configure fields of selected module 2 Module Sequence Numbering Navigates you to Customize Record Numbering feature where you can modify default record numbering of selected module 3 Edit Workflows Navigates you to Workflows feature where you can set up new workflows on selected module 4 Edit Picklist Values Navigates you to Picklist Editor where you can customize picklist fields of selected module 5 Edit Field Mapping Exclusively for Leads. Navigates you to Lead Mapping feature where you can map fields before converting leads Contact us at: [email protected] | 163 (adapted from vtiger CRM 6.0.0Beta© 2004-2013) 8. Picklist Editor CRM. DONE SIMPLY. What is a Picklist Editor? Picklist is a drop-down field with list of options available, within which, only one option can be selected. For instance, Lead status in Leads module. Picklist Editor is used to configure picklist values in different modules. It enables you to add a new values, rename, delete or rearrange existing picklist values. Picklist values vary across roles — users under a role can only access picklist values assigned to that role. Creating a Custom Picklist Field You can create a custom picklist field with desired set values on a selected module. While creating records, select a value from the picklist to have it automatically inserted in the field. Follow few simple steps to create a custom picklist field 1. 2. 3. 4. Click gear icon in the top right Click CRM Settings Click 'Studio' drop-down in the left Click Edit Fields. You can click on pin icon next to it to add a shortcut to your settings home page 5. Now click on Add Custom Field button in the right 6. In the create picklist field popup, provide picklist field name and values Contact us at: [email protected] | 164 (adapted from vtiger CRM 6.0.0Beta© 2004-2013) CRM. DONE SIMPLY. a. Select field type as Picklist b. Provide a label to your picklist field c. Provide values to your picklist field in the text space provided d. Leaving the checkbox unchecked will display your picklist across all users irrespective of roles; on the contrary, enabling the checkbox gives you the flexibility to vary picklist fields across roles. Working with Picklist Fields You can perform a wide variety of operations on picklist fields like adding new values to existing picklist field, modifying, deleting, rearranging existing values of a picklist field. Additionally, you can also assign roles on selected picklist values. Follow few simple steps to configure picklist fields 1. Click gear icon in the top right corne 2. Click CRM Settings 3. Click 'Studio' drop-down in the left 4. Click Picklist Editor. You can click on home page pin icon next to it to add a shortcut to your settings Getting Started To customize picklist fields, you'll need to select desired [Module] from Select Module dropdown (ex:Leads, Contacts, etc). Consequently, Select Picklist in [Module]dropdown will display all picklist fields available for that module. This drop-down can be used to select the desired picklist field to perform global actions. Contact us at: [email protected] | 165 (adapted from vtiger CRM 6.0.0Beta© 2004-2013) CRM. DONE SIMPLY. Rearranging picklist values This feature enables you to modify the sequence of picklist values in a given picklist field. You can rearrange the values according to your requirements. Follow few simple steps to rearrange picklist values 1. Select a module and desired picklist field 2. Click, drag and drop desired values 3. Click Save Order Adding New Value(s) Prism SalesPRO CRM enables you to create new picklist values in addition to existing values. After the custom picklist value(s) are created, they will be available for selection in respective module. Follow few simple steps to add new picklist values 1. Select a module and desired picklist field 2. Click Add Value to add a custom picklist value 3. In the popup, provide desired name in Item Value field 4. Select desired role(s) from Assign to Role drop-down to grant them access to new picklist value Contact us at: [email protected] | 166 (adapted from vtiger CRM 6.0.0Beta© 2004-2013) CRM. DONE SIMPLY. 5. Click Save Notes! Roles are not available for selection for non-role based picklist fields as values are displayed across all users in Prism SalesPRO CRM Editing Existing Values This feature helps you to edit existing picklist values in the selected picklist field. Follow few simple steps to edit existing values 1. Select a module and desired picklist field 2. Select desired picklist value you wish to edit 3. Click Rename Value 3. In the popup, provide new label in Enter New Name field Contact us at: [email protected] | 167 (adapted from vtiger CRM 6.0.0Beta© 2004-2013) CRM. DONE SIMPLY. 4. Click Save Deleting Existing Values This feature helps you to delete existing picklist values in the selected picklist field. It also helps you to select multiple values and delete them all in one shot. Follow few simple steps to delete picklist values 1. Select a module and desired picklist field 2. Select desired picklist values you wish to delete. To select multiple values, press and hold Ctrl key (Command key in Mac) and click on desired picklist values 3. Click Delete Value to delete selected values 4. Select a value in Replace it with field to transfer responsibilities. The selected field will show up in place of deleted value(s). Contact us at: [email protected] | 168 (adapted from vtiger CRM 6.0.0Beta© 2004-2013) CRM. DONE SIMPLY. Assigning Roles Prism SalesPRO CRM gives you the flexibility to grant or revoke access to picklist values through Picklist Editor. When you assign or disable picklist values to a selected role, changes will be affected across all users in that role. Assigning Values to selected role(s) This feature enables you to assign multiple picklist values to multiple roles in one shot. When you assign values to a role, all users under that role will be able to access the picklist values. Notes! Neither Assign Value button nor Values assigned to a role tab are available for non role based picklist fields Follow few simple steps to assign values to role(s) 1. Select a module and desired picklist field 2. Select desired picklist values you wish to assign to selected role(s). To select multiple values, press and hold Ctrl key (Command key in Mac) and click on desired picklist values 5. Select role(s) from Assign to Role drop-down to grant them access to selected values Contact us at: [email protected] | 169 (adapted from vtiger CRM 6.0.0Beta© 2004-2013) CRM. DONE SIMPLY. Values assigned to a role The tab Values assigned to a role is displayed for all role based picklist fields in Picklist Editor. This feature enables you to view available picklist values against the selected role. Additionally, this feature also gives you the flexibility to revoke access to selected values under a role. The values in blue are available for all users across selected role. Click on desired value(s) to disable it. The colour code grey represents that value is disabled for the selected role. You can click on disabled values to enable them back. From the screenshot below, three values: Word of Mouth, Conference, Direct Mail are disabled for Sales Manager role To update changes, click Save. Contact us at: [email protected] | 170 (adapted from vtiger CRM 6.0.0Beta© 2004-2013) 9. Picklist Dependency Setup CRM. DONE SIMPLY. What is a Picklist Dependency Setup? Picklist dependency setup offers you a seamless way of selecting only desired values from the picklist fields. You'll need to set-up dependency between two picklist fields (source and target picklist fields). By selecting a value in source picklist field, you'll have complete control over the target picklist fields. For instance, we will consider a real time example. I have two different fields in Contacts Module. Football Team - source field, and Football Players- target field. When a value is selected in Football Team field, only players related to the selected team should be displayed in Football Players field. Now let's begin. Configuring Picklist Dependency Before we set up picklist dependency, we'll have to specify module, source field, and target field. Entire process is made simple and straight forward. Follow few simple steps to setup picklist dependency Click gear icon in the top right Click CRM Settings Click 'Studio' drop-down in the left Click Picklist Dependency Setup. You can click on settings home page pin icon next to it to add a shortcut to your Select a module, source field, and picklist fields from the dropdown. 6. All available values in source picklist field and target field are displayed. You can view all source picklist values in header section. Contact us at: [email protected] | 171 (adapted from vtiger CRM 6.0.0Beta© 2004-2013) CRM. DONE SIMPLY. 7. Now pick desired target field values under corresponding source field values(headers). Notes! Values in blue are selected and values in grey are unselected. 8. Click Save Working After successfully setting up picklist dependency, you can select a value in source field to view only corresponding values in target field. From the above example, upon selecting a specific team, we should be only able to see players representing that team. We've deployed picklist dependency on fields in Contacts module. In the create view or edit view of a contact record, we will select a value in Football Team field; as a result, appropriate values will be displayed in Football Players field Contact us at: [email protected] | 172 (adapted from vtiger CRM 6.0.0Beta© 2004-2013) CRM. DONE SIMPLY. This gives you the flexibility to explicitly select appropriate values and eliminates the scope for erroneous and inaccurate data. Contact us at: [email protected] | 173 (adapted from vtiger CRM 6.0.0Beta© 2004-2013) 10. Menu Editor CRM. DONE SIMPLY. What is a Menu Editor? With the help of Menu Editor, you can have most frequently accessed Prism SalesPRO CRM modules on your menu bar. This will ensure easy navigation, and switching between different modules is easy. Also, you can shuffle their positions according to your requirements. However, the list of all available modules in Prism SalesPRO CRM are displayed underAll dropdown For instance, Sales reps frequently access sales related modules : Contacts, Leads, Invoices, etc. They can have frequently visited modules on menu bar to save time. Follow few simple steps to configure desired modules on menu bar 1. 2. 3. 4. Click gear icon in the upper right Click CRM Settings Click 'Studio' drop-down in the left Click Menu Editor. You can click on page pin icon next to it to add a shortcut to your settings home All active modules in Prism SalesPRO CRM are available for selection. Select desired modules from list of modules Notes! You can only select upto 7 modules to have on menu bar 5. Change the arrangement of the modules by dragging them among the other modules 6. Click Save 7. Refresh your page to see desired items on your menu bar. Contact us at: [email protected] | 174 (adapted from vtiger CRM 6.0.0Beta© 2004-2013) CRM. DONE SIMPLY. 11. Email Templates What are email templates? This feature enables you to create email templates and easily populate them while sending emails. You can design email templates according to your requirements. You can also include rich text, HTML content, Images, etc in your email templates. You can also design your own email templates for regular Newsletters, Monthly updates, Maintenance alerts etc. Creating Email templates Delight your customers by sending them customized email templates. You'll need to create and have email templates in your repository in order to select them while sending out emails. Follow few simple steps to create new email template 1. 2. 3. 4. 5. 6. 7. Click All dropdown on the menubar Click Email Templates In Email Templates page, click New Template button Enter template Name and Description Select the Folder; Private-only for personal use and Public-used by all others users Enter Subject—This will be populated as Subject of your Email In the Select Field Type, Select the Module in Step 1 and Select Field variables in Step 2 You can also include fields from the Modules in the email. The field variables, if selected, the field values will be populated from respective record and displayed in the email. Organization Fields Displays fields of Organization Module Contacts Displays fields of Contacts Module and related Organization Module Lead Fields Displays fields of Leads Module User Fields Displays user's information from My Preferences page General Fields Displays Current Date and Current Time For instance, Dear $contacts-last_name$, Thanks for subscribing Prism SalesPRO CRM On-Demand. We are so glad that you are now member of Prism SalesPROcommunity. Please feel free to revert to us if you need any assistance Regards, Contact us at: [email protected] | 175 (adapted from vtiger CRM 6.0.0Beta© 2004-2013) CRM. DONE SIMPLY. $users-user_name$ The above email template will be populated as, Dear Diana, Thanks for subscribing Prism SalesPRO CRM On-Demand. We are so glad that you are now member of Prism SalesPROcommunity. Please feel free to revert to us if you need any assistance Regards, Prism SalesPRO Inserting HTML content Email Templates enables you to send emails to your customers. Hold on a sec! Will you let us send email templates we've spent time and money to develop? Yes we do. Apart from boring, routine, plain-text emails, you can also send colorful and visually appealing emails to thrill your customers. All you have to do is — integrating your pre-designed HTML content in your email template. Follow few simple steps to integrate your html content in your email template 1. In create view or edit view of an email template, click Source 2. Paste your HTML content in the text space provided 3. Now click Save! Notes!1. We strongly recommend you to click Save button and 'not' click Source button after pasting your HTML content Contact us at: [email protected] | 176 (adapted from vtiger CRM 6.0.0Beta© 2004-2013) CRM. DONE SIMPLY. 12. Company Details You can personalize the application by uploading your Company logo and details to your Prism SalesPRO CRM service; as a result, company logo appears on your home page.Also, your company logo and address can be used in email templates and Inventory tools such as Quotes and Invoice, when exported to PDF files. Steps to update your company logo and details 1. 2. 3. 4. 5. 6. 7. 8. Click settings icon in the top right corner Click CRM Settings Click 'Templates' drop-down in the left Click Company Details. You can click on pin icon next to it to add a shortcut to your settings home page Click Edit button in the top right corner To update your company logo, click Choose File button, browse and open desired file from your computer You can also update company details in the fields provided Click Save Notes! 1. Recommended image size is 170X60 pixels. 2. Recommended image formats are .jpeg , .jpg , .png , .gif , .pjpeg , .x-png. Go personalize your Prism SalesPRO CRM now! Contact us at: [email protected] | 177 (adapted from vtiger CRM 6.0.0Beta© 2004-2013) CRM. DONE SIMPLY. 13. Taxes What are taxes? Prism SalesPRO CRM gives you the flexibility to manage local and international tax rates through Tax Calculations. After the tax rates are defined, they will be available for selection in Invoices, Purchase Orders, Sales Orders and Quotes. Product and Service Taxes Product and Service taxes enable you to define Group Tax on list of products or services selected in Invoice, SO, PO, and Quote records. It gives you the flexibility to manage following operations Adding New Tax This feature enables you to create national and international taxes. Follow few simple steps to add a new tax 1. 2. 3. 4. 5. 6. 7. Click gear icon in the upper right Click CRM Settings Click 'Other Settings' drop-down in the left Click Tax Calculations Click Add New Tax button under Product & Service Taxes block Provide Tax Name(Alphabets) and Tax Value(Percentage) Click Save Editing Existing Taxes This feature enables you to edit national and international taxes. Follow few simple steps to edit existing taxes 1. 2. 3. 4. 5. 6. 7. Click gear icon in the upper right Click CRM Settings Click 'Other Settings' drop-down in the left Click Tax Calculations Click pencil icon next to tax you'd like to edit Update fields with desired values Click Save Contact us at: [email protected] | 178 (adapted from vtiger CRM 6.0.0Beta© 2004-2013) CRM. DONE SIMPLY. Enabling/Disabling Existing Taxes This feature helps you to enable or disable existing taxes. All the tax values that are enabled in Tax Calculations will be available for selection in Products module. Also, the tax rates in Invoices, SO, PO, and Quotes will be calculated against taxes that are enabled in Tax Calculations. To be precise, the taxes, if disabled in Tax Calculations, they will be simply ignored and not used for calculating taxes. Follow few simple steps to enable/disable existing taxes 1. 2. 3. 4. 5. 6. Click gear icon in the upper right Click CRM Settings Click 'Other Settings' drop-down in the left Click Tax Calculations Uncheck the checkbox under Status to disable specific tax You can click on that checkbox again to enable the tax Notes! Disabled taxes will not affect price in Invoice, Sales Orders, Purchase Orders and Quotes Shipping and Handling Taxes Shipping and Handling Taxes enables you to define taxes that will incur on transporting a product or service. These taxes are basically calculated on Shipping and Handling Charges defined while creating Invoice, SO, PO, and Quote. Unlike Product and Service Taxes, Shipping and Handling Taxes do not respect the value that is selected inTax Mode, ie., these taxes are same for both Group and Individual taxes. Individual Tax Prism SalesPRO CRM enables you to define tax rates on individual product. Individual Tax is product specific. To populate product specific tax while generating Invoice, SO, PO or Quotes. Contact us at: [email protected] | 179 (adapted from vtiger CRM 6.0.0Beta© 2004-2013) CRM. DONE SIMPLY. Contact us at: [email protected] | 180 (adapted from vtiger CRM 6.0.0Beta© 2004-2013) CRM. DONE SIMPLY. 14. Inventory Terms & Conditions What are inventory terms & conditions? This feature enables you to define inventory terms and conditions in the form of text that is automatically populated in inventory modules such as Invoices, Sales Orders, Purchase Orders and Quotes. This will help you to convey your terms and conditions explicitly. Having the terms and conditions text ready in inventory modules also helps you to populate the text in pdf templates sent to customers. Getting Started Prism SalesPRO CRM provides default text in Inventory Terms and Conditions feature. You can modify the text to match your business requirements. Follow few simple steps to modify text in Inventory Terms and Conditions 1. 2. 3. 4. Click gear icon in the top-right Click CRM Settings Click 'Other Settings' drop-down in the left Click Inventory Terms and Conditions. You can click on to your settings home page 5. Modify the default text in the text-space provided 6. Click Save pin icon next to it to add a shortcut Working with Inventory Terms and Conditions Inventory Terms and Conditions text is automatically populated in Terms & Conditions block in inventory modules: Invoices, Sales Orders, Purchase Orders and Quotes. However, you can modify the text from within individual inventory module record, too. For instance, I am going to modify Inventory terms and conditions text from within my invoice record Contact us at: [email protected] | 181 (adapted from vtiger CRM 6.0.0Beta© 2004-2013) CRM. DONE SIMPLY. Contact us at: [email protected] | 182 (adapted from vtiger CRM 6.0.0Beta© 2004-2013) CRM. DONE SIMPLY. 15. Announcements What are announcements? Prism SalesPRO CRM gives admin users the ability to create announcements that can be broadcasted across all users (Admin and non-admin users). You can view announcements below menu bar section in the top. In real-time scenario, Announcements can be used as message boards where users can share their topics of interest with all other users in Prism SalesPRO CRM. Getting Started You'll need the administration privileges to create announcements. Non-admin users can only view announcements created by administrators. Follow few simple steps to create an announcement 1. 2. 3. 4. Click gear icon in the top right Click CRM Settings Click 'Other Settings' drop-down in the left Click Announcement. You can click on pin icon next to it to add a shortcut to your settings home page 5. Compose your message in text space provided 6. Click Save Contact us at: [email protected] | 183 (adapted from vtiger CRM 6.0.0Beta© 2004-2013) CRM. DONE SIMPLY. Announcements in action After successfully creating an announcement, you can view your it below the menu bar section on the top. The announcement also holds the name of the admin user that posted it. Non-admin users can only view the announcement. Contact us at: [email protected] | 184 (adapted from vtiger CRM 6.0.0Beta© 2004-2013) 16. Currencies CRM. DONE SIMPLY. What are Currencies? This feature enables you to configure national and international currencies to help you in dealing business operations with your customers around the globe. You'll be asked to select your base currency at your first login, in startup page. The base currency is the currency against which exchange rates are generally quoted in a given country. For instance, INR in India, and USD in USA. The foreign currencies you'd set up in your Prism SalesPRO CRM account will be converted according to the exchange rates of base currency. Getting Started You'll need to configure base currency during your first login - in start up page Adding new currencies Besides base currency which is automatically added, you can also add new foreign currencies in Prism SalesPRO CRM. While the exchange rate of base currency is set to 1, you'll have to manually provide exchange rates for newly added currencies in accordance with your base currency. Follow few simple steps to add new currencies 1. 2. 3. 4. Click gear icon in the top right corner Click CRM Settings Click 'Other Settings' drop-down in the left Click Currencies. You can click on pin icon next to it to add a shortcut to your settings home page 5. Click Add Currency Contact us at: [email protected] | 185 (adapted from vtiger CRM 6.0.0Beta© 2004-2013) CRM. DONE SIMPLY. In the create view of new currency, you'll need to fill up the following fields a. Currency Name Select desired currency from the drop-down b. Currency Code The currency code of the selected currency is automatically populated c. Symbol The symbol of selected currency is automatically populated d. Conversion Rate Provide conversion rate of selected currency in accordance with your base currency. For instance, 1 USD = 54.89 INR e. Status Enable the check-box to make currency active Configuring desired currency You can also manage reports and other inventory operations in an entirely different currency other than base currency. Prism SalesPRO CRM gives you the flexibility to switch to a different currency; as a result, all currency fields will be updated according to selected currency. It is simply that currency fields are converted according to base currency value. You can choose desired currency from My Preferences page; consequently, all currency values will be updated according to selected currency. Follow few simple steps to configure desired currency 1. Click on your user name in the top right corner 2. Click My Preferences 3. In the 'Currency and Number Field Configuration' block, locate Currency field and select desired currency Contact us at: [email protected] | 186 (adapted from vtiger CRM 6.0.0Beta© 2004-2013) CRM. DONE SIMPLY. 4. Click Save Modifying Product Price Products are sold across different countries with different price tags i.e, if product of US is to be sold in India, price of that product may or may not be decided on the basis of conversion rates. Prism SalesPRO CRM gives you the flexibility to configure product prices manually or populate prices according to conversion rates. Here's how you do it In the edit view or create view of desired product, click more currencies link under Unit Price field In the Product Price popup, you can see, values are all updated according to conversion rates. However, you can modify them and have custom values in place by entering desired price values under Price tab. Contact us at: [email protected] | 187 (adapted from vtiger CRM 6.0.0Beta© 2004-2013) CRM. DONE SIMPLY. Now when you select this product while generating Invoice, Sales Order, Purchase Order or Quotes, you'll see the prices that are updated by you - not conversion rates Contact us at: [email protected] | 188 (adapted from vtiger CRM 6.0.0Beta© 2004-2013) CRM. DONE SIMPLY. 17. Customize record numbering. This feature helps you to customize numbering of records according to your requirements. Prism SalesPRO CRM offers default numbering corresponding to every module in Prism SalesPRO CRM. We recommend you to customize your record numbering prior to inputting data in your Prism SalesPRO CRM account - because this feature doesn't affect the numbering of existing records. Follow few simple steps to customize numbering of your records 1. 2. 3. 4. Click gear icon in the top right corner Click CRM Settings Click 'Other Settings' drop-down in the left Click Customize Record Numbering. You can click on your settings home page pin icon next to it to add a shortcut to a. Select Module Select desired module to customize numbering of records in it b. Use Prefix Provide desired prefix. This will be automatically populated in the detail view of selected module > [Module] number field. Module can be Contacts, Leads, etc., c. Start Sequence Provide the sequence where numbering should be started. This record numbers are updated in chronological order beginning from your start sequence number 5. Click Save After successfully customizing record numbering, you can see that the records that are imported or created after the customization will automatically populate prefix and sequence number is updated chronologically. Contact us at: [email protected] | 189 (adapted from vtiger CRM 6.0.0Beta© 2004-2013) What are workflows? 18. Workflows CRM. DONE SIMPLY. Workflows will streamline your business by automating operations like sending emails, creating activities, updating fields, etc. As tasks are performed automatically, you need not have to execute them manually. Follow few simple steps to setup a workflow 1. 2. 3. 4. Click gear icon icon in the top right Click CRM Settings Click 'Other Settings' drop-down in the left Click Workflows. You can click on pin icon next to it to add a shortcut to your settings home page 5. Click New Workflow Step 1: Scheduling workflow You'll need to provide basic details that include selecting a module and scheduling workflow. Workflows gives you the ability to perform different operations on the selected module such as: sending an email, updating fields, creating a whole new record in another module, creating an event or todo, etc. This answers the question why should we select a module here?. We will discuss the actions that are triggered by the workflows in detail in Step-3. You'll need to specify when would you like to run the workflow. Workflow running conditions are all predefined and you only have to choose the condition that suite your requirements. 1. Only on the first save- Triggers workflow on your first save ie., when you create a new record. 2. Until the first time the condition is true- Triggers workflow if your condition(Step-2) will be true. Once executed, your workflow will not trigger on the same record again. However, it will trigger actions on other records in the selected module. 3. Every time the record is saved- Triggers workflow every time you will save your record— including first save. 4. Every time the record is modified- Triggers workflow every time you edit and save your record—excluding first save. 5. Schedule-Triggers workflow on a certain date Contact us at: [email protected] | 190 (adapted from vtiger CRM 6.0.0Beta© 2004-2013) CRM. DONE SIMPLY. Complicated? Umm, let me give you a few examples for a better understanding Only on first save For instance, I am Rahul, sales agent in ABC company. I manage to send a warm welcome note to new customers through email. I will create a workflow for this purpose and my workflow running condition will be Only on the first save. This will trigger workflow only when new record is created. Until the first time the condition is true Records with 'Sales Stage' equals to 'Closed Won' should be automatically assigned to me. This happens only once in the sales cycle of a record. For that reason, I will create a workflow and have the condition Until the first time the condition is true. Once the workflow is executed, it's not going to perform the same operation on that record again. Every time the record is saved When a deal is won, 5 % share of the total amount goes to the sales agent. I do not waste my time in calculations. I would rather create a workflow. This should execute every time record is saved; as a result, values will be automatically updated. Every time the record is modified I want Prism SalesPRO CRM to trigger me an email if someone modifies information in 'Amount' field in Opportunities module. I will create a workflow and have the condition Every time the record is modified. This workflow will execute every time edit+save operation will be performed on a record. Adding Condition(s) Workflows will be executed on the records in the selected module. More often, you might only need to perform operations on selected records in that module. This is where conditions will come into play. Workflow will only be executed on the records that satisfy the condition specified by you. For instance, I would like to create a workflow on Leads module. I want the workflow to execute operations on records with 'Lead Status' equals 'Hot'. So, my condition will be Lead Status is Hot You'll find two different options while defining conditions. The functionality of the conditions is described below with an example Contact us at: [email protected] | 191 (adapted from vtiger CRM 6.0.0Beta© 2004-2013) CRM. DONE SIMPLY. 1. All Conditions : Filters records based on AND condition. For instance, Condition 1 AND Condition 2 AND Condition 3 Displays the results if and only if ALL conditions are matched. If one condition is failed, other queries will not be executed. 2. Any Conditions : Filters records based on OR condition. For instance, Condition 1 OR Condition 2 OR Condition 3 Displays the results if at-least ONE condition is matched. If one query is failed, other queries will be executed. Notes! 1.By default, AND condition is enabled between ALL conditions and ANY conditions. This will help you in grouping the two conditions, altogether. 2.You can provide existing or custom criteria while defining conditions. 3.You can define multiple conditions for a workflow by clicking on Add Condition button. After defining conditions, click Next Adding Task(s) The actions that should be executed with the help of workflows can be configured through tasks, while previously defined steps are just to provide directions and inputs. Click Add Task button and select desired task Contact us at: [email protected] | 192 (adapted from vtiger CRM 6.0.0Beta© 2004-2013) CRM. DONE SIMPLY. 1. Send Mail- To send an email notification 2. Invoke Custom Function - To update target fields of records in a module when actions are performed on source field in a different module 3. Create Event- To create a new calendar event 4. Create To do- To create a new calendar task 5. Update fields- To updates field(s) of selected module 6. Create Entity- To create or update records when conditions are satisfied on parent record 7. SMS Task- To send SMS notification Contact us at: [email protected] | 193 (adapted from vtiger CRM 6.0.0Beta© 2004-2013) 19. Customer Portal CRM. DONE SIMPLY. What is Customer Portal? Customer Portal helps you deliver value to your customers. The self-service channel offers your customers the ability to generate tickets and refer to faqs. In addition, you can also share Documents, Products, Projects, Invoices, and Quotes etc Getting Started You can provide Customer Portal access to selected number of customers in Contacts module. Follow few simple steps to grant Customer portal access 1. Click Contacts tab. You can find it under All dropdown on menu bar 2. In the Create view of new contact record, or edit view of existing record, enable the checkbox Portal User 3. Provide Support Start Date and End date; your customers will only be able to login within span of Support Start and End dates 4. Customer Portal login URL, User Name and Password will be emailed to your customer automatically. Note! 1.Make sure you have configured your Outgoing Server properly. 2.Emails will not be sent to your Contact if Email Opt Out field is enabled. 3.Your customer can only log into customer portal if the current date falls within the range of Support Start Date and Support End Date. Personalizing Email Template If customer portal access is granted, an email notification will be sent to your customers. This email contains default HTML template designed by PrismSalesPRO. However, you can personalize the email template according to your specifications. Follow few simple steps to personalize email template 1. 2. 3. 4. 5. Click All dropdown Click Email Templates Click Customer Login Details template Click Edit to modify the template according to your requirements After modifications, click Save Notes! 1. User ID: $login_ name$ 2. Password: $password$ 3. $URL$ Contact us at: [email protected] | 194 (adapted from vtiger CRM 6.0.0Beta© 2004-2013) CRM. DONE SIMPLY. Configuring Customer Portal With Customer Portal Settings, you can restrict or grant your customers the ability to view modules, fields and data. In addition, you can also configure default ticket assignee; as a result, tickets generated from Customer Portal will be assigned to selected user. Follow few simple steps to configure Customer Portal Plug-in 1. 2. 3. 4. Click gear icon in the top right Click CRM Settings Click 'Other Settings' dropdown in the left Click Customer Portal. You can click on pin icon next to it to add a shortcut to your settings home page 5. Set up Customer Portal according to your Organization's requirements a. Privileges To grant your customers the privileges that the selected user has on modules and fields in Prism SalesPRO CRM b. Default Assignee Select an user to automatically assign tickets raised by your customers through customer portal c. Portal URL This is where your customers will login to access customer portal d. Module Name Displays the list of all modules that can be viewed by your customers e. Enable Module Enable the check-box to make the corresponding module available to your customers f. See Records Across Organization Selecting the radio button Yes enables your customers to view records of other customers in his / her Organization. No enables your customer to view only his / her records 6. Click Save Notes! Please make sure that you do not select any admin user from the Privileges drop-down Contact us at: [email protected] | 195 (adapted from vtiger CRM 6.0.0Beta© 2004-2013) CRM. DONE SIMPLY. Customer's point of view Using the details like Customer portal URL, username, and password, your customers can easily log into customer portal. Not just that, Prism SalesPRO CRM also offers them flexibility to enjoy following benefits through Customer Portal. Resetting Password Your customers can set up desired password after successfully logging into the Customer Portal. Follow few simple steps to update password 1. Click My Settings. You can find this link in the top right 2. In the popup, provide the password details 3. Click Save Generating Tickets If your customers have any issues with respect to the Product that was purchased from you, they can report issues by creating a Ticket (Case) through Customer Portal. Managing Tickets 1.Click Tickets tab 2.Click Show drop-down to Sort the existing tickets by Status. 3.Click Search button to search for existing tickets Creating New Ticket 1.Click on New Ticket to start creating a new case or an issue. 2.In the Create Ticket view, fill in the necessary information 3.Click Save Note! 1. The tickets generated by customers will be populated in Trouble Tickets module in Prism SalesPRO CRM 2. In the detail view of a case, customers and ticket owner can communicate through comments 3. Email notifications will be sent to ticket owner and contact when Ticket is created, Comments are exchanged or Ticket is closed. 4. You can also attach files to the system. These files can be viewed in Documents section of detail view of Trouble Ticker record 5. After the issue is resolved, your customer can Close the ticket by clicking on Close this ticket link. Ticket owner will also have powers to close the ticket by changing the Status to Closed Contact us at: [email protected] | 196 (adapted from vtiger CRM 6.0.0Beta© 2004-2013) CRM. DONE SIMPLY. Accessing Shared Records Customer Portal is a great media to share information with your customers as they can view Invoices, Quotes, Products, Documents, Contacts, Organizations, Assets and Projects. Customers can view records directly related to them or records related to other contacts in same Organization. Note! 1. Click Products tab to view the products that are directly related to the Contact and Products associated with Quotes and Invoices.This is same for Services also. 2. Click Documents tab to view the list of documents that are related to the Contact. Click on the file name to download the attachment. 3. Click Invoice subject download the PDF version of the Invoice. 4.Click Projects tab > Project detail view of a project record, click on Raise Ticket button to generate a new case if you have any issues with respect to Project record. Contact us at: [email protected] | 197 (adapted from vtiger CRM 6.0.0Beta© 2004-2013) 20. Account Settings CRM. DONE SIMPLY. 1. Changing your Password. Follow these simple steps to change your Prism SalesPRO password: 1. Login with your current credentials. 2. Click your username in the top right corner. 3. Select “My Preferences.” 4. Click “Change Password” button. Contact us at: [email protected] | 198 (adapted from vtiger CRM 6.0.0Beta© 2004-2013) CRM. DONE SIMPLY. Users with admin privileges can reset the password of non-admin users. Here's how to change password of non-admin users 1. 2. 3. 4. 5. Click gear icon in the upper right. Click Manage Users Click on desired user name(non-admin) from the list of users Now click Change Password in the top right Provide password and click Save. My Preferences will help you to configure your personal information. Few simple steps to update personal information of the user 1. Click on user name in the upper right 2. Click My Preferences 3. Update the following details and click Save User Login & Role Prism SalesPRO CRM allows users to modify Primary Email, Name, and Default Lead view. Also, this section will help administrators to assign roles to individual users. Primary Email Specify primary email of the user First Name Specify first name of the user Last Name Specify last name of the user Default Lead View Role To assign roles to individual users. Only displayed for admin users Calendar Settings With calendar settings, you can configure your calendar like the way you wanted it to be. You can set up Reminder Interval, Default calendar View, Time Zone and many more. Reminder Interval Set-up time interval for event reminder popup to appear again after it is closed Starting Day of the week Set-up your start day of week. For Instance, If your working day starts on Monday, you can select Monday Default Call Duration To automatically update End Date and Time for calls. So, you need not have to enter End Date and Time manually Contact us at: [email protected] | 199 (adapted from vtiger CRM 6.0.0Beta© 2004-2013) Other Event Duration CRM. DONE SIMPLY. To automatically update End Date and Time for all events other than calls. So, you need not have to enter End Date and Time manually Default Calendar View Prism SalesPRO supports different views in Calendar module. Select preferred view from the drop-down to make it default view Date Format Select desired date format Calendar Hour Format Select either 12 hour or 24 hour time format Day Starts at Customize your working hour on calendar view Time Zone Select desired time zone Currency and Number Field Configuration While managing inventory modules like Invoices, Quotes, Sales and Purchase Orders, you will need to have a valid currency format, digit and decimal separator, symbol placement etc. You can configure currency as per the requirement. Currency Select desired currency for the drop-down. However, the values will be saved according to base current rates Digit grouping pattern Select digit group separator that is often used when displaying large numbers, to make them easier to read. Decimal Separator Select a decimal point from drop-down to use between the integer and the fractional parts of a decimal Symbol Placement Select a value from drop-down to have currency symbol before or behind the currency value Number of Currency Decimals Select the number of decimals you would like to have after a currency value Truncate Trailing Zeros Enable the check-box to drop the values after the decimal point More Information You can update your personal information like phone number, email, signature etc Title Specify designation of the user Fax Specify fax number of the user Department Specify the department of the user Contact us at: [email protected] | 200 (adapted from vtiger CRM 6.0.0Beta© 2004-2013) CRM. DONE SIMPLY. Other Email Specify the other email of the user Office Phone Specify office phone number of the user Secondary Email Specify secondary email id of the user Mobile Phone Specify mobile phone number of the user Reports to Select the user(Subordinate) to whom the user reports to Home Phone Specify the home phone number of the user Secondary Phone Specify the secondary phone number of the user Signature Specify the signature in the text area. Your signature will be automatically embedded along with email body. Documents Internal Mail Composer Enable the check-box to see Prism SalesPRO CRM's built-in email composing window when you click on email id of records in Prism SalesPRO CRM Theme Select desired theme from drop-down Language Select desired language from the drop-down Default Record View Choose between viewing Summary view or Detail View when you click to view a record. User Address You can update address details of the user like city, state, country, etc. Street Address Specify street address of the user Country Specify user's country name City Specify name of the city where user lives Postal Code Specify postal code of user's address State Specify name of the state where user lives User Photograph Click on Choose file, browse for the user's photograph and click Save to upload. Contact us at: [email protected] | 201 (adapted from vtiger CRM 6.0.0Beta© 2004-2013) CRM. DONE SIMPLY. Contact us at: [email protected] | 202 (adapted from vtiger CRM 6.0.0Beta© 2004-2013)