1
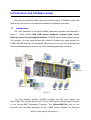
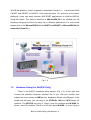
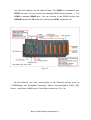
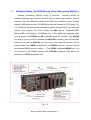
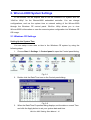
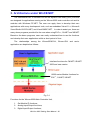
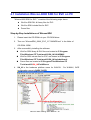
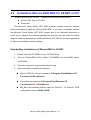
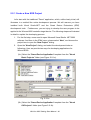
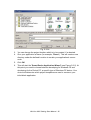
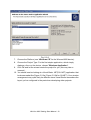
WinCon-8000 Getting Started (Version 1.4) Hardware & Software & Application Using I-7000/I-87K/I-8000 Series Modules Warranty All products manufactured by ICPDAS Inc. are warranted against defective materials for a period of one year from the date of delivery to the original purchaser. Warning ICPDAS Inc. assumes no liability for damages consequent to the use of this product. ICPDAS Inc. reserves the right to change this manual at any time without notice. The information furnished by ICPDAS Inc. is believed to be accurate and reliable. However, no responsibility is assumed by ICPDAS Inc. for its use, or for any infringements of patents or other rights of third parties resulting from its use. Copyright Copyright 1997-2004 by ICPDAS Inc., LTD. All rights reserved worldwide. Trademark The names used for identification only maybe registered trademarks of their respective companies. License The user can use, modify and backup this software on a single machine. The user may not reproduce, transfer or distribute this software, or any copy, in whole or in part. WinCon-8000 Getting Start Manual-- 1 Contents INTRODUCTION AND HARDWARE SETUP................................................................. 3 1.1 Introduction .............................................................................................................. 3 1.2 Hardware Setup( for W-8X3X Only) ..................................................................... 4 1.3 Hardware Setup ( for W-8X4X only, Dual LAN version WinCon)..................... 7 1.4 Specifications ............................................................................................................. 9 1.5 Dimensions ............................................................................................................... 10 1.6 What’s News ............................................................................................................ 11 1.7 Package List ............................................................................................................ 11 2. WINCON-8000 SYSTEM SETTINGS.......................................................................... 12 2.1 Windows CE Settings................................................................................................. 12 2.2 WinCon Utility............................................................................................................ 16 2.3 I-87K Module Settings ............................................................................................... 24 3. ARCHITECTURE UNDER WINCE.NET ................................................................... 28 4.1 INSTALLATION WINCON-8000 SDK FOR EVC ON PC...................................... 30 4.2 INSTALLATION WINCON-8000 SDK FOR VS.NET ON PC............................. 31 5. START THE FIRST APPLICATION PROGRAM ..................................................... 32 5.1 Applications in eMbedded Visual C++ (MFC).......................................................... 32 5.1.1 Create a Forms-Based Application...................................................................... 32 5.1.2 Specify Locations for Demo Files....................................................................... 36 5.1.3 Configure Compiler Options............................................................................... 38 5.1.4 Design an Application Program .......................................................................... 40 5.1.5 Build the Application Program............................................................................ 43 5.1.6 Execute the Application Program on the Wincon-8000 Platform ....................... 45 5.2 Applications in Visual Studio VB .NET and C#.NET ............................................. 47 5.2.1 Create a New SDE Project .................................................................................. 49 5.2.2 Add the Project Reference to an Application ...................................................... 53 5.2.3 Design an Application Program .......................................................................... 55 5.2.4 Building an Application Program........................................................................ 59 5.2.5 Execute the Application Program on the Wincon-8000 Platform ....................... 60 WinCon-8000 Getting Start Manual-- 2 Introduction and hardware setup Welcome to the Wincon-8000 user’s Quick Start manual. ICPDAS provides this manual for new user how to install the hardware and software quick start. 1.1 Introduction The main hardware of the WinCon-8000 embedded controller are depicted in figure 1.1, which include VGA, USB, mouse, keyboard, compact flash, series, Ethernet and an I/O slot standard interface . ICPDAS also provides another remote I/O modules. You can communicate the remote I/O modules by pass through the COM3 (RS-485 network). On the standard Ethernet port, you can use the intranet and internet advantages such as www , ftp, SQL database application and so on. Fig. 1-1 For The software develop, ICPDAS provides two DLL files, namely the WinconSDK_DLL and the Wincon_DLL, for the I-8000 series modules which are used in the Wincon-8000 Embedded Controller. The WinconSDK_DLL has all the essential DLL functions designed for the I-8000 series modules for Microsoft WinCon-8000 Getting Start Manual-- 3 WinCE.Net platform. It can be applied on embedded Visual C++, Visual studio 2003 C#.NET, and VB.NET on WinCE 4.1.Net (refer the figure 1.2), and even on the newer platforms. Users can easily develop WinCE.NET applications on WinCon-8000 by using this toolkit. The various functions in WinconSDK_DLL are divided into the following sub-group functions for easy use in different applications. For more detail please refer to the WinconSDK.DLL for C#.NET and VB.NET or WinconSDK.lib for embedded Visual C++ Fig. 1-2 1.2 Hardware Setup( for W-8X3X Only) There is the W-8731 hardware setup sample (Fig. 1-3). In the right side connect the standard computer interface like 15 pin VGA port monitor (can support the touch screen as HMI device), Keyboard, Mouse, and Ethernet. In the middle and left area, you can plug in the ICPDAS’s I-8K and I-87K series I/O modules. The W-87XX can plug in 7(max.) local I/O modules and W-83XX for 3(max.) local I/O modules. There is no I/O slot about W-80XX, so it can’t plug in WinCon-8000 Getting Start Manual-- 4 any local I/O modules. On the under lift side, The COM2 is a standard 5 wire RS232 com port. You can connect the standard RS232 device (modem …). The COM3 is standard RS485 port. You can connect to the RS485 devices like ICPDAS’s products I-7K series I/O modules and I-87KX expansion unit. Fig. 1-3 By the Ethernet ,you can communicate to the Ethernet devices such as I-7188EX(palm size Embedded Controller), Motion Controller(Galil’s 21XX), SQL Server , mail Server, MMS Server, iPush Server and so on. (Fig. 1-4) WinCon-8000 Getting Start Manual-- 5 Fig. 1-4 If the devices connect was completed, please connect the DC 10V~30V input to the under right side and frame ground to the earth ground finally(if you have earth ground). Please attention that Wincon’s power consumption is low(typical 0.15A at 24VDC) , But On the Power On moment (in 200ms), the Wincon need more current to start up (typical 1.2A at 24VDC). WinCon-8000 Getting Start Manual-- 6 1.3 Hardware Setup ( for W-8X4X only, Dual LAN version WinCon) Another succeeding WinCon family is W-8X4X . Inheriting almost all hardware features from W-8X3X, W-8X4X has the same user interface and OS features. The only difference between W-8X4X and W-8X3X is that W-8X4X adopts 2 USB ports and two 10/100M Ethernet ports instead of 2 PS2 jacks.(Fig. 1-5). In the left side connect the standard computer interface like 15 pin VGA port monitor (can support the touch screen as HMI device), Keyboard(USB), Mouse(USB), and Ethernet (10/100Base x2). In the middle and right-side area, you can plug in the ICPDAS’s I-8K and I-87K series I/O modules. The W-874X can plug in 7(max.) local I/O modules and W-834X for 3(max.) local I/O modules. There is no I/O slot for W-804X, so it can’t plug in any local I/O modules. On the under lift side, The COM2 is a standard 5 wire RS232 com port. You can connect the standard RS232 device (modem …). The COM3 is standard RS485 port. You can connect to the RS485 devices like ICPDAS’s products I-7K series I/O modules and I-87KX expansion unit. Fig. 1-5 WinCon-8000 Getting Start Manual-- 7 Dual Ethernet ports usually help customers with flexibility and extensibility. System integrators can implement their network redundant policies(Fig.1-7), or to plan their business systems and industrial Ethernet network in two separated network segments to gain more network security. (Fig. 1-6) Fig. 1-6 Fig. 1-7 If the devices connect was completed, please connect the DC 10V~30V input to the under right side and frame ground to the earth ground finally(if you have earth ground). Please attention that Wincon’s power consumption is low(typical 0.15A at 24VDC) , But On the Power On moment (in 200ms), the Wincon need more current to start up (typical 1.2A at 24VDC). WinCon-8000 Getting Start Manual-- 8 1.4 Specifications Main Control unit Intel Strong ARM CPU, 206 MHz SRAM : 64M bytes Flash RAM : 32M bytes EEPROM : 16K bytes 64-bit hardware unique serial number Built-in Watchdog Timer Real Time Clock 1 VGA port : 320×240×16 to 1024×768×16 Default is 640×480×16 1 Compact Flash slot : CF memory card Reset button Power LEDs W-8X3X W-8X4X 2 PS/2 port : Keyboard and Mouse USB 1.1 Host x 1 10 Base T : NET2000 compatible USB 1.1 host x 2 10/100 Base T x 2 Cabinet COM0: Internal use COM1: Serial Control for 87k Series COM2: RS-232 COM3: RS-485 FRnet(option) I/O Expansion Slot : 3 - slot for W-83X1 7 - slot for W-87X1 Power Supply : 20W, Unregulated + 10Vdc +30Vdc Environment : Operating Temp. : -25℃ to + 75℃ Storage Temp. : -30℃ to +85℃ Humidity : 5~95% Dimensions : 115.66×110×93.8(none slot) 230.25×110×93.8(3 slot) 354.26×110×93.8(7 slot) I/O module(optional) I-8000 series modules, which include DI,DO,AO,AI… I-87K series modules, which include DI,DO,AO,AI… I-7000 series modules, which include DI,DO,AO,AI… For more information please refer to relative catalog or http://www.icpdas.com WinCon-8000 Getting Start Manual-- 9 1.5 Dimensions None slot : 3 slots : WinCon-8000 Getting Start Manual-- 10 7 slots : 1.6 What’s News Added 2.3 I-87K Module Settings tool by DCON_Utility of PC. Added 2.2 New CARD Wizard function for I-81XX Serial Card. Added 1.3 Specifications Added 1.4 Dimensions 1.7 Package List z z z One set of WinCon-8000 hardware One Compact Flash card for storing system files. One software utility CD WinCon-8000 Getting Start Manual-- 11 2. Wincon-8000 System Settings In this section, we will explore how to set the Windows CE System and the “WinCon Utility” for the Wincon-8000 embedded controller. You can change configurations, such as the system time or network setting of the Wincon-8000 through the Windows CE control panel. WinCon Utility allows you to view Wincon-8000’s information or save the current system configuration into Windows CE OS image. 2.1 Windows CE Settings Setting Up the System Time You can setup a new date or time in the Windows CE system by using the following steps: 1. Choose Start Æ Settings Æ Control panel to open the Control panel dialog. 2. Fig. 2-1 Double click the Date/Time icon on the Control panel dialog. 3. Fig. 2-2 When the Date/Time Properties dialog displays, set the date or current Time and click the Apply button to set your system date and time. WinCon-8000 Getting Start Manual-- 12 # Note: If you have changed any value of the date and time. You must save the registry by means of WinCon Utility tools. For more information about WinCon Utility tools, please refer to the WinCon Utility section. Setup the network Generally, most users don't need to setup the network because DHCP is the default setting. However, if your network system does not contain a DHCP server, you need to configure the network setting by using the manual method. The following steps demonstrate the procedure for how to configure the network system. 1. Choose Start Æ Settings Æ Network and Dial_up Connections on the Windows CE desktop to open this dialog. 2. Double click the LAN90001 icon to open the “LAN9000 Network Compatible Adapter Settings” dialog. 3. 4. Fig. 2-3 When the “LAN9000 Network Compatible Adapter Settings” dialog displays (see figure), click (enable) the “Specify an IP address” radio button in the IP Address tab and type in the IP Address, Subnet Mask, and Default Gateway into the respective fields. Choose the “Name Servers” tab and also type in the Primary DNS, Secondary DNS, Primary WINS, and Secondary WINS into the respective fields, as shown in the figure below. WinCon-8000 Getting Start Manual-- 13 Fig. 2-4 5. Click OK. # Note: If you have changed any value of network configuration, you must save the registry by means of WinCon Utility tools. For more information about the WinCon Utility tool, please refer to the WinCon Utility section. Setting up the Device Name You can configure Wincon-8000 to have the device name of your choice. To change the device name please refer to the following steps: 1. 2. 3. 4. Choose Start Æ Settings Æ Control panel to open the Control panel dialog. Double click the System icon on the Control panel dialog to open the System Properties. When the System Properties dialog is displayed (see figure), select the Device Name tab in the dialog window. Fig. 2-5 Type your preferred Device Name in the Device Name box, and click OK. WinCon-8000 Getting Start Manual-- 14 # Note: If you have changed any information of the Device Name, you must save the registry by means of WinCon Utility tools. For more information about the WinCon Utility tool, please refer to the WinCon Utility section. Here, we only provide some demonstrations for configuring your settings. The configuration steps and operation methods are the same as with the windows system. However, you need to keep in mind “if you have changed any setting on WinCon-8000 embedded controller, you would need to use the WinCon utility to save the current setting into non-volatile internal memory”. Otherwise, when you restart the system, the setting will not change. WinCon-8000 Getting Start Manual-- 15 2.2 WinCon Utility The WinCon Utility provides many tools to save/view the system information registry and to setup the HTTP/FTP path and update non-volatile internal memory within the Wincon-8000 embedded controller. This handy utility (WinCon Utility 1.exe located in the Compact Flash/icpdas/Tools directory) should be located in the computer's Program group. Therefore, you can launch it on the computer through Start Æ Programs Æ WinCon Utility menu. The WinCon Utility provides many functions within the following five tabs: z Save Registry Tab z System Config Tab z Auto-execute Tab z Version Update Tab z Com Tab z About WinCon Utility 1 Tab Save Registry Tab This tab provides functions to save/view the registry of the systems information and to setup the HTTP/FTP directory path. It is very important to save the registry when you change any system information. Then you need to click the “Save and Reboot” button to renew the system configuration. If you do not save the current configuration into the registry, you will lose your information settings when you reboot the Wincon-8000. # Note: The OS image in flash memory will crash if we push the reset or power-off buttons for WinCon-8000 whilst it was writing the registry settings to flash memory. It will take 10-15 seconds to save the registry settings. Add these notes to your user manual because it is very important! WinCon-8000 Getting Start Manual-- 16 Fig. 2-6 The Save Registry tab includes the following folders: z Save and Reboot button: It will take several seconds to save your settings into registry and non-volatile internal memory. You must then reboot the system for the new configuration. z Recover to Factory Setting button: It will take several seconds to clear your registry settings back to Factory Setting and Wright to non-volatile internal memory. You must then reboot the system for the new configuration. z View Registry button: Any settings are changed in the WinCon embedded controller can be pre-viewed by using this function. It is just like the ?regedit function in the windows system that you are very familiar with (shown in below figure). Fig. 2-7 WinCon-8000 Getting Start Manual-- 17 z Change the VGA resolution box: You can setting the VGA Resolution to 320x240,640x480,800x600 or 1024x768, and 2,4,8,16 bits color (Bpp),the monitor reflash Frequncy for normal TFT LCD setting is 60 Hz. z Change FTP default directory to box: Enter a FTP default directory path and click change button to setup the defined path to the ftp server. z Change HTTP default directory to box: Enter a HTTP default directory path and click on the change button to setup the defined path for the web server. System Config Tab The System Config tab allows you to view the information in the Wincon-8000 embedded controller system. Fig. 2-8 This tab includes the following folders: z Slot 1~7 box: The Slot1~7 fields display the module names plugged in the Wincon-8000. WinCon-8000 Getting Start Manual-- 18 z Serial Number box: This field displays the serial number of the Wincon-8000. z MAC address: The field displays the physical address of Ethernet port. (For W-8X4X, upper field displays 1st Ethernet MAC address, Lower field displays 2nd Ethernet MAC address) z EEPROM Size box: This field displays the EEPROM size of the Wincon-8000. z Flash Memory Size box: This field displays the Flash memory size of the Wincon-8000. z OS Version box: This field displays the current operating system. z OS Image Size box: This field displays the size of the current operating system. z WinCon SDK Version box: This field displays the current WinconSDK_DLL version. Auto-execute Tab The Auto-execute tab, provides ten execute files, which can be run after the WinCE system has been launched on the WinCon-8000 system. You can set ten execute files through the Browse button on the tab for WinCon Utility, as shown in the below figure. Note that they are executed in order of program 1, program 2, ... WinCon-8000 Getting Start Manual-- 19 Fig. 2-9 The tab includes the following folders: z Program 1~10 boxes: These files allow one to configure the auto-execute files for Wincon-8000 for when it is started up. You can choose the execute file and file directory path by means of the Browse button. z Save Setting button: If you have changed the settings for the Program 1 ~ 10 field contents, you must then click the Save Setting button before closing the WinCon Utility window. Version Update Tab The Version Update tab provides the function to be able to update newer versions of the operating system. Users can download the OS image file from the web site: http://www.icpdas.com. You can choose the new OS image file name and directory path with the Browse button. Click the “Write to flash now” button to update the current OS version. It will take ten or more minutes to update your OS to Flash memory, and then reboot your system. WinCon-8000 Getting Start Manual-- 20 Fig. 2-10 ComPort Tab Fig. 2-12 Wincon-8000 show set the touch screen Com Port No, now we can support ELO,3COM Dynapro,EGALAX….,Please plug in the right Com Port No。 Fig. 2-11 WinCon-8000 Getting Start Manual-- 21 Setting the I-81XX Serial Port 1. To click New Card Wizard button and show the New Card Wizard Window: 2. To click Slot Scan button and show all Cards in system: WinCon-8000 Getting Start Manual-- 22 3. To click Save New Module button and save the setting: 4. To click Yes button and reset to finish adding Com Port. WinCon-8000 Getting Start Manual-- 23 About WinCon Utility 1 Tab This tab provides an easy function to hyperlink to the ICPDAS World Wide Web site http://www.icpdas.com. This is the best place to go for the latest developments, and support information, application stories, and product news. 2.3 I-87K Module Settings When the module of I-87K is put in the slots of WinCon-8000,it can be set up through the DCON_Utility of PC。The method is easy to use。 When you do it orderly,you will find it is easy to set up the parameter of the I-87K module。 1. You must prepare for a cable(CAT6) to start the DCON_CE of WinCon for PC through ethernet (telnet to use)。 To prepare one line of Full Null Modem and connect the Comport of PC and the COM2 of WinCon-8000 (data transmission)。 DB-9-1 DB9-2 Receive Data 2 3 Transmit Data Transmit Data 3 2 Receive Data Data Terminal Ready 4 6、1 Signal Ground 5 5 Signal Ground 6、1 4 Data Terminal Ready Request to Send 7 8 Clear to Send Clear to Send 8 7 Request to Send Data Set Ready 、Carrier Detect Data Set Ready 、Carrier Detect WinCon-8000 Getting Start Manual-- 24 2. 3. To confirm the DCON_CE_V200.exe in the folder of WinCon-8000 \Compact Flash\ICPDAS\Tools To enforce the DCON_Utility V4.3.8(later vision) of PC and press the connective button of Telnet to open the DCON_CE_V200 V2.0.0 (WinCon-8000)。 Telnet button BaudRate setting 115200 bps user can change Comport (COM 1 Æ COM n…) 4. To input the address of IP of WinCon-8000。 WinCon-8000 Getting Start Manual-- 25 5. After connecting the WinCon-8000,refer to the manual of the DCON_Utility to use,please。 DCON_CE exit button WinCon-8000 Getting Start Manual-- 26 6. To press the exit button of DCON_CE and it can close the DCON_CE_V200.exe of WinCon-8000。Moreover,it will exit automatically when the DCON_Utility does not work during the programs automatically scan in thirty minutes。 Please operate the methods according to the steps。If you find the abnormal situation,you can close the DCON_Utility first and then power ON/OFF WinCon8000。 Web Download : 1) DCON_Utility (PC side) Æ http://www.icpdas.com/products/wincon/winconutility.htm 2) DCON_CE (WinCon) Æ http://www.icpdas.com/products/wincon/winconutility.htm Finally you may react the questions to [email protected],please。Thank you ! WinCon-8000 Getting Start Manual-- 27 3. Architecture under WinCE.NET The WinconSDK.DLL & Wincon.DLL are the dynamic link library (DLL) files that are designed for applications running on the Wincon-8000 main controller unit and its modules with Windows CE.NET. The user can apply them to develop their own applications with many development tools, such as embedded Visual C++, Microsoft Visual Studio 2003 C#.NET, and Visual BASIC.NET. In order to assist you, there are many demo programs provided for the user when using EVC++, C#.NET and VB.NET. Based on the demo programs, users can easily understand how to use the functions and develop their own applications within a short period of time. The relationships among the WinconSDK.DLL, Wincon.DLL and user’s application are depicted as follows: Interface functions for C#.NET/ VB.NET 2003 and new version I-8000 series Module functions for EVC++, C#.NET, VB.NET Fig. 3-1 Functions for the Wincon-8000 Main Controller Unit; 1. 2. 3. Get Module ID functions; Analog Input/Output functions; Digital Input/Output functions; WinCon-8000 Getting Start Manual-- 28 4. 5. 6. 7. 8. Motion card application functions; Encoder card application functions; Support for eMbedded Visual C++ Language; Support for Microsoft® Visual Studio® .NET 2003 C#; Support for Microsoft® Visual Studio® .NET 2003 VB; The DLL functions in Wincon_DLL are designed for WinCE.NET and can be utilized by C# and VB.NET. The main characteristics of the Wincon_DLL that have been developed the application in the C#.NET and VB.NET developer environments, are very simple to use just like the applications in ActiveX(OCX) controls. Users can easily find the method they need for their application from the descriptions in the following section and in the demo programs developed by ICP DAS. WinCon-8000 Getting Start Manual-- 29 4.1 Installation Wincon-8000 SDK for EVC on PC “Wincon-8000 SDK for EVC ” consists of the following major items. z WinCon SDK DLL & library files for EVC z WinCon SDK include files for EVC z Demo files Step-by-Step Installations of WinconSDK 1. Please insert the CD-ROM into your CD-ROM driver. 2. Then run “WinconSDK_8XXX_EVC_YYYYMMDD.msi” in the folder of CD-ROM: \SDK\. 3. After successfully installing the software: WinCon SDK library & DLL files are located at C:\Program Files\Windows CE Tools\wce410\SA_IA\Lib\ARMV4 WinCon SDK include files for EVC are located at C:\Program Files\Windows CE Tools\wce410\SA_IA\Include\Armv4 Demo files are located at C:\Program Files\Windows CE Tools\wce410\SA_IA\Pac\Wincon 4. SA_IA is the hardware platform name for W-8X3X . For W-8X4X, WCE configuration name is SADU_SACR. WCE platform Configuration WinCon-8000 Getting Start Manual-- 30 4.2 Installation Wincon-8000 SDK for VS.NET on PC “Wincon-8000 SDK for VS.NET ” consists of the following major items. z WinCon DLL files for VS.NET z Demo files The Microsoft Visual Studio .NET 2003 software program must be installed before attempting to install the “Wincon-8000 SDK”. If you have not already installed the Microsoft Visual Studio .NET 2003, please refer to the Microsoft document to assist you in installing the software package first and then you can follow the below steps to install the development toolkit provided by ICP DAS for the easy application of Wincon embedded controller platform. Step-by-Step Installations of WinconSDK for VS.NET 1. Please insert the CD-ROM into your CD-ROM driver. 2. Then run “WinconSDK_8XXX_dotNet_YYYYMMDD.msi” in the \SDK\. folder of CD-ROM: 3. Follow the instruction to go forward step by step. 4. After successfully installing the software: WinCon SDK DLL files are located at C:\Program Files\Windows CE Tools\wce410\SA_IA\Dotnet Demo files are located at C:\Program Files\Windows CE Tools\wce410\SA_IA\Pac\Wincon SA_IA is the hardware platform name for W-8X3X . For W-8X4X, WCE configuration name is SADU_SACR WinCon-8000 Getting Start Manual-- 31 5. Start The First Application Program 5.1 Applications in eMbedded Visual C++ (MFC) All the eMbedded Visual C++ 4.0 demo programs are listed in the directory under “C:\Program Files\Windows CE Tools\wce410\SA_IA\Pac\Wincon”. They have been tested OK in WinCE.NET4.1 or newer versions and in the eMbedded Visual C++ 4.0 development toolkit. When users want to create a new program, they have to use these files from the ++ EVC environment toolkit, as shown in the following: 1. \WINCON\INC\WinconSDK.h Æ include all .h files 2. \WINCON\INC\WinCon.h Æ functions for D/I, D/O 3. \WINCON\INC\i8017h.h Æ functions for I-8017H Module 4. \WINCON\INC\i8024.h Æ functions for I-8024 Module 5. \WINCON\INC\i8090.h Æ functions for I-8090 Module 6. \WINCON\INC\i8091.h Æ functions for I-8091 Module 7. \WINCON\LIB\WinconSDK.lib Æ import library of WinconSDK.DLL The application procedures for how to create a program are listed below. More detailed information for each step will be described in the following section. 1. Create a Forms-Based Application; 2. Specify the Locations for Demo Files; 3. Configure Compiler Options; 4. Design an application program; 5. Build the application program; 6. Execute the application program on the Wincon-8000 platform; 7. Example list for the reference of user program design. 5.1.1 Create a Forms-Based Application A form is the dialog box with control items that lets users access and possibly change data. You may want to develop an application in which the user chooses from a selection of forms. Commonly, a forms-based application allows the user to choose WinCon-8000 Getting Start Manual-- 32 “New“ on the “File“ menu to access forms. A dialog-based application, which does provide menus, is also considered a forms-based application. Users can apply the WCE MFC AppWizard (exe) to create a forms-based application. When creating a new form, they have the choice to create a single document interface or a dialog-based application. z A single document interface (SDI), forms-based application allows only one instance of a particular form to run at a time. However, it is possible to run different forms at the same time from an SDI, forms-based application by selecting a new form from the “New” command in the File menu. z A dialog-based application is a form based application by definition. However, if you choose this option, you will not be able to use the “New Form” command on the Insert menu to add additional forms to the application. A dialog-based application does not use the document/view architecture. So, when you need to add forms, you have to manage the creation and access methods for them. The last step of the wizard lets you view and change settings for the classes created by the wizard. For a single or multiple document interface application, you should set “CformView” as the base class for the view class of your application. If your application is database supported, you can also select any class that is derived from “CformView”. A form is any window derived from “CformView” or from any class that comes from “CformView”. To create a demo for forms-based application 1. 2. Firstly, users need to open the EVC++ software. Then, in the “File” please click the “New” to open a new program. In the “Projects“ tab, select “WCE MFC AppWizard (exe)” and set the Project name: “Demo” and the “Location” ,then select the location that you want . Then, select “Win 32[WCE ARMV4]“ in the CPUs list box and other options if necessary. Finally click “OK” to start the wizard process, as shown in the following figure. WinCon-8000 Getting Start Manual-- 33 Fig. 5-1-1 3. The configuration of WCE MFC AppWizard. (3a) WCE MFC AppWizard: Step 1 of 4: Set “Dialog based” as shown in the following figure. Click “Next” to go to the following step. Fig. 5-1-2 (3b) WCE MFC AppWizard-Step 2 of 4: Please enter a title for your dialog in WinCon-8000 Getting Start Manual-- 34 the defined area and click “Next” to go to the following step (see figure 5-1-3). Fig. 5-1-3 (3c) WCE MFC AppWizard-Step 3 of 4: In this step, please choose “Yes, please” to generate source file comments. And set the MFC library as a shared DLL or statically linked library. Then Click “Next” to go to the next step. Fig. 5-1-4 (3d) WCE MFC AppWizard-Step 4 of 4: Click the “Finish” button to start the AppWizard to create the classes, which are shown in the figure below. WinCon-8000 Getting Start Manual-- 35 (see figure 5-1-5). Fig. 5-1-5 5.1.2 Specify Locations for Demo Files The Directories settings in Options for eMbedded Visual C++ specify search paths for files in your projects. These include lists of paths for the following types of files: File type Path contents Executable files Specify locations for the build utilities, such as the compilers (CL, CLARM, CLMIPS, and so on), NMAKE, LINK, and BSCMAKE. Include files Specifies where the compiler should look for “include” files (for example #include <stdio.h>). Library files Specify where the linker should look for libraries to resolve external references. Source files Specify where the debugger should look for default source files, such as the Microsoft Foundation Class Library and the Microsoft run-time library. WinCon-8000 Getting Start Manual-- 36 Path information is stored in directory settings and it allows you to configure them. You can change both the paths listed in these settings and the order in which eMbedded Visual C++ searches for them. The path specifications have separated the setting for the different devices and the different platforms (such as WCE emulator) supported by your installation of eMbedded Visual C++. To specify default folders for demo project files 1. Open the “Options” dialog in the “Tools” menu. 2. In the “Directories“ tab, select the “SA_IA”(for W-8X3X) or “SADU_SACR” (for W-8X4X) on the “Platform” item, “Win32 [WCE ARMV4]” in the “CPUs” item and also the “Show directories“ in the “include files” or “Library files” item. 3. Since all the WinCon specific include and library files have been allocated in default directories, users don’t need to modify the contents of default directories of include and library files . 4. Fig 5-1-6 display the default location of include files. Location of WinCon SDK Include files Fig. 5-1-6 WinCon-8000 Getting Start Manual-- 37 5. Fig 5-1-7 displays the default location of Library files. Location of WinCon SDK Library files Fig. 5-1-7 # Note: If you want to remove a folder, select it and then press DELETE. 5.1.3 Configure Compiler Options To set the compiler options in the development environment, please follow these steps: 1. In the “Project“ menu, choose “Settings” to open the “Project Setting” dialog. 2. Select the configuration “Win32 [WCE ARMV4] Release” in “Settings for” item as shown in following figure. WinCon-8000 Getting Start Manual-- 38 3. Fig. 5-1-8 In the Project Settings dialog, select the “Link“ tab and set the library file name as “WinconSDK.lib” in “Object/library modules” item. Fig. 5-1-9 WinCon-8000 Getting Start Manual-- 39 5.1.4 Design an Application Program After you finish the initial creation of a project, you can build user interfaces. These interfaces can involve the first design and creation of dialog boxes, menus, toolbars, accelerators, and other visual and interactive elements. Then you can hook them up to code. Due to the difference in size and shapes of devices, the user interface elements must be tailored to the design requirements of each targeted device. In the following we will explore some methods on how to create control items in the user’s program. To create an Edit Box: 1. In the “Workspace“window, select the “ResourceView“tab. Click on the “Dialog” folder to expand it and double-click the “IDD_DEMO_DIALOG“ in order to open the dialog form as shown in below figure. Fig. 5-1-10 2. By clicking the icon to create a static text object. WinCon-8000 Getting Start Manual-- 40 3. 4. Right-click on the Static text object and select “Properties”. When the Text Properties dialog is shown, set “Input DO Value” in the “Caption“ field. Fig. 5-1-11 5. Click the icon 6. 7. Right-click on the edit box object and select “Class Wizard”. When the MFC Class-Wizard dialog is shown, select the “Member Variables“ tab. to create an edit box object. Fig. 5-1-12 8. Click the “Add Variable“ button to add a new member variable. WinCon-8000 Getting Start Manual-- 41 Fig. 5-1-13 9. Set “m_DO” in the “Member variable name“ field, and configure the “Category:“ dropdown-box as “Control”, and “Variable type:“ as “CEdit”. 10. Once you have completed the above list of steps, click the “OK“ button to save the Member variable and close the dialog. To create a Button: in the “Con..” window. 1. Create a new button object by clicking on the icon 2. 3. Right-click on the Button object and select “Properties”. When the Push Button Properties dialog is shown, type “Digital Output” into the Caption field (see figure), and close the dialog. 4. Fig. 5-1-14 Double-click on the Push Button object so that you can edit the button’s event code. Then type “OnBtnDO” into the “Member function name:” field (see figure 5-1-15), and click the OK button to display the Editor window. WinCon-8000 Getting Start Manual-- 42 5. Fig. 5-1-15 In the Editor window, type the code in as follows: Fig. 5-1-16 6. Press CTRL+Home to move your cursor to the top, and then insert the “#include “WinconSDK.h” ” within the header area. Fig. 5-1-17 5.1.5 Build the Application Program Microsoft eMbedded Visual C++ provides two ways for building an application program. The first and most common method is to build the application program within WinCon-8000 Getting Start Manual-- 43 the eMbedded Visual C++ development environment. The second method is to build the application program by using command-line tools within the MS-DOS prompt environment. The procedure for building an application involves a number of items namely the preprocessor, the compiler, and the linker. Their main functions are described as below: z The preprocessor prepares source files for the compiler by translating macros, operators, and directives. z The compiler creates an object file containing machine code, linker directives, sections, external references, and function/data names. z The linker combines the code from the object files created by the compiler and from the statically-linked libraries, plus it resolves the name references, and also creates an executable file. The Building Process The following diagram shows the components in the building process using eMbedded Visual C++ and starting with the editor in which you create your source code. Fig. 5-1-18 If you build your program outside the IDE, you may use a makefile to invoke the command-line tools. Microsoft eMbedded Visual C++ provides the NMAKE utility for processing makefiles. If you build your program within the IDE, the eMbedded Visual C++ project system will use the project (.vcp) file to store the make information. WinCon-8000 Getting Start Manual-- 44 The .vcp file is not compatible with NMAKE. However, if your program uses a makefile rather than a .vcp file, you can still build it in the development environment as an external project. To Build the Demo Application 1. 2. 3. On the “Build“ menu, choose “Build Demo”. If you have finished the above steps, you would obtain the following message in the Output window, which means the execution application has been built. Otherwise, you will get error messages. You would then need to debug the source code and rebuild the application. Fig. 5-1-19 If there no error messages are produced, you will find the Demo.exe file in C:\Project\Demo\ARMV4Rel\. 5.1.6 Execute the Application Program on the Wincon-8000 Platform When you have finished the building process for the Demo.exe, you could apply the developed execute file (Demo.exe) into the Wincon-8000 controller unit. For example, you can use a portable memory stick (Like Pen Driver) to store the file and to copy it to Wincon-8000. In a following section, we will develop a method for how to download the application to the main controller unit through the Ethernet (TCP/IP) or RS-232 series protocol. The main idea for running the user program within the WinCon-8000 target control device is to make the process simple just like in the following steps. 1. Copy the Demo.exe from C:\Project\Demo\ARMV4Rel\ subfolder to the 2. Wincon-8000. Double-click on the Demo.exe file to run it on the Wincon-8000, as shown in WinCon-8000 Getting Start Manual-- 45 following figure. Fig. 5-1-20 3. Type “3” into the “Input DO Value” field (above figure), and click the “Digital Output” button. Then, you can turn on the channel 0 and 1 of the Digital output Module plugged into the slot 1 of Wincon-8000. WinCon-8000 Getting Start Manual-- 46 5.2 Applications in Visual Studio VB .NET and C#.NET What are Smart Device Extensions? Smart Device Extensions (SDE) for Microsoft® Visual Studio® .NET allows you to leverage all of your .NET programming skills to build Microsoft Windows® applications for smart devices that support the Microsoft .NET Compact Framework. When using SDE, you can produce applications for Pocket PC and Microsoft Windows CE .NET platforms using the familiar Microsoft Visual Basic® .NET (or Microsoft Visual C#™) language with the same tools and class libraries that are used to build .NET applications for the desktop and for servers. Since these smart devices don't offer all the features of their larger cousins, the hardest thing to master is learning which parts of the Microsoft .NET Framework have been modified to align with the reduced functionality of these more limited portable platforms. Fortunately, the Visual Studio environment provides full support for this as well as enabling desktop debugging for applications running on these platforms. Creating applications using SDE from Visual Basic .NET is so straightforward that you might be tempted to just jump right in by creating a new SDE project, dropping some controls on a form, and writing some code. In fact, we're going to do just that in a moment. But we are also going to step you through the entire development, debugging, and deployment process and point out exactly where the special nature of SDE development is different than developing desktop applications. And for those of you who have a technical interest in how this stuff works, we will explain what's going on under the hood. What is C#.NET? Visual C# (pronounced C sharp) is designed to be a fast and easy way to create .NET applications, including Web services and ASP.NET Web applications. Applications written in Visual C# are built on the services of the common language runtime and take full advantage of the .NET Framework. C# is a simple, elegant, type-safe, object-oriented language recently developed by Microsoft for building a wide range of applications. Anyone familiar with C# and WinCon-8000 Getting Start Manual-- 47 similar languages will find few problems in adapting to C#. C# is designed to bring rapid development to the C++ programmer without sacrificing the power and control that are a hallmark of C and C++. Because of this heritage, C# has a high degree of fidelity with C and C++, and developers familiar with these languages can quickly become productive in C#. Besides, C# also provides intrinsic code trust mechanisms for a high level of security, garbage collection, and type safety. C# supports single inheritance and creates Microsoft intermediate language (MSIL) as input to native code compilers. C# is fully integrated with the .NET Framework and the common language runtime, which together provide language interoperability, garbage collection, enhanced security, and improved versioning support. C# simplifies and modernizes some of the more complex aspects of C and C++, notably namespaces, classes, enumerations, overloading, and structured exception handling. C# also eliminates C and C++ features such as macros, multiple inheritance, and virtual base classes. For current C++ developers, C# provides a powerful, high-productivity language alternative. All the demo programs for Microsoft Visual Studio 2003 Visual Basic.Net and C#.Net are given in the directory “\WINCON\DI_DO_Demo\VB.NET\Demo” and “\WINCON\DI_DO_Demo\C#\Demo”. They have been tested OK on WinCE.NET 4.1 or newer version platforms and on VB.NET or C#.NET development toolkit. The demo programs have been implemented in the VB or C# applications through the Wincon.DLL, which declares all functions for all Modules in WinCON-8000. This section shows you the procedure for how to create the first demo program with VB.NET or C#.NET development tools as below. 1. Create a new SDE project; 2. Add project reference for an application; 3. Design an application program; 4. Execute the application program on the Wincon-8000 platform; 5. Example list for the reference of user program design. WinCon-8000 Getting Start Manual-- 48 5.2.1 Create a New SDE Project Let's start with the traditional "Demo" application, which, while clearly trivial, still illustrates in a nutshell the entire development process. We will assume you have installed both Visual Studio.NET and the Smart Device Extensions (SDE) development tools. Furthermore, you are trying to develop the user program to be applied in the Wincon-8000 controller target device. The following steps are illustrated in detail to explain the developing process. 1. For the first step, users need to open Microsoft Visual Studio .NET 2003 2. software. And then in the “File” menu, please select “New”, and choose the project item to open the “New Project” dialog. Open the "New Project" dialog, and select the development tools as followings. Here we provide two ways for developing applications for Wincon-8000. (2a.) Select the "Smart Device Application" template from the "Visual Basic Projects" folder (see Figure 5-2-1a). Fig. 5-2-1a (2b.) Select the "Smart Device Application" template from the "Visual C# Projects" folder (see Figure 5-2-1b). WinCon-8000 Getting Start Manual-- 49 3. Fig. 5-2-1b You can change the project location which is to be created, if so desired. 4. Give your application a Name (for example; "Demo"). This will create a new directory under the defined Location to contain your application's source code. 5. 6. Click OK. This will start the "Smart Device Application Wizard" (see Figure 5-2-2). At this point you need to choose between developing for Windows CE and developing for the Pocket PC, a specific type of Windows CE device. Your choice will determine which project templates are used to construct your initial blank application. WinCon-8000 Getting Start Manual-- 50 Fig. 5-2-2 7. 8. Choose the Platform (use “Windows CE” for the Wincon-8000 device). Choose the Project Type. For the first simple application, which simply displays a form on the device, choose "Windows Application". 9. Click OK and let the wizard create the project for you (this may take a moment). 10. You should now be looking at a Visual Basic .NET(C# .NET) application that looks somewhat like Figure 5-2-3a (Figure 5-2-3b for C#.NET). Your window arrangement may quite likely be different since Visual Studio remembers the layout you've configured in the past when developing other projects. WinCon-8000 Getting Start Manual-- 51 Fig. 5-2-3a Fig. 5-2-3b WinCon-8000 Getting Start Manual-- 52 5.2.2 Add the Project Reference to an Application The Wincon library contains all the module functions. Before you use the “Wcon” keyword in the program design, you must add the Wincon.dll into the reference list of your application. Please follow the below process to import Wincon.dll into the project reference: 1. Open the "Add Reference" dialog by choosing Project→Add Reference (see Figure 5-2-4). Fig. 5-2-4 2. Select the “ICP DAS Wcon Inside I-8000/I-87K series modules for Wincon-8000” in the list box, and click the “Select” button. # Note: If you don’t find the “ICP DAS Wcon Inside I-8000/I-87K series modules for Wincon-8000” item in the list box then you can add the “Wincon.DLL” file by using the button “Browse”. The default location of the file is “C:\ Program Files\Windows CE Tools\wce410\SA_IA\Dotnet”. 3. If you use the VB.NET development tool in the list box, select the “mscorlib” WinCon-8000 Getting Start Manual-- 53 file and click the Select button (the component “mscorlib” must appear in the Selected Components area). Note: If you use the C#.NET development tool, “MSCorLib” is the default project reference DLL. Therefore, the user does not need to add this project reference to their application. Fig. 5-2-5 4. Click OK to close the “Add Reference” dialog. # Note: If the “The reference ‘Wincon.dll’ may or may not be valid for the active platform. Add references with care to ensure your application will run correctly” message dialog pops up, Click “OK” to close this message dialog. (See Figure 5-2-6) Fig. 5-2-6 5. You have completed adding the “mscorlib” and “Wincon.dll” references for your application; now expand the “Demo” and “References” folders in the “Solution Explorer” tab to make sure the “Wincon.dll” has been added into the project references. (see Figure 5-2-7a of VB.NET, or Figure 5-2-7b of WinCon-8000 Getting Start Manual-- 54 C#.NET). Fig. 5-2-7a Fig 5-2-7b 5.2.3 Design an Application Program Take a moment to explore Visual Studio and note that the appearance is almost identical to what you are used to when developing desktop applications by Visual Basic .NET or Visual C# .NET. The first thing to be noticed is that some of the Toolbox items in the Device Controls tab; for example: some dialogs (Color, Files, Font, Print) and advanced user interfaces (Calendar, ImageList, DataGrid); are not included within the development environment tools of the Smart Device Extension(SDE). However, there is also a new Device Extension toolbar. And if you've selected something on the Form (proceed to fit your target smart device), you may also notice that there are fewer things listed in the Properties window. Now let's do the remaining steps in building this small demo test program. 1. Right-click on “Form1” and select “View Code” from the pop-up menu.(see Figure 5-2-8) WinCon-8000 Getting Start Manual-- 55 2. Fig. 5-2-8 Move your cursor to the top and select the development tool you want by using the following methods: (2a.) In the VB.NET development tool, insert the “Imports Wincon” on the first line location. Fig. 5-2-9a (2b.) In the C#.NET development tool, insert the “Using Wincon;” into the command line after “using System.Data;” as shown in following figure 5-2-9b. Fig. 5-2-9b 3. Click the “Form1.vb [Design]*” (or “Form1.cs [Design]*”) tab in the workspace window above to change the code view window to the form design window. 4. Click the icon object. 5. Type “Input DO Value” into the “Text” field from the “Properties” window. on the “Toolbox” window to create a label text WinCon-8000 Getting Start Manual-- 56 Fig. 5-2-10 6. 7. Click the icon to create a TextBox object. Delete “TextBox1” text in the “Text” field from the “Properties” window. 8. Create a new button object, by clicking the icon in the “Toolbox” window. 9. Type “Digital Output” in the “Text” field from the “Properties” window. 10. Double-click on the button to open the corresponding code window and enter the following line of code in the button's Click event handler: (10a.) VB.NET Dim slot As Integer = 1 Dim data As Integer data = Val(TextBox1.Text) Fig. 5-2-11a (10b.) C#.NET int slot=1; byte data; WinCon-8000 Getting Start Manual-- 57 data=Convert.ToByte(textBox1.text); Fig. 5-2-11b 11. Insert a new line and type “Wcon.”. And then a list box window will pop up as follows to prompt and help the user to add a function for the WinCon-8000 device controller unit. Fig. 5-2-12 12. Select “I8064” from the pop-up list box and press the TAB key. 13. After typing “.” behind the “I8064”, a list box pops up a hint for available WinCon-8000 Getting Start Manual-- 58 functions that can be used for this selected module, as shown in the following figure. Fig. 5-2-13 14. Select “DO_8” from the pop-up list box and press the TAB key. Then input the parameters of the function, which means inputting “(slot, data)”. Fig. 5-2-14a (for VB.Net) Fig 5-2-14b (for C#.Net) 5.2.4 Building an Application Program When you have finished the above processes, you could build an application by following the below steps. 1. In the toolbox menu select “Release” from the solution Configurations in the Combo box. Fig. 5-2-15 WinCon-8000 Getting Start Manual-- 59 2. In the toolbox menu select “Windows CE .NET Device” from the Deployment Device Combo box. (see Figure 5-2-16) Fig. 5-2-16 3. 4. 5. On the “Build“ menu, choose “Build Demo”. If you have finished steps 1~4, you would obtain the following message in the Output window, which means the execution application has been built. Otherwise, you will get error messages. Then you will need to debug the source code and rebuild the application. Fig. 5-2-17 You can find the Demo.exe file in C:\project\Demo\Demo\bin\Release\. 5.2.5 Execute the Application Program on the Wincon-8000 Platform When you have finished the building process for the Demo.exe, you could apply the developed execution file; Demo.exe; into the Wincon-8000 target controller device. For example, you can use a portable memory stick (Like Pen Driver) to store the file and copy it to Wincon-8000. Or later on, we will develop a method on how to download the application to the main controller unit through the Ethernet (TCP/IP) or Rs-232 series protocol. The main idea for running the user program in the WinCon-8000 target control device is because it is very simple as shown in the following steps. WinCon-8000 Getting Start Manual-- 60 1. 2. Copy the Demo.exe and Wincon.DLL from the C:\Project\Demo\ARMV4Rel\ subfolder to Wincon-8000. Double-click on the Demo.exe file to apply it into Wincon-8000, as shown in the following figure. Fig. 5-2-18 3. Type “3” into the “Input DO Value” field (above figure), and click the “Digital Output” button. Then, you can turn on channels 0 and 1 on the Digital output Module plugged into slot 1 of Wincon-8000. WinCon-8000 Getting Start Manual-- 61