
1
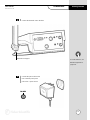
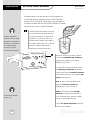
AR50
USER Manual
accumet
Table of Contents
R E S E A R C H
Introduction
4
Unpacking the Meter
5
Specifications
6
Getting Started
Using the Meter
Setup Operations
Connectors
Attaching pH and ISE electrodes
10
Attaching Conductivity Probes
12
Touch Screen Operation
14
Choosing a Channel
16
Button Functions
18
System Setup
20
pH Setup
46
mV Setup
82
Ion Setup
90
Conductivity Setup
104
122
pH Operations
Standardization
124
Measurement
128
130
mV Operations
2
8
Absolute mV Measurement
131
Relative mV Measurement
131
®
accumet
®
Table of Contents
R E S E A R C H
132
Ion Operations
Conductivity
Operations
Direct Reading with Standards
134
Direct Reading with Blank Offset
137
Incremental Methods
140
Known Addition Measurement
142
Known Subtraction Measurement
146
Analate Addition Measurement
148
Analate Subtraction Measurement
150
Standardization
154
Measurement
158
Cleaning
160
Trouble Shooting
161
Warranty
162
Compliance
163
Appendix
Replacement Parts
164
Determining Isopotential Points Experimentally
165
Data Management
166
Factory Default Settings
167
pH Theory
169
ISE Theory
174
Conductivity Theory
178
183
3
accumet
Introduction
R E S E A R C H
Thank you for selecting a Fisher Scientific accumet pH meter. This
manual describes the operation of the accumet AR50 meter. The
state-of-the-art meter that you have purchased is easy to operate and
will guide you through the various functions by displaying easy to
understand prompts. This operating manual should answer any
questions that might arise in operating your meter; however, do not
hesitate to call our Fisher Lab Equipment Technical Support Hotline at
1-800/943-2006 or 412/490-6260, if you need any assistance.
This meter is designed to provide all the information necessary to guide
you through the process of measuring pH, mV, ion concentration, or
conductivity with a series of prompts on the screen.
The accumet Research AR50 provides microprocessor precision in a
compact benchtop design that is easy to use. One touch screen controls
all procedures, letting you:
• Measure pH, absolute mV, relative mV, ion concentration
or conductivity.
• Select one of three sets of standard buffer groups.
• Implement automatic buffer recognition.
• Standardize with up to five standard or custom buffers.
• Customize your display screen and operating parameters.
• Assign operator and sample identification numbers.
• Specify ion selective electrode type.
• Store 250 data points in the meter’s memory or transfer data
to a computer or printer.
• Access extensive online help with just a touch of a button.
It all adds up to rapid, completely automatic, intuitive operation.
4
®
accumet
®
Unpacking the Meter
R E S E A R C H
The following is a listing of what you should have received with your new
accumet AR50 pH/mV/Ion/Conductivity meter.
Meter with kit includes
meter
power supply
electrode arm support bracket
electrode arm
electrode (13-620-285)
ATC probe (13-620-19)
manual and literature
* Note that this meter does not include a conductivity cell.
Meter only includes
meter
power supply
electrode arm support bracket
manual and literature
If any of these items are missing, please contact the Fisher Products
Group Electrochemistry Operation by dialing 412/490-6267.
Accessory Conductivity Probes and Ion Selective Electrodes are
available and can be ordered by calling Fisher Customer Service
at 800/766-7000.
2-cell Conductivity Probes:
Cell Constant
0.1
1.0
10.0
Optimal Conductivity Range
0.5 to 200 µS/cm
0.01 to 2 mS/cm
1 to 200 mS/cm
Glass Body
13-620-156
13-620-155
13-620-157
Epoxy Body
13-620-161
13-620-160
13-620-162
Glass Body
13-620-163
13-620-164
Epoxy Body
13-620-165
13-620-166
4-cell Conductivity Probes:
Cell Constant
1.0
10.0
Optimal Conductivity Range
0.01 to 20 µS/cm
1 to 200 mS/cm
5
accumet
Specifications
R E S E A R C H
Display
screen size
measurement display height
temp/etc. display height
menu options
help screens
configurable display
keypad controls
640x480 digit LCD
4 1/2” x 6”
3/4”
1/4”
extensive
extensive
yes
context specific touchscreen
internal diagnostics
programmable data storage
programmable data output
print interval
programmable alarm
250 data pts
yes
store on stable, time, manual
output on stable, time, manual
1 to 9,999 sec
yes
range
resolution
relative accuracy
automatic buffer recognition
manual buffer recognition
calibration points
auto lock
FET
-2.000 to 20.000
0.1/0.01/0.001
± 0.002
yes
yes
5
yes
yes
Memory
pH Mode
mV Mode
Ion Mode
6
range
resolution
accuracy
range
resolution
relative accuracy
calibration points
incremental methods
± 1800.0
0.1
± 0.1
1x10⁻⁶ to 9.99x10¹⁰
0.1/0.01/0.001
± 0.17n%
5
KA, KS, AA, AS
®
accumet
®
Specifications
R E S E A R C H
Conductivity Mode
cell constants range
conductivity
resistivity
salinity
accuracy
Temperature Mode
General
range
resolution
accuracy
inputs/outputs
electrical requirements
output from PSU
line voltage tolerance
input impedance
meter size
meter weight
0.1, 1.0, 10
0 to 3x10⁵ µS/cm
30 ohm.cm to 100 megohm.cm
2 to 42 ppt
0.5%
-5.0 to +105.0 °C
0.1 °C
± 0.2 °C
2BNC, 2Pin, 2ATC, 2-pin cond.
RS232, DIN (for FET and 4 cell cond.)
115 V/60 Hz, 230 V/50 Hz
12VDC, 500mA
± 10%
>1012 ohms
5.5” x 7.5” x 3.25”
1.86 lb.
Operating Conditions
operating temperature
operation humidity
maximum operating altitude
installation category
Pollution category degree
5-45 °C
5-80 % noncondensing
2000m
II
2
7
Getting Started
accumet
CONNECTORS
®
R E S E A R C H
1
Review the layout and arrangement of the rear connector panel.
Conductivity Cells
AccuFET pH electrode
Automatic Temperature Compensation (ATC)
Power
Reference pin jack
Computer/Printer
POWER
RS-232
BNC input connector
Conductivity
FET
ATC 1 Ref 1 Input 1
2-cell
Conductivity
4-cell
8
ACT 2 Ref 2 Input 2
accumet
®
CONNECTORS
Getting Started
R E S E A R C H
2
Connect the electrode arm to the base.
electrode arm support
To connect RS-232, see
Data Management on
page 166.
3
Connect the power cable to the
rear connector panel power
jack and to a power source.
POWER
9
Getting Started
accumet
pH and ION SPECIFIC ELECTRODES
R E S E A R C H
This meter allows you to use two types of pH electrodes: the
conventional glass pH electrode and the AccuFET field effect
transistor (FET) pH electrode. If both types of pH electrodes are
connected, the meter will read the AccuFET electrode. This meter
also allows you to use ion specific electrodes.
1
Carefully remove the protective cover from
the end of the electrode. Before first using
If both a conventional
your glass pH electrode, or whenever the
electrode and an AccuFET
electrode is dry, soak it 2-4 hours in an
electrode are connected to
electrode storage solution, pH 4 Buffer, or
the meter, do not put them
KCl solution. Before using your ion specific
in a solution together
electrode, consult the manufacturer’s
because you will get
instructions for electrode preparation.
inaccurate measurements.
2
Remove the shorting cap on BNC connector.
Connect the combination pH electrode by
plugging it into the BNC input connector
(twisting to lock in place).
If a combination electrode isn’t used, connect
the indicating pH electrode into the BNC
input connector. Plug the reference electrode
into the reference pin jack. Also, install the ATC
probe into the ATC jack.
Note: Be sure to connect all probes to the
appropriate channel connectors (for
example: Input 1, Ref 1, and ATC 1).
Option: Connect the optional AccuFET
Do not discard the BNC
shorting cap.
electrode by plugging it into the FET jack
on the back meter panel. Allow the AccuFET
to warm up five minutes before use.
Connect ion specific electrodes in the same
manner as pH electrodes.
10
®
accumet
®
pH and ION SPECIFIC ELECTRODES
Getting Started
R E S E A R C H
3
Rinse and blot-dry (don't wipe) electrodes
between each measurement. Rinse electrodes
with distilled or deionized water, or a portion of
the next solution to be measured.
Proper electrode care is
fundamental to obtaining
reliable pH measurements.
Improper care of the
electrode may cause the
meter reading to drift,
respond slowly, or
produce erroneous
readings. For this reason,
the electrode should
always be conditioned
and used in accordance
with manufacturer’s
instructions.
4
Between measurements, store conventional pH
electrodes in electrode storage solution, pH 4
buffer, or KCl solution. Always leave the filling
hole of liquid filled combination electrodes
open. Refill when the level of solution gets
below the manufacturer’s recommended level.
Store ion specific electrodes according to
electrode manufacturer’s recommendations.
11
Getting Started
accumet
CONDUCTIVITY PROBES
R E S E A R C H
This meter also allows you to use two types of conductivity cells:
the 2-cell conductivity cell with dual pin connector and the 4-cell
conductivity cell with DIN connector. The 2-cell conductivity probe
works in channel 1 and the 4-cell conductivity cell works in
channel 2.
1
Carefully remove the protective cover from
the end of the conductivity cell. Before using
your conductivity cell, soak it for 5 to 10
minutes in distilled or deionized water.
2
Connect the 2-cell conductivity cell to the
2-cell jack. Install the ATC probe in the
ATC-1 jack.
OR
Connect the 4-cell conductivity cell to the
4-cell jack. The 4-cell accumet conductivity cells
have built in ATC probes. Therefore, there is no
need to install a separate ATC probe.
12
®
accumet
®
CONDUCTIVITY PROBES
Getting Started
R E S E A R C H
3
Rinse and blot-dry (don't wipe) probe
between each measurement. Rinse probe
with distilled or deionized water, or a portion
of the next solution to be measured.
4
Between measurements, store conductivity
probes dry.
13
Using the Meter
TOUCH SCREEN OPERATION
accumet
R E S E A R C H
Standby screen
Fisher Scientific
11:11am
Touch anywhere to resume
14
®
accumet
®
TOUCH SCREEN OPERATION
Using the Meter
R E S E A R C H
The new accumet Research benchtop pH meters operate with a
state-of-the-art touch screen. The touch screen makes this the easiest
meter on the market to operate and care for. When the meter is first
plugged in, the STANDBY screen will appear. Touch anywhere on this
screen to access the functions of the meter.
The buttons on the right side of the screen control all of the functions of
the meter. A light touch on the screen is all that you need to access the
various functions. Once you touch a button you will get an audible tone;
the screen will not change until you lift your finger. This
design prevents rapid uncontrolled scrolling through the various function
screens. Function buttons and options change from screen to screen.
Easy to understand prompts guide you through the operation of the
meter in the selected mode. If you are ever in doubt about what to do,
just touch help on the bottom right corner of the screen for detailed
information about that screen.
The touch screen is made of a durable polyester material that is
chemically resistant. Maintenance is simple with this meter. To clean
the screen you just need to wipe it with a damp cloth and dry it
with a clean dry towel. For additional information, see cleaning
and troubleshooting sections of the manual (pages 160-161).
15
Using the Meter
accumet
CHOOSING A CHANNEL
R E S E A R C H
Main screen
Channel screen
Fisher Scientific
1
accumet AR50
2
pH
Fisher Scientific
accumet AR50
mV
Ion
dual
Cond
Select from the options to the right
Select your desired measurement channel
setup
stdby
help
channel
September 17, 1997
11:11am
September 17, 1997
Dual screen
Measure
pH
channel 1
9.295
00000
ID#
ATC
1
2
26.2°C
auto buffer
ON
slope
000.0%
auto read
ON
mV
0000.0
BUFFERS Last std: Sep 17 @ 10:17 am
September 17, 1997
11:11 am
uS/cm
channel 2
0.010
ID#
Cell K
STND
16
00000
1.00/cm
ATC
print
stdby
26.2°C
Ref
25°C
Co
0.00%/°C
Last std: Sep 17 @ 10:10 am
help
11:11 am
®
accumet
®
CHOOSING A CHANNEL
Using the Meter
R E S E A R C H
The accumet Research AR50 is a Multi-channel pH meter. With this
meter you can switch from channel 1 to channel 2. You can also view
both channels at the same time by accessing the dual channel mode.
If you set the meter to view both channels, you cannot change the
parameters without choosing the screen that you want to modify. The
setup parameters for each screen are setup independently of one
another.
Choosing a Channel
1
Touch anywhere on the Standby screen.
OR
Touch channel on the main screen.
THEN
2
Touch 1, 2 or dual to access the channel that you want to view.
If you are in any measure
mode, touch mode until
To access System Setup from the Standby screen
you access the main
screen.
1
Touch anywhere on the Standby screen.
2
Touch 1 or 2 on the channel screen to access either channel.
3
Touch setup.
4
Touch system on the Setup screen.
17
Using the Meter
BUTTON FUNCTIONS
accumet
R E S E A R C H
The touch screen of your accumet Research pH meter has “buttons” along the
right side of the screen that are common to many of the screens. The following
indicates the function of these common buttons.
18
stdby
This is the standby button and it allows you to access the standby
mode. When in standby, the meter will not take measurements. It is in a
state of rest. When you touch stdby the meter will return to the standby
screen which says “Fisher Scientific” and displays the time.
channel
This button allows you to access the channel screen to choose what
channel you want to view. This button appears only on multichannel
meters such as the accumet AR25 and AR50. This button also allows
you to move from the main mode screen to the channel screen to access
the standby mode.
mode
The mode button allows you to switch between the various operations
of the meter. These operations, depending upon which meter you have,
include four measuring modes (pH, mV, ion, conductivity) as well as a
setup mode.
enter
The enter button allows you to accept any changes that you have made
on setup screens or accept values that you have input with keypads.
When touched, enter will save the changes and return you to the previous
screen.
save
The save button allows you to save multiple changes you have made on
one screen as a group. It functions like the enter button does for individual
changes.
exit
The exit button allows you to leave the screen you are currently viewing
and return to the previous screen without making any changes.
help
The help button allows you to access helpful information on any screen.
When you touch the help button, information about the current screen
appears. This information will include step-by-step instructions for operating
the meter from the current screen and possible applications information for
that screen.
close
The close key appears on the bottom of all help screens and allows you
to exit the help screen and return to the previous screen.
more
The more button appears on the help screens and allows you to
advance to the next help screen for additional information.
back
The back button appears on the help screens and allows you to
move back to a previous help screen.
®
accumet
®
BUTTON FUNCTIONS
R E S E A R C H
std
Using the Meter
This button accesses the standardization screen from the various
measure modes and initiates standardization of the meter once the
standardization screen is accessed.
meas
This button is the measure button and directs the meter to measure your
sample when in the Auto Read function of the pH or Ion modes.
setup
This button will access the setup screens for the measuring mode that
you are currently using. It can also be used to access the system setup
screen that allows you to set parameters that are not related to measurements such as the time and the date.
print
The print button will send information to the output device that you
have connected to your accumet meter. The output device can be a
printer, data logger or a computer. In addition to this, touching the print
button will also send data to the data storage center of the meter if a
sample ID# has been assigned to your sample.
The arrow keys on the screen move the cursor up and down in order
to highlight parameters that you would like to review or edit.
edit
The edit button appears on the setup screens. After you have highlighted
a parameter that you would like to change, the edit button allows you to
access the available options for that parameter.
clear
The clear button allows you to remove a setup parameter or standard
buffer value from the meter’s memory that may have been entered at a
previous time or by a previous user that is no longer of value to you.
Touching the clear button erases the value so you may enter a new one.
It can also erase a parameter that you may have entered erroneously.
BS
The BS button is a backspace button. It appears on keypad screens and
it allows you to back up and delete a character entered in error.
delete
The delete button appears on the “View Stored Data” screens. This
button allows you to erase the data from the memory of the meter.
prev
The prev button appears on the Data Screens when the data stored in
the meter’s memory has been accessed. It allows you to scroll through
data points sorted and stored prior to the current data point displayed.
next
The next button appears on the Data Screens when the data
stored in the meter’s memory has been accessed. It allows you
to scroll through data points sorted and stored after the current data
point displayed.
19


![[MI 611-227] 875 Series Intelligent Analyzers - Operation](http://vs1.manualzilla.com/store/data/005865143_1-5593040b74ad0b0d98c6c04fef25d9eb-150x150.png)