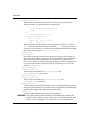
1
WASABI SYSTEMS, INC.
Wasabi® Software Development
Tools User’s Guide for Intel
XScale® Microarchitecture
Version 1.0
March 2004
Copyright © 2004 Wasabi Systems, Inc. All rights reserved.
No part of this document may be reproduced, modified, or distributed in any form or by
any means without the prior express written consent of Wasabi Systems, Inc.
Wasabi® and the Wasabi logo are registered trademarks of Wasabi Systems, Inc. All
other brand and product names are trademarks of their respective owners.
Part Number: WUG001.V1.00
How to Contact Wasabi
Wasabi Systems, Inc.
500 E. Main Street, Suite 1520
Norfolk, VA 23510 USA
EMAIL: [email protected]
PHONE: +1 (757) 248-9601
FAX: +1 (509) 461-7283
URL: http://www.wasabisystems.com/
Font Conventions
This manual uses the following highlighting conventions:
Boldface indicates graphical user interface (GUI) controls such as the names of
fields, buttons, or menus.
Italics indicates cross references, book titles, and emphasized words.
Monospace indicates code, commands, file names, directory paths, and user
entered text in program samples.
Monospace Italics indicates a variable in a command that you should replace
with a value of the appropriate type.
Blue monospace indicates complete Internet addresses (URLs):
■
■
■
■
■
http://www.wasabisystems.com/
■
The following format indicates code displayed on screen. Prompts and program
output are displayed in monospace bold, code that you are to enter is in
monospace font.
C:\> processor-elf-run hello
hello world!
3 + 4 = 7
C:\>
ii
■ Wasabi Software Development Tools User’s Guide
Contents
Introduction .................................................................................................................... 1
Toolkit Features ...........................................................................................................
Processor Version .....................................................................................................
Supported Targets .....................................................................................................
Supported Hosts ........................................................................................................
Object File Format ....................................................................................................
Tool Naming Conventions ...........................................................................................
Case Sensitivity............................................................................................................
2
2
2
2
2
3
4
Installation and Rebuilding ........................................................................................... 5
Red Hat Linux 9 ........................................................................................................... 6
Installation ................................................................................................................ 6
Rebuilding From Source Code ................................................................................. 7
Windows XP ................................................................................................................ 9
Installation ................................................................................................................ 9
Rebuilding From Source Code ............................................................................... 10
Tutorial.......................................................................................................................... 13
Create Source Code....................................................................................................
Compile, Assemble and Link.....................................................................................
Run the Executable ....................................................................................................
Run on the Stand-alone Simulator ..........................................................................
Debugging with GDB ................................................................................................
Debugging Examples ..............................................................................................
Assembler Listing from Source Code ........................................................................
15
16
17
17
18
19
23
Reference ...................................................................................................................... 25
Compiler.....................................................................................................................
Command Line Options..........................................................................................
Preprocessor Symbols.............................................................................................
Attributes ................................................................................................................
26
26
33
33
Wasabi Software Development Tools User’s Guide ■ iii
ARM Pragmas.........................................................................................................
Vector Types...........................................................................................................
Vector Intrinsic Functions ......................................................................................
ABI Summary ............................................................................................................
Data Type Sizes and Alignments............................................................................
Subroutine Calls......................................................................................................
Stack Frame ............................................................................................................
C Language Calling Conventions ...........................................................................
Function Return Values ..........................................................................................
Assembler...................................................................................................................
Command Line Options..........................................................................................
Syntax .....................................................................................................................
Local Symbol Names..............................................................................................
Special Characters...................................................................................................
Register Names .......................................................................................................
Floating-point..........................................................................................................
Opcodes ..................................................................................................................
ARM Machine Directives .......................................................................................
Assembler Error Messages .....................................................................................
Linker .........................................................................................................................
Command Line Options..........................................................................................
Interworking Between ARM and Thumb Code......................................................
Objdump.....................................................................................................................
Command Line Switch ...........................................................................................
Debugger ...................................................................................................................
Command Line Options..........................................................................................
Simulator ...................................................................................................................
Command Line Options..........................................................................................
35
35
36
38
38
39
40
42
43
44
44
46
46
47
48
49
49
49
50
51
51
51
52
52
54
55
56
56
Bibliography ................................................................................................................. 57
iv
■ Wasabi Software Development Tools User’s Guide
1
Introduction
The Wasabi Software Development Tools are a complete solution for C and C++
development for Intel XScale® Microarchitecture. The tools include the compiler,
interactive debugger and utilities libraries.
The Wasabi Software Development Tools User’s Guide consists of the following
sections:
Introduction
An introduction to the features of the Wasabi Software Development Tools
Installation
Installation instructions for the software
Tutorial
Instructions for compiling, linking, and debugging a sample program
Reference
Intel XScale® Microarchitecture features of the main Tools
Bibliography
■
■
■
■
■
Wasabi Software Development Tools User’s Guide ■ 1
Introduction
Toolkit Features
This section describes features of the Wasabi Software Development Tools specific to
the Intel XScale® Microarchitecture.
Processor Version
Processors based upon Intel XScale® Microarchitecture.
Supported Targets
Wasabi Instruction Set Simulator.
Both big-endian and little-endian mode may be selected. The default is little-endian. The
target boards are only supported in little-endian mode.
Supported Hosts
CPU
Operating System
Vendor
x86
Red Hat Linux 9
Red Hat Inc.
x86
Windows XP
Microsoft
Object File Format
The tools support the ELF object file format. Refer to Chapter 4, System V Application
Binary Interface (Prentice Hall, 1990). Use ld, or objcopy to produce S-records.
For information on using ld, see Using LD, the GNU linker at:
http://www.gnu.org/manual/manual.html
For information on objcopy, see GNU Binary Utilities at:
http://www.gnu.org/manual/manual.html
2 ■ Wasabi Software Development Tools User’s Guide
Tool Naming Conventions
Tool Naming Conventions
Wasabi cross-development tools normally have names that reflect the target processor
and the object file format output by the tools (for example, ELF). This makes it possible
to install more than one set of tools in the same binary directory, including both native
and cross-development tools.
The complete tool name is a three-part hyphenated string. The first part indicates the
processor family (xscale). The second part indicates the file format output by the tool
(elf). The third part is the generic tool name (gcc).
For example, the GCC ELF compiler for the Intel XScale® Microarchitecture is:
xscale-elf-gcc
The Intel XScale® Microarchitecture package includes the following supported tools:
Tool Description
Tool Name ELF
GCC compiler
C++ compiler
GAS assembler
GNU LD linker
Stand-alone simulator
Binary Utilities
xscale-elf-gcc
GDB debugger
xscale-elf-g++
xscale-elf-as
xscale-elf-ld
xscale-elf-run
xscale-elf-ar
xscale-elf-nm
xscale-elf-objcopy
xscale-elf-objdump
xscale-elf-ranlib
xscale-elf-readelf
xscale-elf-size
xscale-elf-strings
xscale-elf-strip
xscale-elf-gdb
xscale-elf-insight
Wasabi Software Development Tools User’s Guide ■ 3
Introduction
Case Sensitivity
The following strings are case sensitive under Linux and Windows XP:
command line options
assembler labels
linker script commands
section names
file names within makefiles
file names are case sensitive under Linux
■
■
■
■
■
■
The following strings are not case sensitive under Linux or Windows XP:
GDB commands
assembler instructions and register names
■
■
Case sensitivity for Windows XP is dependent on system configuration. By default, file
names under Windows XP are not case sensitive.
4 ■ Wasabi Software Development Tools User’s Guide
2
Installation and Rebuilding
This section describes how to correctly install the Wasabi® Software Development
Tools, and to rebuild the binaries from source code, on systems running the Red Hat
Linux 9 operating system, and on systems running the Windows XP operating system.
Wasabi Software Development Tools User’s Guide ■ 5
Installation and Rebuilding
Red Hat Linux 9
This section describes how to install the Wasabi Developer Tools on a system running
Red Hat Linux 9, and how to rebuild the tools from source code.
Installation
The name of the file containing the complete set of binary tools is called:
toolname-tools-YYYYMMDD-linux.tar.gz
where the variable toolname is replaced with tool name found on the CD, and YYYYMMDD
is replaced with the release date found on the CD. The file may be installed in the default
location (/usr/local/) using root privileges or in any other convenient directory.
Follow these instructions to correctly install the Wasabi Developer Tools on a system
running Red Hat Linux 9:
1.
Login as the user who owns the install directory (/install-dir/).
2. Use this command to make the install directory current.
cd /install-dir/
3. Use this command to unpack the files:
tar xvzf /path/where/received/toolname-tools-YYYYMMDD-linux.tar.gz
4. To access the compiler make sure that the install directory is on your path. For
example, for Borne Shell users:
PATH=/install-dir/bin:${PATH}
export PATH/
or for C Shell (*csh) users:
setenv PATH /install-dir/bin:${PATH}/
In addition, if you did not install in /usr/local/, you must set an environment
variable. For Borne Shell users:
GCC_EXEC_PREFIX=/install-dir/lib/gcc-lib/
export GCC_EXEC_PREFIX
or for C Shell (*csh) users:
setenv GCC_EXEC_PREFIX /install-dir/lib/gcc-lib/
NOTE In the code example above, the trailing forward slash character (/) is required.
6 ■ Wasabi Software Development Tools User’s Guide
Red Hat Linux 9
Rebuilding From Source Code
The file containing your sources should expand to a directory hierarchy with src/ at the
top.
1. Choose a directory to contain the src/ structure and your build directories. For
example:
cd ~; mkdir xscale-tools; cd xscale-tools
2. Next, unpack your sources. For example:
tar xvzf /path/where/received/toolname-tools-YYYYMDD-src.tar.gz
where the variable toolname is replaced with tool name found on the CD, and
YYYYMMDD is replaced with the release date found on the CD.
3. Next, create a build directory:
mkdir build; cd build
4. Configure the sources:
../src/configure --target=xscale-elf --prefix=/usr/local
The --prefix option should give the directory you want the tools to be installed
in. /usr/local is the usual location, but you can specify any location for which
you have write access. The tools will not be installed there until the final make
command.
5. Build the tools:
make all
6. Install the tools:
make install
NOTE This is the command that requires write access to your prefix directory.
7. To use the tools they must be placed on your path. For example, for Borne Shell
users:
PATH=/usr/local/bin:${PATH}
or for C Shell (*csh) users:
setenv PATH /usr/local/bin:${PATH}/
Wasabi Software Development Tools User’s Guide ■ 7
Installation and Rebuilding
8. A simple test is to compile the canonical “hello world” program and then run it on
the simulator. Create a file foo.c with the following text:
int main()
{
printf ("Hello world\n");
return 0;
}
9. Then execute these commands:
xscale-elf-gcc foo.c -o foo
xscale-elf-run foo
If the toolchain is properly installed, you should see “Hello world” on your
console.
8 ■ Wasabi Software Development Tools User’s Guide
Windows XP
Windows XP
This section describes how to install the Wasabi Developer Tools on a system running
Windows XP, and how to rebuild the tools from source code.
Installation
The Wasabi Developer Tools for Windows XP work under Cygwin 1.5.7. Cygwin is a
Linux-like environment for Windows. Cygwin consists of a DLL (cygwin1.dll) that is
a Linux emulation layer, and a collection of tools that provide a Linux look and feel.
In addition to the standard installation of Cygwin, you need to install the GNU
Internationalization runtime library (libintl).
If you do not have Cygwin 1.5.7, and the GNU Internationalization runtime library on
your system, point your web browser at:
http://cygwin.com
and click on the “Install Cygwin now” icon at the top right of the web page to invoke
the setup.exe installation program. Follow the online installation instructions to install
the standard Cygwin 1.5.7 installation, and then to install libintl.
The name of the file containing the complete set of binary tools for Windows systems is
called:
toolname-tools-YYYYMMDD-cygwin.zip
where the variable toolname is replaced with tool name found on the CD, and YYYYMMDD
is replaced with the release date found on the CD.
IMPORTANT These tools have been built against Cygwin DLL version 1.5.7. Please make
sure your system has this version of Cygwin installed.
Follow these instructions to correctly install the Wasabi Developer Tools:
1. The zip file should be unpacked using a utility such as WinZip. The tools are
normally unpacked in C:\WASABI.
2. After unpacking the tools, open a Windows Command Prompt dialog box. You
will need to modify the following three environment variables:
set GCC_EXEC_PREFIX=C:\WASABI\usr\local\lib\gcc-lib\
set PATH=%PATH%;C:\WASABI\usr\local\bin\
set PATH=%PATH%;C:\cygwin\bin\
NOTE If you wish to unpack the tools in a directory other than C:\WASABI, you will
need to make the appropriate substitutions in the above commands. If you
installed Cygwin in a directory other than the default, modify the final
Wasabi Software Development Tools User’s Guide ■ 9
Installation and Rebuilding
command.
You can now use the tools from within the Windows Command Prompt box.
3. A simple test to verify correct installation is to compile this canonical “hello
world” program and then run it on the simulator
a. Create the text file, foo.c:
int main()
{
printf ("Hello world\n");
return 0;
}
b. Compile the program:
xscale-elf-gcc foo.c -o foo.x
c. Run the executable foo.x on the simulator:
xscale-elf-run foo.x
If the toolchain is properly installed, you should see “Hello world” on your
console as a result of executing this program on the simulator.
Rebuilding From Source Code
When rebuilding the toolchain in a Cygwin environment, the build system requires a
shell such as bash. Before you begin, open a bash window. The Cygwin installation
program can place a “Cygwin” icon on your desktop that opens a bash window.
The file containing your sources should expand to a directory hierarchy with src/ at the
top.
1. Choose a directory to contain the src/ structure and your build directories. For
example:
cd ~; mkdir xscale-tools; cd xscale-tools
2. Next, unpack your sources. For example:
tar xvzf /path/where/received/toolname-tools-YYYYMMDD-src.tar.gz
where the variable toolname is replaced with tool name found on the CD, and
YYYYMMDD is replaced with the release date found on the CD.
3. Next, create a build directory:
mkdir build; cd build
10 ■ Wasabi Software Development Tools User’s Guide
Windows XP
4. Configure the sources:
../src/configure --target=xscale-elf --prefix=/cygdrive/c/wasabi
The --prefix option should give the directory you want the tools to be installed
in. /cygdrive/c/wasabi is the default location, but you can specify any location
for which you have write access. The tools will not be installed there until the
final make command.
5. Build the tools:
make all
6. Install the tools:
make install
NOTE This is the command that requires write access to your prefix directory.
7. If you no longer wish to work in the bash environment, type exit. The rest of
these steps can be completed in a Windows command prompt window and the
syntax of the following commands reflect that.
8. To use the tools they must be placed on your path. For example:
set PATH=%PATH%;c:\wasabi
9. A basic test is to compile the canonical “hello world” program and then run it on
the simulator. Using a text editor, create a file called foo.c containing the
following text:
int main()
{
printf ("Hello world\n");
return 0;
}
10. Then execute these commands:
xscale-elf-gcc foo.c -o foo.exe
xscale-elf-run foo.exe
If the toolchain is properly installed, you should see “Hello world” on your
console as a result of executing this program on the simulator.
Wasabi Software Development Tools User’s Guide ■ 11
Installation and Rebuilding
12 ■ Wasabi Software Development Tools User’s Guide
3
Tutorial
In this tutorial, we will:
Create source code for a sample “Hello World” program.
Compile, assemble, and link the source code
Run the executable on the stand-alone simulator
Step through a sample debugging session using the GDB built-in simulator
Create an assembler listing from source code
■
■
■
■
■
For more detail on any of the individual utilities, refer to the open-source utility manuals.
Wasabi Software Development Tools User’s Guide ■ 13
Tutorial
The following chart outlines the sequence of steps in the tutorial.
Create source code
Compile, assemble
and link the source
code
Run the executable
on the stand-alone
simulator
Create assembler
listing from source
code
Debug with GDB
on the built-in
simulator
NOTE The assembler listing from source code is optional in the tutorial sequence.
14 ■ Wasabi Software Development Tools User’s Guide
Create Source Code
Create Source Code
Create the following sample source code and save it as hello.c. This program will be
used throughout the tutorial, and also can be used to verify correct installation.
#include <stdio.h>
int a, c;
void foo(int b)
{
c = a + b;
printf("%d + %d = %d\n", a, b, c);
}
int main()
{
int b;
a = 3;
b = 4;
printf("Hello, world!\n");
foo(b);
return 0;
}
Wasabi Software Development Tools User’s Guide ■ 15
Tutorial
Compile, Assemble and Link
To compile, assemble, and link this example to run on the GDB built-in instruction set
simulator, type:
xscale-elf-gcc -g hello.c -o hello
The -g option generates debugging information and the -o option specifies the name of
the executable to be produced. Other useful options include -O for standard optimization,
and -O2 for extensive optimization. When no optimization option is specified GCC will
not optimize. It is not necessary to specify the endian-ness of the program; little-endian
is the default.
For a list of available generic compiler options, refer to “GCC Command Options” at:
http://www.gnu.org/manual/manual.html
IMPORTANT It is important to remember throughout the tutorial that the Wasabi Developer
Toolkit is case sensitive on all operating systems. Therefore, enter all
commands and options exactly as indicated in this document.
Programs can also be compiled to run on specific hardware platforms. To compile a
program for a specific board, a specifications-file for that board must be included at
compilation. Each specifications file contains board-specific compiler settings. For
example, the -specs=iq80310.specs compiler option selects the iq80310.specs file.
Some boards require a combination of a specifications file and other compiler settings.
Here is a list of Intel boards, and their required compiler settings
Board
Compiler Settings
80310
-specs=iq80310.specs
80321
-specs=redboot.specs
IWMMXT
-specs=redboot.specs -mcpu=iwmmxt
IXDP425
-specs=redboot.specs -mbig-endian
GRG
-specs=redboot.specs -mbig-endian
16 ■ Wasabi Software Development Tools User’s Guide
Run the Executable
Run the Executable
Throughout these examples, on-screen sample sessions are shown with a green
background. Code input is shown in plain monofont. Code output is shown in bold
monofont. The following examples were made using GDB (GNU Debugger) in
command-line mode on the Windows operating system. The system command prompt is
shown as C:\>.
Run on the Stand-alone Simulator
To run this program on the stand-alone simulator, enter:
xscale-elf-run hello
The simulator executes the program, and returns the system prompt when the program
exits.
C:\> xscale-elf-run hello
hello world!
3 + 4 = 7
C:\>
Wasabi Software Development Tools User’s Guide ■ 17
Tutorial
Debugging with GDB
The debugger can be accessed by graphic user interface (GUI), or in command-line
mode.
To start Insight, the GUI debugger, enter the command:
xscale-elf-insight hello.exe
To start GDB in command-line mode, and run the sample program enter the command:
xscale-elf-gdb hello.exe
After the initial copyright and configuration information GDB returns its own prompt:
(gdb).
C:\> xscale-elf-gdb hello
GNU gdb 2003-08-25-cvs
Copyright 2003 Free Software Foundation, Inc.
GDB is free software, covered by the GNU General Public License, and you are
welcome to change it and/or distribute copies of it under certain conditions.
Type "show copying" to see the conditions.
There is absolutely no warranty for GDB. Type "show warranty" for details. This
GDB was configured as "--host=i386-pc-cygwin --target=xscale-elf"...
(gdb)
In our examples, we have selected the command-line interface to GDB. Command-line
operation is useful when you wish to capture program output for making transcripts like
these, or to display and capture code when reporting a bug in GDB.
To exit GDB, enter the quit command at the (gdb) prompt.
(gdb) quit
C:\>
18 ■ Wasabi Software Development Tools User’s Guide
Debugging with GDB
Debugging Examples
The following example debugging session was run on the GDB built-in instruction set
simulator. First we will step through and explain the sequence of commands in the
sample debugging sessions, then we will show the actual transcripts of the session.
In each of the following steps, type the indicated command at the command prompt and
press the Enter key.
1. Start GDB:
xscale-elf-gdb hello.exe
2. Specify the target the program will run on with the target command.
To specify the instruction set simulator, use:
target sim
3. Load the program into memory:
load
4. Set a breakpoint at main:
break main
5. Start the executable.
To run the executable on the instruction set simulator, use:
run
The program starts running and then stops at the breakpoint.
6. Display the value of the variable “a:”
print a
7. Execute the next line in the program:
step
8. Display the current value of the variable “a:”
print a
9. Display the source code of the program being debugged:
list
10. Display the source code of the “foo” function:
list foo
11. Set a breakpoint at line seven:
break 7
You can set a breakpoint at any line by entering break linenumber, where
linenumber is the specific line number in the source code.
Wasabi Software Development Tools User’s Guide ■ 19
Tutorial
12. Resume normal execution of the program up to the next breakpoint:
continue
13. Step to the next line and execute it:
step
14. Display the value of the variable “c:”
print c
15. Continue to the next source line in the current (innermost) stack frame.
next
This is similar to the step command, but function calls that appear within the line
of code are executed without stopping. Execution stops when control reaches a
different line of code at the original stack level that was executing when you gave
the next command.
16. See how the program got to the current line:
backtrace
A backtrace is a summary of how your program got to its current position. The
backtrace command shows one line per frame, for many frames, starting with the
currently executing frame (frame zero), followed by its caller (frame one), and on
up the stack.
17. Exit the program and quit the debugger:
quit
20 ■ Wasabi Software Development Tools User’s Guide
Debugging with GDB
Debug with the Built-in Instruction Set Simulator
GDB can be used to debug executables with the built-in Instruction Set Simulator, which
does not require access to any hardware. In the following sample debugging session, we
use the target sim command to specify the Instruction Set Simulator as the target.
C:\> xscale-elf-gdb hello
GNU gdb 2003-08-25-cvs
Copyright 2003 Free Software Foundation, Inc.
GDB is free software, covered by the GNU General Public License, and you are
welcome to change it and/or distribute copies of it under certain conditions.
Type "show copying" to see the conditions.
There is absolutely no warranty for GDB. Type "show warranty" for details. This
GDB was configured as "--host=i386-pc-cygwin --target=xscale-elf"...
(gdb) target sim
Connected to the simulator.
(gdb) load
Loading section .init, size 0x1c vma 0x8000
Loading section .text, size 0x926c vma 0x801c
Loading section .fini, size 0x18 vma 0x11288
Loading section .rodata, size 0x354 vma 0x112a0
Loading section .data, size 0x8c0 vma 0x11710
Loading section .eh_frame, size 0x4 vma 0x11fd0
Loading section .ctors, size 0x8 vma 0x11fd4
Loading section .dtors, size 0x8 vma 0x11fdc
Loading section .jcr, size 0x4 vma 0x11fe4
Start address 0x8120
Transfer rate: 325216 bits in <1 sec.
(gdb) break main
Breakpoint 1 at 0x82a0: file hello.c, line 15.
(gdb) run
Starting program: C:\hello
Breakpoint 1, main () at hello.c:15
15
a = 3;
(gdb) print a
$1 = 0
(gdb) step
16
b = 4;
(gdb) print a
$2 = 3
(gdb) list
Wasabi Software Development Tools User’s Guide ■ 21
Tutorial
11
12
13
14
15
16
17
18
19
20
int main()
{
int b;
a = 3;
b = 4;
printf("Hello, world!\n");
foo(b);
return 0;
}
(gdb) list foo
1
#include <stdio.h>
2
3
int a, c;
4
5
void foo(int b)
6
{
7
c = a + b;
8
printf("%d + %d = %d\n", a, b, c);
9
}
10
(gdb) break 7
Breakpoint 2 at 0x824c: file hello.c, line 7.
(gdb) continue
Continuing.
Hello, world!
Breakpoint 2, foo (b=4) at hello.c:7
7
c = a + b;
(gdb) step
8
printf("%d + %d = %d\n", a, b, c);
(gdb) print c
$3 = 7
(gdb) next
3 + 4 = 7
9
}
(gdb) backtrace
#0 foo (b=4) at hello.c:9
#1 0x000082c4 in main () at hello.c:18
(gdb) quit
The program is running.
C:\>
Quit anyway (and kill it)? (y or n) y
22 ■ Wasabi Software Development Tools User’s Guide
Assembler Listing from Source Code
Assembler Listing from Source Code
The following command produces an assembler listing:
xscale-elf-gcc -g -O2 -Wa,-al -c hello.c
The compiler debugging option -g gives the assembler the necessary debugging
information. The -O2 option produces optimized code output. The -Wa option tells the
compiler to pass the text immediately following the comma as a command line to the
assembler. The assembler option -al requests an assembler listing. The -c option tells
GCC to compile or assemble the source files, but not to link. Here is a partial excerpt of
the on-screen output.
66
67
68
69
70
71
72
73
74
75
76
77
78
79
80
81
82
83
84
85
86
87
88
89
90
91
92
93
94
95
96
97
98
99
100
.align 2
.global main
.type
main, %function
main:
.LFB5:
.loc 1 12 0
@ args = 0, pretend = 0, frame = 0
@ frame_needed = 1, uses_anonymous_args = 0
mov
ip, sp
003c 0DC0A0E1
.LCFI1:
0040 00D82DE9
stmfd
sp!, {fp, ip, lr, pc}
sub
fp, ip, #4
.LCFI2:
0044 04B04CE2
.LCFI3:
.loc 1 15 0
ldr
ip, .L5
mov
r3, #3
.loc 1 17 0
0048 1CC09FE5
004c 0330A0E3
.LBB2:
0050 18009FE5
ldr
.loc
str
.loc
bl
.loc
mov
bl
.loc
0054 00308CE5
0058 FEFFFFEB
005c 0400A0E3
0060 FEFFFFEB
r0, .L5+4
1 15 0
r3, [ip, #0]
1 17 0
puts
1 18 0
r0, #4
foo
1 20 0
.LBE2:
0064 0000A0E3
0068 00A81BE9
mov
ldmea
r0, #0
fp, {fp, sp, pc}
.align
2
.word
a
.L6:
.L5:
006c 00000000
Wasabi Software Development Tools User’s Guide ■ 23
Tutorial
24 ■ Wasabi Software Development Tools User’s Guide
4
Reference
This section describes the ABI and attributes of the main GNU tools specific to
Intel XScale® Microarchitecture.
Compiler
ABI Summary
Assembler
Linker
Debugger
Simulator
■
■
■
■
■
■
Wasabi Software Development Tools User’s Guide ■ 25
Reference
Compiler
This section describes features of the GNU Compiler specific to Intel XScale®
Microarchitecture.
Command Line Options
For a list of available generic compiler options, refer to “GCC Command Options” at:
http://www.gnu.org/manual/manual.html
In addition, the following command line options for Intel XScale® Microarchitecture
are supported:
-mabort-on-noreturn
Generate a call to the function abort at the end of a noreturn function. It will be
executed if the function tries to return.
-malign-literal-pools32
-mno-align-literal-pools32
The -malign-literal-pools32
switch (disabled by default) causes the compiler
to align literal pools to a 32-byte boundary (the cache line size on processors
based upon Intel XScale® Microarchitecture).
-malignment-traps
Generate code that will not trap if the MMU has alignment traps enabled. On
ARM architectures prior to ARMv4, there were no instructions to access
half-word objects stored in memory. However, when reading from memory a
feature of the ARM architecture allows a word load to be used, even if the address
is unaligned, and the processor core will rotate the data as it is being loaded. This
option tells the compiler that such misaligned accesses will cause a MMU trap and
that it should instead synthesize the access as a series of byte accesses. The
compiler can still use word accesses to load half-word data if it knows that the
address is aligned to a word boundary.
This option is ignored when compiling for ARM architecture 4 or later, since
these processors have instructions to directly access half-word objects in memory.
-mno-alignment-traps
Generate code that assumes that the MMU will not trap unaligned accesses. This
produces better code when the target instruction set does not have half-word
memory operations (i.e., implementations prior to ARMv4).
Note that you cannot use this option to access unaligned word objects, since the
processor will only fetch one 32-bit aligned object from memory.
The default setting for most targets is -mno-alignment-traps, since this
produces better code when there are no half-word memory instructions available.
26 ■ Wasabi Software Development Tools User’s Guide
Compiler
-mapcs
This is a synonym for -mapcs-frame.
-mapcs-frame
Generate a stack frame that is compliant with the ARM Procedure Call Standard
for all functions, even if this is not strictly necessary for correct execution of the
code. Specifying -fomit-frame-pointer with this option will cause the stack
frames not to be generated for leaf functions. The default is -mno-apcs-frame.
-mapcs-26
Generate code for a processor running with a 26-bit program counter, and
conforming to the function calling standards for the APCS 26-bit option. This
option replaces the -m2 and -m3 options of previous releases of the compiler.
-mapcs-32
Generate code for a processor running with a 32-bit program counter, and
conforming to the function calling standards for the APCS 32-bit option. This
option replaces the -m6 option of previous releases of the compiler.
-march=NAME
This specifies the name of the target ARM architecture. GCC uses this name to
determine what kind of instructions it can emit when generating assembly code.
This option can be used in conjunction with or instead of the -mcpu= option.
Permissible names are:
armv2
armv4t
armv2a
armv5
armv3
armv5t
armv3m
armv5te
armv4
iwmmxt
-matpcs
Generate code that conforms to the ATPCS (ARM Thumb Procedure Call
Standard). This ABI standard is slightly different from the APCS standard and is
incompatible in the way that small structures are returned from a function. For the
APCS a structure like this:
struct { char a; char b; }
would be returned in memory, whereas for the ATPCS it is returned in a register.
-mbig-endian
Generate code for a processor running in big-endian mode; the default is to
compile code for a little-endian processor.
-mcallee-super-interworking
Gives all externally visible functions in the file being compiled an ARM
instruction set header which switches to Thumb mode before executing the rest of
the function. This allows these functions to be called from non-interworking code.
Wasabi Software Development Tools User’s Guide ■ 27
Reference
-mcaller-super-interworking
Allows calls via function pointers (including virtual functions) to execute
correctly regardless of whether the target code has been compiled for
interworking or not. There is a small overhead in the cost of executing a function
pointer if this option is enabled.
-mcpu=NAME
This specifies the name of the target ARM processor. GCC uses this name to
determine what kind of instructions it can emit when generating assembly code.
Permissible names are:
arm2
arm60
arm7
arm7di
arm700i
arm7500
arm810
arm920t
arm1020t
xscale
arm250
arm600
arm7m
arm7dmi
arm710
arm7500fe
arm9
arm940t
strongarm
core3
arm3
arm610
arm7d
arm70
arm710c
arm7tdmi
arm9e
arm9tdmi
strongarm110
iwmmxt
arm6
arm620
arm7dm
arm700
arm7100
arm8
arm920
arm10tdmi
strongarm1100
IMPORTANT If you want the compiler to use the Intel® Wireless MMX™ instructions, you
must use the -mcpu=iwmmxt command-line switch. If -mcpu=iwmmxt is not
specified, code is generated for processors based upon Intel XScale®
Microarchitecture without the Intel® Wireless MMX™ technology.
-mfp=NUMBER
-mfpe=NUMBER
This specifies the version of the floating point emulation available on the target.
Permissible values are 2 and 3. -mfp= is a synonym for -mfpe=, for compatibility
with older versions of GCC.
-mfunc-pad-nop
-mno-func-pad-nop
Some processors based upon Intel XScale® Microarchitecture have a
performance problem which can cause a function return instruction to take longer
to execute than it should. This problem can be worked around by inserting no-op
instructions in the function epilogue. This switch (disabled by default) tells the
compiler to do this.
-mhard-float
Generate output containing floating point instructions. This is the default.
28 ■ Wasabi Software Development Tools User’s Guide
Compiler
-mldm-stm
-mno-ldm-stm
The ARM architecture has load-multiple (LDM) and store-multiple (STM)
instructions, which are used in various places by the compiler. On processors
based upon Intel XScale® Microarchitecture, the LDM and STM instructions
have a high issue latency, and thus are often slower than individual load and store
instructions. The -mno-ldm-stm switch disables the use of LDM and STM
instructions. The default is -mldm-stm.
-mlittle-endian
Generate code for a processor running in little-endian mode. This is the default for
all standard configurations.
-mlong-calls
-mno-long-calls
Tells the compiler to perform function calls by first loading the address of the
function into a register and then performing a subroutine call on this register.
This switch is needed if the target function will lie outside of the 64 megabyte
addressing range of the offset based version of subroutine call instruction.
Even if this switch is enabled, not all function calls will be turned into long calls.
The heuristic is that static functions, functions which have the short-call
attribute, functions that are inside the scope of a #pragma no_long_calls
directive and functions whose definitions have already been compiled within the
current compilation unit, will not be turned into long calls. The exception to this
rule is that weak function definitions, functions with the long-call attribute or
the section attribute, and functions that are within the scope of a
#pragma long_calls directive, will always be turned into long calls.
This feature is not enabled by default. Specifying -mno-long-calls will restore
the default behavior, as will placing the function calls within the scope of a
#pragma long_calls_off directive. Note these switches have no effect on how
the compiler generates code to handle function calls via function pointers.
-mmerge-literal-pools
-mno-merge-literal-pools
The -mmerge-literal-pools switch (disabled by default) causes the compiler to
merge literal pools across function boundary if possible. This allows for smaller
pools due to re-used values and fewer alignment paddings.
-mnop-fun-dllimport
Disable support for the dllimport attribute.
-mpic-register=REG
Specify the register to be used for PIC addressing. The default is R10 unless
stack-checking is enabled, when R9 is used.
Wasabi Software Development Tools User’s Guide ■ 29
Reference
-mpoke-function-name
Write the name of each function into the text section, directly preceding the
function prologue. The generated code is similar to this:
t0
.ascii "arm_poke_function_name", 0
.align
t1
.word 0xff000000 + (t1 - t0)
arm_poke_function_name
mov
ip, sp
stmfd
sp!, {fp, ip, lr, pc}
sub
fp, ip, #4
When performing a stack backtrace, code can inspect the value of pc stored at
fp + 0. If the trace function then looks at location pc - 12 and the top 8 bits are
set, then we know that there is a function name embedded immediately preceding
this location and has length ((pc[-3]) & 0xff000000).
-msched-prolog
-mno-sched-prolog
Prevent the reordering of instructions in the function prolog, or the merging of
those instruction with the instructions in the function’s body. This means that all
functions will start with a recognizable set of instructions (or in fact one of a
choice from a small set of different function prologues), and this information can
be used to locate the start if functions inside an executable piece of code. The
default is -msched-prolog.
-mshort-load-bytes
-mno-short-load-bytes
These are deprecated aliases for -malignment-traps and
-mno-alignment-traps respectively.
-mshort-load-words
-mno-short-load-words
These are deprecated aliases for -mno-alignment-traps and
-malignment-traps respectively.
-msingle-pic-base
Treat the register used for PIC addressing as read-only, rather than loading it in the
prologue for each function. The run-time system is responsible for initializing this
register with an appropriate value before execution begins.
-msoft-float
Generate output containing library calls for floating point.
WARNING The requisite libraries are not available for all ARM targets. Normally the
facilities of the machine’s usual C compiler are used, but this cannot be done
directly in cross-compilation. You must make your own arrangements to
30 ■ Wasabi Software Development Tools User’s Guide
Compiler
provide suitable library functions for cross-compilation. -msoft-float
changes the calling convention in the output file; therefore, it is only useful if
you compile _all_ of a program with this option. In particular, you need to
compile libgcc.a, the library that comes with GCC, with -msoft-float in
order for this to work.
-mstrict-prototypes
-mno-strict-prototypes
The -mstrict-prototypes switch
(enabled by default) causes the compiler to
implement functions and function calls with parameter sizes according to their
types, wherever possible. With -mno-strict-prototypes the compiler will
ensure all call parameters have at least integer size. Also, function prologues will
convert parameters back to the sizes of their declared types. This may be
necessary for compatibility with older object code.
-mstructure-size-boundary=N
The size of all structures and unions will be rounded up to a multiple of the
number of bits set by this option. Permissible values are 8 and 32.
The default value varies for different toolchains. For example, a COFF targeted
toolchain has a default value of 8. Specifying the larger number can produce
faster, more efficient code, but can also increase the size of the program. The two
values are potentially incompatible. Code compiled with one value cannot
necessarily expect to work with code or libraries compiled with the other value, if
they exchange information using structures or unions.
-mthumb
Generate code for the 16-bit Thumb instruction set. The default is to use the 32-bit
ARM instruction set.
-mthumb-interwork
-mno-thumb-interwork
Generate code which supports calling between the ARM and Thumb instruction
sets. Without this option the two instruction sets cannot be reliably used inside
one program. The default is -mno-thumb-interwork, since slightly larger code is
generated when -mthumb-interwork is specified.
-mtpcs-frame
Generate a stack frame that is compliant with the Thumb Procedure Call Standard
for all non-leaf functions. (A leaf function is one that does not call any other
functions.) The default is -mno-tpcs-frame.
-mtpcs-leaf-frame
Generate a stack frame that is compliant with the Thumb Procedure Call Standard
for all leaf functions. (A leaf function is one that does not call any other
functions.) The default is -mno-apcs-leaf-frame.
Wasabi Software Development Tools User’s Guide ■ 31
Reference
-mtune=CPU-TYPE
This option is very similar to the -mcpu= option, except that instead of specifying
the actual target processor type, and hence restricting which instructions can be
used, it specifies that GCC should tune the performance of the code as if the target
were of the type specified in this option, but still choosing the instructions that it
will generate based on the cpu specified by a -mcpu= option. For some ARM
implementations better performance can be obtained by using this option. For a
list of permissible values for CPU-TYPE, see the -mcpu= option.
-mwords-little-endian
This option only applies when generating code for big-endian processors.
Generate code for a little-endian word order but a big-endian byte order. That is, a
byte order of the form 32107654.
NOTE This option should only be used if you need compatibility with code for
big-endian ARM processors generated by versions of the compiler prior to
2.8.
-mxscale-schedule-mult
Processors based upon Intel XScale® Microarchitecture have a non-pipelined
multiplier unit with a variable result latency that requires accurate modelling to
avoid pipeline stalls. Using this option with some source code leads to good
performance improvements, however in others, it causes the instruction
scheduling pass to generate less suboptimal code.
This option may be used in conjunction with -fno-schedule-insns to disable the
first instruction scheduling pass and improve the quality of generated code.
32 ■ Wasabi Software Development Tools User’s Guide
Compiler
Preprocessor Symbols
Following are some relevant preprocessor symbols supported by the compiler for the
Intel XScale® Microarchitecture. The complete list can be found by invoking the
compiler as:
xscale-elf-gcc -dD -E -P -xc /dev/null
You may add other options that you would normally use between -xc and /dev/null.
Symbol
Condition
arm
Is always defined.
__APCS_32__
If -mapcs-26 has NOT been specified.
__APCS_26__
If -mapcs-26 has been specified.
__SOFTFP__
If -mhard-float has NOT been specified.
__ARMWEL__
If -mbig-endian and -mwords-little-endian
have been specified.
__ARMEB__
If -mbig-endian has been specified.
__ARMEL__
If -mbig-endian has NOT been specified.
__ARM_ARCH_5TE__
Is defined by default.
__ARM_XSCALE__
Is defined by default.
__IWMMXT__
If -mcpu=iwmmxt has been specified.
Attributes
There are a few function attributes which are specific to the ARM target. For more
information, see “Declaring Attributes of Functions” in “Extensions to the C Language
Family” at:
http://www.gnu.org/manual/manual.html
long_call/short_call
These attributes specify how a particular function is called on ARM. Both
attributes override the -mlong-calls and #pragma long_calls settings. The
long_call attribute causes the compiler to always call the function by first
loading its address into a register and then using the contents of that register. The
short_call attribute always places the offset to the function from the call site
into the BL instruction directly.
For example:
void fn (void)
__attribute__ ((long_call));
Wasabi Software Development Tools User’s Guide ■ 33
Reference
interrupt
This attribute indicates that the specified function is an interrupt handler. The
compiler will generate appropriate function entry and exit sequences. You can
specify the kind of interrupt to be handled by adding an optional parameter to the
interrupt attribute. The permissible values for this parameter are: IRQ, FIQ, SWI,
ABORT, UNDEF.
For example:
void fn (void) __attribute__ ((interrupt ("IRQ")));
naked
This attribute indicates that the specified function does not need
prologue/epilogue sequences generated by the compiler. The programmer must
provide these sequences as required.
For example:
void fn (void) __attribute__ ((naked));
34 ■ Wasabi Software Development Tools User’s Guide
Compiler
ARM Pragmas
The ARM target defines pragmas for controlling the default addition of long_call and
short_call attributes to functions. For more information on these attributes, see
“Attributes” on page 33.
GCC supports these ARM pragmas:
long_calls
Set all subsequent functions to have the long_call attribute.
no_long_calls
Set all subsequent functions to have the short_call attribute.
long_calls_off
Do not affect the long_call or short_call attributes of subsequent functions.
Vector Types
GCC includes limited support for vectors. Vectors are short fixed length arrays, which
map onto the data types that correspond to Intel® Wireless MMX™ Technology.
Vectors are declared using the compiler’s attribute mechanism. GCC supports three
vector types: two 32-bit values, four 16-bit values, and eight 8-bit values.
Two 32-bit values:
typedef long long int_vector __attribute__ ((mode(V2SI)));
Four 16-bit values:
typedef long long short_vector __attribute__ ((mode(V4HI)));
Eight 8-bit values:
typedef long long char_vector __attribute__ ((mode(V8QI)));
These vector types can be regarded as if they were arrays of the same length and size.
However, they can also be operated upon by the instructions of the Intel® Wireless
MMX™ Technology by using the intrinsic functions feature of the compiler.
Wasabi Software Development Tools User’s Guide ■ 35
Reference
Vector Intrinsic Functions
Vector types can be passed to special built-in functions, which GCC will replace with
invocations of the corresponding instructions from Intel® Wireless MMX™
Technology. For example, to add two word sized vectors using the WADDW
instruction, the following code would be used:
result_vector = __builtin_arm_waddw (first_vector, second_vector);
To perform a similar operation using the WADDHSS instruction to sum half word-sized
vectors using signed saturation the invocation would be:
result_vector = __builtin_arm_waddhss (first_vector, second_vector);
The following is a complete list of all of these intrinsic vector functions:
__builtin_arm_getwcx
__builtin_arm_textrmsh
__builtin_arm_textrmuh
__builtin_arm_tinsrh
__builtin_arm_tmiabb
__builtin_arm_tmiatb
__builtin_arm_tmovmskb
__builtin_arm_getwcx
__builtin_arm_tmovmskw
__builtin_arm_waccb
__builtin_arm_waccw
__builtin_arm_waddbss
__builtin_arm_waddhss
__builtin_arm_waddwss
__builtin_arm_wand
__builtin_arm_wavg2br
__builtin_arm_wcmpeqb
__builtin_arm_wcmpgtsb
__builtin_arm_wcmpgtub
__builtin_arm_wmacs
__builtin_arm_wmacuz
__builtin_arm_wmaxsb
__builtin_arm_wmaxub
__builtin_arm_wminsb
__builtin_arm_wminub
__builtin_arm_wmulsh
__builtin_arm_wor
__builtin_arm_wpackwss
__builtin_arm_wrorh
__builtin_arm_wrorwi
__builtin_arm_wsadh
__builtin_arm_wslld
__builtin_arm_wsllhi
__builtin_arm_setwcx
__builtin_arm_textrmsw
__builtin_arm_textrmuw
__builtin_arm_tinsrw
__builtin_arm_tmiabt
__builtin_arm_tmiatt
__builtin_arm_tmovmskh
__builtin_arm_setwcx
__builtin_arm_tmovmskw
__builtin_arm_wacch
__builtin_arm_waccw
__builtin_arm_waddbus
__builtin_arm_waddhus
__builtin_arm_waddwus
__builtin_arm_wandn
__builtin_arm_wavg2h
__builtin_arm_wcmpeqh
__builtin_arm_wcmpgtsh
__builtin_arm_wcmpgtuh
__builtin_arm_wmacsz
__builtin_arm_wmadds
__builtin_arm_wmaxsh
__builtin_arm_wmaxuh
__builtin_arm_wminsh
__builtin_arm_wminuh
__builtin_arm_wmuluh
__builtin_arm_wpackhss
__builtin_arm_wrord
__builtin_arm_wrorhi
__builtin_arm_wsadb
__builtin_arm_wsadhz
__builtin_arm_wslldi
__builtin_arm_wsllw
36 ■ Wasabi Software Development Tools User’s Guide
__builtin_arm_textrmsb
__builtin_arm_textrmub
__builtin_arm_tinsrb
__builtin_arm_tmia
__builtin_arm_tmiaph
__builtin_arm_tmovmskb
__builtin_arm_tmovmskh
__builtin_arm_textrmsb
__builtin_arm_waccb
__builtin_arm_wacch
__builtin_arm_waddb
__builtin_arm_waddh
__builtin_arm_waddw
__builtin_arm_walign
__builtin_arm_wavg2b
__builtin_arm_wavg2hr
__builtin_arm_wcmpeqw
__builtin_arm_wcmpgtsw
__builtin_arm_wcmpgtuw
__builtin_arm_wmacu
__builtin_arm_wmaddu
__builtin_arm_wmaxsw
__builtin_arm_wmaxuw
__builtin_arm_wminsw
__builtin_arm_wminuw
__builtin_arm_wmulul
__builtin_arm_wpackhus
__builtin_arm_wrordi
__builtin_arm_wrorw
__builtin_arm_wsadbz
__builtin_arm_wshufh
__builtin_arm_wsllh
__builtin_arm_wsllwi
Compiler
__builtin_arm_wsrad
__builtin_arm_wsrahi
__builtin_arm_wsrld
__builtin_arm_wsrlhi
__builtin_arm_wsubb
__builtin_arm_wsubh
__builtin_arm_wsubw
__builtin_arm_wunpckehsb
__builtin_arm_wunpckehsh
__builtin_arm_wunpckehub
__builtin_arm_wunpckehuh
__builtin_arm_wunpckelsb
__builtin_arm_wunpckelsh
__builtin_arm_wunpckelub
__builtin_arm_wunpckeluh
__builtin_arm_wunpckihb
__builtin_arm_wunpckilb
__builtin_arm_wxor
__builtin_arm_wsradi
__builtin_arm_wsraw
__builtin_arm_wsrldi
__builtin_arm_wsrlw
__builtin_arm_wsubbss
__builtin_arm_wsubhss
__builtin_arm_wsubwss
__builtin_arm_wunpckehsb
__builtin_arm_wunpckehsw
__builtin_arm_wunpckehub
__builtin_arm_wunpckehuw
__builtin_arm_wunpckelsb
__builtin_arm_wunpckelsw
__builtin_arm_wunpckelub
__builtin_arm_wunpckeluw
__builtin_arm_wunpckihh
__builtin_arm_wunpckilh
__builtin_arm_wzero
__builtin_arm_wsrah
__builtin_arm_wsrawi
__builtin_arm_wsrlh
__builtin_arm_wsrlwi
__builtin_arm_wsubbus
__builtin_arm_wsubhus
__builtin_arm_wsubwus
__builtin_arm_wunpckehsh
__builtin_arm_wunpckehsw
__builtin_arm_wunpckehuh
__builtin_arm_wunpckehuw
__builtin_arm_wunpckelsh
__builtin_arm_wunpckelsw
__builtin_arm_wunpckeluh
__builtin_arm_wunpckeluw
__builtin_arm_wunpckihw
__builtin_arm_wunpckilw
Wasabi Software Development Tools User’s Guide ■ 37
Reference
ABI Summary
The tools for Intel XScale® Microarchitecture adhere by default to the APCS (ARM
Procedure Call Standard). The following ABI summary is consistent with this standard.
Data Type Sizes and Alignments
The following table shows the size and alignment for all data types:
Type
Size (bytes)
Alignment (bytes)
char
1 byte
2 bytes
4 bytes
4 bytes
4 bytes
8 bytes
4 bytes
8 bytes
4 bytes
1 byte
2 bytes
4 bytes
4 bytes
4 bytes
8 bytes
4 bytes
8 bytes
4 bytes
short
int
unsigned
long
long long
float
double
pointer
■
■
■
Alignment within aggregates (structures and unions) is as above, with padding
added if needed.
Aggregates have alignment equal to that of their most aligned member.
Aggregates have sizes which are a multiple of their alignment.
38 ■ Wasabi Software Development Tools User’s Guide
ABI Summary
Subroutine Calls
The following describes the calling conventions for subroutine calls. The first table
outlines the registers used for passing parameters. The second table outlines other
register usage.
Parameter registers:
General-purpose
r0-r3
Register usage:
Volatile
Non-volatile
Frame pointer
Stack pointer
Return address
Program counter
■
■
r0-r3, r12
r4-r10
r11
r13
r14
r15
Structures that are less than or equal to 32 bits in length are passed as values.
Structures that are greater than 32 bits in length are passed as pointers.
Wasabi Software Development Tools User’s Guide ■ 39
Reference
Stack Frame
This section describes the stack frame for the Intel XScale® Microarchitecture:
The stack grows downwards from high addresses to low addresses.
A leaf function does not need to allocate a stack frame if one is not needed.
A frame pointer need not be allocated.
The stack pointer shall always be aligned to 4-byte boundaries.
At a public interface the stack pointer shall always be aligned to 8-byte
boundaries.
The stack pointer always points to the lowest addressed word currently stored on
the stack.
■
■
■
■
■
■
Stack frames for functions that take a fixed number of arguments look like this:
FP
High
memory
Before call:
After call:
Local variables, register
save area, etc.
Local variables, register
save area, etc.
Reserved space for
largest argument list
Arguments on stack
SP
FP
Register save area
Local variables
Alloca allocations
Low
memory
40 ■ Wasabi Software Development Tools User’s Guide
Reserved space for
largest argument list
SP
ABI Summary
Stack frames for functions that take a variable number of arguments look like this:
FP
High
memory
Before call:
After call:
Local variables, register
save area, etc.
Local variables, register
save area, etc.
Reserved space for
largest argument list
Arguments on stack
SP
Save area for anonymous
parms passed in registers
(the size of this area may
be zero)
Register save area
Local variables
FP
Alloca allocations
Low
memory
Reserved space for
largest argument list
SP
Wasabi Software Development Tools User’s Guide ■ 41
Reference
C Language Calling Conventions
Argument Representation
A floating-point value occupies one or two words as appropriate to its type.
Floating-point values are encoded in IEEE 754 format, with the most significant word of
a double having the lowest address.
NOTE When targeting little-endian ARMs, the words that make up a double will be
stored in big-endian order, while the bytes inside each word will be stored in
little-endian order.
The C compiler widens arguments of type float to type double to support inter-working
between ANSI C and classic C.
Char, short, pointer and other integral values occupy one word in an argument list.
Character and short values are widened by the C compiler during argument marshalling.
A structure always occupies an integral number of words (unless this is overridden by
the -mstructure-size-boundry command line option).
Argument List Collation
Argument values are collated in the order written in the source program
The first four words of the argument values are loaded into r0 through r3, and the
remainder are pushed on to the stack in reverse order (so that arguments later in the
argument list have higher addresses than those earlier in the argument list). As a
consequence, a FP value can be passed in integer registers, or even split between an
integer register and the stack.
42 ■ Wasabi Software Development Tools User’s Guide
ABI Summary
Function Return Values
The following sections describe how different data types are returned.
Floats and Integer-like Values
If ATPCS compliancy is enabled (via -matpcs) then any type that is less than 32 bits in
size is zero- or sign-extended to 32 bits and returned in register r0. Any type that is 32
bits in size is returned in register r0. Larger values are returned in memory. The only
exception being doubles and long long integers which are handled as described below.
If ATPCS compliancy is not enabled (this is the default) then the following rules are
obeyed:
Floats and integer-like values are returned in register r0.
A type is integer-like if its size is less than or equal to one word and if the type is a
structure, union or array, then all of its addressable sub-fields must have an offset
of zero.
■
■
For example
struct {int a:8, b:8, c:8, d:8;}
is integer-like, as is
union {int i; char*p;}
but
struct {char A; char B; char c; char D;}
is not, because it is possible to take the address of fields B, C or D, and their
offsets from the start of the structure are not zero.
Doubles and long long Integers
Doubles and long long integers are returned in registers r0 and r1. For doubles r0
always contains the most significant word of the double. For long long values r0 only
contains the most significant word if the target is big-endian.
Other Values
All other values are returned by placing them into a suitably sized area of memory
provided for this purpose by the function’s caller. A pointer to this area of memory is
passed to the function as a hidden first argument, generated at compile time
LargeType t;
t = func(arg);
is implemented as:
LargeType t;
(void) func(&t,arg);
Wasabi Software Development Tools User’s Guide ■ 43
Reference
Assembler
This section describes the features of the GNU Assembler for Intel XScale®
Microarchitecture. For a more complete description of the GNU assembler, see “Using
as” at:
http://www.gnu.org/manual/manual.html
Command Line Options
The following are assembler options for Intel XScale® Microarchitecture:
-mcpu=processor[+extension...]
This option specifies the target processor. The assembler will issue an error
message if an attempt is made to assemble an instruction which will not execute
on the target processor. Permissible processor names are:
arm2
arm60
arm7
arm7di
arm700i
arm7500
arm810
arm920t
arm1020t
xscale
arm250
arm600
arm7m
arm7dmi
arm710
arm7500fe
arm9
arm940t
strongarm
core3
arm3
arm610
arm7d
arm70
arm710c
arm7tdmi
arm9e
arm9tdmi
strongarm110
iwmmxt
arm6
arm620
arm7dm
arm700
arm7100
arm8
arm920
arm10tdmi
strongarm1100
The special name “all” may be used to allow the assembler to accept instructions
valid for any ARM processor.
In addition to the basic instruction set, the assembler can be told to accept various
extension mnemonics that extend the processor using the co-processor instruction
space. For example, -mcpu=arm920+maverick is equivalent to specifying
-mcpu=ep9312. The following extensions are currently supported: +maverick and
+xscale.
-march=architecture[+extension...]
This option specifies the target architecture. The assembler will issue an error
message if an attempt is made to assemble an instruction which will not execute
on the target architecture. The following architecture names are recognized:
armv1, armv2, armv2a, armv2s, armv3, armv3m, armv4, armv4xm, armv4t,
armv4txm, armv5, armv5t, armv5txm, armv5te, armv5texp and xscale.
NOTE If both -mcpu and -march are specified, the assembler will use the setting for
-mcpu.
The architecture option can be extended with the same instruction set extension
44 ■ Wasabi Software Development Tools User’s Guide
Assembler
options as the -mcpu option.
-mfpu=floating-point-format
This option specifies the floating point format to assemble for. The assembler will
issue an error message if an attempt is made to assemble an instruction which will
not execute on the target floating point unit. The following format options are
recognized: softfpa, fpe, fpe2, fpe3, fpa, fpa10, fpa11, arm7500fe, softvfp,
softvfp+vfp, vfp, vfp10, vfp10-r0, vfp9, vfpxd, arm1020t and arm1020e.
In addition to determining which instructions are assembled, this option also
affects the way in which the .double assembler directive behaves when
assembling little-endian code.
The default is dependent on the processor selected. For Architecture 5 or later, the
default is to assembler for VFP instructions; for earlier architectures the default is
to assemble for FPA instructions.
-mthumb
This option specifies that the assembler should start assembling Thumb
instructions; that is, it should behave as though the file starts with a .code 16
directive.
-mthumb-interwork
This option specifies that the output generated by the assembler should be marked
as supporting interworking.
-mapcs [26|32]
This option specifies that the output generated by the assembler should be marked
as supporting the indicated version of the Arm Procedure. Calling Standard.
-matpcs
This option specifies that the output generated by the assembler should be marked
as supporting the Arm/Thumb Procedure Calling Standard. If enabled this option
will cause the assembler to create an empty debugging section in the object file
called .arm.atpcs. Debuggers can use this to determine the ABI being used by.
-mapcs-float
This indicates the the floating point variant of the APCS should be used. In this
variant floating point arguments are passed in FP registers rather than integer
registers.
-mapcs-reentrant
This indicates that the reentrant variant of the APCS should be used. This variant
supports position independent code.
-EB
This option specifies that the output generated by the assembler should be marked
as being encoded for a big-endian processor.
Wasabi Software Development Tools User’s Guide ■ 45
Reference
-EL
This option specifies that the output generated by the assembler should be marked
as being encoded for a little-endian processor.
-k
This option specifies that the output of the assembler should be marked as
position-independent code (PIC).
-moabi
This indicates that the code should be assembled using the old ARM ELF
conventions, based on a beta release release of the ARM-ELF specifications,
rather than the default conventions which are based on the final release of the
ARM-ELF specifications.
Syntax
For a complete description of Assembler syntax, see “Intel XScale® Microarchitecture
Programmers Reference Manual” at:
http://www.intel.com/design/intelxscale/273436.htm
Local Symbol Names
Local symbols help compilers and programmers use names temporarily. They create
symbols which are guaranteed to be unique over the entire scope of the input source
code, and which can be referred to by a simple notation. To define a local symbol, write
a label of the form N: (where N represents any positive integer). To refer to the most
recent previous definition of that symbol write Nb, using the same number as when you
defined the label. To refer to the next definition of a local label, write Nf-- The b stands
for “backwards” and the f stands for “forwards.”
There is no restriction on how you can use these labels, and you can reuse them too. So
that it is possible to repeatedly define the same local label (using the same number N),
although you can only refer to the most recently defined local label of that number (for a
backwards reference) or the next definition of a specific local label for a forward
reference. It is also worth noting that the first 10 local labels (0:...9:) are implemented in
a slightly more efficient manner than the others.
Here is an example:
1:
2:
1:
2:
branch
branch
branch
branch
1f
1b
2f
1b
Which is the equivalent of:
label_1:
label_2:
branch label_3
branch label_1
46 ■ Wasabi Software Development Tools User’s Guide
Assembler
label_3:
label_4:
branch label_4
branch label_3
Local symbol names are only a notational device. They are immediately transformed
into more conventional symbol names before the assembler uses them. The symbol
names stored in the symbol table, appearing in error messages and optionally emitted to
the object file. The names are constructed using these parts:
L
All local labels begin with L. Normally both the assembler (as) and the linker
(ld) forget symbols that start with L. These labels are used for symbols you are
never intended to see. If you use the -L option then the assembler retains these
symbols in the object file. If you also instruct the linker to retain these symbols,
you may use them in debugging.
number
This is the number that was used in the local label definition. Therefore, if the
label is written 55: then the number is 55.
C-B
This unusual character is included so you do not accidentally invent a symbol of
the same name. The character has an ASCII value of \002 (control-B).
ordinal number
This is a serial number to keep the labels distinct. The first definition of 0: gets the
number 1. The 15th definition of 0: gets the number 15, and so on. Likewise the
first definition of 1: gets the number 1 and its 15th defintion gets 15 as well. For
example, the first 1: is named L1C-B1, the 44th 3: is named L3C-B44.
Special Characters
Assembler comments start with the at symbol (@) and extend to the end of the line.
Multiple assembler statements can appear on the same line providing that they are
separated by the semicolon (;) symbol.
Wasabi Software Development Tools User’s Guide ■ 47
Reference
Register Names
These are the register names supported for the Intel XScale® Microarchitecture, in the
format:
{register_name, register_number}
General registers
{r0, 0}
{r4, 4}
{r8, 8}
{r12, 12}
{r1, 1}
{r5, 5}
{r9, 9}
{r13, 13},
{r2, 2}
{r6, 6}
{r10, 10}
{r14, 14},
{r3, 3}
{r7, 7}
{r11, 11}
{r15, 15}
Accumulators
{acc0, 0}
APCS names for the general registers
{a1,
{v1,
{v5,
{sl,
{lr,
0}
4}
8}
10}
14}
{a2,
{v2,
{v6,
{fp,
{pc,
1}
5}
9}
11}
15}
{a3,
{v3,
{sb,
{ip,
2}
6}
9}
12}
{a4,
{v4,
{v7,
{sp,
3},
7},
10},
13},
Floating point registers
{f0,16}
{f1, 17}
{f2, 18}
{f3, 19}
{f4,20}
{f5, 21}
{f6, 22}
{f7, 23}
{c0,32}
{c1, 33}
{c2, 34}
{c3, 35}
{c4,36}
{c5, 37}
{c6, 38}
{c7, 39}
{c8,40}
{c9, 41}
{c10, 42}
{c11, 43}
{c12,44}
{c13, 45}
{c14, 46}
{c15, 47}
{cr0,32}
{cr1, 33}
{cr2, 34}
{cr3, 35}
{cr4,36}
{cr5, 37}
{cr6, 38}
{cr7, 39}
{cr8,40}
{cr9, 41}
{cr10, 42}
{cr11, 43}
{cr12,44}
{cr13, 45}
{cr14, 46}
{cr15, 47}
48 ■ Wasabi Software Development Tools User’s Guide
Assembler
Floating-point
Both the assembler and the compiler support hardware floating-point.
Opcodes
For detailed information on the machine instruction set for Intel XScale®
Microarchitecture, see “Intel XScale® Microarchitecture Programmers Reference
Manual” at:
http://www.intel.com/design/intelxscale/273436.htm
The GNU Assembler (GAS) implements all the opcodes, including both the standard
ARM opcodes and Intel’s extensions.
ARM Machine Directives
The assembler supports the following ARM machine directives:
.align expression [, expression]
This is the generic .align directive. For the ARM however if the first argument is
zero (i.e., no alignment is needed) the assembler will behave as if the argument
had been 2 (i.e., pad to the next four-byte boundary). This is for compatability
with ARM’s own assembler.
name .req register_name
This creates an alias for register_name called name. For example:
foo .req r0
.code [16|32]
This directive selects the instruction set being generated. The value 16 selects
Thumb, and the value 32 selects ARM.
.thumb
This performs the same action as .code 16.
.arm
This performs the same action as .code 32.
.force_thumb
This directive forces the selection of Thumb instructions, even if the target
processor does not support those instructions.
.thumb_func
This directive specifies that the following symbol is the name of a Thumb
encoded function. This information is necessary in order to allow the assembler
and linker to generate correct code for interworking between Arm and Thumb
instructions and should be used even if interworking is not going to be performed.
The presence of this directive also implies .thumb.
Wasabi Software Development Tools User’s Guide ■ 49
Reference
.thumb_set
This performs the equivalent of a .set directive in that it creates a symbol which
is an alias for another symbol (possibly not yet defined). This directive also has
the added property in that it marks the aliased symbol as being a thumb function
entry point, in the same way that the .thumb_func directive does.
.ltorg
This directive causes the current contents of the literal pool to be dumped into the
current section (which is assumed to be the .text section) at the current location
(aligned to a word boundary).
.pool
This is a synonym for .ltorg.
Assembler Error Messages
Error: Unrecognized opcode
This instruction is misspelled or there is a syntax error somewhere.
Warning: operand out of range
An immediate value was specified that is too large for the instruction
50 ■ Wasabi Software Development Tools User’s Guide
Linker
Linker
This section describes features of the GNU Linker for Intel XScale® Microarchitecture.
For a more complete description of the GNU Linker, see “Using ld” at:
http://www.gnu.org/manual/manual.html
Command Line Options
There are no specific linker options for Intel XScale® Microarchitecture.
Interworking Between ARM and Thumb Code
For the ARM, the linker (ld) will generate code stubs to allow functions calls between
ARM and Thumb code. These stubs only work with code that has been compiled and
assembled with the -mthumb-interwork command line option. If it is necessary to link
with old ARM object files or libraries, which have not been compiled with the
-mthumb-interwork option then the --support-old-code command line switch should
be given to the linker. This will make it generate larger stub functions which will work
with non-interworking aware ARM code.
NOTE The linker does not support generating stubs for function calls to
non-interworking aware Thumb code.
The --thumb-entry switch is a duplicate of the generic --entry switch, in that it sets
the program’s starting address. However, it also sets the bottom bit of the address, so that
it can be branched to using a BX instruction, and the program will start executing in
Thumb mode straight away.
Wasabi Software Development Tools User’s Guide ■ 51
Reference
Objdump
This section describes specific features of the GNU binary utility objdump for
Intel XScale® Microarchitecture.
Command Line Switch
A command line switch has been added to objdump. The switch is
--target-data (long version) or -M (short version). The switch takes an argument that
can be any arbitrary piece of text. This text is passed on to the code specific to the target
object file being dumped and can be used to fine tune the dumping for that target.
In the case of Intel XScale® Microarchitecture, the target specific code will look to see
if one of the following names is provided. If they are there, then the corresponding
register name set will be used when displaying a disassembly:
Name
Register Name Set
raw
r0 r1 r2 r3 r4 r5 r6 r7 r8 r9 r10 r11 r12 r13 r14 r15
std
r0 r1 r2 r3 r4 r5 r6 r7 r8 r9 r10 r11 r12 sp
lr
pc
apcs
a1 a2 a3 a4 v1 v2 v3 v4 v5 v6 sl
fp
ip
sp
lr
pc
atpcs
a1 a2 a3 a4 v1 v2 v3 v4 v5 v6 v7
v8
IP
SP
LR
PC
special-atpcs
a1 a2 a3 a4 v1 v2 v3 WR v5 SB SL
FP
IP
SP
LR
PC
The std set is the default register name set.
For example this assembler source code
add r1, r2, r3
when disassembled with the apcs register set specified
objdump -d --target-data=apcs
will produce
00000000 <.text>:
0:
e0821003
add
a2, a3, a4
Whereas, if the same assembler object file is disassembled without specifying a register
set
objdump -d
this output will be produced
00000000 <.text>:
0:
e0821003
add
r1, r2, r3
52 ■ Wasabi Software Development Tools User’s Guide
Objdump
Abbreviations
-M
Can be used instead of --target-data=.
For example:
objdump -d -Mstandard_names add.o
Will also produce:
0:
e0821003
add
r1, r2, r3
-s
Can be used instead of standard_names.
For example:
objdump -d -M-s add.o
Will also produce:
0:
e0821003
add
r1, r2, r3
-a
Can be used instead of apcs_names.
For example:
objdump -d -M-a add.o
Will also produce:
0:
e0821003
add
a2, a3, a4
Only standard_names, apcs_names, -s and -a are recognized. Any other text will
produce an error message.
For example:
objdump -d -Mbleah add.o
Will produce:
Unrecognised target_data: bleah
0:
e0821003
add
a2, a3, a4
Wasabi Software Development Tools User’s Guide ■ 53
Reference
Debugger
This section describes features of the GNU Debugger for Intel XScale®
Microarchitecture. For a more complete description of the GNU Debugger, see the
“GDB User Manual” at:
http://www.gnu.org/manual/manual.html
The debugger can be accessed in two modes, command line, or in GUI mode.
To get the GDB command line, run:
xscale-elf-gdb
To get the graphical version, run:
xscale-elf-insight
There are two ways for GDB to communicate with a target based upon Intel XScale®
Microarchitecture. Each target requires that the program be compiled with a target
specific linker script.
1. Simulator:
GDB’s built-in instruction set simulation of the processor allows the debugging of
programs compiled for the Intel XScale® Microarchitecture without requiring any
access to actual hardware. To debug on the simulator, no specifications file is
required at compile time. To activate the simulator mode in GDB type target
sim. Then use the load command to load the code.
2. Remote target board:
To debug on an actual evaluation board, a board-specific specifications-file must
be included at compilation. For example, the -specs=iq80310.specs compiler
option selects the iq80310.specs file.
Here is a list of Intel® boards, and their required compiler settings
Board
Compiler Settings
80310
-specs=iq80310.specs
80321
-specs=redboot.specs
IWMMXT
-specs=redboot.specs -mcpu=iwmmxt
IXDP425
-specs=redboot.specs -mbig-endian
GRG
-specs=redboot.specs -mbig-endian
To connect to the target board in GDB, using the command
target remote device_name
where device_name will be a serial device such as /dev/ttya (Linux) or com2
(Windows). Then load the code onto the target board by typing load. After being
54 ■ Wasabi Software Development Tools User’s Guide
Debugger
downloaded, the program can be executed.
NOTE When using the remote target, GDB does not accept the run command.
However, since downloading the program has the side effect of setting the PC
to the start address, you can start your program by typing continue, or
jump *start. The jump *start command can be used to rerun the program
when it has continued as well as starting the program from the beginning.
Command Line Options
There are no specific debugger command-line options for Intel XScale®
Microarchitecture.
Wasabi Software Development Tools User’s Guide ■ 55
Reference
Simulator
The simulator can simulate any ARM processor, including processors based upon
Intel XScale® Microarchitecture. The simulator can simulate any ARM instruction,
including the instructions specific to Intel XScale® Microarchitecture. It is not a cycle
accurate simulator, nor is it a board level simulator.
The simulator supports co-processors CP4, CP5, CP13, CP14, and CP15. The simulator
also supports the ARM MMU registers.
The simulator has limited pass through capability to the host operating system. For
example, it is able to simulate basic file operations (including writing to stdout) and
memory allocation. The simulator is theoretically capable of simulating any address
space, providing that memory is available on the host operating system.
Command Line Options
There are no specific simulator command line options for Intel XScale®
Microarchitecture.
56 ■ Wasabi Software Development Tools User’s Guide
A
Bibliography
Intel XScale® Microarchitecture Programmers Reference Manual
http://www.intel.com/design/intelxscale/273436.htm
Using and Porting GNU CC
by Richard M. Stallman (July 1999, GNU Press, ISBN 1-882114-38-8)
Debugging with GDB:The GNU Source-Level Debugger
by Richard M. Stallman, Roland Pesch, Stan Shebs, et al.
(January 2002, GNU Press, ISBN 1-882114-88-4)
StrongARMTDMI Data Sheet
(ARMDDI0029E, Advanced RISC Machines Ltd. (ARM), August, 1995)
System V Application Binary Interface
(Prentice Hall, 1990)
Advanced RISC Machine Architecture Reference Manual
(Prentice Hall, 1996, ISBN 0-13-736299-4)
Wasabi Software Development Tools User’s Guide ■ 57
Bibliography
58 ■ Wasabi Software Development Tools User’s Guide