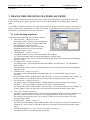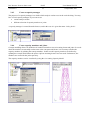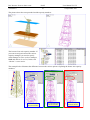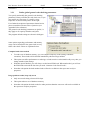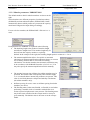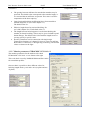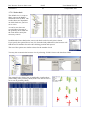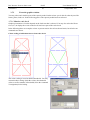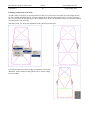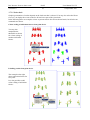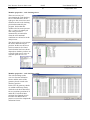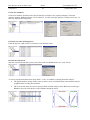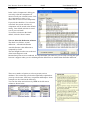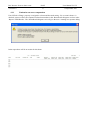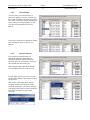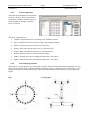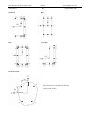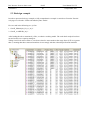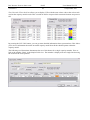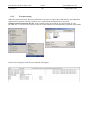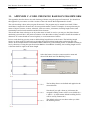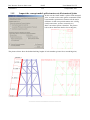
1
TM SESAM USER MANUAL GENIE VOL. IV CODE CHECKING OF BEAMS Concept design and analysis of offshore structures DET NORSKE VERITAS This page is blank for printing TM Sesam User Manual GeniE Vol. IV Code checking of beams Concept design and analysis of offshore structures 15 September 2011 Valid from program version 6.0 Developed and Marketed by DET NORSKE VERITAS DNV Software Report No.: 00-000 / Revision 0, 15 September 2011 Copyright 2011 Det Norske Veritas Software All rights reserved. No part of this book may be reproduced, in any form or by any means, without permission in writing from the publisher. Published by: Det Norske Veritas Software Veritasveien 1 N-1322 HØVIK Norway Telephone: +47 67 57 99 00 Facsimile: +47 67 57 72 72 E-mail, sales: [email protected] E-mail, support: [email protected] Website: www.dnvsoftware.com If any person suffers loss or damage which is proved to have been caused by any negligent act or omission of Det Norske Veritas, then Det Norske Veritas shall pay compensation to such person for his proved direct loss or damage. However, the compensation shall not exceed an amount equal to ten times the fee charged for the service in question, provided that the maximum compensation shall never exceed USD 2 millions. In this provision ―Det Norske Veritas‖ shall mean the Foundation Det Norske Veritas as well as all its subsidiaries, directors, officers, employees, agents and any other acting on behalf of Det Norske Veritas. DET NORSKE VERITAS SOFTWARE Version 6.0 GeniE 1 User Manual Vol. IV 15 September 2011 GeniE User Manual Code checking of beams Version 6.0 Table of Contents INTRODUCTION – CODE CHECKING OF BEAMS........................................................................................ 5 1. 1.1 1.2 1.3 1.4 2. HOW TO READ THIS MANUAL ....................................................................................................................................................... 5 LEARNING FROM TUTORIALS FOR CODE CHECKING ....................................................................................................................... 5 ACRONYMS FREQUENTLY USED IN THE USER MANUAL ................................................................................................................ 7 CODE CHECKING ON LARGE MODELS ........................................................................................................................................... 8 BEAM CODE CHECKING FEATURES OF GENIE .......................................................................................... 9 2.1 2.2 2.3 2.4 CODE CHECKING STANDARDS ...................................................................................................................................................... 9 AVAILABLE CODE CHECKS......................................................................................................................................................... 10 MODEL REQUIREMENTS ............................................................................................................................................................ 12 CODE CHECKING PROCEDURE .................................................................................................................................................... 13 2.4.1 2.4.2 2.4.3 2.4.4 2.4.5 2.4.6 2.4.7 2.4.8 3. A reference model ........................................................................................................................................... 14 Making load combinations .............................................................................................................................. 14 Create a capacity manager ............................................................................................................................. 15 Create capacity members and joints ............................................................................................................... 15 Create code check runs ................................................................................................................................... 16 Compute code checking forces ........................................................................................................................ 17 Perform the code check ................................................................................................................................... 18 Making a code checking report ....................................................................................................................... 19 HOW TO DO BEAM CODE CHECKING ......................................................................................................... 21 3.1 3.2 3.3 CREATE A CAPACITY MANAGER ................................................................................................................................................. 21 DEFINE MEMBER AND JOINTS .................................................................................................................................................... 22 CREATE A CODE CHECK RUN ..................................................................................................................................................... 25 3.3.1 Define global general code checking parameters ........................................................................................... 27 3.3.1.1 3.3.1.2 3.3.1.3 3.3.1.4 3.3.1.5 3.3.1.6 3.3.1.7 3.3.1.8 3.3.2 Define global member parameters .................................................................................................................. 35 3.3.2.1 3.3.2.2 3.3.2.3 3.3.2.4 3.3.2.5 3.3.2.6 3.3.2.7 3.3.2.8 3.3.3 General parameters API WSD 2002&2005 .............................................................................................................. 28 General parameters API LRFD 2003 ........................................................................................................................ 29 General parameters NORSOK N004 ........................................................................................................................ 30 General parameters ISO 19902 2007 ........................................................................................................................ 30 General parameters AISC ASD 2005 ....................................................................................................................... 31 General parameters AISC LRFD 2005 ..................................................................................................................... 32 General parameters EUROCODE 3 EN 1993-1-1 .................................................................................................... 32 General parameters DANISH STANDARD 412 / 449 ............................................................................................. 33 Member parameters API WSD 2002 & 2005 .......................................................................................................... 36 Member parameters API LRFD 2003 ....................................................................................................................... 37 Member parameters NORSOK N004 ....................................................................................................................... 38 Member parameters ISO 19902 2007 ....................................................................................................................... 39 Member parameters AISC ASD 2005 ...................................................................................................................... 40 Member parameters AISC LRFD 2005 .................................................................................................................... 42 Member parameters EUROCODE 3 EN 1993-1-1 ................................................................................................... 43 Member parameters DANISH STANDARD 412 / 449 ............................................................................................ 45 Define global joint parameters ....................................................................................................................... 47 3.3.3.1 3.3.3.2 3.3.3.3 3.3.3.4 3.3.3.5 3.3.3.6 Brace type classification ........................................................................................................................................... 50 Gap classification ..................................................................................................................................................... 51 Load transfer classification ....................................................................................................................................... 51 Through brace classification ..................................................................................................................................... 51 Weld thickness classification .................................................................................................................................... 51 Brace utilisation ........................................................................................................................................................ 51 DET NORSKE VERITAS SOFTWARE Version 6.0 3.4 3.5 3.6 3.7 15 September 2011 Modify local member parameters.................................................................................................................... 52 Modify local joint parameters ......................................................................................................................... 52 CODE CHECKING POSITIONS AND FORCES ................................................................................................................................... 54 PERFORM THE CODE CHECK....................................................................................................................................................... 56 INVESTIGATE THE RESULTS ....................................................................................................................................................... 57 3.7.1 From the browser ............................................................................................................................................ 57 3.7.1.1 3.7.1.2 3.7.2 3.7.3 Member code check .................................................................................................................................................. 57 Joint check ................................................................................................................................................................ 58 From the graphic window. .............................................................................................................................. 59 3.7.2.1 3.7.2.2 Member code check .................................................................................................................................................. 59 Joint check ................................................................................................................................................................ 61 From object property ...................................................................................................................................... 62 3.7.3.1 Detailed results for member check. .......................................................................................................................... 62 3.7.3.2 Detailed results for joint check. ................................................................................................................................ 64 MODIFY AND RE-RUN CODE CHECK ........................................................................................................................................... 67 3.8.1 3.8.2 3.8.3 3.9 4. 2 User Manual Vol. IV LOCAL CODE CHECKING PARAMETERS ....................................................................................................................................... 52 3.4.1 3.4.2 3.8 GeniE Change code checking parameters only .......................................................................................................... 67 Modify structural data without re-running analysis ....................................................................................... 68 Modify structural data and re-run analysis .................................................................................................... 70 MAKE A REPORT ....................................................................................................................................................................... 71 BEAM STRESSES ................................................................................................................................................. 73 4.1 RESULT SELECTION .................................................................................................................................................................. 75 4.1.1 4.1.2 4.1.3 4.1.4 4.1.5 4.1.6 4.2 4.3 5. Limitation on stress computation .................................................................................................................... 77 Select beams .................................................................................................................................................... 78 Select loadcases .............................................................................................................................................. 78 Select component............................................................................................................................................. 79 Select hotspot position..................................................................................................................................... 79 Deflection shape .............................................................................................................................................. 81 GRAPHS.................................................................................................................................................................................... 84 MAXIMUM AND DETAILED VALUES ............................................................................................................................................ 87 REDESIGN ............................................................................................................................................................. 89 5.1 5.2 6. INTRODUCTION ......................................................................................................................................................................... 89 REDESIGN EXAMPLE ................................................................................................................................................................. 90 POST PROCESSING OF SUPERELEMENT RESULTS ............................................................................... 101 6.1 MODELLING AND POST-PROCESSING ........................................................................................................................................ 102 6.1.1 GeniE first level superelements ..................................................................................................................... 103 6.1.1.1 6.1.1.2 6.1.1.3 6.1.1.4 6.1.1.5 6.1.2 6.2 Post-processing ............................................................................................................................................. 107 PROCESS MODELLING IN BRIX EXPLORER ................................................................................................................................ 110 6.2.1 6.2.2 Make the flowchart ........................................................................................................................................ 110 Execute the flowchart .................................................................................................................................... 111 6.2.2.1 6.2.2.2 6.2.2.3 6.2.2.4 6.2.2.5 6.2.2.6 7. 7.1 7.2 Define the superelement number ............................................................................................................................ 103 Make the finite element model ............................................................................................................................... 104 Export the finite element model ............................................................................................................................. 104 Make the global load combinations – combine results in Prepost .......................................................................... 105 Make the global load combinations – all combinations done in Presel .................................................................. 106 Run GeniE .............................................................................................................................................................. 111 Run Presel .............................................................................................................................................................. 112 Run Sestra .............................................................................................................................................................. 112 Run Prepost ............................................................................................................................................................ 113 Re-use a GeniE activity to do post processing ........................................................................................................ 113 Run Xtract .............................................................................................................................................................. 113 EXECUTION OF GENIE ................................................................................................................................... 115 PROGRAM ENVIRONMENT ....................................................................................................................................................... 115 FILES CREATED DURING CODE CHECKING................................................................................................................................. 115 8. DIALOG DESCRIPTION ................................................................................................................................... 117 8.1 CODE CHECKING MENUS FROM THE BROWSER .......................................................................................................................... 117 8.1.1.1 Make a new capacity manager ................................................................................................................................ 117 8.1.1.2 Make capacity members ......................................................................................................................................... 117 DET NORSKE VERITAS SOFTWARE Version 6.0 8.2 8.3 9. GeniE 3 User Manual Vol. IV 15 September 2011 8.1.1.3 Create joints............................................................................................................................................................ 117 8.1.1.4 Add a run ................................................................................................................................................................ 118 8.1.1.5 Generate code checking forces ............................................................................................................................... 119 8.1.1.6 Execute the code check........................................................................................................................................... 119 8.1.1.7 Set a code check run to active ................................................................................................................................ 119 8.1.1.8 Edit a code check description ................................................................................................................................. 119 8.1.1.9 Save a code check report ........................................................................................................................................ 120 8.1.1.10 Delete ..................................................................................................................................................................... 120 CODE CHECKING MENUS FROM THE GRAPHICAL WINDOW ......................................................................................................... 120 8.2.1.1 Properties................................................................................................................................................................ 121 8.2.1.2 Labels ..................................................................................................................................................................... 121 8.2.1.3 Colour coding the results ........................................................................................................................................ 121 CODE CHECKING MENUS FROM THE PULLDOWN MENU .............................................................................................................. 122 8.3.1.1 Specify the colour coding of code check results ..................................................................................................... 122 8.3.1.2 Specify the line width of capacity members ........................................................................................................... 123 APPENDIX A: REFERENCES .......................................................................................................................... 125 10. APPENDIX B: CODE CHECKS AND NOMENCLATURE ...................................................................... 127 10.1 10.2 THE CHECKS PERFORMED ........................................................................................................................................................ 127 NOMENCLATURE .................................................................................................................................................................... 128 11. APPENDIX C: CODE CHECKING BASED ON FRAMEWORK ............................................................ 129 11.1 11.2 11.3 11.4 11.5 IMPORT THE MODEL USING FINITE ELEMENT NUMBERING.......................................................................................................... 132 GENERATE MEMBERS IN FRAMEWORK ..................................................................................................................................... 132 IMPORT THE MODEL USING CONCEPT NAMES, NO SPLIT OF STRUCTURE ...................................................................................... 133 IMPORT THE CONCEPT MODEL, SPLIT STRUCTURE AT REINFORCED STRUCTURAL JOINTS ............................................................. 134 IMPORT THE CONCEPT MODEL, SPLIT STRUCTURE AT ALL STRUCTURAL JOINTS .......................................................................... 135 DET NORSKE VERITAS SOFTWARE Version 6.0 GeniE 4 This page is blank for printing User Manual Vol. IV 15 September 2011 DET NORSKE VERITAS SOFTWARE GeniE Version 6.0 5 User Manual Vol. IV 15 September 2011 1. INTRODUCTION – CODE CHECKING OF BEAMS This is the user manual for the part of GeniE dedicated to code checking of beams on offshore as well as onshore structures. In addition, stress calculations and presentations are covered. This user manual assumes that the user has knowledge in the use of GeniE as covered by the GeniE User Manual Volume I and II – the main user manual and the one describing how to run analysis including wave loads and structure-pile-soil interaction. This manual describes how to create a capacity model (or code checking model), how to perform the code checking as well as how to report the results. Chapter 2 gives an overview while Chapter 3 contains a more detailed description on the code checking. Chapter 4 and 5 give examples on how to present beam stresses and how to do post processing of imported results from a super element analysis. 1.1 How to read this manual Read Chapter 2 ―Beam code checking features of GeniE” to get an overview on code checking features of GeniE (what you can do). Read Chapter 3 ―How to do beam code checking” to learn how to set up a capacity model, perform the code checks and how to report the results. Read Chapter 4 and 5 ―Beam stresses” and ―Post-processing of super-element results‖ to learn how to document beam stresses as well as to import results from a super-element analysis to do post-processing like e.g. code-checking. Read Chapter 6 Execution of GeniE for information on files associated with GeniE – focus is on the files generated during code checking. Read Chapter 7 Command Description for a detailed documentation of relevant commands for code checking (pull down menus, tool buttons, and context sensitive menus). A command from the menu list (also referred to as the pulldown menu) is written like this: Insert|Beam|Dialog. The name of a tool button is written like this: Basic plate. A function buttons is referred to like this: F1. GeniE comes with a context sensitive menu. You invoke this menu by pushing your right mouse button when the mouse is located above a selected object. In this manual this operation is termed RMB. The commands on the context sensitive menu are written like this: Join Beams. It is particularly noted that this User Manual1 documents all capabilities of GeniE. If you do not have access to the program extension ―Code checking of beams (CCBM)‖ there are several items in this manual you do not have access to in your program. These features are blanked out in your program version. 1.2 Learning from tutorials for code checking GeniE comes with an on-line help system (Help|Help Topics or F1). Its purpose is to provide easy access to release notes, limitations, tutorials, wizards and this user manual. In addition it contains a detailed documentation of all available commands in the journalling system (based on J-script). There are also videos showing how to do certain operations, these are best viewed using resolution 1280x1024. The easiest way to find the tutorials is from GeniE‘s help page. For code checking the most relevant tutorials are called ―Member code check‖ and ―Jacket with tubular joints‖. 1 Adobe Acrobat Reader version 8.0 is recommended. DET NORSKE VERITAS SOFTWARE Version 6.0 GeniE 6 User Manual Vol. IV 15 September 2011 The most efficient way to work with the tutorials is to make a print-out of the tutorials, start GeniE, create a new workspace (command File|New workspace) and follow the steps in the tutorial. Each tutorial comes with a pre-defined journal file (command file) – you find these from the help page as shown above under ―Input Files‖. If you want to use these files the steps are as follows: 1. Create a new workspace File|New Workspace|<name> (Keep the default settings for tolerant modelling and database units) 2. Read in the journal file from File|Read Command File|<browse until you find the desired input file> 3. Save your model by File|Save 4. You have now created the same model as in the tutorial you selected. In the example below the <name> has been set to CC_Beams and the imported file is for the tutorial ―Member code check‖. DET NORSKE VERITAS SOFTWARE GeniE Version 6.0 7 User Manual Vol. IV 15 September 2011 The sequence above creates the following view in GeniE (the colour background has been set to white and the view is set to ―Capacity Models‖: You may also read in a journal file by using drag-and-drop. Simply select a journal file from your browser and drop it into the command line window. 1.3 Acronyms frequently used in the User Manual Acronym Explanation RMB Right Mouse Button LMB Left Mouse Button GUI Graphical User Interface DOF Degree Of Freedom CLI Command Line Interface LJF Local Joint Flexibility FEM file Sesam Input Interface File – a formatted ASCII model/load file SIN file Sesam Interface NORSAM – a direct accessible result file Brix Explorer Brix Explorer configured for Sesam DET NORSKE VERITAS SOFTWARE GeniE Version 6.0 8 User Manual Vol. IV 15 September 2011 1.4 Code checking on large models The member code check result database is very big. For a large model it can reach several gigabytes in size. Earlier version including V5.3-10 have stored the results in memory and saved them to disk when you saved your workspace. This put a significant limitation to the number of capacity checks that could be stored in a single workspace. The memory limitation for the in-memory database is 2GB on a 64bit version of Windows. From GeniE V5.4, the code check results are stored on disk in a file based database based on HDF5 technology. What this means is that you are able to code check much larger models than in the previous versions. The code check results files are stored under <Workspace Folder>/<CapacityManagerName>/<RunDescription>.h5 These files are part of the database, and must be included if you want to copy the workspace folder. DET NORSKE VERITAS SOFTWARE Version 6.0 GeniE 9 User Manual Vol. IV 15 September 2011 2. BEAM CODE CHECKING FEATURES OF GENIE Code checking of beams based on the results from a linear structural analysis can be done in GeniE. The features include checks against allowable stress levels, member stability and punching shear of tubular joints. You should be familiar with the relevant rules and procedure of the type of code checking you want to do as this user manual is not intended to cover such. For example, if you want to do a code checking according to the API rules you should know this code of practice. 2.1 Code checking standards GeniE supports the following code checking standards: API-WSD 2002 – Offshore structures For tubular profiles: American Petroleum Institute RP 2A-WSD (21st edition December 2000, Errata and Supplement 1, December 2002) For non-tubular profiles: American National Standard; Specification for Structural Steel Buildings‖, March 9, 2005 API-WSD 2005 – Offshore structures For tubular profiles: American Petroleum Institute RP 2A-WSD (21st edition December 2000, Errata and Supplement 2, October 2005) For non-tubular profiles: American National Standard; Specification for Structural Steel Buildings‖, (March 9, 2005) API-LRFD 2003 – Offshore structures For tubular profiles: American Petroleum Institute LRFD (1st Edition/July 1, 1993/ Reaffirmed, May 16, 2003) For non-tubular profiles: American National Standard; Specification for Structural Steel Buildings‖, (March 9, 2005) NORSOK 2004 - Offshore structures. For tubular profiles: NORSOK STANDARD N-004, Rev. 2, October 2004, Design of steel structures For non-tubular profiles: EUROCODE 3, EN 1993 Part 1-1: General rules and rules for buildings. It is also possible to select the preferences according to the Norwegian National Annex, 2006 ISO 19902 2007 - Offshore structures. For tubular profiles: INTERNATIONAL STANDARD ISO 19902, Petroleum and natural gas industries — Fixed steel offshore structures (First edition 1 December 2007) For non-tubular profiles: EUROCODE 3, EN 1993 Part 1-1: General rules and rules for buildings. It is also possible to select the preferences according to the Norwegian National Annex, 2006 AISC 2005 – Onshore structures For tubular and non-tubular profiles: American National Standard; Specification for Structural Steel Buildings‖, March 9, 2005. The check covers design/utilisation of members according to the provisions for Load and Resistance Factor Design (LRFD) or to the provisions for Allowable Strength Design (ASD). EUROCODE 3 – Onshore structures For tubular and non-tubular profiles: EUROCODE 3, EN 1993 Part 1-1: General rules and rules for buildings. It is also possible to select the preferences according to the Norwegian National Annex, 2006. DANISH STANDARD 412 / 449 – Onshore and Offshore structures For tubular profiles only in both DS 412 and DS 449 DET NORSKE VERITAS SOFTWARE Version 6.0 GeniE 10 User Manual Vol. IV 15 September 2011 For references to each code check standard, please consult Appendix A. Code checking using older code check revisions may also be done using the Sesam Framework module. For further references, please consult Appendix C. 2.2 Available code checks The code checks available are as follows: • Member check • Hydrostatic collapse • Punching shear • Conical transition A member check of a frame structural member is performed to assess whether the member is subjected to acceptable stress levels. This check is performed through the use of the equations presented in the various code checking standards. These equations deliver results – the usage factor – according to capacity of the cross-sections and capacity taking into account the potential failure due to buckling phenomena. If this usage factor is less than 1.0 then the member is regarded to be ―safe‖. If the usage factor is greater than 1.0 then the member is ―overloaded‖ and this is highlighted by the program. A member check is by default performed at five positions; at the two ends of the member, the midpoint and at the quart positions. In addition, additional code checking positions are determined based on variations in section profiles or materials (like in a segmented member) or where the maximum moments (in-plane and out-of- plane) occur. This means that the code checking positions may vary from load case to load case. A hydrostatic collapse check is performed to assess the member induced stresses due to the action of hydrostatic pressure and other externally applied loads. This check is for relevant standards integrated with the member check (see next page). A punching shear check is performed on the brace member at a joint to assess the shear through the chord. As for the other checks this assessment is made through the use of a ‗punching shear interaction equation‘ which delivers a usage factor. The punching shear check is performed for all braces at selected joints. A cone check is performed to assess the stresses in the transition between cone and cylinder. As for the other checks this assessment is made through the use of a ‗conical transition interaction equation‘ which delivers a usage factor. The cone check is performed for cylinder and cone at both ends of the conical transition. This check is for relevant standards integrated with the member check (see next page). Section types that may be code checked are: Tubular sections (PIPE) Symmetrical/un-symmetrical I or H sections (I) Channel sections (CHAN) Box sections (BOX) Massive bar sections (BAR) Angle sections (L) General sections (GENE) DET NORSKE VERITAS SOFTWARE Version 6.0 GeniE User Manual Vol. IV 11 15 September 2011 The table below shows the type of check that may be performed for each code of practice and the section type that may be processed. Code of practice API-WSD 2002 including AISC ASD 2005 API-WSD 2005 including AISC ASD 2005 API-LRFD 2003 including AISC LRFD 2005 NORSOK 2004 including EUROCODE 3 (EN 1993-1-1) ISO 19902 1997 including EUROCODE 3 (EN 1993-1-1) Check Member section PIPE I CHA BOX BAR L GEN Member API AISC AISC AISC AISC AISC AISC Punching shear API Hydrostatic collapse API Conical transition API Member API AISC AISC AISC AISC AISC AISC Punching shear API Hydrostatic collapse API Conical transition API Member API AISC AISC AISC AISC AISC AISC Punching shear API Hydrostatic collapse API Conical transition API Member NOR EUR EUR EUR EUR EUR EUR Punching shear NOR Hydrostatic collapse NOR Conical transition NOR Member ISO EUR EUR EUR EUR EUR EUR Punching shear ISO Hydrostatic collapse ISO Conical transition ISO AISC ASD 2005 Member AISC AISC AISC AISC AISC AISC AISC AISC LRFD 2005 Member AISC AISC AISC AISC AISC AISC AISC EUROCODE 3 (EN 1993-1-1) Member EUR EUR EUR EUR EUR EUR EUR DANISH STANDARD 412/449 Member DS412 DS449 DET NORSKE VERITAS SOFTWARE GeniE Version 6.0 12 User Manual Vol. IV 15 September 2011 2.3 Model requirements When modelling the structure some of the data needed for the punching shear code check is defined. These are (for references please consult User Manual Vol. I under Tubular joint modelling): Modelling of tubular joints including: o Automatic (or explicit) definition of CAN reinforcement assigned to a chord o Automatic (or explicit) definition of STUB reinforcement assigned to a brace o Automatic (or explicit) definition of CONES assigned to transitions between CAN/CHORD and STUB/BRACE o Automatic (or explicit) assignment of plane-wise gaps Definition of different yield strength at different parts of the structure to account for differences in the grade of steel. Yield strength is defined through a material property For a member code check it is necessary to assign the buckling length – or by use of effective length factors – to a member to consider in-plane and out-of-plane buckling effects. In addition it is possible to account for secondary moments due to axial loads in buckling calculations by explicitly assignment of moment amplification factors or by using factors as recommended by the various codes of practices. The other code specific code check parameters are described in Appendix B. Load combinations may be defined before or after finite element analysis. When using the API-WSD code checks you should denote the loadcases with design conditions ―Operating‖, ―Storm‖ or ―Earthquake‖ to automatically increase the allowable stresses (0%, 33.3% and 70% respectively). API-LRFD and ISO 19902 use this design condition to specify the load factor for hydrostatic pressure. The AISC code includes safety factors for fabrication method. Notice that all cross sections are as default set to fabrication status ―Unknown‖. Unknown is in the code check treated as Built-up (Welded). Cross sections imported from the section libraries are also set to status ―Unknown‖. DET NORSKE VERITAS SOFTWARE Version 6.0 GeniE 13 User Manual Vol. IV 15 September 2011 2.4 Code checking procedure A typical procedure adopted for a member and/or punching shear code check analysis may be as follows: Modelling of material, sections, structure, loads and boundary conditions. If relevant, the modelling also comprises the environment (wind, waves and current), the piles and the soil. If you want to perform a punching shear of tubular joints you need to insert joints and complete the tubular joint modelling (can, stub, cone, plane-wise gap). Run the finite element analysis. If the structure is subjected to water and has pile/soil it is necessary to include wave load analysis and pile/soil/structure analysis. These options are pre-defined activities you can select from when setting up your analysis. Define relevant load combinations if they were not part of the above analysis. Create a capacity manager(s). You decide which analysis you want to base the code checking on. You may have several capacity managers – each capacity manager may have one set of member and joints. These may be selected from the whole structure or from named sets Define the members and joints. When defining the members the global default buckling length of each member is assigned. For members you define how to split continuous concept members into code checking members. Create a code check run. The purpose of this task is to decide which code of practice to use, which loadcases to include and to specify other global factors like e.g. moment amplification factors or other safety factors. You also specify what you want to do - member code check and/or punching shear check Assign local details to individual beams, typically another buckling length compared to the rest of the model. Compute the code checking forces. These are computed at pre-defined positions (at ends, in middle and at quarter positions), at positions where material or section properties change (like in segmented beams) or where maximum in-plane and out-of-plane moments occur. Perform the code check and investigate the results graphically or from the browser. If necessary modify sections, materials or other code checking parameters and re-run. Make a report using the report generator and include pictures to it. The granularity of the report depends on how much details you want to add to it. There are several filters you can use to decide the content. The above procedural steps from creating the capacity manager are illustrated in the following using the tutorial ―Jacket with tubular joints‖. A detailed description of each step is explained in the next Chapter. DET NORSKE VERITAS SOFTWARE Version 6.0 2.4.1 GeniE 14 User Manual Vol. IV 15 September 2011 A reference model A reference model has been created by reading in the journal file part of the tutorial ―Jacket with tubular joints‖. The purpose of this tutorial is to create a capacity model to do member and punching shear code checks, hence the model has tubular joints with cans, stubs, cones and gaps. The reference model has one analysis activity called ―PSI‖. The red balls indicate where joints have been defined – these are also the positions where the punching shear will be performed. The colour coding indicates the cans and the stubs. 2.4.2 Making load combinations The reference model has a number of basic loadcases (manually applied as well as wave loads) and load combinations. In this case, four load combinations have been made after the analysis (North_ULS, East_ULS, South_ULS, West_ULS) by combining other loadcases or load combinations and apply load factors to each of them. Each of the four load combinations have been assigned design condition ―Storm‖. The picture to the right shows displacements for the jacket part for load combination South_ULS. As can be seen, the deformed shape may be displayed on top of the un-deformed shape (or alone), for quick evaluation of displacement results. DET NORSKE VERITAS SOFTWARE Version 6.0 2.4.3 GeniE User Manual Vol. IV 15 15 September 2011 Create a capacity manager The purpose of a capacity manager is to decide which analysis results to use in the code checking. You may have several capacity managers if you want to use various analysis results different selection of capacity members or joints A capacity manager is created from the browser, and in this case it is given the name ―Code_check‖. 2.4.4 Create capacity members and joints Concept modelling allows for definition of continuous members across incoming beams and joints. In a code check the members are normally not the same as the concept model, hence it is necessary to define the capacity members by splitting the concept members. In this case the capacity members are defined by splitting the concept model where the option ―Split at incoming beams‖ has been used. Furthermore, the members are created for the jacket part only. The capacity members can be visualised by using the view setting Capacity Model DET NORSKE VERITAS SOFTWARE Version 6.0 GeniE 16 User Manual Vol. IV 15 September 2011 The capacity joints are defined similarly and the capacity model now contains the joints: 2.4.5 Create code check runs When you define a code check run you decide which code of practice, member and/or punching shear code check and global code checking parameters, i.e. valid for the complete capacity model (these may be overruled by local parameters). In this case two different code check runs are defined; one for member code check only and the other for the punching shear. The code check runs for members and joints assume using API WSD 2005 and four loadcases as indicated. All other parameters are using program defaults. You learn how to modify the defaults in the next Chapter. DET NORSKE VERITAS SOFTWARE Version 6.0 GeniE 17 User Manual Vol. IV 15 September 2011 The code check runs are now available in the browser – the browser will be used when looking at the code checking results later. 2.4.6 Compute code checking forces The finite element analysis will compute forces and moments in the ends of each finite element (and the middle node if 2nd order straight beam elements are used). For the code checking it is necessary to compute the forces for other positions. The code checking positions are automatically determined by GeniE as follows: At beam ends, at quarter and middle positions At positions where there is a change in section or material properties like in a segmented member At positions where maximum in-plane and out-of-plane moments occur This means that the positions may vary from load case to load case. The code checking forces are computed from the browser and it must be done for all code check runs. DET NORSKE VERITAS SOFTWARE Version 6.0 2.4.7 GeniE 18 User Manual Vol. IV 15 September 2011 Perform the code check The code checks for member and punching shear can now be done from the browser (remember to specify which code check run is active). Below is shown how to start the code check and the associated results in the browser and a colour coded view. If you have several code check runs, you may compute the forces and execute the code checks for all your runs from the ―All Runs‖ folder. To make a colour coded view of the utilisation factors, simply select all capacity members, RMB and select ColorCode|Results|UfTot. DET NORSKE VERITAS SOFTWARE Version 6.0 GeniE 19 User Manual Vol. IV 15 September 2011 Similarly for the punching shear check: The next Chapter describes in detail how you can interrogate each result. 2.4.8 Making a code checking report The report generator comes with templates to easily generate reports for viewing in text format (typically by using MS Notepad), html format (typically from an internet browser), spreadsheet (MS Excel) or formatted report (MS Word).You may use filters to limit the amount of data that is reported. Furthermore, your report settings may be saved so that you easily can recreate the same report in another code checking run. DET NORSKE VERITAS SOFTWARE Version 6.0 GeniE 20 User Manual Vol. IV 15 September 2011 When you have added the Chapter ―Frame Code Check‖ to your report it is possible to use the filters to specify the content you want. This example uses the default report settings except for the limit of 0.5 for the lower utilisation factor. A typical page of a report when viewing it in MS Word is shown to the right. DET NORSKE VERITAS SOFTWARE Version 6.0 GeniE 21 User Manual Vol. IV 15 September 2011 3. HOW TO DO BEAM CODE CHECKING This Chapter will guide you through the steps which are necessary to do code member code checking or a punching shear check. Two reference cases will be used; one topside model (for member code check) and a jacket (for punching shear check). The following procedure may be used when performing code checks; each is described in detail except for the four first steps (please consult the User Manual Vol. I or III for guidance). Make a frame model. Plates may be included – they are disregarded in the code check. Perform tubular joint modelling if you want to do a punching shear check. Run the finite element analysis Define relevant load combinations if they were not part of the above analysis. Create a capacity manager Define the members and joints Create a code check run Assign specific settings to individual members and joints Compute the code checking forces Perform the code check and investigate the results graphically or from the browser. If necessary modify sections, materials or other code checking parameters and re-run. Make a report 3.1 Create a capacity manager The purpose of a capacity manager is to decide which analysis results to use in the code checking. It is possible to have several analysis activities in GeniE where you can have different loadcases as well as analyse subsets of your model. To be able to do code checking you need to define multiple capacity managers referring to the different analysis in question. A capacity manager is created from the browser, and in this case three capacity managers are defined to account for three different analyses. DET NORSKE VERITAS SOFTWARE Version 6.0 GeniE 22 User Manual Vol. IV 15 September 2011 You may add additional description to each of the capacity managers. The description is also shown in the browser. When making a report, the descriptions are also documented. 3.2 Define member and joints When modelling a concept model it is possible to make continuous members that span several joints. This means that the concept model is different from a member capacity model which normally spans between two joints only. It is therefore necessary to split up the concept model into a member capacity model. When the model is split or kept, the default buckling lengths are set since they are the same as the length of a capacity member. In this example the subset ―Complete_Jacket‖ will be subject to the code checking. Furthermore, the continuous beams are split into capacity members where there are incoming beams to the continuous beam. The naming convention of capacity members refer to the beams. If beam BM25 is split into two capacity members they are denoted member(BM25,1) and member(BM25,2). DET NORSKE VERITAS SOFTWARE Version 6.0 GeniE User Manual Vol. IV 23 15 September 2011 The pictures show the concept model and the capacity members. The browser lists each capacity member. If you want to navigate between the various capacity managers you need to specify which manager is active (select a manager, RMB and choose Set Active). In this case ―Check1‖ is set to active. The example below illustrates the difference between the various options of splitting the beams into capacity members. 1 member per structure beam 12 members per structure beam 4 members per structure beam DET NORSKE VERITAS SOFTWARE Version 6.0 GeniE 24 User Manual Vol. IV 15 September 2011 In order to make joints subjected to punching shear check, the concept model must contain joint definitions. The effects of reinforcement types like can and stubs are also accounted for. If plane-wise gap calculations have been performed, the gap values are per default used in the punching shear check. The example below shows the jacket part with a total of 20 joints – each of them has cans and stubs assigned and a plane-wise gap calculation has been performed. The capacity model has both members and joints as shown in the picture to the right – remember to use the view called Capacity Models. The browser lists both joints and members as seen below. DET NORSKE VERITAS SOFTWARE Version 6.0 GeniE 25 3.3 Create a code check run During the definition of code check runs you decide which code of practice to use which loadcases to use global code checking parameters (i.e. those who apply to the entire capacity model) – for example buckling lengths or safety factors The code check run is defined from the browser. In the example to the right the code check API WSD 2005 has been selected. This code check will not include joints; hence this option is deselected. Furthermore, the two loadcases Comb1 and Comb2 have been added to the code check run. User Manual Vol. IV 15 September 2011 DET NORSKE VERITAS SOFTWARE Version 6.0 GeniE 26 User Manual Vol. IV 15 September 2011 You may modify the code check run from the browser and define additional information to the run. The same procedure may be used to create another code check run, typically for joints only. The only difference is that you deselect members as shown on the picture and specify another description to the run. There are now two code check runs (Check1.run(1) and Check1.run(2)) for the capacity manager ―Check1‖. You specify which one is active from the browser: DET NORSKE VERITAS SOFTWARE Version 6.0 3.3.1 GeniE 27 User Manual Vol. IV 15 September 2011 Define global general code checking parameters You specify and modify the general code checking parameters when you define the code check run, or you may modify at a later stage. To modify, select Properties as shown on the picture to the right. For a further description of parameters shown herein, please consult the relevant codes of practices (see Appendix B for references). The general code checking parameters are global, i.e. they apply to all capacity members and joints. The program default settings are shown in dialogues. Some options regarding performance and memory usage can be found below the general tab in every frame code check. These are explained below. Compute loads when needed To reduce use of database memory, you can compute temporary loads (during codecheck execution). These loads will be deleted immediately when no longer needed. This option can affect performance on redesign, as loads must be recalculated locally every time you change member/joint settings. With this option checked, you will always use the latest FEM loads. When unchecked, you will use the FEM loads retrieved the last time you used ―Generate Code Check Loads‖. Note that with option checked member loads will not be available in the report nor in object properties. Purge position results, keep only worst Only worst result along a beam will be kept. This option reduces use of database memory. Note that with option checked results for other positions than the worst one will not be available in the report nor in object properties. DET NORSKE VERITAS SOFTWARE Version 6.0 GeniE 28 3.3.1.1 General parameters API WSD 2002&2005 The general parameters for the offshore code check API WSD 2002 as well as for API WSD 2005 are shown to the right. These code checks include AISC ASD 2005 for non-tubular members. User Manual Vol. IV 15 September 2011 DET NORSKE VERITAS SOFTWARE GeniE Version 6.0 29 User Manual Vol. IV 15 September 2011 3.3.1.2 General parameters API LRFD 2003 The general member parameters for the offshore code check API LRFD 2003 are shown to the right. This code check include AISC LRFD 2005 for non-tubular members. The general joint parameters for the offshore code check API LRFD 2003 are shown to the left. DET NORSKE VERITAS SOFTWARE GeniE Version 6.0 30 3.3.1.3 General parameters NORSOK N004 The general parameters for the offshore code check NORSOK N004 are shown to the right. This code check includes EUROCODE 3 EN 1993-1-1 2005 for non-tubular members. 3.3.1.4 General parameters ISO 19902 2007 The general member parameters for the offshore code check ISO 19902 2007 are shown to the right. This code check includes EUROCODE 3 EN 1993-1-1 2005 for non-tubular members. User Manual Vol. IV 15 September 2011 DET NORSKE VERITAS SOFTWARE GeniE Version 6.0 31 The general joint parameters for the offshore code check ISO 19902 2007 are shown to the right 3.3.1.5 General parameters AISC ASD 2005 The general parameters for the onshore code check AISC ASD 2005 are shown to the right. User Manual Vol. IV 15 September 2011 DET NORSKE VERITAS SOFTWARE GeniE Version 6.0 User Manual Vol. IV 32 15 September 2011 3.3.1.6 General parameters AISC LRFD 2005 The general parameters for the onshore code check AISC LRFD 2005 are shown to the right. 3.3.1.7 General parameters EUROCODE 3 EN 1993-1-1 The general parameters for the onshore code check EUROCODE 3 EN 1993-1-1 2005 are shown to the left. The national annexes may be chosen from Standard, Norwegian, Danish Normal and Danish Stricter while Interaction factors vary from Method1 and Method2. The Standard annex uses factors M0 and M1: The Norwegian annex uses factors M0 and M1: The Danish annex Control Extent Normal uses factors M0 and M1: The Danish annex Control Extent Stricter uses factors M0 and M1: DET NORSKE VERITAS SOFTWARE Version 6.0 GeniE 33 3.3.1.8 General parameters DANISH STANDARD 412 / 449 The general parameters for the Danish Standard (DS) 412/449 are shown to the right. DS412 and DS449 are both made for handling tubular sections only. Danish Standard Section: DS 412 – Onshore structures DS 449 – Offshore structures Safety Class The default DS partial coefficients can be seen at the bottom of the dialog. Note that these are not the same for DS 412 and DS 449. We will first have a look at the settings for DS 449. You can change the default partial coefficients. An example is shown in the illustration to the right If you check off ―Tabular values‖, the choices under ―Safety Class‖ and ―Control Material‖ decide which partial coefficients that will be used. Note that the setting we just changed (Fy) is back at the value decided by the tabular values settings. User Manual Vol. IV 15 September 2011 DET NORSKE VERITAS SOFTWARE GeniE Version 6.0 34 If we, as an example, change the control material from ―Normal‖ to ―Strict‖ by clicking the radio button, the partial coefficients change according to the new tabular values settings. The settings for DS 412 are similar to the settings for DS 449, but there are a couple of differences: DS 412 has a ―Low‖ safety class. There are no Tg (punching strength) for DS 412 since this standard do not support joints. User Manual Vol. IV 15 September 2011 DET NORSKE VERITAS SOFTWARE Version 6.0 3.3.2 GeniE 35 User Manual Vol. IV 15 September 2011 Define global member parameters The global member parameters (those who apply to the all capacity members) may be changed from default values when you define the code check run or later. The default values are shown in the following for each code check alternative. Some options regarding axial compression and bending can be found below the member tab in all the frame code checks except Danish standard and Eurocode. These are explained below. Axial compression and bending - Bending Moment Option Max Bending Moment This option selects the maximum bending moments along a capacity member derived by the effect of moment gradient, Cm. This method is considered to be best practise. Local Bending Moment This option uses the local bending moments at every code check positions. DET NORSKE VERITAS SOFTWARE Version 6.0 GeniE 36 3.3.2.1 Member parameters API WSD 2002 & 2005 The default member data for tubular members are shown to the right. Notice that there are different properties for tubular members (API WSD) and non-tubular members (AISC). GeniE will automatically detect which profiles are present in the capacity model. For non-tubular members, the AISC ASD 2005 is used. Each parameter for API WSD 2002 & 2005 is explained in the following. The buckling length is the product of member length and effective length factor. The member length may be derived from the capacity member or explicitly defined. In the example to the right, the buckling length equals 5 m times 0.8 = 4 m. The moment amplification allows for explicit or automatic calculation of moment amplification reduction factors, to account for secondary moments due to axial loads in buckling calculations. For tubular members the automatic calculations may be in accordance with API formulas A, B or C. You may also specify the moment amplification factor manually. The spacing between ring stiffeners for tubular and conical members may be specified. The default value corresponds to the member length, i.e. it is assumed that no internal ring stiffeners are present. This value is used for hydrostatic collapse and stability calculations (for tubular members only). The flooding status (either non-flooded, or flooded) is used when performing a member check of a member with tubular cross section exposed to hydrostatic water pressure. The flooding status may be the same as defined in the concept model or it may be given manually. The default value is the same as in the concept model. User Manual Vol. IV 15 September 2011 DET NORSKE VERITAS SOFTWARE GeniE Version 6.0 37 3.3.2.2 Member parameters API LRFD 2003 The default member data for tubular members are shown to the right. Notice that there are different properties for tubular members (API WSD) and non-tubular members (AISC). GeniE will automatically detect which profiles are present in the capacity model. For non-tubular members, the AISC LRFD 2005 is used. Each parameter for API LRFD is explained in the following. The buckling length is the product of member length and effective length factor. The member length may be derived from the capacity member or explicitly defined. In the example to the right, the buckling length equals 5 m times 0.8 = 4 m. The moment amplification allows for explicit or automatic calculation of moment amplification reduction factors, to account for secondary moments due to axial loads in buckling calculations. For tubular members the automatic calculations may be in accordance with API formulas A, B or C. You may also specify the moment amplification factor manually. The spacing between ring stiffeners for tubular and conical members may be specified. The default value corresponds to the member length, i.e. it is assumed that no internal ring stiffeners are present. This value is used for hydrostatic collapse and stability calculations (for tubular members only). The flooding status (either non-flooded, or flooded) is used when performing a member check of a member with tubular cross section exposed to hydrostatic water pressure. The flooding status may be the same as defined in the concept model or it may be given manually. The default value is the same as in the concept model. User Manual Vol. IV 15 September 2011 DET NORSKE VERITAS SOFTWARE GeniE Version 6.0 38 User Manual Vol. IV 15 September 2011 3.3.2.3 Member parameters NORSOK N004 The default member data for tubular members are shown to the right. Notice that there are different properties for tubular members (NORSOK) and non-tubular members (EUROCODE). GeniE automatically detects which profiles are present in the capacity model and configures the input dialog accordingly. For non-tubular members, the EUROCODE 3 EN 1993-1-1 is used. Each parameter for NORSOK is explained in the following. The buckling length is the product of member length and effective length factor. The member length may be derived from the capacity member or explicitly defined. In the example to the right, the buckling length equals 6 m times 0.9 = 5.4 m. The moment amplification allows for explicit or automatic calculation of moment amplification reduction factors, to account for secondary moments due to axial loads in buckling calculations. For tubular members the automatic calculations may be in accordance with NORSOK formulas A, B, B C or C. You may also specify the moment amplification factor manually. The spacing between ring stiffeners for tubular members may be specified. The default value corresponds to the member length, i.e. it is assumed that no internal ring stiffeners are present. This value is used for hydrostatic collapse and stability calculations (for tubular members only). Stiffener spacing for cones- same as stiffener spacing for tubular members (see above) The flooding status (either non-flooded, or flooded) is used when performing a member check of a member with tubular cross section exposed to hydrostatic water pressure. The flooding status may be the same as defined in the concept model or it may be given manually. The default value is the same as in the concept model. DET NORSKE VERITAS SOFTWARE GeniE Version 6.0 39 User Manual Vol. IV 15 September 2011 3.3.2.4 Member parameters ISO 19902 2007 The default member data for tubular members are shown to the right. Notice that there are different properties for tubular members (NORSOK) and non-tubular members (EUROCODE). GeniE automatically detects which profiles are present in the capacity model and configures the input dialog accordingly. For non-tubular members, the EUROCODE 3 EN 1993-1-1 is used. Each parameter for ISO 19902 is explained in the following. The buckling length is the product of member length and effective length factor. The member length may be derived from the capacity member or explicitly defined. In the example to the right, the buckling length equals 6 m times 0.9 = 5.4 m. The moment amplification allows for explicit or automatic calculation of moment amplification reduction factors, to account for secondary moments due to axial loads in buckling calculations. For tubular members the automatic calculations may be in accordance with ISO formulas Case1, Case2, Case2or3 orCase3. You may also specify the moment amplification factor manually. The spacing between ring stiffeners for tubular members may be specified. The default value corresponds to the member length, i.e. it is assumed that no internal ring stiffeners are present. This value is used for hydrostatic collapse and stability calculations (for tubular members only). Stiffener spacing for cones- same as stiffener spacing for tubular members (see above) The flooding status (either non-flooded, or flooded) is used when performing a member check of a member with tubular cross section exposed to hydrostatic water pressure. The flooding status may be the same as defined in the concept model or it may be given manually. The default value is the same as in the concept model. DET NORSKE VERITAS SOFTWARE GeniE Version 6.0 40 User Manual Vol. IV 15 September 2011 3.3.2.5 Member parameters AISC ASD 2005 The member parameters for the onshore code check AISC ASD 2005 are shown to the right This code check is used by API WSD 2002 & 2005 for nontubular profiles. Observe that it is possible to have different values for buckling lengths about y-axis and z-axis (in-plane and outof-plane). Each parameter for AISC ASD 2005 is explained in the following. The buckling length is the product of member length and effective length factor. The member length may be derived from the capacity member or explicitly defined. In the example to the right, the buckling length equals 5 m times 0.8 = 4 m. The moment amplification allows for explicit or automatic calculation of moment amplification reduction factors, to account for secondary moments due to axial loads in buckling calculations. There is one automatic option as described in the AISC code. You may also specify the moment amplification factor manually. The spacing between stiffeners for non-tubular members may be specified. The default value corresponds to the member length, i.e. it is assumed that no stiffeners are present. This value is used for computation of the shear capacity. Lateral torsional buckling modification factor for non-uniform moment diagrams, Cb (ref. AISC chapter F1.). The default value is 1. Effective length factor for torsional buckling, Kz (ref. AISC chapter E4.). The default value is 1. DET NORSKE VERITAS SOFTWARE Version 6.0 GeniE 41 The length between lateral supports is used when checking the member for lateral buckling. Values may be given for both top and bottom flanges. The default value is the member length; however you may specify a specific value. Specific parameters used in connection with single angle compression elements, ref. chapter E5 item (a) versus (b) and how the member is connected, i.e. through long or short leg. The default values are shown to the right. User Manual Vol. IV 15 September 2011 DET NORSKE VERITAS SOFTWARE Version 6.0 GeniE 42 User Manual Vol. IV 15 September 2011 3.3.2.6 Member parameters AISC LRFD 2005 The member parameters for the onshore code check AISC LRFD 2005 are shown to the right This code check is used by API LRFD 2003 for non-tubular profiles Observe that it is possible to have different values for buckling lengths about y-axis and z-axis (in-plane and out-of-plane). Each parameter for AISC LRFD 2005 is explained in the following. The buckling length is the product of member length and effective length factor. The member length may be derived from the capacity member or explicitly defined. In the example to the right, the buckling length equals 5 m times 0.8 = 4 m. The moment amplification allows for explicit or automatic calculation of moment amplification reduction factors, to account for secondary moments due to axial loads in buckling calculations. There is one automatic option as described in the AISC code. You may also specify the moment amplification factor manually. DET NORSKE VERITAS SOFTWARE Version 6.0 GeniE 43 The spacing between stiffeners for non-tubular members may be specified. The default value corresponds to the member length, i.e. it is assumed that no stiffeners are present. This value is used for computation of the shear capacity. Lateral torsional buckling modification factor for non-uniform moment diagrams, Cb (ref. AISC chapter F1.). The default value is 1. Effective length factor for torsional buckling, Kz (ref. AISC chapter E4.). The default value is 1. The length between lateral supports is used when checking the member for lateral buckling. Values may be given for both top and bottom flanges. The default value is the member length; however you may specify a specific value. Specific parameters used in connection with single angle compression elements, ref. chapter E5 item (a) versus (b) and how the member is connected, i.e. through long or short leg. The default values are shown to the right. 3.3.2.7 Member parameters EUROCODE 3 EN 1993-1-1 The member parameters for the onshore code check EUROCODE 3 EN 1993-1-1 are shown to the right. This code check is used by NORSOK N004 and ISO 19902 for non-tubular profiles. Observe that it is possible to have different values for buckling lengths about y-axis and z-axis (in-plane and outof-plane). User Manual Vol. IV 15 September 2011 DET NORSKE VERITAS SOFTWARE Version 6.0 GeniE 44 Each parameter for EUROCODE 3 EN 1993-1-1 is explained in the following. The buckling length is the product of member length and effective length factor. The member length may be derived from the capacity member or explicitly defined. In the example to the right, the buckling length equals 6 m times 0.9 = 5.4 m. The moment amplification allows for explicit or automatic calculation of moment amplification reduction factors, to account for secondary moments due to axial loads in buckling calculations. There is one automatic option as described in the NORSOK code. You may also specify the moment amplification factor manually. The buckling curves may be defined automatically by the program dependent of profile type. Alternatively define which curve to be used. (Ref. EN 1993-1-1 Table 6.2) Note that automatic selection for ―Hollow and welded box‖ sections also require information with respect to ―Hot finished‖ and ―Thick welds‖. The default value is automatic definition according to the profile type. Stiffener spacing means length between vertical stiffeners in webs. The default value is ―None‖ meaning that there are no vertical stiffeners along the member, i.e. the stiffener spacing is the member length. Manually input or automatic calculation of lateral torsional buckling parameters C1 and kc in addition to curve selection/method for use in calculation of χLT . (Ref EN 1993-1-1 section 6.3.2). The default values are shown to the right. o An example on selection of the factor C1 is also shown. The length between lateral supports is used when checking the member for lateral buckling. Values may be given for both top and bottom flanges. The default value is the member length (i.e. no lateral support present); however you may specify a specific value. Select how to handle the cross-section classification, i.e. o manually give the class o automatic classification o elastic = automatic classification, but limited to class 3 and 4 The default values are shown to the right. There are also examples on the selection of ―section classification‖ and ―interaction factor method 2‖. User Manual Vol. IV 15 September 2011 DET NORSKE VERITAS SOFTWARE GeniE Version 6.0 45 3.3.2.8 Member parameters DANISH STANDARD 412 / 449 The member parameters for the onshore code check Danish Standard 412 (DS412) and the offshore code check Danish Standard 449 (DS449) are shown to the right. Observe that it is possible to have different values for buckling lengths, effective lengths, C1 factors and column case for buckling about yaxis and z-axis (in-plane and out-of-plane). About y-axis Buckling length Manual Member Length Effective length From Structure Manual The buckling length is the product of member length and effective length factor. The member length may be derived from the capacity member or explicitly defined. C1 factor is the parameter used to compute internal parameters for circular cylindrical shell as function of the boundary conditions: Fixed Fixed Free Fixed Pinned Fixed Pinned Pinned User Manual Vol. IV 15 September 2011 DET NORSKE VERITAS SOFTWARE Version 6.0 GeniE 46 User Manual Vol. IV 15 September 2011 Column case for buckling The significance of the residual stresses on the shape and manufacture of the profile is considered. You can select between 5 cases, a0, a, b, c and d. A description of the cases can be found in Table V 6.2.1 in the reference documents for DS About z-axis By unchecking the ―y-z symmetry‖ checkbutton you can change the same settings as for the y-axis. Flooding Flooded From Structure Not Flooded The flooding status (either non-flooded, or flooded) is used when performing a member check of a member with tubular cross section exposed to hydrostatic water pressure. The flooding status may be the same as defined in the concept model or it may be given manually. The default value is the same as in the concept model (from structure). DET NORSKE VERITAS SOFTWARE Version 6.0 3.3.3 GeniE 47 User Manual Vol. IV 15 September 2011 Define global joint parameters When defining or modifying the global joint parameters make sure you either define a run where joints are present or set an existing run including joints to active. You should then see a capacity model that contains the capacity joints (remember to set the view to ―Capacity Models‖. The global joint parameters are defined when you create the run or modify an existing run. In this case the latter option is shown (the input dialog form is the same when you define a run). The global default parameters for capacity joints are shown below and they may be modified accordingly. The various parameters are described in the following. The global joint parameters for API WSD 2002 are shown above. DET NORSKE VERITAS SOFTWARE Version 6.0 The global joint parameters for API WSD 2005 are shown to the right. The global joint parameters for API LRFD 2003 are shown to the right. The global joint parameters for NORSOK N-004 are shown to the right. The global joint parameters for ISO 19902 are shown to the right. GeniE 48 User Manual Vol. IV 15 September 2011 DET NORSKE VERITAS SOFTWARE Version 6.0 The global joint parameters for DS are shown to the right GeniE 49 User Manual Vol. IV 15 September 2011 DET NORSKE VERITAS SOFTWARE GeniE Version 6.0 User Manual Vol. IV 50 15 September 2011 3.3.3.1 Brace type classification YT (T or Y joint) X K KTT (T part of a KT joint) KTK (K part of a KT joint) Geometry (the choice of joint classification is based on the actual geometry) Loadpath (the choice of joint classification is based on the actual geometry and then force distribution) - by default, all joints are assumed to be Loadpath Interpolate According to the code checking standards it is recommended to the classification based on load path. GeniE will count the number of braces in the same plane as the current brace and the chord element, and based on the number of near and far side braces determine the joint type. The plane as specified in the rules for tubular joint design (from menu Edit|Rules|Joint Design) is used to determine if neighbouring braces are in the same plane as the current brace. The example to the right shows a plane angle of 5 degrees. The joint classification (‗Geometry‘ or ‗Loadpath‘) is done as follows. Number of braces Joint type based on Same side Opposite side Geometry (only) Loadpath (possibly in addition) 1 0 YT 2 0 K YT 3 0 KTK YT (upper/lower brace) 3 0 KTT YT (middle brace) 4 0 Impossible 1 >0 X YT 2 >0 K YT, X 3 >0 KTK YT, X (upper/lower brace) 3 >0 KTT YT, X (middle brace) 4 >0 Impossible Please notice that when using ‗Loadpath‘ the joint classification may vary from load case to load case. DET NORSKE VERITAS SOFTWARE Version 6.0 GeniE 51 User Manual Vol. IV 15 September 2011 When using the interpolate option, you may interpolate between YT, X, K, KTT and KTK. Notice that the sum of factors must equal 1.0. If you specify otherwise, each factor will be automatically scaled relatively so that the sum becomes 1.0. 3.3.3.2 Gap classification You may also specify which gaps to use. The default option is to use those gaps as computed during ―Tubular Joint Design‖. Alternatively you may exclude any gap values present in the model or you can specify a global common gap value by using the option ―Manual‖. 3.3.3.3 Load transfer classification The ―Load Transfer‖ indicates load transfer through the chord typically used when launch runners. If activated, the effective length of the chord is modified automatically according to the code checking formulas (for API WSD 2002 and API LRFD 2003 only). 3.3.3.4 Through brace classification The ―Through Brace‖ option. GeniE proposes the through brace in an overlapping joint based on: 1. Maximum thickness is through-brace. 2. Maximum diameter is through, when thicknesses are the same 3. Minimum angle with chord is through brace 3.3.3.5 Weld thickness classification The ―Weld Thickness‖ option (for API WSD 2002 and API LRFD 2003 only). Used when specifying the weld thickness to the overlapping brace. If ―None‖ is specified the smallest thickness of through or overlapping brace is used. 3.3.3.6 Brace utilisation The ―Brace utilisation‖ option is used for ISO 19902 only. This value is used for braces connected to joints classified as critical. For each brace you should select if the brace utilization Ub shall be automatically read from the member check performed, or alternatively give a manually defined brace member usage factor. The usage factor with respect to joint capacity is then checked against (Ub/γzj). However, note the joint utilization Uj is always scaled with respect to unity, hence for braces connected to a critical joint the utilization factor Uj is multiplied by (γzj/Ub). For more information, see the reference document. DET NORSKE VERITAS SOFTWARE Version 6.0 GeniE 52 User Manual Vol. IV 15 September 2011 3.4 Local code checking parameters This Section describes how to modify the parameters for individually capacity members and joints. Common for all is to select a member(s) or joint(s), right mouse button (RMB) and select Properties. You can then modify the code checking parameters as described in the previous Chapter. 3.4.1 Modify local member parameters In the example below, the code checking parameters for the two selected members have been changed compared to the global code checking parameters. The changes are for effective length factors about y-axis and z-axis as well as distance between stiffener spacing. The above examples shows API WSD – the principles for modifying local code checking parameters are the same when it comes to the other code checks supported by GeniE. 3.4.2 Modify local joint parameters Similarly to modifying local code checking parameters for capacity members you select a joint(s) before modifying any parameter. In the example below one joint has been selected and visualised. The chord is shown with green colour, while the braces are shown with yellow colour. Notice that ―Load Transfer‖ and ―Weld Thickness‖ apply to API WSD only. DET NORSKE VERITAS SOFTWARE Version 6.0 GeniE 53 User Manual Vol. IV 15 September 2011 To modify the individual braces you need to select them from the brace definition for the actual joint. In the example below two braces have been modified (changes in Brace Type and Load Transfer). Observe that you can graphically identify which brace you are modifying (blue colour). If you click on the joint name in the dialog you will se which braces which are treated to be in the same plane, see below. They are shown with blue colour. DET NORSKE VERITAS SOFTWARE Version 6.0 GeniE 54 User Manual Vol. IV 15 September 2011 3.5 Code checking positions and forces The code checking is based on finite element results. For a straight beam, the displacements and forces are computed at the finite element nodes. In addition to first order beams, it is possible to do code checking of straight higher order beams (i.e. beams with 3 finite element nodes). To do the code checking it is necessary to compute forces at additional positions along the beam: For regular straight beams: At beam ends, middle position, 25% and 75% positions For segmented beams: In addition to above at positions where change in section or material properties Moment based positions: Where maximum in-plane or out-of-plane moments occur. These are described in the following. The code checking forces and positions are computed by using the command ―Generate Code Checking Loads‖. Notice when activating the command from the ―All Runs‖ folder, the code checking forces and positions are computed for all runs defined, in this case ―Check1.run(1)‖ and ―Check1.run(2)‖. Similarly, if you activate the command from the ―Check.run(1)‖ folder the code checking forces and positions are computed for this run only. To exemplify the code checking positions, the following models will be used for reference. For all models the capacity models have been created by the option ―Split at incoming beams‖. Regular beams having no segments or point/line loads. The beams are loaded with self weight. The moment distributions (Mxy (in-plane) and Mxz (out-of-plane)) show that peak values occur at predefined positions for the upper beam, i.e. at positions 25% and 50%. The code checking positions for the upper beam (Bm5) are thus at 0%, 25%, 50%, 75% and 100% of the beam length. DET NORSKE VERITAS SOFTWARE Version 6.0 GeniE 55 User Manual Vol. IV 15 September 2011 Regular beams having no segments but a point load The moment distributions (Mxy (in-plane) and Mxz (out-of-plane)) show that maximum values occur at position 3.5 m from the end of beam Bm5 (i.e. at 35%). The code checking positions for the upper beam (Bm5) are thus at 0%, 25%, 35%, 50%, 75% and 100% of the beam length: The segmented beam has a point load. In addition to the maximum occurring moment the segmented positions are taken into consideration. As can be seen additional code checking positions are added on both sides of the segmented positions, typically at both sides at 15% (P2 and P3). Please notice you learn how to document code checking positions and forces in Chapter 3.7 ―Investigate the results‖. DET NORSKE VERITAS SOFTWARE Version 6.0 GeniE 56 User Manual Vol. IV 15 September 2011 3.6 Perform the code check When the code check positions and forces have been computed it is possible to do the code checking. Multiple code checks can be performed for the various runs at the same time or you may decide to do it for individual code check runs. The code check is executed by using the command ―Execute Code Check‖. Notice when activating the command from the ―All Runs‖ folder, the code check is performed for all runs defined, in this case ―Check1.run(1)‖ and ―Check1.run(2)‖. Similarly, if you activate the command from the ―Check.run(1)‖ folder the code check is computed for this run only. When the code check has been performed the browser includes results from the code check. The examples below show a typical browser view for a member check and a joint check (remember to specify which run is active if you have separate runs for member and joint check). Notice that the code checks examples have been executed using program default values. An example of viewing member code check results in the browser is seen to the right. Similarly, results from a joint check are shown to the right. The next Chapter explains how to find and present the various code checking results. DET NORSKE VERITAS SOFTWARE Version 6.0 GeniE User Manual Vol. IV 57 15 September 2011 3.7 Investigate the results There are four ways of investigating code checking results – see From the browser Graphically From object property A report The three first alternatives are described in this Chapter while Chapter 3.9 ―make a report‖ shows how to make a default report or how to customize a report. 3.7.1 From the browser 3.7.1.1 Member code check The default view is set up so that it sorts on the highest utilisation factor (UfTot). The results shown are dependent on which load case you have set to active. As can be seen, there are several failures because of the code check while all the geometry checks satisfy the necessary criteria. In addition the relative position for the worst code check result for each capacity member is shown. If you specify the option Worst Case (CC) from the load pulldown list, the browser will find the worst condition for each code checking position and report it. The ―Formula‖ column identifies which formula was used to do the code checking. This is a reference to the relevant formula as listed in the various codes of practice supported by GeniE. The column for ―SubCheck‖ lists which type of code check that has been performed, i.e. a pipe section check or a non-pipe section check. You may sort each column in the browser by clicking on the column header. If you select some of the capacity members with a high utilisation factor it is easy to graphically to see where they occur. DET NORSKE VERITAS SOFTWARE Version 6.0 GeniE 58 User Manual Vol. IV 15 September 2011 3.7.1.2 Joint check The default view is set up so that it sorts on the highest utilisation factor (UfTot). The results shown are dependent on which load case you have set to active. As can be seen, there are several failures because of the geometry check while all the code checks satisfy the necessary criteria. In addition the brace that has the worst code check result for each joint is shown. If you specify the option Worst Case (CC) from the load pulldown list, the browser will find the worst condition for each code checking position and report it. The rest of the options are similar to those for the member check. You may also customise the browser view by selecting ―Fields‖ from a code check run folder. The example below shows how to graphically visualise those joints failing in the geometry check (in this case the browser is set to sort on geometry check). DET NORSKE VERITAS SOFTWARE Version 6.0 3.7.2 GeniE 59 User Manual Vol. IV 15 September 2011 From the graphic window. You may select and visualise parts of the capacity model similar to how you do this for other objects like beams, plates, loads etc. In the following parts of the capacity model has been selected. 3.7.2.1 Member code check Graphic presentation of results depends on the load case that is selected. You may also select the Worst Case (CC) to display the worst results for all load cases part of the code check. In the following there are examples on how to present results. Not all are shown herein, but all relevant commands are shown. Colour coding of utilisation factors from code check. The colour coding is based on default thresholds. You may customise these settings (both the colours, the threshold values as well as number of thresholds) from the command View|Options|Color Coding. DET NORSKE VERITAS SOFTWARE Version 6.0 GeniE 60 User Manual Vol. IV 15 September 2011 Labelling results from code check. To add a label to an object (a capacity member in this case) you need to select the object and right click to see the available labelling options. You may add labels as shown in the picture below. It is also possible to have several labels on the same object; the example below shows the utilisation factor as well as the formula used during the code checking. The label UfTot_LC shows the utilisation factor and relevant load case. It is also possible to do colour coding of utilisation factors and add labels. In the example to the right the above colour coding has been added. DET NORSKE VERITAS SOFTWARE Version 6.0 GeniE 61 User Manual Vol. IV 15 September 2011 3.7.2.2 Joint check Graphic presentation of results depends on the load case that is selected. You may also select the Worst Case (CC) to display the worst results for all load cases part of the joint check. In the following there are examples on how to present results. Not all are shown herein, but all relevant commands are shown. Colour coding of utilisation factors from joint check. You may also manipulate the thresholds as shown for colour coding of member utilisation factors. Labelling results from joint check. The example to the right shows utilisation factors for two joints. It is also possible to add colour coding of utilisation factors. DET NORSKE VERITAS SOFTWARE GeniE Version 6.0 3.7.3 62 User Manual Vol. IV 15 September 2011 From object property The previous ways of documenting the results are primarily meant to give you an overview on whether the code checks are within satisfactory levels or not. If a member fails it is necessary to investigate the code checking results more detailed to decide how to strengthen the member. Detailed code checking results may be found from the object browser or from a printed report. Both options are explained in the following. It may also be that you need to re-distribute the forces in the structure to improve the code checking results. To understand the moment and force distribution you may use the features for visualising these either in a 3 dimensional view (Tools|Analysis|Presentation) or in a 2 dimensional view (Tools|Analysis|Beam Result Diagram). 3.7.3.1 Detailed results for member check. To access detailed results from the object property you select the member – either from browser or graphically - you want to investigate, RMB and select Properties. The member data are listed as shown to the right. Please observe that GeniE detects whether the member has a tubular section property (API WSD and NORSOK) or a non-tubular profile (AISC and EUROCODE). You may also modify member data for later use. Member properties - options. The Options folder for the Object Properties lists which options have been assigned to the capacity member. In this case default values have been used. The options to use are described in the previous Chapter 3.3.2 Define global member parameters and Chapter 3.4.2 Modify local member parameters. DET NORSKE VERITAS SOFTWARE Version 6.0 Member properties – code checking forces. There are two ways of investigating the code checking forces. The alternative to the right gives the worst forces and moments at each code checking position determined by the program. Notice that this member also has water pressure (Wpress) since it is submerged. The water pressure is automatically accounted for when the environmental conditions are referred to in the analysis runs. The other option is to investigate the forces and moments per position. In this case the worst load case name is also listed. Notice that the load case shown depends on whether you have set a specific load case to active or used the option Worst Case (CC). Member properties – code checking results. The code checking results overview lists the utilisation factors and the status of the geometry check at each code checking position. In this case all geometry checks are within satisfactory limits, while the code check has failed for two positions (positions 0.75 and 0.90). For both of these positions, the formula uf3343 from the API WSD code of practice was used to compute the utilisation factors. GeniE 63 User Manual Vol. IV 15 September 2011 DET NORSKE VERITAS SOFTWARE Version 6.0 GeniE 64 The detailed view of code checking results (in this case at position 0.90) lists all the attributes that have been computed during code check. For a full documentation of the nomenclature, please see Appendix B Code checks and nomenclature. 3.7.3.2 Detailed results for joint check. To access detailed results from the object property you select the joint – either from browser or graphically - you want to investigate, RMB and select Properties. The member data are listed as shown to the right. In this case the joint consists of two joint checks representing two different planes. You may also modify member data for later use (see previous Chapter 3.3.3 Define global joint parameters and Chapter 3.4.3 Modify local joint parameters). User Manual Vol. IV 15 September 2011 DET NORSKE VERITAS SOFTWARE Version 6.0 Member properties - options. The Options folder for the Object Properties lists which members are part of the chord, how many planes are considered and the members that are considered braces for each plane. Also notice that the plane angle and brace chord angle are also listed. Member properties – code checking forces. The code checking forces for each chord and brace member are listed as shown to the right. These are computed at the joint end of the chord or brace. The code checking forces may also be shown per chord or brace. GeniE 65 User Manual Vol. IV 15 September 2011 DET NORSKE VERITAS SOFTWARE Version 6.0 Member properties – code checking results. An overview of code checking results for the joint is shown to the right. For a full documentation of the nomenclature, please see Appendix B Code checks and nomenclature The code checking results per brace may also be presented by selecting each individual brace. GeniE 66 User Manual Vol. IV 15 September 2011 DET NORSKE VERITAS SOFTWARE GeniE Version 6.0 67 User Manual Vol. IV 15 September 2011 3.8 Modify and re-run code check There are three levels of modifying a code check run Change code checking parameters like safety factors, buckling parameters and stiffener spacing. These are parameters that belong to the capacity model and a re-run of the code check does not require new code checking forces Change section or material properties of a beam without re-running the entire analysis. Please notice that the code checking result is based on a non-consistent stiffness or load matrix. Change section or material properties or adding/removing additional structural members using a consistent and updated load and stiffness matrix. This option requires a full re-run of the analysis and the code check steps. Each of these options is described in the following using the following reference model: Focus is member(Bm14,3). 3.8.1 Change code checking parameters only Modify the buckling lengths of member(Bm14,3) from browser or GUI (select the member, RMB and choose Properties). Change the effective length factors about local y and x axis to 0.80 and 0.90 respectively. The browser is now updated since member(Bm14,3) has no results since the member data has been modified., DET NORSKE VERITAS SOFTWARE Version 6.0 GeniE 68 User Manual Vol. IV 15 September 2011 To generate new code check results you need to re-run the code check. Select the actual run, RMB and choose Execute Code Check. New results are now computed and may be investigated as explained in the previous Chapter. As can be seen the utilisation factor has changed from 1.76 to 1.75. 3.8.2 Modify structural data without re-running analysis When you do modifications to the structural model (typically section or material data) without re-running the whole analysis it is required to re-generate the capacity members and code checking forces prior to executing the code check. Notice also that if you have added local modifications to a capacity member these need to be re-applied. All global settings are kept. The following example shows how to change the section type of a beam (from HE400A to HE600A) and compute a new utilisation factor without re-running analysis. DET NORSKE VERITAS SOFTWARE Version 6.0 GeniE 69 User Manual Vol. IV 15 September 2011 Create new members Create new members from the same capacity manager (or make a new capacity manager). Select the capacity manager, RMB and choose Create Members. Use the same split option as in the previous run – in this case ―Split at incoming beam‖. Generate new code checking forces From the browser, right click to re-create the code checking forces Execute the code check Start the code check from the browser (select the actual run, RMB and Execute Code Check). As can be seen the utilisation factor drops from 1.76 to 1.30 without re-running structural analysis. The global member settings are the same as before, any local modifications to the member must be re-applied when creating new members The revised code check is based on previous finite element analysis where Bm14 has section type HE400A, the code check however uses HE600A during the check DET NORSKE VERITAS SOFTWARE Version 6.0 GeniE 70 3.8.3 User Manual Vol. IV 15 September 2011 Modify structural data and re-run analysis When you re-run analysis it is necessary to Create new members of the capacity manager. o Global settings are kept, but local modifications must be re-applied Compute new code checking forces Run the code check To do this you run analysis (ALT+D) and follow the steps as explained in the previous Section. New results may now be assessed; typically: Modification of section profile for Bm14 from HE400A to HE600A without re-running analysis gives an utilisation factor 1.30. For the same change and re-running the analysis, the utilisation factor becomes 1.28. Notice that GeniE will check whether the concept model is more recent than the FE-analysis and give an error message when such situations are detected. DET NORSKE VERITAS SOFTWARE Version 6.0 GeniE 71 3.9 Make a report A customised report may be generated from the File|Save report. Please notice that the report functionality in versions prior to GeniE version v3.4-27 is still available from the command File|Old Save report. The File|Save report allows you to specify the content of your report as well as to decide the levels of detail in of your report. In the following is given an example on how to make a code checking report. In this case the report UM_Jacket will be made using the XML format for MS Word. You may also generate a report based for viewing in Excel, Html and a pure text based file. The commands used to generate the report are scripted (i.e. the same report is part of the journal file). When you select Frame Code Check from the available chapters above (remember to click ―Add Selected) you can decide the granularity of your report. Notice that if you want to use the option ―Selected Members/Joints‖ these must be the current selection (from the browser or the GUI) before you create the report. User Manual Vol. IV 15 September 2011 DET NORSKE VERITAS SOFTWARE Version 6.0 GeniE 72 This page is blank for printing User Manual Vol. IV 15 September 2011 DET NORSKE VERITAS SOFTWARE Version 6.0 GeniE 73 User Manual Vol. IV 15 September 2011 4. BEAM STRESSES This Chapter explains how to present and export beam force & stress data to Excel or other tools supporting the xml standard. The procedure is as follows: Select a beam or continuous beams Activate the 2D force/beam presentation tool from menu Tools|Analysis|Beam Result Diagram Select which force or stress components, loadcases and hotspots (or stress points) Display the graph(s) and add labels as desired – data can be exported via xml to e.g. Excel Look at print table for maximum and minimum value Look at detailed print containing all information Stresses and forces will be presented for the so-called hotspots for positions along the beam. There are 5 predefined positions (start, 25%, 50%, 75% and end) plus those computed when there are variations in properties (like in a segmented member) and local moments outside the previous mentioned positions (see also Section 3.5 Code checking positions and forces). Two models will be used to show results; a tubular member in a jacket and an I-profile part of a topside. Prior to presenting beam forces and moments, result must be available from an analysis. Notice that it is also possible to present beam forces in a 3D view using the options from Tools|Analysis|Presentation. This will give you an overview of forces in the whole model or parts of it – for details, the diagram tool should be used. DET NORSKE VERITAS SOFTWARE GeniE Version 6.0 User Manual Vol. IV 74 15 September 2011 The beam result diagram tool is started from Tools|Analysis|Beam Result Diagram. Some limitations apply regarding which components that can be presented for different types of structure in the beam result diagram. An overview of this is displayed below. Curve type Beam Result Diagram - Components supported for different structure Element type Componen Parameterized cross sections General Cross Section ts I,L,Pipe,Bar, etc. Straight Beam 1st order Pile 1st order Curved Beam 1st order Force Force Force Y Y N N N/A N Straight Beam 2nd order Pile 2nd order Curved Beam 2nd order Force Force Force Y Y N N N/A N Straight Beam 1st order Pile 1st order Curved Beam 1st order Stress Stress Stress Y Y N N N/A N Straight Beam 2nd order Pile 2nd order Curved Beam 2nd order Stress Stress Stress Y Y N N N/A N Straight Beam 1st order Pile 1st order Curved Beam 1st order Deflection Deflection Deflection Y Y N Y N/A N Straight Beam 2nd order Pile 2nd order Curved Beam 2nd order Deflection Deflection Deflection Y Y N Y N/A N Note: Only pipe-sections can be used for piles. DET NORSKE VERITAS SOFTWARE Version 6.0 GeniE 75 User Manual Vol. IV 15 September 2011 4.1 Result Selection Per default the diagram tool will present the force and stress components for shear and moment (tauNxz, sigMxy, Nxz, Mxy, Dz). In case you have selected several beams you may present results either as a continuous line or into individual lines. By clicking the button ―Select Components‖ you open the dialog ―Select Components‖. DET NORSKE VERITAS SOFTWARE Version 6.0 GeniE 76 User Manual Vol. IV 15 September 2011 In the ―Select Components‖ dialog you can easily select the components of interest for all your selected beams. Click on a component to select it. Use shift+click to select several components. If you tick the checkbox ―Use selection as default‖ the current selection of components will be stored as the default setting. Your default selection is stored even if you exit GeniE. To reset the selection to the GeniE default, click the ―Reset‖ button. Note on Allowable Deflection of Beam: The check is as follows: Actual deflection < Allowable deflection Actual deflection is the deflection as computed by GeniE. The total length from the start to the end of the beam diagram is used. Intermediate points are not considered. It is important that you make sure you are only selecting the span between 2 supports when you are validating that the deflections are smaller than allowable deflection. There are a number of options to select to present various attributes. The on-line help (click on the light-bulb) explains how you may select beams, load cases, component and hotspots. Some examples are also listed in the following. You can also delete and add rows by RMB on the left mouse column as shown below. DET NORSKE VERITAS SOFTWARE Version 6.0 4.1.1 GeniE 77 User Manual Vol. IV 15 September 2011 Limitation on stress computation If an ‗Effective Flange‘ property is assigned to a beam and the mesh setting ‗Use co-centric beams‘ is checked, stresses will not be computed for that beam neither in the ‗Beam Result Diagram‘ tool nor in the ‗Report->FEM Results‘. The ‗Beam Result Diagram‘ tool will give the user a warning in a separate dialog. In the report there will be no results for this beam. DET NORSKE VERITAS SOFTWARE Version 6.0 4.1.2 78 Select beams You may alter your selection from a previously graphic selection. Assume you have made a multiple selection you can use the combo selection to decide which beam to use when presenting attributes. In this case the next presentation will yield Bm253. If you have selected two continuous beams, they will appear in the combo box as follows: 4.1.3 GeniE Select loadcases It is possible to present results for individual loadcases and minimum, maximum, absolute maximum and an envelope for a set of loadcases. These are all selected from the combo box. The example to the right shows that the wave loadcase WLC(2,1) will be used. For the other options you need to decide which of the loadcases that shall be part of the selection. The picture to the right shows that an envelope shall be presented for all the selected components. The below dialogue will appear and in this case three loadcases have been selected to be part of the envelope. User Manual Vol. IV 15 September 2011 DET NORSKE VERITAS SOFTWARE Version 6.0 4.1.4 GeniE 79 User Manual Vol. IV 15 September 2011 Select component The beam result diagram tool will present results for all force, deflection and stress components including VonMises stresses. In the example to the right, VonMises stress is selected. The stress components are: vonMises: Equivalent stresses according to the VonMises criteria sigxx: Combined axial stress from axial force and bending moments sigNxx: Normal stress due to axial force alone (Nxx) tauNxy: Shear stress due to shear force in y direction (Nxy) tauNxz: Shear stress due to shear force in z direction (Nxz) tauMxx: Shear stress due to torsional moment (Mxx) sigMxy: Normal stress due to bending moment about y-axis (Mxy) sigMxz: Normal stress due to bending moment about z-axis (Mxz) 4.1.5 Select hotspot position The hotspots (or stress points) vary from profile to profile. In the following the hotspot numbering is shown for the relevant profile types. Selecting a hotspot will report values for this hotspot only. Selecting e.g. max and min will report for such positions only; this means that the hotspot reported may vary along the beam length. Pipe: I or H-profile: DET NORSKE VERITAS SOFTWARE Version 6.0 GeniE 80 Channel: Bar: Box: L-profile: User Manual Vol. IV 15 September 2011 General section: The positions are calculated as follows: ±Iy/Wy and ±Iz/Wz. DET NORSKE VERITAS SOFTWARE Version 6.0 4.1.6 GeniE 81 Deflection shape By clicking the button ―Deflection shape‖ you get to select which method you want to use to present the graph. There is also a slider to select number of interpolation points per element. A higher number of interpolation points will produce a smoother looking graph, but it requires slightly more time for drawing. The interpolation points are only relevant for the two cubic options. Linear This implies that each finite element is approximated by a straight line. User Manual Vol. IV 15 September 2011 DET NORSKE VERITAS SOFTWARE Version 6.0 Cubic This means that each finite element is approximated by a cubic spline function that matches the beam end rotations. Representation is always linear, but interpolation points are calculated using cubic shape functions. The graph in the illustration to the right is drawn with 5 interpolation points per element. The graph in the illustration to the right is drawn with 25 interpolation points per element, note the difference in smoothness between the two graphs GeniE 82 User Manual Vol. IV 15 September 2011 DET NORSKE VERITAS SOFTWARE Version 6.0 Cubic with local loads An analytic solution of deflection due to local element loads is superimposed on the cubic spline function The graph in the illustration to the right is drawn with 5 interpolation points per element. The graph in the illustration to the right is drawn with 25 interpolation points per element, GeniE 83 User Manual Vol. IV 15 September 2011 DET NORSKE VERITAS SOFTWARE Version 6.0 4.2 Graphs A graph (or graphs) is calculated by clicking on the tab ―Graphs‖. In this case one single beam has been selected. The component sigxx is shown for an envelope consisting of three wave load cases. In the following some examples are given on how to label results, how to extract information and how to change font sizes for better picture generation. The red ―dot‖ indicates the worst position (hotspot) that is shown. When showing results for an I-profile the graph looks different since the hotspot positions are different. By moving the mouse along the x-axis, the actual value is shown and if the hotspot position changes, this is reflected in the left figure. You switch curve to present by moving the mouse over the desired curve and click CTRL+LMB. Right click in the graph window gives you access to the relevant commands. GeniE 84 User Manual Vol. IV 15 September 2011 DET NORSKE VERITAS SOFTWARE GeniE Version 6.0 Labelling maximum and minimum values might be done in one operation by selecting ―Add slider at min‖ and ―Add slider at max‖. The graph values may also be exported to e.g. Excel using the xml format. You may also find the value at a given position. This example shows how to find the value at position 5.5 m (this value is manually specified in the dialogue box as shown): 85 User Manual Vol. IV 15 September 2011 DET NORSKE VERITAS SOFTWARE Version 6.0 GeniE 86 User Manual Vol. IV 15 September 2011 Each graph may be customised in terms of fonts and colour appearance. In this example the font size has been changed as well as the colour and thickness of a graph line Adding header and change fonts: Modifying graph lines: The new graphs look like: DET NORSKE VERITAS SOFTWARE GeniE Version 6.0 87 User Manual Vol. IV 15 September 2011 Labelling at specific positions is done by placing the cursor at the desired positions and click LMB. This example shows that labels have been added at each 2nd meter. More information on how to modify the graphs and its settings may be found from: 4.3 Maximum and detailed values Maximum and minimum values are presented by using the tab ―Max/Min table‖. This report gives the relevant peak values. Similarly, the tab ―Beam Line Tables‖ lists all the detailed values in all hotspots at all positions. DET NORSKE VERITAS SOFTWARE Version 6.0 GeniE 88 This page is blank for printing User Manual Vol. IV 15 September 2011 DET NORSKE VERITAS SOFTWARE Version 6.0 GeniE 89 User Manual Vol. IV 15 September 2011 5. REDESIGN 5.1 Introduction The following list gives a brief overview of the steps involved in the design iteration process including member re-design (steps 7 – 9) and automatic reporting. The details are explained in the following chapters. Steps in the re-iteration process 1. Make your model 2. Run analysis 3. Create capacity manager and make a code check run 4. Create members 5. Generate code check forces (code checking position) and execute the code check 6. Decide the content of a report (table of contents) and create (save) the report Comments First pass These steps are all part of the first pass. You always need to do this to find code check results and decide whether design iterations are needed. The settings for the report are stored, and you can create a new report with the same table of content later. 7. Investigate and select members of interest. Right-click and select ―Redesign‖ 8. Do your changes by altering the settings in the Redesign dialog. 9. Click ―OK‖ when you want to use the settings you have changed These steps are also known as the re-design process. 10. Select ―Run All‖ This action will ensure consistency between capacity and structural models as well as do a full re-run of the analysis as well as activities pertaining to the code check execution. In case you have done a code check and modified a member (e.g. section or material data) outside the redesign feature, you can still click on ―Run All‖ to easily get new code check results. 11. Check if the results are satisfactory, if not, go back to step 7. 12. Auto-regenerate the report. Normally, you may need to loop some times over the steps 7 to 9 until you have an acceptable solution. Notice that the new code check results are not based on updated analysis results. Hence it is necessary to do a full re-run including a new code check to ensure consistent analysis and code check results. You can regenerate the report with the same table of content that you used in step 6. The following limitations apply: - If there are eccentricities to the beams, these need to be manually regenerated in case their section properties are modified during redesign. In such case you need to manually select ―Update Structure from Members‖, apply the eccentricities before the Run All can be executed. - In case you move or insert new members it is necessary to regenerate the capacity members. - The redesign feature applies to members and not joints. DET NORSKE VERITAS SOFTWARE Version 6.0 GeniE 90 User Manual Vol. IV 15 September 2011 5.2 Redesign example In order to present a Redesign example, a fully comprehensive example is carried out. From the Tutorial web page we select the ―Jacket with tubular joints‖ model. First we read in the following two .js files: 1. ―GeniE_PSIanalysis_for_cc_in.js‖ 2. ―GeniE_ccAPIWSD_in.js‖ After loading the above mentioned .js files, we obtain a working model. The code check analysis has been run and we have two capacity managers. Taking a brief look at the results we can observe that for some members the usage factor (UfTot) is greater than 1, meaning that these structural members do not comply with the selected Specification Standard. DET NORSKE VERITAS SOFTWARE Version 6.0 GeniE User Manual Vol. IV 91 15 September 2011 The usage factor for all the members from the run ―APIchk.run(1)‖ can be colour coded as shown in the illustration to the right. We here show the model in the ―Capacity Models‖ view. The same colours, representing the same range of UfTots, can be found in the Redesign window. This is a useful tool allowing the user to immediately spot the members that need to be updated. We select the members of interest. By rightclicking the member selection and selecting ―Redesign‖ in the appearing menu, we open the Redesign dialog. The Redesign dialog contains the same members that we just selected.. The Redesign dialog appears: DET NORSKE VERITAS SOFTWARE Version 6.0 GeniE 92 User Manual Vol. IV 15 September 2011 In order to explain the features of this Redesign dialog a split between the header of the dialog and the grid is made. The header is presented in the figure below. The Run combo box allows you to select which run (single run or all runs at once) you want to include in the redesign. Note that if you don‘t specify a run, all the runs will be taken into consideration for the redesign process and the highest usage factor among all the runs will be shown. In the Loadcase combo box you can select one specific loadcase, or you can select Worst Case, giving you the worst results for all the loadcases. The Recalculation history tracks the changes you do in each step of your redesign process. The first button, on the left hand side of the counter, presents the initial design properties. The second button presents the previous design iteration properties. In the same way, the second button on the right hand side shows the last design iteration and the first button the next design iteration counting from the design iteration displayed on the recalculation history counter. Note that a new step is added to the Recalculation history whenever you make a change. You can move backwards and forwards through the Recalculation History if the results of your changes are not satisfactory, or if you just want to try different settings. DET NORSKE VERITAS SOFTWARE Version 6.0 GeniE 93 User Manual Vol. IV 15 September 2011 The Automatic Recalculate check box and the Recalculate button are parts of the same purpose: to set a new iteration design using the new design parameters. If the check box is checked the Recalculate is overridden and the new usage factors and displayed properties are automatically updated. If the Automatic Recalculate check box is not selected, you must click the Recalculate button every time a new iteration design is necessary. Also note that the background colour changes from white to light yellow when a design parameter is changed. This is shown in the illustrations below. Before changing the Section property of Br08: After changing the Section property of Br08 from Pipe16 to Pipe21, the background colour has changed from white to light yellow. DET NORSKE VERITAS SOFTWARE Version 6.0 GeniE 94 User Manual Vol. IV 15 September 2011 The Colorcode UFtot check box allows you to display UfTot with the same colour code as the colour code used on the capacity models result. This is useful in order to inspect which structural elements are prone to fail. By pressing the Full Table button, you can get more detailed information about your members. This allows you to access information about the structural capacity model from all the checked points within the capacity model. The following two illustrations demonstrate the use of this button for a single capacity member. First we look at the member ―Br46‖ in the Simple Table view. The member is displayed on one single line showing the result for the worst position: DET NORSKE VERITAS SOFTWARE Version 6.0 GeniE 95 User Manual Vol. IV 15 September 2011 After clicking the Full Table button, the results for the single member, ―Br46‖, is displayed for every checked position along the member as can be seen in the illustration below. Information Window: This area shows useful information about the Redesign process and updates to the capacity model. DET NORSKE VERITAS SOFTWARE Version 6.0 GeniE 96 User Manual Vol. IV 15 September 2011 Since the ends of the members are fixed, we want to reduce the buckling factor from 1 to 0.7, just as an example. This change can be done on both buckling length properties: buckling length or buckling factor. Next illustrations show the update done to the buckling factor. After clicking Buckling Length, Factor combo box, select Modify, and the following dialog box appears. After updating the fields click OK and the changes will be effective to the code check. The UfTot for all the members are now below 1.00. If the changes operated on the code check analysis are according with your aim, you should press Apply in order to update the capacity model. OK also accepts your changes to the capacity model. DET NORSKE VERITAS SOFTWARE Version 6.0 GeniE 97 User Manual Vol. IV 15 September 2011 If you intend to continue the Redesign process for other structural members, the following message pops up at the Information Window. In order to update the structure concept model, commit the changes performed during redesign by clicking ―Update Structure From Members‖ “Update Members from Structure” is used when you change something in the concept model, like removing a beam or altering segmentation, and you want this change to be reflected in the capacity model. Information is moved from the concept model to the capacity model. “Update Structure From Member” is used to move information from the capacity model to the concept model. This is further explained below: Earlier in this example, we replaced the section of the member Br39. It was originally Pipe12, and we replaced it by Pipe16. If we look at Br39 in the graphical view (Modeling – Structure) we see that it still has its original section, Pipe12. To change it to its new section we need to rightclick the capacity manager and select ―Update Structure From Member‖. Below you can see how the section of member Br39 is replaced. The figures show the beam before and after clicking ―Update Structure From Member‖. DET NORSKE VERITAS SOFTWARE Version 6.0 GeniE 98 User Manual Vol. IV 15 September 2011 The description shows that the section has been replaced, and the replacement is also visible in the graphical view as the beam looks thicker. Be careful not to mix up the terms ―Update Members From Structure‖ and ―Update Structure From Members‖. Finally, we want to re-run the analysis and update the capacity manager to see the correct UfTot for the members. Click ―Start‖ on the Activity Monitor for the analysis and select ―Generate Code Check Loads‖ and ―Execute Code Check‖ for the capacity manager. DET NORSKE VERITAS SOFTWARE Version 6.0 GeniE 99 User Manual Vol. IV 15 September 2011 The UfTots are almost the same as before running the analysis again, but there are some differences. Observe that for instance UfTot for member Br43 has changed from 0.98 to 0.97. You may want to re-run the analysis, generate the code check loads and execute the code check in one single operation. This is possible if you rightclick the capacity manager and select ―Run All‖. The activity monitor appears. Note that step 3, ―Generate Code Check Loads‖ and step 4, ―Execute Code Check Loads‖ are now included. Just click Start to see the results of your changes. The beams in the example consisted of only one segment. It is also possible do redesign on segmented beams. This is shown in the illustrations below. DET NORSKE VERITAS SOFTWARE Version 6.0 GeniE 100 User Manual Vol. IV 15 September 2011 The beam ―MyBeam‖ is made up of six segments. You can change the properties of each segment individually. The illustration above shows how the redesign dialog will appear when ―Split at incoming beam‖ is checked in the ―Create members‖ dialog. Compare it with the illustration below. The illustration above shows how the redesign dialog will appear when ―Split at incoming beam‖ is left unchecked in the ―Create members‖ dialog. This is the same ―MyBeam‖ as in the first illustration. It is important to note that ―Buckling Length‖ and ―Stiffener Spacing‖ differ from the first illustration. This also affects the UfTot. DET NORSKE VERITAS SOFTWARE Version 6.0 GeniE 101 User Manual Vol. IV 15 September 2011 6. POST PROCESSING OF SUPERELEMENT RESULTS From GeniE version 5.3, the handling of imported SIN results from an external analysis has been modified. Result cases are now separate entities. GeniE may be used to create first level elements (so-called superelements) that can be used in a superelement analysis. In such case the entire process should be modelled and executed from Sesam Brix Explorer. Depending on the tasks to be performed other Sesam modules, in addition to GeniE, should also be used to assemble and analyse the structure. It is also possible to import results from a superelement analysis back to a first level element created by GeniE to do post-processing like code checking. The procedure and requirements to do so are explained in the following using a practical example. The basic requirements are: Import of results can be performed on models created and meshed in GeniE. It is not possible to use repetitions of superelements or merge result files when importing results. Post-processing (code checking, stress/force/displacement evaluations) can be done based on a static or time domain analysis. When you have exported a finite element model (File|Export|FEM File) you cannot modify the original model (if you do, the new mesh must be re-exported). When importing the results, GeniE will check that the number of nodes and finite elements are the same for the original FEM file and the imported result file. Furthermore, the date identification card will be checked to see if there have been any alterations. This is a safety check to ensure that the results refer to the same FEM model created by GeniE. In a single superelement, static analysis, there will be a 1:1 relation between finite element loadcase numbers and finite element result-case numbers. Observe that this refers to the numeric reference system used on the FEM/SIN files, and should not be confused with the numbers used in the loadcase names in GeniE. Load combinations can be defined in the superelement assembly. When the proper RSEL option is used in SESTRA, this will ensure that bending moments and stresses for beams will also correctly take applied beam loads into account (automatically handled if analysis is performed using defaults in Brix Explorer configured for Sesam) Result combinations can be made in Prepost after analysis in GeniE based on analysis results. Note that GeniE version 5.3 does not support creation of combinations of result cases inside GeniE. It is also possible to do load combinations using a more traditional approach where the load combinations are done prior to analysis. Both alternatives are shown in the following. Displacements for global model from a superelement analysis. Shown in Xtract Code checking performed on a superelement part of a superelement. Shown in GeniE DET NORSKE VERITAS SOFTWARE Version 6.0 GeniE 102 User Manual Vol. IV 15 September 2011 6.1 Modelling and post-processing The following example is used to show how to build a small superelement analysis and how to code check individual parts of it using Brix Explorer configured for Sesam as a process modelling tool. For details on how to use Brix Explorer, please consult its user manual. The structure consists of 3 individual parts (Sel_1, Sel_2 and Sel_3). Presel is used to assemble the individual parts into Sel_10 and Sestra is used to analyse it. Code checking and post-processing of individual parts is done using GeniE (CC_Sel1, CC_Sel2 and Displ_Sel3). Finally the entire structure can be post-processed using Xtract (Post_Sel10). There are 4 global load cases in the superelement analysis. These are built by referencing basic load cases in each of the first level elements defined by GeniE. For details on how to assemble structural parts as well as creating load combinations, reference is made to Presel User Manual. DET NORSKE VERITAS SOFTWARE GeniE Version 6.0 6.1.1 103 User Manual Vol. IV 15 September 2011 GeniE first level superelements When making a superelement you need to specify super-nodes to connect to other structural parts. Boundary conditions to prevent rigid body motions may be defined in a first level superelement or at higher order elements. The highlighted support points below for Sel_3 are specified with super degree of freedom to connect the frames Sel_1 and Sel_2. The relevant positions for Sel_1 and Sel_2 are also specified with super degree of freedom. Each of the superelements has 11 loadcases, for further details see the following section on global load combination. The finite element model must be defined from an analysis activity – this is required to set up the necessary folders for results handling after the analysis. To make the mesh and export it the following sequence can be used: 6.1.1.1 Define the superelement number The superelement number is specified from Edit|Rules|Meshing. In this case the number is 3. DET NORSKE VERITAS SOFTWARE Version 6.0 GeniE 104 User Manual Vol. IV 15 September 2011 6.1.1.2 Make the finite element model The finite element mesh is created from the Analysis browser or by using ALT+D. In the example to the right meshing is the only activity to be performed. It is required that the finite element model is created from the activity monitor as this will create an analysis folder for the model – this folder is used when loading the results back to GeniE from the superelement analysis. Superelement load combinations are not defined in GeniE, they are defined in Presel. The combinations on the highest superelement level will define loadcases that are retracked, also referred to as result-cases. There is also an alternative method: Use result combinations in Prepost. In this scenario, each of the 1st level loadcases are combined in Presel with a factor of 1.0 up to the top level. 6.1.1.3 Export the finite element model The finite element model is exported from File|Export|FEM File. In this case the superelement model is termed T3.FEM. DET NORSKE VERITAS SOFTWARE Version 6.0 GeniE User Manual Vol. IV 105 15 September 2011 6.1.1.4 Make the global load combinations – combine results in Prepost The following tables show how it is possible to model only the relevant basic loadcases in each of the GeniE models, and then combine these in Presel, maintaining the individual loads separately. 3 superelements with 3, 3 and 1 loadcases respectively, end up as 7 top level loadcases. These 7 loadcases are solved in Sestra. First lift each basic loadcase up to the highest superelement level by means of Presel load combinations, using a load factor of 1.0. S.el. 10 S.el. 1 S.el. 2 Presel GLC BL (LLC) Content 1 BL1 (1) Self-weight 2 BL2 (2) Equipments 3 BL3 (3) Line loads S.el. 3 BL (LLC) Content 4 BL1 (4) Self-weight 5 BL2 (5) Equipments 6 BL3 (6) Line loads 7 BL (LLC) Content BL1 (7) Self-weight Then, after running Sestra, creating result combinations in Prepost to achieve the required combinations needed for post processing, and importing the results - File|Import|External Results SIN file. Postprocessing can now be done e.g. as shown in Section 5.1.2. GeniE Presel GLC Comment ===== ===== Original S.el. 1 load cases follow resultCase(1) 1 results from BL1 in Sel1 resultCase(2) 2 results from BL2 in Sel1 resultCase(3) 3 results from BL3 in Sel1 ===== ===== Original S.el. 2 load cases follow resultCase(4) 4 results from BL1 in Sel2 resultCase(5) 5 results from BL2 in Sel2 resultCase(6) 6 results from BL3 in Sel2 ===== ===== Original S.el. 3 load cases follow resultCase(7) 7 results from BL1 in Sel3 ===== ===== Prepost result combinations resultCase(8) - 1.0 x res(1) + 1.0 x res(4) + 1.0 x res(7) resultCase(9) - 1.0 x res(2) + 1.0 x res(5) + 1.0 x res(7) resultCase(10) - 1.0 x res(3) + 1.0 x res(6) + 1.0 x res(7) resultCase(11) - 2.0 x res(3) + 3.0 x res(6) + 4.0 x res(7) DET NORSKE VERITAS SOFTWARE GeniE Version 6.0 User Manual Vol. IV 106 15 September 2011 6.1.1.5 Make the global load combinations – all combinations done in Presel When all the superelements have been assembled to form the complete structure in Presel, the global load combinations (GLC) can be made. The Presel User manual shows how to assemble the structure and to make the combinations. In this case the global load combinations (GLC) are built up of basic loadcases (BL) as well as local load combinations (LLC) defined in GeniE. The option for smart load combinations must be disabled so that the load combinations now become ―true‖ basic loads and they will be part of the FEM file used by Presel when assembling the global model. This alternative may be used in connection with wave load analysis. S.el. 10 S.el. 1 S.el. 2 Presel GLC BL (LLC) Content - BL1 (1) Self-weight - BL2 (2) Equipments - BL3 (3) Line loads S.el. 3 BL (LLC) Content - BL1 (4) Self-weight - BL2 (5) Equipments - BL3 (6) Line loads - BL (LLC) Content BL1 (7) Self-weight 1 1.0 x BL1 (1) 1.0 x BL1 (4) 1.0 x BL1 (7) 2 1.0 x BL2 (2) 1.0 x BL2 (5) 1.0 x BL1 (7) 3 1.0 x BL3 (3) 1.0 x BL3 (6) 1.0 x BL1 (7) 4 2.0 x BL3 (3) 3.0 x BL3 (6) 4.0 x BL1 (7) As can be seen above there is consistency between the global load combinations on the highest superelement (s.el. 10) and the load case numbering on lowest level superelements (s.el. 1, 2 and 3). Also notice that any scaling of loads used in a load combination must be performed on the lowest level superelements. Typically, the global load combination consists of 1 x LLC11 from each of the lowest level superelements where LLC11 consist of 2 times the basic loadcase 3 in superelement 1. DET NORSKE VERITAS SOFTWARE Version 6.0 6.1.2 GeniE 107 User Manual Vol. IV 15 September 2011 Post-processing When the structural analysis has been performed it is possible to import the results back to each individual superelement. Open the relevant workspace for a superelement and import the results from File|Import|External Results SIN file. In the example below the result file for superelement 10 - the R10.SIN file - is selected. The relevant results for a superelement will automatically be applied to the model. Result cases will appear in the browser after the SIN import. DET NORSKE VERITAS SOFTWARE Version 6.0 GeniE 108 User Manual Vol. IV 15 September 2011 When importing results into GeniE, the FEM loads are imported and they can be verified, for example by looking at the result view. In the illustrations below, showing results for superelement 1, it can be observed that the displacements are twice as large in the resultcase 4 compared to resultcase 3. This is expected based on the numbers we were using earlier in this example; for resultcase 3 we put in 1.0 x BL3 and for resultcase 4 we put in 2.0 x BL3. DET NORSKE VERITAS SOFTWARE Version 6.0 GeniE 109 User Manual Vol. IV 15 September 2011 Post-processing can now be done including effects from local loads. The example below shows a detail for resultcase 2 on superelement 1 including a local load applied to one of the beams. In this case the local load effect influences the moment so that it has its peak outside one of the system pre-defined stress points along the beam (5 positions at 0, 0.25, 0.5, 0.75, 1.0). DET NORSKE VERITAS SOFTWARE Version 6.0 GeniE 110 User Manual Vol. IV 15 September 2011 6.2 Process modelling in Brix Explorer This chapter explains the steps used to build a process model in Brix Explorer. Main focus is on documenting which options that have been used – if you want to know in detail how to set up a process like this you can find this in the Brix User Manual. There are several ways of making a process like this; the following example shows one way on how to do it. 6.2.1 Make the flowchart The first step is to specify which tasks are to be carried out and in which sequence. After creating a new project in Brix Explorer you can define the tasks and which programs to use. The picture below shows the project ―Sel_example‖ that consists of 10 tasks. The first task is used to organise the design premises like program versions, reference documents, drawings, check-lists etc. For superelement analysis, the top level superelement number is also specified – in this case number 10. The following tasks are used to specify the tasks to be done: Sel_1: Make superelement 1 in GeniE and export T1.FEM Sel_2: Make superelement 2 in GeniE and export T2.FEM Sel_3: Make superelement 3 in GeniE and export T3.FEM Sel_10: Make superelement 10, make load combinations and export T10.FEM (all in Presel) Analysis: Run structural analysis using Sestra (use system default input file) Prepost: Create result case combinations in Prepost (optional, required if only basic loadcases are taken up to the top level in Prepost) CC_Sel1: Import analysis results and perform code check on superelement 1 CC_Sel2: Import analysis results and perform code check on superelement 2 Displ_Sel3: Import analysis results and document displacements on superelement 3 Post_Sel10: Look at displacements, forces and stresses of entire structure (T10) in Xtract DET NORSKE VERITAS SOFTWARE Version 6.0 6.2.2 GeniE 111 User Manual Vol. IV 15 September 2011 Execute the flowchart Initially, the flowchart must be manually executed to specify the various option used in each task (―editing the controllers‖). When all is set and you have generated the input file (or journal files) from manual sessions or by referring to input files (or journal files) the flowchart may be executed automatically by using the ―Run Hierarchy‖ option. All file handling is automatically taken care of by Brix Explorer. In the following, the manual execution of the flowchart is focused. 6.2.2.1 Run GeniE Define the task name and refer to GeniE as program to use. GeniE is started by clicking the Run button. In this case no js-file is automatically imported when running the program. You may refer to a js-file that always is imported when you specify the database status to New. The status is automatically modified to Old when you have exited GeniE. You do not need to use the Advanced View. This and similar activities are used to define superelements T1, T2 and T3. DET NORSKE VERITAS SOFTWARE Version 6.0 6.2.2.2 Run Presel Define the task name and select Presel as program to use. Presel is started by clicking the Run button and like for GeniE you may do manual modelling or refer to an existing input file. 6.2.2.3 Run Sestra Define the task name and select Sestra as program to use. In this case you need to open the ―Advanced view‖ assuming there are no user defined input file from before. Specify static analysis run, click on generate file and start Sestra by clicking the Run button. GeniE 112 User Manual Vol. IV 15 September 2011 DET NORSKE VERITAS SOFTWARE GeniE Version 6.0 113 User Manual Vol. IV 15 September 2011 6.2.2.4 Run Prepost Result case combinations can also be created in Prepost. This is optional and is only required if basic loadcases are taken up to the top level in Prepost 6.2.2.5 Re-use a GeniE activity to do post processing In this case we want to re-use an existing GeniE model in a new activity when importing results from the superelement analysis to do code checking. Define the task and specify GeniE as the program to use. In this case it is necessary to view the advanced view to set the options to do the task. Code checking of superelement 1 is performed using the model defined in task Sel_1 and then results as computed in the task Analysis. 1) Set the database status to Old. 2) Click on ―Reuse database from other GeniE activity‖. 3) Locate the relevant activity folder – in this case 20_sel_1. 4) Click on ―Copy Analysis Folder‖ to ensure that all the analysis details are transferred to the new task. 5) Click Run and do the necessary code checking and other post-processing. 6) When the task is completed it is advised to set database status to ―Read Only‖ – you may now later open the task again to investigate the model, results, make reports or pictures. In case you accidentally modify the model, this is not saved. The similar steps can be used to do the tasks CC_Sel2 and Displ_Sel3. 6.2.2.6 Run Xtract The final step is to specify the task to do postprocessing of the entire structure (T10) based on Xtract. DET NORSKE VERITAS SOFTWARE Version 6.0 GeniE 114 User Manual Vol. IV 15 September 2011 The program is started like shown in previous tasks and it will automatically pick up the highest superelement. DET NORSKE VERITAS SOFTWARE Version 6.0 GeniE User Manual Vol. IV 115 15 September 2011 7. EXECUTION OF GENIE This Chapter describes which files are used by the program in connection with code checking of beams. 7.1 Program Environment See the GeniE User Manual Vol. I for information on the hardware requirements of GeniE and how to execute the program. 7.2 Files created during code checking GeniE will create the following files during code checking and reporting of such: The journal file format *.js The database, format *.gni The XML Concept Model file *.xml The GeniE saved report, format *.lis, *.html, *.xml (for Excel and Word) The GeniE saved graphics file, format *.gif, *.jpg, *.eps, *.bmp, *.tga, *.tif, *.ps, *.vrml, *.dfile The GeniE_log.txt file in case of model errors and/or warnings Notice that the File|Export|GeniE Journal File (the ―clean‖ journal file) does not contain code checking definitions nor any information pertaining to shell models (curved plates). For a neutral storage of the model, you should use the File|Export|XML Concept Model file. This file can be imported to new workspaces. DET NORSKE VERITAS SOFTWARE Version 6.0 GeniE 116 This page is blank for printing User Manual Vol. IV 15 September 2011 DET NORSKE VERITAS SOFTWARE Version 6.0 GeniE 117 User Manual Vol. IV 15 September 2011 8. DIALOG DESCRIPTION This Chapter lists the relevant dialogs used in connection with code checking of beams. For all other dialog definitions reference is made to GeniE User Manual Vol. I. All dialogs relevant for code checking are available from the browser and partially from the graphical window by using the context sensitive menu (select objects and right click to access these menus). 8.1 Code checking menus from the browser 8.1.1.1 Make a new capacity manager To decide which analysis to include in the code check runs. 8.1.1.2 Make capacity members To make a capacity model and decide which parts of the structure to include in the code check run. The default buckling lengths are also decided based on how a beam is split. 8.1.1.3 Create joints To create joints to be part of a punching shear check and to decide which parts of the structure to include in the code check run. DET NORSKE VERITAS SOFTWARE Version 6.0 GeniE 118 User Manual Vol. IV 15 September 2011 8.1.1.4 Add a run To decide which code check standard to use, to specify which load cases to use and to set up the global code checking parameters for the code check, the members and the joints. DET NORSKE VERITAS SOFTWARE Version 6.0 GeniE 119 User Manual Vol. IV 15 September 2011 8.1.1.5 Generate code checking forces To compute the code checking positions and forces to be used in the code check. If you do it from the ―All Runs‖ folder the operation is performed for all the code check runs you have defined. 8.1.1.6 Execute the code check To perform the code check. All code check runs will be executed if you do it from the ―All Runs‖ folder. 8.1.1.7 Set a code check run to active If you have multiple code check runs, you specify which one is active from this command. Notice the default symbol in the browser. 8.1.1.8 Edit a code check description Include additional information to a code check run (or a capacity manager). The information is listed in the report. DET NORSKE VERITAS SOFTWARE Version 6.0 GeniE 120 User Manual Vol. IV 15 September 2011 8.1.1.9 Save a code check report This command will save a code check report as described in Section 3.9 Make a report. The only difference is that the report dialog assumes that a frame code check report will be made – hence the other chapters for structure, loads and so on are not added to the report content (you may add these manually). 8.1.1.10 Delete This command deletes the code check run from the capacity manager. 8.2 Code checking menus from the graphical window Notice that you need to select a capacity object (member or joint) and right click to see the context sensitive menu. You should thus use the pre-defined view setting Capacity Models when viewing your capacity model. DET NORSKE VERITAS SOFTWARE Version 6.0 GeniE 121 User Manual Vol. IV 15 September 2011 8.2.1.1 Properties Specify capacity parameters that apply to the selected member or joint only. These settings will over-ride the system default and other global settings specified when you define the code check run. Notice that the content of the property dialog depends on capacity member or joint as well as which code check has been selected. The examples below are based on API WSD. 8.2.1.2 Labels When the code check has been executed you may add labels as shown below to the capacity members. Notice that ―Clear Labels‖ will remove the labels on the selected object(s) only. If you want to remove all labels for the whole model you should use the exclamation mark. 8.2.1.3 Colour coding the results You can colour code the code checking results by using this command. To customize the colours, number of levels and the thresholds see explanation in next Section. DET NORSKE VERITAS SOFTWARE Version 6.0 GeniE 122 User Manual Vol. IV 15 September 2011 8.3 Code checking menus from the pulldown menu 8.3.1.1 Specify the colour coding of code check results The pulldown menu View|Options|Color Coding is used to customise the colours, number of levels and the thresholds when colour coding code checking results. The view options dialog is used to customize how you want to view your model in various modes – typically during modelling, load application, analysis or code checking stage. If you select ―Category‖ to ―Results‖ as shown below you can modify number of contour levels, the thresholds and the colours within each range. Additional levels are added from ―Add Contour‖. Contours are removed by selecting a contour from the contour column, RMB and Remove Contour. DET NORSKE VERITAS SOFTWARE Version 6.0 GeniE 123 User Manual Vol. IV 15 September 2011 8.3.1.2 Specify the line width of capacity members You may change the line width of the capacity members for better viewing graphically or on pictures. The pictures below shows a picture generated by default line width (3) and a picture with line width 6. The line width is modified from the pulldown menu View|Options|Settings (remember to specify which view you want to modify, in this case ―Capacity Models‖). DET NORSKE VERITAS SOFTWARE Version 6.0 GeniE 124 This page is blank for printing User Manual Vol. IV 15 September 2011 DET NORSKE VERITAS SOFTWARE Version 6.0 GeniE 125 User Manual Vol. IV 15 September 2011 9. APPENDIX A: REFERENCES 1. API/WSD 2002 – The implementation of API WSD is according to ―Recommended Practice for Planning, Designing and Constructing Fixed Offshore Platforms—Working Stress Design‖. API RECOMMENDED PRACTICE 2A-WSD (RP 2A-WSD). TWENTY-FIRST EDITION, DECEMBER 2000. ERRATA AND SUPPLEMENT 1, DECEMBER 2002 2. API/WSD 2005 - The implementation of API WSD is according to ―Recommended Practice for Planning, Designing and Constructing Fixed Offshore Platforms—Working Stress Design‖. API RECOMMENDED PRACTICE 2A-WSD (RP 2A-WSD). TWENTY-FIRST EDITION, DECEMBER 2000. ERRATA AND SUPPLEMENT 2, OCTOBER 2005. The joint capacity check also includes error/misprint corrections in ERRATA 3, January 2007 3. API LRFD 2003. The implementation of API LRFD is according to ―Planning, Designing and Constructing Fixed Offshore Platforms—Load and Resistance Factor Design‖. The implementation of API LRFD 2003 is according to the revision ―1st Edition / July 1, 1993 / Reaffirmed, May 16, 2003‖. 4. NORSOK N004 – The implementation of Norsok N-004 is according to NORSOK STANDARD N004, Rev. 2, October 2004, Design of steel structures 5. ISO 19902. The implementation of ISO is according to ―International Standard ISO 19902, Petroleum and natural gas industries – fixed offshore structures‖ 1st Edition, 1 December 2007. 6. AISC. The implementation of AISC is according to ―ANSI/AISC 360-05 An American National Standard; Specification for Structural Steel Buildings‖, March 9, 2005. The implementation of AISC is according to the revision March 9, 2005. The check covers design/utilisation of members according to the provisions for Load and Resistance Factor Design (LRFD) or to the provisions for Allowable Strength Design (ASD). 7. EUROCODE 3 - The implementation of Eurocode 3, EN 1993-1-1 is according to Eurocode 3: Design of steel structures – EN 1993 Part 1-1: General rules and rules for buildings, 2005 DET NORSKE VERITAS SOFTWARE Version 6.0 GeniE 126 This page is blank for printing User Manual Vol. IV 15 September 2011 DET NORSKE VERITAS SOFTWARE GeniE Version 6.0 User Manual Vol. IV 127 15 September 2011 10. APPENDIX B: CODE CHECKS AND NOMENCLATURE This Appendix describes which checks are performed and the nomenclature used. For reference to how the various standards are implemented, please see separate documents available from GeniE‘s help menu. 10.1 The checks performed GeniE will perform two checks during the code check execution run: 1 To find utilisation factors o Formulas in codes describe design strength of members and joints o Failure modes: o 2 Strength of cross section Stability of member due to compression and/or moments Hydrostatic collapse Punching shear of chord (can) from incoming braces (stubs) in a tubular joint Conical transition (tubular) Formulas converted into calculation of interaction ratios in GeniE based on actual loading and design strength Interaction ratio < 1.0 then OK Interaction ratio > 1.0 then failure (require re-design) To perform a geometry check according to the criteria specified in the code of practice. Typically for API/AISC these are o o API (failure when below criteria are exceeded) D/thk < 300 Thk ≥ 0.25 inch (6 mm) AISC (failure when below criteria are exceeded) slenderness L/r < 300 (member in tension) slenderness L/r < 200 (member in compression) D/t < 273 (pipe section only) < Izc/Iz < 0.9 (I section only) h/tw ratio according to Section F13.2. Reported relative to variable limit. Aweb/Acf < 10 (according to Section F13.2) Leg length ratio < 1.7 (L section only) DET NORSKE VERITAS SOFTWARE Version 6.0 10.2 GeniE 128 User Manual Vol. IV 15 September 2011 Nomenclature The nomenclature for each of the code checks may be found from GeniE‘s help pages under ―Reference Documents‖. DET NORSKE VERITAS SOFTWARE Version 6.0 GeniE 129 User Manual Vol. IV 15 September 2011 11. APPENDIX C: CODE CHECKING BASED ON FRAMEWORK This appendix describes how to do code checking of beams using the program Framework. You should use this approach if you want to use older versions of the code checks than implemented in GeniE. The code checking is done in the program Framework. The program may be started from GeniE. When model data is imported in Framework, all concept information is read in. Examples of concept data may be names of objects (beams, sections, materials, load case names, joint names, buckling length factors) and relationship between beam members and the finite elements. This means that when referring to an object the name in GeniE is used, or you may use the finite element numbering system if this is the preferred solution. Note that when creating a model in GeniE the number of characters in a name should not exceed eight (8) to avoid truncation of names. Prior to code checking you may want to add buckling length factors to the beams. The buckling length factors are being used by Framework to calculate the beam buckling length when performing the code checks. In the example below beams BM58, BM59, BM60 are given buckling factors to simulate buckling in local y-direction covering the span from beam BM64 to beam BM26. Similarly, the buckling length in local z-direction shall be equal to the beam length. Select the beams, force the context sensitive menu and choose Edit Beam and Tab Buckling Factors The buckling factors are defined and applied to the selected beams. Note that if you split a beam or join beams, the assigned buckling factors will be set to default (ky=1 and Kz=-1) which means default buckling factors will be used by Framework). The default values are not shown when you label the buckling factors. DET NORSKE VERITAS SOFTWARE Version 6.0 GeniE 130 User Manual Vol. IV 15 September 2011 You may also verify the applied buckling factors from the browser (by adding the necessary fields to the structure browser), the saved report or from Framework itself. All options are showed below. The fields kz, and ky are added to the browser view. The buckling factors as reported by Framework. See below on how to start the code checking. The code checking program is started from Tools|Analysis|Frame Code Check. This Chapter focus how to set up the code checking model and how to control which data are exported to Framework. For more details on how to do the actual code checking (yield, buckling, punching), fatigue (deterministic, stochastic), or earthquake analysis, reference is made to the Framework User Manual. DET NORSKE VERITAS SOFTWARE Version 6.0 GeniE 131 User Manual Vol. IV 15 September 2011 To show how a code checking model can be set up by GeniE, the jacket frame to the left is used. This model consists of tubular members only, and there is one joint where cans, stubs, cones, and gaps are assigned. This structural joint is named Myjoint. To visualise only the joint and incoming members, select the joint, RMB, Select Connected Beams and show these only. The picture at right shows the model imported to Framework To set up the model for code checking, the dialog sheet at left is used (this is activated from Tools|Analysis|Frame Code Check) In the following, the options on how to split up the structure to create wanted member lengths are discussed. DET NORSKE VERITAS SOFTWARE Version 6.0 11.1 GeniE User Manual Vol. IV 132 15 September 2011 Import the model using finite element numbering No concept information is exported to Framework. To do code checking all references must be made to finite element and node numbering. These numbers are identical in GeniE and Framework. Below is an example of the element numbers close to the structural joint Myjoint. 11.2 Generate members in Framework In Framework it is possible to automatically create members between two structural joints where each member may consist of many finite elements. By activating this feature, Framework will do this operation during import of the model data, see details close to Myjoint. Both examples above imply that the user has knowledge about the finite element model, and as such not utilising the high level concept information already built into the model. By using the automatic member creation, the buckling length is always set equal to the member length unless manually specified or automatically computed by the program using an eigenvalue analysis approach (tubular members only). Since members are modelled independently of finite element numbers in GeniE, the default buckling lengths are more inline with the real situation as compared to a finite element modelling approach. DET NORSKE VERITAS SOFTWARE Version 6.0 11.3 GeniE 133 User Manual Vol. IV 15 September 2011 Import the model using concept names, no split of structure The concept information is now read by Framework. The names of the beams close to Myjoint are shown below, and the names are identical to those in GeniE. This means that if the finite element numbering for some reason change, you can still use the same names in Framework since the beams (or concepts) are independent of mesh density. Since no split of structure is performed, the buckling length of Bm1 is identical to the member length. The pictures below show the extent of Bm1 and the buckling length of the same beam in Framework (buckling factor is 1.0, and buckling length is L-B-J (Length-Between-Joints)). To override the buckling length factors, either specify manually or compute by using an eigenvalue approach (for tubular members only) in Framework. DET NORSKE VERITAS SOFTWARE Version 6.0 11.4 joints GeniE 134 User Manual Vol. IV 15 September 2011 Import the concept model, split structure at reinforced structural The split at can-reinforcements is the default option and will create new members in Framework. This means that you can model on a high level in GeniE and concentrate on the code checking model part of it afterwards. The new member names will always refer to the original beam name in GeniE, for example Bm1 split in two members in Framework receive the names Bm1_1 and Bm1_2. The upper part of the leg is shown below. A split has been performed, and the default buckling length of the new Framework members Bm1_1 and Bm1_2 are equal to the length of the respective members. The pictures below show the extent of Bm1_1 and Bm1_2, in this case they are 52.8062 m and 32.4962 m. DET NORSKE VERITAS SOFTWARE Version 6.0 11.5 GeniE 135 User Manual Vol. IV 15 September 2011 Import the concept model, split structure at all structural joints In this case the GeniE model is split at each structural joint. As such it is the same option as automatic FEM based member generation in Framework, the major difference is that concept information now is being used (beam names, sections, materials etc.). Bm1 is now thus split in 6 members. The picture below shows the name details close to Myjoint, The pictures below show the default buckling lengths of each member (picture focus around Myjoint). ----------------------------- o -----------------------------