1
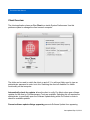
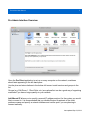
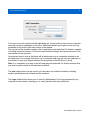
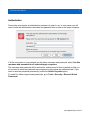
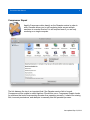
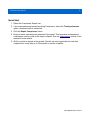
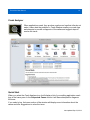
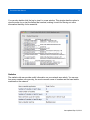
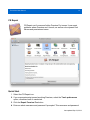
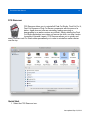
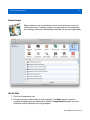
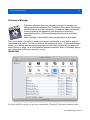
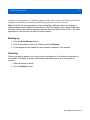
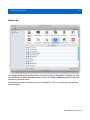
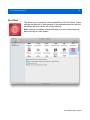
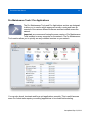
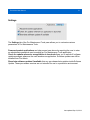
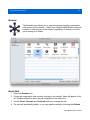
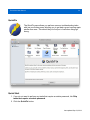
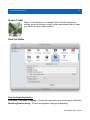
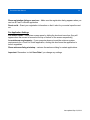
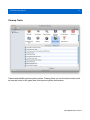
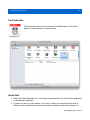
Pro Admin User Manual 1 Pro Admin User Manual Pro Admin extends Pro Maintenance Tools to allow tasks to be performed simultaneously over a network. The Pro Admin interface gives system administrators all the tools they need to manage, maintain and troubleshoot Final Cut Studio systems on their network. With just one button press, administrators can repair Compressor, clean caches, analyze crash logs, synchronize plugins, troubleshoot problems and much more - saving time and allowing them to get on with more important tasks. The software consists of a Pro Client that is installed on every computer on the network and a Pro Admin tool to manage and perform tasks. Pro Admin also requires Pro Maintenance Tools to be installed on each client computer, which can be downloaded and installed remotely from within the admin tool. Features • • • • • Perform maintenance tasks across the network simultaneously Sync plugins, preferences, user paths and scheduled tasks between computers Use the Difference Finder tool to find the differences in speci fication between computers on the network, allowing you to determine why a particular system isn't working correctly when others are fine View aggregate crash statistics including the number of crashes across the network per day, week or month, the most common cause of crashes, and the most and least stable machines Maintenance tasks can be scheduled to run automatically Last updated Sep 24, 2014 Pro Admin User Manual 2 Quick Start 1. Use the provided installer to install and setup Pro Client. Install this on every computer on your network. If a firewall message pops up asking you to allow incoming connections, click Allow. 2. Drag the Pro Admin application to your Applications folder. You can choose to do this on just a single computer or you can install it on every machine on the network. 3. Load Pro Admin. You should see the computers on your network populated in the lefthand pane. If any are missing, open up System Preferences on the machine in question and select the Pro Client preference pane. Move the slider to the On position (or toggle it off then on if it was on already). If a firewall message pops up asking you to allow incoming connections, click Allow. 4. In the Pro Admin, click the Software Updates button in the top right corner. This will install the latest version of Pro Maintenance Tools on every computer if it is not already installed. Alternatively, you could install it manually on each machine if you so wished. 5. If you need to change any Pro Client settings or you wish to enable or disable the client, launch the Pro Client pane inside System Preferences. 6. If you run into any issues, go to Tools > Connection Troubleshooter or read the Troubleshooting section at the back of the user manual. Last updated Sep 24, 2014 Pro Admin User Manual 3 Client Overview The client application places an Pro Client icon inside System Preferences. Use this preference pane to manage the client on each computer. The slider can be used to switch the client on and off. You will most likely need to type an administrator password in order to do this. Switching the client off disables Pro Admin functionality on that computer. Automatically check for updates allows the client to notify Pro Admin when new software updates for the client or Pro Maintenance Tools are available. Switching this off requires the administrator to speci fically open the Software Update dialog within Pro Admin in order to check for available updates. Prevent software update dialogs appearing prevents Software Update from appearing Last updated Sep 24, 2014 Pro Admin User Manual 4 whenever a local user launches an Pro Maintenance Tools application. Switching this on makes updates invisible to the user; they will only be listed in Pro Admin. Listen on interface allows you to specify a network interface (e.g. Ethernet, Airport, FireWire, etc) to run the client on. This is useful if you have network interfaces that are reserved for another purpose, such as Xsan. The default setting is Any, which provides the easiest setup and maximum compatibility. If the interface is not connected or otherwise unavailable, it will default to the Any setting. Custom port allows you to specify a custom port to listen on. This is useful if you have a corporate firewall and need to specify a speci fic port to allow network traf fic on. Switching this off chooses a randomly available port each time the client launches. Disable Bonjour broadcasts allows you to disable periodic broadcasts from the clients that allow Pro Admin to find them automatically. This setting is recommended if you are planning to connect to the clients manually within Pro Admin. Last updated Sep 24, 2014 Pro Admin User Manual 5 Pro Admin Interface Overview Once the Pro Client application is set up on every computer on the network, machines should start appearing in the left-hand pane. Use the plus and minus buttons in the bottom left corner to add services and groups to the list. Groups (e.g. Edit Room 1, Client Suite, etc.) are optional but can be a good way of organizing machines if you have a large quantity on your network. Add Manual IP allows you to specify a manual IP address and port for the system you would like to connect to. It is recommended that you disable Bonjour broadcasts in the client preference pane and specify a network interface and custom port if you are planning to connect manually. Last updated Sep 24, 2014 Pro Admin User Manual 6 If an error occurs the machine will be highlighted red. Hovering the mouse over the computer name will reveal an explanation of the error. Additional details may be given in the error log accessible in the bottom right-hand corner of the window. The top pane of the window contains a list of applications and tasks that Pro Admin is capable of running across the network. The bottom pane includes settings and options relevant to the task selected in the top pane. An important point to note is that tasks will be performed only on computers selected in the left-hand pane. For example, this allows you to compare crash logs on only two machines on the network or only sync plugins between the computers in the Edit Room 1 group. Note: if no computers or groups in the left-hand pane are selected, Pro Admin assumes that you wish to perform tasks on all machines by default. The Info toolbar button can be used to get information on a selected machine including system speci fications and software version numbers. The Logs toolbar button allows you to view Pro Maintenance Tools logs generated by any computer on the network, allowing you to verify the tasks that were performed. Last updated Sep 24, 2014 Pro Admin User Manual 7 Authorization Some tasks may require an administrator password in order to run. In such cases you will need to enter an administrator username and password that is valid on the target computer. If all the computers on your network use the same username and password, select Use this username and password for all selected target computers. The username and password will be cached for a short period of time by default so that you do not need to enter the password every single time you perform an authorized task. If you want to save the password permanently, select the Add to Keychain option. To make Pro Admin forget saved passwords, go to Tools > Security > Remove Stored Passwords. Last updated Sep 24, 2014 Pro Admin User Manual 8 Compressor Repair Apple's Compressor relies heavily on the Qmaster service in order to work. Qmaster allows you to split rendering tasks across multiple machines in a render farm but it is still required even if you are only rendering on a single computer. The link between the two is so important that if the Qmaster service fails to launch, Compressor will be unable to submit batches. Should this occur, Compressor Repair checks for problems that could be preventing Qmaster from operating correctly. It checks for missing files, incorrect permissions, and attempts to manually start the qmasterd process. Last updated Sep 24, 2014 Pro Admin User Manual 9 Quick Start 1. Select the Compressor Repair icon. 2. If you are experiencing issues launching Compressor, select the Trash preferences option, otherwise leave it unselected. 3. Click the Repair Compressor button. 4. Enter an admin username and password if prompted. This username and password combination must be valid on the target computer. See the Authorization section of this manual for more details. 5. Wait for results to appear in the window. Results are only logged after the task has completed so it may take up to 30 seconds for results to appear. Last updated Sep 24, 2014 Pro Admin User Manual 10 Crash Analyzer When applications crash, they produce cryptic error logs that often do not make it clear what the problem is. Crash Analyzer scans your crash logs and attempts to provide a diagnosis of the cause and suggest steps to resolve the issue. Quick Start When you select the Crash Analyzer icon it will display a list of your editing application crash logs in the lower pane. In the Suspected Cause column it will have attempted to diagnose the issue. If you select a log, the lower section of the window will display more information about the cause and offer suggestions to solve the issue. Last updated Sep 24, 2014 Pro Admin User Manual 11 You can also double-click the log to view it in a new window. This window has the option to view the entire log or just the thread that crashed, making it useful for filtering out extra information that may not be essential. Statistics The statistics tab can provide useful information on your network as a whole. You can see how many crashes occur per day, the most common cause of crashes and the least stable machines on the network. Last updated Sep 24, 2014 Pro Admin User Manual 12 CS Repair CS Repair can fix common Adobe Premiere Pro issues. It can repair problems where Premiere won't launch, as well as solve dynamic link failures and permissions issues. Quick Start 1. Select the CS Repair icon. 2. If you are experiencing issues launching Premiere, select the Trash preferences option, otherwise leave it unselected. 3. Click the Repair Premiere Pro button. 4. Enter an admin username and password if prompted. This username and password Last updated Sep 24, 2014 Pro Admin User Manual 13 combination must be valid on the target computer. See the Authorization section of this manual for more details. 5. Wait for results to appear in the window. Results are only logged after the task has completed so it may take up to 30 seconds for results to appear. Last updated Sep 24, 2014 Pro Admin User Manual 14 Difference Finder Difference Finder allows you to see the differences between two groups of computers on your network. It compares operating system and software versions, plugins, frameworks and kernel extensions and determines what is unique about a certain group of computers that may not be working correctly. Quick Start Difference Finder is best explained with an example. For instance, say you have an network of ten machines, eight of which are running fine and two of which have an issue. Fire up the Difference Finder, drag the eight working machines into the Working category and the two non-working into the Not Working category. Last updated Sep 24, 2014 Pro Admin User Manual 15 Click the Find Differences button and Difference Finder will compare operating system and software versions, plugins, frameworks and kernel extensions between the working and nonworking groups, allowing you to spot outdated software versions or missing frameworks that could be causing issues. Frequently Asked Questions Why doesn't Difference Finder report every single difference? Difference Finder is trying to find differences that are common among the group of nonworking computers. If a difference is only unique to a single computer then it is unlikely to be the cause of the issue among the whole group, so Difference Finder ignores it. Last updated Sep 24, 2014 Pro Admin User Manual 16 FCS Remover FCS Remover allows you to uninstall all Final Cut Studio, Final Cut Pro X, Final Cut Express or Final Cut Server components with the press of a button. Apple does not offer an uninstaller, making removing or downgrading to an earlier version very dif ficult. Simply deleting the Final Cut Studio application icons does not remove the suite, nor does it make it possible to reinstall it again. FCS Remover allows you to quickly and easily uninstall Final Cut Studio either permanently or in order to reinstall an earlier version over the top. Quick Start 1. Select the FCS Remover icon. Last updated Sep 24, 2014 Pro Admin User Manual 17 2. Select the components you wish to remove or choose a preset. If you have other Apple Pro Applications such as Logic, Aperture or Shake installled, choose the Maximum Compatibility preset if you are not planning on reinstalling Final Cut Studio. 3. Click the Remove Selected button to remove the components. They will be placed in the trash on each computer. Last updated Sep 24, 2014 Pro Admin User Manual 18 Housekeeper Many problems such as slowdowns, errors and crashes are a result of invalid cache data. Trashing caches is an important part of maintaining your editing system and Housekeeper simpli fies this process signi ficantly. Quick Start 1. Click the Housekeeper icon. 2. Choose a preset or select items to trash manually. The Basic preset is good for everyday housekeeping and optimization and the Comprehensive preset is a more advanced function designed for fixing problems. Last updated Sep 24, 2014 Pro Admin User Manual 19 3. Click Clean. Tip: these tasks can be automated quickly and easily with Task Scheduler. Frequently Asked Questions Q. When I try to empty my trash, I get a message saying files are in use. A. Mac OS X erroneously believes the files are in use, however this is not actually the case and it is perfectly safe to delete them. To force the trash to be emptied, go to the Finder menu and select Secure Empty Trash. Last updated Sep 24, 2014 Pro Admin User Manual 20 MC Repair MC Repair can fix common Avid Media Composer issues. It can repair problems where Media Composer won't launch, as well as solve permissions issues. Quick Start 1. Select the MC Repair icon 2. If you are unable to access a bin on a Unity system because a system crashed while using it, select the Trash Unity lock files option, otherwise leave it unselected. Last updated Sep 24, 2014 Pro Admin User Manual 21 Click the Repair Media Composer button. Enter an admin username and password if prompted. This username and password combination must be valid on the target computer. See the Authorization section of this manual for more details. Wait for results to appear in the window. Results are only logged after the task has completed so it may take up to 30 seconds for results to appear. Last updated Sep 24, 2014 Pro Admin User Manual 22 Path Manager Path Manager is a utility to manage the locations of scratch and content directories on your system. Paths for each computer are listed under each item, allowing you to compare paths at a glance and see if any are out of sync or incorrect. Additionally, each item has a Reset button that sets the path back to its default value. Tips for changing paths • Press Enter after typing the new path to save changes on the remote machine. • If you wish to make a path local to the currently logged in user on the remote machine, use a tilde ~ character at the beginning of the path, such as ~/Documents. • To change the location of a path for every selected computer simultaneously, type the Last updated Sep 24, 2014 Pro Admin User Manual 23 path next to the bold title heading and it will be propagated to every computer on the network. Synchronization Use the Sync From button to sync paths from one computer on the network to all the rest. Last updated Sep 24, 2014 Pro Admin User Manual 24 Plugin Manager Plugin Manager allows you to quickly and easily organize your editing application plugins. You can view all plugins on the network, selectively enable and disable them, and ensure they are in sync across the network – all without having to worry about where the plugins are physically located on disk. Most editing applications scan each plugin at startup so it makes sense to run as few plugins as possible in order to speed up boot times and decrease resource usage. Plugin Manager makes it easy to quickly enable a group of plugins on demand. Quick Start 1. Click the Plugin Manager icon. Your currently installed plugins will be listed. 2. Green icons next to plugins mean that the plugins are in sync across all machines. Last updated Sep 24, 2014 Pro Admin User Manual 25 Yellow icons mean that the plugin is installed on all machines but doesn't quite match (a different version for example). Red icons mean that the plugin is not installed on every computer. If a plugin is yellow or red, click the arrow next to it to view more information about which aspects are not in synchronization. 3. Click the Sync button to automatically sync all plugins on the network. This may take a few minutes. 4. Use the dropdown menu under the Enabled column to disable plugins you do not use regularly. When you wish to use a disabled plugin, enable it on demand before launching Final Cut Pro. 5. For best results, select All Users under the User column for all plugins. This makes the plugin available to all users logged into the computer and simpli fies transferring projects from one machine to another. Frequently Asked Questions Q. Where are disabled plugins located? A. Disabled plugins are located on each computer at /Library/Application Support/Digital Rebellion/Pro Maintenance Tools/Plugin Manager Disabled Plugins. Last updated Sep 24, 2014 Pro Admin User Manual 26 Preference Manager Preference Manager gives you everything you need to manage your editing application preference files. Preference files contain user settings, window positions and other information. Sometimes these can become corrupt, preventing the application from launching or producing unexpected behavior. Preference Manager allows you to trash these which will restore settings to their defaults when the application is relaunched. Even more useful is the ability to backup and restore preferences, or lock them to prevent unintended modi cation. You are not limited to just preferences either – Preference Manager allows you to backup and restore keyboard layouts, button bars, window layouts and more, storing them in a single l e to ease transition between computers. Now it is incredibly easy to take your custom preferences wherever you go. Quick Start The Basic tab offers a quick way to access common tasks. The Quick Trash button instantly trashes Last updated Sep 24, 2014 Pro Admin User Manual 27 preferences for all applications. The Restore button restores a previously-saved backup to all selected computers simultaneously, essentially synchronizing preferences across the network. Note: Final Cut Pro ignores preference files created by a different version so restoring a backup created under a different major version of FCP will appear to do nothing. Make sure that the versions match before restoring a backup. This only affects Final Cut Pro - the other applications in the suite do not suffer from this problem. Backing up 1. Click the Quick Backup button. 2. Enter a descriptive name for the backup and click Backup. 3. A new backup will be created for each selected computer on the network. Restoring Restoring a backup allows you to copy one set of preferences to all selected computers on the network. This helps to ensure consistency when editors move from one system to another. 1. Select a backup in the list. 2. Click the Restore button. Last updated Sep 24, 2014 Pro Admin User Manual 28 Advanced The Advanced tab gives greater control over the elements to be trashed or backed up. Use the checkboxes to select individual items and click the Trash or Backup buttons to perform actions on just these items. Preferences can also be locked to prevent modi fication. This is a useful way of preventing data corruption. Last updated Sep 24, 2014 Pro Admin User Manual 29 Pro Client This allows you to customize various parameters of the Pro Client. These settings are identical to those present in the preference pane but with the advantage that they can be set in bulk, remotely. Note: network connection settings still need to be set in the preference pane manually for each system. Last updated Sep 24, 2014 Pro Admin User Manual 30 Pro Maintenance Tools / Pro Applications The Pro Maintenance Tools and Pro Applications sections are designed to allow you to monitor which apps are currently running and have an overview of the various different software versions installed across the network. Important: we recommend having the same version of Pro Maintenance Tools installed on every computer on the network. The Pro Maintenance Tools section allows you to quickly see any outdated versions on your network. You can also launch, terminate and force quit applications remotely. This is useful because some Pro Admin tasks require your editing applications to be closed before starting. Last updated Sep 24, 2014 Pro Admin User Manual 31 Settings The Settings tab of the Pro Maintenance Tools pane allows you to customize various parameters of Pro Maintenance Tools. Password-protect applications can help prevent user abuse by requiring the user to enter an administrator password upon launching an Pro Maintenance Tools application. Check for updates whenever an application is launched allows you to switch off software update messages whenever the user launches an application. Software updates can still be installed from Pro Admin. Show beta software updates if available lists any pre-release beta updates inside Software Update. These pre-release versions are not intended for use in a production environment. Last updated Sep 24, 2014 Pro Admin User Manual 32 Qmaster The Qmaster pane allows you to view and manage ongoing compression jobs running on the network. It differs from Apple's Batch Monitor utility with its ability to view any job on the network, regardless of whether or not the job is running on a cluster. Quick Start 1. Select the Qmaster icon. 2. If there are compression jobs currently running on the network, these will appear in the list. Detailed information about the job is displayed in the table view. 3. Use the Pause, Resume and Terminate buttons to manage the job. 4. The view will periodically update, or you can update manually by clicking the Refresh Last updated Sep 24, 2014 Pro Admin User Manual 33 button in the top left corner. Additional controls are provided for managing the Qmaster process, including starting and stopping sharing and resetting Qmaster. To repair Qmaster, use Compressor Repair. Last updated Sep 24, 2014 Pro Admin User Manual 34 QuickFix The QuickFix pane allows you perform common troubleshooting tasks with just one button press, allowing you to get back up and running again quicker than ever. This should be your first port of call when things go wrong. Quick Start 1. If you do not want to perform any tasks that require an admin password, tick Skip tasks that require an admin password. 2. Click the QuickFix button. Last updated Sep 24, 2014 Pro Admin User Manual 35 System Toolkit System Toolkit allows you to manage Final Cut Studio licenses and settings, as well as running common system maintenance tasks to keep your system running in peak condition. Final Cut Studio Final Cut Studio Registration First Name, Last Name, Company – Change the registered owner and company information Banish registration dialog – Prevent the registration dialog from appearing Last updated Sep 24, 2014 Pro Admin User Manual 36 Show registration dialog on next run – Make sure the registration dialog appears when you next run a Final Cut Studio application Reset serial – Reset your registration information so that it asks for your serial upon the next run Per-Application Settings Full-screen mode – maximizes screen space by hiding the dock and menu bar (they will appear when the mouse is hovered at the top or bottom of the screen respectively) Low minimum requirements – If your computer does not meet the minimum system requirements for a Final Cut Studio application, clicking this box forces the application to launch regardless. Show welcome dialog at startup – restores the welcome dialog for certain applications. Important: Remember to click Save Data if you change any settings. Last updated Sep 24, 2014 Pro Admin User Manual 37 Cleanup Tasks Trashes and rebuilds various system caches. Clearing these out can fix certain issues (such as incorrect icons for file types) and often improve system performance. Last updated Sep 24, 2014 Pro Admin User Manual 38 Task Scheduler Task Scheduler allows you to schedule Pro Maintenance Tools tasks based on time intervals or system events. Quick Start 1. Select the Task Scheduler icon. You will be presented with a list of the tasks scheduled on all selected machines. 2. A green icon next to a task means it is in sync. A yellow icon means that the task is present on all computers but doesn't quite match (a different interval for instance). A Last updated Sep 24, 2014 Pro Admin User Manual 39 red icon means that the task is missing from some machines. 3. Click the Sync icon to synchronize tasks. Adding tasks 1. Click the + button to add a new task. 4. Select an application to perform a task for and choose a task from the list. 5. Choose an interval or event from the Run dropdown menu. Important: the daily task is set for 7:00am every day, the weekly task is set to run at 7:00am every Monday and the monthly task is set for 7:00am on the first day of the month. OS X 10.5 users will need to have the computer switched on at these times but OS X 10.6 users need not, as Snow Leopard will automatically run the task the first time you switch it on after this date. Last updated Sep 24, 2014 Pro Admin User Manual 40 If these times are inconvenient, please use the At speci fic interval option to manually schedule the task for a speci fic time. 6. If you selected At speci fic interval, you will be presented with a series of blank text boxes. At least one of these must be filled in. If you put a 1 in the Minute box, the task will run every hour at minute 01. If you then put a 5 in the Hour box, it will run every day at 05:01, and so forth. 7. Click Add Task. Double-click a task to edit it and use the Enabled dropdown menu to enable or disable it. Last updated Sep 24, 2014 Pro Admin User Manual 41 Troubleshooting If a client machine is highlighted in red, it means it is not connected. Here are some things to try to resolve the issue: 1. If you have set the client to listen on a speci fic network interface (by default it is set to Any), make sure that the interface is connected to a network that the admin computer is capable of accessing. 2. In the Security pane of System Preferences, make sure the Firewall is not set to Allow only essential services. 3. If the Firewall is set to Set access for speci fic services and applications, make sure Pro Admin.app and ProClient are added to the list (ProClient is located at /Library/PreferencePanes/Pro Client.prefPane/MacOS/ProClient). 4. In the Pro Client pane in System Preferences, toggle the switch to the Off position, wait a few seconds and then toggle it back to On. 5. Try disabling your network connection and then re-enabling it. If you are connected to a wireless network, this will involve going to the Airport icon in the top-right corner of the screen, selecting Turn Airport Off, waiting a few seconds and then switching it back on. If you are connected to a cabled network, it will require unplugging the cable, waiting a few seconds and plugging it back in. 6. If you are on a corporate network, you may have a hardware firewall. In this case, go to the Pro Client pane in System Preferences, specify a custom port and make sure this port is open on your firewall. Also try opening 35011, which is the fallback port if something goes wrong. 7. Download and reinstall Pro Client on the affected systems. 8. You may also experience success by closing Pro Admin and reopening it. 9. Report the issue to Digital Rebellion Support by going to Help > Report a Bug. Please include as much detail as possible. We recommend including your email address so that a support representative can contact you and resolve your issue quickly. Support Email support can be accessed directly within Pro Admin. To report a bug or any other issue, go to Help > Report a Bug. To request a new feature, go to Help > Suggest a Feature. Last updated Sep 24, 2014 Pro Admin User Manual 42 When emailing customer support, it is helpful to include log files from the relevant application, if available. To access the logs for the Pro Admin, go to Help > Troubleshooting > View Log. You can also choose Gather logs to gather Pro Admin logs or Gather network logs to gather all Digital Rebellion logs across the network. Last updated Sep 24, 2014