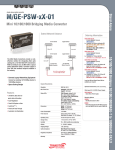
1
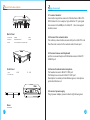
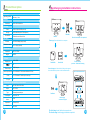
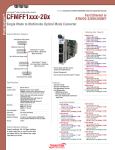
Please read this notice carefully!
【Warranty and instructions】
1,From the date of purchase , the manufacturer provides free replacement in one year and 3 years
warranty,.The warranty start date will be subject to the effective purchase date of the product from our
factory.
2,As a electronic product, Without authorization of maintenance man, you shouldn’t open the cover , or you
can’t get the related after sales service .
3,Be affected with lighting,damp and artificial , the factory may charge additional fees in the case of a notice .
4,The factory guaranty of the product by virtue of warranty card , If meet quality problem,you should fill in
customer information and product problem description carefully , or you can’t get proper aftersales service.
5,In addition to the machine accessories(power adapter, support bracket , package ,etc) don’t apply in this
User manual
rules.
6,The factory has the right to the interpretation of the statement
Product Warranty Card
Product model :
Date of purchase :
Customer Name :
Product service hotline:
Date of inspection qualified:
Quality inspector:
Customer feedback product’s problems:
Maintenance results (filled by maintenance man)
Maintenance NO.
Mini PC series
【Notice】
Thank you for purchasing cloud computer.
In order to easily use this equipment, please read the manual
before using.
The product version may upgrade in ceaseless, this document
is used only as a guide. All of these documents,
representations,informations and advices does not constitute
any express or implied warranty. The instruction of the material
are subject to change without notice, and don't take any
responsibility that manual errors generated or omissions
caused.
Catalogue
1.Component...........................................................................01
2.Connection........................................................ ..................02
2.1 Connect with Monitor.........................................................02
2.2 Connect with Lan Cable.....................................................02
2.3 Connect with Mouse&Keyboard......................................... 02
2.4 Connect with Mic&Speaker................................................02
2.5 Connect with Power.......................................................02
3.Product Parameter ...............................................................03
【Precautions】
● In order to assure the safety, please select the power
adapter appointed or provided by our factory
● In the boot state,please do not directly pulled out power
adapter, or it may off power suddenly.
● Please do not move the equipment when it is running.
● Keep far away from high temperature or low temperature
environment, try to keep moistureproof and ventilated working
environment.
3.1Master Control...................................................................03
3.1.1Display...........................................................................03
3.1.2Memory..........................................................................03
3.1.3Ethernet.........................................................................03
3.2Appearance...................................................................... 03
3.1 I/Oport..............................................................................04
3.1.1Power and Working environment.......................................04
● Please do not hurl,knock or rock the machine,the nonprofessional workers do not unpack the box without any
guides.
● Do not clean the machine with harsh chemical or corrosive
cleaner.
4.Faults and maintenance .......................................................05
1 Spare Parts description
2 How to connect
E
A
C
B
D
F G
2.1 connect monitor
Use monitor signal line access to VGA interface of Mini PC .
With hd monitor ,for example, high-definition TV, put signal
line access to the HDMI port on Mini PC , then can support
double screen.
H
Back Panel
A. Power port
B. HDMI
D.LAN port
E.CPU Radiator Port
G. USB
H. 2in1 speaker and microphone port
C. VGA
F.USB
2.2 Connect the network cable
Put ordinary network cable access LAN port on Mini PC and
the other end connect to the network switch router port.
2.3 Connect mouse and Keyboard
put the mouse and keyboard USB cable access to Mini PC
USB 2.0 port
L
I
J
K
Side Panel
J: USB
I. On-of
L : Radiator port
K: USB
2.4Connect headset and microphone
Put headset access to Mini PC SPK port
Put Microphone connect to Mini PC MIC port
Description: Headset port identified as green, microphone
ports identified as red.
2.5 connect power supply
Plug in power adapter, power indicator light shows green
M
Base
1
M: HDD Base
2
3
Product Description
4 Back hanging installation instructions
Processor
Operating system
Windows、Linux
Display
Resolution
1920*1200 32 bits 60Hz
storage
RAM
Storage
Sound card
DDRIII 2GB(1GB-4GB optional)
SATA DOM 8GB(4GB-1TGB optional)
HD Multichannel Sound Card
Network
Ethernet
Wireless network
Bracket
Monitor
Bracket installation is completed
First stage:Screw the bracket to a computer
10/100/1000Mbps (adjust itself)
802.11.b/g/n(optional)
Appearance
Dimension
Weight
14*14*2.5CM
0.4KG
I/O port
Display port
VGA+HDMI
front side
back side
4
Ethernet port
Rj45 Lan port
Power input interface 1 inner diameter 2.5mm,external diameter 5.5mm
Audio
2 in 1 Standard 3.5 Audio input and output
DC port
1
Second stage:put the back side of the product groove
aim to the bracket,top-down to the installed bracket
The preliminary
product installation drawing
How to install the HDD base?
Consumption and working environment
Input
Output
Type
Consumption
Noise
Temperature
Humidity
3
Machine
AC 100-240V AC/50-60Hz
HDD
DC 12V/3A
External power adapter
buttons
HDD base
Less than 17W
Zero
Back hanging
installation diagram
Vertical 0-40℃
10%-85%
Installation Completed
The third stage:Install buttons to secure device
The fourth stage :back hanging installation completed
4