1
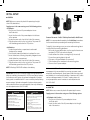
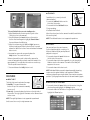
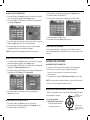
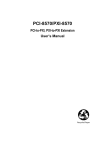
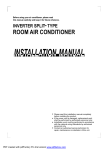
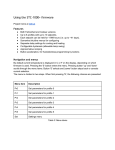
45255 ver2 Wireless Color Digital Home Monitoring Kit User Manual HOME MONITORING SMALL BUSINESS PROTECTION BABY MONITORING NANNY CAM THEFT DETECTION & PREVENTION NIGHT VISION DOORWAY MONITORING (INDOORS) WAITING AREAS CAREGIVER ASSITANCE/ MONITORING PET SUPERVISION http://goo.gl/3wUHy NOTE: Camera and surveillance products may be prohibited by laws that vary under federal and state laws. IT IS THE SOLE RESPOSIBILITY OF THE USER TO DETERMINE WHETHER THEIR USE OF THESE PRODUCTS VIOLATES ANY APPLICABLE FEDERAL OR STATE LAWS. 2 FEATURES INITIAL SETUP Camera ............................................................................................. 5 Monitor.............................................................................................. 5 THE BASICS How to view live video .............................................................. 6 How to view live video with motion and/or sound detection ........................................................... 6 FEATURES Night Light ....................................................................................... 7 Talk-back .......................................................................................... 7 Lullabies............................................................................................ 7 Digital Pan/Tilt and Zoom ....................................................... 7 Temperature Alert ....................................................................... 8 Auto Mute ........................................................................................ 8 SETTINGS Adjusting the Sound and/or Motion Detection Sensitivity.................................................. 8 Setting the Date and Time ..................................................... 8 Adjusting the Brightness ......................................................... 9 Adjusting Temperature Display Unit ................................. 9 Restoring to Factory Defaults .............................................. 9 Updating the Firmware............................................................ 9 ADVANCED FEATURES Connecting to a computer ..................................................... 9 Using with add-on cameras.................................................. 9 View live video with 1st priority motion and/or sound detection .........................................................10 Recording with optional MicroSD™ card........................10 Manually record .........................................................................10 Automatically record with motion and/or sound detection .........................................................................10 Automatically record with 1st priority motion and/or sound detection .........................................................12 Playback/Deletion of recorded videos...........................12 Adjusting the amount of time recording continues after motion and/or sound is detected .........................13 Formatting optional MicroSD™ card ................................13 TROUBLESHOOTING Frequently asked questions ...................................................13 Technical support ........................................................................13 WARRANTY INFORMATION SPECIFICATIONS FCC STATEMENT For the most up-to-date product support, accessories, electronic (PDF) format manuals and more, visit www.jascoproducts.com/support or Call 1-800-654-8483, option 1 M-F, 8-5pm CST PACKAGE CONTENTS: Please locate and identify all the parts before proceeding: (1) Monitor (1) Camera (1) Charging cradle (2) AC power supply adapters (1) Mini USB cable (1) CD (Computer Monitoring Software) (1) Camera wall plate and mounting hardware 3 Congratulations on your purchase of the GE Wireless Color Digital Home Monitoring Kit! Please review these instructions carefully and retain them for your future reference. FEATURES CAMERA • 2.4GHz digital wireless technology—private and secure monitoring with interference-free picture and sound • Built-in motion and/or sound detection • Built-in night vision (black & white, up to 20ft visibility) • Built-in microphone for broadcasting audio to monitor automatically • Built-in night light (manually activated on camera or remotely activated on monitor) • (4) Musical lullabies (remotely activated on monitor) • Tabletop or wall mount options • Portable operation using (4) AA batteries or optional rechargeable battery pack (sold separately at www. jascoproducts.com) night light (manual or remote control) 4.9mm lens infrared LEDs (night vision) speaker (lullabies & audio from monitor) microphone IR light sensor temperature sensor power switch power LED (flashes when power is low) wall mount slots AC power sensitivity control volume control battery compartment (4 -AA) pairing control 4 FEATURES speaker (audio from camera(s)) music controls/ lullabies MONITOR • High contrast 3.5” LCD color monitor for remote video and audio monitoring • 2.4GHz digital wireless technology—private and secure monitoring with STATIC-FREE picture and sound • Wirelessly receives audio and video up to 500ft (unobstructed; line of sight) • Expandable up to 4 cameras—quad, sequential or single view • Digital Pan/Tilt and Zoom • Built-in microphone for broadcasting your voice to each camera • Built-in speaker for listening to audio coming auto record from each camera • Built-in motion and/or sound detection manual record alarm notification night light • Temperature Monitoring with alarm notification charging light • Built-in 4hr Li-polymer rechargeable battery (green=fully charged • Multiple charging options AC power • USB output to computer (direct to monitor) • DVR functions: mini USB - record/stream to computer hard drive - record to removable micro SD card (32GB max capacity = 120hrs recorded) • Motion-activated, sound-activated and manual recording modes menu (access system functions) ok (press to select) RECORDING & PLAYBACK talkback control (speak to camera) kickstand monitor power switch MicroSD™ card slot charging cradle AC power antenna antenna release back play/pause rewind auto record mode indicator dynamic audio level indicator (sound received from camera(s)) monitor power LED (low battery if flashing) tabletop charging cradle delete CAMERA VIEWING microphone standby (turns screen off until video or motion is detected by camera) fast forward stop Up, Down, Left, Right navigation volume controls (adjusts sound level from camera(s)) manual activates the single viewing mode quad/scan toggles between multiscreen and sequential viewing modes overwrite enabled (when the memory talk-back button card is full, old video activated temperature will be overwritten) (broadcasting audio reading near to camera) selected camera night light on/ camera channel off indicator (currently viewing) reception quality (full strength shown) memory card inserted CAM1 68 ° F SD recording indicator FLASHING YELLOW: new video saved to memory (resets when power is turned-off) RED: memory card full name of video currently recording (cannot be changed) • REC 132418-1.AVI CHARGE CAMERA OUT OF RANGE CHARGE BATTERY BRAHMS X2 03.21.2011 13:24 name of lullaby currently playing current monitor zoom level OW date & time stamp (year-month-day-time) monitor volume mute indicator 5 INITIAL SETUP: CAMERA Wall mount NOTE: Before use, remove the plastic film protecting the night vision LEDs (around lens). Supply power to the camera using one of the following options: • AC Adapter1. Plug-in one of the two AC power adapters into an electrical outlet. 2. Insert the other end of the power adapter into the base of the camera. 3. Locate the power switch on the left side of the camera. 4. Slide the power switch to the ‘on’ position. The power LED will illuminate green below the OFF position. • AA Batteries1. Locate the rear battery compartment underneath the base of the camera. 2. Push the tab towards the batteries to release the cover. 3. Insert the batteries, following the polarity diagram shown inside the battery compartment. 4. Locate the power switch on the left side of the camera. 5. Slide the power switch to the ‘on’ position. The power LED will illuminate green below the OFF position. NOTE: A flashing POWER LED indicates a low battery. Special Note: In the event of a power outage, having standard AA batteries installed in the camera WILL NOT act as a ‘battery backup’ for the absence of AC power. An optional rechargeable LI-polymer battery pack is available that WILL serve as a battery backup during a power outage. Optional rechargeable Li-polymer battery packs can be ordered online at www.jascoproducts.com or by contacting our sales department at 800-654-8483. wall mounting plate Tabletop stand Camera Placement - Built-in Tabletop Stand and/or Wall Mount NOTE: It is recommended to complete the ‘Initial Setup’ procedures for the monitor before proceeding with mounting the camera. To simplify the mounting process, a custom wall mounting plate is included with the mounting hardware. 1. After selecting an ideal location, use the supplied mount as a template. Drill 3/16” holes where indicated. 2. Insert wall anchors (unless screwing directly into a stud). 3. Secure the mounting plate to the wall. 4. Disconnect AC power adapter (if connected). 5. Slide the base of the camera onto the mounting plate. 6. Connect the AC power adapter. Notes on Installation: For a cleaner-looking installation, cord management clips are available for securing your power cords along walls and baseboards. Special power cable extension cords are available for in-wall rated installation. A maximum of (2) cables can be used (approximately 10 ft each). To order, please visit www.jascoproducts.com or contact our sales department at 800-654-8483. MONITOR NOTE: Before use, remove the plastic film protecting the screen. WARNING Strangulation Hazard Children have been strangled in cords. Keep away from children • Keep all cords at least 3 ft. away from infant cribs • Do not use with household extension cords • Do not remove warning tags CAUTION Batteries may leak harmful liquids or ignitable materials or explode causing injury or product damage. • Do not mix old and new or other battery types • Replace all batteries at the same time • Replace fully discharged batteries immediately • Remove batteries if product is to be unused for extended period of time Supply power to the monitor using one of the following options: • AC Adapter into Monitor1. Plug-in one of the two AC power adapters into an electrical outlet. 2. Insert the other end of the AC power adapter into the right side of the monitor. 6 • AC Adapter into Cradle1. Plug-in the AC power adapter into an electrical outlet. Charging 2. Insert the other end of the AC power Light adapter into the rear of monitor AC power the charging cradle. 3. Place the monitor into the cradle, making sure the kickstand is secure 4. The charging light will illuminate near the power input on the monitor. RED=Charging NOTE: Depending on the current state of GREEN=Fully charged the battery, it can take up to 6 hours to fully charge the monitor. Battery is built-in and not replaceable. It is designed to last for the lifetime of the product. Monitor Operation1. Locate the POWER switch on the left side of the monitor. 2. Slide the power switch to the ‘on’ position. The power LED will illuminate green near the bottom left of the display. NOTE: A flashing POWER LED indicates a low battery. The monitor will automatically scan for the camera. If within range, video will appear on the screen. The built-in speaker will automatically broadcast live audio from the camera. Volume can be adjusted using the buttons located on top of the monitor. Antenna UsageExtending the antenna is recommended for optimal reception. 1. Locate the ANTENNA RELEASE SWITCH on top of the monitor. 2. Slide the switch to unlock. Take care not to force the antenna beyond its maximum position. antenna Locating your SystemWhen choosing the best location for the placement of the camera and monitor, it is best to avoid any sources of possible RF interference such as wireless routers. Proximity—within ~10 Ft.— to these and other RF interference sources may inhibit the proper functioning of the receiver, and/or the wireless router. The digital wireless signal can easily pass through your home’s interior walls, but the signal may be reflected by power wires or plumbing inside those walls. Usually a slight adjustment to the position of the monitor and/or camera will improve reception. Other Potential Sources of RF Interference: plumbing masonry electrical conduit ductwork windows metal doors & frames audio/video/computer RF devices The Digital Wireless monitor system has a private and secure 2.4GHz connection. Only cameras that have been directly paired with the monitor can be viewed. THE BASICS: VIEWING LIVE VIDEO Video appears automatically when monitor is powered ON. How to view live video with video motion and/or sound detection: 1. Adjust/disable audio & motion sensitivity (refer to the ‘Settings’ section in the manual) 2. In manual or scan mode, press and release the ‘stdby’ button. The screen will turn off. When motion and/or sound is detected by camera, the screen will automatically turn back on and will remain lit for approximately 15 seconds after the video motion or sound stops. This will repeat for each detection. 3. Press and release the ‘stdby’ button to exit. • WITH notification alarmWhen audio or video motion is detected, monitor will sound 4 beeping tones. This will repeat for each detection. To be notified with the screen illuminated... 1. Adjust/disable audio & motion sensitivity (refer to the ‘Settings’ section in the manual) 2. Press and release the ‘menu’ button on the monitor. Use the directional keypad to highlight ‘Alarm Volume’. Press and release the ‘ok’ button. 3. Enable the alarm by increasing the volume using the ‘right’ arrow on the directional keypad. Adjust to desired level. 4. Press and release the ‘ok’ button to save. Press and release the ‘menu’ button to exit. 7 TALK-BACK To be notified with the screen in standby mode... 1. Adjust/disable audio & motion sensitivity (refer to the ‘Settings’ section in the manual) 2. Press and release the ‘menu’ button on the monitor. Use the directional keypad to highlight ‘Alarm Volume’. Press and release the ‘ok’ button. 3. Adjust the volume using the ‘left’ and ‘right’ arrows on the directional keypad. Adjust to desired level. Press and release the ‘ok’ button to save. Press and release the ‘menu’ button to exit. 4. In manual or scan mode, press and release the ‘stdby’ button. The screen will turn off. When motion and/or sound is detected by camera, the screen will automatically turn back on and will remain lit for approximately 15 seconds after the motion or sound stops. This will repeat for each detection. 5. Press and release the ‘stdby’ button to exit. FEATURES: night light Speak directly to currently selected camera channel: 1. Locate the ‘talk back’ button on the left side of the monitor. 2. Press and hold the ‘talk back’ button. 3. Begin speaking. 4. Release when finished. talk back control Adjust the volume level on the camera if needed (located below the sensitivity dial). NOTE: The talk back feature is not supported in quad view. LULLABIES Play musical tunes from each camera. lullaby control Once activated, a playlist consisting of 4 (music) different lullabies will play and repeat until playback is stopped. 1. Press and release the ‘music’ button on the left side of the monitor. 2. Press and release the button repeatedly to cycle through the lullabies stored on the camera. The name of the lullaby will appear on the screen. 3. Press and release the button to exit. NOTE: Individual lullabies cannot be played repeatedly. Importing custom music to replace lullabies is not supported. If lullabies continue to play after pressing the button, there may be a reception problem. Try bringing the monitor closer to the camera and try again. NIGHT LIGHT The Night Light can be activated two ways: 1. Manually - Press and release the button on top of the camera to manually turn on or off. 2. Remotely - Press and release the button on the right side of the monitor. The night light will illuminate on the camera shown on the screen. NOTE: The night light feature is not supported in quad mode (multi-screen) view—only in single camera view. DIGITAL PAN/TILT AND ZOOM 1. Press and release the ‘menu’ button on the monitor. Using the directional keypad, highlight the ‘Settings’ option. 2. Press and release the ‘ok’ button. Using the directional keypad, highlight the ‘Zoom’ option. 8 3. Press and release the ‘ok’ button. Use the directional keypad to highlight either ‘1x’ or ‘2x’. 4. Press and release the ‘ok’ button. Press and release the ‘menu’ button to exit. Use the directional keypad to digitally pan and tilt the displayed image. TEMPERATURE ALERT Monitor the temperature near the camera with alarm notification. When activated, the temperature reading on the display will blink red continuously when the temperature range is exceeded. Additionally, the monitor will beep twice every 60 seconds. The alarm resets automatically when the temperature returns within the range selected. Functional range: -4–131°F (-20–55°C) 1. Press and release the ‘menu’ button on the monitor. Using the directional keypad, highlight the ‘Settings’ option. 2. Press and release the ‘ok’ button. Using the directional keypad, highlight the ‘Temp. Alert Range’ option. 3. Press and release the ‘ok’ button. Use the directional keypad to adjust the values displayed. 4. Use the directional keypad to highlight ‘On’ or ‘Off’. 5. Press and release the ‘ok’ button to save. Press and release the ‘menu’ button to exit. AUTO MUTE Mutes monitor speaker until camera is activated by motion or audio (if enabled). Speaker transmits audio from activated camera for approximately 5 seconds after camera no longer detects motion or audio. Can be triggered for an indefinite period of time. 1. Press and release the ‘menu’ button on the monitor. Using the directional keypad, highlight the ‘Settings’ option. 2. Press and release the ‘ok’ button. Use the directional keypad to highlight ‘Auto Mute’. Press and release the ‘ok’ button. 3. Use the directional keypad to highlight either ‘Yes’ or ‘No’. Press and release the ‘ok’ button to save. 4. Press and release the ‘menu’ button to exit. SETTINGS: ADJUSTING THE SOUND AND/OR MOTION DETECTION SENSITIVITY sensitivity control • Sound 1. Identify the ‘sensitivity’ dial and adjust as shown. 2. Turn the dial completely down to disable sound detection. • Motion 1. Press and release the ‘menu’ button on the monitor. Using the directional keypad, highlight the ‘Record’ option. 2. Press and release the ‘ok’ button. Using the directional keypad, highlight the ‘Motion Sensitivity’ option. 3. Press and release the ‘ok’ button. Use the directional keypad to highlight ‘High, ‘Medium’, ‘Low’ or ‘Off’. Press and release the ‘ok’ button. 4. Press and release the ‘menu’ button to exit. SETTING THE DATE AND TIME 1. Press and release the ‘menu’ button on the monitor. Using the directional keypad, highlight the ‘Settings’ option. 2. Press and release the ‘ok’ button. Press and release the ‘ok’ button to select ‘Date & Time’. 3. Use the directional keypad to adjust the values displayed. Press and release the ‘ok’ button to save. Press and release the ‘menu’ button to exit. 9 ADJUSTING THE BRIGHTNESS 1. Press and release the ‘menu’ button on the monitor. Using the directional keypad, highlight the ‘Settings’ option. 2. Press and release the ‘ok’ button. Use the directional keypad to highlight ‘Brightness’. 4. Using the directional keypad, highlight the ‘Default’ option. 5. Press and release the ‘ok’ button. 6. Use the directional keypad to highlight either ‘Yes’ or ‘No’. 7. Press and release the ‘ok’ button. 8. Press and release the ‘menu’ button to exit. 3. Press and release the ‘ok’ button. Adjust the volume using the ‘left’ and ‘right’ arrows on the directional keypad. 4. Press and release the ‘ok’ button to save. Press and release the ‘menu’ button to exit and display changes. NOTE: Changes will not be updated inside the menu screen. UPDATING THE FIRMWARE Visit www.jascoproducts.com/support for the latest version of the firmware available for download. Instructions provided on the website. ADJUSTING THE TEMPERATURE DISPLAY UNIT 1. Press and release the ‘menu’ button on the monitor. Using the directional keypad, highlight the ‘Settings’ option. 2. Press and release the ‘ok’ button. Using the directional keypad, highlight the ‘Temp. Display Unit’ option. 3. Press and release the ‘ok’ button. Use the directional keypad to highlight either ‘C’ (Celsius) or ‘F’ (Fahrenheit). ADVANCED FEATURES: CONNECTING TO A COMPUTER 1. Insert the CD included with the contents of the packaging. 2. Follow the on-screen prompts to install the software. Connect the included mini USB cable into the monitor and computer. 3. The monitor will display, ‘USB PC Camera Mode’ on the screen. NOTE: For instructions using the software, reference the electronic version of the user manual included on the CD. USING WITH ADD-ON CAMERAS (sold separately) 4. Press and release the ‘ok’ button. Press and release the ‘menu’ button to exit. Follow the installation instructions listed in the manual that came manual with the add-on camera. activates the single viewing mode RESTORING TO FACTORY DEFAULTS 1. Press and release the ‘menu’ button on the monitor. 2. Using the directional keypad, highlight the ‘Settings’ option. 3. Press and release the ‘ok’ button. More Viewing Modes: 1. Quad (Multi-Camera View) • View all paired cameras continuously at once. quad/scan toggles between multiscreen and sequential viewing modes 10 • Press and release the ‘quad/scan’ button until multiple camera video streams appear on the screen. QUAD VIEW 1 3 1 2 3 4 2 4 2. Sequential (Scan) • Displays each paired camera every 7-seconds. • Press and release the ‘quad/scan’ button until a single camera video stream appears. • View individual camera continuously. 3. Manual (Single Camera View) • Press and release the ‘manual’ button. Tap repeatedly to cycle through all cameras paired to monitor. ‘jump’ to the applicable camera. The screen will remain lit for approximately 15 seconds after the video motion or sound stops. RECORDING WITH OPTIONAL MICRO SD™ CARD (Micro SD™ card sold separately) NOTE: Before recording, it’s recommended to set the correct date and time. Refer to the ‘Settings’ section of the manual for instructions. When activated, the directional keypad, ‘menu’ button, ‘ok’ button and ‘volume’ buttons are disabled. Not supported in quad view (multi-screen). 32GB actual size Manually Record 1. Press and release the ‘man’ button on the right side of the monitor. Recording will begin immediately and ‘REC’ will appear flashing on top of the display. Additionally, the name of the recording is shown to the right of ‘REC’ in blue. LIVE VIDEO WITH 1ST PRIORITY MOTION AND/OR SOUND DETECTION NOTE: See ‘how-to’ instructions in ‘The Basics’ section of the manual. • WITHOUT notification alarm ...To be notified with the screen in stand-by mode In addition to turning the screen back on when motion and/ or sound is detected, the screen will ‘jump’ to the applicable camera. The screen will remain lit for approximately 15 seconds after the video motion or sound stops. ...To be notified with the screen illuminated —NOT SUPPORTED— • WITH notification alarm ...While the screen is ON While in manual or scan view, sounds 4 beeping tones when audio or video motion is detected. Alarm can be triggered repeatedly for an indefinite period of time. NOTE: Alarm only sounds when applicable camera is displayed on the screen. ...While the screen is in standby mode In addition to turning the screen back on and beeping 4 tones when motion and/or sound is detected, the screen will NOTE: Maximum recording time is 10 minutes of continuous motion and/or sound detected by camera. After 10 minutes, the monitor will record to a new file if camera still detects motion and/or sound. The task will repeat itself indefinitely until all storage space is consumed (unless the overwrite feature is activated). 2. To stop recording, press and release the ‘man’ button again. Both the name and ‘REC’ on the display will disappear. A new flashing yellow icon will appear indicating a new file was recorded and ready for playback. automatic record manual record 11 Automatically Record with motion and/or sound detection Activates recording when motion and/or sound is detected by camera. • WITHOUT notification alarm ...To be notified with the screen illuminated Adjust/disable audio & motion sensitivity (refer to the ‘Settings’ section in the manual) 1. Press and release the ‘auto’ button on the right side of the monitor. A red light will illuminate near the top left of the display indicating automatic recording mode is active. 2. When motion and/or audio is detected, the monitor will begin recording. ‘REC’ will appear flashing on top of the display. Additionally, the name of the recording will appear to the right of ‘REC’ in blue. 3. The monitor will stop recording 15 seconds after the motion and/or audio stops. Both the name and ‘REC’ on the display will disappear. A new flashing yellow icon will appear indicating a new file was recorded and ready for playback. 4. Press and release the ‘auto’ button on the right side of the monitor to exit. ...To be notified with the screen in stand-by mode Adjust/disable audio & motion sensitivity (refer to the ‘Settings’ section in the manual) 1. Press and release the ‘auto’ button on the right side of the monitor. A red light will illuminate near the top left of the display indicating automatic recording mode is active. 2. In manual or scan mode, press and release the ‘stdby’ button. The screen will turn off. 3. When motion and/or sound is detected by camera, the screen will automatically turn back on and will begin recording. ‘REC’ will appear flashing on top of the display. Additionally, the name of the recording will appear to the right of ‘REC’ in blue. 4. To exit auto record mode, press and release the ‘stdby’ button and then the ‘auto’ button on the right side of the monitor. • WITH notification alarm In addition to recording when motion and/or sound is detected by camera, sounds 4 beeping tones that can be triggered repeatedly for an indefinite period of time. ...To be notified with the screen illuminated Adjust/disable audio & motion sensitivity (refer to the ‘Settings’ section in the manual) 1. Press and release the ‘menu’ button on the monitor. Use the directional keypad to highlight ‘Alarm Volume’. 2. Press and release the ‘ok’ button. Adjust the volume using the ‘left’ and ‘right’ arrows on the directional keypad. (No bars displayed de-activates the alarm.) 3. Press and release the ‘ok’ button to save. Press and release the ‘menu’ button to exit. 4. Press and release the ‘auto’ button on the right side of the monitor. A red light will illuminate near the top left of the display indicating automatic recording mode is active. When motion and/or audio is detected, the monitor will begin recording. ‘REC’ will appear flashing on top of the display. Additionally, the name of the recording will appear to the right of ‘REC’ in blue. The monitor will stop recording 15 seconds after the motion and/or audio stops. Both the name and ‘REC’ on the display will disappear. A new flashing yellow icon will appear indicating a new file was recorded and ready for playback. 5. Press and release the ‘auto’ button on the right side of the monitor to exit. ...To be notified with the screen in stand-by mode Adjust/disable audio & motion sensitivity (refer to the ‘Settings’ section in the manual) 1. Press and release the ‘menu’ button on the monitor. Use the directional keypad to highlight ‘Alarm Volume’. 2. Press and release the ‘ok’ button. Adjust the volume using the ‘left’ and ‘right’ arrows on the directional keypad. No bars displayed de-activates the alarm. 3. Press and release the ‘ok’ button to save. Press and release the ‘menu’ button to exit. 12 4. Press and release the ‘auto’ button on the right side of the monitor. A red light will illuminate near the top left of the display indicating automatic recording mode is active. 5. In manual or scan mode, press and release the ‘stdby’ button. The screen will turn off. 6. When motion and/or sound is detected by camera, the screen will automatically turn back on and will begin recording. ‘REC’ will appear flashing on top of the display. Additionally, the name of the recording will appear to the right of ‘REC’ in blue. 7. To exit auto record mode, press and release the ‘stdby’ button and then the ‘auto’ button on the right side of the monitor. Automatically Record with 1st priority motion and/or sound detection Activates recording and ‘jumps’ to the applicable camera when motion and/or sound is detected. NOTE: See ‘how-to’ instructions in the ‘Automatically Record with motion and/or sound detection’ section of the manual. Requires more than one camera. - Before recording, it’s recommended to set the correct date and time. Refer to the ‘Settings’ section of the manual for instructions. - When activated, the directional keypad, ‘menu’ button, ‘ok’ button and ‘volume’ buttons are disabled. - Maximum recording time is 10 minutes of continuous motion and/ or sound detected by camera. After 10 minutes, the monitor will record to a new file if camera still detects motion and/or sound. The task will repeat itself indefinitely until all storage space is consumed (unless the overwrite feature is activated). • WITHOUT notification alarm...To be notified with the screen illuminated In quad view only (split screen), the screen will ‘jump’ to the applicable camera when motion and/or sound is detected. The screen will remain lit and record for approximately 15 seconds after the video motion and/or sound stops. ...To be notified with the screen in standby mode In addition to turning the screen back on when motion and/or sound is detected, the screen will ‘jump’ to the applicable camera. The screen will remain lit and record for approximately 15 seconds after the video motion or sound stops. • WITH notification alarm...To be notified with the screen illuminated In quad view only (split screen), the screen will ‘jump’ to the applicable camera when motion and/or sound is detected. The screen will remain lit and record for approximately 15 seconds after the video motion and/or sound stops. Additionally, sounds 4 beeping tones when audio or video motion is detected. Alarm can be triggered repeatedly for an indefinite period of time. NOTE: Alarm only sounds when applicable camera is displayed on the screen. ...To be notified with the screen in standby mode In addition to turning the screen back on and beeping 4 tones when motion and/or sound is detected, the screen will ‘jump’ to the applicable camera. The screen will remain lit and record for approximately 15 seconds after the video motion and/or sound stops. PLAYBACK & DELETION OF RECORDED VIDEOS • Playback 1. In single or sequential viewing mode, press the ‘ok’ button. A list of folders stored on the memory card will appear on the screen. 2. Use the directional keypad to select the folder named, ‘VIDEO’ and press and release the ‘ok’ button. A new list of folders sorted by the date the video(s) were recorded will appear on the display. 3. Use the directional keypad to select the folder desired. Press and release the ‘ok’ button to select. A list of individual video files will appear. The newest videos will appear near the bottom of the list. Files are named according to time recorded, file number and size. recording time (24hr format) recorded file size 203342-3 2MB hrs mins secs file# back play/pause rewind fast forward stop delete 13 4. Use the directional keypad to select the file desired. Press and release the ‘ok’ button to select. The video selected will start playing immediately. The following commands can be use during playback: Stop, Fast Forward, Rewind and Play from Beginning. 5. Press and release the ‘menu’ button to exit. NOTE: To return to a previous list of folders viewed on the display, press and release the ‘OK’ button after highlighting this icon whenever shown. • Delete recorded videos 1. In single or sequential viewing mode, press the ‘ok’ button. A list of folders stored on the memory card will appear on the screen. 2. Use the directional keypad to select the folder named, ‘VIDEO’ and press and release the ‘ok’ button. A new list of folders sorted by the date the video(s) were recorded will appear. 3. Use the directional keypad to select the folder desired. Press and release the ‘ok’ button to select. A list of individual video files will appear. The newest videos will appear near the bottom of the list. 4. Use the directional keypad to select the file you want to delete. Press and release the ‘stdby’ button to select. A warning message will appear on the display requesting confirmation. 5. Use the directional keypad to select ‘Yes’. Press and release the ‘ok’ button. NOTE: Folders can also be deleted following the same procedure. Instead of highlighting a file, simply highlight the folder. FORMATTING A MICRO SD™ CARD 1. Press and release the ‘menu’ button on the monitor. Using the directional keypad, highlight the ‘Settings’ option. Press and release the ‘ok’ button. 2. Using the directional keypad, highlight the ‘Format’ option. Press and release the ‘ok’ button. A warning message will appear on the display requesting confirmation. 3. Use the directional keypad to select ‘Yes’. Press and release the ‘ok’ button. Press and release the ‘menu’ button to exit. TROUBLESHOOTING: FREQUENTLY ASKED QUESTIONS 1. ‘OUT OF RANGE’ appears on the display, camera is already paired, and camera is next to the monitor. Try sliding the monitor power switch to the ‘off’ position and then back to ‘on’. This will cause the monitor to search for the camera again. If monitor is still unable to locate camera, perform the following steps to re-pair camera to monitor: NOTE: Cameras are limited to one monitor at a time. ADJUSTING THE AMOUNT OF TIME RECORDING CONTINUES AFTER MOTION AND/OR SOUND IS DETECTED 1. Press and release the ‘menu’ button on the monitor. Using the directional keypad, highlight the ‘Record’ option. 2. Press and release the ‘ok’ button. Using the directional keypad, highlight the ‘Trigger Record’ option. Press and release the ‘ok’ button. 3. Use the directional keypad to highlight ‘5 Seconds’, ‘15 Seconds’, or ‘30 Seconds’. Press and release the ‘ok’ button. 4. Press and release the ‘menu’ button to exit. Re-Pairing the Camera 1. Follow the ‘Initial Setup’ procedures as indicated in the beginning of the manual. 2. Press and release the ‘menu’ button on the monitor. Using the directional keypad, highlight the ‘Pairing’ option. Press and release the ‘ok’ button. 3. Using the directional keypad, highlight the camera number desired. Cameras previously assigned can be overwritten. Press and release the ‘ok’ button to save. 14 5. Image on screen appears to illuminate or ‘pulse’ on and off repeatedly. The camera is likely pointed directly at a light source causing the camera sensor autofocus to not ‘lock-on’ to what is displayed on the screen. Try moving the camera slightly or moving the camera away from the light source (if known) to allow the camera to focus properly. 4. Press and release the ‘pair’ button, located on the bottom rear part of the camera head. The monitor will allow 30 seconds before timing out. If successful, the camera will be automatically added and a live video stream will appear on the display. TECHNICAL SUPPORT: For additional assistance: pair button 2. Camera video constantly freezes or appears ‘choppy’. This problem is likely due to a wireless router nearby causing interference. To maintain optimal signal strength, the camera and monitor use a wireless technology designed to automatically ‘hop’ frequency channels. By default, wireless routers work the same way. This may inevitably cause signals to collide with one another. To prevent this from happening, it’s recommended to configure the wireless router to stop ‘hopping’ for channels. This requires the need to lock the router to a specific channel. Consult the router user manual for assistance. NOTE: Try different channels if the signal from your wireless router is dropping more than usual after locking it to a specific channel. 3. Buttons on the monitor not responding. Auto or Manual Record mode likely activated. Check to see if red LED is illuminated or ‘REC’ appears on the display. Press the ‘auto’ or ‘man’ button to de-activate setting and regain control of the monitor. Alternatively, try sliding the monitor power switch to the ‘off’ position and then back to ‘on’. 4. Automatic or Manual Record mode not activating. Micro SD™ card likely not fully inserted or at all. Online: www.jascoproducts.com/support Email: [email protected] Our in-house call center is open M-F, 8-5pm central (except holidays and special events). Featuring the most updated copy of the user manual, FAQs, firmware updates and demonstration videos. Live chat support also available for product information, troubleshooting and warranty requests (M-F, 8-5 central). For product information, troubleshooting and warranty calls: 800-654-8483, option 1 For consumer/business sales: 800-654-8483, option 2 Mailing Address: Jasco Products Company, Attn: CIC, 10 E Memorial Rd, Bldg B, Oklahoma City, OK 73114 Please contact technical support (using one of the above options) before attempting to ship product returns or warranty requests. Failure to do so may delay processing times considerably. ONE-YEAR LIMITED WARRANTY Jasco Products Company warrants this product to be free from manufacturing defects for a period of one year from the original date of consumer purchase. This warranty is limited to the repair or replacement of this product only and does not extend to consequential or incidental damage to other products that may be used with this unit. This warranty is in lieu of all other warranties express or implied. Some states do not allow limitations on how long an implied warranty lasts or permit the exclusion or limitation of incidental or consequential damages, so the above limitations may not apply to you. This warranty gives you specific rights, and you may also have other rights which vary from state to state. If unit appears to be defective within the warranty period, please contact out technical support team for assistance (‘Technical Support’ section in the manual). 15 SPECIFICATIONS: GENERAL RF Frequency: .................................................................................2.4~2.48 GHz Transmit Power:........................................................................................... 16dBm RF Range: ................................................450ft Unobstructed Line of Sight Modulation: .........................................................................................................GFSK Spread Spectrum:............................................................................................FHSS Operational Temperature: ........................................................ -20~55C @ 5~85% RH non-condensing .........................................................-4~131F @ 5~85% RH non-condensing Storage Temperature: ........................................................-30~60C @ 5~85% RH non-condensing .......................................................-22~140F @ 5~85% RH non-condensing AC/DC Adapter: .............................................................................Input: 120VAC ...........................................................................................................Output: 5V @ 1A MONITOR LCD Size: ............................................................................................. 3.5” Diagonal Battery Life: ...................................................................................... Up to 5 hours System Resolution: ............................................. QVGA (320X240)-Monitor ................................................................................................... VGA (640X480)-USB Current Consumption: ............................................................................. 850mA Memory Card: ................................................................. Micro SD (32GB max) Output Port: .................................................................................................. USB 2.0 Operational Temperature: .........................................................-10~45C @ 5~85% RH non-condensing ........................................................ 14~113F @ 5~85% RH non-condensing Storage Temperature: ........................................................-30~60C @ 5~85% RH non-condensing .......................................................-22~140F @ 5~85% RH non-condensing CAMERA Imaging Sensor: ......................................................................................¼” CMOS Lens Type:.............................................................................................. 4.9mm F2.8 Minimum Illumination: ..................................... 0 Lux with IR Illumination System Resolution: ............................................. QVGA (320X240)-Monitor ................................................................................................... VGA (640X480)-USB Imager Resolution:...................................................................VGA (640 x 480) View Angle: ..............................................................................................................45º Night Vision Range: .......................................................................................... 16ft Temperature Sensor: .........................................................-10~35C (14~ 95F) Current Consumption: .............................................................................540mA Battery Type: ......................................................................................4AA Alkaline Battery Life: ...................................................................................... Up to 4 hours Dimensions: ...........................................................3.3mm x 2.6mm x 6.3mm Weight:...................................................................................................... 130 grams is a trademark of General Electric Company and is under license by Jasco Products Company LLC, 10 E. Memorial Road, Oklahoma City, OK 73114 www.jascoproducts.com FCC STATEMENT This device complies with part 15 of the FCC rules. Operation is subject to the following two conditions: 1) this device may not cause harmful interference, and 2) this device must accept any interference received, including interference that may cause undesired operation. FCC NOTE: The manufacturer is not responsible for any radio or TV interference caused by unauthorized modifications to this equipment. Such modifications could viod the user’s authority to operate the equipment. This equipment has been tested and found to comply with the limits for a Class B digital device, pursuant to Part 15 of the FCC Rules. These limits are designed to provide reasonable protection against harmful interference in a residential installation. This equipment generates, uses and can radiate radio frequency energy and, if not installed and used in accordance with the instructions, may cause harmful interference to radio communications. However, there is no guarantee that interference will not occur in a particular installation. If this equipment does cause harmful interference to radio or television reception, which can be determined by turning the equipment off and on, the user is encouraged to try to correct the interference by one or more of the following measures: - Reorient or relocate the receiving antenna. - Increase the separation between the equipment and receiver. - Connect the equipment into an outlet on a circuit different from that to which the receiver is connected. - Consult the dealer or an experienced radio/TV technician for help.