1
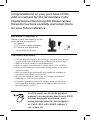
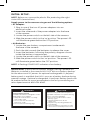
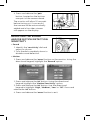
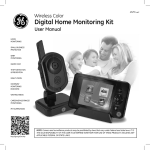
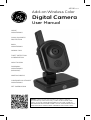
45256 ver2
Add-on Wireless Color
Digital Camera
User Manual
HOME
MONITORING
SMALL BUSINESS
PROTECTION
BABY
MONITORING
NANNY CAM
THEFT DETECTION
& PREVENTION
NIGHT VISION
DOORWAY
MONITORING
(INDOORS)
WAITING AREAS
CAREGIVER ASSITANCE/
MONITORING
PET SUPERVISION
NOTE: Camera and surveillance products may be
prohibited by laws that vary under federal and state
laws. IT IS THE SOLE RESPOSIBILITY OF THE USER TO
DETERMINE WHETHER THEIR USE OF THESE PRODUCTS
VIOLATES ANY APPLICABLE FEDERAL OR STATE LAWS.
http://goo.gl/3wUHy
Congratulations on your purchase of this
add-on camera for the GE Wireless Color
Digital Home Monitoring Kit! Please review
these instructions carefully and retain them
for your future reference.
PACKAGE CONTENTS:
Please locate and identify all the
parts before proceeding:
(1) Camera
(1) AC power supply adapter
(1) Camera wall plate and
mounting hardware
CAMERA FEATURES:
• 2.4GHz digital wireless technology—private and secure
monitoring with interference-free picture and sound
• Built-in motion and/or sound detection
• Built-in night vision (black & white, up to 20ft visibility)
• Built-in microphone for broadcasting audio to monitor
automatically
• Built-in night light (manually activated on camera or
remotely activated on monitor)
• (4) Musical lullabies (remotely activated on monitor)
• Tabletop or wall mount options
• Portable operation using (4) AA batteries or optional
rechargeable battery pack (sold separately at www.
jascoproducts.com)
For the most up-to-date product
support, accessories, electronic (PDF)
format manuals and more, visit
www.jascoproducts.com/support
or Call 1-800-654-8483, option 1
M-F, 8-5pm CST
4.9mm lens
infrared LEDs
(night vision)
speaker
(lullabies &
audio from
monitor)
IR light
sensor
microphone
temperature
sensor
power
switch
power
LED
(flashes
when
power is
low)
AC power
pairing
control
night light
(manual or
remote control)
sensitivity
control
volume control
wall mount
slots
battery
compartment
(4 -AA)
INITIAL SETUP:
NOTE: Before use, remove the plastic film protecting the night
vision LEDs (around lens).
Supply power to the camera using one of the following options:
• AC Adapter1. Plug-in one of the two AC power adapters into an
electrical outlet.
2. Insert the other end of the power adapter into the base
of the camera.
3. Locate the power switch on the left side of the camera.
4. Slide the power switch to the ‘on’ position. The power LED
will illuminate green below the OFF position.
• AA Batteries1. Locate the rear battery compartment underneath
the base of the camera.
2. Push the tab towards the batteries to release the cover.
3. Insert the batteries, following the polarity diagram shown
inside the battery compartment.
4. Locate the power switch on the left side of the camera.
5. Slide the power switch to the ‘on’ position. The power LED
will illuminate green below the OFF position.
NOTE: A flashing POWER LED indicates a low battery.
Special Note: In the event of a power outage, having standard AA
batteries installed in the camera WILL NOT act as a ‘battery backup’
for the absence of AC power. An optional rechargeable LI-polymer
battery pack is available that WILL serve as a battery backup during
a power outage. Optional rechargeable Li-polymer battery packs can
be ordered online at www.jascoproducts.com or by contacting our
sales department at 800-654-8483.
WARNING
Strangulation Hazard
Children have been strangled in cords.
Keep away from children
• Keep all cords at least 3 ft. away
from infant cribs
• Do not use with household
extension cords
• Do not remove warning tags
CAUTION
Batteries may leak harmful liquids or
ignitable materials or explode causing
injury or product damage.
• Do not mix old and new or other
battery types
• Replace all batteries at the
same time
• Replace fully discharged batteries
immediately
• Remove batteries if product is to be
unused for extended period of time
Camera Placement - Built-in Tabletop Stand and/or Wall Mount
NOTE: It is recommended to complete the ‘Initial Setup’ procedures
for the monitor before proceeding with mounting the camera.
To simplify the mounting process, a custom wall mounting plate is
included with the mounting hardware.
1. After selecting an ideal location, use the supplied mount as a
template. Drill 3/16” holes where indicated.
2. Insert wall anchors (unless screwing directly into a stud).
3. Secure the mounting plate to the wall.
4. Disconnect AC power adapter (if connected).
5. Slide the base of the camera onto the mounting plate.
6. Connect the AC power adapter.
NIGHT LIGHT FEATURE:
night light
The Night Light can be activated two ways:
1. Manually - Press and release the
button on top of the camera to manually
turn on or off.
2. Remotely - Press and release the button
on the right side of the monitor. The night light will illuminate on
the camera shown on the screen.
NOTE: The night light feature is not supported in quad mode
(multi-screen) view—only in single camera view.
PAIRING THE CAMERA:
1. Follow the ‘Initial Setup’ procedures first.
2. Press and release the ‘menu’ button on the monitor. Using the
directional keypad, highlight the ‘Pairing’ option. Press and
release the ‘ok’ button.
3. Using the directional keypad, highlight the camera number
desired. Cameras previously assigned can be overwritten.
Press and release the ‘ok’ button to save.
4. Press and release the ‘pair’
button, located on the bottom
rear part of the camera head.
The monitor will allow 30 seconds
before timing out. If successful,
the camera will be automatically
added and a live video stream
will appear on the display.
ADJUSTING THE SOUND
AND/OR MOTION DETECTION
SENSITIVITY
pair
button
sensitivity
control
• Sound
1. Identify the ‘sensitivity’ dial and
adjust as shown.
2. Turn the dial completely down to
disable sound detection.
• Motion
1. Press and release the ‘menu’ button on the monitor. Using the
directional keypad, highlight the ‘Record’ option.
2. Press and release the ‘ok’ button. Using the directional
keypad, highlight the ‘Motion Sensitivity’ option.
3. Press and release the ‘ok’ button. Use the directional
keypad to highlight ‘High, ‘Medium’, ‘Low’ or ‘Off’. Press and
release the ‘ok’ button.
4. Press and release the ‘menu’ button to exit.
TECHNICAL SUPPORT:
For additional assistance:
Online: www.jascoproducts.com/support
Email: [email protected]
Our in-house call center is open M-F, 8-5pm central
(except holidays and special events).
Featuring the most updated copy of the user manual, FAQs, firmware
updates and demonstration videos. Live chat support also available
for product information, troubleshooting and warranty requests (M-F,
8-5 central).
For product information, troubleshooting and warranty calls:
800-654-8483, option 1
For consumer/business sales: 800-654-8483, option 2
Mailing Address:
Jasco Products Company, Attn: CIC,
10 E Memorial Rd, Bldg B, Oklahoma City, OK 73114
Please contact technical support (using one of the above options)
before attempting to ship product returns or warranty requests. Failure
to do so may delay processing times considerably.
CAMERA SPECIFICATIONS:
Imaging Sensor: ......................................................................................¼” CMOS
Lens Type:.............................................................................................. 4.9mm F2.8
Minimum Illumination: ..................................... 0 Lux with IR Illumination
System Resolution: ............................................. QVGA (320X240)-Monitor
................................................................................................... VGA (640X480)-USB
Imager Resolution:...................................................................VGA (640 x 480)
View Angle: ..............................................................................................................45º
Night Vision Range: .......................................................................................... 16ft
Temperature Sensor: .........................................................-10~35C (14~ 95F)
Current Consumption: .............................................................................540mA
Battery Type: ......................................................................................4AA Alkaline
Battery Life: ...................................................................................... Up to 4 hours
Dimensions: ...........................................................3.3mm x 2.6mm x 6.3mm
Weight:...................................................................................................... 130 grams
FCC STATEMENT
This device complies with part 15 of the FCC rules. Operation is subject to the
following two conditions:
1) this device may not cause harmful interference, and 2) this device must
accept any interference received, including interference that may cause
undesired operation.
FCC NOTE: The manufacturer is not responsible for any radio or TV interference
caused by unauthorized modifications to this equipment. Such modifications
could viod the user’s authority to operate the equipment.
This equipment has been tested and found to comply with the limits for a Class
B digital device, pursuant to Part 15 of the FCC Rules. These limits are designed
to provide reasonable protection against harmful interference in a residential
installation. This equipment generates, uses and can radiate radio frequency
energy and, if not installed and used in accordance with the instructions, may
cause harmful interference to radio communications. However, there is no
guarantee that interference will not occur in a particular installation. If this
equipment does cause harmful interference to radio or television reception,
which can be determined by turning the equipment off and on, the user is
encouraged to try to correct the interference by one or more of the following
measures:
- Reorient or relocate the receiving antenna.
- Increase the separation between the equipment and receiver.
- Connect the equipment into an outlet on a circuit different from
that to which the receiver is connected.
- Consult the dealer or an experienced radio/TV technician for help.
ONE-YEAR LIMITED WARRANTY
Jasco Products Company warrants this product to be free from manufacturing
defects for a period of one year from the original date of consumer purchase.
This warranty is limited to the repair or replacement of this product only and
does not extend to consequential or incidental damage to other products
that may be used with this unit. This warranty is in lieu of all other warranties
express or implied. Some states do not allow limitations on how long an
implied warranty lasts or permit the exclusion or limitation of incidental or
consequential damages, so the above limitations may not apply to you. This
warranty gives you specific rights, and you may also have other rights which
vary from state to state. If unit appears to be defective within the warranty
period, please contact out technical support team for assistance (‘Technical
Support’ section in the manual).
is a trademark of General Electric Company
and is under license by Jasco Products Company LLC,
10 E. Memorial Road, Oklahoma City, OK 73114
www.jascoproducts.com