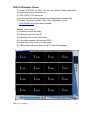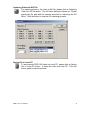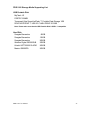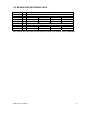
1
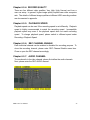
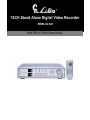
16CH Stand Alone Digital Video Recorder
PDR-3160
INSTRUCTION MANUAL
Executive Summary
PDR-3160 is a high performance stand-along digital video recorder (DVR) with
32-bits RISC processor which can perform multiplex DVR features
simultaneously including Recording, Live Monitoring, Playback, and Network
Monitoring.
It is designed by the most advanced technologies of Merit Lilin. These
technologies enable users to enjoy extreme flexibilities including Jog & Shuttle
menu, USB portable disk backup, Integrated DVR & PTZ remote controller, and
quick video searching time bar user interface.
Securities are highly concerned during design phase. Many features such as
non-stop hot swappable HDD recording, multiplex system design, instant
controllable PTZ camera, system alarm & motion event lists, and user
authentication provide maximum securities in operating PDR-3160.
The quality and reliability of PDR-3160 are strictly monitored and controlled
throughout the manufacturing processes by Merit Lilin.
Major Features
16-channel video inputs
1-channel audio Input and output
Simultaneous recording & playback
Built-in multiplex features for split monitoring
Up to 480fps live display rate
Two hot swappable HDDs
16x12 motion detection grids
Portable USB disk backup & firmware update
Remote controller
HTTP for downloading network viewer application
Jog & Shuttle for menu systems
PDR-3160 User Manual
1
CAUTIOIN
Do not drop or strike this equipment
Do not install the equipment near any naked flames or heat
sources
Do not expose this unit to rain, moisture, smoke or dust
environment
Do not cover the opening of the cabinet with cloth and
plastic or to install this unit in poor ventilated places. Allow
10cm between this unit and its surroundings
Do not continue to operate the unit under abnormal
conditions such as detection or smoke, strange smell or no
display on screen while power is turned on
Do not touch the power connection with wet hands
Do not damage the power cord or leave it under pressure
Do not operate this unit near magnet, speaker system, etc.,
to avoid unnecessary magnetic interference
Connection cables should be grounded properly
PDR-3160 User Manual
2
TABLE OF CONTENTS
CHAPTER 1. SYSTEMS OVERVIEW.............................................................5
Chapter 1-1. BEFORE USING PDR-3160 .................................................8
Chapter 1-2. SURVEILLENCE MODE..................................................... 11
CHAPTER 2. PTZ CONTROLS ....................................................................14
Chapter 2-1. INSTANT PTZ CONTROLLABLE MODE............................14
Chapter 2-2. REMOTE CONTROLLER & PTZ ........................................14
Chapter 2-3. RECALL PRESETS ............................................................15
CHAPTER 3. RECORDING ..........................................................................16
Chapter 3-1. START RECORDING..........................................................16
Chapter 3-2. STOP RECORDING ...........................................................16
Chapter 3-3. EMERGENCY RECORDING ..............................................16
Chapter 3-4. MOTION DETECTION RECORDING .................................16
Chapter 3-5. SCHEDULE RECORDING .................................................16
CHAPTER 4. PLAYBACK SEARCH .............................................................17
Chapter 4-1. TIME SEARCH (M+S) ........................................................17
Chapter 4-2. EVENT SEARCH ................................................................18
Chapter 4-3. REC SEARCH ....................................................................18
Chapter 4-4. OTHER PLAYBACK FEATURES........................................19
CHAPTER 5. SYSTEM START-UP...............................................................20
CHAPTER 6. MENU SYSTEM......................................................................21
Chapter 6-1. SETUP MENU ....................................................................21
Chapter 6-2. CAMERA SETUP................................................................21
Chapter 6-2-1. CAMERA NAME................................................................ 22
Chapter 6-2-2. ENABLE NAME................................................................. 22
Chapter 6-2-3. Video Setup................................................................22
Chapter 6-2-4. SEQUENCE....................................................................... 23
Chapter 6-2-5. BOARDER COLOR .......................................................... 23
Chapter 6-3. RECORD SETUP ...............................................................23
Chapter 6-3-1.
Chapter 6-3-2.
Chapter 6-3-3.
Chapter 6-3-4.
Chapter 6-3-5.
Chapter 6-3-6.
PDR-3160 User Manual
SCHEDULE........................................................................ 24
REC MODE........................................................................ 24
REC SPEED ...................................................................... 24
RECORD QUALITY.......................................................... 25
PLAYBACK SPEED......................................................... 25
REC CHANNEL ENABLE............................................... 25
3
Chapter 6-3-7. AUDIO CHANNEL............................................................ 25
Chapter 6-4. ALARM SETUP...................................................................26
Chapter 6-4-1. CAMERA SELECT............................................................ 26
Chapter 6-4-2. ALARM ENABLE............................................................... 26
Chapter 6-4-3. MOTION ENABLE ............................................................ 26
Chapter 6-4-4. SENSITIVITY..................................................................... 26
Chapter 6-4-5. MOTION AREA SET......................................................... 27
Chapter 6-4-6. BUZZER TIME................................................................... 27
Chapter 6-4-7. ALARM REC TIME............................................................ 27
Chapter 6-5. SYSTEM SETUP ................................................................28
Chapter 6-5-1. DATE/TIME ........................................................................ 28
Chapter 6-5-2. HDD FORMAT ................................................................... 29
Chapter 6-5-3. HDD INFO .......................................................................... 29
Chapter 6-5-4. FACTORY RESET ............................................................ 30
Chapter 6-5-5. VIDEO SYSTEM ............................................................... 30
Chapter 6-5-6. BUZZER ENABLE ............................................................ 30
Chapter 6-5-7. PASSWORD ...................................................................... 30
Chapter 6-5-8. FIRMWARE UPDATE....................................................... 32
Chapter 6-6. NETWORK ENABLE.................................................................. 33
Chapter 6-7. PTZ SETUP ........................................................................34
Chapter 6-7-1. CAMERA SELECT............................................................ 34
Chapter 6-7-2. FAST DOME TYPE........................................................... 34
Chapter 6-7-3. PRESET ADJUST ............................................................. 35
Chapter 6-7-4. PRESET ............................................................................. 35
Chapter 6-7-5. DWELL................................................................................ 35
Chapter 6-7-6. SPEED................................................................................ 35
Chapter 6-7-7. ADJUST POS .................................................................... 36
Chapter 6-7-8. SAVE ................................................................................... 36
Chapter 6-8. BACKUP .............................................................................37
APPENDIX.....................................................................................................42
EXTERNAL ALARM SWITCHES..............................................................42
PDR-3160 STORAGE MEDIA SUPPORTING LIST .................................43
120 GB HARD DISK RECORDING TABLE ..............................................44
PDR-3160 User Manual
4
Chapter 1. SYSTEMS OVERVIEW
FRONT VIEW
12.
Split display buttons—4 split, 8 split,
9 split, 13 split, and 16 split buttons
Play button
13.
Camera 1 to 16
4.
Mode button
14.
REC LED (yellow)
5.
Pause button
15.
HDD LED (green)
6.
Backup button
16.
AL LED (red)
7.
Stop button
17.
USB LED (green)
8.
ESC button
18.
POWER (yellow)
9.
REC button
19.
Jog & shuttle
10.
11.
Menu button
Up, down, left, right, and
enter buttons
20.
USB connector
21.
IR receiver
1.
HDD hot swappable lock
2.
HDD hot swappable tray
3.
PDR-3160 User Manual
5
REAR VIEW
Cameras inputs 1-16 (BNC connectors)
Monitor output (BNC connector)
S-Video
Audio inputs (RCA connector)
Audio output (RCA connector)
RJ-45 (LAN connector)
External alarm switches (25 pins)—RS-485, 16 alarm input switches, 1
N/O alarm output, and 1 N/C alarm output.
PDR-3160 power switch
AC power input
REMOTE CONTROLLER
The button arrangement of the remote controller is designate for easy-to-use
purposes. Buttons are separated in regions based on their features including
PDR-3160 operational keys, pan, tilt, and zoom camera device (PTZ)
operational keys, numerical keys, and hybrid keys of PDR-3160 and PTZ. The
details are described in the following table.
PDR-3160 User Manual
6
PDR-3160 operational keys (gray area)
MENU
ESC
ZOOM
REC
FREEZE
SEQ
MUTE
Audio
BACKUP
PTZ features (yellow area)
AUTO PAN
ZOOM IN
ZOOM OUT
PRESET
Setup menu
Escape/exit
2X digital video zooming
Record/stop recording
Live video freeze
Pause
Playback
Stop
Fast forward
Fast rewind
Next single channel
Previous single channel
4 split display
8 split display
9 split display
13 split display
16 split display
Sequential display
Audio mute
Audio on
Video backup
PDR-3160 & PTZ hybrid keys (blue
area)
Perform auto pan
feature
Zooming in of a fast
dome camera
Zooming out of a fast
dome camera
Call preset of a fast
dome camera
Move up/tilt up
Move down/tilt down
Move left/pan left
Move right/pan right
Enter/set
0 to 9
PDR-3160 User Manual
Numerical keys (green area)
Numerical keys
7
Chapter 1-1. BEFORE USING PDR-3160
Please read the chapter before operating PDR-3160. Features, terms and
symbols are covered in this chapter.
PTZ CONTROL MODE
Instant controllable PTZ camera is shown in yellow color for the camera
name/number in live monitoring mode indicating that the camera can instantly
be controlled for PTZ operations. Moving the active camera sequentially, one
can simply press the Enter button on the remote controller or keypad. Once a
camera is in active mode (text in yellow), major PTZ features can be easily
performed.
JOG & SHUTTLE
PDR-3160 adopts Jog & Shuttle mainly in menu system and video playback
modes. In menu setup mode, rolling Jog is to move the cursor of the menu
system up or down. Shuttle moves the cursor of the menu system left and right.
During video playback mode, Jog & Shuttle acts as conventional VCR for video
stepping forward (rewind) and fast forward (rewind).
SYMBOLS & ICONS
PDR-3160 adopts many symbols and icons for graphical user interface (GUI)
design. These symbols and icons contain useful information in operating PDR3160. All the symbols and icons are discussed in the rest of the chapters.
PDR-3160 User Manual
8
MENU HELP
Most of the time, the menu systems including menu setup and playback menu
contain the operating usage at the bottom of each menu. User can use the
menu help to operate PDR-3160 if the user manual is not handy.
SYSTEM LED STATUS PANEL
System LEDs are meaningful while operating PDR-3160. The status of each
LED is described as in the following table:
LED
REC
HDD
AL
USB
POWER
Description
Recording indicator
HDD reading & writing indicator
External alarm switches indicators
USB portable disk connected indicator
PDR-3160 power on/off indicator
Color
Yellow
Green (blinking)
Red
Green
Yellow
ICONS
PDR-3160 provides graphical On Screen Display (OSD) technology to show
the operating status on screen. The graphical user interface, icons, are
described as in the chart bellow:
Freezing screen
Record
Network connected
Playback
Motion alarm
Pause
Sequential display
Fast rewind
External alarm
Fast forward
Zooming
PDR-3160 User Manual
9
HOT SWAPABLE HDD
PDR-3160 supports two hot swappable IDE HDDs (hard disk drives). Most of
the IDE HDDs with 138 Giga bytes and above in the market are supportable by
PDR-3160.
To lock PDR-3160 and to perform recording operation, please use the key to
lock the HDD tray in counter clockwise. PDR-3160 resumes recording, if PDR3160 was in recording mode.
To pull the HDD out of PDR-3160, first unlock the HDD tray in clockwise. If
PDR-3160 is in recording mode, the recording operation will be stopped.
Caution
Please use “cable select” (HDD default setting) mode
while installing HDDs.
PDR-3160 User Manual
10
Chapter 1-2. SURVEILLENCE MODE
Most of the time, PDR-3160 is operated at the surveillance mode.
The information of screen layout and symbols are described in this section.
SCREEN LAYOUT
1
2
3
4
5
7
6
8
Date
Day of the week
Time
HDD recording percentage and master (M)/slave (S) HDD indicator
Recording symbol (circle in red)
Alarm activation indicator (bell in yellow)
Yellow camera ID: controllable PTZ device
Motion detection indicator (little man in yellow)
PDR-3160 User Manual
11
SPLIT DISPLAY MODES
PDR-3160 can provide various split display modes on live and playback
monitoring using remote controller and keypad.
16-Channel Split Display 13-Channel Split Display
8-Channel Split Display
4-Channel Split Display
9-Channel Split Display
Full Screen Mode
SEQUENTIAL DISPLAY
PDR-3160 provides the multiplexing feature displaying each full screen in a
sequence with specific time period. To perform sequential display, simply press
SEQ on remote controller. A sequential display symbol shows on top of the
screen indicating that PDR-3160 is in sequential status.
FREEZE
In monitoring and playback modes, PDR-3160 provides screen-freezing feature
in which the suspicious individuals can be determined. To freeze the screen,
press Freeze button on the remote controller. Press the button again to cancel
the freezing screen.
PDR-3160 User Manual
12
ZOOM
PDR-3160 provides 2X digital zooming capability in screen freezing, live
monitoring, and video playback modes. Other split windows are all allowed in
using this feature. To perform this feature, press Zoom button on the remote
controller. Once PDR-3160 is in zooming status, press Up, Down, Left, and
Right buttons to move the zooming window around to view other portion of the
channel. Press the Zoom button again can cancel the zooming window and
back to normal screen.
CH+ & CHIn case of scanning through each full screen channel, CH+ & CH- can be used
to monitor each camera. Press CH+ button that each camera channel in full
screen gets called in ascending sequence. Press CH- button that each camera
channel gets called in descending sequence.
AUDIO & MUTE
Once the audio channel is properly setup, PDR-3160 can output the live audio.
To disable live audio, one can press Mute button. To enable live audio, press
Audio button again.
PDR-3160 User Manual
13
Chapter 2. PTZ CONTROLS
PTZ device can be controlled in live monitoring mode and PTZ setup mode via
keypad and/or remote controller. The rest of the chapter describes the ways of
manipulating PTZ devices using keypad and remove controller.
Chapter 2-1. INSTANT PTZ CONTROLLABLE MODE
Instant controllable PTZ camera is shown in yellow color for the camera
name/number in live monitoring mode indicating that the camera can be
instantly controlled for PTZ operations. Moving the active camera sequentially,
one can simply press the Enter button on the remote controller. Once a
camera is in active mode (text in yellow), major PTZ features can be easily
performed.
Chapter 2-2. REMOTE CONTROLLER & PTZ
PTZ buttons are framed in yellow that contain auto panning, zooming, and
zooming out. Other PTZ and DVR buttons are shown in blue on remote
controller. The details are described as follows:
5
6
7
Tilting the PTZ device up
1
3
Tilting the PTZ device down
4
2
Panning the PTZ device left
Panning the PTZ device right
Perform auto panning of the PTZ device
Perform zooming in of the PTZ device
Perform zoom out of the PTZ device
8
PDR-3160 User Manual
Calling presets
14
Chapter 2-3. RECALL PRESETS
To call preset, please follow the following instructions:
Press Preset button to enable the calling preset mode. The blinking “Preset”
text on live monitoring screen indicates that PDR-3160 is in Preset mode.
In Preset mode, preset 01 to 16 directly to recall preset points of the PTZ
device.
The above operations can apply to full screen mode as well as multi-channel
split modes.
PDR-3160 User Manual
15
Chapter 3. RECORDING
Chapter 3-1. START RECORDING
To start recording, press REC button on keypad or remote
controller. The red recording icon shows on monitor at each
camera’s position, and the REC LED goes on.
Chapter 3-2. STOP RECORDING
To stop recording, press REC button again to stop the recording
operation. Both REC button and REC LED go off. The recording
operation for all the recorded cameras is disabled.
Chapter 3-3. EMERGENCY RECORDING
Recording operation can be triggered by external alarm switch. There are up
to 16 external alarm switches that can be installed for cameras. External alarm
switches can be triggered and inform PDR-3160 for emergency recording.
Proper settings such as Alarm Rec Duration and activation type (N/O or N/C)
should be configured before this operation. Once one of the alarm switch gets
triggered, the alarm icon (yellow bell), shows on monitor at the bottom of each
camera channel.
Chapter 3-4. MOTION DETECTION RECORDING
Motion detection is very important feature of PDR-3160 that the intrusion
detection of a camera’s view can be detected. Motion detection recording
sensors motion variation, and it triggers PDR-3160 to perform recording task.
Once motion detection is in active, the motioned channel activates an alarm
symbol (little man in yellow) on the screen to inform users.
Chapter 3-5. SCHEDULE RECORDING
Schedule recording allows a user to
define the specific time period for
recording on a weekly basis. The
specific recording period can also be
enabled or disabled. One can preview
the record scheduling table at Setup
→ Record → Schedule.
PDR-3160 performs recording operation based on the scheduling table.
PDR-3160 User Manual
16
Chapter 4. PLAYBACK SEARCH
To playback, please press play button on remote controller or keypad. A Play
message with four different ways box shows up for searching video clips
containing time search, event search, rec search, and play entire HDD. Each
of the function is described in the following sections:
Chapter 4-1. TIME SEARCH (M+S)
Time search (master + slave) feature can perform date and time search based
on recorded video data. This feature is very easy-to-use, and it allows a user
to perform video searching task throughout two hard disk drives. The stored
video clips are shown in red in the date/time bar. Yellow blocks indicate that
there is no video clip stored. On the other hand, the red blocks indicate that
there are video clips exist.
●
To perform the searching, simply press Left or Right button and move the
●
cursor above the red block at desired date and time specified.
Press Enter to choose the date and time information
Press Up or Down to setup year, month, date, hour, and minute.
●
PDR-3160 User Manual
17
Chapter 4-2. EVENT SEARCH
Event search is performed based on individual hard disk drive. Event list
contains information including date, time, event type, and camera channel for
the event. There are three different event types—external alarm, schedule, and
motion alarm in PDR-3160.
●
●
●
To perform event search, press Up and Down button to the desired event.
Press Enter button to play the video clips
Press Left or Right button to the next page
Chapter 4-3. REC SEARCH
REC SEARCH contains the list when a user press REC button to activate
recording operation or to stop recording. To play the REC Search list, please
choose REC Search item. A list of start and end recording shows up
accordingly. Press Up or Down to select the date and time for playing.
PDR-3160 User Manual
18
Chapter 4-4. OTHER PLAYBACK FEATURES
Once of the above playback features is performed, features such as fast
forward (FF), fast rewind (FR), pause, stop, step, and re-play can then be used.
FF: Press FF key on remote controller to fast forward the playing video.
The speed of fast forwarding ranges from 2X ~ 64X of the original playback
speed.
FR: Press FR key on remote controller to fast rewind the playing video.
The speed of fast rewinding ranges from 2X ~ 16X of the original playback
speed.
Note: Shuttle can be used to fast forwarding or to fast rewinding the video.
PAUSE & STEPPING: pressing Pause key during playing video can pause the
video. Once the video is in pausing stage, one can press Left or Right on PDR3160’s keypad or remote controller to play the video step-by-step.
Roll the Jog to see the slow motion of the video.
STOP: To stop video playback, press Stop button on keypad or remote
controller. PDR-3160’s screen switches back to live mode automatically.
PDR-3160 User Manual
19
Chapter 5. SYSTEM START-UP
There are three start-up stages while booting PDR-3160. System information
of PDR-3160 is useful for system troubleshooting.
The start-up stages are described as follows:
1) System Initializing
● First boot up screen
● Specified video system (NTSC/PAL)
● Version number for firmware update
2) Network Initializing
● Network information
3) HDD Initializing
HDD model number and size
detected
HDD information shows blank if
no HDD detected
If both HDDs are not present,
PDR-3160 can still perform its
function except features related
to HDD operations.
4) Once all above stages are correctly present, PDR-3160 finishes the booting
sequence.
PDR-3160 User Manual
20
Chapter 6. MENU SYSTEM
Chapter 6-1. SETUP MENU
Setup menu contains seven setting categories which are camera, record, alarm,
system, network, PTZ, and backup settings. The details of all the setting
categories are described in the rest of the chapters.
Chapter 6-2. CAMERA SETUP
One can setup individual camera’s settings such as camera name, camera
name displaying, video attributes, sequential displaying, and boarder color. To
setup above, please select Camera menu item in setup main menu.
PDR-3160 User Manual
21
Chapter 6-2-1. CAMERA NAME
A user can edit upto 8 characters for camera name. The name is shown at the
screen bottom of each single display. To setup the camera name, follow the
following instructions:
① Press Enter to enable the
screen keyboard.
② Scroll Jog to move cursor to
the desired character.
③ Press Left or Right key to
choose character.
④ Press Up or Down key to
set next character.
⑤ Press Esc to quit screen
keyboard and setup menu.
Chapter 6-2-2. ENABLE NAME
Enable name feature is to enable/disable camera name, HDD recording ratio,
date, and time on live monitoring mode. To disable camera name (caption), set
Enable Name to off.
Chapter 6-2-3. Video Setup
Video setup can adjust contrast, brightness, hue, and saturation for each
camera.
Press Left or Right to switch
item
Press Up or Down to
change value.
Press ESC to exit this
menu.
PDR-3160 User Manual
22
Chapter 6-2-4. SEQUENCE
Sequence feature can multiplex each camera screen in full size in specific time
period. Once the sequence table is set, press SEQ button on the remote
controller or keypad to activate the sequence feature.
① Press Left or Right button to
adjust the time period.
② Press Up or Down button to
move to the next camera
sequence setting.
③ Press ESC to exit the setup.
④ Press SEQ button to enable
sequence feature.
Chapter 6-2-5. BOARDER COLOR
Boarder color refers to the boarder of each split display’s color. This color can
be changed at Camera setup menu. There are three different colors, white,
gray, and black for user to choose.
Chapter 6-3. RECORD SETUP
Record setup menu can setup features related to recording features such as
scheduled recording, HDD over written recording, recorded image resolution
settings, recorded video speed settings, and audio channel setting.
PDR-3160 User Manual
23
Chapter 6-3-1. SCHEDULE
Once the schedule has been setup, PDR-3160 records camera video based on
the schedule table. PDR-3160’s timer detects every minute to check if it should
start to record.
① Press “Enter” to enter edit
mode
Press Up or Down to
enable or disable schedule.
Press Right to edit start or sto
p mode.
Press Up or Down to edit
start or stop time.
Press ESC to exit.
Chapter 6-3-2. REC MODE
PDR-3160 can record video in fields or CIFs resolution for storage
consideration. In short, field recording mode records only either even or odd
scanned video lines. The total throughput within a second can generate 60/50
fields per second. CIF recording mode processes each video image and
scaled into 1/4 of the original image size. The total throughput within a second
can generate 120/100 CIF/Sec. Due to image quality (storage) and fluent
video considerations, one should setup the recording system based on the
environment and monitored targets.
The manufacturing rec mode is in field mode. To change the setting to CIF,
please press Left or Right button to change.
Chapter 6-3-3. REC SPEED
PDR-3160 provides two recording modes upto 120/100 CIF/Sec and 60/50
Fields/Sec. The recording speed can be specified for storage consideration—
higher recording speed consumes more HDD storage space. To change REC
Speed, please switch menu item at Record->REC Speed.
PDR-3160 User Manual
24
Chapter 6-3-4. RECORD QUALITY
There are four different video qualities, Very High, High, Normal, and Low, a
user can setup. In general, higher image quality implies lower video compress
rate. The details of different image qualities at different HDD recording medium
are documented in appendix.
Chapter 6-3-5. PLAYBACK SPEED
Playback speed can be used if the recording speed is set differently. Playback
speed is highly recommended to match the recording speed. Incompatible
playback speed may occur if the playback speed does not match recording
speed. To change playback speed, please switch to different speed under
Recording->Playback Speed.
Chapter 6-3-6. REC CHANNEL ENABLE
Each individual channel can be enabled or disabled for recording purpose. To
close the recording channel, please enter REC Channel Enable menu item.
Close or open the REC channel accordingly.
Chapter 6-3-7. AUDIO CHANNEL
To record audio to its video channel, please first define the audio channels.
Next, please enter the REC AUDIO channel.
PDR-3160 User Manual
25
Chapter 6-4. ALARM SETUP
Alarm setup menu can change the settings of extern alarm switches, motion
alarm, buzzer, and alarm recording duration. To change these settings, please
enter Alarm setup menu and follow the instructions:
Chapter 6-4-1. CAMERA SELECT
Press Left or Right button to switch to different camera channel. It is useful to
see the video image as background reference while setting up motion area.
Chapter 6-4-2. ALARM ENABLE
PDR-3160 has 16 alarm inputs which can be configured as normal open (N/O),
normal close (N/C), or disabled. Sixteen alarm inputs numbered from 1 to 16
are one-to-one mapped to camera 1 to 16 respectively. Press Left or Right
button to switch the alarm to N/O, N/C, or None status.
Chapter 6-4-3. MOTION ENABLE
Motion Enable enables motion alarm activation to alarm outputs (N/O and N/C),
if the motion area has been set with proper motion sensitivity. Press Left or
Right button at Motion Enable menu item to change the setting.
Chapter 6-4-4. SENSITIVITY
There are five levels of sensitivity adjustment for motion video alarm triggering
range from Very High to Very Low. Press Left or Right button to change the
sensitivity setting.
PDR-3160 User Manual
26
Chapter 6-4-5. MOTION AREA SET
① Press Up, Down, Left or
Right to move cursor
block (blinking).
② Press Enter to set the
motion area block.
③ You can also use Jog &
Shuttle to move the
motion area block.
Note: to select or deselect entire view area, please first press Enter (toggle select or
deselect mode) and press Enter for 5 seconds.
Chapter 6-4-6. BUZZER TIME
Motion alarms and external alarm inputs can triger buzzer alarm. Buzzer time
is adjustable from 1 to 99 sec. Press left or right on Buzzer Time to adjust the
time setting.
Chapter 6-4-7. ALARM REC TIME
Motion alarms and external alarm inputs can trigger PDR-3160 to record. The
recording time is range from 1 to 99 sec. To setup the recording time, please
press left or right on Alarm Rec Time menu item.
PDR-3160 User Manual
27
Chapter 6-5. SYSTEM SETUP
PDR-3160 systems related settings such as date/time, HDD settings, restoring
manufacturing default, video format, buzzer output, password authentication,
and firmware update can be configured from system menu. To setup above
features, please follow the following instructions.
Chapter 6-5-1. DATE/TIME
PDR-3160 has built-in timer to record time information. One can choose
different time displaying format shown on the screen or disable the timer. Date
& time information are kept by using a battery if PDR-3160 has no power.
① Press Left or Right to
adjust date or time.
② Press Up or Down to move
to the next item.
③ Press ESC to exit the
menu.
PDR-3160 User Manual
28
Chapter 6-5-2. HDD FORMAT
To format HDDs, please select HDD Format. A message is prompted for
formatting verification. Please be alerted to this operation. It may erase not
only event list data but also video data. Press enter at HDD Format menu to
format the hard disk drives. Formatting hard disk drives may take several
seconds based on the number of lists recorded. “FORMAT COMPLETED”
message shows up after the process is done.
☞
Caution
To format HDD, it erases event lists and may damage
stored video data of the HDDs permanently.
Chapter 6-5-3. HDD INFO
HDD INFO shows the following information:
1.
Model number—The model number of the hard disk drive
2.
Size—The capacity of the hard disk drive
3.
Used--Recorded video percentage rate
4.
Rec No—Record list count
5.
Event No—Event list count
PDR-3160 User Manual
29
Chapter 6-5-4. FACTORY RESET
User may want to restore manufacturing default settings. A confirm message
shows up for final verification. To perform this task, please select Factory
Reset at System->Factory Reset and press Enter.
Chapter 6-5-5. VIDEO SYSTEM
PDR-3160 supports both NTSC and PAL video systems. PDR-3160 allows
switching from one video system to another without rebooting. To change
video system, press Left or Right button at System->Video System.
Chapter 6-5-6. BUZZER ENABLE
In case, the warning buzzer requires to be turned off. A user can disable the
buzzer under System->Buzzer Enable menu item.
Chapter 6-5-7. PASSWORD
PDR-3160 has one set of password protection preventing unauthorized access.
To activate password function, please turn Enable Password on or off at
System->Password
The password consists of four characters. The default password setting is
“1111”. The acceptable characters are 1 to 10 (0). To change the password
setting, please press Enter at System->Password->Change Password. Please
follow the sequence to change password.
PDR-3160 User Manual
30
1. Enter current password
2. Enter new password
3. Enter confirmed password
☞
Note
In case of forgetting password, please contact your local
dealer.
PDR-3160 User Manual
31
Chapter 6-5-8. FIRMWARE UPDATE
Firmware update allows one to upgrade PDR-3160’s firmware improving
system performance.
To perform firmware update, press Enter on Setup->System->Firmware Update.
Plug in portable USB device at PDR-3160’s USB port.
Press Enter button on Update Start.
After finishing transferring, remove the USB device and reboot PDR-3160
PREPARE FIRMWARE
To prepare firmware update, please create a directory, firmware, at the portable
USB disk. The portable USB disk should contain file system FAT-16 or FAT-32.
Please visit the web site at www.meritlilin.com to download the latest firmware,
and save the file in the directory mentioned above.
PDR-3160 User Manual
32
Chapter 6-6. NETWORK
PDR-3160 allows a user to access the video via Internet or LAN. In order to
connect to LAN or Internet, subnet mask, gateway, and IP address should be
configured. Please consult your Internet provider or system administrator for
above information.
Chapter 6-6-1. NETWORK ENABLE
Each camera channel can be enabled or disabled for remote access. To
enable or disable remote access, follow the following instructions.
①
②
③
④
PDR-3160 User Manual
Press Left or Right to select
camera.
Press Up or Down to
move to the next item.
Press ESC to exit the
menu
Press ESC to exit the
menu.
33
Chapter 6-7. PTZ SETUP
PDR-3160 can connect video and control signal up to 16 PTZ cameras. Using
PDR-3160 keypad or remote controller can access all these cameras. To setup
PTZ connection, please follow the following instructions:
Chapter 6-7-1. CAMERA SELECT
Press Left or Right button, one can choose each camera as background
reference to adjust PTZ’s lens.
Each PTZ camera ID is one-to-one mapped to PDR-3160’s camera. For
example, one PTZ camera is connected at camera #5 of PDR-3160. Please
adjust the PTZ camera’s device ID to 5 to response PTZ’s protocol sent by
PDR-3160.
Chapter 6-7-2. FAST DOME TYPE
One can choose the model of different PTZ device by click Left or Right button.
PDR-3160 adopts this PTZ model’s protocol and communicates with the PTZ
device automatically.
PDR-3160 User Manual
34
Chapter 6-7-3. PRESET ADJUST
The preset of a PTZ camera can be configured for live monitoring manipulation.
Panning, tilting, zooming, calling presets, auto panning, and other PTZ features
provided by a PTZ camera can be accessed during live monitoring mode. All
the features should be configured before accessing PTZ functions. Please
follow the rest of this chapter:
Chapter 6-7-4. PRESET
To define Preset, press Left or Right button on keypad or remote controller to
change the preset number.
Chapter 6-7-5. DWELL
Define Dwell time of presets. The Dwell number ranges from 0 to 255 (the
shortest to the longest). The Dwell time might vary based on different model
the user chooses. Please see each PTZ device user manual for detail.
Chapter 6-7-6. SPEED
Define Speed of previous preset to the next preset. The Speed number ranges
from 1 to 8 (the slowest to the fastest). The speed might vary based on
different PTZ device’s settings.
PDR-3160 User Manual
35
Chapter 6-7-7. ADJUST POS
To adjust PTZ lens position, press Enter on Adjust Pos item. A PTZ screen
keypad shows up as a reminder. Please press direction keys on remote
controller to move the PTZ lens. To zoom in and/or zoom out of the PTZ
device, press Zoom In and/or Out on the remote controller.
Chapter 6-7-8. SAVE
Once the above parameters are entered, the lens of the PTZ device should be
in place with proper IRIS and focus set. To store the parameters permanently,
please press Up or Down button to choose Save menu item. The position is
stored by each PTZ device programmatically. You can test the stored preset by
switch back and forth on Preset menu item. To define other preset point,
please repeat chapter 6-7-4.
In live monitoring mode, this preset can be recalled at any time. To recall a
preset, please read Call Preset section for detail.
☞
WARNNING
Please make sure that the RS-485 wires are properly
installed and connected to PDR-3160. The PTZ device
ID is adjusted to PDR-3160’s camera number
accordingly.
☞
Note
The screen keypad of Adjust POS acts as a reminder.
Please press relative buttons on PDR-3160 front keypad
or remote control.
PDR-3160 User Manual
36
Chapter 6-8. BACKUP
BACKUP INFORMATION
PDR-3160 adopts portable USB disk device for performing video backup task.
Since there are many portable USB devices currently available in the market,
Linux OS may not support all the device drivers. BACKUP INFORMATION
provides USB information and user can test if the USB device is supported by
PDR-3160.
To perform BACKUP INFORMATION, please choose BACKUP INFORMATION
at MENU->BACKUP INFORMATION. The information is as follows:
1.
2.
3.
4.
INSTALL: USB device detected (YES/NO)
TOTAL SIZE: The total size of the portable USB device
USED SIZE: File size used of the portable USB device
USED PER: The file usage percentage rate of the portable USB device
PDR-3160 User Manual
37
VIDEO BACKUP
To backup stored or live video from PDR-3160, please follow the following
instructions:
1. Plug in the portable USB disk into PDR-3160’s USB port
2. Search the video using play button. Please refer to playback section for
details.
3. Once the stored video has been located, press Backup button for
capturing the video clips into PDR-3160’s memory. The message,
“Video Capturing”, shows:
4. Press Backup button again for transferring video clips into portable USB
disk. The message, “USB DATA TRANSFERING...”, shows:
5. If the USB device is full, the message, “USB Full”, shows:
To erase the USB Full message, please press ESC button.
6. Once the USB backup has been done, the message, “FINISH USB
TRANSFERING”, shows up. Press ESC to erase the message.
☞
WARNNING
Fatal error may occure if the portable USB disk is
removed while backup operation is still under way. It
may damage the file system of the USB device.
PDR-3160 User Manual
38
PDR-3160 Network Viewer
To access PDR-3160 via LAN, one can use Network Viewer application.
The application can be retrieved from:
(1) PDR-3160’s HTTP web server
(2) Performing video backup (transferring the application automatically)
(3) System→Firmware Update→Start Copy Application, or visit
www.meritlilin.com for the latest firmware.
Network Viewer allows:
(1) Accessing remote live video
(2) Capturing video into local PC
(3) Exporting video into AVI file format
(4) Converting snapshot into standard JPEG
(5) Retrieving remote event & recording lists
(6) USB portable disk video files or local PC video files playback.
PDR-3160 User Manual
39
Connect PDR-3160
To connect PDR-3160 please click on Connect DVR button. Type IP
address at IP Address edit box.
To record live video into local PC, please specify the directory at Local
record path. Click to connect to the PDR-3160.
Disconnected PDR-3160
To disconnect PDR-3160 for reconnecting others, please click on
Disconnect button.
Play PC File
To play the stored video files on the flash portable disk or local PC,
please click on Play PC File that it allows a user to play, fast forward,
fast reverse, pause, and to step the video file.
To export the video to standard JPEG file, please click on the camera channel
and perform right mouse click for exporting JPEG file.
PDR-3160 User Manual
40
Capturing Video Into AVI File
For capturing stored or live video to AVI file, please click on Capturing
Video Into AVI file button. The AVI Save dialog box shows up. Please
specify the file path and the camera channels for exporting the AVI
file(s). Click the button to stop the AVI capturing process.
Saving File to Local PC
To save remote PDR-3160 video into local PC, please click on Saving
File to Local PC button. It saves the video into local PC. Click the
button again to stop the process.
PDR-3160 User Manual
41
APPENDIX
EXTERNAL ALARM SWITCHES
PDR-3160 has a D-SUB 25 Pins IO connector which contains 16 alarm switch
inputs, one RS-485, and two alarm outputs. The detail description of the pin
assignment is in the following chart.
Table
Pin 1
Pin 2
Pin 3
Pin 4
Pin 5
Pin 6
Pin 7
Pin 8
Pin 9
Pin 10
Pin 11
Pin 12
Pin 13
Pin 14
Pin 15
Pin 16
Pin 17
Pin 18
Pin 19
Pin 20
Pin 21
Pin 22
Pin 23
Pin 24
Pin 25
PDR-3160 User Manual
Alarm input 1
Alarm input 2
Alarm input 3
Alarm input 4
Alarm input 5
Alarm input 6
Alarm input 7
Alarm input 8
Alarm input 9
Alarm input 10
Alarm input 11
Alarm input 12
GND
Alarm input 13
Alarm input 14
Alarm input 15
Alarm input 16
485A
485B
GND
ALARM COM
ALARM NC (normal close)
ALARM NO (normal open)
GND
GND
42
PDR-3160 Storage Media Supporting List
USB Portable Disk
MyFlash 1G
PRETEC 256MB
Transcend Ultra Speed JetFlash ™ Portable Data Storage 1GB
RiDATA EZDRIVE ™ USB 2.0 FLASH DRIVE 512 MB
Note: Please make sure that the USB Portable Disk is USB 1.1 compatible.
Hard Disk
Seagate Barracuba
Seagate Barracuba
Seagate Barracuba
Western Digital WD250OJB
Hitachi HDT722525 DLAT80
Maxtor GB200PO
PDR-3160 User Manual
80GB
120GB
200GB
250GB
200GB
200GB
43
120 GB HARD DISK RECORDING TABLE
Resolution
FPS
720 * 288
50
25
12
Very High
8.2GB/14.7hrs
4.0GB/30hrs
2.0GB/58.8hrs
720 * 240
60
30
20
8.8GB/13.7hrs
4.6GB/26.1hrs
2.2GB/55.6hrs
Recording Quality
PAL
High
Normal
5.8GB/20.8hrs
5.4GB/22.2hrs
2.9GB/41.7hrs
2.3GB/52.6hrs
1.4GB/83.3hrs
1.2GB/120hrs
NTSC
6.4GB/18.8hrs
4.9GB/24.5hrs
3.4GB/35.3hrs
2.9GB/41.4hrs
1.6GB/76.9hrs 1.32GB/90.9hrs
Low
4.7GB/25.6hrs
2.0GB/58.8hrs
0.8GB/150hrs
4.2GB/28.6hrs
2.5GB/47.6hrs
1.2GB/100hrs
Note: HDD space required for one hour/total recording hours allowed for an 120GB HDD
PDR-3160 User Manual
44
DISTRIBUTOR:
PLP-3160CSE-1
PDR-3160 User Manual
45