1
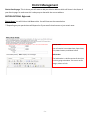
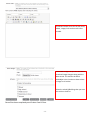
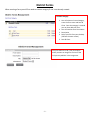
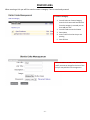
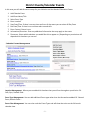
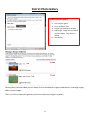
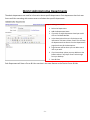
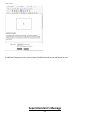
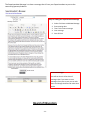
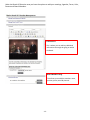
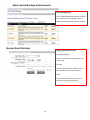
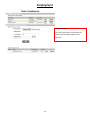
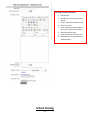
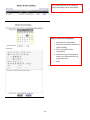
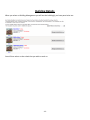
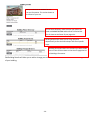
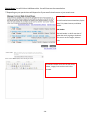
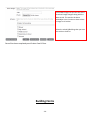
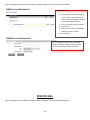
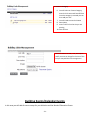
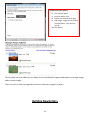
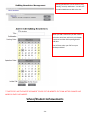
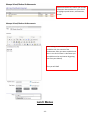
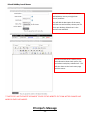
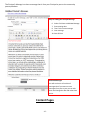
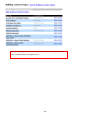
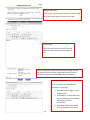
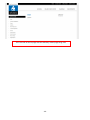
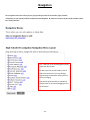
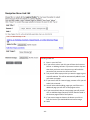
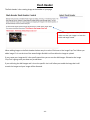
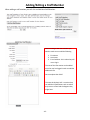
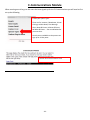
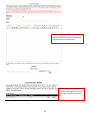
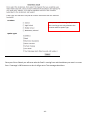
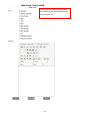
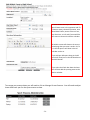
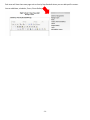
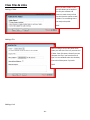
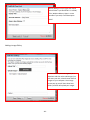
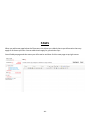
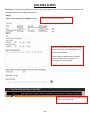
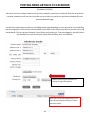
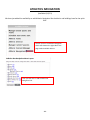
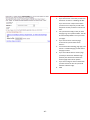
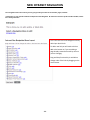
SchoolPointe CMS Manual 3248 W. Henderson Rd Columbus, OH 43220 District Management-Pgs 2-23 District Details- Pg. 3 District News- Pg. 3-4 District Forms- Pg. 5 District Links- Pg 6 District Events- Pg.-7 District Photo Gallery- Pg. 8 District Administrative Departments- Pg. 9-10 Superintendent Message- Pg. 11 Board of Education- Pg. 12-13 Employment- Pg. 14-15 School Closing- Pg. 16-17 District Content Pages- Pgs 18-20 Navigation- Pgs. 21-22 Flash Header- Pg.23 Building Management- Pgs. 24-43 Building Details- Pgs. 25-27 Building News- Pgs. 28-28 Building Forms- Pg. 30 Building Links- Pg. 31 Building Events- Pg. 32 Building Photo Gallery- Pg. 33 Building Newsletters- Pg. 34 Student/School Achievements- Pg. 35 Lunch Menus- Pg. 36 Principals Message- Pg 37 Content Pages-Pg. 38-40 Navigation- Pgs. 41-42 Flash Header- Pg. 43 Staff Module-Pgs. 44-46 Security Module- Pgs. 47-51 Alumni Module- Pgs. 52-56 E-Survey module- Pgs. 57-61 E-Communications Module- Pgs. 62-65 Mobile View- Pgs. 66-67 Athletics Module- Pgs. 68-75 & NEW New Athletics Navigation- 86-87 Online Classroom- Pgs. 76-83 NEWEST FEATURESBuilding Alerts- 84 Posting News Articles to Facebook- 85 New Athletics Navigation- 86-87 New Intranet Navigation- 88-89 -1- DISTRICT MANAGEMENT -2- District Management District Details page- This is where you will want to add your district address which will show in the footer of your district page. So make sure this is always up to date with the correct address. SECTION OPTIONS- Right side District News- You will click on Add New article. You will then see the screen below. **Depending on your permissions will depend on if you see all school names or just certain ones. Date & Title You will need to have a News Date, Expire Date, Title, News Content, and Select School. Sub-Header The Sub-header is a brief overview of what that article is going to be about. This area is not for images, videos or links. -3- The News Content area is for the full article, videos, images, links and as much info as needed. In the News Image area you can then add a thumbnail image that goes along with the News article. This needs to be about 100x100px in size. You do not have to have a image for all articles. Select the school(s)/Buildings that you want this article to show on. Once all has been completed you will select Save & Close. -4- District Forms When creating a form you will first need to create a category if one is not already created. To add a Catagory 1. You will select on Create Category, enter the form name and Save & Close. Once the category is created you can then add your form. 2. You will need to enter Form Name 3. Description 4. Select your file from your desktop. (PDF are the most secure) 5. Save & Close. You must add in the URL, Title, Description and if you want an image for the icon of the link you may add this in the Image area. -5- District Links When creating a Link you will first need to create a category if one is not already created. To Create a Category. 1. You will select on Create Category, enter the link name and Save & Close. Once the category is created you can then add your link. 2. You will need to enter Link Name 3. Description, 4. enter in the link to the site you are posting 5. Save & Close. You must add in the URL, Title, Description and if you want an image for the icon of the link you may add this in the Image area. -6- District Events/Calendar Events In this area you will add all events except for your Athletics and the Board of Education Events. 1. 2. 3. 4. 5. 6. 7. 8. 9. Add Calendar Event Add Event Name/Title Select Event Type Enter Location Start Date/Time- If there is no start time and is an all-day event you can select All Day Event End Date/Time- If there is no end time select no end time Enter Contact if there is one. Information/Directions- Enter any additional information that may apply to the event. Placement- Select which calendars you would like this to appear on. (Depending on permissions will depend which locations you can see. Location Management- Where you can add which locations that you will use throughout your district. EX. Café, Gym, Football Field… Event Type Management- You can add additional Event types other than the few we have added. EX. General Event, Athletic Event…. Event Color Management- You can color code the Event Types and will show that color on the full month calendar view. -7- District Photo Gallery To add a new photo gallery: 1. 2. 3. 4. Click add new gallery Enter the Gallery Title Browse your desktop for images. Add Images- Images will not load till you Save Gallery. They will then upload. 5. Save Gallery Once a gallery has been added you can always click on the add/edit images to add captions, rearrange images, add or remove images. There is no limit to how many galleries you have or how many images in a gallery. -8- District Administrative Departments The admin departments are used for information about specific departments. Each department has their own forms and links area along with content area to tell about that specific department. Steps to adding information: 1. Select the Department 2. Add the Department Name 3. If you wish to add a Department head you would click on Find Staff Member. 4. In the Description this area is for business card information. EX. Name, Phone, Email. This will keep all departments that same size on the Departments page that shows all the descriptions. 5. Page Content will be where you can add as much info as you wish. 6. If you have a dept. photo you may add that at the bottom where it says Dept. Photo. Select image from you Desktop. 7. Save & Close Each Department will have a Forms & Links area that is the same feature as the District Forms & Links. -9- If additional Departments are need contact SchoolPointe and we can add those for you. Superintendent’s Message - 10 - The Superintendent Message is to have a message that is from your Superintendent to post to the community/parents/students. Steps to adding the Superintendent Message 1. 2. 3. 4. 5. Select Click here to Add New Message Enter posting date. That it is the active message Your message. Save & Close Archived Messages You will see that it will archive all messages that if you want to reuse messages from year to year you can edit them and change the date and make them active. Board of Education - 11 - Under the Board of Education area you have the options to add your meetings, Agendas, Forms, Links, Content and Board Members. Content Area This is where you can add any additional information that might be going on within the Board. Board Member ListingThis allows you to add the members name, position, photo, email & phone #. - 12 - Add a Board Meeting Click on Add Board Meeting which will allow you to add your meeting dates, and any documents that go along with that meeting. Adding a Board Meeting Info Enter Meeting Date Enter the time that the meeting will start if you know. The title Create Event Check box will allow you to then add this to the District Calendar. SAVE Once you save the meeting it will then allow you to add any documents. - 13 - Employment Add a New Form This area is where you can add forms for current staff or people apply for new positions. - 14 - Creating a New Job Placement 1. Add Job Title 2. The date you are wanting to post the job 3. Enter in Description about the job. 4. Select it is active 5. Enter a Expiration Date if there is not one it will enter Untill Filled. 6. Selection position type 7. Enter staff contact if there is one 8. Add a doc such as application full job description…. School Closing - 15 - This is where you will see all closing you have had and what type of closing/delay Steps to create your closing/delay 1. Select Date for closing/delay 2. Select if all schools are effected or a specific building 3. Enter in the details of the closing/delay 4. Select what type of closing/delay and you can add specific that you might experience. 5. SAVE - 16 - School Closings/Delays will show where the News regularly shows up and will be in Bold Red letters. ** At midnight the closing will automatically be removed from your site. You do not have to do it manually. Content Pages - 17 - In the content page area this is where you can access all content page that have been created through the Navigation area. - 18 - Manage Staff Access You can give a specific person access to a content page to be able to help keep information up to date. Content AreaThis is the main content area where you will add all information that you want people to see. The link is what you would use to link out to this page. You will only need to use the /content_page.aspx?cid=516 if you are linking out you do not need the beginning of the address. Secondary Content areaYou have 3 options to add additional information to this page. 1. Secondary Content page- to add additional text. 2. Photo Gallery- To show about and event or if building a new building the progression of the construction… 3. Downloads- Where you can add forms that pertain to the article - 19 - This is the look of the live page with the secondary content page being used. - 20 - Navigation The navigation of the site is where you are going to add your links out to modules, pages, website. ** Depending on your specific website will depend on the Navigation. All sites will have the Top Nav and the Left Nav, others are a site by site basis This is the look of the Left Navigation usually called your Quick Links. To add a new link you will need to click on Add at the bottom or if you are editing a page already created select edit by the one you are changing. Drag and Drop functionality is available to change order of the links by dragging on the arrow button. - 21 - Creating a New link 1. Enter in your Link Title 2. If you want it to be a main link you will leave the Parent as District or Building Left Nav. If you want it to be a drop out that when you hover over it drops out you will make the parent the link you want it to hover out from. 3. Link you will leave empty unless you want the page to go to a specific website. This will be automatically added in once you create your page. 4. If you want to link to a internal page, content or file you will select link to internal…. 5. You will select what building, page type, and if there is a additional page you will click on the page to select. 6. If you want a blank slate to create a page yourself you will click on Add New Page (Content) This will then be saved in the Content page section of the options. 7. If you want a image to show on the button you click on from the live site you would add that to button image. 8. SAVE - 22 - Flash Header The flash header is the rotating image at the header of your page. When creating the flash header you need to make sure that your image is at least the width and height stated. When adding images to the flash header the best way is to select Click here to Use Image Crop Tool. When you add a image if it is not the size of the stated height & width it will not allow the image to upload. If you create your image and it is the specfic stated size you can use the Add Images. Otherwise the Image Crop Tool is going to be your best way to add them. If you add using the Add Images and it it not the specific size it will allow you to add the image but it will stretch the images and your image will be distorted. - 23 - BUILDING MANAGEMENT - 24 - Building Details When you select on Building Management you will see the building(s) you have permission too. You will then select on the school that you wish to work on. - 25 - Always make sure the address has the correct information. This is what shows on the footer of your site. On the Phone Directory make sure that your phone # is listed as ADMINSITRATION and the fax # is listed as FAX. This all shows at the footer of your page also. Building Department allows you to assign people to departments just like the District depts. But school specific Depts. Building Principals & Asst’s this is where you want to add them in this will show them on the school’s page that list all buildings information. Edit Building Details will allow you to add or change your school address add additional info and add a image of your building. - 26 - Building News - 27 - District News- You will click on Add New article. You will then see the screen below. **Depending on your permissions will depend on if you see all school names or just certain ones. Date & Title You will need to have a News Date, Expire Date, Title, News Content, and Select School. Sub-Header The Sub-header is a brief overview of what that article is going to be about. This area is not for images, videos or links. The News Content area is for the full article, videos, images, links and as much info as needed. - 28 - In the News Image area you can then add a thumbnail image that goes along with the News article. This needs to be about 100x100px in size. You do not have to have a image for all articles. Select the school(s)/Buildings that you want this article to show on. Once all has been completed you will select Save & Close. Building Forms - 29 - When creating a form you will first need to create a category if one is not already created. To add a Catagory 6. You will select on Create Category, enter the form name and Save & Close. Once the category is created you can then add your form. 7. You will need to enter Form Name 8. Description 9. Select your file from your desktop. (PDF are the most secure) 10. Save & Close. You must add in the URL, Title, Description and if you want an image for the icon of the link you may add this in the Image area. District Links When creating a Link you will first need to create a category if one is not already created. - 30 - To Create a Category. 6. You will select on Create Category, enter the link name and Save & Close. Once the category is created you can then add your link. 7. You will need to enter Link Name 8. Description, 9. enter in the link to the site you are posting 10. Save & Close. You must add in the URL, Title, Description and if you want an image for the icon of the link you may add this in the Image area. Building Events/Calendar Events In this area you will add all events except for your Athletics and the Board of Education Events. - 31 - 1. 2. 3. 4. 5. 6. 7. 8. 9. Add Calendar Event Add Event Name/Title Select Event Type Enter Location Start Date/Time- If there is no start time and is an all-day event you can select All Day Event End Date/Time- If there is no end time select no end time Enter Contact if there is one. Information/Directions- Enter any additional information that may apply to the event. Placement- Select which calendars you would like this to appear on. (Depending on permissions will depend which locations you can see. Location Management- Where you can add which locations that you will use throughout your district. EX. Café, Gym, Football Field… Event Type Management- You can add additional Event types other than the few we have added. EX. General Event, Athletic Event…. Event Color Management- You can color code the Event Types and will show that color on the full month calendar view. Building Photo Gallery - 32 - To add a new photo gallery: 6. 7. 8. 9. Click add new gallery Enter the Gallery Title Browse your desktop for images. Add Images- Images will not load till you Save Gallery. They will then upload. 10. Save Gallery Once a gallery has been added you can always click on the add/edit images to add captions, rearrange images, add or remove images. There is no limit to how many galleries you have or how many images in a gallery. Building Newsletters - 33 - Building Newsletters can be used for daily, weekly, monthly newsletters. You will click on add a Newsletter to add to the site. When you add a newsletter you will need to select the active box, add a title, sub-header is optional and then add a posting date & end date. You will then select your file from your desktop and SAVE ***NOTE PDF’S ARE THE SAFEST DOCUMENT TO ADD TO THE WEBSITE. PDF’S CAN NOT BE CHANGED LIKE WORD OR EXCEL DOCUMENTS. School/Student Achievements - 34 - Student achievements is where you can add information about students or your school to highlight special honors, achievements, awards. When adding an achievement you will need to add the title, the content of the achievement, when you want to publish and when it is to end. If there is a document you can add that at the very bottom by getting that from your desktop. Then you will SAVE Lunch Menus - 35 - In the lunch menu area you will be able to add whatever menus you might have. Lunch, breakfast… You will add the description of the menu, add the start and end date, choose your file from your desktop, Select that it is the active menu and SAVE. The lunch content area is where you can add information about lunch prices, free and reduce meal plans, substitutions… This will then show on the Lunch menu page with the menus. ***NOTE PDF’S ARE THE SAFEST DOCUMENT TO ADD TO THE WEBSITE. PDF’S CAN NOT BE CHANGED LIKE WORD OR EXCEL DOCUMENTS. Principal’s Message - 36 - The Principal’s Message is to have a message that is from your Principal to post to the community parents/students. Steps to adding the Principal Message 6. 7. 8. 9. 10. Select Click here to Add New Message Enter posting date. That it is the active message Your message. Save & Close Archived Messages You will see that it will archive all messages that if you want to reuse messages from year to year you can edit them and change the date and make them active. Content Pages - 37 - In the content page area this is where you can access all content page that have been created through the Navigation area. - 38 - Manage Staff Access You can give a specific person access to a content page to be able to help keep information up to date. Content AreaThis is the main content area where you will add all information that you want people to see. The link is what you would use to link out to this page. You will only need to use the /content_page.aspx?cid=516 if you are linking out you do not need the beginning of the address. Secondary Content areaYou have 3 options to add additional information to this page. 4. Secondary Content page- to add additional text. 5. Photo Gallery- To show about and event or if building a new building the progression of the construction… 6. Downloads- Where you can add forms that pertain to the article - 39 - This is the look of the live page with the secondary content page being used. - 40 - Navigation The navigation of the site is where you are going to add your links out to modules, pages, website. ** Depending on your specific website will depend on the Navigation. All sites will have the Top Nav and the Left Nav, others are a site by site basis This is the look of the Left Navigation usually called your Quick Links. To add a new link you will need to click on Add at the bottom or if you are editing a page already created select edit by the one you are changing. Drag and Drop functionality is available to change order of the links by dragging on the arrow button. - 41 - Creating a New link 9. Enter in your Link Title 10. If you want it to be a main link you will leave the Parent as District or Building Left Nav. If you want it to be a drop out that when you hover over it drops out you will make the parent the link you want it to hover out from. 11. Link you will leave empty unless you want the page to go to a specific website. This will be automatically added in once you create your page. 12. If you want to link to a internal page, content or file you will select link to internal…. 13. You will select what building, page type, and if there is a additional page you will click on the page to select. 14. If you want a blank slate to create a page yourself you will click on Add New Page (Content) This will then be saved in the Content page section of the options. 15. If you want a image to show on the button you click on from the live site you would add that to button image. 16. SAVE - 42 - Flash Header The flash header is the rotating image at the header of your page. When creating the flash header you need to make sure that your image is at least the width and height stated. When adding images to the flash header the best way is to select Click here to Use Image Crop Tool. When you add a image if it is not the size of the stated height & width it will not allow the image to upload. If you create your image and it is the specfic stated size you can use the Add Images. Otherwise the Image Crop Tool is going to be your best way to add them. If you add using the Add Images and it it not the specific size it will allow you to add the image but it will stretch the images and your image will be distorted. - 43 - STAFF MODULE - 44 - Adding/Editing a Staff Member When adding a staff member you will click on Add New Staff Member. When creating a new staff member you Need to make sure to add the following 1. First Name 2. Last Name 3. E-mail address- this is what they will use to log in. The rest of the information can be added once the user has logged in and can add the additional info. Once complete then SAVE. The next tab by Basic Info is a section they can add their Qualifications such as where they went to school and the degrees they might have. - 45 - The assignments is where you will add them to specific buildings or departments. They can be assigned to multiple buildings by selecting the location and SAVE The delete button will delete them from your system. Editing a user you will simple search there name within the Staff module and make any changes that you may need too. If adding or removing a staff member from a building you will go to Assignments and add or remove the specific building. - 46 - SECURITY MODULE - 47 - Security Permissions To give someone permission to areas of your website you will need to do the following steps: 1. Select on Security from the CMS home page. 2. If it is the first time to give a person permission you will need to type their last name in the search and select GO. 3. Once their name has appeared you will SELECT them. 4. You will then go and select on the area that you want them to have the permissions too. 5. You will select Enable (District) Access District Permissions- Ones you will use. School Closings- Allows you to post in the school closings/delays District Forms- Allows you to add forms to the district page that people can download District Links – Allows you to add links to the district page that will link to specific websites Employment- Allows you to post job openings and forms that may be needed by staff and applicants District News- Allows you to add the news articles to the district website Administrative Departments- Allows a user to make changes to their specific Department they are assigned too. Calendar- Allows you to add events to the District calendar. (If permission to calendar is given you must give permission to Calendar Permission that is farther down in the list of permissions) Superintendents Message –Allows you to be able to post the Superintendent’s message Board of Education- Gives you access to the BOE area to list meetings, agendas, minutes, info and BOE members. District Content Pages - Allows a user to make changes to their specific Content Page they are assigned too. Photo Gallery- Allows you to create photo galleries for the District page. Administrative Dept (super user) – This will be for the admins of the district. This is so that you can see all Admin depts. for the District that have been created for the district area and can make changes to any of them. (You must have this permission along with District Admin Depts.) Content Page (super user) - This will be for the admins of the district. This is so that you can see all Content Pages that have been created for the district area and can make changes to any of them. (You must have this permission along with District Content Pages. ) Navigation- Allows you to be able to add the Links that show on the Quick Links and top Navigation - 48 - Flash Header- This allows you to post images to the rotating images at the top of your page if your district has this feature. Building Permissions Enable Building Access Enable All Building Sections- If you select this it will select all areas of that specific building Forms- Allows you to add forms to the building page that people can download Links- Allows you to add links to the building page that will link to specific websites Current News- Allows you to add the news articles to the building website Newsletters- Allows you to be able to add Newsletters to your building page. Principals Message- Allows you to be able to post the Superintendent’s message Student Achievement- Allows you to add Student/School Achievements such as honor roll, awards… Lunch Menu- Allows you to add your buildings lunch menus Calendar- Allows you to add events to your building calendar. (If permission to calendar is given you must give permission to Calendar Permission that is farther down in the list of permissions) Building Details- Allows you to make changes to the Building Depts, Address, Phone #’s and Principal names. Photo Gallery- Allows you to create photo galleries for the Building page. Building Content Pages- - Allows a user to make changes to their specific Content Page they are assigned too. Content Page (super user)-This will be for the admins of the district. This is so that you can see all Content Pages that have been created for the specific building area and can make changes to any of them. (You must have this permission along with Building Content Pages. ) Navigation Flash Header- This allows you to post images to the rotating images at the top of your page if your Building has this feature. ** A SUPER-USER CAN SEE ALL ADMIN DEPARTMENT OR CONTENT PAGES. THIS IS FOR MAIN ADMINISTRATORS. - 49 - Calendar Permissions Bulk Import- Allows you to add events to a template (in the CMS) and upload them all at once. Calendar Locations- Allows you to create locations you can select for you events. Event Types- Allows you create event types that will be use within your district/schools Staff Permissions Online Classroom Access- This allows you to be able to see others OLC without having their username and password. This does not allow you to see their file manager or Video Library. Search for Staff- Allows you to search for staff members within the Staff Module. Manage Staff- Allows you to make changes to the staff profile and add and remove staff members. Online Classroom Permission Enable OLC Permission- This allows someone to have their own OLC page that they can create. Alumni Permissions Enable Alumni Module Access- This allows someone to be able to make changes to the Alumni section of the website. Security Permissions Enable Security Access- This allows someone to come and make adjustments to these areas in the Security area. This is meant for the main administrators of the website. - 50 - Athletics Module Enable Athletics Module Access- Allows someone to add the athletics teams, schedules, news, forms and any information pertaining to the athletics of your schools. E-Survey Module Enable E-Survey Module- This allows someone to create Surveys that can then be posted to the website or sent out in email. Communication Module Enable Communication Module- Allows someone to send out e-information such as newsletters, updates, school closings… this also can send out text messages. Mobile View Module Enable Mobile Admin Access- This allows someone to make changes to the look of the mobile view in color & Logo. - 51 - ALUMNI MODULE - 52 - On the Alumni module you have a few options with getting information to Alumni’s that have signed up. 1. 2. 3. 4. You can send out e-mails to those that have signed up for the Alumni Post News articles Post Reunion Information You can export out list so that you can pull all Alumni info. Whenever someone has signed up as Alumni they must be approved in order to be searchable on the live site. - 53 - Reunion Announcements Allows you to add announcements about upcoming reunions that are planned. - 54 - Alumni News articles This is a place where you can place articles that are associated with Alumni’s and important info just for them. You will need to do the following steps. 1. Enter start and end dates 2. Add a header title 3. Sub-header is a brief overview of what the article will be about. 4. News content is where you can add your full article with images, links, videos and so on. - 55 - Alumni E-Contacts This area allows you to send out e-mails to specific classes or all alumni’s You will need to do the following 1. 2. 3. 4. - 56 - Add a subject Enter your message Select year(s) or all classes Send e-mail E-SURVEY MODULE - 57 - E-Survey Module E-Survey Module allows you to create surveys for your staff, students, parents, community to get information for a specific item. You will first create the Survey Name and then a Pin # ** A Pin # can only be used one time for survey. So if you use 123 you can not use that for a new survey. It also must consist of #’s only. To add info to your survey you will do the next steps: 1. Survey Description is what you want them to know about the Survey before they take it. 2. Instructions what specific instructions you might have you can add here. 3. Confirmation Message the message want them to see once they are done taking the survey. You will then enter your Start and End date # of Questions you want on a page and then select the survey active and if you wish to have them complete this anonymously. SAVE - 58 - Once you have all info created you will then click on Survey Questions tab at the top. You will then enter your Questions text and then what type of question you would like this to be.. Multiple Choice, True or False, Text Answer. You will then save and go to your next question. - 59 - Once you have created all questions and saved you can then click on Page Viewer to see what your page will look like and can move your questions around if you chose. - 60 - Once the Survey has been completed by those you wish to take it you can then go to the main E-Survey Page and click on Survey results. Once you click on Survey Results you will be able to see the following reports. Report Types: Statistical Report Full Individual Report Completed Survey Individual Report Full Excel Report - 61 - E-COMMUNICATIONS MODULE - 62 - E-Communications Module When creating a email to go to the ones that have signed up for the E-Communications you will need to first set up the following. Create your option Types. These are for instance, E-Newsletter, School Closings, Athletic News, Text Message Alerts, News & Events, HS News & Events, MS News & Events…. You can add whatever you want here. Once those are added then the parents can sign up for all they want You will first click on Create E-mail - 63 - You will select your email type, enter your subject, the information you are wanting to send out and then click Save Email. You will then click on Send this will take you to the page where you can decide who you want to send this too. - 64 - Here you will select which groups you want this e-mail to go out to by selections the location and then option Type Once you click on Submit you will enter who the Email is coming from and the address you want it to come from. If message is 160 characters or less it will go out to Text message subscribers. - 65 - MOBILE VIEW MODULE - 66 - Mobile View Mobile view allows you to adjust what color you want for the icons, start color & End color. You can use your district colors, add your district Logo. When you click on schools it will take you to the list of schools and same with the news & Events. - 67 - ATHLETICS MODULE - 68 - Athletics Module This is the main Athletics page where you will chose which school sports you want or which sport you wish to work on. Once you click on the school you want for sports this is where you will add which sports that school has. You will click on the Add a New Sport. - 69 - Once you click on Add New Sport you will enter in the sport name such as Football, Softballl… the sports you have. DO NOT ADD JV, VARSITY… THIS WILL BE ADDED LATER. You will then add if it is boys or girls, and which season it belongs too. Then Select Create Sport Once you are into the specific sport you will then click on Teams View Schedules under the actions/activities. This is where you will then add your teams levels. - 70 - Once you go to the teams view schedules this is where you will chose which level of team that sport has. - 71 - To add a athletic event you will select the sport & team enter in the opponent and if it is home or away, choose the location, start & end date & time, contact if there is one, any directions or info and if you would like this event to show on the district calendar. All athletic events will show on the correct school page that you enter it under. So if it is in the HS sports it will show in the HS calendar and so on. If you add your MS sports along in the HS area it will show just on the HS calendar not the MS Calendar. If you select the Check box above the Save this will then add this sporting event to the district calendar. To manage your seasons dates you will need to click on Manage Current Seasons. You will need to adjust these dates each year for that years events to show. - 72 - Schedule Star Events If you use Schedule Star you can select on the Schedule Star Sync. If you have given us your highschoolsports.net ID #. We can then pull your events in through Schedule Star. Once you have clicked on Schedule Star Sync this is what you will see. Once you are here you will click on Load Season. That will then pull all the events you have in Schedule Star into our system. - 73 - Once you click load season this is what you will see the events that have not been synced yet. If you make a change in Schedule Star you will need to resync the events. It will only pull the events that you made changes too. You also have the option on this page to Sync just to the District Calendar, Sync to the district along with the school. All events will go to the school calendar always. - 74 - Each team will have there own page such as Varsity Boys Baseball where you can add specific content. You can add News, schedules, Forms, Photo Gallery - 75 - ONLINE CLASSROOM - 76 - Online Classroom The Online Classroom is available to all staff members. At anytime you can save your information and at the top right of your OLC page you will see Once a teacher creates the Online Classroom he/she will have the options to create numerous classrooms for each subject along with general pages. The homepage along with each classroom has its own Calendar. Display Name will be your name or grade level whatever you wish. Contact Information will go in this area. Basic info such as Phone #, email, name, room #. The teacher bio area is where you can tell about yourself about your class whatever. This is where you can pull all info that you want parents & students to know about your class. Once you have created your homepage you then can start on your individual classroom pages. Under the Display Name you can select on Add New Classroom. This is where you can add as many classrooms as you wish, so one for each subject you teach or just one. Under your Classroom Pages you have a section called Pages this area give you a blank page where you can add info that will pertain to all classes without having to add it to each of your classrooms. - 77 - Classroom Pages In a OLC Classroom page you have the option to add Announcements, Assignments, Blogs, Files & Links or Photo Galleries. If you are working on a page that you do not want to make public yet you can always click on the Disable Teacher Classroom while you are working on this page and when you are ready to set it live uncheck the box. By Clicking on the Edit Name beside Class Announcements or one of the sections you can change the name of that section to your preference you can also disable sections if you do not want to use those areas or they are a work in progress. - 78 - In the OLC you can also drag and drop the sections and put them in whatever order you wish them to be in or if you want then in one Coulmn you have that option by just dragging and dropping the box to the place you would like it. Class Calendar To add a class event you will click on Add Event under the calendar. You will enter your event Headline (Title) Choose which classroom it belongs with, when the event starts & time if there is a time, select end date and time, enter the location and then any additional information. SAVE This will show on that class calendar along with your main homepage calendar. Class Announcments- - 79 - You will add your display Title and then enter in the description of your Announcement. You can also add a image to the announcement if you wish. SAVE Class Assignment With the Class assignments you will add the name, the date you are assigning this on, date it is due, and the description of the assignment. You can then also choose to allow them to submit assignments online for you to look at or download. When they submit an assignment online it will date & time stamp when they submitted it. They do have to enter their first and last name when they submit the assignment. SAVE - 80 - When you choose the Assign date that is the date that it will also show up on the assignments area. So if you put a future date it will not show till then. Class Files & Links When you add a Folder to your files this allows you to separate files for your students and parents to make it easy to find. You also have the option to Hide a folder if it is something that is not ready to be public. Adding a Folder SAVE Adding A File When creating a file you will select which folder you want this to be in if you want it in a folder. Enter File Name, Choose from your computer the file, if you want that file to open in a new window select the checkbox, enter a brief description if you wish. SAVE Adding a Link - 81 - When adding a link you again will choose which folder if you would like it in a folder, Title, Website address, Open in a new window if you wish, a brief description SAVE Adding a Image Gallery You will choose if you want a gallery or a slideshow and then select add images. You will enter your title, select browse and find images on your computer. Once image names pop up you will then select Save Gallery and that will upload your images. - 82 - PAGES When you add a new page below the Classrooms this allows you a blank slate to put information that may apply to all classes you have. You can add school supply list, permission slips… You will add you page and then enter your information and then click the save page at top right corner. - 83 - BUILDING ALERTS Building Alerts allow you to add info to the very top of your page so if there is an important message you are wanting to show you can add this at the top. First you will click on the add Alert You will then add the info that you want the alert to say on the main home pages for the district and the schools. You will add your dates & times you want this alert to show and if you want it on every page or just home pages. Below is how it will look on your home page once it is live to your site. - 84 - POSTING NEWS ARTICLES TO FACEBOOK (Available 6/12/2013) Now once you have created a News article you are now able to post that to facebook. Once the news article has been created you will now see a icon that you can click on to post this to the district facebook OR your personal facebook page. You will first need to go to the district or building details page depending on your permission for the building you are assigned too. You will then edit the address area which at the bottom you will now see the area to log into facebook. Click on Log Into Facebook. You will then verify and log in. Then once logged in you will click on the facebook icon next to the news article which will then post it to Facebook. Where you will log into Facebook, by clicking on Log into Facebook. Once you click on the Facebook icon it will then show a check box letting you know it has been shared. - 85 - ATHLETICS NAVIGATION (Available 6/12/13) We have just added the availability to add Athletics Navigation like the district and buildings have for the quick links. You will click on The Athletic Navigation which will show on the right side of the page under Available Actions. Then you will click on add to add a new Navigation link. - 86 - 1. 2. 3. 4. 5. 6. 7. 8. - 87 - Enter in your Link Title If you want it to be a main link you will leave the Parent as District or Building Left Nav. If you want it to be a drop out that when you hover over it drops out you will make the parent the link you want it to hover out from. Link you will leave empty unless you want the page to go to a specific website. This will be automatically added in once you create your page. If you want to link to a internal page, content or file you will select link to internal…. You will select what building, page type, and if there is a additional page you will click on the page to select. If you want a blank slate to create a page yourself you will click on Add New Page (Content) This will then be saved in the Content page section of the options. If you want a image to show on the button you click on from the live site you would add that to button image. SAVE NEW INTRANET NAVIGATION The navigation of the site is where you are going to add your links out to modules, pages, website. ** Depending on your specific website will depend on the Navigation. All sites will have the Top Nav and the Left Nav, others are a site by site basis This is the look of the Left Navigation usually called your Quick Links. To add a new link you will need to click on Add at the bottom or if you are editing a page already created select edit by the one you are changing. Drag and Drop functionality is available to change order of the links by dragging on the arrow button. - 88 - 1. Creating a New link 2. Enter in your Link Title 3. If you want it to be a main link you will leave the Parent as District or Building Left Nav. If you want it to be a drop out that when you hover over it drops out you will make the parent the link you want it to hover out from. 4. Link you will leave empty unless you want the page to go to a specific website. This will be automatically added in once you create your page. 5. If you want to link to a internal page, content or file you will select link to internal…. 6. You will select what building, page type, and if there is a additional page you will click on the page to select. 7. If you want a blank slate to create a page yourself you will click on Add New Page (Content) This will then be saved in the Content page section of the options. 8. If you want a image to show on the button you click on from the live site you would add that to button image. 9. SAVE - 89 -