1
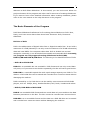
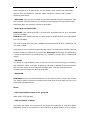
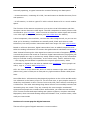
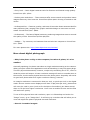
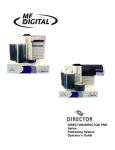
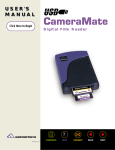
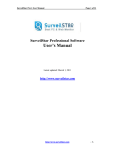
1
Tutorial of DVD Photo Slideshow
Produced by ANVSOFT Inc.
2
The Basic Elements of the Program .................................................................................... 3
Division of DVD ................................................................................................................... 3
Photo ....................................................................................................................................... 4
Slideshow .............................................................................................................................. 5
General Process of Creating Slideshows with DVD Photo Slideshow ..................... 5
Step Two: Decorate Photos and Albums ................................................................... 8
Step Three: Apply Album Theme ................................................................................. 9
Step Four: Choose DVD Menu....................................................................................... 9
Step Five: Export Your Slideshow................................................................................ 9
Tips for the Program ............................................................................................................... 10
--System Requirements................................................................................................. 10
--Recommended screen resolution and disc.......................................................... 10
--Creating Image File ..................................................................................................... 11
--Deleting Temporary Folders...................................................................................... 11
--Smart Encode................................................................................................................. 11
--Not support music with license ............................................................................... 11
--Where is dps.log file? .................................................................................................. 12
Other Resources about digital photo and digital cameras........................................ 12
-The resolution of digital photos................................................................................. 12
The Two Faces of Resolution ........................................................................................ 12
The resolution setting should be chosen while taking a picture .................... 13
Camcorder .......................................................................................................................... 13
Reviews of current popular digital cameras........................................................... 14
More about digital photograph............................................................................................ 15
3
Welcome to DVD Photo Slideshow. In this tutorial, you can know more about the
project elements of the program and other useful resources of creating slideshows.
If you want to know more detailed information about creating slideshow, please
refer to the user manual or the help document in the program.
The Basic Elements of the Program
DVD Photo Slideshow Professional is for making photo slideshow to DVD. Now,
firstly, let’s know more about these three basic elements: DVD, Photo and
Slideshow.
Division of DVD
DVD is the abbreviation of Digital Video Disc or Digital Versatile Disc. It can hold a
maximum of 4.7GB (Normally it can only record a maximum of 4.38 GB information)
data and uses MPEG-2 to compress video data. DVD is divided into several
categories. Generally, it can be divided into writable and rewritable DVD. Currently,
our program can only support burning slideshows in CD-R/RW,
DVD+R/RW and DVD-R/RW discs. The following is the detailed division of DVD:
--DVD+R and DVD+RW
DVD+R is a recordable but not rewritable DVD format and can only record data
only once, so if you want to use the disc repeatedly, the disc will not be good choice.
DVD+RW is a rewritable optical disc with equal storage capacity to a DVD+R. The
data on a DVD+RW disc can be erased and recorded over numerous times without
damaging the medium.
DVDs created by a +R/+RW device can be read by most commercial DVD-ROM
players, such as Philips, Sony, Hewlett-Packard, Dell, Ricoh, Yamaha and others.
--DVD-R, DVD-RW and DVD-RAM
DVD-R is a recordable DVD format and can record data only once and then the data
becomes permanent on the disc. The disc cannot be recorded onto a second time.
DVD-RW is a re-recordable format and the data on a DVD-RW disc can be erased
and recorded over numerous times without damaging the medium.
4
DVDs created by a -R/-RW device can be read by most commercial DVD-ROM
players, such as Panasonic, Toshiba, Apple Computer, Hitachi, NEC, Pioneer,
Samsung and Sharp.
--DVD-RAM discs can be recorded and erased repeatedly but are compatible only
with devices manufactured by the companies that support the DVD-RAM format.
DVD-RAM discs are typically housed in cartridges.
--DVD+R DL and DVD-R DL
DVD+R DL (also called DVD+R9) is a Dual Layer writeable DVD+R. It is recordable
but not rewritable.
DVD-R DL (also called DVD-R9) is a Dual Layer writeable DVD-R. It is recordable
but not rewritable.
The dual layered discs can hold 7.95GB and double sided dual layer (called dvd-18)
can hold 15.9GB.
Dual Layer is more commonly called Double Layer in the consumer market, and can
be seen written as DVD+R DL or DVD-R DL. Dual layer technology is supported by
a range of manufacturers including Dell, HP, Verbatim, Philips, Sony, Yamaha and
others.
--HD-DVD
It is Short for high definition-DVD, a generic term for the technology of recording
high-definition video on a DVD. In general, HD-DVD is capable of storing between
two and four times as much data as standard DVD. The two most prominent
competing technologies are Blu-ray and AOD.
--DVD-ROM
DVD-ROM was the first DVD standard to hit the market and is a read-only format.
The video or game content is burned onto the DVD once and the DVD will run on any
DVD-ROM-equipped device.
Photo
--The supportable format in the program
JPEG, PNG, TIFF and BMP
--The resolution of photo
Generally, the higher the resolution is, the larger the image file is. With DVD Photo
Slideshow, there is no limitation on the resolution of added photos, but no matter
5
what resolution added you photos are with , the program will encode the pictures to
the fixed resolution, about 352 × 240(288) for VCD, 480 × 480(576) for SVCD, and
720×480(576) for DVD. (The former one is for NTSC video system and the latter is
for PAL system). As we know, the higher the resolution is, the better the image
quality is, so DVD output is the best in terms of image quality as well as DVD player
compatibility.
Slideshow
Slideshow is a modern concatenation of "Slide Show". A slideshow is a display of a
series of chosen images, which is done for artistic or instructional purposes.
Slideshows are conducted by a presenter using an apparatus, such as a carousel
slide projector, an overhead projector or in more recent years, a computer running
presentation software.
With the recent popular slideshow software, you can make use of your photos and
videos to make personalized slideshow for a variety of uses, such as gift and
business presentation. Our DVD Photo Slideshow is among the easiest-to-use
slideshow tools. With our neat program, you can make your slideshow in various
formats, such as DVD, VCD, MPEG movie, FLV and AVI movie. That to say, you can
not only enjoy your slideshow on TV, but on your PC, website and mobile devices.
General Process of Creating Slideshows with DVD Photo
Slideshow
Generally, creating a slideshow involves a three-step workflow: Organize, Modify
and Export.
In DVD Photo Slideshow, you can finish producing slideshow in three steps, more
specific, five sub-steps.
Step 1: Add and Organize Photos
Several image formats are supported by the program, including JPEG, PNG, BMP
and TIFF. You can create one or multiple albums for your slideshow. Each album can
be regarded as a small independent slideshow.
To add photos to the album, you can choose to add one by one, add by multiple
choices, add by drag-and-drop and add by batch collect. The previous two methods
are common-used in most of software and the following we will give you more
details on drag-and-drop as well as batch collect.
6
--drag-and-drop
You can finish drag-and-drop with the following three steps:
1. Select the resource object you want to drag. Press the left key of mouse and hold
on.
2. Move the object to the target position. Once you begin to move , you will see a
shadow of the selected object move with the moving of the mouse.
3. when you move the selected object to the desired position, please release the left
key and it will be moved to your desired position.
Actually, in DVD Photo Slideshow, you can adopt drag-and-drop while you adding
photos, arranging slide order, setting album thumbnail and adding background
music, so it would be more convenient for you to know how to drag and drop. More
detailed information is available in the help document in the program.
--Batch Collect
A batch is a group of similar items produced, processed or gathered together and
treated as a single unit. When you have a great lot of pictures saved in different
subfolders of the same folder on your hard drive and you want to add them to the
slideshow without selecting them one-by-one, moreover, you would like each
subfolder can be an individual slideshow, then please choose “Batch Collect” to help
you do this conveniently.
Right-click on the Album Toolbar or Album List to select "Batch Collect" in the
pop-up menu and then you will view a pop-up window for your batch collect.
7
Check the folder which contains all the subfolders of pictures and then click Ok
button and all the subfolders in your checked folder will be created as an album with
the same title as the file name of the subfolder.
After finishing adding photos, it’s time to organize them in your desired way. The
first step should be sorting pictures.
--Sort Pictures
In DVD Photo Slideshow, you can sort your pictures simply by drag-and-drop them
in the slide panel. You can also sort pictures according to different criterion, such as
file name, file size and file date. If you want to sort pictures in this way, please
firstly choose to view your added pictures in Details mode.
--Select Details in the drop-down menu after you click the More tab in slide toolbar.
--You can see that all detailed information of added pictures are displayed, including
Number, Name, Size, File Date, Dimensions and Path. Click any of this and the
photos will be displayed according to its criteria. After you finishing sorting, you can
choose Thumbnail in the drop-down menu of the More tab to return to the
previous view mode.
--Auto Exposure
Because of the light condition when you take pictures, you pictures may in
unbalanced exposure. You can check Auto Exposure option in our program to adjust
8
the exposure of the selected photo. Another way for you for solve this problem is to
make use of some other image tool, such as PhotoShop to modify your pictures and
then save them.
Step Two: Decorate Photos and Albums
Now, let’s go to the next step, also the most import step in photo organization:
Decorate your photos by transition effects, music, text, art clips and subtitles.
--Transition Effects
Transition refers to the visual way in which the previous slide disappears and the
next appears. With transition, you can make your whole slideshow play more
smoothly. More than 300 transition effects are available in the program. However,
you can choose to apply no transition to the album by clicking N/A in the
Transition&Music window.
--Transition Subset
Here, we provide transition subset feature for the demand of using only several
desired transition effects to the whole album randomly. Click Subset in the
Transition&Music window and then select you desired effects in the pop-up window.
After your selection, please click Randomize to apply these effects to the current
album randomly.
--Time Line
The main function of time line is to show the sync of the slideshow duration and
audio slideshow. Making use of time line, you can control the duration of slideshow
and audio exactly.
As we mentioned before, you can add background music by drag-and-drop. Firstly,
please click Add to add your desired music to the album and then drag and drop it
onto the slide or transition which you want the music start from. You will find the
time line will start from here.
--Fade in & Fade out
This option is quite useful when you add several music clips to the album. Check this
option to make transition of clips more smoothly.
Loop Audio
When you just want to use one background music file in the album, you can check
this option to make the added audio play repeatedly until the end of the album.
However, pay attention that the option can just make you loop the audio for the
current album not for the whole slideshow.
9
Step Three: Apply Album Theme
Album theme can determine the overall visual appearance of the album. Actually,
you can make use of album theme to emphasize the theme of your album. We
provides theme for various festivals and important days, so you can find a proper
one to make your album more animated.
--Titles and Credits
With our program, you can not only apply album theme but add titles and credits to
your album. A variety of motion effects are provided for you to apply to titles and
credits.
Step Four: Choose DVD Menu
This step is designed for the demand of outputting slideshow in professional DVD
mode. Although you cannot design the DVD menu here, you can still customize the
menu by changing background image, adding background music and adjusting
onscreen texts.
--Menu Navigator
Menu navigator is used to control the playback order of albums in the slideshow. You
can choose to play the current album repeatedly or play the next album.
Step Five: Export Your Slideshow
DVD Photo Slideshow let you output your slideshow in various format, such as DVD,
SVCD, VCD 2.0, MPEG, FLV and AVI.
--DVD, SVCD and VCD 2.0
If you have a DVD burner and want to play to play your slideshow on TV, please
choose DVD as the output format. The image quality of DVD is the best among DVD,
SVCD and VCD 2.0. But to encode your slideshow in DVD/SVCD/VCD 2.0 format
may need more time than to encode in MPEG, FLV and AVI. Since this format needs
the program to encode the slideshow in MPEG-1 (for audio) and MPEG-2 (for video)
format, which is larger in file size than MPEG-4 (MPEG Movie).
• Create Image File
When you want to burn the slideshow onto the disc, but your DVD burner is not
recognized by the program, except changing some technical setting, you can also
10
choose to just create image file with the program and then burn the slideshow
image file with some other burning software, such as Nero. You can know the
detailed information about this in the third part of this tutorial.
--MPEG Movie
If you want to upload your creative slideshow to YouTube and MySpace or to import
your slideshow to some mobile devices, such as iPod, PSP and mobile phones,
you
can choose MPEG Movie or YouTube Uploadable Movie as the output format. For
YouTube, MPEG-4 movie with resolution of 320×240 is the best uploading format.
But please pay attention that DVD menu is not available in this format.
--FLV Movie
This format is for those people who want to share their slideshow on their own
website. Choose FLV Movie to output your slideshow in .flv format which is also
supportable by YouTube and MySpace. After encoding, you can insert the FLV file
into your webpage.
--AVI Movie
If you want to enjoy your slideshow anywhere, you can choose AVI as the output
format and import your creative works to your MP4 player.
Tips for the Program
The following are some useful tips on making slideshows with DVD Photo Slideshow.
--System Requirements
Intel Pentium III 800M HZ Processor and above
Microsoft Windows 98, ME, 2000, XP and Vista
256 MB of RAM (above is recommended)
200 MB of available hard drive space for program installation
DVD-R/RW or DVD+R/RW drives for burning DVD
Windows-compatible sound card (recommended)
TV connected to DVD player (recommended)
--Recommended screen resolution and disc
1280 ×1024
DVD+RW/DVD-RW
11
--Creating Image File
When you encounter some problems in DVD burning, you can choose to create
image file of the slideshow and then burn with other burning software. You can do
this by the following steps:
1. Click Burn Disc tab and come to the burning window.
2. After you finish setting all the technical parameters, select Image Recorder
in the DVD/CD recorder options or check Create Image File option. Then
you will be asked to choose a folder to save the image file.
3. Click Burn Now to start burning.
4. After burning, you can use other burning software, such as Nero, to burn the
slideshow onto disc easily.
--Deleting Temporary Folders
A temporary folder will be created automatically once you start a new project. When
you choose to simulate burning, the output MPEG-2 file of your slideshow will be
saved here by default. You can choose Explore Temporary Folder in File menu to
view the mpeg file conveniently. Each album in your slideshow will be encoded as an
individual MPEG file.
This method is useful when you encounter some burning errors. You can do this by
choosing Options in View menu. After you see the default album setting window,
please click Remove All Temporary Folder button. You can also delete the
temporary folder manually.
--Smart Encode
In DVD Photo Slideshow, in order to save time, Smart Encode is adopted. The Smart
Encoding means the program will only re-encode for those part which you have
modified when you burn the same project. But this also may cause some problems
when you encounter problems with the project. So it would better for you make
modifications for the part with problem and then let the program re-encode and the
problem may be solved.
--Not support music with license
The current version supports mp3, wma and wav format music. Please do not use
any music with license because this program does not support any encrypted music
files. For example, most iTunes files are encrypted, hence our program could not
open it. But the program provides sound recording function which may be helpful. If
12
you can play the iTunes music file on your computer, you can use the recording
feature to record the music and then add these music files to the slideshow.
--Where is dps.log file?
The log file records all the operations you have done in the program. When you
encounter some problems, just send this log file to our technical support staff and
this may help us fix the problem more quickly and exactly.
This log file always is located in the temporary folder of the program. Normally, it is
in C:\Documents and Settings\Administrator\My Documents\ DVD Photo Slideshow
Professional\dps.log.
Other Resources about digital photo and digital cameras
With the development of the technology, people have more and more devices to
take photos conveniently, such as camcorder, digital camera, cellular phone with
camera, etc; moreover, the above devices are no longer need any roll films as the
ordinary camera, and they help people store their sweet memory on their PC. Then,
with the help of some photo editing software, the photos can be made into photo
slideshow, which shows the photos in a brand new way.
-The resolution of digital photos
In the digital world, "inches" don't exist, only pixels do. A pixel (short for "picture
element") is the smallest unit in a computer image or display. Every image on your
computer is made up of a colored grid of pixels. Digital images contain a fixed
number of pixels per inch. You can increase the dpi (and therefore the resolution) by
decreasing the dimensions of the photograph. For instance, if you have a
photograph taken with a digital camera that is 1800 by 1200 pixels with a resolution
of 72 dpi, you could obtain a 300-dpi resolution by decreasing the photo to a
6-by-4-inch size.
The Two Faces of Resolution
There are two basic ways the term resolution is used. One refers to the pixel count
of an image. An image with lots of pixels is often called a "high resolution" image.
But in other contexts, resolution refers to the density of pixels in a given linear area
such as an inch. This "density" is expressed as ppi (pixels per inch) or dpi (dots per
inch) and this density number is embedded invisibly in a bitmap image, as an
instruction to output devices, such as a printers.
13
The resolution setting should be chosen while taking a picture
It depends on what you want to do with the picture. Do you want to e-mail it to
friends, post it on a Web site, make it your computer's wallpaper, print it as a 4" x
6" photograph, or create a poster-sized print? If you want to view the pictures on a
computer monitor (such as those you send by e-mail or post to the Web), a low
pixel-count setting is perfectly adequate. Because most people view images on
monitors that display only 800 x 600 pixels, a low pixel-count image, such as a 600
x 400 photograph, will fill up most of their screen without running off the edges. A
low pixel-count setting will also reduce the file size of the image and reduce time it
takes others to download or display your image.
Printers, however, can print at much higher resolution than a typical computer
screen. Images that you intend to print should be captured at a higher pixel-count
setting.
•
For a 2" x 3" print, the image dimensions should be 400 x 600 pixels
minimum
•
For a 4" x 6" print, the image dimensions should be 800 x 600 pixels
minimum
•
For a 5" x 7" print, the image dimensions should be 1000 x 1400 pixels
minimum
•
For an 8" x 10" print, the image dimensions should be 1600 x 2000 pixels
minimum
If you are not sure what you want to do with your pictures the moment when you
take a picture, to be safe, it's a good idea to set your camera to the highest
resolution setting. You can always reduce the pixel-count of your image later for
e-mailing or web publishing.
(http://www.fotofinish.com/resources/centers/photo/resolution.htm )
Camcorder
Camcorders, or video camera-recorders, have been familiar for nearly 20 years to
people. They can be used everywhere, such as school plays, sports events, family
reunions and even births! When you go to a popular tourist spot, you are
surrounded by them. Camcorders have really taken hold in many places, and this is
because they are an extremely useful piece of technology that you can own for
under $300 (or more than $100,000).
A brief introduction of camcorder
14
Generally speaking, a typical camcorder contains following two basic parts:
--A camera section, consisting of a CCD , lens and motors to handle the zoom, focus
and aperture.
--A VCR section, in which a typical TV VCR is shrunk down to fit in a much smaller
space.
The function of the camera component is to receive visual information and then
interpret it as an electronic video signal. The VCR component is exactly like the VCR
connected to your television , which receives an electronic video signal and records
it on video tape as magnetic patterns (see How VCRs Work for details).
A third component, the viewfinder, receives the video image as well, so you can see
what you're shooting. Viewfinders are actually small, black-and-white or color
televisions, but many modern camcorders also have larger full-color LCD screens .
Based on all these elements, digital camcorders have an added component that
takes the analog information the camera has gathered and translates it to bytes of
data. Instead of storing the video signal as a continuous track of magnetic patterns,
it records the picture and sound as 1s and 0s. Digital camcorders are so popular just
because people can copy 1s and 0s very easily without losing any of the information
they've recorded. Analog information, on the other hand, "fades" with each copy
-- the copying process doesn't reproduce the original signal exactly. Video
information in digital form can also be loaded onto computers , where people can
edit it, copy it, e-mail it and manipulate it .
CCD: the sensor in the camcorder and it is used to measure light with a half-inch
(about 1cm) panel of 300,000 to 500,000 tiny light-sensitive diodes called photo
sites.
How VCRs Work: VCR started to develop and popularize in the 1970s and 80s and it
is a milestone in the history of the TV. For the first time, it gave people control of
what they could watch on their TV sets. Prior to the VCR, there was no such thing as
a video store. The other interesting thing about VCRs is how incredibly intricate and
interesting they are inside. They are certainly the most complex mechanical
systems most people own outside of their automobiles, yet VCRs can cost as little as
$75! There are motorized tape loading and ejection systems, complex motorized
tape paths, drum-mounted rotating read/record heads. Thus, to some extent, VCRs
really are neat inside!
Reviews of current popular digital cameras
There are five types of digital cameras in current market:
15
--Entry-level -- Basic digital cameras with few features and limited image quality.
Priced from $50 - $200.
--Deluxe point-and-shoot -- These cameras offer more controls and produce better
images than entry-level ones do. Priced from $200-$400. Printing is limited to 4x6
inches.
--Professional lite -- Features, quality, and ease of use make these cameras ideal for
many different jobs, ranging from graphic and Web design to insurance and real
estate. Priced from $300 - $800.
--Professional -- The best of digital cameras, producing images that meet or exceed
the quality of film. Priced from $1500-$60,000.
--Gadget -- Toy cameras, and cameras that are built into computers. Priced from
$10 - $200.
For more please visit: http://www.dpreview.com/reviews/
More about digital photograph
--Why is the photo so big on the computer, but when it prints, it's a lot
smaller?
Generally speaking, the photo was taken at a high resolution setting on the camera.
When you open it with some application such as Photoshop, it may look pretty large.
The file's physical dimensions, however, maybe only something like 3"x5", which is
what the printer will output. A lower resolution setting will result in a smaller size on
the monitor, but the same physical size when the photo prints. Its quality will not be
as good as a photo taken at a higher resolution setting, however.
An image's resolution is measured in dots per inch, or pixels per inch in the digital
realm. Since a monitor never displays more than 72 dpi (dots per inch), photos that
will never be used in print (such as for the Web or PowerPoint) are better saved
down to 72 dpi from higher resolutions. You'll have a smaller file size and the files
will load more quickly.
To see a file's physical size and resolution, open it in Photoshop and under the
"Image" menu, go to "Image Size". It will bring up a window that will allow you to
view and adjust the photo's physical size and resolution.
--How do I transfer images?
16
The medium defines the ways you can transfer images from the camera to the
computer. You can either connect the camera directly to a computer using a cable or
you can remove the card or disk from the camera and pop it into a special drive.
After downloading the images, erase the camera's storage medium, and you're
ready to take more pictures.
Serial connections are very slow and require special software to download the
images. Serial cables came with all the older cameras. They are plugged into the
printer or modem port of the computer.
USB (universal serial bus) is a faster replacement for serial. If you are planning on
using USB, you can look at the outside of the camera box for the USB symbol. Just
plug the camera in and out of the USB port while the computer and camera are
turned on, and open a photo application like iPhoto to download and view your
pictures.