1
TASKING VX-toolset for ARM
User Guide
MA101-800 (v4.3) August 14, 2012
Copyright © 2012 Altium Limited.
All rights reserved. You are permitted to print this document provided that (1) the use of such is for personal use only
and will not be copied or posted on any network computer or broadcast in any media, and (2) no modifications of the
document is made. Unauthorized duplication, in whole or part, of this document by any means, mechanical or electronic,
including translation into another language, except for brief excerpts in published reviews, is prohibited without the
express written permission of Altium Limited. Unauthorized duplication of this work may also be prohibited by local
statute. Violators may be subject to both criminal and civil penalties, including fines and/or imprisonment. Altium,
TASKING, and their respective logos are trademarks or registered trademarks of Altium Limited or its subsidiaries. All
other registered or unregistered trademarks referenced herein are the property of their respective owners and no
trademark rights to the same are claimed.
Table of Contents
1. C Language .................................................................................................................. 1
1.1. Data Types ......................................................................................................... 1
1.2. Changing the Alignment: __unaligned, __packed__ and __align() ................................. 2
1.3. Placing an Object at an Absolute Address: __at() ....................................................... 3
1.4. Accessing Hardware from C .................................................................................. 4
1.5. Using Assembly in the C Source: __asm() ................................................................ 5
1.6. Attributes ......................................................................................................... 11
1.7. Pragmas to Control the Compiler .......................................................................... 14
1.8. Predefined Preprocessor Macros .......................................................................... 19
1.9. Switch Statement ............................................................................................... 21
1.10. Functions ....................................................................................................... 22
1.10.1. Calling Convention ................................................................................. 22
1.10.2. Inlining Functions: inline .......................................................................... 23
1.10.3. Interrupt Functions / Exception Handlers .................................................... 25
1.10.4. Intrinsic Functions ................................................................................. 27
2. C++ Language ............................................................................................................ 35
2.1. C++ Language Extension Keywords ...................................................................... 35
2.2. C++ Dialect Accepted ......................................................................................... 35
2.2.1. Standard Language Features Accepted ....................................................... 35
2.2.2. C++0x Language Features Accepted .......................................................... 38
2.2.3. Anachronisms Accepted ........................................................................... 42
2.2.4. Extensions Accepted in Normal C++ Mode ................................................... 43
2.3. GNU Extensions ................................................................................................ 45
2.4. Namespace Support .......................................................................................... 59
2.5. Template Instantiation ......................................................................................... 61
2.5.1. Automatic Instantiation ............................................................................. 62
2.5.2. Instantiation Modes ................................................................................. 63
2.5.3. Instantiation #pragma Directives ................................................................. 64
2.5.4. Implicit Inclusion ..................................................................................... 65
2.5.5. Exported Templates ................................................................................. 66
2.6. Inlining Functions ............................................................................................... 69
2.7. Extern Inline Functions ....................................................................................... 70
2.8. Pragmas to Control the C++ Compiler .................................................................... 70
2.9. Predefined Macros ............................................................................................. 71
2.10. Precompiled Headers ....................................................................................... 75
2.10.1. Automatic Precompiled Header Processing ................................................. 75
2.10.2. Manual Precompiled Header Processing .................................................... 78
2.10.3. Other Ways to Control Precompiled Headers ............................................... 78
2.10.4. Performance Issues ............................................................................... 79
3. Assembly Language ..................................................................................................... 81
3.1. Assembly Syntax ............................................................................................... 81
3.2. Assembler Significant Characters .......................................................................... 82
3.3. Operands of an Assembly Instruction ..................................................................... 83
3.4. Symbol Names .................................................................................................. 83
3.4.1. Predefined Preprocessor Symbols .............................................................. 84
3.5. Registers ......................................................................................................... 85
3.6. Assembly Expressions ........................................................................................ 85
3.6.1. Numeric Constants .................................................................................. 86
iii
TASKING VX-toolset for ARM User Guide
3.6.2. Strings .................................................................................................. 86
3.6.3. Expression Operators .............................................................................. 87
3.7. Working with Sections ......................................................................................... 88
3.8. Built-in Assembly Functions ................................................................................. 89
3.9. Assembler Directives .......................................................................................... 94
3.9.1. Overview of Assembler Directives ............................................................... 95
3.9.2. Detailed Description of Assembler Directives ................................................ 96
3.10. Macro Operations ........................................................................................... 135
3.10.1. Defining a Macro ................................................................................. 135
3.10.2. Calling a Macro ................................................................................... 135
3.10.3. Using Operators for Macro Arguments ..................................................... 136
3.11. Generic Instructions ........................................................................................ 139
3.11.1. ARM Generic Instructions ...................................................................... 139
3.11.2. ARM and Thumb-2 32-bit Generic Instructions ........................................... 140
3.11.3. Thumb 16-bit Generic Instructions ........................................................... 142
4. Using the C Compiler .................................................................................................. 145
4.1. Compilation Process ......................................................................................... 145
4.2. Calling the C Compiler ...................................................................................... 146
4.3. How the Compiler Searches Include Files ............................................................. 148
4.4. Compiling for Debugging ................................................................................... 149
4.5. Compiler Optimizations ..................................................................................... 149
4.5.1. Generic Optimizations (frontend) .............................................................. 151
4.5.2. Core Specific Optimizations (backend) ....................................................... 153
4.5.3. Optimize for Size or Speed ...................................................................... 155
4.6. Influencing the Build Time .................................................................................. 158
4.7. Static Code Analysis ......................................................................................... 160
4.7.1. C Code Checking: CERT C ...................................................................... 161
4.7.2. C Code Checking: MISRA-C .................................................................... 163
4.8. C Compiler Error Messages ............................................................................... 165
5. Using the C++ Compiler ............................................................................................... 167
5.1. Calling the C++ Compiler ................................................................................... 167
5.2. How the C++ Compiler Searches Include Files ....................................................... 169
5.3. C++ Compiler Error Messages ............................................................................ 170
6. Profiling .................................................................................................................... 173
6.1. What is Profiling? ............................................................................................. 173
6.1.1. Methods of Profiling ............................................................................... 173
6.2. Profiling using Code Instrumentation (Dynamic Profiling) .......................................... 174
6.2.1. Step 1: Build your Application for Profiling ................................................... 176
6.2.2. Step 2: Execute the Application ................................................................ 177
6.2.3. Step 3: Displaying Profiling Results ........................................................... 179
6.3. Profiling at Compile Time (Static Profiling) ............................................................. 182
6.3.1. Step 1: Build your Application with Static Profiling ......................................... 182
6.3.2. Step 2: Displaying Static Profiling Results ................................................... 183
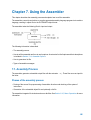
7. Using the Assembler ................................................................................................... 185
7.1. Assembly Process ............................................................................................ 185
7.2. Assembler Versions .......................................................................................... 186
7.3. Calling the Assembler ....................................................................................... 186
7.4. How the Assembler Searches Include Files ........................................................... 187
7.5. Generating a List File ........................................................................................ 188
7.6. Assembler Error Messages ................................................................................ 189
iv
TASKING VX-toolset for ARM User Guide
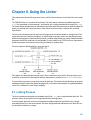
8. Using the Linker .........................................................................................................
8.1. Linking Process ...............................................................................................
8.1.1. Phase 1: Linking ....................................................................................
8.1.2. Phase 2: Locating ..................................................................................
8.2. Calling the Linker .............................................................................................
8.3. Linking with Libraries ........................................................................................
8.3.1. How the Linker Searches Libraries ............................................................
8.3.2. How the Linker Extracts Objects from Libraries ............................................
8.4. Incremental Linking ..........................................................................................
8.5. Importing Binary Files .......................................................................................
8.6. Linker Optimizations .........................................................................................
8.7. Controlling the Linker with a Script .......................................................................
8.7.1. Purpose of the Linker Script Language ......................................................
8.7.2. Eclipse and LSL ....................................................................................
8.7.3. Structure of a Linker Script File ................................................................
8.7.4. The Architecture Definition ......................................................................
8.7.5. The Derivative Definition .........................................................................
8.7.6. The Processor Definition .........................................................................
8.7.7. The Memory Definition ............................................................................
8.7.8. The Section Layout Definition: Locating Sections ..........................................
8.8. Linker Labels ..................................................................................................
8.9. Generating a Map File .......................................................................................
8.10. Linker Error Messages ....................................................................................
9. Run-time Environment .................................................................................................
9.1. Startup Code ..................................................................................................
9.2. Reset Handler and Vector Table ..........................................................................
9.3. CMSIS Support ...............................................................................................
9.4. Stack and Heap ...............................................................................................
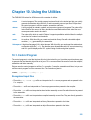
10. Using the Utilities ......................................................................................................
10.1. Control Program .............................................................................................
10.2. Make Utility mkarm .........................................................................................
10.2.1. Calling the Make Utility ..........................................................................
10.2.2. Writing a Makefile ................................................................................
10.3. Make Utility amk .............................................................................................
10.3.1. Makefile Rules ....................................................................................
10.3.2. Makefile Directives ...............................................................................
10.3.3. Macro Definitions .................................................................................
10.3.4. Makefile Functions ...............................................................................
10.3.5. Conditional Processing .........................................................................
10.3.6. Makefile Parsing ..................................................................................
10.3.7. Makefile Command Processing ...............................................................
10.3.8. Calling the amk Make Utility ...................................................................
10.4. Archiver ........................................................................................................
10.4.1. Calling the Archiver ..............................................................................
10.4.2. Archiver Examples ...............................................................................
10.5. HLL Object Dumper ........................................................................................
10.5.1. Invocation ..........................................................................................
10.5.2. HLL Dump Output Format ......................................................................
11. Using the Debugger ..................................................................................................
11.1. Reading the Eclipse Documentation ...................................................................
191
191
193
194
195
196
199
200
200
201
201
203
203
203
205
208
210
211
211
213
215
216
217
219
219
221
225
226
231
231
233
234
235
244
244
246
246
248
249
249
250
251
252
252
254
256
256
256
263
263
v
TASKING VX-toolset for ARM User Guide
11.2. Creating a Customized Debug Configuration ........................................................
11.3. Troubleshooting ..............................................................................................
11.4. TASKING Debug Perspective ............................................................................
11.4.1. Debug View ........................................................................................
11.4.2. Breakpoints View .................................................................................
11.4.3. File System Simulation (FSS) View ..........................................................
11.4.4. Disassembly View ................................................................................
11.4.5. Expressions View .................................................................................
11.4.6. Memory View ......................................................................................
11.4.7. Compare Application View .....................................................................
11.4.8. Heap View ..........................................................................................
11.4.9. Logging View ......................................................................................
11.4.10. RTOS View .......................................................................................
11.4.11. Registers View ...................................................................................
11.4.12. Trace View ........................................................................................
11.5. Programming a Flash Device ............................................................................
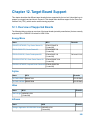
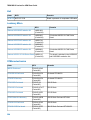
12. Target Board Support .................................................................................................
12.1. Overview of Supported Boards ..........................................................................
12.2. Updating the SEGGER J-Link Interface DLL ........................................................
12.3. Using the EFM32TG-STK3300, Tiny Gecko Starter Kit ...........................................
12.4. Using the EFM32-G8XX-STK, Gecko Starter Kit ...................................................
12.5. Using the EFM32-G2XX-DK, Gecko Development Kit ............................................
12.6. Using the EFM32GG-STK3700, Giant Gecko Starter Kit .........................................
12.7. Using the EFM32LG-STK3600, Leopard Gecko Starter Kit .....................................
12.8. Using the Fujitsu SK-FM3-64PMC1 Evaluation Board ............................................
12.9. Using the Fujitsu SK-FM3-100PMC Evaluation Board ............................................
12.10. Using the Hitex XMC-HiLight ...........................................................................
12.11. Using the Infineon Hexagon Application Kit XMC4500 ..........................................
12.12. Using the Stellaris LM3S1968 Evaluation Board ..................................................
12.13. Using the Stellaris LM3S2965 Evaluation Board ..................................................
12.14. Using the Stellaris LM3S3748 Evaluation Board ..................................................
12.15. Using the Stellaris LM3S6965 Evaluation Board ..................................................
12.16. Using the Stellaris LM3S8962 Evaluation Board ..................................................
12.17. Using the Stellaris LM3S2110 CAN Device Board ...............................................
12.18. Using the STMicroelectronics MB525-Eval Board ................................................
12.19. Using the STMicroelectronics STM320518-EVAL Board .......................................
12.20. Using the STMicroelectronics STM32F0 Discovery ..............................................
12.21. Using the STMicroelectronics STM3210B-Eval Board ..........................................
12.22. Using the STMicroelectronics STM3210C-Eval Board ..........................................
12.23. Using the STMicroelectronics STM3210E-Eval Board ..........................................
12.24. Using the STMicroelectronics STM32 Value Line Discovery ...................................
12.25. Using the STMicroelectronics STM32L152-Eval Board .........................................
12.26. Using the STMicroelectronics STM32L152D-Eval Board .......................................
12.27. Using the STMicroelectronics STM32L Discovery ................................................
12.28. Using the STMicroelectronics STM3220G-EVAL Board ........................................
12.29. Using the STMicroelectronics STM3221G-EVAL Board ........................................
12.30. Using the STMicroelectronics STM32303C-EVAL Board .......................................
12.31. Using the STMicroelectronics STM32373C-EVAL Board .......................................
12.32. Using the STMicroelectronics STM3240G-EVAL Board ........................................
12.33. Using the STMicroelectronics STM32F4 Discovery ..............................................
vi
263
269
269
270
272
273
274
274
275
276
276
277
277
277
278
279
283
283
286
286
287
288
289
290
291
292
293
294
295
296
297
298
299
300
301
302
303
304
305
306
308
309
310
311
312
313
315
316
317
318
TASKING VX-toolset for ARM User Guide
12.34. Using the STMicroelectronics STM32W108B-SK ................................................
12.35. Using the STMicroelectronics STM32W108B-KEXT .............................................
12.36. Using the STMicroelectronics STM32W RF Control Kit .........................................
12.37. Using the Keil MCB1760 Evaluation Board .........................................................
12.38. Trace Port Interface Unit Support .....................................................................
13. Tool Options .............................................................................................................
13.1. Configuring the Command Line Environment .......................................................
13.2. C Compiler Options ........................................................................................
13.3. C++ Compiler Options .....................................................................................
13.4. Assembler Options .........................................................................................
13.5. Linker Options ...............................................................................................
13.6. Control Program Options .................................................................................
13.7. Make Utility Options ........................................................................................
13.8. Parallel Make Utility Options .............................................................................
13.9. Archiver Options ............................................................................................
13.10. HLL Object Dumper Options ...........................................................................
14. Libraries .................................................................................................................
14.1. Using the CMSIS DSP Library ..........................................................................
14.2. Library Functions ...........................................................................................
14.2.1. assert.h .............................................................................................
14.2.2. complex.h ..........................................................................................
14.2.3. cstart.h ..............................................................................................
14.2.4. ctype.h and wctype.h ............................................................................
14.2.5. dbg.h .................................................................................................
14.2.6. errno.h ...............................................................................................
14.2.7. fcntl.h ................................................................................................
14.2.8. fenv.h ................................................................................................
14.2.9. float.h ................................................................................................
14.2.10. inttypes.h and stdint.h .........................................................................
14.2.11. io.h ..................................................................................................
14.2.12. iso646.h ...........................................................................................
14.2.13. limits.h .............................................................................................
14.2.14. locale.h ............................................................................................
14.2.15. malloc.h ...........................................................................................
14.2.16. math.h and tgmath.h ...........................................................................
14.2.17. setjmp.h ...........................................................................................
14.2.18. signal.h ............................................................................................
14.2.19. stdarg.h ............................................................................................
14.2.20. stdbool.h ..........................................................................................
14.2.21. stddef.h ............................................................................................
14.2.22. stdint.h .............................................................................................
14.2.23. stdio.h and wchar.h .............................................................................
14.2.24. stdlib.h and wchar.h ............................................................................
14.2.25. string.h and wchar.h ...........................................................................
14.2.26. time.h and wchar.h .............................................................................
14.2.27. unistd.h ............................................................................................
14.2.28. wchar.h ............................................................................................
14.2.29. wctype.h ...........................................................................................
14.3. C Library Reentrancy ......................................................................................
15. List File Formats .......................................................................................................
319
321
322
323
324
325
331
332
402
530
571
624
690
718
732
746
767
769
769
770
770
771
771
772
772
773
773
774
775
775
776
776
776
777
777
782
782
782
783
783
783
784
792
795
796
799
800
801
801
813
vii
TASKING VX-toolset for ARM User Guide
15.1. Assembler List File Format ...............................................................................
15.2. Linker Map File Format ....................................................................................
16. Object File Formats ...................................................................................................
16.1. ELF/DWARF Object Format ..............................................................................
16.2. Intel Hex Record Format ..................................................................................
16.3. Motorola S-Record Format ...............................................................................
17. Linker Script Language (LSL) ......................................................................................
17.1. Structure of a Linker Script File .........................................................................
17.2. Syntax of the Linker Script Language .................................................................
17.2.1. Preprocessing .....................................................................................
17.2.2. Lexical Syntax .....................................................................................
17.2.3. Identifiers and Tags ..............................................................................
17.2.4. Expressions ........................................................................................
17.2.5. Built-in Functions .................................................................................
17.2.6. LSL Definitions in the Linker Script File .....................................................
17.2.7. Memory and Bus Definitions ..................................................................
17.2.8. Architecture Definition ...........................................................................
17.2.9. Derivative Definition .............................................................................
17.2.10. Processor Definition and Board Specification ...........................................
17.2.11. Section Layout Definition and Section Setup ............................................
17.3. Expression Evaluation .....................................................................................
17.4. Semantics of the Architecture Definition ..............................................................
17.4.1. Defining an Architecture ........................................................................
17.4.2. Defining Internal Buses .........................................................................
17.4.3. Defining Address Spaces ......................................................................
17.4.4. Mappings ...........................................................................................
17.5. Semantics of the Derivative Definition .................................................................
17.5.1. Defining a Derivative ............................................................................
17.5.2. Instantiating Core Architectures ..............................................................
17.5.3. Defining Internal Memory and Buses .......................................................
17.6. Semantics of the Board Specification .................................................................
17.6.1. Defining a Processor ............................................................................
17.6.2. Instantiating Derivatives ........................................................................
17.6.3. Defining External Memory and Buses ......................................................
17.7. Semantics of the Section Setup Definition ...........................................................
17.7.1. Setting up a Section .............................................................................
17.8. Semantics of the Section Layout Definition ..........................................................
17.8.1. Defining a Section Layout ......................................................................
17.8.2. Creating and Locating Groups of Sections ................................................
17.8.3. Creating or Modifying Special Sections ....................................................
17.8.4. Creating Symbols ................................................................................
17.8.5. Conditional Group Statements ................................................................
18. Debug Target Configuration Files .................................................................................
18.1. Custom Board Support ....................................................................................
18.2. Description of DTC Elements and Attributes ........................................................
18.3. Special Resource Identifiers .............................................................................
19. CPU Problem Bypasses and Checks ............................................................................
20. CERT C Secure Coding Standard ................................................................................
20.1. Preprocessor (PRE) ........................................................................................
20.2. Declarations and Initialization (DCL) ...................................................................
viii
813
814
823
823
823
826
829
829
831
831
832
832
833
833
835
835
837
840
841
841
846
847
848
849
849
853
855
856
856
857
858
858
859
859
860
861
861
862
863
869
872
872
875
875
876
878
881
883
883
884
TASKING VX-toolset for ARM User Guide
20.3. Expressions (EXP) .........................................................................................
20.4. Integers (INT) ................................................................................................
20.5. Floating Point (FLP) ........................................................................................
20.6. Arrays (ARR) .................................................................................................
20.7. Characters and Strings (STR) ...........................................................................
20.8. Memory Management (MEM) ...........................................................................
20.9. Environment (ENV) .........................................................................................
20.10. Signals (SIG) ...............................................................................................
20.11. Miscellaneous (MSC) ....................................................................................
21. MISRA-C Rules ........................................................................................................
21.1. MISRA-C:1998 ..............................................................................................
21.2. MISRA-C:2004 ..............................................................................................
885
886
886
887
887
887
888
888
889
891
891
895
ix
TASKING VX-toolset for ARM User Guide
x
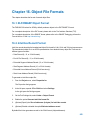
Chapter 1. C Language
This chapter describes the target specific features of the C language, including language extensions that
are not standard in ISO-C. For example, pragmas are a way to control the compiler from within the C
source.
®
The TASKING VX-toolset for ARM C compiler fully supports the ISO-C standard and adds extra
possibilities to program the special functions of the target.
In addition to the standard C language, the compiler supports the following:
• attribute to specify alignment and absolute addresses
• intrinsic (built-in) functions that result in target specific assembly instructions
• pragmas to control the compiler from within the C source
• predefined macros
• the possibility to use assembly instructions in the C source
• keywords for inlining functions and programming interrupt routines
• libraries
All non-standard keywords have two leading underscores (__).
In this chapter the target specific characteristics of the C language are described, including the above
mentioned extensions.
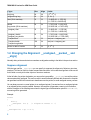
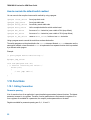
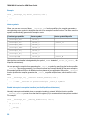
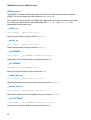
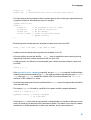
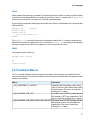
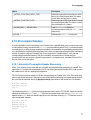
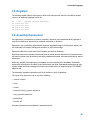
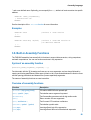
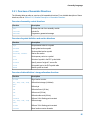
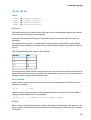
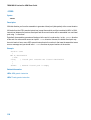
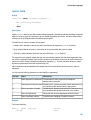
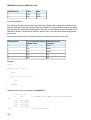
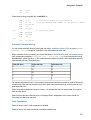
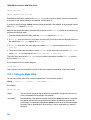
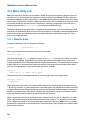
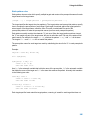
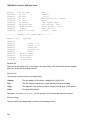
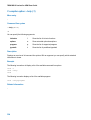
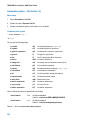
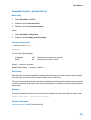
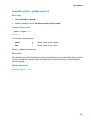
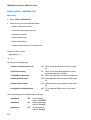
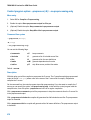
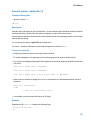
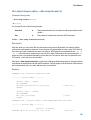
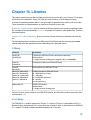
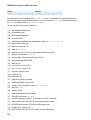
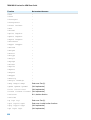
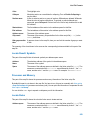
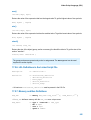
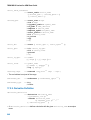
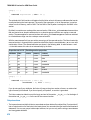
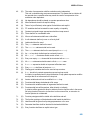
1.1. Data Types
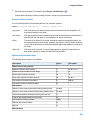
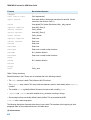
The TASKING C compiler for the ARM supports the following data types.
C type
Size
Align
Limits
_Bool
1
8
0 or 1
signed char
8
8
[-2 , 2 -1]
unsigned char
8
8
[0, 2 -1]
short
16
16
[-2 , 2 -1]
16
7
7
8
15
15
unsigned short
16
16
[0, 2 -1]
int
32
32
[-2 , 2 -1]
unsigned int
32
32
[0, 2 -1]
enum
32
32
[-2 , 2 -1]
31
31
32
31
31
31
31
long
32
32
[-2 , 2 -1]
unsigned long
32
32
[0, 2 -1]
32
1
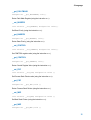
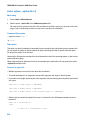
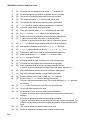
TASKING VX-toolset for ARM User Guide
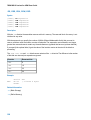
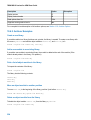
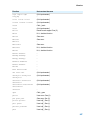
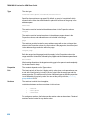
C type
Size
Align
Limits
long long
64
64
[-2 , 2 -1]
unsigned long long
64
64
[0, 2 -1]
float (23-bit mantissa)
32
32
[–3.402E+38, –1.175E-38]
[+1.175E-38, +3.402E+38]
double
long double (52-bit mantissa)
64
64
[-1.797E+308, -2.225E-308]
[+2.225E-308, +1.797E+308]
_Imaginary float
32
32
[–3.402E+38i, –1.175E-38i]
[+1.175E-38i, +3.402E+38i]
_Imaginary double
_Imaginary long double
64
64
[-1.797E+308i, -2.225E-308i]
[+2.225E-308i, +1.797E+308i]
_Complex float
64
32
real part + imaginary part
_Complex double
_Complex long double
128
64
real part + imaginary part
pointer to data or function
32
32
[0, 2 -1]
63
63
64
32
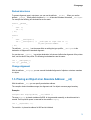
1.2. Changing the Alignment: __unaligned, __packed__ and
__align()
Normally data, pointers and structure members are aligned according to the table in the previous section.
Suppress alignment
With the type qualifier __unaligned you can specify to suppress the alignment of objects or structure
members. This can be useful to create compact data structures. In this case the alignment will be one bit
for bit-fields or one byte for other objects or structure members.
At the left side of a pointer declaration you can use the type qualifier __unaligned to mark the pointer
value as potentially unaligned. This can be useful to access externally defined data. However the compiler
can generate less efficient instructions to dereference such a pointer, to avoid unaligned memory access.
You can always convert a normal pointer to an unaligned pointer. Conversions from an unaligned pointer
to an aligned pointer are also possible. However, the compiler will generate a warning in this situation,
with the exception of the following case: when the logical type of the destination pointer is char or void,
no warning will be generated.
Example:
struct
{
char c;
__unaligned
} s;
int i;
/* aligned at offset 1 ! */
__unaligned int * up = & s.i;
2
C Language
Packed structures
To prevent alignment gaps in structures, you can use the attribute __packed__. When you use the
attribute __packed__ directly after the keyword struct, all structure members are marked __unaligned.
For example the following two declarations are the same:
struct __packed__
{
char c;
int * i;
} s1;
struct
{
char __unaligned c;
int * __unaligned i; /* __unaligned at right side of '*'
to pack pointer member
*/
} s2;
The attribute __packed__ has the same effect as adding the type qualifier __unaligned to the
declaration to suppress the standard alignment.
You can also use __packed__ in a pointer declaration. In that case it affects the alignment of the pointer
itself, not the value of the pointer. The following two declarations are the same:
int * __unaligned p;
int * p __packed__;
Change alignment
With the attribute __align(n) you can overrule the default alignment of objects or structure members
to n bytes.
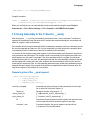
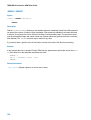
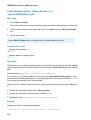
1.3. Placing an Object at an Absolute Address: __at()
With the attribute __at() you can specify an absolute address.
The compiler checks the address range, the alignment and if an object crosses a page boundary.
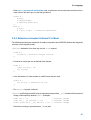
Examples
unsigned char Display[80*24] __at( 0x2000 );
The array Display is placed at address 0x2000. In the generated assembly, an absolute section is
created. On this position space is reserved for the variable Display.
int i __at(0x1000) = 1;
The variable i is placed at address 0x1000 and is initialized.
3
TASKING VX-toolset for ARM User Guide
void f(void) __at( 0xf0ff + 1 ) { }
The function f is placed at address 0xf100.
Restrictions
Take note of the following restrictions if you place a variable at an absolute address:
• The argument of the __at() attribute must be a constant address expression.
• You can place only global variables at absolute addresses. Parameters of functions, or automatic
variables within functions cannot be placed at absolute addresses.
• A variable that is declared extern, is not allocated by the compiler in the current module. Hence it is
not possible to use the keyword __at() on an external variable. Use __at() at the definition of the
variable.
• You cannot place structure members at an absolute address.
• Absolute variables cannot overlap each other. If you declare two absolute variables at the same address,
the assembler and/or linker issues an error. The compiler does not check this.
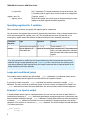
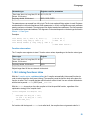
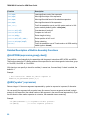
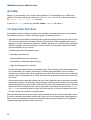
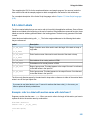
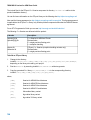
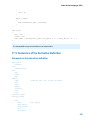
1.4. Accessing Hardware from C
It is easy to access Special Function Registers (SFRs) that relate to peripherals from C. The SFRs are
defined in a special include file (*.h) as symbol names for use with the compiler.
The TASKING VX-toolset for ARM supports the Cortex Micro-controller Software Interface Standard
(CMSIS). You can find details about this standard on www.onarm.com.
The product includes a full set of CMSIS files in the cmsis directory under the product installation directory.
This includes SFR files for the supported devices and for the various Cortex cores. The organization of
the CMSIS files in the product installation is as follows:
cmsis/CM0/CoreSupport
directory with Cortex-M0 header files and C files
cmsis/CM0/DeviceSupport/vendor/device directory with Cortex-M0 device specific header files
and C files
cmsis/CM3/CoreSupport
directory with Cortex-M3 header files and C files
cmsis/CM3/DeviceSupport/vendor/device directory with Cortex-M3 device specific header files
and C files
When you include CMSIS SFR file in your source you must set an include search path to the appropriate
CMSIS directory.
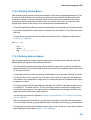
Example of including an SFR file:
#include "stm32f10x.h"
void main(void)
{
4
C Language
SCB->VTOR |= (1 << SCB_VTOR_TBLBASE_Pos);
}
Compiler invocation:
ccarm -c -CARMv7M -I"installation_dir\cmsis\CM3\DeviceSupport\ST\STM32F10x"
-I"installation_dir\cmsis\CM3\CoreSupport" file.c
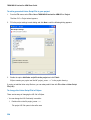
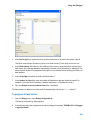
When you use Eclipse you can easily add the include search paths by using the option Project »
Properties for » C/C++ Build » Settings » C/C++ Compiler » Add CMSIS include paths.
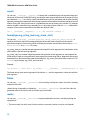
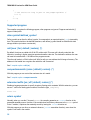
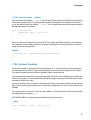
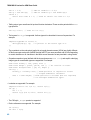
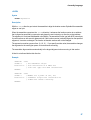
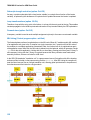
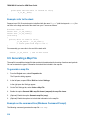
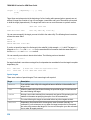
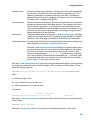
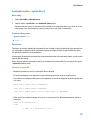
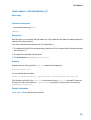
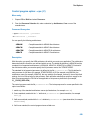
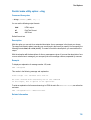
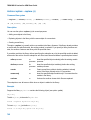
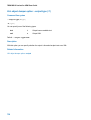
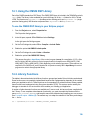
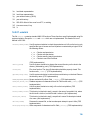
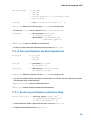
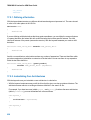
1.5. Using Assembly in the C Source: __asm()
With the keyword __asm you can use assembly instructions in the C source and pass C variables as
operands to the assembly code. Be aware that C modules that contain assembly are not portable and
harder to compile in other environments.
The compiler does not interpret assembly blocks but passes the assembly code to the assembly source
file; they are regarded as a black box. So, it is your responsibility to make sure that the assembly block
is syntactically correct. Possible errors can only be detected by the assembler.
You need to tell the compiler exactly what happens in the inline assembly code because it uses that for
code generation and optimization. The compiler needs to know exactly which registers are written and
which registers are only read. For example, if the inline assembly writes to a register from which the
compiler assumes that it is only read, the generated code after the inline assembly is based on the fact
that the register still contains the same value as before the inline assembly. If that is not the case the
results may be unexpected. Also, an inline assembly statement using multiple input parameters may be
assigned the same register if the compiler finds that the input parameters contain the same value. As
long as this register is only read this is not a problem.
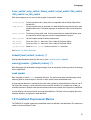
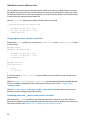
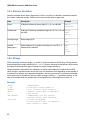
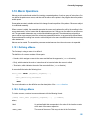
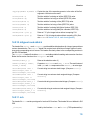
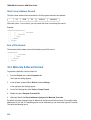
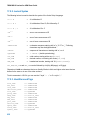
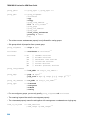
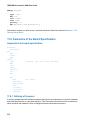
General syntax of the __asm keyword
__asm( "instruction_template"
[ : output_param_list
[ : input_param_list
[ : register_save_list]]] );
instruction_template
%parm_nr
Assembly instructions that may contain parameters from the input
list or output list in the form: %parm_nr
Parameter number in the range 0 .. 9.
output_param_list
[[ "=[&]constraint_char"(C_expression)],...]
input_param_list
[[ "constraint_char"(C_expression)],...]
&
Says that an output operand is written to before the inputs are read,
so this output must not be the same register as any input.
constraint _char
Constraint character: the type of register to be used for the
C_expression. See the table below.
5
TASKING VX-toolset for ARM User Guide
C_expression
register_save_list
Any C expression. For output parameters it must be an lvalue, that
is, something that is legal to have on the left side of an assignment.
[["register_name"],...]
register_name
Name of the register you want to reserve. Note that saving too many
registers can make register allocation impossible.
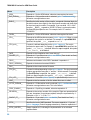
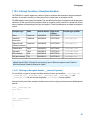
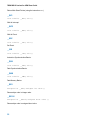
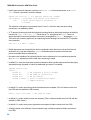
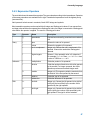
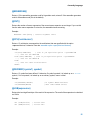
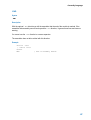
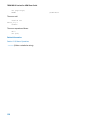
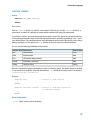
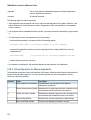
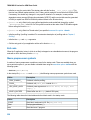
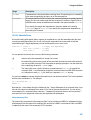
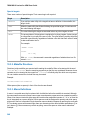
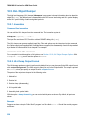
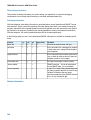
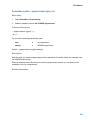
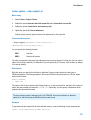
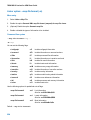
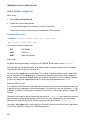
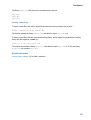
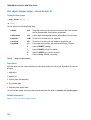
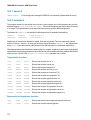
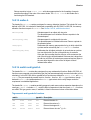
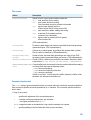
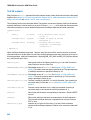
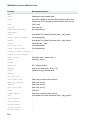
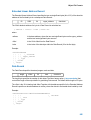
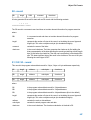
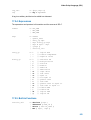
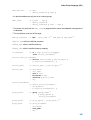
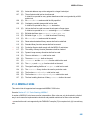
Specifying registers for C variables
With a constraint character you specify the register type for a parameter.
You can reserve the registers that are used in the assembly instructions, either in the parameter lists or
in the reserved register list (register_save_list). The compiler takes account of these lists, so no
unnecessary register saves and restores are placed around the inline assembly instructions.
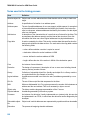
Constraint
character
Type
Operand
r
general purpose register r0 .. r11, lr
number
type of operand it is
associated with
Remark
Thumb mode r0 .. r7
same as %number Input constraint only. The number must
refer to an output parameter. Indicates
that %number and number are the same
register.
If an input parameter is modified by the inline assembly then this input parameter must also be
added to the list of output parameters (see Example 6). If this is not the case, the resulting code
may behave differently than expected since the compiler assumes that an input parameter is not
being changed by the inline assembly.
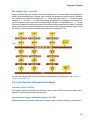
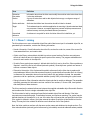
Loops and conditional jumps
The compiler does not detect loops with multiple __asm() statements or (conditional) jumps across
__asm() statements and will generate incorrect code for the registers involved.
If you want to create a loop with __asm(), the whole loop must be contained in a single __asm()
statement. The same counts for (conditional) jumps. As a rule of thumb, all references to a label in an
__asm() statement must be in that same statement. You can use numeric labels for these purposes.
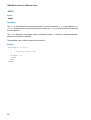
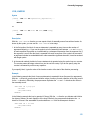
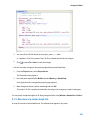
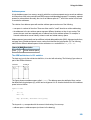
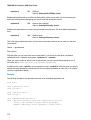
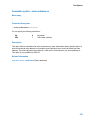
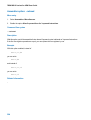
Example 1: no input or output
A simple example without input or output parameters. You can use any instruction or label. When it is
required that a sequence of __asm() statements generates a contiguous sequence of instructions, then
they can be best combined to a single __asm() statement. Compiler optimizations can insert instruction(s)
in between __asm() statements. Note that you can use standard C escape sequences. Use newline
characters ‘\n’ to continue on a new line in a __asm() statement. For multi-line output, use tab characters
'\t' to indent instructions.
__asm( "nop\n"
"\tnop" );
6
C Language
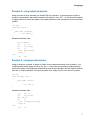
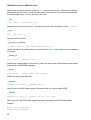
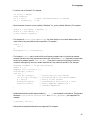
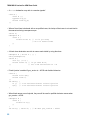
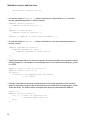
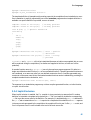
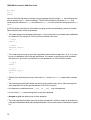
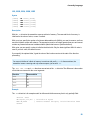
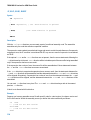
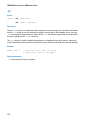
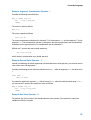
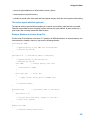
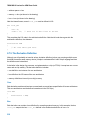
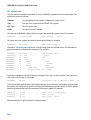
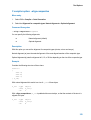
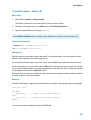
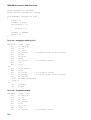
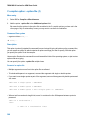
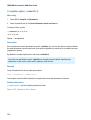
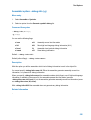
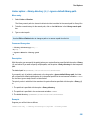
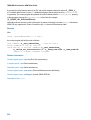
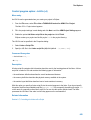
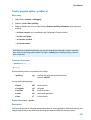
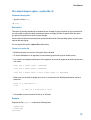
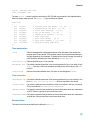
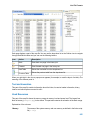
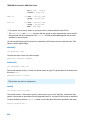
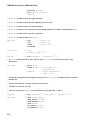
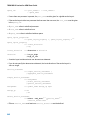
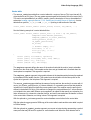
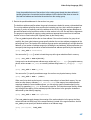
Example 2: using output parameters
Assign the result of inline assembly to a variable. With the constraint r a general purpose register is
chosen for the parameter; the compiler decides which register it uses. The %0 in the instruction template
is replaced with the name of this register. The compiler generates code to assign the result to the output
variable.
int out;
void main( void )
{
__asm( "mov %0,#0xff"
: "=r" (out) );
}
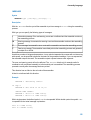
Generated assembly code:
mov r0,#0xff
ldr
r1,.L2
str
r0,[r1,#0]
bx
lr
.size main,$-main
.align 4
.L2:
.dw
out
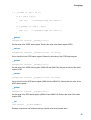
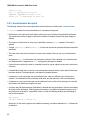
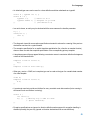
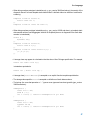
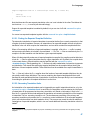
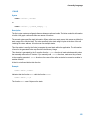
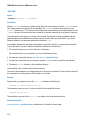
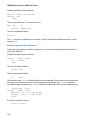
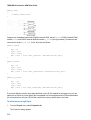
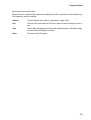
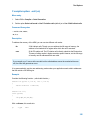
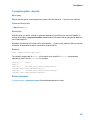
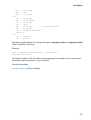
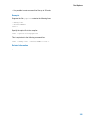
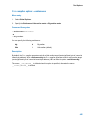
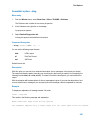
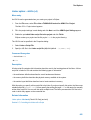
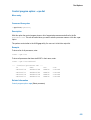
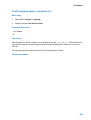
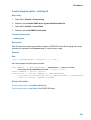
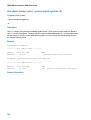
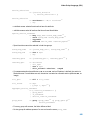
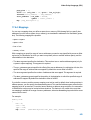
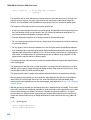
Example 3: using input parameters
Assign a variable to a register. A register is chosen for the parameter because of the constraint r; the
compiler decides which register is best to use. The %0 in the instruction template is replaced with the
name of this register. The compiler generates code to move the input variable to the input register. Because
there are no output parameters, the output parameter list is empty. Only the colon has to be present.
int in;
void initreg( void )
{
__asm( "MOV R0,%0"
:
: "r" (in) );
}
Generated assembly code:
ldr
r0,.L2
ldr
r0,[r0,#0]
MOV R0,r0
bx
lr
.size initreg,$-initreg
.align 4
.L2:
.dw
in
7
TASKING VX-toolset for ARM User Guide
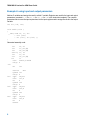
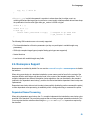
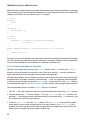
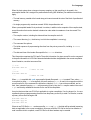
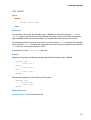
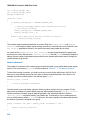
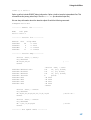
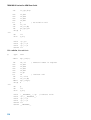
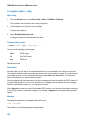
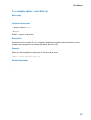
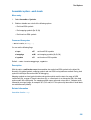
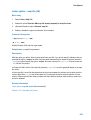
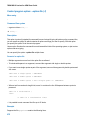
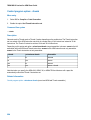
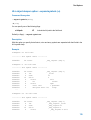
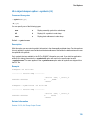
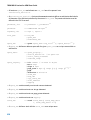
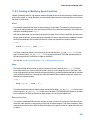
Example 4: using input and output parameters
Add two C variables and assign the result to a third C variable. Registers are used for the input and output
parameters (constraint r, %0 for out, %1 for in1, %2 for in2 in the instruction template). The compiler
generates code to move the input expressions into the input registers and to assign the result to the output
variable.
int in1, in2, out;
void add32( void )
{
__asm( "add %0, %1, %2"
: "=r" (out)
: "r" (in1), "r" (in2) );
}
Generated assembly code:
ldr
ldr
ldr
add r0,
ldr
str
bx
.size
.align
r0,.L2
r1,[r0,#0]
r0,[r0,#4]
r1, r0
r1,.L2
r0,[r1,#8]
lr
add32,$-add32
4
.dw
in1
.L2:
.section
.bss
.global in1
.align 4
in1: .type
object
.size
in1,4
.ds
4
.global in2
.align 4
in2: .type
object
.size
in2,4
.ds
4
.global out
.align 4
out: .type
object
.size
out,4
.ds
4
.endsec
8
C Language
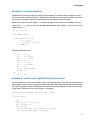
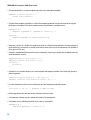
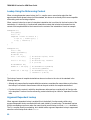
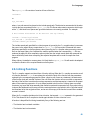
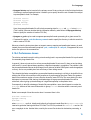
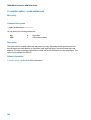
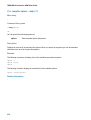
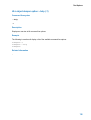
Example 5: reserving registers
Sometimes an instruction knocks out certain specific registers. The most common example of this is a
function call, where the called function is allowed to do whatever it likes with some registers. If this is the
case, you can list specific registers that get clobbered by an operation after the inputs.
Same as Example 4, but now register r0 is a reserved register. You can do this by adding a reserved
register list (: "r0"). As you can see in the generated assembly code, register r0 is not used (the first
register used is r1).
int in1, in2, out;
void add32( void )
{
__asm( "add %0, %1, %2"
: "=r" (out)
: "r" (in1), "r" (in2)
: "r0" );
}
Generated assembly code:
ldr
ldr
ldr
add r1,
ldr
str
bx
.size
.align
r2,.L2
r2,[r1,#0]
r1,[r1,#4]
r2, r1
r0,.L2
r1,[r0,#8]
lr
add32,$-add32
4
.dw
in1
.L2:
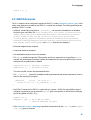
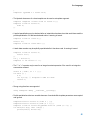
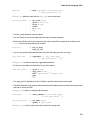
Example 6: use the same register for input and output
As input constraint you can use a number to refer to an output parameter. This tells the compiler that the
same register can be used for the input and output parameter. When the input and output parameter are
the same C expression, these will effectively be treated as if the input parameter is also used as output.
In that case it is allowed to write to this register. For example:
inline int foo(int par1, int par2, int * par3)
{
int retvalue;
__asm(
"add %2,%1,%1,lsl #2\n\t"
"mov %5,%2\n\t"
"mov %0,%2"
: "=&r" (retvalue), "=r" (par1), "=r" (par2)
: "1" (par1), "2" (par2), "r" (par3)
9
TASKING VX-toolset for ARM User Guide
);
return retvalue;
}
int result,parm;
void func(void)
{
result = foo(1000,1000,&parm);
}
In this example the "1" constraint for the input parameter par1 refers to the output parameter par1, and
similar for the "2" constraint and par2. In the inline assembly %1 (par1) and %2 (par2) are written. This
is allowed because the compiler is aware of this.
This results in the following generated assembly code:
mov
mov
ldr
r0,#1000
r1,r0
r2,.L2
add
mov
mov
r1,r0,r0,lsl #2
r2,r1
r3,r1
ldr
str
r0,.L2+4
r3,[r0,#0]
bx
.L2:
.dw
.dw
lr
parm
result
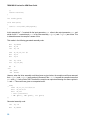
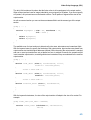
However, when the inline assembly would have been as given below, the compiler would have assumed
that %1 (par1) and %2 (par2) were read-only. Because of the inline keyword the compiler knows that
par1 and par2 both contain 1000. Therefore the compiler can optimize and assign the same register to
%1 and %2. This would have given an unexpected result.
__asm(
"add %2,%1,%1,lsl #2\n\t"
"mov %3,%2\n\t"
"mov %0,%2"
: "=&r" (retvalue)
: "r" (par1), "r" (par2), "r" (par3)
);
Generated assembly code:
ldr
mov
10
r0,.L2
r1,#1000
C Language
add
mov
mov
r1,r1,r1,lsl #2
r0,r1
r2,r1
ldr
str
r0,.L2+4
r2,[r0,#0]
bx
.L2:
.dw
.dw
; same register, but is expected read-only
; contains unexpected result
lr
parm
result
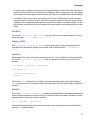
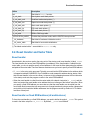
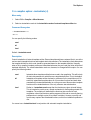
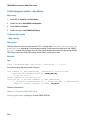
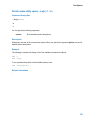
1.6. Attributes
You can use the keyword __attribute__ to specify special attributes on declarations of variables,
functions, types, and fields.
Syntax:
__attribute__((name,...))
or:
__name__
The second syntax allows you to use attributes in header files without being concerned about a possible
macro of the same name.
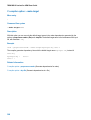
alias("symbol")
You can use __attribute__((alias("symbol"))) to specify that the function declaration appears
in the object file as an alias for another symbol. For example:
void __f() { /* function body */; }
void f() __attribute__((weak, alias("__f")));
declares 'f' to be a weak alias for '__f'.
const
You can use __attribute__((const)) to specify that a function has no side effects and will not
access global data. This can help the compiler to optimize code.
The following kinds of functions should not be declared __const__:
• A function with pointer arguments which examines the data pointed to.
• A function that calls a non-const function.
11
TASKING VX-toolset for ARM User Guide
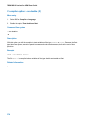
export
You can use __attribute__((export)) to specify that a variable/function has external linkage and
should not be removed. During MIL linking, the compiler treats external definitions at file scope as if they
were declared static. As a result, unused variables/functions will be eliminated, and the alias checking
algorithm assumes that objects with static storage cannot be referenced from functions outside the current
module. During MIL linking not all uses of a variable/function can be known to the compiler. For example
when a variable is referenced in an assembly file or a (third-party) library. With the export attribute the
compiler will not perform optimizations that affect the unknown code.
int i __attribute__((export)); /* 'i' has external linkage */
format(type,arg_string_index,arg_check_start)
You can use __attribute__((format(type,arg_string_index,arg_check_start))) to
specify that functions take format strings as arguments and that calls to these functions must be
type-checked against a format string, similar to the way the compiler checks calls to the functions printf,
scanf, strftime, and strfmon for errors.
arg_string_index is a constant integral expression that specifies which argument in the declaration of the
user function is the format string argument.
arg_check_start is a constant integral expression that specifies the first argument to check against the
format string. If there are no arguments to check against the format string (that is, diagnostics should only
be performed on the format string syntax and semantics), arg_check_start should have a value of 0. For
strftime-style formats, arg_check_start must be 0.
Example:
int foo(int i, const char * my_format, ...) __attribute__ ((format(printf, 2, 3)));
The format string is the second argument of the function foo and the arguments to check start with the
third argument.
flatten
You can use __attribute__((flatten)) to force inlining of all function calls in a function, including
nested function calls.
Unless inlining is impossible or disabled by __attribute__((noinline)) for one of the calls, the
generated code for the function will not contain any function calls.
malloc
You can use __attribute__((malloc)) to improve optimization and error checking by telling the
compiler that:
• The return value of a call to such a function points to a memory location or can be a null pointer.
12
C Language
• On return of such a call (before the return value is assigned to another variable in the caller), the memory
location mentioned above can be referenced only through the function return value; e.g., if the pointer
value is saved into another global variable in the call, the function is not qualified for the malloc attribute.
• The lifetime of the memory location returned by such a function is defined as the period of program
execution between a) the point at which the call returns and b) the point at which the memory pointer
is passed to the corresponding deallocation function. Within the lifetime of the memory object, no other
calls to malloc routines should return the address of the same object or any address pointing into that
object.
noinline
You can use __attribute__((noinline)) to prevent a function from being considered for inlining.
Same as keyword __noinline or #pragma noinline.
always_inline
With __attribute__((always_inline)) you force the compiler to inline the specified function,
regardless of the optimization strategy of the compiler itself. Same as keyword inline or #pragma
inline.
noreturn
Some standard C function, such as abort and exit cannot return. The C compiler knows this automatically.
You can use __attribute__((noreturn)) to tell the compiler that a function never returns. For
example:
void fatal() __attribute__((noreturn));
void fatal( /* ... */ )
{
/* Print error message */
exit(1);
}
The function fatal cannot return. The compiler can optimize without regard to what would happen if
fatal ever did return. This can produce slightly better code and it helps to avoid warnings of uninitialized
variables.
protect
You can use __attribute__((protect)) to exclude a variable/function from the duplicate/unreferenced
section removal optimization in the linker. When you use this attribute, the compiler will add the "protect"
section attribute to the symbol's section. Example:
int i __attribute__((protect));
Note that the protect attribute will not prevent the compiler from removing an unused variable/function
(see the used symbol attribute).
13
TASKING VX-toolset for ARM User Guide
This attribute is the same as #pragma protect/endprotect.
pure
You can use __attribute__((pure)) to specify that a function has no side effects, although it may
read global data. Such pure functions can be subject to common subexpression elimination and loop
optimization.
section("section_name")
You can use __attribute__((section("name"))) to specify that a function must appear in the
object file in a particular section. For example:
extern void foobar(void) __attribute__((section("bar")));
puts the function foobar in the section named bar.
See also #pragma section.
used
You can use __attribute__((used)) to prevent an unused symbol from being removed, by both the
compiler and the linker. Example:
static const char copyright[] __attribute__((used)) = "Copyright 2010 Altium BV";
When there is no C code referring to the copyright variable, the compiler will normally remove it. The
__attribute__((used)) symbol attribute prevents this. Because the linker should also not remove
this symbol, __attribute__((used)) implies __attribute__((protect)).
unused
You can use __attribute__((unused)) to specify that a variable or function is possibly unused. The
compiler will not issue warning messages about unused variables or functions.
weak
You can use __attribute__((weak)) to specify that the symbol resulting from the function declaration
or variable must appear in the object file as a weak symbol, rather than a global one. This is primarily
useful when you are writing library functions which can be overwritten in user code without causing
duplicate name errors.
See also #pragma weak.
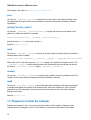
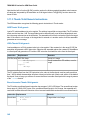
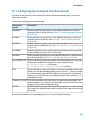
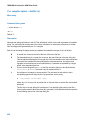
1.7. Pragmas to Control the Compiler
Pragmas are keywords in the C source that control the behavior of the compiler. Pragmas overrule
compiler options. Put pragmas in your C source where you want them to take effect. Unless stated
14
C Language
otherwise, a pragma is in effect from the point where it is included to the end of the compilation unit or
until another pragma changes its status.
The syntax is:
#pragma [label:]pragma-spec pragma-arguments [on | off | default | restore]
or:
_Pragma( "[label:]pragma-spec pragma-arguments [on | off | default | restore]" )
Some pragmas can accept the following special arguments:
on
switch the flag on (same as without argument)
off
switch the flag off
default
set the pragma to the initial value
restore
restore the previous value of the pragma
Label pragmas
Some pragmas support a label prefix of the form "label:" between #pragma and the pragma name. Such
a label prefix limits the effect of the pragma to the statement following a label with the specified name.
The restore argument on a pragma with a label prefix has a special meaning: it removes the most
recent definition of the pragma for that label.
You can see a label pragma as a kind of macro mechanism that inserts a pragma in front of the statement
after the label, and that adds a corresponding #pragma ... restore after the statement.
Compared to regular pragmas, label pragmas offer the following advantages:
• The pragma text does not clutter the code, it can be defined anywhere before a function, or even in a
header file. So, the pragma setting and the source code are uncoupled. When you use different header
files, you can experiment with a different set of pragmas without altering the source code.
• The pragma has an implicit end: the end of the statement (can be a loop) or block. So, no need for
pragma restore / endoptimize etc.
Example:
#pragma lab1:optimize P
volatile int v;
voi f( void )
{
int i, a;
a = 42;
lab1: for( i=1; i<10; i++ )
15
TASKING VX-toolset for ARM User Guide
{
/* the entire for loop is part of the pragma optimize */
a += i;
}
v = a;
}
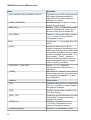
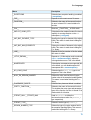
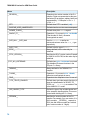
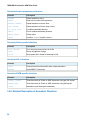
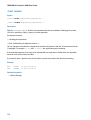
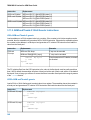
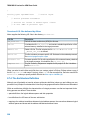
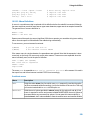
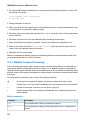
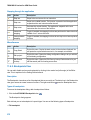
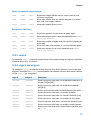
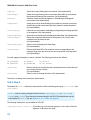
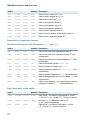
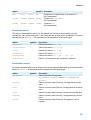
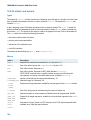
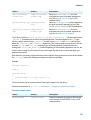
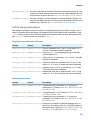
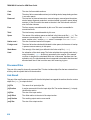
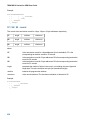
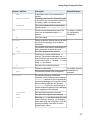
Supported pragmas
The compiler recognizes the following pragmas, other pragmas are ignored. Pragmas marked with (*)
support a label prefix.
alias symbol=defined_symbol
Define symbol as an alias for defined_symbol. It corresponds to an equate directive (.EQU) at assembly
level. The symbol should not be defined elsewhere, and defined_symbol should be defined with static
storage duration (not extern or automatic).
call {near | far | default | restore} (*)
By default, functions are called with 26-bit PC-relative calls. This near call is directly coded into the
instruction, resulting in higher execution speed and smaller code size. The destination address of a near
call must be located within +/-32 MB from the program counter.
The other call mode is a 32-bit indirect call. With far calls you can address the full range of memory. The
address is first loaded into a register after which the call is executed.
See C compiler option --call (-m).
compactmaxmatch {value | default | restore} (*)
With this pragma you can control the maximum size of a match.
See C compiler option --compact-max-size.
extension isuffix [on | off | default | restore] (*)
Enables a language extension to specify imaginary floating-point constants. With this extension, you can
use an "i" suffix on a floating-point constant, to make the type _Imaginary.
float 0.5i
extern symbol
Normally, when you use the C keyword extern, the compiler generates an .EXTERN directive in the
generated assembly source. However, if the compiler does not find any references to the extern symbol
in the C module, it optimizes the assembly source by leaving the .EXTERN directive out.
With this pragma you can force an external reference (.EXTERN assembler directive), even when the
symbol is not used in the module.
16
C Language
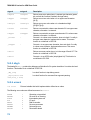
inline / noinline / smartinline
See Section 1.10.2, Inlining Functions: inline.
inline_max_incr / inline_max_size {value | default | restore} (*)
With these pragmas you can control the automatic function inlining optimization process of the compiler.
It has only effect when you have enabled the inlining optimization (--optimize=+inline (-Oi)).
See C compiler options --inline-max-incr and --inline-max-size.
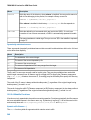
macro / nomacro [on | off | default | restore] (*)
Turns macro expansion on or off. By default, macro expansion is enabled.
maxcalldepth {value | default | restore} (*)
With this pragma you can control the maximum call depth. Default is infinite (-1).
See C compiler option --max-call-depth.
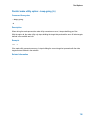
message "message" ...
Print the message string(s) on standard output.
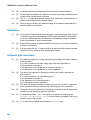
nomisrac [nr,...] [default | restore] (*)
Without arguments, this pragma disables MISRA-C checking. Alternatively, you can specify a
comma-separated list of MISRA-C rules to disable.
See C compiler option --misrac and Section 4.7.2, C Code Checking: MISRA-C.
optimize [flags | default | restore] (*) / endoptimize
You can overrule the C compiler option --optimize for the code between the pragmas optimize and
endoptimize. The pragma works the same as C compiler option --optimize.
See Section 4.5, Compiler Optimizations.
profile [flags | default | restore] (*) / endprofile
Control the profile settings. The pragma works the same as C compiler option --profile. Note that this
pragma will only be checked at the start of a function. endprofile switches back to the previous profiling
settings.
profiling [on | off | default | restore] (*)
If profiling is enabled on the command line (C compiler option --profile), you can disable part of your
source code for profiling with the pragmas profiling off and profiling.
17
TASKING VX-toolset for ARM User Guide
protect [on | off | default | restore] (*) / endprotect
With these pragmas you can protect sections against linker optimizations. This excludes a section from
unreferenced section removal and duplicate section removal by the linker. endprotect restores the
default section protection.
runtime [flags | default | restore] (*)
With this pragma you can control the generation of additional code to check for a number of errors at
run-time.The pragma argument syntax is the same as for the arguments of the C compiler option --runtime.
You can use this pragma to control the run-time checks for individual statements. In addition, objects
declared when the "bounds" sub-option is disabled are not bounds checked. The "malloc" sub-option
cannot be controlled at statement level, as it only extracts an alternative malloc implementation from the
library.
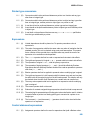
section [name=]{suffix |-f|-m|-fm} [default | restore] (*) / endsection
Rename sections by adding a suffix to all section names specified with name, or restore default section
naming. If you specify only a suffix (without a name), the suffix is added to all section names. See C
compiler option --rename-sections and assembler directive .SECTION for more information.
section_code_init [on | off | default | restore] (*) / section_no_code_init
Copy or do not copy code sections from ROM to RAM at application startup.
section_const_init [on | off | default | restore] (*) / section_no_const_init
Copy or do not copy read-only data sections from ROM to RAM at application startup.
silicon_bug [bug,...] [default | restore] (*)
Without arguments, all silicon bug workarounds are enabled. Alternatively, you can specify a
comma-separated list of silicon bug workarounds.
See C compiler option --silicon-bug and Chapter 19, CPU Problem Bypasses and Checks.
source [on | off | default | restore] (*) / nosource
With these pragmas you can choose which C source lines must be listed as comments in assembly output.
See C compiler option --source.
stdinc [on | off | default | restore] (*)
This pragma changes the behavior of the #include directive. When set, the C compiler options
--include-directory and --no-stdinc are ignored.
18
C Language
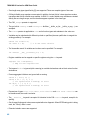
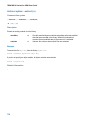
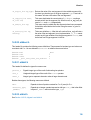
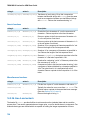
linear_switch / jump_switch / binary_switch / smart_switch / tbb_switch
/ tbh_switch / no_tbh_switch
With these pragmas you can overrule the compiler chosen switch method:
linear_switch
Force jump chain code. A jump chain is comparable with an if/else-if/else-if/else
construction.
jump_switch
Force jump table code. A jump table is a table filled with jump instructions for each
possible switch value. The switch argument is used as an index to jump within this
table.
binary_switch
Force binary lookup table code. A binary search table is a table filled with a value
to compare the switch argument with and a target address to jump to.
smart_switch
Let the compiler decide the switch method used.
tbb_switch
Force use of the tbb instruction. Uses a table of 8-bit jump offsets.
tbh_switch
Force use of the tbh instruction. Uses a table of 8-bit jump offsets.
no_tbh_switch
Same as smart_switch, but do not use the tbh instruction.
See Section 1.9, Switch Statement.
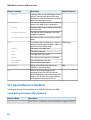
tradeoff {level | default | restore} (*)
Specify tradeoff between speed (0) and size (4). See C compiler option --tradeoff
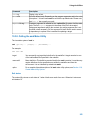
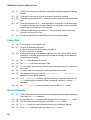
warning [number,...] [default | restore] (*)
With this pragma you can disable warning messages. If you do not specify a warning number, all warnings
will be suppressed.
weak symbol
Mark a symbol as "weak" (.WEAK assembler directive). The symbol must have external linkage, which
means a global or external object or function. A static symbol cannot be declared weak.
A weak external reference is resolved by the linker when a global (or weak) definition is found in one of
the object files. However, a weak reference will not cause the extraction of a module from a library to
resolve the reference. When a weak external reference cannot be resolved, the null pointer is substituted.
A weak definition can be overruled by a normal global definition. The linker will not complain about the
duplicate definition, and ignore the weak definition.
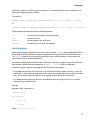
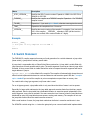
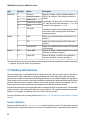
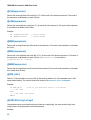
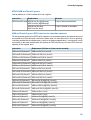
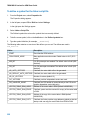
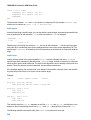
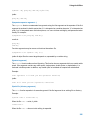
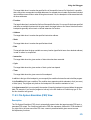
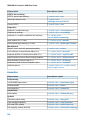
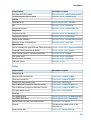
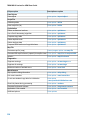
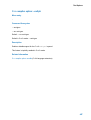
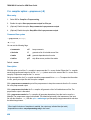
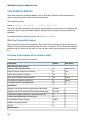
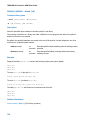
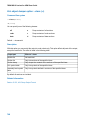
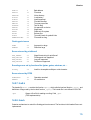
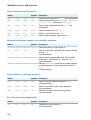
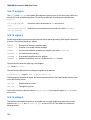
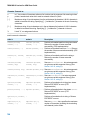
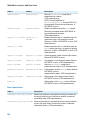
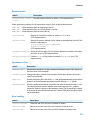
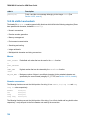
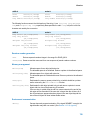
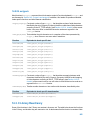
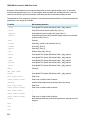
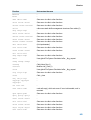
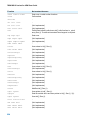
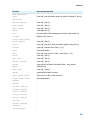
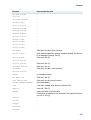
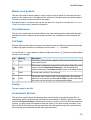
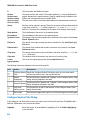
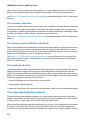
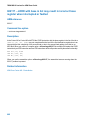
1.8. Predefined Preprocessor Macros
The TASKING C compiler supports the predefined macros as defined in the table below. The macros are
useful to create conditional C code.
19
TASKING VX-toolset for ARM User Guide
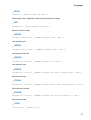
Macro
Description
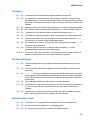
__ARM__
Expands to 1 for the ARM toolset, otherwise unrecognized as macro.
__BIG_ENDIAN__
Expands to 1 if big-endian mode is selected (option --endianness=big),
otherwise unrecognized as macro.
__BUILD__
Identifies the build number of the compiler, composed of decimal digits for
the build number, three digits for the major branch number and three digits
for the minor branch number. For example, if you use build 1.22.1 of the
compiler, __BUILD__ expands to 1022001. If there is no branch number,
the branch digits expand to zero. For example, build 127 results in
127000000.
__CARM__
Expands to 1 for the ARM toolset, otherwise unrecognized as macro.
__CPU__
Expands to the ARM architecture name (option --cpu=arch). When no --cpu
is supplied, this symbol is not defined. For example, if --cpu=ARMv7M is
specified, the symbol __CPU__ expands to ARMv7M.
__CPU_arch__
A symbol is defined depending on the option --cpu=arch. The arch is
converted to upper case. For example, if --cpu=ARMv7M is specified, the
symbol __CPU_ARMV7M__ is defined. When no --cpu is supplied, this symbol
__CPU_ARMV7M__ is the default.
__DATE__
Expands to the compilation date: “mmm dd yyyy”.
__DOUBLE_FP__
Expands to 1 if you did not use option --no-double (Treat ‘double’ as ‘float’),
otherwise unrecognized as macro.
__DSPC__
Indicates conformation to the DSP-C standard. It expands to 1.
__DSPC_VERSION__
Expands to the decimal constant 200001L.
__FILE__
Expands to the current source file name.
__FPU_fpu__
A symbol is defined depending on the option --fpu=fpu. The fpu is converted
to upper case and the lower case “v" and the '-' will be removed. For example,
if --fpu=VFPv3-sp is specified, the symbol __FPU_VFP3SP__ is defined.
When no --fpu is supplied, the symbol __FPU_NONE__ is the default.
__FPU_VFP__
Expands to 1 if one the options --fpu=fpu is specified and fpu is not NONE.
__LINE__
Expands to the line number of the line where this macro is called.
__LITTLE_ENDIAN__
Expands to 1 if little-endian mode is selected (option --endianness=little),
otherwise unrecognized as macro. This is the default.
__PROF_ENABLE__
Expands to 1 if profiling is enabled, otherwise expands to 0.
__REVISION__
Expands to the revision number of the compiler. Digits are represented as
they are; characters (for prototypes, alphas, betas) are represented by -1.
Examples: v1.0r1 -> 1, v1.0rb -> -1
__SINGLE_FP__
Expands to 1 if you used option --no-double (Treat ‘double’ as ‘float’),
otherwise unrecognized as macro.
__STDC__
Identifies the level of ANSI standard. The macro expands to 1 if you set
option --language (Control language extensions), otherwise expands to 0.
__STDC_HOSTED__
Always expands to 0, indicating the implementation is not a hosted
implementation.
20
C Language
Macro
Description
__STDC_VERSION__
Identifies the ISO-C version number. Expands to 199901L for ISO C99 or
199409L for ISO C90.
__TASKING__
Identifies the compiler as a TASKING compiler. Expands to 1 if a TASKING
compiler is used.
__THUMB__
Expands to 1 if you used option --thumb, otherwise unrecognized as macro.
__TIME__
Expands to the compilation time: “hh:mm:ss”
__VERSION__
Identifies the version number of the compiler. For example, if you use version
3.0r1 of the compiler, __VERSION__ expands to 3000 (dot and revision
number are omitted, minor version number in 3 digits).
Example
#ifdef __CARM__
/* this part is only compiled for the ARM */
...
#endif
1.9. Switch Statement
The TASKING C compiler supports three ways of code generation for a switch statement: a jump chain
(linear switch), a jump table or a binary search table.
A jump chain is comparable with an if/else-if/else-if/else construction. A jump table is a table filled with
jump instructions for each possible switch value. The switch argument is used as an index to jump within
this table. A binary search table is a table filled with a value to compare the switch argument with and a
target address to jump to.
#pragma smart_switch is the default of the compiler. The compiler will automatically choose the most
efficient switch implementation based on code and data size and execution speed. With the C compiler
option --tradeoff you can tell the compiler to put more emphasis on speed than on memory size.
For a switch with a long type argument, only linear code is used.
For an int type argument, a jump table switch is only used when the table of cases is not too sparse.
Especially for large switch statements, the jump table approach executes faster than the binary search
table approach. Also the jump table has a predictable behavior in execution speed: independent of the
switch argument, every case is reached in the same execution time. However, when the case labels are
distributed far apart, the jump table becomes sparse, wasting code memory. The compiler will not use
the jump table method when the waste becomes excessive.
With a small number of cases, the jump chain method can be faster in execution and shorter in size.
For ARMv7M a switch using the tbh instruction gets priority over a normal switch table implementation.
21
TASKING VX-toolset for ARM User Guide
How to overrule the default switch method
You can overrule the compiler chosen switch method by using a pragma:
#pragma linear_switch
force jump chain code
#pragma jump_switch
force jump table code
#pragma binary_switch
force binary search table code
#pragma smart_switch
let the compiler decide the switch method used
#pragma tbb_switch
force use of tbb instruction (uses a table of 8-bit jump offsets)
#pragma tbh_switch
force use of tbh instruction (uses a table of 16-bit jump offsets)
#pragma no_tbh_switch
same as smart_switch, but do not use tbh instruction
Using a pragma cannot overrule the restrictions as described earlier.
The switch pragmas must be placed before the switch statement. Nested switch statements use the
same switch method, unless the nested switch is implemented in a separate function which is preceded
by a different switch pragma.
Example:
/* place pragma before function body */
#pragma jump_switch
void test(unsigned char val)
{ /* function containing the switch */
switch (val)
{
/* use jump table */
}
}
1.10. Functions
1.10.1. Calling Convention
Parameter passing
A lot of execution time of an application is spent transferring parameters between functions. The fastest
parameter transport is via registers. Therefore, function parameters are first passed via registers. If no
more registers are available for a parameter, the compiler pushes parameters on the stack.
Registers available for parameter passing are r0, r1, r2 and r3.
22
C Language
Parameter type
Registers used for parameters
_Bool, char, short, int, long, float, 32–bit R0, R1, R2, R3
pointer, 32–bit struct
long long, double, 64–bit struct
R0R1, R1R2, R2R3
The parameters are processed from left to right. The first not used and fitting register is used. Registers
are searched for in the order listed above. When a parameter is > 64 bit, or all registers are used, parameter
passing continues on the stack. The stack grows from higher towards lower addresses. The first parameter
is pushed at the lowest stack address. The alignment on the stack depends on the data type as listed in
Section 1.1, Data Types.
Examples:
void func1( int a, char * b, char c );
/* R0 R1 R2 */
void func2( long long d, char e );
/* R0R1 R2 */
void func4( double f, long long g, char h );
/* R0R1 R2R3 stack */
Function return values
The C compiler uses registers to store C function return values, depending on the function return types.
Return type
Register
_Bool, char, short, int, long, float, 32–bit R0
pointer, 32–bit struct
long long, double, 64–bit struct
R0R1
Objects larger than 64 bits are returned via the stack.
1.10.2. Inlining Functions: inline
With the C compiler option --optimize=+inline, the C compiler automatically inlines small functions in
order to reduce execution time (smart inlining). The compiler inserts the function body at the place the
function is called. The C compiler decides which functions will be inlined. You can overrule this behavior
with the two keywords inline (ISO-C) and __noinline.
With the inline keyword you force the compiler to inline the specified function, regardless of the
optimization strategy of the compiler itself:
inline unsigned int abs(int val)
{
unsigned int abs_val = val;
if (val < 0) abs_val = -val;
return abs_val;
}
If a function with the keyword inline is not called at all, the compiler does not generate code for it.
23
TASKING VX-toolset for ARM User Guide
You must define inline functions in the same source module as in which you call the function, because
the compiler only inlines a function in the module that contains the function definition. When you need to
call the inline function from several source modules, you must include the definition of the inline function
in each module (for example using a header file).
With the __noinline keyword, you prevent a function from being inlined:
__noinline unsigned int abs(int val)
{
unsigned int abs_val = val;
if (val < 0) abs_val = -val;
return abs_val;
}
Using pragmas: inline, noinline, smartinline
Instead of the inline qualifier, you can also use #pragma inline and #pragma noinline to inline
a function body:
#pragma inline
unsigned int abs(int val)
{
unsigned int abs_val = val;
if (val < 0) abs_val = -val;
return abs_val;
}
#pragma noinline
void main( void )
{
int i;
i = abs(-1);
}
If a function has an inline/__noinline function qualifier, then this qualifier will overrule the current
pragma setting.
With the #pragma noinline / #pragma smartinline you can temporarily disable the default behavior
that the C compiler automatically inlines small functions when you turn on the C compiler option
--optimize=+inline.
With the C compiler options --inline-max-incr and --inline-max-size you have more control over the
automatic function inlining process of the compiler.
Combining inline with __asm to create intrinsic functions
With the keyword __asm it is possible to use assembly instructions in the body of an inline function.
Because the compiler inserts the (assembly) body at the place the function is called, you can create your
own intrinsic function. See Section 1.10.4.1, Writing Your Own Intrinsic Function.
24
C Language
1.10.3. Interrupt Functions / Exception Handlers
The TASKING C compiler supports a number of function qualifiers and keywords to program exception
handlers. An exception handler (or: interrupt function) is called when an exception occurs.
The ARM supports seven types of exceptions.The next table lists the types of exceptions and the processor
mode that is used to process that exception. When an exception occurs, execution is forced from a fixed
memory address corresponding to the type of exception. These fixed addresses are called the exception
vectors.
Exception type
Mode
Normal address High vector
address
Function type qualifier
Reset
Supervisor
0x00000000
0xFFFF0000
Undefined
instructions
Undefined
0x00000004
0xFFFF0004
__interrupt_und
Supervisor call
(software interrupt)
Supervisor
0x00000008
0xFFFF0008
__interrupt_svc
Prefetch abort
Abort
0x0000000C
0xFFFF000C
__interrupt_iabt
Data abort
Abort
0x00000010
0xFFFF0010
__interrupt_dabt
IRQ (interrupt)
IRQ
0x00000018
0xFFFF0018
__interrupt_irq
FIQ (fast interrupt)
FIQ
0x0000001C
0xFFFF001C
__interrupt_fiq
ARMv6-M and ARMv7-M (M-profile architectures) have a different exception model. Read the
ARM Architecture Reference Manual for details.
1.10.3.1. Defining an Exception Handler: __interrupt Keywords
You can define six types of exception handlers with the function type qualifiers __interrupt_und,
__interrupt_svc, __interrupt_iabt, __interrupt_dabt, __interrupt_irq and
__interrupt_fiq. You can also use the general __interrupt() function qualifier.
Interrupt functions and other exception handlers cannot return anything and must have a void argument
type list:
void __interrupt_xxx
isr( void )
{
...
}
void __interrupt(n)
isr2( void )
{
...
}
25
TASKING VX-toolset for ARM User Guide
Example
void __interrupt_irq serial_receive( void )
{
...
}
Vector symbols
When you use one or more of these __interrupt_xxx function qualifiers, the compiler generates a
corresponding vector symbol to designate the start of an exception handler function. The linker uses this
symbol to automatically generate the exception vector.
Function type qualifier
Vector symbol
Vector symbol M-profile
__interrupt_und
_vector_1
-
__interrupt_svc
_vector_2
_vector_11
__interrupt_iabt
_vector_3
-
__interrupt_dabt
_vector_4
-
__interrupt_irq
_vector_6
-
__interrupt_fiq
_vector_7
-
__interrupt(n)
_vector_n
_vector_n
Note that the reset handler is designated by the symbol _START instead of _vector_0 (_vector_1 for
M-profile architectures).
You can prevent the compiler from generating the _vector_n symbol by specifying the function qualifier
__novector. This can be necessary if you have more than one interrupt handler for the same exception,
for example for different IRQ's or for different run-time phases of your application. Without the __novector
function qualifier the compiler generates the _vector_n symbol multiple times, which results in a link
error.
void __interrupt_irq __novector another_handler( void )
{
... // used __novector to prevent multiple _vector_6 symbols
}
Enable interrupts in exception handlers (not for M-profile architectures)
Normally interrupts are disabled when an exception handler is entered. With the function qualifier
__nesting_enabled you can force that the link register (LR) is saved and that interrupts are enabled.
For example:
void __interrupt_svc __nesting_enabled svc( int n )
{
if ( n == 2 )
{
__svc(3);
}
26
C Language
...
}
1.10.3.2. Interrupt Frame: __frame()
With the function type qualifier __frame() you can specify which registers and SFRs must be saved for
a particular interrupt function. Only the specified registers will be pushed and popped from the stack. If
you do not specify the function qualifier __frame(), the C compiler determines which registers must be
pushed and popped. The syntax is:
void __interrupt_xxx
__frame(reg[, reg]...) isr( void )
{
...
}
where, reg can be any register defined as an SFR. The compiler generates a warning if some registers
are missing which are normally required to be pushed and popped in an interrupt function prolog and
epilog to avoid run-time problems.
Example
__interrupt_irq __frame(R4,R5,R6) void alarm( void )
{
...
}
1.10.4. Intrinsic Functions
Some specific assembly instructions have no equivalence in C. Intrinsic functions give the possibility to
use these instructions. Intrinsic functions are predefined functions that are recognized by the compiler.
The compiler generates the most efficient assembly code for these functions.
The compiler always inlines the corresponding assembly instructions in the assembly source (rather than
calling it as a function). This avoids parameter passing and register saving instructions which are normally
necessary during function calls.
Intrinsic functions produce very efficient assembly code. Though it is possible to inline assembly code by
hand, intrinsic functions use registers even more efficiently. At the same time your C source remains very
readable.
You can use intrinsic functions in C as if they were ordinary C (library) functions. All intrinsics begin with
a double underscore character (__).
The TASKING ARM C compiler recognizes the following intrinsic functions:
__alloc
void * volatile __alloc( __size_t size );
27
TASKING VX-toolset for ARM User Guide
Allocate memory. Returns a pointer to space of size bytes on the stack of the calling function. Memory
allocated through this function is freed when the calling function returns. This function is used internally
for variable length arrays, it is not to be used by end users.
__free
void volatile __free( void * p );
Deallocate the memory pointed to by p. p must point to memory earlier allocated by a call to __alloc().
__nop
void __nop( void );
Generate a NOP instruction.
__get_return_address
__codeptr volatile __get_return_address( void );
Used by the compiler for profiling when you compile with the option --profile. Returns the return address
of a function.
__remap_pc
void volatile __remap_pc( void );
Load the 'real' program address. This intrinsic is used in the startup code to assure that the reset handler
is immune for any ROM/RAM remapping.
__setsp
void volatile __setsp( __data void * stack );
Initialize the stack pointer with 'stack'.
__getspsr
unsigned int volatile __getspsr( void );
Get the value of the SPSR status register. Returns the value of the status register SPSR.
__setspsr
unsigned int volatile __setspsr( int set, int clear);
Set or clear bits in the SPSR status register. Returns the new value of the SPSR status register.
Example:
#define SR_F 0x00000040
#define SR_I 0x00000080
28
C Language
i = __setspsr (0, SR_F | SR_I);
if (i & (SR_F | SR_I))
{
exit (6);
/* Interrupt flags not correct */
}
if (__getspsr () & (SR_F | SR_I))
{
exit (7);
/* Interrupt flags not correct */
}
__getcpsr
unsigned int volatile __getcpsr( void );
Get the value of the CPSR status register. Returns the value of the status register CPSR.
__setcpsr
unsigned int volatile __setcpsr( int set, int clear);
Set or clear bits in the CPSR status register. Returns the new value of the CPSR status register.
__getapsr
unsigned int volatile __getapsr( void );
Get the value of the APSR status register (ARMv6-M and ARMv7-M). Returns the value of the status
register APSR.
__setapsr
unsigned int volatile __setapsr( int set, int clear);
Set or clear bits in the APSR status register (ARMv6-M and ARMv7-M). Returns the new value of the
APSR status register.
__getipsr
unsigned int volatile __getipsr( void );
Get the value of the IPSR status register (ARMv6-M and ARMv7-M). Returns the value of the status
register IPSR.
__svc
void volatile __svc(int number);
Generate a supervisor call (software interrupt). Number must be a constant value.
29
TASKING VX-toolset for ARM User Guide
CMSIS intrinsics
The TASKING VX-toolset for ARM supports the Cortex Micro-controller Software Interface Standard
(CMSIS). You can find details about this standard on www.onarm.com.
The required functions as defined in the CMSIS are supported by the compiler as intrinsic functions and
do not have any implementation in the CMSIS header files core_cm0.h and core_cm3.h. The
implemented intrinsic functions are:
__enable_irq
void volatile __enable_irq( void );
Global Interrupt enable (using the instruction CPSIE i).
__disable_irq
void volatile __disable_irq( void );
Global Interrupt disable (using the instruction CPSID i).
__set_PRIMASK
void volatile __set_PRIMASK( unsigned int value );
Assign value to Priority Mask Register (using the instruction MSR).
__get_PRIMASK
unsigned int __get_PRIMASK( void );
Return Priority Mask Register (using the instruction MRS).
__enable_fault_irq
void volatile __enable_fault_irq( void );
Global Fault exception and Interrupt enable (using the instruction CPSIE f).
__disable_fault_irq
void volatile __disable_fault_irq( void );
Global Fault exception and Interrupt disable (using the instruction CPSID f).
__set_FAULTMASK
void volatile __set_FAULTMASK( unsigned int value );
Assign value to Fault Mask Register (using the instruction MSR).
30
C Language
__get_FAULTMASK
unsigned int __get_FAULTMASK( void );
Return Fault Mask Register (using the instruction MRS).
__set_BASEPRI
void volatile __set_BASEPRI( unsigned int value );
Set Base Priority (using the instruction MSR).
__get_BASEPRI
unsigned int __get_BASEPRI( void );
Return Base Priority (using the instruction MRS).
__set_CONTROL
void volatile __set_CONTROL( unsigned int value );
Set CONTROL register value (using the instruction MSR).
__get_CONTROL
unsigned int __get_CONTROL( void );
Return Control Register Value (using the instruction MRS).
__set_PSP
void volatile __set_PSP( unsigned int value );
Set Process Stack Pointer value (using the instruction MSR).
__get_PSP
unsigned int __get_PSP( void );
Return Process Stack Pointer (using the instruction MRS).
__set_MSP
void volatile __set_MSP( unsigned int value );
Set Main Stack Pointer (using the instruction MSR).
__get_MSP
unsigned int __get_MSP( void );
31
TASKING VX-toolset for ARM User Guide
Return Main Stack Pointer (using the instruction MRS).
__WFI
void volatile __WFI( void );
Wait for Interrupt.
__WFE
void volatile __WFE( void );
Wait for Event.
__SEV
void volatile __SEV( void );
Set Event.
__ISB
void volatile __ISB( void );
Instruction Synchronization Barrier.
__DSB
void volatile __DSB( void );
Data Synchronization Barrier.
__DMB
void volatile __DMB( void );
Data Memory Barrier.
__REV
unsigned int __REV( unsigned int value );
Reverse byte order in integer value.
__REV16
unsigned int __REV16( unsigned short value );
Reverse byte order in unsigned short value.
32
C Language
__REVSH
signed int __REVSH( signed int value );
Reverse byte order in signed short value with sign extension to integer.
__RBIT
unsigned int __RBIT( unsigned int value );
Reverse bit order of value.
__LDREXB
unsigned volatile char __LDREXB( unsigned char * addr );
Load exclusive byte.
__LDREXH
unsigned volatile short __LDREXH( unsigned short * addr );
Load exclusive half-word.
__LDREXW
unsigned int volatile __LDREXW( unsigned int * addr );
Load exclusive word.
__STREXB
unsigned int volatile __STREXB( unsigned char value, unsigned char * addr );
Store exclusive byte.
__STREXH
unsigned int volatile __STREXH( unsigned short value, unsigned short * addr );
Store exclusive half-word.
__STREXW
unsigned int volatile __STREXW( unsigned int value, unsigned int * addr );
Store exclusive word.
__CLREX
void volatile __CLREX( void );
33
TASKING VX-toolset for ARM User Guide
Remove the exclusive lock created by __LDREXB, __LDREXH, or __LDREXW.
1.10.4.1. Writing Your Own Intrinsic Function
Because you can use any assembly instruction with the __asm() keyword, you can use the __asm()
keyword to create your own intrinsic functions. The essence of an intrinsic function is that it is inlined.
1.
First write a function with assembly in the body using the keyword __asm(). See Section 1.5, Using
Assembly in the C Source: __asm()
2.
Next make sure that the function is inlined rather than being called. You can do this with the function
qualifier inline. This qualifier is discussed in more detail in Section 1.10.2, Inlining Functions: inline.
inline int __my_pow( int base, int power )
{
int result;
__asm( "mov
%0,%1\n"
"1:\n\t"
"subs %2,%2,#1\n\t"
"mulne %0,%0,%1\n\t"
"bne
1p\n\t", %2"
: "=&r"(result)
: "r"(base), "r"(power) );
return result;
}
void main(void)
{
int result;
// call to function __my_pow
result = __my_pow(3,2);
}
Generated assembly code:
main:
.type func
; __my_pow code is inlined here
mov
r0,#2
mov
r1,#3
mov
r2,r1
1:
subs r0,r0,#1
mulne r2,r2,r1
bne
1p
As you can see, the generated assembly code for the function __my_pow is inlined rather than called.
Numeric labels are used for the loop.
34
Chapter 2. C++ Language
The TASKING C++ compiler (cparm) offers a new approach to high-level language programming for your
ARM architecture. The C++ compiler accepts the C++ language as defined by the ISO/IEC 14882:2003
standard. It also accepts the language extensions of the C compiler (see Chapter 1, C Language).
This chapter describes the C++ language implementation and some specific features.
Note that the C++ language itself is not described in this document. For more information on the C++
language, see
• The C++ Programming Language (second edition) by Bjarne Straustrup (1991, Addison Wesley)
• ISO/IEC 14882:1998 C++ standard [ANSI] More information on the standards can be found at
http://www.ansi.org/
2.1. C++ Language Extension Keywords
The C++ compiler supports the same language extension keywords as the C compiler. When option
--strict is used, the extensions will be disabled.
pragmas
The C++ compiler supports the pragmas as explained in Section 2.8, Pragmas to Control the C++ Compiler.
Pragmas give directions to the code generator of the compiler.
2.2. C++ Dialect Accepted
The C++ compiler accepts the C++ language as defined by the ISO/IEC 14882:2003 standard.
Command line options are also available to enable and disable anachronisms and strict
standard-conformance checking.
2.2.1. Standard Language Features Accepted
The following features not in traditional C++ (the C++ language of "The Annotated C++ Reference Manual"
by Ellis and Stroustrup (ARM)) but in the standard are implemented:
• The dependent statement of an if, while, do-while, or for is considered to be a scope, and the
restriction on having such a dependent statement be a declaration is removed.
• The expression tested in an if, while, do-while, or for, as the first operand of a "?" operator, or
as an operand of the "&&", ":", or "!"operators may have a pointer-to-member type or a class type that
can be converted to a pointer-to-member type in addition to the scalar cases permitted by the ARM.
• Qualified names are allowed in elaborated type specifiers.
• A global-scope qualifier is allowed in member references of the form x.::A::B and p->::A::B.
35
TASKING VX-toolset for ARM User Guide
• The precedence of the third operand of the "?" operator is changed.
• If control reaches the end of the main() routine, and main() has an integral return type, it is treated
as if a return 0; statement were executed.
• Pointers to arrays with unknown bounds as parameter types are diagnosed as errors.
• A functional-notation cast of the form A() can be used even if A is a class without a (nontrivial)
constructor. The temporary created gets the same default initialization to zero as a static object of the
class type.
• A cast can be used to select one out of a set of overloaded functions when taking the address of a
function.
• Template friend declarations and definitions are permitted in class definitions and class template
definitions.
• Type template parameters are permitted to have default arguments.
• Function templates may have nontype template parameters.
• A reference to const volatile cannot be bound to an rvalue.
• Qualification conversions, such as conversion from T** to T const * const * are allowed.
• Digraphs are recognized.
• Operator keywords (e.g., not, and, bitand, etc.) are recognized.
• Static data member declarations can be used to declare member constants.
• When option --wchar_t-keyword is set, wchar_t is recognized as a keyword and a distinct type.
• bool is recognized.
• RTTI (run-time type identification), including dynamic_cast and the typeid operator, is implemented.
• Declarations in tested conditions (in if, switch, for, and while statements) are supported.
• Array new and delete are implemented.
• New-style casts (static_cast, reinterpret_cast, and const_cast) are implemented.
• Definition of a nested class outside its enclosing class is allowed.
• mutable is accepted on non-static data member declarations.
• Namespaces are implemented, including using declarations and directives. Access declarations are
broadened to match the corresponding using declarations.
• Explicit instantiation of templates is implemented.
• The typename keyword is recognized.
36
C++ Language
• explicit is accepted to declare non-converting constructors.
• The scope of a variable declared in the for-init-statement of a for loop is the scope of the loop
(not the surrounding scope).
• Member templates are implemented.
• The new specialization syntax (using "template <>") is implemented.
• Cv-qualifiers are retained on rvalues (in particular, on function return values).
• The distinction between trivial and nontrivial constructors has been implemented, as has the distinction
between PODs and non-PODs with trivial constructors.
• The linkage specification is treated as part of the function type (affecting function overloading and
implicit conversions).
• extern inline functions are supported, and the default linkage for inline functions is external.
• A typedef name may be used in an explicit destructor call.
• Placement delete is implemented.
• An array allocated via a placement new can be deallocated via delete.
• Covariant return types on overriding virtual functions are supported.
• enum types are considered to be non-integral types.
• Partial specialization of class templates is implemented.
• Partial ordering of function templates is implemented.
• Function declarations that match a function template are regarded as independent functions, not as
"guiding declarations" that are instances of the template.
• It is possible to overload operators using functions that take enum types and no class types.
• Explicit specification of function template arguments is supported.
• Unnamed template parameters are supported.
• The new lookup rules for member references of the form x.A::B and p->A::B are supported.
• The notation :: template (and ->template, etc.) is supported.
• In a reference of the form f()->g(), with g a static member function, f() is evaluated. The ARM
specifies that the left operand is not evaluated in such cases.
• enum types can contain values larger than can be contained in an int.
• Default arguments of function templates and member functions of class templates are instantiated only
when the default argument is used in a call.
37
TASKING VX-toolset for ARM User Guide
• String literals and wide string literals have const type.
• Class name injection is implemented.
• Argument-dependent (Koenig) lookup of function names is implemented.
• Class and function names declared only in unqualified friend declarations are not visible except for
functions found by argument-dependent lookup.
• A void expression can be specified on a return statement in a void function.
• Function-try-blocks, i.e., try-blocks that are the top-level statements of functions, constructors, or
destructors, are implemented.
• Universal character set escapes (e.g., \uabcd) are implemented.
• On a call in which the expression to the left of the opening parenthesis has class type, overload resolution
looks for conversion functions that can convert the class object to pointer-to-function types, and each
such pointed-to "surrogate function" type is evaluated alongside any other candidate functions.
• Dependent name lookup in templates is implemented. Nondependent names are looked up only in the
context of the template definition. Dependent names are also looked up in the instantiation context, via
argument-dependent lookup.
• Value-initialization is implemented. This form of initialization is indicated by an initializer of "()" and
causes zeroing of certain POD-typed members, where the usual default-initialization would leave them
uninitialized.
• A partial specialization of a class member template cannot be added outside of the class definition.
• Qualification conversions may be performed as part of the template argument deduction process.
• The export keyword for templates is implemented.
2.2.2. C++0x Language Features Accepted
The following features added in the working paper for the next C++ standard (expected to be completed
in 2011) are enabled in C++0x mode (with option --c++0x). Several of these features are also enabled
in default (nonstrict) C++ mode.
• A "right shift token" (>>) can be treated as two closing angle brackets. For example:
template<typename T> struct S {};
S<S<int>> s; // OK. No whitespace needed
// between closing angle brackets.
• The static_assert construct is supported. For example:
template<typename T> struct S {
static_assert(sizeof(T) > 1, "Type T too small");
};
38
C++ Language
S<S[2]> s;
S<char> s2;
// OK.
// Instantiation error due to failing static_assert.
• The friend class syntax is extended to allow nonclass types as well as class types expressed through
a typedef or without an elaborated type name. For example:
typedef struct S ST;
class C {
friend S;
//
friend ST;
//
friend int;
//
friend S const; //
//
};
OK (requires S to be in scope).
OK (same as "friend S;").
OK (no effect).
Error: cv-qualifiers cannot
appear directly.
• Mixed string literal concatenations are accepted (a feature carried over from C99):
wchar_t *str = "a" L"b"; // OK, same as L"ab".
• Variadic macros and empty macro arguments are accepted, as in C99.
• In function bodies, the reserved identifier __func__ refers to a predefined array containing a string
representing the function's name (a feature carried over from C99).
• A trailing comma in the definition of an enumeration type is silently accepted (a feature carried over
from C99):
enum E { e, };
• If the command line option --long-long is specified, the type long long is accepted. Unsuffixed integer
literals that cannot be represented by type long, but could potentially be represented by type unsigned
long, have type long long instead (this matches C99, but not the treatment of the long long
extension in C89 or default C++ mode).
• An explicit instantiation directive may be prefixed with the extern keyword to suppress the instantiation
of the specified entity.
• The keyword typename followed by a qualified-id can appear outside a template declaration.
struct S { struct N {}; };
typename S::N *p; // Silently accepted
// in C++0x mode
• The keyword auto can be used as a type specifier in the declaration of a variable or reference. In such
cases, the actual type is deduced from the associated initializer. This feature can be used for variable
declarations, for inclass declarations of static const members, and for new-expressions.
39
TASKING VX-toolset for ARM User Guide
auto x = 3.0;
// Same as "double x = 3.0;"
auto p = new auto(x);
// Same as "double *p = new double(x);"
struct S {
static auto const m = 3; // Same as "static int const m = 3;"
};
• Trailing return types are allowed in top-level function declarators. These must be paired with the auto
type specifier.
auto f()->int*;
// Same as: int *f();
• The keyword decltype is supported: It allows types to be described in terms of expressions. For
example:
template<typename T> struct S {
decltype(f(T())) *p; // A pointer to the return type of f.
};
• The constraints on the code points implied by universal character names (UCNs) are slightly different:
UCNs for surrogate code points (0xD000 through 0xDFFF) are never permitted, and UCN corresponding
to control characters or to characters in the basic source character set are permitted in string literals.
• Scoped enumeration types (defined with the keyword sequence enum class) and explicit underlying
integer types for enumeration types are supported. For example:
enum
enum
enum
void
}
class Primary { red, green, blue };
class Danger { green, yellow, red }; // No conflict on "red".
Code: unsigned char { yes, no, maybe };
f() {
Primary p = Primary::red; // Enum-qualifier is required to access
// scoped enumerator constants.
Code c = Code::maybe; // Enum qualifier is allowed (but not required)
// for unscoped enumeration types.
• Lambdas are supported. For example:
template<class F> int z(F f) { return f(0); }
int g() {
int v = 7;
return z([v](int x)->int { return x+v; });
}
• The C99-style _Pragma operator is supported.
• Rvalue references are supported. For example:
int f(int);
int &&rr = f(3);
40
C++ Language
• Functions can be "deleted". For example:
int f(int) = delete;
short f(short);
int x = f(3);
int y = f((short)3);
// Error: selected function is deleted.
// OK.
• Special member functions can be explicitly "defaulted" (i.e., given a default definition). For example:
struct S { S(S const&) = default; };
struct T { T(T const&); };
T::T(T const&) = default;
• The operand of sizeof, typeid, or decltype can refer directly to a non-static data member of a
class without using a member access expression. For example:
struct S {
int i;
};
decltype(S::i) j = sizeof(S::i);
• The keyword nullptr can be used as both a null pointer constant and a null pointer-to-member
constant. Variables and other expressions whose type is that of the nullptr keyword (conventionally
known by its standard typedef, std::nullptr_t) can also be used as null pointer(-to-member)
constants, although they are only constant expressions if they otherwise would be. For example:
#include <cstddef> // To get std::nullptr_t
struct S { };
template <int *> struct X { };
std::nullptr_t null();
void f() {
void *p = nullptr;
// Initializes p to null pointer
int S::* mp = nullptr; // Initializes mp to null ptr-to-member
p = null();
// Sets p to null pointer
X<nullptr> xnull0;
// Instantiates X with null int * value
X<null()> xnull1;
// Error: template argument not a
// constant expression
}
• Attributes delimited by double square brackets ([[ ... ]]) are accepted in declarations. The standard
attributes align, noreturn, nothrow, final, and carries_dependency are supported. For
example:
[[nothrow]] void f();
• Alias and alias template declarations are supported. For example:
41
TASKING VX-toolset for ARM User Guide
using X = int;
X x; // equivalent to "int x"
template <typename T> using Y = T*;
Y<int> yi; // equivalent to "int* yi"
2.2.3. Anachronisms Accepted
The following anachronisms are accepted when anachronisms are enabled (with --anachronisms):
• overload is allowed in function declarations. It is accepted and ignored.
• Definitions are not required for static data members that can be initialized using default initialization.
The anachronism does not apply to static data members of template classes; they must always be
defined.
• The number of elements in an array may be specified in an array delete operation. The value is
ignored.
• A single operator++() and operator--() function can be used to overload both prefix and postfix
operations.
• The base class name may be omitted in a base class initializer if there is only one immediate base
class.
• Assignment to this in constructors and destructors is allowed. This is allowed only if anachronisms
are enabled and the "assignment to this" configuration parameter is enabled.
• A bound function pointer (a pointer to a member function for a given object) can be cast to a pointer to
a function.
• A nested class name may be used as a non-nested class name provided no other class of that name
has been declared. The anachronism is not applied to template classes.
• A reference to a non-const type may be initialized from a value of a different type. A temporary is
created, it is initialized from the (converted) initial value, and the reference is set to the temporary.
• A reference to a non-const class type may be initialized from an rvalue of the class type or a derived
class thereof. No (additional) temporary is used.
• A function with old-style parameter declarations is allowed and may participate in function overloading
as though it were prototyped. Default argument promotion is not applied to parameter types of such
functions when the check for compatibility is done, so that the following declares the overloading of
two functions named f:
int f(int);
int f(x) char x; { return x; }
Note that in C this code is legal but has a different meaning: a tentative declaration of f is followed by
its definition.
42
C++ Language
• When option --nonconst-ref-anachronism is set, a reference to a non-const class can be bound to a
class rvalue of the same type or a derived type thereof.
struct A {
A(int);
A operator=(A&);
A operator+(const A&);
};
main () {
A b(1);
b = A(1) + A(2); // Allowed as anachronism
}
2.2.4. Extensions Accepted in Normal C++ Mode
The following extensions are accepted in all modes (except when strict ANSI/ISO violations are diagnosed
as errors or were explicitly noted):
• A friend declaration for a class may omit the class keyword:
class A {
friend B; // Should be "friend class B"
};
• Constants of scalar type may be defined within classes:
class A {
const int size = 10;
int a[size];
};
• In the declaration of a class member, a qualified name may be used:
struct A {
int A::f(); // Should be int f();
};
• The restrict keyword is allowed.
• A const qualified object with file scope or namespace scope and the __at() attribute will have external
linkage, unless explicitly declared static. Examples:
const int i = 5;
const int j __at( 0x1234 ) = 10;
static const int k __at( 0x1236 ) = 15;
// internal linkage
// external linkage
// internal linkage
Note that no warning is generated when 'j' is not used.
43
TASKING VX-toolset for ARM User Guide
• Implicit type conversion between a pointer to an extern "C" function and a pointer to an extern
"C++" function is permitted. Here's an example:
extern "C" void
void (*pf)() //
= &f;
//
//
f(); // f's type has extern "C" linkage
pf points to an extern "C++" function
error unless implicit conversion is
allowed
This extension is allowed in environments where C and C++ functions share the same calling
conventions. It is enabled by default.
• A "?" operator whose second and third operands are string literals or wide string literals can be implicitly
converted to "char *" or "wchar_t *". (Recall that in C++ string literals are const. There is a
deprecated implicit conversion that allows conversion of a string literal to "char *", dropping the const.
That conversion, however, applies only to simple string literals. Allowing it for the result of a "?" operation
is an extension.)
char *p = x ? "abc" : "def";
• Default arguments may be specified for function parameters other than those of a top-level function
declaration (e.g., they are accepted on typedef declarations and on pointer-to-function and
pointer-to-member-function declarations).
• Non-static local variables of an enclosing function can be referenced in a non-evaluated expression
(e.g., a sizeof expression) inside a local class. A warning is issued.
• In default C++ mode, the friend class syntax is extended to allow nonclass types as well as class types
expressed through a typedef or without an elaborated type name. For example:
typedef struct S ST;
class C {
friend S;
//
friend ST;
//
friend int;
//
friend S const; //
//
};
OK (requires S to be in scope).
OK (same as "friend S;").
OK (no effect).
Error: cv-qualifiers cannot
appear directly.
• In default C++ mode, mixed string literal concatenations are accepted. (This is a feature carried over
from C99 and also available in GNU modes).
wchar_t *str = "a" L"b"; // OK, same as L"ab".
• In default C++ mode, variadic macros are accepted. (This is a feature carried over from C99 and also
available in GNU modes.)
• In default C++ mode, empty macro arguments are accepted (a feature carried over from C99).
• A trailing comma in the definition of an enumeration type is silently accepted (a feature carried over
from C99):
44
C++ Language
enum E { e, };
2.3. GNU Extensions
The C++ compiler can be configured to support the GNU C++ mode (command line option --g++). In this
mode, many extensions provided by the GNU C++ compiler are accepted. The following extensions are
provided in GNU C++ mode.
• Attributes, introduced by the keyword __attribute__, can be used on declarations of variables,
functions, types, and fields. The alias, aligned, alloc_size, always_inline, artificial,
common, const, constructor, deprecated, destructor, error, externally_visible,
flatten, format, format_arg, gnu_inline, hot, init_priority, malloc, mode,
no_check_memory_usage, no_instrument_function, nocommon, noinline, nonnull,
noreturn, nothrow, packed, pure, section, sentinel, strong, unused, used, volatile,
warn_unused_result, warning, weak, and weakref attributes are supported.
• Extended designators are accepted
• Compound literals are accepted.
• Non-standard anonymous unions are accepted
• The typeof operator is supported. This operator can take an expression or a type (like the sizeof
operator, but parentheses are always required) and expands to the type of the given entity. It can be
used wherever a typedef name is allowed
typeof(2*2.3) d; // Declares a "double"
typeof(int) i;
// Declares an "int"
This can be useful in macro and template definitions.
• The __extension__ keyword is accepted preceding declarations and certain expressions. It has no
effect on the meaning of a program.
__extension__ __inline__ int f(int a) {
return a > 0 ? a/2 : f(__extension__ 1-a);
}
• In all GNU C modes and in GNU C++ modes with gnu_version < 30400, the type modifiers signed,
unsigned, long and short can be used with typedef types if the specifier is valid with the underlying
type of the typedef in ANSI C. E.g.:
typedef int I;
unsigned I *pui; // OK in GNU C++ mode;
// same as "unsigned int *pui"
• If the command line option --long-long is specified, the extensions for the long long and unsigned
long long types are enabled.
45
TASKING VX-toolset for ARM User Guide
• Zero-length array types (specified by [0]) are supported. These are complete types of size zero.
• C99-style flexible array members are accepted. In addition, the last field of a class type have a class
type whose last field is a flexible array member. In GNU C++ mode, flexible array members are treated
exactly like zero-length arrays, and can therefore appear anywhere in the class type.
• The C99 _Pragma operator is supported.
• The gcc built-in <stdarg.h> and <varargs.h> facilities (__builtin_va_list, __builtin_va_arg, ...) are
accepted.
• The sizeof operator is applicable to void and to function types and evaluates to the value one.
• Variables can be redeclared with different top-level cv-qualifiers (the new qualification is merged into
existing qualifiers). For example:
extern int volatile x;
int const x = 32;
// x is now const volatile
• The "assembler name" of variables and routines can be specified. For example:
int counter __asm__("counter_v1") = 0;
• Register variables can be mapped on specific registers using the asm keyword.
register int i asm("eax");
// Map "i" onto register eax.
• The keyword inline is ignored (with a warning) on variable declarations and on block-extern function
declarations.
• Excess aggregate initializers are ignored with a warning.
struct S { int a, b; };
struct S a1 = { 1, 2, 3 };
// "3" ignored with a warning; no error
int a2[2] = { 7, 8, 9 };
// "9" ignored with a warning; no error
• Expressions of types void*, void const*, void volatile* and void const volatile* can
be dereferenced; the result is an lvalue.
• The __restrict__ keyword is accepted. It is identical to the C99 restrict keyword, except for its
spelling.
• Out-of-range floating-point values are accepted without a diagnostic. When IEEE floating-point is being
used, the "infinity" value is used.
• Extended variadic macros are supported.
46
C++ Language
• Dollar signs ($) are allowed in identifiers.
• Hexadecimal floating point constants are recognized.
• The __asm__ keyword is recognized and equivalent to the asm token. Extended syntax is supported
to indicate how assembly operands map to C/C++ variables.
asm("fsinx %1,%0" : "=f"(x) : "f"(a));
// Map the output operand on "x",
// and the input operand on "a".
• The \e escape sequence is recognized and stands for the ASCII "ESC" character.
• The address of a statement label can be taken by use of the prefix "&&" operator, e.g., void *a =
&&L. A transfer to the address of a label can be done by the "goto *" statement, e.g., goto *a.
• Multi-line strings are supported, e.g.,
char *p = "abc
def";
• ASCII "NULL" characters are accepted in source files.
• A source file can end with a backslash ("\") character.
• Case ranges (e.g., "case 'a' ... 'z':") are supported.
• A number of macros are predefined in GNU mode. See Section 2.9, Predefined Macros.
• A predefined macro can be undefined.
• If a directory is specified as both a normal include directory and a system include directory, the normal
directory entry is ignored.
• A large number of special functions of the form __builtin_xyz (e.g., __builtin_alloca) are
predeclared.
• Some expressions are considered to be constant-expressions even though they are not so considered
in standard C and C++. Examples include "((char *)&((struct S *)0)->c[0]) - (char
*)0" and "(int)"Hello" & 0".
• The macro __GNUC__ is predefined to the major version number of the emulated GNU compiler.
Similarly, the macros __GNUC_MINOR__ and __GNUC_PATCHLEVEL__ are predefined to the
corresponding minor version number and patch level. Finally, __VERSION__ is predefined to a string
describing the compiler version.
• The __thread specifier can be used to indicate that a variable should be placed in thread-local storage
(requires gnu_version >= 30400).
• An extern inline function that is referenced but not defined is permitted (with a warning).
47
TASKING VX-toolset for ARM User Guide
• Trigraphs are ignored (with a warning).
• Non-standard casts are allowed in null pointer constants, e.g., (int)(int *)0 is considered a null
pointer constant in spite of the pointer cast in the middle.
• Statement expressions, e.g., ({int j; j = f(); j;)} are accepted. Branches into a statement
expression are not allowed. In C++ mode, branches out are also not allowed. Variable-length arrays,
destructible entities, try, catch, local non-POD class definitions, and dynamically-initialized local static
variables are not allowed inside a statement expression.
• Labels can be declared to be local in statement expressions by introducing them with a __label__
declaration.
({ __label__ lab; int i = 4; lab: i = 2*i-1; if (!(i%17)) goto lab; i; })
• Not-evaluated parts of constant expressions can contain non-constant terms:
int i;
int a[ 1 || i ]; // Accepted in g++ mode
• Casts on an lvalue that don't fall under the usual "lvalue cast" interpretation (e.g., because they cast
to a type having a different size) are ignored, and the operand remains an lvalue. A warning is issued.
int i;
(short)i = 0; // Accepted,cast is ignored; entire int is set
• Variable length arrays (VLAs) are supported. GNU C also allows VLA types for fields of local structures,
which can lead to run-time dependent sizes and offsets. The C++ compiler does not implement this,
but instead treats such arrays as having length zero (with a warning); this enables some popular
programming idioms involving fields with VLA types.
void f(int n) {
struct {
int a[n]; // Warning: n ignored and
// replaced by zero
};
}
• Complex type extensions are supported (these are the same as the C99 complex type features, with
the elimination of _Imaginary and the addition of __complex, __real, __imag, the use of "~" to
denote complex conjugation, and complex literals such as "1.2i").
• If an explicit instantiation directive is preceded by the keyword extern, no (explicit or implicit)
instantiation is for the indicated specialization.
• If an explicit instantiation directive for a class is preceded by the keyword inline, the virtual function
table for the class (if any) will be emitted by the compilation.
48
C++ Language
• An explicit instantiation directive that names a class may omit the class keyword, and may refer to a
typedef.
• An explicit instantiation or extern template directive that names a class is accepted in an invalid
namespace.
• std::type_info does not need to be introduced with a special pragma.
• A special keyword __null expands to the same constant as the literal "0", but is expected to be used
as a null pointer constant.
• When gnu_version < 30400, names from dependent base classes are ignored only if another name
would be found by the lookup.
const int n = 0;
template <class T> struct B {
static const int m = 1; static const int n = 2;
};
template <class T> struct D : B<T> {
int f() { return m + n; }
// B::m + ::n in g++ mode
};
• A non-static data member from a dependent base class, which would usually be ignored as described
above, is found if the lookup would have otherwise found a nonstatic data member of an enclosing
class (when gnu_version is < 30400).
template <class T> struct C {
struct A { int i; };
struct B: public A {
void f() {
i = 0; // g++ uses A::i not C::i
}
};
int i;
};
• A new operation in a template is always treated as dependent (when gnu_version >= 30400).
template <class T > struct A {
void f() {
void *p = 0;
new (&p) int(0); // calls operator new
// declared below
}
};
void* operator new(size_t, void* p);
• When doing name lookup in a base class, the injected class name of a template class is ignored.
49
TASKING VX-toolset for ARM User Guide
namespace N {
template <class T> struct A {};
}
struct A {
int i;
};
struct B : N::A<int> {
B() { A x; x.i = 1; } // g++ uses ::A, not N::A
};
• The injected class name is found in certain contexts in which the constructor should be found instead.
struct A {
A(int) {};
};
A::A a(1);
• In a constructor definition, what should be treated as a template argument list of the constructor is
instead treated as the template argument list of the enclosing class.
template <int u1> struct A { };
template <> struct A<1> {
template<class T> A(T i, int j);
};
template <> A<1>::A<1>(int i, int j) { }
// accepted in g++ mode
• A difference in calling convention is ignored when redeclaring a typedef.
typedef void F();
extern "C" {
typedef void F(); // Accepted in GNU C++ mode
// (error otherwise)
}
• The macro __GNUG__ is defined identically to __GNUC__ (i.e., the major version number of the GNU
compiler version that is being emulated).
• The macro _GNU_SOURCE is defined as "1".
• Guiding declarations (a feature present in early drafts of the standard, but not in the final standard) are
disabled.
• Namespace std is predeclared.
• No connection is made between declarations of identical names in different scopes even when these
names are declared extern "C". E.g.,
50
C++ Language
extern "C" { void f(int); }
namespace N {
extern "C" {
void f() {} // Warning (not error) in g++ mode
}
}
int main() { f(1); }
This example is accepted by the C++ compiler, but it will emit two conflicting declarations for the function
f.
• When a using-directive lookup encounters more than one extern "C" declaration (created when
more than one namespace declares an extern "C" function of a given name, as described above),
only the first declaration encountered is considered for the lookup.
extern "C" int f(void);
extern "C" int g(void);
namespace N {
extern "C" int f(void); // same type
extern "C" void g(void); // different type
};
using namespace N;
int i = f(); // calls ::f
int j = g(); // calls ::f
• The definition of a member of a class template that appears outside of the class definition may declare
a nontype template parameter with a type that is different than the type used in the definition of the
class template. A warning is issued (GNU version 30300 and below).
template <int I> struct A { void f(); };
template <unsigned int I> void A<I>::f(){}
• The definition of a member of a nested class of a class template that appears outside of the class
definition may use an incorrect template argument list. A warning is issued.
template <class T, class V> struct Outer {
struct Inner {
void f();
};
};
template <class T, class V> void Outer<T, int>::Inner::f() { }
^ should be V
• A class template may be redeclared with a nontype template parameter that has a type that is different
than the type used in the earlier declaration. A warning is issued.
template <int I> class A;
template <unsigned int I> class A {};
51
TASKING VX-toolset for ARM User Guide
• A friend declaration may refer to a member typedef.
class A {
class B {};
typedef B my_b;
friend class my_b;
};
• When a friend class is declared with an unqualified name, the lookup of that name is not restricted to
the nearest enclosing namespace scope.
struct S;
namespace N {
class C {
friend struct S; // ::S in g++ mode,
// N::S in default mode
};
}
• A friend class declaration can refer to names made visible by using-directives.
namespace N { struct A { }; }
using namespace N;
struct B {
void f() { A a; }
friend struct A; // in g++ mode N::A,
};
// not a new declaration of ::A
• Friend injection is enabled if gnu_version is < 40100 and disabled otherwise.
class X {
friend
friend
};
int main()
Y* y;
f(0);
}
void f(X*);
class Y;
{
// Y not declared without friend injection
// f not declared without friend injection
• When friend names are not injected, they can still be used in qualified declarator names when
gnu_version < 40300.
namespace N {
class A {
friend int f();
};
}
int N::f() { return 0; } // OK when gnu_version < 40300
52
C++ Language
• An inherited type name can be used in a class definition and later redeclared as a typedef.
struct A { typedef int I; };
struct B : A {
typedef I J;
// Refers to A::I
typedef double I; // Accepted in g++ mode
};
// (introduces B::I)
• In a catch clause, an entity may be declared with the same name as the handler parameter.
try { }
catch(int e) {
char e;
}
• The diagnostic issued for an exception specification mismatch is reduced to a warning if the previous
declaration was found in a system header.
• The exception specification for an explicit template specialization (for a function or member function)
does not have to match the exception specification of the corresponding primary template.
• A template argument list may appear following a constructor name in constructor definition that appears
outside of the class definition:
template <class T> struct A {
A();
};
template <class T> A<T>::A<T>(){}
• When gnu_version < 30400, an incomplete type can be used as the type of a nonstatic data member
of a class template.
class B;
template <class T> struct A {
B b;
};
• A constructor need not provide an initializer for every nonstatic const data member (but a warning is
still issued if such an initializer is missing).
struct S {
int const ic;
S() {}
// Warning only in GNU C++ mode
// (error otherwise).
};
• Exception specifications are ignored on function definitions when support for exception handling is
disabled (normally, they are only ignored on function declarations that are not definitions).
53
TASKING VX-toolset for ARM User Guide
• A friend declaration in a class template may refer to an undeclared template.
template <class T> struct A {
friend void f<>(A<T>);
};
• A friend class template declaration in which the template parameter list does not match the original
declaration is accepted if the class template name is specified as a qualified name.
namespace N {
template <typename T, typename U> struct A { };
}
struct B {
template<typename T> friend struct N::A;
};
• When gnu_version is < 30400, the semantic analysis of a friend function defined in a class template is
performed only if the function is actually used and is done at the end of the translation unit (instead of
at the point of first use).
• A function template default argument may be redeclared. A warning is issued and the default from the
initial declaration is used.
template<class T> void f(int i = 1);
template<class T> void f(int i = 2){}
int main() {
f<void>();
}
• A definition of a member function of a class template that appears outside of the class may specify a
default argument.
template <class T> struct A { void f(T); };
template <class T> void A<T>::f(T value = T() ) { }
• Function declarations (that are not definitions) can have duplicate parameter names.
void f(int i, int i); // Accepted in GNU C++ mode
• Default arguments are retained as part of deduced function types.
• A namespace member may be redeclared outside of its namespace.
• A template may be redeclared outside of its class or namespace.
namespace N {
template< typename T > struct S {};
54
C++ Language
}
template< typename T > struct N::S;
• The injected class name of a class template can be used as a template argument.
template <template <class> class T> struct A {};
template <class T> struct B {
A<B> a;
};
• A partial specialization may be declared after an instantiation has been done that would have used the
partial specialization if it had been declared earlier. A warning is issued.
template <class T> class X {};
X<int*> xi;
template <class T> class X<T*> {};
• A static data member may be explicitly specialized after it has been used. A warning is issued.
template <class T> struct A {
static int i;
};
int j = A<int>::i;
template <> int A<int>::i = 1;
• The "." or "->" operator may be used in an integral constant expression if the result is an integral or
enumeration constant:
struct A { enum { e1 = 1 }; };
int main () {
A a;
int x[a.e1]; // Accepted in GNU C++ mode
return 0;
}
• Strong using-directives are supported.
using namespace debug __attribute__((strong));
• Partial specializations that are unusable because of nondeductible template parameters are accepted
and ignored.
template<class T> struct A {class C { };};
template<class T> struct B {enum {e = 1}; };
template <class T> struct B<typename A<T>::C> {enum {e = 2}; };
int main(int argc, char **argv) {
printf("%d\n", B<int>::e);
55
TASKING VX-toolset for ARM User Guide
printf("%d\n", B<A<int>::C>::e);
}
• An incorrect number of template <> clauses is allowed on a full specialization (i.e., one with no
remaining template parameters). A warning is issued.
template <class T> struct A {
template <class U> struct B { };
};
template <> struct A<int> {
template <class U> struct B { };
};
template <> template <> struct A<int>::B<double> { };
• An incorrect number of template <> clauses is allowed on a friend class template declaration. A
warning is issued.
template <typename T> struct A {
template <typename U> class B {
template <typename V> friend class B;
};
};
• Template parameters that are not used in the signature of a function template are not ignored for partial
ordering purposes (i.e., the resolution of core language issue 214 is not implemented) when gnu_version
is < 40100.
template <class S, class T> void f(T t);
template <class T> void f(T t);
int main() {
f<int>(3); // not ambiguous when gnu_version
// is < 40100
}
• Prototype instantiations of functions are deferred until the first actual instantiation of the function to
allow the compilation of programs that contain definitions of unusable function templates (gnu_version
30400 and above). The example below is accepted when prototype instantiations are deferred.
class A {};
template <class T> struct B {
B () {}; // error: no initializer for
// reference member "B<T>::a"
A& a;
};
56
C++ Language
• When doing nonclass prototype instantiations (e.g., gnu_version 30400 and above), the severity of the
diagnostic issued if a const template static data member is defined without an initializer is reduced to
a warning.
template <class T> struct A {
static const int i;
};
template <class T> const int A<T>::i;
• When doing nonclass prototype instantiations (e.g., gnu_version 30400 and above), a template static
data member with an invalid aggregate initializer is accepted (the error is diagnosed if the static data
member is instantiated).
struct A {
A(double val);
};
template <class T> struct B {
static const A I[1];
};
template <class T> const A B<T>::I[1]= {
{1.,0.,0.,0.}
};
• A storage class may appear in a declaration that also has a “direct” linkage specification. For example,
extern "C" static void f();
is treated as equivalent to
extern "C" { static void f(); }
• A storage class (static or extern) is accepted on an explicit function template specialization.
• The storage class specifier extern is accepted on definitions of static data members.
• The lookup of a name that precedes a “::” ignores enum types and nonclass typedefs (gnu_version
30400 and above).
namespace N {
const int a = 42;
enum N { e };
int i = N::a; // refers to namespace N in g++ mode
}
namespace M {
const int a = 42;
typedef int M;
int i = M::a; // refers to namespace M in g++ mode
}
57
TASKING VX-toolset for ARM User Guide
• A call of a dependent function template without the use of the template keyword is accepted if a
normal lookup in the scope of the reference finds a function template or an overload set containing a
function template (even though that function template will not end up being the one that is actually
called).
template <typename T> struct A
template <typename U> void
};
template <typename T> struct B
template <typename U> void
void f(){}
A<T> a;
void g(T t) {
a.f<T>(t); // accepted
// m_impl.f
}
};
{
f(U);
{
f(U);
in g++ mode - should be written as:
template <T>(t)
• The template keyword may be omitted in a dependent member class template reference when the
template argument list matches the implied template argument list of the prototype instantiation. In the
example below, in the reference to A<T>::B<...> the template parameter T has the same coordinates
(position and nesting depth) as the T of the prototype instantiation of A, so the template keyword can
be omitted.
template <class T> struct A {
template <class T2> struct B {};
};
template <class T, class U> struct C {
A<T>::B<T> ab1; // g++ accepts
A<T>::B<U> ab2; // g++ accepts
A<U>::B<T> ab3; // g++ gives error
typename A<U>::template B<T> ab4; // correct syntax
};
• Partial ordering in non-call contexts does not include the return type in the partial ordering process.
template <class T> T f(const T* p);
template <class T> int f(T* p);
// ambiguous specialization, but accepted in g++ mode
template <> int f(const int*){return 0;}
• A pointer to function is considered to be compatible with a reference to function for partial ordering
purposes (gnu_version 40100 and above).
template <typename T> void f(T** p, void (*)()); // #1
template <typename T> void f(T* p, void (&)()); // #2
void x(){}
void g(int** p) {
58
C++ Language
f(p, x); // calls #1
}
• A static_cast in which the operand is a pointer to a base class that is neither const- nor
volatile-qualified and the target type is a pointer to a const- and/or volatile-qualified derived class drops
the qualification from the result type when gnu_version is 30400 or higher.
struct B { };
struct D: B { };
D *f(B *p) {
return static_cast<const D *>(p);
// accepted in g++ mode with
// gnu_version >= 30400
}
The following GNU extensions are not currently supported:
• The forward declaration of function parameters (so they can participate in variable-length array
parameters).
• GNU-style complex integral types (complex floating-point types are supported)
• Nested functions
• Local structs with variable-length array fields.
2.4. Namespace Support
Namespaces are enabled by default. You can use the command line option --no-namespaces to disable
the features.
When doing name lookup in a template instantiation, some names must be found in the context of the
template definition while others may also be found in the context of the template instantiation. The C++
compiler implements two different instantiation lookup algorithms: the one mandated by the standard
(referred to as "dependent name lookup"), and the one that existed before dependent name lookup was
implemented.
Dependent name lookup is done in strict mode (unless explicitly disabled by another command line option)
or when dependent name processing is enabled by either a configuration flag or command line option.
Dependent Name Processing
When doing dependent name lookup, the C++ compiler implements the instantiation name lookup rules
specified in the standard. This processing requires that non-class prototype instantiations be done. This
in turn requires that the code be written using the typename and template keywords as required by
the standard.
59
TASKING VX-toolset for ARM User Guide
Lookup Using the Referencing Context
When not using dependent name lookup, the C++ compiler uses a name lookup algorithm that
approximates the two-phase lookup rule of the standard, but does so in such a way that is more compatible
with existing code and existing compilers.
When a name is looked up as part of a template instantiation but is not found in the local context of the
instantiation, it is looked up in a synthesized instantiation context that includes both names from the
context of the template definition and names from the context of the instantiation. Here's an example:
namespace N {
int g(int);
int x = 0;
template <class T> struct A {
T f(T t) { return g(t); }
T f() { return x; }
};
}
namespace M {
int x = 99;
double g(double);
N::A<int> ai;
int i = ai.f(0);
//
//
//
//
N::A<int>::f(int) calls
N::g(int)
N::A<int>::f() returns
0 (= N::x)
N::A<double> ad;
double d = ad.f(0); //
//
double d2 = ad.f(); //
//
N::A<double>::f(double)
calls M::g(double)
N::A<double>::f() also
returns 0 (= N::x)
int i2 = ai.f();
}
The lookup of names in template instantiations does not conform to the rules in the standard in the
following respects:
• Although only names from the template definition context are considered for names that are not functions,
the lookup is not limited to those names visible at the point at which the template was defined.
• Functions from the context in which the template was referenced are considered for all function calls
in the template. Functions from the referencing context should only be visible for "dependent" function
calls.
Argument Dependent Lookup
When argument-dependent lookup is enabled (this is the default), functions made visible using
argument-dependent lookup overload with those made visible by normal lookup. The standard requires
that this overloading occurs even when the name found by normal lookup is a block extern declaration.
The C++ compiler does this overloading, but in default mode, argument-dependent lookup is suppressed
when the normal lookup finds a block extern.
60
C++ Language
This means a program can have different behavior, depending on whether it is compiled with or without
argument-dependent lookup --no-arg-dep-lookup, even if the program makes no use of namespaces.
For example:
struct A { };
A operator+(A, double);
void f() {
A a1;
A operator+(A, int);
a1 + 1.0; // calls operator+(A, double)
// with arg-dependent lookup enabled but
// otherwise calls operator+(A, int);
}
2.5. Template Instantiation
The C++ language includes the concept of templates. A template is a description of a class or function
1
that is a model for a family of related classes or functions. For example, one can write a template for a
Stack class, and then use a stack of integers, a stack of floats, and a stack of some user-defined type.
In the source, these might be written Stack<int>, Stack<float>, and Stack<X>. From a single
source description of the template for a stack, the compiler can create instantiations of the template for
each of the types required.
The instantiation of a class template is always done as soon as it is needed in a compilation. However,
the instantiations of template functions, member functions of template classes, and static data members
of template classes (hereafter referred to as template entities) are not necessarily done immediately, for
several reasons:
• One would like to end up with only one copy of each instantiated entity across all the object files that
make up a program. (This of course applies to entities with external linkage.)
• The language allows one to write a specialization of a template entity, i.e., a specific version to be used
in place of a version generated from the template for a specific data type. (One could, for example,
write a version of Stack<int>, or of just Stack<int>::push, that replaces the template-generated
version; often, such a specialization provides a more efficient representation for a particular data type.)
Since the compiler cannot know, when compiling a reference to a template entity, if a specialization for
that entity will be provided in another compilation, it cannot do the instantiation automatically in any
source file that references it.
• C++ templates can be exported (i.e., declared with the keyword export). Such templates can be used
in a translation unit that does not contain the definition of the template to instantiate. The instantiation
of such a template must be delayed until the template definition has been found.
• The language also dictates that template functions that are not referenced should not be compiled,
that, in fact, such functions might contain semantic errors that would prevent them from being compiled.
Therefore, a reference to a template class should not automatically instantiate all the member functions
of that class.
1
Since templates are descriptions of entities (typically, classes) that are parameterizable according to the types they operate upon,
they are sometimes called parameterized types.
61
TASKING VX-toolset for ARM User Guide
(It should be noted that certain template entities are always instantiated when used, e.g., inline functions.)
From these requirements, one can see that if the compiler is responsible for doing all the instantiations
automatically, it can only do so on a program-wide basis. That is, the compiler cannot make decisions
about instantiation of template entities until it has seen all the source files that make up a complete
program.
This C++ compiler provides an instantiation mechanism that does automatic instantiation at link time. For
cases where you want more explicit control over instantiation, the C++ compiler also provides instantiation
modes and instantiation pragmas, which can be used to exert fine-grained control over the instantiation
process.
2.5.1. Automatic Instantiation
The goal of an automatic instantiation mode is to provide painless instantiation. You should be able to
compile source files to object code, then link them and run the resulting program, and never have to worry
about how the necessary instantiations get done.
In practice, this is hard for a compiler to do, and different compilers use different automatic instantiation
schemes with different strengths and weaknesses:
• AT&T/USL/Novell's cfront product saves information about each file it compiles in a special directory
called ptrepository. It instantiates nothing during normal compilations. At link time, it looks for
entities that are referenced but not defined, and whose mangled names indicate that they are template
entities. For each such entity, it consults the ptrepository information to find the file containing the
source for the entity, and it does a compilation of the source to generate an object file containing object
code for that entity. This object code for instantiated objects is then combined with the "normal" object
code in the link step.
If you are using cfront you must follow a particular coding convention: all templates must be declared
in .h files, and for each such file there must be a corresponding .cc file containing the associated
definitions. The compiler is never told about the .cc files explicitly; one does not, for example, compile
them in the normal way. The link step looks for them when and if it needs them, and does so by taking
2
the .h filename and replacing its suffix.
This scheme has the disadvantage that it does a separate compilation for each instantiated function
(or, at best, one compilation for all the member functions of one class). Even though the function itself
is often quite small, it must be compiled along with the declarations for the types on which the instantiation
is based, and those declarations can easily run into many thousands of lines. For large systems, these
compilations can take a very long time. The link step tries to be smart about recompiling instantiations
only when necessary, but because it keeps no fine-grained dependency information, it is often forced
to "recompile the world" for a minor change in a .h file. In addition, cfront has no way of ensuring that
preprocessing symbols are set correctly when it does these instantiation compilations, if preprocessing
symbols are set other than on the command line.
• Borland's C++ compiler instantiates everything referenced in a compilation, then uses a special linker
to remove duplicate definitions of instantiated functions.
2
The actual implementation allows for several different suffixes and provides a command line option to change the suffixes sought.
62
C++ Language
If you are using Borland's compiler you must make sure that every compilation sees all the source code
it needs to instantiate all the template entities referenced in that compilation. That is, one cannot refer
to a template entity in a source file if a definition for that entity is not included by that source file. In
practice, this means that either all the definition code is put directly in the .h files, or that each .h file
includes an associated .cc (actually, .cpp) file.
Our approach is a little different. It requires that, for each instantiation of a non-exported template, there
is some (normal, top-level, explicitly-compiled) source file that contains the definition of the template
entity, a reference that causes the instantiation, and the declarations of any types required for the
3
instantiation. This requirement can be met in various ways:
• The Borland convention: each .h file that declares a template entity also contains either the definition
of the entity or includes another file containing the definition.
• Implicit inclusion: when the compiler sees a template declaration in a .h file and discovers a need to
instantiate that entity, it is given permission to go off looking for an associated definition file having the
same base name and a different suffix, and it implicitly includes that file at the end of the compilation.
This method allows most programs written using the cfront convention to be compiled with our approach.
See Section 2.5.4, Implicit Inclusion.
• The ad hoc approach: you make sure that the files that define template entities also have the definitions
of all the available types, and add code or pragmas in those files to request instantiation of the entities
there.
Exported templates are also supported by our automatic instantiation method, but they require additional
mechanisms explained further on.
The automatic instantiation mode is enabled by default. It can be turned off by the command line option
--no-auto-instantiation. If automatic instantiation is turned off, the extra information about template
entities that could be instantiated in a file is not put into the object file.
2.5.2. Instantiation Modes
Normally, when a file is compiled, template entities are instantiated everywhere where they are used.
The overall instantiation mode can, however, be changed by a command line option:
--instantiate=used
Instantiate those template entities that were used in the compilation. This will include all static data
members for which there are template definitions. This is the default.
--instantiate=all
Instantiate all template entities declared or referenced in the compilation unit. For each fully instantiated
template class, all of its member functions and static data members will be instantiated whether or not
they were used. Non-member template functions will be instantiated even if the only reference was a
declaration.
3
Isn't this always the case? No. Suppose that file A contains a definition of class X and a reference to Stack<X>::push, and that
file B contains the definition for the member function push. There would be no file containing both the definition of push and the
definition of X.
63
TASKING VX-toolset for ARM User Guide
--instantiate=local
Similar to --instantiate=used except that the functions are given internal linkage. This is intended to
provide a very simple mechanism for those getting started with templates. The compiler will instantiate
the functions that are used in each compilation unit as local functions, and the program will link and run
correctly (barring problems due to multiple copies of local static variables.) However, one may end up
with many copies of the instantiated functions, so this is not suitable for production use. --instantiate=local
cannot be used in conjunction with automatic template instantiation. If automatic instantiation is enabled
by default, it will be disabled by the --instantiate=local option.
In the case where the ccarm command is given a single file to compile and link, e.g.,
ccarm test.cc
the compiler knows that all instantiations will have to be done in the single source file. Therefore, it uses
the --instantiate=used mode and suppresses automatic instantiation.
2.5.3. Instantiation #pragma Directives
Instantiation pragmas can be used to control the instantiation of specific template entities or sets of
template entities. There are three instantiation pragmas:
• The instantiate pragma causes a specified entity to be instantiated.
• The do_not_instantiate pragma suppresses the instantiation of a specified entity. It is typically used
to suppress the instantiation of an entity for which a specific definition will be supplied.
• The can_instantiate pragma indicates that a specified entity can be instantiated in the current
compilation, but need not be; it is used in conjunction with automatic instantiation, to indicate potential
sites for instantiation if the template entity turns out to be required.
The argument to the instantiation pragma may be:
• a template class name A<int>
• a template class declaration class A<int>
• a member function name A<int>::f
• a static data member name A<int>::i
• a static data declaration int A<int>::i
• a member function declaration void A<int>::f(int,char)
• a template function declaration char* f(int, float)
A pragma in which the argument is a template class name (e.g., A<int> or class A<int>) is equivalent
to repeating the pragma for each member function and static data member declared in the class. When
instantiating an entire class a given member function or static data member may be excluded using the
do_not_instantiate pragma. For example,
64
C++ Language
#pragma instantiate A<int>
#pragma do_not_instantiate A<int>::f
The template definition of a template entity must be present in the compilation for an instantiation to occur.
If an instantiation is explicitly requested by use of the instantiate pragma and no template definition is
available or a specific definition is provided, an error is issued.
template <class T> void f1(T);
template <class T> void g1(T);
// No body provided
// No body provided
void f1(int) {} // Specific definition
void main()
{
int i;
double d;
f1(i);
f1(d);
g1(i);
g1(d);
}
#pragma instantiate void f1(int) //
//
#pragma instantiate void g1(int) //
//
error - specific
definition
error - no body
provided
f1(double) and g1(double) will not be instantiated (because no bodies were supplied) but no errors
will be produced during the compilation (if no bodies are supplied at link time, a linker error will be
produced).
A member function name (e.g., A<int>::f) can only be used as a pragma argument if it refers to a
single user defined member function (i.e., not an overloaded function). Compiler-generated functions are
not considered, so a name may refer to a user defined constructor even if a compiler-generated copy
constructor of the same name exists. Overloaded member functions can be instantiated by providing the
complete member function declaration, as in
#pragma instantiate char* A<int>::f(int, char*)
The argument to an instantiation pragma may not be a compiler-generated function, an inline function,
or a pure virtual function.
2.5.4. Implicit Inclusion
When implicit inclusion is enabled, the C++ compiler is given permission to assume that if it needs a
definition to instantiate a template entity declared in a .h file it can implicitly include the corresponding
.cc file to get the source code for the definition. For example, if a template entity ABC::f is declared in
file xyz.h, and an instantiation of ABC::f is required in a compilation but no definition of ABC::f appears
in the source code processed by the compilation, the compiler will look to see if a file xyz.cc exists, and
if so it will process it as if it were included at the end of the main source file.
65
TASKING VX-toolset for ARM User Guide
To find the template definition file for a given template entity the C++ compiler needs to know the path
name specified in the original include of the file in which the template was declared and whether the file
was included using the system include syntax (e.g., #include <file.h>). This information is not
available for preprocessed source containing #line directives. Consequently, the C++ compiler will not
attempt implicit inclusion for source code containing #line directives.
The file to be implicitly included is found by replacing the file suffix with each of the suffixes specified in
the instantiation file suffix list. The normal include search path mechanism is then used to look for the file
to be implicitly included.
By default, the list of definition-file suffixes tried is .c, .cc, .cpp, and .cxx.
Implicit inclusion works well alongside automatic instantiation, but the two are independent. They can be
enabled or disabled independently, and implicit inclusion is still useful when automatic instantiation is not
done.
The implicit inclusion mode can be turned on by the command line option --implicit-include. If this option
is turned on, you cannot use exported templates.
Implicit inclusions are only performed during the normal compilation of a file, (i.e., not when doing only
preprocessing). A common means of investigating certain kinds of problems is to produce a preprocessed
source file that can be inspected. When using implicit inclusion it is sometimes desirable for the
preprocessed source file to include any implicitly included files. This may be done using the command
line option --no-preprocessing-only. This causes the preprocessed output to be generated as part of a
normal compilation. When implicit inclusion is being used, the implicitly included files will appear as part
of the preprocessed output in the precise location at which they were included in the compilation.
2.5.5. Exported Templates
Exported templates are templates declared with the keyword export. Exporting a class template is
equivalent to exporting each of its static data members and each of its non-inline member functions. An
exported template is special because its definition does not need to be present in a translation unit that
uses that template. In other words, the definition of an exported (non-class) template does not need to
be explicitly or implicitly included in a translation unit that instantiates that template. For example, the
following is a valid C++ program consisting of two separate translation units:
// File 1:
#include <stdio.h>
static void trace() { printf("File 1\n"); }
export template<class T> T const& min(T const&, T const&);
int main()
{
trace();
return min(2, 3);
}
// File 2:
#include <stdio.h>
static void trace() { printf("File 2\n"); }
66
C++ Language
export template<class T> T const& min(T const &a, T const &b)
{
trace();
return a<b? a: b;
}
Note that these two files are separate translation units: one is not included in the other. That allows the
two functions trace() to coexist (with internal linkage).
Support for exported templates is enabled by default, but you can turn it off with command line option
--no-export.
You cannot use exported templates together with the command line option --implicit-include.
2.5.5.1. Finding the Exported Template Definition
The automatic instantiation of exported templates is somewhat similar (from a user's perspective) to that
of regular (included) templates. However, an instantiation of an exported template involves at least two
translation units: one which requires the instantiation, and one which contains the template definition.
When a file containing definitions of exported templates is compiled, a file with a .et suffix is created
and some extra information is included in the associated .ti file. The .et files are used later by the C++
compiler to find the translation unit that defines a given exported template.
When a file that potentially makes use of exported templates is compiled, the compiler must be told where
to look for .et files for exported templates used by a given translation unit. By default, the compiler looks
in the current directory. Other directories may be specified with the command line option
--template-directory. Strictly speaking, the .et files are only really needed when it comes time to generate
an instantiation. This means that code using exported templates can be compiled without having the
definitions of those templates available. Those definitions must be available when explicit instantiation is
done.
The .et files only inform the C++ compiler about the location of exported template definitions; they do
not actually contain those definitions. The sources containing the exported template definitions must
therefore be made available at the time of instantiation. In particular, the export facility is not a mechanism
for avoiding the publication of template definitions in source form.
2.5.5.2. Secondary Translation Units
An instantiation of an exported template can be triggered by an explicit instantiation directive, or by the
command line option --instantiate=used. In each case, the translation unit that contains the initial point
of instantiation will be processed as the primary translation unit. Based on information it finds in the .et
files, the C++ compiler will then load and parse the translation unit containing the definition of the template
to instantiate. This is a secondary translation unit. The simultaneous processing of the primary and
secondary translation units enables the C++ compiler to create instantiations of the exported templates
(which can include entities from both translation units). This process may reveal the need for additional
instantiations of exported templates, which in turn can cause additional secondary translation units to be
4
loaded .
4
As a consequence, using exported templates may require considerably more memory that similar uses of regular (included)
templates.
67
TASKING VX-toolset for ARM User Guide
When secondary translation units are processed, the declarations they contain are checked for consistency.
This process may report errors that would otherwise not be caught. Many these errors are so-called "ODR
violations" (ODR stands for "one-definition rule"). For example:
// File 1:
struct X {
int x;
};
int main() {
return min(2, 3);
}
// File 2:
struct X {
unsigned x; // Error: X::x declared differently
// in File 1
};
export template<class T> T const& min(T const &a, T const &b)
{
return a<b? a: b;
}
If there are no errors, the instantiations are generated in the output associated with the primary translation
unit. This may also require that entities with internal linkage in secondary translation units be "externalized"
so they can be accessed from the instantiations in the primary translation unit.
2.5.5.3. Libraries with Exported Templates
Typically a (non-export) library consists of an include directory and a lib directory. The include
directory contains the header files required by users of the library and the lib directory contains the
object code libraries that client programs must use when linking programs.
With exported templates, users of the library must also have access to the source code of the exported
templates and the information contained in the associated .et files. This information should be placed
in a directory that is distributed along with the include and lib directories: This is the export directory.
It must be specified using the command line option --template-directory when compiling client programs.
The recommended procedure to build the export directory is as follows:
1. For each .et file in the original source directory, copy the associated source file to the export directory.
2. Concatenate all of the .et files into a single .et file (e.g., mylib.et) in the export directory. The
individual .et files could be copied to the export directory, but having all of the .et information in one
file will make use of the library more efficient.
3. Create an export_info file in the export directory. The export_info file specifies the include
search paths to be used when recompiling files in the export directory. If no export_info file is
provided, the include search path used when compiling the client program that uses the library will
also be used to recompile the library exported template files.
68
C++ Language
The export_info file consists of a series of lines of the form
include=x
or
sys_include=x
where x is a path name to be placed on the include search path. The directories are searched in the order
in which they are encountered in the export_info file. The file can also contain comments, which begin
with a "#", and blank lines. Spaces are ignored but tabs are not currently permitted. For example:
# The include directories to be used for the xyz library
include = /disk1/xyz/include
sys_include = /disk2/abc/include
include=/disk3/jkl/include
The include search path specified for a client program is ignored by the C++ compiler when it processes
the source in the export library, except when no export_info file is provided. Command line macro
definitions specified for a client program are also ignored by the C++ compiler when processing a source
file from the export library; the command line macros specified when the corresponding .et file was
produced do apply. All other compilation options (other than the include search path and command line
macro definitions) used when recompiling the exported templates will be used to compile the client
program.
When a library is installed on a new system, it is likely that the export_info file will need to be adapted
to reflect the location of the required headers on that system.
2.6. Inlining Functions
The C++ compiler supports a minimal form of function inlining. When the C++ compiler encounters a call
of a function declared inline it can replace the call with the body of the function with the parameters
replaced by the corresponding arguments. When a function call occurs as a statement, the statements
of the function body are inserted in place of the call. When the function call occurs within an expression,
the body of the function is rewritten as one large expression and that expression is inserted in the proper
place in the containing expression. It is not always possible to do this sort of inlining: there are certain
constructs (e.g. loops and inline assembly) that cannot be rendered in expression form. Even when inlining
is done at the statement level, there are certain constructs that are not practical to inline. Calls that cannot
be inlined are left in their original call form, and an out-of-line copy of the function is used. When enabled,
a remark is issued.
When the C++ compiler decides not to inline a function, the keyword inline is passed to the generated
C file. This allows for the C compiler to decide again whether to inline a function or not.
A function is disqualified for inlining immediately if any of the following are true:
• The function has local static variables.
• The function has local constants.
69
TASKING VX-toolset for ARM User Guide
• The function has local types.
• The function has block scopes.
• The function includes pragmas.
• The function has a variable argument list.
2.7. Extern Inline Functions
Depending on the way in which the C++ compiler is configured, out-of-line copies of extern inline
functions are either implemented using static functions, or are instantiated using a mechanism like the
template instantiation mechanism. Note that out-of-line copies of inline functions are only required in
cases where the function cannot be inlined, or when the address of the function is taken (whether explicitly
by the user, by implicitly generated functions, or by compiler-generated data structures such as virtual
function tables or exception handling tables).
When static functions are used, local static variables of the functions are promoted to global variables
with specially encoded names, so that even though there may be multiple copies of the code, there is
only one copy of such global variables. This mechanism does not strictly conform to the standard because
the address of an extern inline function is not constant across translation units.
When the instantiation mechanism is used, the address of an extern inline function is constant across
translation units, but at the cost of requiring the use of one of the template instantiation mechanisms,
even for programs that don't use templates. Definitions of extern inline functions can be provided either
through use of the automatic instantiation mechanism or by use of the --instantiate=used or
--instantiate=all instantiation modes. There is no mechanism to manually control the definition of extern
inline function bodies.
2.8. Pragmas to Control the C++ Compiler
Pragmas are keywords in the C++ source that control the behavior of the compiler. Pragmas overrule
compiler options.
The syntax is:
#pragma pragma-spec
The C++ compiler supports the following pragmas:
instantiate / do_not_instantiate / can_instantiate
These are template instantiation pragmas. They are described in detail in Section 2.5.3, Instantiation
#pragma Directives.
hdrstop / no_pch
These are precompiled header pragmas. They are described in detail in Section 2.10, Precompiled
Headers.
70
C++ Language
once
When placed at the beginning of a header file, indicates that the file is written in such a way that including
it several times has the same effect as including it once. Thus, if the C++ compiler sees #pragma once
at the start of a header file, it will skip over it if the file is #included again.
A typical idiom is to place an #ifndef guard around the body of the file, with a #define of the guard variable
after the #ifndef:
#pragma once
// optional
#ifndef FILE_H
#define FILE_H
... body of the header file ...
#endif
The #pragma once is marked as optional in this example, because the C++ compiler recognizes the
#ifndef idiom and does the optimization even in its absence. #pragma once is accepted for compatibility
with other compilers and to allow the programmer to use other guard-code idioms.
ident
This pragma is given in the form:
#pragma ident "string"
or
#ident "string"
2.9. Predefined Macros
The C++ compiler defines a number of preprocessing macros. Many of them are only defined under
certain circumstances. This section describes the macros that are provided and the circumstances under
which they are defined.
Macro
Description
__ABI_COMPATIBILITY_VERSION
Defines the ABI compatibility version being
used. This macro is set to 9999, which means
the latest version. This macro is used when
building the C++ library.
__ABI_CHANGES_FOR_RTTI
This macro is set to TRUE, meaning that the
ABI changes for RTTI are implemented. This
macro is used when building the C++ library.
__ABI_CHANGES_FOR_ARRAY_NEW_AND_DELETE This macro is set to TRUE, meaning that the
ABI changes for array new and delete are
implemented. This macro is used when
building the C++ library.
71
TASKING VX-toolset for ARM User Guide
Macro
Description
__ABI_CHANGES_FOR_PLACEMENT_DELETE
This macro is set to TRUE, meaning that the
ABI changes for placement delete are
implemented. This macro is used when
building the C++ library.
__ARRAY_OPERATORS
Defined when array new and delete are
enabled. This is the default.
__BASE_FILE__
Similar to __FILE__ but indicates the primary
source file rather than the current one (i.e.,
when the current file is an included file).
__BIG_ENDIAN__
Expands to 1 if big-endian mode is selected
(option --endianness=big), otherwise
unrecognized as macro.
_BOOL
Defined when bool is a keyword. This is the
default.
__BUILD__
Identifies the build number of the C++
compiler, composed of decimal digits for the
build number, three digits for the major branch
number and three digits for the minor branch
number. For example, if you use build 1.22.1
of the compiler, __BUILD__ expands to
1022001. If there is no branch number, the
branch digits expand to zero. For example,
build 127 results in 127000000.
__CHAR_MIN / __CHAR_MAX
Used in limits.h to define the
minimum/maximum value of a plain char
respectively.
__CPARM__
Identifies the C++ compiler. You can use this
symbol to flag parts of the source which must
be recognized by the cparm C++ compiler
only. It expands to 1.
__cplusplus
Always defined.
__CPU__
Expands to a string with the CPU supplied with
the option --cpu. When no --cpu is supplied,
this symbol is not defined.
__DATE__
Defined to the date of the compilation in the
form "Mmm dd yyyy".
__DELTA_TYPE
Defines the type of the offset field in the virtual
function table. This macro is used when
building the C++ library.
__DOUBLE_FP__
Expands to 1 if you did not use option
--no-double (Treat ‘double’ as ‘float’),
otherwise unrecognized as macro.
__embedded_cplusplus
Defined as 1 in Embedded C++ mode.
72
C++ Language
Macro
Description
__EXCEPTIONS
Defined when exception handling is enabled
(--exceptions).
__FILE__
Expands to the current source file name.
__FUNCTION__
Defined to the name of the current function.
An error is issued if it is used outside of a
function.
__func__
Same as __FUNCTION__ in GNU mode.
__IMPLICIT_USING_STD
Defined when the standard header files should
implicitly do a using-directive on the std
namespace (--using-std).
__JMP_BUF_ELEMENT_TYPE
Specifies the type of an element of the setjmp
buffer. This macro is used when building the
C++ library.
__JMP_BUF_NUM_ELEMENTS
Defines the number of elements in the setjmp
buffer. This macro is used when building the
C++ library.
__LINE__
Expands to the line number of the line where
this macro is called.
__LITTLE_ENDIAN__
Expands to 1 if little-endian mode is selected
(option --endianness=little), otherwise
unrecognized as macro. This is the default.
__NAMESPACES
Defined when namespaces are supported (this
is the default, you can disable support for
namespaces with --no-namespaces).
__NO_LONG_LONG
Defined when the long long type is not
supported. This is the default.
__NULL_EH_REGION_NUMBER
Defines the value used as the null region
number value in the exception handling tables.
This macro is used when building the C++
library.
__PLACEMENT_DELETE
Defined when placement delete is enabled.
__PRETTY_FUNCTION__
Defined to the name of the current function.
This includes the return type and parameter
types of the function. An error is issued if it is
used outside of a function.
__PTRDIFF_MIN / __PTRDIFF_MAX
Used in stdint.h to define the
minimum/maximum value of a ptrdiff_t
type respectively.
__PTRDIFF_TYPE__
Defined to be the type of ptrdiff_t.
__REGION_NUMBER_TYPE
Defines the type of a region number field in
the exception handling tables. This macro is
used when building the C++ library.
73
TASKING VX-toolset for ARM User Guide
Macro
Description
__REVISION__
Expands to the revision number of the C++
compiler. Digits are represented as they are;
characters (for prototypes, alphas, betas) are
represented by -1. Examples: v1.0r1 -> 1,
v1.0rb -> -1
__RTTI
Defined when RTTI is enabled (--rtti).
__RUNTIME_USES_NAMESPACES
Defined when the run-time uses namespaces.
__SIGNED_CHARS__
Defined when plain char is signed.
__SINGLE_FP__
Expands to 1 if you used option --no-double
(Treat ‘double’ as ‘float’), otherwise
unrecognized as macro.
__SIZE_MIN / __SIZE_MAX
Used in stdint.h to define the
minimum/maximum value of a size_t type
respectively.
__SIZE_TYPE__
Defined to be the type of size_t.
__STDC__
Always defined, but the value may be
redefined.
__STDC_VERSION__
Identifies the ISO-C version number. Expands
to 199901L for ISO C99, but the value may be
redefined.
_STLP_NO_IOSTREAMS
Defined when option --io-streams is not used.
This disables I/O stream functions in the
STLport C++ library.
__TASKING__
Always defined for the TASKING C++
compiler.
__THUMB__
Expands to 1 if you used option --thumb,
otherwise unrecognized as macro.
__TIME__
Expands to the compilation time: “hh:mm:ss”
__TYPE_TRAITS_ENABLED
Defined when type traits pseudo-functions (to
ease the implementation of ISO/IEC TR
19768; e.g., __is_union) are enabled. This
is the default in C++ mode.
__VAR_HANDLE_TYPE
Defines the type of the variable-handle field
in the exception handling tables. This macro
is used when building the C++ library.
__VERSION__
Identifies the version number of the C++
compiler. For example, if you use version 2.1r1
of the compiler, __VERSION__ expands to
2001 (dot and revision number are omitted,
minor version number in 3 digits).
74
C++ Language
Macro
Description
__VIRTUAL_FUNCTION_INDEX_TYPE
Defines the type of the virtual function index
field of the virtual function table. This macro
is used when building the C++ library.
__VIRTUAL_FUNCTION_TYPE
Defines the type of the virtual function field of
the virtual function table. This macro is used
when building the C++ library.
__WCHAR_MIN / __WCHAR_MAX
Used in stdint.h to define the
minimum/maximum value of a wchar_t type
respectively.
_WCHAR_T
Defined when wchar_t is a keyword.
2.10. Precompiled Headers
It is often desirable to avoid recompiling a set of header files, especially when they introduce many lines
of code and the primary source files that #include them are relatively small. The C++ compiler provides
a mechanism for, in effect, taking a snapshot of the state of the compilation at a particular point and writing
it to a disk file before completing the compilation; then, when recompiling the same source file or compiling
another file with the same set of header files, it can recognize the "snapshot point", verify that the
corresponding precompiled header (PCH) file is reusable, and read it back in. Under the right
circumstances, this can produce a dramatic improvement in compilation time; the trade-off is that PCH
files can take a lot of disk space.
2.10.1. Automatic Precompiled Header Processing
When --pch appears on the command line, automatic precompiled header processing is enabled. This
means the C++ compiler will automatically look for a qualifying precompiled header file to read in and/or
will create one for use on a subsequent compilation.
The PCH file will contain a snapshot of all the code preceding the "header stop" point. The header stop
point is typically the first token in the primary source file that does not belong to a preprocessing directive,
but it can also be specified directly by #pragma hdrstop (see below) if that comes first. For example:
#include "xxx.h"
#include "yyy.h"
int i;
The header stop point is int (the first non-preprocessor token) and the PCH file will contain a snapshot
reflecting the inclusion of xxx.h and yyy.h. If the first non-preprocessor token or the #pragma hdrstop
appears within a #if block, the header stop point is the outermost enclosing #if. To illustrate, heres a
more complicated example:
#include "xxx.h"
#ifndef YYY_H
#define YYY_H 1
#include "yyy.h"
#endif
75
TASKING VX-toolset for ARM User Guide
#if TEST
int i;
#endif
Here, the first token that does not belong to a preprocessing directive is again int, but the header stop
point is the start of the #if block containing it. The PCH file will reflect the inclusion of xxx.h and
conditionally the definition of YYY_H and inclusion of yyy.h; it will not contain the state produced by #if
TEST.
A PCH file will be produced only if the header stop point and the code preceding it (mainly, the header
files themselves) meet certain requirements:
• The header stop point must appear at file scope -- it may not be within an unclosed scope established
by a header file. For example, a PCH file will not be created in this case:
// xxx.h
class A {
// xxx.C
#include "xxx.h"
int i; };
• The header stop point may not be inside a declaration started within a header file, nor (in C++) may it
be part of a declaration list of a linkage specification. For example, in the following case the header
stop point is int, but since it is not the start of a new declaration, no PCH file will be created:
// yyy.h
static
// yyy.C
#include "yyy.h"
int i;
• Similarly, the header stop point may not be inside a #if block or a #define started within a header
file.
• The processing preceding the header stop must not have produced any errors. (Note: warnings and
other diagnostics will not be reproduced when the PCH file is reused.)
• No references to predefined macros __DATE__ or __TIME__ may have appeared.
• No use of the #line preprocessing directive may have appeared.
• #pragma no_pch (see below) must not have appeared.
• The code preceding the header stop point must have introduced a sufficient number of declarations to
justify the overhead associated with precompiled headers.The minimum number of declarations required
is 1.
76
C++ Language
When the host system does not support memory mapping, so that everything to be saved in the
precompiled header file is assigned to preallocated memory (MS-Windows), two additional restrictions
apply:
• The total memory needed at the header stop point cannot exceed the size of the block of preallocated
memory.
• No single program entity saved can exceed 16384, the preallocation unit.
When a precompiled header file is produced, it contains, in addition to the snapshot of the compiler state,
some information that can be checked to determine under what circumstances it can be reused. This
includes:
• The compiler version, including the date and time the compiler was built.
• The current directory (i.e., the directory in which the compilation is occurring).
• The command line options.
• The initial sequence of preprocessing directives from the primary source file, including #include
directives.
• The date and time of the header files specified in #include directives.
This information comprises the PCH prefix. The prefix information of a given source file can be compared
to the prefix information of a PCH file to determine whether the latter is applicable to the current compilation.
As an illustration, consider two source files:
// a.cc
#include "xxx.h"
...
// b.cc
#include "xxx.h"
...
// Start of code
// Start of code
When a.cc is compiled with --pch, a precompiled header file named a.pch is created. Then, when b.cc
is compiled (or when a.cc is recompiled), the prefix section of a.pch is read in for comparison with the
current source file. If the command line options are identical, if xxx.h has not been modified, and so
forth, then, instead of opening xxx.h and processing it line by line, the C++ compiler reads in the rest of
a.pch and thereby establishes the state for the rest of the compilation.
It may be that more than one PCH file is applicable to a given compilation. If so, the largest (i.e., the one
representing the most preprocessing directives from the primary source file) is used. For instance, consider
a primary source file that begins with
#include "xxx.h"
#include "yyy.h"
#include "zzz.h"
If there is one PCH file for xxx.h and a second for xxx.h and yyy.h, the latter will be selected (assuming
both are applicable to the current compilation). Moreover, after the PCH file for the first two headers is
read in and the third is compiled, a new PCH file for all three headers may be created.
77
TASKING VX-toolset for ARM User Guide
When a precompiled header file is created, it takes the name of the primary source file, with the suffix
replaced by an implementation-specified suffix (pch by default). Unless --pch-dir is specified (see below),
it is created in the directory of the primary source file.
When a precompiled header file is created or used, a message such as
"test.cc": creating precompiled header file "test.pch"
is issued. The user may suppress the message by using the command line option --no-pch-messages.
When the option --pch-verbose is used the C++ compiler will display a message for each precompiled
header file that is considered that cannot be used giving the reason that it cannot be used.
In automatic mode (i.e., when --pch is used) the C++ compiler will deem a precompiled header file obsolete
and delete it under the following circumstances:
• if the precompiled header file is based on at least one out-of-date header file but is otherwise applicable
for the current compilation; or
• if the precompiled header file has the same base name as the source file being compiled (e.g., xxx.pch
and xxx.cc) but is not applicable for the current compilation (e.g., because of different command line
options).
This handles some common cases; other PCH file clean-up must be dealt with by other means (e.g., by
the user).
Support for precompiled header processing is not available when multiple source files are specified in a
single compilation: an error will be issued and the compilation aborted if the command line includes a
request for precompiled header processing and specifies more than one primary source file.
2.10.2. Manual Precompiled Header Processing
Command line option --create-pch=file-name specifies that a precompiled header file of the specified
name should be created.
Command line option --use-pch=file-name specifies that the indicated precompiled header file should
be used for this compilation; if it is invalid (i.e., if its prefix does not match the prefix for the current primary
source file), a warning will be issued and the PCH file will not be used.
When either of these options is used in conjunction with --pch-dir, the indicated file name (which may
be a path name) is tacked on to the directory name, unless the file name is an absolute path name.
The options --create-pch, --use-pch, and --pch may not be used together. If more than one of these
options is specified, only the last one will apply. Nevertheless, most of the description of automatic PCH
processing applies to one or the other of these modes -- header stop points are determined the same
way, PCH file applicability is determined the same way, and so forth.
2.10.3. Other Ways to Control Precompiled Headers
There are several ways in which the user can control and/or tune how precompiled headers are created
and used.
78
C++ Language
• #pragma hdrstop may be inserted in the primary source file at a point prior to the first token that does
not belong to a preprocessing directive. It enables you to specify where the set of header files subject
to precompilation ends. For example,
#include "xxx.h"
#include "yyy.h"
#pragma hdrstop
#include "zzz.h"
Here, the precompiled header file will include processing state for xxx.h and yyy.h but not zzz.h.
(This is useful if the user decides that the information added by what follows the #pragma hdrstop
does not justify the creation of another PCH file.)
• #pragma no_pch may be used to suppress precompiled header processing for a given source file.
• Command line option --pch-dir=directory-name is used to specify the directory in which to search for
and/or create a PCH file.
Moreover, when the host system does not support memory mapping and preallocated memory is used
instead, then one of the command line options --pch, --create-pch, or --use-pch, if it appears at all, must
be the first option on the command line.
2.10.4. Performance Issues
The relative overhead incurred in writing out and reading back in a precompiled header file is quite small
for reasonably large header files.
In general, it does not cost much to write a precompiled header file out even if it does not end up being
used, and if it is used it almost always produces a significant speedup in compilation. The problem is that
the precompiled header files can be quite large (from a minimum of about 250K bytes to several megabytes
or more), and so one probably does not want many of them sitting around.
Thus, despite the faster recompilations, precompiled header processing is not likely to be justified for an
arbitrary set of files with nonuniform initial sequences of preprocessing directives. Rather, the greatest
benefit occurs when a number of source files can share the same PCH file. The more sharing, the less
disk space is consumed. With sharing, the disadvantage of large precompiled header files can be
minimized, without giving up the advantage of a significant speedup in compilation times.
Consequently, to take full advantage of header file precompilation, users should expect to reorder the
#include sections of their source files and/or to group #include directives within a commonly used
header file.
Below is an example of how this can be done. A common idiom is this:
#include "comnfile.h"
#pragma hdrstop
#include ...
where comnfile.h pulls in, directly and indirectly, a few dozen header files; the #pragma hdrstop is
inserted to get better sharing with fewer PCH files. The PCH file produced for comnfile.h can be a bit
over a megabyte in size. Another idiom, used by the source files involved in declaration processing, is
this:
79
TASKING VX-toolset for ARM User Guide
#include "comnfile.h"
#include "decl_hdrs.h"
#pragma hdrstop
#include ...
decl_hdrs.h pulls in another dozen header files, and a second, somewhat larger, PCH file is created.
In all, the source files of a particular program can share just a few precompiled header files. If disk space
were at a premium, you could decide to make comnfile.h pull in all the header files used -- then, a
single PCH file could be used in building the program.
Different environments and different projects will have different needs, but in general, users should be
aware that making the best use of the precompiled header support will require some experimentation
and probably some minor changes to source code.
80
Chapter 3. Assembly Language
This chapter describes the most important aspects of the TASKING assembly language for ARM and
contains a detailed description of all built-in assembly functions and assembler directives. For a complete
overview of the architecture you are using and a description of the assembly instruction set, refer to the
target's core reference manual (for example the ARM Architecture Reference Manual ARM DDI 0100I
[2005, ARM Limited]).
3.1. Assembly Syntax
An assembly program consists of statements. A statement may optionally be followed by a comment.
Any source statement can be extended to more lines by including the line continuation character (\) as
the last character on the line. The length of a source statement (first line and continuation lines) is only
limited by the amount of available memory.
Mnemonics, directives and other keywords are case insensitive. Labels, symbols, directive arguments,
and literal strings are case sensitive.
The syntax of an assembly statement is:
[label[:]] [instruction | directive | macro_call] [;comment]
label
A label is a special symbol which is assigned the value and type of the current
program location counter. A label can consist of letters, digits and underscore
characters (_). The first character cannot be a digit. The label can also be a
number. A label which is prefixed by whitespace (spaces or tabs) has to be
followed by a colon (:). The size of an identifier is only limited by the amount of
available memory.
number is a number ranging from 1 to 255. This type of label is called a numeric
label or local label. To refer to a numeric label, you must put an n (next) or p
(previous) immediately after the label. This is required because the same label
number may be used repeatedly.
Examples:
LAB1:
LAB1
1: b 1p
;
;
;
;
;
;
This label is followed by a colon and
can be prefixed by whitespace
This label has to start at the beginning
of a line
This is an endless loop
using numeric labels
81
TASKING VX-toolset for ARM User Guide
instruction
An instruction consists of a mnemonic and zero, one or more operands. It must
not start in the first column.
All instructions of the ARM Unified Assembler Language (UAL) are supported.
With assembler option --old-syntax you can specify to use the pre-UAL syntax.
VFP instructions are only supported in the UAL syntax.
Operands are described in Section 3.3, Operands of an Assembly Instruction.
The instructions are described in the target's core Architecture Reference Manual.
The instruction can also be a so-called 'generic instruction'. Generic instructions
are pseudo instructions (no instructions from the instruction set). Depending on
the situation in which a generic instruction is used, the assembler replaces the
generic instruction with appropriate real assembly instruction(s). For a complete
list, see Section 3.11, Generic Instructions.
directive
With directives you can control the assembler from within the assembly source.
Except for preprocessing directives, these must not start in the first column.
Directives are described in Section 3.9, Assembler Directives.
macro_call
A call to a previously defined macro. It must not start in the first column. See
Section 3.10, Macro Operations.
comment
Comment, preceded by a ; (semicolon).
You can use empty lines or lines with only comments.
3.2. Assembler Significant Characters
You can use all ASCII characters in the assembly source both in strings and in comments. Also the
extended characters from the ISO 8859-1 (Latin-1) set are allowed.
Some characters have a special meaning to the assembler. Special characters associated with expression
evaluation are described in Section 3.6.3, Expression Operators. Other special assembler characters
are:
Character Description
;
Start of a comment
\
Line continuation character or macro operator: argument concatenation
?
Macro operator: return decimal value of a symbol
%
Macro operator: return hex value of a symbol
^
Macro operator: override local label
”
Macro string delimiter or quoted string .DEFINE expansion character
'
String constants delimiter
@
Start of a built-in assembly function
$
Location counter substitution
#
Immediate addressing
82
Assembly Language
Character Description
++
String concatenation operator
[]
Load and store addressing mode
3.3. Operands of an Assembly Instruction
In an instruction, the mnemonic is followed by zero, one or more operands. An operand has one of the
following types:
Operand
Description
symbol
A symbolic name as described in Section 3.4, Symbol Names. Symbols can also occur
in expressions.
register
Any valid register as listed in Section 3.5, Registers.
expression
Any valid expression as described in Section 3.6, Assembly Expressions.
address
A combination of expression, register and symbol.
Addressing modes
The ARM assembly language has several addressing modes. These are described in detail in the target's
core Architecture Reference Manual.
3.4. Symbol Names
User-defined symbols
A user-defined symbol can consist of letters, digits and underscore characters (_). The first character
cannot be a digit. The size of an identifier is only limited by the amount of available memory. The case
of these characters is significant. You can define a symbol by means of a label declaration or an equate
or set directive.
Predefined preprocessor symbols
These symbols start and end with two underscore characters, __symbol__, and you can use them in your
assembly source to create conditional assembly. See Section 3.4.1, Predefined Preprocessor Symbols.
Labels
Symbols used for memory locations are referred to as labels. It is allowed to use reserved symbols as
labels as long as the label is followed by a colon or starts at the first column.
83
TASKING VX-toolset for ARM User Guide
Reserved symbols
Symbol names and other identifiers beginning with a period (.) are reserved for the system (for example
for directives or section names). Instructions and registers are also reserved. The case of these built-in
symbols is insignificant.
Examples
Valid symbol names:
loop_1
ENTRY
a_B_c
_aBC
Invalid symbol names:
1_loop
.DEFINE
; starts with a number
; reserved directive name
3.4.1. Predefined Preprocessor Symbols
The TASKING assembler knows the predefined symbols as defined in the table below. The symbols are
useful to create conditional assembly.
Symbol
Description
__ASARM__
Expands to 1 for the ARM toolset, otherwise unrecognized as macro.
__BUILD__
Identifies the build number of the assembler, composed of decimal digits for
the build number, three digits for the major branch number and three digits
for the minor branch number. For example, if you use build 1.22.1 of the
assembler, __BUILD__ expands to 1022001. If there is no branch number,
the branch digits expand to zero. For example, build 127 results in
127000000.
__REVISION__
Expands to the revision number of the assembler. Digits are represented
as they are; characters (for prototypes, alphas, betas) are represented by
-1. Examples: v1.0r1 -> 1, v1.0rb -> -1
__TASKING__
Identifies the assembler as a TASKING assembler. Expands to 1 if a
TASKING assembler is used.
__VERSION__
Identifies the version number of the assembler. For example, if you use
version 2.1r1 of the assembler, __VERSION__ expands to 2001 (dot and
revision number are omitted, minor version number in 3 digits).
Example
.if @defined('__ASARM__')
; this part is only for the asarm assembler
...
.endif
84
Assembly Language
3.5. Registers
The following register names, either upper or lower case, should not be used for user-defined symbol
names in an assembly language source file:
R0
IP
SP
LR
PC
.. R15
(general purpose registers)
(alias for R12)
(alias for R13)
(alias for R14)
(alias for R15)
3.6. Assembly Expressions
An expression is a combination of symbols, constants, operators, and parentheses which represent a
value that is used as an operand of an assembler instruction (or directive).
Expressions can contain user-defined labels (and their associated integer or floating-point values), and
any combination of integers, floating-point numbers, or ASCII literal strings.
Expressions follow the conventional rules of algebra and boolean arithmetic.
Expressions that can be evaluated at assembly time are called absolute expressions. Expressions where
the result is unknown until all sections have been combined and located, are called relocatable or relative
expressions.
When any operand of an expression is relocatable, the entire expression is relocatable. Relocatable
expressions are emitted in the object file and evaluated by the linker. Relocatable expressions can only
contain integral functions; floating-point functions and numbers are not supported by the ELF/DWARF
object format.
The assembler evaluates expressions with 64-bit precision in two's complement.
The syntax of an expression can be any of the following:
• numeric constant
• string
• symbol
• expression binary_operator expression
• unary_operator expression
• (expression)
• function call
All types of expressions are explained in separate sections.
85
TASKING VX-toolset for ARM User Guide
3.6.1. Numeric Constants
Numeric constants can be used in expressions. If there is no prefix, by default the assembler assumes
the number is a decimal number. Prefixes can be used in either lower or upper case.
Base
Description
Example
Binary
A 0b prefix followed by binary digits (0,1). Or use a b suffix.
0B1101
11001010b
Hexadecimal
A 0x prefix followed by hexadecimal digits (0-9, A-F, a-f). Or use 0x12FF
0x45
a h suffix.
0fa10h
Decimal integer
Decimal digits (0-9).
12
1245
Decimal
floating-point
Decimal digits (0-9), includes a decimal point, or an 'E' or 'e'
followed by the exponent.
6E10
.6
3.14
2.7e10
3.6.2. Strings
ASCII characters, enclosed in single (') or double (”) quotes constitute an ASCII string. Strings between
double quotes allow symbol substitution by a .DEFINE directive, whereas strings between single quotes
are always literal strings. Both types of strings can contain escape characters.
Strings constants in expressions are evaluated to a number (each character is replaced by its ASCII
value). Strings in expressions can have a size of up to 8 characters or less depending on the operand of
an instruction or directive; any subsequent characters in the string are ignored. In this case the assembler
issues a warning. An exception to this rule is when a string is used in a .DB assembler directive; in that
case all characters result in a constant value of the specified size. Null strings have a value of 0.
Examples
'ABCD'
'''79'
"A\"BC"
'AB'+1
''
.DW 'abcdef'
'ab'++'cd'
86
;
;
;
;
;
;
;
;
;
;
(0x41424344)
to enclose a quote double it
or to enclose a quote escape it
(0x4143) string used in expression
null string
(0x64636261) 'ef' are ignored
warning: string value truncated
you can concatenate
two strings with the '++' operator.
This results in 'abcd'
Assembly Language
3.6.3. Expression Operators
The next table shows the assembler operators. They are ordered according to their precedence. Operators
of the same precedence are evaluated left to right. Parenthetical expressions have the highest priority
(innermost first).
Valid operands include numeric constants, literal ASCII strings and symbols.
Most assembler operators can be used with both integer and floating-point values. If one operand has
an integer value and the other operand has a floating-point value, the integer is converted to a floating-point
value before the operator is applied. The result is a floating-point value.
Type
Unary
Arithmetic
Shift
Operator
Name
Description
()
parenthesis
Expressions enclosed by parenthesis are evaluated
first.
+
plus
Returns the value of its operand.
-
minus
Returns the negative of its operand.
~
one's complement
Integer only. Returns the one’s complement of its
operand. It cannot be used with a floating-point
operand.
!
logical negate
Returns 1 if the operands' value is 0; otherwise 0.
For example, if buf is 0 then !buf is 1. If buf has
a value of 1000 then !buf is 0.
*
multiplication
Yields the product of its operands.
/
division
Yields the quotient of the division of the first operand
by the second. For integer operands, the divide
operation produces a truncated integer result.
%
modulo
Integer only. This operator yields the remainder from
the division of the first operand by the second.
+
addition
Yields the sum of its operands.
-
subtraction
Yields the difference of its operands.
<<
shift left
Integer only. Causes the left operand to be shifted
to the left (and zero-filled) by the number of bits
specified by the right operand.
>>
shift right
Integer only. Causes the left operand to be shifted
to the right by the number of bits specified by the
right operand. The sign bit will be extended.
87
TASKING VX-toolset for ARM User Guide
Type
Operator
Name
Description
Relational
<
less than
<=
less than or equal
Returns an integer 1 if the indicated condition is
TRUE or an integer 0 if the indicated condition is
FALSE.
>
greater than
>=
!=
greater than or equal For example, if D has a value of 3 and E has a value
of 5, then the result of the expression D<E is 1, and
equal
the result of the expression D>E is 0.
not equal
Use tests for equality involving floating-point values
with caution, since rounding errors could cause
unexpected results.
&
AND
Integer only. Yields the bitwise AND function of its
operand.
|
OR
Integer only. Yields the bitwise OR function of its
operand.
^
exclusive OR
Integer only.Yields the bitwise exclusive OR function
of its operands.
&&
logical AND
Returns an integer 1 if both operands are non-zero;
otherwise, it returns an integer 0.
||
logical OR
Returns an integer 1 if either of the operands is
non-zero; otherwise, it returns an integer 1
==
Bitwise
Logical
The relational operators and logical operators are intended primarily for use with the conditional assembly
.if directive, but can be used in any expression.
3.7. Working with Sections
Sections are absolute or relocatable blocks of contiguous memory that can contain code or data. Some
sections contain code or data that your program declared and uses directly, while other sections are
created by the compiler or linker and contain debug information or code or data to initialize your application.
These sections can be named in such a way that different modules can implement different parts of these
sections. These sections are located in memory by the linker (using the linker script language, LSL) so
that concerns about memory placement are postponed until after the assembly process.
All instructions and directives which generate data or code must be within an active section. The assembler
emits a warning if code or data starts without a section definition. The compiler automatically generates
sections. If you program in assembly you have to define sections yourself.
For more information about locating sections see Section 8.7.8, The Section Layout Definition: Locating
Sections.
Section definition
Sections are defined with the .SECTION/.ENDSEC directive and have a name. The names have a special
meaning to the locating process and have to start with a predefined name, optionally extended by a dot
88
Assembly Language
'.' and a user defined name. Optionally, you can specify the at() attribute to locate a section at a specific
address.
.SECTION name[,at(address)]
; instructions etc.
.ENDSEC
See the description of the .SECTION directive for more information.
Examples
.SECTION .data
; ...
.ENDSEC
; Declare a .data section
.SECTION .data.abs, at(0x0)
; Declare a .data.abs section at
; an absolute address
; ...
.ENDSEC
3.8. Built-in Assembly Functions
The TASKING assembler has several built-in functions to support data conversion, string comparison,
and math computations. You can use functions as terms in any expression.
Syntax of an assembly function
@function_name([argument[,argument]...])
Functions start with the '@' character and have zero or more arguments, and are always followed by
opening and closing parentheses. White space (a blank or tab) is not allowed between the function name
and the opening parenthesis and between the (comma-separated) arguments.
The names of assembly functions are case insensitive.
Overview of assembly functions
Function
Description
@ALUPCREL(expr,group[,check])
PC-relative ADD/SUB with operand split
@ARG('symbol' | expr)
Test whether macro argument is present
@BIGENDIAN()
Test if assembler generates code for big-endian mode
@CNT()
Return number of macro arguments
@CPU('architecture')
Test if current CPU matches architecture
@DEFINED('symbol' | symbol)
Test whether symbol exists
@LSB(expr)
Least significant byte of the expression
@LSH(expr)
Least significant half word of the absolute expression
89
TASKING VX-toolset for ARM User Guide
Function
Description
@LSW(expr)
Least significant word of the expression
@MSB(expr)
Most significant byte of the expression
@MSH(expr)
Most significant half word of the absolute expression
@MSW(expr)
Most significant word of the expression
@PRE_UAL()
Test if the assembler runs in pre-UAL syntax mode or in UAL
syntax mode by default (option --old-syntax)
@STRCAT(str1,str2)
Concatenate str1 and str2
@STRCMP(str1,str2)
Compare str1 with str2
@STRLEN(string)
Return length of string
@STRPOS(str1,str2[,start])
Return position of str2 in str1
@STRSUB(str,expr1,expr2)
Return substring
@THUMB()
Test if the assembler runs in Thumb mode or in ARM mode by
default (option --thumb)
Detailed Description of Built-in Assembly Functions
@ALUPCREL(expression,group[,check])
This function is used internally by the assembler with the generic instructions ADR, ADRL and ADRLL.
This function returns the PC-relative address of the expression for use in these generic instructions. group
is 0 for ADR,1 for ADRL or 2 for ADRLL.
With check you can specify to check for overflow (1 means true, 0 means false). If check is omitted, the
default is 1.
Example:
; The instruction "ADRAL R1,label" expands to
ADRAL R1,PC,@ALUPCREL(label,0,1)
@ARG('symbol' | expression)
Returns integer 1 if the macro argument represented by symbol or expression is present, 0 otherwise.
You can specify the argument with a symbol name (the name of a macro argument enclosed in single
quotes) or with expression (the ordinal number of the argument in the macro formal argument list). If you
use this function when macro expansion is not active, the assembler issues a warning.
Example:
.IF @ARG('TWIDDLE') ;is argument twiddle present?
.IF @ARG(1)
;is first argument present?
90
Assembly Language
@BIGENDIAN()
Returns 1 if the assembler generates code for big-endian mode, returns 0 if the assembler generates
code for little-endian mode (this is the default).
@CNT()
Returns the number of macro arguments of the current macro expansion as an integer. If you use this
function when macro expansion is not active, the assembler issues a warning.
Example:
ARGCOUNT .SET @CNT() ; reserve argument count
@CPU('architecture')
Returns 1 if architecture corresponds to the architecture that was specified with the option
--cpu=architecture; 0 otherwise. See also assembler option --cpu (Select architecture).
Example:
.IF @CPU('ARMv7EM')
; true if you specified option --cpu=ARMv7EM
... ; code for the ARMv7EM
.ELIF @CPU('ARMv6M') ; true if you specified option --cpu=ARMv6M
... ; code for the ARMv6-M
.ELSE
... ; code for other architectures
.ENDIF
@DEFINED('symbol' | symbol)
Returns 1 if symbol has been defined, 0 otherwise. If symbol is quoted, it is looked up as a .DEFINE
symbol; if it is not quoted, it is looked up as an ordinary symbol, macro or label.
Example:
.IF @DEFINED('ANGLE')
.IF @DEFINED(ANGLE)
;is symbol ANGLE defined?
;does label ANGLE exist?
@LSB(expression)
Returns the least significant byte of the result of the expression. The result of the expression is calculated
as 16 bits.
Example:
.DB
.DB
@LSB(0x1234)
@MSB(0x1234)
; stores 0x34
; stores 0x12
91
TASKING VX-toolset for ARM User Guide
@LSH(expression)
Returns the least significant half word (bits 0..15) of the result of the absolute expression. The result of
the expression is calculated as a word (32 bits).
@LSW(expression)
Returns the least significant word (bits 0..31) of the result of the expression. The result of the expression
is calculated as a double-word (64 bits).
Example:
.DW
.DW
@LSW(0x12345678)
@MSW(0x123456)
; stores 0x5678
; stores 0x0012
@MSB(expression)
Returns the most significant byte of the result of the expression. The result of the expression is calculated
as 16 bits.
@MSH(expression)
Returns the most significant half word (bits 16..31) of the result of the absolute expression. The result of
the expression is calculated as a word (32 bits). @MSH(expression) is equivalent to
((expression>>16) & 0xffff).
@MSW(expression)
Returns the most significant word of the result of the expression. The result of the expression is calculated
as a double-word (64 bits).
@PRE_UAL()
Returns 1 if the assembler runs in pre-UAL syntax mode by default, or 0 if the assembler runs in UAL
syntax mode (default). This function reflects the setting of the assembler option --old-syntax.
Example:
.IF @PRE_UAL()
; true if you specified option --old-syntax
... ; old code
.ELSE
... ; new code, UAL syntax
.ENDIF
@STRCAT(string1,string2)
Concatenates string1 and string2 and returns them as a single string. You must enclose string1 and
string2 either with single quotes or with double quotes.
Example:
92
Assembly Language
.DEFINE ID "@STRCAT('TAS','KING')"
; ID = 'TASKING'
@STRCMP(string1,string2)
Compares string1 with string2 by comparing the characters in the string.The function returns the difference
between the characters at the first position where they disagree, or zero when the strings are equal:
<0 if string1 < string2
0 if string1 == string2
>0 if string1 > string2
Example:
.IF (@STRCMP(STR,'MAIN'))==0
; does STR equal 'MAIN'?
@STRLEN(string)
Returns the length of string as an integer.
Example:
SLEN .SET @STRLEN('string')
; SLEN = 6
@STRPOS(string1,string2[,start])
Returns the position of string2 in string1 as an integer. If string2 does not occur in string1, the last string
position + 1 is returned.
With start you can specify the starting position of the search. If you do not specify start, the search is
started from the beginning of string1.
Example:
ID .set @STRPOS('TASKING','ASK')
ID .set @STRPOS('TASKING','BUG')
; ID = 1
; ID = 7
@STRSUB(string,expression1,expression2)
Returns the substring from string as a string. expression1 is the starting position within string, and
expression2 is the length of the desired string. The assembler issues an error if either expression1 or
expression2 exceeds the length of string. Note that the first position in a string is position 0.
Example:
.DEFINE
ID
"@STRSUB('TASKING',3,4)"
;ID = 'KING'
93
TASKING VX-toolset for ARM User Guide
@THUMB()
Returns 1 if the assembler runs in Thumb mode by default or 0 if the assembler runs in ARM mode
(default). This function reflects the setting of the assembler option --thumb. So, it does not depend on
the .CODE16, .CODE32, .ARM or .THUMB directive.
If you are in a .CODE32 part and you specified --thumb, @THUMB() still returns 1.
3.9. Assembler Directives
An assembler directive is simply a message to the assembler. Assembler directives are not translated
into machine instructions. There are three main groups of assembler directives.
• Assembler directives that tell the assembler how to go about translating instructions into machine code.
This is the most typical form of assembly directives. Typically they tell the assembler where to put a
program in memory, what space to allocate for variables, and allow you to initialize memory with data.
When the assembly source is assembled, a location counter in the assembler keeps track of where
the code and data is to go in memory.
The following directives fall under this group:
• Assembly control directives
• Symbol definition and section directives
• Data definition / Storage allocation directives
• High Level Language (HLL) directives
• Directives that are interpreted by the macro preprocessor. These directives tell the macro preprocessor
how to manipulate your assembly code before it is actually being assembled. You can use these
directives to write macros and to write conditional source code. Parts of the code that do not match the
condition, will not be assembled at all. Unlike other directives, preprocessor directives can start in the
first column.
• Some directives act as assembler options and most of them indeed do have an equivalent assembler
(command line) option. The advantage of using a directive is that with such a directive you can overrule
the assembler option for a particular part of the code. Directives of this kind are called controls. A typical
example is to tell the assembler with an option to generate a list file while with the directives .NOLIST
and .LIST you overrule this option for a part of the code that you do not want to appear in the list file.
Directives of this kind sometimes are called controls.
Each assembler directive has its own syntax. Some assembler directives can be preceded with a label.
If you do not precede an assembler directive with a label, you must use white space instead (spaces or
tabs). You can use assembler directives in the assembly code as pseudo instructions. The assembler
recognizes both upper and lower case for directives.
94
Assembly Language
3.9.1. Overview of Assembler Directives
The following tables provide an overview of all assembler directives. For a detailed description of these
directives, refer to Section 3.9.2, Detailed Description of Assembler Directives.
Overview of assembly control directives
Directive
Description
.END
Indicates the end of an assembly module
.INCLUDE
Include file
.MESSAGE
Programmer generated message
Overview of symbol definition and section directives
Directive
Description
.EQU
Set permanent value to a symbol
.EXTERN
Import global section symbol
.GLOBAL
Declare global section symbol
.SECTION, .ENDSEC
Start a new section
.SET
Set temporary value to a symbol
.SIZE
Set size of symbol in the ELF symbol table
.SOURCE
Specify name of original C source file
.TYPE
Set symbol type in the ELF symbol table
.WEAK
Mark a symbol as 'weak'
Overview of data definition / storage allocation directives
Directive
Description
.ALIGN
Align location counter
.BS, .BSB, .BSH, .BSW,
.BSD
Define block storage (initialized)
.DB
Define byte
.DH
Define half word (16 bits)
.DW
Define word (32 bits)
.DD
Define double-word (64 bits)
.DOUBLE
Define a 64-bit floating-point constant
.DS, .DSB, .DSH, .DSW,
.DSD
Define storage
.FLOAT
Define a 32-bit floating-point constant
.OFFSET
Move location counter forwards
95
TASKING VX-toolset for ARM User Guide
Overview of macro preprocessor directives
Directive
Description
.DEFINE
Define substitution string
.BREAK
Break out of current macro expansion
.REPEAT, .ENDREP
Repeat sequence of source lines
.FOR, .ENDFOR
Repeat sequence of source lines n times
.IF, .ELIF, .ELSE
Conditional assembly directive
.ENDIF
End of conditional assembly directive
.MACRO, .ENDM
Define macro
.UNDEF
Undefine .DEFINE symbol or macro
Overview of listing control directives
Directive
Description
.LIST, .NOLIST
Print / do not print source lines to list file
.PAGE
Set top of page/size of page
.TITLE
Set program title in header of assembly list file
Overview of HLL directives
Directive
Description
.CALLS
Pass call tree information and/or stack usage information
.MISRAC
Pass MISRA-C information
Overview of ARM specific directives
Directive
Description
.CODE16, .CODE32
Treat instructions as Thumb or ARM instructions using pre-UAL syntax
.THUMB, .ARM
Treat instructions as Thumb or ARM instructions using UAL syntax
.LTORG
Assemble current literal pool immediately
3.9.2. Detailed Description of Assembler Directives
96
Assembly Language
.ALIGN
Syntax
.ALIGN expression
Description
With the .ALIGN directive you instruct the assembler to align the location counter. By default the assembler
aligns on one byte.
When the assembler encounters the .ALIGN directive, it advances the location counter to an address
that is aligned as specified by expression and places the next instruction or directive on that address.
The alignment is in minimal addressable units (MAUs). The assembler fills the ‘gap’ with NOP instructions
for code sections or with zeros for data sections. If the location counter is already aligned on the specified
alignment, it remains unchanged. The location of absolute sections will not be changed.
The expression must be a power of two: 2, 4, 8, 16, ... If you specify another value, the assembler changes
the alignment to the next higher power of two and issues a warning.
The assembler aligns sections automatically to the largest alignment value occurring in that section.
A label is not allowed before this directive.
Example
.SECTION .text
.ALIGN 4
; the assembler aligns
instruction ; this instruction at 4 MAUs and
; fills the 'gap' with NOP instructions.
.ENDSEC
.SECTION .text
.ALIGN 3
; WRONG: not a power of two, the
instruction ; assembler aligns this instruction at
; 4 MAUs and issues a warning.
.ENDSEC
97
TASKING VX-toolset for ARM User Guide
.BREAK
Syntax
.BREAK
Description
The .BREAK directive causes immediate termination of a macro expansion, a .FOR loop expansion or a
.REPEAT loop expansion. In case of nested loops or macros, the .BREAK directive returns to the previous
level of expansion.
The .BREAK directive is, for example, useful in combination with the .IF directive to terminate expansion
when error conditions are detected.
The assembler does not allow a label with this directive.
Example
.FOR MYVAR IN 10 TO 20
...
;
...
; assembly source lines
...
;
.IF MYVAR > 15
.BREAK
.ENDIF
.ENDFOR
98
Assembly Language
.BS, .BSB, .BSH, .BSW, .BSD
Syntax
[label]
[label]
[label]
[label]
[label]
.BS count[,value]
.BSB count[,value]
.BSH count[,value]
.BSW count[,value]
.BSD count[,value]
Description
With the .BS directive the assembler reserves a block of memory. The reserved block of memory is
initialized to the value of value, or zero if omitted.
With count you specify the number of minimum addressable units (MAUs) you want to reserve, and how
much the location counter will advance. The expression must be an integer greater than zero and cannot
contain any forward references to address labels (labels that have not yet been defined).
With value you can specify a value to initialize the block with. Only the least significant MAU of value is
used. If you omit value, the default is zero.
If you specify the optional label, it gets the value of the location counter at the start of the directive
processing.
You cannot initialize of a block of memory in sections with prefix .bss. In those sections, the
assembler issues a warning and only reserves space, just as with .DS.
The .BSB, .BSH, .BSW and .BSD directives are variants of the .BS directive.The difference is the number
of bits that are reserved for the count argument:
Directive
Reserved bits
.BSB
8
.BSH
16
.BSW
32
.BSD
64
Example
The .BSB directive is for example useful to define and initialize an array that is only partially filled:
.section .data
.DB 84,101,115,116
.BSB 96,0xFF
.endsec
; initialize 4 bytes
; reserve another 96 bytes, initialized with 0xFF
99
TASKING VX-toolset for ARM User Guide
Related Information
.DB (Define Memory)
.DS (Define Storage)
100
Assembly Language
.CALLS
Syntax
.CALLS ’caller’,’callee’
or
.CALLS ’caller’,’’,stack_usage[,...]
Description
The first syntax creates a call graph reference between caller and callee. The linker needs this information
to build a call graph. caller and callee are names of functions.
The second syntax specifies stack information. When callee is an empty name, this means we define the
stack usage of the function itself. The value specified is the stack usage in bytes at the time of the call
including the return address. A function can use multiple stacks.
This information is used by the linker to compute the used stack within the application. The information
is found in the generated linker map file within the Memory Usage.
This directive is generated by the C compiler. Use the .CALLS directive in hand-coded assembly when
the assembly code calls a C function. If you manually add .CALLS directives, make sure they connect
to the compiler generated .CALLS directives: the name of the caller must also be named as a callee in
another directive.
A label is not allowed before this directive.
Example
.CALLS 'main','nfunc'
Indicates that the function main calls the function nfunc.
.CALLS 'main','',8
The function main uses 8 bytes on the stack.
101
TASKING VX-toolset for ARM User Guide
.CODE16, .CODE32, .THUMB, .ARM
Syntax
.CODE16
.CODE32
.THUMB
.ARM
Description
With the .CODE16 directive you instruct the assembler to interpret subsequent instructions as 16-bit
Thumb instructions using the pre-UAL syntax until it encounters another mode directive or till it reaches
the end of the active section. This directive causes an implicit alignment of two bytes.
The .THUMB directive is the same as the .CODE16 directive except that the UAL syntax is expected.
With the .CODE32 directive you instruct the assembler to interpret subsequent instructions as 32-bit ARM
instructions using the pre-UAL syntax until it encounters another mode directive or till it reaches the end
of the active section. This directive causes an implicit alignment of four bytes. The assembler issues an
error message if .CODE32 is used in combination with option --cpu=ARMv7M.
The .ARM directive is the same as the .CODE32 directive except that the UAL syntax is expected.
These directives are useful when you have files that contain both ARM and Thumb instructions. The
directive must appear before the instruction change and between a .SECTION/.ENDSEC. The default
instruction set at the start of a section depends on the use of assembler option --thumb.
Example
.section .text
.code32
;following instructions are ARM instructions
;
.endsec
Related Information
Assembler option --thumb (Treat input as Thumb instructions)
102
Assembly Language
.DB, .DH, .DW, .DD
Syntax
[label]
[label]
[label]
[label]
.DB
.DH
.DW
.DD
argument[,argument]...
argument[,argument]...
argument[,argument]...
argument[,argument]...
Description
With these directive you can define memory. With each directive the assembler allocates and initializes
one or more bytes of memory for each argument.
If you specify the optional label, it gets the value of the location counter at the start of the directive
processing.
An argument can be a single- or multiple-character string constant, an expression or empty. Multiple
arguments must be separated by commas with no intervening spaces. Empty arguments are stored as
0 (zero).
The following table shows the number of bits initialized.
Directive
Bits
.DB
8
.DH
16
.DW
32
.DD
64
The value of the arguments must be in range with the size of the directive; floating-point numbers are not
allowed. If the evaluated argument is too large to be represented in a half word / word / double-word, the
assembler issues a warning and truncates the value.
String constants
Single-character strings are stored in a byte whose lower seven bits represent the ASCII value of the
character, for example:
.DB 'R'
; = 0x52
Multiple-character strings are stored in consecutive byte addresses, as shown below. The standard C
language escape characters like ‘\n’ are permitted.
.DB 'AB',,'C'
; = 0x41420043 (second argument is empty)
Example
When a string is supplied as argument of a directive that initializes multiple bytes, each character in the
string is stored in consecutive bytes whose lower seven bits represent the ASCII value of the character.
For example:
103
TASKING VX-toolset for ARM User Guide
HTBL: .DH 'ABC',,'D'
WTBL: .DW 'ABC'
Related Information
.BS (Block Storage)
.DS (Define Storage)
104
; results in 0x424100004400 , the 'C' is truncated
; results in 0x43424100
Assembly Language
.DEFINE
Syntax
.DEFINE symbol
string
Description
With the .DEFINE directive you define a substitution string that you can use on all following source lines.
The assembler searches all succeeding lines for an occurrence of symbol, and replaces it with string. If
the symbol occurs in a double quoted string it is also replaced. Strings between single quotes are not
expanded.
This directive is useful for providing better documentation in the source program. A symbol can consist
of letters, digits and underscore characters (_), and the first character cannot be a digit.
Macros represent a special case. .DEFINE directive translations will be applied to the macro definition
as it is encountered. When the macro is expanded, any active .DEFINE directive translations will again
be applied.
The assembler issues a warning if you redefine an existing symbol.
A label is not allowed before this directive.
Example
Suppose you defined the symbol LEN with the substitution string "32":
.DEFINE LEN "32"
Then you can use the symbol LEN for example as follows:
.DS LEN
.MESSAGE "The length is: LEN"
The assembler preprocessor replaces LEN with "32" and assembles the following lines:
.DS 32
.MESSAGE "The length is: 32"
Related Information
.UNDEF (Undefine a .DEFINE symbol)
.MACRO, .ENDM (Define a macro)
105
TASKING VX-toolset for ARM User Guide
.DS, .DSB, .DSH, .DSW, .DSD
Syntax
[label]
[label]
[label]
[label]
[label]
.DS expression
.DSB expression
.DSH expression
.DSW expression
.DSD expression
Description
With the .DS directive the assembler reserves a block in memory. The reserved block of memory is not
initialized to any value.
With the expression you specify the number of MAUs (Minimal Addressable Units) that you want to
reserve, and how much the location counter will advance. The expression must evaluate to an integer
greater than zero and cannot contain any forward references (symbols that have not yet been defined).
If you specify the optional label, it gets the value of the location counter at the start of the directive
processing.
The .DSB, .DSH, .DSW and .DSD directives are variants of the .DS directive.The difference is the number
of bits that are reserved per expression argument:
Directive
Reserved bits
.DSB
8
.DSH
16
.DSW
32
.DSD
64
Example
RES:
.section .bss
.DS 5+3
; allocate 8 bytes
.endsec
Related Information
.BS (Block Storage)
.DB (Define Memory)
106
Assembly Language
.END
Syntax
.END
Description
With the optional .END directive you tell the assembler that the end of the module is reached. If the
assembler finds assembly source lines beyond the .END directive, it ignores those lines and issues a
warning.
You cannot use the .END directive in a macro expansion.
The assembler does not allow a label with this directive.
Example
.section .text
; source lines
.endsec
.END
; End of assembly module
107
TASKING VX-toolset for ARM User Guide
.EQU
Syntax
symbol .EQU expression
Description
With the .EQU directive you assign the value of expression to symbol permanently. The expression can
be relative or absolute. Once defined, you cannot redefine the symbol. With the .GLOBAL directive you
can declare the symbol global.
Example
To assign the value 0x400 permanently to the symbol MYSYMBOL:
MYSYMBOL .EQU
0x4000
You cannot redefine the symbol MYSYMBOL after this.
Related Information
.SET (Set temporary value to a symbol)
108
Assembly Language
.EXTERN
Syntax
.EXTERN symbol[,symbol]...
Description
With the .EXTERN directive you define an external symbol. It means that the specified symbol is referenced
in the current module, but is not defined within the current module. This symbol must either have been
defined outside of any module or declared as globally accessible within another module with the .GLOBAL
directive.
If you do not use the .EXTERN directive and the symbol is not defined within the current module, the
assembler issues a warning and inserts the .EXTERN directive.
A label is not allowed with this directive.
Example
.EXTERN AA,CC,DD
;defined elsewhere
Related Information
.GLOBAL (Declare global section symbol)
109
TASKING VX-toolset for ARM User Guide
.FLOAT, .DOUBLE
Syntax
[label].FLOAT expression[,expression]...
[label].DOUBLE expression[,expression]...
Description
With the .FLOAT or .DOUBLE directive the assembler allocates and initializes a floating-point number
(32 bits) or a double (64 bits) in memory for each argument.
An expression can be:
• a floating-point expression
• NULL (indicated by two adjacent commas: ,,)
You can represent a constant as a signed whole number with fraction or with the 'e' format as used in the
C language. For example, 12.457 and +0.27E-13 are legal floating-point constants.
If the evaluated argument is too large to be represented in a single word / double-word, the assembler
issues an error and truncates the value.
If you specify label, it gets the value of the location counter at the start of the directive processing.
Example
FLT:
DBL:
.FLOAT
.DOUBLE
12.457,+0.27E-13
12.457,+0.27E-13
Related Information
.DS (Define Storage)
110
Assembly Language
.FOR, .ENDFOR
Syntax
[label] .FOR var IN expression[,expression]...
....
.ENDFOR
or:
[label] .FOR var IN start TO end [STEP step]
....
.ENDFOR
Description
With the .FOR/.ENDFOR directive you can repeat a block of assembly source lines with an iterator. As
shown by the syntax, you can use the .FOR/.ENDFOR in two ways.
1. In the first method, the block of source statements is repeated as many times as the number of
arguments following IN. If you use the symbol var in the assembly lines between .FOR and .ENDFOR,
for each repetition the symbol var is substituted by a subsequent expression from the argument list. If
the argument is a null, then the block is repeated with each occurrence of the symbol var removed. If
an argument includes an embedded blank or other assembler-significant character, it must be enclosed
with single quotes.
2. In the second method, the block of source statements is repeated using the symbol var as a counter.
The counter passes all integer values from start to end with a step. If you do not specify step, the
counter is increased by one for every repetition.
If you specify label, it gets the value of the location counter at the start of the directive processing.
Example
In the following example the block of source statements is repeated 4 times (there are four arguments).
With the .DB directive you allocate and initialize a byte of memory for each repetition of the loop (a word
for the .DW directive). Effectively, the preprocessor duplicates the .DB and .DW directives four times in
the assembly source.
.FOR VAR1 IN 1,2+3,4,12
.DB VAR1
.DW (VAR1*VAR1)
.ENDFOR
In the following example the loop is repeated 16 times. With the .DW directive you allocate and initialize
four bytes of memory for each repetition of the loop. Effectively, the preprocessor duplicates the .DW
directive 16 times in the assembled file, and substitutes VAR2 with the subsequent numbers.
.FOR VAR2 IN 1 to 0x10
.DW (VAR1*VAR1)
.ENDFOR
111
TASKING VX-toolset for ARM User Guide
Related Information
.REPEAT,.ENDREP (Repeat sequence of source lines)
112
Assembly Language
.GLOBAL
Syntax
.GLOBAL symbol[,symbol]...
Description
All symbols or labels defined in the current section or module are local to the module by default. You can
change this default behavior with assembler option --symbol-scope=global.
With the .GLOBAL directive you declare one of more symbols as global. It means that the specified
symbols are defined within the current section or module, and that those definitions should be accessible
by all modules.
To access a symbol, defined with .GLOBAL, from another module, use the .EXTERN directive.
Only program labels and symbols defined with .EQU can be made global.
If the symbols that appear in the operand field are not used in the module, the assembler gives a warning.
The assembler does not allow a label with this directive.
Example
LOOPA .EQU 1
.GLOBAL
LOOPA
; definition of symbol LOOPA
; LOOPA will be globally
; accessible by other modules
Related Information
.EXTERN (Import global section symbol)
113
TASKING VX-toolset for ARM User Guide
.IF, .ELIF, .ELSE, .ENDIF
Syntax
.IF expression
.
.
[.ELIF expression] ; the .ELIF directive is optional
.
.
[.ELSE]
; the .ELSE directive is optional
.
.
.ENDIF
Description
With the .IF/.ENDIF directives you can create a part of conditional assembly code. The assembler
assembles only the code that matches a specified condition.
The expression must evaluate to an absolute integer and cannot contain forward references. If expression
evaluates to zero, the IF-condition is considered FALSE, any non-zero result of expression is considered
as TRUE.
If the optional .ELSE and/or .ELIF directives are not present, then the source statements following the
.IF directive and up to the next .ENDIF directive will be included as part of the source file being assembled
only if the expression had a non-zero result.
If the expression has a value of zero, the source file will be assembled as if those statements between
the .IF and the .ENDIF directives were never encountered.
If the .ELSE directive is present and expression has a nonzero result, then the statements between the
.IF and .ELSE directives will be assembled, and the statement between the .ELSE and .ENDIF directives
will be skipped. Alternatively, if expression has a value of zero, then the statements between the .IF and
.ELSE directives will be skipped, and the statements between the .ELSE and .ENDIF directives will be
assembled.
You can nest .IF directives to any level. The .ELSE and .ELIF directive always refer to the nearest
previous .IF directive.
A label is not allowed with this directive.
Example
Suppose you have an assemble source file with specific code for a test version, for a demo version and
for the final version. Within the assembly source you define this code conditionally as follows:
.IF
... ;
.ELIF
... ;
.ELSE
114
TEST
code for the test version
DEMO
code for the demo version
Assembly Language
... ; code for the final version
.ENDIF
Before assembling the file you can set the values of the symbols TEST and DEMO in the assembly source
before the .IF directive is reached. For example, to assemble the demo version:
TEST .SET 0
DEMO .SET 1
Related Information
Assembler option --define (Define preprocessor macro)
115
TASKING VX-toolset for ARM User Guide
.INCLUDE
Syntax
.INCLUDE "filename" | <filename>
Description
With the .INCLUDE directive you include another file at the exact location where the .INCLUDE occurs.
This happens before the resulting file is assembled. The .INCLUDE directive works similarly to the
#include statement in C. The source from the include file is assembled as if it followed the point of the
.INCLUDE directive. When the end of the included file is reached, assembly of the original file continues.
The string specifies the filename of the file to be included. The filename must be compatible with the
operating system (forward/backward slashes) and can contain a directory specification. If you omit a
filename extension, the assembler assumes the extension .asm.
If an absolute pathname is specified, the assembler searches for that file. If a relative path is specified
or just a filename, the order in which the assembler searches for include files is:
1. The current directory if you use the "filename" construction.
The current directory is not searched if you use the <filename> syntax.
2. The path that is specified with the assembler option --include-directory.
3. The path that is specified in the environment variable ASARMINC when the product was installed.
4. The default include directory in the installation directory.
The assembler does not allow a label with this directive.
The state of the assembler is not changed when an include file is processed. The lines of the include file
are inserted just as if they belong to the file where it is included.
Example
Suppose that your assembly source file test.src contains the following line:
.INCLUDE "c:\myincludes\myinc.inc"
The assembler issues an error if it cannot find the file at the specified location.
.INCLUDE "myinc.inc"
The assembler searches the file myinc.inc according to the rules described above.
Related Information
Assembler option --include-directory (Add directory to include file search path)
116
Assembly Language
.LIST, .NOLIST
Syntax
.NOLIST
.
. ; assembly source lines
.
.LIST
Description
If you generate a list file with the assembler option --list-file, you can use the directives .LIST and
.NOLIST to specify which source lines the assembler must write to the list file. Without the assembler
option --list-file these directives have no effect. The directives take effect starting at the next line.
The assembler prints all source lines to the list file, until it encounters a .NOLIST directive. The assembler
does not print the .NOLIST directive and subsequent source lines. When the assembler encounters the
.LIST directive, it resumes printing to the list file.
It is possible to nest the .LIST/.NOLIST directives.
Example
Suppose you assemble the following assembly code with the assembler option --list-file:
.SECTION .text
... ; source line 1
.NOLIST
... ; source line 2
.LIST
... ; source line 3
.ENDSEC
The assembler generates a list file with the following lines:
.SECTION .text
... ; source line 1
... ; source line 3
.ENDSEC
Related Information
Assembler option --list-file (Generate list file)
117
TASKING VX-toolset for ARM User Guide
.LTORG
Syntax
.LTORG
Description
With this directive you force the assembler to generate a literal pool (data pocket) at the current location.
All literals from the LDR= pseudo-instructions (except those which could be translated to MOV or MVN
instructions) between the previous literal pool and the current location will be assembled in a new literal
pool using .DW directives.
By default, the assembler generates a literal pool at the end of a code section, i.e. the .ENDSEC directive
at the end of a code section causes an implicit .LTORG directive. However, the default literal pool may
be out-of-reach of one or more LDR= pseudo-instructions in the section. In that case the assembler issues
an error message and you should insert .LTORG directives at proper locations in the section.
Example
.section .text
;
LDR r1,=0x12345678
; code
.ltorg
; literal pool contains the literal &0x12345678
;
;
.endsec
; default literal pool is empty
Related Information
LDR= ARM generic instruction
LDR= Thumb generic instruction
118
Assembly Language
.MACRO, .ENDM
Syntax
macro_name .MACRO [argument[,argument]...]
...
macro_definition_statements
...
.ENDM
Description
With the .MACRO directive you define a macro. Macros provide a shorthand method for handling a repeated
pattern of code or group of instructions. You can define the pattern as a macro, and then call the macro
at the points in the program where the pattern would repeat.
The definition of a macro consists of three parts:
• Header, which assigns a name to the macro and defines the arguments (.MACRO directive).
• Body, which contains the code or instructions to be inserted when the macro is called.
• Terminator, which indicates the end of the macro definition (.ENDM directive).
The arguments are symbolic names that the macro processor replaces with the literal arguments when
the macro is expanded (called). Each formal argument must follow the same rules as symbol names: the
name can consist of letters, digits and underscore characters (_). The first character cannot be a digit.
Argument names cannot start with a percent sign (%).
Macro definitions can be nested but the nested macro will not be defined until the primary macro is
expanded.
You can use the following operators in macro definition statements:
Operator
Name
Description
\
Macro argument concatenation Concatenates a macro argument with adjacent
alphanumeric characters.
?
Return decimal value of symbol Substitutes the ?symbol sequence with a character string
that represents the decimal value of the symbol.
%
Return hex value of symbol
Substitutes the %symbol sequence with a character string
that represents the hexadecimal value of the symbol.
“
Macro string delimiter
Allows the use of macro arguments as literal strings.
^
Macro local label override
Prevents name mangling on labels in macros.
Example
The macro definition:
macro_a .MACRO
.db arg1
arg1,arg2
;header
;body
119
TASKING VX-toolset for ARM User Guide
.dw (arg1*arg2)
.ENDM
The macro call:
.section far
macro_a 2,3
.endsec
The macro expands as follows:
.db 2
.dw (2*3)
Related Information
Section 3.10, Macro Operations
.DEFINE (Define a substitution string)
120
;terminator
Assembly Language
.MESSAGE
Syntax
.MESSAGE type [{str|exp}[,{str|exp}]...]
Description
With the .MESSAGE directive you tell the assembler to print a message to stderr during the assembling
process.
With type you can specify the following types of messages:
I
Information message. Error and warning counts are not affected and the assembler continues
the assembling process.
W
Warning message. Increments the warning count and the assembler continues the assembling
process.
E
Error message. Increments the error count and the assembler continues the assembling process.
F
Fatal error message. The assembler immediately aborts the assembling process and generates
no object file or list file.
An arbitrary number of strings and expressions, in any order but separated by commas with no intervening
white space, can be specified to describe the nature of the generated message. If you use expressions,
the assembler outputs the result. The assembler outputs a space between each argument.
The error and warning counts will not be affected. The .MESSAGE directive is for example useful in
combination with conditional assembly to indicate which part is assembled. The assembling process
proceeds normally after the message has been printed.
This directive has no effect on the exit code of the assembler.
A label is not allowed with this directive.
Example
.MESSAGE I 'Generating tables'
ID .EQU 4
.MESSAGE E 'The value of ID is',ID
.DEFINE LONG "SHORT"
.MESSAGE I 'This is a LONG string'
.MESSAGE I "This is a LONG string"
Within single quotes, the defined symbol LONG is not expanded. Within double quotes the symbol LONG
is expanded so the actual message is printed as:
This is a LONG string
This is a SHORT string
121
TASKING VX-toolset for ARM User Guide
.MISRAC
Syntax
.MISRAC string
Description
The C compiler can generate the .MISRAC directive to pass the compiler’s MISRA-C settings to the object
file. The linker performs checks on these settings and can generate a report. It is not recommended to
use this directive in hand-coded assembly.
Example
.MISRAC 'MISRA-C:2004,64,e2,0b,e,e11,27,6,ef83,e1,ef,66,cb75,af1,eff,e7,
e7f,8d,63,87ff7,6ff3,4'
Related Information
Section 4.7.2, C Code Checking: MISRA-C
C compiler option --misrac
122
Assembly Language
.OFFSET
Syntax
.OFFSET expression
Description
With the .OFFSET directive you tell the assembler to give the location counter a new offset relative to the
start of the section.
When the assembler encounters the .OFFSET directive, it moves the location counter forwards to the
specified address, relative to the start of the section, and places the next instruction on that address. If
you specify an address equal to or lower than the current position of the location counter, the assembler
issues an error.
A label is not allowed with this directive.
Example
.SECTION .text
nop
nop
nop
.OFFSET 0x20
; the assembler places
nop
; this instruction at address 0x20
; relative to the start of the section.
.ENDSEC
.SECTION .text
nop
nop
nop
.OFFSET 0x02
; WRONG: the current position of the
nop
; location counter is 0x0C.
.ENDSEC
Related Information
.SECTION (Start a new section)
123
TASKING VX-toolset for ARM User Guide
.PAGE
Syntax
.PAGE [pagewidth[,pagelength[,blanktop[,blankbtm[,blankleft]]]]
Default
.PAGE 132,72,0,0,0
Description
If you generate a list file with the assembler option --list-file, you can use the directive .PAGE to format
the generated list file.
The arguments may be any positive absolute integer expression, and must be separated by commas.
pagewidth
Number of columns per line. The default is 132, the minimum is 40.
pagelength
Total number of lines per page. The default is 72, the minimum is 10.
As a special case, a page length of 0 turns off page breaks.
blanktop
Number of blank lines at the top of the page. The default is 0, the
minimum is 0 and the maximum must be a value so that (blanktop +
blankbtm) ≤ (pagelength - 10).
blankbtm
Number of blank lines at the bottom of the page. The default is 0, the
minimum is 0 and the maximum must be a value so that (blanktop +
blankbtm) ≤ (pagelength - 10).
blankleft
Number of blank columns at the left of the page. The default is 0, the
minimum is 0, and the maximum must maintain the relationship: blankleft
< pagewidth.
If you use the .PAGE directive without arguments, it causes a 'formfeed': the next source line is printed
on the next page in the list file. The .PAGE directive itself is not printed.
You can omit an argument by using two adjacent commas. If the remaining arguments after an argument
are all empty, you can omit them.
Example
.PAGE
; formfeed, the next source line is printed
; on the next page in the list file.
.PAGE 96
; set page width to 96. Note that you can
; omit the last four arguments.
.PAGE ,,3,3
; use 3 line top/bottom margins.
Related Information
.TITLE (Set program title in header of assembler list file)
124
Assembly Language
Assembler option --list-file
125
TASKING VX-toolset for ARM User Guide
.REPEAT, .ENDREP
Syntax
[label] .REPEAT expression
....
.ENDREP
Description
With the .REPEAT/.ENDREP directive you can repeat a sequence of assembly source lines.With expression
you specify the number of times the loop is repeated. If the expression evaluates to a number less than
or equal to 0, the sequence of lines will not be included in the assembler output. The expression result
must be an absolute integer and cannot contain any forward references (symbols that have not already
been defined). The .REPEAT directive may be nested to any level.
If you specify label, it gets the value of the location counter at the start of the directive processing.
Example
In this example the loop is repeated 3 times. Effectively, the preprocessor repeats the source lines (.DB
10) three times, then the assembler assembles the result:
.REPEAT 3
.DB 10 ; assembly source lines
.ENDFOR
Related Information
.FOR,.ENDFOR (Repeat sequence of source lines n times)
126
Assembly Language
.SECTION, .ENDSEC
Syntax
.SECTION name[,at( address)]
....
.ENDSEC
Description
With the .SECTION directive you define a new section. Each time you use the .SECTION directive, a
new section is created. It is possible to create multiple sections with exactly the same name.
If you define a section, you must always specify the section name. The names have a special meaning
to the locating process and have to start with a predefined name, optionally extended by a dot '.' and a
user defined name. The predefined section name also determines the type of the section (code, data or
debug). Optionally, you can specify the at() attribute to locate a section at a specific address.
You can use the following predefined section names:
Section name Description
Section type
.text
Code sections
code
.data
Initialized data
data
.bss
Uninitialized data (cleared)
data
.rodata
ROM data (constants)
data
.debug
Debug sections
debug
Sections of a specified type are located by the linker in a memory space. The space names are defined
in a so-called 'linker script file' (files with the extension .lsl) delivered with the product in the directory
installation-dir\include.lsl.
Example
.SECTION .data
;;
.ENDSEC
; Declare a .data section
.SECTION .data.abs, at(0x0)
; Declare a .data.abs section at
; an absolute address
;;
.ENDSEC
Related Information
.OFFSET (Move location counter forwards)
127
TASKING VX-toolset for ARM User Guide
.SET
Syntax
symbol
.SET
expression
.SET
symbol
expression
Description
With the .SET directive you assign the value of expression to symbol temporarily. If a symbol was defined
with the .SET directive, you can redefine that symbol in another part of the assembly source, using the
.SET directive again. Symbols that you define with the .SET directive are always local: you cannot define
the symbol global with the .GLOBAL directive.
The .SET directive is useful in establishing temporary or reusable counters within macros. expression
must be absolute and cannot include a symbol that is not yet defined (no forward references are allowed).
Example
COUNT
.SET
0
; Initialize count. Later on you can
; assign other values to the symbol
Related Information
.EQU (Set permanent value to a symbol)
128
Assembly Language
.SIZE
Syntax
.SIZE
symbol,expression
Description
With the .SIZE directive you set the size of the specified symbol to the value represented by expression.
The .SIZE directive may occur anywhere in the source file unless the specified symbol is a function. In
this case, the .SIZE directive must occur after the function has been defined.
Example
.section
.text
.global main
.arm
.align 4
; Function main
main:
.type
func
;
.SIZE
main,$-main
.endsec
Related Information
.TYPE (Set symbol type)
129
TASKING VX-toolset for ARM User Guide
.SOURCE
Syntax
.SOURCE string
Description
With the .SOURCE directive you specify the name of the original C source module. This directive is
generated by the C compiler. You do not need this directive in hand-written assembly.
Example
.SOURCE "main.c"
130
Assembly Language
.TITLE
Syntax
.TITLE ["string"]
Default
.TITLE ""
Description
If you generate a list file with the assembler option --list-file, you can use the .TITLE directive to specify
the program title which is printed at the top of each page in the assembler list file.
If you use the .TITLE directive without the argument, the title becomes empty. This is also the default.
The specified title is valid until the assembler encounters a new .TITLE directive.
The .TITLE directive itself will not be printed in the source listing.
If the page width is too small for the title to fit in the header, it will be truncated.
Example
.TITLE
"This is the title"
Related Information
.PAGE (Format the assembler list file)
Assembler option --list-file
131
TASKING VX-toolset for ARM User Guide
.TYPE
Syntax
symbol
.TYPE
typeid
Description
With the .TYPE directive you set a symbol's type to the specified value in the ELF symbol table. Valid
symbol types are:
FUNC
The symbol is associated with a function or other executable code.
OBJECT The symbol is associated with an object such as a variable, an array, or a structure.
FILE
The symbol name represents the filename of the compilation unit.
Labels in code sections have the default type FUNC. Labels in data sections have the default type OBJECT.
Example
Afunc:
.type
func
Related Information
.SIZE (Set symbol size)
132
Assembly Language
.UNDEF
Syntax
.UNDEF symbol
Description
With the .UNDEF directive you can undefine a substitution string that was previously defined with the
.DEFINE directive. The substitution string associated with symbol is released, and symbol will no longer
represent a valid .DEFINE substitution or macro.
The assembler issues a warning if you redefine an existing symbol.
The assembler does not allow a label with this directive.
Example
The following example undefines the LEN substitution string that was previously defined with the .DEFINE
directive:
.UNDEF LEN
Related Information
.DEFINE (Define a substitution string)
.MACRO,.ENDM (Define a macro)
133
TASKING VX-toolset for ARM User Guide
.WEAK
Syntax
.WEAK symbol[,symbol]...
Description
With the .WEAK directive you mark one or more symbols as 'weak'. The symbol can be defined in the
same module with the .GLOBAL directive or the .EXTERN directive. If the symbol does not already exist,
it will be created.
A 'weak' external reference is resolved by the linker when a global (or weak) definition is found in one of
the object files. However, a weak reference will not cause the extraction of a module from a library to
resolve the reference.
You can overrule a weak definition with a .GLOBAL definition in another module. The linker will not
complain about the duplicate definition, and ignore the weak definition.
Only program labels and symbols defined with .EQU can be made weak.
Example
LOOPA .EQU 1
.GLOBAL
LOOPA
.WEAK LOOPA
;
;
;
;
definition of symbol LOOPA
LOOPA will be globally
accessible by other modules
mark symbol LOOPA as weak
Related Information
.EXTERN (Import global section symbol)
.GLOBAL (Declare global section symbol)
134
Assembly Language
3.10. Macro Operations
Macros provide a shorthand method for inserting a repeated pattern of code or group of instructions. You
can define the pattern as a macro, and then call the macro at the points in the program where the pattern
would repeat.
Some patterns contain variable entries which change for each repetition of the pattern. Others are subject
to conditional assembly.
When a macro is called, the assembler executes the macro and replaces the call by the resulting in-line
source statements. 'In-line' means that all replacements act as if they are on the same line as the macro
call. The generated statements may contain substitutable arguments. The statements produced by a
macro can be any processor instruction, almost any assembler directive, or any previously-defined macro.
Source statements resulting from a macro call are subject to the same conditions and restrictions as any
other statements.
Macros can be nested. The assembler processes nested macros when the outer macro is expanded.
3.10.1. Defining a Macro
The first step in using a macro is to define it.
The definition of a macro consists of three parts:
• Header, which assigns a name to the macro and defines the arguments (.MACRO directive).
• Body, which contains the code or instructions to be inserted when the macro is called.
• Terminator, which indicates the end of the macro definition (.ENDM directive).
A macro definition takes the following form:
macro_name .MACRO [argument[,argument]...]
...
macro_definition_statements
...
.ENDM
For more information on the definition see the description of the .MACRO directive.
3.10.2. Calling a Macro
To invoke a macro, construct a source statement with the following format:
[label] macro_name [argument[,argument]...]
[; comment]
where,
label
An optional label that corresponds to the value of the location counter
at the start of the macro expansion.
macro_name
The name of the macro. This may not start in the first column.
135
TASKING VX-toolset for ARM User Guide
argument
One or more optional, substitutable arguments. Multiple arguments
must be separated by commas.
comment
An optional comment.
The following applies to macro arguments:
• Each argument must correspond one-to-one with the formal arguments of the macro definition. If the
macro call does not contain the same number of arguments as the macro definition, the assembler
issues a warning.
• If an argument has an embedded comma or space, you must surround the argument by single quotes
(').
• You can declare a macro call argument as null in three ways:
• enter delimiting commas in succession with no intervening spaces
macroname ARG1,,ARG3 ; the second argument is a null argument
• terminate the argument list with a comma, the arguments that normally would follow, are now
considered null
macroname ARG1,
; the second and all following arguments are null
• declare the argument as a null string
• No character is substituted in the generated statements that reference a null argument.
3.10.3. Using Operators for Macro Arguments
The assembler recognizes certain text operators within macro definitions which allow text substitution of
arguments during macro expansion. You can use these operators for text concatenation, numeric
conversion, and string handling.
Operator
Name
\
Macro argument concatenation Concatenates a macro argument with adjacent
alphanumeric characters.
?
Return decimal value of symbol Substitutes the ?symbol sequence with a character string
that represents the decimal value of the symbol.
%
Return hex value of symbol
Substitutes the %symbol sequence with a character string
that represents the hexadecimal value of the symbol.
“
Macro string delimiter
Allows the use of macro arguments as literal strings.
^
Macro local label override
Prevents name mangling on labels in macros.
136
Description
Assembly Language
Example: Argument Concatenation Operator - \
Consider the following macro definition:
MAC_A .MACRO reg,val
sub
r\reg,r\reg,#val
.ENDM
The macro is called as follows:
MAC_A 2,1
The macro expands as follows:
sub r2,r2,#1
The macro preprocessor substitutes the character '2' for the argument reg, and the character '1' for the
argument val. The concatenation operator (\) indicates to the macro preprocessor that the substitution
characters for the arguments are to be concatenated with the characters 'r'.
Without the '\' operator the macro would expand as:
sub rreg,rreg,#1
which results in an assembler error (invalid operand).
Example: Decimal Value Operator - ?
Instead of substituting the formal arguments with the actual macro call arguments, you can also use the
value of the macro call arguments.
Consider the following source code that calls the macro MAC_A after the argument AVAL has been set to
1.
AVAL .SET 1
MAC_A 2,AVAL
If you want to replace the argument val with the value of AVAL rather than with the literal string 'AVAL',
you can use the ? operator and modify the macro as follows:
MAC_A .MACRO reg,val
sub
r\reg,r\reg,#?val
.ENDM
Example: Hex Value Operator - %
The percent sign (%) is similar to the standard decimal value operator (?) except that it returns the
hexadecimal value of a symbol.
137
TASKING VX-toolset for ARM User Guide
Consider the following macro definition:
GEN_LAB
.MACRO
LAB\%VAL STMT
.ENDM
LAB,VAL,STMT
The macro is called after NUM has been set to 10:
NUM
.SET
GEN_LAB
10
HEX,NUM,NOP
The macro expands as follows:
HEXA NOP
The %VAL argument is replaced by the character 'A' which represents the hexadecimal value 10 of the
argument VAL.
Example: Argument String Operator - "
To generate a literal string, enclosed by single quotes ('), you must use the argument string operator (")
in the macro definition.
Consider the following macro definition:
STR_MAC
.DB
.ENDM
.MACRO STRING
"STRING"
The macro is called as follows:
STR_MAC
ABCD
The macro expands as follows:
.DB
'ABCD'
Within double quotes .DEFINE directive definitions can be expanded. Take care when using constructions
with single quotes and double quotes to avoid inappropriate expansions. Since .DEFINE expansion
occurs before macro substitution, any .DEFINE symbols are replaced first within a macro argument string:
.DEFINE LONG 'short'
STR_MAC
.MACRO STRING
.MESSAGE I 'This is a LONG STRING'
.MESSAGE I "This is a LONG STRING"
.ENDM
If the macro is called as follows:
STR_MAC
138
sentence
Assembly Language
it expands as:
.MESSAGE I 'This is a LONG STRING'
.MESSAGE I 'This is a short sentence'
Macro Local Label Override Operator - ^
If you use labels in macros, the assembler normally generates another unique name for the labels (such
as LOCAL__M_L000001).
The macro ^-operator prevents name mangling on macro local labels.
Consider the following macro definition:
INIT .MACRO
LOCAL: ldr
.ENDM
addr
r0,^addr
The macro is called as follows:
LOCAL:
INIT LOCAL
The macro expands as:
LOCAL__M_L000001: ldr
r0,LOCAL
If you would not have used the ^ operator, the macro preprocessor would choose another name for LOCAL
because the label already exists. The macro would expand like:
LOCAL__M_L000001: ldr
r0,LOCAL__M_L000001
3.11. Generic Instructions
The assembler supports so-called 'generic instructions'. Generic instructions are pseudo instructions (no
instructions from the instruction set). Depending on the situation in which a generic instruction is used,
the assembler replaces the generic instruction with appropriate real assembly instruction(s).
3.11.1. ARM Generic Instructions
The ARM assembler recognizes the following generic instructions in ARM mode:
ADR, ADRL, ADRLL ARM generics
Load a PC-relative address into a register. The address is specified as a target label. The assembler
generates one (ADR), two (ADRL) or three (ADRLL) generic DPR instruction (called ADR) and one, two
or three PC-relative relocation types for the target label. The linker evaluates the relocation types (calculate
the PC-relative offset) and generates one, two or three add or sub instructions each with an 8-bit immediate
operand plus a 4-bit rotation. If the offset cannot be encoded the linker generates an error message.
139
TASKING VX-toolset for ARM User Guide
Instruction
Replacement
ADRcond Rd,label
ADRcond Rd, PC, @ALUPCREL(label,0,1)
ADRLcond Rd,label
ADRcond Rd, PC, @ALUPCREL(label,0,0)
ADRcond Rd, Rd, @ALUPCREL(label,1,1)
ADRLLcond Rd,label ADRcond Rd, PC, @ALUPCREL(label,0,0)
ADRcond Rd, Rd, @ALUPCREL(label,1,0)
ADRcond Rd, Rd, @ALUPCREL(label,2,1)
3.11.2. ARM and Thumb-2 32-bit Generic Instructions
LDR= ARM and Thumb-2 generic
Load an address or a 32-bit constant value into a register. If the constant or its bitwise negation can be
encoded, then the assembler will generate a MOV or a MVN instruction. Otherwise the assembler places
the constant or the address in a literal pool and generates a PC-relative LDR instruction that loads the
value from the literal pool.
Instruction
Replacement
Remarks
LDRcond
Rd,=expr
MOVcond Rd, #expr
If expr can be encoded
MVNcond Rd,#@LSW(~(expr))
If ~expr can be encoded
LDRcond Rd,ltpool
;; code
ltpool:
.DW expr
If expr is external or PC-relative, or cannot
be encoded
The PC-relative offset from the LDR instruction to the value in the literal pool must be positive and less
than 4 kB. By default the assembler will place a literal pool at the end of each code section. If the default
literal pool is out-of-range you will have to ensure that there is another literal pool within range by means
of the .LTORG directive.
VLDR= ARM and Thumb-2 generic
Load a 32-bit or 64-bit floating-point constant value into a register. The assembler places the constant in
a literal pool and generates a PC-relative VLDR instruction that loads the value from the literal pool.
Instruction
Replacement
VLDRcond Sd,=expr
VLDRcond Sd,ltpool
;; code
ltpool:
.FLOAT expr
VLDRcond Dd,=expr
VLDRcond Dd,ltpool
;; code
ltpool:
.DOUBLE expr
140
Assembly Language
MOV32 ARM and Thumb-2 generic
Load an address or a 32-bit constant value into a register.
Instruction
Replacement
MOV32cond Rd,=expr MOVWcond Rd, #@LSH(expr)
MOVTcond Rd, #@MSH(expr)
MOVWcond Rd, #expr
MOVTcond Rd, #expr
Remarks
If expr is internal and absolute
If expr is external or relocatable
ARM and Thumb-2 generic DPR inversions for immediate operands
For data processing instructions (DPR) which operate on an immediate operand, the operand value must
be encoded as an 8-bit value plus a 4-bit even rotation value. If a value does not fit in such an encoding,
it could be possible that the negated value (-value) or the bitwise negated value (~value) does fit in such
an encoding. In that case the assembler will replcace the DPR instruction by its inverse DPR instruction
operating on the negated value.
Instruction
Replacement (if #-imm or #~imm can be encoded)
ADDcond Rd,Rn,#imm32
SUBcond Rd,Rn,#-(imm32)
ADDcondS Rd,Rn,#imm32 SUBcondS Rd,Rn,#-(imm32)
ADDWcond Rd,Rn,#imm12 SUBWcond Rd,Rn,#-(imm12)
SUBcond Rd,Rn,#imm32
ADDcond Rd,Rn,#-(imm32)
SUBcondS Rd,Rn,#imm32 ADDcondS Rd,Rn,#-(imm32)
SUBWcond Rd,Rn,#imm12 ADDWcond Rd,Rn,#-(imm12)
ADCcond Rd,Rn,#imm32
SBCcond Rd,Rn,#-(imm32)
ADCcondS Rd,Rn,#imm32 SBCcondS Rd,Rn,#-(imm32)
SBCcond Rd,Rn,#imm32
ADCcond Rd,Rn,#-(imm32)
SBCcondS Rd,Rn,#imm32 ADCcondS Rd,Rn,#-(imm32)
ANDcond Rd,Rn,#imm32
BICcond Rd,Rn,#@LSW(~(imm32))
ANDcondS Rd,Rn,#imm32 BICcondS Rd,Rn,#@LSW(~(imm32))
BICcond Rd,Rn,#imm32
ANDcond Rd,Rn,#@LSW(~(imm32))
BICcondS Rd,Rn,#imm32
ANDcondS Rd,Rn,#@LSW(~(imm32))
CMNcond Rn,#imm32
CMPcond Rn,#-(imm)
CMPcond Rn,#imm32
CMNcond Rn,#-(imm)
MOVcond Rd,#imm32
MVNcond Rd,#@LSW(~(imm32))
MOVcondS Rd,#imm32
MVNcondS Rd,#@LSW(~(imm32))
MVNcond Rd,#imm32
MOVcond Rd,#@LSW(~(imm32))
MVNcondS Rd,#imm32
MOVcondS Rd,#@LSW(~(imm32))
141
TASKING VX-toolset for ARM User Guide
Note that the built-in function @LSW() must be used on the bitwise negated immediate value because
all values are interpreted by the assembler as 64-bit signed values. The @LSW() function returns the
lowest 32 bits.
3.11.3. Thumb 16-bit Generic Instructions
The ARM assembler recognizes the following generic instructions in Thumb mode:
ADR Thumb 16-bit generic
Load a PC-relative address into a low register. The address is specified as a target label. The PC-relative
offset must be less than 1 kB. The target label must be defined locally, must be word-aligned and must
be in the same code section as the instruction. The assembler will not emit a relocation type for the target
label. If the offset is out-of-range or the target label is external or in another section, then the assembler
generates an error message.
LDR= Thumb 16-bit generic
Load an address or a 32-bit constant value into a low register. If the constant is in the range [0,255] the
assembler will generate a MOV instruction. Otherwise the assembler places the constant or the address
in a literal pool and generates a PC-relative LDR instruction that loads the value from the literal pool.
Instruction
Replacement
LDR Rd,=expr MOV Rd, #expr
LDR Rd,ltpool
;; code
ltpool:
.DW expr
Remarks
If expr is in range
If expr is external or PC-relative, or not in
range
The PC-relative offset from the LDR instruction to the value in the literal pool must be positive and less
than 1 kB. By default the assembler will place a literal pool at the end of each code section. If the default
literal pool is out-of-range you will have to ensure that there is another literal pool within range by means
of the .LTORG directive.
Bcond inversion Thumb 16-bit generic
The PC-relative conditional branch instruction has a range of (-256,+255) bytes. The unconditional version
has a range of (-2048,+2047) bytes. If the conditional branch target is out-of-range, the assembler will
rewrite the conditional branch instruction with an inversed conditional branch and an unconditional branch.
Instruction Replacement
Remarks
Bcond label
If target label out-of-range
Binv_cond ~1
B label
~1:
142
Assembly Language
ADD, SUB inversions Thumb 16-bit generic
For the following six instructions the assembler accepts negative values for the immediate operand. If a
negative value is specified, the assembler inverts the instruction from ADD to SUB or vice versa. For
example: ADD R1,#-4 will be rewritten as SUB R1,#4.
Instruction
Replacement
ADD Rd,Rn,#imm SUB Rd,Rn,#-(imm)
ADD Rd,#imm
SUB Rd,#-(imm)
ADD SP,#imm
SUB SP,#-(imm)
SUB Rd,Rn,#imm ADD Rd,Rn,#-(imm)
SUB Rd,#imm
ADD Rd,#-(imm)
SUB SP,#imm
ADD SP,#-(imm)
143
TASKING VX-toolset for ARM User Guide
144
Chapter 4. Using the C Compiler
This chapter describes the compilation process and explains how to call the C compiler.
The TASKING VX-toolset for ARM under Eclipse can use the internal builder (default) or the TASKING
makefile generator (external builder) to build your entire embedded project, from C source till the final
ELF/DWARF object file which serves as input for the debugger.
Although in Eclipse you cannot run the C compiler separately from the other tools, this section discusses
the options that you can specify for the C compiler.
On the command line it is possible to call the C compiler separately from the other tools. However, it is
recommended to use the control program for command line invocations of the toolset (see Section 10.1,
Control Program). With the control program it is possible to call the entire toolset with only one command
line.
The C compiler takes the following files for input and output:
This chapter first describes the compilation process which consists of a frontend and a backend part.
Next it is described how to call the C compiler and how to use its options. An extensive list of all options
and their descriptions is included in Section 13.2, C Compiler Options. Finally, a few important basic tasks
are described, such as including the C startup code and performing various optimizations.
4.1. Compilation Process
During the compilation of a C program, the C compiler runs through a number of phases that are divided
into two parts: frontend and backend.
The backend part is not called for each C statement, but starts after a complete C module or set of modules
has been processed by the frontend (in memory). This allows better optimization.
The C compiler requires only one pass over the input file which results in relative fast compilation.
Frontend phases
1. The preprocessor phase:
The preprocessor includes files and substitutes macros by C source. It uses only string manipulations
on the C source. The syntax for the preprocessor is independent of the C syntax but is also described
in the ISO/IEC 9899:1999(E) standard.
145
TASKING VX-toolset for ARM User Guide
2. The scanner phase:
The scanner converts the preprocessor output to a stream of tokens.
3. The parser phase:
The tokens are fed to a parser for the C grammar. The parser performs a syntactic and semantic
analysis of the program, and generates an intermediate representation of the program. This code is
called MIL (Medium level Intermediate Language).
4. The frontend optimization phase:
Target processor independent optimizations are performed by transforming the intermediate code.
Backend phases
1. Instruction selector phase:
This phase reads the MIL input and translates it into Low level Intermediate Language (LIL). The LIL
objects correspond to a processor instruction, with an opcode, operands and information used within
the C compiler.
2. Peephole optimizer/instruction scheduler/software pipelining phase:
This phase replaces instruction sequences by equivalent but faster and/or shorter sequences, rearranges
instructions and deletes unnecessary instructions.
3. Register allocator phase:
This phase chooses a physical register to use for each virtual register.
4. The backend optimization phase:
Performs target processor independent and dependent optimizations which operate on the Low level
Intermediate Language.
5. The code generation/formatter phase:
This phase reads through the LIL operations to generate assembly language output.
4.2. Calling the C Compiler
The TASKING VX-toolset for ARM under Eclipse can use the internal builder (default) or the TASKING
makefile generator (external builder) to build your entire project. After you have built your project, the
output files are available in a subdirectory of your project directory, depending on the active configuration
you have set in the C/C++ Build » Settings page of the Project » Properties for dialog.
Building a project under Eclipse
You have several ways of building your project:
146
Using the C Compiler
• Build Selected File(s) (
). This compiles and assembles the selected file(s) without calling the linker.
1. In the C/C++ Projects view, select the files you want to compile.
2. Right-click in the C/C++ Projects view and select Build Selected File(s).
• Build Individual Project (
).
To build individual projects incrementally, select Project » Build project.
• Rebuild Project ( ). This builds every file in the project whether or not a file has been modified since
the last build. A rebuild is a clean followed by a build.
1. Select Project » Clean...
2. Enable the option Start a build immediately and click OK.
• Build Automatically. This performs a build of all projects whenever any project file is saved, such as
your makefile.
This way of building is not recommended for C/C++ development, but to enable this feature select
Project » Build Automatically and ensure there is a check mark beside the Build Automatically
menu item. In order for this option to work, you must also enable option Build on resource save (Auto
build) on the Behaviour tab of the C/C++ Build page of the Project » Properties for dialog.
Select a target processor (core)
Processor options affect the invocation of all tools in the toolset. In Eclipse you only need to set them
once. Based on the target processor, the compiler includes a special function register file. This is a regular
include file which enables you to use virtual registers that are located in memory.
1.
From the Project menu, select Properties for
The Properties dialog appears.
2.
In the left pane, expand C/C++ Build and select Processor.
In the right pane the Processor page appears.
3.
From the Processor selection list, select a processor.
To access the C/C++ compiler options
1.
From the Project menu, select Properties for
The Properties dialog appears.
2.
In the left pane, expand C/C++ Build and select Settings.
In the right pane the Settings appear.
3.
On the Tool Settings tab, select C/C++ Compiler.
147
TASKING VX-toolset for ARM User Guide
4.
Select the sub-entries and set the options in the various pages.
Note that the C/C++ compiler options are used to create an object file from a C or C++ file. The
options you enter in the Assembler page are not only used for hand-coded assembly files, but
also for intermediate assembly files.
You can find a detailed description of all C compiler options in Section 13.2, C Compiler Options.
Invocation syntax on the command line (Windows Command Prompt):
carm [ [option]... [file]... ]...
4.3. How the Compiler Searches Include Files
When you use include files (with the #include statement), you can specify their location in several ways.
The compiler searches the specified locations in the following order:
1. If the #include statement contains an absolute pathname, the compiler looks for this file. If no path
or a relative path is specified, the compiler looks in the same directory as the source file. This is only
possible for include files that are enclosed in "".
This first step is not done for include files enclosed in <>.
2. When the compiler did not find the include file, it looks in the directories that are specified in the C/C++
Compiler » Include Paths page in the C/C++ Build » Settings » Tool Settings tab of the Project
Properties dialog (equivalent to the -I command line option). If the option Add CMSIS include paths
is enabled, this path is search first.
3. When the compiler did not find the include file (because it is not in the specified include directory or
because no directory is specified), it looks in the path(s) specified in the environment variable CARMINC.
4. When the compiler still did not find the include file, it finally tries the default include directory relative
to the installation directory (unless you specified option --no-stdinc).
Example
Suppose that the C source file test.c contains the following lines:
#include <stdio.h>
#include "myinc.h"
You can call the compiler as follows:
carm -Imyinclude test.c
148
Using the C Compiler
First the compiler looks for the file stdio.h in the directory myinclude relative to the current directory.
If it was not found, the compiler searches in the environment variable CARMINC and then in the default
include directory.
The compiler now looks for the file myinc.h, in the directory where test.c is located. If the file is not
there the compiler searches in the directory myinclude. If it was still not found, the compiler searches
in the environment variable CARMINC and then in the default include directory.
4.4. Compiling for Debugging
Compiling your files is the first step to get your application ready to run on a target. However, during
development of your application you first may want to debug your application.
To create an object file that can be used for debugging, you must instruct the compiler to include symbolic
debug information in the source file.
To include symbolic debug information
1.
From the Project menu, select Properties for
The Properties dialog appears.
2.
In the left pane, expand C/C++ Build and select Settings.
In the right pane the Settings appear.
3.
On the Tool Settings tab, select C/C++ Compiler » Debugging.
4.
Select Default in the Generate symbolic debug information box.
Debug and optimizations
Due to different compiler optimizations, it might be possible that certain debug information is optimized
away. Therefore, if you encounter strange behavior during debugging it might be necessary to reduce
the optimization level, so that the source code is still suitable for debugging. For more information on
optimization see Section 4.5, Compiler Optimizations.
Invocation syntax on the command line (Windows Command Prompt)
The invocation syntax on the command line is:
carm -g file.c
4.5. Compiler Optimizations
The compiler has a number of optimizations which you can enable or disable.
1.
From the Project menu, select Properties for
149
TASKING VX-toolset for ARM User Guide
The Properties dialog appears.
2.
In the left pane, expand C/C++ Build and select Settings.
In the right pane the Settings appear.
3.
On the Tool Settings tab, select C/C++ Compiler » Optimization.
4.
Select an optimization level in the Optimization level box.
or:
In the Optimization level box select Custom optimization and enable the optimizations you want
on the Custom optimization page.
Optimization levels
The TASKING C compiler offers four optimization levels and a custom level, at each level a specific set
of optimizations is enabled.
• Level 0 - No optimization: No optimizations are performed. The compiler tries to achieve a 1-to-1
resemblance between source code and produced code. Expressions are evaluated in the order written
in the source code, associative and commutative properties are not used.
• Level 1 - Optimize: Enables optimizations that do not affect the debug-ability of the source code. Use
this level when you encounter problems during debugging your source code with optimization level 2.
• Level 2 - Optimize more (default): Enables more optimizations to reduce the memory footprint and/or
execution time. This is the default optimization level.
• Level 3 - Optimize most: This is the highest optimization level. Use this level when your
program/hardware has become too slow to meet your real-time requirements.
• Custom optimization: you can enable/disable specific optimizations on the Custom optimization page.
Optimization pragmas
If you specify a certain optimization, all code in the module is subject to that optimization. Within the C
source file you can overrule the C compiler options for optimizations with #pragma optimize flag
and #pragma endoptimize. Nesting is allowed:
#pragma optimize e
...
... C source ...
...
#pragma optimize c
...
... C source ...
...
#pragma endoptimize
...
150
/* Enable expression
simplification
*/
/* Enable common expression
elimination. Expression
simplification still enabled */
/* Disable common expression
elimination
*/
Using the C Compiler
#pragma endoptimize
...
/* Disable expression
simplification
*/
The compiler optimizes the code between the pragma pair as specified.
You can enable or disable the optimizations described in the following subsection. The command line
option for each optimization is given in brackets.
4.5.1. Generic Optimizations (frontend)
Common subexpression elimination (CSE) (option -Oc/-OC)
The compiler detects repeated use of the same (sub-)expression. Such a "common" expression is replaced
by a variable that is initialized with the value of the expression to avoid recomputation. This method is
called common subexpression elimination (CSE).
Expression simplification (option -Oe/-OE)
Multiplication by 0 or 1 and additions or subtractions of 0 are removed. Such useless expressions may
be introduced by macros or by the compiler itself (for example, array subscripting).
Constant propagation (option -Op/-OP)
A variable with a known value is replaced by that value.
Automatic function inlining (option -Oi/-OI)
Small functions that are not too often called, are inlined. This reduces execution time at the cost of code
size.
Control flow simplification (option -Of/-OF)
A number of techniques to simplify the flow of the program by removing unnecessary code and reducing
the number of jumps. For example:
• Switch optimization: A number of optimizations of a switch statement are performed, such as removing
redundant case labels or even removing an entire switch.
• Jump chaining: A (conditional) jump to a label which is immediately followed by an unconditional jump
may be replaced by a jump to the destination label of the second jump. This optimization speeds up
execution.
• Conditional jump reversal: A conditional jump over an unconditional jump is transformed into one
conditional jump with the jump condition reversed. This reduces both the code size and the execution
time.
• Dead code elimination: Code that is never reached, is removed. The compiler generates a warning
messages because this may indicate a coding error.
151
TASKING VX-toolset for ARM User Guide
Subscript strength reduction (option -Os/-OS)
An array or pointer subscripted with a loop iterator variable (or a simple linear function of the iterator
variable), is replaced by the dereference of a pointer that is updated whenever the iterator is updated.
Loop transformations (option -Ol/-OL)
Transform a loop with the entry point at the bottom, to a loop with the entry point at the top. This enables
constant propagation in the initial loop test and code motion of loop invariant code by the CSE optimization.
Forward store (option -Oo/-OO)
A temporary variable is used to cache multiple assignments (stores) to the same non-automatic variable.
MIL linking (Control program option --mil-link)
The frontend phase performs its optimizations on the MIL code. When all C modules and/or MIL modules
of an application are given to the C compiler in a single invocation, the C compiler will link MIL code of
the modules to a complete application automatically. Next, the frontend will run its optimizations again
with application scope. After this, the MIL code is passed on to the backend, which will generate a single
.src file for the whole application. Linking with the run-time library, floating-point library and C library is
still necessary. Linking with the C library is required because this library contains some hand-coded
assembly functions, that are not linked in at MIL level.
In the ISO C99 standard a "translation unit" is a preprocessed source file together with all the headers
and source files included via the preprocessing directive #include. After MIL linking the compiler will
treat the linked sources files as a single translation unit, allowing global optimizations to be performed,
that otherwise would be limited to a single module.
152
Using the C Compiler
MIL splitting (option --mil-split)
When you specify that the C compiler has to use MIL splitting, the C compiler will first link the application
at MIL level as described above. However, after rerunning the optimizations the MIL code is not passed
on to the backend. Instead the frontend writes a .ms file for each input module. A .ms file has the same
format as a .mil file. Only .ms files that really change are updated. The advantage of this approach is
that it is possible to use the make utility to translate only those parts of the application to a .src file that
really have changed. MIL splitting is therefore a more efficient build process than MIL linking. The penalty
for this is that the code compaction optimization in the backend does not have application scope. As with
MIL linking, it is still required to link with the normal libraries to build an ELF file.
To read more about how MIL linking influences the build process of your application, see Section 4.6,
Influencing the Build Time.
4.5.2. Core Specific Optimizations (backend)
Coalescer (option -Oa/-OA)
The coalescer seeks for possibilities to reduce the number of moves (MOV instruction) by smart use of
registers. This optimizes both speed and code size.
Interprocedural register optimization (option -Ob/-OB)
Register allocation is improved by taking note of register usage in functions called by a given function.
153
TASKING VX-toolset for ARM User Guide
Peephole optimizations (option -Oy/-OY)
The generated assembly code is improved by replacing instruction sequences by equivalent but faster
and/or shorter sequences, or by deleting unnecessary instructions.
Instruction Scheduler (option -Ok/-OK)
The instruction scheduler is a backend optimization that acts upon the generated instructions. When two
instructions need the same machine resource - like a bus, register or functional unit - at the same time,
they suffer a structural hazard, which stalls the pipeline. This optimization tries to rearrange instructions
to avoid structural hazards, for example by inserting another non-related instruction.
First the instruction stream is partitioned into basic blocks. A new basic block starts at a label, or right
after a jump instruction. Unschedulable instructions and, when -Av is enabled, instructions that access
volatile objects, each get their own basic block. Next, the scheduler searches the instructions within a
basic block, looking for places where the pipeline stalls. After identifying these places it tries to rebuild
the basic block using the existing instructions, while avoiding the pipeline stalls. In this process data
dependencies between instructions are honoured.
Note that the function inlining optimization happens in the frontend of the compiler. The instruction
scheduler has no knowledge about the origin of the instructions.
Unroll small loops (option -Ou/-OU)
To reduce the number of branches, short loops are eliminated by replacing them with a number of copies.
Software pipelining (option -Ow/-OW)
A number of techniques to optimize loops. For example, within a loop the most efficient order of instructions
is chosen by the pipeline scheduler and it is examined what instructions can be executed parallel.
Code compaction (reverse inlining) (option -Or/-OR)
Compaction is the opposite of inlining functions: chunks of code that occur more than once, are transformed
into a function. This reduces code size at the cost of execution speed. The size of the chunks of code to
be inlined depends on the setting of the C compiler option --tradeoff (-t). See the subsection Code
Compaction in Section 4.5.3, Optimize for Size or Speed.
Generic assembly optimizations (option -Og/-OG)
A set of target independent optimizations that increase speed and decrease code size.
Cluster global variables (option -O+cluster/-O-cluster)
Global variables are accessed by first loading their address into a register and then accessing them via
this register. Each address will result in an entry in the constant pool. By clustering global variables it is
possible to access multiple variables using the same base register, which means we can lower the amount
of entries in the constant pool. It also means that potentially we need less base registers. Clustering
ensures that the linker locates the global variables together.
154
Using the C Compiler
4.5.3. Optimize for Size or Speed
You can tell the compiler to focus on execution speed or code size during optimizations. You can do this
by specifying a size/speed trade-off level from 0 (speed) to 4 (size). This trade-off does not turn optimization
phases on or off. Instead, its level is a weight factor that is used in the different optimization phases to
influence the heuristics. The higher the level, the more the compiler focusses on code size optimization.
To choose a trade-off value read the description below about which optimizations are affected and the
impact of the different trade-off values.
Note that the trade-off settings are directions and there is no guarantee that these are followed. The
compiler may decide to generate different code if it assessed that this would improve the result.
Optimization hint: Optimizing for size has a speed penalty and vice versa. The advice is to
optimize for size by default and only optimize those areas for speed that are critical for the
application with respect to speed. Using the tradeoff options -t0, -t1 and -t2 globally for the
application is not recommended.
To specify the size/speed trade-off optimization level:
1.
From the Project menu, select Properties for
The Properties dialog appears.
2.
In the left pane, expand C/C++ Build and select Settings.
In the right pane the Settings appear.
3.
On the Tool Settings tab, select C/C++ Compiler » Optimization.
4.
Select a trade-off level in the Trade-off between speed and size box.
See also C compiler option --tradeoff (-t)
Instruction Selection
Trade-off levels 0, 1 and 2: the compiler selects the instructions with the smallest number of cycles.
Trade-off levels 3 and 4: the compiler selects the instructions with the smallest number of bytes.
Switch Jump Chain versus Jump Table
Instruction selection for the switch statements follows different trade-off rules. A switch statement can
result in a jump chain or a jump table. The compiler makes the decision between those by measuring
and weighing bytes and cycles. This weigh is controlled with the trade-off values:
Trade-off value
Time
Size
0
100%
0%
1
75%
25%
2
50%
50%
155
TASKING VX-toolset for ARM User Guide
Trade-off value
Time
Size
3
25%
75%
4
0%
100%
Loop Optimization
For a top-loop, the loop is entered at the top of the loop. A bottom-loop is entered at the bottom. Every
loop has a test and a jump at the bottom of the loop, otherwise it is not possible to create a loop. Some
top-loops also have a conditional jump before the loop. This is only necessary when the number of loop
iterations is unknown. The number of iterations might be zero, in this case the conditional jump jumps
over the loop.
Bottom loops always have an unconditional jump to the loop test at the bottom of the loop.
Trade-off value
Try to rewrite top-loops to Optimize loops for
bottom-loops
size/speed
0
no
speed
1
yes
speed
2
yes
speed
3
yes
size
4
yes
size
Example:
int a;
void i( int l, int m )
{
int i;
for ( i = m; i < l; i++ )
{
a++;
}
return;
}
Coded as a bottom loop (compiled with --tradeoff=4) is:
ldr
b
r2,.L4
.L2
ldr
add
add
str
r3,[r2,#0]
r1,r1,#1
r3,r3,#1
r3,[r2,#0]
;; unconditional jump to loop test at bottom
.L3:
.L2:
156
;; loop entry point
Using the C Compiler
cmp
blt
r1,r0
.L3
Coded as a top loop (compiled with --tradeoff=0) is:
cmp
ldr
ldr
bge
sub
r1,r0
r2,.L4
r3,[r2,#0]
.L2
r0,r0,r1
subs
add
bgt
r0,r0,#1
r0,r0,#1
.L3
str
r3,[r2,#0]
.L3:
;; test for at least one loop iteration
;; can be omitted when number of iterations is known
;; loop entry point
.L2:
Automatic Function Inlining
You can enable automatic function inlining with the option --optimize=+inline (-Oi) or by using #pragma
optimize +inline. This option is also part of the -O3 predefined option set.
When automatic inlining is enabled, you can use the options --inline-max-incr and --inline-max-size (or
their corresponding pragmas inline_max_incr / inline_max_size) to control automatic inlining.
By default their values are set to -1. This means that the compiler will select a value depending upon the
selected trade-off level. The defaults are:
Trade-off value
inline-max-incr
inline-max-size
0
100
50
1
50
25
2
20
20
3
10
10
4
0
0
For example with trade-off value 1, the compiler inlines all functions that are smaller or equal to 25 internal
compiler units. After that the compiler tries to inline even more functions as long as the function will not
grow more than 50%.
When these options/pragmas are set to a value >= 0, the specified value is used instead of the values
from the table above.
Static functions that are called only once, are always inlined, independent of the values chosen for
inline-max-incr and inline-max-size.
Code Compaction
Trade-off levels 0 and 1: code compaction is disabled.
Trade-off level 2: only code compaction of matches outside loops.
157
TASKING VX-toolset for ARM User Guide
Trade-off level 3: code compaction of matches outside loops, and matches inside loops of patterns that
have an estimate execution frequency lower or equal to 10.
Trade-off level 4: code compaction of matches outside loops, and matches inside loops of patterns that
have an estimate execution frequency lower or equal to 100.
For loops where the iteration count is unknown an iteration count of 10 is assumed.
For the execution frequency the compiler also accounts nested loops.
See C compiler option --compact-max-size
Cluster global variables
Clustering of global variables is only done for trade-off level 4.
4.6. Influencing the Build Time
In general many settings have influence on the build time of a project. Any change in the tool settings of
your project source will have more or less impact on the build time.The following sections describe several
issues that can have significant influence on the build time.
MIL Linking
With MIL linking it is possible to let the compiler apply optimizations application wide. This can yield
significant optimization improvements, but the build times can also be significantly longer. MIL linking
itself can require significant time, but also the changed build process implies longer build times. The MIL
linking settings in Eclipse are:
• Build for application wide optimizations (MIL linking)
This enables MIL linking. The build process changes: the C files are translated to intermediate code
(MIL files) and the generated MIL files of the whole project are linked together by the C compiler. The
next step depends on the setting of the option below.
• Application wide optimization mode: Optimize more/Build slower
When this option is enabled, the compiler runs the code generator immediately on the completely linked
MIL stream, which represents the entire application. This way the code generator can perform several
optimizations, such as "code compaction", at application scope. But this also requires significantly more
memory and requires more time to generate code. Besides that, it is no longer possible to do incremental
builds. With each build the full MIL linking phase and code generation has to be done, even with the
smallest change that would in a normal build (not MIL linking) require only a single module to be
translated.
• Application wide optimization mode: Optimize less/Build faster
When this option is disabled, the compiler splits the MIL stream after MIL linking in separate modules.
This allows the code generation to be performed for the modified modules only, and will therefore be
faster than with the other option enabled. Although the MIL stream is split in separate modules after
MIL linking, it still may happen that modifying a single C source file results in multiple MIL files to be
158
Using the C Compiler
compiled.This is a natural result of global optimizations, where the code generated for multiple modules
was affected by the change.
In general, if you do not need code compaction, for example because you are optimizing fully for speed,
it is recommended to choose Optimize less/Build faster.
Optimization Options
In general any optimization may require more work to be done by the compiler. But this does not mean
that disabling all optimizations (level 0) gives the fastest compilation time. Disabling optimizations may
result in more code being generated, resulting in more work for other parts of the compiler, like for example
the register allocator.
Automatic Inlining
Automatic inlining is an optimization which can result in significant longer build time. The overall functions
will get bigger, often making it possible to do more optimizations. But also often resulting in more registers
to be in use in a function, giving the register allocation a tougher job.
Code Compaction
When you disable the code compaction optimization, the build times may be shorter. Certainly when MIL
linking is used where the full application is passed as a single MIL stream to the code generation. Code
compaction is however an optimization which can make a huge difference when optimizing for code size.
When size matters it makes no sense to disable this option. When you choose to optimize for speed
(--tradeoff=0) the code compaction is automatically disabled.
Header Files
Many applications include all header files in each module, often by including them all within a single
include file. Processing header files takes time. It is a good programming practice to only include the
header files that are really required in a module, because:
• it is clear what interfaces are used by a module
• an incremental build after modifying a header file results in less modules required to be rebuild
• it reduces compile time
Parallel Build
The make utility amk, which is used by Eclipse, has a feature to build jobs in parallel. This means that
multiple modules can be compiled in parallel. With today's multi-core processors this means that each
core can be fully utilized. In practice even on single core machines the compile time decreases when
using parallel jobs. On multi-core machines the build time even improves further when specifying more
parallel jobs than the number of cores.
In Eclipse you can control the parallel build behavior:
1.
From the Project menu, select Properties for
159
TASKING VX-toolset for ARM User Guide
The Properties dialog appears.
2.
In the left pane, select C/C++ Build.
In the right pane the C/C++ Build page appears.
3.
On the Behaviour tab, select Use parallel build.
4.
You can specify the number of parallel jobs, or you can use an optimal number of jobs. In the last
case, amk will fork as many jobs in parallel as cores are available.
Number of Sections
The linker speed depends on the number of sections in the object files. The more sections, the longer
the locating will take. You can decrease the link time by creating output sections in the LSL file. For
example:
Use compiler option --rename-sections=.text={name}
section_layout ::linear
{
group (ordered)
{
section "code_output1" ( size = 64k, attributes = x, fill=0xFF,
overflow = "code_output2")
{
select "*__cocofun*";
}
}
}
4.7. Static Code Analysis
Static code analysis (SCA) is a relatively new feature in compilers. Various approaches and algorithms
exist to perform SCA, each having specific pros and cons.
SCA Implementation Design Philosophy
SCA is implemented in the TASKING compiler based on the following design criteria:
• An SCA phase does not take up an excessive amount of execution time. Therefore, the SCA can be
performed during a normal edit-compile-debug cycle.
• SCA is implemented in the compiler front-end. Therefore, no new makefiles or work procedures have
to be developed to perform SCA.
• The number of emitted false positives is kept to a minimum. A false positive is a message that indicates
that a correct code fragment contains a violation of a rule/recommendation. A number of warnings is
issued in two variants, one variant when it is guaranteed that the rule is violated when the code is
160
Using the C Compiler
executed, and the other variant when the rules is potentially violated, as indicated by a preceding
warning message.
For example see the following code fragment:
extern int some_condition(int);
void f(void)
{
char buf[10];
int i;
for (i = 0; i <= 10; i++)
{
if (some_condition(i))
{
buf[i] = 0; /* subscript may be out of bounds */
}
}
}
As you can see in this example, if i=10 the array buf[] might be accessed beyond its upper boundary,
depending on the result of some_condition(i). If the compiler cannot determine the result of this
function at run-time, the compiler issues the warning "subscript is possibly out of bounds" preceding
the CERT warning "ARR35: do not allow loops to iterate beyond the end of an array". If the compiler
can determine the result, or if the if statement is omitted, the compiler can guarantee that the "subscript
is out of bounds".
• The SCA implementation has real practical value in embedded system development. There are no real
objective criteria to measure this claim.Therefore, the TASKING compilers support well known standards
for safety critical software development such as the MISRA guidelines for creating software for safety
critical automotive systems and secure "CERT C Secure Coding Standard" released by CERT. CERT
is founded by the US government and studies internet and networked systems security vulnerabilities,
and develops information to improve security.
Effect of optimization level on SCA results
The SCA implementation in the TASKING compilers has the following limitations:
• Some violations of rules will only be detected when a particular optimization is enabled, because they
rely on the analysis done for that optimization, or on the transformations performed by that optimization.
In particular, the constant propagation and the CSE/PRE optimizations are required for some checks.
It is preferred that you enable these optimizations. These optimizations are enabled with the default
setting of the optimization level (-O2).
• Some checks require cross-module inspections and violations will only be detected when multiple
source files are compiled and linked together by the compiler in a single invocation.
4.7.1. C Code Checking: CERT C
The CERT C Secure Coding Standard provides rules and recommendations for secure coding in the C
programming language. The goal of these rules and recommendations is to eliminate insecure coding
161
TASKING VX-toolset for ARM User Guide
practices and undefined behaviors that can lead to exploitable vulnerabilities. The application of the secure
coding standard will lead to higher-quality systems that are robust and more resistant to attack.
For details about the standard, see the CERT C Secure Coding Standard web site. For general information
about CERT secure coding, see www.cert.org/secure-coding.
Versions of the CERT C standard
Version 1.0 of the CERT C Secure Coding Standard is available as a book by Robert C. Seacord
[Addison-Wesley]. Whereas the web site is a wiki and reflects the latest information, the book serves as
a fixed point of reference for the development of compliant applications and source code analysis tools.
The rules and recommendations supported by the TASKING compiler reflect the version of the CERT
web site as of June 1 2009.
The following rules/recommendations implemented by the TASKING compiler, are not part of the book:
PRE11-C, FLP35-C, FLP36-C, MSC32-C
For a complete overview of the supported CERT C recommendations/rules by the TASKING compiler,
see Chapter 20, CERT C Secure Coding Standard.
Priority and Levels of CERT C
Each CERT C rule and recommendation has an assigned priority. Three values are assigned for each
rule on a scale of 1 to 3 for
• severity - how serious are the consequences of the rule being ignored
1. low (denial-of-service attack, abnormal termination)
2. medium (data integrity violation, unintentional information disclosure)
3. high (run arbitrary code)
• likelihood - how likely is it that a flaw introduced by ignoring the rule could lead to an exploitable
vulnerability
1. unlikely
2. probable
3. likely
• remediation cost - how expensive is it to comply with the rule
1. high (manual detection and correction)
2. medium (automatic detection and manual correction)
3. low (automatic detection and correction)
The three values are then multiplied together for each rule. This product provides a measure that can be
used in prioritizing the application of the rules. These products range from 1 to 27. Rules and
162
Using the C Compiler
recommendations with a priority in the range of 1-4 are level 3 rules (low severity, unlikely, expensive to
repair flaws), 6-9 are level 2 (medium severity, probable, medium cost to repair flaws), and 12-27 are
level 1 (high severity, likely, inexpensive to repair flaws).
The TASKING compiler checks most of the level 1 and some of the level 2 CERT C recommendations/rules.
For a complete overview of the supported CERT C recommendations/rules by the TASKING compiler,
see Chapter 20, CERT C Secure Coding Standard.
To apply CERT C code checking to your application
1.
From the Project menu, select Properties for
The Properties dialog appears.
2.
In the left pane, expand C/C++ Build and select Settings.
In the right pane the Settings appear.
3.
On the Tool Settings tab, select C/C++ Compiler » CERT C Secure Coding.
4.
Make a selection from the CERT C secure code checking list.
5.
If you selected Custom, expand the Custom CERT C entry and enable one or more individual
recommendations/rules.
On the command line you can use the option --cert.
carm --cert={all | name [-name],...]
With --diag=cert you can see a list of the available checks, or you can use a three-letter mnemonic to
list only the checks in a particular category. For example, --diag=pre lists all supported checks in the
preprocessor category.
4.7.2. C Code Checking: MISRA-C
The C programming language is a standard for high level language programming in embedded systems,
yet it is considered somewhat unsuitable for programming safety-related applications. Through enhanced
code checking and strict enforcement of best practice programming rules, TASKING MISRA-C code
checking helps you to produce more robust code.
MISRA-C specifies a subset of the C programming language which is intended to be suitable for embedded
automotive systems. It consists of a set of rules, defined in MISRA-C:2004, Guidelines for the Use of the
C Language in Critical Systems (Motor Industry Research Association (MIRA), 2004).
The compiler also supports MISRA-C:1998, the first version of MISRA-C.You can select this version with
the following C compiler option:
--misrac-version=1998
For a complete overview of all MISRA-C rules, see Chapter 21, MISRA-C Rules.
163
TASKING VX-toolset for ARM User Guide
Implementation issues
The MISRA-C implementation in the compiler supports nearly all rules. Only a few rules are not supported
because they address documentation, run-time behavior, or other issues that cannot be checked by static
source code inspection, or because they require an application-wide overview.
During compilation of the code, violations of the enabled MISRA-C rules are indicated with error messages
and the build process is halted.
MISRA-C rules are divided in required rules and advisory rules. If rules are violated, errors are generated
causing the compiler to stop. With the following options warnings, instead of errors, are generated for
either or both the required rules and the advisory rules:
--misrac-required-warnings
--misrac-advisory-warnings
Note that not all MISRA-C violations will be reported when other errors are detected in the input
source. For instance, when there is a syntax error, all semantic checks will be skipped, including
some of the MISRA-C checks. Also note that some checks cannot be performed when the
optimizations are switched off.
Quality Assurance report
To ensure compliance to the MISRA-C rules throughout the entire project, the TASKING linker can
generate a MISRA-C Quality Assurance report. This report lists the various modules in the project with
the respective MISRA-C settings at the time of compilation. You can use this in your company's quality
assurance system to provide proof that company rules for best practice programming have been applied
in the particular project.
To apply MISRA-C code checking to your application
1.
From the Project menu, select Properties for
The Properties dialog appears.
2.
In the left pane, expand C/C++ Build and select Settings.
In the right pane the Settings appear.
3.
On the Tool Settings tab, select C/C++ Compiler » MISRA-C.
4.
Select the MISRA-C version (2004 or 1998).
5.
In the MISRA-C checking box select a MISRA-C configuration. Select a predefined configuration
for conformance with the required rules in the MISRA-C guidelines.
6.
(Optional) In the Custom 2004 or Custom 1998 entry, specify the individual rules.
On the command line you can use the option --misrac.
carm --misrac={all | number [-number],...]
164
Using the C Compiler
4.8. C Compiler Error Messages
The C compiler reports the following types of error messages in the Problems view of Eclipse.
F ( Fatal errors)
After a fatal error the compiler immediately aborts compilation.
E (Errors)
Errors are reported, but the compiler continues compilation. No output files are produced unless you have
set the C compiler option --keep-output-files (the resulting output file may be incomplete).
W (Warnings)
Warning messages do not result into an erroneous assembly output file. They are meant to draw your
attention to assumptions of the compiler for a situation which may not be correct.You can control warnings
in the C/C++ Build » Settings » Tool Settings » C/C++ Compiler » Diagnostics page of the Project
» Properties for menu (C compiler option --no-warnings).
I (Information)
Information messages are always preceded by an error message. Information messages give extra
information about the error.
S (System errors)
System errors occur when internal consistency checks fail and should never occur. When you still receive
the system error message
S9##: internal consistency check failed - please report
please report the error number and as many details as possible about the context in which the error
occurred.
Display detailed information on diagnostics
1.
From the Window menu, select Show View » Other » TASKING » Problems.
The Problems view is added to the current perspective.
2.
In the Problems view right-click on a message.
A popup menu appears.
3.
Select Detailed Diagnostics Info.
A dialog box appears with additional information.
165
TASKING VX-toolset for ARM User Guide
On the command line you can use the C compiler option --diag to see an explanation of a diagnostic
message:
carm --diag=[format:]{all | number,...]
166
Chapter 5. Using the C++ Compiler
This chapter describes the compilation process and explains how to call the C++ compiler. You should
be familiar with the C++ language and with the ISO C language.
The C++ compiler can be seen as a preprocessor or front end which accepts C++ source files or sources
using C++ language features. The output generated by the C++ compiler (cparm) is intermediate C,
which can be translated with the C compiler (carm).
The C++ compiler is part of a complete toolset, the TASKING VX-toolset for ARM. For details about the
C compiler see Chapter 4, Using the C Compiler.
The C++ compiler takes the following files for input and output:
Although in Eclipse you cannot run the C++ compiler separately from the other tools, this section discusses
the options that you can specify for the C++ compiler.
On the command line it is possible to call the C++ compiler separately from the other tools. However, it
is recommended to use the control program for command line invocations of the toolset (see Section 10.1,
Control Program). With the control program it is possible to call the entire toolset with only one command
line. Eclipse also uses the control program to call the C++ compiler. Files with the extensions .cc, .cpp
or .cxx are seen as C++ source files and passed to the C++ compiler.
The C++ compiler accepts the C++ language of the ISO/IEC 14882:2003 C++ standard, with some minor
exceptions documented in Chapter 2, C++ Language. It also accepts embedded C++ language extensions.
The C++ compiler does no optimization. Its goal is to produce quickly a complete and clean parsed form
of the source program, and to diagnose errors. It does complete error checking, produces clear error
messages (including the position of the error within the source line), and avoids cascading of errors. It
also tries to avoid seeming overly finicky to a knowledgeable C or C++ programmer.
5.1. Calling the C++ Compiler
Under Eclipse you cannot run the C++ compiler separately. However, you can set options specific for the
C++ compiler. After you have built your project, the output files are available in a subdirectory of your
project directory, depending on the active configuration you have set in the C/C++ Build » Settings page
of the Project » Properties for dialog.
Building a project under Eclipse
You have several ways of building your project:
167
TASKING VX-toolset for ARM User Guide
• Build Selected File(s) (
). This compiles and assembles the selected file(s) without calling the linker.
1. In the C/C++ Projects view, select the files you want to compile.
2. Right-click in the C/C++ Projects view and select Build Selected File(s).
• Build Individual Project (
).
To build individual projects incrementally, select Project » Build project.
• Rebuild Project ( ). This builds every file in the project whether or not a file has been modified since
the last build. A rebuild is a clean followed by a build.
1. Select Project » Clean...
2. Enable the option Start a build immediately and click OK.
• Build Automatically. This performs a build of all projects whenever any project file is saved, such as
your makefile.
This way of building is not recommended for C/C++ development, but to enable this feature select
Project » Build Automatically and ensure there is a check mark beside the Build Automatically
menu item. In order for this option to work, you must also enable option Build on resource save (Auto
build) on the Behaviour tab of the C/C++ Build page of the Project » Properties for dialog.
Select a target processor (core)
Processor options affect the invocation of all tools in the toolset. In Eclipse you only need to set them
once. Based on the target processor, the compiler includes a special function register file. This is a regular
include file which enables you to use virtual registers that are located in memory.
1.
From the Project menu, select Properties for
The Properties dialog appears.
2.
In the left pane, expand C/C++ Build and select Processor.
In the right pane the Processor page appears.
3.
From the Processor selection list, select a processor.
To access the C/C++ compiler options
1.
From the Project menu, select Properties for
The Properties dialog appears.
2.
In the left pane, expand C/C++ Build and select Settings.
In the right pane the Settings appear.
3.
168
On the Tool Settings tab, select C/C++ Compiler.
Using the C++ Compiler
4.
Select the sub-entries and set the options in the various pages.
Note that C++ compiler options are only enabled if you have added a C++ file to your project, a
file with the extension .cc, .cpp or .cxx.
Note that the options you enter in the Assembler page are also used for intermediate assembly
files.
You can find a detailed description of all C++ compiler options in Section 13.3, C++ Compiler Options.
Invocation syntax on the command line (Windows Command Prompt):
cparm [ [option]... [file]... ]...
5.2. How the C++ Compiler Searches Include Files
When you use include files (with the #include statement), you can specify their location in several ways.
The C++ compiler searches the specified locations in the following order:
1. If the #include statement contains an absolute pathname, the C++ compiler looks for this file. If no
path or a relative path is specified, the C++ compiler looks in the same directory as the source file.
This is only possible for include files that are enclosed in "".
This first step is not done for include files enclosed in <>.
2. When the C++ compiler did not find the include file, it looks in the directories that are specified in the
C/C++ Compiler » Include Paths page in the C/C++ Build » Settings » Tool Settings tab of the
Project Properties dialog (equivalent to the --include-directory (-I) command line option).
3. When the C++ compiler did not find the include file (because it is not in the specified include directory
or because no directory is specified), it looks in the path(s) specified in the environment variable
CPARMINC.
4. When the C++ compiler still did not find the include file, it finally tries the default include.cpp and
include directory relative to the installation directory.
5. If the include file is still not found, the directories specified in the --sys-include option are searched.
If the include directory is specified as -, e.g., -I-, the option indicates the point in the list of -I or
--include-directory options at which the search for file names enclosed in <...> should begin. That is,
the search for <...> names should only consider directories named in -I or --include-directory options
following the -I-, and the directories of items 3 and 4 above. -I- also removes the directory containing the
current input file (item 1 above) from the search path for file names enclosed in "...".
An include directory specified with the --sys-include option is considered a "system" include directory.
Warnings are suppressed when processing files found in system include directories.
169
TASKING VX-toolset for ARM User Guide
If the filename has no suffix it will be searched for by appending each of a set of include file suffixes.
When searching in a given directory all of the suffixes are tried in that directory before moving on to the
next search directory. The default set of suffixes is, no extension and .stdh. The default can be overridden
using the --incl-suffixes command line option. A null file suffix cannot be used unless it is present in the
suffix list (that is, the C++ compiler will always attempt to add a suffix from the suffix list when the filename
has no suffix).
Example
Suppose that the C++ source file test.cc contains the following lines:
#include <stdio.h>
#include "myinc.h"
You can call the C++ compiler as follows:
cparm -Imyinclude test.cc
First the C++ compiler looks for the file stdio.h in the directory myinclude relative to the current
directory. If it was not found, the C++ compiler searches in the environment variable CPARMINC and then
in the default include directory.
The C++ compiler now looks for the file myinc.h, in the directory where test.cc is located. If the file
is not there the C++ compiler searches in the directory myinclude. If it was still not found, the C++
compiler searches in the environment variable CPARMINC and then in the default include.cpp and
include directories.
5.3. C++ Compiler Error Messages
The C++ compiler reports the following types of error messages in the Problems view of Eclipse.
F ( Fatal errors)
Catastrophic errors, also called 'fatal errors', indicate problems of such severity that the compilation cannot
continue. For example: command-line errors, internal errors, and missing include files. If multiple source
files are being compiled, any source files after the current one will not be compiled.
E (Errors)
Errors indicate violations of the syntax or semantic rules of the C++ language. Compilation continues,
but object code is not generated.
W (Warnings)
Warnings indicate something valid but questionable. Compilation continues and object code is generated
(if no errors are detected). You can control warnings in the C/C++ Build » Settings » Tool Settings »
C/C++ Compiler » Diagnostics page of the Project » Properties for menu (C++ compiler option
--no-warnings).
170
Using the C++ Compiler
R (Remarks)
Remarks indicate something that is valid and probably intended, but which a careful programmer may
want to check. These diagnostics are not issued by default. Compilation continues and object code is
generated (if no errors are detected). To enable remarks, enable the option Issue remarks on C++ code
in the C/C++ Build » Settings » Tool Settings » C/C++ Compiler » Diagnostics page of the Project
» Properties for menu (C++ compiler option --remarks).
S (Internal errors)
Internal compiler errors are caused by failed internal consistency checks and should never occur. However,
if such a 'SYSTEM' error appears, please report the occurrence to Altium. Please include a small C++
program causing the error.
Message format
By default, diagnostics are written in a form like the following:
cparm E0020: ["test.cc" 3] identifier "name" is undefined
With the command line option --error-file=file you can redirect messages to a file instead of stderr.
Note that the message identifies the file and line involved. Long messages are wrapped to additional lines
when necessary.
With the option C/C++ Build » Settings » Tool Settings » Global Options » Treat warnings as errors
(option --warnings-as-errors) you can change the severity of warning messages to errors.
With the command line option --diag you can see a list of all messages.
For some messages, a list of entities is useful; they are listed following the initial error message:
cparm E0308: ["test.cc" 4] more than one instance of overloaded
function "f" matches the argument list:
function "f(int)"
function "f(float)"
argument types are: (double)
In some cases, some additional context information is provided; specifically, such context information is
useful when the C++ compiler issues a diagnostic while doing a template instantiation or while generating
a constructor, destructor, or assignment operator function. For example:
cparm E0265: ["test.cc" 7] "A::A()" is inaccessible
detected during implicit generation of "B::B()" at line 7
Without the context information, it is very hard to figure out what the error refers to.
Termination Messages
The C++ compiler writes sign-off messages to stderr (the Problems view in Eclipse) if errors are detected.
For example, one of the following forms of message
171
TASKING VX-toolset for ARM User Guide
n errors detected in the compilation of "file".
1 catastrophic error detected in the compilation of "file".
n errors and 1 catastrophic error detected in the compilation of "file".
is written to indicate the detection of errors in the compilation. No message is written if no errors were
detected. The following message
Error limit reached.
is written when the count of errors reaches the error limit (see the option --error-limit); compilation is
then terminated. The message
Compilation terminated.
is written at the end of a compilation that was prematurely terminated because of a catastrophic error.
The message
Compilation aborted
is written at the end of a compilation that was prematurely terminated because of an internal error. Such
an error indicates an internal problem in the compiler. If such an internal error appears, please report the
occurrence to Altium. Please include a small C++ program causing the error.
172
Chapter 6. Profiling
Profiling is the process of collecting statistical data about a running application. With these data you can
analyze which functions are called, how often they are called and what their execution time is. This chapter
describes the TASKING profiling method with code instrumentation techniques and static profiling.
6.1. What is Profiling?
Profiling is a collection of methods to gather data about your application which helps you to identify code
fragments where execution consumes the greatest amount of time.
TASKING supplies a number of profiler tools each dedicated to solve a particular type of performance
tuning problem. Performance problems can be solved by:
• Identifying time-consuming algorithms and rewrite the code using a more time-efficient algorithm.
• Identifying time-consuming functions and select the appropriate compiler optimizations for these functions
(for example, enable loop unrolling or function inlining).
• Identifying time consuming loops and add the appropriate pragmas to enable the compiler to further
optimize these loops.
A profiler helps you to find and identify the time consuming constructs and provides you this way with
valuable information to optimize your application.
TASKING employs various schemes for collecting profiling data, depending on the capabilities of the
target system and different information needs.
6.1.1. Methods of Profiling
There are several methods of profiling: recording by an instruction set simulator, profiling with code
instrumentation techniques (dynamic profiling) and profiling by the C compiler at compile time (static
profiling). Each method has its advantages and disadvantages.
Profiling by an instruction set simulator
One way to gather profiling information is built into the instruction set simulator (ISS). The ISS records
the time consumed by each instruction that is executed. The debugger then retrieves this information and
correlates the time spent for individual instructions to C source statements.
Advantages
• it gives (cycle) accurate information with extreme fine granularity
• the executed code is identical to the non-profiled code
Disadvantages
• the method requires an ISS as execution environment
173
TASKING VX-toolset for ARM User Guide
Profiling using code instrumentation techniques (Dynamic Profiling)
The TASKING C compiler has an option to add code to your application which takes care of the profiling
process. This is called code instrumentation. The gathered profiling data is first stored in the target's
memory and will be written to a file when the application finishes execution or when the function
__prof_cleanup() is called.
Advantages
• it can give a complete call graph of the application annotated with the time spent in each function and
basic block
• this profiling method is execution environment independent
• the application is profiled while it executes on its aimed target taking real-life input
Disadvantage
• instrumentation code creates a significant run-time overhead, and instrumentation code and gathered
data take up target memory
This method provides a valuable complement to the other two methods and is described into more detail
below.
Profiling estimation by the C compiler (Static Profiling)
The TASKING C compiler has an option to generate static profile information through various heuristics
and estimates. The profiling data produced this way at compile time is stored in an XML file, which can
be processed and displayed using the same tools used for dynamic (run-time) profiling.
Advantages
• it can give a give a quick estimation of the time spent in each function and basic block
• this profiling method is execution environment independent
• the application is profiled at compile time
• it requires no extra code instrumentation, so no extra run-time overhead
Disadvantage
• it is an estimation by the compiler and therefore less accurate than dynamic profiling
This method also is described into more detail below.
6.2. Profiling using Code Instrumentation (Dynamic Profiling)
Profiling can be used to determine which parts of a program take most of the execution time.
Once the collected data are presented, it may reveal which pieces of your code execute slower than
expected and which functions contribute most to the overall execution time of a program. It gives you
174
Profiling
also information about which functions are called more or less often than expected. This information not
only reveal design flaws or bugs that had otherwise been unnoticed, it also reveals parts of the program
which can be effectively optimized.
Important considerations
The dynamic profiling method adds code to your original application which is needed to gather the profiling
data. Therefore, the code size of your application increases. Furthermore, during the profiling process,
the gathered data is initially stored into dynamically allocated memory of the target. The heap of your
application should be large enough to store this data. Since code instrumentation is done by the compiler,
assembly functions used in your program do not show up in the profile.
The profiling information is collected during the actual execution of the program. Therefore, the input of
the program influences the results. If a part/function of the program is not activated while the program is
profiled, no profile data is generated for that part/function.
When you use dynamic profiling on a target board, function clock() must be added to the application
to get profiling timer results. You can add the file clock.c from the example profiling-stm32f1xx
project to your project as a starting point.
It is not possible to profile applications that are compiled with the optimization code compaction (C compiler
option --optimize=+compact). Therefore, when you turn profiling on, the compiler automatically disables
parts of the code compaction optimization.
Overview of steps to perform
To obtain a profile using code instrumentation, perform the following steps:
1. Compile and link your program with profiling enabled
2. Execute the program to generate the profile data
3. Display the profile
First you need a completed project. If you are not using your own project, use the profiling example
as described below.
1.
From the File menu, select Import...
The Import dialog appears.
2.
Select TASKING C/C++ » TASKING ARM Example Projects and click Next.
3.
In the Example projects box, disable all projects except profiling .
4.
Click Finish.
The profiling project should now be visible in the C/C++ view.
175
TASKING VX-toolset for ARM User Guide
6.2.1. Step 1: Build your Application for Profiling
The first step is to add the code that takes care of the profiling, to your application. This is done with C
compiler options:
1.
From the Project menu, select Properties for
The Properties for profiling dialog box appears.
2.
In the left pane, expand C/C++ Build and select Settings.
In the right pane the Settings appear.
3.
On the Tool Settings tab, expand the C/C++ Compiler entry and select Debugging.
4.
Enable one or more of the following Generate profiling information options (the sample profiling
project already has profiling options enabled).
• for block counters (not in combination with Call graph or Function timers)
• to build a call graph (not in combination with Block counters)
• for function counters
• for function timers (not in combination with Block counters/Function counters)
Note that the more detailed information you request, the larger the overhead in terms of
execution time, code size and heap space needed. The option Generate symbolic debug
information (--debug) does not affect profiling, execution time or code size.
Block counters (not in combination with Call graph or Function timers)
This will instrument the code to perform basic block counting. As the program runs, it will count how
many time it executed each branch of each if statement, each iteration of a for loop, and so on. Note
that though you can combine Block counters with Function counters, this has no effect because
Function counters is only a subset of Block counters.
Call graph (not in combination with Block counters)
This will instrument the code to reconstruct the run-time call graph. As the program runs it associates
the caller with the gathered profiling data.
Function counters
This will instrument the code to perform function call counting. This is a subset of the basic Block
counters.
Function timers (not in combination with Block counters/Function counters)
This will instrument the code to measure the time spent in a function. This includes the time spent
in all called functions (callees).
176
Profiling
For the command line, see the C compiler option --profile (-p).
Profiling is only possible with optimization levels 0, 1 and 2. So:
5.
Open the Optimization page and set the Optimization level to 2 - Optimize more.
6.
Click OK to apply the new option settings and rebuild the project (
).
6.2.1.1. Profiling Modules and C Libraries
Profiling individual modules
It is possible to profile individual C modules. In this case only limited profiling data is gathered for the
functions in the modules compiled without the profiling option. When you use the suboption Call graph,
the profiling data reveals which profiled functions are called by non-profiled functions. The profiling data
does not show how often and from where the non-profiled functions themselves are called. Though this
does not affect the flat profile, it might reduce the usefulness of the call graph.
Profiling C library functions
Eclipse and/or the control program will link your program with the standard version of the C library.
Functions from this library which are used in your application, will not be profiled. If you do want to
incorporate the library functions in the profile, you must set the appropriate C compiler options in the C
library makefiles and rebuild the library.
6.2.1.2. Linking Profiling Libraries
When building your application, the application must be linked against the corresponding profile library.
Eclipse (or the control program) automatically select the correct library based on the profiling options you
specified. However, if you compile, assemble and link your application manually, make sure you specify
the correct library.
See Section 8.3, Linking with Libraries for an overview of the (profiling) libraries.
6.2.2. Step 2: Execute the Application
Once you have compiled and linked the application for profiling, it must be executed to generate the
profiling data. Run the program as usual: the program should run normally taking the same input as usual
and producing the same output as usual. The application will run somewhat slower than normal because
of the extra time spent on collecting the profiling data.
Follow the steps below to run the application on the TASKING simulator, using the debugger. (In fact,
you can run the application also on a target board.)
1.
From the Debug menu, select Debug Configurations...
The Debug Configurations dialog appears.
2.
Select TASKING C/C++ Debugger and click the New launch configuration button (
new configuration.
) to add a
177
TASKING VX-toolset for ARM User Guide
3.
In the Name field enter the name of the configuration. By default, this is the name of the project, but
you can give your configuration any name you want to distinguish it from the project name. For
example enter profiling.simulator to identify the simulator debug configuration.
4.
On the Target tab, select the ARM Simulator.
5.
Click the Apply button.
6.
Click the Debug button to start the debugger and launch the profiling application.
Eclipse will open the TASKING Debug perspective (as specified in the configuration) and asks for
confirmation.
7.
Click Yes to open the TASKING Debug perspective.
The TASKING Debug perspective opens while the application has stopped before it enters main()
8.
In the Debug view, click on the
(Resume) button.
A file system simulation (FSS) view appears in which the application outputs the results.
When the program has finished, the collected profiling data is saved (for details see 'After execution'
below).
Startup code
The startup code initializes the profiling functions by calling the function __prof_init(). Eclipse will
automatically make the required modifications to the startup code. Or, when you use the control program,
this extracts the correct startup code from the C library.
If you use your own startup code, you must manually insert a call to the function __prof_init just before
the call to main and its stack setup.
An application can have multiple entry points, such as main() and other functions that are called by
interrupt. This does not affect the profiling process.
Small heap problem
When the program does not run as usual, this is typically caused by a shortage of heap space. In this
case a message is issued (when running with file system simulation, it is displayed on the Debug console).
To solve this problem, increase the size of the heap. Information about the heap is stored in the linker
script file (.lsl) file which is automatically added when a project is created.
1.
From the Project menu, select Properties for
The Properties dialog appears.
2.
In the left pane, expand C/C++ Build and select Stack/Heap.
In the right pane the Stack/Heap property page appears.
3.
178
Enter larger values for heap and click OK.
Profiling
The project LSL file is updated automatically according to the new settings.
Presumable incorrect call graph
The call graph is based on the compiled source code. Due to compiler optimizations the call graph may
therefor seem incorrect at first sight. For example, the compiler can replace a function call immediately
followed by a return instruction by a jump to the callee, thereby merging the callee function with the caller
function. In this case the time spent in the callee function is not recorded separately anymore, but added
to the time spent in the caller function (which, as said before, now holds the callee function).This represents
exactly the structure of your source in assembly but may differ from the structure in the initial C source.
After execution
When the program has finished (returning from main()), the exit code calls the function
__prof_cleanup(void). This function writes the gathered profiling data to a file on the host system
using the debugger's file system simulation features. If your program does not return from main(), you
can force this by inserting a call to the function __prof_cleanup() in your application source code.
Please note the double underscores when calling from C code!
The resulting profiling data file is named amon.prf.
If your program does not run under control of the debugger and therefore cannot use the file
system simulation (FSS) functionality to write a file to the host system, you must implement a way
to pass the profiling data gathered on the target to the host. Adapt the function
__prof_cleanup() in the profiling libraries or the underlying I/O functions for this purpose.
6.2.3. Step 3: Displaying Profiling Results
After the function __prof_cleanup() has been executed, the result of the profiler can be displayed in
the TASKING Profiler perspective. The profiling data in the file amon.prf is then converted to an XML
file. This file is read and its information is displayed. To view the profiling information, open the TASKING
Profiler perspective:
1.
From the Window menu, select Open Perspective » Other...
The Select Perspective dialog appears.
2.
Select the TASKING Profiler perspective and click OK.
The TASKING Profiler perspective opens.
179
TASKING VX-toolset for ARM User Guide
The TASKING Profiler perspective
The TASKING Profiler perspective contains the following Views:
Profiler view
Shows the profiling information of all functions in all C source modules belonging
to your application.
Callers / Callees
view
The first table in this view, the callers table, shows the functions that called the
focus function.
The second table in this view, the callees table, shows the functions that are called
by the focus function.
• Clicking on a function (or on its table row) makes it the focus function.
• Double-clicking on a function, opens the appropriate C source module in the Editor view at the location
of the function definition.
• To sort the rows in the table, click on one of the column headers.
180
Profiling
The profiling information
Based on the profiling options you have set before compiling your application, some profiling data may
be present and some may be not. The columns in the tables represent the following information:
Module
The C source module in which the function resides.
#Line
The line number of the function definition in the C source module.
Function
The function for which profiling data is gathered and (if present) the code blocks in each
function. To show or hide the block counts, in the Profiler view click the Menu button ( )
and select Show Block Counts.
Total Time
The total amount of time in seconds that was spent in this function and all of its
sub-functions.
Self Time
The amount of time in seconds that was spent in the function itself. This excludes the
time spent in the sub-functions. So, self time = function's total time - total times of the
called functions.
% in
Function
This is the relative amount of time spent in this function, calculated as a percentage of
the total application time. These should add up to 100%. The total application time is
determined by taking the total time of the call graph. This is usually main. Example:
Total time of main: 0.002000
Self time of function foo: 0.000100
%in Function = (0.000100 / 0.002000) * 100 =
5%
Calls
Number of times the function has been executed.
#Callers
Number of functions by which the function was called.
#Callees
Number of functions that was actually called from this function.
Contribution In the caller table: shows for which part (in percent) the caller contributes to the time spent
%
in the focus function.
In the callee table: shows how much time the focus function has spent relatively in each
of its callees.
Calls %
In the caller table: shows how often each callee was called as a percentage of all calls
from the focus function.
In the callee table: shows how often the focus function was called from a particular caller
as a percentage of all calls to the focus function.
Common toolbar icons
Icon
Action
Description
Show/Hide Block Toggle. If enabled, shows profiling information for block counters.
Counts
Select Profiling
File(s)
Opens a dialog where you can specify profiling files for display.
181
TASKING VX-toolset for ARM User Guide
Viewing previously recorded profiling results, combining results
Each time you run your application, new profiling information is gathered and stored in the file amon.prf.
You can store previous results by renaming the file amon.prf (keep the extension .prf); this prevents
the existing amon.prf from being overwritten by the new amon.prf. At any time, you can reload these
profiling results in the profiler.You can even load multiple .prf files into the Profiler to view the combined
results.
First, open the TASKING Profiler perspective if it is not open anymore:
1.
In the Profiler view, click on the
(Select Profiling File(s)) button.
The Select Profiling File(s) dialog appears.
2.
In the Profiling Type group box, select Dynamic Profiling.
3.
In the Profiling Files group box, disable the option Use default.
4.
Click the Add... button, select the .prf files you want to load and click Open to confirm your choice.
5.
Make sure the correct symbol file is selected, in this example profiling.abs.
6.
Click OK to finish.
6.3. Profiling at Compile Time (Static Profiling)
Just as with dynamic profiling, static profiling can be used to determine which parts of a program take
most of the execution time. It can provide a good alternative if you do not want that your code is affected
by extra code.
Overview of steps to perform
To obtain a profile using code instrumentation, perform the following steps:
1. Compile and link your program with static profiling enabled
2. Display the profile
First you need a completed project. If you are not using your own project, use the profiling example
as described in Section 6.2, Profiling using Code Instrumentation (Dynamic Profiling).
6.3.1. Step 1: Build your Application with Static Profiling
The first step is to tell the C compiler to make an estimation of the profiling information of your application.
This is done with C compiler options:
1.
From the Project menu, select Properties for
The Properties for profiling dialog box appears.
2.
182
In the left pane, expand C/C++ Build and select Settings.
Profiling
In the right pane the Settings appear.
3.
On the Tool Settings tab, expand the C/C++ Compiler entry and select Debugging.
4.
Enable Static profiling.
For the command line, see the C compiler option --profile (-p).
Profiling is only possible with optimization levels 0, 1 and 2. So:
5.
Open the Optimization page and set the Optimization level to 2 - Optimize more.
6.
Click OK to apply the new option settings and rebuild the project (
).
6.3.2. Step 2: Displaying Static Profiling Results
After your project has been built with static profiling, the result of the profiler can be displayed in the
TASKING Profiler perspective. The profiling data of each individual file (.sxml), is combined in the XML
file profiling.xprof. This file is read and its information is displayed. To view the profiling information,
open the TASKING Profiler perspective:
1.
From the Window menu, select Open Perspective » Other...
The Select Perspective dialog appears.
2.
Select the TASKING Profiler perspective and click OK.
The TASKING Profiler perspective opens. This perspective is explained in Section 6.2.3, Step 3:
Displaying Profiling Results
To display static profiling information in the Profiler view
1.
In the Profiler view, click on the
(Select Profiling File(s)) button.
The Select Profiling File(s) dialog appears.
2.
In the Profiling Type group box, select Static Profiling.
3.
In the Static Profiling File group box, enable the option Use default.
By default, the file project.xprof is used (profiling.xprof). If you want to specify another file,
disable the option Use default and use the edit field and/or Browse button to specify a static profiling
file (.xprof).
4.
Click OK to finish.
183
TASKING VX-toolset for ARM User Guide
184
Chapter 7. Using the Assembler
This chapter describes the assembly process and explains how to call the assembler.
The assembler converts hand-written or compiler-generated assembly language programs into machine
language, resulting in object files in the ELF/DWARF object format.
The assembler takes the following files for input and output:
The following information is described:
• The assembly process.
• How to call the assembler and how to use its options. An extensive list of all options and their descriptions
is included in Section 13.4, Assembler Options.
• How to generate a list file.
• Types of assembler messages.
7.1. Assembly Process
The assembler generates relocatable output files with the extension .obj. These files serve as input for
the linker.
Phases of the assembly process
• Parsing of the source file: preprocessing of assembler directives and checking of the syntax of
instructions
• Generation of the relocatable object file and optionally a list file
The assembler integrates file inclusion and macro facilities. See Section 3.10, Macro Operations for more
information.
185
TASKING VX-toolset for ARM User Guide
7.2. Assembler Versions
The TASKING VX-toolset for ARM consists of a set of three assemblers. Depending on the architecture
and the selection of the Thumb or mixed ARM/Thumb instruction set Eclipse and the control program
select the correct assembler, which results in faster build times.
asarm
supports both ARM and Thumb/Thumb-2 instruction set (full assembler)
asarma
supports ARM instruction set only
asarmt
supports Thumb/Thumb-2 instruction set only
All command line options are the same for all three assemblers.
Also see control program option --thumb.
7.3. Calling the Assembler
The TASKING VX-toolset for ARM under Eclipse can use the internal builder (default) or the TASKING
makefile generator (external builder) to build your entire project. After you have built your project, the
output files are available in a subdirectory of your project directory, depending on the active configuration
you have set in the C/C++ Build » Settings page of the Project » Properties for dialog.
Building a project under Eclipse
You have several ways of building your project:
• Build Selected File(s) (
). This compiles and assembles the selected file(s) without calling the linker.
1. In the C/C++ Projects view, select the files you want to compile.
2. Right-click in the C/C++ Projects view and select Build Selected File(s).
• Build Individual Project (
).
To build individual projects incrementally, select Project » Build project.
• Rebuild Project ( ). This builds every file in the project whether or not a file has been modified since
the last build. A rebuild is a clean followed by a build.
1. Select Project » Clean...
2. Enable the option Start a build immediately and click OK.
• Build Automatically. This performs a build of all projects whenever any project file is saved, such as
your makefile.
This way of building is not recommended for C/C++ development, but to enable this feature select
Project » Build Automatically and ensure there is a check mark beside the Build Automatically
186
Using the Assembler
menu item. In order for this option to work, you must also enable option Build on resource save (Auto
build) on the Behaviour tab of the C/C++ Build page of the Project » Properties for dialog.
Select a target processor (core)
Processor options affect the invocation of all tools in the toolset. In Eclipse you only need to set them
once. Based on the target processor, the compiler includes a special function register file. This is a regular
include file which enables you to use virtual registers that are located in memory.
1.
From the Project menu, select Properties for
The Properties dialog appears.
2.
In the left pane, expand C/C++ Build and select Processor.
In the right pane the Processor page appears.
3.
From the Processor selection list, select a processor.
To access the assembler options
1.
From the Project menu, select Properties for
The Properties dialog appears.
2.
In the left pane, expand C/C++ Build and select Settings.
In the right pane the Settings appear.
3.
On the Tool Settings tab, select Assembler.
4.
Select the sub-entries and set the options in the various pages.
Note that the options you enter in the Assembler page are not only used for hand-coded assembly
files, but also for the assembly files generated by the compiler.
You can find a detailed description of all assembler options in Section 13.4, Assembler Options.
Invocation syntax on the command line (Windows Command Prompt):
asarm [ [option]... [file]... ]...
The input file must be an assembly source file (.asm or .src).
7.4. How the Assembler Searches Include Files
When you use include files (with the .INCLUDE directive), you can specify their location in several ways.
The assembler searches the specified locations in the following order:
187
TASKING VX-toolset for ARM User Guide
1. If the .INCLUDE directive contains an absolute path name, the assembler looks for this file. If no path
or a relative path is specified, the assembler looks in the same directory as the source file.
2. When the assembler did not find the include file, it looks in the directories that are specified in the
Assembler » Include Paths page in the C/C++ Build » Settings » Tool Settings tab of the Project
Properties dialog (equivalent to the -I command line option).
3. When the assembler did not find the include file (because it is not in the specified include directory or
because no directory is specified), it looks in the path(s) specified in the environment variable ASARMINC.
4. When the assembler still did not find the include file, it finally tries the default include directory relative
to the installation directory.
Example
Suppose that the assembly source file test.asm contains the following lines:
.INCLUDE 'myinc.inc'
You can call the assembler as follows:
asarm -Imyinclude test.asm
First the assembler looks for the file myinc.asm, in the directory where test.asm is located. If the file
is not there the assembler searches in the directory myinclude. If it was still not found, the assembler
searches in the environment variable ASARMINC and then in the default include directory.
7.5. Generating a List File
The list file is an additional output file that contains information about the generated code. You can
customize the amount and form of information.
If the assembler generates errors or warnings, these are reported in the list file just below the source line
that caused the error or warning.
To generate a list file
1.
From the Project menu, select Properties for
The Properties dialog appears.
2.
In the left pane, expand C/C++ Build and select Settings.
In the right pane the Settings appear.
3.
On the Tool Settings tab, select Assembler » List File.
4.
Enable the option Generate list file.
5.
(Optional) Enable the options to include that information in the list file.
188
Using the Assembler
Example on the command line (Windows Command Prompt)
The following command generates the list file test.lst:
asarm -l test.asm
See Section 15.1, Assembler List File Format, for an explanation of the format of the list file.
7.6. Assembler Error Messages
The assembler reports the following types of error messages in the Problems view of Eclipse.
F ( Fatal errors)
After a fatal error the assembler immediately aborts the assembly process.
E (Errors)
Errors are reported, but the assembler continues assembling. No output files are produced unless you
have set the assembler option --keep-output-files (the resulting output file may be incomplete).
W (Warnings)
Warning messages do not result into an erroneous assembly output file. They are meant to draw your
attention to assumptions of the assembler for a situation which may not be correct. You can control
warnings in the C/C++ Build » Settings » Tool Settings » Assembler » Diagnostics page of the Project
» Properties for menu (assembler option --no-warnings).
Display detailed information on diagnostics
1.
From the Window menu, select Show View » Other » TASKING » Problems.
The Problems view is added to the current perspective.
2.
In the Problems view right-click on a message.
A popup menu appears.
3.
Select Detailed Diagnostics Info.
A dialog box appears with additional information.
On the command line you can use the assembler option --diag to see an explanation of a diagnostic
message:
asarm --diag=[format:]{all | number,...]
189
TASKING VX-toolset for ARM User Guide
190
Chapter 8. Using the Linker
This chapter describes the linking process, how to call the linker and how to control the linker with a script
file.
The TASKING linker is a combined linker/locator. The linker phase combines relocatable object files
(.obj files, generated by the assembler), and libraries into a single relocatable linker object file (.out).
The locator phase assigns absolute addresses to the linker object file and creates an absolute object file
which you can load into a target processor. From this point the term linker is used for the combined
linker/locator.
The linker can simultaneously link and locate all programs for all cores available on a target board. The
target board may be of arbitrary complexity. A simple target board may contain one standard processor
with some external memory that executes one task. A complex target board may contain multiple standard
processors and DSPs combined with configurable IP-cores loaded in an FPGA. Each core may execute
a different program, and external memory may be shared by multiple cores.
The linker takes the following files for input and output:
This chapter first describes the linking process. Then it describes how to call the linker and how to use
its options. An extensive list of all options and their descriptions is included in Section 13.5, Linker Options.
To control the link process, you can write a script for the linker. This chapter shortly describes the purpose
and basic principles of the Linker Script Language (LSL) on the basis of an example. A complete description
of the LSL is included in Linker Script Language.
8.1. Linking Process
The linker combines and transforms relocatable object files (.obj) into a single absolute object file. This
process consists of two phases: the linking phase and the locating phase.
In the first phase the linker combines the supplied relocatable object files and libraries into a single
relocatable object file. In the second phase, the linker assigns absolute addresses to the object file so it
can actually be loaded into a target.
191
TASKING VX-toolset for ARM User Guide
Terms used in the linking process
Term
Definition
Absolute object file Object code in which addresses have fixed absolute values, ready to load into a
target.
Address
A specification of a location in an address space.
Address space
The set of possible addresses. A core can support multiple spaces, for example in
a Harvard architecture the addresses that identify the location of an instruction
refer to code space, whereas addresses that identify the location of a data object
refer to a data space.
Architecture
A description of the characteristics of a core that are of interest for the linker. This
encompasses the address space(s) and the internal bus structure. Given this
information the linker can convert logical addresses into physical addresses.
Copy table
A section created by the linker. This section contains data that specifies how the
startup code initializes the data sections. For each section the copy table contains
the following fields:
• action: defines whether a section is copied or zeroed
• destination: defines the section's address in RAM
• source: defines the sections address in ROM
• length: defines the size of the section in MAUs of the destination space
Core
An instance of an architecture.
Derivative
The design of a processor. A description of one or more cores including internal
memory and any number of buses.
Library
Collection of relocatable object files. Usually each object file in a library contains
one symbol definition (for example, a function).
Logical address
An address as encoded in an instruction word, an address generated by a core
(CPU).
LSL file
The set of linker script files that are passed to the linker.
MAU
Minimum Addressable Unit. For a given processor the number of bits between an
address and the next address. This is not necessarily a byte or a word.
Object code
The binary machine language representation of the C source.
Physical address
An address generated by the memory system.
Processor
An instance of a derivative. Usually implemented as a (custom) chip, but can also
be implemented in an FPGA, in which case the derivative can be designed by the
developer.
Relocatable object
file
Object code in which addresses are represented by symbols and thus relocatable.
Relocation
The process of assigning absolute addresses.
192
Using the Linker
Term
Definition
Relocation
information
Information about how the linker must modify the machine code instructions when
it relocates addresses.
Section
A group of instructions and/or data objects that occupy a contiguous range of
addresses.
Section attributes
Attributes that define how the section should be linked or located.
Target
The hardware board on which an application is executing. A board contains at least
one processor. However, a complex target may contain multiple processors and
external memory and may be shared between processors.
Unresolved
reference
A reference to a symbol for which the linker did not find a definition yet.
8.1.1. Phase 1: Linking
The linker takes one or more relocatable object files and/or libraries as input. A relocatable object file, as
generated by the assembler, contains the following information:
• Header information: Overall information about the file, such as the code size, name of the source file
it was assembled from, and creation date.
• Object code: Binary code and data, divided into various named sections. Sections are contiguous
chunks of code that have to be placed in specific parts of the memory. The program addresses start
at zero for each section in the object file.
• Symbols: Some symbols are exported - defined within the file for use in other files. Other symbols are
imported - used in the file but not defined (external symbols). Generally these symbols are names of
routines or names of data objects.
• Relocation information: A list of places with symbolic references that the linker has to replace with
actual addresses. When in the code an external symbol (a symbol defined in another file or in a library)
is referenced, the assembler does not know the symbol's size and address. Instead, the assembler
generates a call to a preliminary relocatable address (usually 0000), while stating the symbol name.
• Debug information: Other information about the object code that is used by a debugger. The assembler
optionally generates this information and can consist of line numbers, C source code, local symbols
and descriptions of data structures.
The linker resolves the external references between the supplied relocatable object files and/or libraries
and combines the files into a single relocatable linker object file.
The linker starts its task by scanning all specified relocatable object files and libraries. If the linker
encounters an unresolved symbol, it remembers its name and continues scanning. The symbol may be
defined elsewhere in the same file, or in one of the other files or libraries that you specified to the linker.
If the symbol is defined in a library, the linker extracts the object file with the symbol definition from the
library. This way the linker collects all definitions and references of all of the symbols.
Next, the linker combines sections with the same section name and attributes into single sections. The
linker also substitutes (external) symbol references by (relocatable) numerical addresses where possible.
193
TASKING VX-toolset for ARM User Guide
At the end of the linking phase, the linker either writes the results to a file (a single relocatable object file)
or keeps the results in memory for further processing during the locating phase.
The resulting file of the linking phase is a single relocatable object file (.out). If this file contains unresolved
references, you can link this file with other relocatable object files (.obj) or libraries (.lib) to resolve
the remaining unresolved references.
With the linker command line option --link-only, you can tell the linker to only perform this linking phase
and skip the locating phase. The linker complains if any unresolved references are left.
8.1.2. Phase 2: Locating
In the locating phase, the linker assigns absolute addresses to the object code, placing each section in
a specific part of the target memory. The linker also replaces references to symbols by the actual address
of those symbols. The resulting file is an absolute object file which you can actually load into a target
memory. Optionally, when the resulting file should be loaded into a ROM device the linker creates a
so-called copy table section which is used by the startup code to initialize the data sections.
Code modification
When the linker assigns absolute addresses to the object code, it needs to modify this code according
to certain rules or relocation expressions to reflect the new addresses. These relocation expressions are
stored in the relocatable object file. Consider the following snippet of x86 code that moves the contents
of variable a to variable b via the eax register:
A1 3412 0000 mov a,%eax
A3 0000 0000 mov %eax,b
(a defined at 0x1234, byte reversed)
(b is imported so the instruction refers to
0x0000 since its location is unknown)
Now assume that the linker links this code so that the section in which a is located is relocated by 0x10000
bytes, and b turns out to be at 0x9A12. The linker modifies the code to be:
A1 3412 0100 mov a,%eax
A3 129A 0000 mov %eax,b
(0x10000 added to the address)
(0x9A12 patched in for b)
These adjustments affect instructions, but keep in mind that any pointers in the data part of a relocatable
object file have to be modified as well.
Output formats
The linker can produce its output in different file formats. The default ELF/DWARF format (.abs) contains
an image of the executable code and data, and can contain additional debug information. The Intel-Hex
format (.hex) and Motorola S-record format (.sre) only contain an image of the executable code and
data. You can specify a format with the options --output (-o) and --chip-output (-c).
Controlling the linker
Via a so-called linker script file you can gain complete control over the linker. The script language is called
the Linker Script Language (LSL). Using LSL you can define:
• The memory installed in the embedded target system:
194
Using the Linker
To assign locations to code and data sections, the linker must know what memory devices are actually
installed in the embedded target system. For each physical memory device the linker must know its
start-address, its size, and whether the memory is read-write accessible (RAM) or read-only accessible
(ROM).
• How and where code and data should be placed in the physical memory:
Embedded systems can have complex memory systems. If for example on-chip and off-chip memory
devices are available, the code and data located in internal memory is typically accessed faster and
with dissipating less power. To improve the performance of an application, specific code and data
sections should be located in on-chip memory. By writing your own LSL file, you gain full control over
the locating process.
• The underlying hardware architecture of the target processor.
To perform its task the linker must have a model of the underlying hardware architecture of the processor
you are using. For example the linker must know how to translate an address used within the object
file (a logical address) into an offset in a particular memory device (a physical address). In most linkers
this model is hard coded in the executable and can not be modified. For the TASKING linker this
hardware model is described in the linker script file. This solution is chosen to support configurable
cores that are used in system-on-chip designs.
When you want to write your own linker script file, you can use the standard linker script files with
architecture descriptions delivered with the product.
See also Section 8.7, Controlling the Linker with a Script.
8.2. Calling the Linker
In Eclipse you can set options specific for the linker. After you have built your project, the output files are
available in a subdirectory of your project directory, depending on the active configuration you have set
in the C/C++ Build » Settings page of the Project » Properties for dialog.
Building a project under Eclipse
You have several ways of building your project:
• Build Individual Project (
).
To build individual projects incrementally, select Project » Build project.
• Rebuild Project ( ). This builds every file in the project whether or not a file has been modified since
the last build. A rebuild is a clean followed by a build.
1. Select Project » Clean...
2. Enable the option Start a build immediately and click OK.
195
TASKING VX-toolset for ARM User Guide
• Build Automatically. This performs a build of all projects whenever any project file is saved, such as
your makefile.
This way of building is not recommended, but to enable this feature select Project » Build Automatically
and ensure there is a check mark beside the Build Automatically menu item. In order for this option
to work, you must also enable option Build on resource save (Auto build) on the Behaviour tab of
the C/C++ Build page of the Project » Properties for dialog.
To access the linker options
1.
From the Project menu, select Properties for
The Properties dialog appears.
2.
In the left pane, expand C/C++ Build and select Settings.
In the right pane the Settings appear.
3.
On the Tool Settings tab, select Linker.
4.
Select the sub-entries and set the options in the various pages.
You can find a detailed description of all linker options in Section 13.5, Linker Options.
Invocation syntax on the command line (Windows Command Prompt):
lkarm [ [option]... [file]... ]...
When you are linking multiple files, either relocatable object files (.obj) or libraries (.lib), it is important
to specify the files in the right order. This is explained in Section 8.3, Linking with Libraries.
Example:
lkarm -darm.lsl test.obj
This links and locates the file test.obj and generates the file test.abs.
8.3. Linking with Libraries
There are two kinds of libraries: system libraries and user libraries.
System library
System libraries are stored in the directories:
<ARM
<ARM
<ARM
<ARM
<ARM
196
installation
installation
installation
installation
installation
path>\lib\v6M\le
(little-endian variant)
path>\lib\v6M\be
(big-endian variant)
path>\lib\v7[EM|M|R]\le
path>\lib\v7[EM|M|R]\be
path>\lib\v7R\be32 (big-endian 32 variant)
Using the Linker
An overview of the system libraries is given in the following table:
Libraries
Description
carm[s].lib
cthumb[s].lib
C libraries for ARM and Thumb instructions respectively
Optional letter:
s = single precision floating-point (compiler option --no-double)
fparm.lib
fpthumb.lib
Floating-point libraries for ARM and Thumb
rtarm.lib
rtthumb.lib
Run-time library for ARM and Thumb
pbarm.lib / pbthumb.lib
pcarm.lib / pcthumb.lib
pctarm.lib / pctthumb.lib
pdarm.lib / pdthumb.lib
ptarm.lib / ptthumb.lib
Profiling libraries for ARM and Thumb
pb = block/function counter
pc = call graph
pct = call graph and timing
pd = dummy
pt = function timing
dspthumb[s].lib
CMSIS DSP libraries
Optional letter:
s = single precision floating-point
cparm[s][x].lib
cpthumb[s][x].lib
C++ libraries for ARM and Thumb
Optional letter:
s = single precision floating-point
x = exception handling
stlarmx.lib
stlthumbx.lib
STLport C++ libraries (exception handling variants only)
Optional letter:
s = single precision floating-point
To link the default C (system) libraries
1.
From the Project menu, select Properties for
The Properties dialog appears.
2.
In the left pane, expand C/C++ Build and select Settings.
In the right pane the Settings appear.
3.
On the Tool Settings tab, select Linker » Libraries.
4.
Enable the option Link default libraries.
When you want to link system libraries from the command line, you must specify this with the option
--library (-l). For example, to specify the system library carm.lib, type:
lkarm --library=carm test.obj
197
TASKING VX-toolset for ARM User Guide
To use the CMSIS DSP library in your Eclipse project
Part of the CMSIS standard is a DSP library. The CMSIS DSP library is included in the TASKING product's
cmsis folder. The library is also available as a pre-built library file in the lib folders for v6M, v7M and
v7EM. The libraries are dspthumb.lib (double precision floating point) and dspthumbs.lib (single
precision floating point). MIL libraries are present also: dspthumb.ma and dspthumbs.ma.
1.
From the Project menu, select Properties for
The Properties dialog appears.
2.
In the left pane, expand C/C++ Build and select Settings.
In the right pane the Settings appear.
3.
On the Tool Settings tab, select C/C++ Compiler » Include Paths .
4.
Enable the option Add CMSIS include paths.
5.
On the Tool Settings tab, select Linker » Libraries.
6.
Enable the option Link CMSIS DSP library.
This passes the option --dsp-library of the control program (ccarm) for compilation of C/C++ files
and for linking. With this option the control program sets the compiler macro ARM_MATH_CM0,
ARM_MATH_CM3 or ARM_MATH_CM4, depending on the selected processor. These macros are
required for the CMSIS arm_math.h header file to operate correctly. With --dsp-library the control
program also selects the appropriate library.
User library
You can create your own libraries. Section 10.4, Archiver describes how you can use the archiver to
create your own library with object modules.
To link user libraries
1.
From the Project menu, select Properties for
The Properties dialog appears.
2.
In the left pane, expand C/C++ Build and select Settings.
In the right pane the Settings appear.
3.
On the Tool Settings tab, select Linker » Libraries.
4.
Add your libraries to the Libraries box.
When you want to link user libraries from the command line, you must specify their filenames on the
command line:
lkarm start.obj mylib.lib
198
Using the Linker
If the library resides in a sub-directory, specify that directory with the library name:
lkarm start.obj mylibs\mylib.lib
If you do not specify a directory, the linker searches the library in the current directory only.
Library order
The order in which libraries appear on the command line is important. By default the linker processes
object files and libraries in the order in which they appear at the command line. Therefore, when you use
a weak symbol construction, like printf, in an object file or your own library, you must position this
object/library before the C library.
With the option --first-library-first you can tell the linker to scan the libraries from left to right, and extract
symbols from the first library where the linker finds it. This can be useful when you want to use newer
versions of a library routine:
lkarm --first-library-first a.lib test.obj b.lib
If the file test.obj calls a function which is both present in a.lib and b.lib, normally the function in
b.lib would be extracted. With this option the linker first tries to extract the symbol from the first library
a.lib.
Note that routines in b.lib that call other routines that are present in both a.lib and b.lib are now
also resolved from a.lib.
8.3.1. How the Linker Searches Libraries
System libraries
You can specify the location of system libraries in several ways. The linker searches the specified locations
in the following order:
1. The linker first looks in the Library search path that are specified in the Linker » Libraries page in
the C/C++ Build » Settings » Tool Settings tab of the Project Properties dialog (equivalent to the -L
command line option). If you specify the -L option without a pathname, the linker stops searching after
this step.
2. When the linker did not find the library (because it is not in the specified library directory or because
no directory is specified), it looks in the path(s) specified in the environment variable LIBARM.
3. When the linker did not find the library, it tries the default lib directory relative to the installation
directory (or a processor specific sub-directory).
User library
If you use your own library, the linker searches the library in the current directory only.
199
TASKING VX-toolset for ARM User Guide
8.3.2. How the Linker Extracts Objects from Libraries
A library built with the TASKING archiver ararm always contains an index part at the beginning of the
library. The linker scans this index while searching for unresolved externals. However, to keep the index
as small as possible, only the defined symbols of the library members are recorded in this area.
When the linker finds a symbol that matches an unresolved external, the corresponding object file is
extracted from the library and is processed. After processing the object file, the remaining library index
is searched. If after a complete search of the library unresolved externals are introduced, the library index
will be scanned again. After all files and libraries are processed, and there are still unresolved externals
and you did not specify the linker option --no-rescan, all libraries are rescanned again. This way you do
not have to worry about the library order on the command line and the order of the object files in the
libraries. However, this rescanning does not work for 'weak symbols'. If you use a weak symbol construction,
like printf, in an object file or your own library, you must position this object/library before the C library.
The option--verbose (-v) shows how libraries have been searched and which objects have been extracted.
Resolving symbols
If you are linking from libraries, only the objects that contain symbols to which you refer, are extracted
from the library. This implies that if you invoke the linker like:
lkarm mylib.lib
nothing is linked and no output file will be produced, because there are no unresolved symbols when the
linker searches through mylib.lib.
It is possible to force a symbol as external (unresolved symbol) with the option --extern (-e):
lkarm --extern=main mylib.lib
In this case the linker searches for the symbol main in the library and (if found) extracts the object that
contains main.
If this module contains new unresolved symbols, the linker looks again in mylib.lib. This process
repeats until no new unresolved symbols are found.
8.4. Incremental Linking
With the TASKING linker it is possible to link incrementally. Incremental linking means that you link some,
but not all .obj modules to a relocatable object file .out. In this case the linker does not perform the
locating phase. With the second invocation, you specify both new .obj files as the .out file you had
created with the first invocation.
Incremental linking is only possible on the command line.
lkarm -darm.lsl --incremental test1.obj -otest.out
lkarm -darm.lsl test2.obj test.out
200
Using the Linker
This links the file test1.obj and generates the file test.out.This file is used again and linked together
with test2.obj to create the file test.abs (the default name if no output filename is given in the default
ELF/DWARF format).
With incremental linking it is normal to have unresolved references in the output file until all .obj files
are linked and the final .out or .abs file has been reached. The option --incremental (-r) for incremental
linking also suppresses warnings and errors because of unresolved symbols.
8.5. Importing Binary Files
With the TASKING linker it is possible to add a binary file to your absolute output file. In an embedded
application you usually do not have a file system where you can get your data from. With the linker option
--import-object you can add raw data to your application. This makes it possible for example to display
images on a device or play audio. The linker puts the raw data from the binary file in a section. The section
is aligned on a 4-byte boundary.The section name is derived from the filename, in which dots are replaced
by an underscore. So, when importing a file called my.mp3, a section with the name my_mp3 is created.
In your application you can refer to the created section by using linker labels.
For example:
#include <stdio.h>
extern char
_lc_ub_my_mp3; /* linker labels */
extern char
_lc_ue_my_mp3;
char*
mp3 = &_lc_ub_my_mp3;
void main(void)
{
int size = &_lc_ue_my_mp3 - &_lc_ub_my_mp3;
int i;
for (i=0;i<size;i++)
putchar(mp3[i]);
}
If you want to use the export functionality of Eclipse, the binary file has to be part of your project.
8.6. Linker Optimizations
During the linking and locating phase, the linker looks for opportunities to optimize the object code. Both
code size and execution speed can be optimized.
To enable or disable optimizations
1.
From the Project menu, select Properties for
The Properties dialog appears.
2.
In the left pane, expand C/C++ Build and select Settings.
201
TASKING VX-toolset for ARM User Guide
In the right pane the Settings appear.
3.
On the Tool Settings tab, select Linker » Optimization.
4.
Enable one or more optimizations.
You can enable or disable the optimizations described below. The command line option for each
optimization is given in brackets.
Delete unreferenced sections (option -Oc/-OC)
This optimization removes unused sections from the resulting object file.
First fit decreasing (option -Ol/-OL)
When the physical memory is fragmented or when address spaces are nested it may be possible that a
given application cannot be located although the size of the available physical memory is larger than the
sum of the section sizes. Enable the first-fit-decreasing optimization when this occurs and re-link your
application.
The linker's default behavior is to place sections in the order that is specified in the LSL file (that is, working
from low to high memory addresses or vice versa). This also applies to sections within an unrestricted
group. If a memory range is partially filled and a section must be located that is larger than the remainder
of this range, then the section and all subsequent sections are placed in a next memory range. As a result
of this gaps occur at the end of a memory range.
When the first-fit-decreasing optimization is enabled the linker will first place the largest sections in the
smallest memory ranges that can contain the section. Small sections are located last and can likely fit in
the remaining gaps.
Compress copy table (option -Ot/-OT)
The startup code initializes the application's data areas. The information about which memory addresses
should be zeroed and which memory ranges should be copied from ROM to RAM is stored in the copy
table.
When this optimization is enabled the linker will try to locate sections in such a way that the copy table
is as small as possible thereby reducing the application's ROM image.
Delete duplicate code (option -Ox/-OX)
Delete duplicate constant data (option -Oy/-OY)
These two optimizations remove code and constant data that is defined more than once, from the resulting
object file.
Compress ROM sections of copy table items (option -Oz/-OZ)
Reduces the size of the application's ROM image by compressing the ROM image of initialized data
sections. At application startup time the ROM image is decompressed and copied to RAM.
202
Using the Linker
When this optimization is enabled the linker will try to locate sections in such a way that the copy table
is as small as possible thereby reducing the application's ROM image.
8.7. Controlling the Linker with a Script
With the options on the command line you can control the linker's behavior to a certain degree. From
Eclipse it is also possible to determine where your sections will be located, how much memory is available,
which sorts of memory are available, and so on. Eclipse passes these locating directions to the linker via
a script file. If you want even more control over the locating process you can supply your own script.
The language for the script is called the Linker Script Language, or shortly LSL.You can specify the script
file to the linker, which reads it and locates your application exactly as defined in the script. If you do not
specify your own script file, the linker always reads a standard script file which is supplied with the toolset.
8.7.1. Purpose of the Linker Script Language
The Linker Script Language (LSL) serves three purposes:
1. It provides the linker with a definition of the target's core architecture. This definition is supplied with
the toolset.
2. It provides the linker with a specification of the memory attached to the target processor.
3. It provides the linker with information on how your application should be located in memory. This gives
you, for example, the possibility to create overlaying sections.
The linker accepts multiple LSL files. You can use the specifications of the core architectures that Altium
has supplied in the include.lsl directory. Do not change these files.
If you use a different memory layout than described in the LSL file supplied for the target core, you must
specify this in a separate LSL file and pass both the LSL file that describes the core architecture and your
LSL file that contains the memory specification to the linker. Next you may want to specify how sections
should be located and overlaid. You can do this in the same file or in another LSL file.
LSL has its own syntax. In addition, you can use the standard C preprocessor keywords, such as #include
and #define, because the linker sends the script file first to the C preprocessor before it starts interpreting
the script.
The complete LSL syntax is described in Chapter 17, Linker Script Language (LSL).
8.7.2. Eclipse and LSL
In Eclipse you can specify the size of the stack and heap; the physical memory attached to the processor;
identify that particular address ranges are reserved; and specify which sections are located where in
memory. Eclipse translates your input into an LSL file that is stored in the project directory under the
name project_name.lsl and passes this file to the linker. If you want to learn more about LSL you can
inspect the generated file project_name.lsl.
203
TASKING VX-toolset for ARM User Guide
To add a generated Linker Script File to your project
1.
From the File menu, select File » New » TASKING VX-toolset for ARM C/C++ Project.
The New C/C++ Project wizard appears.
2.
Fill in the project settings in each dialog and click Next > until the following dialog appears.
3.
Enable the option Add linker script file to the project and click Finish.
Eclipse creates your project and the file "project_name.lsl" in the project directory.
If you do not add the linker script file here, you can always add it later with File » New » Linker Script
File (LSL)
To change the Linker Script File in Eclipse
There are two ways of changing the LSL file in Eclipse.
• You can change the LSL file directly in an editor.
1.
Double-click on the file project_name.lsl.
The project LSL file opens in the editor area.
204
Using the Linker
2.
You can edit the LSL file directly in the project_name.lsl editor.
A * appears in front of the name of the LSL file to indicate that the file has changes.
3.
Click
or select File » Save to save the changes.
• You can also make changes to the property pages Memory and Stack/Heap.
1.
From the Project menu, select Properties for
The Properties dialog appears.
2.
In the left pane, expand C/C++ Build and select Memory or Stack/Heap.
In the right pane the corresponding property page appears.
3.
Make changes to memory and/or stack/heap and click OK.
The project LSL file is updated automatically according to the changes you make in the pages.
You can quickly navigate through the LSL file by using the Outline view (Window » Show View » Outline).
8.7.3. Structure of a Linker Script File
A script file consists of several definitions. The definitions can appear in any order.
205
TASKING VX-toolset for ARM User Guide
The architecture definition (required)
In essence an architecture definition describes how the linker should convert logical addresses into
physical addresses for a given type of core. If the core supports multiple address spaces, then for each
space the linker must know how to perform this conversion. In this context a physical address is an offset
on a given internal or external bus. Additionally the architecture definition contains information about items
such as the (hardware) stack and the vector table.
This specification is normally written by Altium. Altium supplies LSL files in the include.lsl directory.
The architecture definition of the LSL file should not be changed by you unless you also modify the core's
hardware architecture. If the LSL file describes a multi-core system an architecture definition must be
available for each different type of core.
The linker uses the architecture name in the LSL file to identify the target. For example, the default library
search path can be different for each core architecture.
The derivative definition
The derivative definition describes the configuration of the internal (on-chip) bus and memory system.
Basically it tells the linker how to convert offsets on the buses specified in the architecture definition into
offsets in internal memory. Microcontrollers and DSPs often have internal memory and I/O sub-systems
apart from one or more cores. The design of such a chip is called a derivative.
When you want to use multiple cores of the same type, you must instantiate the cores in a derivative
definition, since the linker automatically instantiates only a single core for an unused architecture.
The processor definition
The processor definition describes an instance of a derivative. A processor definition is only needed in a
multi-processor embedded system. It allows you to define multiple processors of the same type.
If for a derivative 'A' no processor is defined in the LSL file, the linker automatically creates a processor
named 'A' of derivative 'A'. This is why for single-processor applications it is enough to specify the derivative
in the LSL file.
The memory and bus definitions (optional)
Memory and bus definitions are used within the context of a derivative definition to specify internal memory
and on-chip buses. In the context of a board specification the memory and bus definitions are used to
define external (off-chip) memory and buses. Given the above definitions the linker can convert a logical
address into an offset into an on-chip or off-chip memory device.
The board specification
The processor definition and memory and bus definitions together form a board specification. LSL provides
language constructs to easily describe single-core and heterogeneous or homogeneous multi-core
systems.The board specification describes all characteristics of your target board's system buses, memory
devices, I/O sub-systems, and cores that are of interest to the linker. Based on the information provided
in the board specification the linker can for each core:
206
Using the Linker
• convert a logical address to an offset within a memory device
• locate sections in physical memory
• maintain an overall view of the used and free physical memory within the whole system while locating
The section layout definition (optional)
The optional section layout definition enables you to exactly control where input sections are located.
Features are provided such as: the ability to place sections at a given address, to place sections in a
given order, and to overlay code and/or data sections.
Example: Skeleton of a Linker Script File
A linker script file that defines a derivative "X'" based on the ARM architecture, its external memory and
how sections are located in memory, may have the following skeleton:
architecture ARM
{
// Specification of the ARM core architecture.
// Written by Altium.
}
derivative X // derivative name is arbitrary
{
// Specification of the derivative.
// Written by Altium.
core ARM
// always specify the core
{
architecture = ARM;
}
bus local_bus
// local bus
{
// maps to bus "local_bus" in "ARM" core
}
// internal memory
}
processor spe
{
derivative = X;
// processor name is arbitrary
// You can omit this part, except if you use a
// multi-core system.
}
memory ext_name
{
// external memory definition
207
TASKING VX-toolset for ARM User Guide
}
section_layout spe:ARM:linear
// section layout
{
// section placement statements
// sections are located in address space 'linear'
// of core 'ARM' of processor 'spe'
}
Overview of LSL files delivered by Altium
Altium supplies the following LSL files in the directory include.lsl.
LSL file
Description
arm_arch.lsl
Defines the base architecture (ARM) for all cores.
arm.lsl
It includes the file arm_arch.lsl and contains a default specification of the
external memory attached to the target processor.
default.lsl
Default LSL file. This file includes the file arm.lsl or device.lsl if
__DEVICE_LSL_FILE is defined.
device.lsl
This file includes a processor specific LSL file based on the selected processor.
See control program option --cpu.
processor.lsl
Processor specific LSL file with a specification of the external memory attached
to the target processor. It includes the file arm_arch.lsl.
template.lsl
This file is used by Eclipse as a template for the project LSL file. It includes
the file device.lsl.
When you select to add a linker script file when you create a project in Eclipse, Eclipse makes a copy of
the file template.lsl and names it “project_name.lsl". On the command line, the linker uses the file
default.lsl, unless you specify another file with the linker option --lsl-file (-d).
8.7.4. The Architecture Definition
Although you will probably not need to write an architecture definition (unless you are building your own
processor core) it helps to understand the Linker Script Language and how the definitions are interrelated.
Within an architecture definition the characteristics of a target processor core that are important for the
linking process are defined. These include:
• space definitions: the logical address spaces and their properties
• bus definitions: the I/O buses of the core architecture
• mappings: the address translations between logical address spaces, the connections between logical
address spaces and buses and the address translations between buses
208
Using the Linker
Address spaces
A logical address space is a memory range for which the core has a separate way to encode an address
into instructions. Most microcontrollers and DSPs support multiple address spaces. For example, separate
N
spaces for code and data. Normally, the size of an address space is 2 , with N the number of bits used
to encode the addresses.
The relation of an address space with another address space can be one of the following:
• one space is a subset of the other. These are often used for "small" absolute or relative addressing.
• the addresses in the two address spaces represent different locations so they do not overlap. This
means the core must have separate sets of address lines for the address spaces. For example, in
Harvard architectures we can identify at least a code and a data memory space.
Address spaces (even nested) can have different minimal addressable units (MAU), alignment restrictions,
and page sizes. All address spaces have a number that identifies the logical space (id). The following
table lists the different address spaces for the architecture ARM as defined in arm_arch.lsl.
Space Id MAU Description
linear 1 8
Linear address space.
The ARM architecture in LSL notation
The best way to write the architecture definition, is to start with a drawing. The following figure shows a
part of the ARM architecture:
The figure shows one address space called linear. The address space has attributes like a number
that identifies the logical space (id), a MAU and an alignment. In LSL notation the definition of this address
space looks as follows:
space linear
{
id = 1;
mau = 8;
map (size=4G, dest=bus:local_bus);
}
The keyword map corresponds with the arrows in the drawing. You can map:
• address space => address space (not shown in the drawing)
209
TASKING VX-toolset for ARM User Guide
• address space => bus
• memory => bus (not shown in the drawing)
• bus => bus (not shown in the drawing)
Next the internal buses, named local_bus must be defined in LSL:
bus local_bus
{
mau = 8;
width = 32;
}
// there are 32 data lines on the bus
This completes the LSL code in the architecture definition. Note that all code above goes into the
architecture definition, thus between:
architecture ARM
{
// All code above goes here.
}
8.7.5. The Derivative Definition
Although you will probably not need to write a derivative definition (unless you are using multiple cores
that both access the same memory device) it helps to understand the Linker Script Language and how
the definitions are interrelated.
A derivative is the design of a processor, as implemented on a chip (or FPGA). It comprises one or more
cores and on-chip memory. The derivative definition includes:
• core definition: an instance of a core architecture
• bus definition: the I/O buses of the core architecture
• memory definitions: internal (or on-chip) memory
Core
Each derivative must have at least one core and each core must have a specification of its core architecture.
This core architecture must be defined somewhere in the LSL file(s).
core ARM
{
architecture = ARM;
}
Bus
Each derivative can contain a bus definition for connecting external memory. In this example, the bus
local_bus maps to the bus local_bus defined in the architecture definition of core ARM:
210
Using the Linker
bus local_bus
{
mau = 8;
width = 32;
map (dest=bus:ARM:local_bus, dest_offset=0, size=4G);
}
Memory
Memory is usually described in a separate memory definition, but you can specify on-chip memory for a
derivative. For example:
memory internal_code_rom
{
mau = 8;
type = rom;
size = 2k;
map( dest=bus:ARM:local_bus, size = 2k, dest_offset = 0x00100000);
// src_offset is zero by default
}
This completes the LSL code in the derivative definition. Note that all code above goes into the derivative
definition, thus between:
derivative X
// name of derivative
{
// All code above goes here
}
8.7.6. The Processor Definition
The processor definition is only needed when you write an LSL file for a multi-processor embedded
system. The processor definition explicitly instantiates a derivative, allowing multiple processors of the
same type.
processor name
{
derivative = derivative_name;
}
If no processor definition is available that instantiates a derivative, a processor is created with the same
name as the derivative.
8.7.7. The Memory Definition
Once the core architecture is defined in LSL, you may want to extend the processor with external (or
off-chip) memory. You need to specify the location and size of the physical external memory devices in
the target system.
The principle is the same as defining the core's architecture but now you need to fill the memory definition:
211
TASKING VX-toolset for ARM User Guide
memory name
{
// memory definitions
}
Suppose your embedded system has 512kB of external ROM, named simrom, 512kB of external RAM,
named simram and 32kB of external NVRAM, named my_nvram (see figure above.) All memories are
connected to the bus local_bus. In LSL this looks like follows:
memory simrom
{
mau = 8;
type = rom;
size = 512k;
map ( size = 512k, dest_offset=0, dest=bus:X:local_bus);
}
memory simram
{
mau = 8;
type = ram;
size = 512k;
map ( size = 512k, dest_offset=512k, dest=bus:X:local_bus);
}
memory my_nvram
{
mau = 8;
size = 32k;
type = ram;
map ( size = 32k, dest_offset=1M, dest=bus:X:local_bus);
}
If you use a different memory layout than described in the LSL file supplied for the target core, you can
specify this in Eclipse or you can specify this in a separate LSL file and pass both the LSL file that describes
the core architecture and your LSL file that contains the memory specification to the linker.
To add memory using Eclipse
1.
From the Project menu, select Properties for
The Properties dialog appears.
212
Using the Linker
2.
In the left pane, expand C/C++ Build and select Memory.
In the right pane the Memory page appears.
3.
Open the Memory tab and click on the Add... button.
The Add new memory dialog appears.
4.
Enter the memory name (for example my_nvram), type (for example nvram) and size.
5.
Click on the Add... button.
The Add new mapping dialog appears.
6.
You have to specify at least one mapping. Enter the mapping name (optional), address, size and
destination and click OK.
The new mapping is added to the list of mappings.
7.
Click OK.
The new memory is added to the list of memories (user memory).
8.
Click OK to close the Properties dialog.
The updated settings are stored in the project LSL file.
If you make changes to the on-chip memory as defined in the architecture LSL file, the memory is copied
to your project LSL file and the line #define __MEMORY is added. If you remove all the on-chip memory
from your project LSL file, also make sure you remove this define.
8.7.8. The Section Layout Definition: Locating Sections
Once you have defined the internal core architecture and optional memory, you can actually define where
your application must be located in the physical memory.
During compilation, the compiler divides the application into sections. Sections have a name, an indication
(section type) in which address space it should be located and attributes like writable or read-only.
In the section layout definition you can exactly define how input sections are placed in address spaces,
relative to each other, and what their absolute run-time and load-time addresses will be.
Example: section propagation through the toolset
To illustrate section placement, the following example of a C program (bat.c) is used. The program
saves the number of times it has been executed in battery back-upped memory, and prints the number.
#define BATTERY_BACKUP_TAG
#include <stdio.h>
0xa5f0
int uninitialized_data;
int initialized_data = 1;
#pragma section "non_volatile"
213
TASKING VX-toolset for ARM User Guide
int battery_backup_tag;
int battery_backup_invok;
#pragma endsection
void main (void)
{
if (battery_backup_tag != BATTERY_BACKUP_TAG )
{
// battery back-upped memory area contains invalid data
// initialize the memory
battery_backup_tag = BATTERY_BACKUP_TAG;
battery_backup_invok = 0;
}
printf( "This application has been invoked %d times\n",
battery_backup_invok++);
}
The compiler assigns names and attributes to sections. With the #pragma section and #pragma
endsection the compiler's default section naming convention is overruled and a section with the name
non_volatile appended is defined. In this section the battery back-upped data is stored.
As a result of the #pragma section "non_volatile", the data objects between the pragma pair
are placed in a section with the name ”.bss.non_volatile". Note that ".bss" sections are cleared at
startup. However, battery back-upped sections should not be cleared and therefore we will change this
section attribute using the LSL.
Section placement
The number of invocations of the example program should be saved in non-volatile (battery back-upped)
memory. This is the memory my_nvram from the example in Section 8.7.7, The Memory Definition.
To control the locating of sections, you need to write one or more section definitions in the LSL file. At
least one for each address space where you want to change the default behavior of the linker. In our
example, we need to locate sections in the address space linear:
section_layout ::linear
{
// Section placement statements
}
To locate sections, you must create a group in which you select sections from your program. For the
battery back-up example, we need to define one group, which contains the section .bss.non_volatile.
All other sections are located using the defaults specified in the architecture definition. Section
.bss.non_volatile should be placed in non-volatile ram. To achieve this, the run address refers to
our non-volatile memory called my_nvram. Furthermore, the section should not be cleared and therefore
the attribute s (scratch) is assigned to the group:
group ( ordered, run_addr = mem:my_nvram, attributes = rws )
{
select ".bss.non_volatile";
}
214
Using the Linker
This completes the LSL file for the sample architecture and sample program. You can now invoke the
linker with this file and the sample program to obtain an application that works for this architecture.
For a complete description of the Linker Script Language, refer to Chapter 17, Linker Script Language
(LSL).
8.8. Linker Labels
The linker creates labels that you can use to refer to from within the application software. Some of these
labels are real labels at the beginning or the end of a section. Other labels have a second function, these
labels are used to address generated data in the locating phase. The data is only generated if the label
is used.
Linker labels are labels starting with _lc_. The linker assigns addresses to the following labels when
they are referenced:
Label
Description
_lc_ub_name
Begin of section name. Also used to mark the begin of the stack or heap or
copy table.
_lc_b_name
_lc_ue_name
End of section name. Also used to mark the end of the stack or heap.
_lc_e_name
_lc_cb_name
Start address of an overlay section in ROM.
_lc_ce_name
End address of an overlay section in ROM.
_lc_gb_name
Begin of group name. This label appears in the output file even if no reference
to the label exists in the input file.
_lc_ge_name
End of group name. This label appears in the output file even if no reference
to the label exists in the input file.
The linker only allocates space for the stack and/or heap when a reference to either of the section labels
exists in one of the input object files.
If you want to use linker labels in your C source for sections that have a dot (.) in the name, you
have to replace all dots by underscores.
Example: refer to a label with section name with dots from C
Suppose a section has the name .text. When you want to refer to the begin of this section you have to
replace all dots in the section name by underscores:
#include <stdio.h>
extern void * _lc_ub__text;
void main(void)
{
215
TASKING VX-toolset for ARM User Guide
printf("The function main is located at %x\n",
&_lc_ub__text);
}
Example: refer to the stack
Suppose in an LSL file a stack section is defined with the name "stack" (with the keyword stack). You
can refer to the begin and end of the stack from your C source as follows:
#include <stdio.h>
extern char _lc_ub_stack[];
extern char _lc_ue_stack[];
void main()
{
printf( "Size of stack is %d\n",
_lc_ub_stack - _lc_ue_stack );
/* stack grows from high to low */
}
From assembly you can refer to the end of the stack with:
.extern _lc_ue_stack
; end of user stack
8.9. Generating a Map File
The map file is an additional output file that contains information about the location of sections and symbols.
You can customize the type of information that should be included in the map file.
To generate a map file
1.
From the Project menu, select Properties for
The Properties dialog appears.
2.
In the left pane, expand C/C++ Build and select Settings.
In the right pane the Settings appear.
3.
On the Tool Settings tab, select Linker » Map File.
4.
Enable the option Generate XML map file format (.mapxml) for map file viewer.
5.
(Optional) Enable the option Generate map file (.map).
6.
(Optional) Enable the options to include that information in the map file.
Example on the command line (Windows Command Prompt)
The following command generates the map file test.map:
216
Using the Linker
lkarm --map-file test.obj
With this command the map file test.map is created.
See Section 15.2, Linker Map File Format, for an explanation of the format of the map file.
8.10. Linker Error Messages
The linker reports the following types of error messages in the Problems view of Eclipse.
F ( Fatal errors)
After a fatal error the linker immediately aborts the link/locate process.
E (Errors)
Errors are reported, but the linker continues linking and locating. No output files are produced unless you
have set the linker option--keep-output-files.
W (Warnings)
Warning messages do not result into an erroneous output file. They are meant to draw your attention to
assumptions of the linker for a situation which may not be correct. You can control warnings in the C/C++
Build » Settings » Tool Settings » Linker » Diagnostics page of the Project » Properties for menu
(linker option --no-warnings).
I (Information)
Verbose information messages do not indicate an error but tell something about a process or the state
of the linker. To see verbose information, use the linker option--verbose.
S (System errors)
System errors occur when internal consistency checks fail and should never occur. When you still receive
the system error message
S6##: message
please report the error number and as many details as possible about the context in which the error
occurred.
Display detailed information on diagnostics
1.
From the Window menu, select Show View » Other » TASKING » Problems.
The Problems view is added to the current perspective.
2.
In the Problems view right-click on a message.
217
TASKING VX-toolset for ARM User Guide
A popup menu appears.
3.
Select Detailed Diagnostics Info.
A dialog box appears with additional information.
On the command line you can use the linker option --diag to see an explanation of a diagnostic message:
lkarm --diag=[format:]{all | number,...]
218
Chapter 9. Run-time Environment
This chapter describes the startup code used by the TASKING VX-toolset for ARM C Compiler, the vector
table, the stack layout and the heap.
9.1. Startup Code
You need the run-time startup code to build an executable application. The default startup code consists
of the following components:
• Initialization code. This code is executed when the program is initiated and before the function main()
is called.
• Exit code. This controls the close down of the application after the program's main function terminates.
The startup code is part of the C library, and the source is present in the file cstart.asm (ARM and
Thumb), or cstart.c (Thumb2 specific) in the directory lib\src. This code is generic code. It uses
linker generated symbols which you can give target specific or application specific values. These symbols
are defined in the linker script file (include.lsl\arm_arch.lsl) and you can specify their values in
Eclipse or on the command line with linker option --define. If the default run-time startup code does not
match your configuration, you need to make a copy of the startup file, modify it and add it to your project.
A typical example for doing this is when main() has arguments, typically argc/argv. In this case cstart
needs to be recompiled with the macro __USE_ARGC_ARGV set. When necessary you can use the macro
__ARGCV_BUFSIZE to define the size of the buffer used to pass arguments to main().
The entry point of the startup code (reset handler) is label _START. This global label should not be
removed, since the linker uses it in the linker script file. It is also used as the default start address of the
application.
Initialization code
The following initialization actions are executed before the application starts:
• Load the 'real' program address. This assures that the reset handler is immune for any ROM/RAM
re-mapping.
• Initialize the stack pointers for each processor mode. The stack pointers are loaded in memory by the
stack address located at a linker generate symbol (for example _lc_ub_stack). These symbols are
defined in the linker script file. See Section 9.4, Stack and Heap, for detailed information on the stack.
• Call a user function which initializes hardware. The startup code calls the function __init_hardware.
This function has an empty implementation in the C library, which you should change if certain hardware
initializations, such as ROM/RAM re-mapping or MMU configuration, are required before calling the
main application.
• Copy initialized sections from ROM to RAM, using a linker generated table (also known as the 'copy
table') and clear uninitialized data sections in RAM.
219
TASKING VX-toolset for ARM User Guide
• Initialize or copy the vector table. The startup code calls the function __init_vector_table. This
function has a default implementation in the C library, which copies the vector table from ROM to RAM
if necessary. You should only change it in very specific situations. For example, in case position
dependent vectors are used (B instructions instead of LDR PC) and the vector table must be generated
in RAM (or copied from ROM to RAM with patched offsets in the B instructions).
• (cstart.asm only) Switch to the user-defined application mode as defined through the symbol
_APPLICATION_MODE_ in the LSL file. This symbol is used to set the value of the CPSR status register
before calling the function main.
• (cstart.asm only) Switch to Thumb code if you specified command line option --thumb.
• Initialize profiling if profiling is enabled. For an extensive description of profiling refer to Chapter 6,
Profiling.
• Initialize the argc and argv arguments.
• Call the entry point of your application with a call to function main().
Exit code
When the C application 'returns', which is not likely to happen in an embedded environment, the program
ends with a call to the library function exit().
Macro preprocessor symbols
A number of macro preprocessor symbols are used in the startup code. These are enabled when you
use a particular option or you can enable or disable them using the assembler option --define with the
following syntax:
--define=symbol[=value]
In the startup file (cstart.asm and cstart.c) the following macro preprocessor symbols are used:
Define
Description
__PROF_ENABLE__
If defined, initialize profiling.
__POSIX__
If defined, call posix_main instead of main.
__USE_ARGC_ARGV
If defined, pass arguments to main: int main( int argc, char
*argv[] ).
__ARGCV_BUFSIZE
Define buffer size for argv. (default: 256 bytes)
The following table shows the linker labels and other labels used in the startup code.
Define
Description
_START
Start label, mentioned in LSL file (arm_arch.lsl)
_Next
Real program address. (*)
main
Start label user C program.
220
Run-time Environment
Define
Description
exit
Start label of exit() function.
_lc_ub_stack
User/system mode stack pointer.
_lc_ub_stack_und
Undefined mode stack pointer. (*)
_lc_ub_stack_svc
Supervisor mode stack pointer. (*)
_lc_ub_stack_abt
Abort mode stack pointer. (*)
_lc_ub_stack_irq
IRQ mode stack pointer. (*)
_lc_ub_stack_fiq
FIQ mode stack pointer. (*)
_lc_ub_table
ROM to RAM copy table.
_APPLICATION_MODE_
Contains the processor mode, and the IRQ/FIQ interrupts mode.
__init_hardware
Start label of hardware initialization routine.
__init_vector_table
Start label of vector table initialization.
*
(*) The labels marked with a * are available in cstart.asm only.
9.2. Reset Handler and Vector Table
Reset handler
As explained in the previous section the entry point of the startup code (reset handler) is label _START.
The reset handler can have a fixed ROM address (run address). If the reset handler is called from the
vector table, you do not need the specify a fixed address. In this case the linker determines the address
and patches the vector table.There are however situations were you have to specify a fixed ROM address:
• If _START is the entry point upon reset. Typically you would set the ROM address to the address which
is mapped at address 0x00000000. Your initialization code remaps this address during startup. Note
that the reset handler in the run-time library is immune to this remapping because the first instruction
in the startup code sets the program counter to the actual ROM address.
• When the reset handler is called from the vector table with a branch instruction (B _START) and the
linker has located the reset handler at an address that is out-of-range of the branch instruction. When
you specify a fixed ROM address you can make sure that the reset handler can be called from the
vector table. Note however that you can prevent out-of-range branches by using a position independent
vector table, which loads the handler addresses into the program counter by means of a PC-relative
load from a literal pool.
Reset handler on fixed ROM address (all architectures)
To force the reset handler on a fixed ROM address, you need to define the symbol __START. This symbol
is used in the linker script file arm_arch.lsl. By default, __START is not defined.
221
TASKING VX-toolset for ARM User Guide
To define a symbol for the linker script file
1.
From the Project menu, select Properties for
The Properties dialog appears.
2.
In the left pane, expand C/C++ Build and select Settings.
In the right pane the Settings appear.
3.
Select Linker » Script File.
The Defined symbols box shows the symbols that are currently defined.
4.
To define a new symbol, click on the Add button in the Defined symbols box.
5.
Type the symbol definition (for example, __START=0x0).
The following table contains an overview of the defines you can set. The defines are used in
arm_arch.lsl.
Define
Description
__START
Reset handler ROM address
__PROCESSOR_MODE
Main application execution mode. Default value is 0x1F (SYS
mode).
__IRQ_BIT
If 0, IRQ interrupts are enabled. The default value is 0x80 (IRQ
disabled).
__FIQ_BIT
If 0, FIQ interrupts are enabled. The default value is 0x40 (FIQ
disabled).
__NO_AUTO_VECTORS
If defined, the vector table will not be generated.
__NO_DEFAULT_AUTO_VECTORS If defined, the vector table will not be generated.
__NR_OF_VECTORS
Number of vectors (default 16).
__PIC_VECTORS
If defined, position independent vectors are used.
__FIQ_HANDLER_INLINE
If defined, the FIQ handler is located directly at the FIQ vector
(position dependent vector table only).
__VECTOR_TABLE_ROM_ADDR
Address of the vector table in ROM (default 0x00000000).
__VECTOR_TABLE_RAM_SPACE
If defined, space must be reserved for a copy of the vector table
in RAM.
__VECTOR_TABLE_RAM_ADDR
Address of the copy of the vector table in RAM (default
0x00000000).
__VECTOR_TABLE_RAM_COPY
If defined, the linker provides copy address symbols so that the
startup code can copy the vector table from ROM to RAM.
222
Run-time Environment
Main application execution mode (all architectures except M-profile)
With the symbol __PROCESSOR_MODE you can define the execution mode in which the processor should
run when your application's main program is called. Based on this setting, together with the interrupt
status (FIQ interrupts enabled/disabled, IRQ interrupts enabled/disabled), the linker will generate a symbol
(_APPLICATION_MODE_) which value is used in the startup code in the run-time library to set the value
of the CPSR status register before calling your main function. Available values:
Value
Description
0x10
USR mode
0x11
FIQ mode
0x12
IRQ mode
0x13
SVC mode
0x17
ABT mode
0x1B
UND mode
0x1F
SYS mode (default)
Interrupt Status (all architectures except M-profile)
It is common use to start with interrupts disabled (__IRQ_BIT=0x80 and __FIQ_BIT=0x40) and enable
interrupt during run-time after installing all exception handlers and initializing all peripherals. To enable
interrupts during run-time, use the __setcpsr() intrinsic:
__setcpsr (0x00, 0x80); /* Enable IRQ interrupts */
__setcpsr (0x00, 0x40); /* Enable FIQ interrupts */
If you want to start with interrupts enabled, set the define the symbols __IRQ_BIT=0 and/or __FIQ_BIT=0.
Vector table
By default the linker can generate a vector table, unless you define the symbol __NO_AUTO_VECTORS
or __NO_DEFAULT_AUTO_VECTORS.
The linker will look for specific symbols designating the start of a handler function. These symbols are
generated by the compiler when one of the following function qualifiers is used:
Function type qualifier
Vector symbol
__interrupt_und
_vector_1
__interrupt_svc
_vector_2 (*)
__interrupt_iabt
_vector_3
__interrupt_dabt
_vector_4
__interrupt_irq
_vector_6
__interrupt_fiq
_vector_7
__interrupt(n)
_vector_n
223
TASKING VX-toolset for ARM User Guide
(*) For M-profile architecture the __interrupt_swi qualifier is mapped to _vector_11. Function
qualifier __interrupt_swi is equal to __interrupt_svc.
Note that the reset handler is designated by the symbol _START instead of _vector_0. The fifth vector,
with symbol _vector_5 is reserved. You should use the same vector symbols in hand-coded assembly
handlers. You may first want to generate an idle handler in C with the compiler and than use the result
as a starting point for your assembly implementation. If the linker does not find the symbol for a handler,
it will generate a loop for the corresponding vector, i.e. a jump to itself.
Note that if you have more than one handler for the same exception, for example for different IRQ's or
for different run-time phases of your application, and you are using the __interrupt_type function
qualifier of the compiler, you will need to specify the __novector attribute in order to prevent the compiler
from generating the _vector_nr symbol multiple times, as this would lead to a link error.
Vector table size (M-profile architectures)
The vector table size for M-profile architectures is calculated as 4 times the number of vectors. The default
number of vectors is 16, but you can specify another value by defining the symbol __NR_OF_VECTORS.
Vector table versions (all architectures except M-profile)
You can select between two versions of the vector table: position dependent or position independent.
The position dependent table contains branch instructions to the handlers. The handlers must be located
in-range of the branch instructions. The size of the table is 32 bytes. This is the default.
The position independent table contains PC-relative load instructions of the PC. The handler addresses
are in a literal pool (data pocket) following the vector table. There are no range restrictions. The size of
the table and pool together is 64 bytes.
A position independent table is recommended if the table is copied from ROM to RAM at run-time or if
the ROM table is re-mapped to address 0x00000000 after startup.
To select a position independent vector table, define the symbol __PIC_VECTORS.
FIQ handler at FIQ vector (all architectures except M-profile)
If you selected a position dependent vector table (this is the default), it is possible to locate the FIQ handler
directly at the FIQ vector, since the FIQ vector is the last vector in the table. To do this, define the symbol
__FIQ_HANDLER_INLINE. Doing so saves a branch instruction when servicing a fast interrupt. The
generated vector table or the space reserved for the table will be 28 bytes instead of 32.
This option is not available for a position independent vector table. Note that you need to use the __at()
attribute to specify the actual position of the FIQ handler.
Vector table ROM address (all architectures)
The ROM address of the vector table is usually address 0x00000000. You have to specify an address if
the vector table will be copied from ROM to RAM (address 0x00000000 is mapped to RAM) or if the
hardware uses high vectors at address 0xFFFF0000. If you forced the reset handler on address
224
Run-time Environment
0x00000000 then you also have to specify a vector table ROM address to prevent overlapping address
ranges.
By default, the symbol __VECTOR_TABLE_ROM_ADDR is defined as 0x00000000.
Reserve RAM space for copy of vector table (all architectures except
M-profile)
You can ask the linker to reserve space in RAM memory for a copy of the vector table at run-time at a
certain address in memory. Typically this would be the address which will be the mapping of address
0x00000000 after ROM/RAM re-mapping. If you reserve space for a copy you can also let the startup
code copy the table automatically from ROM to RAM, but only if position independent vectors are used.
By default, the symbol __VECTOR_TABLE_RAM_SPACE is not defined.
Vector table RAM address (all architectures except M-profile)
With the define __VECTOR_TABLE_RAM_ADDR you can set the address in RAM of the copy of the vector
table (default 0x00000000).
Copy of vector table in RAM (all architectures except M-profile)
If you define the symbol __VECTOR_TABLE_RAM_COPY, the linker will provide copy address symbols
that will be used by the startup code to copy the vector table from ROM to RAM.
Refer to the run-time library implementation of the __init_vector_table routine in
lib\src\initvectortable.asm or initvectortable_thumb.asm for more information.
9.3. CMSIS Support
The interrupt vector table, required for CMSIS, is defined in device specific LSL files. These LSL files are
available in the include.lsl directory of the product installation directory. Device LSL files are similarly
named as the CMSIS header files. For example when you use stm32f10x.h the LSL file stm32f10x.lsl
is available. The device LSL files include the file arm_arch.lsl. You can control the allocated amount
of flash and SRAM by using defines for the linker. The names of these defines vary per device.
The following table contains an overview of the defines you can set.
Vector table defines
Define
Description
__NO_DEFAULT_AUTO_VECTORS If defined, the default vector table will not be generated.
__CMSIS_VECTORS
If defined, the CMSIS vector table will be generated.
__NR_OF_VECTORS
Number of vectors.
__COPY_VECTOR_TABLE
If defined, the vector table is copied from ROM to RAM at startup.
__VECTOR_TABLE_ROM_ADDR
Address of the vector table in ROM.
225
TASKING VX-toolset for ARM User Guide
Define
Description
__VECTOR_TABLE_RAM_SPACE
If defined, space must be reserved for a copy of the vector table
in RAM.
__VECTOR_TABLE_RAM_ADDR
Address of the copy of the vector table in RAM.
__VECTOR_TABLE_RAM_COPY
If defined, the linker provides copy address symbols so that the
startup code can copy the vector table from ROM to RAM.
Memory defines
Define
Description
__ROM_SIZE
Size of ROM memory to be allocated.
__RAM_SIZE
Size of RAM memory to be allocated.
__FLASH_SIZE
Size of the flash memory to be allocated.
__SRAM_SIZE
Size of the SRAM memory to be allocated.
__CPU_SRAM_SIZE Size of the SRAM memory to be allocated.
__AHB_SRAM0_SIZE Size of the AHH SRAM bank 0memory.The memory is not allocated if this macro
is not defined.
__AHB_SRAM1_SIZE Size of the AHH SRAM bank 1 memory. The memory is not allocated if this
macro is not defined.
An example of the invocation of the linker (using the control program):
ccarm -CARMv7M "installation_dir\include.lsl\stm32f10x.lsl"
-Wl-D__FLASH_SIZE=128k -Wl-D__SRAM_SIZE=20k file.obj
When you create a new project in Eclipse the LSL template file will be copied to the project. Eclipse will
pass device specific macro definitions to the linker, depending on the device selected in the Project »
Properties for » C/C++ Build » Processor properties page. This way the project LSL file will include
the appropriate device LSL file and memories are mapped as required for the selected device.
9.4. Stack and Heap
The stack is used for local automatic variables and function parameters. The following diagram shows
the structure of a stack frame.
226
Run-time Environment
All ARM architectures, except for M-profile architectures, have separate stack pointers for each processor
mode. M-profile architectures have one stack pointer. These stack pointers should be initialized at run-time.
This is taken care of by the startup code in the run-time library, by means of linker-generated symbols
defined in the LSL file. See Section 9.1, Startup Code, for a list of these symbols.
You can define the values of these symbols in Eclipse as follows.
1.
From the Project menu, select Properties for
The Properties dialog appears.
2.
In the left pane, expand C/C++ Build and select Stack/Heap.
In the right pane the Stack/Heap property page appears.
227
TASKING VX-toolset for ARM User Guide
3.
Make your changes and click OK.
The project LSL file is updated automatically according to the changes you make.
You can specify the size and location of the stacks.
The stack size is defined in the linker script file (arm_arch.lsl in directory include.lsl) with macros:
Define
Description
__STACK
Size of user stack.
__STACK_ABT
Abort mode stack size. (*)
__STACK_FIQ
FIQ mode stack size. (*)
__STACK_IRQ
IRQ mode stack size. (*)
__STACK_SVC
Supervisor mode stack size. (*)
__STACK_UND
Undefined mode stack size. (*)
__STACK_FIXED
Defined if you do not expand the user stack if space is left.
__STACKADDR
User stack start address.
(*) The defines marked with a * are not used for M-profile architectures.
228
Run-time Environment
Heap allocation
The heap is only needed when you use one or more of the dynamic memory management library functions:
malloc(), calloc(), free() and realloc(). The heap is a reserved area in memory. Only if you
use one of the memory allocation functions listed above, the linker automatically allocates a heap, as
specified in the linker script file with the keyword heap.
A special section called heap is used for the allocation of the heap area. The size of the heap is defined
in the linker script file (arm_arch.lsl in directory include.lsl) with the macro __HEAP, which results
in a section called heap. The linker defined labels _lc_ub_heap and _lc_ue_heap (begin and end of
heap) are used by the library function sbrk(), which is called by malloc() when memory is needed
from the heap.
The following heap macros are used in arm_arch.lsl:
Define
Description
__HEAP
Size of heap.
__HEAP_FIXED
Defined if you do not expand the heap if space is left.
__HEAPADDR
Heap start address.
229
TASKING VX-toolset for ARM User Guide
230
Chapter 10. Using the Utilities
The TASKING VX-toolset for ARM comes with a number of utilities:
ccarm
A control program. The control program invokes all tools in the toolset and lets you quickly
generate an absolute object file from C and/or assembly source input files. Eclipse uses
the control program to call the compiler, assembler and linker.
mkarm
A utility program to maintain, update, and reconstruct groups of programs. The make utility
looks whether files are out of date, rebuilds them and determines which other files as a
consequence also need to be rebuilt.
amk
The make utility which is used in Eclipse. It supports parallelism which utilizes the multiple
cores found on modern host hardware.
ararm
An archiver. With this utility you create and maintain library files with relocatable object
modules (.obj) generated by the assembler.
hldumparm A high level language (HLL) object dumper. With this utility you can dump information about
an absolute object file (.abs) . Key features are a disassembler with HLL source intermixing
and HLL symbol display and a HLL symbol listing of static and global symbols.
10.1. Control Program
The control program is a tool that invokes all tools in the toolset for you. It provides a quick and easy way
to generate the final absolute object file out of your C/C++ sources without the need to invoke the compiler,
assembler and linker manually.
Eclipse uses the control program to call the C++ compiler, C compiler, assembler and linker, but you can
call the control program from the command line. The invocation syntax is:
ccarm [ [option]... [file]... ]...
Recognized input files
• Files with a .cc, .cxx or .cpp suffix are interpreted as C++ source programs and are passed to the
C++ compiler.
• Files with a .c suffix are interpreted as C source programs and are passed to the compiler.
• Files with a .asm suffix are interpreted as hand-written assembly source files which have to be passed
to the assembler.
• Files with a .src suffix are interpreted as compiled assembly source files. They are directly passed to
the assembler.
• Files with a .lib suffix are interpreted as library files and are passed to the linker.
• Files with a .obj suffix are interpreted as object files and are passed to the linker.
231
TASKING VX-toolset for ARM User Guide
• Files with a .out suffix are interpreted as linked object files and are passed to the locating phase of
the linker. The linker accepts only one .out file in the invocation.
• Files with a .lsl suffix are interpreted as linker script files and are passed to the linker.
Options
The control program accepts several command line options. If you specify an unknown option to the
control program, the control program looks if it is an option for a specific tool. If so, it passes the option
directly to the tool. However, it is recommended to use the control program options --pass-* (-Wcp, -Wc,
-Wa, -Wl) to pass arguments directly to tools.
For a complete list and description of all control program options, see Section 13.6, Control Program
Options.
Example with verbose output
ccarm --verbose test.c
The control program calls all tools in the toolset and generates the absolute object file test.abs. With
option --verbose (-v) you can see how the control program calls the tools:
+ "path\carm" -o cc3248a.src test.c
+ "path\asarm" -o cc3248b.obj cc3248a.src
+ "path\lkarm" cc3248b.obj -o test.abs --map-file
-lcarm -lfparm -lrtarm"
The control program produces unique filenames for intermediate steps in the compilation process (such
as cc3248a.src and cc3248b.obj in the example above) which are removed afterwards, unless you
specify command line option --keep-temporary-files (-t).
Example with argument passing to a tool
ccarm --pass-compiler=-Oc test.c
The option -Oc is directly passed to the compiler.
232
Using the Utilities
10.2. Make Utility mkarm
If you are working with large quantities of files, or if you need to build several targets, it is rather
time-consuming to call the individual tools to compile, assemble, link and locate all your files.
You save already a lot of typing if you use the control program and define an options file. You can even
create a batch file or script that invokes the control program for each target you want to create. But with
these methods all files are completely compiled, assembled and linked to obtain the target file, even if
you changed just one C source. This may demand a lot of (CPU) time on your host.
The make utility mkarm is a tool to maintain, update, and reconstruct groups of programs. The make
utility looks which files are out-of-date and only recreates these files to obtain the updated target.
Make process
In order to build a target, the make utility needs the following input:
• the target it should build, specified as argument on the command line
• the rules to build the target, stored in a file usually called makefile
In addition, the make utility also reads the file mkarm.mk which contains predefined rules and
macros. See Section 10.2.2, Writing a Makefile.
The makefile contains the relationships among your files (called dependencies) and the commands
that are necessary to create each of the files (called rules). Typically, the absolute object file (.abs) is
updated when one of its dependencies has changed. The absolute file depends on .obj files and libraries
that must be linked together. The .obj files on their turn depend on .src files that must be assembled
and finally, .src files depend on the C source files (.c) that must be compiled. In the makefile this
looks like:
test.src : test.c
carm test.c
# dependency
# rule
test.obj : test.src
asarm test.src
test.abs : test.obj
lkarm test.obj -o test.abs --map-file -lcarm -lfparm -lrtarm
You can use any command that is valid on the command line as a rule in the makefile. So, rules are
not restricted to invocation of the toolset.
Example
To build the target test.abs, call mkarm with one of the following lines:
233
TASKING VX-toolset for ARM User Guide
mkarm test.abs
mkarm -fmymake.mak test.abs
By default the make utility reads the file makefile so you do not need to specify it on the command line.
If you want to use another name for the makefile, use the option -f.
If you do not specify a target, mkarm uses the first target defined in the makefile. In this example it would
build test.src instead of test.abs.
Based on the sample invocation, the make utility now tries to build test.abs based on the makefile and
performs the following steps:
1. From the makefile the make utility reads that test.abs depends on test.obj.
2. If test.obj does not exist or is out-of-date, the make utility first tries to build this file and reads from
the makefile that test.obj depends on test.src.
3. If test.src does exist, the make utility now creates test.obj by executing the rule for it: asarm
test.src.
4. There are no other files necessary to create test.abs so the make utility now can use test.obj to
create test.abs by executing the rule: lkarm test.obj -o test.abs ...
The make utility has now built test.abs but it only used the assembler to update test.obj and the
linker to create test.abs.
If you compare this to the control program:
ccarm test.c
This invocation has the same effect but now all files are recompiled (assembled, linked and located).
10.2.1. Calling the Make Utility
You can only call the make utility from the command line. The invocation syntax is:
mkarm [ [option]... [target]... [macro=def]... ]
For example:
mkarm test.abs
target
You can specify any target that is defined in the makefile. A target can also be one
of the intermediate files specified in the makefile.
macro=def
Macro definition. This definition remains fixed for the mkarm invocation. It overrides
any regular definitions for the specified macro within the makefiles and from the
environment. It is inherited by subordinate mkarm's but act as an environment variable
for these. That is, depending on the -e setting, it may be overridden by a makefile
definition.
234
Using the Utilities
option
For a complete list and description of all make utility options, see Section 13.7, Make
Utility Options.
Exit status
The make utility returns an exit status of 1 when it halts as a result of an error. Otherwise it returns an
exit status of 0.
10.2.2. Writing a Makefile
In addition to the standard makefile makefile, the make utility always reads the makefile mkarm.mk
before other inputs. This system makefile contains implicit rules and predefined macros that you can use
in the makefile makefile.
With the option -r (Do not read the mkarm.mk file) you can prevent the make utility from reading mkarm.mk.
The default name of the makefile is makefile in the current directory. If you want to use another makefile,
use the option -f.
The makefile can contain a mixture of:
• targets and dependencies
• rules
• macro definitions or functions
• conditional processing
• comment lines
• include lines
• export lines
To continue a line on the next line, terminate it with a backslash (\):
# this comment line is continued\
on the next line
If a line must end with a backslash, add an empty macro:
# this comment line ends with a backslash \$(EMPTY)
# this is a new line
10.2.2.1. Targets and Dependencies
The basis of the makefile is a set of targets, dependencies and rules. A target entry in the makefile has
the following format:
235
TASKING VX-toolset for ARM User Guide
target ... : [dependency ...] [; rule]
[rule]
...
Target lines must always start at the beginning of a line, leading white spaces (tabs or spaces) are not
allowed. A target line consists of one or more targets, a semicolon and a set of files which are required
to build the target (dependencies). The target itself can be one or more filenames or symbolic names:
all:
demo.abs final.abs
demo.abs final.abs:
test.obj demo.obj final.obj
You can now can specify the target you want to build to the make utility. The following three invocations
all have the same effect:
mkarm
mkarm all
mkarm demo.abs final.abs
If you do not specify a target, the first target in the makefile (in this example all) is built. The target all
depends on demo.abs and final.abs so the second and third invocation have the same effect and
the files demo.abs and final.abs are built.
You can normally use colons to denote drive letters. The following works as intended:
c:foo.obj : a:foo.c
If a target is defined in more than one target line, the dependencies are added to form the target's complete
dependency list:
all:
all:
demo.abs
final.abs
# These two lines are equivalent with:
# all: demo.abs final.abs
Special targets
There are a number of special targets. Their names begin with a period.
Target
Description
.DEFAULT
If you call the make utility with a target that has no definition in the makefile, this
target is built.
.DONE
When the make utility has finished building the specified targets, it continues with
the rules following this target.
.IGNORE
Non-zero error codes returned from commands are ignored. Encountering this in a
makefile is the same as specifying the option -i on the command line.
.INIT
The rules following this target are executed before any other targets are built.
.PRECIOUS
Dependency files mentioned for this target are never removed. Normally, if a
command in a rule returns an error or when the target construction is interrupted,
the make utility removes that target file. You can use the option -p on the command
line to make all targets precious.
236
Using the Utilities
Target
Description
.SILENT
Commands are not echoed before executing them. Encountering this in a makefile
is the same as specifying the option -s on the command line.
.SUFFIXES
This target specifies a list of file extensions. Instead of building a completely specified
target, you now can build a target that has a certain file extension. Implicit rules to
build files with a number of extensions are included in the system makefile mkarm.mk.
If you specify this target with dependencies, these are added to the existing
.SUFFIXES target in mkarm.mk. If you specify this target without dependencies,
the existing list is cleared.
10.2.2.2. Makefile Rules
A line with leading white space (tabs or spaces) is considered as a rule and associated with the most
recently preceding dependency line. A rule is a line with commands that are executed to build the
associated target. A target-dependency line can be followed by one or more rules.
final.src : final.c
move test.c final.c
carm final.c
# target and dependency
# rule1
# rule2
You can precede a rule with one or more of the following characters:
@
does not echo the command line, except if -n is used.
-
the make utility ignores the exit code of the command. Normally the make utility stops if a
non-zero exit code is returned. This is the same as specifying the option -i on the command
line or specifying the special .IGNORE target.
+
The make utility uses a shell or Windows command prompt (cmd.exe) to execute the
command. If the '+' is not followed by a shell line, but the command is an MS-DOS command
or if redirection is used (<, |, >), the shell line is passed to cmd.exe anyway.
You can force mkarm to execute multiple command lines in one shell environment. This is accomplished
with the token combination ';\'. For example:
cd c:\Tasking\bin ;\
mkarm -V
Note that the ';' must always directly be followed by the '\' token. Whitespace is not removed when it is at
the end of the previous command line or when it is in front of the next command line. The use of the ';'
as an operator for a command (like a semicolon ';' separated list with each item on one line) and the '\'
as a layout tool is not supported, unless they are separated with whitespace.
Inline temporary files
The make utility can generate inline temporary files. If a line contains <<LABEL (no whitespaces!) then
all subsequent lines are placed in a temporary file until the line LABEL is encountered. Next, <<LABEL
is replaced by the name of the temporary file. For example:
237
TASKING VX-toolset for ARM User Guide
lkarm -o $@ -f <<EOF
$(separate "\n" $(match .obj $!))
$(separate "\n" $(match .lib $!))
$(LKFLAGS)
EOF
The three lines between <<EOF and EOF are written to a temporary file (for example mkce4c0a.tmp),
and the rule is rewritten as: lkarm -o $@ -f mkce4c0a.tmp.
Suffix targets
Instead of specifying a specific target, you can also define a general target. A general target specifies the
rules to generate a file with extension .ex1 to a file with extension .ex2. For example:
.SUFFIXES:
.c.obj
:
.c
ccarm -c $<
Read this as: to build a file with extension .obj out of a file with extension .c, call the control program
with -c $<. $< is a predefined macro that is replaced with the name of the current dependency file. The
special target .SUFFIXES: is followed by a list of file extensions of the files that are required to build the
target.
Implicit rules
Implicit rules are stored in the system makefile mkarm.mk and are intimately tied to the .SUFFIXES
special target. Each dependency that follows the .SUFFIXES target, defines an extension to a filename
which must be used to build another file. The implicit rules then define how to actually build one file from
another. These files share a common basename, but have different extensions.
If the specified target on the command line is not defined in the makefile or has not rules in the makefile,
the make utility looks if there is an implicit rule to build the target.
Example:
LIB
=
-lcarm -lfparm -lrtarm
# macro
prog.abs: prog.obj sub.obj
lkarm prog.obj sub.obj $(LIB) -o prog.abs
prog.obj: prog.c inc.h
carm prog.c
asarm prog.src
sub.obj:
sub.c inc.h
carm sub.c
asarm sub.src
This makefile says that prog.abs depends on two files prog.obj and sub.obj, and that they in turn
depend on their corresponding source files (prog.c and sub.c) along with the common file inc.h.
The following makefile uses implicit rules (from mkarm.mk) to perform the same job.
238
Using the Utilities
LDFLAGS =
prog.abs:
prog.obj:
sub.obj:
-lcarm -lfparm -lrtarm
prog.obj sub.obj
prog.c inc.h
sub.c inc.h
#
#
#
#
macro used by
implicit rule
implicit rule
implicit rule
implicit rules
used
used
used
10.2.2.3. Macro Definitions
A macro is a symbol name that is replaced with its definition before the makefile is executed. Although
the macro name can consist of lower case or upper case characters, upper case is an accepted convention.
The general form of a macro definition is:
MACRO = text
MACRO += and more text
Spaces around the equal sign are not significant. With the += operator you can add a string to an existing
macro. An extra space is inserted before the added string automatically.
To use a macro, you must access its contents:
$(MACRO)
${MACRO}
# you can read this as
# the contents of macro MACRO
If the macro name is a single character, the parentheses are optional. Note that the expansion is done
recursively, so the body of a macro may contain other macros. These macros are expanded when the
macro is actually used, not at the point of definition:
FOOD = $(EAT) and $(DRINK)
EAT = meat and/or vegetables
DRINK = water
export FOOD
The macro FOOD is expanded as meat and/or vegetables and water at the moment it is used in
the export line, and the environment variable FOOD is set accordingly.
Predefined macros
Macro
Description
MAKE
Holds the value mkarm. Any line which uses MAKE, temporarily overrides the option
-n (Show commands without executing), just for the duration of the one line. This way
you can test nested calls to MAKE with the option -n.
MAKEFLAGS
Holds the set of options provided to mkarm (except for the options -f and -d). If this
macro is exported to set the environment variable MAKEFLAGS, the set of options is
processed before any command line options. You can pass this macro explicitly to
nested mkarm's, but it is also available to these invocations as an environment variable.
239
TASKING VX-toolset for ARM User Guide
Macro
Description
PRODDIR
Holds the name of the directory where mkarm is installed. You can use this macro to
refer to files belonging to the product, for example a library source file.
DOPRINT = $(PRODDIR)/lib/src/_doprint.c
When mkarm is installed in the directory c:/Tasking/bin this line expands to:
DOPRINT = c:/Tasking/lib/src/_doprint.c
SHELLCMD
Holds the default list of commands which are local to the SHELL. If a rule is an
invocation of one of these commands, a SHELL is automatically spawned to handle
it.
$
This macro translates to a dollar sign.Thus you can use "$$" in the makefile to represent
a single "$".
Dynamically maintained macros
There are several dynamically maintained macros that are useful as abbreviations within rules. It is best
not to define them explicitly.
Macro
Description
$*
The basename of the current target.
$<
The name of the current dependency file.
$@
The name of the current target.
$?
The names of dependents which are younger than the target.
$!
The names of all dependents.
The $< and $* macros are normally used for implicit rules. They may be unreliable when used within
explicit target command lines. All macros may be suffixed with F to specify the Filename components
(e.g. ${*F}, ${@F}). Likewise, the macros $*, $< and $@ may be suffixed by D to specify the Directory
component.
The result of the $* macro is always without double quotes ("), regardless of the original target having
double quotes (") around it or not.
The result of using the suffix F (Filename component) or D (Directory component) is also always without
double quotes ("), regardless of the original contents having double quotes (") around it or not.
10.2.2.4. Makefile Functions
A function not only expands but also performs a certain operation. Functions syntactically look like macros
but have embedded spaces in the macro name, e.g. '$(match arg1 arg2 arg3 )'. All functions are built-in
and currently these are: match, separate, protect, exist,nexist and addprefix.
$(match suffix filename ...)
The match function yields all arguments which match a certain suffix:
240
Using the Utilities
$(match .obj prog.obj sub.obj mylib.lib)
yields:
prog.obj sub.obj
$(separate separator argument ...)
The separate function concatenates its arguments using the first argument as the separator. If the first
argument is enclosed in double quotes then '\n' is interpreted as a newline character, '\t' is interpreted as
a tab, '\ooo' is interpreted as an octal value (where, ooo is one to three octal digits), and spaces are taken
literally. For example:
$(separate "\n" prog.obj sub.obj)
results in:
prog.obj
sub.obj
Function arguments may be macros or functions themselves. So,
$(separate "\n" $(match .obj $!))
yields all object files the current target depends on, separated by a newline string.
$(protect argument)
The protect function adds one level of quoting. This function has one argument which can contain white
space. If the argument contains any white space, single quotes, double quotes, or backslashes, it is
enclosed in double quotes. In addition, any double quote or backslash is escaped with a backslash.
Example:
echo $(protect I'll show you the "protect" function)
yields:
echo "I'll show you the \"protect\" function"
$(exist file | directory argument)
The exist function expands to its second argument if the first argument is an existing file or directory.
Example:
$(exist test.c ccarm test.c)
When the file test.c exists, it yields:
ccarm test.c
When the file test.c does not exist nothing is expanded.
241
TASKING VX-toolset for ARM User Guide
$(nexist file|directory argument)
The nexist function is the opposite of the exist function. It expands to its second argument if the first
argument is not an existing file or directory.
Example:
$(nexist test.src ccarm test.c)
$(addprefix prefix, argument ...)
The addprefix function adds a prefix to its arguments. It is used in mkarm.mk for invocation of the
control program to pass arguments directly to a tool.
Example:
ccarm $(addprefix -Wc, -g1 -O2) test.c
yields:
ccarm -Wc-g1 -Wc-O2 test.c
10.2.2.5. Conditional Processing
Lines containing ifdef, ifndef, else or endif are used for conditional processing of the makefile.
They are used in the following way:
ifdef macro-name
if-lines
else
else-lines
endif
The if-lines and else-lines may contain any number of lines or text of any kind, even other ifdef, ifndef,
else and endif lines, or no lines at all. The else line may be omitted, along with the else-lines following
it.
First the macro-name after the ifdef command is checked for definition. If the macro is defined then
the if-lines are interpreted and the else-lines are discarded (if present). Otherwise the if-lines are discarded;
and if there is an else line, the else-lines are interpreted; but if there is no else line, then no lines are
interpreted.
When you use the ifndef line instead of ifdef, the macro is tested for not being defined. These
conditional lines can be nested up to 6 levels deep.
You can also add tests based on strings. With ifeq the result is true if the two strings match, with ifneq
the result is true if the two strings do not match. They are used in the following way:
ifeq(string1,string2)
if-lines
else
242
Using the Utilities
else-lines
endif
10.2.2.6. Comment, Include and Export Lines
Comment lines
Anything after a "#" is considered as a comment, and is ignored. If the "#" is inside a quoted string, it is
not treated as a comment. Completely blank lines are ignored.
test.src
: test.c
ccarm test.c
# this is comment and is
# ignored by the make utility
Include lines
An include line is used to include the text of another makefile (like including a .h file in a C source).
Macros in the name of the included file are expanded before the file is included. You can include several
files. Include files may be nested.
include makefile2 makefile3
Export lines
An export line is used to export a macro definition to the environment of any command executed by the
make utility.
GREETING = Hello
export GREETING
This example creates the environment variable GREETING with the value Hello. The macro is exported
at the moment the export line is read so the macro definition has to precede the export line.
243
TASKING VX-toolset for ARM User Guide
10.3. Make Utility amk
amk is the make utility Eclipse uses to maintain, update, and reconstruct groups of programs. But you
can also use it on the command line. Its features are a little different from mkarm. The main difference
compared to mkarm and other make utilities, is that amk features parallelism which utilizes the multiple
cores found on modern host hardware, hardening for path names with embedded white space and it has
an (internal) interface to provide progress information for updating a progress bar. It does not use an
external command shell (/bin/sh, cmd.exe) but executes commands directly.
The primary purpose of any make utility is to speed up the edit-build-test cycle. To avoid having to build
everything from scratch even when only one source file changes, it is necessary to describe dependencies
between source files and output files and the commands needed for updating the output files. This is
done in a so called "makefile".
10.3.1. Makefile Rules
A makefile dependency rule is a single line of the form:
[target ...] : [prerequisite ...]
where target and prerequisite are path names to files. Example:
test.obj : test.c
This states that target test.obj depends on prerequisite test.c. So, whenever the latter is modified
the first must be updated. Dependencies accumulate: prerequisites and targets can be mentioned in
multiple dependency rules (circular dependencies are not allowed however). The command(s) for updating
a target when any of its prerequisites have been modified must be specified with leading white space
after any of the dependency rule(s) for the target in question. Example:
test.obj :
ccarm test.c
# leading white space
Command rules may contain dependencies too. Combining the above for example yields:
test.obj : test.c
ccarm test.c
White space around the colon is not required. When a path name contains special characters such as
':', '#' (start of comment), '=' (macro assignment) or any white space, then the path name must be enclosed
in single or double quotes. Quoted strings can contain anything except the quote character itself and a
newline. Two strings without white space in between are interpreted as one, so it is possible to embed
single and double quotes themselves by switching the quote character.
When a target does not exist, its modification time is assumed to be very old. So, amk will try to make it.
When a prerequisite does not exist possibly after having tried to make it, it is assumed to be very new.
So, the update commands for the current target will be executed in that case. amk will only try to make
targets which are specified on the command line. The default target is the first target in the makefile which
does not start with a dot.
244
Using the Utilities
Static pattern rules
Static pattern rules are rules which specify multiple targets and construct the prerequisite names for each
target based on the target name.
[target ...] : target-pattern : [prerequisite-patterns ...]
The target specifies the targets the rules applies to. The target-pattern and prerequisite-patterns specify
how to compute the prerequisites of each target. Each target is matched against the target-pattern to
extract a part of the target name, called the stem. This stem is substituted into each of the
prerequisite-patterns to make the prerequisite names (one from each prerequisite-pattern).
Each pattern normally contains the character '%' just once. When the target-pattern matches a target,
the '%' can match any part of the target name; this part is called the stem. The rest of the pattern must
match exactly. For example, the target foo.obj matches the pattern '%.obj', with 'foo' as the stem.
The targets foo.c and foo.abs do not match that pattern.
The prerequisite names for each target are made by substituting the stem for the '%' in each prerequisite
pattern.
Example:
objects = test.obj filter.obj
all: $(objects)
$(objects): %.obj: %.c
ccarm -c $< -o $@
echo the stem is $*
Here '$<' is the automatic variable that holds the name of the prerequisite, '$@' is the automatic variable
that holds the name of the target and '$*' is the stem that matches the pattern. Internally this translates
to the following two rules:
test.obj: test.c
ccarm -c test.c -o test.obj
echo the stem is test
filter.obj: filter.c
ccarm -c filter.c -o filter.obj
echo the stem is filter
Each target specified must match the target pattern; a warning is issued for each target that does not.
245
TASKING VX-toolset for ARM User Guide
Special targets
There are a number of special targets. Their names begin with a period.
Target
Description
.DEFAULT
If you call the make utility with a target that has no definition in the makefile, this
target is built.
.DONE
When the make utility has finished building the specified targets, it continues with
the rules following this target.
.INIT
The rules following this target are executed before any other targets are built.
.PHONY
The prerequisites of this target are considered to be phony targets. A phony target
is a target that is not really the name of a file. The rules following a phony target are
executed unconditionally, regardless of whether a file with that name exists or what
its last-modification time is.
For example:
.PHONY: clean
clean:
rm *.obj
With amk clean, the command is executed regardless of whether there is a file
named clean.
10.3.2. Makefile Directives
Directives inside makefiles are executed while reading the makefile. When a line starts with the word
"include" or "-include" then the remaining arguments on that line are considered filenames whose
contents are to be inserted at the current line. "-include" will silently skip files which are not present.
You can include several files. Include files may be nested.
Example:
include makefile2 makefile3
White spaces (tabs or spaces) in front of the directive are allowed.
10.3.3. Macro Definitions
A macro is a symbol name that is replaced with its definition before the makefile is executed. Although
the macro name can consist of lower case or upper case characters, upper case is an accepted convention.
When a line does not start with white space and contains the assignment operator '=', ':=' or '+=' then the
line is interpreted as a macro definition. White space around the assignment operator and white space
at the end of the line is discarded. Single character macro evaluation happens by prefixing the name with
'$'. To evaluate macros with names longer than one character put the name between parentheses '()' or
curly braces '{}'. Macro names may contain anything, even white space or other macro evaluations.
Example:
246
Using the Utilities
DINNER = $(FOOD) and $(BEVERAGE)
FOOD = pizza
BEVERAGE = sparkling water
FOOD += with cheese
With the += operator you can add a string to an existing macro. An extra space is inserted before the
added string automatically.
Macros are evaluated recursively. Whenever $(DINNER) or ${DINNER} is mentioned after the above,
it will be replaced by the text "pizza with cheese and sparkling water". The left hand side in
a macro definition is evaluated before the definition takes place. Right hand side evaluation depends on
the assignment operator:
=
Evaluate the macro at the moment it is used.
:=
Evaluate the replacement text before defining the macro.
Subsequent '+=' assignments will inherit the evaluation behavior from the previous assignment. If there
is none, then '+=' is the same as '='. The default value for any macro is taken from the environment. Macro
definitions inside the makefile overrule environment variables. Macro definitions on the amk command
line will be evaluated first and overrule definitions inside the makefile.
Predefined macros
Macro
Description
$
This macro translates to a dollar sign.Thus you can use "$$" in the makefile to represent
a single "$".
@
The name of the current target. When a rule has multiple targets, then it is the name
of the target that caused the rule commands to be run.
*
The basename (or stem) of the current target. The stem is either provided via a static
pattern rule or is calculated by removing all characters found after and including the
last dot in the current target name. If the target name is 'test.c' then the stem is
'test' (if the target was not created via a static pattern rule).
<
The name of the first prerequisite.
MAKE
The amk path name (quoted if necessary). Optionally followed by the options -n and
-s.
ORIGIN
The name of the directory where amk is installed (quoted if necessary).
SUBDIR
The argument of option -G. If you have nested makes with -G options, the paths are
combined. This macro is defined in the environment (i.e. default macro value).
The @, * and < macros may be suffixed by 'D' to specify the directory component or by 'F' to specify the
filename component. $(@D) evaluates to the directory name holding the file$(@F). $(@D)/$(@F) is
equivalent to $@. Note that on MS-Windows most programs accept forward slashes, even for UNC path
names.
The result of the predefined macros @, * and < and 'D' and 'F' variants is not quoted, so it may be necessary
to put quotes around it.
247
TASKING VX-toolset for ARM User Guide
Note that stem calculation can cause unexpected values. For example:
$@
/home/.wine/test
/home/test/.project
/../file
$*
/home/
/home/test/
/.
Macro string substitution
When the macro name in an evaluation is followed by a colon and equal sign as in
$(MACRO:string1=string2)
then amk will replace string1 at the end of every word in $(MACRO) by string2 during evaluation. When
$(MACRO) contains quoted path names, the quote character must be mentioned in both the original string
1
and the replacement string . For example:
$(MACRO:.obj"=.d")
10.3.4. Makefile Functions
A function not only expands but also performs a certain operation. The following functions are available:
$(filter pattern ...,item ...)
The filter function filters a list of items using a pattern. It returns items that do match any of the pattern
words, removing any items that do not match. The patterns are written using '%',
${filter %.c %.h, test.c test.h test.obj readme.txt .project output.c}
results in:
test.c test.h output.c
$(filter-out pattern ...,item ...)
The filter-out function returns all items that do not match any of the pattern words, removing the
items that do match one or more. This is the exact opposite of the filter function.
${filter-out %.c %.h, test.c test.h test.obj readme.txt .project output.c}
results in:
test.obj readme.txt .project
1
Internally, amk tokenizes the evaluated text, but performs substitution on the original input text to preserve compatibility here with
existing make implementations and POSIX.
248
Using the Utilities
$(foreach var-name, item ..., action)
The foreach function runs through a list of items and performs the same action for each item. The
var-name is the name of the macro which gets dynamically filled with an item while iterating through the
item list. In the action you can refer to this macro. For example:
${foreach T, test filter output, ${T}.c ${T}.h}
results in:
test.c test.h filter.c filter.h output.c output.h
10.3.5. Conditional Processing
Lines containing ifdef, ifndef, else or endif are used for conditional processing of the makefile.
They are used in the following way:
ifdef macro-name
if-lines
else
else-lines
endif
The if-lines and else-lines may contain any number of lines or text of any kind, even other ifdef, ifndef,
else and endif lines, or no lines at all. The else line may be omitted, along with the else-lines following
it. White spaces (tabs or spaces) in front of preprocessing directives are allowed.
First the macro-name after the ifdef command is checked for definition. If the macro is defined then
the if-lines are interpreted and the else-lines are discarded (if present). Otherwise the if-lines are discarded;
and if there is an else line, the else-lines are interpreted; but if there is no else line, then no lines are
interpreted.
When you use the ifndef line instead of ifdef, the macro is tested for not being defined. These
conditional lines can be nested to any level.
You can also add tests based on strings. With ifeq the result is true if the two strings match, with ifneq
the result is true if the two strings do not match. They are used in the following way:
ifeq(string1,string2)
if-lines
else
else-lines
endif
10.3.6. Makefile Parsing
amk reads and interprets a makefile in the following order:
1. When the last character on a line is a backslash (\) (i.e. without trailing white space) then that line and
the next line will be concatenated, removing the backslash and newline.
249
TASKING VX-toolset for ARM User Guide
2. The unquoted '#' character indicates start of comment and may be placed anywhere on a line. It will
be removed in this phase.
# this comment line is continued\
on the next line
3. Trailing white space is removed.
4. When a line starts with white space and it is not followed by a directive or preprocessing directive, then
it is interpreted as a command for updating a target.
5. Otherwise, when a line contains the unquoted text '=', '+=' or ':=' operator, then it will be interpreted as
a macro definition.
6. Otherwise, all macros on the line are evaluated before considering the next steps.
7. When the resulting line contains an unquoted ':' the line is interpreted as a dependency rule.
8. When the first token on the line is "include" or "-include" (which by now must start on the first
column of the line), amk will execute the directive.
9. Otherwise, the line must be empty.
Macros in commands for updating a target are evaluated right before the actual execution takes place
(or would take place when you use the -n option).
10.3.7. Makefile Command Processing
A line with leading white space (tabs or spaces) without a (preprocessing) directive is considered as a
command for updating a target. When you use the option -j or -J, amk will execute the commands for
updating different targets in parallel. In that case standard input will not be available and standard output
and error output will be merged and displayed on standard output only after the commands have finished
for a target.
You can precede a command by one or more of the following characters:
@
Do not show the command. By default, commands are shown prior to their output.
-
Continue upon error. This means that amk ignores a non-zero exit code of the command.
+
Execute the command, even when you use option -n (dry run).
|
Execute the command on the foreground with standard input, standard output and error
output available.
Built-in commands
Command
Description
true
This command does nothing. Arguments are ignored.
false
This command does nothing, except failing with exit code 1. Arguments are
ignored.
250
Using the Utilities
Command
Description
echo arg...
Display a line of text.
exit code
Exit with defined code. Depending on the program arguments and/or the extra
rule options '-' this will cause amk to exit with the provided code. Please note
that 'exit 0' has currently no result.
argfile file arg...
Create an argument file suitable for the --option-file (-f) option of all the other
tools. The first argfile argument is the name of the file to be created.
Subsequent arguments specify the contents. An existing argument file is not
modified unless necessary. So, the argument file itself can be used to create
a dependency to options of the command for updating a target.
10.3.8. Calling the amk Make Utility
The invocation syntax of amk is:
amk [option]... [target]... [macro=def]...
For example:
amk test.abs
target
You can specify any target that is defined in the makefile. A target can also be one
of the intermediate files specified in the makefile.
macro=def
Macro definition. This definition remains fixed for the amk invocation. It overrides any
regular definitions for the specified macro within the makefiles and from the
environment. It is not inherited by subordinate amk's
option
For a complete list and description of all amk make utility options, see Section 13.8,
Parallel Make Utility Options.
Exit status
The make utility returns an exit status of 1 when it halts as a result of an error. Otherwise it returns an
exit status of 0.
251
TASKING VX-toolset for ARM User Guide
10.4. Archiver
The archiver ararm is a program to build and maintain your own library files. A library file is a file with
extension .lib and contains one or more object files (.obj) that may be used by the linker.
The archiver has five main functions:
• Deleting an object module from the library
• Moving an object module to another position in the library file
• Replacing an object module in the library or add a new object module
• Showing a table of contents of the library file
• Extracting an object module from the library
The archiver takes the following files for input and output:
The linker optionally includes object modules from a library if that module resolves an external symbol
definition in one of the modules that are read before.
10.4.1. Calling the Archiver
You can create a library in Eclipse, which calls the archiver or you can call the archiver on the command
line.
To create a library in Eclipse
Instead of creating an ARM absolute ELF file, you can choose to create a library. You do this when you
create a new project with the New C/C++ Project wizard.
1.
From the File menu, select New » TASKING VX-toolset for ARM C/C++ Project.
The New C/C++ Project wizard appears.
2.
Enter a project name.
3.
In the Project type box, select TASKING ARM Library and clickNext >.
4.
Follow the rest of the wizard and click Finish.
5.
Add the files to your project.
252
Using the Utilities
6.
Build the project as usual. For example, select Project » Build Project (
).
Eclipse builds the library. Instead of calling the linker, Eclipse now calls the archiver.
Command line invocation
You can call the archiver from the command line. The invocation syntax is:
ararm key_option [sub_option...] library [object_file]
key_option
With a key option you specify the main task which the archiver should perform. You
must always specify a key option.
sub_option
Sub-options specify into more detail how the archiver should perform the task that is
specified with the key option. It is not obligatory to specify sub-options.
library
The name of the library file on which the archiver performs the specified action. You
must always specify a library name, except for the options -? and -V. When the library
is not in the current directory, specify the complete path (either absolute or relative) to
the library.
object_file
The name of an object file. You must always specify an object file name when you
add, extract, replace or remove an object file from the library.
Options of the archiver utility
The following archiver options are available:
Description
Option
Sub-option
Replace or add an object module
-r
-a -b -c -u -v
Extract an object module from the library
-x
-v
Delete object module from library
-d
-v
Move object module to another position
-m
-a -b -v
Print a table of contents of the library
-t
-s0 -s1
Print object module to standard output
-p
Main functions (key options)
Sub-options
Append or move new modules after existing module name
-a name
Append or move new modules before existing module name
-b name
Create library without notification if library does not exis
-c
Preserve last-modified date from the library
-o
Print symbols in library modules
-s{0|1}
Replace only newer modules
-u
Verbose
-v
Miscellaneous
253
TASKING VX-toolset for ARM User Guide
Description
Option
Display options
-?
Display version header
-V
Read options from file
-f file
Suppress warnings above level n
-wn
Sub-option
For a complete list and description of all archiver options, see Section 13.9, Archiver Options.
10.4.2. Archiver Examples
Create a new library
If you add modules to a library that does not yet exist, the library is created. To create a new library with
the name mylib.lib and add the object modules cstart.obj and calc.obj to it:
ararm -r mylib.lib cstart.obj calc.obj
Add a new module to an existing library
If you add a new module to an existing library, the module is added at the end of the module. (If the
module already exists in the library, it is replaced.)
ararm -r mylib.lib mod3.obj
Print a list of object modules in the library
To inspect the contents of the library:
ararm -t mylib.lib
The library has the following contents:
cstart.obj
calc.obj
mod3.obj
Move an object module to another position
To move mod3.obj to the beginning of the library, position it just before cstart.obj:
ararm -mb cstart.obj mylib.lib mod3.obj
Delete an object module from the library
To delete the object module cstart.obj from the library mylib.lib:
ararm -d mylib.lib cstart.obj
254
Using the Utilities
Extract all modules from the library
Extract all modules from the library mylib.lib:
ararm -x mylib.lib
255
TASKING VX-toolset for ARM User Guide
10.5. HLL Object Dumper
The high level language (HLL) dumper hldumparm is a program to dump information about an absolute
object file (.abs) . Key features are a disassembler with HLL source intermixing and HLL symbol display
and a HLL symbol listing of static and global symbols.
10.5.1. Invocation
Command line invocation
You can call the HLL dumper from the command line. The invocation syntax is:
hldumparm [option]... file...
The input file must be an ELF file with or without DWARF debug info (.abs).
The HLL dumper can process multiple input files. Files and options can be intermixed on the command
line. Options apply to all supplied files. If multiple files are supplied, the disassembly of each file is preceded
by a header to indicate which file is dumped. For example:
========== file.abs ==========
For a complete list and description of all options, see Section 13.10, HLL Object Dumper Options. With
hldumparm --help you will see the options on stdout.
10.5.2. HLL Dump Output Format
The HLL dumper produces output in text format by default, but you can also specify the XML output format
with --output-file-type=xml. The XML output is mainly for use in the Eclipse editor. The output is printed
on stdout, unless you specify an output file with --output=filename.
The parts of the output are dumped in the following order:
1. Module list
2. Section list
3. Section dump (disassembly)
4. HLL symbol table
5. Assembly level symbol table
With the option --dump-format=flag you can control which parts are shown. By default, all parts are
shown.
Example
Suppose we have a simple "Hello World" program in a file called hello.c. We call the control program
as follows:
256
Using the Utilities
ccarm -g -t hello.c
Option -g tells to include DWARF debug information. Option -t tells to keep the intermediate files. This
command results (among other files) in the file hello.abs (the absolute output file).
We can dump information about the absolute object file with the following command:
hldumparm hello.abs
---------- Module list ---------Name
Full path
hello.c hello.c
---------- Section list ---------Address Size
Align Name
00000694
24
4 .text
000400e0
4
4 .data
000006b8
6
4 .rodata
000006ac
11
4 .rodata
---------- Section dump ---------.section .data, '[.data]'
.org 000000e8
.db b8,06,00,00
.endsec
00000694
00000698
0000069c
000006a0
000006a4
000006a6
000006a8
000006aa
08009fe5 main
001090e5
04009fe5
74ffffea
e000
0400
ac06
0000
; ....
.section .text, '.text'
ldr
r0, [r15, #+0x8]
ldr
r1, [r0, #+0x0]
ldr
r0, [r15, #+0x4]
b
printf
.dh 00e0
.dh 0004
.dh 06ac
.dh 0000
.endsec
.section .data, '.rodata'
.org 000006ac
.db 48,65,6c,6c,6f,20,25,73,21,0a,00
.endsec
.section .data, '.rodata'
.org 000006b8
.db 77,6f,72,6c,64,00
.endsec
; Hello %s!..
; world.
---------- HLL symbol table ----------
257
TASKING VX-toolset for ARM User Guide
Address
00000394
0000040c
00000478
00000694
00040028
00040040
00040090
000400e0
000400e4
Size
88
104
64
16
24
80
80
4
200
HLL Type
void
void
int
void
struct
static char
static char
char
struct _iobuf
Name
_START()
__init()
printf(const char * format, ...)
main()
_dbg_request [dbg.c]
stdin_buf[80] [_iob.c]
stdout_buf[80] [_iob.c]
* world [hello.c]
_iob[10] [_iob.c]
---------- assembly level symbol table ---------Address Size
Type Name
00000000
00000000
$group_.1.str
00000000
$group_.2.str
00000000
$group_main
00000000
$group_world
00000000
hello.c
00000394
88 code _START
00000478
64 code printf
00000694
16 code main
000400e0
4 data world
Module list
This part lists all modules (C/C++ files) found in the object file(s). It lists the filename and the complete
path name at the time the module was built.
Section list
This part lists all sections found in the object file(s).
Address
The start address of the section. Hexadecimal, 8 digits, 32-bit.
Size
The size (length) of the section in bytes. Decimal, filled up with spaces.
Align
The alignment of the section in number of bytes. Decimal, filled up with spaces.
Name
The name of the section.
With option --sections=name[,name]... you can specify a list of sections that should be dumped.
Section dump
This part contains the disassembly. It consists of the following columns:
258
Using the Utilities
address column
Contains the address of the instruction or directive that is shown in the disassembly.
If the section is relocatable the section start address is assumed to be 0. The
address is represented in hexadecimal and has a fixed width. The address is
padded with zeros. No 0x prefix is displayed. For example, on a 32-bit architecture,
the address 0x32 is displayed as 00000032.
encoding column
Shows the hexadecimal encoding of the instruction (code sections) or it shows the
hexadecimal representation of data (data sections). The encoding column has a
maximum width of eight digits, i.e. it can represent a 32-bit hexadecimal value.
The encoding is padded to the size of the data or instruction. For example, a 16-bit
instruction only shows four hexadecimal digits. The encoding is aligned left and
padded with spaces to fill the eight digits.
label column
Displays the label depending on the option --symbols=[hll|asm|none]. The default
is asm, meaning that the low level (ELF) symbols are used. With hll, HLL (DWARF)
symbols are used. With none, no symbols will be included in the disassembly.
disassembly column For code sections the instructions are disassembled. Operands are replaced with
labels, depending on the option --symbols=[hll|asm|none].
With option --data-dump-format=directives (default), the contents of data sections
are represented by directives. A new directive will be generated for each symbol.
ELF labels in the section are used to determine the start of a directive. ROM
sections are represented with .db, .dh, .dw, .dd kind of directives, depending
on the size of the data. RAM sections are represented with .ds directives, with a
size operand depending on the data size. This can be either the size specified in
the ELF symbol, or the size up to the next label.
With option --data-dump-format=hex, no directives will be generated for data sections, but data sections
are dumped as hexadecimal code with ASCII translation. This only applies to ROM sections. The hex
dump has the following format:
AAAAAAAA H0 H1 H2 H3 H4 H5 H6 H7 H8 H9 HA HB HC HD HE HF RRRRRRRRRRRRRRRR
where,
A = Address (8 digits, 32-bit)
Hx = Hex contents, one byte (16 bytes max)
R = ASCII representation (16 characters max)
For example:
section 7 (.rodata):
00000000 48 65 6c 6c 6f 20 25 73 21 0a 00
Hello %s!..
With option --data-dump-format=hex, RAM sections will be represented with only a start address and
a size indicator:
AAAAAAAA Space: 48 bytes
With option --disassembly-intermix you can intermix the disassembly with HLL source code.
259
TASKING VX-toolset for ARM User Guide
HLL symbol table
This part contains a symbol listing based on the HLL (DWARF) symbols found in the object file(s). The
symbols are sorted on address.
Address
The start address of the symbol. Hexadecimal, 8 digits, 32-bit.
Size
The size of the symbol from the DWARF info in bytes.
HLL Type
The HLL symbol type.
Name
The name of the HLL symbol.
HLL arrays are indicated by adding the size in square brackets to the symbol name. For example:
00040040
80 static char
stdin_buf[80] [_iob.c]
HLL struct and union symbols are listed by default without fields. For example:
00040028
24 struct
_dbg_request [dbg.c]
With option --expand-symbols all struct, union and array fields are included as well. For the fields the
types and names are indented with two spaces. For example:
00040028
00040028
0004002c
00040030
00040030
00040030
00040030
00040030
00040034
...
24 struct
_dbg_request [dbg.c]
4
int
_errno
4
enum
nr
16
union
u
4
struct
exit
4
int
status
8
struct
open
4
const char
* pathname
2
unsigned short int
flags
Functions are displayed with the full function prototype. Size is the size of the function. HLL Type is the
return type of the function. For example:
00000480
68 int
printf(const char * restrict format, ...)
The local and static symbols get an identification between square brackets. The filename is printed if and
if a function scope is known the function name is printed between the square brackets as well. If multiple
files with the same name exist, the unique part of the path is added. For example:
00040100
00040104
00040108
4 int
4 int
4 int
count [file.c, somefunc()]
count [x\a.c]
count [y\a.c, foo()]
Global symbols do not get information in square brackets.
260
Using the Utilities
Assembly level symbol table
This part contains a symbol listing based on the assembly level (ELF) symbols found in the object file(s).
The symbols are sorted on address.
Address
The start address of the symbol. Hexadecimal, 8 digits, 32-bit.
Size
The size of the symbol from the ELF info in bytes. If this field is empty, the size is
zero.
Type
Code or Data, depending on the section the symbol belongs to. If this field is empty,
the symbol does not belong to a section.
Name
The name of the ELF symbol.
261
TASKING VX-toolset for ARM User Guide
262
Chapter 11. Using the Debugger
This chapter describes the debugger and how you can run and debug a C or C++ application.This chapter
only describes the TASKING specific parts.
11.1. Reading the Eclipse Documentation
Before you start with this chapter, it is recommended to read the Eclipse documentation first. It provides
general information about the debugging process. This chapter guides you through a number of examples
using the TASKING debugger with simulation as target.
You can find the Eclipse documentation as follows:
1.
Start Eclipse.
2.
From the Help menu, select Help Contents.
The help screen overlays the Eclipse Workbench.
3.
In the left pane, select C/C++ Development User Guide.
4.
Open the Getting Started entry and select Debugging projects.
This Eclipse tutorial provides an overview of the debugging process. Be aware that the Eclipse
example does not use the TASKING tools and TASKING debugger.
11.2. Creating a Customized Debug Configuration
Before you can debug a project, you need a Debug launch configuration. Such a configuration, identified
by a name, contains all information about the debug project: which debugger is used, which project is
used, which binary debug file is used, which perspective is used, ... and so forth.
If you want to debug on a target board, you have to create a custom debug configuration for your target
board, otherwise you have to create a debug launch configuration for the TASKING simulator.
To debug a project, you need at least one opened and active project in your workbench. In this
chapter, it is assumed that the myproject is opened and active in your workbench.
See Chapter 12, Target Board Support, for an overview of all supported evaluation boards.
Create or customize your debug configuration
To create or change a debug configuration follow the steps below.
1.
From the Debug menu, select Debug Configurations...
The Debug Configurations dialog appears.
263
TASKING VX-toolset for ARM User Guide
2.
Select TASKING C/C++ Debugger and click the New launch configuration button (
) to add a new configuration.
Or: In the left pane, select the configuration you want to change, for example, TASKING C/C++
Debugger » myproject.simulator.
3.
In the Name field enter the name of the configuration. By default, this is the name of the project, but
you can give your configuration any name you want to distinguish it from the project name. For
example enter myproject.simulator to identify the simulator debug configuration.
4.
On the Target tab, select the ARM Simulator or any of the target boards.
The dialog shows several tabs.
Target tab
On the Target tab you can select on which target the application should be debugged. An application
can run on an external evaluation board, or on a simulator using your own PC. On this tab you can also
select the connection settings (J-Link, RS-232, TCP/IP). The information in this tab is based on the Debug
Target Configuration (DTC) files as explained in Chapter 18, Debug Target Configuration Files. See
Chapter 12, Target Board Support, for an overview of all supported evaluation boards.
Initialization tab
On the Initialization tab enable one or more of the following options:
264
Using the Debugger
• Initial download of program
If enabled, the target application is downloaded onto the target. If disabled, only the debug information
in the file is loaded, which may be useful when the application has already been downloaded (or flashed)
earlier. If downloading fails, the debugger will shut down.
• Verify download of program
If enabled, the debugger verifies whether the code and data has been downloaded successfully. This
takes some extra time but may be useful if the connection to the target is unreliable.
• Program flash when downloading
If enabled, also flash devices are programmed (if necessary). Flash programming will not work when
you use a simulator.
• Reset target
If enabled, the target is immediately reset after downloading has completed.
• Goto main
If enabled, only the C startup code is processed when the debugger is launched. The application stops
executing when it reaches the first C instruction in the function main(). Usually you enable this option
in combination with the option Reset Target.
• Break on exit
If enabled, the target halts automatically when the exit() function is called.
• Reduce target state polling
265
TASKING VX-toolset for ARM User Guide
If you have set a breakpoint, the debugger checks the status of the target every number of seconds to
find out if the breakpoint is hit. In this field you can change the polling frequency.
• Monitor file (Flash settings)
Filename of the monitor, usually an Intel Hex or S-Record file.
• Sector buffer size (Flash settings)
Specifies the buffer size for buffering a flash sector.
• Workspace address (Flash settings)
The address of the workspace of the flash programming monitor.
Project tab
On the Project tab, you can set the properties for the debug configuration such as a name for the project
and the application binary file which are used when you choose this configuration.
• In the Project field, you can choose the project for which you want to make a debug configuration.
Because the project myproject is the active project, this project is filled in automatically. Click the
Browse... button to select a different project. Only the opened projects in your workbench are listed.
• In the C/C++ Application field, you can choose the binary file to debug. The file myproject.abs is
automatically selected from the active project.
Arguments tab
If your application's main() function takes arguments, you can pass them in this tab. Arguments are
conventionally passed in the argv[] array. Because this array is allocated in target memory, make sure
you have allocated sufficient memory space for it.
266
Using the Debugger
Source tab
On the Source tab, you can add additional source code locations in which the debugger should search
for debug data.
• Usually, the default source code location is correct.
Miscellaneous tab
On the Miscellaneous tab you can specify several file locations.
267
TASKING VX-toolset for ARM User Guide
• Debugger location
The location of the debugger itself. This should not be changed.
• FSS root directory
The initial directory used by file system simulation (FSS) calls. See the description of the FSS view.
• ORTI file and KSM module
If you wish to use the debugger's special facilities for kernel-aware debugging, specify the name of a
Kernel Debug Interface (KDI) compatible KSM module (shared library) in the appropriate edit box. The
toolset comes with a KSM suitable for OSEK kernels. If you wish to use this, browse for the file
osek_radm.dll in the bin directory of the toolset. See also the description of the RTOS view.
• GDI log file and Debug instrument log file
You can use the options GDI log file and Debug instrument log file (if applicable) to control the generation
of internal log files. These are primarily intended for use by or at the request of Altium support personnel.
• Cache target access
Except when using a simulator, the debugger's performance is generally strongly dependent on the
throughput and latency of the connection to the target. Depending on the situation, enabling this option
may result in a noticeable improvement, as the debugger will then avoid re-reading registers and
memory while the target remains halted. However, be aware that this may cause the debugger to show
the wrong data if tasks with a higher priority or external sources can influence the halted target's state.
• Launch in background
268
Using the Debugger
When this option is disabled you will see a progress bar when the debugger starts. If you do not want
to see the progress bar and want that the debugger launches in the background you can enable this
option.
• Use linker/locator memory map file (.mdf) for memory map
You can use this option to find errors in your application that cause access to non-existent memory or
cause an attempt to write to read-only memory. When building your project, the linker/locator creates
a memory description file (.mdf) file which describes the memory regions of the target you selected
in your project properties. The debugger uses this file to initialize the debugging target.
This option is only useful in combination with a simulator as debug target. The debugger may fail to
start if you use this option in combination with other debugging targets than a simulator.
11.3. Troubleshooting
If the debugger does not launch properly, this is likely due to mistakes in the settings of the execution
environment or to an improper connection between the host computer and the execution environment.
Always read the notes for your particular execution environment.
Some common problems you may check for, are:
Problem
Solution
Wrong device name in the launch
configuration
Make sure the specified device name is correct.
Invalid baud rate
Specify baud rate that matches the baud rate the execution
environment is configured to expect.
No power to the execution
environment.
Make sure the execution environment or attached probe is powered.
Wrong type of RS–232 cable.
Make sure you are using the correct type of RS-232 cable.
Cable connected to the wrong port Some target machines and hosts have several ports. Make sure
on the execution environment or host. you connect the cable to the correct port.
Conflict between communication
ports.
A device driver or background application may use the same
communications port on the host system as the debugger. Disable
any service that uses the same port-number or choose a different
port-number if possible.
Port already in use by another user. The port may already be in use by another user on some UNIX
hosts, or being allocated by a login process. Some target machines
and hosts have several ports. Make sure you connect the cable to
the correct port.
11.4. TASKING Debug Perspective
After you have launched the debugger, you are either asked if the TASKING Debug perspective should
be opened or it is opened automatically. The Debug perspective consists of several views.
269
TASKING VX-toolset for ARM User Guide
To open views in the Debug perspective:
1. Make sure the Debug perspective is opened
2. From the Window menu, select Show View »
3. Select a view from the menu or choose Other... for more views.
By default, the Debug perspective is opened with the following views:
11.4.1. Debug View
The Debug view shows the target information in a tree hierarchy shown below with a sample of the
possible icons:
Icon
Session item
Description
Launch instance
Launch configuration name and launch type
Debugger instance Debugger name and state
270
Thread instance
Thread number and state
Stack frame
instance
Stack frame number, function, file name, and file line number
Using the Debugger
The number beside the thread label is a reference counter, not a thread identification number (TID).
Stack display
During debugging (running) the actual stack is displayed as it increases or decreases during program
execution. By default, all views present information that is related to the current stack item (variables,
memory, source code etc.). To obtain the information from other stack items, click on the item you want.
The Debug view displays stack frames as child elements. It displays the reason for the suspension beside
the thread, (such as end of stepping range, breakpoint hit, and signal received). When a program exits,
the exit code is displayed.
The Debug view contains numerous functions for controlling the individual stepping of your programs and
controlling the debug session. You can perform actions such as terminating the session and stopping the
program. All functions are available from the right-click menu, though commonly used functions are also
available from the toolbar in the Debug view.
Controlling debug sessions
Icon
Action
Description
Remove all
Removes all terminated launches.
Reset target
system
Resets the target system and restarts the application.
Restart
Restarts the application. The target system is not reset.
Resume
Resumes the application after it was suspended (manually, breakpoint,
signal).
Suspend
Suspends the application (pause). Use the Resume button to continue.
Relaunch
Right-click menu. Restarts the selected debug session when it was
terminated. If the debug session is still running, a new debug session is
launched.
Reload current
application
Reloads the current application without restarting the debug session. The
application does restart of course.
Terminate
Ends the selected debug session and/or process. Use Relaunch to restart
this debug session, or start another debug session.
Terminate all
Right-click menu. As terminate. Ends all debug sessions.
Terminate and
remove
Right-click menu. Ends the debug session and removes it from the Debug
view.
Terminate and
Relaunch
Right-click menu. Ends the debug session and relaunches it. This is the
same as choosing Terminate and then Relaunch.
Disconnect
Detaches the debugger from the selected process (useful for debugging
attached processes)
271
TASKING VX-toolset for ARM User Guide
Stepping through the application
Icon
Action
Description
Step into
Steps to the next source line or instruction
Step over
Steps over a called function. The function is executed and the application
suspends at the next instruction after the call.
Step return
Executes the current function. The application suspends at the next
instruction after the return of the function.
Instruction
stepping
Toggle. If enabled, the stepping functions are performed on instruction level
instead of on C source line level.
Interrupt aware
stepping
Toggle. If enabled, the stepping functions do not step into an interrupt when
it occurs.
Miscellaneous
Icon
Action
Description
Copy Stack
Right-click menu. Copies the stack as text to the windows clipboard. You
can paste the copied selection as text in, for example, a text editor.
Edit project...
Right-click menu. Opens the debug configuration dialog to let you edit the
current debug configuration.
Edit Source
Lookup...
Right-click menu. Opens the Edit Source Lookup Path window to let you
edit the search path for locating source files.
11.4.2. Breakpoints View
You can add, disable and remove breakpoints by clicking in the marker bar (left margin) of the Editor
view. This is explained in the Getting Started manual.
Description
The Breakpoints view shows a list of breakpoints that are currently set. The button bar in the Breakpoints
view gives access to several common functions. The right-most button opens the Breakpoints menu.
Types of breakpoints
To access the breakpoints dialog, add a breakpoint as follows:
1. Click the Add TASKING Breakpoint button ( ).
The Breakpoints dialog appears.
Each tab lets you set a breakpoint of a special type. You can set the following types of breakpoints:
• File breakpoint
272
Using the Debugger
The target halts when it reaches the specified line of the specified source file. Note that it is possible
that a source line corresponds to multiple addresses, for example when a header file has been included
into two different source files or when inlining has occurred. If so, the breakpoint will be associated with
all those addresses.
• Function
The target halts when it reaches the first line of the specified function. If no source file has been specified
and there are multiple functions with the given name, the target halts on all of those. Note that function
breakpoints generally will not work on inlined instances of a function.
• Address
The target halts when it reaches the specified instruction address.
• Stack
The target halts when it reaches the specified stack level.
• Data
The target halts when the given variable or memory location (specified in terms of an absolute address)
is read or written to, as specified.
• Instruction
The target halts when the given number of instructions has been executed.
• Cycle
The target halts when the given number of clock cycles has elapsed.
• Timer
The target halts when the given amount of time elapsed.
In addition to the type of the breakpoint, you can specify the condition that must be met to halt the program.
In the Condition field, type a condition.The condition is an expression which evaluates to 'true' (non-zero)
or 'false' (zero). The program only halts on the breakpoint if the condition evaluates to 'true'.
In the Ignore count field, you can specify the number of times the breakpoint is ignored before the program
halts. For example, if you want the program to halt only in the fifth iteration of a while-loop, type '4': the
first four iterations are ignored.
11.4.3. File System Simulation (FSS) View
Description
The File System Simulation (FSS) view is automatically opened when the target requests FSS input or
generates FSS output. The virtual terminal that the FSS view represents, follows the VT100 standard. If
you right-click in the view area of the FSS view, a menu is presented which gives access to some
self-explanatory functions.
273
TASKING VX-toolset for ARM User Guide
VT100 characteristics
The queens example demonstrates some of the VT100 features. (You can find the queens example in
the <ARM installation path>\examples directory from where you can import it into your workspace.)
Per debugging session, you can have more than one FSS view, each of which is associated with a positive
integer. By default, the view "FSS #1" is associated with the standard streams stdin, stdout, stderr
and stdaux. Other views can be accessed by opening a file named "terminal window <number>", as
shown in the example below.
FILE * f3 = fopen("terminal window 3", "rw");
fprintf(f3, "Hello, window 3.\n");
fclose(f3);
You can set the initial working directory of the target application in the Debug configuration dialog (see
also Section 11.2, Creating a Customized Debug Configuration):
1. On the Debugger tab, select the Miscellaneous sub-tab.
2. In the FSS root directory field, specify the FSS root directory.
The FSS implementation is designed to work without user intervention. Nevertheless, there are some
aspects that you need to be aware of.
First, the interaction between the C library code (in the files dbg*.c and dbg*.h; see Section 14.2.5,
dbg.h) and the debugger takes place via a breakpoint, which incidentally is not shown in the Breakpoints
view. Depending on the situation this may be a hardware breakpoint, which may be in short supply.
Secondly, proper operation requires certain code in the C library to have debug information. This debug
information should normally be present but might get lost when this information is stripped later in the
development process.
11.4.4. Disassembly View
The Disassembly view shows target memory disassembled into instructions and / or data. If possible, the
associated C / C++ source code is shown as well. The Address field shows the address of the current
selected line of code.
To view the contents of a specific memory location, type the address in the Address field. If the address
is invalid, the field turns red.
11.4.5. Expressions View
The Expressions view allows you to evaluate and watch regular C expressions.
To add an expression:
Click OK to add the expression.
1. Right-click in the Expressions View and select Add Watch Expression.
The Add Watch Expression dialog appears.
274
Using the Debugger
2. Enter an expression you want to watch during debugging, for example, the variable name "i"
If you have added one or more expressions to watch, the right-click menu provides options to Remove
and Edit or Enable and Disable added expressions.
• You can access target registers directly using #NAME. For example "arr[#R0 << 3]" or "#TIMER3
= m++". If a register is memory-mapped, you can also take its address, for example, "&#ADCIN".
• Expressions may contain target function calls like for example "g1 + invert(&g2)". Be aware that
this will not work if the compiler has optimized the code in such a way that the original function code
does not actually exist anymore. This may be the case, for example, as a result of inlining. Also, be
aware that the function and its callees use the same stack(s) as your application, which may cause
problems if there is too little stack space. Finally, any breakpoints present affect the invoked code in
the normal way.
11.4.6. Memory View
Use the Memory view to inspect and change process memory. The Memory view supports the same
addressing as the C and C++ languages. You can address memory using expressions such as:
• 0x0847d3c
• (&y)+1024
• *ptr
Monitors
To monitor process memory, you need to add a monitor:
1.
In the Debug view, select a debug session. Selecting a thread or stack frame automatically selects
the associated session.
2.
Click the Add Memory Monitor button in the Memory Monitors pane.
The Monitor Memory dialog appears.
3.
Type the address or expression that specifies the memory section you want to monitor and click OK.
The monitor appears in the monitor list and the Memory Renderings pane displays the contents of
memory locations beginning at the specified address.
To remove a monitor:
1.
In the Monitors pane, right-click on a monitor.
2.
From the popup menu, select Remove Memory Monitor.
275
TASKING VX-toolset for ARM User Guide
Renderings
You can inspect the memory in so-called renderings. A rendering specifies how the output is displayed:
hexadecimal, ASCII, signed integer, unsigned integer or traditional. You can add or remove renderings
per monitor. Though you cannot change a rendering, you can add or remove them:
1.
Click the New Renderings... tab in the Memory Renderings pane.
The Add Memory Rendering dialog appears.
2.
Select the rendering you want (Hex Integer, Hex, ASCII, Signed Integer, Unsigned Integer or
Traditional) and click Add Rendering(s).
To remove a rendering:
1.
Right-click on a memory address in the rendering.
2.
From the popup menu, select Remove Rendering.
Changing memory contents
In a rendering you can change the memory contents. Simply type a new value.
Warning: Changing process memory can cause a program to crash.
The right-click popup menu gives some more options for changing the memory contents or to change the
layout of the memory representation.
11.4.7. Compare Application View
You can use the Compare Application view to check if the downloaded application matches the application
in memory. Differences may occur, for example, if you changed memory addresses in the Memory view.
• To check for differences, click the Compare button.
11.4.8. Heap View
With the Heap view you can inspect the status of the heap memory. This can be illustrated with the
following example:
string = (char *) malloc(100);
strcpy ( string, "abcdefgh" );
free (string);
If you step through these lines during debugging, the Heap view shows the situation after each line has
been executed. Before any of these lines has been executed, there is no memory allocated and the Heap
view is empty.
• After the first line the Heap view shows that memory is occupied, the description tells where the block
starts, how large it is (100 MAUs) and what its content is (0x0, 0x0, ...).
276
Using the Debugger
• After the second line, "abcdefgh" has been copied to the allocated block of memory. The description
field of the Heap view again shows the actual contents of the memory block (0x61, 0x62,...).
• The third line frees the memory. The Heap view is empty again because after this line no memory is
allocated anymore.
11.4.9. Logging View
Use the Logging view to control the generation of internal log files. This view is intended mainly for use
by or at the request of Altium support personnel.
11.4.10. RTOS View
The debugger has special support for debugging real-time operating systems (RTOSs). This support is
implemented in an RTOS-specific shared library called a kernel support module (KSM) or RTOS-aware
debugging module (RADM). Specifically, the TASKING VX-toolset for ARM ships with a KSM supporting
the OSEK standard. You have to create your own OSEK Run Time Interface (ORTI) and specify this file
on the Miscellaneous tab while configuring a customized debug configuration (see also Section 11.2,
Creating a Customized Debug Configuration):
1.
From the Debug menu, select Debug Configurations...
The Debug Configurations dialog appears.
2.
In the left pane, select the configuration you want to change, for example, TASKING C/C++ Debugger
» myproject.simulator.
Or: click the New launch configuration button (
) to add a new configuration.
3.
Open the Miscellaneous tab
4.
In the ORTI file field, specify the name of your own ORTI file.
5.
If you want to use the supplied KSM suitable for OSEK kernels, in the KSM module field browse for
the file osek_radm.dll in the bin directory of the toolset.
The debugger supports ORTI specifications v2.0 and v2.1.
11.4.11. Registers View
In the Registers view you can examine the value of registers while stepping through your application. The
registers are organized in a number of register groups, which together contain all known registers. You
can select a group to see which registers it contains. This view has a number of features:
• While you step through the application, the registers involved in the step turn yellow. If you scroll in the
view or switch groups, some registers may appear on a lighter yellow background, indicating that the
debugger does not know whether the registers have changed because the debugger did not read the
registers before the step began.
277
TASKING VX-toolset for ARM User Guide
• You can change each register's value.
• For some registers the menu entry Symbolic Representation is available in their right-click popup
menu. This opens a new view which shows the internal fields of the register. (Alternatively, you can
double-click on a register). For example, the XPSR register from the Core group may be shown as
follows:
In this view you can set the individual values in the register, either by selecting a value from a drop-down
box or by simply entering a value depending on the chosen field. To update the register with the new
values, click the Write button.
• You can search for a specific register: right-click on a register and from the popup menu select Find
Register.... Enter a group or register name filter, click the register you want to see and click OK. The
register of your interest will be shown in the view.
11.4.12. Trace View
If tracing is enabled, the Trace view shows the code was most recently executed. For example, while you
step through the application, the Trace view shows the executed code of each step. To enable tracing:
278
Using the Debugger
• Right-click in the Trace view and select Trace.
A check mark appears when tracing is enabled.
The view has three tabs, Source, Instruction and Raw, each of which represents the trace in a different
way. However, not all target environments will support all three of these. The view is updated automatically
each time the target halts.
When you use the simulator, this works as is. Otherwise, tracing only works when the processor has a
Trace Port Interface Unit (TPIU) and this is supported. See Section 12.38, Trace Port Interface Unit
Support.
When tracing is enabled note the following:
• If the condition associated with a conditional instruction was false, the instruction will still be shown in
the trace, with no distinct visual indication. This applies to conditional branches, but also to instructions
inside an IT block, for example.
• If the target halted due to a software breakpoint, then technically a BKPT instruction was executed and
hence traced. However, for convenience this will not actually be shown in the Trace view.
• For bandwidth and performance reasons, the trace shown may be shorter than what would be expected
considering the amount of data the debug probe can provide.
• The Raw tab shows the trace in its compressed form, i.e. compliant with the Embedded Trace Macrocell
(ETM) signal protocol as defined by ARM Ltd. Usually, you will not need this information, but it may be
useful if you suspect problems with the target communication or the decompression.
11.5. Programming a Flash Device
With the TASKING debugger you can download an application file to flash memory. Before you download
the file, you must specify the type of flash devices you use in your system and the address range(s) used
by these devices.
To program a flash device the debugger needs to download a flash programming monitor to the target
to execute the flash programming algorithm (target-target communication). This method uses temporary
target memory to store the flash programming monitor and you have to specify a temporary data workspace
for interaction between the debugger and the flash programming monitor.
Two types of flash devices can exist: on-chip flash devices and external flash devices.
Setup an on-chip flash device
When you specify a target configuration board using the Import Board Configuration wizard, as explained
in the Getting Started with the TASKING VX-toolset for ARM manual, any on-chip flash devices are setup
automatically.
Setup an external flash device
1.
From the Project menu, select Properties for
279
TASKING VX-toolset for ARM User Guide
The Properties for project dialog appears.
2.
In the left pane, expand Run/Debug Settings and select Flash Programming.
The Flash Programming pane appears.
3.
Click Add... to specify an external flash device.
The Select a New Flash Device dialog appears.
280
Using the Debugger
4.
In the Device type box, expand the name of the manufacturer of the device and select a device.
The Sector map displays the memory layout of the flash device(s). Each sector has a size and
5.
In the Base address field enter the start address of the memory range that will be covered by the
flash device. Any following addresses separated by commas are considered mirror addresses. This
allows the flash device to be programmed through its mirror address before switching the flash to its
base address.
6.
In the Chip width field select the width of the flash device.
7.
In the Number of chips field, enter the number of flash devices that are located in parallel. For
example, if you have two 8-bit devices in parallel attached to a 16-bit data bus, enter 2.
8.
Fill in the Number of unused address lines field, if necessary.
The flash memory is added to the linker script file automatically with the tag "flash=flash-id".
To program a flash device
1.
From the Debug menu, select Debug Configurations...
The Debug Configurations dialog appears.
2.
In the left pane, select the configuration you want to change, for example, TASKING C/C++ Debugger
» myproject.board.
281
TASKING VX-toolset for ARM User Guide
3.
On the Debugger tab, select the Initialization tab
4.
Enable the option Program flash when downloading.
The Flash settings group box becomes active.
5.
In the Monitor file field, specify the filename of the flash programming monitor, usually an Intel Hex
or S-Record file.
6.
In the Sector buffer size field, specify the buffer size for buffering a flash sector.
7.
Specify the data Workspace address used by the flash programming monitor. This address may
not conflict with the addresses of the flash devices.
8.
Click Debug to program the flash device and start debugging.
282
Chapter 12. Target Board Support
This chapter describes the different target boards that are supported by the tool set. It describes how to
prepare your target board and how to connect it. This chapter also describes support for the Trace Port
Interface Unit (TPIU), which can be used for tracing purposes.
12.1. Overview of Supported Boards
The following tables contains an overview of the target boards (sorted by manufacturer) that are currently
supported by the TASKING VX-toolset for ARM Cortex.
Energy Micro
Name
MCU
EFM32TG-STK3300, Tiny Gecko Starter Kit
EFM32TG840F32
(Cortex-M3)
EFM32-G8XX-STK, Gecko Starter Kit
EFM32G890F128
(Cortex-M3)
EFM32-G2XX-DK, Gecko Development Kit
EFM32G290F128
(Cortex-M3)
EFM32GG-STK3700, Giant Gecko Starter Kit
EFM32GG990F1024
(Cortex-M3)
Remarks
On-board J-Link
EFM32LG-STK3600, Leopard Gecko Starter Kit EFM32LG990F256
(Cortex-M3)
Fujitsu
Name
MCU
Remarks
SK-FM3-64PMC1 MB9AF314L
512 KB flash
SK-FM3-100PMC MB9BF506N
512 KB flash
Hitex
Name
MCU
Remarks
XMC-HiLight XMC4500-1024
(Cortex-M4)
Infineon
Name
MCU
Remarks
Hexagon Application Kit XMC4500 Series XMC4500-1024
(Cortex-M4)
283
TASKING VX-toolset for ARM User Guide
Keil
Name
MCU
Remarks
MCB1760 NXP LPC1768
Board is powered via a separate USB cable.
Luminary Micro
Name
MCU
Stellaris LM3S1968 Evaluation Kit
LM3S1968
(Cortex-M3)
Stellaris LM3S2965 Evaluation Kit
LM3S2965
(Cortex-M3)
Stellaris LM3S3748 Evaluation Kit
LM3S3748
(Cortex-M3)
Stellaris LM3S6965 Evaluation Kit
LM3S6965
(Cortex-M3)
Stellaris LM3S8962 Evaluation Kit
LM3S8962
(Cortex-M3)
Stellaris LM3S2110 CAN Device Board LM3S2110
(Cortex-M3)
Remarks
Kit includes LM3S2110 CAN Device
Board
Kit includes LM3S2110 CAN Device
Board
This board is included in the LM3S2965
and LM3S8962 evaluation kits.
STMicroelectronics
Name
MCU
MB525-Eval board
STM32F103VB
(Cortex-M3)
STM320518-Eval board
STM32F051R8
(Cortex-M0)
On-board ST-LINK/V2.
STM32F0-Discovery
STM32F051R8
(Cortex-M0)
On-board ST-LINK/V2.
STM3210B-Eval board
STM32F10x
(Cortex-M3)
128 KB flash
STM3210C-Eval board
STM32F107VCT
(Cortex-M3)
256 KB flash
STM3210E-Eval board
STM32F103ZD
(Cortex-M3)
512 KB flash
STM32 Value line discovery
STM32F100RB
(Cortex-M3)
128 KB flash. On-board ST-LINK.
STM32L152-Eval board
STM32L152VB
(Cortex-M3)
128 KB flash
STM32L152D-Eval board
STM32L152ZD
(Cortex-M3)
384 KB flash. On-board ST-LINK/V2.
284
Remarks
Target Board Support
Name
MCU
Remarks
STM32L-Discovery
STM32L152RB
(Cortex-M3)
128 KB flash. On-board ST-LINK/V2.
STM3220G-Eval board
STM32F2xxxx
(Cortex-M3)
On-board ST-LINK/V2.
STM3221G-Eval board
STM32F2xxxx
(Cortex-M3)
On-board ST-LINK/V2.
STM32303C-Eval board
STM32F303VC
(Cortex-M4)
On-board ST-LINK/V2.
STM32373C-Eval board
STM32F373VC
(Cortex-M4)
On-board ST-LINK/V2.
STM3240G-Eval board
STM32F457IG
(Cortex-M4)
On-board ST-LINK/V2.
STM32F4-Discovery
STM32F407VG
(Cortex-M4)
1 MB flash. On-board ST-LINK/V2.
STM32W108B-SK Starter Kit
STM32W108xx
(Cortex-M3)
2.4 GHz, IEEE 802.15.4-compliant
transceiver
STM32W108B-KEXT Extension Kit STM32W108xx
(Cortex-M3)
2.4 GHz, IEEE 802.15.4-compliant
transceiver
STM32W RF Control Kit
2.4 GHz, IEEE 802.15.4-compliant
transceiver
STM32W108xx
(Cortex-M3)
You can use the following debugger probes to connect a board to the host computer:
Debugger probes
Name
Manufacturer
Interface
Remarks
J-Link
SEGGER
USB
Equal to IAR's J-Link.
J-Link Pro
SEGGER
USB/Ethernet
For Ethernet use USB power
supply.
J-Link Ultra
SEGGER
USB
J-Link Lite
SEGGER
USB
J-Link Lite CortexM
SEGGER
USB
J-Link EDU
SEGGER
USB
J-Link OB
SEGGER
USB
J-Trace ARM
SEGGER
USB
J-Trace ARM Cortex-M3
SEGGER
USB
ST-LINK
STMicroelectronics USB
ST-LINK/V2
STMicroelectronics USB
On-board on eval board
J-Link is a USB powered JTAG emulator for a wide variety of CPU cores.
285
TASKING VX-toolset for ARM User Guide
J-Trace for Cortex-M3 is a JTAG emulator designed for Cortex-M3 cores which includes trace support.
See Section 12.38, Trace Port Interface Unit Support. It can also be used as a J-Link.
12.2. Updating the SEGGER J-Link Interface DLL
You can download the latest software for J-Link from www.segger.com/download_jlink.html.
The file JLinkARM.DLL in the TASKING product's bin folder is a DLL from SEGGER, which is used by
the debugger. When you update or install the SEGGER software package it is recommended to update
this DLL in the TASKING product as well. Note that the program JLinkDLLUpdater in the SEGGER
software does not detect the TASKING toolset. You can update the DLL by copying the DLL by hand.
• Copy JLinkARM.DLL from the folder where the SEGGER software is installed (usually C:\Program
Files\SEGGER) to the bin folder in the TASKING product (by default C:\Program
Files\TASKING\carm vversion\bin).
If you start the debugger and the required debug probe drivers are not found, Eclipse can ask you if you
want to install these drivers. You can change this behavior in the Debugger Startup Preferences:
1.
From the Window menu, select Preferences.
The Preferences dialog appears.
2.
Select TASKING » Debugger Startup.
3.
In the Allow starting when the required debug probe drivers are not found field, select Prompt
if Eclipse should ask to install new drivers, or select Always to start the debugger without installing
up-to-date drivers.
12.3. Using the EFM32TG-STK3300, Tiny Gecko Starter Kit
The EFM32TG-STK3300 is a starter kit for evaluation, prototyping and application development for the
EFM32TG MCU family with the ARM Cortex-M3 CPU core. Read the Starter Kit EFM32TG-STK3300
User Manual, for detailed information.
Installing driver software
Before you connect J-Link to the board, first make sure you have installed the latest driver software. You
can download the latest software for J-Link from www.segger.com/download_jlink.html.
286
Target Board Support
Connecting the board
1.
Connect any of the J-Link debugger probes with the 20-pin JTAG/SWD cable to the board.
2.
Connect J-Link to a PC with a USB cable.
3.
Connect the board to a PC with the USB cable for power supply. If Windows asks to search for
drivers, you can ignore this.
Eclipse target board debug configuration
In order to debug in the Eclipse environment, you have to create a debug launch configuration for your
hardware configuration. This is explained in Section 11.2, Creating a Customized Debug Configuration.
Use the following settings:
Target board debug configuration Setting
Target
Energy Micro Tiny Gecko Starter Kit
Configuration
Default
Connection
J-Link over USB (JTAG or SWD)
12.4. Using the EFM32-G8XX-STK, Gecko Starter Kit
The EFM32-G8XX-STK is a starter kit for evaluation, prototyping and application development for the
EFM32 Gecko MCU family with the ARM Cortex-M3 CPU core. Read the Starter Kit EFM32-G8XX-STK
User Manual, for detailed information.
Installing driver software
Before you connect J-Link to the board, first make sure you have installed the latest driver software. You
can download the latest software for J-Link from www.segger.com/download_jlink.html.
Connecting the board
1.
Connect any of the J-Link debugger probes with the 20-pin JTAG/SWD cable to the board.
2.
Connect J-Link to a PC with a USB cable.
287
TASKING VX-toolset for ARM User Guide
3.
Connect the board to a PC with the USB cable for power supply. If Windows asks to search for
drivers, you can ignore this.
Eclipse target board debug configuration
In order to debug in the Eclipse environment, you have to create a debug launch configuration for your
hardware configuration. This is explained in Section 11.2, Creating a Customized Debug Configuration.
Use the following settings:
Target board debug configuration Setting
Target
Energy Micro Gecko Starter Kit
Configuration
Default
Connection
J-Link over USB (JTAG or SWD)
12.5. Using the EFM32-G2XX-DK, Gecko Development Kit
The EFM32-G2XX-DK is a development kit with an EFM32G290F128 MCU plugin board for evaluation,
prototyping and application development for the EFM32 Gecko MCU family with the ARM Cortex-M3
CPU core. Read the Development Kit EFM32-G2XX-DK User Manual, for detailed information.
Installing driver software
This board uses on-board J-Link, but you can also use an external J-Link. First make sure you have
installed the latest driver software. You can download the latest software for J-Link from
www.segger.com/download_jlink.html.
Connecting the board
If you want to use the on-board J-Link:
• Connect the board to a PC with a USB cable.
If you want to use an external J-Link debugger probe:
1.
Connect any of the J-Link debugger probes with the 20-pin JTAG/SWD cable to the board.
2.
Connect J-Link to a PC with a USB cable.
288
Target Board Support
3.
Connect the board to a PC with the USB cable for power supply. If Windows asks to search for
drivers, you can ignore this.
Eclipse target board debug configuration
In order to debug in the Eclipse environment, you have to create a debug launch configuration for your
hardware configuration. This is explained in Section 11.2, Creating a Customized Debug Configuration.
Use the following settings:
Target board debug configuration Setting
Target
Energy Micro Gecko Development Kit
Configuration
Default
Connection
J-Link over USB (JTAG or SWD)
12.6. Using the EFM32GG-STK3700, Giant Gecko Starter Kit
The EFM32GG-STK3700 is a starter kit for evaluation, prototyping and application development for the
EFM32 Giant Gecko MCU family with the ARM Cortex-M3 CPU core. Read the Starter Kit
EFM32GG-STK3700 User Manual, for detailed information.
Installing driver software
Before you connect J-Link to the board, first make sure you have installed the latest driver software. You
can download the latest software for J-Link from www.segger.com/download_jlink.html.
Connecting the board
1.
Connect any of the J-Link debugger probes with the 20-pin JTAG/SWD cable to the board.
2.
Connect J-Link to a PC with a USB cable.
3.
Connect the board to a PC with the USB cable for power supply. If Windows asks to search for
drivers, you can ignore this.
289
TASKING VX-toolset for ARM User Guide
Eclipse target board debug configuration
In order to debug in the Eclipse environment, you have to create a debug launch configuration for your
hardware configuration. This is explained in Section 11.2, Creating a Customized Debug Configuration.
Use the following settings:
Target board debug configuration Setting
Target
Energy Micro Giant Gecko Starter Kit
Configuration
Default
Connection
J-Link over USB (JTAG or SWD)
12.7. Using the EFM32LG-STK3600, Leopard Gecko Starter Kit
The EFM32LG-STK3600 is a starter kit for evaluation, prototyping and application development for the
EFM32LG MCU family with the ARM Cortex-M3 CPU core. Read the Starter Kit EFM32LG-STK3600
User Manual, for detailed information.
Installing driver software
Before you connect J-Link to the board, first make sure you have installed the latest driver software. You
can download the latest software for J-Link from www.segger.com/download_jlink.html.
Connecting the board
1.
Connect any of the J-Link debugger probes with the 20-pin JTAG/SWD cable to the board.
2.
Connect J-Link to a PC with a USB cable.
3.
Connect the board to a PC with the USB cable for power supply. If Windows asks to search for
drivers, you can ignore this.
Eclipse target board debug configuration
In order to debug in the Eclipse environment, you have to create a debug launch configuration for your
hardware configuration. This is explained in Section 11.2, Creating a Customized Debug Configuration.
Use the following settings:
290
Target Board Support
Target board debug configuration Setting
Target
Energy Micro Leopard Gecko Starter Kit
Configuration
Default
Connection
J-Link over USB (JTAG or SWD)
12.8. Using the Fujitsu SK-FM3-64PMC1 Evaluation Board
The Fujitsu SK-FM3-64PMC1 is an evaluation board for Fujitsu Cortex-M3 core-based MB9A310 series
microcontrollers. Read the Readme.pdf on the CD, for detailed information about the board.
Installing driver software
Before you connect J-Link to the board, first make sure you have installed the latest driver software. You
can download the latest software for J-Link from www.segger.com/download_jlink.html.
Jumper settings
Set jumper JP5 to USBPWR1 for power through the USB port (X5).
Connecting the board
1.
Connect any of the J-Link debugger probes with the 20-pin JTAG/SWD cable to the board.
2.
Connect J-Link to a PC with a USB cable.
3.
Connect the board to a PC with the USB cable for power supply. If Windows asks to search for
drivers, you can ignore this.
Eclipse target board debug configuration
In order to debug in the Eclipse environment, you have to create a debug launch configuration for your
hardware configuration. This is explained in Section 11.2, Creating a Customized Debug Configuration.
Use the following settings:
Target board debug configuration Setting
Target
Fujitsu SK-FM3-64PMC1
291
TASKING VX-toolset for ARM User Guide
Target board debug configuration Setting
Configuration
Default
Connection
J-Link over USB (JTAG or SWD)
Flash settings: monitor file
mb9xf_paired.sre
Flash settings: sector buffer size
4096
Flash settings: workspace address
0x20000000
12.9. Using the Fujitsu SK-FM3-100PMC Evaluation Board
The Fujitsu SK-FM3-100PMC is an evaluation board for Fujitsu Cortex-M3 core-based MB9B500A series
microcontrollers. Read the Readme.pdf on the CD, for detailed information about the board.
Installing driver software
Before you connect J-Link to the board, first make sure you have installed the latest driver software. You
can download the latest software for J-Link from www.segger.com/download_jlink.html.
Jumper settings
Set jumper JP5 to USBPWR1 for power through the USB port (X5).
Connecting the board
1.
Connect any of the J-Link debugger probes with the 20-pin JTAG/SWD cable to the board or use
J-Trace.
2.
Connect J-Link to a PC with a USB cable.
3.
Connect the board to a PC with the USB cable for power supply. If Windows asks to search for
drivers, you can ignore this.
Eclipse target board debug configuration
In order to debug in the Eclipse environment, you have to create a debug launch configuration for your
hardware configuration. This is explained in Section 11.2, Creating a Customized Debug Configuration.
Use the following settings:
292
Target Board Support
Target board debug configuration Setting
Target
Fujitsu SK-FM3-100PMC
Configuration
Default
Connection
J-Link over USB (JTAG or SWD)
Flash settings: monitor file
mb9xf_paired.sre
Flash settings: sector buffer size
4096
Flash settings: workspace address
0x20000000
12.10. Using the Hitex XMC-HiLight
The XMC-HiLight from Hitex is an evaluation board for Infineon XMC4500 series microcontrollers. The
board is hardware compatible to the Infineon Hexagon Evaluation Board. Read the User Manual for
detailed information about the board.
Installing driver software
Before you connect J-Link to the board, first make sure you have installed the latest driver software. You
can download the latest software for J-Link from www.segger.com/download_jlink.html.
Connecting the board
1.
Connect any of the J-Link debugger probes with the 20-pin JTAG/SWD cable to the board.
2.
Connect J-Link to a PC with a USB cable.
3.
Connect the board to a PC with the USB cable for power supply.
Eclipse target board debug configuration
In order to debug in the Eclipse environment, you have to create a debug launch configuration for your
hardware configuration. This is explained in Section 11.2, Creating a Customized Debug Configuration.
Use the following settings:
Target board debug configuration Setting
Target
Hitex XMC-HiLight
293
TASKING VX-toolset for ARM User Guide
Target board debug configuration Setting
Configuration
Default
Connection
J-Link over USB (JTAG or SWD)
Universal Debug Access Server
Flash settings: monitor file
fARMv7M.sre
Flash settings: sector buffer size
4096
Flash settings: workspace address
0x20000000
12.11. Using the Infineon Hexagon Application Kit XMC4500
The CPU Board XMC4500 is an evaluation board for Infineon XMC4500 series microcontrollers. The
board is part of the Hexagon Application Kit. Read the CPU Board XMC4500 General Purpose Board
User's Manual for detailed information about the board.
Installing driver software
Before you connect J-Link to the board, first make sure you have installed the latest driver software. You
can download the latest software for J-Link from www.segger.com/download_jlink.html.
Connecting the board
1.
Connect any of the J-Link debugger probes with the 20-pin JTAG/SWD cable to the board.
2.
Connect J-Link to a PC with a USB cable.
3.
Connect the board to a PC with the USB cable for power supply.
Eclipse target board debug configuration
In order to debug in the Eclipse environment, you have to create a debug launch configuration for your
hardware configuration. This is explained in Section 11.2, Creating a Customized Debug Configuration.
Use the following settings:
Target board debug configuration Setting
Target
294
Infineon Hexagon Application Kit XMC4500 Series
Target Board Support
Target board debug configuration Setting
Configuration
Default
Connection
J-Link over USB (JTAG or SWD)
Universal Debug Access Server
Flash settings: monitor file
fARMv7M.sre
Flash settings: sector buffer size
4096
Flash settings: workspace address
0x20000000
12.12. Using the Stellaris LM3S1968 Evaluation Board
The Stellaris LM3S1968 Evaluation Board is part of a kit that comes with a USB cable, a 20-pin JTAG/SWD
(Serial Wire Debug) target cable and a CD. Read the Stellaris LM3S1968 Evaluation Board User’s Manual
on the CD, for detailed information about the board.
Installing driver software
Before you connect J-Link to the board, first make sure you have installed the latest driver software. You
can download the latest software for J-Link from www.segger.com/download_jlink.html.
Connecting the board
1.
Connect any of the J-Link debugger probes with the 20-pin JTAG/SWD cable to the board.
2.
Connect J-Link to a PC with a USB cable.
3.
Connect the board to a PC with the USB cable for power supply. If Windows asks to search for
drivers, you can ignore this.
Eclipse target board debug configuration
In order to debug in the Eclipse environment, you have to create a debug launch configuration for your
hardware configuration. This is explained in Section 11.2, Creating a Customized Debug Configuration.
Use the following settings:
295
TASKING VX-toolset for ARM User Guide
Target board debug configuration Setting
Target
Luminary Micro Stellaris LM3S1968 Evaluation Kit
Configuration
Default
Connection
J-Link over USB (JTAG or SWD)
Flash settings: monitor file
fluminaryonchip.sre
Flash settings: sector buffer size
4096
Flash settings: workspace address
0x20000000
12.13. Using the Stellaris LM3S2965 Evaluation Board
The Stellaris LM3S2965 Evaluation Board is part of a kit that comes with a LM3S2110 CAN device board,
a USB cable, a 20-pin JTAG/SWD (Serial Wire Debug) target cable, a 10-pin CAN cable and a CD. Read
the Stellaris LM3S2965 Evaluation Board User’s Manual on the CD, for detailed information about the
board.
Installing driver software
Before you connect J-Link to the board, first make sure you have installed the latest driver software. You
can download the latest software for J-Link from www.segger.com/download_jlink.html.
Connecting the board
1.
Connect any of the J-Link debugger probes with the 20-pin JTAG/SWD cable to the board.
2.
Connect J-Link to a PC with a USB cable.
3.
Connect the board to a PC with the USB cable for power supply. If Windows asks to search for
drivers, you can ignore this.
Eclipse target board debug configuration
In order to debug in the Eclipse environment, you have to create a debug launch configuration for your
hardware configuration. This is explained in Section 11.2, Creating a Customized Debug Configuration.
Use the following settings:
296
Target Board Support
Target board debug configuration Setting
Target
Luminary Micro Stellaris LM3S2965 Evaluation Kit
Configuration
Default
Connection
J-Link over USB (JTAG or SWD)
Flash settings: monitor file
fluminaryonchip.sre
Flash settings: sector buffer size
4096
Flash settings: workspace address
0x20000000
12.14. Using the Stellaris LM3S3748 Evaluation Board
The Stellaris LM3S3748 Evaluation Board is part of a kit that comes with USB cables (debugger USB
cable and device USB cable), USB flash memory stick, four oscilloscope test leads, a 20-pin JTAG/SWD
(Serial Wire Debug) target cable and a CD. Read the Stellaris LM3S3748 Evaluation Board User’s Manual
on the CD, for detailed information about the board.
Installing driver software
Before you connect J-Link to the board, first make sure you have installed the latest driver software. You
can download the latest software for J-Link from www.segger.com/download_jlink.html.
Connecting the board
1.
Connect any of the J-Link debugger probes with the 20-pin JTAG/SWD cable to the board.
2.
Connect J-Link to a PC with a USB cable.
3.
The board has several ways to be powered. If you set the USB Power switch (SW3) in the SELF
position, you can power the board from the Debug USB connector (J7) or from the DC power jack
(J5). Do not apply power to both of them at the same time. For more information, read the manual
that came with the board. We connect the board via the Debug USB connector to a PC with the USB
cable. If Windows asks to search for drivers, you can ignore this.
Eclipse target board debug configuration
In order to debug in the Eclipse environment, you have to create a debug launch configuration for your
hardware configuration. This is explained in Section 11.2, Creating a Customized Debug Configuration.
297
TASKING VX-toolset for ARM User Guide
Use the following settings:
Target board debug configuration Setting
Target
Luminary Micro Stellaris LM3S3748 Evaluation Kit
Configuration
Default
Connection
J-Link over USB (JTAG or SWD)
Flash settings: monitor file
fluminaryonchip.sre
Flash settings: sector buffer size
4096
Flash settings: workspace address
0x20000000
12.15. Using the Stellaris LM3S6965 Evaluation Board
The Stellaris LM3S6965 Evaluation Board is part of a kit that comes with a USB cable, a 20-pin JTAG/SWD
(Serial Wire Debug) target cable and a CD. Read the Stellaris LM3S6965 Evaluation Board User’s Manual
on the CD, for detailed information about the board.
Installing driver software
Before you connect J-Link to the board, first make sure you have installed the latest driver software. You
can download the latest software for J-Link from www.segger.com/download_jlink.html.
Connecting the board
1.
Connect any of the J-Link debugger probes with the 20-pin JTAG/SWD cable to the board.
2.
Connect J-Link to a PC with a USB cable.
3.
Connect the board to a PC with the USB cable for power supply. If Windows asks to search for
drivers, you can ignore this.
Eclipse target board debug configuration
In order to debug in the Eclipse environment, you have to create a debug launch configuration for your
hardware configuration. This is explained in Section 11.2, Creating a Customized Debug Configuration.
Use the following settings:
298
Target Board Support
Target board debug configuration Setting
Target
Luminary Micro Stellaris LM3S6965 Evaluation Kit
Configuration
Default
Connection
J-Link over USB (JTAG or SWD)
Flash settings: monitor file
fluminaryonchip.sre
Flash settings: sector buffer size
4096
Flash settings: workspace address
0x20000000
12.16. Using the Stellaris LM3S8962 Evaluation Board
The Stellaris LM3S8962 Evaluation Board is part of a kit that comes with a LM3S2110 CAN device board,
a USB cable, a 20-pin JTAG/SWD (Serial Wire Debug) target cable, a 10-pin CAN cable and a CD. Read
the Stellaris LM3S8962 Evaluation Board User’s Manual on the CD, for detailed information about the
board.
Installing driver software
Before you connect J-Link to the board, first make sure you have installed the latest driver software. You
can download the latest software for J-Link from www.segger.com/download_jlink.html.
Connecting the board
1.
Connect any of the J-Link debugger probes with the 20-pin JTAG/SWD cable to the board.
2.
Connect J-Link to a PC with a USB cable.
3.
Connect the board to a PC with the USB cable for power supply. If Windows asks to search for
drivers, you can ignore this.
Eclipse target board debug configuration
In order to debug in the Eclipse environment, you have to create a debug launch configuration for your
hardware configuration. This is explained in Section 11.2, Creating a Customized Debug Configuration.
Use the following settings:
299
TASKING VX-toolset for ARM User Guide
Target board debug configuration Setting
Target
Luminary Micro Stellaris LM3S8962 Evaluation Kit
Configuration
Default
Connection
J-Link over USB (JTAG or SWD)
Flash settings: monitor file
fluminaryonchip.sre
Flash settings: sector buffer size
4096
Flash settings: workspace address
0x20000000
12.17. Using the Stellaris LM3S2110 CAN Device Board
The Stellaris LM3S2110 CAN device board is delivered with the LM3S8962 Evaluation kit and the
LM3S2965 Evaluation kit. Read the Stellaris LM3S8962 or LM3S2965 Evaluation Board User’s Manual
on the CD, for detailed information about the CAN device board.
Installing driver software
Before you connect J-Link to the board, first make sure you have installed the latest driver software. You
can download the latest software for J-Link from www.segger.com/download_jlink.html.
Connecting the board
1.
Connect any of the J-Link debugger probes with the 20-pin JTAG/SWD cable to the CAN device
board.
2.
The CAN device board receives its power from the CAN bus, therefore, connect the CAN device
board to the LM3S8962 evaluation board or the LM3S2965 evaluation board with the 10-pin CAN
cable.
3.
Connect J-Link to a PC with a USB cable.
4.
Connect the LM3S8962 or LM3S2965 evaluation board to a PC with the USB cable for power supply.
If Windows asks to search for drivers, you can ignore this.
Eclipse target board debug configuration
In order to debug in the Eclipse environment, you have to create a debug launch configuration for your
hardware configuration. This is explained in Section 11.2, Creating a Customized Debug Configuration.
300
Target Board Support
Use the following settings:
Target board debug configuration Setting
Target
Luminary Micro Stellaris LM3S2110 Evaluation Kit
Configuration
Default
Connection
J-Link over USB (JTAG or SWD)
Flash settings: monitor file
fluminaryonchip.sre
Flash settings: sector buffer size
4096
Flash settings: workspace address
0x20000000
12.18. Using the STMicroelectronics MB525-Eval Board
The STMicroelectronics MB525-Eval evaluation board is part of a kit that comes with a USB cable, a
20-pin JTAG/SWD (Serial Wire Debug) target cable, a 5V DC power adapter and a CD. Read the
STMicroelectronics MB525-Eval evaluation board User Manual on the CD, for detailed information about
the board.
Installing driver software
Before you connect J-Link or ST-LINK to the board, first make sure you have installed the latest driver
software. You can download the latest software for J-Link from www.segger.com/download_jlink.html.
You can download the latest software for ST-LINK from
http://www.st.com/internet/com/SOFTWARE_RESOURCES/SW_COMPONENT/SW_DRIVER/st-link_v2_usbdriver.zip.
Jumper settings
Set jumper POWER SEL (JP4) to PSU for power through the 5V DC power jack.
Connecting the board
1.
Connect any of the J-Link or ST-LINK debugger probes with the 20-pin JTAG/SWD cable to the
board.
2.
Connect J-Link or ST-LINK to a PC with a USB cable.
3.
Power the board with the 5V DC power adapter connected to the power jack on the board (PSU).
301
TASKING VX-toolset for ARM User Guide
Eclipse target board debug configuration
In order to debug in the Eclipse environment, you have to create a debug launch configuration for your
hardware configuration. This is explained in Section 11.2, Creating a Customized Debug Configuration.
Use the following settings:
Target board debug configuration Setting
Target
STMicroelectronics MB525-Eval board
Configuration
Default
Connection
J-Link over USB (JTAG or SWD) /
ST-LINK over USB (JTAG or SWD)
Flash settings: monitor file
fstm32f10x.sre
Flash settings: sector buffer size
4096
Flash settings: workspace address
0x20000000
12.19. Using the STMicroelectronics STM320518-EVAL Board
The STM320518-EVAL is an evaluation board for STMicroelectronics ARM Cortex-M0 core-based
STM32F051R8 microcontrollers. Read the STM320518-EVAL evaluation board User Manual, for detailed
information about the board.
Installing driver software
Before you connect J-Link or ST-LINK to the board or if you want to use the ST-LINK/V2 that is embedded
on the board, first make sure you have installed the latest driver software. You can download the latest
software for J-Link from www.segger.com/download_jlink.html. You can download the latest software for
ST-LINK and ST-LINK/V2 from
http://www.st.com/internet/com/SOFTWARE_RESOURCES/SW_COMPONENT/SW_DRIVER/st-link_v2_usbdriver.zip.
Jumper settings
Set jumper JP8 to PSU for power through the 5V DC power jack.
302
Target Board Support
Connecting the board
1.
Connect any of the J-Link or ST-LINK debugger probes with the 20-pin JTAG/SWD cable to the
board. Alternatively, you can use the ST-LINK/V2 that is embedded on the board. In this case, connect
a USB cable from CN21 to a PC.
2.
(Only if a debugger probe is connected) Connect J-Link or ST-LINK to a PC with a USB cable.
3.
Power the board with the 5V DC power adapter connected to the power jack on the board.
Eclipse target board debug configuration
In order to debug in the Eclipse environment, you have to create a debug launch configuration for your
hardware configuration. This is explained in Section 11.2, Creating a Customized Debug Configuration.
Use the following settings:
Target board debug configuration Setting
Target
STMicroelectronics STM320518-EVAL
Configuration
Default
Connection
J-Link over USB (JTAG or SWD) /
ST-LINK over USB (JTAG or SWD)
Flash settings: monitor file
fstm32f051xx.sre
Flash settings: sector buffer size
4096
Flash settings: workspace address
0x20000000
12.20. Using the STMicroelectronics STM32F0 Discovery
The STM32F0 Discovery is an evaluation board for STMicroelectronics ARM Cortex-M0 core-based
STM32F051R8 microcontrollers.
Installing driver software
Before you connect ST-LINK to the board or if you want to use the ST-LINK/V2 that is embedded on the
board, first make sure you have installed the latest driver software. You can download the latest software
for ST-LINK and ST-LINK/V2 from
http://www.st.com/internet/com/SOFTWARE_RESOURCES/SW_COMPONENT/SW_DRIVER/st-link_v2_usbdriver.zip.
303
TASKING VX-toolset for ARM User Guide
Connecting the board
• Connect the board to a PC with a USB cable.
Eclipse target board debug configuration
In order to debug in the Eclipse environment, you have to create a debug launch configuration for your
hardware configuration. This is explained in Section 11.2, Creating a Customized Debug Configuration.
Use the following settings:
Target board debug configuration Setting
Target
STMicroelectronics STM32F0 Discovery Kit
Configuration
Default
Connection
ST-LINK over USB (SWD)
Flash settings: monitor file
fstm32f051xx.sre
Flash settings: sector buffer size
4096
Flash settings: workspace address
0x20000000
12.21. Using the STMicroelectronics STM3210B-Eval Board
The STM3210B-EVAL is an evaluation board for STMicroelectronics ARM Cortex-M3 core-based
STM32F10x 128 Kbyte microcontrollers. Read the STM3210B-EVAL evaluation board User Manual
(UM0426) on the CD, for detailed information about the board.
Installing driver software
Before you connect J-Link or ST-LINK to the board, first make sure you have installed the latest driver
software. You can download the latest software for J-Link from www.segger.com/download_jlink.html.
You can download the latest software for ST-LINK from
http://www.st.com/internet/com/SOFTWARE_RESOURCES/SW_COMPONENT/SW_DRIVER/st-link_v2_usbdriver.zip.
Jumper settings
Set jumper POWER SEL (JP4) to PSU for power through the 5V DC power jack.
304
Target Board Support
Connecting the board
1.
Connect any of the J-Link or ST-LINK debugger probes with the 20-pin JTAG/SWD cable to the
board.
2.
Connect J-Link or ST-LINK to a PC with a USB cable.
3.
Power the board with the 5V DC power adapter connected to the power jack on the board (CN4).
Eclipse target board debug configuration
In order to debug in the Eclipse environment, you have to create a debug launch configuration for your
hardware configuration. This is explained in Section 11.2, Creating a Customized Debug Configuration.
Use the following settings:
Target board debug configuration Setting
Target
STMicroelectronics STM3210B-Eval board
Configuration
Default
Connection
J-Link over USB (JTAG or SWD) /
ST-LINK over USB (JTAG or SWD)
Flash settings: monitor file
fstm32f10x.sre
Flash settings: sector buffer size
4096
Flash settings: workspace address
0x20000000
12.22. Using the STMicroelectronics STM3210C-Eval Board
The STM3210C-EVAL is an evaluation board for STMicroelectronics ARM Cortex-M3 core-based
STM32F107VCT microcontrollers. Read the STM3210C-EVAL evaluation board User Manual (UM0600),
for detailed information about the board.
Installing driver software
Before you connect J-Link or ST-LINK to the board, first make sure you have installed the latest driver
software. You can download the latest software for J-Link from www.segger.com/download_jlink.html.
You can download the latest software for ST-LINK from
http://www.st.com/internet/com/SOFTWARE_RESOURCES/SW_COMPONENT/SW_DRIVER/st-link_v2_usbdriver.zip.
305
TASKING VX-toolset for ARM User Guide
Jumper settings
Set jumper JP25 to PSU for power through the 5V DC power jack.
Connecting the board
1.
Connect any of the J-Link or ST-LINK debugger probes with the 20-pin JTAG/SWD cable to the
board.
2.
Connect J-Link or ST-LINK to a PC with a USB cable.
3.
Power the board with the 5V DC power adapter connected to the power jack on the board (CN18).
Eclipse target board debug configuration
In order to debug in the Eclipse environment, you have to create a debug launch configuration for your
hardware configuration. This is explained in Section 11.2, Creating a Customized Debug Configuration.
Use the following settings:
Target board debug configuration Setting
Target
STMicroelectronics STM3210C-Eval board
Configuration
Default
Connection
J-Link over USB (JTAG or SWD) /
ST-LINK over USB (JTAG or SWD)
Flash settings: monitor file
fstm32f10x.sre
Flash settings: sector buffer size
4096
Flash settings: workspace address
0x20000000
12.23. Using the STMicroelectronics STM3210E-Eval Board
The STM3210E-EVAL is an evaluation board for STMicroelectronics ARM Cortex-M3 core-based
STM32F103Z microcontrollers. Read the STM3210E-EVAL evaluation board User Manual (UM0488),
for detailed information about the board.
306
Target Board Support
Installing driver software
Before you connect J-Link or ST-LINK to the board, first make sure you have installed the latest driver
software. You can download the latest software for J-Link from www.segger.com/download_jlink.html.
You can download the latest software for ST-LINK from
http://www.st.com/internet/com/SOFTWARE_RESOURCES/SW_COMPONENT/SW_DRIVER/st-link_v2_usbdriver.zip.
Jumper settings
Set jumper JP13 to PSU for power through the 5V DC power jack.
Connecting the board
1.
Connect any of the J-Link or ST-LINK debugger probes with the 20-pin JTAG/SWD cable to the
board.
2.
Connect J-Link or ST-LINK to a PC with a USB cable.
3.
Power the board with the 5V DC power adapter connected to the power jack on the board (CN17).
Eclipse target board debug configuration
In order to debug in the Eclipse environment, you have to create a debug launch configuration for your
hardware configuration. This is explained in Section 11.2, Creating a Customized Debug Configuration.
Use the following settings:
Target board debug configuration Setting
Target
STMicroelectronics STM3210E-Eval board
Configuration
Default
Connection
J-Link over USB (JTAG or SWD) /
ST-LINK over USB (JTAG or SWD)
Flash settings: monitor file
fstm32f10x.sre
Flash settings: sector buffer size
4096
Flash settings: workspace address
0x20000000
307
TASKING VX-toolset for ARM User Guide
12.24. Using the STMicroelectronics STM32 Value Line
Discovery
The STM32 Value Line Discovery is an evaluation board for STMicroelectronics ARM Cortex-M3 core-based
STM32F100RB microcontrollers. Read the STM32 Value Line Discovery User Manual (UM0919), for
detailed information about the board.
Driver software
This board uses on-board ST-LINK. Except for Windows XP, no special driver software is needed. For
Windows XP, install the ST-LINK/V2 software. You can download the latest software for ST-LINK from
http://www.st.com/internet/com/SOFTWARE_RESOURCES/SW_COMPONENT/SW_DRIVER/st-link_v2_usbdriver.zip
Connecting the board
• Connect the board to a PC with a USB cable.
Eclipse target board debug configuration
In order to debug in the Eclipse environment, you have to create a debug launch configuration for your
hardware configuration. This is explained in Section 11.2, Creating a Customized Debug Configuration.
Use the following settings:
Target board debug configuration Setting
Target
STMicroelectronics STM32 Value line discovery
Configuration
Default
Connection
Embedded ST-LINK over USB
Flash settings: monitor file
fstm32f10x.sre
Flash settings: sector buffer size
4096
Flash settings: workspace address
0x20000000
308
Target Board Support
12.25. Using the STMicroelectronics STM32L152-Eval Board
The STM32L152-EVAL is an evaluation board for STMicroelectronics ARM Cortex-M3 core-based
STM32L152VB microcontrollers. Read the STM32L152-EVAL evaluation board User Manual (UM1018),
for detailed information about the board.
Installing driver software
Before you connect J-Link or ST-LINK to the board or if you want to use the ST-LINK/V2 that is embedded
on the board, first make sure you have installed the latest driver software. You can download the latest
software for J-Link from www.segger.com/download_jlink.html. You can download the latest software for
ST-LINK and ST-LINK/V2 from
http://www.st.com/internet/com/SOFTWARE_RESOURCES/SW_COMPONENT/SW_DRIVER/st-link_v2_usbdriver.zip.
Jumper settings
Set jumper JP12 to PSU for power through the 5V DC power jack.
Connecting the board
1.
Connect any of the J-Link or ST-LINK debugger probes with the 20-pin JTAG/SWD cable to the
board. Alternatively, you can use the ST-LINK/V2 that is embedded on the board. In this case, connect
a USB cable from CN11 to a PC.
2.
(Only if a debugger probe is connected) Connect J-Link or ST-LINK to a PC with a USB cable.
3.
Power the board with the 5V DC power adapter connected to the power jack on the board (CN12).
Eclipse target board debug configuration
In order to debug in the Eclipse environment, you have to create a debug launch configuration for your
hardware configuration. This is explained in Section 11.2, Creating a Customized Debug Configuration.
Use the following settings:
Target board debug configuration Setting
Target
STMicroelectronics STM32L152-EVAL
Configuration
Default
309
TASKING VX-toolset for ARM User Guide
Target board debug configuration Setting
Connection
J-Link over USB (JTAG or SWD) /
ST-LINK over USB (JTAG or SWD)
Flash settings: monitor file
fstm32l1xx.sre
Flash settings: sector buffer size
4096
Flash settings: workspace address
0x20000000
12.26. Using the STMicroelectronics STM32L152D-Eval Board
The STM32L152D-EVAL is an evaluation board for STMicroelectronics ARM Cortex-M3 core-based
STM32L152ZD microcontrollers. Read the STM32L152D-EVAL evaluation board User Manual, for detailed
information about the board.
Note that prototype versions of the STM32L152D-EVAL board have some limitations. STMicroelectronic
recommends to use SWD instead of JTAG to load and debug the code. For more details see section 1.1
Prototype limitations in the STM32L152D-EVAL evaluation board User Manual.
Installing driver software
Before you connect J-Link or ST-LINK to the board or if you want to use the ST-LINK/V2 that is embedded
on the board, first make sure you have installed the latest driver software. You can download the latest
software for J-Link from www.segger.com/download_jlink.html. You can download the latest software for
ST-LINK and ST-LINK/V2 from
http://www.st.com/internet/com/SOFTWARE_RESOURCES/SW_COMPONENT/SW_DRIVER/st-link_v2_usbdriver.zip.
Jumper settings
Set jumper JP1 to PSU for power through the 5V DC power jack (CN2), or set JP1 to STlk for power
supply from the ST-LINK/V2 USB connector (CN14).
Connecting the board
1.
Connect any of the J-Link or ST-LINK debugger probes with the 20-pin JTAG/SWD cable to the
board. Alternatively, you can use the ST-LINK/V2 that is embedded on the board. In this case, connect
a USB cable from CN14 to a PC.
2.
(Only if a debugger probe is connected) Connect J-Link or ST-LINK to a PC with a USB cable.
310
Target Board Support
3.
Power the board with the 5V DC power adapter connected to the power jack on the board (CN2), or
with the 5V DC power with 500mA limitation from CN14, the ST-LINK/V2 USB type B connector.
Eclipse target board debug configuration
In order to debug in the Eclipse environment, you have to create a debug launch configuration for your
hardware configuration. This is explained in Section 11.2, Creating a Customized Debug Configuration.
Use the following settings:
Target board debug configuration Setting
Target
STMicroelectronics STM32L152D-EVAL
Configuration
Default
Connection
J-Link over USB (JTAG or SWD) /
ST-LINK over USB (JTAG or SWD)
Flash settings: monitor file
fstm32l1xx.sre
Flash settings: sector buffer size
4096
Flash settings: workspace address
0x20000000
12.27. Using the STMicroelectronics STM32L Discovery
The STM32L-DISCOVERY is an evaluation board for STMicroelectronics ARM Cortex-M3 core-based
STM32L152RB microcontrollers. Read the STM32L-DISCOVERY User Manual (UM1079), for detailed
information about the board.
Installing driver software
Before you use the ST-LINK/V2 that is embedded on the board, first make sure you have installed the
latest driver software. You can download the latest software for ST-LINK/V2 from
http://www.st.com/internet/com/SOFTWARE_RESOURCES/SW_COMPONENT/SW_DRIVER/st-link_v2_usbdriver.zip.
Jumper settings
Set jumper JP1 to ON for Idd measurement. Set both CN3 jumpers to ON to enable ST-LINK/V2 functions
for on board programming.
311
TASKING VX-toolset for ARM User Guide
Connecting the board
• Connect the board to a PC with a USB cable.
Eclipse target board debug configuration
In order to debug in the Eclipse environment, you have to create a debug launch configuration for your
hardware configuration. This is explained in Section 11.2, Creating a Customized Debug Configuration.
Use the following settings:
Target board debug configuration Setting
Target
STMicroelectronics STM32L Discovery
Configuration
Default
Connection
Embedded ST-LINK over USB
Flash settings: monitor file
fstm32l1xx.sre
Flash settings: sector buffer size
4096
Flash settings: workspace address
0x20000000
12.28. Using the STMicroelectronics STM3220G-EVAL Board
The STM3220G-EVAL is an evaluation board for STMicroelectronics ARM Cortex-M3 core-based
STM32F2xxxx microcontrollers. Read the STM3220G-EVAL evaluation board User Manual (UM1057),
for detailed information about the board.
Installing driver software
Before you connect J-Link or ST-LINK to the board or if you want to use the ST-LINK/V2 that is embedded
on the board, first make sure you have installed the latest driver software. You can download the latest
software for J-Link from www.segger.com/download_jlink.html. You can download the latest software for
ST-LINK and ST-LINK/V2 from
http://www.st.com/internet/com/SOFTWARE_RESOURCES/SW_COMPONENT/SW_DRIVER/st-link_v2_usbdriver.zip.
312
Target Board Support
Jumper settings
Set jumper JP18 to PSU for power through the 5V DC power jack (CN18), or set JP18 to STlk for power
supply from the ST-LINK/V2 USB connector (CN21).
Connecting the board
1.
Connect any of the J-Link or ST-LINK debugger probes with the 20-pin JTAG/SWD cable to the
board. Alternatively, you can use the ST-LINK/V2 that is embedded on the board. In this case, connect
a USB cable from CN21 to a PC.
2.
(Only if a debugger probe is connected) Connect J-Link or ST-LINK to a PC with a USB cable.
3.
Power the board with the 5V DC power adapter connected to the power jack on the board (CN18),
or with the 5V DC power with 500mA limitation from CN21, the ST-LINK/V2 USB connector.
Eclipse target board debug configuration
In order to debug in the Eclipse environment, you have to create a debug launch configuration for your
hardware configuration. This is explained in Section 11.2, Creating a Customized Debug Configuration.
Use the following settings:
Target board debug configuration Setting
Target
STMicroelectronics STM3220G-EVAL
Configuration
Default
Connection
J-Link over USB (JTAG or SWD) /
ST-LINK over USB (JTAG or SWD)
Flash settings: monitor file
fstm32f2xxxx.sre
Flash settings: sector buffer size
4096
Flash settings: workspace address
0x20000000
12.29. Using the STMicroelectronics STM3221G-EVAL Board
The STM3221G-EVAL is an evaluation board for STMicroelectronics ARM Cortex-M3 core-based
STM32F2xxxx microcontrollers. Read the STM3221G-EVAL evaluation board User Manual (UM1065),
for detailed information about the board.
313
TASKING VX-toolset for ARM User Guide
Installing driver software
Before you connect J-Link or ST-LINK to the board or if you want to use the ST-LINK/V2 that is embedded
on the board, first make sure you have installed the latest driver software. You can download the latest
software for J-Link from www.segger.com/download_jlink.html. You can download the latest software for
ST-LINK and ST-LINK/V2 from
http://www.st.com/internet/com/SOFTWARE_RESOURCES/SW_COMPONENT/SW_DRIVER/st-link_v2_usbdriver.zip.
Jumper settings
Set jumper JP18 to PSU for power through the 5V DC power jack (CN18), or set JP18 to STlk for power
supply from the ST-LINK/V2 USB connector (CN21).
Connecting the board
1.
Connect any of the J-Link or ST-LINK debugger probes with the 20-pin JTAG/SWD cable to the
board. Alternatively, you can use the ST-LINK/V2 that is embedded on the board. In this case, connect
a USB cable from CN21 to a PC.
2.
(Only if a debugger probe is connected) Connect J-Link or ST-LINK to a PC with a USB cable.
3.
Power the board with the 5V DC power adapter connected to the power jack on the board (CN18),
or with the 5V DC power with 500mA limitation from CN21, the ST-LINK/V2 USB connector.
Eclipse target board debug configuration
In order to debug in the Eclipse environment, you have to create a debug launch configuration for your
hardware configuration. This is explained in Section 11.2, Creating a Customized Debug Configuration.
Use the following settings:
Target board debug configuration Setting
Target
STMicroelectronics STM3221G-EVAL
Configuration
Default
Connection
J-Link over USB (JTAG or SWD) /
ST-LINK over USB (JTAG or SWD)
Flash settings: monitor file
fstm32f2xxxx.sre
Flash settings: sector buffer size
4096
Flash settings: workspace address
0x20000000
314
Target Board Support
12.30. Using the STMicroelectronics STM32303C-EVAL Board
The STM32303C-EVAL is an evaluation board for STMicroelectronics ARM Cortex-M4 core-based
STM32F303VC microcontrollers. Read the STM32303C-EVAL evaluation board User Manual, for detailed
information about the board.
Installing driver software
Before you connect J-Link or ST-LINK to the board or if you want to use the ST-LINK/V2 that is embedded
on the board, first make sure you have installed the latest driver software. You can download the latest
software for J-Link from www.segger.com/download_jlink.html. You can download the latest software for
ST-LINK and ST-LINK/V2 from
http://www.st.com/internet/com/SOFTWARE_RESOURCES/SW_COMPONENT/SW_DRIVER/st-link_v2_usbdriver.zip.
Jumper settings
Set jumper JP14 to PSU for power through the 5V DC power jack (CN14), or set JP14 to STlk for power
supply from the ST-LINK/V2 USB connector (CN5).
Connecting the board
1.
Connect any of the J-Link or ST-LINK debugger probes with the 20-pin JTAG/SWD cable to the
board. Alternatively, you can use the ST-LINK/V2 that is embedded on the board. In this case, connect
a USB cable from CN5 to a PC.
2.
(Only if a debugger probe is connected) Connect J-Link or ST-LINK to a PC with a USB cable.
3.
Power the board with the 5V DC power adapter connected to the power jack on the board (CN14),
or with the 5V DC power with 500mA limitation from CN5, the ST-LINK/V2 USB connector.
Eclipse target board debug configuration
In order to debug in the Eclipse environment, you have to create a debug launch configuration for your
hardware configuration. This is explained in Section 11.2, Creating a Customized Debug Configuration.
Use the following settings:
Target board debug configuration Setting
Target
STMicroelectronics STM32303C-Eval board
315
TASKING VX-toolset for ARM User Guide
Target board debug configuration Setting
Configuration
Default
Connection
J-Link over USB (JTAG or SWD) /
ST-LINK over USB (JTAG or SWD)
Flash settings: monitor file
fstm32f10x.sre
Flash settings: sector buffer size
4096
Flash settings: workspace address
0x20000000
12.31. Using the STMicroelectronics STM32373C-EVAL Board
The STM32373C-EVAL is an evaluation board for STMicroelectronics ARM Cortex-M4 core-based
STM32F373VC microcontrollers. Read the STM32373C-EVAL evaluation board User Manual, for detailed
information about the board.
Installing driver software
Before you connect J-Link or ST-LINK to the board or if you want to use the ST-LINK/V2 that is embedded
on the board, first make sure you have installed the latest driver software. You can download the latest
software for J-Link from www.segger.com/download_jlink.html. You can download the latest software for
ST-LINK and ST-LINK/V2 from
http://www.st.com/internet/com/SOFTWARE_RESOURCES/SW_COMPONENT/SW_DRIVER/st-link_v2_usbdriver.zip.
Jumper settings
Set jumper JP10 to PSU for power through the 5V DC power jack (CN18), or set JP10 to STlk for power
supply from the ST-LINK/V2 USB connector (CN22).
Connecting the board
1.
Connect any of the J-Link or ST-LINK debugger probes with the 20-pin JTAG/SWD cable to the
board. Alternatively, you can use the ST-LINK/V2 that is embedded on the board. In this case, connect
a USB cable from CN22 to a PC.
2.
(Only if a debugger probe is connected) Connect J-Link or ST-LINK to a PC with a USB cable.
3.
Power the board with the 5V DC power adapter connected to the power jack on the board (CN18),
or with the 5V DC power with 500mA limitation from CN22, the ST-LINK/V2 USB connector.
316
Target Board Support
Eclipse target board debug configuration
In order to debug in the Eclipse environment, you have to create a debug launch configuration for your
hardware configuration. This is explained in Section 11.2, Creating a Customized Debug Configuration.
Use the following settings:
Target board debug configuration Setting
Target
STMicroelectronics STM32373C-Eval board
Configuration
Default
Connection
J-Link over USB (JTAG or SWD) /
ST-LINK over USB (JTAG or SWD)
Flash settings: monitor file
fstm32f10x.sre
Flash settings: sector buffer size
4096
Flash settings: workspace address
0x20000000
12.32. Using the STMicroelectronics STM3240G-EVAL Board
The STM3240G-EVAL is an evaluation board for STMicroelectronics ARM Cortex-M4 core-based
STM32F407IE, STM32F407IG, STM32F417IE or STM32F417IG microcontrollers. Read the
STM3240G-EVAL evaluation board User Manual (UM1461), for detailed information about the board.
Installing driver software
Before you connect J-Link or ST-LINK to the board or if you want to use the ST-LINK/V2 that is embedded
on the board, first make sure you have installed the latest driver software. You can download the latest
software for J-Link from www.segger.com/download_jlink.html. You can download the latest software for
ST-LINK and ST-LINK/V2 from
http://www.st.com/internet/com/SOFTWARE_RESOURCES/SW_COMPONENT/SW_DRIVER/st-link_v2_usbdriver.zip.
Jumper settings
Set jumper JP18 to PSU for power through the 5V DC power jack (CN18), or set JP18 to STlk for power
supply from the ST-LINK/V2 USB connector (CN21).
317
TASKING VX-toolset for ARM User Guide
Connecting the board
1.
Connect any of the J-Link or ST-LINK debugger probes with the 20-pin JTAG/SWD cable to the
board. Alternatively, you can use the ST-LINK/V2 that is embedded on the board. In this case, connect
a USB cable from CN21 to a PC.
2.
(Only if a debugger probe is connected) Connect J-Link or ST-LINK to a PC with a USB cable.
3.
Power the board with the 5V DC power adapter connected to the power jack on the board (CN18),
or with the 5V DC power with 500mA limitation from CN21, the ST-LINK/V2 USB connector.
Eclipse target board debug configuration
In order to debug in the Eclipse environment, you have to create a debug launch configuration for your
hardware configuration. This is explained in Section 11.2, Creating a Customized Debug Configuration.
Use the following settings:
Target board debug configuration Setting
Target
STMicroelectronics STM3240G-EVAL
Configuration
Default
Connection
J-Link over USB (JTAG or SWD) /
ST-LINK over USB (JTAG or SWD)
Flash settings: monitor file
fstm32f2xxxx.sre
Flash settings: sector buffer size
4096
Flash settings: workspace address
0x20000000
12.33. Using the STMicroelectronics STM32F4 Discovery
The STM32F4DISCOVERY is an evaluation board for STMicroelectronics ARM Cortex-M4 core-based
STM32F407VG microcontrollers. Read the STM32F4DISCOVERY User Manual (UM1472), for detailed
information about the board.
318
Target Board Support
Installing driver software
Before you use the ST-LINK/V2 that is embedded on the board, first make sure you have installed the
latest driver software. You can download the latest software for ST-LINK/V2 from
http://www.st.com/internet/com/SOFTWARE_RESOURCES/SW_COMPONENT/SW_DRIVER/st-link_v2_usbdriver.zip.
Jumper settings
Set jumper JP1 to ON for Idd measurement. Set both CN3 jumpers to ON to enable ST-LINK/V2 functions
for on board programming.
Connecting the board
• Connect the board to a PC with a USB cable.
Eclipse target board debug configuration
In order to debug in the Eclipse environment, you have to create a debug launch configuration for your
hardware configuration. This is explained in Section 11.2, Creating a Customized Debug Configuration.
Use the following settings:
Target board debug configuration Setting
Target
STMicroelectronics STM32F4 Discovery Kit
Configuration
Default
Connection
Embedded ST-LINK over USB
Flash settings: monitor file
fstm32f2xxxx.sre
Flash settings: sector buffer size
4096
Flash settings: workspace address
0x20000000
12.34. Using the STMicroelectronics STM32W108B-SK
The STM32W108B-SK is a starter kit for STMicroelectronics ARM Cortex-M3 core-based STM32FW108xx
microcontrollers.The starter kit comes with two STM32W108 application boards (MB851), one STM32W108
extension board (MB850), one STM32-Primer2 tool, one J-Link Lite and a mini USB cable. Read the
319
TASKING VX-toolset for ARM User Guide
STM32W-SK and STM32W-EXT starter and extension kits for STM32W108xx microcontrollers User
Manual (UM0894), for detailed information about the kit.
Installing driver software
Before you connect J-Link or ST-LINK to the board, first make sure you have installed the latest driver
software. You can download the latest software for J-Link from www.segger.com/download_jlink.html.
You can download the latest software for ST-LINK from
http://www.st.com/internet/com/SOFTWARE_RESOURCES/SW_COMPONENT/SW_DRIVER/st-link_v2_usbdriver.zip.
Jumper settings
Set jumper P2 to USB JTAG for power through the USB or JTAG interface.
Connecting the board
1.
Connect any of the J-Link or ST-LINK debugger probes with the 20-pin JTAG/SWD cable to the
board.
2.
Connect J-Link or ST-LINK to a PC with a USB cable.
Eclipse target board debug configuration
In order to debug in the Eclipse environment, you have to create a debug launch configuration for your
hardware configuration. This is explained in Section 11.2, Creating a Customized Debug Configuration.
Use the following settings:
Target board debug configuration Setting
Target
STMicroelectronics STM32W108B-SK Starter Kit board MB851
Configuration
Default
Connection
J-Link over USB (JTAG or SWD) /
ST-LINK over USB (JTAG or SWD)
Flash settings: monitor file
fstm32wxxx.sre
Flash settings: sector buffer size
4096
Flash settings: workspace address
0x20000000
320
Target Board Support
12.35. Using the STMicroelectronics STM32W108B-KEXT
The STM32W108B-KEXT is an extension kit for STMicroelectronics ARM Cortex-M3 core-based
STM32FW108xx microcontrollers. The extension kit comes with two STM32W108 application boards
(MB851) and two STM32W108 application boards with a power amplifier (MB954). Read the STM32W-SK
and STM32W-EXT starter and extension kits for STM32W108xx microcontrollers User Manual (UM0894),
for detailed information about the kit.
Installing driver software
Before you connect J-Link or ST-LINK to the board, first make sure you have installed the latest driver
software. You can download the latest software for J-Link from www.segger.com/download_jlink.html.
You can download the latest software for ST-LINK from
http://www.st.com/internet/com/SOFTWARE_RESOURCES/SW_COMPONENT/SW_DRIVER/st-link_v2_usbdriver.zip.
Jumper settings
Set jumper P2 to USB JTAG for power through the USB or JTAG interface.
Connecting the board
1.
Connect any of the J-Link or ST-LINK debugger probes with the 20-pin JTAG/SWD cable to the
board.
2.
Connect J-Link or ST-LINK to a PC with a USB cable.
Eclipse target board debug configuration
In order to debug in the Eclipse environment, you have to create a debug launch configuration for your
hardware configuration. This is explained in Section 11.2, Creating a Customized Debug Configuration.
Use the following settings:
Target board debug configuration Setting
Target
STMicroelectronics STM32W108B-KEXT Extension Kit board
MB954
Configuration
Default
321
TASKING VX-toolset for ARM User Guide
Target board debug configuration Setting
Connection
J-Link over USB (JTAG or SWD) /
ST-LINK over USB (JTAG or SWD)
Flash settings: monitor file
fstm32wxxx.sre
Flash settings: sector buffer size
4096
Flash settings: workspace address
0x20000000
12.36. Using the STMicroelectronics STM32W RF Control Kit
The STM32W-RFCKIT is an RF control kit for STMicroelectronics ARM Cortex-M3 core-based
STM32FW108xx RF microcontrollers. The RF control kit contains an STM32W108xx remote application
board (MB950) that you can use for debugging if you solder JTAG/SWD pins on the board. Read the
STM32W-RFCKIT RF control kit for STM32W108xx microcontrollers User Manual (UM1050), for detailed
information about the kit.
Installing driver software
Before you connect J-Link or ST-LINK to the board, first make sure you have installed the latest driver
software. You can download the latest software for J-Link from www.segger.com/download_jlink.html.
You can download the latest software for ST-LINK from
http://www.st.com/internet/com/SOFTWARE_RESOURCES/SW_COMPONENT/SW_DRIVER/st-link_v2_usbdriver.zip.
JTAG/SWD connection
Note that you can only use the MB950 board for debugging if you solder JTAG/SWD pins on P1.
Connecting the board
1.
Connect any of the J-Link or ST-LINK debugger probes with the 20-pin JTAG/SWD cable to the pins
on the board.
2.
Connect J-Link or ST-LINK to a PC with a USB cable.
Eclipse target board debug configuration
In order to debug in the Eclipse environment, you have to create a debug launch configuration for your
hardware configuration. This is explained in Section 11.2, Creating a Customized Debug Configuration.
322
Target Board Support
Use the following settings:
Target board debug configuration Setting
Target
STMicroelectronics STM32W RF Control Kit board
Configuration
Default
Connection
J-Link over USB (JTAG or SWD) /
ST-LINK over USB (JTAG or SWD)
Flash settings: monitor file
fstm32wxxx.sre
Flash settings: sector buffer size
4096
Flash settings: workspace address
0x20000000
12.37. Using the Keil MCB1760 Evaluation Board
The Keil MCB1760 Evaluation Board is part of a kit that comes with a USB cable and a CD. Read the
MCB1700 Evaluation Board User’s Manual on the CD, for detailed information about the board.
Installing driver software
Before you connect J-Link to the board, first make sure you have installed the latest driver software. You
can download the latest software for J-Link from www.segger.com/download_jlink.html.
Jumper settings
Set the jumpers according to the following picture of the board:
Connecting the board
1.
Connect any of the J-Link debugger probes with a 20-pin JTAG cable to the board.
2.
Connect J-Link to a PC with a USB cable.
323
TASKING VX-toolset for ARM User Guide
3.
Connect the board via the USB Device port to a PC with the USB cable for power supply. If Windows
asks to search for drivers, you can ignore this.
Eclipse target board debug configuration
In order to debug in the Eclipse environment, you have to create a debug launch configuration for your
hardware configuration. This is explained in Section 11.2, Creating a Customized Debug Configuration.
Use the following settings:
Target board debug configuration Setting
Target
Keil MCB1760 Evaluation Kit
Configuration
Default
Connection
J-Link over USB
Flash settings: monitor file
flpc1xxx.sre
Flash settings: sector buffer size
4096
Flash settings: workspace address
0x20000000
12.38. Trace Port Interface Unit Support
Many modern ARM-based processors have a Trace Port Interface Unit (TPIU), which provides a means
to communicate trace and other debug related information to a suitable debug probe, such as a SEGGER
J-Trace.
Currently, the TASKING debugger can process TPIU output only for STMicroelectronics STM32F
processors and only in conjunction with a SEGGER J-Trace probe. Note that not all evaluation boards
actually allow connecting a J-Trace.
You need to be aware of the following:
• The TPIU data is output via five pins named TRACECK and TRACED0...3 or similar. Typically, these
pins are shared with other chip peripherals and hence you must take care not to use these pins for
other purposes while using TPIU-related debugger facilities.
• At the moment, the TPIU is used only for tracing purposes (see Section 11.4.12, Trace View). In this
case especially the amount of TPIU data is relatively large and therefore, it is important that the TPIU
output frequency is large enough relative to the core's, because otherwise overflow may occur. The
default settings are such that no overflow will occur, but if you increase the core clock frequency, it is
recommended that you increase the TPIU output frequency by the same factor.
If overflow does occur, the debugger will try to detect and/or work around it, but this may not always
succeed. This may manifest itself as a trace which is inconsistent with actual program execution, for
example.
324
Chapter 13. Tool Options
This chapter provides a detailed description of the options for the compiler, assembler, linker, control
program, make utility and the archiver.
Tool options in Eclipse (Menu entry)
For each tool option that you can set from within Eclipse, a Menu entry description is available. In Eclipse
you can customize the tools and tool options in the following dialog:
1.
From the Project menu, select Properties for
The Properties dialog appears.
2.
In the left pane, expand C/C++ Build and select Settings.
In the right pane the Settings appear.
3.
Open the Tool Settings tab.
You can set all tool options here.
Unless stated otherwise, all Menu entry descriptions expect that you have this Tool Settings tab
open.
The following tables give an overview of all tool options on the Tool Settings tab in Eclipse with hyperlinks
to the corresponding command line options (if available).
Global Options
Eclipse option
Description or option
Use global 'product directory' preference
Directory where the TASKING toolset is
installed
Treat warnings as errors
Control program option --warnings-as-errors
Keep temporary files
Control program option
--keep-temporary-files (-t)
Verbose mode of control program
Control program option --verbose (-v)
Endianness
Control program option --endianness
C/C++ Compiler
Eclipse option
Description or option
Preprocessing
Include CMSIS device register definition header file
C compiler option --include-file
325
TASKING VX-toolset for ARM User Guide
Eclipse option
Description or option
Store preprocessor output in <file>.pre
Control program option --preprocess (-E) /
--no-preprocessing-only
Keep comments in preprocessor output
Control program option
--preprocess=+comments
Keep #line info in preprocessor output
Control program option
--preprocess=-noline
Defined symbols
C compiler option --define
Pre-include files
C compiler option --include-file
Include Paths
Add CMSIS include paths
C compiler option --include-directory
Include paths
C compiler option --include-directory
Precompiled C++ Headers
Automatically use/create precompiled header file
C++ compiler option --pch
Create precompiled header file
C++ compiler option --create-pch
Use precompiled header file
C++ compiler option --use-pch
Precompiled header file directory
C++ compiler option --pch-dir
Language
Comply to C standard
C compiler option --iso
Allow GNU C extensions
C compiler option --language=+gcc
Allow // comments in ISO C90 mode
C compiler option --language=+comments
Check assignment of string literal to non-const string pointer C compiler option --language=-strings
Treat “char” variables as unsigned
C compiler option --uchar
Treat “int” bit-fields as unsigned
C compiler option --signed-bitfields
Treat double as float
C compiler option --no-double
Allow optimization across volatile access
C compiler option --language=-volatile
Comply to embedded C++ subset
C++ compiler option --embedded-c++
Support for C++ I/O streams
C++ compiler option --io-streams
Support for C++ exception handling
C++ compiler option --exceptions
Support for C++ RTTI (run-time type information)
C++ compiler option --rtti
Allow the 'wchar_t' keyword (C++)
C++ compiler option --wchar_t-keyword
Allow non-ANSI/ISO C++ features
C++ compiler option --strict
C++ anachronisms
C++ compiler option --anachronisms
Allow GNU C++ extensions
C++ compiler option --g++
Code Generation
Use Thumb instruction set
C compiler option --thumb
Compile for ARM/Thumb interworking
C compiler option --interwork
326
Tool Options
Eclipse option
Description or option
Use FPU
C compiler option --fpu
Alignment for composite types
C compiler option --align-composites
Select call mode
C compiler option --call
Optimization
Optimization level
C compiler option --optimize
Trade-off between speed and size
C compiler option --tradeoff
Maximum size for code compaction
C compiler option --compact-max-size
Maximum call depth for code compaction
C compiler option --max-call-depth
Always inline function calls
C compiler option --inline
Maximum size increment when inlining (in %)
C compiler option --inline-max-incr
Maximum size for functions to always inline
C compiler option --inline-max-size
Build for application wide optimizations (MIL linking)
Control program option --mil-link / --mil-split
Application wide optimization mode
Control program option --mil-link / --mil-split
Custom Optimization
C compiler option --optimize
Debugging
Generate symbolic debug information
C compiler option --debug-info
Static profiling
C compiler option --profile=+static
Generate profiling information for block counters
C compiler option --profile=+block
Generate profiling information to build a call graph
C compiler option --profile=+callgraph
Generate profiling information for function counters
C compiler option --profile=+function
Generate profiling information for function timers
C compiler option --profile=+time
Exclude time spent in interrupt functions
C compiler option --profile=+time,+interrupt
Generate code for bounds checking
C compiler option --runtime=+bounds
Generate code to detect unhandled case in a switch
C compiler option --runtime=+case
Generate code for malloc consistency checks
C compiler option --runtime=+malloc
Generate code for stack overflow checks (allowed for USR C compiler option --runtime=+stack
and SYS mode only)
Generate code for division by zero checks
C compiler option --runtime=+zero
MISRA-C
MISRA-C checking
C compiler option --misrac
MISRA-C version
C compiler option --misrac-version
Warnings instead of errors for required rules
C compiler option
--misrac-required-warnings
Warnings instead of errors for advisory rules
C compiler option
--misrac-advisory-warnings
Custom 1998 / Custom 2004
C compiler option --misrac
327
TASKING VX-toolset for ARM User Guide
Eclipse option
Description or option
CERT C Secure Coding
CERT C secure code checking
C compiler option --cert
Warnings instead of errors
C compiler option
--warnings-as-errors=700-715
Custom CERT C
C compiler option --cert
Diagnostics
Suppress C compiler warnings
C compiler option --no-warnings=num
Suppress all warnings
C compiler option --no-warnings
Suppress C++ compiler “used before set” warnings
C++ compiler option
--no-use-before-set-warnings
Issue remarks on C++ code
C++ compiler option --remarks
Perform global type checking on C code
C compiler option --global-type-checking
Miscellaneous
Merge C source code with generated assembly
C compiler option --source
Force definition of virtual function tables (C++)
C++ compiler option --force-vtbl
Suppress definition of virtual function tables (C++)
C++ compiler option --suppress-vtbl
Implicit inclusion of source files for finding templates
C++ compiler option --implicit-include
Minimal inlining of function calls (C++)
C++ compiler option --no-inlining
Instantiation mode of external template entities
C++ compiler option --instantiate
Additional options
C compiler options, C++ compiler options,
Control program options
Assembler
Eclipse option
Description or option
Preprocessing
Use TASKING preprocessor
Assembler option --preprocessor-type
Defined symbols
Assembler option --define
Pre-include files
Assembler option --include-file
Include Paths
Include paths
Assembler option --include-directory
Symbols
Generate symbolic debug
Assembler option --debug-info
Case insensitive identifiers
Assembler option --case-insensitive
Emit local EQU symbols
Assembler option --emit-locals=+equ
Emit mapping symbols ($a,$t,$d)
Assembler option --emit-locals=+mappings
328
Tool Options
Eclipse option
Description or option
Emit local non-EQU symbols
Assembler option --emit-locals=+symbols
Set default symbol scope to global
Assembler option --symbol-scope
List File
Generate list file
Control program option --list-files
List ...
Assembler option --list-format
List section summary
Assembler option --section-info=+list
Diagnostics
Suppress warnings
Assembler option --no-warnings=num
Suppress all warnings
Assembler option --no-warnings
Display section summary
Assembler option --section-info=+console
Maximum number of emitted errors
Assembler option --error-limit
Miscellaneous
Use full assembler for mixed ARM and Thumb instructions Control program option --mixed-arm-thumb
Assemble Thumb instructions by default
Control program option --thumb
Allow 2-operand form for 3-operand instructions
Assembler option --relaxed
UAL syntax mode
Assembler option --old-syntax
Allow instruction inversions
Assembler option --inversions
Additional options
Assembler options
Linker
Eclipse option
Description or option
Output Format
Generate Intel Hex format file
Linker option --output=file:IHEX
Generate S-records file
Linker option --output=file:SREC
Create file for each memory chip
Linker option --chip-output
Size of addresses (in bytes) for Intel Hex records
Linker option --output=file:IHEX:size
Size of addresses (in bytes) for Motorola S records
Linker option --output=file:SREC:size
Emit start address record
Linker option --hex-format=s
Libraries
Link default libraries
Control program option --no-default-libraries
Link CMSIS DSP library
Control program option --dsp-library
Rescan libraries to solve unresolved externals
Linker option --no-rescan
Libraries
The libraries are added as files on the
command line.
Library search path
Linker option --library-directory
329
TASKING VX-toolset for ARM User Guide
Eclipse option
Description or option
Data Objects
Data objects
Linker option --import-object
Script File
Defined symbols
Linker option --define
Linker script file (.lsl)
Linker option --lsl-file
Optimization
Delete unreferenced sections
Linker option --optimize=c
Use a 'first-fit decreasing' algorithm
Linker option --optimize=l
Compress copy table
Linker option --optimize=t
Delete duplicate code
Linker option --optimize=x
Delete duplicate data
Linker option --optimize=y
Compress ROM sections of copy table items
Linker option --optimize=z
Map File
Generate map file (.map)
Control program option --no-map-file
Generate XML map file format (.mapxml) for map file viewer Linker option --map-file=file.mapxml:XML
Include ...
Linker option --map-file-format
Diagnostics
Suppress warnings
Linker option --no-warnings=num
Suppress all warnings
Linker option --no-warnings
Maximum number of emitted errors
Linker option --error-limit
Miscellaneous
Strip symbolic debug information
Linker option --strip-debug
Link case insensitive
Linker option --case-insensitive
Do not use standard copy table for initialization
Linker option
--user-provided-initialization-code
Show link phases during processing
Linker option --verbose
Generate long-branch veneers
Linker option --long-branch-veneers
Application is not romable
Linker option --non-romable
Additional options
Linker options
330
Tool Options
13.1. Configuring the Command Line Environment
If you want to use the tools on the command line (using a Windows command prompt), you can set
environment variables.
You can set the following environment variables:
Environment
variable
Description
ASARMINC
With this variable you specify one or more additional directories in which the
assembler looks for include files. See Section 7.4, How the Assembler Searches
Include Files.
CARMINC
With this variable you specify one or more additional directories in which the C
compiler looks for include files. See Section 4.3, How the Compiler Searches
Include Files.
CPARMINC
With this variable you specify one or more additional directories in which the C++
compiler looks for include files. See Section 5.2, How the C++ Compiler Searches
Include Files.
CCARMBIN
When this variable is set, the control program prepends the directory specified
by this variable to the names of the tools invoked.
LIBCARM
With this variable you specify one or more additional directories in which the linker
looks for libraries. See Section 8.3.1, How the Linker Searches Libraries.
LM_LICENSE_FILE
With this variable you specify the location of the license data file. You only need
to specify this variable if the license file is not on its default location
(c:\flexlm\license.dat for Windows,
/usr/local/flexlm/licenses/license.dat for Solaris).
PATH
With this variable you specify the directory in which the executables reside. This
allows you to call the executables when you are not in the bin directory. Usually
your system already uses the PATH variable for other purposes. To keep these
settings, you need to add (rather than replace) the path. Use a semicolon (;) to
separate path names.
TASKING_LIC_WAIT If you set this variable, the tool will wait for a license to become available, if all
licenses are taken. If you have not set this variable, the tool aborts with an error
message. (Only useful with floating licenses)
TMPDIR
With this variable you specify the location where programs can create temporary
files. Usually your system already uses this variable. In this case you do not need
to change it.
See the documentation of your operating system on how to set environment variables.
331
TASKING VX-toolset for ARM User Guide
13.2. C Compiler Options
This section lists all C compiler options.
Options in Eclipse versus options on the command line
Most command line options have an equivalent option in Eclipse but some options are only available on
the command line. Eclipse invokes the compiler via the control program. Therefore, it uses the syntax of
the control program to pass options and files to the C compiler. If there is no equivalent option in Eclipse,
you can specify a command line option in Eclipse as follows:
1.
From the Project menu, select Properties for
The Properties dialog appears.
2.
In the left pane, expand C/C++ Build and select Settings.
In the right pane the Settings appear.
3.
On the Tool Settings tab, select C/C++ Compiler » Miscellaneous.
4.
In the Additional options field, enter one or more command line options.
Because Eclipse uses the control program, you have to precede the option with -Wc to pass the
option via the control program directly to the C compiler.
Be aware that some command line options are not useful in Eclipse or just do not have any effect. For
example, the option -n sends output to stdout instead of a file and has no effect in Eclipse.
Short and long option names
Options can have both short and long names. Short option names always begin with a single minus (-)
character, long option names always begin with two minus (--) characters.You can abbreviate long option
names as long as it forms a unique name. You can mix short and long option names on the command
line.
Options can have flags or suboptions. To switch a flag 'on', use a lower case letter or a +longflag. To
switch a flag off, use an upper case letter or a -longflag. Separate longflags with commas. The following
two invocations are equivalent:
carm -Oac test.c
carm --optimize=+coalesce,+cse test.c
When you do not specify an option, a default value may become active.
332
Tool Options
C compiler option: --align-composites
Menu entry
1.
Select C/C++ Compiler » Code Generation.
2.
Select the Alignment for composite types: Natural alignment or Optimal alignment.
Command line syntax
--align-composites=alignment
You can specify the following alignments:
n
Natural alignment (default)
o
Optimal alignment
Description
With this option you can set the alignment for composite types (structs, unions and arrays).
Natural alignment (n) uses the natural alignment of the most-aligned member of the composite type.
Optimal alignment (o) sets the alignment to 8, 16, or 32 bits depending on the size of the composite type.
Example
Consider the following structure of three chars.
struct s
{
char a;
char b;
char c;
} s_var;
With natural alignment this results in a size of s_var of three bytes.
s_var
.type
.size
.ds
object
s_var,3
3
With --align-composites=o, s_var is padded with one extra byte, so that the contents of the struct is
aligned at 4 bytes.
s_var
.type
.size
.ds
object
s_var,4
4
333
TASKING VX-toolset for ARM User Guide
Related information
-
334
Tool Options
C compiler option: --call (-m)
Menu entry
1.
Select C/C++ Compiler » Code Generation.
2.
Set the option Select call mode to Use PC-relative calls (default) or to Use 32-bit indirect calls.
Command line syntax
--call={far|near}
-m{f|n}
Description
To address the memory of the ARM, you can use two different call modes:
far
32-bit indirect calls. Though you can address the full range of memory, the
address is first loaded into a register after which the call is executed.
near
26-bit PC-relative call. The PC-relative call is directly coded into the B instruction.
This way of calling results in higher execution speed. However, not the full range
of memory can be addressed with near calls.
If you compile your C source with near calls but the called address cannot be reached with a near
call, the linker will generate an error.
It is recommended to use the near addressing mode unless your application needs calls to addresses
that fall outside a 256 MB region.
Example
Consider the following function q which calls function p:
extern int p(int a, int b, int c, int d)
{
return a+b+c+d + a*b*c*d;
}
extern int iii;
void q(void)
{
iii=p(42,43,44,45);
}
With --call=near, this results into
q:
.type
func
335
TASKING VX-toolset for ARM User Guide
str
lr,[sp,#-4]!
mov
mov
mov
mov
bl
ldr
str
ldr
.align
r3,#45
r2,#44
r1,#43
r0,#42
p
r1,.L3
r0,[r1,#0]
pc,[sp],#4
4
.dw
.size
iii
q,$-q
.calls
.calls
.calls
.extern
'q','p'
'p','',8
'q','',4
iii
; PC-relative call
.L3:
With --call=far, this results into
q:
.type
func
stmfd
sp!,{r4,lr}
ldr
mov
mov
mov
mov
mov
bx
ldr
str
ldmfd
.align
r4,.L3
; address loaded in register
r3,#45
r2,#44
r1,#43
r0,#42
lr,pc
r4
; indirect call
r1,.L3+4
r0,[r1,#0]
sp!,{r4,pc}
4
.dw
.dw
.size
p
iii
q,$-q
.calls
.calls
.calls
.calls
.extern
.extern
'__INDIRECT__','p'
'q','__INDIRECT__'
'p','',8
'q','',8
iii
__INDIRECT__
.L3:
336
; indirect calls
Tool Options
Related information
-
337
TASKING VX-toolset for ARM User Guide
C compiler option: --cert
Menu entry
1.
Select C/C++ Compiler » CERT C Secure Coding.
2.
Make a selection from the CERT C secure code checking list.
3.
If you selected Custom, expand the Custom CERT C entry and enable one or more individual
recommendations/rules.
Command line syntax
--cert={all | name[-name],...}
Default format: all
Description
With this option you can enable one or more checks for CERT C Secure Coding Standard
recommendations/rules. When you omit the argument, all checks are enabled. name is the name of a
CERT recommendation/rule, consisting of three letters and two digits. Specify only the three-letter
mnemonic to select a whole category. For the list of names you can use, see Chapter 20, CERT C Secure
Coding Standard.
On the command line you can use --diag=cert to see a list of the available checks, or you can use a
three-letter mnemonic to list only the checks in a particular category. For example, --diag=pre lists all
supported preprocessor checks.
Example
To enable the check for CERT rule STR30-C, enter:
carm --cert=str30 test.c
Related information
Chapter 20, CERT C Secure Coding Standard
C compiler option --diag (Explanation of diagnostic messages)
338
Tool Options
C compiler option: --check
Menu entry
-
Command line syntax
--check
Description
With this option you can check the source code for syntax errors, without generating code. This saves
time in developing your application because the code will not actually be compiled.
The compiler reports any warnings and/or errors.
This option is available on the command line only.
Related information
Assembler option --check (Check syntax)
339
TASKING VX-toolset for ARM User Guide
C compiler option: --code-endianness
Menu entry
-
Command line syntax
--code-endianness=endianness
You can specify the following endianness:
big
b
Big endian
little
l
Little endian (default)
Description
This option tells the compiler what code endianness you want, little-endian (least significant byte of a
word at lowest byte code address) or big-endian (most significant byte of a word at lowest byte code
address). The code endianness used must be a valid one for the architecture you are compiling for. This
option is only available for ARMv7R.
Related information
C compiler option --endianness (Data endianness)
340
Tool Options
C compiler option: --compact-max-size
Menu entry
1.
Select C/C++ Compiler » Optimization.
2.
In the Maximum size for code compaction field, enter the maximum size of a match.
Command line syntax
--compact-max-size=value
Default: 200
Description
This option is related to the compiler optimization --optimize=+compact (Code compaction or reverse
inlining). Code compaction is the opposite of inlining functions: large sequences of code that occur more
than once, are transformed into a function. This reduces code size (possibly at the cost of execution
speed).
However, in the process of finding sequences of matching instructions, compile time and compiler memory
usage increase quadratically with the number of instructions considered for code compaction. With this
option you tell the compiler to limit the number of matching instructions it considers for code compaction.
Example
To limit the maximum number of instructions in functions that the compiler generates during code
compaction:
carm --optimize=+compact --compact-max-size=100 test.c
Related information
C compiler option --optimize=+compact (Optimization: code compaction)
C compiler option --max-call-depth (Maximum call depth for code compaction)
341
TASKING VX-toolset for ARM User Guide
C compiler option: --cpu (-C)
Menu entry
1.
Expand C/C++ Build and select Processor.
2.
From the Processor Selection list, make a selection by Architecture, Core or one of the
manufacturers.
Command line syntax
--cpu=architecture
-Carchitecture
You can specify the following architectures:
ARMv6M
Compile for ARMv6-M architecture
ARMv7M
Compile for ARMv7-M architecture
ARMv7EM
Compile for ARMv7E-M architecture
ARMv7R
Compile for ARMv7-R architecture
Description
With this option you specify the ARM architecture for which you create your application. The ARM target
supports more than one architecture and therefore you need to specify for which architecture the compiler
should compile. The architecture determines which instructions are valid and which are not.
You choose one of the following architectures: ARMv6-M, ARMv7-M, ARMv7E-M or ARMv7-R. The
compiler sets the Thumb instruction set implicitly (option --thumb).
The macro __CPU_arch__ is defined in the C source file. The arch is converted to upper case.
When you call the compiler from the command line, make sure you specify the same core type to the
assembler to avoid conflicts!
Example
To compile the file test.c for the ARMv7E-M processor type, enter the following on the command line:
carm --cpu=ARMv7EM test.c
The compiler compiles for the chosen processor type.
Related information
Control program option --cpu (Select architecture)
Assembler option --cpu (Select architecture)
342
Tool Options
C compiler option: --debug-info (-g)
Menu entry
1.
Select C/C++ Compiler » Debugging.
2.
To generate symbolic debug information, select Default, Small set or Full.
To disable the generation of debug information, select None.
Command line syntax
--debug-info[=suboption]
-g[suboption]
You can set the following suboptions:
small
1/c
Emit small set of debug information.
default
2/d
Emit default symbolic debug information.
all
3/a
Emit full symbolic debug information.
Default: --debug-info (same as --debug-info=default)
Description
With this option you tell the compiler to add directives to the output file for including symbolic information.
This facilitates high level debugging but increases the size of the resulting assembler file (and thus the
size of the object file). For the final application, compile your C files without debug information.
The DWARF debug format allows for a flexible approach as to how much symbolic information is included,
as long as the structure is valid. Adding all possible DWARF data for a program is not practical. The
amount of DWARF information per compilation unit can be huge. And for large projects, with many object
modules the link time can grow unacceptably long.That is why the compiler has several debug information
levels. In general terms one can say, the higher the level the more DWARF information is produced.
The DWARF data in an object module is not only used for debugging. The toolset can also do "type
checking" of the whole application. In that case the linker will use the DWARF information of all object
modules to determine if every use of a symbol is done with the same type. In other words, if the application
is built with type checking enabled then the compiler will add DWARF information too.
Small set of debug information
With this suboption only DWARF call frame information and type information are generated. This enables
you to inspect parameters of nested functions. The type information improves debugging.You can perform
a stack trace, but stepping is not possible because debug information on function bodies is not generated.
You can use this suboption, for example, to compact libraries.
343
TASKING VX-toolset for ARM User Guide
Default debug information
This provides all debug information you need to debug your application. It meets the debugging
requirements in most cases without resulting in oversized assembler/object files.
Full debug information
With this suboption extra debug information is generated about unused typedefs and DWARF "lookup
table sections". Under normal circumstances this extra debug information is not needed to debug the
program. Information about unused typedefs concerns all typedefs, even the ones that are not used for
any variable in the program. (Possibly, these unused typedefs are listed in the standard include files.)
With this suboption, the resulting assembler/object file will increase significantly.
In the following table you see in more detail what DWARF information is included for the debug option
levels.
Feature
-g1
-g2
-g3
type check
Remarks
basic info
+
+
+
+
info such as symbol name and type
call frame
+
+
+
+
this is information for a debugger to compute
a stack trace when a program has stopped
at a breakpoint
symbol lifetime
+
+
line number info
+
+
this is information about where symbols live
(e.g. on stack at offset so and so, when the
program counter is in this range)
+
file name, line number, column number
”lookup tables"
+
DWARF sections ... this is an optimization
for the DWARF data, it is not essential
unused typedefs
+
in the C/C++ code of the program there can
be (many) typedefs that are not used for any
variable. Sometimes this can cause
enormous expansion of the DWARF data and
thus it is only included in -g3.
Related information
-
344
Tool Options
C compiler option: --define (-D)
Menu entry
1.
Select C/C++ Compiler » Preprocessing.
The Defined symbols box shows the symbols that are currently defined.
2.
To define a new symbol, click on the Add button in the Defined symbols box.
3.
Type the symbol definition (for example, demo=1)
Use the Edit and Delete button to change a macro definition or to remove a macro from the list.
Command line syntax
--define=macro_name[=macro_definition]
-Dmacro_name[=macro_definition]
Description
With this option you can define a macro and specify it to the preprocessor. If you only specify a macro
name (no macro definition), the macro expands as '1'.
You can specify as many macros as you like. Simply use the Add button to add new macro definitions.
On the command line, you can use the option --define (-D) multiple times. If the command line exceeds
the limit of the operating system, you can define the macros in an option file which you then must specify
to the compiler with the option --option-file (-f) file.
Defining macros with this option (instead of in the C source) is, for example, useful to compile conditional
C source as shown in the example below.
Example
Consider the following C program with conditional code to compile a demo program and a real program:
void main( void )
{
#if DEMO
demo_func();
#else
real_func();
#endif
}
/* compile for the demo program */
/* compile for the real program */
You can now use a macro definition to set the DEMO flag:
345
TASKING VX-toolset for ARM User Guide
carm --define=DEMO test.c
carm --define=DEMO=1 test.c
Note that both invocations have the same effect.
The next example shows how to define a macro with arguments. Note that the macro name and definition
are placed between double quotes because otherwise the spaces would indicate a new option.
carm --define="MAX(A,B)=((A) > (B) ? (A) : (B))" test.c
Related information
C compiler option --undefine (Remove preprocessor macro)
C compiler option --option-file (Specify an option file)
346
Tool Options
C compiler option: --dep-file
Menu entry
Eclipse uses this option in the background to create a file with extension .d (one for every input file).
Command line syntax
--dep-file[=file]
Description
With this option you tell the compiler to generate dependency lines that can be used in a Makefile. In
contrast to the option --preprocess=+make, the dependency information will be generated in addition to
the normal output file.
By default, the information is written to a file with extension .d (one for every input file). When you specify
a filename, all dependencies will be combined in the specified file.
Example
carm --dep-file=test.dep test.c
The compiler compiles the file test.c, which results in the output file test.src, and generates
dependency lines in the file test.dep. For example:
test.obj :
test.c
test.c :
test.obj :
<install-dir>/carm/include/stdio.h
<install-dir>/carm/include/stdio.h :
test.obj :
<install-dir>/carm/include/stdarg.h
<install-dir>/carm/include/stdarg.h :
Related information
C compiler option --preprocess=+make (Generate dependencies for make)
347
TASKING VX-toolset for ARM User Guide
C compiler option: --diag
Menu entry
1.
From the Window menu, select Show View » Other » TASKING » Problems.
The Problems view is added to the current perspective.
2.
In the Problems view right-click on a message.
A popup menu appears.
3.
Select Detailed Diagnostics Info.
A dialog box appears with additional information.
Command line syntax
--diag=[format:]{all | msg[-msg],...}
You can set the following output formats:
html
HTML output.
rtf
Rich Text Format.
text
ASCII text.
Default format: text
Description
With this option you can ask for an extended description of error messages in the format you choose.
The output is directed to stdout (normally your screen) and in the format you specify. The compiler does
not compile any files. You can specify the following formats: html, rtf or text (default). To create a file
with the descriptions, you must redirect the output.
With the suboption all, the descriptions of all error messages are given (except for the CERT checks). If
you want the description of one or more selected error messages, you can specify the error message
numbers, separated by commas, or you can specify a range.
With --diag=cert you can see a list of the available CERT checks, or you can use a three-letter mnemonic
to list only the checks in a particular category. For example, --diag=pre lists all supported preprocessor
checks.
Example
To display an explanation of message number 282, enter:
carm --diag=282
This results in the following message and explanation:
348
Tool Options
E282: unterminated comment
Make sure that every comment starting with /* has a matching */.
Nested comments are not possible.
To write an explanation of all errors and warnings in HTML format to file cerrors.html, use redirection
and enter:
carm --diag=html:all > cerrors.html
Related information
Section 4.8, C Compiler Error Messages
C compiler option --cert (Enable individual CERT checks)
349
TASKING VX-toolset for ARM User Guide
C compiler option: --endianness
Menu entry
1.
Select Global Options.
2.
Specify the Endianness:Little-endian mode or Big-endian mode.
Command line syntax
--endianness=endianness
-B
--big-endian
You can specify the following endianness:
big
b
Big endian
little
l
Little endian (default)
Description
By default, the compiler generates code for a little-endian target (least significant byte of a word at lowest
byte address). With --endianness=big the compiler generates code for a big-endian target (most significant
byte of a word at lowest byte address). -B is an alias for option --endianness=big.
Related information
C compiler option --code-endianness (Code endianness)
350
Tool Options
C compiler option: --error-file
Menu entry
-
Command line syntax
--error-file[=file]
Description
With this option the compiler redirects error messages to a file. If you do not specify a filename, the error
file will be named after the input file with extension .err.
Example
To write errors to errors.err instead of stderr, enter:
carm --error-file=errors.err test.c
Related information
-
351
TASKING VX-toolset for ARM User Guide
C compiler option: --fpu
Menu entry
1.
Select C/C++ Compiler » Code Generation.
2.
Enable the option Use FPU.
Command line syntax
--fpu=fpu
You can specify the following arguments:
FPv4-sp
alias for VFPv4-sp
VFPv2
alias for VFPv3
VFPv3
Compile for VFPv3 architecture
VFPv3-sp
Compile for VFPv3-sp architecture
VFPv4-sp
Compile for VFPv4-sp architecture
none
Compile for software FPU library (default)
Description
With this option you define the kind of FPU support with which you create your application. The "sp" suffix
denotes single precision floating-point only.
The macro __FPU_fpu__ is defined in the C source file. The fpu is converted to upper case and the
lower case “v" and the '-' will be removed. Also when "none" is not used, the macro __FPU_VFP__ is
defined in the C source file, otherwise the macro __FPU_NONE__ is defined.
Example
To compile the file test.c for the VFPv3-sp architecture, enter the following on the command line:
carm --fpu=VFPv3-sp test.c
This defines the symbols __FPU_VFP__ and __FPU_VFP3SP__.
Related information
-
352
Tool Options
C compiler option: --global-type-checking
Menu entry
1.
Select C/C++ Compiler » Diagnostics.
2.
Enable the option Perform global type checking on C code.
Command line syntax
--global-type-checking
Description
The C compiler already performs type checking within each module. Use this option when you want the
linker to perform type checking between modules.
Related information
-
353
TASKING VX-toolset for ARM User Guide
C compiler option: --help (-?)
Menu entry
-
Command line syntax
--help[=item]
-?
You can specify the following arguments:
intrinsics
i
Show the list of intrinsic functions
options
o
Show extended option descriptions
pragmas
p
Show the list of supported pragmas
typedefs
t
Show the list of predefined typedefs
Description
Displays an overview of all command line options. With an argument you can specify which extended
information is shown.
Example
The following invocations all display a list of the available command line options:
carm -?
carm --help
carm
The following invocation displays a list of the available pragmas:
carm --help=pragmas
Related information
-
354
Tool Options
C compiler option: --include-directory (-I)
Menu entry
1.
Select C/C++ Compiler » Include Paths.
The Include paths box shows the directories that are added to the search path for include files.
2.
To define a new directory for the search path, click on the Add button in the Include paths box.
3.
Type or select a path.
4.
Optionally enable the option Add CMSIS include paths.
Use the Edit and Delete button to change a path or to remove a path from the list.
Command line syntax
--include-directory=path,...
-Ipath,...
Description
With this option you can specify the path where your include files are located. A relative path will be
relative to the current directory,
The order in which the compiler searches for include files is:
1. The pathname in the C source file and the directory of the C source (only for #include files that are
enclosed in "")
2. The path or paths that are specified with this option. Multiple paths/options are handled by the C
compiler from left to right. From Eclipse, the CMSIS include paths, if enabled, are the first option, so
they are searched first.
3. The path that is specified in the environment variable CARMINC when the product was installed.
4. The default directory $(PRODDIR)\include (unless you specified option --no-stdinc).
Example
Suppose that the C source file test.c contains the following lines:
#include <stdio.h>
#include "myinc.h"
You can call the compiler as follows:
carm --include-directory=myinclude test.c
355
TASKING VX-toolset for ARM User Guide
First the compiler looks for the file stdio.h in the directory myinclude relative to the current directory.
If it was not found, the compiler searches in the environment variable and then in the default include
directory.
The compiler now looks for the file myinc.h in the directory where test.c is located. If the file is not
there the compiler searches in the directory myinclude. If it was still not found, the compiler searches
in the environment variable and then in the default include directory.
Related information
C compiler option --include-file (Include file at the start of a compilation)
C compiler option --no-stdinc (Skip standard include files directory)
356
Tool Options
C compiler option: --include-file (-H)
Menu entry
1.
Select C/C++ Compiler » Preprocessing.
The Pre-include files box shows the files that are currently included before the compilation starts.
2.
To define a new file, click on the Add button in the Pre-include files box.
3.
Type the full path and file name or select a file.
4.
(Optional) Enable the option Include CMSIS device register definition header file.
Use the Edit and Delete button to change a file name or to remove a file from the list.
Command line syntax
--include-file=file,...
-Hfile,...
Description
With this option you include one or more extra files at the beginning of each C source file, before other
includes. This is the same as specifying #include "file" at the beginning of each of your C sources.
Example
carm --include-file=stdio.h test1.c test2.c
The file stdio.h is included at the beginning of both test1.c and test2.c.
Related information
C compiler option --include-directory (Add directory to include file search path)
357
TASKING VX-toolset for ARM User Guide
C compiler option: --inline
Menu entry
1.
Select C/C++ Compiler » Optimization.
2.
Enable the option Always inline function calls.
Command line syntax
--inline
Description
With this option you instruct the compiler to inline calls to functions without the __noinline function
qualifier whenever possible. This option has the same effect as a #pragma inline at the start of the
source file.
This option can be useful to increase the possibilities for code compaction (C compiler option
--optimize=+compact).
Example
To always inline function calls:
carm --optimize=+compact --inline test.c
Related information
C compiler option --optimize=+compact (Optimization: code compaction)
Section 1.10.2, Inlining Functions: inline
358
Tool Options
C compiler option: --inline-max-incr / --inline-max-size
Menu entry
1.
Select C/C++ Compiler » Optimization.
2.
In the Maximum size increment when inlining field, enter a value (default -1).
3.
In the Maximum size for functions to always inline field, enter a value (default -1).
Command line syntax
--inline-max-incr=percentage
(default: -1)
--inline-max-size=threshold
(default: -1)
Description
With these options you can control the automatic function inlining optimization process of the compiler.
These options have only effect when you have enabled the inlining optimization (option --optimize=+inline
or Optimize most).
Regardless of the optimization process, the compiler always inlines all functions that have the
function qualifier inline.
With the option --inline-max-size you can specify the maximum size of functions that the compiler inlines
as part of the optimization process. The compiler always inlines all functions that are smaller than the
specified threshold. The threshold is measured in compiler internal units and the compiler uses this
measure to decide which functions are small enough to inline. The default threshold is -1, which means
that the threshold depends on the option --tradeoff.
After the compiler has inlined all functions that have the function qualifier inline and all functions that
are smaller than the specified threshold, the compiler looks whether it can inline more functions without
increasing the code size too much. With the option --inline-max-incr you can specify how much the code
size is allowed to increase. The default value is -1, which means that the value depends on the option
--tradeoff.
Example
carm --inline-max-incr=40 --inline-max-size=15 test.c
The compiler first inlines all functions with the function qualifier inline and all functions that are smaller
than the specified threshold of 15. If the code size has still not increased with 40%, the compiler decides
which other functions it can inline.
Related information
C compiler option --optimize=+inline (Optimization: automatic function inlining)
Section 1.10.2, Inlining Functions: inline
359
TASKING VX-toolset for ARM User Guide
Section 4.5.3, Optimize for Size or Speed
360
Tool Options
C compiler option: --interwork
Menu entry
1.
Select C/C++ Compiler » Code Generation.
2.
Enable the option Compile for ARM/Thumb interworking.
Command line syntax
--interwork
Description
With this option the compiler generates code which supports calls between functions with the ARM and
Thumb instruction set.
Use this option if your program consists of both ARM and Thumb functions.
By default this option is disabled, since it produces slightly larger code.
Related information
C compiler option --thumb (Use Thumb instruction set)
361
TASKING VX-toolset for ARM User Guide
C compiler option: --iso (-c)
Menu entry
1.
Select C/C++ Compiler » Language.
2.
From the Comply to C standard list, select ISO C99 or ISO C90.
Command line syntax
--iso={90|99}
-c{90|99}
Default: --iso=99
Description
With this option you select the ISO C standard. C90 is also referred to as the "ANSI C standard". C99
refers to the newer ISO/IEC 9899:1999 (E) standard. C99 is the default.
Example
To select the ISO C90 standard on the command line:
carm --iso=90 test.c
Related information
C compiler option --language (Language extensions)
362
Tool Options
C compiler option: --keep-output-files (-k)
Menu entry
Eclipse always removes the .src file when errors occur during compilation.
Command line syntax
--keep-output-files
-k
Description
If an error occurs during compilation, the resulting .src file may be incomplete or incorrect. With this
option you keep the generated output file (.src) when an error occurs.
By default the compiler removes the generated output file (.src) when an error occurs. This is useful
when you use the make utility. If the erroneous files are not removed, the make utility may process corrupt
files on a subsequent invocation.
Use this option when you still want to inspect the generated assembly source. Even if it is incomplete or
incorrect.
Example
carm --keep-output-files test.c
When an error occurs during compilation, the generated output file test.src will not be removed.
Related information
C compiler option --warnings-as-errors (Treat warnings as errors)
363
TASKING VX-toolset for ARM User Guide
C compiler option: --language (-A)
Menu entry
1.
Select C/C++ Compiler » Language.
2.
Enable or disable one or more of the following options:
• Allow GNU C extensions
• Allow // comments in ISO C90 mode
• Check assignment of string literal to non-const string pointer
• Allow optimization across volatile access
Command line syntax
--language=[flags]
-A[flags]
You can set the following flags:
+/-gcc
g/G
enable a number of gcc extensions
+/-comments
p/P
// comments in ISO C90 mode
+/-volatile
v/V
don't optimize across volatile access
+/-strings
x/X
relaxed const check for string literals
Default: -AGpVx
Default (without flags): -AGPVX
Description
With this option you control the language extensions the compiler can accept. By default the ARM compiler
allows all language extensions, except for gcc extensions.
The option --language (-A) without flags disables all language extensions.
GNU C extensions
The --language=+gcc (-Ag) option enables the following gcc language extensions:
• The identifier __FUNCTION__ expands to the current function name.
• Alternative syntax for variadic macros.
• Alternative syntax for designated initializers.
364
Tool Options
• Allow zero sized arrays.
• Allow empty struct/union.
• Allow unnamed struct/union fields.
• Allow empty initializer list.
• Allow initialization of static objects by compound literals.
• The middle operand of a ? : operator may be omitted.
• Allow a compound statement inside braces as expression.
• Allow arithmetic on void pointers and function pointers.
• Allow a range of values after a single case label.
• Additional preprocessor directive #warning.
• Allow comma operator, conditional operator and cast as lvalue.
• An inline function without "static" or "extern" will be global.
• An "extern inline" function will not be compiled on its own.
• An __attribute__ directly following a struct/union definition relates to that tag instead of to the
objects in the declaration.
For a more complete description of these extensions, you can refer to the UNIX gcc info pages (info
gcc).
Comments in ISO C90 mode
With --language=+comments (-Ap) you tell the compiler to allow C++ style comments (//) in ISO C90
mode (option --iso=90). In ISO C99 mode this style of comments is always accepted.
Check assignment of string literal to non-const string pointer
With --language=+strings (-Ax) you disable warnings about discarded const qualifiers when a string
literal is assigned to a non-const pointer.
char *p;
void main( void ) { p = "hello"; }
Optimization across volatile access
With the --language=+volatile (-Av) option, the compiler will block optimizations when reading or writing
a volatile object, by treating the access as a call to an unknown function. With this option you can prevent
for example that code below the volatile object is optimized away to somewhere above the volatile object.
Example:
365
TASKING VX-toolset for ARM User Guide
extern unsigned int variable;
extern volatile unsigned int access;
void TestFunc( unsigned int flag )
{
access = 0;
variable |= flag;
if( variable == 3 )
{
variable = 0;
}
variable |= 0x8000;
access = 1;
}
Result with --language=-volatile (default):
TestFunc:
str
ldr
ldr
ldr
mov
orr
cmp
str
bne
mov
.L2:
orr
mov
str
str
ldr
.size
.align
.L3:
.dw
.dw
.type
func
lr,[sp,#-4]!
r1,.L3
lr,.L3+4
r2,[r1,#0]
r3,#0
r0,r2,r0
r0,#3
r3,[lr,#0]
.L2
r0,r3
; <== Moved across volatile access
; <== Volatile access
r0,r0,#32768
r2,#1
r2,[lr,#0]
; <== Volatile access
r0,[r1,#0]
; <== Moved across volatile access
pc,[sp],#4
TestFunc,$-TestFunc
4
variable
access
Result with --language=+volatile:
TestFunc:
str
ldr
ldr
ldr
mov
orr
cmp
str
366
.type
func
lr,[sp,#-4]!
r3,.L3
r2,.L3+4
lr,[r3,#0]
r1,#0
r0,lr,r0
r0,#3
r1,[r2,#0]
; <== Volatile access
Tool Options
str
bne
str
r0,[r3,#0]
.L2
r1,[r3,#0]
.L2:
ldr
orr
str
mov
str
ldr
.size
.align
r0,[r3,#0]
r0,r0,#32768
r0,[r3,#0]
r0,#1
r0,[r2,#0]
; <== Volatile access
pc,[sp],#4
TestFunc,$-TestFunc
4
.L3:
.dw
.dw
variable
access
Note that the volatile behavior of the compiler with option --language=-volatile or --language=+volatile
is ISO C compliant in both cases.
Example
carm --language=-comments,+strings --iso=90 test.c
carm -APx -c90 test.c
The compiler compiles in ISO C90 mode, accepts assignments of a constant string to a non-constant
string pointer and does not allow C++ style comments.
Related information
C compiler option --iso (ISO C standard)
367
TASKING VX-toolset for ARM User Guide
C compiler option: --make-target
Menu entry
-
Command line syntax
--make-target=name
Description
With this option you can overrule the default target name in the make dependencies generated by the
options --preprocess=+make (-Em) and --dep-file. The default target name is the basename of the input
file, with extension .obj.
Example
carm --preprocess=+make --make-target=mytarget.obj test.c
The compiler generates dependency lines with the default target name mytarget.obj instead of
test.obj.
mytarget.obj :
test.c :
test.c
Related information
C compiler option --preprocess=+make (Generate dependencies for make)
C compiler option --dep-file (Generate dependencies in a file)
368
Tool Options
C compiler option: --max-call-depth
Menu entry
1.
Select C/C++ Compiler » Optimization.
2.
In the Maximum call depth for code compaction field, enter a value.
Command line syntax
--max-call-depth=value
Default: -1
Description
This option is related to the compiler optimization --optimize=+compact (Code compaction or reverse
inlining). Code compaction is the opposite of inlining functions: large sequences of code that occur more
than once, are transformed into a function. This reduces code size (possibly at the cost of execution
speed).
During code compaction it is possible that the compiler generates nested calls. This may cause the
program to run out of its stack. To prevent stack overflow caused by too deeply nested function calls, you
can use this option to limit the call depth. This option can have the following values:
-1
Poses no limit to the call depth (default)
0
The compiler will not generate any function calls. (Effectively the same as if you turned of
code compaction with option --optimize=-compact)
>0
Code sequences are only reversed if this will not lead to code at a call depth larger than
specified with value. Function calls will be placed at a call depth no larger than value-1.
(Note that if you specified a value of 1, the option --optimize=+compact may remain
without effect when code sequences for reversing contain function calls.)
This option does not influence the call depth of user written functions.
If you use this option with various C modules, the call depth is valid for each individual module.
The call depth after linking may differ, depending on the nature of the modules.
Related information
C compiler option --optimize=+compact (Optimization: code compaction)
C compiler option --compact-max-size (Maximum size of a match for code compaction)
369
TASKING VX-toolset for ARM User Guide
C compiler option: --mil / --mil-split
Menu entry
1.
Select C/C++ Compiler » Optimization.
2.
Enable the option Build for application wide optimizations (MIL linking).
3.
Select Optimize less/Build faster or Optimize more/Build slower.
Command line syntax
--mil
--mil-split[=file,...]
Description
With option --mil the C compiler skips the code generator phase and writes the optimized intermediate
representation (MIL) to a file with the suffix .mil. The C compiler accepts .mil files as input files on the
command line.
Option --mil-split does the same as option --mil, but in addition, the C compiler splits the MIL representation
and writes it to separate files with suffix .ms. One file is written for each input file or MIL library specified
on the command line. The .ms files are only updated on a change. The C compiler accepts .ms files as
input files on the command line.
With option --mil-split you can perform application-wide optimizations during the frontend phase by
specifying all modules at once, and still invoke the backend phase one module at a time to reduce the
total compilation time. Application wide code compaction is not possible in this case.
Optionally, you can specify another filename for the .ms file the C compiler generates. Without an
argument, the basename of the C source file is used to create the .ms filename. Note that if you specify
a filename, you have to specify one filename for every input file.
Build for application wide optimizations (MIL linking) and Optimize less/Build faster
This option is standard MIL linking and splitting. Note that you can control the optimizations to be performed
with the optimization settings.
Optimize more/Build slower
When you enable this option, the compiler's frontend does not split the MIL stream in separate modules,
but feeds it directly to the compiler's backend, allowing the code compaction to be performed application
wide.
Related information
Section 4.1, Compilation Process
Control program option --mil-link / --mil-split
370
Tool Options
C compiler option: --misrac
Menu entry
1.
Select C/C++ Compiler » MISRA-C.
2.
Make a selection from the MISRA-C checking list.
3.
If you selected Custom, expand the Custom 2004 or Custom 1998 entry and enable one or more
individual rules.
Command line syntax
--misrac={all | nr[-nr]},...
Description
With this option you specify to the compiler which MISRA-C rules must be checked. With the option
--misrac=all the compiler checks for all supported MISRA-C rules.
Example
carm --misrac=9-13 test.c
The compiler generates an error for each MISRA-C rule 9, 10, 11, 12 or 13 violation in file test.c.
Related information
Section 4.7.2, C Code Checking: MISRA-C
C compiler option --misrac-advisory-warnings
C compiler option --misrac-required-warnings
Linker option --misrac-report
371
TASKING VX-toolset for ARM User Guide
C compiler option: --misrac-advisory-warnings / --misrac-required-warnings
Menu entry
1.
Select C/C++ Compiler » MISRA-C.
2.
Make a selection from the MISRA-C checking list.
3.
Enable one or both options Warnings instead of errors for required rules and Warnings instead
of errors for advisory rules.
Command line syntax
--misrac-advisory-warnings
--misrac-required-warnings
Description
Normally, if an advisory rule or required rule is violated, the compiler generates an error. As a consequence,
no output file is generated. With this option, the compiler generates a warning instead of an error.
Related information
Section 4.7.2, C Code Checking: MISRA-C
C compiler option --misrac
Linker option --misrac-report
372
Tool Options
C compiler option: --misrac-version
Menu entry
1.
Select C/C++ Compiler » MISRA-C.
2.
Select the MISRA-C version: 2004 or 1998.
Command line syntax
--misrac-version={1998|2004}
Default: 2004
Description
MISRA-C rules exist in two versions: MISRA-C:1998 and MISRA-C:2004. By default, the C source is
checked against the MISRA-C:2004 rules. With this option you can specify to check against the
MISRA-C:1998 rules.
Related information
Section 4.7.2, C Code Checking: MISRA-C
C compiler option --misrac
373
TASKING VX-toolset for ARM User Guide
C compiler option: --no-double (-F)
Menu entry
1.
Select C/C++ Compiler » Language.
2.
Enable the option Treat double as float.
Command line syntax
--no-double
-F
Description
With this option you tell the compiler to treat variables of the type double as float. Because the float
type takes less space, execution speed increases and code size decreases, both at the cost of less
precision.
Example
carm --no-double test.c
The file test.c is compiled where variables of the type double are treated as float.
Related information
-
374
Tool Options
C compiler option: --no-stdinc
Menu entry
1.
Select C/C++ Compiler » Miscellaneous.
2.
Add the option --no-stdinc to the Additional options field.
Command line syntax
--no-stdinc
Description
With this option you tell the compiler not to look in the default include directory relative to the installation
directory, when searching for include files. This way the compiler only searches in the include file search
paths you specified.
Related information
C compiler option --include-directory (Add directory to include file search path)
Section 4.3, How the Compiler Searches Include Files
375
TASKING VX-toolset for ARM User Guide
C compiler option: --no-warnings (-w)
Menu entry
1.
Select C/C++ Compiler » Diagnostics.
The Suppress C compiler warnings box shows the warnings that are currently suppressed.
2.
To suppress a warning, click on the Add button in the Suppress warnings box.
3.
Enter the numbers, separated by commas or as a range, of the warnings you want to suppress (for
example 537,538). Or you can use the Add button multiple times.
4.
To suppress all warnings, enable the option Suppress all warnings.
Use the Edit and Delete button to change a warning number or to remove a number from the list.
Command line syntax
--no-warnings[=number[-number],...]
-w[number[-number],...]
Description
With this option you can suppresses all warning messages or specific warning messages.
On the command line this option works as follows:
• If you do not specify this option, all warnings are reported.
• If you specify this option but without numbers, all warnings are suppressed.
• If you specify this option with a number or a range, only the specified warnings are suppressed. You
can specify the option --no-warnings=number multiple times.
Example
To suppress warnings 537 and 538, enter:
carm test.c --no-warnings=537,538
Related information
C compiler option --warnings-as-errors (Treat warnings as errors)
Pragma warning
376
Tool Options
C compiler option: --optimize (-O)
Menu entry
1.
Select C/C++ Compiler » Optimization.
2.
Select an optimization level in the Optimization level box.
Command line syntax
--optimize[=flags]
-Oflags
You can set the following flags:
+/-coalesce
a/A
Coalescer: remove unnecessary moves
+/-ipro
b/B
Interprocedural register optimizations
+/-cse
c/C
Common subexpression elimination
+/-expression
e/E
Expression simplification
+/-flow
f/F
Control flow simplification
+/-glo
g/G
Generic assembly code optimizations
+/-inline
i/I
Automatic function inlining
+/-sign
j/J
Sign extend elimination
+/-schedule
k/K
Instruction scheduler
+/-loop
l/L
Loop transformations
+/-forward
o/O
Forward store
+/-propagate
p/P
Constant propagation
+/-compact
r/R
Code compaction (reverse inlining)
+/-subscript
s/S
Subscript strength reduction
+/-unroll
u/U
Unroll small loops
+/-peephole
y/Y
Peephole optimizations
+/-cluster
Cluster global variables
Use the following options for predefined sets of flags:
--optimize=0
-O0
No optimization
Alias for -OaBCEFGIJKLOPRSUY,-cluster
No optimizations are performed except for the coalescer (to allow better debug information). The compiler
tries to achieve an optimal resemblance between source code and produced code. Expressions are
evaluated in the same order as written in the source code, associative and commutative properties are
not used.
377
TASKING VX-toolset for ARM User Guide
--optimize=1
-O1
Optimize
Alias for -OabcefgIJKLOPRSUy,-cluster
Enables optimizations that do not affect the debug ability of the source code. Use this level when you
encounter problems during debugging your source code with optimization level 2.
--optimize=2
-O2
Optimize more (default)
Alias for -OabcefgIJkloprsUy,-cluster
Enables more optimizations to reduce code size and/or execution time. This is the default optimization
level.
--optimize=3
-O3
Optimize most
Alias for -OabcefgiJkloprsuy,+cluster
This is the highest optimization level. Use this level to decrease execution time to meet your real-time
requirements.
Default: --optimize=2
Description
With this option you can control the level of optimization. If you do not use this option, the default
optimization level is Optimize more (option --optimize=2 or --optimize).
When you use this option to specify a set of optimizations, you can overrule these settings in your C
source file with #pragma optimize flag / #pragma endoptimize.
In addition to the option --optimize, you can specify the option --tradeoff (-t). With this option you specify
whether the used optimizations should optimize for more speed (regardless of code size) or for smaller
code size (regardless of speed).
Example
The following invocations are equivalent and result all in the default optimization set:
carm test.c
carm --optimize=2 test.c
carm -O2 test.c
carm --optimize test.c
carm -O test.c
carm -OabcefgIJklopsrUy test.c
carm --optimize=+coalesce,+ipro,+cse,+expression,+flow,+glo,
-inline,-sign,+schedule,+loop,+forward,+propagate,
+compact,+subscript,-unroll,+peephole,-cluster test.c
378
Tool Options
Related information
C compiler option --tradeoff (Trade off between speed and size)
Pragma optimize/endoptimize
Section 4.5, Compiler Optimizations
379
TASKING VX-toolset for ARM User Guide
C compiler option: --option-file (-f)
Menu entry
1.
Select C/C++ Compiler » Miscellaneous.
2.
Add the option --option-file to the Additional options field.
Be aware that the options in the option file are added to the C compiler options you have set in the
other pages. Only in extraordinary cases you may want to use them in combination.
Command line syntax
--option-file=file,...
-f file,...
Description
This option is primarily intended for command line use. Instead of typing all options on the command line,
you can create an option file which contains all options and flags you want to specify. With this option
you specify the option file to the compiler.
Use an option file when the command line would exceed the limits of the operating system, or just to store
options and save typing.
You can specify the option --option-file multiple times.
Format of an option file
• Multiple arguments on one line in the option file are allowed.
• To include whitespace in an argument, surround the argument with single or double quotes.
• If you want to use single quotes as part of the argument, surround the argument by double quotes and
vise versa:
"This has a single quote ' embedded"
'This has a double quote " embedded'
'This has a double quote " and a single quote '"' embedded"
• When a text line reaches its length limit, use a \ to continue the line. Whitespace between quotes is
preserved.
"This is a continuation \
line"
-> "This is a continuation line"
380
Tool Options
• It is possible to nest command line files up to 25 levels.
Example
Suppose the file myoptions contains the following lines:
--debug-info
--define=DEMO=1
test.c
Specify the option file to the compiler:
carm --option-file=myoptions
This is equivalent to the following command line:
carm --debug-info --define=DEMO=1 test.c
Related information
-
381
TASKING VX-toolset for ARM User Guide
C compiler option: --output (-o)
Menu entry
Eclipse names the output file always after the C source file.
Command line syntax
--output=file
-o file
Description
With this option you can specify another filename for the output file of the compiler. Without this option
the basename of the C source file is used with extension .src.
Example
To create the file output.src instead of test.src, enter:
carm --output=output.src test.c
Related information
-
382
Tool Options
C compiler option: --preprocess (-E)
Menu entry
1.
Select C/C++ Compiler » Preprocessing.
2.
Enable the option Store preprocessor output in <file>.pre.
3.
(Optional) Enable the option Keep comments in preprocessor output.
4.
(Optional) Enable the option Keep #line info in preprocessor output.
Command line syntax
--preprocess[=flags]
-E[flags]
You can set the following flags:
+/-comments
c/C
keep comments
+/-includes
i/I
generate a list of included source files
+/-list
l/L
generate a list of macro definitions
+/-make
m/M
generate dependencies for make
+/-noline
p/P
strip #line source position information
Default: -ECILMP
Description
With this option you tell the compiler to preprocess the C source. Under Eclipse the compiler sends the
preprocessed output to the file name.pre (where name is the name of the C source file to compile).
Eclipse also compiles the C source.
On the command line, the compiler sends the preprocessed file to stdout. To capture the information in
a file, specify an output file with the option --output.
With --preprocess=+comments you tell the preprocessor to keep the comments from the C source file
in the preprocessed output.
With --preprocess=+includes the compiler will generate a list of all included source files.The preprocessor
output is discarded.
With --preprocess=+list the compiler will generate a list of all macro definitions. The preprocessor output
is discarded.
With --preprocess=+make the compiler will generate dependency lines that can be used in a Makefile.
The preprocessor output is discarded. The default target name is the basename of the input file, with the
extension .obj. With the option --make-target you can specify a target name which overrules the default
target name.
383
TASKING VX-toolset for ARM User Guide
With --preprocess=+noline you tell the preprocessor to strip the #line source position information (lines
starting with #line). These lines are normally processed by the assembler and not needed in the
preprocessed output. When you leave these lines out, the output is easier to read.
Example
carm --preprocess=+comments,+includes,-list,-make,-noline test.c --output=test.pre
The compiler preprocesses the file test.c and sends the output to the file test.pre. Comments and
a list of all included source files are included but no list of macro definitions and no dependencies are
generated and the line source position information is not stripped from the output file.
Related information
C compiler option --dep-file (Generate dependencies in a file)
C compiler option --make-target (Specify target name for -Em output)
384
Tool Options
C compiler option: --profile (-p)
Menu entry
1.
Select C/C++ Compiler » Debugging.
2.
Enable or disable Static profiling.
3.
Enable or disable one or more of the following Generate profiling information options (dynamic
profiling):
• for block counters (not in combination with Call graph or Function timers)
• to build a call graph
• for function counters
• for function timers
Note that the more detailed information you request, the larger the overhead in terms of execution
time, code size and heap space needed. The option --debug does not affect profiling, execution
time or code size.
Command line syntax
--profile[=flag,...]
-p[flags]
Use the following option for a predefined set of flags:
--profile=g
-pg
Profiling with call graph and function timers.
Alias for: -pBcFSt
You can set the following flags:
+/-block
b/B
block counters
+/-callgraph
c/C
call graph
+/-function
f/F
function counters
+/-static
s/S
static profile generation
+/-time
t/T
function timers
Default (without flags): -pBCfST
Description
Profiling is the process of collecting statistical data about a running application. With these data you can
analyze which functions are called, how often they are called and what their execution time is.
385
TASKING VX-toolset for ARM User Guide
Several methods of profiling exist. One method is code instrumentation which adds code to your application
that takes care of the profiling process when the application is executed. Another method is static profiling.
For an extensive description of profiling refer to Chapter 6, Profiling.
You can obtain the following profiling data (see flags above):
Block counters (not in combination with Call graph or Function timers)
This will instrument the code to perform basic block counting. As the program runs, it counts the number
of executions of each branch in an if statement, each iteration of a for loop, and so on. Note that though
you can combine Block counters with Function counters, this has no effect because Function counters
is only a subset of Block counters.
Call graph (not in combination with Block counters)
This will instrument the code to reconstruct the run-time call graph. As the program runs it associates the
caller with the gathered profiling data.
Function counters
This will instrument the code to perform function call counting. This is a subset of the basic Block counters.
Function timers (not in combination with Block counters/Function counters)
This will instrument the code to measure the time spent in a function. This includes the time spent in all
sub functions (callees).
Static profiling
With this option you do not need to run the application to get profiling results. The compiler generates
profiling information at compile time, without adding extra code to your application.
If you use one or more profiling options that use code instrumentation, you must link the corresponding
libraries too! Refer to Section 8.3, Linking with Libraries, for an overview of the (profiling) libraries. In
Eclipse the correct libraries are linked automatically.
Example
To generate block count information for the module test.c during execution, compile as follows:
carm --profile=+block test.c
In this case you must link the library libpb.a.
Related information
Chapter 6, Profiling
386
Tool Options
C compiler option: --rename-sections (-R)
Menu entry
1.
Select C/C++ Compiler » Miscellaneous.
2.
Add the option --rename-sections to the Additional options field.
Command line syntax
--rename-sections=[name=]suffix
-R[name=]suffix
Description
In case a module must be loaded at a fixed address, or a data section needs a special place in memory,
you can use this option to generate different section names. You can then use this unique section name
in the linker script file for locating. Because sections have reserved names, the compiler will not actually
change the section name, but will add a suffix to the name.
With the section name you select which sections are renamed. With suffix you specify the suffix part
which will be attached to the existing name. The suffix can contain the following suffix specifiers:
{module}
expands to the module name
{name}
expands to the symbol name as generated in the assembly file, including compiler
generated prefixes and suffixes
{cname}
expands to the symbol name as used in your C source. Compiler generated names
will be cleaned up and prefixed by a '$'.
If you do not specify a section name, all sections will receive the specified suffix.
Example
To change all sections named .data into .data.NEW, enter:
carm --rename-sections=.data=NEW test.c
To add the name of the current module as suffix to all data sections, resulting in .data.test, enter:
carm --rename-sections=.data={module} test.c
The following examples show the difference when using --rename-sections={name} or
--rename-sections={cname}.
Generated labels:
.section
.section
.section
.section
.text.tm..cocofun_1
.text.tm.$cocofun
.rodata.hs..1.str
.rodata.hs.$str
;;
;;
;;
;;
{name}
{cname}
{name}
{cname}
387
TASKING VX-toolset for ARM User Guide
.section
.section
.rodata.hs..2.ini
.rodata.hs.$ini
;; {name}
;; {cname}
Statics within a function:
.section
.section
.section
.section
.data.hs._999001_my_local
.data.hs.my_local
.data.hs._999002_my_local
.data.hs.my_local
;;
;;
;;
;;
Several modules with static functions of the same name:
.section
.section
.section
.section
.text.hs1.f1
.text.hs1.f1
.text.hs2.f1.1
.text.hs2.f1
Related information
Assembler directive .SECTION
388
;;
;;
;;
;;
{name}
{cname}
{name}
{cname}
{name}
{cname}
{name}
{cname}
Tool Options
C compiler option: --runtime (-r)
Menu entry
1.
Select C/C++ Compiler » Debugging.
2.
Enable or disable one or more of the following run-time error checking options:
• Generate code for bounds checking
• Generate code to detect unhandled case in a switch
• Generate code for malloc consistency checks
• Generate code for stack overflow checks (allowed for USR and SYS mode only)
• Generate code for division by zero checks
Command line syntax
--runtime[=flag,...]
-r[flags]
You can set the following flags:
+/-bounds
b/B
bounds checking
+/-case
c/C
report unhandled case in a switch
+/-malloc
m/M
malloc consistency checks
+/-stack
s/S
check for stack overflow
+/-zero
z/Z
check for divide by zero
Default (without flags): -rbcmSZ
Description
This option controls a number of run-time checks to detect errors during program execution. Some of
these checks require additional code to be inserted in the generated code, and may therefore slow down
the program execution. The following checks are available:
Bounds checking
Every pointer update and dereference will be checked to detect out-of-bounds accesses, null pointers
and uninitialized automatic pointer variables. This check will increase the code size and slow down the
program considerably. In addition, some heap memory is allocated to store the bounds information. You
may enable bounds checking for individual modules or even parts of modules only (see #pragma
runtime).
389
TASKING VX-toolset for ARM User Guide
Report unhandled case in a switch
Report an unhandled case value in a switch without a default part. This check will add one function call
to every switch without a default part, but it will have little impact on the execution speed.
Malloc consistency checks
This option enables the use of wrappers around the functions malloc/realloc/free that will check for common
dynamic memory allocation errors like:
• buffer overflow
• write to freed memory
• multiple calls to free
• passing invalid pointer to free
Enabling this check will extract some additional code from the library, but it will not enlarge your application
code. The dynamic memory usage will increase by a couple of bytes per allocation.
Stack overflow check
The compiler generates extra code within the function prolog that will check the available stack size before
allocating. This is only useful when the processor runs in USR or SYS mode.
Division by zero check
The compiler generates a call to specific run-time functions for additional division by zero checks. If this
situation occurs, an abort signal is issued. Without this check, a division by zero could lead to unpredictable
results.
Related information
Pragma runtime
390
Tool Options
C compiler option: --signed-bitfields
Menu entry
1.
Select C/C++ Compiler » Language.
2.
Enable the option Treat "int" bit-fields as signed.
Command line syntax
--signed-bitfields
Description
For bit-fields it depends on the implementation whether a plain int is treated as signed int or unsigned
int. By default an int bit-field is treated as unsigned int. This offers the best performance. With this
option you tell the compiler to treat int bit-fields as signed int. In this case, you can still add the
keyword unsigned to treat a particular int bit-field as unsigned.
Related information
C++ compiler option --signed-bitfields
Section 1.1, Data Types
391
TASKING VX-toolset for ARM User Guide
C compiler option: --silicon-bug
Menu entry
1.
Select C/C++ Compiler » Miscellaneous.
2.
Add the option --silicon-bug to the Additional options field.
Command line syntax
--silicon-bug[=bug,...]
Description
With this option you specify for which hardware problems the compiler should generate workarounds.
Please refer to Chapter 19, CPU Problem Bypasses and Checks for the numbers and descriptions. Silicon
bug numbers are specified as a comma separated list. When you use this option without arguments, all
silicon bug workarounds are enabled.
Example
To enable workarounds for problem 602117, enter:
carm --silicon-bug=602117 test.c
Related information
Chapter 19, CPU Problem Bypasses and Checks
Assembler option --silicon-bug
392
Tool Options
C compiler option: --source (-s)
Menu entry
1.
Select C/C++ Compiler » Miscellaneous.
2.
Enable the option Merge C source code with generated assembly.
Command line syntax
--source
-s
Description
With this option you tell the compiler to merge C source code with generated assembly code in the output
file. The C source lines are included as comments.
Related information
Pragmas source/nosource
393
TASKING VX-toolset for ARM User Guide
C compiler option: --stdout (-n)
Menu entry
-
Command line syntax
--stdout
-n
Description
With this option you tell the compiler to send the output to stdout (usually your screen). No files are
created. This option is for example useful to quickly inspect the output or to redirect the output to other
tools.
Related information
-
394
Tool Options
C compiler option: --thumb
Menu entry
1.
Select C/C++ Compiler » Code Generation.
2.
Enable the option Use Thumb instruction set.
Command line syntax
--thumb
Description
With this option you tell the compiler to generate Thumb or Thumb-2 instructions, depending on the
architecture.
When you specify the ARMv6-M, ARMv7-M or ARMv7E-M architecture (option --cpu), the compiler
automatically selects the Thumb-2 instruction set.
Related information
C compiler option --cpu (Select architecture)
C compiler option --interwork (Generate interworking code)
395
TASKING VX-toolset for ARM User Guide
C compiler option: --tradeoff (-t)
Menu entry
1.
Select C/C++ Compiler » Optimization.
2.
Select a trade-off level in the Trade-off between speed and size box.
Command line syntax
--tradeoff={0|1|2|3|4}
-t{0|1|2|3|4}
Default: --tradeoff=4
Description
If the compiler uses certain optimizations (option --optimize), you can use this option to specify whether
the used optimizations should optimize for more speed (regardless of code size) or for smaller code size
(regardless of speed).
By default the compiler optimizes for code size (--tradeoff=4).
If you have not specified the option --optimize, the compiler uses the default Optimize more
optimization. In this case it is still useful to specify a trade-off level.
Example
To set the trade-off level for the used optimizations:
carm --tradeoff=2 --thumb test.c
The compiler uses the default Optimize more optimization level and optimizes for code size.
Related information
C compiler option --optimize (Specify optimization level)
Section 4.5.3, Optimize for Size or Speed
396
Tool Options
C compiler option: --uchar (-u)
Menu entry
1.
Select C/C++ Compiler » Language.
2.
Enable the option Treat "char" variables as unsigned.
Command line syntax
--uchar
-u
Description
By default char is the same as specifying signed char. With this option char is the same as unsigned
char.
Related information
Section 1.1, Data Types
397
TASKING VX-toolset for ARM User Guide
C compiler option: --unaligned-access
Menu entry
1.
Select C/C++ Compiler » Miscellaneous.
2.
Add the option --unaligned-access to the Additional options field.
Command line syntax
--unaligned-access
Description
With this option you tell the compiler to generate more efficient instructions to access unaligned 16-bit or
larger data. Halfword or word load and store instructions are used instead of byte instructions.
This option is only useful for cores that have support for unaligned access.
Related information
-
398
Tool Options
C compiler option: --undefine (-U)
Menu entry
1.
Select C/C++ Compiler » Preprocessing
The Defined symbols box shows the symbols that are currently defined.
2.
To remove a defined symbol, select the symbol in the Defined symbols box and click on the Delete
button.
Command line syntax
--undefine=macro_name
-Umacro_name
Description
With this option you can undefine an earlier defined macro as with #undef. This option is for example
useful to undefine predefined macros.
The following predefined ISO C standard macros cannot be undefined:
__FILE__
current source filename
__LINE__
current source line number (int type)
__TIME__
hh:mm:ss
__DATE__
Mmm dd yyyy
__STDC__
level of ANSI standard
Example
To undefine the predefined macro __TASKING__:
carm --undefine=__TASKING__ test.c
Related information
C compiler option --define (Define preprocessor macro)
Section 1.8, Predefined Preprocessor Macros
399
TASKING VX-toolset for ARM User Guide
C compiler option: --version (-V)
Menu entry
-
Command line syntax
--version
-V
Description
Display version information. The compiler ignores all other options or input files.
Related information
-
400
Tool Options
C compiler option: --warnings-as-errors
Menu entry
1.
Select Global Options.
2.
Enable the option Treat warnings as errors.
Command line syntax
--warnings-as-errors[=number[-number],...]
Description
If the compiler encounters an error, it stops compiling. When you use this option without arguments, you
tell the compiler to treat all warnings not suppressed by option --no-warnings (or #pragma warning)
as errors. This means that the exit status of the compiler will be non-zero after one or more compiler
warnings. As a consequence, the compiler now also stops after encountering a warning.
You can also limit this option to specific warnings by specifying a comma-separated list of warning numbers
or ranges. In this case, this option takes precedence over option --no-warnings (and #pragma warning).
Related information
C compiler option --no-warnings (Suppress some or all warnings)
Pragma warning
401
TASKING VX-toolset for ARM User Guide
13.3. C++ Compiler Options
This section lists all C++ compiler options.
Options in Eclipse versus options on the command line
Most command line options have an equivalent option in Eclipse but some options are only available on
the command line. Eclipse invokes the C++ compiler via the control program. Therefore, it uses the syntax
of the control program to pass options and files to the C++ compiler. If there is no equivalent option in
Eclipse, you can specify a command line option in Eclipse as follows:
1.
From the Project menu, select Properties for
The Properties dialog appears.
2.
In the left pane, expand C/C++ Build and select Settings.
In the right pane the Settings appear.
3.
On the Tool Settings tab, select C/C++ Compiler » Miscellaneous.
4.
In the Additional options field, enter one or more command line options.
Because Eclipse uses the control program, you have to precede the option with -Wcp to pass the
option via the control program directly to the C++ compiler.
Short and long option names
Options can have both short and long names. Short option names always begin with a single minus (-)
character, long option names always begin with two minus (--) characters.You can abbreviate long option
names as long as it forms a unique name. You can mix short and long option names on the command
line.
If an option requires an argument, the argument may be separated from the keyword by white space, or
the keyword may be immediately followed by =option. When the second form is used there may not be
any white space on either side of the equal sign.
Options can have flags or suboptions. To switch a flag 'on', use a lower case letter or a +longflag. To
switch a flag off, use an upper case letter or a -longflag. Separate longflags with commas. The following
two invocations are equivalent:
cparm -Ecp test.cc
cparm --preprocess=+comments,+noline test.cc
When you do not specify an option, a default value may become active.
The priority of the options is left-to-right: when two options conflict, the first (most left) one takes effect.
The -D and -U options are not considered conflicting options, so they are processed left-to-right for each
source file. You can overrule the default output file name with the --output-file option.
402
Tool Options
C++ compiler option: --alternative-tokens
Menu entry
-
Command line syntax
--alternative-tokens
Description
Enable recognition of alternative tokens. This controls recognition of the digraph tokens in C++, and
controls recognition of the operator keywords (e.g., not, and, bitand, etc.).
Example
To enable operator keywords (e.g., "not", "and") and digraphs, enter:
cparm --alternative-tokens test.cc
Related information
-
403
TASKING VX-toolset for ARM User Guide
C++ compiler option: --anachronisms
Menu entry
1.
Select C/C++ Compiler » Language.
2.
Enable the option C++ anachronisms.
Command line syntax
--anachronisms
Description
Enable C++ anachronisms. This option also enables --nonconst-ref-anachronism. But you can turn this
off individually with option --no-nonconst-ref-anachronism.
Related information
C++ compiler option --nonconst-ref-anachronism (Nonconst reference anachronism)
Section 2.2.3, Anachronisms Accepted
404
Tool Options
C++ compiler option: --auto-type
Menu entry
-
Command line syntax
--auto-type
--no-auto-type
Default: auto is a storage class specifier.
Description
Enable or disable auto as a type specifier where the actual type is deduced from an initializer that follows.
This feature is implicitly enabled in C++0x mode.
Related information
C++ compiler option --no-auto-storage (Do not allow auto as storage specifier)
C++ compiler option --c++0x (C++0x language extensions)
405
TASKING VX-toolset for ARM User Guide
C++ compiler option: --base-assign-op-is-default
Menu entry
-
Command line syntax
--base-assign-op-is-default
Description
Enable the anachronism of accepting a copy assignment operator that has an input parameter that is a
reference to a base class as a default copy assignment operator for the derived class.
Related information
-
406
Tool Options
C++ compiler option: --building-runtime
Menu entry
-
Command line syntax
--building-runtime
Description
Special option for building the C++ run-time library. Used to indicate that the C++ run-time library is being
compiled. This causes additional macros to be predefined that are used to pass configuration information
from the C++ compiler to the run-time.
Related information
-
407
TASKING VX-toolset for ARM User Guide
C++ compiler option: --c++0x
Menu entry
-
Command line syntax
--c++0x
Description
Enable the C++ extensions that are defined by the latest C++ working paper.
Related information
-
408
Tool Options
C++ compiler option: --c++0x-sfinae
Menu entry
-
Command line syntax
--c++0x-sfinae
--no-c++0x-sfinae
Description
Enable or disable template deduction in the style dictated by the C++0x standard (SFINAE rules of
document N2634), i.e., where general expressions are allowed in deduction contexts and they undergo
the full usual semantic checking. This type of deduction is necessary to get the full power of the decltype
feature in return types. “SFINAE” refers to the initials of the phrase “Substitution Failure Is Not An Error”,
which is the guiding principle for template deduction, and by extension a name for the process of deduction.
This feature is implicitly enabled in C++0x mode (option --c++0x), and is implicitly disabled in GNU modes.
Related information
C++ compiler option --c++0x (C++0x language extensions)
409
TASKING VX-toolset for ARM User Guide
C++ compiler option: --c++0x-sfinae-ignore-access
Menu entry
-
Command line syntax
--c++0x-sfinae-ignore-access
--no-c++0x-sfinae-ignore-access
Default: --no-c++0x-sfinae-ignore-access
Description
When C++0x SFINAE is enabled (option --c++0x-sfinae), option --c++0x-sfinae-ignore-access indicates
that access errors are not counted as errors that cause deduction failures. In document N2634 access
errors are ignored, but the standards committee changed its mind about that later. So, the default (option
--no-c++0x-sfinae-ignore-access) is that access errors cause a deduction failure.
Related information
C++ compiler option --c++0x-sfinae (C++0x SFINAE rules)
410
Tool Options
C++ compiler option: --check
Menu entry
-
Command line syntax
--check
Description
With this option you can check the source code for syntax errors, without generating code. This saves
time in developing your application because the code will not actually be compiled.
The C++ compiler reports any warnings and/or errors.
This option is available on the command line only.
Related information
C compiler option --check (Check syntax)
Assembler option --check (Check syntax)
411
TASKING VX-toolset for ARM User Guide
C++ compiler option: --check-concatenations
Menu entry
-
Command line syntax
--check-concatenations
Description
With this option the preprocessor will generate a diagnostic when a macro concatenation (such as a ##
b) does not result in a valid token.
Related information
-
412
Tool Options
C++ compiler option: --compound-literals
Menu entry
-
Command line syntax
--compound-literals
Description
Allow compound literals in expressions. A compound literal looks like a cast containing an initializer. Its
value is an object of the type specified in the cast, containing the elements specified in the initializer; it is
an lvalue.
For example:
static int i[] = (int []) {1, 2, 3};
Related information
-
413
TASKING VX-toolset for ARM User Guide
C++ compiler option: --context-limit
Menu entry
-
Command line syntax
--context-limit=number
Default: --context-limit=10
Description
Set the context limit to number. The context limit is the maximum number of template instantiation context
entries to be displayed as part of a diagnostic message. If the number of context entries exceeds the
limit, the first and last N context entries are displayed, where N is half of the context limit. A value of zero
is used to indicate that there is no limit.
Example
To set the context limit to 5, enter:
cparm --context-limit=5 test.cc
Related information
-
414
Tool Options
C++ compiler option: --cpu (-C)
Menu entry
1.
Expand C/C++ Build and select Processor.
2.
From the Processor Selection list, make a selection by Architecture, Core or one of the
manufacturers.
Command line syntax
--cpu=architecture
-Carchitecture
You can specify the following architectures:
ARMv6M
Compile for ARMv6-M architecture
ARMv7M
Compile for ARMv7-M architecture
ARMv7EM
Compile for ARMv7E-M architecture
ARMv7R
Compile for ARMv7-R architecture
Description
With this option you specify the ARM architecture for which you create your application. The ARM target
supports more than one architecture and therefore you need to specify for which architecture the compiler
should compile. The architecture determines which instructions are valid and which are not.
The effect of this option is that the C++ compiler uses the appropriate instruction set. You choose one of
the following architectures: ARMv6-M, ARMv7-M, ARMv7E-M or ARMv7-R.
The macro __CPU__ is set to the name of the architecture.
Example
To compile the file test.cc for the ARMv7E-M architecture, enter the following on the command line:
cparm --cpu=ARMv7EM test.cc
Related information
C compiler option --cpu (Select architecture)
415
TASKING VX-toolset for ARM User Guide
C++ compiler option: --create-pch
Menu entry
1.
Select C/C++ Compiler » Precompiled C++ Headers.
2.
Enter a filename in the Create precompiled header file field.
Command line syntax
--create-pch=filename
Description
If other conditions are satisfied, create a precompiled header file with the specified name. If --pch (automatic
PCH mode) or --use-pch appears on the command line following this option, its effect is erased.
Example
To create a precompiled header file with the name test.pch, enter:
cparm --create-pch=test.pch test.cc
Related information
C++ compiler option --pch (Automatic PCH mode)
C++ compiler option --use-pch (Use precompiled header file)
Section 2.10, Precompiled Headers
416
Tool Options
C++ compiler option: --default-nocommon-tentative-definitions
Menu entry
-
Command line syntax
--default-nocommon-tentative-definitions
Description
In GNU C++ mode, this option prevents tentative definitions to be placed in common storage.
Related information
-
417
TASKING VX-toolset for ARM User Guide
C++ compiler option: --defer-parse-function-templates
Menu entry
-
Command line syntax
--defer-parse-function-templates
--no-defer-parse-function-templates
Default: --defer-parse-function-templates in GNU C++ mode.
Description
Enable or disable deferral of prototype instantiations until the first actual instantiation of a function. This
is used to permit the compilation of programs that contain definitions of unusable function templates.
It is enabled by default in GNU C++ mode.
Related information
-
418
Tool Options
C++ compiler option: --define (-D)
Menu entry
1.
Select C/C++ Compiler » Preprocessing.
The Defined symbols box shows the symbols that are currently defined.
2.
To define a new symbol, click on the Add button in the Defined symbols box.
3.
Type the symbol definition (for example, demo=1)
Use the Edit and Delete button to change a macro definition or to remove a macro from the list.
Command line syntax
--define=macro_name[(parm-list)][=macro_definition]
-Dmacro_name(parm-list)][=macro_definition]
Description
With this option you can define a macro and specify it to the preprocessor. If you only specify a macro
name (no macro definition), the macro expands as '1'.
Function-style macros can be defined by appending a macro parameter list to macro_name.
You can specify as many macros as you like. Simply use the Add button to add new macro definitions.
On the command line, you can use the option --define (-D) multiple times. If the command line exceeds
the limit of the operating system, you can define the macros in an option file which you then must specify
to the C++ compiler with the option --option-file (-f) file.
The definition can be tested by the preprocessor with #if, #ifdef and #ifndef, for conditional
compilations.
Example
Consider the following program with conditional code to compile a demo program and a real program:
void main( void )
{
#if DEMO
demo_func();
#else
real_func();
#endif
}
/* compile for the demo program */
/* compile for the real program */
You can now use a macro definition to set the DEMO flag:
419
TASKING VX-toolset for ARM User Guide
cparm --define=DEMO test.cc
cparm --define=DEMO=1 test.cc
Note that both invocations have the same effect.
The next example shows how to define a macro with arguments. Note that the macro name and definition
are placed between double quotes because otherwise the spaces would indicate a new option.
cparm --define="MAX(A,B)=((A) > (B) ? (A) : (B))" test.cc
Related information
C++ compiler option --undefine (Remove preprocessor macro)
C++ compiler option --option-file (Specify an option file)
420
Tool Options
C++ compiler option: --dep-file
Menu entry
-
Command line syntax
--dep-file[=file]
Description
With this option you tell the C++ compiler to generate dependency lines that can be used in a Makefile.
In contrast to the option --preprocess=+make, the dependency information will be generated in addition
to the normal output file.
By default, the information is written to a file with extension .d (one for every input file). When you specify
a filename, all dependencies will be combined in the specified file.
Example
cparm --dep-file=test.dep test.cc
The C++ compiler compiles the file test.cc, which results in the output file test.ic, and generates
dependency lines in the file test.dep.
Related information
C++ compiler option --preprocess=+make (Generate dependencies for make)
421
TASKING VX-toolset for ARM User Guide
C++ compiler option: --diag
Menu entry
-
Command line syntax
--diag
Description
With this option the C++ compiler displays a list of all diagnostic messages on stdout (usually your
screen). The C++ compiler does not compile any files.
Related information
Section 5.3, C++ Compiler Error Messages
422
Tool Options
C++ compiler option: --dollar
Menu entry
-
Command line syntax
--dollar
Default format: No dollar signs are allowed in identifiers.
Description
Accept dollar signs in identifiers. Names like A$VAR are allowed.
Related information
-
423
TASKING VX-toolset for ARM User Guide
C++ compiler option: --embedded-c++
Menu entry
1.
Select C/C++ Compiler » Language.
2.
Enable the option Comply to embedded C++ subset.
Command line syntax
--embedded-c++
Description
The "Embedded C++" subset does not support templates, exceptions, namespaces, new-style casts,
RTTI, multiple inheritance, virtual base classes, and the mutable keyword. Select this option when you
want the C++ compiler to give an error when you use any of them in your C++ source.
Related information
-
424
Tool Options
C++ compiler option: --endianness
Menu entry
1.
Select Global Options.
2.
Specify the Endianness:Little-endian mode or Big-endian mode.
Command line syntax
--endianness=endianness
-B
--big-endian
You can specify the following endianness:
big
b
Big endian
little
l
Little endian (default)
Description
By default, the C++ compiler generates code for a little-endian target (least significant byte of a word at
lowest byte address). With --endianness=big the C++ compiler generates code for a big-endian target
(most significant byte of a word at lowest byte address). -B is an alias for option --endianness=big.
The macro __BIG_ENDIAN__ is defined when this option is specified, otherwise the macro
__LITTLE_ENDIAN__ is defined.
425
TASKING VX-toolset for ARM User Guide
C++ compiler option: --error-file
Menu entry
-
Command line syntax
--error-file[=file]
Description
With this option the C++ compiler redirects error messages to a file. If you do not specify a filename, the
error file will be named after the input file with extension .ecp.
Example
To write errors to errors.ecp instead of stderr, enter:
cparm --error-file=errors.ecp test.cc
Related information
-
426
Tool Options
C++ compiler option: --error-limit (-e)
Menu entry
-
Command line syntax
--error-limit=number
-enumber
Default: --error-limit=100
Description
Set the error limit to number. The C++ compiler will abandon compilation after this number of errors
(remarks and warnings are not counted). By default, the limit is 100.
Example
When you want compilation to stop when 10 errors occurred, enter:
cparm --error-limit=10 test.cc
Related information
-
427
TASKING VX-toolset for ARM User Guide
C++ compiler option: --exceptions (-x)
Menu entry
1.
Select C/C++ Compiler » Language.
2.
Enable or disable the option Support for C++ exception handling.
Command line syntax
--exceptions
-x
--no-exceptions
Default: --no-exceptions
Default in C++0x mode: --exceptions
Description
With this option you enable or disable support for exception handling in the C++ compiler.
The macro __EXCEPTIONS is defined when exception handling support is enabled.
This feature is implicitly enabled in C++0x mode.
Related information
C++ compiler option --c++0x (C++0x language extensions)
428
Tool Options
C++ compiler option: --exported-template-file
Menu entry
-
Command line syntax
--exported-template-file=file
Description
This option specifies the name to be used for the exported template file used for processing of exported
templates.
This option is supplied for use by the control program that invokes the C++ compiler and is not intended
to be used by end-users.
Related information
-
429
TASKING VX-toolset for ARM User Guide
C++ compiler option: --extended-variadic-macros
Menu entry
-
Command line syntax
--extended-variadic-macros
--no-extended-variadic-macros
Description
Enable or disable support for macros with a variable number of arguments (implies --variadic-macros)
and allow the naming of the variable argument list.
Related information
C++ compiler option --variadic-macros (Allow variadic macros)
430
Tool Options
C++ compiler option: --force-vtbl
Menu entry
1.
Select C/C++ Compiler » Miscellaneous.
2.
Enable the option Force definition of virtual function tables (C++).
Command line syntax
--force-vtbl
Description
Force definition of virtual function tables in cases where the heuristic used by the C++ compiler to decide
on definition of virtual function tables provides no guidance.
Related information
C++ compiler option --suppress-vtbl (Suppress definition of virtual function tables)
431
TASKING VX-toolset for ARM User Guide
C++ compiler option: --friend-injection
Menu entry
-
Command line syntax
--friend-injection
Default: friend names are not injected.
Description
Controls whether the name of a class or function that is declared only in friend declarations is visible
when using the normal lookup mechanisms. When friend names are injected, they are visible to such
lookups. When friend names are not injected (as required by the standard), function names are visible
only when using argument-dependent lookup, and class names are never visible.
Related information
C++ compiler option --no-arg-dep-lookup (Disable argument dependent lookup)
432
Tool Options
C++ compiler option: --g++
Menu entry
1.
Select C/C++ Compiler » Language.
2.
Enable the option Allow GNU C++ extensions.
Command line syntax
--g++
Description
Enable GNU C++ compiler language extensions.
Related information
Section 2.3, GNU Extensions
433
TASKING VX-toolset for ARM User Guide
C++ compiler option: --gnu-version
Menu entry
-
Command line syntax
--gnu-version=version
Default: 30300 (version 3.3.0)
Description
It depends on the GNU C++ compiler version if a particular GNU extension is supported or not. With this
option you set the GNU C++ compiler version that should be emulated in GNU C++ mode. Version x.y.z
of the GNU C++ compiler is represented by the value x*10000+y*100+z.
Example
To specify version 3.4.1 of the GNU C++ compiler, enter:
cparm --g++ --gnu-version=30401 test.cc
Related information
Section 2.3, GNU Extensions
434
Tool Options
C++ compiler option: --guiding-decls
Menu entry
-
Command line syntax
--guiding-decls
Description
Enable recognition of "guiding declarations" of template functions. A guiding declaration is a function
declaration that matches an instance of a function template but has no explicit definition (since its definition
derives from the function template). For example:
template <class T> void f(T) { ... }
void f(int);
When regarded as a guiding declaration, f(int) is an instance of the template; otherwise, it is an
independent function for which a definition must be supplied.
Related information
C++ compiler option --old-specializations (Old-style template specializations)
435
TASKING VX-toolset for ARM User Guide
C++ compiler option: --help (-?)
Menu entry
-
Command line syntax
--help[=item]
-?
You can specify the following arguments:
options
Show extended option descriptions
Description
Displays an overview of all command line options. When you specify an argument you can list extended
information such as a list of option descriptions.
Example
The following invocations all display a list of the available command line options:
cparm -?
cparm --help
cparm
The following invocation displays an extended list of the available options:
cparm --help=options
Related information
-
436
Tool Options
C++ compiler option: --ignore-std
Menu entry
-
Command line syntax
--ignore-std
Description
Enable a GNU C++ compatibility feature that makes the std namespace a synonym for the global
namespace.
Related information
-
437
TASKING VX-toolset for ARM User Guide
C++ compiler option: --implicit-extern-c-type-conversion
Menu entry
-
Command line syntax
--implicit-extern-c-type-conversion
Description
Enable the implicit type conversion between pointers to extern "C" and extern "C++" function types.
Related information
-
438
Tool Options
C++ compiler option: --implicit-include
Menu entry
1.
Select C/C++ Compiler » Miscellaneous.
2.
Enable the option Implicit inclusion of source files for finding templates.
Command line syntax
--implicit-include
Description
Enable implicit inclusion of source files as a method of finding definitions of template entities to be
instantiated.
Related information
C++ compiler option --instantiate (Instantiation mode)
Section 2.5, Template Instantiation
439
TASKING VX-toolset for ARM User Guide
C++ compiler option: --incl-suffixes
Menu entry
-
Command line syntax
--incl-suffixes=suffixes
Default: no extension and .stdh.
Description
Specifies the list of suffixes to be used when searching for an include file whose name was specified
without a suffix. If a null suffix is to be allowed, it must be included in the suffix list. suffixes is a
colon-separated list of suffixes (e.g., "::stdh").
Example
To allow only the suffixes .h and .stdh as include file extensions, enter:
cparm --incl-suffixes=h:stdh test.cc
Related information
C++ compiler option --include-file (Include file at the start of a compilation)
Section 5.2, How the C++ Compiler Searches Include Files
440
Tool Options
C++ compiler option: --include-directory (-I)
Menu entry
1.
Select C/C++ Compiler » Include Paths.
The Include paths box shows the directories that are added to the search path for include files.
2.
To define a new directory for the search path, click on the Add button in the Include paths box.
3.
Type or select a path.
Use the Edit and Delete button to change a path or to remove a path from the list.
Command line syntax
--include-directory=path,...
-Ipath,...
Description
Add path to the list of directories searched for #include files whose names do not have an absolute
pathname. You can specify multiple directories separated by commas.
Example
To add the directory /proj/include to the include file search path, enter:
cparm --include-directory=/proj/include test.cc
Related information
C++ compiler option --include-file (Include file at the start of a compilation)
C++ compiler option --sys-include (Add directory to system include file search path)
Section 5.2, How the C++ Compiler Searches Include Files
441
TASKING VX-toolset for ARM User Guide
C++ compiler option: --include-file (-H)
Menu entry
1.
Select C/C++ Compiler » Preprocessing.
The Pre-include files box shows the files that are currently included before the compilation starts.
2.
To define a new file, click on the Add button in the Pre-include files box.
3.
Type the full path and file name or select a file.
4.
(Optional) Enable the option Include CMSIS device register definition header file.
Use the Edit and Delete button to change a file name or to remove a file from the list.
Command line syntax
--include-file=file
-Hfile
Description
Include the source code of the indicated file at the beginning of the compilation. This is the same as
specifying #include "file" at the beginning of each of your C++ sources.
All files included with --include-file are processed after any of the files included with --include-macros-file.
The filename is searched for in the directories on the include search list.
Example
cparm --include-file=extra.h test1.cc test2.cc
The file extra.h is included at the beginning of both test1.cc and test2.cc.
Related information
C++ compiler option --include-directory (Add directory to include file search path)
Section 5.2, How the C++ Compiler Searches Include Files
442
Tool Options
C++ compiler option: --include-macros-file
Menu entry
-
Command line syntax
--include-macros-file=file
Description
Include the macros of the indicated file at the beginning of the compilation. Only the preprocessing
directives from the file are evaluated. All of the actual code is discarded. The effect of this option is that
any macro definitions from the specified file will be in effect when the primary source file is compiled. All
of the macro-only files are processed before any of the normal includes (--include-file). Within each
group, the files are processed in the order in which they were specified.
Related information
C++ compiler option --include-file (Include file at the start of a compilation)
Section 5.2, How the C++ Compiler Searches Include Files
443
TASKING VX-toolset for ARM User Guide
C++ compiler option: --init-priority
Menu entry
-
Command line syntax
--init-priority=number
Default: 0
Description
Normally, the C++ compiler assigns no priority to the global initialization functions and the exact order is
determined by the linker. This option sets the default priority for global initialization functions. Default
value is "0". You can also set the default priority with the #pragma init_priority.
Values from 1 to 100 are for internal use only and should not be used. Values 101 to 65535 are available
for user code. A lower number means a higher priority.
Example
cparm --init-priority=101 test.cc
Related information
-
444
Tool Options
C++ compiler option: --instantiate (-t)
Menu entry
1.
Select C/C++ Compiler » Miscellaneous.
2.
Select an instantiation mode in the Instantiation mode of external template entities box.
Command line syntax
--instantiate=mode
-tmode
You can specify the following modes:
used
all
local
Default: --instantiate=used
Description
Control instantiation of external template entities. External template entities are external (that is, non-inline
and non-static) template functions and template static data members. The instantiation mode determines
the template entities for which code should be generated based on the template definition. Normally,
when a file is compiled, template entities are instantiated wherever they are used (the linker will discard
duplicate definitions). The overall instantiation mode can, however, be changed with this option. You can
specify the following modes:
used
Instantiate those template entities that were used in the compilation. This will include
all static data members for which there are template definitions. This is the default.
all
Instantiate all template entities declared or referenced in the compilation unit. For
each fully instantiated template class, all of its member functions and static data
members will be instantiated whether or not they were used. Non-member template
functions will be instantiated even if the only reference was a declaration.
local
Similar to --instantiate=used except that the functions are given internal linkage.
This is intended to provide a very simple mechanism for those getting started with
templates. The compiler will instantiate the functions that are used in each
compilation unit as local functions, and the program will link and run correctly (barring
problems due to multiple copies of local static variables). However, one may end
up with many copies of the instantiated functions, so this is not suitable for production
use.
You cannot use --instantiate=local in conjunction with automatic template instantiation.
445
TASKING VX-toolset for ARM User Guide
Related information
C++ compiler option --no-auto-instantiation (Disable automatic C++ instantiation)
Section 2.5, Template Instantiation
446
Tool Options
C++ compiler option: --io-streams
Menu entry
1.
Select C/C++ Compiler » Language.
2.
Enable the option Support for C++ I/O streams.
Command line syntax
--io-streams
Description
As I/O streams require substantial resources they are disabled by default. Use this option to enable I/O
streams support in the C++ library.
This option also enables exception handling.
Related information
-
447
TASKING VX-toolset for ARM User Guide
C++ compiler option: --lambdas
Menu entry
-
Command line syntax
--lambdas
--no-lambdas
Default: --no-lambdas
Default in C++0x mode: --lambdas
Description
Enable or disable support for C++0x lambdas.
This feature is implicitly enabled in C++0x mode.
Related information
C++ compiler option --c++0x (C++0x language extensions)
448
Tool Options
C++ compiler option: --late-tiebreaker
Menu entry
-
Command line syntax
--late-tiebreaker
Default: early tiebreaker processing.
Description
Select the way that tie-breakers (e.g., cv-qualifier differences) apply in overload resolution. In "early"
tie-breaker processing, the tie-breakers are considered at the same time as other measures of the
goodness of the match of an argument value and the corresponding parameter type (this is the standard
approach).
In "late" tie-breaker processing, tie-breakers are ignored during the initial comparison, and considered
only if two functions are otherwise equally good on all arguments; the tie-breakers can then be used to
choose one function over another.
Related information
-
449
TASKING VX-toolset for ARM User Guide
C++ compiler option: --list-file (-L)
Menu entry
-
Command line syntax
--list-file=file
-Lfile
Default: -1
Description
Generate raw listing information in the file. This information is likely to be used to generate a formatted
listing. The raw listing file contains raw source lines, information on transitions into and out of include
files, and diagnostics generated by the C++ compiler.
Each line of the listing file begins with a key character that identifies the type of line, as follows:
N
A normal line of source; the rest of the line is the text of the line.
X
The expanded form of a normal line of source; the rest of the line is the text of the line.
This line appears following the N line, and only if the line contains non-trivial modifications
(comments are considered trivial modifications; macro expansions, line splices, and
trigraphs are considered non-trivial modifications). Comments are replaced by a single
space in the expanded-form line.
S
A line of source skipped by an #if or the like; the rest of the line is text. Note that the
#else, #elif, or #endif that ends a skip is marked with an N.
L
An indication of a change in source position. The line has a format similar to the #
line-identifying directive output by the C preprocessor, that is to say
L
line_number "file-name" [key]
where key is, 1 for entry into an include file, or 2 for exit from an include file, and omitted
otherwise.
The first line in the raw listing file is always an L line identifying the primary input file. L
lines are also output for #line directives (key is omitted). L lines indicate the source position
of the following source line in the raw listing file.
450
Tool Options
R, W, An indication of a diagnostic (R for remark, W for warning, E for error, and C for catastrophic
E, or C error). The line has the form:
S
"file-name" line_number column-number message-text
where S is R, W, E, or C, as explained above. Errors at the end of file indicate the last line
of the primary source file and a column number of zero. Command line errors are
catastrophes with an empty file name ("") and a line and column number of zero. Internal
errors are catastrophes with position information as usual, and message-text beginning
with (internal error). When a diagnostic displays a list (e.g., all the contending routines
when there is ambiguity on an overloaded call), the initial diagnostic line is followed by
one or more lines with the same overall format (code letter, file name, line number, column
number, and message text), but in which the code letter is the lower case version of the
code letter in the initial line. The source position in such lines is the same as that in the
corresponding initial line.
Example
To write raw listing information to the file test.lst, enter:
cparm --list-file=test.lst test.cc
Related information
-
451
TASKING VX-toolset for ARM User Guide
C++ compiler option: --long-lifetime-temps
Menu entry
-
Command line syntax
--long-lifetime-temps
Description
Select the lifetime for temporaries: short means to end of full expression; long means to the earliest of
end of scope, end of switch clause, or the next label. Short is the default.
Related information
-
452
Tool Options
C++ compiler option: --long-long
Menu entry
-
Command line syntax
--long-long
Description
Permit the use of long long in strict mode in dialects in which it is non-standard.
Related information
-
453
TASKING VX-toolset for ARM User Guide
C++ compiler option: --make-target
Menu entry
-
Command line syntax
--make-target=name
Description
With this option you can overrule the default target name in the make dependencies generated by the
options --preprocess=+make (-Em) and --dep-file. The default target name is the basename of the input
file, with extension .obj.
Example
cparm --preprocess=+make --make-target=mytarget.obj test.cc
The compiler generates dependency lines with the default target name mytarget.obj instead of
test.obj.
Related information
C++ compiler option --preprocess=+make (Generate dependencies for make)
C++ compiler option --dep-file (Generate dependencies in a file)
454
Tool Options
C++ compiler option: --multibyte-chars
Menu entry
-
Command line syntax
--multibyte-chars
Default: multibyte character sequences are not allowed.
Description
Enable processing for multibyte character sequences in comments, string literals, and character constants.
Multibyte encodings are used for character sets like the Japanese SJIS.
Related information
-
455
TASKING VX-toolset for ARM User Guide
C++ compiler option: --namespaces
Menu entry
-
Command line syntax
--namespaces
--no-namespaces
Default: namespaces are supported.
Description
When you used option --embedded-c++ namespaces are disabled. With option --namespaces you can
enable support for namespaces in this case.
The macro __NAMESPACES is defined when namespace support is enabled.
Related information
C++ compiler option --embedded-c++ (Embedded C++ compliancy tests)
C++ compiler option --using-std (Implicit use of the std namespace)
Section 2.4, Namespace Support
456
Tool Options
C++ compiler option: --no-arg-dep-lookup
Menu entry
-
Command line syntax
--no-arg-dep-lookup
Default: argument dependent lookup of unqualified function names is performed.
Description
With this option you disable argument dependent lookup of unqualified function names.
Related information
-
457
TASKING VX-toolset for ARM User Guide
C++ compiler option: --no-array-new-and-delete
Menu entry
-
Command line syntax
--no-array-new-and-delete
Default: array new and delete are supported.
Description
Disable support for array new and delete.
The macro __ARRAY_OPERATORS is defined when array new and delete is enabled.
Related information
-
458
Tool Options
C++ compiler option: --no-auto-instantiation
Menu entry
-
Command line syntax
--no-auto-instantiation
Default: the C++ compiler automatically instantiates templates.
Description
With this option automatic instantiation of templates is disabled.
Related information
C++ compiler option --instantiate (Set instantiation mode)
Section 2.5, Template Instantiation
459
TASKING VX-toolset for ARM User Guide
C++ compiler option: --no-auto-storage
Menu entry
-
Command line syntax
--no-auto-storage
Default: auto is a storage class specifier.
Description
Disable the traditional meaning of auto keyword as a storage class specifier.
Related information
C++ compiler option --auto-type (auto can be used as type specifier)
460
Tool Options
C++ compiler option: --no-bool
Menu entry
-
Command line syntax
--no-bool
Default: bool is recognized as a keyword.
Description
Disable recognition of the bool keyword.
The macro _BOOL is defined when bool is recognized as a keyword.
Related information
-
461
TASKING VX-toolset for ARM User Guide
C++ compiler option: --no-class-name-injection
Menu entry
-
Command line syntax
--no-class-name-injection
Default: the name of a class is injected into the scope of the class (as required by the standard).
Description
Do not inject the name of a class into the scope of the class (as was true in earlier versions of the C++
language).
Related information
-
462
Tool Options
C++ compiler option: --no-const-string-literals
Menu entry
-
Command line syntax
--no-const-string-literals
Default: C++ string literals and wide string literals are const (as required by the standard).
Description
With this option C++ string literals and wide string literals are non-const (as was true in earlier versions
of the C++ language).
Related information
-
463
TASKING VX-toolset for ARM User Guide
C++ compiler option: --no-dep-name
Menu entry
-
Command line syntax
--no-dep-name
Default: dependent name processing is enabled.
Description
Disable dependent name processing; i.e., the special lookup of names used in templates as required by
the C++ standard. This option implies the use of --no-parse-templates.
Related information
C++ compiler option --no-parse-templates (Disable parsing of nonclass templates)
464
Tool Options
C++ compiler option: --no-distinct-template-signatures
Menu entry
-
Command line syntax
--no-distinct-template-signatures
Description
Control whether the signatures for template functions can match those for non-template functions when
the functions appear in different compilation units. By default a normal function cannot be used to satisfy
the need for a template instance; e.g., a function "void f(int)" could not be used to satisfy the need
for an instantiation of a template "void f(T)" with T set to int.
--no-distinct-template-signatures provides the older language behavior, under which a non-template
function can match a template function. Also controls whether function templates may have template
parameters that are not used in the function signature of the function template.
Related information
-
465
TASKING VX-toolset for ARM User Guide
C++ compiler option: --no-double (-F)
Menu entry
1.
Select C/C++ Compiler » Language.
2.
Enable the option Treat double as float.
Command line syntax
--no-double
-F
Description
With this option you tell the C++ compiler to treat variables of the type double as float. Because the
float type takes less space, execution speed increases and code size decreases, both at the cost of less
precision.
Example
cparm --no-double test.cc
The file test.cc is compiled where variables of the type double are treated as float.
Related information
-
466
Tool Options
C++ compiler option: --no-enum-overloading
Menu entry
-
Command line syntax
--no-enum-overloading
Description
Disable support for using operator functions to overload built-in operations on enum-typed operands.
Related information
-
467
TASKING VX-toolset for ARM User Guide
C++ compiler option: --no-explicit
Menu entry
-
Command line syntax
--no-explicit
Default: the explicit specifier is allowed.
Description
Disable support for the explicit specifier on constructor declarations.
Related information
-
468
Tool Options
C++ compiler option: --no-export
Menu entry
-
Command line syntax
--no-export
Default: exported templates (declared with the keyword export) are allowed.
Description
Disable recognition of exported templates.This option requires that dependent name processing be done,
and cannot be used with implicit inclusion of template definitions.
Related information
Section 2.5.5, Exported Templates
469
TASKING VX-toolset for ARM User Guide
C++ compiler option: --no-extern-inline
Menu entry
-
Command line syntax
--no-extern-inline
Default: inline functions are allowed to have external linkage.
Description
Disable support for inline functions with external linkage in C++. When inline functions are allowed
to have external linkage (as required by the standard), then extern and inline are compatible specifiers
on a non-member function declaration; the default linkage when inline appears alone is external (that
is, inline means extern inline on non-member functions); and an inline member function takes
on the linkage of its class (which is usually external). However, when inline functions have only internal
linkage (using --no-extern-inline), then extern and inline are incompatible; the default linkage when
inline appears alone is internal (that is, inline means static inline on non-member functions);
and inline member functions have internal linkage no matter what the linkage of their class.
Related information
Section 2.7, Extern Inline Functions
470
Tool Options
C++ compiler option: --no-for-init-diff-warning
Menu entry
-
Command line syntax
--no-for-init-diff-warning
Description
Disable a warning that is issued when programs compiled without the --old-for-init option would have
had different behavior under the old rules.
Related information
C++ compiler option --old-for-init (Use old for scoping rules)
471
TASKING VX-toolset for ARM User Guide
C++ compiler option: --no-implicit-typename
Menu entry
-
Command line syntax
--no-implicit-typename
Default: implicit typename determination is enabled.
Description
Disable implicit determination, from context, whether a template parameter dependent name is a type or
nontype.
Related information
C++ compiler option --no-typename (Disable the typename keyword)
472
Tool Options
C++ compiler option: --no-inlining
Menu entry
1.
Select C/C++ Compiler » Miscellaneous.
2.
Disable the option Minimal inlining of function calls (C++).
Command line syntax
--no-inlining
Description
Disable minimal inlining of function calls.
Related information
-
473
TASKING VX-toolset for ARM User Guide
C++ compiler option: --nonconst-ref-anachronism
Menu entry
-
Command line syntax
--nonconst-ref-anachronism
--no-nonconst-ref-anachronism
Default: --no-nonconst-ref-anachronism
Description
Enable or disable the anachronism of allowing a reference to nonconst to bind to a class rvalue of the
right type. This anachronism is also enabled by the --anachronisms option.
Related information
C++ compiler option --anachronisms (Enable C++ anachronisms)
Section 2.2.3, Anachronisms Accepted
474
Tool Options
C++ compiler option: --nonstd-default-arg-deduction
Menu entry
-
Command line syntax
--nonstd-default-arg-deduction
Description
Controls whether default arguments are retained as part of deduced function types. The C++ standard
requires that default arguments not be part of deduced function types. This option changes that behavior.
Related information
-
475
TASKING VX-toolset for ARM User Guide
C++ compiler option: --nonstd-instantiation-lookup
Menu entry
-
Command line syntax
--nonstd-instantiation-lookup
Description
Controls whether the lookup of names during template instantiation should, instead of the normal lookup
rules, use rules that were part of the C++98 working paper for some time during the development of the
standard. In this mode, names are looked up in both the namespace of the template definition and in the
namespace in which a template entity was first referenced in a way that would require an instantiation.
Related information
-
476
Tool Options
C++ compiler option: --nonstd-qualifier-deduction
Menu entry
-
Command line syntax
--nonstd-qualifier-deduction
Description
Controls whether non-standard template argument deduction should be performed in the qualifier portion
of a qualified name. With this feature enabled, a template argument for the template parameter T can be
deduced in contexts like A<T>::B or T::B. The standard deduction mechanism treats these as
non-deduced contexts that use the values of template parameters that were either explicitly specified or
deduced elsewhere.
Related information
-
477
TASKING VX-toolset for ARM User Guide
C++ compiler option: --nonstd-using-decl
Menu entry
-
Command line syntax
--nonstd-using-decl
Default: non-standard using declarations are not allowed.
Description
Allow a non-member using declaration that specifies an unqualified name.
Related information
-
478
Tool Options
C++ compiler option: --no-parse-templates
Menu entry
-
Command line syntax
--no-parse-templates
Default: parsing of nonclass templates is enabled.
Description
Disable the parsing of nonclass templates in their generic form (i.e., even if they are not really instantiated).
It is done by default if dependent name processing is enabled.
Related information
C++ compiler option --no-dep-name (Disable dependent name processing)
479
TASKING VX-toolset for ARM User Guide
C++ compiler option: --no-pch-messages
Menu entry
-
Command line syntax
--no-pch-messages
Default: a message is displayed indicating that a precompiled header file was created or used in the
current compilation. For example,
"test.cc": creating precompiled header file "test.pch"
Description
Disable the display of a message indicating that a precompiled header file was created or used in the
current compilation.
Related information
C++ compiler option --pch (Automatic PCH mode)
C++ compiler option --use-pch (Use precompiled header file)
C++ compiler option --create-pch (Create precompiled header file)
Section 2.10, Precompiled Headers
480
Tool Options
C++ compiler option: --no-preprocessing-only
Menu entry
Eclipse always does a full compilation.
Command line syntax
--no-preprocessing-only
Description
You can use this option in conjunction with the options that normally cause the C++ compiler to do
preprocessing only (e.g., --preprocess, etc.) to specify that a full compilation should be done (not just
preprocessing). When used with the implicit inclusion option, this makes it possible to generate a
preprocessed output file that includes any implicitly included files.
Example
cparm --preprocess --implicit-include --no-preprocessing-only test.cc
Related information
C++ compiler option --preprocess (Preprocessing only)
C++ compiler option --implicit-include (Implicit source file inclusion)
481
TASKING VX-toolset for ARM User Guide
C++ compiler option: --no-stdarg-builtin
Menu entry
-
Command line syntax
--no-stdarg-builtin
Description
Disable special treatment of the stdarg.h header. When enabled, the stdarg.h header is treated as
a built-in, and references to its macros ("va_start" et al) are passed through as such in generated C
code.
Related information
-
482
Tool Options
C++ compiler option: --no-stdinc / --no-stdstlinc
Menu entry
1.
Select C/C++ Compiler » Miscellaneous.
2.
Add the option --no-stdinc or --no-stdstlinc to the Additional options field.
Command line syntax
--no-stdinc
--no-stdstlinc
Description
With option --no-stdinc you tell the C++ compiler not to look in the default include directory relative to
the installation directory, when searching for standard include files.
With option --no-stdstlinc you tell the C++ compiler not to look in the default include.stl directory
relative to the installation directory, when searching for standard STL include files.
This way the C++ compiler only searches in the include file search paths you specified.
Related information
Section 5.2, How the C++ Compiler Searches Include Files
483
TASKING VX-toolset for ARM User Guide
C++ compiler option: --no-typename
Menu entry
-
Command line syntax
--no-typename
Default: typename is recognized as a keyword.
Description
Disable recognition of the typename keyword.
Related information
C++ compiler option --no-implicit-typename (Disable implicit typename determination)
484
Tool Options
C++ compiler option: --no-use-before-set-warnings (-j)
Menu entry
1.
Select C/C++ Compiler » Diagnostics.
2.
Enable the option Suppress C++ compiler "used before set" warnings.
Command line syntax
--no-use-before-set-warnings
-j
Description
Suppress warnings on local automatic variables that are used before their values are set.
Related information
C++ compiler option --no-warnings (Suppress all warnings)
485
TASKING VX-toolset for ARM User Guide
C++ compiler option: --no-warnings (-w)
Menu entry
1.
Select C/C++ Compiler » Diagnostics.
2.
Enable the option Suppress all warnings.
Command line syntax
--no-warnings
-w
Description
With this option you suppress all warning messages. Error messages are still issued.
Related information
C++ compiler option --warnings-as-errors (Treat warnings as errors)
486
Tool Options
C++ compiler option: --nullptr
Menu entry
-
Command line syntax
--nullptr
--no-nullptr
Default: --no-nullptr
Default in C++0x mode: --nullptr
Description
Enable or disable support for the C++0x nullptr keyword.
This feature is implicitly enabled in C++0x mode.
Related information
C++ compiler option --c++0x (C++0x language extensions)
487
TASKING VX-toolset for ARM User Guide
C++ compiler option: --old-for-init
Menu entry
-
Command line syntax
--old-for-init
Description
Control the scope of a declaration in a for-init-statement. The old (cfront-compatible) scoping rules
mean the declaration is in the scope to which the for statement itself belongs; the default
(standard-conforming) rules in effect wrap the entire for statement in its own implicitly generated scope.
Related information
C++ compiler option --no-for-init-diff-warning (Disable warning for old for-scoping)
488
Tool Options
C++ compiler option: --old-line-commands
Menu entry
-
Command line syntax
--old-line-commands
Description
When generating source output, put out #line directives in the form # nnn instead of #line nnn.
Example
To do preprocessing only, without comments and with old style line control information, enter:
cparm --preprocess --old-line-commands test.cc
Related information
C++ compiler option --preprocess (Preprocessing only)
489
TASKING VX-toolset for ARM User Guide
C++ compiler option: --old-specializations
Menu entry
-
Command line syntax
--old-specializations
Description
Enable acceptance of old-style template specializations (that is, specializations that do not use the
template<> syntax).
Related information
-
490
Tool Options
C++ compiler option: --option-file (-f)
Menu entry
-
Command line syntax
--option-file=file
-f file
Description
This option is primarily intended for command line use. Instead of typing all options on the command line,
you can create an option file which contains all options and flags you want to specify. With this option
you specify the option file to the C++ compiler.
Use an option file when the command line would exceed the limits of the operating system, or just to store
options and save typing.
You can specify the option --option-file multiple times.
Format of an option file
• Multiple arguments on one line in the option file are allowed.
• To include whitespace in an argument, surround the argument with single or double quotes.
• If you want to use single quotes as part of the argument, surround the argument by double quotes and
vise versa:
"This has a single quote ' embedded"
'This has a double quote " embedded'
'This has a double quote " and a single quote '"' embedded"
• When a text line reaches its length limit, use a \ to continue the line. Whitespace between quotes is
preserved.
"This is a continuation \
line"
-> "This is a continuation line"
• It is possible to nest command line files up to 25 levels.
491
TASKING VX-toolset for ARM User Guide
Example
Suppose the file myoptions contains the following lines:
--embedded-c++
--define=DEMO=1
test.cc
Specify the option file to the C++ compiler:
cparm --option-file=myoptions
This is equivalent to the following command line:
cparm --embedded-c++ --define=DEMO=1 test.cc
Related information
-
492
Tool Options
C++ compiler option: --output (-o)
Menu entry
Eclipse names the output file always after the C++ source file.
Command line syntax
--output-file=file
-o file
Default: module name with .ic suffix.
Description
With this option you can specify another filename for the output file of the C++ compiler. Without this
option the basename of the C++ source file is used with extension .ic.
You can also use this option in combination with the option --preprocess (-E) to redirect the preprocessing
output to a file.
Example
To create the file output.ic instead of test.ic, enter:
cparm --output=output.ic test.cc
To use the file my.pre as the preprocessing output file, enter:
cparm --preprocess --output=my.pre test.cc
Related information
C++ compiler option --preprocess (Preprocessing)
493
TASKING VX-toolset for ARM User Guide
C++ compiler option: --pch
Menu entry
1.
Select C/C++ Compiler » Precompiled C++ Headers.
2.
Enable the option Automatically use/create precompiled header file.
Command line syntax
--pch
Description
Automatically use and/or create a precompiled header file. If --use-pch or --create-pch (manual PCH
mode) appears on the command line following this option, its effect is erased.
Related information
C++ compiler option --use-pch (Use precompiled header file)
C++ compiler option --create-pch (Create precompiled header file)
Section 2.10, Precompiled Headers
494
Tool Options
C++ compiler option: --pch-dir
Menu entry
1.
Select C/C++ Compiler » Precompiled C++ Headers.
2.
Enter a path in the Precompiled header file directory.
Command line syntax
--pch-dir=directory-name
Description
Specify the directory in which to search for and/or create a precompiled header file. This option may be
used with automatic PCH mode (--pch) or manual PCH mode (--create-pch or --use-pch).
Example
To use the directory c:\usr\include\pch to automatically create precompiled header files, enter:
cparm --pch-dir=c:\usr\include\pch --pch test.cc
Related information
C++ compiler option --pch (Automatic PCH mode)
C++ compiler option --use-pch (Use precompiled header file)
C++ compiler option --create-pch (Create precompiled header file)
Section 2.10, Precompiled Headers
495
TASKING VX-toolset for ARM User Guide
C++ compiler option: --pch-verbose
Menu entry
-
Command line syntax
--pch-verbose
Description
In automatic PCH mode, for each precompiled header file that cannot be used for the current compilation,
a message is displayed giving the reason that the file cannot be used.
Example
cparm --pch --pch-verbose test.cc
Related information
C++ compiler option --pch (Automatic PCH mode)
Section 2.10, Precompiled Headers
496
Tool Options
C++ compiler option: --pending-instantiations
Menu entry
-
Command line syntax
--pending-instantiations=n
where n is the maximum number of instantiations of a single template.
Default: 64
Description
Specifies the maximum number of instantiations of a given template that may be in process of being
instantiated at a given time. This is used to detect runaway recursive instantiations. If n is zero, there is
no limit.
Example
To specify a maximum of 32 pending instantiations, enter:
cparm --pending-instantiations=32 test.cc
Related information
Section 2.5, Template Instantiation
497
TASKING VX-toolset for ARM User Guide
C++ compiler option: --preprocess (-E)
Menu entry
1.
Select C/C++ Compiler » Preprocessing.
2.
Enable the option Store preprocessor output in <file>.pre.
3.
(Optional) Enable the option Keep comments in preprocessor output.
4.
(Optional) Enable the option Keep #line info in preprocessor output.
Command line syntax
--preprocess[=flags]
-E[flags]
You can set the following flags:
+/-comments
c/C
keep comments
+/-includes
i/I
generate a list of included source files
+/-make
m/M
generate dependencies for make
+/-noline
p/P
strip #line source position information
Default: -ECIMP
Description
With this option you tell the C++ compiler to preprocess the C++ source. Under Eclipse the C++ compiler
sends the preprocessed output to the file name.pre (where name is the name of the C++ source file to
compile). Eclipse also compiles the C++ source.
On the command line, the C++ compiler sends the preprocessed file to stdout. To capture the information
in a file, specify an output file with the option --output.
With --preprocess=+comments you tell the preprocessor to keep the comments from the C++ source
file in the preprocessed output.
With --preprocess=+includes the C++ compiler will generate a list of all included source files. The
preprocessor output is discarded.
With --preprocess=+make the C++ compiler will generate dependency lines that can be used in a
Makefile. The preprocessor output is discarded. The default target name is the basename of the input
file, with the extension .obj. With the option --make-target you can specify a target name which overrules
the default target name.
When implicit inclusion of templates is enabled, the output may indicate false (but safe)
dependencies unless --no-preprocessing-only is also used.
498
Tool Options
With --preprocess=+noline you tell the preprocessor to strip the #line source position information (lines
starting with #line). These lines are normally processed by the assembler and not needed in the
preprocessed output. When you leave these lines out, the output is easier to read.
Example
cparm --preprocess=+comments,-make,-noline test.cc --output=test.pre
The C++ compiler preprocesses the file test.cc and sends the output to the file test.pre. Comments
are included but no dependencies are generated and the line source position information is not stripped
from the output file.
Related information
C++ compiler option --no-preprocessing-only (Force full compilation)
C++ compiler option --dep-file (Generate dependencies in a file)
C++ compiler option --make-target (Specify target name for -Em output)
499
TASKING VX-toolset for ARM User Guide
C++ compiler option: --remarks (-r)
Menu entry
1.
Select C/C++ Compiler » Diagnostics.
2.
Enable the option Issue remarks on C++ code.
Command line syntax
--remarks
-r
Description
Issue remarks, which are diagnostic messages even milder than warnings.
Related information
Section 5.3, C++ Compiler Error Messages
500
Tool Options
C++ compiler option: --remove-unneeded-entities
Menu entry
-
Command line syntax
--remove-unneeded-entities
Description
Enable an optimization to remove types, variables, routines, and related constructs that are not really
needed. Something may be referenced but unneeded if it is referenced only by something that is itself
unneeded; certain entities, such as global variables and routines defined in the translation unit, are always
considered to be needed.
Related information
-
501
TASKING VX-toolset for ARM User Guide
C++ compiler option: --rtti
Menu entry
1.
Select C/C++ Compiler » Language.
2.
Enable the option Support for C++ RTTI (run-time type information).
Command line syntax
--rtti
Default: RTTI (run-time type information) features are disabled.
Description
Enable support for RTTI (run-time type information) features: dynamic_cast, typeid.
The macro __RTTI is defined when RTTI support is enabled.
Related information
-
502
Tool Options
C++ compiler option: --rvalue-ctor-is-not-copy-ctor
Menu entry
-
Command line syntax
--rvalue-ctor-is-not-copy-ctor
Description
Do not treat an rvalue (or "move") constructor as a copy constructor. In the default situation, where rvalue
constructors are treated as copy constructors, a user-declared rvalue constructor will inhibit the implicit
generation of a traditional copy constructor.
Related information
-
503
TASKING VX-toolset for ARM User Guide
C++ compiler option: --rvalue-refs
Menu entry
-
Command line syntax
--rvalue-refs
--no-rvalue-refs
Default: --no-rvalue-refs
Default in C++0x mode: --rvalue-refs
Description
Enable or disable support for rvalue references.
This feature is implicitly enabled in C++0x mode.
Related information
C++ compiler option --c++0x (C++0x language extensions)
504
Tool Options
C++ compiler option: --schar (-s)
Menu entry
1.
Select C/C++ Compiler » Language.
2.
Disable the option Treat "char" variables as unsigned.
Command line syntax
--schar
-s
Description
With this option char is the same as signed char. This is the default.
When plain char is signed, the macro __SIGNED_CHARS__ is defined.
Related information
C++ compiler option --uchar (Plain char is unsigned)
Section 1.1, Data Types
505
TASKING VX-toolset for ARM User Guide
C++ compiler option: --signed-bitfields
Menu entry
1.
Select C/C++ Compiler » Language.
2.
Enable the option Treat "int" bit-fields as signed.
Command line syntax
--signed-bitfields
Description
For bit-fields it depends on the implementation whether a plain int is treated as signed int or unsigned
int. By default an int bit-field is treated as unsigned int. This offers the best performance. With this
option you tell the C++ compiler to treat int bit-fields as signed int. In this case, you can still add the
keyword unsigned to treat a particular int bit-field as unsigned.
Related information
C compiler option --signed-bitfields
C++ compiler option --unsigned-bitfields
Section 1.1, Data Types
506
Tool Options
C++ compiler option: --special-subscript-cost
Menu entry
-
Command line syntax
--special-subscript-cost
Description
Enable a special nonstandard weighting of the conversion to the integral operand of the [] operator in
overload resolution.
This is a compatibility feature that may be useful with some existing code. With this feature enabled, the
following code compiles without error:
struct A {
A();
operator int *();
int operator[](unsigned);
};
void main() {
A a;
a[0];
// Ambiguous, but allowed with this option
// operator[] is chosen
}
Related information
-
507
TASKING VX-toolset for ARM User Guide
C++ compiler option: --strict (-A)
Menu entry
1.
Select C/C++ Compiler » Language.
2.
Disable the option Allow non-ANSI/ISO C++ features.
Command line syntax
--strict
-A
Default: non-ANSI/ISO C++ features are enabled.
Description
Enable strict ANSI/ISO mode, which provides diagnostic messages when non-standard features are used,
and disables features that conflict with ANSI/ISO C or C++. All ANSI/ISO violations are issued as errors.
Example
To enable strict ANSI mode, with error diagnostic messages, enter:
cparm --strict test.cc
Related information
C++ compiler option --strict-warnings (Strict ANSI/ISO mode with warnings)
508
Tool Options
C++ compiler option: --strict-warnings (-a)
Menu entry
-
Command line syntax
--strict-warnings
-a
Default: non-ANSI/ISO C++ features are enabled.
Description
This option is similar to the option --strict, but all violations are issued as warnings instead of errors.
Example
To enable strict ANSI mode, with warning diagnostic messages, enter:
cparm --strict-warnings test.cc
Related information
C++ compiler option --strict (Strict ANSI/ISO mode with errors)
509
TASKING VX-toolset for ARM User Guide
C++ compiler option: --suppress-vtbl
Menu entry
1.
Select C/C++ Compiler » Miscellaneous.
2.
Enable the option Suppress definition of virtual function tables (C++).
Command line syntax
--suppress-vtbl
Description
Suppress definition of virtual function tables in cases where the heuristic used by the C++ compiler to
decide on definition of virtual function tables provides no guidance. The virtual function table for a class
is defined in a compilation if the compilation contains a definition of the first non-inline non-pure virtual
function of the class. For classes that contain no such function, the default behavior is to define the virtual
function table (but to define it as a local static entity). The --suppress-vtbl option suppresses the definition
of the virtual function tables for such classes, and the --force-vtbl option forces the definition of the virtual
function table for such classes. --force-vtbl differs from the default behavior in that it does not force the
definition to be local.
Related information
C++ compiler option --force-vtbl (Force definition of virtual function tables)
510
Tool Options
C++ compiler option: --sys-include
Menu entry
-
Command line syntax
--sys-include=directory,...
Description
Change the algorithm for searching system include files whose names do not have an absolute pathname
to look in directory.
Example
To add the directory c:\proj\include to the system include file search path, enter:
cparm --sys-include=c:\proj\include test.cc
Related information
C++ compiler option --include-directory (Add directory to include file search path)
Section 5.2, How the C++ Compiler Searches Include Files
511
TASKING VX-toolset for ARM User Guide
C++ compiler option: --template-directory
Menu entry
-
Command line syntax
--template-directory=directory,...
Description
Specifies a directory name to be placed on the exported template search path. The directories are used
to find the definitions of exported templates (.et files) and are searched in the order in which they are
specified on the command line. The current directory is always the first entry on the search path.
Example
To add the directory export to the exported template search path, enter:
cparm --template-directory=export test.cc
Related information
Section 2.5.5, Exported Templates
512
Tool Options
C++ compiler option: --template-typedefs-in-diagnostic
Menu entry
-
Command line syntax
--template-typedefs-in-diagnostic
Default: typedefs declared in template classes are not replaced with their underlying type.
Description
Enable the replacement of typedefs declared in template classes with their underlying type. Diagnostic
messages are often more useful when such typedefs are replaced.
Related information
-
513
TASKING VX-toolset for ARM User Guide
C++ compiler option: --thumb
Menu entry
1.
Select C/C++ Compiler » Code Generation.
2.
Enable the option Use Thumb instruction set.
Command line syntax
--thumb
Description
Generate code in Thumb mode. The Thumb instruction set is a subset of the ARM instruction set which
is encoded using 16-bit instructions instead of 32-bit instructions.
The macro __THUMB__ is defined when the Thumb mode is enabled.
Related information
-
514
Tool Options
C++ compiler option: --timing
Menu entry
-
Command line syntax
--timing
Default: no timing information is generated.
Description
Generate compilation timing information. This option causes the C++ compiler to display the amount of
CPU time and elapsed time used by each phase of the compilation and a total for the entire compilation.
Example
cparm --timing test.cc
processed 180 lines at 8102 lines/min
Related information
-
515
TASKING VX-toolset for ARM User Guide
C++ compiler option: --trace-includes
Menu entry
-
Command line syntax
--trace-includes
Description
Output a list of the names of files #included to the error output file. The source file is compiled normally
(i.e. it is not just preprocessed) unless another option that causes preprocessing only is specified.
Example
cparm --trace-includes test.cc
iostream.h
string.h
Related information
C++ compiler option --preprocess (Preprocessing only)
516
Tool Options
C++ compiler option: --type-traits-helpers
Menu entry
-
Command line syntax
--type-traits-helpers
--no-type-traits-helpers
Default: in C++ mode type traits helpers are enabled by default. In GNU C++ mode, type traits helpers
are never enabled by default.
Description
Enable or disable type traits helpers (like __is_union and __has_virtual_destructor). Type traits
helpers are meant to ease the implementation of ISO/IEC TR 19768.
The macro __TYPE_TRAITS_ENABLED is defined when type traits pseudo-functions are enabled.
Related information
-
517
TASKING VX-toolset for ARM User Guide
C++ compiler option: --uchar (-u)
Menu entry
1.
Select C/C++ Compiler » Language.
2.
Enable the option Treat "char" variables as unsigned.
Command line syntax
--uchar
-u
Description
By default char is the same as specifying signed char. With this option char is the same as unsigned
char.
Related information
C++ compiler option --schar (Plain char is signed)
Section 1.1, Data Types
518
Tool Options
C++ compiler option: --uliterals
Menu entry
-
Command line syntax
--uliterals
Default: U-literals are not recognized.
Description
Enable recognition of U-literals (string literals of the forms U"..." and u"...", and character literals of
the forms U'...' and u'...').
Related information
-
519
TASKING VX-toolset for ARM User Guide
C++ compiler option: --undefine (-U)
Menu entry
1.
Select C/C++ Compiler » Preprocessing
The Defined symbols box shows the symbols that are currently defined.
2.
To remove a defined symbol, select the symbol in the Defined symbols box and click on the Delete
button.
Command line syntax
--undefine=macro_name
-Umacro_name
Description
Remove any initial definition of macro_name as in #undef. --undefine options are processed after all
--define options have been processed.
You cannot undefine a predefined macro as specified in Section 2.9, Predefined Macros, except for:
__STDC__
__cplusplus
__SIGNED_CHARS__
Example
To undefine the predefined macro __cplusplus:
cparm --undefine=__cplusplus test.cc
Related information
C++ compiler option --define (Define preprocessor macro)
Section 2.9, Predefined Macros
520
Tool Options
C++ compiler option: --unsigned-bitfields
Menu entry
1.
Select C/C++ Compiler » Language.
2.
Disable the option Treat "int" bit-fields as signed.
Command line syntax
--unsigned-bitfields
Description
For bit-fields it depends on the implementation whether a plain int is treated as signed int or unsigned
int. By default (this option) an int bit-field is treated as unsigned int.This offers the best performance.
Related information
C++ compiler option --signed-bitfields
C compiler option --signed-bitfields
Section 1.1, Data Types
521
TASKING VX-toolset for ARM User Guide
C++ compiler option: --use-pch
Menu entry
1.
Select C/C++ Compiler » Precompiled C++ Headers.
2.
Enter a filename in the Use precompiled header file field.
Command line syntax
--use-pch=filename
Description
Use a precompiled header file of the specified name as part of the current compilation. If --pch (automatic
PCH mode) or --create-pch appears on the command line following this option, its effect is erased.
Example
To use the precompiled header file with the name test.pch, enter:
cparm --use-pch=test.pch test.cc
Related information
C++ compiler option --pch (Automatic PCH mode)
C++ compiler option --create-pch (Create precompiled header file)
Section 2.10, Precompiled Headers
522
Tool Options
C++ compiler option: --using-std
Menu entry
-
Command line syntax
--using-std
Default: implicit use of the std namespace is disabled.
Description
Enable implicit use of the std namespace when standard header files are included. Note that this does
not do the equivalent of putting a "using namespace std;" in the program to allow old programs to
be compiled with new header files; it has a special and localized meaning related to the TASKING versions
of certain header files, and is unlikely to be of much use to end-users of the TASKING C++ compiler.
Related information
C++ compiler option --namespaces (Support for namespaces)
Section 2.4, Namespace Support
523
TASKING VX-toolset for ARM User Guide
C++ compiler option: --variadic-macros
Menu entry
-
Command line syntax
--variadic-macros
--no-variadic-macros
Default: --no-variadic-macros
Default in C++0x mode: --variadic-macros
Description
Allow or do not allow macros with a variable number of arguments.
This feature is implicitly enabled in C++0x mode.
Related information
C++ compiler option --extended-variadic-macros (Allow extended variadic macros)
C++ compiler option --c++0x (C++0x language extensions)
524
Tool Options
C++ compiler option: --version (-V)
Menu entry
-
Command line syntax
--version
-V
Description
Display version information. The C++ compiler ignores all other options or input files.
525
TASKING VX-toolset for ARM User Guide
C++ compiler option: --vla
Menu entry
-
Command line syntax
--vla
Description
Enable support for variable length arrays. This allows the declaration and use of arrays of automatic
storage duration with dimensions that are fixed at run-time.
526
Tool Options
C++ compiler option: --warnings-as-errors
Menu entry
1.
Select Global Options.
2.
Enable the option Treat warnings as errors.
Command line syntax
--warnings-as-errors[=number,...]
Description
If the C++ compiler encounters an error, it stops compiling. When you use this option without arguments,
you tell the C++ compiler to treat all warnings as errors. This means that the exit status of the C++ compiler
will be non-zero after one or more compiler warnings. As a consequence, the C++ compiler now also
stops after encountering a warning.
You can also limit this option to specific warnings by specifying a comma-separated list of warning numbers.
Related information
C++ compiler option --no-warnings (Suppress all warnings)
527
TASKING VX-toolset for ARM User Guide
C++ compiler option: --wchar_t-keyword
Menu entry
1.
Select C/C++ Compiler » Language.
2.
Enable the option Allow the 'wchar_t' keyword (C++).
Command line syntax
--wchar_t-keyword
Default: wchar_t is not recognized as a keyword.
Description
Enable recognition of wchar_t as a keyword.
The macro _WCHAR_T is defined when wchar_t is recognized as a keyword.
Related information
-
528
Tool Options
C++ compiler option: --xref-file (-X)
Menu entry
-
Command line syntax
--xref-file=file
-Xfile
Description
Generate cross-reference information in a file. For each reference to an identifier in the source program,
a line of the form
symbol_id name X file-name line-number column-number
is written, where X is
D
for definition;
d
for declaration (that is, a declaration that is not a definition);
M
for modification;
A
for address taken;
U
for used;
C
for changed (but actually meaning used and modified in a single operation, such as an
increment);
R
for any other kind of reference, or
E
for an error in which the kind of reference is indeterminate.
symbol-id is a unique decimal number for the symbol. The fields of the above line are separated by tab
characters.
Related information
-
529
TASKING VX-toolset for ARM User Guide
13.4. Assembler Options
This section lists all assembler options. All options are the same for all three assemblers, asarm (mixed
ARM/Thumb), asarma (ARM only) and asarmt (Thumb only). In the examples we only use asarm.
Options in Eclipse versus options on the command line
Most command line options have an equivalent option in Eclipse but some options are only available on
the command line. Eclipse invokes the assembler via the control program. Therefore, it uses the syntax
of the control program to pass options and files to the assembler. If there is no equivalent option in Eclipse,
you can specify a command line option in Eclipse as follows:
1.
From the Project menu, select Properties for
The Properties dialog appears.
2.
In the left pane, expand C/C++ Build and select Settings.
In the right pane the Settings appear.
3.
On the Tool Settings tab, select Assembler » Miscellaneous.
4.
In the Additional options field, enter one or more command line options.
Because Eclipse uses the control program, Eclipse automatically precedes the option with -Wa to
pass the option via the control program directly to the assembler.
Note that the options you enter in the Assembler page are not only used for hand-coded assembly
files, but also for the assembly files generated by the compiler.
Be aware that some command line options are not useful in Eclipse or just do not have any effect. For
example, the option -V displays version header information and has no effect in Eclipse.
Short and long option names
Options can have both short and long names. Short option names always begin with a single minus (-)
character, long option names always begin with two minus (--) characters.You can abbreviate long option
names as long as it forms a unique name. You can mix short and long option names on the command
line.
Options can have flags or suboptions. To switch a flag 'on', use a lower case letter or a +longflag. To
switch a flag off, use an upper case letter or a -longflag. Separate longflags with commas. The following
two invocations are equivalent:
asarm -l -LeM test.src
asarm --list-file --list-format=+symbol,-macro test.src
When you do not specify an option, a default value may become active.
530
Tool Options
Assembler option: --case-insensitive (-c)
Menu entry
1.
Select Assembler » Symbols.
2.
Enable the option Case insensitive identifiers.
Command line syntax
--case-insensitive
-c
Default: case sensitive
Description
With this option you tell the assembler not to distinguish between upper and lower case characters. By
default the assembler considers upper and lower case characters as different characters.
Assembly source files that are generated by the compiler must always be assembled case sensitive.
When you are writing your own assembly code, you may want to specify the case insensitive mode.
Example
When assembling case insensitive, the label LabelName is the same label as labelname.
asarm --case-insensitive test.src
Related information
-
531
TASKING VX-toolset for ARM User Guide
Assembler option: --check
Menu entry
-
Command line syntax
--check
Description
With this option you can check the source code for syntax errors, without generating code. This saves
time in developing your application.
The assembler reports any warnings and/or errors.
This option is available on the command line only.
Related information
C compiler option --check (Check syntax)
532
Tool Options
Assembler option: --code-endianness
Menu entry
-
Command line syntax
--code-endianness=endianness
You can specify the following endianness:
big
b
Big endian
little
l
Little endian (default)
Description
This option tells the assembler what code endianness you want, little-endian (least significant byte of a
word at lowest byte code address) or big-endian (most significant byte of a word at lowest byte code
address). The code endianness used must be a valid one for the architecture you are assembling for.
This option is only available for ARMv7R.
Related information
Assembler option --endianness (Data endianness)
533
TASKING VX-toolset for ARM User Guide
Assembler option: --cpu (-C)
Menu entry
1.
Expand C/C++ Build and select Processor.
2.
From the Processor Selection list, make a selection by Architecture, Core one of the manufacturers.
Command line syntax
--cpu=architecture
-Carchitecture
You can specify the following architectures:
ARMv6M
Assemble for ARMv6-M architecture
ARMv7M
Assemble for ARMv7-M architecture
ARMv7EM
Assemble for ARMv7E-M architecture
ARMv7R
Assemble for ARMv7-R architecture
Description
With this option you specify the ARM architecture for which you create your application. The architecture
determines which instructions are valid and which are not. The default architecture is ARMv7M and the
complete list of supported architectures is: ARMv6-M, ARMv7-M, ARMv7E-M or ARMv7-R.
Assembly code can check the value of the option by means of the built-in function @CPU(). Architecture
ARMv7-M only supports the Thumb-2 instruction set, i.e. it has no ARM execution state.
To avoid conflicts, make sure you specify the same architecture as you did for the compiler (Eclipse and
the control program do this automatically).
Related information
Assembly function @CPU()
Control program option --cpu (Select architecture)
C compiler option --cpu (Select architecture)
534
Tool Options
Assembler option: --debug-info (-g)
Menu entry
1.
Select Assembler » Symbols.
2.
Select an option from the Generate symbolic debug list.
Command line syntax
--debug-info[=flags]
-g[flags]
You can set the following flags:
+/-asm
a/A
Assembly source line information
+/-hll
h/H
Pass high level language debug information (HLL)
+/-local
l/L
Assembler local symbols debug information
+/-smart
s/S
Smart debug information
Default: --debug-info=+hll
Default (without flags): --debug-info=+smart
Description
With this option you tell the assembler which kind of debug information to emit in the object file.
You cannot specify --debug-info=+asm,+hll. Either the assembler generates assembly source line
information, or it passes HLL debug information.
When you specify --debug-info=+smart, the assembler selects which flags to use. If high level language
information is available in the source file, the assembler passes this information (same as
--debug-info=-asm,+hll,-local). If not, the assembler generates assembly source line information (same
as --debug-info=+asm,-hll,+local).
With --debug-info=AHLS the assembler does not generate any debug information.
Related information
-
535
TASKING VX-toolset for ARM User Guide
Assembler option: --define (-D)
Menu entry
1.
Select Assembler » Preprocessing.
The Defined symbols box right-below shows the symbols that are currently defined.
2.
To define a new symbol, click on the Add button in the Defined symbols box.
3.
Type the symbol definition (for example, demo=1)
Use the Edit and Delete button to change a macro definition or to remove a macro from the list.
Command line syntax
--define=macro_name[=macro_definition]
-Dmacro_name[=macro_definition]
Description
With this option you can define a macro and specify it to the assembler preprocessor. If you only specify
a macro name (no macro definition), the macro expands as '1'.
You can specify as many macros as you like. Simply use the Add button to add new macro definitions.
On the command line, use the option --define (-D) multiple times. If the command line exceeds the limit
of the operating system, you can define the macros in an option file which you then must specify to the
assembler with the option --option-file (-f) file.
Defining macros with this option (instead of in the assembly source) is, for example, useful in combination
with conditional assembly as shown in the example below.
This option has the same effect as defining symbols via the .DEFINE, .SET, and .EQU directives.
(similar to #define in the C language). With the .MACRO directive you can define more complex
macros.
Example
Consider the following assembly program with conditional code to assemble a demo program and a real
program:
.IF DEMO == 1
...
; instructions for demo application
.ELSE
...
; instructions for the real application
.ENDIF
536
Tool Options
You can now use a macro definition to set the DEMO flag:
asarm --define=DEMO test.src
asarm --define=DEMO=1 test.src
Note that both invocations have the same effect.
Related information
Assembler option --option-file (Specify an option file)
537
TASKING VX-toolset for ARM User Guide
Assembler option: --dep-file
Menu entry
-
Command line syntax
--dep-file[=file]
Description
With this option you tell the assembler to generate dependency lines that can be used in a Makefile. The
dependency information will be generated in addition to the normal output file.
By default, the information is written to a file with extension .d. When you specify a filename, all
dependencies will be combined in the specified file.
Example
asarm --dep-file=test.dep test.src
The assembler assembles the file test.src, which results in the output file test.obj, and generates
dependency lines in the file test.dep.
Related information
Assembler option --make-target (Specify target name for --dep-file output)
538
Tool Options
Assembler option: --diag
Menu entry
1.
From the Window menu, select Show View » Other » TASKING » Problems.
The Problems view is added to the current perspective.
2.
In the Problems view right-click on a message.
A popup menu appears.
3.
Select Detailed Diagnostics Info.
A dialog box appears with additional information.
Command line syntax
--diag=[format:]{all | nr,...}
You can set the following output formats:
html
HTML output.
rtf
Rich Text Format.
text
ASCII text.
Default format: text
Description
With this option you can ask for an extended description of error messages in the format you choose.
The output is directed to stdout (normally your screen) and in the format you specify. You can specify the
following formats: html, rtf or text (default). To create a file with the descriptions, you must redirect the
output.
With the suboption all, the descriptions of all error messages are given. If you want the description of one
or more selected error messages, you can specify the error message numbers, separated by commas.
Example
To display an explanation of message number 244, enter:
asarm --diag=244
This results in the following message and explanation:
W244: additional input files will be ignored
The assembler supports only a single input file. All other input files are ignored.
539
TASKING VX-toolset for ARM User Guide
To write an explanation of all errors and warnings in HTML format to file aserrors.html, use redirection
and enter:
asarm --diag=html:all > aserrors.html
Related information
Section 7.6, Assembler Error Messages
540
Tool Options
Assembler option: --emit-locals
Menu entry
1.
Select Assembler » Symbols.
2.
Enable or disable one or both of the following options:
• Emit local EQU symbols
• Emit mapping symbols ($a, $t, $d)
• Emit local non-EQU symbols
Command line syntax
--emit-locals[=flag,...]
You can set the following flags:
+/-equs
e/E
emit local EQU symbols
+/-mappings
m/M
emit mapping symbols ($a, $t, $d)
+/-symbols
s/S
emit local non-EQU symbols
Default: --emit-locals=+mappings,+symbols
Description
With the option --emit-locals=+equs the assembler also emits local EQU symbols to the object file.
Normally, only global symbols, mapping symbols and non-EQU local symbols are emitted. Having local
symbols in the object file can be useful for debugging.
Mapping symbols are local symbols inside code sections which mark the start of a range of ARM
instructions ($a), a range of Thumb instructions ($t), or a literal pool a.k.a. data pocket ($d). Also, data
sections start with a $d symbol. The mapping symbol names are made unique with a'.' character suffix
followed by a unique integer, for example: $a.1, $t.2 and $d.3. This option only takes effect if local labels
are emitted as well (default).
Related information
Assembler directive .EQU
541
TASKING VX-toolset for ARM User Guide
Assembler option: --endianness
Menu entry
1.
Select Global Options.
2.
Specify the Endianness:Little-endian mode or Big-endian mode.
Command line syntax
--endianness=endianness
-B
--big-endian
You can specify the following endianness:
big
b
Big endian
little
l
Little endian (default)
Description
By default, the assembler generates object files with instructions and data in little-endian format (least
significant byte of a word at lowest byte address). With --endianness=big the assembler generates object
files in big-endian format (most significant byte of a word at lowest byte address). -B is an alias for option
--endianness=big.
The endianness is reflected in the list file.
Assembly code can check the setting of this option by means of the built-in assembly function
@BIGENDIAN().
Related information
Assembly function @BIGENDIAN()
Assembler option --code-endianness (Code endianness)
542
Tool Options
Assembler option: --error-file
Menu entry
-
Command line syntax
--error-file[=file]
Description
With this option the assembler redirects error messages to a file. If you do not specify a filename, the
error file will be named after the input file with extension .ers.
Example
To write errors to errors.ers instead of stderr, enter:
asarm --error-file=errors.ers test.src
Related information
Section 7.6, Assembler Error Messages
543
TASKING VX-toolset for ARM User Guide
Assembler option: --error-limit
Menu entry
1.
Select Assembler » Diagnostics.
2.
Enter a value in the Maximum number of emitted errors field.
Command line syntax
--error-limit=number
Default: 42
Description
With this option you tell the assembler to only emit the specified maximum number of errors. When 0
(null) is specified, the assembler emits all errors. Without this option the maximum number of errors is
42.
Related information
Section 7.6, Assembler Error Messages
544
Tool Options
Assembler option: --help (-?)
Menu entry
-
Command line syntax
--help[=item]
-?
You can specify the following arguments:
options
Show extended option descriptions
Description
Displays an overview of all command line options. When you specify the argument options you can list
detailed option descriptions.
Example
The following invocations all display a list of the available command line options:
asarm -?
asarm --help
asarm
To see a detailed description of the available options, enter:
asarm --help=options
Related information
-
545
TASKING VX-toolset for ARM User Guide
Assembler option: --include-directory (-I)
Menu entry
1.
Select Assembler » Include Paths.
The Include paths box shows the directories that are added to the search path for include files.
2.
To define a new directory for the search path, click on the Add button in the Include paths box.
3.
Type or select a path.
Use the Edit and Delete button to change a path or to remove a path from the list.
Command line syntax
--include-directory=path,...
-Ipath,...
Description
With this option you can specify the path where your include files are located. A relative path will be
relative to the current directory,
The order in which the assembler searches for include files is:
1. The pathname in the assembly file and the directory of the assembly source.
2. The path that is specified with this option.
3. The path that is specified in the environment variable ASARMINC when the product was installed.
4. The default directory $(PRODDIR)\include.
Example
Suppose that the assembly source file test.src contains the following lines:
.INCLUDE 'myinc.inc'
You can call the assembler as follows:
asarm --include-directory=c:\proj\include test.src
First the assembler looks for the file myinc.inc in the directory where test.src is located. If it does
not find the file, it looks in the directory c:\proj\include (this option). If the file is still not found, the
assembler searches in the environment variable and then in the default include directory.
546
Tool Options
Related information
Assembler option --include-file (Include file at the start of the input file)
547
TASKING VX-toolset for ARM User Guide
Assembler option: --include-file (-H)
Menu entry
1.
Select Assembler » Preprocessing.
The Pre-include files box shows the files that are currently included before the assembling starts.
2.
To define a new file, click on the Add button in the Pre-include files box.
3.
Type the full path and file name or select a file.
Use the Edit and Delete button to change a file name or to remove a file from the list.
Command line syntax
--include-file=file,...
-Hfile,...
Description
With this option (set at project level) you include one extra file at the beginning of the assembly source
file. The specified include file is included before all other includes. This is the same as specifying .INCLUDE
'file' at the beginning of your assembly source.
Example
asarm --include-file=myinc.inc test.src
The file myinc.inc is included at the beginning of test.src before it is assembled.
Related information
Assembler option --include-directory (Add directory to include file search path)
548
Tool Options
Assembler option: --inversions
Menu entry
1.
Select Assembler » Miscellaneous.
2.
Enable the option Allow instruction inversions.
Command line syntax
--inversions
Description
With this option you tell the assembler to try to invert some data processing instructions with an immediate
operand. Inversions are available for MOV/MVN, CMP/CMN, AND/BIC, ADC/SBC, and ADD/SUB.
Example
With this option enabled, you can write
add r1,r2,#-4
and the assembler will generate
sub r1,r2,#4
and instead of
mov r1,0xFFFFFFFF
the assembler will generate
mvn r1,0
Related information
-
549
TASKING VX-toolset for ARM User Guide
Assembler option: --keep-output-files (-k)
Menu entry
Eclipse always removes the object file when errors occur during assembling.
Command line syntax
--keep-output-files
-k
Description
If an error occurs during assembling, the resulting object file (.obj) may be incomplete or incorrect. With
this option you keep the generated object file when an error occurs.
By default the assembler removes the generated object file when an error occurs. This is useful when
you use the make utility. If the erroneous files are not removed, the make utility may process corrupt files
on a subsequent invocation.
Use this option when you still want to use the generated object. For example when you know that a
particular error does not result in a corrupt object file.
Related information
Assembler option --warnings-as-errors (Treat warnings as errors)
550
Tool Options
Assembler option: --list-file (-l)
Menu entry
1.
Select Assembler » List File.
2.
Enable the option Generate list file.
3.
Enable or disable the types of information to be included.
Command line syntax
--list-file[=file]
-l[file]
Default: no list file is generated
Description
With this option you tell the assembler to generate a list file. A list file shows the generated object code
and the relative addresses. Note that the assembler generates a relocatable object file with relative
addresses.
With the optional file you can specify an alternative name for the list file. By default, the name of the list
file is the basename of the source file with the extension .lst.
Related information
Assembler option --list-format (Format list file)
551
TASKING VX-toolset for ARM User Guide
Assembler option: --list-format (-L)
Menu entry
1.
Select Assembler » List File.
2.
Enable the option Generate list file.
3.
Enable or disable the types of information to be included.
Command line syntax
--list-format=flag,...
-Lflags
You can set the following flags:
+/-section
d/D
List section directives (.SECTION)
+/-symbol
e/E
List symbol definition directives
+/-generic-expansion
g/G
List expansion of generic instructions
+/-generic
i/I
List generic instructions
+/-line
l/L
List C preprocessor #line directives
+/-macro
m/M
List macro definitions
+/-empty-line
n/N
List empty source lines and comment lines
+/-conditional
p/P
List conditional assembly
+/-equate
q/Q
List equate and set directives (.EQU, .SET)
+/-relocations
r/R
List relocations characters 'r'
+/-hll
s/S
List HLL symbolic debug informations
+/-equate-values
v/V
List equate and set values
+/-wrap-lines
w/W
Wrap source lines
+/-macro-expansion
x/X
List macro expansions
+/-cycle-count
y/Y
List cycle counts
+/-define-expansion
z/Z
List define expansions
Use the following options for predefined sets of flags:
--list-format=0
-L0
All options disabled
Alias for --list-format=DEGILMNPQRSVWXYZ
--list-format=1
-L1
All options enabled
Alias for --list-format=degilmnpqrsvwxyz
Default: --list-format=dEGilMnPqrsVwXyZ
552
Tool Options
Description
With this option you specify which information you want to include in the list file.
On the command line you must use this option in combination with the option --list-file (-l).
Related information
Assembler option --list-file (Generate list file)
Assembler option --section-info=+list (Display section information in list file)
553
TASKING VX-toolset for ARM User Guide
Assembler option: --make-target
Menu entry
-
Command line syntax
--make-target=name
Description
With this option you can overrule the default target name in the make dependencies generated by the
option --dep-file. The default target name is the basename of the input file, with extension .obj.
Example
asarm --dep-file --make-target=../mytarget.obj test.src
The assembler generates dependency lines with the default target name ../mytarget.obj instead of
test.obj.
Related information
Assembler option --dep-file (Generate dependencies in a file)
554
Tool Options
Assembler option: --no-warnings (-w)
Menu entry
1.
Select Assembler » Diagnostics.
The Suppress warnings box shows the warnings that are currently suppressed.
2.
To suppress a warning, click on the Add button in the Suppress warnings box.
3.
Enter the numbers, separated by commas, of the warnings you want to suppress (for example
201,202). Or you can use the Add button multiple times.
4.
To suppress all warnings, enable the option Suppress all warnings.
Use the Edit and Delete button to change a warning number or to remove a number from the list.
Command line syntax
--no-warnings[=number,...]
-w[number,...]
Description
With this option you can suppresses all warning messages or specific warning messages.
On the command line this option works as follows:
• If you do not specify this option, all warnings are reported.
• If you specify this option but without numbers, all warnings are suppressed.
• If you specify this option with a number, only the specified warning is suppressed. You can specify the
option --no-warnings=number multiple times.
Example
To suppress warnings 201 and 202, enter:
asarm test.src --no-warnings=201,202
Related information
Assembler option --warnings-as-errors (Treat warnings as errors)
555
TASKING VX-toolset for ARM User Guide
Assembler option: --old-syntax
Menu entry
1.
Select Assembler » Miscellaneous.
2.
Disable the option UAL syntax mode.
Command line syntax
--old-syntax
Description
In UAL syntax mode the assembler will not accept instructions which use the pre-UAL syntax and will
select encodings based on the UAL syntax in case both syntaxes are the same.
With this option you can change this default behavior. The assembler will run in pre-UAL mode. The
built-in function @PRE_UAL() will return true, so you can use:
.IF @PRE_UAL()
; <old code>
.ELSE
; <new code>
.ENDIF
Related information
Assembly function @PRE_UAL()
556
Tool Options
Assembler option: --option-file (-f)
Menu entry
1.
Select Assembler » Miscellaneous.
2.
Add the option --option-file to the Additional options field.
Be aware that the options in the option file are added to the assembler options you have set in the
other pages. Only in extraordinary cases you may want to use them in combination.
Command line syntax
--option-file=file,...
-f file,...
Description
This option is primarily intended for command line use. Instead of typing all options on the command line,
you can create an option file which contains all options and flags you want to specify. With this option
you specify the option file to the assembler.
Use an option file when the command line would exceed the limits of the operating system, or just to store
options and save typing.
Option files can also be generated on the fly, for example by the make utility. You can specify the option
--option-file multiple times.
Format of an option file
• Multiple arguments on one line in the option file are allowed.
• To include whitespace in an argument, surround the argument with single or double quotes.
• If you want to use single quotes as part of the argument, surround the argument by double quotes and
vise versa:
"This has a single quote ' embedded"
'This has a double quote " embedded'
'This has a double quote " and a single quote '"' embedded"
• When a text line reaches its length limit, use a \ to continue the line. Whitespace between quotes is
preserved.
"This is a continuation \
line"
-> "This is a continuation line"
557
TASKING VX-toolset for ARM User Guide
• It is possible to nest command line files up to 25 levels.
Example
Suppose the file myoptions contains the following lines:
--debug=+asm,-local
test.src
Specify the option file to the assembler:
asarm --option-file=myoptions
This is equivalent to the following command line:
asarm --debug=+asm,-local test.src
Related information
-
558
Tool Options
Assembler option: --output (-o)
Menu entry
Eclipse names the output file always after the input file.
Command line syntax
--output=file
-o file
Description
With this option you can specify another filename for the output file of the assembler. Without this option,
the basename of the assembly source file is used with extension .obj.
Example
To create the file relobj.obj instead of asm.obj, enter:
asarm --output=relobj.obj asm.src
Related information
-
559
TASKING VX-toolset for ARM User Guide
Assembler option: --page-length
Menu entry
1.
Select Assembler » Miscellaneous.
2.
Add the option --page-length to the Additional options field.
Command line syntax
--page-length=number
Default: 72
Description
If you generate a list file with the assembler option --list-file, this option sets the number of lines in a page
in the list file. The default is 72, the minimum is 10. As a special case, a page length of 0 turns off page
breaks.
Related information
Assembler option --list-file (Generate list file)
Assembler directive .PAGE
560
Tool Options
Assembler option: --page-width
Menu entry
1.
Select Assembler » Miscellaneous.
2.
Add the option --page-width to the Additional options field.
Command line syntax
--page-width=number
Default: 132
Description
If you generate a list file with the assembler option --list-file, this option sets the number of columns per
line on a page in the list file. The default is 132, the minimum is 40.
Related information
Assembler option --list-file (Generate list file)
Assembler directive .PAGE
561
TASKING VX-toolset for ARM User Guide
Assembler option: --preprocess (-E)
Menu entry
-
Command line syntax
--preprocess
-E
Description
With this option the assembler will only preprocess the assembly source file. The assembler sends the
preprocessed file to stdout.
Related information
-
562
Tool Options
Assembler option: --preprocessor-type (-m)
Menu entry
1.
Select Assembler » Preprocessing.
2.
Enable or disable the option Use TASKING preprocessor.
Command line syntax
--preprocessor-type=type
-mtype
You can set the following preprocessor types:
none
n
No preprocessor
tasking
t
TASKING preprocessor
Default: --preprocessor-type=tasking
Description
With this option you select the preprocessor that the assembler will use. By default, the assembler uses
the TASKING preprocessor.
When the assembly source file does not contain any preprocessor symbols, you can specify to the
assembler not to use a preprocessor.
Related information
-
563
TASKING VX-toolset for ARM User Guide
Assembler option: --relaxed
Menu entry
1.
Select Assembler » Miscellaneous.
2.
Enable the option Allow 2-operand form for 3-operand instructions.
Command line syntax
--relaxed
Description
With this option you tell the assembler that a relaxed 2-operand syntax is allowed on 3-operand instructions.
If the first two register operands are equal, you can replace the two registers by one.
Example
With this option enabled, instead of
add r1,r1,#4
you can write
add r1,#4
and instead of
add r1,r1,r2
you can write
add r1,r2
Related information
-
564
Tool Options
Assembler option: --section-info (-t)
Menu entry
1.
Select Assembler » List File.
2.
Enable the option Generate list file.
3.
Enable the option List section summary.
and/or
1.
Select Assembler » Diagnostics.
2.
Enable the option Display section summary.
Command line syntax
--section-info[=flag,...]
-t[flags]
You can set the following flags:
+/-console
c/C
Display section summary on console
+/-list
l/L
List section summary in list file
Default: --section-info=CL
Default (without flags): --section-info=cl
Description
With this option you tell the assembler to display section information. For each section its memory space,
size, total cycle counts and name is listed on stdout and/or in the list file.
The cycle count consists of two parts: the total accumulated count for the section and the total accumulated
count for all repeated instructions. In the case of nested loops it is possible that the total supersedes the
section total.
Example
To writes the section information to the list file and also display the section information on stdout, enter:
asarm --list-file --section-info asm.src
Related information
Assembler option --list-file (Generate list file)
565
TASKING VX-toolset for ARM User Guide
Assembler option: --silicon-bug
Menu entry
1.
Select Assembler » Miscellaneous.
2.
Add the option --silicon-bug to the Additional options field.
Command line syntax
--silicon-bug[=bug,...]
Description
With this option you specify for which hardware problems the assembler should check. Please refer to
Chapter 19, CPU Problem Bypasses and Checks for the numbers and descriptions. Silicon bug numbers
are specified as a comma separated list. When this option is used without arguments, all silicon bugs are
checked.
Example
To check for problem 602117, enter:
asarm --silicon-bug=602117 test.src
Related information
Chapter 19, CPU Problem Bypasses and Checks
566
Tool Options
Assembler option: --symbol-scope (-i)
Menu entry
1.
Select Assembler » Symbols.
2.
Enable or disable the option Set default symbol scope to global.
Command line syntax
--symbol-scope=scope
-iscope
You can set the following scope:
global
g
Default symbol scope is global
local
l
Default symbol scope is local
Default: --symbol-scope=local
Description
With this option you tell the assembler how to treat symbols that you have not specified explicitly as global
or local. By default the assembler treats all symbols as local symbols unless you have defined them
explicitly as global.
Related information
Assembler directive .GLOBAL
567
TASKING VX-toolset for ARM User Guide
Assembler option: --thumb
Menu entry
1.
Select Assembler » Miscellaneous.
2.
Enable the option Assemble Thumb instructions by default.
Command line syntax
--thumb
Description
With this option you tell the assembler that the input file contains Thumb code. By default the assembler
assumes that the input file contains ARM code. Specifying --thumb with --cpu=ARMv7M or with the
Thumb only assembler (asarmt) is not required.
Note that the input may still contain mixed Thumb and ARM code because the .ARM, .THUMB, .CODE16
and .CODE32 directives overrule the --thumb option. Assembly code can check the setting of the --thumb
option by means of the built-in assembly function @THUMB(). So, if you use @THUMB() in a .ARM part
and you specified --thumb, @THUMB() still returns 1.
Related information
Assembly function @THUMB()
Assembler directives .CODE16, .CODE32, .ARM, .THUMB
568
Tool Options
Assembler option: --version (-V)
Menu entry
-
Command line syntax
--version
-V
Description
Display version information. The assembler ignores all other options or input files.
Related information
-
569
TASKING VX-toolset for ARM User Guide
Assembler option: --warnings-as-errors
Menu entry
1.
Select Global Options.
2.
Enable the option Treat warnings as errors.
Command line syntax
--warnings-as-errors[=number,...]
Description
If the assembler encounters an error, it stops assembling. When you use this option without arguments,
you tell the assembler to treat all warnings as errors. This means that the exit status of the assembler will
be non-zero after one or more assembler warnings. As a consequence, the assembler now also stops
after encountering a warning.
You can also limit this option to specific warnings by specifying a comma-separated list of warning numbers.
Related information
Assembler option --no-warnings (Suppress some or all warnings)
570
Tool Options
13.5. Linker Options
This section lists all linker options.
Options in Eclipse versus options on the command line
Most command line options have an equivalent option in Eclipse but some options are only available on
the command line. Eclipse invokes the linker via the control program. Therefore, it uses the syntax of the
control program to pass options and files to the linker. If there is no equivalent option in Eclipse, you can
specify a command line option in Eclipse as follows:
1.
From the Project menu, select Properties for
The Properties dialog appears.
2.
In the left pane, expand C/C++ Build and select Settings.
In the right pane the Settings appear.
3.
On the Tool Settings tab, select Linker » Miscellaneous.
4.
In the Additional options field, enter one or more command line options.
Because Eclipse uses the control program, Eclipse automatically precedes the option with -Wl to
pass the option via the control program directly to the linker.
Be aware that some command line options are not useful in Eclipse or just do not have any effect. For
example, the option --keep-output-files keeps files after an error occurred. When you specify this option
in Eclipse, it will have no effect because Eclipse always removes the output file after an error had occurred.
Short and long option names
Options can have both short and long names. Short option names always begin with a single minus (-)
character, long option names always begin with two minus (--) characters.You can abbreviate long option
names as long as it forms a unique name. You can mix short and long option names on the command
line.
Options can have flags or suboptions. To switch a flag 'on', use a lower case letter or a +longflag. To
switch a flag off, use an upper case letter or a -longflag. Separate longflags with commas. The following
two invocations are equivalent:
lkarm -mfkl test.obj
lkarm --map-file-format=+files,+link,+locate test.obj
When you do not specify an option, a default value may become active.
571
TASKING VX-toolset for ARM User Guide
Linker option: --case-insensitive
Menu entry
1.
Select Linker » Miscellaneous.
2.
Enable the option Link case insensitive.
Command line syntax
--case-insensitive
Default: case sensitive
Description
With this option you tell the linker not to distinguish between upper and lower case characters in symbols.
By default the linker considers upper and lower case characters as different characters.
Assembly source files that are generated by the compiler must always be assembled and thus linked
case sensitive. When you have written your own assembly code and specified to assemble it case
insensitive, you must also link the .obj file case insensitive.
Related information
Assembler option --case-insensitive
572
Tool Options
Linker option: --chip-output (-c)
Menu entry
1.
Select Linker » Output Format.
2.
Enable the option Generate Intel Hex format file and/or Generate S-records file.
3.
Enable the option Create file for each memory chip.
4.
Optionally, specify the Size of addresses.
Eclipse always uses the project name as the basename for the output file.
Command line syntax
--chip-output=[basename]:format[:addr_size],...
-c[basename]:format[:addr_size],...
You can specify the following formats:
IHEX
Intel Hex
SREC
Motorola S-records
The addr_size specifies the size of the addresses in bytes (record length). For Intel Hex you can use the
values 1, 2 or 4 bytes (default). For Motorola-S you can specify: 2 (S1 records), 3 (S2 records) or 4 bytes
(S3 records, default).
Description
With this option you specify the Intel Hex or Motorola S-record output format for loading into a
PROM-programmer. The linker generates a file for each ROM memory defined in the LSL file, where
sections are located:
memory memname
{ type=rom; }
The name of the file is the name of the Eclipse project or, on the command line, the name of the memory
device that was emitted with extension .hex or .sre. Optionally, you can specify a basename which
prepends the generated file name.
The linker always outputs a debugging file in ELF/DWARF format and optionally an absolute
object file in Intel Hex-format and/or Motorola S-record format.
Example
To generate Intel Hex output files for each defined memory, enter the following on the command line:
lkarm --chip-output=myfile:IHEX test1.obj
573
TASKING VX-toolset for ARM User Guide
In this case, this generates the file myfile_memname.hex.
Related information
Linker option --output (Output file)
574
Tool Options
Linker option: --code-endianness
Menu entry
-
Command line syntax
--code-endianness=endianness
You can specify the following endianness:
big
b
Big endian
little
l
Little endian (default)
Description
This option tells the linker what code endianness you want, little-endian (least significant byte of a word
at lowest byte code address) or big-endian (most significant byte of a word at lowest byte code address).
The code endianness used must be a valid one for the architecture you are compiling for. This option is
only available for ARMv7R.
Related information
Linker option --endianness (Data endianness)
575
TASKING VX-toolset for ARM User Guide
Linker option: --cpu (-C)
Menu entry
1.
Expand C/C++ Build and select Processor.
2.
From the Processor Selection list, make a selection by Architecture, Core or one of the
manufacturers.
Command line syntax
--cpu=architecture
-Carchitecture
You can specify the following architectures:
ARMv6M
Link for ARMv6-M architecture
ARMv7M
Link for ARMv7-M architecture
ARMv7EM
Link for ARMv7E-M architecture
ARMv7R
Link for ARMv7-R architecture
Description
With this option you specify the ARM architecture for which you create your application. The linker uses
the architecture to determine which libraries must be linked and what kind of veneers to generate. The
default architecture is ARMv7M and the complete list of supported architectures is: ARMv6-M, ARMv7-M,
ARMv7E-M or ARMv7-R.
Architecture ARMv7-M only supports the Thumb-2 instruction set.
Related information
C compiler option --cpu (Select architecture)
576
Tool Options
Linker option: --define (-D)
Menu entry
1.
Select Linker » Script File.
The Defined symbols box shows the symbols that are currently defined.
2.
To define a new symbol, click on the Add button in the Defined symbols box.
3.
Type the symbol definition (for example, demo=1)
Use the Edit and Delete button to change a macro definition or to remove a macro from the list.
Command line syntax
--define=macro_name[=macro_definition]
-Dmacro_name[=macro_definition]
Description
With this option you can define a macro and specify it to the linker LSL file preprocessor. If you only
specify a macro name (no macro definition), the macro expands as '1'.
You can specify as many macros as you like; just use the option --define (-D) multiple times. If the
command line exceeds the limit of the operating system, you can define the macros in an option file which
you then must specify to the linker with the option --option-file (-f) file.
The definition can be tested by the preprocessor with #if, #ifdef and #ifndef, for conditional locating.
Example
To define the stack size and start address which are used in the linker script file arm.lsl, enter:
lkarm test.obj -otest.abs --lsl-file=arm.lsl --define=__STACK=32k
--define=__START=0x00000000
Related information
Linker option --option-file (Specify an option file)
577
TASKING VX-toolset for ARM User Guide
Linker option: --dep-file
Menu entry
Eclipse uses this option in the background to create a file with extension .d (one for every input file).
Command line syntax
--dep-file[=file]
Description
With this option you tell the linker to generate dependency lines that can be used in a Makefile. The
dependency information will be generated in addition to the normal output file.
By default, the information is written to the file lkarm.d. When you specify a filename, all dependencies
will be combined in the specified file.
Example
lkarm --dep-file=test.dep test.obj
The linker links the file test.obj, which results in the output file test.abs, and generates dependency
lines in the file test.dep.
Related information
Linker option --make-target (Target to use in dependencies file)
578
Tool Options
Linker option: --diag
Menu entry
1.
From the Window menu, select Show View » Other » TASKING » Problems.
The Problems view is added to the current perspective.
2.
In the Problems view right-click on a message.
A popup menu appears.
3.
Select Detailed Diagnostics Info.
A dialog box appears with additional information.
Command line syntax
--diag=[format:]{all | nr,...}
You can set the following output formats:
html
HTML output.
rtf
Rich Text Format.
text
ASCII text.
Default format: text
Description
With this option you can ask for an extended description of error messages in the format you choose.
The output is directed to stdout (normally your screen) and in the format you specify. You can specify the
following formats: html, rtf or text (default). To create a file with the descriptions, you must redirect the
output.
With the suboption all, the descriptions of all error messages are given. If you want the description of one
or more selected error messages, you can specify the error message numbers, separated by commas.
With this option the linker does not link/locate any files.
Example
To display an explanation of message number 106, enter:
lkarm --diag=106
This results in the following message and explanation:
E106: unresolved external: <message>
The linker could not resolve all external symbols.
579
TASKING VX-toolset for ARM User Guide
This is an error when the incremental linking option is disabled.
The <message> indicates the symbol that is unresolved.
To write an explanation of all errors and warnings in HTML format to file lkerrors.html, use redirection
and enter:
lkarm --diag=html:all > lkerrors.html
Related information
Section 8.10, Linker Error Messages
580
Tool Options
Linker option: --endianness
Menu entry
1.
Select Global Options.
2.
Specify the Endianness:Little-endian mode or Big-endian mode.
Command line syntax
--endianness=endianness
-B
--big-endian
You can specify the following endianness:
big
b
Big endian
little
l
Little endian (default)
Description
By default, the linker links objects in little-endian mode. With --endianness=big you tell the linker to link
the input files in big-endian mode. The endianness used must be valid for the architecture you are linking
for. Depending on the endianness used, the linker links different libraries. -B is an alias for option
--endianness=big.
Related information
Linker option --code-endianness (Code endianness)
581
TASKING VX-toolset for ARM User Guide
Linker option: --error-file
Menu entry
-
Command line syntax
--error-file[=file]
Description
With this option the linker redirects error messages to a file. If you do not specify a filename, the error file
is lkarm.elk.
Example
To write errors to errors.elk instead of stderr, enter:
lkarm --error-file=errors.elk test.obj
Related information
Section 8.10, Linker Error Messages
582
Tool Options
Linker option: --error-limit
Menu entry
1.
Select Linker » Diagnostics.
2.
Enter a value in the Maximum number of emitted errors field.
Command line syntax
--error-limit=number
Default: 42
Description
With this option you tell the linker to only emit the specified maximum number of errors. When 0 (null) is
specified, the linker emits all errors. Without this option the maximum number of errors is 42.
Related information
Section 8.10, Linker Error Messages
583
TASKING VX-toolset for ARM User Guide
Linker option: --extern (-e)
Menu entry
-
Command line syntax
--extern=symbol,...
-esymbol,...
Description
With this option you force the linker to consider the given symbol as an undefined reference. The linker
tries to resolve this symbol, either the symbol is defined in an object file or the linker extracts the
corresponding symbol definition from a library.
This option is, for example, useful if the startup code is part of a library. Because your own application
does not refer to the startup code, you can force the startup code to be extracted by specifying the symbol
_START as an unresolved external.
Example
Consider the following invocation:
lkarm mylib.lib
Nothing is linked and no output file will be produced, because there are no unresolved symbols when the
linker searches through mylib.lib.
lkarm --extern=_START mylib.lib
In this case the linker searches for the symbol _START in the library and (if found) extracts the object that
contains _START, the startup code. If this module contains new unresolved symbols, the linker looks
again in mylib.lib. This process repeats until no new unresolved symbols are found.
Related information
Section 8.3, Linking with Libraries
584
Tool Options
Linker option: --first-library-first
Menu entry
-
Command line syntax
--first-library-first
Description
When the linker processes a library it searches for symbols that are referenced by the objects and libraries
processed so far. If the library contains a definition for an unresolved reference the linker extracts the
object that contains the definition from the library.
By default the linker processes object files and libraries in the order in which they appear on the command
line. If you specify the option --first-library-first the linker always tries to take the symbol definition from
the library that appears first on the command line before scanning subsequent libraries.
This is for example useful when you are working with a newer version of a library that partially overlaps
the older version. Because they do not contain exactly the same functions, you have to link them both.
However, when a function is present in both libraries, you may want the linker to extract the most recent
function.
Example
Consider the following example:
lkarm --first-library-first a.lib test.obj b.lib
If the file test.obj calls a function which is both present in a.lib and b.lib, normally the function in
b.lib would be extracted. With this option the linker first tries to extract the symbol from the first library
a.lib.
Note that routines in b.lib that call other routines that are present in both a.lib and b.lib
are now also resolved from a.lib.
Related information
Linker option --no-rescan (Rescan libraries to solve unresolved externals)
585
TASKING VX-toolset for ARM User Guide
Linker option: --global-type-checking
Menu entry
-
Command line syntax
--global-type-checking
Description
Use this option when you want the linker to check the types of variable and function references against
their definitions, using DWARF 2 or DWARF 3 debug information.
This check should give the same result as the C compiler when you use MIL linking.
Related information
C compiler option --global-type-checking (Global type checking)
586
Tool Options
Linker option: --help (-?)
Menu entry
-
Command line syntax
--help[=item]
-?
You can specify the following arguments:
options
Show extended option descriptions
Description
Displays an overview of all command line options. When you specify the argument options you can list
detailed option descriptions.
Example
The following invocations all display a list of the available command line options:
lkarm -?
lkarm --help
lkarm
To see a detailed description of the available options, enter:
lkarm --help=options
Related information
-
587
TASKING VX-toolset for ARM User Guide
Linker option: --hex-format
Menu entry
1.
Select Linker » Output Format.
2.
Enable the option Generate Intel Hex format file.
3.
Enable or disable the optionEmit start address record.
Command line syntax
--hex-format=flag,...
You can set the following flag:
+/-start-address
s/S
Emit start address record
Default: --hex-format=s
Description
With this option you can specify to emit or omit the start address record from the hex file.
Related information
Linker option --output (Output file)
588
Tool Options
Linker option: --hex-record-size
Menu entry
1.
Select Linker » Output Format.
2.
Enable the option Generate Intel Hex format file.
3.
Select Linker » Miscellaneous.
4.
Add the option --hex-record-size to the Additional options field.
Command line syntax
--hex-record-size=size
Default: 32
Description
With this option you can set the size (width) of the Intel Hex data records.
Related information
Linker option --output (Output file)
Section 16.2, Intel Hex Record Format
589
TASKING VX-toolset for ARM User Guide
Linker option: --import-object
Menu entry
1.
Select Linker » Data Objects.
The Data objects box shows the list of object files that are imported.
2.
To add a data object, click on the Add button in the Data objects box.
3.
Type or select a binary file (including its path).
Use the Edit and Delete button to change a filename or to remove a data object from the list.
Command line syntax
--import-object=file,...
Description
With this option the linker imports a binary file containing raw data and places it in a section. The section
name is derived from the filename, in which dots are replaced by an underscore. So, when importing a
file called my.jpg, a section with the name my_jpg is created. In your application you can refer to the
created section by using linker labels.
Related information
Section 8.5, Importing Binary Files
590
Tool Options
Linker option: --include-directory (-I)
Menu entry
-
Command line syntax
--include-directory=path,...
-Ipath,...
Description
With this option you can specify the path where your LSL include files are located. A relative path will be
relative to the current directory.
The order in which the linker searches for LSL include files is:
1. The pathname in the LSL file and the directory where the LSL file is located (only for #include files that
are enclosed in "")
2. The path that is specified with this option.
3. The default directory $(PRODDIR)\include.lsl.
Example
Suppose that your linker script file mylsl.lsl contains the following line:
#include "myinc.inc"
You can call the linker as follows:
lkarm --include-directory=c:\proj\include --lsl-file=mylsl.lsl test.obj
First the linker looks for the file myinc.inc in the directory where mylsl.lsl is located. If it does not
find the file, it looks in the directory c:\proj\include (this option). Finally it looks in the directory
$(PRODDIR)\include.lsl.
Related information
Linker option --lsl-file (Specify linker script file)
591
TASKING VX-toolset for ARM User Guide
Linker option: --incremental (-r)
Menu entry
-
Command line syntax
--incremental
-r
Description
Normally the linker links and locates the specified object files. With this option you tell the linker only to
link the specified files. The linker creates a linker output file .out. You then can link this file again with
other object files until you have reached the final linker output file that is ready for locating.
In the last pass, you call the linker without this option with the final linker output file .out. The linker will
now locate the file.
Example
In this example, the files test1.obj, test2.obj and test3.obj are incrementally linked:
1. lkarm --incremental test1.obj test2.obj --output=test.out
test1.obj and test2.obj are linked
2. lkarm --incremental test3.obj test.out
test3.obj and test.out are linked, task1.out is created
3. lkarm task1.out
task1.out is located
Related information
Section 8.4, Incremental Linking
592
Tool Options
Linker option: --keep-output-files (-k)
Menu entry
Eclipse always removes the output files when errors occurred.
Command line syntax
--keep-output-files
-k
Description
If an error occurs during linking, the resulting output file may be incomplete or incorrect. With this option
you keep the generated output files when an error occurs.
By default the linker removes the generated output file when an error occurs. This is useful when you use
the make utility. If the erroneous files are not removed, the make utility may process corrupt files on a
subsequent invocation.
Use this option when you still want to use the generated file. For example when you know that a particular
error does not result in a corrupt object file, or when you want to inspect the output file, or send it to Altium
support.
Related information
Linker option --warnings-as-errors (Treat warnings as errors)
593
TASKING VX-toolset for ARM User Guide
Linker option: --library (-l)
Menu entry
1.
Select Linker » Libraries.
The Libraries box shows the list of libraries that are linked with the project.
2.
To add a library, click on the Add button in the Libraries box.
3.
Type or select a library (including its path).
4.
Optionally, disable the option Link default libraries.
Use the Edit and Delete button to change a library name or to remove a library from the list.
Command line syntax
--library=name
-lname
Description
With this option you tell the linker to use system library name.lib, where name is a string. The linker
first searches for system libraries in any directories specified with --library-directory, then in the directories
specified with the environment variables LIBARM, unless you used the option --ignore-default-library-path.
Example
To search in the system library carm.lib (C library):
lkarm test.obj mylib.lib --library=carm
The linker links the file test.obj and first looks in library mylib.lib (in the current directory only),
then in the system library carm.lib to resolve unresolved symbols.
Related information
Linker option --library-directory (Additional search path for system libraries)
Section 8.3, Linking with Libraries
594
Tool Options
Linker option: --library-directory (-L) / --ignore-default-library-path
Menu entry
1.
Select Linker » Libraries.
The Library search path box shows the directories that are added to the search path for library files.
2.
To define a new directory for the search path, click on the Add button in the Library search path
box.
3.
Type or select a path.
Use the Edit and Delete button to change a path or to remove a path from the list.
Command line syntax
--library-directory=path,...
-Lpath,...
--ignore-default-library-path
-L
Description
With this option you can specify the path(s) where your system libraries, specified with the option --library
(-l), are located. If you want to specify multiple paths, use the option --library-directory for each separate
path.
The default path is$(PRODDIR)\lib\architecture\endianness.
If you specify only -L (without a pathname) or the long option --ignore-default-library-path, the linker
will not search the default path and also not in the paths specified in the environment variables LIBARM.
So, the linker ignores steps 2 and 3 as listed below.
The priority order in which the linker searches for system libraries specified with the option --library (-l)
is:
1. The path that is specified with the option --library-directory.
2. The path that is specified in the environment variables LIBARM.
3. The default directory $(PRODDIR)\libarchitecture\endianness.
Example
Suppose you call the linker as follows:
lkarm test.obj --library-directory=c:\mylibs --library=carm
595
TASKING VX-toolset for ARM User Guide
First the linker looks in the directory c:\mylibs for library carm.lib (this option). If it does not find the
requested libraries, it looks in the directory that is set with the environment variables LIBARM. Then the
linker looks in the default directory $(PRODDIR)\libarchitecture\endianness for libraries.
Related information
Linker option --library (Link system library)
Linker option --cpu (Select architecture)
Linker option --endianness (Specify endianness)
Section 8.3.1, How the Linker Searches Libraries
596
Tool Options
Linker option: --link-only
Menu entry
-
Command line syntax
--link-only
Description
With this option you suppress the locating phase. The linker stops after linking and informs you about
unresolved references.
Related information
Control program option --create=relocatable (-cl) (Stop after linking)
597
TASKING VX-toolset for ARM User Guide
Linker option: --long-branch-veneers
Menu entry
1.
Select Linker » Miscellaneous.
2.
Enable the option Generate long-branch veneers.
Command line syntax
--long-branch-veneers
Description
With this option you enable the linker to generate a long-branch veneer if the target of a B (ARM only,
not for Thumb), BL or BLX instruction is out-of-range. The locating process of the linker may become less
efficient if this option is switched on, even if no long-branch veneers are required after all. Therefore it is
better to first see if out-of-range branches are in the code (unlikely) before switching on this option. You
cannot use this option with the ARMv6-M architecture profile.
Related information
-
598
Tool Options
Linker option: --lsl-check
Menu entry
-
Command line syntax
--lsl-check
Description
With this option the linker just checks the syntax of the LSL file(s) and exits. No linking or locating is
performed. Use the option --lsl-file to specify the name of the Linker Script File you want to test.
Related information
Linker option --lsl-file (Linker script file)
Linker option --lsl-dump (Dump LSL info)
Section 8.7, Controlling the Linker with a Script
599
TASKING VX-toolset for ARM User Guide
Linker option: --lsl-dump
Menu entry
-
Command line syntax
--lsl-dump[=file]
Description
With this option you tell the linker to dump the LSL part of the map file in a separate file, independent of
the option --map-file (generate map file). If you do not specify a filename, the file lkarm.ldf is used.
Related information
Linker option --map-file-format (Map file formatting)
600
Tool Options
Linker option: --lsl-file (-d)
Menu entry
An LSL file can be generated when you create your project in Eclipse:
1.
From the File menu, select File » New » TASKING VX-toolset for ARM C/C++ Project.
The New C/C++ Project wizard appears.
2.
Fill in the project settings in each dialog and click Next > until the ARM Project Settings appear.
3.
Enable the optionAdd linker script file to the project and click Finish.
Eclipse creates your project and the file project.lsl in the project directory.
The LSL file can be specified in the Properties dialog:
1.
Select Linker » Script File.
2.
Specify a LSL file in the Linker script file (.lsl) field (default ../${PROJ}.lsl).
Command line syntax
--lsl-file=file
-dfile
Description
A linker script file contains vital information about the core for the locating phase of the linker. A linker
script file is coded in LSL and contains the following types of information:
• the architecture definition describes the core's hardware architecture.
• the memory definition describes the physical memory available in the system.
• the section layout definition describes how to locate sections in memory.
With this option you specify a linker script file to the linker. If you do not specify this option, the linker uses
a default script file (default.lsl).You can specify the existing file target.lsl or the name of a manually
written linker script file. You can use this option multiple times. The linker processes the LSL files in the
order in which they appear on the command line.
Related information
Linker option --lsl-check (Check LSL file(s) and exit)
Section 8.7, Controlling the Linker with a Script
601
TASKING VX-toolset for ARM User Guide
Linker option: --make-target
Menu entry
-
Command line syntax
--make-target=name
Description
With this option you can overrule the default target name in the make dependencies generated by the
option --dep-file. The default target name is the basename of the input file, with extension .abs.
Example
lkarm --make-target=mytarget.abs test.obj
The linker generates dependency lines with the default target name mytarget.abs instead of test.abs.
Related information
Linker option --dep-file (Generate dependencies in a file)
602
Tool Options
Linker option: --map-file (-M)
Menu entry
1.
Select Linker » Map File.
2.
Enable the option Generate XML map file format (.mapxml) for map file viewer.
3.
(Optional) Enable the option Generate map file.
4.
Enable or disable the types of information to be included.
Command line syntax
--map-file[=file][:XML]
-M[file][:XML]
Default (Eclipse): XML map file is generated
Default (linker): no map file is generated
Description
With this option you tell the linker to generate a linker map file. If you do not specify a filename and you
specified the option --output, the linker uses the same basename as the output file with the extension
.map. If you did not specify the option --output, the linker uses the file task1.map. Eclipse names the
.map file after the project.
In Eclipse the XML variant of the map file (extension .mapxml) is used for graphical display in the map
file viewer.
A linker map file is a text file that shows how the linker has mapped the sections and symbols from the
various object files (.obj) to the linked object file. A locate part shows the absolute position of each
section. External symbols are listed per space with their absolute address, both sorted on symbol and
sorted on address.
Related information
Linker option --map-file-format (Format map file)
Section 15.2, Linker Map File Format
603
TASKING VX-toolset for ARM User Guide
Linker option: --map-file-format (-m)
Menu entry
1.
Select Linker » Map File.
2.
Enable the option Generate XML map file format (.mapxml) for map file viewer.
3.
(Optional) Enable the option Generate map file.
4.
Enable or disable the types of information to be included.
Command line syntax
--map-file-format=flag,...
-mflags
You can set the following flags:
+/-callgraph
c/C
Include call graph information
+/-removed
d/D
Include information on removed sections
+/-files
f/F
Include processed files information
+/-invocation
i/I
Include information on invocation and tools
+/-link
k/K
Include link result information
+/-locate
l/L
Include locate result information
+/-memory
m/M
Include memory usage information
+/-nonalloc
n/N
Include information of non-alloc sections
+/-overlay
o/O
Include overlay information
+/-statics
q/Q
Include module local symbols information
+/-crossref
r/R
Include cross references information
+/-lsl
s/S
Include processor and memory information
+/-rules
u/U
Include locate rules
Use the following options for predefined sets of flags:
--map-file-format=0
-m0
Link information
Alias for -mcDfikLMNoQrSU
--map-file-format=1
-m1
Locate information
Alias for -mCDfiKlMNoQRSU
--map-file-format=2
-m2
Most information
Alias for -mcdfiklmNoQrSu
Default: --map-file-format=2
604
Tool Options
Description
With this option you specify which information you want to include in the map file.
On the command line you must use this option in combination with the option --map-file (-M).
Related information
Linker option --map-file (Generate map file)
Section 15.2, Linker Map File Format
605
TASKING VX-toolset for ARM User Guide
Linker option: --misra-c-report
Menu entry
-
Command line syntax
--misra-c-report[=file]
Description
With this option you tell the linker to create a MISRA-C Quality Assurance report. This report lists the
various modules in the project with the respective MISRA-C settings at the time of compilation. If you do
not specify a filename, the file basename.mcr is used.
Related information
C compiler option --misrac (MISRA-C checking)
606
Tool Options
Linker option: --munch
Menu entry
-
Command line syntax
--munch
Description
With this option you tell the linker to activate the muncher in the pre-locate phase.
The muncher phase is a special part of the linker that creates sections containing a list of pointers to the
initialization and termination routines. The list of pointers is consulted at run-time by startup code invoked
from main, and the routines on the list are invoked at the appropriate times.
Related information
-
607
TASKING VX-toolset for ARM User Guide
Linker option: --non-romable
Menu entry
1.
Select Linker » Miscellaneous.
2.
Enable the option Application is not romable.
Command line syntax
--non-romable
Description
With this option you tell the linker that the application must not be located in ROM. The linker will locate
all ROM sections, including a copy table if present, in RAM. When the application is started, the data
sections are re-initialized and the BSS sections are cleared as usual.
This option is, for example, useful when you want to test the application in RAM before you put the final
application in ROM. This saves you the time of flashing the application in ROM over and over again.
Related information
-
608
Tool Options
Linker option: --no-rescan
Menu entry
1.
Select Linker » Libraries.
2.
Disable the option Rescan libraries to solve unresolved externals.
Command line syntax
--no-rescan
Description
When the linker processes a library it searches for symbol definitions that are referenced by the objects
and libraries processed so far. If the library contains a definition for an unresolved reference the linker
extracts the object that contains the definition from the library. The linker processes object files and
libraries in the order in which they appear on the command line.
When all objects and libraries are processed the linker checks if there are unresolved symbols left. If so,
the default behavior of the linker is to rescan all libraries in the order given at the command line. The
linker stops rescanning the libraries when all symbols are resolved, or when the linker could not resolve
any symbol(s) during the rescan of all libraries. Notice that resolving one symbol may introduce new
unresolved symbols.
With this option, you tell the linker to scan the object files and libraries only once. When the linker has
not resolved all symbols after the first scan, it reports which symbols are still unresolved. This option is
useful if you are building your own libraries. The libraries are most efficiently organized if the linker needs
only one pass to resolve all symbols.
Related information
Linker option --first-library-first (Scan libraries in given order)
609
TASKING VX-toolset for ARM User Guide
Linker option: --no-rom-copy (-N)
Menu entry
-
Command line syntax
--no-rom-copy
-N
Description
With this option the linker will not generate a ROM copy for data sections. A copy table is generated and
contains entries to clear BSS sections. However, no entries to copy data sections from ROM to RAM are
placed in the copy table.
The data sections are initialized when the application is downloaded.The data sections are not re-initialized
when the application is restarted.
Related information
-
610
Tool Options
Linker option: --no-warnings (-w)
Menu entry
1.
Select Linker » Diagnostics.
The Suppress warnings box shows the warnings that are currently suppressed.
2.
To suppress a warning, click on the Add button in the Suppress warnings box.
3.
Enter the numbers, separated by commas, of the warnings you want to suppress (for example
135,136). Or you can use the Add button multiple times.
4.
To suppress all warnings, enable the option Suppress all warnings.
Use the Edit and Delete button to change a warning number or to remove a number from the list.
Command line syntax
--no-warnings[=number,...]
-w[number,...]
Description
With this option you can suppresses all warning messages or specific warning messages.
On the command line this option works as follows:
• If you do not specify this option, all warnings are reported.
• If you specify this option but without numbers, all warnings are suppressed.
• If you specify this option with a number, only the specified warning is suppressed. You can specify the
option --no-warnings=number multiple times.
Example
To suppress warnings 135 and 136, enter:
lkarm --no-warnings=135,136 test.obj
Related information
Linker option --warnings-as-errors (Treat warnings as errors)
611
TASKING VX-toolset for ARM User Guide
Linker option: --optimize (-O)
Menu entry
1.
Select Linker » Optimization.
2.
Select one or more of the following options:
• Delete unreferenced sections
• Use a 'first-fit decreasing' algorithm
• Compress copy table
• Delete duplicate code
• Delete duplicate data
• Compress ROM sections of copy table items
Command line syntax
--optimize=flag,...
-Oflags
You can set the following flags:
+/-delete-unreferenced-sections
c/C Delete unreferenced sections from the output
file
+/-first-fit-decreasing
l/L
Use a 'first-fit decreasing' algorithm to locate
unrestricted sections in memory
+/-copytable-compression
t/T
Emit smart restrictions to reduce copy table size
+/-delete-duplicate-code
x/X Delete duplicate code sections from the output
file
+/-delete-duplicate-data
y/Y Delete duplicate constant data from the output
file
+/-copytable-item-compression
z/Z
Try to compress ROM sections of copy table
items
Use the following options for predefined sets of flags:
612
--optimize=0
-O0
No optimization
Alias for -OCLTXYZ
--optimize=1
-O1
Default optimization
Alias for -OcLtxyZ
--optimize=2
-O2
All optimizations
Alias for -OcltxyZ
Tool Options
Default: --optimize=1
Description
With this option you can control the level of optimization.
Related information
For details about each optimization see Section 8.6, Linker Optimizations.
613
TASKING VX-toolset for ARM User Guide
Linker option: --option-file (-f)
Menu entry
1.
Select Linker » Miscellaneous.
2.
Add the option --option-file to the Additional options field.
Be aware that the options in the option file are added to the linker options you have set in the other
pages. Only in extraordinary cases you may want to use them in combination.
Command line syntax
--option-file=file,...
-f file,...
Description
This option is primarily intended for command line use. Instead of typing all options on the command line,
you can create an option file which contains all options and flags you want to specify. With this option
you specify the option file to the linker.
Use an option file when the command line would exceed the limits of the operating system, or just to store
options and save typing.
Option files can also be generated on the fly, for example by the make utility. You can specify the option
--option-file multiple times.
Format of an option file
• Multiple arguments on one line in the option file are allowed.
• To include whitespace in an argument, surround the argument with single or double quotes.
• If you want to use single quotes as part of the argument, surround the argument by double quotes and
vise versa:
"This has a single quote ' embedded"
'This has a double quote " embedded'
'This has a double quote " and a single quote '"' embedded"
• When a text line reaches its length limit, use a \ to continue the line. Whitespace between quotes is
preserved.
"This is a continuation \
line"
-> "This is a continuation line"
614
Tool Options
• It is possible to nest command line files up to 25 levels.
Example
Suppose the file myoptions contains the following lines:
--map-file=my.map
test.obj
--library-directory=c:\mylibs
(generate a map file)
(input file)
(additional search path for system libraries)
Specify the option file to the linker:
lkarm --option-file=myoptions
This is equivalent to the following command line:
lkarm --map-file=my.map test.obj --library-directory=c:\mylibs
Related information
-
615
TASKING VX-toolset for ARM User Guide
Linker option: --output (-o)
Menu entry
1.
Select Linker » Output Format.
2.
Enable one or more output formats.
For some output formats you can specify a number of suboptions.
Eclipse always uses the project name as the basename for the output file.
Command line syntax
--output=[filename][:format[:addr_size][,space_name]]...
-o[filename][:format[:addr_size]]...
You can specify the following formats:
ELF
ELF/DWARF
IHEX
Intel Hex
SREC
Motorola S-records
Description
By default, the linker generates an output file in ELF/DWARF format, with the name task1.abs.
With this option you can specify an alternative filename, and an alternative output format. The default
output format is the format of the first input file.
You can use the --output option multiple times. This is useful to generate multiple output formats. With
the first occurrence of the --output option you specify the basename (the filename without extension),
which is used for subsequent --output options with no filename specified. If you do not specify a filename,
or you do not specify the --output option at all, the linker uses the default basename taskn.
IHEX and SREC formats
If you specify the Intel Hex format or the Motorola S-records format, you can use the argument addr_size
to specify the size of addresses in bytes (record length). For Intel Hex you can use the values: 1, 2, and
4 (default). For Motorola S-records you can specify: 2 (S1 records), 3 (S2 records, default) or 4 bytes (S3
records).
The name of the output file will be filename with the extension .hex or .sre and contains the code and
data allocated in the default address space. If they exist, any other address spaces are also emitted
whereas their output files are named filename_spacename with the extension .hex or .sre.
Use option --chip-output (-c) to create Intel Hex or Motorola S-record output files for each chip defined
in the LSL file (suitable for loading into a PROM-programmer).
616
Tool Options
Example
To create the output file myfile.hex of the default address space, enter:
lkarm test.obj --output=myfile.hex:IHEX:4
Related information
Linker option --chip-output (Generate an output file for each chip)
Linker option --hex-format (Specify Hex file format settings)
617
TASKING VX-toolset for ARM User Guide
Linker option: --print-mangled-symbols (-P)
Menu entry
-
Command line syntax
--print-mangled-symbols
-P
Description
C++ compilers generate unreadable symbol names. These symbols cannot easily be related to your C++
source file anymore. Therefore the linker will by default decode these symbols conform the IA64 ABI
when printed to stdout. With this option you can override this default setting and print the mangled
names instead.
Related information
-
618
Tool Options
Linker option: --strip-debug (-S)
Menu entry
1.
Select Linker » Miscellaneous.
2.
Enable the option Strip symbolic debug information.
Command line syntax
--strip-debug
-S
Description
With this option you specify not to include symbolic debug information in the resulting output file.
Related information
-
619
TASKING VX-toolset for ARM User Guide
Linker option: --user-provided-initialization-code (-i)
Menu entry
1.
Select Linker » Miscellaneous.
2.
Enable the option Do not use standard copy table for initialization.
Command line syntax
--user-provided-initialization-code
-i
Description
It is possible to use your own initialization code, for example, to save ROM space. With this option you
tell the linker not to generate a copy table for initialize/clear sections. Use linker labels in your source
code to access the positions of the sections when located.
If the linker detects references to the TASKING initialization code, an error is emitted: it is either the
TASKING initialization routine or your own, not both.
Note that the options --no-rom-copy and --non-romable, may vary independently. The
'copytable-compression' optimization (--optimize=t) is automatically disabled when you enable this option.
Related information
Linker option --no-rom-copy (Do not generate ROM copy)
Linker option --non-romable (Application is not romable)
Linker option --optimize (Specify optimization)
620
Tool Options
Linker option: --verbose (-v) / --extra-verbose (-vv)
Menu entry
1.
Select Linker » Miscellaneous.
2.
Enable the option Show link phases during processing.
The verbose output is displayed in the Problems view and the Console view.
Command line syntax
--verbose / --extra-verbose
-v / -vv
Description
With this option you put the linker in verbose mode. The linker prints the link phases while it processes
the files. In the extra verbose mode, the linker also prints the filenames and it shows which objects are
extracted from libraries. With this option you can monitor the current status of the linker.
Related information
-
621
TASKING VX-toolset for ARM User Guide
Linker option: --version (-V)
Menu entry
-
Command line syntax
--version
-V
Description
Display version information. The linker ignores all other options or input files.
Related information
-
622
Tool Options
Linker option: --warnings-as-errors
Menu entry
1.
Select Global Options.
2.
Enable the option Treat warnings as errors.
Command line syntax
--warnings-as-errors[=number,...]
Description
When the linker detects an error or warning, it tries to continue the link process and reports other errors
and warnings. When you use this option without arguments, you tell the linker to treat all warnings as
errors. This means that the exit status of the linker will be non-zero after the detection of one or more
linker warnings. As a consequence, the linker will not produce any output files.
You can also limit this option to specific warnings by specifying a comma-separated list of warning numbers.
Related information
Linker option --no-warnings (Suppress some or all warnings)
623
TASKING VX-toolset for ARM User Guide
13.6. Control Program Options
The control program ccarm facilitates the invocation of the various components of the ARM toolset from
a single command line.
Options in Eclipse versus options on the command line
Eclipse invokes the compiler, assembler and linker via the control program. Therefore, it uses the syntax
of the control program to pass options and files to the tools. The control program processes command
line options either by itself, or, when the option is unknown to the control program, it looks whether it can
pass the option to one of the other tools. However, for directly passing an option to the C++ compiler, C
compiler, assembler or linker, it is recommended to use the control program options --pass-c++, --pass-c,
--pass-assembler, --pass-linker.
See the previous sections for details on the options of the tools.
Short and long option names
Options can have both short and long names. Short option names always begin with a single minus (-)
character, long option names always begin with two minus (--) characters.You can abbreviate long option
names as long as it forms a unique name. You can mix short and long option names on the command
line.
Options can have flags or suboptions. To switch a flag 'on', use a lower case letter or a +longflag. To
switch a flag off, use an upper case letter or a -longflag. Separate longflags with commas. The following
two invocations are equivalent:
ccarm -Wc-Oac test.c
ccarm --pass-c=--optimize=+coalesce,+cse test.c
When you do not specify an option, a default value may become active.
624
Tool Options
Control program option: --address-size
Menu entry
1.
Select Linker » Output Format.
2.
Enable the option Generate Intel Hex format file and/or Generate S-records file.
3.
Specify the Size of addresses.
Eclipse always uses the project name as the basename for the output file.
Command line syntax
--address-size=addr_size
Description
If you specify IHEX or SREC with the control option --format, you can additionally specify the record
length to be emitted in the output files.
With this option you can specify the size of the addresses in bytes (record length). For Intel Hex you can
use the values 1, 2 or 4 bytes (default). For Motorola-S you can specify: 2 (S1 records), 3 (S2 records)
or 4 bytes (S3 records, default).
If you do not specify addr_size, the default address size is generated.
Example
To create the SREC file test.sre with S1 records, type:
ccarm --format=SREC --address-size=2 test.c
Related information
Control program option --format (Set linker output format)
Control program option --output (Output file)
625
TASKING VX-toolset for ARM User Guide
Control program option: --be32
Menu entry
-
Command line syntax
--be32
Description
This option is an alias for --endianness=big --code-endianness=big, big-endian code and data. This
option is only available for ARMv7R.
Related information
Control program option --endianness (Data endianness)
Control program option --code-endianness (Code endianness)
626
Tool Options
Control program option: --check
Menu entry
-
Command line syntax
--check
Description
With this option you can check the source code for syntax errors, without generating code. This saves
time in developing your application because the code will not actually be compiled.
The compiler/assembler reports any warnings and/or errors.
This option is available on the command line only.
Related information
C compiler option --check (Check syntax)
Assembler option --check (Check syntax)
627
TASKING VX-toolset for ARM User Guide
Control program option: --code-endianness
Menu entry
-
Command line syntax
--code-endianness=endianness
You can specify the following endianness:
big
b
Big endian
little
l
Little endian (default)
Description
This option tells the compiler what code endianness you want, little-endian (least significant byte of a
word at lowest byte code address) or big-endian (most significant byte of a word at lowest byte code
address). The code endianness used must be a valid one for the architecture you are compiling for. This
option is only available for ARMv7R.
Related information
Control program option --endianness (Data endianness)
628
Tool Options
Control program option: --cpu (-C)
Menu entry
1.
Expand C/C++ Build and select Processor.
2.
From the Processor Selection list, make a selection by Architecture, Core or one of the
manufacturers.
Command line syntax
--cpu=architecture | processor
-Carchitecture | processor
You can specify the following architectures:
ARMv6M
Compile/assemble for ARMv6-M architecture
ARMv7M
Compile/assemble for ARMv7-M architecture
ARMv7EM
Compile/assemble for ARMv7E-M architecture
ARMv7R
Compile/assemble for ARMv7-R architecture
Description
With this option you specify the ARM architecture for which you create your application. The architecture
determines which instructions are valid and which are not. The default architecture is ARMv7M and the
complete list of supported architectures is: ARMv6-M, ARMv7-M, ARMv7E-M or ARMv7-R. Instead of
the architecture name you can also specify the full processor name, like "STM32F205RB".
The standard list of supported processors is defined in the file processors.xml. This file defines for
each processor its full name (for example, STM32F205RB), its ID (for example, stm32f205rb), the
architecture name (for example, ARMv7M), the core settings (for example, cortexm3), the on-chip flash
settings, the list of silicon bugs for that processor. Each processor also defines options to supply to the
linker for preprocessing the LSL file for the applicable on-chip memory definitions (for example,
-D__FLASH_SIZE=128k).
The control program reads the file processors.xml. The lookup sequence for names specified to this
option is as follows:
1. match any of the standard architecture names (as listed above, for example ARMv7M)
2. if none matched, match with the 'id' attribute in processors.xml (case insensitive, for example
armv7_m)
3. if still none matched, match with the 'name' attribute in processors.xml (case insensitive, for example
STM32F205RB)
4. if still none matched, the control program issues a fatal error.
629
TASKING VX-toolset for ARM User Guide
If you specify a full processor name (or its ID), the control program passes the option -D__PROC_id __
to C compiler and the linker. id is the 'id' attribute belonging to the processor found in processors.xml,
in uppercase. The control program also passes the macros defined with the 'linker_macros' property
of the processor found in the processors.xml to the linker (for example,
-D__DEVICE_LSL_FILE=stm32f2xx.lsl).
Assembly code can check the value of the option by means of the built-in function @CPU(). Architecture
ARMv7-M only supports the Thumb-2 instruction set, i.e. it has no ARM execution state.
Example
After
ccarm --cpu="STM32F205RB" -v -t test.c
the control program will call the tools as follows:
carm -CARMv7M -D__PROC_STM32F205RB__ -o test.src test.c
asarmt -CARMv7M -o test.obj test.src
lkarm test.obj -o test.abs -CARMv7M -D__PROC_STM32F205RB__
-D__DEVICE_LSL_FILE=stm32f2xx.lsl -D__FLASH_SIZE=128k -D__SRAM_SIZE=64k
--map-file -lcthumb -lfpthumb -lrtthumb
Related information
Control program option --cpu-list (Show list of processors)
C compiler option --cpu (Select architecture)
Assembler option --cpu (Select architecture)
Control program option --processors (Read additional processor definitions)
Control program option --tasking-sfr (Include CMSIS SFR file)
Assembly function @CPU()
630
Tool Options
Control program option: --cpu-list
Menu entry
-
Command line syntax
--cpu-list[=pattern]
Description
With this option the control program shows a list of supported processors as defined in the file
processors.xml. This can be useful when you want to select a processor name or id for the --cpu
option.
The pattern works similar to the UNIX grep utility. You can use it to limit the output list.
Example
To show a list of all processors, enter:
ccarm --cpu-list
To show all processors that have stm32f107 in their name, enter:
ccarm --cpu-list=stm32f107
--- ~/carm/etc/processors.xml --id
name
stm32f107rb
STM32F107RB
stm32f107rc
STM32F107RC
stm32f107vb
STM32F107VB
stm32f107vc
STM32F107VC
CPU
ARMv7M
ARMv7M
ARMv7M
ARMv7M
core
cortexm3
cortexm3
cortexm3
cortexm3
Related information
Control program option --cpu (Select processor)
631
TASKING VX-toolset for ARM User Guide
Control program option: --create (-c)
Menu entry
-
Command line syntax
--create[=stage]
-c[stage]
You can specify the following stages:
intermediate-c
c
Stop after C++ files are compiled to intermediate C files (.ic)
relocatable
l
Stop after the files are linked to a linker object file (.out)
mil
m
Stop after C++ files or C files are compiled to MIL (.mil)
object
o
Stop after the files are assembled to objects (.obj)
assembly
s
Stop after C++ files or C files are compiled to assembly (.src)
Default (without flags): --create=object
Description
Normally the control program generates an absolute object file of the specified output format from the file
you supplied as input. With this option you tell the control program to stop after a certain number of phases.
Example
To generate the object file test.obj:
ccarm --create test.c
The control program stops after the file is assembled. It does not link nor locate the generated output.
Related information
Linker option --link-only (Link only, no locating)
632
Tool Options
Control program option: --debug-info (-g)
Menu entry
1.
Select C/C++ Compiler » Debugging.
2.
To generate symbolic debug information, select Default, Call-frame only or Full.
To disable the generation of debug information, select None.
Command line syntax
--debug-info
-g
Description
With this option you tell the control program to include debug information in the generated object file.
The control program passes the option --debug-info (-g) to the C compiler and calls the assembler with
--debug-info=+smart (-g).
Related information
C compiler option --debug-info (Generate symbolic debug information)
Assembler option --debug-info (Generate symbolic debug information)
633
TASKING VX-toolset for ARM User Guide
Control program option: --define (-D)
Menu entry
1.
Select C/C++ Compiler » Preprocessing and/or Assembler » Preprocessing.
The Defined symbols box right-below shows the symbols that are currently defined.
2.
To define a new symbol, click on the Add button in the Defined symbols box.
3.
Type the symbol definition (for example, demo=1)
Use the Edit and Delete button to change a macro definition or to remove a macro from the list.
Command line syntax
--define=macro_name[=macro_definition]
-Dmacro_name[=macro_definition]
Description
With this option you can define a macro and specify it to the preprocessor. If you only specify a macro
name (no macro definition), the macro expands as '1'.
You can specify as many macros as you like. Simply use the Add button to add new macro definitions.
On the command line, use the option --define (-D) multiple times. If the command line exceeds the limit
of the operating system, you can define the macros in an option file which you then must specify to the
compiler with the option --option-file (-f) file.
Defining macros with this option (instead of in the C source) is, for example, useful to compile conditional
C source as shown in the example below.
The control program passes the option --define (-D) to the compiler and the assembler.
Example
Consider the following C program with conditional code to compile a demo program and a real program:
void main( void )
{
#if DEMO
demo_func();
#else
real_func();
#endif
}
/* compile for the demo program */
/* compile for the real program */
You can now use a macro definition to set the DEMO flag:
634
Tool Options
ccarm --define=DEMO test.c
ccarm --define=DEMO=1 test.c
Note that both invocations have the same effect.
The next example shows how to define a macro with arguments. Note that the macro name and definition
are placed between double quotes because otherwise the spaces would indicate a new option.
ccarm --define="MAX(A,B)=((A) > (B) ? (A) : (B))" test.c
Related information
Control program option --undefine (Remove preprocessor macro)
Control program option --option-file (Specify an option file)
635
TASKING VX-toolset for ARM User Guide
Control program option: --dep-file
Menu entry
-
Command line syntax
--dep-file[=file]
Description
With this option you tell the compiler to generate dependency lines that can be used in a Makefile. In
contrast to the option --preprocess=+make, the dependency information will be generated in addition to
the normal output file.
By default, the information is written to a file with extension .d (one for every input file). When you specify
a filename, all dependencies will be combined in the specified file.
Example
ccarm --dep-file=test.dep -t test.c
The compiler compiles the file test.c, which results in the output file test.src, and generates
dependency lines in the file test.dep.
Related information
Control program option --preprocess=+make (Generate dependencies for make)
636
Tool Options
Control program option: --diag
Menu entry
1.
From the Window menu, select Show View » Other » TASKING » Problems.
The Problems view is added to the current perspective.
2.
In the Problems view right-click on a message.
A popup menu appears.
3.
Select Detailed Diagnostics Info.
A dialog box appears with additional information.
Command line syntax
--diag=[format:]{all | nr,...}
You can set the following output formats:
html
HTML output.
rtf
Rich Text Format.
text
ASCII text.
Default format: text
Description
With this option you can ask for an extended description of error messages in the format you choose.
The output is directed to stdout (normally your screen) and in the format you specify. You can specify the
following formats: html, rtf or text (default). To create a file with the descriptions, you must redirect the
output.
With the suboption all, the descriptions of all error messages are given. If you want the description of one
or more selected error messages, you can specify the error message numbers, separated by commas.
Example
To display an explanation of message number 103, enter:
ccarm --diag=103
This results in message 103 with explanation.
To write an explanation of all errors and warnings in HTML format to file ccerrors.html, use redirection
and enter:
ccarm --diag=html:all > ccerrors.html
637
TASKING VX-toolset for ARM User Guide
Related information
Section 4.8, C Compiler Error Messages
638
Tool Options
Control program option: --dry-run (-n)
Menu entry
-
Command line syntax
--dry-run
-n
Description
With this option you put the control program in verbose mode. The control program prints the invocations
of the tools it would use to process the files without actually performing the steps.
Related information
Control program option --verbose (Verbose output)
639
TASKING VX-toolset for ARM User Guide
Control program option: --dsp-library
Menu entry
1.
Select C/C++ Compiler » Include Paths.
2.
Enable the option Add CMSIS include paths.
3.
Select Linker » Libraries.
4.
Enable the option Link CMSIS DSP library.
Command line syntax
--dsp-library
Description
With this option the control program sets the C/C++ compiler macro ARM_MATH_CM0, ARM_MATH_CM3
or ARM_MATH_CM4, depending on the selected processor. These macros are required for the CMSIS
arm_math.h header file to operate correctly. The control program also passes the appropriate CMSIS
DSP library to the linker. When MIL linking, the MIL library variant will be used.
Example
After
ccarm --cpu=STM32F205RB --dsp-library --tasking-sfr -v -t test.c
the control program will call the tools as follows:
carm -CARMv7M -D__PROC_STM32F205RB__ -Hstm32f2xx.h -Icmsis/Include,
cmsis/Device/ST/STM32F2xx/Include -DARM_MATH_CM3
-o test.src test.c
asarmt -CARMv7M -o test.obj test.src
lkarm test.obj -o test.abs -CARMv7M -D__PROC_STM32F205RB__
-D__DEVICE_LSL_FILE=stm32f2xx.lsl -D__FLASH_SIZE=128k -D__SRAM_SIZE=64k
--map-file -lcthumb -lfpthumb -lrtthumb -ldspthumb
Related information
Section 14.1, Using the CMSIS DSP Library
Control program option --tasking-sfr (Include CMSIS SFR file)
640
Tool Options
Control program option: --endianness
Menu entry
1.
Select Global Options.
2.
Specify the Endianness:Little-endian mode or Big-endian mode.
Command line syntax
--endianness=endianness
-B
--big-endian
--be32
You can specify the following endianness:
big
b
Big endian
little
l
Little endian (default)
Description
By default, the compiler generates code for a little-endian target (least significant byte of a word at lowest
byte address). With --endianness=big the compiler generates code for a big-endian target (most significant
byte of a word at lowest byte address). -B is an alias for option --endianness=big.
--be32 is an alias for --endianness=big --code-endianness=big
Related information
Control program option --be32 (Big-endian code and data)
Control program option --code-endianness (Code endianness)
641
TASKING VX-toolset for ARM User Guide
Control program option: --error-file
Menu entry
-
Command line syntax
--error-file
Description
With this option the control program tells the compiler, assembler and linker to redirect error messages
to a file.
The error file will be named after the input file with extension .err (for compiler) or .ers (for assembler).
For the linker, the error file is lkarm.elk.
Example
To write errors to error files instead of stderr, enter:
ccarm --error-file -t test.c
Related information
Control Program option --warnings-as-errors (Treat warnings as errors)
642
Tool Options
Control program option: --exceptions
Menu entry
1.
Select C/C++ Compiler » Language.
2.
Enable the option Support for C++ exception handling.
Command line syntax
--exceptions
Description
With this option you enable support for exception handling in the C++ compiler.
Related information
-
643
TASKING VX-toolset for ARM User Guide
Control program option: --force-c
Menu entry
-
Command line syntax
--force-c
Description
With this option you tell the control program to treat all .cc files as C files instead of C++ files. This means
that the control program does not call the C++ compiler and forces the linker to link C libraries.
Related information
Control program option --force-c++ (Force C++ compilation and linking)
644
Tool Options
Control program option: --force-c++
Menu entry
Eclipse always uses this option for a C++ project.
Command line syntax
--force-c++
Description
With this option you tell the control program to treat all .c files as C++ files instead of C files. This means
that the control program calls the C++ compiler prior to the C compiler and forces the linker to link C++
libraries.
Related information
Control program option --force-c (Treat C++ files as C files)
645
TASKING VX-toolset for ARM User Guide
Control program option: --force-munch
Menu entry
Eclipse always uses this option for a C++ project.
Command line syntax
--force-munch
Description
With this option you force the control program to activate the muncher in the pre-locate phase.
Related information
-
646
Tool Options
Control program option: --format
Menu entry
1.
Select Linker » Output Format.
2.
Enable the option Generate Intel Hex format file and/or Generate S-records file.
3.
Optionally, specify the Size of addresses.
Eclipse always uses the project name as the basename for the output file.
Command line syntax
--format=format
You can specify the following formats:
ELF
ELF/DWARF
IHEX
Intel Hex
SREC
Motorola S-records
Description
With this option you specify the output format for the resulting (absolute) object file. The default output
format is ELF/DWARF, which can directly be used by the debugger.
If you choose IHEX or SREC, you can additionally specify the address size of the chosen format (option
--address-size).
Example
To generate a Motorola S-record output file:
ccarm --format=SREC test1.c test2.c --output=test.sre
Related information
Control program option --address-size (Set address size for linker IHEX/SREC files)
Control program option --output (Output file)
Linker option --chip-output (Generate an output file for each chip)
647
TASKING VX-toolset for ARM User Guide
Control program option: --fpu
Menu entry
1.
Select C/C++ Compiler » Code Generation.
2.
Enable the option Use FPU.
Command line syntax
--fpu=fpu
You can specify the following arguments:
FPv4-sp
alias for VFPv4-sp
VFPv2
alias for VFPv3
VFPv3
Compile for VFPv3 architecture
VFPv3-sp
Compile for VFPv3-sp architecture
VFPv4-sp
Compile for VFPv4-sp architecture
none
Compile for software FPU library (default)
Description
With this option you define the kind of FPU support with which you create your application. The "sp" suffix
denotes single precision floating-point only.
Related information
-
648
Tool Options
Control program option: --global-type-checking
Menu entry
1.
Select C/C++ Compiler » Diagnostics.
2.
Enable the option Perform global type checking on C code.
Command line syntax
--global-type-checking
Description
The C compiler already performs type checking within each module. Use this option when you want the
linker to perform type checking between modules. The control program passes this option to both the C
compiler and the linker.
Related information
-
649
TASKING VX-toolset for ARM User Guide
Control program option: --help (-?)
Menu entry
-
Command line syntax
--help[=item]
-?
You can specify the following argument:
options
Show extended option descriptions
Description
Displays an overview of all command line options. When you specify the argument options you can list
detailed option descriptions.
Example
The following invocations all display a list of the available command line options:
ccarm -?
ccarm --help
ccarm
To see a detailed description of the available options, enter:
ccarm --help=options
Related information
-
650
Tool Options
Control program option: --include-directory (-I)
Menu entry
1.
Select C/C++ Compiler » Include Paths.
The Include paths box shows the directories that are added to the search path for include files.
2.
To define a new directory for the search path, click on the Add button in the Include paths box.
3.
Type or select a path.
4.
Optionally enable the option Add CMSIS include paths.
Use the Edit and Delete button to change a path or to remove a path from the list.
Command line syntax
--include-directory=path,...
-Ipath,...
Description
With this option you can specify the path where your include files are located. A relative path will be
relative to the current directory.
The control program passes this option to the compiler and the assembler.
Example
Suppose that the C source file test.c contains the following lines:
#include <stdio.h>
#include "myinc.h"
You can call the control program as follows:
ccarm --include-directory=myinclude test.c
First the compiler looks for the file stdio.h in the directory myinclude relative to the current directory.
If it was not found, the compiler searches in the environment variable and then in the default include
directory.
The compiler now looks for the file myinc.h in the directory where test.c is located. If the file is not
there the compiler searches in the directory myinclude. If it was still not found, the compiler searches
in the environment variable and then in the default include directory.
Related information
C compiler option --include-directory (Add directory to include file search path)
651
TASKING VX-toolset for ARM User Guide
C compiler option --include-file (Include file at the start of a compilation)
652
Tool Options
Control program option: --instantiate
Menu entry
1.
Select C/C++ Compiler » Miscellaneous.
2.
Select an instantiation mode in the Instantiation mode of external template entities box.
Command line syntax
--instantiate=mode
You can specify the following modes:
used
all
local
Default: --instantiate=used
Description
Control instantiation of external template entities. External template entities are external (that is, non-inline
and non-static) template functions and template static data members. The instantiation mode determines
the template entities for which code should be generated based on the template definition. Normally,
when a file is compiled, template entities are instantiated wherever they are used (the linker will discard
duplicate definitions). The overall instantiation mode can, however, be changed with this option. You can
specify the following modes:
used
Instantiate those template entities that were used in the compilation. This will include
all static data members for which there are template definitions. This is the default.
all
Instantiate all template entities declared or referenced in the compilation unit. For
each fully instantiated template class, all of its member functions and static data
members will be instantiated whether or not they were used. Non-member template
functions will be instantiated even if the only reference was a declaration.
local
Similar to --instantiate=used except that the functions are given internal linkage.
This is intended to provide a very simple mechanism for those getting started with
templates. The compiler will instantiate the functions that are used in each
compilation unit as local functions, and the program will link and run correctly (barring
problems due to multiple copies of local static variables). However, one may end
up with many copies of the instantiated functions, so this is not suitable for production
use.
You cannot use --instantiate=local in conjunction with automatic template instantiation.
Related information
Control program option --no-auto-instantiation (Disable automatic C++ instantiation)
653
TASKING VX-toolset for ARM User Guide
Section 2.5, Template Instantiation
654
Tool Options
Control program option: --io-streams
Menu entry
1.
Select C/C++ Compiler » Language.
2.
Enable the option Support for C++ I/O streams.
Command line syntax
--io-streams
Description
As I/O streams require substantial resources they are disabled by default. Use this option to enable I/O
streams support in the C++ library.
This option also enables exception handling.
Related information
-
655
TASKING VX-toolset for ARM User Guide
Control program option: --iso
Menu entry
1.
Select C/C++ Compiler » Language.
2.
From the Comply to C standard list, select ISO C99 or ISO C90.
Command line syntax
--iso={90|99}
Default: --iso=99
Description
With this option you select the ISO C standard. C90 is also referred to as the "ANSI C standard". C99
refers to the newer ISO/IEC 9899:1999 (E) standard. C99 is the default.
Independent of the chosen ISO standard, the control program always links libraries with C99 support.
Example
To select the ISO C90 standard on the command line:
ccarm --iso=90 test.c
Related information
C compiler option --iso (ISO C standard)
656
Tool Options
Control program option: --keep-output-files (-k)
Menu entry
Eclipse always removes generated output files when an error occurs.
Command line syntax
--keep-output-files
-k
Description
If an error occurs during the compilation, assembling or linking process, the resulting output file may be
incomplete or incorrect. With this option you keep the generated output files when an error occurs.
By default the control program removes generated output files when an error occurs. This is useful when
you use the make utility. If the erroneous files are not removed, the make utility may process corrupt files
on a subsequent invocation.
Use this option when you still want to use the generated files. For example when you know that a particular
error does not result in a corrupt file, or when you want to inspect the output file, or send it to Altium
support.
The control program passes this option to the compiler, assembler and linker.
Example
ccarm --keep-output-files test.c
When an error occurs during compiling, assembling or linking, the erroneous generated output files will
not be removed.
Related information
C compiler option --keep-output-files
Assembler option --keep-output-files
Linker option --keep-output-files
657
TASKING VX-toolset for ARM User Guide
Control program option: --keep-temporary-files (-t)
Menu entry
1.
Select Global Options.
2.
Enable the option Keep temporary files.
Command line syntax
--keep-temporary-files
-t
Description
By default, the control program removes intermediate files like the .src file (result of the compiler phase)
and the .obj file (result of the assembler phase).
With this option you tell the control program to keep temporary files it generates during the creation of
the absolute object file.
Example
ccarm --keep-temporary-files test.c
The control program keeps all intermediate files it generates while creating the absolute object file
test.abs.
Related information
-
658
Tool Options
Control program option: --library (-l)
Menu entry
1.
Select Linker » Libraries.
The Libraries box shows the list of libraries that are linked with the project.
2.
To add a library, click on the Add button in the Libraries box.
3.
Type or select a library (including its path).
4.
Optionally, disable the option Link default libraries.
Use the Edit and Delete button to change a library name or to remove a library from the list.
Command line syntax
--library=name
-lname
Description
With this option you tell the linker via the control program to use system library name.lib, where name
is a string. The linker first searches for system libraries in any directories specified with --library-directory,
then in the directories specified with the environment variables LIBARM, unless you used the option
--ignore-default-library-path.
Example
To search in the system library carm.lib (C library):
ccarm test.obj mylib.lib --library=carm
The linker links the file test.obj and first looks in library mylib.lib (in the current directory only),
then in the system library carm.lib to resolve unresolved symbols.
Related information
Control program option --no-default-libraries (Do not link default libraries)
Control program option --library-directory (Additional search path for system libraries)
Section 8.3, Linking with Libraries
659
TASKING VX-toolset for ARM User Guide
Control program option: --library-directory (-L) /
--ignore-default-library-path
Menu entry
1.
Select Linker » Libraries.
The Library search path box shows the directories that are added to the search path for library files.
2.
To define a new directory for the search path, click on the Add button in the Library search path
box.
3.
Type or select a path.
Use the Edit and Delete button to change a path or to remove a path from the list.
Command line syntax
--library-directory=path,...
-Lpath,...
--ignore-default-library-path
-L
Description
With this option you can specify the path(s) where your system libraries, specified with the option --library
(-l), are located. If you want to specify multiple paths, use the option --library-directory for each separate
path.
The default path is$(PRODDIR)\lib\architecture\endianness.
If you specify only -L (without a pathname) or the long option --ignore-default-library-path, the linker
will not search the default path and also not in the paths specified in the environment variables LIBARM.
So, the linker ignores steps 2 and 3 as listed below.
The priority order in which the linker searches for system libraries specified with the option --library (-l)
is:
1. The path that is specified with the option --library-directory.
2. The path that is specified in the environment variables LIBARM.
3. The default directory $(PRODDIR)\libarchitecture\endianness.
Example
Suppose you call the control program as follows:
ccarm test.c --library-directory=c:\mylibs --library=carm
660
Tool Options
First the linker looks in the directory c:\mylibs for library carm.lib (this option). If it does not find the
requested libraries, it looks in the directory that is set with the environment variables LIBARM. Then the
linker looks in the default directory $(PRODDIR)\libarchitecture\endianness for libraries.
Related information
Control program option --library (Link system library)
Section 8.3.1, How the Linker Searches Libraries
661
TASKING VX-toolset for ARM User Guide
Control program option: --list-files
Menu entry
-
Command line syntax
--list-files[=file]
Default: no list files are generated
Description
With this option you tell the assembler via the control program to generate a list file for each specified
input file. A list file shows the generated object code and the relative addresses. Note that the assembler
generates a relocatable object file with relative addresses.
With the optional file you can specify a name for the list file. This is only possible if you specify only one
input file to the control program. If you do not specify a file name, or you specify more than one input file,
the control program names the generated list file(s) after the specified input file(s) with extension .lst.
Note that object files and library files are not counted as input files.
Related information
Assembler option --list-file (Generate list file)
Assembler option --list-format (Format list file)
662
Tool Options
Control program option: --lsl-file (-d)
Menu entry
An LSL file can be generated when you create your project in Eclipse:
1.
From the File menu, select File » New » TASKING VX-toolset for ARM C/C++ Project.
The New C/C++ Project wizard appears.
2.
Fill in the project settings in each dialog and click Next > until the ARM Project Settings appear.
3.
Enable the option Add linker script file to the project and click Finish.
Eclipse creates your project and the file project.lsl in the project directory.
The LSL file can be specified in the Properties dialog:
1.
Select Linker » Script File.
2.
Specify a LSL file in the Linker script file (.lsl) field (default ../${PROJ}.lsl).
Command line syntax
--lsl-file=file,...
-dfile,...
Description
A linker script file contains vital information about the core for the locating phase of the linker. A linker
script file is coded in LSL and contains the following types of information:
• the architecture definition describes the core's hardware architecture.
• the memory definition describes the physical memory available in the system.
• the section layout definition describes how to locate sections in memory.
With this option you specify a linker script file via the control program to the linker. If you do not specify
this option, the linker uses a default script file (default.lsl).You can specify the existing file target.lsl
or the name of a manually written linker script file. You can use this option multiple times. The linker
processes the LSL files in the order in which they appear on the command line.
Related information
Section 8.7, Controlling the Linker with a Script
663
TASKING VX-toolset for ARM User Guide
Control program option: --make-target
Menu entry
-
Command line syntax
--make-target=name
Description
With this option you can overrule the default target name in the make dependencies generated by the
options --preprocess=+make (-Em) and --dep-file. The default target name is the basename of the input
file, with extension .obj.
Example
ccarm --preprocess=+make --make-target=../mytarget.obj test.c
The compiler generates dependency lines with the default target name ../mytarget.obj instead of
test.obj.
Related information
Control program option --preprocess=+make (Generate dependencies for make)
Control program option --dep-file (Generate dependencies in a file)
664
Tool Options
Control program option: --mil-link / --mil-split
Menu entry
1.
Select C/C++ Compiler » Optimization.
2.
Enable the option Build for application wide optimizations (MIL linking).
3.
Select Optimize less/Build faster or Optimize more/Build slower.
Command line syntax
--mil-link
--mil-split[=file,...]
Description
With option --mil-link the C compiler links the optimized intermediate representation (MIL) of all input
files and MIL libraries specified on the command line in the compiler. The result is one single module that
is optimized another time.
Option --mil-split does the same as option --mil-link, but in addition, the resulting MIL representation is
written to a file with the suffix .mil and the C compiler also splits the MIL representation and writes it to
separate files with suffix .ms. One file is written for each input file or MIL library specified on the command
line. The .ms files are only updated on a change.
With option --mil-split you can perform application-wide optimizations during the frontend phase by
specifying all modules at once, and still invoke the backend phase one module at a time to reduce the
total compilation time. Application wide code compaction is not possible in this case.
Optionally, you can specify another filename for the .ms file the C compiler generates. Without an
argument, the basename of the C source file is used to create the .ms filename. Note that if you specify
a filename, you have to specify one filename for every input file.
Build for application wide optimizations (MIL linking) and Optimize less/Build faster
This option is standard MIL linking and splitting. Note that you can control the optimizations to be performed
with the optimization settings.
Optimize more/Build slower
When you enable this option, the compiler's frontend does not split the MIL stream in separate modules,
but feeds it directly to the compiler's backend, allowing the code compaction to be performed application
wide.
Related information
Section 4.1, Compilation Process
C compiler option --mil / --mil-split
665
TASKING VX-toolset for ARM User Guide
Control program option: --mixed-arm-thumb
Menu entry
1.
Select C/C++ Compiler » Code Generation.
2.
Enable the option Use full assembler for mixed ARM and Thumb instructions.
Command line syntax
--mixed-arm-thumb
Description
With this option the control program calls the mixed ARM and Thumb assembler (asarm).
When you do not use this option, option --thumb determines which target assembler is chosen. Without
--thumb: the ARM instruction set only assembler (asarma). With --thumb: the Thumb instruction set only
assembler (asmarmt).
See the description of --thumb for more information.
Note that when you specify the ARMv6-M or ARMv7-M architecture profile with --cpu, this automatically
selects the Thumb-2 instruction set.
Related information
Control program option --thumb (use Thumb instruction set)
666
Tool Options
Control program option: --no-auto-instantiation
Menu entry
-
Command line syntax
--no-auto-instantiation
Default: the C++ compiler automatically instantiates templates.
Description
With this option automatic instantiation of templates is disabled.
Related information
Control program option --instantiate (Set instantiation mode)
Section 2.5, Template Instantiation
667
TASKING VX-toolset for ARM User Guide
Control program option: --no-default-libraries
Menu entry
1.
Select Linker » Libraries.
2.
Disable the option Link default libraries.
Command line syntax
--no-default-libraries
Description
By default the control program specifies the standard C libraries (C99) and run-time library to the linker.
With this option you tell the control program not to specify the standard C libraries and run-time library to
the linker.
In this case you must specify the libraries you want to link to the linker with the option --library=library_name
or pass the libraries as files on the command line. The control program recognizes the option --library
(-l) as an option for the linker and passes it as such.
Example
ccarm --no-default-libraries test.c
The control program does not specify any libraries to the linker. In normal cases this would result in
unresolved externals.
To specify your own libraries (carm.lib) and avoid unresolved externals:
ccarm --no-default-libraries --library=carm test.c
Related information
Control program option --library (Link system library)
Section 8.3.1, How the Linker Searches Libraries
668
Tool Options
Control program option: --no-double (-F)
Menu entry
1.
Select C/C++ Compiler » Language.
2.
Enable the option Treat double as float.
Command line syntax
--no-double
-F
Description
With this option you tell the compiler to treat variables of the type double as float. Because the float
type takes less space, execution speed increases and code size decreases, both at the cost of less
precision.
The control program also tells the linker to link the single-precision C library.
Related information
-
669
TASKING VX-toolset for ARM User Guide
Control program option: --no-map-file
Menu entry
1.
Select Linker » Map File.
2.
Disable the option Generate map file.
Command line syntax
--no-map-file
Description
By default the control program tells the linker to generate a linker map file.
A linker map file is a text file that shows how the linker has mapped the sections and symbols from the
various object files (.obj) to the linked object file. A locate part shows the absolute position of each
section. External symbols are listed per space with their absolute address, both sorted on symbol and
sorted on address.
With this option you prevent the generation of a map file.
Related information
-
670
Tool Options
Control program option: --no-warnings (-w)
Menu entry
1.
Select C/C++ Compiler » Diagnostics.
The Suppress C compiler warnings box shows the warnings that are currently suppressed.
2.
To suppress a warning, click on the Add button in the Suppress warnings box.
3.
Enter the numbers, separated by commas or as a range, of the warnings you want to suppress (for
example 537,538). Or you can use the Add button multiple times.
4.
To suppress all warnings, enable the option Suppress all warnings.
Use the Edit and Delete button to change a warning number or to remove a number from the list.
Command line syntax
--no-warnings[=number[-number],...]
-w[number[-number],...]
Description
With this option you can suppresses all warning messages for the various tools or specific control program
warning messages.
On the command line this option works as follows:
• If you do not specify this option, all warnings are reported.
• If you specify this option but without numbers, all warnings of all tools are suppressed.
• If you specify this option with a number or a range, only the specified control program warnings are
suppressed. You can specify the option --no-warnings=number multiple times.
Example
To suppress all warnings for all tools, enter:
ccarm test.c --no-warnings
Related information
Control program option --warnings-as-errors (Treat warnings as errors)
671
TASKING VX-toolset for ARM User Guide
Control program option: --option-file (-f)
Menu entry
-
Command line syntax
--option-file=file,...
-f file,...
Description
This option is primarily intended for command line use. Instead of typing all options on the command line,
you can create an option file which contains all options and flags you want to specify. With this option
you specify the option file to the control program.
Use an option file when the command line would exceed the limits of the operating system, or just to store
options and save typing.
You can specify the option --option-file multiple times.
Format of an option file
• Multiple arguments on one line in the option file are allowed.
• To include whitespace in an argument, surround the argument with single or double quotes.
• If you want to use single quotes as part of the argument, surround the argument by double quotes and
vise versa:
"This has a single quote ' embedded"
'This has a double quote " embedded'
'This has a double quote " and a single quote '"' embedded"
• When a text line reaches its length limit, use a \ to continue the line. Whitespace between quotes is
preserved.
"This is a continuation \
line"
-> "This is a continuation line"
• It is possible to nest command line files up to 25 levels.
Example
Suppose the file myoptions contains the following lines:
672
Tool Options
--debug-info
--define=DEMO=1
test.c
Specify the option file to the control program:
ccarm --option-file=myoptions
This is equivalent to the following command line:
ccarm —-debug-info --define=DEMO=1 test.c
Related information
-
673
TASKING VX-toolset for ARM User Guide
Control program option: --output (-o)
Menu entry
Eclipse always uses the project name as the basename for the output file.
Command line syntax
--output=file
-o file
Description
By default, the control program generates a file with the same basename as the first specified input file.
With this option you specify another name for the resulting absolute object file.
The default output format is ELF/DWARF, but you can specify another output format with option --format.
Example
ccarm test.c prog.c
The control program generates an ELF/DWARF object file (default) with the name test.abs.
To generate the file result.abs:
ccarm --output=result.abs test.c prog.c
Related information
Control program option --format (Set linker output format)
Linker option --output (Output file)
Linker option --chip-output (Generate an output file for each chip)
674
Tool Options
Control program option: --pass (-W)
Menu entry
1.
Select C/C++ Compiler » Miscellaneous or Assembler » Miscellaneous or Linker » Miscellaneous.
2.
Add an option to the Additional options field.
Be aware that the options in the option file are added to the options you have set in the other pages.
Only in extraordinary cases you may want to use them in combination. The assembler options are
preceded by -Wa and the linker options are preceded by -Wl. For the C/C++ options you have to do
this manually.
Command line syntax
--pass-assembler=option
-Waoption
Pass option directly to the assembler
--pass-c=option
-Wcoption
Pass option directly to the C compiler
--pass-c++=option
-Wcpoption
Pass option directly to the C++ compiler
--pass-linker=option
-Wloption
Pass option directly to the linker
Description
With this option you tell the control program to call a tool with the specified option. The control program
does not use or interpret the option itself, but specifies it directly to the tool which it calls.
Example
To pass the option --verbose directly to the linker, enter:
ccarm --pass-linker=--verbose test.c
Related information
-
675
TASKING VX-toolset for ARM User Guide
Control program option: --preprocess (-E) / --no-preprocessing-only
Menu entry
1.
Select C/C++ Compiler » Preprocessing.
2.
Enable the option Store preprocessor output in <file>.pre.
3.
(Optional) Enable the option Keep comments in preprocessor output.
4.
(Optional) Enable the option Keep #line info in preprocessor output.
Command line syntax
--preprocess[=flags]
-E[flags]
--no-preprocessing-only
You can set the following flags:
+/-comments
c/C
keep comments
+/-includes
i/I
generate a list of included source files
+/-list
l/L
generate a list of macro definitions
+/-make
m/M
generate dependencies for make
+/-noline
p/P
strip #line source position information
Default: -ECILMP
Description
With this option you tell the compiler to preprocess the C source. The C compiler sends the preprocessed
output to the file name.pre (where name is the name of the C source file to compile). Eclipse also
compiles the C source.
On the command line, the control program stops after preprocessing. If you also want to compile the C
source you can specify the option --no-preprocessing-only. In this case the control program calls the
compiler twice, once with option --preprocess and once for a regular compilation.
With --preprocess=+comments you tell the preprocessor to keep the comments from the C source file
in the preprocessed output.
With --preprocess=+includes the compiler will generate a list of all included source files.The preprocessor
output is discarded.
With --preprocess=+list the compiler will generate a list of all macro definitions. The preprocessor output
is discarded.
676
Tool Options
With --preprocess=+make the compiler will generate dependency lines that can be used in a Makefile.
The information is written to a file with extension .d. The preprocessor output is discarded. The default
target name is the basename of the input file, with the extension .obj. With the option --make-target
you can specify a target name which overrules the default target name.
With --preprocess=+noline you tell the preprocessor to strip the #line source position information (lines
starting with #line). These lines are normally processed by the assembler and not needed in the
preprocessed output. When you leave these lines out, the output is easier to read.
Example
ccarm --preprocess=+comments,-make,-noline --no-preprocessing-only test.c
The compiler preprocesses the file test.c and sends the output to the file test.pre. Comments are
included but no dependencies are generated and the line source position information is not stripped from
the output file. Next, the control program calls the compiler, assembler and linker to create the final object
file test.abs
Related information
Control program option --dep-file (Generate dependencies in a file)
Control program option --make-target (Specify target name for -Em output)
677
TASKING VX-toolset for ARM User Guide
Control program option: --processors
Menu entry
1.
From the Window menu, select Preferences.
The Preferences dialog appears.
2.
Select TASKING » ARM.
3.
Click the Add button to add additional processor definition files.
Command line syntax
--processors=file
Description
With this option you can specify an additional XML file with processor definitions.
The standard list of supported processors is defined in the file processors.xml. This file defines for
each processor its full name (for example, STM32F205RB), its ID (for example, stm32f205rb), the
architecture name (for example, ARMv7M), the core settings (for example, cortexm3), the on-chip flash
settings, the list of silicon bugs for that processor. Each processor also defines options to supply to the
linker for preprocessing the LSL file for the applicable on-chip memory definitions (for example,
-D__FLASH_SIZE=128k).
The control program reads the specified file after the file processors.xml in the product's etc directory.
Additional XML files can override processor definitions made in XML files that are read before.
Multiple --processors options are allowed.
Eclipse generates a --processors option in the makefiles for each specified XML file.
Example
Specify an additional processor definition file (suppose processors-new.xml contains a new processor
ARMNEW):
ccarm --processors=processors-new.xml --cpu=ARMNEW test.c
Related information
Control program option --cpu (Select architecture)
678
Tool Options
Control program option: --profile (-p)
Menu entry
1.
Select C/C++ Compiler » Debugging.
2.
Enable or disable Static profiling.
3.
Enable or disable one or more of the following Generate profiling information options (dynamic
profiling):
• for block counters (not in combination with Call graph or Function timers)
• to build a call graph
• for function counters
• for function timers
Note that the more detailed information you request, the larger the overhead in terms of execution
time, code size and heap space needed. The option --debug does not affect profiling, execution
time or code size.
Command line syntax
--profile[=flag,...]
-p[flags]
Use the following option for a predefined set of flags:
--profile=g
-pg
Profiling with call graph and function timers.
Alias for: -pBcFSt
You can set the following flags:
+/-block
b/B
block counters
+/-callgraph
c/C
call graph
+/-function
f/F
function counters
+/-static
s/S
static profile generation
+/-time
t/T
function timers
Default (without flags): -pBCfST
Description
Profiling is the process of collecting statistical data about a running application. With these data you can
analyze which functions are called, how often they are called and what their execution time is.
679
TASKING VX-toolset for ARM User Guide
Several methods of profiling exist. One method is code instrumentation which adds code to your application
that takes care of the profiling process when the application is executed. Another method is static profiling.
For an extensive description of profiling refer to Chapter 6, Profiling.
You can obtain the following profiling data (see flags above):
Block counters (not in combination with Call graph or Function timers)
This will instrument the code to perform basic block counting. As the program runs, it counts the number
of executions of each branch in an if statement, each iteration of a for loop, and so on. Note that though
you can combine Block counters with Function counters, this has no effect because Function counters
is only a subset of Block counters.
Call graph (not in combination with Block counters)
This will instrument the code to reconstruct the run-time call graph. As the program runs it associates the
caller with the gathered profiling data.
Function counters
This will instrument the code to perform function call counting. This is a subset of the basic Block counters.
Function timers (not in combination with Block counters/Function counters)
This will instrument the code to measure the time spent in a function. This includes the time spent in all
sub functions (callees).
Static profiling
With this option you do not need to run the application to get profiling results. The compiler generates
profiling information at compile time, without adding extra code to your application.
Note that the more detailed information you request, the larger the overhead in terms of execution
time, code size and heap space needed. The option Generate symbolic debug information
(--debug) does not affect profiling, execution time or code size.
The control program automatically specifies the corresponding profiling libraries to the linker.
Example
To generate block count information for the module test.c during execution, compile as follows:
ccarm --profile=+block test.c
In this case the control program tells the linker to link the library pbarm.lib.
Related information
Chapter 6, Profiling
680
Tool Options
Control program option: --show-c++-warnings
Menu entry
-
Command line syntax
--show-c++-warnings
Description
The C++ compiler may generate a compiled C++ file (.ic) that causes warnings during compilation or
assembling. With this option you tell the control program to show these warnings. By default C++ warnings
are suppressed.
Related information
-
681
TASKING VX-toolset for ARM User Guide
Control program option: --signed-bitfields
Menu entry
1.
Select C/C++ Compiler » Language.
2.
Enable the option Treat "int" bit-fields as signed.
Command line syntax
--signed-bitfields
Description
For bit-fields it depends on the implementation whether a plain int is treated as signed int or unsigned
int. By default an int bit-field is treated as unsigned int. This offers the best performance. With this
option you tell the compiler to treat int bit-fields as signed int. In this case, you can still add the
keyword unsigned to treat a particular int bit-field as unsigned.
Related information
C compiler option --signed-bitfields
Section 1.1, Data Types
682
Tool Options
Control program option: --tasking-sfr
Menu entry
1.
Select C/C++ Compiler » Preprocessing.
2.
Enable the option Include CMSIS device register definition header file.
3.
Select C/C++ Compiler » Include Paths.
4.
Enable the option Add CMSIS include paths.
Command line syntax
--tasking-sfr
Description
With this option the compiler automatically includes the CMSIS SFR header file belonging to the target
processor you selected on the Processor page (C compiler option --cpu).
Example
After
ccarm --cpu=STM32F205RB --tasking-sfr -v -t test.c
the control program will call the tools as follows:
carm -CARMv7M -D__PROC_STM32F205RB__ -Hstm32f2xx.h -Icmsis/Include,
cmsis/Device/ST/STM32F2xx/Include -o test.src test.c
asarmt -CARMv7M -o test.obj test.src
lkarm test.obj -o test.abs -CARMv7M -D__PROC_STM32F205RB__
-D__DEVICE_LSL_FILE=stm32f2xx.lsl -D__FLASH_SIZE=128k -D__SRAM_SIZE=64k
--map-file -lcthumb -lfpthumb -lrtthumb
Related information
Control program option --cpu (Select architecture)
Control program option --dsp-library (Link CMSIS DSP library)
683
TASKING VX-toolset for ARM User Guide
Control program option: --thumb
Menu entry
1.
Select C/C++ Compiler » Code Generation.
2.
Enable the option Use Thumb instruction set.
Command line syntax
--thumb
Description
Generate code in Thumb mode or Thumb-2 mode, depending on the architecture. The Thumb instruction
set is a subset of the ARM instruction set which is encoded using 16-bit instructions instead of 32-bit
instructions. The Thumb-2 instruction set has 16-bit and 32-bit instructions.
Depending on this option and option --mixed-arm-thumb a target assembler is chosen. asarm is the full
assembler with both ARM and Thumb instructions. asarma is the ARM instruction set only assembler.
asarmt is the Thumb instruction set only assembler.
--thumb
--mixed-arm-thumb
Assembler
no
no
asarma
no
yes
asarm
yes
no
asarmt
yes
yes
asarm --thumb
Note that when you specify the ARMv6-M, ARMv7-M, or ARMv7E-M architecture with --cpu, this
automatically selects the Thumb-2 instruction set.
Related information
Control program option --mixed-arm-thumb (use mixed ARM and Thumb assembler)
684
Tool Options
Control program option: --uchar (-u)
Menu entry
1.
Select C/C++ Compiler » Language.
2.
Enable the option Treat "char" variables as unsigned.
Command line syntax
--uchar
-u
Description
By default char is the same as specifying signed char. With this option char is the same as unsigned
char. This option is passed to both the C++ compiler and the C compiler.
Related information
Section 1.1, Data Types
685
TASKING VX-toolset for ARM User Guide
Control program option: --undefine (-U)
Menu entry
1.
Select C/C++ Compiler » Preprocessing
The Defined symbols box shows the symbols that are currently defined.
2.
To remove a defined symbol, select the symbol in the Defined symbols box and click on the Delete
button.
Command line syntax
--undefine=macro_name
-Umacro_name
Description
With this option you can undefine an earlier defined macro as with #undef. This option is for example
useful to undefine predefined macros.
The following predefined ISO C standard macros cannot be undefined:
__FILE__
current source filename
__LINE__
current source line number (int type)
__TIME__
hh:mm:ss
__DATE__
Mmm dd yyyy
__STDC__
level of ANSI standard
The control program passes the option --undefine (-U) to the compiler.
Example
To undefine the predefined macro __TASKING__:
ccarm --undefine=__TASKING__ test.c
Related information
Control program option --define (Define preprocessor macro)
Section 1.8, Predefined Preprocessor Macros
686
Tool Options
Control program option: --verbose (-v)
Menu entry
1.
Select Global Options.
2.
Enable the option Verbose mode of control program.
Command line syntax
--verbose
-v
Description
With this option you put the control program in verbose mode. The control program performs it tasks while
it prints the steps it performs to stdout.
Related information
Control program option --dry-run (Verbose output and suppress execution)
687
TASKING VX-toolset for ARM User Guide
Control program option: --version (-V)
Menu entry
-
Command line syntax
--version
-V
Description
Display version information. The control program ignores all other options or input files.
Related information
-
688
Tool Options
Control program option: --warnings-as-errors
Menu entry
1.
Select Global Options.
2.
Enable the option Treat warnings as errors.
Command line syntax
--warnings-as-errors[=number[-number],...]
Description
If one of the tools encounters an error, it stops processing the file(s). With this option you tell the tools to
treat warnings as errors or treat specific control program warning messages as errors:
• If you specify this option but without numbers, all warnings are treated as errors.
• If you specify this option with a number or a range, only the specified control program warnings are
treated as an error. You can specify the option --warnings-as-errors=number multiple times.
Use one of the --pass-tool options to pass this option directly to a tool when a specific warning for that
tool must be treated as an error. For example, use --pass-c=--warnings-as-errors=number to treat a
specific C compiler warning as an error.
Related information
Control program option --no-warnings (Suppress some or all warnings)
Control program option --pass (Pass option to tool)
689
TASKING VX-toolset for ARM User Guide
13.7. Make Utility Options
You can use the make utility mkarm from the command line to build your project. Note that this make
utility is not the default make used by Eclipse. So, you have to create your own makefile.
The invocation syntax is:
mkarm [option...] [target...] [macro=def]
This section describes all options for the make utility. The make utility is a command line tool so there
are no equivalent options in Eclipse.
For detailed information about the make utility and using makefiles see Section 10.2, Make Utility mkarm.
690
Tool Options
Defining Macros
Command line syntax
macro_name[=macro_definition]
Description
With this argument you can define a macro and specify it to the make utility.
A macro definition remains in existence during the execution of the makefile, even when the makefile
recursively calls the make utility again. In the recursive call, the macro acts as an environment variable.
This means that it is overruled by definitions in the recursive call. Use the option -e to prevent this.
You can specify as many macros as you like. If the command line exceeds the limit of the operating
system, you can define the macros in an option file which you then must specify to the make utility with
the option -m) file.
Defining macros on the command line is, for example, useful in combination with conditional processing
as shown in the example below.
Example
Consider the following makefile with conditional rules to build a demo program and a real program:
ifdef DEMO
# the value of DEMO is of no importance
real.abs : demo.obj main.obj
lkarm demo.obj main.obj -darm.lsl -lcarm -lfparm -lrtarm
else
real.abs : real.obj main.obj
lkarm real.obj main.obj -darm.lsl -lcarm -lfparm -lrtarm
endif
You can now use a macro definition to set the DEMO flag:
mkarm real.abs DEMO=1
In both cases the absolute object file real.abs is created but depending on the DEMO flag it is linked
with demo.obj or with real.obj.
Related information
Make utility option -e (Environment variables override macro definitions)
Make utility option -m (Name of invocation file)
691
TASKING VX-toolset for ARM User Guide
Make utility option: -?
Command line syntax
-?
Description
Displays an overview of all command line options.
Example
The following invocation displays a list of the available command line options:
mkarm -?
Related information
-
692
Tool Options
Make utility option: -a
Command line syntax
-a
Description
Normally the make utility rebuilds only those files that are out of date. With this option you tell the make
utility to rebuild all files, without checking whether they are out of date.
Example
mkarm -a
Rebuilds all your files, regardless of whether they are out of date or not.
Related information
-
693
TASKING VX-toolset for ARM User Guide
Make utility option: -c
Command line syntax
-c
Description
Eclipse uses this option when you create sub-projects. In this case the make utility calls another instance
of the make utility for the sub-project. With the option -c, the make utility runs as a child process of the
current make.
The option -c overrules the option -err.
Example
mkarm -c
The make utility runs its commands as a child processes.
Related information
Make utility option -err (Redirect error message to file)
694
Tool Options
Make utility option: -D / -DD
Command line syntax
-D
-DD
Description
With the option -D the make utility prints every line of the makefile to standard output as it is read by
mkarm.
With the option -DD not only the lines of the makefile are printed but also the lines of the mkarm.mk file
(implicit rules).
Example
mkarm -D
Each line of the makefile that is read by the make utility is printed to standard output (usually your screen).
Related information
-
695
TASKING VX-toolset for ARM User Guide
Make utility option: -d/ -dd
Command line syntax
-d
-dd
Description
With the option -d the make utility shows which files are out of date and thus need to be rebuild. The
option -dd gives more detail than the option -d.
Example
mkarm -d
Shows which files are out of date and rebuilds them.
Related information
-
696
Tool Options
Make utility option: -e
Command line syntax
-e
Description
If you use macro definitions, they may overrule the settings of the environment variables. With the option
-e, the settings of the environment variables are used even if macros define otherwise.
Example
mkarm -e
The make utility uses the settings of the environment variables regardless of macro definitions.
Related information
-
697
TASKING VX-toolset for ARM User Guide
Make utility option: -err
Command line syntax
-err file
Description
With this option the make utility redirects error messages and verbose messages to a specified file.
With the option -s the make utility only displays error messages.
Example
mkarm -err error.txt
The make utility writes messages to the file error.txt.
Related information
Make utility option -s (Do not print commands before execution)
Make utility option -c (Run as child process)
698
Tool Options
Make utility option: -f
Command line syntax
-f my_makefile
Description
By default the make utility uses the file makefile to build your files.
With this option you tell the make utility to use the specified file instead of the file makefile. Multiple -f
options act as if all the makefiles were concatenated in a left-to-right order.
If you use '-' instead of a makefile name it means that the information is read from stdin.
Example
mkarm -f mymake
The make utility uses the file mymake to build your files.
Related information
-
699
TASKING VX-toolset for ARM User Guide
Make utility option: -G
Command line syntax
-G path
Description
Normally you must call the make utility from the directory where your makefile and other files are stored.
With the option -G you can call the make utility from within another directory. The path is the path to the
directory where your makefile and other files are stored and can be absolute or relative to your current
directory.
Example
Suppose your makefile and other files are stored in the directory ..\myfiles. You can call the make
utility, for example, as follows:
mkarm -G ..\myfiles
Related information
-
700
Tool Options
Make utility option: -i
Command line syntax
-i
Description
When an error occurs during the make process, the make utility exits with a certain exit code.
With the option -i, the make utility exits without an error code, even when errors occurred.
Example
mkarm -i
The make utility exits without an error code, even when an error occurs.
Related information
-
701
TASKING VX-toolset for ARM User Guide
Make utility option: -K
Command line syntax
-K
Description
With this option the make utility keeps temporary files it creates during the make process. The make utility
stores temporary files in the directory that you have specified with the environment variable TMPDIR or
in the default 'temp' directory of your system when the TMPDIR environment variable is not specified.
Example
mkarm -K
The make utility preserves all temporary files.
Related information
-
702
Tool Options
Make utility option: -k
Command line syntax
-k
Description
When during the make process the make utility encounters an error, it stops rebuilding your files.
With the option -k, the make utility only stops building the target that produced the error. All other targets
defined in the makefile are built.
Example
mkarm -k
If the make utility encounters an error, it stops building the current target but proceeds with the other
targets that are defined in the makefile.
Related information
Make utility option -S (Undo the effect of -k)
703
TASKING VX-toolset for ARM User Guide
Make utility option: -m
Command line syntax
-m file
Description
Instead of typing all options on the command line, you can create an option file which contains all options
and flags you want to specify. With this option you specify the option file to the make utility.
Use an option file when the command line would exceed the limits of the operating system, or just to store
options and save typing.
You can specify the option -m multiple times.
If you use '-' instead of a filename it means that the options are read from stdin.
Format of an option file
• Multiple arguments on one line in the option file are allowed.
• To include whitespace in an argument, surround the argument with single or double quotes.
• If you want to use single quotes as part of the argument, surround the argument by double quotes and
vise versa:
"This has a single quote ' embedded"
'This has a double quote " embedded'
'This has a double quote " and a single quote '"' embedded"
Note that adjacent strings are concatenated.
• When a text line reaches its length limit, use a \ to continue the line. Whitespace between quotes is
preserved.
"This is a continuation \
line"
-> "This is a continuation line"
• It is possible to nest command line files up to 25 levels.
Example
Suppose the file myoptions contains the following lines:
-k
-err errors.txt
test.abs
704
Tool Options
Specify the option file to the make utility:
mkarm -m myoptions
This is equivalent to the following command line:
mkarm -k -err errors.txt test.abs
Related information
-
705
TASKING VX-toolset for ARM User Guide
Make utility option: -n
Command line syntax
-n
Description
With this option you tell the make utility to perform a dry run. The make utility shows what it would do but
does not actually perform these tasks.
This option is for example useful to quickly inspect what would happen if you call the make utility.
Example
mkarm -n
The make utility does not perform any tasks but displays what it would do if called without the option -n.
Related information
Make utility option -s (Do not print commands before execution)
706
Tool Options
Make utility option: -p
Command line syntax
-p
Description
Normally, if a command in a target rule in a makefile returns an error or when the target construction is
interrupted, the make utility removes that target file. With this option you tell the make utility to make all
target files precious. This means that all dependency files are never removed.
Example
mkarm -p
The make utility never removes target dependency files.
Related information
Special target .PRECIOUS in Section 10.2.2.1, Targets and Dependencies
707
TASKING VX-toolset for ARM User Guide
Make utility option: -q
Command line syntax
-q
Description
With this option the make utility does not perform any tasks but only returns an exit code. A zero status
indicates that all target files are up to date, a non-zero status indicates that some or all target files are
out of date.
Example
mkarm -q
The make utility only returns an error code that indicates whether all target files are up to date or not. It
does not rebuild any files.
Related information
-
708
Tool Options
Make utility option: -r
Command line syntax
-r
Description
When you call the make utility, it first reads the implicit rules from the file mkarm.mk, then it reads the
makefile with the rules to build your files. (The file mkarm.mkis located in the \etc directory of the toolset.)
With this option you tell the make utility not to read mkarm.mk and to rely fully on the make rules in the
makefile.
Example
mkarm -r
The make utility does not read the implicit make rules in mkarm.mk.
Related information
-
709
TASKING VX-toolset for ARM User Guide
Make utility option: -S
Command line syntax
-S
Description
With this option you cancel the effect of the option -k. This is only necessary in a recursive make where
the option -k might be inherited from the top-level make via MAKEFLAGS or if you set the option -k in
the environment variable MAKEFLAGS.
With this option you tell the make utility not to read mkarm.mk and to rely fully on the make rules in the
makefile.
Example
mkarm -S
The effect of the option -k is cancelled so the make utility stops with the make process after it encounters
an error.
The option -k in this example may have been set with the environment variable MAKEFLAGS or in a
recursive call to mkarm in the makefile.
Related information
Make utility option -k (On error, abandon the work for the current target only)
710
Tool Options
Make utility option: -s
Command line syntax
-s
Description
With this option you tell the make utility to perform its tasks without printing the commands it executes.
Error messages are normally printed.
Example
mkarm -s
The make utility rebuilds your files but does not print the commands it executes during the make process.
Related information
Make utility option -n (Perform a dry run)
711
TASKING VX-toolset for ARM User Guide
Make utility option: -t
Command line syntax
-t
Description
With this option you tell the make utility to touch the target files, bringing them up to date, rather than
performing the rules to rebuild them.
Example
mkarm -t
The make utility updates out-of-date files by giving them a new date and time stamp. The files are not
actually rebuild.
Related information
-
712
Tool Options
Make utility option: -time
Command line syntax
-time
Description
With this option you tell the make utility to display the current date and time on standard output.
Example
mkarm -time
The make utility displays the current date and time and updates out-of-date files.
Related information
-
713
TASKING VX-toolset for ARM User Guide
Make utility option: -V
Command line syntax
-V
Description
Display version information. The make utility ignores all other options or input files.
Related information
-
714
Tool Options
Make utility option: -W
Command line syntax
-W target
Description
With this option the make utility considers the specified target file always as up to date and will not rebuild
it.
Example
mkarm -W test.abs
The make utility rebuilds out of date targets in the makefile except the file test.abs which is considered
now as up to date.
Related information
-
715
TASKING VX-toolset for ARM User Guide
Make utility option: -w
Command line syntax
-w
Description
With this option the make utility sends error messages and verbose messages to standard output. Without
this option, the make utility sends these messages to standard error.
This option is only useful on UNIX systems.
Example
mkarm -w
The make utility sends messages to standard out instead of standard error.
Related information
-
716
Tool Options
Make utility option: -x
Command line syntax
-x
Description
With this option the make utility shows extended error messages. Extended error messages give more
detailed information about the exit status of the make utility after errors.
Example
mkarm -x
If errors occur, the make utility gives extended information.
Related information
-
717
TASKING VX-toolset for ARM User Guide
13.8. Parallel Make Utility Options
When you build a project in Eclipse, Eclipse generates a makefile and uses the make utility amk to build
all your files. However, you can also use the make utility directly from the command line to build your
project.
The invocation syntax is:
amk [option...] [target...] [macro=def]
This section describes all options for the parallel make utility.
For detailed information about the parallel make utility and using makefiles see Section 10.3, Make Utility
amk.
718
Tool Options
Parallel make utility option: --always-rebuild (-a)
Command line syntax
--always-rebuild
-a
Description
Normally the make utility rebuilds only those files that are out of date. With this option you tell the make
utility to rebuild all files, without checking whether they are out of date.
Example
amk -a
Rebuilds all your files, regardless of whether they are out of date or not.
Related information
-
719
TASKING VX-toolset for ARM User Guide
Parallel make utility option: --change-dir (-G)
Command line syntax
--change-dir=path
-G path
Description
Normally you must call the make utility from the directory where your makefile and other files are stored.
With the option -G you can call the make utility from within another directory. The path is the path to the
directory where your makefile and other files are stored and can be absolute or relative to your current
directory.
The macro SUBDIR is defined with the value of path.
Example
Suppose your makefile and other files are stored in the directory ..\myfiles. You can call the make
utility, for example, as follows:
amk -G ..\myfiles
Related information
-
720
Tool Options
Parallel make utility option: --diag
Command line syntax
--diag=[format:]{all | nr,...}
You can set the following output formats:
html
HTML output.
rtf
Rich Text Format.
text
ASCII text.
Default format: text
Description
With this option you can ask for an extended description of error messages in the format you choose.
The output is directed to stdout (normally your screen) and in the format you specify. You can specify the
following formats: html, rtf or text (default). To create a file with the descriptions, you must redirect the
output.
With the suboption all, the descriptions of all error messages are given. If you want the description of one
or more selected error messages, you can specify the error message numbers, separated by commas.
Example
To display an explanation of message number 169, enter:
amk --diag=169
This results in the following message and explanation:
F169: target '%s' returned exit code %d
An error occured while executing one of the commands
of the target, and -k option is not specified.
To write an explanation of all errors and warnings in HTML format to file amkerrors.html, use redirection
and enter:
amk --diag=html:all > amkerrors.html
Related information
-
721
TASKING VX-toolset for ARM User Guide
Parallel make utility option: --dry-run (-n)
Command line syntax
--dry-run
-n
Description
With this option you tell the make utility to perform a dry run. The make utility shows what it would do but
does not actually perform these tasks.
This option is for example useful to quickly inspect what would happen if you call the make utility.
Example
amk -n
The make utility does not perform any tasks but displays what it would do if called without the option -n.
Related information
Parallel make utility option -s (Do not print commands before execution)
722
Tool Options
Parallel make utility option: --help (-? / -h)
Command line syntax
--help[=item]
-h
-?
You can specify the following arguments:
options
Show extended option descriptions
Description
Displays an overview of all command line options. When you specify the argument options you can list
detailed option descriptions.
Example
The following invocations all display a list of the available command line options:
amk -?
amk --help
To see a detailed description of the available options, enter:
amk --help=options
Related information
-
723
TASKING VX-toolset for ARM User Guide
Parallel make utility option: --jobs (-j) / --jobs-limit (-J)
Menu
1.
From the Project menu, select Properties for
The Properties dialog appears.
2.
In the left pane, select C/C++ Build.
In the right pane the C/C++ Build page appears.
3.
On the Behaviour tab, select Use parallel build.
4.
You can specify the number of parallel jobs, or you can use an optimal number of jobs. In the last
case, amk will fork as many jobs in parallel as cores are available.
Command line syntax
--jobs[=number]
-j[number]
--jobs-limit[=number]
-J[number]
Description
When these options you can limit the number of parallel jobs. The default is 1. Zero means no limit. When
you omit the number, amk uses the number of cores detected.
Option -J is the same as -j, except that the number of parallel jobs is limited by the number of cores
detected.
Example
amk -j3
Limit the number of parallel jobs to 3.
Related information
-
724
Tool Options
Parallel make utility option: --keep-going (-k)
Command line syntax
--keep-going
-k
Description
When during the make process the make utility encounters an error, it stops rebuilding your files.
With the option -k, the make utility only stops building the target that produced the error. All other targets
defined in the makefile are built.
Example
amk -k
If the make utility encounters an error, it stops building the current target but proceeds with the other
targets that are defined in the makefile.
Related information
-
725
TASKING VX-toolset for ARM User Guide
Parallel make utility option: --list-targets (-l)
Command line syntax
--list-targets
-l
Description
With this option, the make utility lists all "primary" targets that are out of date.
Example
amk -l
list of targets
Related information
-
726
Tool Options
Parallel make utility option: --makefile (-f)
Command line syntax
--makefile=my_makefile
-f my_makefile
Description
By default the make utility uses the file makefile to build your files.
With this option you tell the make utility to use the specified file instead of the file makefile. Multiple -f
options act as if all the makefiles were concatenated in a left-to-right order.
If you use '-' instead of a makefile name it means that the information is read from stdin.
Example
amk -f mymake
The make utility uses the file mymake to build your files.
Related information
-
727
TASKING VX-toolset for ARM User Guide
Parallel make utility option: --no-warnings (-w)
Command line syntax
--no-warnings[=number,...]
-w[number,...]
Description
With this option you can suppresses all warning messages or specific warning messages.
On the command line this option works as follows:
• If you do not specify this option, all warnings are reported.
• If you specify this option but without numbers, all warnings are suppressed.
• If you specify this option with a number, only the specified warning is suppressed. You can specify the
option --no-warnings=number multiple times.
Example
To suppress warnings 751 and 756, enter:
amk --no-warnings=751,756
Related information
Parallel make utility option --warnings-as-errors (Treat warnings as errors)
728
Tool Options
Parallel make utility option: --silent (-s)
Command line syntax
--silent
-s
Description
With this option you tell the make utility to perform its tasks without printing the commands it executes.
Error messages are normally printed.
Example
amk -s
The make utility rebuilds your files but does not print the commands it executes during the make process.
Related information
Parallel make utility option -n (Perform a dry run)
729
TASKING VX-toolset for ARM User Guide
Parallel make utility option: --version (-V)
Command line syntax
--version
-V
Description
Display version information. The make utility ignores all other options or input files.
Related information
-
730
Tool Options
Parallel make utility option: --warnings-as-errors
Command line syntax
--warnings-as-errors[=number,...]
Description
If the make utility encounters an error, it stops. When you use this option without arguments, you tell the
make utility to treat all warnings as errors. This means that the exit status of the make utility will be non-zero
after one or more warnings. As a consequence, the make utility now also stops after encountering a
warning.
You can also limit this option to specific warnings by specifying a comma-separated list of warning numbers.
Related information
Parallel make utility option --no-warnings (Suppress some or all warnings)
731
TASKING VX-toolset for ARM User Guide
13.9. Archiver Options
The archiver and library maintainer ararm is a tool to build library files and it offers the possibility to
replace, extract and remove modules from an existing library.
The invocation syntax is:
ararm key_option [sub_option...] library [object_file]
This section describes all options for the archiver. Some suboptions can only be used in combination with
certain key options. They are described together. Suboptions that can always be used are described
separately.
For detailed information about the archiver, see Section 10.4, Archiver.
Short and long option names
Options can have both short and long names. Short option names always begin with a single minus (-)
character, long option names always begin with two minus (--) characters.You can abbreviate long option
names as long as it forms a unique name. You can mix short and long option names on the command
line.
Overview of the options of the archiver utility
The following archiver options are available:
Description
Option
Sub-option
Replace or add an object module
-r
-a -b -c -u -v
Extract an object module from the library
-x
-o -v
Delete object module from library
-d
-v
Move object module to another position
-m
-a -b -v
Print a table of contents of the library
-t
-s0 -s1
Print object module to standard output
-p
Main functions (key options)
Sub-options
Append or move new modules after existing module name
-a name
Append or move new modules before existing module name
-b name
Create library without notification if library does not exist
-c
Preserve last-modified date from the library
-o
Print symbols in library modules
-s{0|1}
Replace only newer modules
-u
Verbose
-v
Miscellaneous
732
Tool Options
Description
Option
Display options
-?
Display version header
-V
Read options from file
-f file
Suppress warnings above level n
-wn
Sub-option
733
TASKING VX-toolset for ARM User Guide
Archiver option: --delete (-d)
Command line syntax
--delete [--verbose]
-d [-v]
Description
Delete the specified object modules from a library. With the suboption --verbose (-v) the archiver shows
which files are removed.
--verbose
-v
Verbose: the archiver shows which files are removed.
Example
ararm --delete mylib.lib obj1.obj obj2.obj
The archiver deletes obj1.obj and obj2.obj from the library mylib.lib.
ararm -d -v mylib.lib obj1.obj obj2.obj
The archiver deletes obj1.obj and obj2.obj from the library mylib.lib and displays which files are
removed.
Related information
-
734
Tool Options
Archiver option: --dump (-p)
Command line syntax
--dump
-p
Description
Print the specified object module(s) in the library to standard output.
This option is only useful when you redirect or pipe the output to other files or tools that serve your own
purposes. Normally you do not need this option.
Example
ararm --dump mylib.lib obj1.obj > file.obj
The archiver prints the file obj1.obj to standard output where it is redirected to the file file.obj. The
effect of this example is very similar to extracting a file from the library but in this case the 'extracted' file
gets another name.
Related information
-
735
TASKING VX-toolset for ARM User Guide
Archiver option: --extract (-x)
Command line syntax
--extract [--modtime] [--verbose]
-x [-o] [-v]
Description
Extract an existing module from the library.
--modtime
-o
Give the extracted object module the same date as the last-modified
date that was recorded in the library. Without this suboption it
receives the last-modified date of the moment it is extracted.
--verbose
-v
Verbose: the archiver shows which files are extracted.
Example
To extract the file obj1.obj from the library mylib.lib:
ararm --extract mylib.lib obj1.obj
If you do not specify an object module, all object modules are extracted:
ararm -x mylib.lib
Related information
-
736
Tool Options
Archiver option: --help (-?)
Command line syntax
--help[=item]
-?
You can specify the following argument:
options
Show extended option descriptions
Description
Displays an overview of all command line options. When you specify the argument options you can list
detailed option descriptions.
Example
The following invocations all display a list of the available command line options:
ararm -?
ararm --help
ararm
To see a detailed description of the available options, enter:
ararm --help=options
Related information
-
737
TASKING VX-toolset for ARM User Guide
Archiver option: --move (-m)
Command line syntax
--move [-a posname] [-b posname]
-m [-a posname] [-b posname]
Description
Move the specified object modules to another position in the library.
The ordering of members in a library can make a difference in how programs are linked if a symbol is
defined in more than one member.
By default, the specified members are moved to the end of the archive. Use the suboptions -a or -b to
move them to a specified place instead.
--after=posname
-a
Move the specified object module(s) after the existing module
posname posname.
--before=posname
-b
Move the specified object module(s) before the existing
posname module posname.
Example
Suppose the library mylib.lib contains the following objects (see option --print):
obj1.obj
obj2.obj
obj3.obj
To move obj1.obj to the end of mylib.lib:
ararm --move mylib.lib obj1.obj
To move obj3.obj just before obj2.obj:
ararm -m -b obj3.obj mylib.lib obj2.obj
The library mylib.lib after these two invocations now looks like:
obj3.obj
obj2.obj
obj1.obj
Related information
Archiver option --print (-t) (Print library contents)
738
Tool Options
Archiver option: --option-file (-f)
Command line syntax
--option-file=file
-f file
Description
Instead of typing all options on the command line, you can create an option file which contains all options
and flags you want to specify. With this option you specify the option file to the archiver.
Use an option file when the command line would exceed the limits of the operating system, or just to store
options and save typing.
You can specify the option --option-file (-f) multiple times.
If you use '-' instead of a filename it means that the options are read from stdin.
Format of an option file
• Multiple arguments on one line in the option file are allowed.
• To include whitespace in an argument, surround the argument with single or double quotes.
• If you want to use single quotes as part of the argument, surround the argument by double quotes and
vise versa:
"This has a single quote ' embedded"
'This has a double quote " embedded'
'This has a double quote " and a single quote '"' embedded"
• When a text line reaches its length limit, use a \ to continue the line. Whitespace between quotes is
preserved.
"This is a continuation \
line"
-> "This is a continuation line"
• It is possible to nest command line files up to 25 levels.
Example
Suppose the file myoptions contains the following lines:
-x mylib.lib obj1.obj
-w5
739
TASKING VX-toolset for ARM User Guide
Specify the option file to the archiver:
ararm --option-file=myoptions
This is equivalent to the following command line:
ararm -x mylib.lib obj1.obj -w5
Related information
-
740
Tool Options
Archiver option: --print (-t)
Command line syntax
--print [--symbols=0|1]
-t [-s0|-s1]
Description
Print a table of contents of the library to standard output. With the suboption -s0 the archiver displays all
symbols per object file.
--symbols=0
-s0
Displays per object the name of the object itself and all symbols in
the object.
--symbols=1
-s1
Displays the symbols of all object files in the library in the form
library_name:object_name:symbol_name
Example
ararm --print mylib.lib
The archiver prints a list of all object modules in the library mylib.lib:
ararm -t -s0 mylib.lib
The archiver prints per object all symbols in the library. For example:
cstart.obj
symbols:
_START
Related information
-
741
TASKING VX-toolset for ARM User Guide
Archiver option: --replace (-r)
Command line syntax
--replace [--after=posname] [--before=posname][--create] [--newer-only] [--verbose]
-r [-a posname] [-b posname][-c] [-u] [-v]
Description
You can use the option --replace (-r) for several purposes:
• Adding new objects to the library
• Replacing objects in the library with the same object of a newer date
• Creating a new library
The option --replace (-r) normally adds a new module to the library. However, if the library already contains
a module with the specified name, the existing module is replaced. If you specify a library that does not
exist, the archiver creates a new library with the specified name.
If you add a module to the library without specifying the suboption -a or -b, the specified module is added
at the end of the archive. Use the suboptions -a or -b to insert them after/before a specified place instead.
--after=posname
-a
Insert the specified object module(s) after the existing module
posname posname.
--before=posname
-b
Insert the specified object module(s) before the existing
posname module posname.
--create
-c
Create a new library without checking whether it already
exists. If the library already exists, it is overwritten.
--newer-only
-u
Insert the specified object module only if it is newer than the
module in the library.
--verbose
-v
Verbose: the archiver shows which files are replaced.
The suboptions -a or -b have no effect when an object is added to the library.
Example
Suppose the library mylib.lib contains the following object (see option --print):
obj1.obj
To add obj2.obj to the end of mylib.lib:
ararm --replace mylib.lib obj2.obj
To insert obj3.obj just before obj2.obj:
ararm -r -b obj2.obj mylib.lib obj3.obj
742
Tool Options
The library mylib.lib after these two invocations now looks like:
obj1.obj
obj3.obj
obj2.obj
Creating a new library
To create a new library file, add an object file and specify a library that does not yet exist:
ararm --replace obj1.obj newlib.lib
The archiver creates the library newlib.lib and adds the object obj1.obj to it.
To create a new library file and overwrite an existing library, add an object file and specify an existing
library with the supoption --create (-c):
ararm -r -c obj1.obj mylib.lib
The archiver overwrites the library mylib.lib and adds the object obj1.obj to it. The new library
mylib.lib only contains obj1.obj.
Related information
Archiver option --print (-t) (Print library contents)
743
TASKING VX-toolset for ARM User Guide
Archiver option: --version (-V)
Command line syntax
--version
-V
Description
Display version information. The archiver ignores all other options or input files.
Related information
-
744
Tool Options
Archiver option: --warning (-w)
Command line syntax
--warning=level
-wlevel
Description
With this suboption you tell the archiver to suppress all warnings above the specified level. The level is
a number between 0 - 9.
The level of a message is printed between parentheses after the warning number. If you do not use the
-w option, the default warning level is 8.
Example
To suppress warnings above level 5:
ararm --extract --warning=5 mylib.lib obj1.obj
Related information
-
745
TASKING VX-toolset for ARM User Guide
13.10. HLL Object Dumper Options
The high level language (HLL) dumper hldumparm is a program to dump information about an absolute
object file (.abs).
Short and long option names
Options can have both short and long names. Short option names always begin with a single minus (-)
character, long option names always begin with two minus (--) characters.You can abbreviate long option
names as long as it forms a unique name. You can mix short and long option names on the command
line.
Options can have flags or suboptions. To switch a flag 'on', use a lower case letter or a +longflag. To
switch a flag off, use an upper case letter or a -longflag. Separate longflags with commas. The following
two invocations are equivalent:
hldumparm -FdhMsy test.abs
hldumparm --dump-format=+dump,+hllsymbols,-modules,+sections,+symbols test.abs
When you do not specify an option, a default value may become active.
746
Tool Options
HLL object dumper option: --address-size (-A)
Command line syntax
--address-size=addr_size
-Aaddr_size
Default: 4
Description
With this option you can specify the size of the addresses in bytes.
Related information
-
747
TASKING VX-toolset for ARM User Guide
HLL object dumper option: --class (-c)
Command line syntax
--class[=class]
-c[class]
You can specify one of the following classes:
all
a
Dump contents of all sections.
code
c
Dump contents of code sections.
data
d
Dump contents of data sections.
Default: --class=all
Description
With this option you can restrict the output to code or data only. This option affects all parts of the output,
except the module list. The effect is listed in the following table.
Output part
Effect of --class
Module list
Not restricted
Section list
Only lists sections of the specified class
Section dump
Only dumps the contents of the sections of the specified class
HLL symbol table
Only lists symbols of the specified class
Assembly level symbol
table
Only lists symbols defined in sections of the specified class
By default all sections are included.
Related information
Section 10.5.2, HLL Dump Output Format
748
Tool Options
HLL object dumper option: --data-dump-format (-d)
Command line syntax
--data-dump-format[=format]
-d[format]
You can specify one of the following formats:
directives
d
Dump data as directives. A new directive will be generated for each
symbol.
hex
h
Dump data as hexadecimal code with ASCII translation.
Default: --data-dump-format=directives
Description
With this option you can control the way data sections are dumped. By default, the contents of data
sections are represented by directives. A new directive will be generated for each symbol. ELF labels in
the section are used to determine the start of a directive. ROM sections are represented with .db, .dh,
.dw, .dd kind of directives, depending on the size of the data. RAM sections are represented with .ds
directives, with a size operand depending on the data size. This can be either the size specified in the
ELF symbol, or the size up to the next label.
With option --data-dump-format=hex, no directives will be generated for data sections, but data sections
are dumped as hexadecimal code with ASCII translation. This only applies to ROM sections. RAM sections
will be represented with only a start address and a size indicator.
Example
hldumparm -F2 --section=.rodata hello.abs
---------- Section dump ---------.section .data, '.rodata'
.org 000006ac
.db 48,65,6c,6c,6f,20,25,73,21,0a,00
.endsec
.section .data, '.rodata'
.org 000006b8
.db 77,6f,72,6c,64,00
.endsec
; Hello %s!..
; world.
hldumparm -F2 --section=.rodata --data-dump-format=hex hello.abs
---------- Section dump ---------section 7 (.rodata):
000006ac 48 65 6c 6c 6f 20 25 73 21 0a 00
Hello %s!..
749
TASKING VX-toolset for ARM User Guide
section 6 (.rodata):
000006b8 77 6f 72 6c 64 00
Related information
Section 10.5.2, HLL Dump Output Format
750
world.
Tool Options
HLL object dumper option: --disassembly-intermix (-i)
Command line syntax
--disassembly-intermix
-i
Description
With this option the disassembly is intermixed with HLL source code. The source is searched for as
described with option --source-lookup-path
Example
hldumparm --disassembly-intermix --source-lookup-path=c:\mylib\src hello.abs
Related information
HLL object dumper option --source-lookup-path
751
TASKING VX-toolset for ARM User Guide
HLL object dumper option: --dump-format (-F)
Command line syntax
--dump-format[=flag,...]
-F[flag],...
You can specify the following format flags:
+/-dump
d/D
Dump the contents of the sections in the object file. Code sections
can be disassembled, data sections are dumped.
+/-hllsymbols
h/H
List the high level language symbols, with address, size and type.
+/-modules
m/M
Print a list of modules found in object file.
+/-sections
s/S
Print a list of sections with start address, length and type.
+/-symbols
y/Y
List the low level symbols, with address and length (if known).
0
Alias for DHMSY (nothing)
1
Alias for DhMSY (only HLL symbols)
2
Alias for dHMSY (only section contents)
3
Alias for dhmsy (default, everything)
Default: --dump-format=dhmsy
Description
With this option you can control which parts of the dump output you want to see. By default, all parts are
dumped.
1. Module list
2. Section list
3. Section dump (disassembly)
4. HLL symbol table
5. Assembly level symbol table
You can limit the number of sections that will be dumped with the options --sections and --section-types.
Related information
Section 10.5.2, HLL Dump Output Format
752
Tool Options
HLL object dumper option: --expand-symbols (-e)
Command line syntax
--expand-symbols[=flag]
-e[flag]
You can specify one of the following flags:
+/-fullpath
f/F
Include the full path to the field level.
Default (no flags): --expand-symbols=F
Description
With this option you specify that all struct, union and array symbols are expanded with their fields in the
HLL symbol dump.
Example
hldumparm -F1 hello.abs
---------- HLL symbol table ---------00040028
24 struct
_dbg_request [dbg.c]
hldumparm -e -F1 hello.abs
---------- HLL symbol table ---------00040028
00040028
0004002c
00040030
00040030
00040030
00040030
00040030
00040034
...
24 struct
_dbg_request [dbg.c]
4
int
_errno
4
enum
nr
16
union
u
4
struct
exit
4
int
status
8
struct
open
4
const char
* pathname
2
unsigned short int
flags
hldumparm -ef -F1 hello.abs
---------- HLL symbol table ---------00040028
00040028
0004002c
00040030
00040030
24 struct
4
int
4
enum
16
union
4
struct
_dbg_request [dbg.c]
_dbg_request._errno
_dbg_request.nr
_dbg_request.u
_dbg_request.u.exit
753
TASKING VX-toolset for ARM User Guide
00040030
00040030
00040030
00040034
...
4
8
4
2
int
_dbg_request.u.exit.status
struct
_dbg_request.u.open
const char
* _dbg_request.u.open.pathname
unsigned short int
_dbg_request.u.open.flags
Related information
Section 10.5.2, HLL Dump Output Format
754
Tool Options
HLL object dumper option: --help (-?)
Command line syntax
--help
-?
Description
Displays an overview of all command line options.
Example
The following invocations all display a list of the available command line options:
hldumparm -?
hldumparm --help
hldumparm
Related information
-
755
TASKING VX-toolset for ARM User Guide
HLL object dumper option: --output-type (-T)
Command line syntax
--output-type[=type]
-T[type]
You can specify one of the following types:
text
t
Output human readable text.
xml
x
Output XML.
Default: --output-type=text
Description
With this option you can specify whether the output is formatted as plain text or as XML.
Related information
HLL object dumper option --output
756
Tool Options
HLL object dumper option: --option-file (-f)
Command line syntax
--option-file=file,...
-f file,...
Description
This option is primarily intended for command line use. Instead of typing all options on the command line,
you can create an option file which contains all options and flags you want to specify. With this option
you specify the option file to the HLL object dumper.
Use an option file when the command line would exceed the limits of the operating system, or just to store
options and save typing.
You can specify the option --option-file multiple times.
Format of an option file
• Multiple arguments on one line in the option file are allowed.
• To include whitespace in an argument, surround the argument with single or double quotes.
• If you want to use single quotes as part of the argument, surround the argument by double quotes and
vise versa:
"This has a single quote ' embedded"
'This has a double quote " embedded'
'This has a double quote " and a single quote '"' embedded"
• When a text line reaches its length limit, use a \ to continue the line. Whitespace between quotes is
preserved.
"This is a continuation \
line"
-> "This is a continuation line"
• It is possible to nest command line files up to 25 levels.
Example
Suppose the file myoptions contains the following lines:
--symbols=hll
--class=code
hello.abs
757
TASKING VX-toolset for ARM User Guide
Specify the option file to the HLL object dumper:
hldumparm --option-file=myoptions
This is equivalent to the following command line:
hldumparm --symbols=hll --class=code hello.abs
Related information
-
758
Tool Options
HLL object dumper option: --output (-o)
Command line syntax
--output=file
-o file
Description
By default, the HLL object dumper dumps the output on stdout. With this option you specify to dump
the information in the specified file.
The default output format is text, but you can specify another output format with option --output-type.
Example
hldumparm --output=dump.txt hello.abs
The HLL object dumper dumps the output in file dump.txt.
Related information
HLL object dumper option --output-type
759
TASKING VX-toolset for ARM User Guide
HLL object dumper option: --print-mangled-symbols (-P)
Command line syntax
--print-mangled-symbols
-P
Description
The C++ compiler can generate unreadable symbol names. These symbols cannot easily be related to
your C++ source file anymore. Therefore the HLL dumper by default demangles C++ function names and
variable names in the HLL symbol table. With this option you can override this default setting and print
the mangled names instead.
Example
hldumparm hellocpp.abs
---------- HLL symbol table ---------Address
00001254
Size HLL Type
20 void
Name
__register_finalization_routine()
hldumparm --print-mangled-symbols hellocpp.abs
---------- HLL symbol table ---------Address
00001254
Size HLL Type
20 void
Related information
-
760
Name
_Z31__register_finalization_routinev()
Tool Options
HLL object dumper option: --sections (-s)
Command line syntax
--sections=name,...
-sname,...
Description
With this option you can restrict the output to the specified sections only. This option affects the following
parts of the output:
Output part
Effect of --sections
Module list
Not restricted
Section list
Only lists the specified sections
Section dump
Only dumps the contents of the specified sections
HLL symbol table
Not restricted
Assembly level symbol
table
Only lists symbols defined in the specified sections
By default all sections are included.
Related information
Section 10.5.2, HLL Dump Output Format
761
TASKING VX-toolset for ARM User Guide
HLL object dumper option: --source-lookup-path (-L)
Command line syntax
--source-lookup-path=path
-Lpath
Description
With this option you can specify an additional path where your source files are located. If you want to
specify multiple paths, use the option --source-lookup-path for each separate path.
The order in which the HLL object dumper will search for source files when intermixed disassembly is
used, is:
1. The path obtained from the HLL debug information.
2. The path that is specified with the option --source-lookup-path. If multiple paths are specified, the
paths will be searched for in the order in which they are given on the command line.
Example
Suppose you call the HLL object dumper as follows:
hldumparm --disassembly-intermix --source-lookup-path=c:\mylib\src hello.abs
First the HLL object dumper looks in the directory found in the HLL debug information of file hello.abs
for the location of the source file(s). If it does not find the file(s), it looks in the directory c:\mylib\src.
Related information
HLL object dumper option --disassembly-intermix
762
Tool Options
HLL object dumper option: --symbols (-S)
Command line syntax
--symbols[=type]
-S[type]
You can specify one of the following types:
asm
a
Display assembly symbols in code dump.
hll
h
Display HLL symbols in code dump.
none
n
Display plain addresses in code dump.
Default: --symbols=asm
Description
With this option you can control symbolic information in the disassembly and data dump. For data sections
this only applies to symbols used as labels at the data addresses. Data within the data sections will never
be replaced with symbols.
Only symbols that are available in the ELF or DWARF information are used. If you build an application
without HLL debug information the --symbols=hll option will result in the same output as with
--symbols=none. The same applies to the --symbols=asm option when all symbols are stripped from
the ELF file.
Example
hldumparm -F2 hello.abs
----------- Section dump ---------.section .text, '_vector_0'
b
_START
.endsec
00000000 e30000ea
hldumparm --symbols=none -F2 hello.abs
----------- Section dump ----------
00000000 e30000ea
.section .text, '_vector_0'
b
0x364
.endsec
Related information
Section 10.5.2, HLL Dump Output Format
763
TASKING VX-toolset for ARM User Guide
HLL object dumper option: --version (-V)
Command line syntax
--version
-V
Description
Display version information. The HLL object dumper ignores all other options or input files.
Related information
-
764
Tool Options
HLL object dumper option: --xml-base-filename (-X)
Command line syntax
--xml-base-filename
-X
Description
With this option the <File name> field in the XML output only contains the filename of the object file.
By default, any path name, if present, is printed as well.
Example
hldumparm --output-type=xml --output=hello.xml ../hello.abs
The field <File name="../hello.abs"> is used in hello.xml.
hldumparm --output-type=xml --output=hello.xml -X ../hello.abs
The field <File name="hello.abs"> is used in hello.xml. The path is stripped from the filename.
Related information
HLL object dumper option --output-type
765
TASKING VX-toolset for ARM User Guide
766
Chapter 14. Libraries
This chapter contains an overview of all library functions that you can call in your C source. This includes
all functions of the standard C library (ISO C99) and some functions of the floating-point library.
A number of standard operations within C are too complex to generate inline code for (too much code).
These operations are implemented as run-time library functions to save code.
Section 14.2, Library Functions, gives an overview of all library functions you can use, grouped per header
file. A number of functions declared in wchar.h are parallel to functions in other header files. These are
discussed together.
Section 14.3, C Library Reentrancy, gives an overview of which functions are reentrant and which are
not.
The following libraries are included in the ARM toolset. Both Eclipse and the control program ccarm
automatically select the appropriate libraries depending on the specified options.
C library
Libraries
Description
carm[s].lib
cthumb[s].lib
C libraries for ARM and Thumb instructions respectively
Optional letter:
s = single precision floating-point (compiler option --no-double)
fparm.lib
fpthumb.lib
Floating-point libraries for ARM and Thumb
rtarm.lib
rtthumb.lib
Run-time library for ARM and Thumb
pbarm.lib / pbthumb.lib
pcarm.lib / pcthumb.lib
pctarm.lib / pctthumb.lib
pdarm.lib / pdthumb.lib
ptarm.lib / ptthumb.lib
Profiling libraries for ARM and Thumb
pb = block/function counter
pc = call graph
pct = call graph and timing
pd = dummy
pt = function timing
dspthumb[s].lib
CMSIS DSP libraries
Optional letter:
s = single precision floating-point
For the C libraries, profiling libraries and CMIS DPS libraries, also MIL library variants are present (files
with extension .ma).
C++ Library
The TASKING C++ compiler supports the STLport C++ libraries. STLport is a multi-platform ISO C++
Standard Library implementation. It is a free, open-source product, which is delivered with the TASKING
C++ compiler. The library supports standard templates and I/O streams.
767
TASKING VX-toolset for ARM User Guide
The include files for the STLport C++ libraries are present in directory include.stl relative to the
product installation directory.
You can find more information on the STLport library on the following site:http://stlport.sourgeforge.net/
Also read the license agreement on http://stlport.sourgeforge.net/License.shtml. This license agreement
is applicable to the STLport C++ library only. All other product components fall under the TASKING license
agreement.
For an STL Programmer's Guide you can see http://www.sgi.com/tech/stl/index.html
The following C++ libraries are delivered with the product:
Libraries
Description
cparm[s][x].lib
cpthumb[s][x].lib
C++ libraries for ARM and Thumb
Optional letter:
s = single precision floating-point
x = exception handling
stlarmx.lib
stlthumbx.lib
STLport C++ libraries (exception handling variants only)
Optional letter:
s = single precision floating-point
To build an STLport library
1.
Change to the directory
installdir\lib\src.stl\[v6M][v7EM][v7M][v7R]\[le][be][be32]\stl[arm|thumb]x,
depending on the library set used by your project.
2.
Run the makefile by executing installdir\bin\mkarm.exe without arguments.
3.
Copy the generated C++ library stl[arm|thumb]x.lib to the corresponding directory
installdir\lib\[v6M][v7EM][v7M][v7R]\[le][be][be32].
where,
768
[v6M]
libraries for ARMv6-M architectures
[v7EM]
libraries for ARMv7E-M architectures
[v7M]
libraries for ARMv7-M architectures
[v7R]
libraries for ARMv7-R architectures
[le]
little-endian library variant
[be]
big-endian library variant
[be32]
big-endian 32 library variant
Libraries
14.1. Using the CMSIS DSP Library
Part of the CMSIS standard is a DSP library. The CMSIS DSP library is included in the TASKING product's
cmsis folder. The library is also available as a pre-built library file in the lib folders for v6M, v7M and
v7EM. The libraries are dspthumb.lib (double precision floating point) and dspthumbs.lib (single
precision floating point). MIL libraries are present also: dspthumb.ma and dspthumbs.ma.
To use the CMSIS DSP library in your Eclipse project
1.
From the Project menu, select Properties for
The Properties dialog appears.
2.
In the left pane, expand C/C++ Build and select Settings.
In the right pane the Settings appear.
3.
On the Tool Settings tab, select C/C++ Compiler » Include Paths .
4.
Enable the option Add CMSIS include paths.
5.
On the Tool Settings tab, select Linker » Libraries.
6.
Enable the option Link CMSIS DSP library.
This passes the option --dsp-library of the control program (ccarm) for compilation of C/C++ files
and for linking. With this option the control program sets the compiler macro ARM_MATH_CM0,
ARM_MATH_CM3 or ARM_MATH_CM4, depending on the selected processor. These macros are
required for the CMSIS arm_math.h header file to operate correctly. With --dsp-library the control
program also selects the appropriate library.
14.2. Library Functions
The tables in the sections below list all library functions, grouped per header file in which they are declared.
Some functions are not completely implemented because their implementation depends on the context
where your application will run. These functions are for example all I/O related functions. Where possible,
these functions are implemented using file system simulation (FSS). This system can be used by the
debugger to simulate an I/O environment which enables you to debug your application.
A number of wide-character functions are available as C source code, but have not been compiled with
the C library. To use complete wide-character functionality, you must recompile the libraries with the
macro WCHAR_SUPPORT_ENABLED and keep this macro also defined when compiling your own sources.
See C compiler option --define (-D). The easiest way is to adapt the makefile for the library and change
the CC line to:
CC = $(PRODDIR)\bin\carm -DWCHAR_SUPPORT_ENABLED
769
TASKING VX-toolset for ARM User Guide
14.2.1. assert.h
assert(expr)
Prints a diagnostic message if NDEBUG is not defined. (Implemented as macro)
14.2.2. complex.h
The complex number z is also written as x+yi where x (the real part) and y (the imaginary part) are real
numbers of types float, double or long double. The real and imaginary part can be stored in structs
or in arrays. This implementation uses arrays because structs may have different alignments.
The header file complex.h also defines the following macros for backward compatibility:
complex
imaginary
_Complex
_Imaginary
/* C99 keyword */
/* C99 keyword */
Parallel sets of functions are defined for double, float and long double. They are respectively named
function, functionf, functionl. All long type functions, though declared in complex.h, are implemented
as the double type variant which nearly always meets the requirement in embedded applications.
This implementation uses the obvious implementation for complex multiplication; and a more sophisticated
implementation for division and absolute value calculations which handles underflow, overflow and infinities
with more care. The ISO C99 #pragma CX_LIMITED_RANGE therefore has no effect.
Trigonometric functions
csin
csinf
csinl
Returns the complex sine of z.
ccos
ccosf
ccosl
Returns the complex cosine of z.
ctan
ctanf
ctanl
Returns the complex tangent of z.
casin
casinf
casinl
Returns the complex arc sine sin (z).
cacos
cacosf
cacosl
Returns the complex arc cosine cos (z).
catan
catanf
catanl
Returns the complex arc tangent tan (z).
csinh
csinhf
csinhl
Returns the complex hyperbolic sine of z.
ccosh
ccoshf
ccoshl
Returns the complex hyperbolic cosine of z.
ctanh
ctanhf
ctanhl
Returns the complex hyperbolic tangent of z.
casinh
casinhf
casinhl
Returns the complex arc hyperbolic sinus of z.
cacosh
cacoshf
cacoshl
Returns the complex arc hyperbolic cosine of z.
catanh
catanhf
catanhl
Returns the complex arc hyperbolic tangent of z.
-1
-1
-1
Exponential and logarithmic functions
z
cexp
cexpf
cexpl
Returns the result of the complex exponential function e .
clog
clogf
clogl
Returns the complex natural logarithm.
770
Libraries
Power and absolute-value functions
cabs
cabsf
cabsl
Returns the complex absolute value of z (also known as norm,
modulus or magnitude).
cpow
cpowf
cpowl
Returns the complex value of x raised to the power y (x ) where
both x and y are complex numbers.
csqrt
csqrtf
csqrtl
Returns the complex square root of z.
y
Manipulation functions
carg
cargf
cargl
Returns the argument of z (also known as phase angle).
cimag
cimagf
cimagl
Returns the imaginary part of z as a real (respectively as a double,
float, long double)
conj
conjf
conjl
Returns the complex conjugate value (the sign of its imaginary part
is reversed).
cproj
cprojf
cprojl
Returns the value of the projection of z onto the Riemann sphere.
creal
crealf
creall
Returns the real part of z as a real (respectively as a double,
float, long double)
14.2.3. cstart.h
The header file cstart.h controls the system startup code's general settings and register initializations.
It contains defines only, no functions.
14.2.4. ctype.h and wctype.h
The header file ctype.h declares the following functions which take a character c as an integer type
argument. The header file wctype.h declares parallel wide-character functions which take a character
c of the wchar_t type as argument.
ctype.h
wctype.h
Description
isalnum
iswalnum
Returns a non-zero value when c is an alphabetic character or a
number ([A-Z][a-z][0-9]).
isalpha
iswalpha
Returns a non-zero value when c is an alphabetic character
([A-Z][a-z]).
isblank
iswblank
Returns a non-zero value when c is a blank character (tab, space...)
iscntrl
iswcntrl
Returns a non-zero value when c is a control character.
isdigit
iswditit
Returns a non-zero value when c is a numeric character ([0-9]).
isgraph
iswgraph
Returns a non-zero value when c is printable, but not a space.
islower
iswlower
Returns a non-zero value when c is a lower case character ([a-z]).
isprint
iswprint
Returns a non-zero value when c is printable, including spaces.
ispunct
iswpunct
Returns a non-zero value when c is a punctuation character (such
as '.', ',', '!').
771
TASKING VX-toolset for ARM User Guide
ctype.h
wctype.h
Description
isspace
iswspace
Returns a non-zero value when c is a space type character (space,
tab, vertical tab, formfeed, linefeed, carriage return).
isupper
iswupper
Returns a non-zero value when c is an upper case character
([A-Z]).
isxdigit
iswxdigit
Returns a non-zero value when c is a hexadecimal digit
([0-9][A-F][a-f]).
tolower
towlower
Returns c converted to a lower case character if it is an upper case
character, otherwise c is returned.
toupper
towupper
Returns c converted to an upper case character if it is a lower case
character, otherwise c is returned.
_tolower
-
Converts c to a lower case character, does not check if c really is
an upper case character. Implemented as macro. This macro
function is not defined in ISO C99.
_toupper
-
Converts c to an upper case character, does not check if c really
is a lower case character. Implemented as macro. This macro
function is not defined in ISO C99.
isascii
Returns a non-zero value when c is in the range of 0 and 127. This
function is not defined in ISO C99.
toascii
Converts c to an ASCII value (strip highest bit). This function is
not defined in ISO C99.
14.2.5. dbg.h
The header file dbg.h contains the debugger call interface for file system simulation. It contains low level
functions. This header file is not defined in ISO C99.
_dbg_trap
Low level function to trap debug events
_argcv(const char
*buf,size_t size)
Low level function for command line argument passing
14.2.6. errno.h
int errno
External variable that holds implementation defined error codes.
The following error codes are defined as macros in errno.h:
EPERM
ENOENT
EINTR
EIO
EBADF
EAGAIN
ENOMEM
EACCES
772
1
2
3
4
5
6
7
8
Operation not permitted
No such file or directory
Interrupted system call
I/O error
Bad file number
No more processes
Not enough core
Permission denied
Libraries
EFAULT
EEXIST
ENOTDIR
EISDIR
EINVAL
ENFILE
EMFILE
ETXTBSY
ENOSPC
ESPIPE
EROFS
EPIPE
ELOOP
ENAMETOOLONG
9
10
11
12
13
14
15
16
17
18
19
20
21
22
Bad address
File exists
Not a directory
Is a directory
Invalid argument
File table overflow
Too many open files
Text file busy
No space left on device
Illegal seek
Read-only file system
Broken pipe
Too many levels of symbolic links
File name too long
Floating-point errors
EDOM
ERANGE
23
24
Argument too large
Result too large
Errors returned by printf/scanf
ERR_FORMAT
ERR_NOFLOAT
ERR_NOLONG
ERR_NOPOINT
25
26
27
28
Illegal format string for printf/scanf
Floating-point not supported
Long not supported
Pointers not supported
Encoding errors set by functions like fgetwc, getwc, mbrtowc, etc ...
EILSEQ
29
Invalid or incomplete multibyte or wide character
Errors returned by RTOS
ECANCELED
ENODEV
30
31
Operation canceled
No such device
14.2.7. fcntl.h
The header file fcntl.h contains the function open(), which calls the low level function _open(), and
definitions of flags used by the low level function _open(). This header file is not defined in ISO C99.
open
Opens a file a file for reading or writing. Calls _open.
(FSS implementation)
14.2.8. fenv.h
Contains mechanisms to control the floating-point environment. The functions in this header file are not
implemented.
773
TASKING VX-toolset for ARM User Guide
fegetenv
Stores the current floating-point environment. (Not implemented)
feholdexept
Saves the current floating-point environment and installs an environment
that ignores all floating-point exceptions. (Not implemented)
fesetenv
Restores a previously saved (fegetenv or feholdexcept) floating-point
environment. (Not implemented)
feupdateenv
Saves the currently raised floating-point exceptions, restores a previously
saved floating-point environment and finally raises the saved exceptions.
(Not implemented)
feclearexcept
Clears the current exception status flags corresponding to the flags specified
in the argument. (Not implemented)
fegetexceptflag
Stores the current setting of the floating-point status flags. (Not implemented)
feraiseexcept
Raises the exceptions represented in the argument. As a result, other
exceptions may be raised as well.
(Not implemented)
fesetexceptflag
Sets the current floating-point status flags.
(Not implemented)
fetestexcept
Returns the bitwise-OR of the exception macros corresponding to the
exception flags which are currently set and are specified in the argument.
(Not implemented)
For each supported exception, a macro is defined. The following exceptions are defined:
FE_DIVBYZERO
FE_OVERFLOW
FE_INEXACT
FE_UNDERFLOW
FE_INVALID
FE_ALL_EXCEPT
fegetround
Returns the current rounding direction, represented as one of the values of
the rounding direction macros.
(Not implemented)
fesetround
Sets the current rounding directions. (Not implemented)
Currently no rounding mode macros are implemented.
14.2.9. float.h
The header file float.h defines the characteristics of the real floating-point types float, double and
long double.
float.h used to contain prototypes for the functions copysign(f), isinf(f), isfinite(f),
isnan(f) and scalb(f). These functions have accordingly to the ISO C99 standard been moved
to the header file math.h. See also Section 14.2.16, math.h and tgmath.h.
The following functions are only available for ISO C90:
copysignf(float f,float s) Copies the sign of the second argument s to the value of the first
argument f and returns the result.
774
Libraries
copysign(double d,double s) Copies the sign of the second argument s to the value of the first
argument d and returns the result.
isinff(float f)
Test the variable f on being an infinite (IEEE-754) value.
isinf(double d);
Test the variable d on being an infinite (IEEE-754) value.
isfinitef(float f)
Test the variable f on being a finite (IEEE-754) value.
isfinite(double d)
Test the variable d on being a finite (IEEE-754) value.
isnanf(float f)
Test the variable f on being NaN (Not a Number, IEEE-754) .
isnan(double d)
Test the variable d on being NaN (Not a Number, IEEE-754) .
scalbf(float f,int p)
Returns f * 2^p for integral values without computing 2^N.
scalb(double d,int p)
Returns d * 2^p for integral values without computing 2^N. (See
also scalbn in Section 14.2.16, math.h and tgmath.h)
14.2.10. inttypes.h and stdint.h
The header files stdint.h and inttypes.h provide additional declarations for integer types and have
various characteristics. The stdint.h header file contains basic definitions of integer types of certain
sizes, and corresponding sets of macros. This header file clearly refers to the corresponding sections in
the ISO C99 standard.
The inttypes.h header file includes stdint.h and adds portable formatting and conversion functions.
Below the conversion functions from inttypes.h are listed.
imaxabs(intmax_t j)
Returns the absolute value of j
imaxdiv(intmax_t numer,
intmax_t denom)
Computes numer/denomand numer % denom.The result is stored
in the quot and rem components of the imaxdiv_t structure type.
strtoimax(const char *
restrict nptr, char **
restrict endptr, int base)
Convert string to maximum sized integer. (Compare strtoll)
strtoumax(const char *
restrict nptr, char **
restrict endptr, int base)
Convert string to maximum sized unsigned integer. (Compare
strtoull)
wcstoimax(const wchar_t *
restrict nptr, wchar_t **
restrict endptr, int base)
Convert wide string to maximum sized integer. (Compare wcstoll)
wcstoumax(const wchar_t *
restrict nptr, wchar_t **
restrict endptr, int base)
Convert wide string to maximum sized unsigned integer. (Compare
wcstoull)
14.2.11. io.h
The header file io.h contains prototypes for low level I/O functions. This header file is not defined in ISO
C99.
_close(fd)
Used by the functions close and fclose. (FSS implementation)
775
TASKING VX-toolset for ARM User Guide
_lseek(fd,offset,whence)
Used by all file positioning functions: fgetpos, fseek, fsetpos,
ftell, rewind. (FSS implementation)
_open(fd,flags)
Used by the functions fopen and freopen. (FSS implementation)
_read(fd,*buff,cnt)
Reads a sequence of characters from a file. (FSS implementation)
_unlink(*name)
Used by the function remove. (FSS implementation)
_write(fd,*buffer,cnt)
Writes a sequence of characters to a file. (FSS implementation)
14.2.12. iso646.h
The header file iso646.h adds tokens that can be used instead of regular operator tokens.
#define
#define
#define
#define
#define
#define
#define
#define
#define
#define
#define
and
and_eq
bitand
bitor
compl
not
not_eq
or
or_eq
xor
xor_eq
&&
&=
&
|
~
!
!=
||
|=
^
^=
14.2.13. limits.h
Contains the sizes of integral types, defined as macros.
14.2.14. locale.h
To keep C code reasonable portable across different languages and cultures, a number of facilities are
provided in the header file local.h.
char *setlocale( int category, const char *locale )
The function above changes locale-specific features of the run-time library as specified by the category
to change and the name of the locale.
The following categories are defined and can be used as input for this function:
LC_ALL
LC_COLLATE
LC_CTYPE
0
1
2
LC_NUMERIC
LC_TIME
LC_MONETARY
struct lconv *localeconv( void )
776
3
4
5
Libraries
Returns a pointer to type struct lconv with values appropriate for the formatting of numeric
quantities according to the rules of the current locale. The struct lconv in this header file is
conforming the ISO standard.
14.2.15. malloc.h
The header file malloc.h contains prototypes for memory allocation functions. This include file is not
defined in ISO C99, it is included for backwards compatibility with ISO C90. For ISO C99, the memory
allocation functions are part of stdlib.h. See Section 14.2.24, stdlib.h and wchar.h.
malloc(size)
Allocates space for an object with size size.
The allocated space is not initialized. Returns a pointer to the
allocated space.
calloc(nobj,size)
Allocates space for n objects with size size.
The allocated space is initialized with zeros. Returns a pointer to
the allocated space.
free(*ptr)
Deallocates the memory space pointed to by ptr which should be
a pointer earlier returned by the malloc or calloc function.
realloc(*ptr,size)
Deallocates the old object pointed to by ptr and returns a pointer
to a new object with size size, while preserving its contents.
If the new size is smaller than the old size, some contents at the
end of the old region will be discarded. If the new size is larger than
the old size, all of the old contents are preserved and any bytes in
the new object beyond the size of the old object will have
indeterminate values.
14.2.16. math.h and tgmath.h
The header file math.h contains the prototypes for many mathematical functions. Before ISO C99, all
functions were computed using the double type (the float was automatically converted to double, prior to
calculation). In this ISO C99 version, parallel sets of functions are defined for double, float and long
double. They are respectively named function, functionf, functionl. All long type functions, though
declared in math.h, are implemented as the double type variant which nearly always meets the
requirement in embedded applications.
The header file tgmath.h contains parallel type generic math macros whose expansion depends on the
used type. tgmath.h includes math.h and the effect of expansion is that the correct math.h functions
are called. The type generic macro, if available, is listed in the second column of the tables below.
Trigonometric and hyperbolic functions
math.h
tgmath.h Description
sin
sinf
sinl
sin
Returns the sine of x.
cos
cosf
cosl
cos
Returns the cosine of x.
tan
tanf
tanl
tan
Returns the tangent of x.
asin
asinf
asinl
asin
Returns the arc sine sin (x) of x.
-1
777
TASKING VX-toolset for ARM User Guide
math.h
tgmath.h Description
-1
acos
acosf
acosl
acos
Returns the arc cosine cos (x) of x.
atan
atanf
atanl
atan
Returns the arc tangent tan (x) of x.
atan2
atan2f
atan2l
atan2
Returns the result of: tan (y/x).
sinh
sinhf
sinhl
sinh
Returns the hyperbolic sine of x.
cosh
coshf
coshl
cosh
Returns the hyperbolic cosine of x.
tanh
tanhf
tanhl
tanh
Returns the hyperbolic tangent of x.
asinh
asinhf
asinhl
asinh
Returns the arc hyperbolic sine of x.
acosh
acoshf
acoshl
acosh
Returns the non-negative arc hyperbolic cosine of x.
atanh
atanhf
atanhl
atanh
Returns the arc hyperbolic tangent of x.
-1
-1
Exponential and logarithmic functions
All of these functions are new in ISO C99, except for exp, log and log10.
math.h
tgmath.h Description
x
exp
expf
expl
exp
Returns the result of the exponential function e .
exp2
exp2f
exp2l
exp2
Returns the result of the exponential function 2 . (Not
implemented)
expm1
expm1f
expm1l
expm1
Returns the result of the exponential function e -1. (Not
implemented)
log
logf
logl
log
Returns the natural logarithm ln(x), x>0.
log10
log10f
log10l
log10
Returns the base-10 logarithm of x, x>0.
log1p
log1pf
log1pl
log1p
Returns the base-e logarithm of (1+x). x <> -1. (Not
implemented)
log2
log2f
log2l
log2
Returns the base-2 logarithm of x. x>0. (Not implemented)
ilogb
ilogbf
ilogbl
ilogb
Returns the signed exponent of x as an integer. x>0. (Not
implemented)
logb
logbf
logbl
logb
Returns the exponent of x as a signed integer in value in
floating-point notation. x > 0. (Not implemented)
x
x
frexp, ldexp, modf, scalbn, scalbln
math.h
tgmath.h Description
frexp
frexpf
frexpl
frexp
Splits a float x into fraction f and exponent n, so that:
n
f = 0.0 or 0.5 ≤ | f | ≤ 1.0 and f*2 = x. Returns f, stores n.
ldexp
ldexpf
ldexpl
ldexp
Inverse of frexp. Returns the result of x*2n.
(x and n are both arguments).
modf
modff
modfl
-
Splits a float x into fraction f and integer n, so that:
| f | < 1.0 and f+n=x. Returns f, stores n.
778
Libraries
math.h
scalbn
tgmath.h Description
scalbnf scalbnl scalbn
n
Computes the result of x*FLT_RADIX . efficiently, not
n
normally by computing FLT_RADIX explicitly.
scalbln scalblnf scalblnl scalbln Same as scalbn but with argument n as long int.
Rounding functions
math.h
tgmath.h Description
ceil
ceilf
ceill
ceil
Returns the smallest integer not less than x, as a double.
floor
floorf
floorl
floor
Returns the largest integer not greater than x, as a double.
rint
rintf
rintl
rint
Returns the rounded integer value as an int according
to the current rounding direction. See fenv.h. (Not
implemented)
lrint
lrintf
lrintl
lrint
Returns the rounded integer value as a long int
according to the current rounding direction. See fenv.h.
(Not implemented)
llrint
lrintf
lrintl
llrint
Returns the rounded integer value as a long long int
according to the current rounding direction. See fenv.h.
(Not implemented)
nearbyint nearbyintf nearbyintl nearbyint Returns the rounded integer value as a floating-point
according to the current rounding direction. See fenv.h.
(Not implemented)
round
roundf
roundl
round
lround
lroundf lroundl lround
Returns the nearest integer value of x as int.
(Not implemented)
Returns the nearest integer value of x as long int.
(Not implemented)
llround lroundf llroundl llround Returns the nearest integer value of x as long long int.
(Not implemented)
trunc
truncf
truncl
trunc
Returns the truncated integer value x. (Not implemented)
Remainder after division
math.h
fmod
tgmath.h Description
fmodf
fmodl
fmod
Returns the remainder r of x-ny. n is chosen as
trunc(x/y). r has the same sign as x.
remainder remainderf remainderl remainder Returns the remainder r of x-ny. n is chosen as
trunc(x/y). r may not have the same sign as x. (Not
implemented)
remquo
remquof remquol remquo
Same as remainder. In addition, the argument *quo is
given a specific value (see ISO). (Not implemented)
779
TASKING VX-toolset for ARM User Guide
Power and absolute-value functions
math.h
tgmath.h Description
cbrt
cbrtf
cbrtl
cbrt
Returns the real cube root of x (=x1/3). (Not implemented)
fabs
fabsf
fabsl
fabs
Returns the absolute value of x (|x|). (abs, labs, llabs,
div, ldiv, lldiv are defined in stdlib.h)
fma
fmaf
fmal
fma
Floating-point multiply add. Returns x*y+z. (Not
implemented)
hypot
hypotf
hypotl
hypot
Returns the square root of x2+y2.
pow
powf
powl
power
Returns x raised to the power y (xy).
sqrt
sqrtf
sqrtl
sqrt
Returns the non-negative square root of x. x 0.
Manipulation functions: copysign, nan, nextafter, nexttoward
math.h
tgmath.h Description
copysign copysignf copysignll copysign Returns the value of x with the sign of y.
nan
nanf
nanl
-
Returns a quiet NaN, if available, with content indicated
through tagp.
(Not implemented)
nextafter nextafterf nextafterl nextafter Returns the next representable value in the specified
format after x in the direction of y. Returns y is x=y.
(Not implemented)
nexttoward nexttowardf nexttowardl nexttoward Same as nextafter, except that the second argument
in all three variants is of type long double. Returns y if
x=y.
(Not implemented)
Positive difference, maximum, minimum
math.h
tgmath.h Description
fdim
fdimf
fdiml
fdim
Returns the positive difference between: |x-y|.
(Not implemented)
fmax
fmaxf
fmaxl
fmax
Returns the maximum value of their arguments.
(Not implemented)
fmin
fminf
fminl
fmin
Returns the minimum value of their arguments.
(Not implemented)
Error and gamma (Not implemented)
math.h
erf
780
tgmath.h Description
erff
erfl
erf
Computes the error function of x.
(Not implemented)
Libraries
math.h
tgmath.h Description
erfcl
Computes the complementary error function of x.
(Not implemented)
erfc
erfcf
erc
lgamma
lgammaf lgammal lgamma
Computes the *loge|Γ(x)|
(Not implemented)
tgamma
tgammaf tgammal tgamma
Computes Γ(x)
(Not implemented)
Comparison macros
The next are implemented as macros. For any ordered pair of numeric values exactly one of the
relationships - less, greater, and equal - is true. These macros are type generic and therefor do not have
a parallel function in tgmath.h. All arguments must be expressions of real-floating type.
math.h
tgmath.h
Description
isgreater
-
Returns the value of (x) > (y)
isgreaterequal
-
Returns the value of (x) >= (y)
isless
-
Returns the value of (x) < (y)
islessequal
-
Returns the value of (x) <= (y)
islessgreater
-
Returns the value of (x) < (y) || (x) > (y)
isunordered
-
Returns 1 if its arguments are unordered, 0 otherwise.
Classification macros
The next are implemented as macros. These macros are type generic and therefor do not have a parallel
function in tgmath.h. All arguments must be expressions of real-floating type.
math.h
tgmath.h
Description
fpclassify
-
Returns the class of its argument:
FP_INFINITE, FP_NAN, FP_NORMAL, FP_SUBNORMAL or
FP_ZERO
isfinite
-
Returns a nonzero value if and only if its argument has a finite
value
isinf
-
Returns a nonzero value if and only if its argument has an infinite
value
isnan
-
Returns a nonzero value if and only if its argument has NaN value.
isnormal
-
Returns a nonzero value if an only if its argument has a normal
value.
signbit
-
Returns a nonzero value if and only if its argument value is
negative.
781
TASKING VX-toolset for ARM User Guide
14.2.17. setjmp.h
The setjmp and longjmp in this header file implement a primitive form of non-local jumps, which may
be used to handle exceptional situations. This facility is traditionally considered more portable than
signal.h
int setjmp(jmp_buf
env)
Records its caller's environment in env and returns 0.
void longjmp(jmp_buf
env, int status)
Restores the environment previously saved with a call to setjmp().
14.2.18. signal.h
Signals are possible asynchronous events that may require special processing. Each signal is named by
a number. The following signals are defined:
SIGINT
1
Receipt of an interactive attention signal
SIGILL
2
Detection of an invalid function message
SIGFPE
3
An erroneous arithmetic operation (for example, zero divide, overflow)
SIGSEGV
4
An invalid access to storage
SIGTERM
5
A termination request sent to the program
SIGABRT
6
Abnormal termination, such as is initiated by the abort function
The next function sends the signal sig to the program:
int raise(int sig)
The next function determines how subsequent signals will be handled:
signalfunction *signal (int, signalfunction *);
The first argument specifies the signal, the second argument points to the signal-handler function or has
one of the following values:
SIG_DFL
Default behavior is used
SIG_IGN
The signal is ignored
The function returns the previous value of signalfunction for the specific signal, or SIG_ERR if an
error occurs.
14.2.19. stdarg.h
The facilities in this header file gives you a portable way to access variable arguments lists, such as
needed for as fprintf and vfprintf. va_copy is new in ISO C99. This header file contains the
following macros:
782
Libraries
va_arg(va_list ap,type) Returns the value of the next argument in the variable argument list.
Its return type has the type of the given argument type. A next call to
this macro will return the value of the next argument.
va_copy(va_list dest,
va_list src)
This macro duplicates the current state of src in dest, creating a
second pointer into the argument list. After this call, va_arg() may be
used on src and dest independently.
va_end(va_list ap)
This macro must be called after the arguments have been processed.
It should be called before the function using the macro 'va_start' is
terminated.
va_start(va_list ap,
lastarg)
This macro initializes ap. After this call, each call to va_arg() will return
the value of the next argument. In our implementation, va_list cannot
contain any bit type variables. Also the given argument lastarg must
be the last non-bit type argument in the list.
14.2.20. stdbool.h
This header file contains the following macro definitions. These names for boolean type and values are
consistent with C++. You are allowed to #undefine or redefine the macros below.
#define
#define
#define
#define
bool
true
false
__bool_true_false_are_defined
_Bool
1
0
1
14.2.21. stddef.h
This header file defines the types for common use:
ptrdiff_t
Signed integer type of the result of subtracting two pointers.
size_t
Unsigned integral type of the result of the sizeof operator.
wchar_t
Integer type to represent character codes in large character sets.
Besides these types, the following macros are defined:
NULL
Expands to the null pointer constant for C or 0 (zero) for C++.
offsetof(_type,
_member)
Expands to an integer constant expression with type size_t that is the offset
in bytes of _member within structure type _type.
14.2.22. stdint.h
See Section 14.2.10, inttypes.h and stdint.h
783
TASKING VX-toolset for ARM User Guide
14.2.23. stdio.h and wchar.h
Types
The header file stdio.h contains functions for performing input and output. A number of functions also
have a parallel wide character function or macro, defined in wchar.h. The header file wchar.h also
includes stdio.h.
In the C language, many I/O facilities are based on the concept of streams. The stdio.h header file
defines the data type FILE which holds the information about a stream. A FILE object is created with
the function fopen. The pointer to this object is used as an argument in many of the in this header file.
The FILE object can contain the following information:
• the current position within the stream
• pointers to any associated buffers
• indications of for read/write errors
• end of file indication
The header file also defines type fpos_t as an unsigned long.
Macros
stdio.h
Description
NULL
Expands to the null pointer constant for C or 0 (zero) for C++.
BUFSIZ
Size of the buffer used by the setbuf/setvbuf function: 512
EOF
End of file indicator. Expands to -1.
WEOF
End of file indicator. Expands to UINT_MAX (defined in limits.h)
NOTE: WEOF need not to be a negative number as long as its value does not
correspond to a member of the wide character set. (Defined in wchar.h).
FOPEN_MAX
Number of files that can be opened simultaneously: 10
FILENAME_MAX
Maximum length of a filename: 100
_IOFBF
_IOLBF
_IONBF
Expand to an integer expression, suitable for use as argument to the setvbuf function.
L_tmpnam
Size of the string used to hold temporary file names: 8 (tmpxxxxx)
TMP_MAX
Maximum number of unique temporary filenames that can be generated: 0x8000
SEEK_CUR
SEEK_END
SEEK_SET
Expand to an integer expression, suitable for use as the third argument to the fseek
function.
stderr
stdin
stdout
Expressions of type "pointer to FILE" that point to the FILE objects associated with
standard error, input and output streams.
784
Libraries
File access
stdio.h
Description
fopen(name,mode)
Opens a file for a given mode. Available modes are:
"r"
"w"
"a"
"r+"
"w+"
"a+"
read; open text file for reading
write; create text file for writing;
if the file already exists, its contents is discarded
append; open existing text file or
create new text file for writing at end of file
open text file for update; reading and writing
create text file for update; previous
contents if any is discarded
append; open or create text file for update,
writes at end of file
(FSS implementation)
fclose(name)
Flushes the data stream and closes the specified file that was previously
opened with fopen. (FSS implementation)
fflush(name)
If stream is an output stream, any buffered but unwritten date is written.
Else, the effect is undefined. (FSS implementation)
freopen(name,mode,
stream)
Similar to fopen, but rather than generating a new value of type FILE *,
the existing value is associated with a new stream. (FSS implementation)
setbuf(stream,buffer) If buffer is NULL, buffering is turned off for the stream. Otherwise, setbuf
is equivalent to: (void) setvbuf(stream,buffer,_IOFBF,BUFSIZ).
setvbuf(stream,buffer,mode, Controls buffering for the stream; this function must be called before reading
or writing. Mode can have the following values:
size)
_IOFBF causes full buffering
_IOLBF causes line buffering of text files
_IONBF causes no buffering.
If buffer is not NULL, it will be used as a buffer; otherwise a buffer will be
allocated. size determines the buffer size.
Formatted input/output
The format string of printf related functions can contain plain text mixed with conversion specifiers.
Each conversion specifier should be preceded by a '%' character. The conversion specifier should be
built in order:
• Flags (in any order):
-
specifies left adjustment of the converted argument.
+
a number is always preceded with a sign character.
+ has higher precedence than space.
space a negative number is preceded with a sign, positive numbers with a space.
0
specifies padding to the field width with zeros (only for numbers).
785
TASKING VX-toolset for ARM User Guide
#
specifies an alternate output form. For o, the first digit will be zero. For x or X, "0x" and "0X"
will be prefixed to the number. For e, E, f, g, G, the output always contains a decimal point,
trailing zeros are not removed.
• A number specifying a minimum field width. The converted argument is printed in a field with at least
the length specified here. If the converted argument has fewer characters than specified, it will be
padded at the left side (or at the right when the flag '-' was specified) with spaces. Padding to numeric
fields will be done with zeros when the flag '0' is also specified (only when padding left). Instead of a
numeric value, also '*' may be specified, the value is then taken from the next argument, which is
assumed to be of type int.
• A period. This separates the minimum field width from the precision.
• A number specifying the maximum length of a string to be printed. Or the number of digits printed after
the decimal point (only for floating-point conversions). Or the minimum number of digits to be printed
for an integer conversion. Instead of a numeric value, also '*' may be specified, the value is then taken
from the next argument, which is assumed to be of type int.
• A length modifier 'h', 'hh', 'l', 'll', 'L', 'j', 'z' or 't'. 'h' indicates that the argument is to be treated as a short
or unsigned short. 'hh' indicates that the argument is to be treated as a char or unsigned char.
'l' should be used if the argument is a long integer, 'll' for a long long. 'L' indicates that the argument
is a long double. 'j' indicates a pointer to intmax_t or uintmax_t, 'z' indicates a pointer to size_t
and 't' indicates a pointer to ptrdiff_t.
Flags, length specifier, period, precision and length modifier are optional, the conversion character is not.
The conversion character must be one of the following, if a character following '%' is not in the list, the
behavior is undefined:
Character Printed as
d, i
int, signed decimal
o
int, unsigned octal
x, X
int, unsigned hexadecimal in lower case or upper case respectively
u
int, unsigned decimal
c
int, single character (converted to unsigned char)
s
char *, the characters from the string are printed until a NULL character is found. When the
given precision is met before, printing will also stop
f
double
e, E
double
g, G
double
a, A
double
n
int *, the number of characters written so far is written into the argument. This should be a
pointer to an integer in default memory. No value is printed.
p
pointer
%
No argument is converted, a '%' is printed.
786
Libraries
printf conversion characters
All arguments to the scanf related functions should be pointers to variables (in default memory) of the
type which is specified in the format string.
The format string can contain :
• Blanks or tabs, which are skipped.
• Normal characters (not '%'), which should be matched exactly in the input stream.
• Conversion specifications, starting with a '%' character.
Conversion specifications should be built as follows (in order) :
• A '*', meaning that no assignment is done for this field.
• A number specifying the maximum field width.
• The conversion characters d, i, n, o, u and x may be preceded by 'h' if the argument is a pointer to
short rather than int, or by 'hh' if the argument is a pointer to char, or by 'l' (letter ell) if the argument
is a pointer to long or by 'll' for a pointer to long long, 'j' for a pointer to intmax_t or uintmax_t,
'z' for a pointer to size_t or 't' for a pointer to ptrdiff_t. The conversion characters e, f, and g
may be preceded by 'l' if the argument is a pointer to double rather than float, and by 'L' for a pointer
to a long double.
• A conversion specifier. '*', maximum field width and length modifier are optional, the conversion character
is not. The conversion character must be one of the following, if a character following '%' is not in the
list, the behavior is undefined.
Length specifier and length modifier are optional, the conversion character is not. The conversion character
must be one of the following, if a character following '%' is not in the list, the behavior is undefined.
Character Scanned as
d
int, signed decimal.
i
int, the integer may be given octal (i.e. a leading 0 is entered) or hexadecimal (leading "0x"
or "0X"), or just decimal.
o
int, unsigned octal.
u
int, unsigned decimal.
x
int, unsigned hexadecimal in lower case or upper case.
c
single character (converted to unsigned char).
s
char *, a string of non white space characters. The argument should point to an array of
characters, large enough to hold the string and a terminating NULL character.
f, F
float
e, E
float
g, G
float
a, A
float
787
TASKING VX-toolset for ARM User Guide
Character Scanned as
n
int *, the number of characters written so far is written into the argument. No scanning is done.
p
pointer; hexadecimal value which must be entered without 0x- prefix.
[...]
Matches a string of input characters from the set between the brackets. A NULL character is
added to terminate the string. Specifying [ ]...] includes the ']' character in the set of scanning
characters.
[^...]
Matches a string of input characters not in the set between the brackets. A NULL character
is added to terminate the string. Specifying [^]...] includes the ']' character in the set.
%
Literal '%', no assignment is done.
scanf conversion characters
stdio.h
wchar.h
Description
fscanf(stream,
format, ...)
fwscanf(stream,
format, ...)
Performs a formatted read from the given stream.
Returns the number of items converted
successfully. (FSS implementation)
scanf(format,...)
wscanf(format, ...) Performs a formatted read from stdin. Returns
the number of items converted successfully. (FSS
implementation)
sscanf(*s, format,
...)
swscanf(*s, format, Performs a formatted read from the string s.
Returns the number of items converted
...)
successfully.
vfscanf(stream,
format, arg)
vfwscanf(stream,
format, arg)
Same as fscanf/fwscanf, but extra arguments
are given as variable argument list arg. (See
Section 14.2.19, stdarg.h)
vscanf(format, arg) vwscanf(format, arg) Same as sscanf/swscanf, but extra arguments
are given as variable argument list arg. (See
Section 14.2.19, stdarg.h)
vsscanf(*s, format, vswscanf(*s, format, Same as scanf/wscanf, but extra arguments
arg)
arg)
are given as variable argument list arg. (See
Section 14.2.19, stdarg.h)
fprintf(stream,
format, ...)
fwprintf(stream,
format, ...)
Performs a formatted write to the given stream.
Returns EOF/WEOF on error. (FSS
implementation)
printf(format, ...) wprintf(format, ...) Performs a formatted write to the stream stdout.
Returns EOF/WEOF on error. (FSS
implementation)
sprintf(*s, format, ...)
Performs a formatted write to string s. Returns
EOF/WEOF on error.
snprintf(*s, n,
format, ...)
Same as sprintf, but n specifies the maximum
number of characters (including the terminating
null character) to be written.
788
swprintf(*s, n,
format, ...)
Libraries
stdio.h
wchar.h
Description
vfprintf(stream,
format, arg)
vfwprintf(stream,
format, arg)
Same as fprintf/fwprintf, but extra
arguments are given as variable argument list
arg. (See Section 14.2.19, stdarg.h) (FSS
implementation)
vprintf(format, arg) vwprintf(format,
arg)
Same as printf/wprintf, but extra arguments
are given as variable argument list arg. (See
Section 14.2.19, stdarg.h) (FSS implementation)
vsprintf(*s, format, vswprintf(*s,
arg)
format, arg)
Same as sprintf/swprintf, but extra
arguments are given as variable argument list
arg. (See Section 14.2.19, stdarg.h)
The C library functions printf(), fprintf(), vfprintf(), vsprintf(), ... call one single function,
_doprint(), that deals with the format string and arguments. The same applies to all scanf type
functions, which call the function _doscan(), and also for the wprintf and wscanf type functions
which call _dowprint() and _dowscan() respectively. The C library contains three versions of these
routines: int, long and long long versions. If you use floating-point the formatter function for
floating-point _doflt() or _dowflt() is called. Depending on the formatting arguments you use, the
correct routine is used from the library. Of course the larger the version of the routine the larger your
produced code will be.
Note that when you call any of the printf/scanf routines indirect, the arguments are not known and always
the long long version with floating-point support is used from the library.
Example:
#include <stdio.h>
long L;
void main(void)
{
printf( "This is a long: %ld\n", L );
}
The linker extracts the long version without floating-point support from the library.
See also the description of #pragma weak in Section 1.7, Pragmas to Control the Compiler.
Character input/output
stdio.h
wchar.h
Description
fgetc(stream)
fgetwc(stream)
Reads one character from stream. Returns the
read character, or EOF/WEOF on error. (FSS
implementation)
789
TASKING VX-toolset for ARM User Guide
stdio.h
wchar.h
Description
getc(stream)
getwc(stream)
Same as fgetc/fgetwc except that is
implemented as a macro.
(FSS implementation)
NOTE: Currently #defined as
getchar()/getwchar() because FILE I/O is
not supported. Returns the read character, or
EOF/WEOF on error.
getchar(stdin)
getwchar(stdin)
Reads one character from the stdin stream.
Returns the character read or EOF/WEOF on
error. Implemented as macro.
(FSS implementation)
fgets(*s, n, stream) fgetws(*s, n,
stream)
Reads at most the next n-1 characters from the
stream into array s until a newline is found.
Returns s or NULL or EOF/WEOF on error. (FSS
implementation)
gets(*s, n, stdin)
-
Reads at most the next n-1 characters from the
stdin stream into array s. A newline is ignored.
Returns s or NULL or EOF/WEOF on error. (FSS
implementation)
ungetc(c, stream)
ungetwc(c, stream)
Pushes character c back onto the input stream.
Returns EOF/WEOF on error.
fputc(c, stream)
fputwc(c, stream)
Put character c onto the given stream. Returns
EOF/WEOF on error. (FSS implementation)
putc(c, stream)
putwc(c, stream)
Same as fpuc/fputwc except that is
implemented as a macro. (FSS implementation)
putchar(c, stdout)
putwchar(c, stdout) Put character c onto the stdout stream. Returns
EOF/WEOF on error.
Implemented as macro. (FSS implementation)
fputs(*s, stream)
fputws(*s, stream)
Writes string s to the given stream. Returns
EOF/WEOF on error. (FSS implementation)
puts(*s)
-
Writes string s to the stdout stream. Returns
EOF/WEOF on error. (FSS implementation)
Direct input/output
stdio.h
Description
fread(ptr,size,nobj,stream)
Reads nobj members of size bytes from the given stream into
the array pointed to by ptr. Returns the number of elements
successfully read. (FSS implementation)
fwrite(ptr,size,nobj,stream) Writes nobj members of size bytes from to the array pointed to
by ptr to the given stream. Returns the number of elements
successfully written. (FSS implementation)
790
Libraries
Random access
stdio.h
Description
fseek(stream, offset,
origin)
Sets the position indicator for stream. (FSS implementation)
When repositioning a binary file, the new position origin is given by the following macros:
SEEK_SET 0 offset characters from the beginning of the file
SEEK_CUR 1 offset characters from the current position in the file
SEEK_END 2 offset characters from the end of the file
ftell(stream)
Returns the current file position for stream, or -1L on error.
(FSS implementation)
rewind(stream)
Sets the file position indicator for the stream to the beginning of the file. This
function is equivalent to:
(void) fseek(stream,0L,SEEK_SET);
clearerr(stream);
(FSS implementation)
fgetpos(stream,pos) Stores the current value of the file position indicator for stream in the object
pointed to by pos. (FSS implementation)
fsetpos(stream,pos) Positions stream at the position recorded by fgetpos in *pos. (FSS
implementation)
Operations on files
stdio.h
Description
remove(file)
Removes the named file, so that a subsequent attempt to open it fails. Returns a
non-zero value if not successful.
rename(old,new) Changes the name of the file from old name to new name. Returns a non-zero
value if not successful.
tmpfile()
Creates a temporary file of the mode "wb+" that will be automatically removed when
closed or when the program terminates normally. Returns a file pointer.
tmpnam(buffer)
Creates new file names that do not conflict with other file names currently in use.
The new file name is stored in a buffer which must have room for L_tmpnam
characters. Returns a pointer to the temporary name. The file names are created
in the current directory and all start with "tmp". At most TMP_MAX unique file names
can be generated.
Error handling
stdio.h
Description
clearerr(stream)
Clears the end of file and error indicators for stream.
ferror(stream)
Returns a non-zero value if the error indicator for stream is set.
feof(stream)
Returns a non-zero value if the end of file indicator for stream is set.
791
TASKING VX-toolset for ARM User Guide
stdio.h
Description
perror(*s)
Prints s and the error message belonging to the integer errno. (See
Section 14.2.6, errno.h )
14.2.24. stdlib.h and wchar.h
The header file stdlib.h contains general utility functions which fall into the following categories (Some
have parallel wide-character, declared in wchar.h)
• Numeric conversions
• Random number generation
• Memory management
• Environment communication
• Searching and sorting
• Integer arithmetic
• Multibyte/wide character and string conversions.
Macros
EXIT_SUCCES Predefined exit codes that can be used in the exit function.
0
EXIT_FAILURE
1
RAND_MAX
32767
Highest number that can be returned by the rand/srand function.
MB_CUR_MAX 1 Maximum number of bytes in a multibyte character for the extended character set
specified by the current locale (category LC_CTYPE, see Section 14.2.14, locale.h).
Numeric conversions
The following functions convert the initial portion of a string *s to a double, int, long int and long
long int value respectively.
double
int
long
long long
atof(*s)
atoi(*s)
atol(*s)
atoll(*s)
The following functions convert the initial portion of the string *s to a float, double and long double value
respectively. *endp will point to the first character not used by the conversion.
792
Libraries
stdlib.h
wchar.h
float
strtof(*s,**endp)
double
strtod(*s,**endp)
long double strtold(*s,**endp)
float
wcstof(*s,**endp)
double
wcstod(*s,**endp)
long double wcstold(*s,**endp)
The following functions convert the initial portion of the string *s to a long, long long, unsigned
long and unsigned long long respectively. Base specifies the radix. *endp will point to the first
character not used by the conversion.
stdlib.h
wchar.h
long strtol (*s,**endp,base)
long long strtoll
(*s,**endp,base)
unsigned long strtoul
(*s,**endp,base)
unsigned long long strtoull
(*s,**endp,base)
long wcstol (*s,**endp,base)
long long wcstoll
(*s,**endp,base)
unsigned long wcstoul
(*s,**endp,base)
unsigned long long wcstoull
(*s,**endp,base)
Random number generation
rand
Returns a pseudo random integer in the range 0 to RAND_MAX.
srand(seed) Same as rand but uses seed for a new sequence of pseudo random numbers.
Memory management
malloc(size)
Allocates space for an object with size size.
The allocated space is not initialized. Returns a pointer to the allocated space.
calloc(nobj,size)
Allocates space for n objects with size size.
The allocated space is initialized with zeros. Returns a pointer to the allocated
space.
free(*ptr)
Deallocates the memory space pointed to by ptr which should be a pointer
earlier returned by the malloc or calloc function.
realloc(*ptr,size) Deallocates the old object pointed to by ptr and returns a pointer to a new
object with size size, while preserving its contents.
If the new size is smaller than the old size, some contents at the end of the
old region will be discarded. If the new size is larger than the old size, all of
the old contents are preserved and any bytes in the new object beyond the
size of the old object will have indeterminate values.
Environment communication
abort()
Causes abnormal program termination. If the signal SIGABRT is caught, the
signal handler may take over control. (See Section 14.2.18, signal.h).
793
TASKING VX-toolset for ARM User Guide
atexit(*func)
func points to a function that is called (without arguments) when the program
normally terminates.
exit(status)
Causes normal program termination. Acts as if main() returns with status as
the return value. Status can also be specified with the predefined macros
EXIT_SUCCES or EXIT_FAILURE.
_Exit(status)
Same as exit, but not registered by the atexit function or signal handlers
registered by the signal function are called.
getenv(*s)
Searches an environment list for a string s. Returns a pointer to the contents
of s.
NOTE: this function is not implemented because there is no OS.
system(*s)
Passes the string s to the environment for execution.
NOTE: this function is not implemented because there is no OS.
Searching and sorting
bsearch(*key,
*base, n, size,
*cmp)
This function searches in an array of n members, for the object pointed to by
key. The initial base of the array is given by base. The size of each member
is specified by size. The given array must be sorted in ascending order,
according to the results of the function pointed to by cmp. Returns a pointer
to the matching member in the array, or NULL when not found.
qsort(*base, n,
size, *cmp)
This function sorts an array of n members using the quick sort algorithm. The
initial base of the array is given by base. The size of each member is specified
by size. The array is sorted in ascending order, according to the results of the
function pointed to by cmp.
Integer arithmetic
int abs(j)
Compute the absolute value of an int, long int, and long long int j
long labs(j)
respectively.
long long llabs(j)
div_t div(x,y)
Compute x/y and x%y in a single operation. X and y have respectively type
int, long int and long long int. The result is stored in the members
ldiv_t ldiv(x,y)
lldiv_t lldiv(x,y) quot and rem of struct div_t, ldiv_t and lldiv_t which have the
same types.
Multibyte/wide character and string conversions
mblen(*s,n)
Determines the number of bytes in the multi-byte character pointed to by s. At
most n characters will be examined. (See also mbrlen in Section 14.2.28,
wchar.h).
mbtowc(*pwc,*s,n)
Converts the multi-byte character in s to a wide-character code and stores it
in pwc. At most n characters will be examined.
wctomb(*s,wc)
Converts the wide-character wc into a multi-byte representation and stores it
in the string pointed to by s. At most MB_CUR_MAX characters are stored.
794
Libraries
mbstowcs(*pwcs,*s,n) Converts a sequence of multi-byte characters in the string pointed to by s into
a sequence of wide characters and stores at most n wide characters into the
array pointed to by pwcs. (See also mbsrtowcs in Section 14.2.28, wchar.h).
wcstombs(*s,*pwcs,n) Converts a sequence of wide characters in the array pointed to by pwcs into
multi-byte characters and stores at most n multi-byte characters into the string
pointed to by s. (See also wcsrtowmb in Section 14.2.28, wchar.h).
14.2.25. string.h and wchar.h
This header file provides numerous functions for manipulating strings. By convention, strings in C are
arrays of characters with a terminating null character. Most functions therefore take arguments of type
*char. However, many functions have also parallel wide-character functions which take arguments of
type *wchar_t. These functions are declared in wchar.h.
Copying and concatenation functions
string.h
wchar.h
Description
memcpy(*s1,*s2,n) wmemcpy(*s1,*s2,n) Copies n characters from *s2 into *s1 and returns *s1. If
*s1 and *s2 overlap the result is undefined.
memmove(*s1,*s2,n) wmemmove(*s1,*s2,n) Same as memcpy, but overlapping strings are handled
correctly. Returns *s1.
strcpy(*s1,*s2) wcscpy(*s1,*s2) Copies *s2 into *s1 and returns *s1. If *s1 and *s2 overlap
the result is undefined.
strncpy(*s1,*s2,n) wcsncpy(*s1,*s2,n) Copies not more than n characters from *s2 into *s1 and
returns *s1. If *s1 and *s2 overlap the result is undefined.
strcat(*s1,*s2) wcscat(*s1,*s2) Appends a copy of *s2 to *s1 and returns *s1. If *s1 and
*s2 overlap the result is undefined.
strncat(*s1,*s2,n) wcsncat(*s1,*s2,n) Appends not more than n characters from *s2 to *s1 and
returns *s1. If *s1 and *s2 overlap the result is undefined.
Comparison functions
string.h
wchar.h
Description
memcmp(*s1,*s2,n) wmemcmp(*s1,*s2,n) Compares the first n characters of *s1 to the first n
characters of *s2. Returns < 0 if *s1 < *s2, 0 if *s1 = = *s2,
or > 0 if *s1 > *s2.
strcmp(*s1,*s2) wcscmp(*s1,*s2) Compares string *s1 to *s2. Returns < 0 if *s1 < *s2, 0 if *s1
= = *s2, or > 0 if *s1 > *s2.
strncmp(*s1,*s2,n) wcsncmp(*s1,*s2,n) Compares the first n characters of *s1 to the first n
characters of *s2. Returns < 0 if *s1 < *s2, 0 if *s1 = = *s2,
or > 0 if *s1 > *s2.
strcoll(*s1,*s2) wcscoll(*s1,*s2) Performs a local-specific comparison between string *s1
and string *s2 according to the LC_COLLATE category of
the current locale. Returns < 0 if *s1 < *s2, 0 if *s1 = = *s2,
or > 0 if *s1 > *s2. (See Section 14.2.14, locale.h)
795
TASKING VX-toolset for ARM User Guide
string.h
wchar.h
Description
strxfrm(*s1,*s2,n) wcsxfrm(*s1,*s2,n) Transforms (a local) string *s2 so that a comparison
between transformed strings with strcmp gives the same
result as a comparison between non-transformed strings
with strcoll. Returns the transformed string *s1.
Search functions
string.h
wchar.h
memchr(*s,c,n)
wmemchr(*s,c,n) Checks the first n characters of *s on the occurrence of
character c. Returns a pointer to the found character.
Description
strchr(*s,c)
wcschr(*s,c)
Returns a pointer to the first occurrence of character c in
*s or the null pointer if not found.
strrchr(*s,c)
wcsrchr(*s,c)
Returns a pointer to the last occurrence of character c in *s
or the null pointer if not found.
strspn(*s,*set) wcsspn(*s,*set) Searches *s for a sequence of characters specified in *set.
Returns the length of the first sequence found.
strcspn(*s,*set) wcscspn(*s,*set) Searches *s for a sequence of characters not specified in
*set. Returns the length of the first sequence found.
strpbrk(*s,*set) wcspbrk(*s,*set) Same as strspn/wcsspn but returns a pointer to the first
character in *s that also is specified in *set.
strstr(*s,*sub) wcsstr(*s,*sub) Searches for a substring *sub in *s. Returns a pointer to the
first occurrence of *sub in *s.
strtok(*s,*dlm) wcstok(*s,*dlm) A sequence of calls to this function breaks the string *s into
a sequence of tokens delimited by a character specified in
*dlm. The token found in *s is terminated with a null
character. Returns a pointer to the first position in *s of the
token.
Miscellaneous functions
string.h
wchar.h
Description
memset(*s,c,n)
wmemset(*s,c,n) Fills the first n bytes of *s with character c and returns *s.
strerror(errno) -
Typically, the values for errno come from int errno. This
function returns a pointer to the associated error message.
(See also Section 14.2.6, errno.h)
strlen(*s)
Returns the length of string *s.
wcslen(*s)
14.2.26. time.h and wchar.h
The header file time.h provides facilities to retrieve and use the (calendar) date and time, and the
process time. Time can be represented as an integer value, or can be broken-down in components. Two
arithmetic data types are defined which are capable of holding the integer representation of times:
796
Libraries
clock_t unsigned long long
time_t unsigned long
The type struct tm below is defined according to ISO C99 with one exception: this implementation
does not support leap seconds. The struct tm type is defines as follows:
struct tm
{
int
tm_sec;
int
tm_min;
int
tm_hour;
int
tm_mday;
int
tm_mon;
int
tm_year;
int
tm_wday;
int
tm_yday;
int
tm_isdst;
};
/*
/*
/*
/*
/*
/*
/*
/*
/*
seconds after the minute - [0, 59]
minutes after the hour - [0, 59]
hours since midnight - [0, 23]
day of the month - [1, 31]
months since January - [0, 11]
year since 1900
days since Sunday - [0, 6]
days since January 1 - [0, 365]
Daylight Saving Time flag
*/
*/
*/
*/
*/
*/
*/
*/
*/
Time manipulation
clock
Returns the application's best approximation to the processor time used by the
program since it was started. This low-level routine is not implemented because it
strongly depends on the hardware. To determine the time in seconds, the result of
clock should be divided by the value defined by CLOCKS_PER_SEC.
difftime(t1,t0) Returns the difference t1-t0 in seconds.
mktime(tm *tp) Converts the broken-down time in the structure pointed to by tp, to a value of type
time_t. The return value has the same encoding as the return value of the time
function.
time(*timer)
Returns the current calendar time. This value is also assigned to *timer.
Time conversion
asctime(tm *tp) Converts the broken-down time in the structure pointed to by tp into a string in the
form Mon Jan 22 16:15:14 2007\n\0. Returns a pointer to this string.
ctime(*timer)
Converts the calender time pointed to by timer to local time in the form of a string.
This is equivalent to: asctime(localtime(timer))
gmtime(*timer) Converts the calender time pointed to by timer to the broken-down time, expressed
as UTC. Returns a pointer to the broken-down time.
localtime(*timer) Converts the calendar time pointed to by timer to the broken-down time, expressed
as local time. Returns a pointer to the broken-down time.
Formatted time
The next function has a parallel function defined in wchar.h:
797
TASKING VX-toolset for ARM User Guide
time.h
wchar.h
strftime(*s,smax,*fmt,tm *tp) wcsftime(*s,smax,*fmt,tm *tp)
Formats date and time information from struct tm *tp into *s according to the specified format *fmt.
No more than smax characters are placed into *s. The formatting of strftime is locale-specific using
the LC_TIME category (see Section 14.2.14, locale.h).
You can use the next conversion specifiers:
%a
abbreviated weekday name
%A
full weekday name
%b
abbreviated month name
%B
full month name
%c
locale-specific date and time representation (same as %a %b %e %T %Y)
%C
last two digits of the year
%d
day of the month (01-31)
%D
same as %m/%d/%y
%e
day of the month (1-31), with single digits preceded by a space
%F
ISO 8601 date format: %Y-%m-%d
%g
last two digits of the week based year (00-99)
%G
week based year (0000–9999)
%h
same as %b
%H
hour, 24-hour clock (00-23)
%I
hour, 12-hour clock (01-12)
%j
day of the year (001-366)
%m
month (01-12)
%M
minute (00-59)
%n
replaced by newline character
%p
locale's equivalent of AM or PM
%r
locale's 12-hour clock time; same as %I:%M:%S %p
%R
same as %H:%M
%S
second (00-59)
%t
replaced by horizontal tab character
%T
ISO 8601 time format: %H:%M:%S
%u
ISO 8601 weekday number (1-7), Monday as first day of the week
%U
week number of the year (00-53), week 1 has the first Sunday
%V
ISO 8601 week number (01-53) in the week-based year
%w
weekday (0-6, Sunday is 0)
%W week number of the year (00-53), week 1 has the first Monday
798
Libraries
%x
local date representation
%X
local time representation
%y
year without century (00-99)
%Y
year with century
%z
ISO 8601 offset of time zone from UTC, or nothing
%Z
time zone name, if any
%% %
14.2.27. unistd.h
The file unistd.h contains standard UNIX I/O functions. These functions are all implemented using file
system simulation. Except for lstat and fstat which are not implemented. This header file is not
defined in ISO C99.
access(*name,mode) Use file system simulation to check the permissions of a file on the host. mode
specifies the type of access and is a bit pattern constructed by a logical OR of
the following values:
R_OK
W_OK
X_OK
F_OK
Checks read permission.
Checks write permission.
Checks execute (search) permission.
Checks to see if the file exists.
(FSS implementation)
chdir(*path)
Use file system simulation to change the current directory on the host to the
directory indicated by path. (FSS implementation)
close(fd)
File close function. The given file descriptor should be properly closed. This
function calls _close(). (FSS implementation)
getcwd(*buf,size) Use file system simulation to retrieve the current directory on the host. Returns
the directory name. (FSS implementation)
lseek(fd,offset,whence) Moves read-write file offset. Calls _lseek(). (FSS implementation)
read(fd,*buff,cnt) Reads a sequence of characters from a file. This function calls _read(). (FSS
implementation)
stat(*name,*buff) Use file system simulation to stat() a file on the host platform. (FSS
implementation)
lstat(*name,*buff) This function is identical to stat(), except in the case of a symbolic link, where
the link itself is 'stat'-ed, not the file that it refers to. (Not implemented)
fstat(fd,*buff)
This function is identical to stat(), except that it uses a file descriptor instead
of a name. (Not implemented)
unlink(*name)
Removes the named file, so that a subsequent attempt to open it fails. (FSS
implementation)
write(fd,*buff,cnt) Write a sequence of characters to a file. Calls _write(). (FSS implementation)
799
TASKING VX-toolset for ARM User Guide
14.2.28. wchar.h
Many functions in wchar.h represent the wide-character variant of other functions so these are discussed
together. (See Section 14.2.23, stdio.h and wchar.h, Section 14.2.24, stdlib.h and wchar.h, Section 14.2.25,
string.h and wchar.h and Section 14.2.26, time.h and wchar.h).
The remaining functions are described below. They perform conversions between multi-byte characters
and wide characters. In these functions, ps points to struct mbstate_t which holds the conversion state
information necessary to convert between sequences of multibyte characters and wide characters:
typedef struct
{
wchar_t
wc_value;
unsigned short
n_bytes;
unsigned short
encoding;
/* wide character value solved
so far */
/* number of bytes of solved
multibyte */
/* encoding rule for wide
character <=> multibyte
conversion */
} mbstate_t;
When multibyte characters larger than 1 byte are used, this struct will be used to store the conversion
information when not all the bytes of a particular multibyte character have been read from the source. In
this implementation, multi-byte characters are 1 byte long (MB_CUR_MAX and MB_LEN_MAX are defined
as 1) and this will never occur.
mbsinit(*ps)
Determines whether the object pointed to by ps, is an initial conversion
state. Returns a non-zero value if so.
mbsrtowcs(*pwcs,**src,n,*ps) Restartable version of mbstowcs. See Section 14.2.24, stdlib.h and
wchar.h. The initial conversion state is specified by ps. The input sequence
of multibyte characters is specified indirectly by src.
wcsrtombs(*s,**src,n,*ps) Restartable version of wcstombs. See Section 14.2.24, stdlib.h and
wchar.h. The initial conversion state is specified by ps. The input wide
string is specified indirectly by src.
mbrtowc(*pwc,*s,n,*ps) Converts a multibyte character *s to a wide character *pwc according to
conversion state ps. See also mbtowc in Section 14.2.24, stdlib.h and
wchar.h.
wcrtomb(*s,wc,*ps)
Converts a wide character wc to a multi-byte character according to
conversion state ps and stores the multi-byte character in *s.
btowc(c)
Returns the wide character corresponding to character c. Returns WEOF
on error.
wctob(c)
Returns the multi-byte character corresponding to the wide character c.
The returned multi-byte character is represented as one byte. Returns
EOF on error.
mbrlen(*s,n,*ps)
Inspects up to n bytes from the string *s to see if those characters
represent valid multibyte characters, relative to the conversion state held
in *ps.
800
Libraries
14.2.29. wctype.h
Most functions in wctype.h represent the wide-character variant of functions declared in ctype.h and
are discussed in Section 14.2.4, ctype.h and wctype.h. In addition, this header file provides extensible,
locale specific functions and wide character classification.
wctype(*property) Constructs a value of type wctype_t that describes a class of wide characters
identified by the string *property. If property identifies a valid class of wide characters
according to the LC_TYPE category (see Section 14.2.14, locale.h) of the current
locale, a non-zero value is returned that can be used as an argument in the
iswctype function.
iswctype(wc,desc) Tests whether the wide character wc is a member of the class represented by
wctype_t desc. Returns a non-zero value if tested true.
Function
Equivalent to locale specific test
iswalnum(wc)
iswctype(wc,wctype("alnum"))
iswalpha(wc)
iswctype(wc,wctype("alpha"))
iswcntrl(wc)
iswctype(wc,wctype("cntrl"))
iswdigit(wc)
iswctype(wc,wctype("digit"))
iswgraph(wc)
iswctype(wc,wctype("graph"))
iswlower(wc)
iswctype(wc,wctype("lower"))
iswprint(wc)
iswctype(wc,wctype("print"))
iswpunct(wc)
iswctype(wc,wctype("punct"))
iswspace(wc)
iswctype(wc,wctype("space"))
iswupper(wc)
iswctype(wc,wctype("upper"))
iswxditig(wc)
iswctype(wc,wctype("xdigit"))
wctrans(*property) Constructs a value of type wctype_t that describes a mapping between wide
characters identified by the string *property. If property identifies a valid mapping
of wide characters according to the LC_TYPE category (see Section 14.2.14,
locale.h) of the current locale, a non-zero value is returned that can be used as an
argument in the towctrans function.
towctrans(wc,desc) Transforms wide character wc into another wide-character, described by desc.
Function
Equivalent to locale specific transformation
towlower(wc)
towctrans(wc,wctrans("tolower")
towupper(wc)
towctrans(wc,wctrans("toupper")
14.3. C Library Reentrancy
Some of the functions in the C library are reentrant, others are not. The table below shows the functions
in the C library, and whether they are reentrant or not. A dash means that the function is reentrant. Note
801
TASKING VX-toolset for ARM User Guide
that some of the functions are not reentrant because they set the global variable 'errno' (or call other
functions that eventually set 'errno'). If your program does not check this variable and errno is the only
reason for the function not being reentrant, these functions can be assumed reentrant as well.
The explanation of the cause why a function is not reentrant sometimes refers to a footnote because the
explanation is too lengthy for the table.
Function
Not reentrant because
_close
Uses global File System Simulation buffer, _dbg_request
_doflt
Uses I/O functions which modify iob[ ]. See (1).
_doprint
Uses indirect access to static iob[ ] array. See (1).
_doscan
Uses indirect access to iob[ ] and calls ungetc (access to local static
ungetc[ ] buffer). See (1).
_Exit
See exit.
_filbuf
Uses iob[ ], which is not reentrant. See (1).
_flsbuf
Uses iob[ ]. See (1).
_getflt
Uses iob[ ]. See (1).
_iob
Defines static iob[ ]. See (1).
_lseek
Uses global File System Simulation buffer, _dbg_request
_open
Uses global File System Simulation buffer, _dbg_request
_read
Uses global File System Simulation buffer, _dbg_request
_unlink
Uses global File System Simulation buffer, _dbg_request
_write
Uses global File System Simulation buffer, _dbg_request
abort
Calls exit
abs labs llabs
-
access
Uses global File System Simulation buffer, _dbg_request
acos acosf acosl
Sets errno.
acosh acoshf acoshl
Sets errno via calls to other functions.
asctime
asctime defines static array for broken-down time string.
asin asinf asinl
Sets errno.
asinh asinhf asinhl
Sets errno via calls to other functions.
atan atanf atanl
-
atan2 atan2f atan2l
-
atanh atanhf atanhl
Sets errno via calls to other functions.
atexit
atexit defines static array with function pointers to execute at exit of
program.
atof
-
atoi
-
atol
-
802
Libraries
Function
Not reentrant because
bsearch
-
btowc
-
cabs cabsf cabsl
Sets errno via calls to other functions.
cacos cacosf cacosl
Sets errno via calls to other functions.
cacosh cacosh cfacoshl
Sets errno via calls to other functions.
calloc
calloc uses static buffer management structures. See malloc (5).
carg cargf cargl
-
casin casinf casinl
Sets errno via calls to other functions.
casinh casinh cfasinhl
Sets errno via calls to other functions.
catan catanf catanl
Sets errno via calls to other functions.
catanh catanhf catanhl
Sets errno via calls to other functions.
cbrt cbrtf cbrtl
(Not implemented)
ccos ccosf ccosl
Sets errno via calls to other functions.
ccosh ccoshf ccoshl
Sets errno via calls to other functions.
ceil ceilf ceill
-
cexp cexpf cexpl
Sets errno via calls to other functions.
chdir
Uses global File System Simulation buffer, _dbg_request
cimag cimagf cimagl
-
cleanup
Calls fclose. See (1)
clearerr
Modifies iob[ ]. See (1)
clock
Uses global File System Simulation buffer, _dbg_request
clog clogf clogl
Sets errno via calls to other functions.
close
Calls _close
conj conjf conjl
-
copysign copysignf
copysignl
-
cos cosf cosl
-
cosh coshf coshl
cosh calls exp(), which sets errno. If errno is discarded, cosh is
reentrant.
cpow cpowf cpowl
Sets errno via calls to other functions.
cproj cprojf cprojl
-
creal crealf creall
-
csin csinf csinl
Sets errno via calls to other functions.
csinh csinhf csinhl
Sets errno via calls to other functions.
csqrt csqrtf csqrtl
Sets errno via calls to other functions.
ctan ctanf ctanl
Sets errno via calls to other functions.
803
TASKING VX-toolset for ARM User Guide
Function
Not reentrant because
ctanh ctanhf ctanhl
Sets errno via calls to other functions.
ctime
Calls asctime
difftime
-
div ldiv lldiv
-
erf erfl erff
(Not implemented)
erfc erfcf erfcl
(Not implemented)
exit
Calls fclose indirectly which uses iob[ ] calls functions in _atexit
array. See (1). To make exit reentrant kernel support is required.
exp expf expl
Sets errno.
exp2 exp2f exp2l
(Not implemented)
expm1 expm1f expm1l
(Not implemented)
fabs fabsf fabsl
-
fclose
Uses values in iob[ ]. See (1).
fdim fdimf fdiml
(Not implemented)
feclearexcept
(Not implemented)
fegetenv
(Not implemented)
fegetexceptflag
(Not implemented)
fegetround
(Not implemented)
feholdexept
(Not implemented)
feof
Uses values in iob[ ]. See (1).
feraiseexcept
(Not implemented)
ferror
Uses values in iob[ ]. See (1).
fesetenv
(Not implemented)
fesetexceptflag
(Not implemented)
fesetround
(Not implemented)
fetestexcept
(Not implemented)
feupdateenv
(Not implemented)
fflush
Modifies iob[ ]. See (1).
fgetc fgetwc
Uses pointer to iob[ ]. See (1).
fgetpos
Sets the variable errno and uses pointer to iob[ ]. See (1) / (2).
fgets fgetws
Uses iob[ ]. See (1).
floor floorf floorl
-
fma fmaf fmal
(Not implemented)
fmax fmaxf fmaxl
(Not implemented)
fmin fminf fminl
(Not implemented)
804
Libraries
Function
Not reentrant because
fmod fmodf fmodl
-
fopen
Uses iob[ ] and calls malloc when file open for buffered IO. See (1)
fpclassify
-
fprintf fwprintf
Uses iob[ ]. See (1).
fputc fputwc
Uses iob[ ]. See (1).
fputs fputws
Uses iob[ ]. See (1).
fread
Calls fgetc. See (1).
free
free uses static buffer management structures. See malloc (5).
freopen
Modifies iob[ ]. See (1).
frexp frexpf frexpl
-
fscanf fwscanf
Uses iob[ ]. See (1)
fseek
Uses iob[ ] and calls _lseek. Accesses ungetc[ ] array. See (1).
fsetpos
Uses iob[ ] and sets errno. See (1) / (2).
fstat
(Not implemented)
ftell
Uses iob[ ] and sets errno. Calls _lseek. See (1) / (2).
fwrite
Uses iob[ ]. See (1).
getc getwc
Uses iob[ ]. See (1).
getchar getwchar
Uses iob[ ]. See (1).
getcwd
Uses global File System Simulation buffer, _dbg_request
getenv
Skeleton only.
gets getws
Uses iob[ ]. See (1).
gmtime
gmtime defines static structure
hypot hypotf hypotl
Sets errno via calls to other functions.
ilogb ilogbf ilogbl
(Not implemented)
imaxabs
-
imaxdiv
-
isalnum iswalnum
-
isalpha iswalpha
-
isascii iswascii
-
iscntrl iswcntrl
-
isdigit iswdigit
-
isfinite
-
isgraph iswgraph
-
isgreater
-
isgreaterequal
-
805
TASKING VX-toolset for ARM User Guide
Function
Not reentrant because
isinf
-
isless
-
islessequal
-
islessgreater
-
islower iswlower
-
isnan
-
isnormal
-
isprint iswprint
-
ispunct iswpunct
-
isspace iswspace
-
isunordered
-
isupper iswupper
-
iswalnum
-
iswalpha
-
iswcntrl
-
iswctype
-
iswdigit
-
iswgraph
-
iswlower
-
iswprint
-
iswpunct
-
iswspace
-
iswupper
-
iswxditig
-
isxdigit iswxdigit
-
ldexp ldexpf ldexpl
Sets errno. See (2).
lgamma lgammaf lgammal
(Not implemented)
llrint lrintf lrintl
(Not implemented)
llround llroundf llroundl (Not implemented)
localeconv
N.A.; skeleton function
localtime
-
log logf logl
Sets errno. See (2).
log10 log10f log10l
Sets errno via calls to other functions.
log1p log1pf log1pl
(Not implemented)
log2 log2f log2l
(Not implemented)
806
Libraries
Function
Not reentrant because
logb logbf logbl
(Not implemented)
longjmp
-
lrint lrintf lrintl
(Not implemented)
lround lroundf lroundl
(Not implemented)
lseek
Calls _lseek
lstat
(Not implemented)
malloc
Needs kernel support. See (5).
mblen
N.A., skeleton function
mbrlen
Sets errno.
mbrtowc
Sets errno.
mbsinit
-
mbsrtowcs
Sets errno.
mbstowcs
N.A., skeleton function
mbtowc
N.A., skeleton function
memchr wmemchr
-
memcmp wmemcmp
-
memcpy wmemcpy
-
memmove wmemmove
-
memset wmemset
-
mktime
-
modf modff modfl
-
nan nanf nanl
(Not implemented)
nearbyint nearbyintf
nearbyintl
(Not implemented)
nextafter nextafterf
nextafterl
(Not implemented)
nexttoward nexttowardf
nexttowardl
(Not implemented)
offsetof
-
open
Calls _open
perror
Uses errno. See (2)
pow powf powl
Sets errno. See (2)
printf wprintf
Uses iob[ ]. See (1)
putc putwc
Uses iob[ ]. See (1)
putchar putwchar
Uses iob[ ]. See (1)
puts
Uses iob[ ]. See (1)
807
TASKING VX-toolset for ARM User Guide
Function
Not reentrant because
qsort
-
raise
Updates the signal handler table
rand
Uses static variable to remember latest random number. Must
diverge from ISO C standard to define reentrant rand. See (4).
read
Calls _read
realloc
See malloc (5).
remainder remainderf
remainderl
(Not implemented)
remove
Uses global File System Simulation buffer, _dbg_request
remquo remquof remquol
(Not implemented)
rename
Uses global File System Simulation buffer, _dbg_request
rewind
Eventually calls _lseek
rint rintf rintl
(Not implemented)
round roundf roundl
(Not implemented)
scalbln scalblnf scalblnl scalbn scalbnf scalbnl
-
scanf wscanf
Uses iob[ ], calls _doscan. See (1).
setbuf
Sets iob[ ]. See (1).
setjmp
-
setlocale
N.A.; skeleton function
setvbuf
Sets iob and calls malloc. See (1) / (5).
signal
Updates the signal handler table
signbit
-
sin sinf sinl
-
sinh sinhf sinhl
Sets errno via calls to other functions.
snprintf swprintf
Sets errno. See (2).
sprintf
Sets errno. See (2).
sqrt sqrtf sqrtl
Sets errno. See (2).
srand
See rand
sscanf swscanf
Sets errno via calls to other functions.
stat
Uses global File System Simulation buffer, _dbg_request
strcat wcscat
-
strchr wcschr
-
strcmp wcscmp
-
strcoll wcscoll
-
strcpy wcscpy
-
808
Libraries
Function
Not reentrant because
strcspn wcscspn
-
strerror
-
strftime wcsftime
-
strlen wcslen
-
strncat wcsncat
-
strncmp wcsncmp
-
strncpy wcsncpy
-
strpbrk wcspbrk
-
strrchr wcsrchr
-
strspn wcsspn
-
strstr wcsstr
-
strtod wcstod
-
strtof wcstof
-
strtoimax
Sets errno via calls to other functions.
strtok wcstok
strtok saves last position in string in local static variable. This function
is not reentrant by design. See (4).
strtol wcstol
Sets errno. See (2).
strtold wcstold
-
strtoul wcstoul
Sets errno. See (2).
strtoull wcstoull
Sets errno. See (2).
strtoumax
Sets errno via calls to other functions.
strxfrm wcsxfrm
-
system
N.A; skeleton function
tan tanf tanl
Sets errno. See (2).
tanh tanhf tanhl
Sets errno via call to other functions.
tgamma tgammaf tgammal
(Not implemented)
time
Uses static variable which defines initial start time
tmpfile
Uses iob[ ]. See (1).
tmpnam
Uses local buffer to build filename.
Function can be adapted to use user buffer. This makes the function
non ISO C. See (4).
toascii
-
tolower
-
toupper
-
towctrans
-
towlower
-
809
TASKING VX-toolset for ARM User Guide
Function
Not reentrant because
towupper
-
trunc truncf truncl
(Not implemented)
ungetc ungetwc
Uses static buffer to hold unget characters for each file. Can be
moved into iob structure. See (1).
unlink
Uses global File System Simulation buffer, _dbg_request
vfprintf vfwprintf
Uses iob[ ]. See (1).
vfscanf vfwscanf
Calls _doscan
vprintf vwprintf
Uses iob[ ]. See (1).
vscanf vwscanf
Calls _doscan
vsprintf vswprintf
Sets errno.
vsscanf vswscanf
Sets errno.
wcrtomb
Sets errno.
wcsrtombs
Sets errno.
wcstoimax
Sets errno via calls to other functions.
wcstombs
N.A.; skeleton function
wcstoumax
Sets errno via calls to other functions.
wctob
-
wctomb
N.A.; skeleton function
wctrans
-
wctype
-
write
Calls _write
Table: C library reentrancy
Several functions in the C library are not reentrant due to the following reasons:
• The iob[] structure is static. This influences all I/O functions.
• The ungetc[] array is static. This array holds the characters (one for each stream) when ungetc()
is called.
• The variable errno is globally defined. Numerous functions read or modify errno
• _doprint and _doscan use static variables for e.g. character counting in strings.
• Some string functions use locally defined (static) buffers. This is prescribed by ANSI.
• malloc uses a static heap space.
The following description discusses these items in more detail. The numbers at the beginning of each
paragraph relate to the number references in the table above.
(1) iob structures
810
Libraries
The I/O part of the C library is not reentrant by design. This is mainly caused by the static declaration of
the iob[] array. The functions which use elements of this array access these elements via pointers (
FILE * ).
Building a multi-process system that is created in one link-run is hard to do. The C language scoping
rules for external variables make it difficult to create a private copy of the iob[] array. Currently, the
iob[] array has external scope. Thus it is visible in every module involved in one link phase. If these
modules comprise several tasks (processes) in a system each of which should have its private copy of
iob[], it is apparent that the iob[] declaration should be changed. This requires adaptation of the
library to the multi-tasking environment. The library modules must use a process identification as an index
for determining which iob[] array to use. Thus the library is suitable for interfacing to that kernel only.
Another approach for the iob[] declaration problem is to declare the array static in one of the modules
which create a task. Thus there can be more than one iob[] array is the system without having conflicts
at link time. This brings several restrictions: Only the module that holds the declaration of the static iob[]
can use the standard file handles stdin, stdout and stderr (which are the first three entries in iob[]).
Thus all I/O for these three file handles should be located in one module.
(2) errno declaration
Several functions in the C library set the global variable errno. After completion of the function the user
program may consult this variable to see if some error occurred. Since most of the functions that set
errno already have a return type (this is the reason for using errno) it is not possible to check successful
completion via the return type.
The library routines can set errno to the values defined in errno.h. See the file errno.h for more
information.
errno can be set to ERR_FORMAT by the print and scan functions in the C library if you specify illegal
format strings.
errno will never be set to ERR_NOLONG or ERR_NOPOINT since the C library supports long and
pointer conversion routines for input and output.
errno can be set to ERANGE by the following functions: exp(), strtol(), strtoul() and tan().
These functions may produce results that are out of the valid range for the return type. If so, the result of
the function will be the largest representable value for that type and errno is set to ERANGE.
errno is set to EDOM by the following functions: acos(), asin(), log(), pow() and sqrt(). If the
arguments for these functions are out of their valid range ( e.g. sqrt( -1 ) ), errno is set to EDOM.
errno can be set to ERR_POS by the file positioning functions ftell(), fsetpos() and fgetpos().
(3) ungetc
Currently the ungetc buffer is static. For each file entry in the iob[] structure array, there is one character
available in the buffer to unget a character.
(4) local buffers
811
TASKING VX-toolset for ARM User Guide
tmpnam() creates a temporary filename and returns a pointer to a local static buffer. This is according
to the ANSI definition. Changing this function such that it creates the name in a user specified buffer
requires another calling interface. Thus the function would be no longer portable.
strtok() scans through a string and remembers that the string and the position in the string for
subsequent calls. This function is not reentrant by design. Making it reentrant requires support of a kernel
to store the information on a per process basis.
rand() generates a sequence of random numbers. The function uses the value returned by a previous
call to generate the next value in the sequence. This function can be made reentrant by specifying the
previous random value as one of the arguments. However, then it is no longer a standard function.
(5) malloc
Malloc uses a heap space which is assigned at locate time. Thus this implementation is not reentrant.
Making a reentrant malloc requires some sort of system call to obtain free memory space on a per process
basis. This is not easy to solve within the current context of the library. This requires adaptation to a
kernel.
This paragraph on reentrancy applies to multi-process environments only. If reentrancy is required
for calling library functions from an exception handler, another approach is required. For such a
situation it is of no use to allocate e.g. multiple iob[] structures. In such a situation several pieces
of code in the library have to be declared 'atomic': this means that interrupts have to be disabled
while executing an atomic piece of code.
812
Chapter 15. List File Formats
This chapter describes the format of the assembler list file and the linker map file.
15.1. Assembler List File Format
The assembler list file is an additional output file of the assembler that contains information about the
generated code. For details on how to generate a list file, see Section 7.5, Generating a List File.
The list file consists of a page header and a source listing.
Page header
The page header is repeated on every page:
TASKING VX-toolset for ARM: assembler vx.yrz Build nnn SN 00000000
Title
Page 1
ADDR CODE
CYCLES
LINE SOURCE LINE
The first line contains version information. The second line can contain a title which you can specify with
the assembler directive .TITLE and always contains a page number. The third line is empty and the
fourth line contains the headings of the columns for the source listing.
With the assembler directives .LIST/.NOLIST, .PAGE, and with the assembler option --list-format you
can format the list file.
Source listing
The following is a sample part of a listing. An explanation of the different columns follows below.
ADDR CODE
CYCLES
0000
0004
0008
000C
1
1
1
3
08009FE5
001090E5
04009FE5
rrrrrrEA
0000
| RESERVED
0001
1
2
3
6
LINE SOURCE LINE
1
; Module start
.
.
16
ldr
r0,.L2
17
ldr
r1,[r0,#0]
18
ldr
r0,.L2+4
19
b
printf
.
.
38
.ds
2
813
TASKING VX-toolset for ARM User Guide
ADDR
This column contains the memory address. The address is a hexadecimal number
that represents the offset from the beginning of a relocatable section or the absolute
address for an absolute section. The address only appears on lines that generate
object code.
CODE
This is the object code generated by the assembler for this source line, displayed
in hexadecimal format.The displayed code need not be the same as the generated
code that is entered in the object module. The code can also be relocatable code.
In this case the letter 'r' is printed for the relocatable code part in the listing. For
lines that allocate space, the code field contains the text "RESERVED". For lines
that initialize a buffer, the code field lists one value followed by the word
"REPEATS".
CYCLES
The first number in this column is the number of instruction cycles needed to
execute the instruction(s) as generated in the CODE field. The second number is
the accumulated cycle count of this section.
LINE
This column contains the line number. This is a decimal number indicating each
input line, starting from 1 and incrementing with each source line.
SOURCE LINE
This column contains the source text. This is a copy of the source line from the
assembly source file.
For the .SET and .EQU directives the ADDR and CODE columns do not apply. The symbol value is listed
instead.
15.2. Linker Map File Format
The linker map file is an additional output file of the linker that shows how the linker has mapped the
sections and symbols from the various object files (.obj) to output sections. The locate part shows the
absolute position of each section. External symbols are listed per space with their absolute address, both
sorted on symbol and sorted on address. For details on how to generate a map file, see Section 8.9,
Generating a Map File.
With the linker option --map-file-format you can specify which parts of the map file you want to see.
In Eclipse the linker map file (project.mapxml) is generated in the output directory of the build configuration,
usually Debug or Release. You can open the map file by double-clicking on the file name.
814
List File Formats
Each page displays a part of the map file. You can use the drop-down list or the Outline view to navigate
through the different tables and you can use the following buttons.
Icon
Action
Description
Back
Goes back one page in the history list.
Forward
Goes forward one page in the history list.
Next Table
Shows the next table from the drop-down list.
Previous Table
Shows the previous table from the drop-down list.
When you right-click in the view, a popup menu appears (for example, to reset the layout of a table). The
meaning of the different parts is:
Tool and Invocation
This part of the map file contains information about the linker, its version header information, binary
location and which options are used to call it.
Used Resources
This part of the map file shows the memory usage at memory level and space level. The largest free
block of memory (Largest gap) is also shown. This part also contains an estimation of the stack usage.
Explanation of the columns:
Memory
The names of the system memory and user memory as defined in the linker script
file (*.lsl).
815
TASKING VX-toolset for ARM User Guide
Code
The size of all executable sections.
Data
The size of all non-executable sections (not including stacks, heaps, debug sections
in non-alloc space).
Reserved
The total size of reserved memories, reserved ranges, reserved special sections,
stacks, heaps, alignment protections, sections located in non-alloc space (debug
sections). In fact, this size is the same as the size in the Total column minus the
size of all other columns.
Free
The free memory area addressable by this core. This area is accessible for
unrestricted items.
Total
The total memory area addressable by this core.
Space
The names of the address spaces as defined in the linker script file (*.lsl). The
names are constructed of the derivative name followed by a colon ':', the core
name, another colon ':' and the space name. For example: ARM:ARM:linear.
Native used ...
The size of sections located in this space.
Foreign used
The size of all sections destined for/located in other spaces, but because of overlap
in spaces consume memory in this space.
Stack Name
The name(s) of the stack(s) as defined in the linker script file (*.lsl).
Used
An estimation of the stack usage. The linker calculates the required stack size by
using information (.CALLS directives) generated by the compiler. If for example
recursion is detected, the calculated stack size is inaccurate, therefore this is an
estimation only. The calculated stack size is supposed to be smaller than the actual
allocated stack size. If that is not the case, then a warning is given.
Processed Files
This part of the map file shows all processed files. This also includes object files that are extracted from
a library, with the symbol that led to the extraction.
Link Result
This part of the map file shows per object file how the link phase has mapped the sections from the various
object files (.obj) to output sections.
[in] File
The name of an input object file.
[in] Section
A section name and id from the input object file. The number between '( )' uniquely
identifies the section.
[in] Size
The size of the input section.
[out] Offset
The offset relative to the start of the output section.
[out] Section
The resulting output section name and id.
[out] Size
The size of the output section.
816
List File Formats
Module Local Symbols
This part of the map file shows a table for each local scope within an object file. Each table has three
columns, 1 the symbol name, 2 the address of the symbol and 3 the space where the symbol resides in.
The table is sorted on symbol name within each space.
By default this part is not shown in the map file. You have to turn this part on manually with linker option
--map-file-format=+statics (module local symbols).
Cross References
This part of the map file lists all symbols defined in the object modules and for each symbol the object
modules that contain a reference to the symbol are shown. Also, symbols that remain undefined are
shown.
Call Graph
This part of the map file contains a schematic overview that shows how (library) functions call each other.
To obtain call graph information, the assembly file must contain .CALLS directives.
You can click the + or - sign to expand or collapse a single node. Use the
all nodes in the call graph.
Icon
/
buttons to expand/collapse
Meaning
Description
Root
This function is the top of the call graph. If there are interrupt handlers, there
can be several roots.
Callee
This function is referenced by several No leaf functions. Right-click on the
function and select Expand all References to see all functions that
reference this function. Select Back to Caller to return to the calling function.
Node
A normal node (function) in the call graph.
Caller
This function calls a function which is listed separately in the call graph.
Right-click on the function and select Go to Callee to see the callee. Hover
the mouse over the function to see a popup with all callees.
Overlay
This part is empty for the ARM.
Locate Result: Sections
This part of the map file shows the absolute position of each section in the absolute object file. It is
organized per memory chip and group and sorted on space address. In Eclipse, right-click in the table
and select Configure Columns to specify which columns you want to see. If you hover the mouse over
a section, you get a popup with information about the section. If you select a range of sections, in the
Fast View bar (at the bottom) you will see information about the selected range, such as the total size,
how many sections are selected and how many gaps are present.
817
TASKING VX-toolset for ARM User Guide
#
The line number and default sort order.
Section
Section name
Section number
The name and id of the section. The number between '( )' uniquely identifies the
section. Names within square brackets [ ] will be copied during initialization from
ROM to the corresponding section name in RAM.
Sect. size (hex)
Sect. size (dec)
The size of the section in minimum addressable units (hexadecimal or decimal).
Group
Sections can be ordered in groups. These are the names of the groups as defined
in the linker script file (*.lsl) with the keyword group in the section_layout
definition. The name that is displayed is the name of the deepest nested group.
Start address
The first address of the section in the address space.
End address
The last address of the section in the address space.
Symbols in sect.
The names of the external symbols that are referenced in the section. See Locate
Result: Symbols below.
Defined in
The names of the input modules the section is defined in. See Link Result: [in]
File above.
Referenced in
The names of the modules that contain a reference to the section. See Cross
References above.
Chip name
The names of the memory chips as defined in the linker script file (*.lsl) in the
memory definitions.
Chip addr
The absolute offset of the section from the start of a memory chip.
Locate
type:properties
The locate rule type and properties. See Locate Rules below.
The following buttons are available in this part of the map file.
Icon
Action
Description
Configure Section Opens the Configure Section Filter dialog. Here you can select which
Filter
sections you want to see in the map file and how.
Enable
Highlighting
All sections that are marked with ”Highlight" in the Configure Section Filter
dialog will be highlighted in the table.
Enable Collapsing
All sections that are marked with ”Collapse" in the Configure Section Filter
dialog will appear collapsed in the table.
Only Show
Matching Lines
All lines that are not part of the selection in the Configure Section Filter
dialog will be hidden.
Show Gaps
Also shows the gaps in the map file. Click the button again to hide the gaps.
Configure Section Filter Dialog
In this dialog you can filter which sections you want to see in the map file and how. Click Add to add a
new filter. Explanation of the columns and fields:
Highlight
818
Marks the section as a candidate for highlighting. Turn on Enable Highlighting
to see the effect.
List File Formats
Color
The highlight color.
Collapse
Marks the section as a candidate for collapsing. Turn on Enable Collapsing to
see the effect.
Section name
A filter to select a section or group of sections. Wildcards are allowed. Wildcards
follow the rules of regular expressions. To get help on which wildcards are
supported, press Ctrl-space. Click an item in the list for help, double-click to add
the wildcard.
Start address
The first address of the section in the address space for this filter.
End address
The last address of the section in the address space for this filter.
Address space
The name of the address space.
Chip name
The name of the memory chip as defined in the linker script file (*.lsl) in the
memory definitions.
Hide gaps smaller
than
If gaps are shown in the map file, here you can limit the number of gaps you want
to see.
The meaning of the check boxes is the same as the corresponding buttons available in this part of the
map file.
Locate Result: Symbols
This part of the map file lists all external symbols per address space name.
Address
The absolute address of the symbol in the address space.
Name
The name of the symbol.
Space
The names of the address spaces as defined in the linker script file (*.lsl). The
names are constructed of the derivative name followed by a colon ':', the core
name, another colon ':' and the space name. For example: ARM:ARM:linear.
Processor and Memory
This part of the map file shows the processor and memory information of the linker script file.
By default this part is not shown in the map file. You have to turn this part on manually with linker option
--map-file-format=+lsl (processor and memory info).You can print this information to a separate file with
linker option --lsl-dump.
You can click the + or - sign to expand or collapse a part of the information.
Locate Rules
This part of the map file shows the rules the linker uses to locate sections.
Address space
The names of the address spaces as defined in the linker script file (*.lsl). The
names are constructed of the derivative name followed by a colon ':', the core
name, another colon ':' and the space name.
819
TASKING VX-toolset for ARM User Guide
Type
The rule type:
ordered/contiguous/clustered/unrestricted
Specifies how sections are grouped. By default, a group is 'unrestricted' which
means that the linker has total freedom to place the sections of the group in the
address space.
absolute
The section must be located at the address shown in the Properties column.
ranged
The section must be located anywhere in the address ranges shown in the
Properties column; end addresses are not included in the range.
page
The sections must be located in some address range with a size not larger than
shown in the Properties column; the first number is the page size, the second part
is the address range restriction within the page.
ranged page
Both the ranged and the paged restriction apply. In the Properties column the
range restriction is listed first, followed by the paged restriction between parenthesis.
ballooned
After locating all sections, the largest remaining gap in the space is used completely
for the stack and/or heap.
Properties
The contents depends on the Type column.
Prio
The locate priority of the rule. A higher priority value gives a rule precedence over
a rule with a lower priority, but only if the two rules have the same type and the
same properties.The relative order of rules of different types or different properties
is not affected by this priority value. You can set the priority with the priority
group attribute in LSL
Sections
The sections to which the rule applies;
restrictions between sections are shown in this column:
<
|
+
ordered
contiguous
clustered
For contiguous sections, the linker uses the section order as shown here. Clustered
sections can be located in any relative order.
820
List File Formats
Removed Sections
This part of the map file shows the sections which are removed from the output file as a result of the
optimization option to delete unreferenced sections and or duplicate code or constant data (linker option
--optimize=cxy).
Section
The name of the section which has been removed.
File
The name of the input object file where the section is removed from.
Library
The name of the library where the object file is part of.
Symbol
The symbols that were present in the section.
Reason
The reason why the section has been removed. This can be because the section
is unreferenced or duplicated.
821
TASKING VX-toolset for ARM User Guide
822
Chapter 16. Object File Formats
This chapter describes the format of several object files.
16.1. ELF/DWARF Object Format
The TASKING VX-toolset for ARM by default produces objects in the ELF/DWARF 3 format.
For a complete description of the ELF format, please refer to the Tool Interface Standard (TIS).
For a complete description of the DWARF format, please refer to the DWARF Debugging Information
Format Version 3. See http://dwarfstd.org/
16.2. Intel Hex Record Format
Intel Hex records describe the hexadecimal object file format for 8-bit, 16-bit and 32-bit microprocessors.
The hexadecimal object file is an ASCII representation of an absolute binary object file. There are six
different types of records:
• Data Record (8-, 16, or 32-bit formats)
• End of File Record (8-, 16, or 32-bit formats)
• Extended Segment Address Record (16, or 32-bit formats)
• Start Segment Address Record (16, or 32-bit formats)
• Extended Linear Address Record (32-bit format only)
• Start Linear Address Record (32-bit format only)
To generate an Intel Hex output file:
1.
From the Project menu, select Properties for
The Properties dialog appears.
2.
In the left pane, expand C/C++ Build and select Settings.
In the right pane the Settings appear.
3.
On the Tool Settings tab, select Linker » Output Format.
4.
Enable the option Generate Intel Hex format file.
5.
(Optional) Specify the Size of addresses (in bytes) for Intel Hex records.
6.
(Optional) Enable or disable the optionEmit start address record.
By default the linker generates records in the 32-bit format (4-byte addresses).
823
TASKING VX-toolset for ARM User Guide
General Record Format
In the output file, the record format is:
:
length
offset
type
content
checksum
where:
:
is the record header.
length
is the record length which specifies the number of bytes of the content field. This
value occupies one byte (two hexadecimal digits). The linker outputs records of
255 bytes (32 hexadecimal digits) or less; that is, length is never greater than 0xFF.
offset
is the starting load offset specifying an absolute address in memory where the
data is to be located when loaded by a tool. This field is two bytes long. This field
is only used for Data Records. In other records this field is coded as four ASCII
zero characters ('0000').
type
is the record type. This value occupies one byte (two hexadecimal digits). The
record types are:
Byte Type Record Type
00
Data
01
End of file
02
Extended segment address (not used)
03
Start segment address (not used)
04
Extended linear address (32-bit)
05
Start linear address (32-bit)
content
is the information contained in the record. This depends on the record type.
checksum
is the record checksum. The linker computes the checksum by first adding the
binary representation of the previous bytes (from length to content). The linker
then computes the result of sum modulo 256 and subtracts the remainder from
256 (two's complement). Therefore, the sum of all bytes following the header is
zero.
824
Object File Formats
Extended Linear Address Record
The Extended Linear Address Record specifies the two most significant bytes (bits 16-31) of the absolute
address of the first data byte in a subsequent Data Record:
:
02
0000
04
upper_address
checksum
The 32-bit absolute address of a byte in a Data Record is calculated as:
( address + offset + index ) modulo 4G
where:
address
is the base address, where the two most significant bytes are the upper_address
and the two least significant bytes are zero.
offset
is the 16-bit offset from the Data Record.
index
is the index of the data byte within the Data Record (0 for the first byte).
Example:
:0200000400FFFB
| |
| |
|_ checksum
| |
| |_ upper_address
| |
|_ type
| |_ offset
|_ length
Data Record
The Data Record specifies the actual program code and data.
:
length
offset
00
data
checksum
The length byte specifies the number of data bytes. The linker has an option (--hex-record-size) that
controls the length of the output buffer for generating Data records. The default buffer length is 32 bytes.
The offset is the 16-bit starting load offset. Together with the address specified in the Extended Address
Record it specifies an absolute address in memory where the data is to be located when loaded by a tool.
Example:
:0F00200000232222754E00754F04AF4FAE4E22C3
| |
| |
|_ checksum
| |
| |_ data
| |
|_ type
| |_ offset
|_ length
825
TASKING VX-toolset for ARM User Guide
Start Linear Address Record
The Start Linear Address Record contains the 32-bit program execution start address.
:
04
0000
05
address
checksum
With linker option --hex-format=S you can prevent the linker from emitting this record.
Example:
:0400000500FF0003F5
| |
| |
|_ checksum
| |
| |_ address
| |
|_ type
| |_ offset
|_ length
End of File Record
The hexadecimal file always ends with the following end-of-file record:
:00000001FF
| |
| |_ checksum
| |
|_ type
| |_ offset
|_ length
16.3. Motorola S-Record Format
To generate a Motorola S-record output file:
1.
From the Project menu, select Properties for
The Properties dialog appears.
2.
In the left pane, expand C/C++ Build and select Settings.
In the right pane the Settings appear.
3.
On the Tool Settings tab, select Linker » Output Format.
4.
Enable the option Generate S-records file.
5.
(Optional) Specify the Size of addresses (in bytes) for Motorola S records.
By default, the linker produces output in Motorola S-record format with three types of S-records (4-byte
addresses): S0, S3 and S7. Depending on the size of addresses you can force other types of S-records.
They have the following layout:
826
Object File Formats
S0 - record
S0
length
0000
comment
checksum
A linker generated S-record file starts with an S0 record with the following contents:
l k a r m
S00800006C6B61726DE0
The S0 record is a comment record and does not contain relevant information for program execution.
where:
S0
is a comment record and does not contain relevant information for program
execution.
length
represents the number of bytes in the record, not including the record type and
length byte. This value occupies one byte (two hexadecimal digits).
comment
contains the name of the linker.
checksum
is the record checksum. The linker computes the checksum by first adding the
binary representation of the bytes following the record type (starting with the length
byte) to just before the checksum. Then the one's complement is calculated of this
sum. The least significant byte of the result is the checksum. The sum of all bytes
following the record type is 0xFF.
S1 / S2 / S3 - record
This record is the program code and data record for 2-byte, 3-byte or 4-byte addresses respectively.
S1
length
address
code bytes
checksum
S2
length
address
code bytes
checksum
S3
length
address
code bytes
checksum
where:
S1
is the program code and data record for 2-byte addresses.
S2
is the program code and data record for 3-byte addresses.
S3
is the program code and data record for 4-byte addresses (this is the default).
length
represents the number of bytes in the record, not including the record type and
length byte. This value occupies one byte (two hexadecimal digits).
address
contains the code or data address.
code bytes
contains the actual program code and data.
checksum
is the record checksum. The checksum calculation is identical to S0.
827
TASKING VX-toolset for ARM User Guide
Example:
S3070000FFFE6E6825
| |
|
|_ checksum
| |
|_ code
| |_ address
|_ length
S7 / S8 / S9 - record
This record is the termination record for 4-byte, 3-byte or 2-byte addresses respectively.
S7
length
address
checksum
S8
length
address
checksum
S9
length
address
checksum
where:
S7
is the termination record for 4-byte addresses (this is the default). S7 is the
corresponding termination record for S3 records.
S8
is the termination record for 3-byte addresses. S8 is the corresponding termination
record for S2 records.
S9
is the termination record for 2-byte addresses. S9 is the corresponding termination
record for S1 records.
length
represents the number of bytes in the record, not including the record type and
length byte. This value occupies one byte (two hexadecimal digits).
address
contains the program start address.
checksum
is the record checksum. The checksum calculation is identical to S0.
Example:
S70500000000FA
| |
|_checksum
| |_ address
|_ length
828
Chapter 17. Linker Script Language (LSL)
To make full use of the linker, you can write a script with information about the architecture of the target
processor and locating information.The language for the script is called the Linker Script Language (LSL).
This chapter first describes the structure of an LSL file. The next section contains a summary of the LSL
syntax. In the remaining sections, the semantics of the Linker Script Language is explained.
The TASKING linker is a target independent linker/locator that can simultaneously link and locate all
programs for all cores available on a target board. The target board may be of arbitrary complexity. A
simple target board may contain one standard processor with some external memory that executes one
task. A complex target board may contain multiple standard processors and DSPs combined with
configurable IP-cores loaded in an FPGA. Each core may execute a different program, and external
memory may be shared by multiple cores.
LSL serves two purposes. First it enables you to specify the characteristics (that are of interest to the
linker) of your specific target board and of the cores installed on the board. Second it enables you to
specify how sections should be located in memory.
17.1. Structure of a Linker Script File
A script file consists of several definitions. The definitions can appear in any order.
The architecture definition (required)
In essence an architecture definition describes how the linker should convert logical addresses into
physical addresses for a given type of core. If the core supports multiple address spaces, then for each
space the linker must know how to perform this conversion. In this context a physical address is an offset
on a given internal or external bus. Additionally the architecture definition contains information about items
such as the (hardware) stack and the vector table.
This specification is normally written by Altium. Altium supplies LSL files in the include.lsl directory.
The architecture definition of the LSL file should not be changed by you unless you also modify the core's
hardware architecture. If the LSL file describes a multi-core system an architecture definition must be
available for each different type of core.
See Section 17.4, Semantics of the Architecture Definition for detailed descriptions of LSL in the architecture
definition.
The derivative definition
The derivative definition describes the configuration of the internal (on-chip) bus and memory system.
Basically it tells the linker how to convert offsets on the buses specified in the architecture definition into
offsets in internal memory. Microcontrollers and DSPs often have internal memory and I/O sub-systems
apart from one or more cores. The design of such a chip is called a derivative.
When you build an ASIC or use a derivative that is not (yet) supported by the TASKING tools, you may
have to write a derivative definition.
829
TASKING VX-toolset for ARM User Guide
When you want to use multiple cores of the same type, you must instantiate the cores in a derivative
definition, since the linker automatically instantiates only a single core for an unused architecture.
See Section 17.5, Semantics of the Derivative Definition for a detailed description of LSL in the derivative
definition.
The processor definition
The processor definition describes an instance of a derivative.Typically the processor definition instantiates
one derivative only (single-core processor). A processor that contains multiple cores having the same
(homogeneous) or different (heterogeneous) architecture can also be described by instantiating multiple
derivatives of the same or different types in separate processor definitions.
See Section 17.6, Semantics of the Board Specification for a detailed description of LSL in the processor
definition.
The memory and bus definitions (optional)
Memory and bus definitions are used within the context of a derivative definition to specify internal memory
and on-chip buses. In the context of a board specification the memory and bus definitions are used to
define external (off-chip) memory and buses. Given the above definitions the linker can convert a logical
address into an offset into an on-chip or off-chip memory device.
See Section 17.6.3, Defining External Memory and Buses, for more information on how to specify the
external physical memory layout. Internal memory for a processor should be defined in the derivative
definition for that processor.
The board specification
The processor definition and memory and bus definitions together form a board specification. LSL provides
language constructs to easily describe single-core and heterogeneous or homogeneous multi-core
systems.The board specification describes all characteristics of your target board's system buses, memory
devices, I/O sub-systems, and cores that are of interest to the linker. Based on the information provided
in the board specification the linker can for each core:
• convert a logical address to an offset within a memory device
• locate sections in physical memory
• maintain an overall view of the used and free physical memory within the whole system while locating
The section layout definition (optional)
The optional section layout definition enables you to exactly control where input sections are located.
Features are provided such as: the ability to place sections at a given load-address or run-time address,
to place sections in a given order, and to overlay code and/or data sections.
Which object files (sections) constitute the task that will run on a given core is specified on the command
line when you invoke the linker. The linker will link and locate all sections of all tasks simultaneously.
From the section layout definition the linker can deduce where a given section may be located in memory,
830
Linker Script Language (LSL)
form the board specification the linker can deduce which physical memory is (still) available while locating
the section.
See Section 17.8, Semantics of the Section Layout Definition, for more information on how to locate a
section at a specific place in memory.
Skeleton of a Linker Script File
architecture architecture_name
{
// Specification core architecture
}
derivative derivative_name
{
// Derivative definition
}
processor processor_name
{
// Processor definition
}
memory and/or bus definitions
section_layout space_name
{
// section placement statements
}
17.2. Syntax of the Linker Script Language
This section describes what the LSL language looks like. An LSL document is stored as a file coded in
UTF-8 with extension .lsl. Before processing an LSL file, the linker preprocesses it using a standard
C preprocessor. Following this, the linker interprets the LSL file using a scanner and parser. Finally, the
linker uses the information found in the LSL file to guide the locating process.
17.2.1. Preprocessing
When the linker loads an LSL file, the linker processes it with a C-style prepocessor. As such, it strips C
and C++ comments. You can use the standard ISO C preprocessor directives, such as #include,
#define, #if/#else/#endif, #error.
For example:
#include "arch.lsl"
Preprocess and include the file arch.lsl at this point in the LSL file.
831
TASKING VX-toolset for ARM User Guide
17.2.2. Lexical Syntax
The following lexicon is used to describe the syntax of the Linker Script Language:
A ::= B
=
A is defined as B
A ::= B C
=
A is defined as B and C; B is followed by C
A ::= B | C
=
A is defined as B or C
<B>0|1
=
zero or one occurrence of B
<B>>=0
=
zero of more occurrences of B
<B>>=1
=
one of more occurrences of B
IDENTIFIER
=
a character sequence starting with 'a'-'z', 'A'-'Z' or '_'. Following
characters may also be digits and dots '.'
STRING
=
sequence of characters not starting with \n, \r or \t
DQSTRING
=
" STRING " (double quoted string)
OCT_NUM
=
octal number, starting with a zero (06, 045)
DEC_NUM
=
decimal number, not starting with a zero (14, 1024)
HEX_NUM
=
hexadecima