1
TIMESTONE SOFTWARE
A division of Terra Australis Group
CapturePost
UserManual
CAPTUREPOST
User Manual
Terra Australis Group
www.timestonesoftware.com
T A B L E
O F
C O N T E N T S
Table of Contents
INTRODUCTION .................................................................................................................5
VERSION HISTORY............................................................................................................6
Version 2.7.0.....................................................................................................................................................................6
Version 2.6.0.....................................................................................................................................................................6
Version 2.5.0.....................................................................................................................................................................6
Version 2.4.0.....................................................................................................................................................................6
Version 2.3.0.....................................................................................................................................................................6
Version 2.2.0.....................................................................................................................................................................6
Version 2.1.0 Major upgrade release................................................................................................................................6
WHO USES CAPTUREPOST?...........................................................................................7
KEY FEATURES AND FUNCTIONS OF CAPTUREPOST................................................7
Simple one screen interface..............................................................................................................................................7
Images named with subject ID as part of the filename....................................................................................................7
Ability to add new subjects "on the fly" ..........................................................................................................................7
Ability to edit subject details "on the fly" .......................................................................................................................7
Print ID Cards and small items (option)...........................................................................................................................7
Aspect ratio guides............................................................................................................................................................7
On Screen reports..............................................................................................................................................................7
Color Management ...........................................................................................................................................................8
SYSTEM REQUIREMENTS ................................................................................................8
INSTALLING CAPTUREPOST ...........................................................................................9
The USB Hardlock.............................................................................................................................................................9
To install the program:......................................................................................................................................................9
To run the program ...........................................................................................................................................................9
Before your hardlock expires ...........................................................................................................................................9
Renewing your hardlock:..................................................................................................................................................9
GETTING TO KNOW CAPTUREPOST ............................................................................10
THE INTERFACE ..............................................................................................................10
1
T A B L E
O F
C O N T E N T S
THE TIMESTONE NEO JOB FILE....................................................................................11
THE CAPTURED IMAGE FILES.......................................................................................12
The images folder .............................................................................................................................................................12
Opening a job file in DataPost or the “Neo” applications...........................................................................................12
SETTING UP CAPTUREPOST .........................................................................................12
The CapturePost setup window......................................................................................................................................13
Bitmap quality.................................................................................................................................................................13
Aspect ratio guides..........................................................................................................................................................13
New image sound............................................................................................................................................................13
Camera problem sound ...................................................................................................................................................14
Rotate and mirror ............................................................................................................................................................14
Apply LUT......................................................................................................................................................................14
Sharpening ......................................................................................................................................................................14
Deselect image after getting another subject .................................................................................................................14
Provide feedback for scanned images ............................................................................................................................14
Image file prefix..............................................................................................................................................................14
ID card printing ...............................................................................................................................................................14
Printer..............................................................................................................................................................................14
Template..........................................................................................................................................................................14
Print manually or automatically .....................................................................................................................................14
WORKING WITH CAPTUREPOST...................................................................................15
SAMPLE WORKFLOW .....................................................................................................15
Prior to photography day ................................................................................................................................................15
CapturePost on photography day .................................................................................................................................15
After photography day....................................................................................................................................................16
FINDING SUBJECTS ........................................................................................................16
Keyboard entry ................................................................................................................................................................17
Barcode Entry...................................................................................................................................................................17
ADDING NEW SUBJECTS ...............................................................................................17
ENTERING ORDERS ........................................................................................................18
To order retouching ........................................................................................................................................................18
FOLDERS ..........................................................................................................................19
TAKING PHOTOS .............................................................................................................20
Multiple images for the one subject ...............................................................................................................................20
2
T A B L E
O F
C O N T E N T S
The primary or main image ............................................................................................................................................21
Changing the primary image ..........................................................................................................................................21
Discarding images ............................................................................................................................................................21
Incorrectly matched images............................................................................................................................................21
Matching an image to a folder........................................................................................................................................22
PRINTING ID CARDS .......................................................................................................22
Setting up ID Card printing ............................................................................................................................................22
Printing the ID cards automatically................................................................................................................................23
Printing manually............................................................................................................................................................23
EXPORTING THE IMAGES ..............................................................................................23
REPORTS..........................................................................................................................24
Check images report ........................................................................................................................................................24
Unphotographed subjects report ...................................................................................................................................25
APPENDIX.........................................................................................................................26
SUPPORTED CAMERAS .................................................................................................26
Fuji S1................................................................................................................................................................................26
Shooting driver ...............................................................................................................................................................26
Setting the image size .....................................................................................................................................................26
Fuji S2................................................................................................................................................................................26
Shooting driver ...............................................................................................................................................................26
Beware flat batteries .......................................................................................................................................................27
Setting the image resolution ...........................................................................................................................................27
Canon EOS Driver...........................................................................................................................................................27
Supported camera models...............................................................................................................................................27
ACDSee ..........................................................................................................................................................................27
RAW vs JPEG modes.....................................................................................................................................................27
Using RAW mode with the 300D ..................................................................................................................................28
Troubleshooting ..............................................................................................................................................................28
Kodak DCS 5xx/6xx driver .............................................................................................................................................28
Kodak DCS Pro 7xx / Pro Back / 14n drivers...............................................................................................................28
Important message for 14N users:..................................................................................................................................28
Nikon camera drivers ......................................................................................................................................................29
The hotfolder driver ........................................................................................................................................................29
SHOOT CARD AND ORDER BARCODES ......................................................................29
3
T A B L E
O F
C O N T E N T S
Subject identification ......................................................................................................................................................29
Order information ...........................................................................................................................................................30
Examples of order information barcodes .......................................................................................................................30
Ordering retouching for a subject...................................................................................................................................31
Erasing orders .................................................................................................................................................................31
Scanning item designs independently of layouts ...........................................................................................................31
Entering data automatically into a field by scanning a barcode ....................................................................................31
POSE BARCODES ...........................................................................................................32
The assign pose barcode .................................................................................................................................................32
Combining an order and pose barcode...........................................................................................................................33
MISCELLANEOUS BARCODES ......................................................................................33
Save barcode ...................................................................................................................................................................33
Print barcode ...................................................................................................................................................................33
Shoot barcode..................................................................................................................................................................33
FREQUENTLY ASKED QUESTIONS...............................................................................34
Q. Do I need DataPost? ...................................................................................................................................................34
Q. My lab doesn’t have any Timestone programs. Can I still use CapturePost?.....................................................34
Q. Which cameras can be used?.....................................................................................................................................34
Q. Can I still use CapturePost if I don’t get data before the shoot? ..........................................................................34
Q. Can I edit the images from within CapturePost?....................................................................................................34
Q. My camera is listed but it still does not work with CapturePost. What gives? ...................................................34
Q. How can I find out if someone was photographed earlier in the day? .................................................................34
4
1
Chapter
I N T R O D U C T I O N
Introduction
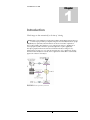
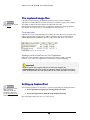
Match images to data automatically at the time of shooting.
C
apturePost is an application used by photographers. With a digital camera tethered
to either a laptop or desktop computer, images are automatically matched to people
(subjects). Optionally order information can also be entered into CapturePost.
Prior to photography, either DataPost or one of the professional “Neo” applications is
used to prepare a job file. This file is opened by CapturePost on photography day.
After photography, further work can be done with either the data or images in, say,
DataPost before moving on to one of the professional series "Neo" applications. If order
information has already been entered, the Neo applications will be able to automatically
prepare the orders for each subject.
FIGURE 1.1 The CapturePost system chart
5
I N T R O D U C T I O N
Version History
Below is a version history of the most recent updates. Since updates are released on a
regular basis it is recommended the user check the Timestone Software website
frequently.
Version 2.7.0
Added pose option to order barcodes
Allowed /% barcodes to be chained together
Version 2.6.0
New Olympus E1 camera driver added
Original camera file now preserved (won’t re-jpeg the jpeg)
Version 2.5.0
Ability to scan a data barcode, thereby adding data automatically to a
field
Version 2.4.0
Option to print ID cards and other small items
Finding previously photographed subject returns the subject's
primary image
Version 2.3.0
Ability to scan item design barcodes independently of layouts
Version 2.2.0
Audible notification of any communication problem with camera
Ability to specify a prefix for image file names
Version 2.1.0 Major upgrade release
Sizeable window including larger preview image
Flag a subject's images for retouching
On-screen report of un-photographed subjects
On-screen report checking for missing or corrupt images
Large graphical feedback when an order barcode is scanned
Larger iconic representation of a subject's order
Audible notification when an image has been matched
Item designs can also be included in order barcodes
6
I N T R O D U C T I O N
Who uses CapturePost?
CapturePost is used by any photographer wishing to automatically link images to data at
the time of photography. This data can be nothing more than a unique identifier such as
an ID number or it can be a complete set of data held in user defined fields.
As such CapturePost is particularly suited to:
School photographers
Sports photographers
Event photographers
Catalogue and product photographers
Key features and functions of CapturePost
The primary purpose of CapturePost is to capture images from a tethered digital camera
and match these images to subject data and, optionally, order information. In doing so
CapturePost provides the following features and functions.
Simple one screen interface
CapturePost has been deliberately designed to be as simple as possible in order to avoid
unnecessary complications during photography. To this end CapturePost interfaces with
the user via a single uncluttered screen.
Images named with subject ID as part of the filename
All images are saved with the subject ID as part of the image's filename. In this way images
can always be linked back to data. For easy reference, images are saved in a folder relative
to job file. This folder is created automatically by CapturePost.
Ability to add new subjects "on the fly"
Should a subject not be present in the job file, they can be added to the database at the
time of photography. Furthermore CapturePost gives the user the ability to allocate this
new subject to a specific folder
Ability to edit subject details "on the fly"
CapturePost provides the ability to edit the subject's data at the time of photography. This
is useful if for example names had been misspelled in the original data.
Print ID Cards and small items (option)
CapturePost Version 2.4.0 introduced the option of "Instant-ID" printing, allowing the
user to print ID cards and other small items at the time of shooting.
Aspect ratio guides
CapturePost allows the user to define aspect ratio guidelines. These guides can be
displayed on the preview image to give the photographer a cropping guide.
On Screen reports
CapturePost provides the user two on-screen reports.
7
I N T R O D U C T I O N
The "unphotographed subjects" report lists any subjects who have not yet been
photographed.
The "check images report" checks for any missing or corrupted image files for subjects
who have been photographed
Color Management
CapturePost supports ICC color management
System Requirements
The following hardware requirements should be seen as a guide only.
Windows 2000, Windows XP or later
Pentium P4 CPU at 2.40GHz
80Gb Hard Drive
512MB RAM
CD or DVD ROM drive
Sufficient USB and Firewire ports to run peripheral devices
Note
CapturePost requires a USB Hardlock in order to operate. Most barcode scanners are
also USB devices, as are many pointing devices (mouse). Digital cameras will also
require either a USB or Firewire port. It is important to take all these requirements into
consideration before purchasing a laptop
8
I N T R O D U C T I O N
Installing CapturePost
CapturePost will only run on Windows 2000 and XP machines. It will not run correctly on
Windows 9x and Windows ME and therefore Timestone Software does not support
installations on these platforms.
The USB Hardlock
CapturePost is protected by USB hardlocks. You will receive a USB hardlock for each copy
of CapturePost you purchase. The hardlock needs to be plugged into the computer’s USB
port while you are running the program.
To install the program:
Visit the Timestone Software website support pages to download the
CapturePost installer to a temporary location such as your desktop
Run the installer
Follow the installation wizard to install the program
To run the program
Ensure the CapturePost USB hardlock is plugged into the computer
Use your computer’s Start Menu to launch the CapturePost
You may also use My Computer, Windows Explorer or your favourite file
browser to launch the programs
Before your hardlock expires:
Each hardlock has a unique number. You can check your hardlock number
from the Help menu. (Help>About). You may need to quote your hardlock
number when it is time to renew your subscription.
In most cases your hardlock will expire in 12 months. You can check when
your hardlock expires from the program’s Help menu. (Help>Hardlock
expiry)
You will be notified by us prior to your hardlock expiring. You will be given
the option to renew your subscription.
If you choose to renew your subscription an extend code will be sent to you
for your hardlock
Renewing your hardlock:
Ensure the correct USB hardlock is plugged into the computer
Start CapturePost
Go to the Help Menu and select Hardlock Expiry.
Enter the extend code that has been sent to you.
9
G E T T I N G
T O
K N O W
C A P T U R E P O S T
2
Chapter
Getting to know
CapturePost
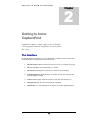
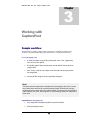
CapturePost employs a simple, single screen user interface.
All the program’s functions and features are accessed from
this screen.
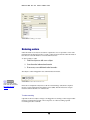
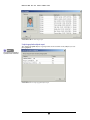
The Interface
Broadly speaking the CapturePost screen is divided into a number of areas: Each of these
areas will be discussed in detail in the relevant sections
1.
The menu items: Pull down menus allow the user access to a number of features.
2.
The “Get” section: Is used to find subjects or folders
3.
The “Details” area: Displays the data for the currently selected subject
4.
Order information: Is displayed with icons if orders have been scanned for the
currently displayed subject
5.
Camera status: Displays when the camera is ready, disconnected, busy etc
6.
Image preview area: Shows the image just photographed.
7.
Thumbnails: A row of thumbnails shows the previously photographed subjects
10
G E T T I N G
T O
K N O W
C A P T U R E P O S T
Menu items
Camera status
The Get section
Image preview
The Details area
Thumbnails
Order information
FIGURE 2.1 The CapturePost user interface.
The Timestone Neo Job file
Central to CapturePost, DataPost and the "Neo" applications is the Timestone Neo Job file
or tnj.
The job file contains information regarding:
For more information on
preparing a job file see the
DataPost Quick Start Guide.
•
Details (data) of the people being photographed (subjects). This data is organized into
a subject database using user defined fields. Furthermore the data can be arranged
into folders
•
Images for each subject
•
Matching information that relates the images to the subjects
•
Order information describing each subject's order
•
CapturePost uses a pre existing job file - it cannot create a job file itself. The job file
can be prepared in DataPost or one of the professional "Neo" applications prior to
being opened in CapturePost. Once CapturePost has finished with the job file, the job
file is opened again by either DataPost or one of the professional series "Neo"
applications.
11
G E T T I N G
T O
K N O W
C A P T U R E P O S T
The captured image files
Supported cameras are listed
in the Appendix
CapturePost works with jpegs. With digital cameras for which a driver is available,
CapturePost reads data directly from the camera sensor and writes a jpeg to the computer.
The quality (compression) of the jpeg may be adjusted in the setup.
When using the Hotfolder Camera Source, CapturePost makes use of jpegs captured via
the camera's shooting software or some third party shooting software.
The images folder
CapturePost stores the captured images in a folder in the same directory as the tnj file. The
folder is automatically created when a job file is opened in CapturePost and is named
jobname#images where jobname is the name of the job file without the .tnj extension
FIGURE 2.2 The job file and images folder
Opening a job file in DataPost or the “Neo” applications
When the user has finished working in CapturePost the job file is usually opened in
DataPost or one of the “Neo” applications for further processing and printing.
Important!
DataPost and the Neo programs will know to look for the images in the
jobname#images folder when printing. It is therefore vital the job file and the images
folder are always kept in the same path relative to each other and neither is re-named..
Setting up CapturePost
If you don’t see your camera
listed or cannot get
CapturePost to work with
your camera, make sure to
read the Supported Cameras
section of the Appendix
After starting CapturePost it is necessary to open the job file and select the digital camera.
1. Start CapturePost and open a pre-existing job file File>Open
2. Select your digital camera from the setup window File>Setup
The setup window allows the user to set other options.
12
G E T T I N G
T O
K N O W
C A P T U R E P O S T
The CapturePost setup window
Bitmap quality
Be aware quality setting 1 gives
lossless jpegs - a format not
supported by some other image
editors including Adobe
Photoshop™.
CapturePost outputs jpeg image files. The degree of compression (quality) of these files
can be controlled with the Output bitmap quality slider. Twenty quality levels are
available. Move the slider to the left to increase bitmap quality (minimum compression).
Move the slider to the right to decrease bitmap quality (maximum compression).
Aspect ratio guides
Lines may be superimposed over CapturePost's preview image to give the photographer a
guide to any future cropping. For example if the final images will be used in the 4:5 aspect,
the user can define this ratio in CapturePost and make sure the important area of the
subjects fall between the guide lines on the preview image.
New image sound
CapturePost can play back an audible notification when an image has been captured and
matched and it is safe to scan the next subject's barcode (or find a subject via the keyboard
or enter a new subject). To activate this feature check the "New image sound" box and
browse for a sound to be played.
13
G E T T I N G
T O
K N O W
C A P T U R E P O S T
Camera problem sound
Standard Windows sound files
are stored in c:\windows\media.
Ping.wav and ding.wav aere
good examples.
Be sure to choose a sound that
is not too long.
CapturePost can play back an audible notification if the communication between the
camera and laptop is broken eg USB or Firewire cable is disconnected. To activate this
feature check the "Camera problem sound" box and browse for a sound to be played.
Rotate and mirror
If necessary the images may be rotated after capture in 90 degree increments. They may
also be flipped along their vertical and horizontal axis.
Apply LUT
CapturePost allows the user to use LUT (Look up table) values. However with modern
Color Management Systems now available LUTs are considered redundant.
Sharpening
A sharpening algorithm can be applied to the images in CapturePost. It is important to
note that this sharpening is only applied to the images when they are printed or exported
allowing the user to alter the sharpening at any stage of the workflow prior to printing or
export. In this way the original files are never altered.
Deselect image after getting another subject
If the “Deselect image…” option
is checked, finding a previously
photographed subject will only
show the subject’s data – not
their image.
If so desired the user may elect to have the main preview area return to blank whenever a
subject is scanned or entered. The alternative is for the main preview image to remain on
screen until the next photo is taken.
Provide feedback for scanned images
Checking this option causes CapturePost to display a large iconic representation whenever
a barcode is scanned
Image file prefix
CapturePost will automatically number the images with a unique number that
incorporates the subject's ID (unique field). The images can also be prefixed with alphanumeric characters by entering the prefix in the Image file prefix box.
ID card printing
With the advent of Version 2.4.0 users may elect to purchase CapturePost with a printing
option. This allows the user to print ID cards and other small items directly through
CapturePost at the time of shooting. A further set of options will then need to be set in the
setup.
Printer
Select the printer that will be used for printing. The properties button opens the printer
driver dialogue allowing the user to set a number of printer options.
Template
The template needs to be
designed in either DataPost or
NeoPack/Professional. It must
be a “Fixed size item” template..
All products printed through Timestone Software require a template. Browse and select
the template to be used for printing
Print manually or automatically
The user may elect to have CapturePost automatically begin printing after a given time
interval as each subject is photographed. Alternatively the user may disable automatic
printing and trigger printing manually with the F10 key.
14
W O R K I N G
W I T H
C A P T U R E P O S T
3
Chapter
Working with
CapturePost
Sample workflow
The following is a sample workflow using CapturePost. It should be noted that other
workflows are possible depending on the circumstances of each job and each user.
Prior to photography day
1.
In either DataPost or one of the professional series "Neo" applications,
start and save a new job file
2.
If available, import subject details (data) into the job file. Ensure you have
a unique field
3.
Print "shoot" cards for each subject with a barcode containing data from
the unique field.
4.
Save the job file and give it to the CapturePost computer
Note
The above assumes subject data is available prior to photography day. If this is not the
case “blank” shoot cards can be used which merely contain a barcode with a unique
number and space to write down each subjects’ details. The data can be entered later in
either DataPost, one of the “Neo” programs or, time permitting, directly into CapturePost
at the shoot.
CapturePost on photography day
1.
Start CapturePost and open the job file created in DataPost
2.
Select your digital camera
15
W O R K I N G
W I T H
C A P T U R E P O S T
3.
Subject approaches the photographer and presents his or her shoot card
4.
Scan the subject identification barcode. This brings up the subject's data
on screen
5.
Optionally scan the subject's order information
6.
Optionally scan a retouching barcode
7.
Take the photo. CapturePost automatically matches the image to the
subject's data and order information
8.
Repeat until all subjects are photographed. Save the job file and close
CapturePost
Note
If using "blank" shoot cards, the subject ID barcode is still scanned which assigns a
unique ID to the subject. The remainder of the subject's details can be entered on site
(time permitting) or later in DataPost or one of the "Neo" applications.
After photography day
1.
Start DataPost or one of the professional series "Neo" applications.
2.
If necessary go to Images mode and perform any image editing (eg
cropping)
3.
The job file is now ready for printing with one of the professional series
"Neo" applications
Important!
As mentioned previously the above workflow is but one way of using CapturePost and
only shows a minimum of CapturePost's features. The Frequently Asked Questions in
the Appendix discuss some other workflows.
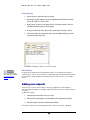
Finding subjects
Before taking a photo of a subject, it is necessary to find the subject in the database (or add
a new subject). This can be done either by keyboard entry or by scanning a barcode from a
shoot card.
If the subject has already been photographed finding the subject will display their data
together with their primary image. (However this function is inactive if "Deselect image
after getting another subject or folder" is selected in the setup)
16
W O R K I N G
W I T H
C A P T U R E P O S T
Keyboard entry
1.
Ensure Subject is selected in the Get section
2. Ensure the via field lookup is set to the appropriate field. This will usually
be the "ID" field or a "Name" field
3. Begin typing. Your entry will appear in the "find input window" and a list
of subjects matching your entry will appear
4. Using the arrow keys or the mouse select your subject then press "Enter"
5.
If necessary make any corrections to the data by double clicking on a field
and entering the correct data
FIGURE 3.1 Finding a subject via keyboard entry
Barcode Entry
Learn more about creating
shoot cards with barcodes at:
Shoot cards and order
barcodes
If a properly encoded barcode (as prepared in DataPost or NeoPack/Professional) is
scanned, steps 1-4 above are not necessary. Scanning the barcode will immediately bring
up the subject's details regardless of whether Subject is selected or the "correct" field is
chosen.
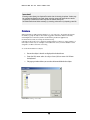
Adding new subjects
There may be occasions when a subject to be photographed is not in the database.
(Recently enrolled students for example). CapturePost allows the user to add new subjects
"on the fly".
To add a new subject:
1.
From the Edit menu select Add new subject
2.
The Set Folder pop up allows a home folder to be assigned to the subject.
3.
Enter the subject's details in the blank detail fields
The subject’s details are now in the database. He or she may now be photographed
17
W O R K I N G
W I T H
C A P T U R E P O S T
FIGURE 3.2 Adding a new subject
Entering orders
Order information can only be scanned into CapturePost. It is not possible to enter order
information from the keyboard. Shoot cards or order envelopes with the order information
barcodes are created in DataPost or NeoPack/Professional.
To enter a subject's order
1. Find the subject or add a new subject
2. Scan the order information barcode
3. If necessary scan additional order barcodes
The subject's order will appear in the order information window.
FIGURE 3.2 The order information icons
Learn more about creating
shoot cards with barcodes at:
Shoot cards and order
barcodes
In the above example the subject has order the "Value Package" (VP) which comprises
Pack A, a novelty pack (NOV) and a memory mate (MM). This information is setup in
DataPost and encoded into an order barcode
To order retouching
CapturePost allows a subject's images to be flagged for retouching at a later stage in either
DataPost, NeoPack/Professional or NeoComposite. To order retouching a special
retouching barcode is scanned!
18
W O R K I N G
W I T H
C A P T U R E P O S T
Important!
Entering orders directly into CapturePost at the time of shooting is optional. Orders may
be scanned into DataPost at a later stage using the same order barcodes as used by
CapturePost. Furthermore orders may also be entered directly into
NeoPack/Professional either manually, by scanning a barcode or by importing a text file.
Folders
When preparing a job file (in either DataPost, or one of the "Neo" programs) the user has
the ability to group the subjects into folders (eg grades and teams). This has extremely
useful implications when the job file is used with the production applications,
NeoPack/Professional, NeoComposite and NeoGroup.
CapturePost allows the user to change an existing folder for a subject or assign a folder to a
new subject. In this way, for example, a new student who is not yet in the database can be
assigned to a folder at the time of shooting.
To set the home folder for a subject.
1.
Ensure the subject's details are displayed in the details area
2.
From the Edit menu select Set subjects home folder or enter Ctrl-H from
the keyboard
3.
The pop up window allows you to select the home folder for the subject
FIGURE 3.3 Setting a home folder
19
W O R K I N G
W I T H
C A P T U R E P O S T
Taking photos
In CapturePost, taking photos matched to subject data is simply a matter of:
1.
Find a subject or add a new subject
2.
Optionally enter order information
3.
Scan order barcode or barcodes
Optionally flag the subject for retouching
4.
Either scan a barcode or look up or add the subject via the keyboard
Scan a retouching barcode
Take the photo then repeat for the next subject
Important!
You should wait until the main preview image is displayed before finding the next
subject. Failure to do so will result in the image just taken being matched to the wrong
subject..
Multiple images for the one subject
It is possible to take more than one photo for the same subject. You may wish to do this
when the subject blinks, for example or you simply do not like the image or you
deliberately take more than one pose for each subject.
Multiple images for the same subject are flagged with a little red triangle in the bottom
right corner of both the main preview and the thumbnail images in the image list.
FIGURE 3.4 The thumbnails indicating several images (poses) for the one subject
20
W O R K I N G
W I T H
C A P T U R E P O S T
The primary or main image
Where the user intentionally
takes more than one pose per
subject, Poses Mode in
DataPost and the Neo programs
allows the user to work with
these poses in powerful and
creative ways
Where more than one photo is taken for the same subject, the software will use the last
image as the primary or main image. This is the image that is then used by default in
production and when exported in either DataPost, NeoPack/Professional or
NeoComposite.
Changing the primary image
Although more frequently done outside of CapturePost, it is possible for the CapturePost
operator to assign an image other than the last image as the primary or main image.
1. Click on the thumbnail of the image you want as the primary image
2. Using the keyboard enter Ctrl-I
3. Alternatively select Edit>Mark main subject image
4. The red flag in the lower right corner of the thumbnail will change to dark
grey indicating it is now the main image
5. Other images for this subject will be flagged with a light grey triangle
6. If you have erred with the selection of the primary image, simple repeat the
procedure with the correct thumbnail.
FIGURE 3.5 Changing the main image
Discarding images
There is no real need to discard
an unwanted photos since,
unless it is the main image, it will
not be used in production.
Unwanted images can be removed. To remove an unwanted image select the image and
click the discard button or select Edit>Discard photo.
Incorrectly matched images
If the operator has inadvertently matched an image to the wrong subject, as would happen
if the next subject was not found before the photo taken, it is possible unmatch an image
and rematch it to the correct data
1.
Select the incorrectly matched image
2.
Click the Unmatch button or select Edit>Unmatch to unmatch the image
3.
Find the correct subject
4.
Rematch the image by clicking the Match button or selecting Edit>Match
21
W O R K I N G
W I T H
C A P T U R E P O S T
Matching an image to a folder
As well as matching an image to subject data, CapturePost allows the user to match an
image to a folder.
1.
Ensure Folder is selected in the Get section
2.
Ensure the via field lookup is set to Name
3.
Enter the desired folder
4.
Take the photo. The image is automatically matched to the selected
folder
FIGURE 3.6 Selecting a folder to match to
An image matched to a folder can be called onto a template in the Neo programs by using
a labelled image holder with "Folder" as the label
If more than one photo is matched to a folder the Neo programs will use the last image
taken.
Printing ID Cards
FIGURE 3.7 Setting up ID card printing
Setting up ID Card printing
1.
In CapturePost go to File>Setup
22
W O R K I N G
W I T H
C A P T U R E P O S T
2.
In the ID card printing section select the printer and printer properties if
necessary
3.
Select the template you wish to use for printing by either entering an
explicit path to the template or browsing for the template with the browse
button.
4.
Decide whether you will manually print the ID cards by pressing the F10
key or have CapturePost automatically print the ID card after a given time
interval after each subject is photographed.
You can toggle automatic printing on and off without returning to File>Setup with the CtrlF10 keys.
Printing the ID cards automatically
1.
Ensure you have selected the "Print automatically..." option in File>Setup
and entered the desired delay time.
2.
Use CapturePost in the normal way. As each photograph is taken,
printing will begin after the given time interval
3.
If a second photo is taken within the given time delay it will be printed
instead of the first image
Printing manually
Printing may be triggered manually at anytime regardless of the automatic time setting in
the setup with the F10 key.
Exporting the images
CapturePost allows the user to export a second set of images. However rather than merely
creating a duplicate copy of the original image files, the user has the ability to apply several
options to the exported set.
Options available when exporting the images give the user the ability to:
name the exported images according to any field in the
database
give the exported image name a prefix and a suffix
organize the exported images into folders
choose a variety of formats (jpeg, tiff, png, targa, bmp, pcx, pct)
Choose the bit depth
change the size of the images
set the resolution of the exported images
apply sharpening to the images
23
W O R K I N G
W I T H
C A P T U R E P O S T
Images are exported via Images>Export. The above options can be accessed through the
setup button.
FIGURE 3.9 Options for exporting images
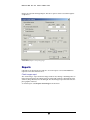
Reports
CapturePost can present the user with two on-screen reports. It is recommended these
reports be run at the end of the shoot.
Check images report
The "check images" report checks the images folder for any missing or bad image files. An
image may be missing if the transfer between camera and computer is interrupted. In the
same way image files may become damaged .The check images report therefore alerts the
photographer of this fact.
To run this report select Reports>check images from the menu.
24
W O R K I N G
W I T H
C A P T U R E P O S T
FIGURE 3.10 The check images report
Unphotographed subjects report
The "unphotographed subjects" report presents an on-screen list of any subjects yet to be
photographed.
This same report is available in
a printable version in DataPost
FIGURE 3.11 The unphotographed subjects report
25
A P P E N D I X
4
Chapter
Appendix
Supported cameras
Fuji S1
Shooting driver
To use the S1 with CapturePost, the camera's PC MODE must be set to 'SHOOTING' (as
opposed to DOWNLOADING). PC MODE is selectable via the camera's menu. Shooting
mode is sometimes referred to as tethered mode.
Shooting mode requires its own Windows device driver (different from the USB Mass
Storage driver used with Downloading mode). This driver is installed as part of the S1
Camera Shooting Software, which is supplied with the S1 camera's on the Utilities for
FinePix S1 Pro CD.
If you have problems getting CapturePost to work with the S1, we suggest you first get it
working with Fuji's own Camera Shooting Software to be sure you have all the cables
connected and drivers installed properly.
Setting the image size
CapturePost does not use the image size set on the camera's rear display panel. Instead
you must select the desired resolution use the Camera - Settings menu.
Fuji S2
Shooting driver
To use the S2 with CapturePost, the camera's PC MODE must be set to '1394 Shooting' (as
opposed to 1394/USB Downloading). PC MODE is selectable via the camera's menu.
Shooting mode is sometimes referred to as tethered mode. The S2 can only operate in this
mode over a 1394 firewire connection (ie. not USB).
Shooting mode requires a special Windows device driver - the FinePix S2 Pro Shooting
Driver. This driver is supplied Fuji's Camera Shooting Software, which allows you to
control the camera from the PC. Officially the Camera Shooting Software is an optional
extra that is not supplied with the S2 base package, but must be purchased separately from
Fuji as part of their Hyper-Utility Software package. However in reality we have found that
most customers who purchase an S2 have received this software for free. If you do not
26
A P P E N D I X
have the Camera Shooting Software, contact us and we can provide you with a copy of the
S2 Shooting Driver.
If you have problems getting CapturePost to work with the S2. we suggest you first get it
working with Fuji's own Camera Shooting Software to be sure you have all the cables
connected and drivers installed properly.
Beware flat batteries
If you cannot get CapturePost or the Fuji software to recognize the camera, or if you find
the software frequently reports camera disconnects, it's most likely to be the batteries. The
S2 has two batteries, and if they are flat the camera will not function properly - even if it is
plugged into mains power.
Setting the image resolution
The resolution for the S2 is set in CapturePost with the Camera - Settings menu.
CapturePost ignores the resolution set on the camera itself.
Canon EOS Driver
Supported camera models
Our Canon driver supports and has been tested with the following camera models: D30,
D60, 10D, 300D. It should also work with the EOS-1D and 1Ds cameras, although to date
we have not had a camera to test with (so please let us know if you successfully use
CapturePost with a 1D or 1Ds).
CapturePost does not support the PowerShot cameras because these models do not
support the 'remote release control mode' required for tethered operation.
ACDSee
The popular utility ACDSee may cause conflicts with CapturePost. This happens because
ACDSee installs certain Canon DLLs into the Windows SYSTEM32 folder, even though
Canon's SDK documentation explicitly states that software developers should not copy
these DLLs into the system folder (so please complain to ACD Systems on our behalf).
There are two solutions to this problem:
Try uninstalling ACDSee's 'Canon Camera Plug-In' and 'Canon
Image Decoder Plug-In'. If that doesn't work try removing ACDSee
altogether and see if that fixes the problem.
Try copying all the files from the Program Files\Common
Files\Timestone Shared\Cameras\CDSDK folder to the Program
Files\Timestone Software\CapturePost folder. By placing the Canon
SDK files in the same folder as CapurePost.exe, Windows will always
load the correct DLLs.
RAW vs JPEG modes
CapturePost will use whatever resolution is set on the camera. If RAW mode is selected, the
RAW image is retrieved from the camera, processed automatically and converted to JPEG
by CapturePost. RAW mode in theory gives the best image quality but it is extremely slow.
In practice most people will use one of the JPEG modes, where the camera itself creates the
JPEG file before it is downloaded to CapturePost.
27
A P P E N D I X
Using RAW mode with the 300D
The Canon 300D was released after the current Canon SDK and there is a problem using
RAW mode with this model. To make it work, search your hard disk for a file called
deImg170.DLL and copy it to the Program Files\Common Files\Timestone
Shared\Cameras\CDSDK folder (this file will be installed with the Canon software
supplied with the 300D).
Troubleshooting
Early versions of the Canon drivers proved to be very unstable in tethered mode. However
the most recent versions of Canon's drivers and SDK have proved to be quite robust. If you
are experiencing unexplained crashed or camera disconnects, please make sure you are
using the latest version of the Canon driver. At the time of writing this is the Canon WIA
Driver 5.2.0.
If you still have problems first see if you can use the camera with Canon's own Remote
Capture utility. This will ensure you have the cables and drivers installed correctly.
Kodak DCS 5xx/6xx driver
This driver supports older Kodak digital cameras such as the DCS 520/620. We no longer
recommend people use these cameras with CapturePost because a bug has been
discovered that can cause the camera to pause every 30-60 seconds every now and then,
followed by an error message. Kodak no longer support these camera's so there's not
much we can do about it.
Kodak DCS Pro 7xx / Pro Back / 14n drivers
This driver, collectively known as the DCSPro driver, supports the Kodak DCS 720, 760 &
14n. It should also work with the Kodak Pro Backs but to date we have not been able to
verify this.
Starting with version 1.6.2, CapturePost requires the new Kodak drivers that are also
required by the latest versions of the Kodak DCS Camera Manager software. If you have
installed DCS Camera Manager version 3.0 or earlier, the older driver called "Kodak Pro3
1394 DCS Camera" (Pro31394.sys) will be installed on your computer. This driver will not
work with CapturePost. You must install the new driver called "DCS ProDriver Camera"
(ProDriver.sys) that is supplied with DCS Camera Manager 3.0.1 and later.
The easiest thing to do is download the latest DCS Camera Manager from Kodak's website
and get it going first. As part of the download Kodak supply a document called
IEEE1394ReadMe.pdf that provides further instructions for installing the new drivers.
Important message for 14N users:
You may find your camera no longer works with CapturePost after you upgrade to Version
2.3.0 of CapturePost or later. This version of CapturePost installs the latest Kodak DLL's in
order to support the new Slr/n digital camera and these files may be incompatible with
your ProDriver.sys camera driver. The easiest way to install this driver is to visit Kodak's
website and download and install the laterst Camera Manager software
CapturePost always retrieves the raw image from the DCS Pro cameras, processes it,
applies a color transform, and finally saves it as a JPEG file. You must tell CapturePost what
color space you want to store the images in. By default Kodak's DCSRGB color space is
used. We suggest you stick to DCSRGB unless you have a good reason to use something
else. ].
28
A P P E N D I X
The Camera - Settings menu in CapturePost is where you select the color space for the
images. Here you can also select the look profile - portrait or product. These are the same
look profiles available in Kodak's software.
Nikon camera drivers
At the time of writing there are no drivers specifically for Nikon cameras You can use the
hotfolder driver with these cameras (see next section).
The hotfolder driver
The Hotfolder Camera Source can be used with any digital camera that supports tethered
shooting and can output images as jpegs. It is primarily used with the Nikon D series
digital cameras. The procedure is described below.
1.
Install the camera manufacturers camera shooting software or
appropriate third party shooting software.
2.
Setup the digital camera for tethered shooting according to the software's
instructions. The camera should save the image files
to a folder on
the computer, the Hotfolder
3.
Verify the setup is correct by taking a few test photos and making sure the
images are saved to the hotfolder
4.
Delete the test photos from the hotfolder
5.
Run CapturePost and select File>Setup
6.
Choose Hotfolder Camera Source as the camera
7.
Go to Camera>Settings and browse your computer for the Hotfolder
8.
Make any adjustments to the other CapturePost settings and begin using
CapturePost in the normal way.
Shoot card and order barcodes
Shoot cards and/or order envelopes are used by CapturePost to find subjects and enter
order information. Shoot cards are created in DataPost or NeoPack/Professional.
When designing a shoot card, barcodes are generally used to encode two types of
information: subject identification and order information.
Subject identification
The subject identification barcode is used by CapturePost to quickly find a subject.
The format for this barcode is as follows:
/%S@field
Where
29
A P P E N D I X
/%S is an internal code that "tells" CapturePost a subject is being scanned. When this
barcode is scanned in CapturePost the program strips away the /%S and uses the data
from the database's unique field to find the subject
@field
field is the unique field as defined in details mode when preparing the job file
Example
Let us assume you are a school photographer and the students in your database are
uniquely identified by their ID number. This number is included in a field called “ID”. The
barcode to find each student is therefore encoded /%S@ID
Order information
Order information barcodes are used to assign orders to the subject. A separate barcode is
used for each package offered. The package may combine several layouts with or without
item designs, composite group photos and traditional group photos.
Entering order information is optional and can be done in either CapturePost or DataPost
The format for this barcode is as follows: (Note several of these entries are optional and
may be omitted)
/%O{package-code}/P{layout-key}%{item-key}.copies/C.copies/G.copies
Where
/%O
is an internal code that tells CapturePost what follows is an order
package-code
is the package code as defined in DataPost's Edit>Packages. This entry is
optional and is used in DataPost’s reporting features.
/P
Is an internal code that tells CapturePost what follows is a layout
(portrait pack) from NeoPack/Professional
layout-key
is the key assigned to the layout template in NeoPack/Professional
item-key
is the key assigned to the item design template in NeoPack/professional.
This entry is optional
/C
is an internal code that tells CapturePost or DataPost a composite group
photo has been ordered from NeoComposite. This entry is optional
/G
is an internal code that tells CapturePost or DataPost a traditional group
photo has been ordered from NeoGroup. This entry is optional
.copies
Is the number of copies required of each portrait pack, composite or
group. This is optional and if omitted defaults to one. This entry is
optional
Examples of order information barcodes
/%OA/PXY
package A which includes the layout whose key is XY
/%O/PD
layout D
/%O/PB%TCB
portrait pack B with item design TCB
30
A P P E N D I X
/%OB/PAA/C.2
package B which includes layout AA plus 2x composite group
photos
/%OC/PB%FR/PD/G
package C which includes layout B with item design FR plus
layout D plus a traditional group photo
Ordering retouching for a subject
The CapturePost operator may mark a subject’s images for retouching later in DataPost or
the Neo programs
/%R+
flags the subject's image(s) for retouching
/%R-
removes the retouching flag from the subject's image(s)
Important
Retouching must be ordered with a separate barcode –it cannot be incorporated into an
order barcode.
Erasing orders
A barcode encoded with the sequence /%O erases an order
Scanning item designs independently of layouts
With Version 2.3.0 and above it is possible to scan an item barcode independently of the
layout barcode. This means the user may have separate barcodes for layouts and designs
and can therefore mix and match the two. The format for an item design barcode is as
follows:
/%O%P%{item-key}
where {item-key} is the key assigned to the item design in NeoPack/Professional
The barcode /%O%P% removes the item design
Entering data automatically into a field by scanning a barcode
With Version 2.5.0 and above it has been possible to scan a details or data barcode which
will place data into a specified field. The format for such a barcode is as follows:
/%Dfield%value
where field is a field name or field number (1 through to n).and value is the data that will
be placed into the field for the currently selected subject
31
A P P E N D I X
Example
You are photographing music bands and have a field called Instrument. As each
subject is photographed you wish to enter their musical instrument. You have barcodes
for each of the instruments such as:
/%DInstrument%Flute
Scanning this barcode will place the value “Flute” into the Instrument field
Sports photography provides another opportunity for using this type of barcode.
Example
You are photographing a soccer team and have a field called Position. As each subject
is photographed you wish to enter their playing position. You have barcodes for each of
the positions such as:
/%DPosiitiont%Striker
Scanning this barcode will place the value “Striker” into the Position field
Notes
•
the package code is optional and is only used by DataPost for reporting purposes
•
where a subject has multiple orders simply scan additional barcodes as required
•
orders can also be scanned into DataPost using the same order barcodes used by
CapturePost
•
orders may also be entered directly into NeoPack/Professional without the need
for order barcodes
Pose barcodes
When a photographer deliberately takes multiple images (or poses) it is possible to assign
pose numbers or pose labels to the images. Separate orders can then be assigned to each
pose.
The assign pose barcode
The barcode is encoded in the following format:
/%Ppose
where pose is a pose number or label
Examples
/%P2 will assign pose 2 to the selected image
/%Pformal will assign the pose label, formal, to the selected image
The pose number or label will be visible at the end of the text string below the main
preview image in CapturePost and all scanned poses will subsequently be visible in Poses
Mode in DataPost, PackBuilder, CompBuilder, NeoPack/Professional and NeoComposite.
32
A P P E N D I X
Combining an order and pose barcode
It is possible to scan a barcode that will place an order for a particular pose.
This is achieved by adding the string, %pose to the end of the standard order barcode
/%Opackage/Playout-key%item-key%pose
The package and item-key entries are optional
Examples
/%O/Pabc%xyz%1
This barcode will add the layout abc with item design xyz to pose number 1
If the optional item design entry is not used it is still necessary to leave its % symbol in the
barcode.
/%O/Pabc%%2
will add the layout whose key is abc to pose 2
Note this barcode does not assign the pose to the subject's image - it merely enters an
order for a pose. The pose will need to be assigned by scanning a separate barcode in
CapturePost
Miscellaneous barcodes
Version 2.7.0 introduced three new barcodes
Save barcode
/%CS – save. This barcode performs a File>Save action
Print barcode
/%CP – print. This only applies to CapturePost with ID card printing option
Shoot barcode
/%CS – shoot. This barcode triggers the camera
33
A P P E N D I X
Frequently asked questions
Q. Do I need DataPost?
A. CapturePost is not a stand-alone program. It needs to open a job file that has been
created by either DataPost, PackBuilder, NeoPack/Professional or NeoComposite. If you
are an independent photographer you will most likely use DataPost or PackBuilder for this
purpose. However if you are working with a lab using one of the above “Neo” programs
you will not need DataPost or PackBuilder.
Q. My lab doesn’t have any Timestone programs. Can I still use CapturePost?
A. Yes. You will need CapturePost and DataPost. You will be able to provide your lab with a
set of images named according to any of the fields in your database eg 324563.jpg where
324563 is the subject ID number. You will also be able to provide the lab with a text file
containing all the necessary subject data including a cross reference to the image number.
Q. Which cameras can be used?
A. Timestone Software has developed many direct drivers for the more popular
professional digital cameras. Furthermore the generic “Hotfolder driver” can be used with
any digital camera that can capture jpegs to a tethered computer. See the Supported
Cameras section of the user manual for more information.
Q. Can I still use CapturePost if I don’t get data before the shoot?
A. Yes. One way that works well is to still use shoot cards that are blank except for a unique
identifier for each card. When you scan this barcode in CapturePost it will add the
“subject” to the database. If needed the subject can write the data onto the shoot card and
you can enter this information at a later time.
Q. Can I edit the images from within CapturePost?
A. No. You can only do this in DataPost, PackBuilder or one of the Neo programs.
Q. My camera is listed but it still does not work with CapturePost. What gives?
A. Make sure you also install the camera maker’s software as this installs certain files
needed by CapturePost. Always get the camera working in tethered mode with the camera
manufactures shooting software first eg Canon’s Remote Capture.
Q. How can I find out if someone was photographed earlier in the day?
A. Just scan their ID barcode or look them up manually. If they have been photographed
their image will be displayed. Note however this will not happen if you have chosen to
clear the display when a subject is displayed in the setup dialogue.
34