1
D8/D8-M1/D8-M3/D8-OEM – User Manual
inXtron, Inc.
www.inxtron.com
All functions, specifications and images in this manual may change without prior
notice. Please ask your sales representative for the latest firmware and PDF version
of the manual.
Date: August 30, 2010 - v2.1
Firmware: mpt20100415_msd, mpt20100409_m3_mhd
D8
D8-M1
D8-M3
D8-OEM
D8-PCB2
MS-DOS, Microsoft, Windows XP/Vista are trademarks of Microsoft Corporation. Apple Macintosh and Mac
are trademarks of Apple Computer. All other third party brands and names are the property of their
respective owners.
D8
Table of Contents
Table of Contents
1
INTRODUCTION -------------------------------- 1
4
1.1
SYSTEM REQUIREMENTS ................. 2
1.1.1 PC Requirements ..................... 2
1.1.2 Display Panel Requirements .... 2
1.1.3 Other Equipment....................... 2
1.2
OPTIONAL ACCESSORIES ................. 2
1.3
PACKAGE CONTENTS ...................... 2
1.4
DETAILED VIEW - D8 ....................... 3
1.4.1 Front View................................. 3
1.4.2 Rear View ................................. 3
1.5
DETAILED VIEW - D8-M1 ................. 4
1.5.1 Front View................................. 4
1.5.2 Rear View ................................. 4
1.5.3 Mounting Holes ......................... 4
1.6
DETAILED VIEW - D8-M3/RS232 ..... 5
1.6.1 Front View................................. 5
1.6.2 Rear View ................................. 5
1.6.3 Mounting Holes ......................... 5
1.7
REMOTE CONTROL .......................... 6
2
4.1
MODE 1 - HTTP/FTP DOWNLOAD .. 36
4.1.1 Disk Management ................... 37
4.1.2 Scheduled Download .............. 38
4.1.3 Creating the update.d8 List ..... 40
4.1.4 Creating the Download List ..... 42
4.1.5 Downloading New Content ..... 42
4.1.6 Creating the Upload List.......... 43
4.1.7 FTP Server .............................. 44
4.2
MODE 2 - SMB STREAMING ........... 46
4.2.1 Shared Folder on WinXP ........ 47
4.2.2 Shared Folder on WinVista ..... 49
4.2.3 LAN Disk ................................. 52
4.3
MODE 3 - USB DRIVE .................... 54
4.3.1 USB Drive ............................... 54
4.3.2 USB Auto-Copy ....................... 55
4.3.3 Firmware Update..................... 56
4.4
PLAYBACK MODES ......................... 57
4.5
PLAYLIST ....................................... 58
4.5.1 Creating a single Playlist ......... 59
4.5.2 Display Time for Images ......... 59
4.5.3 Playlist by Time ....................... 60
4.5.4 Playlist by Date ....................... 61
4.5.5 Playlist by Date&Time ............. 62
4.6
AUTOMATED PLAY MODES ............. 63
4.6.1 Standard .................................. 63
4.6.2 Repeat ..................................... 63
4.6.3 Manual & Standby ................... 64
4.6.4 Auto ON/OFF .......................... 64
4.7
RS-232 COMMANDS ...................... 65
4.8
SCROLLING TEXT ........................... 66
4.9
REMOTE COMMANDS ..................... 67
4.9.1 Creating a command file ......... 67
4.9.2 Multi command file .................. 68
4.9.3 Playmode command file .......... 68
4.9.4 Creating a file index ................ 68
4.9.5 Creating a delete list ............... 69
HARDWARE INSTALLATION --------------- 8
2.1
DRIVE ASSEMBLY - D8 .................... 9
2.1.1 2.5” HDD or CF card ................. 9
2.2
WIRELESS KIT ASSEMBLY - D8 ...... 10
2.3
DRIVE ASSEMBLY - D8-M1/D8-M3 11
2.3.1 CF Card .................................. 11
2.3.2 2.5” HDD ................................. 11
3
SOFTWARE CONFIGURATION ---------- 13
3.1
NETWORK CATEGORY ................... 14
3.2
MISC1 CATEGORY ......................... 15
3.3
MISC2 CATEGORY ......................... 16
3.4
MISC3 CATEGORY ......................... 17
3.5
AUDIO & VIDEO CATEGORY ........... 18
3.6
CONFIGURATION FILE .................... 19
3.7
CONFIGURATION TOOL .................. 20
3.7.1 Configuration Structure ........... 21
3.7.2 Configuration Values .............. 22
3.8
FIRMWARE UPDATE ....................... 24
3.9
WIRELESS CONNECTION ................ 25
3.10
TIME & DATE................................. 27
3.10.1
Using the NTP server ......... 27
3.10.2
Manually setting the time ... 29
3.11
SCREEN MODE.............................. 30
3.11.1
Multi Zone 1........................ 31
3.11.2
Multi Zone 2........................ 32
3.11.3
Multi Zone 3........................ 33
3.11.4
Info Screen ......................... 34
PLAYBACK ------------------------------------- 35
5
APPENDIX -------------------------------------- 70
5.1
CONFIGURATION TOOL ................... 70
5.1.1 Configuration ........................... 70
5.1.2 Remote Command .................. 71
5.1.3 Message Control ..................... 73
5.1.4 File List Manager..................... 74
5.2
TFTP ............................................ 75
5.3
REMOTE CONTROL KEY FUNCTIONS76
5.4
FAQ ............................................. 77
5.5
ABOUT THIS MANUAL ..................... 78
D8
Introduction
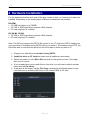
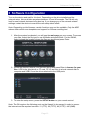
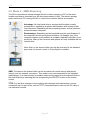
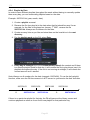
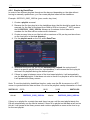
1 Introduction
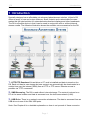
Specially designed as an affordable yet advanced advertisement solution, inXtron's D8
offers an array of new and unique features. Small footprint and customisable firmware
makes this the ideal solution for networked advertisement displays and other broadcasts.
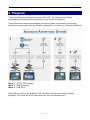
The D8 is a flexible device in that it can be used in conjunction with or without internal
storage media. The following illustration shows the possible set-up scenarios for the D8.
1 - HTTP/FTP Download: A hard drive or CF card is installed and data is stored on the
D8. Each unit has its own storage but new content can automatically be downloaded at a
certain time over the internet (WAN) from a HTTP or FTP server. Remote access is
possible via TFTP commands.
2 - SMB Streaming: The D8 is used without internal storage. The content is stored on a
PC at the same location and data is accessed over the local area network (LAN).
3 - USB Drive: There is no network connection whatsoever. The data is accessed from an
USB drive via one of the D8’s USB ports.
Note: See Chapter 4 for a detailed explanation on how to set up each of these scenarios.
Page 1
D8
Introduction
1.1 System Requirements
1.1.1 PC Requirements
· Minimum Intel Processor III 500MHz, 128MB RAM. The faster the processor the better,
as more devices can be connected and you will experience better playback.
· Operating System; WinXP Home, WinXP Professional or Windows Vista.
· 10Mbps, 100Mbps or 10/100Mbps Fast Ethernet card, or a USB-to-Ethernet converter
equipped PC.
1.1.2 Display Panel Requirements
· Video/Audio input, standard Composite RCA input. For better quality, S-Video,
Component or HDMI input is recommended.
· Optional amplifier with surround speaker system.
1.1.3 Other Equipment
· Network switch or router.
· Optional hard drive up to 750GB, CF card (high speed required) or USB drive.
1.2 Optional Accessories
The D8 comes without internal drive. For the D8, D8-M1 and D8-M3, you can install either
a CF card or a 2.5” IDE hard drive by using the optional CF/2.5” HDD module. In addition
to your D8 kit, the following cables and modules are available on request:
·
·
·
·
·
·
·
SCART adapter
HDMI AV cable
Digital audio cable (S/PDIF)
802.11b/g Wireless Kit
CF card module
CF card & 2.5” IDE HDD module
CF card & 2.5” SATA HDD module
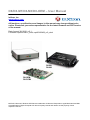
1.3 Package Contents
· D8, D8-M1 or D8-M3
· External Power Adapter
Input 110/240V auto switching, Output +12V/2A
· Composite, Component and VGA AV cables
· Remote Control
· User manual
Note: Package content may vary, depending on model and vendor.
Page 2
D8
Introduction
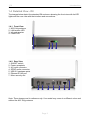
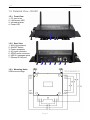
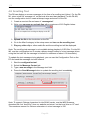
1.4 Detailed View - D8
The images below depict the standard D8 enclosure showing the front view with its LED
lights and the rear view with the interface and connections.
1.4.1 Front View
1. 802.11b/g antenna
2. LAN access LED
3. Infrared receiver
4. Power LED
u
vw x
1.4.2 Rear View
1. ON/OFF switch
2. Power receptacle
3. A/V multi connector
4. SPDIF audio connector
5. USB 2.0 upstream ports
6. Ethernet RJ-45 port
7. Micro security slot
u v
w
x
y
z {
Note: These images are for reference only. Your model may come in a different colour and
without the 802.11b/g antenna.
Page 3
D8
Introduction
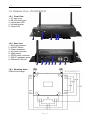
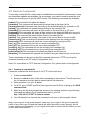
1.5 Detailed View - D8-M1
1.5.1 Front View
1. CF card cover
2. LAN access LED
3. Infrared receiver
4. Power LED
u
v wx
1.5.2 Rear View
1. 802.11b/g antenna
2. ON/OFF switch
3. Power receptacle
4. A/V multi connector
5. SPDIF audio connector
6. USB 2.0 upstream ports
7. Ethernet RJ-45 port
u
v w
1.5.3 Mounting Holes
VESA mount design
Page 4
x
y
z
{
D8
Introduction
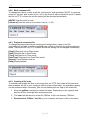
1.6 Detailed View - D8-M3/RS232
1.6.1 Front View
1. CF card cover
2. RS-232 serial input
3. LAN access LED
4. Infrared receiver
5. Power LED
u
v
w xy
1.6.2 Rear View
1. 802.11b/g antenna
2. ON/OFF switch
3. Power receptacle
4. A/V multi connector
5. HDMI output
6. SPDIF audio connector
7. USB 2.0 upstream ports
8. Ethernet RJ-45 port
u
v w x yz
1.6.3 Mounting Holes
VESA mount design
Page 5
{
|
D8
Introduction
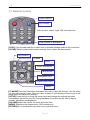
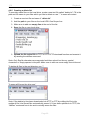
1.7 Remote Control
Power ON/OFF
No Function
Input for time, search, login, URL and other text.
Copy
Clear (Delete or Backspace)
[COPY] Copy the selected file or folder from an external storage media to the local drive.
[CLEAR] Delete a letter/number when entering text or delete the selected file.
No Function
TV Mode
Setup
Volume Adjustment
Mute Sound
Navigation Keys
Chapter menu (ISO)
Return
[TV MODE] Each time this button is pressed, the video output will change - use this when
you only see a blank screen. Once you have a signal on your display, be sure to go to the
setup menu and save your settings.
[SETUP] Press this key to enter the setup menu and change the settings and other
configuration options for your D8. During playback, this button can be used to adjust
contrast, saturation and brightness.
[VOLUME] Adjust the volume for music and video files.
[MENU] Returns to the chapter menu (ISO movies only)
[RETURN] Go one step back and return to the previous menu.
Page 6
D8
Introduction
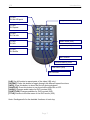
A: N/A
B: Set A-B point
Playback Functions
A: N/A
B: Repeat
A: N/A
B: File Info
A: N/A
B: N/A
Audio track (ISO)
Subtitles (ISO)
A: N/A
B: Shuffle
No Function
Fast forward by time
Title menu (ISO)
No Function
[A-B] Set A-B points to repeat parts of the video (ISO only).
[REPEAT] Press this button to toggle through the different repeat functions.
[INFO] Press this button to show the file info during playback.
[SHUFFLE] Press this button to turn the shuffle mode ON or OFF.
[AUDIO] Changes audio tracks for DVD movies (ISO)
[SUBTITLES] Changes subtitles for DVD movies (ISO)
[TITLE] Returns to the title menu of the DVD movie (ISO)
Note: See Appendix for the detailed functions of each key.
Page 7
D8
Hardware Installation
2 Hardware Installation
For the download function and most of the play modes to work, an internal drive has to be
installed. Depending on the media player, different combinations are possible:
D8-OEM
· 3.5” IDE hard drive up to 750GB
· 2.5” IDE or SATA hard drive (requires HDD module)
· CF card (requires CF module)
D8, D8-M1, D8-M3
· 2.5” IDE or SATA hard drive (requires HDD module)
· CF card (requires CF module)
Note: The D8 only supports the FAT32 file system or for CF cards also FAT16. Make sure
your hard drive is formatted using FAT32 before you install it. If formatted using NTFS, the
D8 will be able to read from the drive but will not be able to write any data to it!
1. Prepare your hard drive and format it using FAT32.
2. Install the drive or CF card and make sure all cables are connected.
3. Switch the power on your D8 to ON, and wait for the system to boot. This might
take up to a minute.
4. If you already have some media files on the drive, you will now be able to access
them from the file library.
5. If the drive is still empty, use the File Copy command in the Setup menu to copy
new files from an external USB drive to the internal HDD or CF card.
Page 8
D8
Hardware Installation
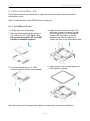
2.1 Drive Assembly - D8
If your setup requires an internal drive, open the case and install a hard drive before
turning the unit on.
Note: Format the drive using FAT32 before installing it.
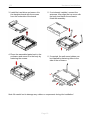
2.1.1 2.5” HDD or CF card
2. Take the drive module and insert your
CF card or the 2.5” HDD. Note: The
D8 can not work with a CF card AND
hard drive installed together!
4. Align the drive module with your D8
and push it lightly into place, so that
the connector from your module fits
into the IDE connector on the D8
bridge board. Mount it with the 4
screws as seen in the illustration below.
3. If you are installing the 2.5” HDD,
mount it with two screws from beneath.
5. Align the top cover with the body and
push lightly into place.
1. Lift the top cover off the body.
Note: Be careful not to damage any cables or components during the installation!
Page 9
D8
Hardware Installation
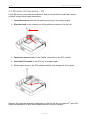
2.2 Wireless Kit Assembly - D8
If your D8 did not come with the wireless kit and you would like to install this module
yourself, simply follow these instructions:
1. Insert the antenna into the slot opening ensuring it is pointing upright.
2. Place the lock on the internal end of the antenna to secure it to the unit.
3. Fasten the antenna cable to the “MAIN” connector on the PCI module.
4. Insert the PCI module in the PCI slot at a slight angle.
5. Gently press down on the PCI module until the side clasps lock it into place.
Remark: Only use the wireless kit designed for the D8. We do not support 3rd party PCI
cards and installation of any other components will void the warranty.
Page 10
D8
Hardware Installation
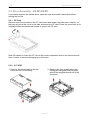
2.3 Drive Assembly - D8-M1/D8-M3
If your setup requires an internal drive, open the case and install a hard drive before
turning the unit on.
2.3.1 CF Card
Remove one of the screws for the CF card cover and loosen the other one a little bit, so
that you can move the cover to the side and insert the CF card. Place the cover back in its
original position and fasten the screws to secure the CF card.
Note: Be careful to insert the CF card in the correct orientation and do not use excessive
force in order to prevent damaging any of the pins.
2.3.2 2.5” HDD
1. Remove the two screws for the top
cover and lift it off the body.
2. Remove the four screws which are
holding the daughter board in place
and lift the daughter board out of the
enclosure.
Page 11
D8
3. Install the hard drive and secure it to
the daughter board with the screws
from the underside of the board.
4. Place the assembled parts back in the
enclosure and mount it to the body by
fastening the screws.
Hardware Installation
5. If not already installed, connect the
antennas, then align the top cover with
the body and fasten the screws to
finish the assembly.
6. If required, the wall mount plates can
be installed by fastening them to the
side of the enclosure.
Note: Be careful not to damage any cables or components during the installation!
Page 12
D8
Software Configuration
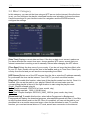
3 Software Configuration
Turn on the device and wait for it to boot. Depending on the drive installed and the
network setup, this could take anywhere between 10 and 40 seconds. The D8 will only
look for new network devices during boot up. If you change any of the network related
settings, restart the device to ensure the new setup takes effect.
Note: Depending on the firmware, certain functions may not be available. Only the MSD
release offers multi-zone templates and support for Chinese scrolling text.
1. After the system has booted, you will see the main page on your screen. To access
your files, select the file type or use All Media and press Enter. For the D8-M3,
select instead the location where the files are stored and press Enter.
2. Select the directory where your files are stored and press Enter to browse for your
files. HDD is the local drive or CF card, PC1/2 are links to a local network disk or
computer and USB1/2 are the drives attached to the USB ports.
3. To enter the setup menu, press the SETUP button on your remote control.
Note: The D8 requires the following ports on the firewall to be opened in order to access
the internet and the required services: 21 (FTP), 69 (TFTP), 80 (HTTP), 445 (SMB).
Page 13
D8
Software Configuration
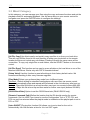
3.1 Network Category
In this category, you can configure how the D8 is connected to the local network and set
up the links to a local computer or network disk for PC1/2. Use the arrow keys on your
remote control for navigation and the ENTER button to configure the settings. You will
need to reboot your device after changing any of the settings.
[Network Type] Select between Wired and Wireless network connection. For the wireless
function, you will need to have the optional 802.11b/g wireless kit installed. When no
network connection is required, setting it to Off will reduce the start up time.
[Automatic IP Address] Choose ON and the D8 will acquire the IP address automatically
at boot up or choose OFF and configure the settings manually. You will be able to enter
the IP address, mask, gateway and DNS server. When selecting Enhance, it will
automatically obtain and IP address but when it fails to do so, it will reboot about 30
seconds after start up and try again until an IP address can be obtained.
[IP Address] Displays the current IP address of your D8. If 0.0.0.0 is shown, your device
will not be able to connect to the network. Restart the device or set the IP manually.
[MAC Address] Displays the MAC address of your D8. This can not be changed.
[SSID] If you are using the wireless connection, this will display your current SSID. Select
it to change the SSID (maximum 20 characters) and if required enter the WEP key.
[Link PC1] Path to your remote network storage folder. Enter the IP address of your
computer or network disk and the shared directory. Once this link is set, you can access
the files from the file library under PC1.
[Link PC2] Path to your remote network storage folder. Enter the IP address of your
computer or network disk and the shared directory. Once this link is set, you can access
the files from the file library under PC2.
Page 14
D8
Software Configuration
3.2 Misc1 Category
In this category, you can set the time using an NTP server via the internet. Once the time
is set, you can configure the playlist, download function and schedule for these functions.
Use the arrow keys on your remote control for navigation and the ENTER button to
configure the settings.
[Date Time] Displays current date and time. If the time or date is not correct, make sure
you have selected the correct time zone, choose another NTP server, ensure that your
internet connection is working or set it manually. Reboot after changing the NTP server.
[Time Zone] Select the time zone of your country. If you do not know the time offset, refer
to your PC clock. Double click on the time in the taskbar and go to Time Zone. Select your
country from the list and you will see the corresponding time offset.
[NTP Server] Select one of the NTP servers from the list or enter the IP address manually
to synchronise the time via the internet. Turn it OFF if you don’t need this function.
[Play List] To enable this function, select one of the playlist modes from the list. Once it is
enabled, you can set the path to your playlist. Reboot the unit and make sure the
corresponding playlist is stored in the right location to start using the playlist mode.
Single - Playlist example: play.lst
Date - Playlist example: 20070101.lst (year, month, day)
Time - Playlist example: _0900_1200.lst (time)
Date/Time - Playlist example: 20070101_0900_1200.lst (year, month, day, time)
[Download List] To enable this function, select either Foreground or Background.
Foreground will display the download progress, whereas Background will hide it. Use Skip
to skip files that already exist on the D8. Once it is enabled, you can set the path to your
download list on a remote server and enter a time for the download to start. To use this
function, you need an internal drive or CF card, as well as a connection to the internet.
Page 15
D8
Software Configuration
3.3 Misc2 Category
In this category, you can manage your files using the copy and erase functions and set the
playback mode for automated playback. Use the arrow keys on your remote control for
navigation and press the ENTER button to configure the settings.
[All File Copy] Use this to easily and quickly copy new files to or from your local drive.
This will copy all files found in the root directory of either your local drive or the remote
location but does not include any sub-folders. Existing files with the same name will be
overwritten. To copy only single files or sub-folders, use the SELECT button on the remote
control.
[All File Erase] This function can be used to erase all data on the local drive or one of the
attached USB drives. Works only with FAT32 formatted drives!
[Setup Value] Use this function to reset all settings to their factory default value. We
recommend resetting it after every firmware upgrade.
[Play Mode] Select your preferred play mode from 4 different types:
Standard - Default setting for standard media player with user input via remote control.
Repeat - Automatically plays and repeats all files stored in the root directory after boot up.
Manual - Plays title file at boot up as well as after user input via numeric buttons 000-999.
Standby - Plays title file at boot up and then waits for further user input (buttons 000-999).
[RS232 Baud Rate] Option to set the RS232 baud rate (D8-M3 RS232 only).
[Remote Command Path] Define the location that the D8 should monitor for remote
commands. Set it to HDD if you intend to use the Configuration Tool or TFTP. PC1 and
PC2 can only be selected when the playlist mode is enabled and the playlist path is set to
PC1 or PC2.
[Auto ON/OFF] Turning this function ON, allows you to set a time for the unit to
automatically turn ON and also a time for it to turn OFF again.
Page 16
D8
Software Configuration
3.4 Misc3 Category
In this category, you can disable the onscreen messages (OSD) and configure the options
for the scrolling text message. Use the arrow keys on your remote control for navigation
and the ENTER button to configure the settings.
[OSD] Option to enable or disable the on-screen messages (OSD).
[Scrolling Text] Turn the scrolling text message ON or OFF. When turned on, a text file
“message.txt” has to be placed on the local hard drive for it to display the message. This
does not work for PC1/PC2 or USB1/USB2.
[Scrolling Text Speed] Set the scrolling speed by selecting one of the three available
presets from the list.
[Color] Choose between several different colour schemes for the font and background to
be used for the scrolling text message.
[Password of Setup menu] When turned ON, the user will be prompted to enter a
password before the setup menu can be accessed. The password is 2580 (can not be
changed, only turned ON or OFF).
[JPEG Display] When set to Quality, the JPG images will be displayed in high quality but
depending on the size, there will be a black screen during the transition for the slideshow
when the new image is loaded. Setting it to Quick will display the JPG images in slightly
lower quality but it will have a smoother and quicker transition during the slideshow.
[Select screen mode] Choose a screen mode from the list of pre-set screen zone
templates. This option is only available for the MSD firmware version.
Note: The D8-M3 does not require the option to set the JPEG display mode. It will be set
to quality by default.
Page 17
D8
Software Configuration
3.5 Audio & Video Category
In this category, you can configure the audio and video output of your D8. Use the arrow
keys on your remote control for navigation and the ENTER button to configure the settings.
[SPDIF] Depending on the audio cable you are using, set this to Analog if you are using
the simple RCA left/right audio cables or to Digital if you are using the optical SPDIF cable.
[Speakers] Depending on your speaker set up, set this to 2 Channels if you are only using
2 speakers or to 5.1 Channels if you are using digital audio with 5 speakers and surround
sound.
[TV Standard] Select your TV system from the list. You can choose either NTSC or PAL.
[TV Type] Select the aspect ratio for your TV (4:3 Letter Box, 4:3 Pan-Scan, 16:9).
[Video Connector] Depending on the A/V cable you are using, select the corresponding
connection from the list. For the standard Composite cable, choose C/S-Video and for the
Component cable, choose YPbPr. Also available are VGA and HDMI.
[HDMI Standard] Set it to one of the preset resolutions or use Auto EDID in order to let it
automatically detect the resolution and switch to the highest possible resolution by itself.
[YPbPr Standard] Select the resolution and frequency of your TV display. The range
includes resolutions from 480p to 1080i with a frequency of either 50Hz or 60Hz.
[VGA Standard] Select the resolution and frequency of your display or monitor. The VGA
output is using 60Hz and offers multiple resolutions from 640x480 to 1920x1200. See
Configuration Values for more resolutions not available via GUI.
Note: If your display is blank and you can not see the D8 menu, press the TV Mode button
on your remote control to toggle between the different video outputs. Once you can see
the main screen, go to the setup menu and save your video output.
Page 18
D8
Software Configuration
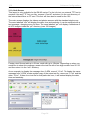
3.6 Configuration File
Instead of entering all the settings manually via remote control, you can load the
configurations from a text file. To create it, do so manually using the Configuration Tool on
the PC or save the current settings and then modify the text file.
To save the current settings, use the configuration tool or do the following:
1. Turn on your D8 and wait for it to boot.
2. [D8-M1] Turn it off using the power button on the remote control and then press the
numeric keys 1111.
[D8-M3] Go to the main screen, select Config and press the Enter key.
3. Select SAVE and press the ENTER key on your remote control. The settings will be
stored in a text file (config.conf) on the local drive.
4. Use TFTP to download the config.conf file to your computer:
tftp -i [IP address of your D8] GET /config.conf C:\config.conf
To load the new settings, use the configuration tool or do the following:
1. Turn on your D8 and wait for it to boot.
2. Use TFTP to upload the config.conf file to your D8:
tftp -i [IP address of your D8] PUT C:\config.conf /config.conf
3. Enter the Configuration Menu as described earlier.
4. Select RESTORE and press ENTER on your remote control to load the settings.
5. The unit will automatically reboot after the new settings have been uploaded.
Note: If you do not have a local drive installed on the D8, the config.conf file will be stored
in the memory. If you turn off the power using the hardware switch on the D8, this file will
be lost, so transfer or upload it BEFORE you turn off the unit.
Tip: To restore the settings without an internet connection, use the copy function. Store the
config.conf file on a USB drive, connect it to the D8, go to the SETUP menu and select
Copy from USB to HDD. Enter the Configuration Management wizard and load it.
Page 19
D8
Software Configuration
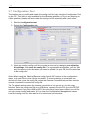
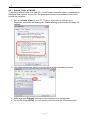
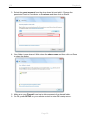
3.7 Configuration Tool
The easiest way to modify and create the config.conf file is by using the Configuration Tool
on the PC. This utility is only available for the Windows platform, so if you are working on
a Mac platform, please edit and create the config.conf file manually with a text editor.
1. Start the configuration tool.
2. Select the Configuration tab.
3. Open an existing config.conf file or create a new one by changing and adjusting
the settings, then save the config file. For organisational purposes, you can use
any file name you like but when you want to upload it to your D8, the file name has
to be config.conf.
Note: When using the “Backup/Restore config from/to D8” buttons in the configuration
menu, only one D8 at a time can be controlled. To restore settings to more than one
device at a time, save the config file, select the Remote Command tab and then use the
remote command to restore the config file.
Tip: To upload settings when the internet connection is not yet set up, use the copy
function. Store the config.conf file on a USB drive, connect it to the D8, go to the SETUP
menu and select Copy from USB to HDD. Once the file(s) have been copied, turn off the
unit via remote control and press 1111 to enter the Configuration Management wizard.
Load the config.conf file, then wait for it to reboot and you are done.
Page 20
D8
Software Configuration
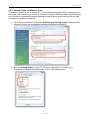
3.7.1 Configuration Structure
The config.conf file can also be edited manually with a text editor. Leave the settings
empty if you do not want to set it. For the structure, please refer to the following example.
One text string per line.
[NETWORK SETTING]
[NetWork Type]=Wired
[Automatic IP]=Off
[IP Address]=10.128.129.227
[IP Mask]=255.255.255.0
[IP Gateway]=10.128.129.210
[IP Primary DNS]=10.128.129.1
[IP Secondary DNS]=
[ENCRYPTION]=WEP
[Wireless SSID]=
[Wireless KEY]=
[PC1 Address]=10.128.129.163
[PC1 Dir]=public
[PC2 Address]=
[PC2 Dir]=
[MISC1]
[Time Zone]=UTC+8
[NTP Server]=Off
[Play List]=Off
[Play List Path]=HDD
[Download List]=Off
[Download Path]=http://69.10.157.55/test/d8/
[Download Time]=18:00
[MISC2]
[Play Mode]=Standard
[Remote Command Path]=HDD
[Auto On/Off]=Off
[Power Off Time]=18:20
[Power On Time]=09:00
[MISC3]
[OSD]=Off
[Scrolling Text]=Off
[Scrolling Text Speed]=2
[Scrolling Text Color=White on Orange
[Volume]=32
[Password of Setup Menu]=Off
[JPEG Display]=Quality
[Screen Mode]=Single Zone
[AUDIO & VIDEO]
[SPDIF Out]=Analog/DPCM
[Speakers Out]=5.1 Channels
[TV Standard]=NTSC
[TV Type]=4:3 Letter Box
[Video Connector]=C/S-Video
[HDMI Standard]=Auto EDID
[YPbPr Standard]=480p 60Hz
[VGA Standard]=640x480 60Hz
Note: The screen mode is only available for the MSD firmware and the JPEG display
option is not required for the D8-M3. The HDMI standard is only available for the D8-M3
with HDMI.
Page 21
D8
Software Configuration
3.7.2 Configuration Values
The following are the available settings for the config.conf file:
Setup Menu
config.conf
Value
Network Type:
[NetWork Type]
Off
Wired
Wireless
Automatic IP
Address:
[Automatic IP]
On
Off
Enhance
IP Address:
[IP Address]
e.g.
10.128.129.227
Mask:
[IP Mask]
e.g.
255.255.255.0
Gateway:
[IP Gateway]
e.g.
10.128.129.210
Primary DNS :
[IP Primary DNS]
e.g.
10.128.129.1
Secondary DNS:
[IP Secondary DNS] e.g.
10.128.129.1
ENCRYPTION
[Wireless ENCRYP] D8-M3 only
SSID:
[Wireless SSID]
e.g.
KEY:
[Wireless KEY]
e.g.
PC1 IP Address:
[PC1 Address]
e.g.
10.128.129.163
PC1 Directory:
[PC1 Dir]
e.g.
public
PC2 IP Address:
PC2 Directory:
[PC2 Address]
[PC2 Dir]
e.g.
e.g.
10.128.129.186
test
Time Zone:
[Time Zone]
WEP
WPA-TKIP
WL_HDD
UTC-12
UTC-11
UTC-10
UTC-9
UTC-8
UTC-7
UTC-6
UTC-5
UTC-4
UTC-3
UTC-2
UTC-1
UTC
UTC+1
UTC+2
UTC+3
UTC+4
UTC+5
UTC+6
UTC+7
UTC+8
UTC+9
UTC+10
URC+11
UTC+12
NTP Server:
[NTP Server]
On
Play List:
[Play List]
Off
Play List Path :
[Play List Path]
HDD
Download List:
[Download List]
Off
Download Path:
[Download Path]
e.g.
Download
Schedule:
[Download Time]
e.g. 18:00
Every 5 minutes
Every 30 minutes
Every 15 minutes
Every 60 minutes
Play Mode:
[Play Mode]
Standard
Manual
Page 22
Off
Single
PC1
Date
Time
PC2
Date/Time
USB1
USB2
Foreground Foreground/Skip
Background Background/Skip
http://69.10.157.55/test/d8/
Repeat
Standby
D8
Software Configuration
Remote Command [Remote
Path:
Command Path]
HDD
Auto On/Off:
[Auto On/Off]
On
Power Off Time:
[Power Off Time]
e.g.
18:20
Power On Time:
[Power On Time]
e.g.
09:00
OSD:
[OSD]
On
Off
Scrolling Text:
[Scrolling Text]
On
Off
Scrolling Text
Speed:
[Scrolling Text
Speed]
e.g. from 1-3
Slow = 1, Medium = 2, Fast = 3
Color:
[Scrolling Text
Color]
PC1
PC2
Off
2
White on Orange
White on Red
White on Blue
White on Black
Black on White
Volume:
[Volume]
15
e.g. from 0-32
Password of Setup [Password of
Menu
Setup Menu]
On
Off
JPEG Display
[JPEG Display]
Quick
Quality
Screen Mode
[Screen Mode]
Single Zone
Multi Zone 2
Multi Zone 1
Multi Zone 3
SPDIF Out:
[SPDIF Out]
Analog/DPCM
Encoded Digital
Speakers Out:
[Speakers Out]
2 Channels
5.1 Channels
TV Standard:
[TV Standard]
NTSC
PAL
TV Type:
[TV Type]
3:4 Letter Box
Video Connector:
[Video Connector] C/S-Video
HDMI Standard
[HDMI Standard]
YPbPr Standard:
[YPbPr Standard]
VGA Standard:
[VGA Standard]
3:4 Pan-Scan
YPbPr
Auto EDID 480I
480P
VGA
16:9
HDMI
720P 1080I
1080P
480p 60Hz
576p 50Hz
720p 60Hz
720p 50Hz
1080i 50Hz
1080i 60Hz
640x480 60Hz 800x600 60Hz
1024x768 60Hz 1280x720 60Hz
1280x1024
1280x960 60Hz
60Hz
1400x1050
1440x900 60Hz
60Hz
1600x1200
1920x1080
60Hz
60Hz
1920x1440
60Hz
Page 23
848x480 60Hz
1280x768 60Hz
1366x768 60Hz
1680x1050
60Hz
1920x1200
60Hz
D8
Software Configuration
3.8 Firmware Update
Periodically, the firmware will be updated to offer new functions and improvements. You
will find it on your vendor’s or our website. Download the latest version, store it on a USB
drive and start the upgrade procedure as follows.
Note: If possible, we always recommend storing the firmware on the internal CF card or
hard drive instead of doing the update from a USB disk.
1. Download the latest firmware, save it on your local disk and unzip it.
2. Store the BIN/COD file on a USB disk in the root directory (FAT32).
3. Connect the USB disk to your D8 and turn both devices ON.
4. Once ready, make sure the USB disk has been recognised by accessing the drive
in the file library (you won't see the BIN/COD file itself but you can see other files).
5. [D8-M1] Press the power button on your remote control to turn the D8 OFF.
[D8-M3] Go to the main screen, select Firmware and press the Enter key.
6. [D8-M1] Press the number keys 1234 in order to enter the firmware update page.
[D8-M3] Browse for the firmware on your USB disk.
7. [D8-M1] Select "Check" and press Enter to search for the new firmware. It will
display a message when the file has been found and verified.
[D8-M3] Select the firmware and press the Enter key.
8. [D8-M1] Select "Update" and press Enter to start the update procedure.
[D8-M3] Select “Yes” and press Enter to start the update procedure.
This might take several minutes and the screen may flicker a few times. DO NOT
turn off the unit or disrupt the upgrade process in any other way.
9. Once the update process shows 100%, wait a few more seconds, then reboot the
device by turning off the power switch and turn it back on a few seconds later.
10. Remove the USB disk and erase the firmware. Done!
WARNING: NEVER TURN OFF YOUR UNIT DURING THE FIRMWARE UPDATE
PROCEDURE AS THIS MAY DAMAGE YOUR DEVICE. IF FOR ANY REASONS (E.G.
POWER SUPPLY FAILURE DURING FIRMWARE UPDATE) THE PROCEDURE FAILS,
YOU MAY NOT BE ABLE TO OPERATE YOUR DEVICE ANY MORE.
Note: The firmware can also be updated via USB auto-copy or remotely via HTTP/FTP
download. See “Creating the update.d8 List” for more details.
Page 24
D8
Software Configuration
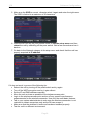
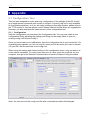
3.9 Wireless Connection
The D8 comes with an optional wireless kit. If installed, it can connect wirelessly to the
network using 802.11b or 802.11g. It supports WEP 64-bit and 128-bit encryption.
For the D8-M3, in addition to WEP, WPA-TKIP is also available.
1. Make sure the wireless kit has been installed properly. The antenna should be
connected to the MAIN connector on the PCI module.
2. Turn on your D8 and go to the Network category in the Setup menu.
3. Set the Network Type to Wireless and press the ENTER key.
4. When changing from Wired to Wireless, a window will pop up for you to enter the
SSID and the WEP key. If the wireless connection is not encrypted, leave the KEY
field blank.
For WEP 64-bit encryption, enter the corresponding 10 hexadecimal characters, for
WEP 128-bit encryption, enter the corresponding 26 hexadecimal characters. Press
the ENTER key to save it.
Page 25
D8
Software Configuration
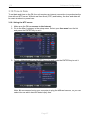
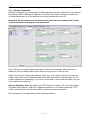
5. Make sure the SSID is correct, otherwise select it again and enter the right name.
The SSID is limited to a maximum of 20 characters.
6. Press the SETUP key on your remote control to exit the setup menu and then
reboot the unit by switching off the power switch. Wait a few seconds and turn it
back on.
7. Go back to the Network category in the setup menu and check that the unit has
properly acquired its IP address.
If it does not work, try some of the following tips:
· Reboot the unit by turning off the power switch and try again.
· Turn off the WEP encryption and try it again without.
· Set the IP and DNS address manually.
· Move the unit as close as possible to the wireless access point.
· Login to the wireless access point and turn off any speed or performance
enhancements for the wireless connection. Use only the most basic features.
· Talk to your system administrator to make sure the wireless connection is not
restricted to certain computers only and the D8 can access it.
· Make sure that the wireless kit works and has been installed properly.
· Test the unit in a different environment.
Page 26
D8
Software Configuration
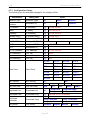
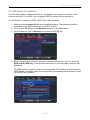
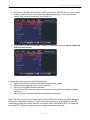
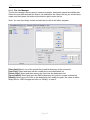
3.10 Time & Date
To set date and time on the D8, the unit requires an internet connection to synchronise the
time with an NTP server. Without real time clock (RTC) and battery, the time and date will
be reset at reboot or power loss.
3.10.1 Using the NTP server
1. Make sure the D8 has access to the internet.
2. Go to the Misc1 category in the setup menu. Select your time zone from the list
and press the ENTER key to set it.
3. Select a time server from the NTP Server list and press the ENTER key to set it.
Note: We recommend using your computer to ping the different servers, so you can
select the one which has the fastest reply time.
Page 27
D8
Software Configuration
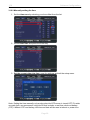
4. At this time, the date will still show 1970, so press the SETUP key on your remote
control to exit the setup menu and then reboot the device. Turn off the power
switch, wait a few seconds and turn it back on.
5. After reboot, go back to the Misc1 category in the setup menu to check if the date
and time are correct.
If it does not work, try some of the following tips:
· Reboot the unit by turning off the power switch and try again.
· Make sure the unit has access to the internet.
· Set the IP and DNS address manually.
· Ping all the NTP servers from your computer and select the one with the fastest
reply time.
· Use the wired connection instead of wireless and try again.
Note: The time will only be synchronised with the NTP server at boot up. After changing
the server, remember to reboot. To retain accurate time over a long period of time, we
recommend using the D8 that includes a real time clock and battery (RTC) or using the
Auto ON/OFF function to reboot once a day and synchronise the time.
Page 28
D8
Software Configuration
3.10.2 Manually setting the time
1. Set the time zone by selecting your time offset from the list.
2. Select Date/Time and press the Enter key.
3. Set the current date plus time, save the settings and exit the setup menu.
Note: Setting the time manually only works when the NTP server is turned OFF! To retain
accurate time, we recommend using the D8 that includes a real time clock and battery
(RTC). Without RTC and battery, the time and date will be reset at reboot or power loss.
Page 29
D8
Software Configuration
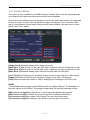
3.11 Screen Mode
This option is only available for the MSD firmware release. Other than the standard single
zone display, this option also offers pre-set multi-zone templates.
Note: Due to the different memory allocation used for the multi-zone display, the supported
bit rate for videos is lower than the standard single zone display. If you encounter video
lag or other playback issues when using the multi-screen display, you may have to lower
the bit rate of your videos.
[Single Zone] Standard display with a single zone only.
[Multi Zone 1] Main screen on the right side, static images on the left and banner on top.
[Multi Zone 2] Main screen on the left side, static images on the right and banner on top.
[Multi Zone 3] Standard display with a single zone plus static info text field.
[pic] 180x420px JPG photos for the static images on left or right side (max 128 images).
[toppic] 540x60px JPG photos for the banner image on top (max 128 images).
[info] Static text field with a width of 180px, displaying the message in the info.txt file.
D8-M3
The available screen modes for the D8-M3 series are slightly different. The dimension of
the main screen is 810x630px. The height of toppic and the scrolling message is 90px.
[Main screen on right] See Multi Zone 1, same layout but different dimensions.
[Main screen on left] See Multi Zone 2, same layout but different dimensions.
[Info screen on left] See chapter “Info Screen” for more about this layout.
[Info screen on right] See chapter “Info Screen” for more about this layout.
Page 30
D8
Software Configuration
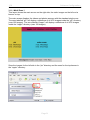
3.11.1 Multi Zone 1
This layout shows the main screen on the right side, the static images on the left and a
banner on top.
The main screen displays the videos and photos as seen with the standard single zone.
The zone labelled “pic” will display a slideshow of all JPG images inside the “pic” directory
(max 128 images). The zone labelled “toppic” will display a slideshow of all JPG images
inside the “toppic” directory (max 128 images).
Store the images for the left side in the “pic” directory and the ones for the top banner in
the “toppic” directory.
Page 31
D8
Software Configuration
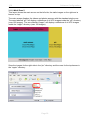
3.11.2 Multi Zone 2
This layout shows the main screen on the left side, the static images on the right and a
banner on top.
The main screen displays the videos and photos as seen with the standard single zone.
The zone labelled “pic” will display a slideshow of all JPG images inside the “pic” directory
(max 128 images). The zone labelled “toppic” will display a slideshow of all JPG images
inside the “toppic” directory (max 128 images).
Store the images for the right side in the “pic” directory and the ones for the top banner in
the “toppic” directory.
Page 32
D8
Software Configuration
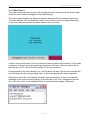
3.11.3 Multi Zone 3
This layout shows the main screen, the scrolling text and a small area in the bottom right
corner for a short static message and time/date display.
The main screen displays the videos and photos as seen with the standard single zone.
The zone labelled “info” will display the date, time and then a short message depending
on the video and the text that has been added to the info.txt file.
Create a text file and name it info.txt. Add the file name (without file extension) of the video
(maximum 32 bytes) and a short message (maximum 13 bytes). Store the info.txt file on
the hard drive or CF card of the D8, placing it in the root directory.
During playback, the zone labelled “info” will first show the date, then the time and last the
short message for the corresponding video. It will keep repeating the same sequence.
Without the info.txt file, it will display the date, time and weekday. If there is no specific
message for the video currently playing, it will fall back to the “info” message on the first
line of the info.txt file. In the example below, it would therefore display “Macpower”.
Page 33
D8
Software Configuration
3.11.4 Info Screen
This layout is only available for the D8-M3 series. For the info text, an external TTF font is
required. Use any TTF font you like, rename it “font.ttf” and store it in the root directory of
the internal hard drive or CF card. This font will then also be used for the GUI.
The main screen displays the videos and photos as seen with the standard single zone.
The zone labelled “info” will display the date, time and weekday. It can be replaced with a
text message, changing every full hour. The zone labelled “pic” will display a slideshow of
all JPG images inside the “pic” directory (max 128 images).
Create a text file and add up to 5 lines, each with up to 12bytes. Depending on when you
would like to show this message, rename the text file with a two digit number from 00~23
and then store it in the “info” directory.
As an example, to display the message from 3-4PM, name it “15.txt”. To display the same
message from 3-5PM, create another copy of the same text file, name one “15.txt” and the
other “16.txt”. If there is no text file for that particular hour, it will instead display the date,
time and weekday.
Page 34
D8
Playback
4 Playback
There are three basic playback scenarios for the D8. The following are detailed
explanations and step by step instructions on how to set the device up.
If you jumped here directly and skipped the previous parts of the manual, we strongly
recommend reading the previous chapters, especially if you have not yet set up the device.
Mode 1 - HTTP/FTP Download
Mode 2 - SMB Streaming
Mode 3 - USB Drive
Note: We recommend using Mode 1 with an internal drive for smooth and reliable
playback. This mode will at the same time offer the most flexible setup.
Page 35
D8
Playback
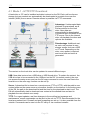
4.1 Mode 1 - HTTP/FTP Download
A hard drive or CF card is installed and data is stored on the D8. Each unit has its own
storage but new content can automatically be downloaded at a certain time over the
internet (WAN) from a server. Remote access is possible via TFTP commands.
Advantage: Uninterrupted data
playback is guaranteed, as all
files are stored on the local
drive. New data can
automatically be downloaded
via internet from a website or an
FTP server. Due to the internal
drive, all playback functions and
options are available.
Disadvantage: Additional cost,
as each unit requires its own
storage media, such as a HDD
or CF card. Depending on the
drive, more power is required
and more heat and noise is
generated.
The content on the local drive can be updated in several different ways:
USB: New data is stored on a USB drive or USB thumb drive. To update the content, the
USB drive has to be connected to the USB port on the D8. Via remote control, the user
can access the setup menu and use the file copy command to move the new files to the
local drive or the auto copy function can be set up.
Server: A download list is stored on a remote server (FTP or HTTP), with the path to new
content either on the same server or at another location on the internet. In the setup menu
of the D8, the path to the download list and the time for the download to start is set. The
D8 will automatically start to download new content at the allotted time and start to
playback the new content once ready.
TFTP: For urgent updates, real time changes to the scrolling text message and
maintenance, remote commands can be sent to the unit via TFTP. Recommended for the
local area network but if firewall and port forwarding are set up, it is also possible from the
outside. Commands can be sent via the PC utility or via command console.
Page 36
D8
Playback
4.1.1 Disk Management
To manage the data on the local hard drive and to update the files with new content,
access the file copy and erase command in the MISC2 category.
All File Copy
1. Press the SETUP button and go to All File Copy in the MISC2 category.
2. Choose one of the functions and press ENTER to start the copy process.
3. The copy status will be displayed on screen and once finished, it will return to the
main screen.
Note: Only files in the root directory will be copied. Any existing files with the same
file name will be overwritten. To copy single files or sub-folders, use the SELECT
button on the remote control, select the file and press the button to copy the file.
All File Erase
1. Press the SETUP button and go to All File Erase in the MISC2 category.
2. Select the drive and press ENTER to start the process.
3. It will erase all files on the selected drive and return to the main screen when done.
Note: To erase only single files or a sub-folder, use the CLEAR button on your
remote control, select the file or folder and press the button to erase it.
Page 37
D8
Playback
4.1.2 Scheduled Download
To download new content over the internet and store it on the local drive, the D8 can be
scheduled to download new files and certain commands automatically. It can access an
FTP server or an HTTP link.
To use this function, enable the Download List by setting it to Foreground or Background
and set the path to your server. On the server, create the update.d8 file and any other
required files such as down.lst, message.txt, playlists and media files to be downloaded.
1. Press SETUP on your remote control to enter the D8’s setup menu.
2. In the MISC1 category under Download List, select Foreground or Background.
Foreground will show the download progress on-screen, Background will hide it and
not interrupt playback. Skip will not download the files that already exist on the local
drive (checks file name). Files with the .lst extension will always be downloaded.
3. Set the path to your server by entering the URL with a maximum of 80 characters
(30 per line and 20 on the last line).
4. For the URL, use the IP address and enter the path to the folder where the
update.d8 list is located. This can either be an HTTP or a FTP address.
For password protected FTP accounts, use ftp://login:pass@IP/folder/.
When the string [MAC] is added, it will replace it with the wired MAC address (one
word, lower case) of the D8.
Page 38
D8
Playback
5. Set a time when the download should start and save the settings.
6. On your server, prepare all the files required for the download.
7. The D8 will first look for the update.d8 file. It will download and execute the files
that are set to 1 and ignore those that are set to 0.
8. If the down.lst path in the update.d8 file was set to 1, it will start downloading the
new files according to the download list.
9. Once the download has finished, the unit will automatically refresh its content and
playlist if necessary. Depending on the play mode, it will stop at the library screen
or continue playback.
Note: If the D8 fails to download a file, it will skip and jump to the next one on the list. If it’s
stuck in the middle of downloading a file and stays at the same percentage for more than
5 minutes due to network or connection problems, it will reboot automatically.
Page 39
D8
Playback
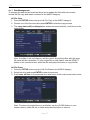
4.1.3 Creating the update.d8 List
The first file that the D8 will access is the update.d8 list. According to those settings, it will
execute further commands and download new files.
1. Create a new text file and call it “update.d8”.
2. Add the following lines, followed by one empty line (use 1 to enable the download
or command and 0 to disable it or simply leave out the ones you don’t need):
delete.lst 0
message.txt 1
play.lst 1
down.lst 1
upload.lst 1
volume 3
FWupdate 0
Version 20071212
config 0
3. Save and store the file on your server. This location should be identical to the
download path you have entered on your D8.
The commands will be executed in following order:
Order Command
Function
Details
1
delete.lst
Deletes files
according to the
delete.lst file
If set to 1, it will download the delete.lst file
and erase the existing files on the local
drive according to the delete list. Use *.* in
the delete.lst to erase all files in the root
directory or * to erase all files. Store the
file in the same location as the update.d8
file.
2
message.txt Downloads the
message.txt file
If set to 1, it will download the message.txt
file and replace the current text message.
Store the message.txt file in the same
location as the update.d8 file.
Page 40
D8
Playback
3
play.lst
Downloads the
play.lst file
If set to 1, it will download the play.lst file
and replace the current playlist. Store the
play.lst file in the same location as the
update.d8 file. If you are using multiple
playlists, set this option to 0 and add the
path to your multiple playlists to the
download list instead.
4
down.lst
Downloads files
according to the
down.lst file
If set to 1, it will download the down.lst file
and download all the media files as well as
the multiple playlists which are included in
that list. Store the down.lst file in the same
location as the update.d8 file.
5
upload.lst
Uploads files
according to the
upload.lst file
If set to 1, it will download the upload.lst
file from the server and then upload the
files according to that list to a remote FTP
server. Store the upload.lst in the same
location as the update.d8 file.
6
volume
Changes Volume
Volume followed by a number from 0-32
will set a new volume level without the
need of restoring the configuration.
7
FWupdate
Updates Firmware
8
config
Restores settings
according to the
config.conf file
If set to 1, it will check the Version and if
the date is newer than the current one,
download the latest firmware and update it
Important:
Make sure the CF automatically.
card or HDD has
The new firmware has to be stored in the
sufficient free
same location as the update.d8 file with
space (~10MB)
the file name as follows (change the date)
for the new
“mpt20070801.bin”. The date (8 digits) has
firmware before
to be added to the update.d8 file on the
using this
next line like this “Version 20070801” (see
function!
screenshot of the update.d8 file).
If set to 1, it will download the
configuration file (config.conf) and restore
the settings according to that file. Store the
config.conf file in the same location as the
update.d8 file.
Note: If both FWupdate and config are enabled, it will first upgrade the firmware and
then restore the settings according to the config.conf file. If the volume is set via
update.d8 and config, the one in the config.conf file will be used.
Note: Make sure the last character on the line is 1 or 0 and NOT and empty space! If set
to 0 or if there is no such command in the update.d8 file, that file or command will be
ignored. If set to 1, it will download and execute that file or command. The Skip function of
the download mode will be overwritten for the files included in the update.d8 list.
Page 41
D8
Playback
4.1.4 Creating the Download List
If the down.lst in the update.d8 list is enabled, the D8 will download the new content
according to the download list. Create a new text file called “down.lst”, add the URL to the
media files to be downloaded and store it on your server (same location as update.d8).
1. Create a new text file and call it “down.lst”.
2. Add the URL to the multiple playlists as well as the media files, followed by a
space and the path to define the directory where the new files are to be stored. Use
the IP address and the complete address, one file per line.
3. Save the download list and store the file on your server in the same location as
the update.d8 file.
Note: The URL to the media files do not have to be on the same server but make sure to
use the IP address instead of the domain name. Add one more empty line at the end. The
limit is 120 bytes per line and 2000 lines in total.
4.1.5 Downloading New Content
At the scheduled time, the D8 will automatically connect to the internet. It will read the
content of the download list and start downloading the files accordingly. The media files
will be stored and added to the existing files on the local drive.
If the download mode is set to Foreground, it will show the progress on-screen and if set
to Background, the download will be hidden and the playback uninterrupted. Use the Skip
option to skip the file if the same file name already exists on the local hard drive. Once
finished, the unit will automatically refresh its content and playlist when necessary.
Page 42
D8
Playback
4.1.6 Creating the Upload List
If the upload function in the update.d8 list is enabled, the D8 will first get the upload.lst
from the server and then upload the content according to that upload list.
1. Create a new text file and name it upload.lst.
2. Add the path to the files on the D8 (source), followed by a space and then the URL
to the remote FTP server (destination) where the files are to be stored. Use the IP
address and the complete address but without the file name, one file per line.
3. Save the upload list and store the upload.lst file on your server in the same
location as the update.d8 file.
Tip: For password protected FTP accounts, use ftp://login:pass@IP/folder/. When the
text string [MAC] is added, the system will replace it with the wired MAC address (one
word, lower case) of the D8.
Note: The URL to the remote directory does not have to be on the same server but make
sure that the D8 has the rights to upload files to that FTP folder. We recommend using the
IP address instead of the domain name. Add one more empty line at the end.
Page 43
D8
Playback
4.1.7 FTP Server
For demonstrations and a convenient way to update the content, the following is an
example of how to set up the Cerberus FTP server on a PC. You can of course also use a
different application or a device like the LAN disk.
1. Install the Cerberus FTP server on your computer.
2. Follow the setup wizard and set up an anonymous user. In this example, the files
for the download are stored in the ftp directory on the F: drive. The root folder is
therefore set to F:\ftp, with permission to download and upload.
3. In the next step, the FTP server will attempt to detect the external IP address of
your WAN. If port forwarding on your router is set up to allow such traffic, the FTP
server can also be accessed from outside the local network. If not required, you can
skip this step.
4. The last step with the security settings can be skipped. Leave this turned off.
5. If necessary, modify your firewall to allow the Cerberus FTP server access to the
local network and also allow the D8 access to the files on your computer.
6. Create the update.d8 and down.lst list and store it in the root folder you set up in
step 2. In this example, a video stored in the same directory will be downloaded
and stored in a new sub-folder called vid.
Page 44
D8
Playback
7. Store the files you like to download in the root folder or in a sub-folder in the same
directory you set up in step 2. In this example, it’s a WMV video.
8. On the D8, go to the Misc1 category in the setup menu and enter the path to your
FTP server. In this example, both D8 and computer are on the same local network.
The path is ftp://, followed by the IP address of the computer and the location of the
root folder /ftp. For password protected accounts, use ftp://login:pass@IP/folder/.
9. Set a time for the scheduled download or use the configuration tool to send the
downfromserver command, initialising the download immediately.
10. In the log of the FTP server, you can now see the download process in real-time.
Page 45
D8
Playback
4.2 Mode 2 - SMB Streaming
The D8 is used without internal storage with the content stored on a PC at the same
location and data is accessed over the local area network (LAN). The remote storage
space could be a PC running WinXP or it could be a network disk as an example.
Advantage: No local hard drive is required and the data is easily
maintained or updated by a system administrator with access to that
local computer. Depending on the processing power, several units can
access the same computer.
Disadvantage: Depending on the bandwidth and the specifications of
the computer, this set up might be limited to 2-3 displays only. If the
computer crashes or the network is unstable, playback will suffer or not
work at all. Many of the functions and options are only available with an
internal drive.
Note: Data on the shared folder can only be accessed in the standard
play mode via remote control or if the playlist is enabled.
SMB: The data on the shared folder can be accessed via remote control and played
directly over the network connection. This mode is only recommended for the standard
media player. If an internal drive is installed, data can be copied from the shared folder to
the internal drive by selecting the file and pressing the SELECT button on the remote
control.
TFTP: For real time changes to the scrolling text message and maintenance, remote
commands can be sent to the unit via TFTP. Commands can be sent via the PC utility or
via command console.
Page 46
D8
Playback
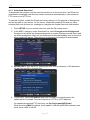
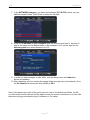
4.2.1 Shared Folder on WinXP
To access a shared folder on a local PC, you will need a computer which is connected to
the same local network as your D8. The guest account has to be enabled for the D8 to
access the computer.
1. Set up a shared folder on your PC. To do so, right click on a folder, go to
Properties and select the Sharing tab. Enable sharing for this folder and apply the
settings.
2. Your folder should now have a new icon with a picture resembling a hand.
3. Make sure your Firewall is set up to allow access to the shared folder.
4. On the D8, press SETUP on your remote control to enter the D8’s setup menu.
Page 47
D8
Playback
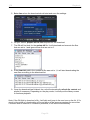
5. In the NETWORK category, you have two locations (PC1 & PC2) where you can
add the shared folders. Press Enter to setup the file path.
6. Enter the IP address of your computer plus the directory and save it. As seen in
step 1, the name for the shared folder in this example is 123, so the input for the
directory path here would therefore be 123.
Note: Passwords are not supported, so to access the PC, a guest account has to
be enabled.
7. In order for these changes to take effect, exit the setup menu and reboot the
device immediately.
8. After rebooting, you can access the remote folder through your local network. Go to
the file library and access the files in PC1 or PC2.
Page 48
D8
Playback
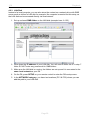
4.2.2 Shared Folder on Windows Vista
To access a shared folder on a local PC, you will need a computer which is connected to
the same local network as your D8. To use this function on Windows Vista, file sharing has
to be turned on, password protected sharing turned off and a guest account with at least
contributor level has to be added.
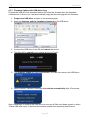
1. Go to the Control Panel, then to the Network and Sharing Center. Make sure file
sharing is turned on and password protected sharing is turned off.
2. Set up a shared folder on your PC. To do so, right click on a folder, go to
Properties and select the Sharing tab. Click on the Share button.
Page 49
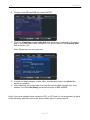
D8
Playback
3. Select the guest account from the drop down list and add it. Change the
permission level to Contributor or Co-owner and then click on Share.
4. Your folder is now shared. Write down the share name and then click on Done
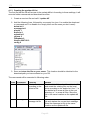
to close the dialog.
5. Make sure your Firewall is set up to allow access to the shared folder.
6. On D8, press SETUP on your remote control to enter D8’s setup menu.
Page 50
D8
Playback
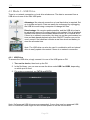
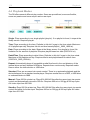
7. In the NETWORK category, you have two locations (PC1 & PC2) where you can
add the shared folders. Press Enter to setup the file path.
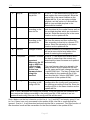
8. Enter the IP address of your computer plus the directory and save it. As seen in
step 4, the name for the shared folder in this example is 123, so the input for the
directory path here would therefore be 123.
9. In order for these changes to take effect, exit the Setup menu and reboot the
device immediately.
10. After rebooting, you can access the remote folder through your local network. Go to
the file library and access the files in PC1 or PC2.
Note: If the permission level of the guest account is set to its default level Read, the D8
can still access the files but will not be able to erase the remote commands on its own. We
therefore strongly recommend using Contributor or Co-owner.
Page 51
D8
Playback
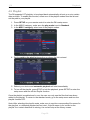
4.2.3 LAN Disk
Instead of a local computer, you can also store the content on a network drive with SMB
server such as inXtron’s LAN disk for example. No computer is needed for this setup, as
the LAN disk can be accessed directly via local network.
1. Set up a shared SMB folder on the LAN disk (example here à 123).
2. Write down the IP address of your LAN disk. You will need to enter this IP in step 7.
Note: DO NOT enter any passwords for SMB folders.
3. Make sure the LAN disk is running, the folders are set up and it is connected to the
same local network as your D8.
4. On the D8, press SETUP on your remote control to enter the D8’s setup menu.
5. In the NETWORK category, you have two locations (PC1 & PC2) where you can
add the path to your LAN disk.
Page 52
D8
Playback
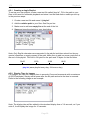
6. Choose a link (PC1 or PC2) and press ENTER.
7. Enter the IP address of your LAN disk plus the directory and save it. As seen in
step 1, the SMB folder in this example is 123, so the input for the directory path
here would be 123.
Note: Passwords are not supported.
8. In order for those changes to take effect, exit the setup menu and reboot the
device immediately.
9. After rebooting, you will be able to access the remote folder through your local
network. Go to the file library and access the files in PC1 or PC2.
Note: If you have updated some content on PC1 or PC2 and it is not recognised, go back
to the file library and then access the shared folder again or reboot the D8.
Page 53
D8
Playback
4.3 Mode 3 - USB Drive
There is no network connection or local drive whatsoever. The data is accessed from a
USB drive via one of the D8’s USB ports.
Advantage: No network connection or local hard drive is required. Set
up is simple and quick. Data can easily be exchanged by unplugging
the USB drive and using a computer to change the files.
Disadvantage: No remote update possible, and the USB drive has to
be physically removed if content needs to be updated. Not all playback
functions and options are available because there is no internal drive.
If there is no network connection, the time can not be synchronised, so
time and date based playback plus Auto ON/OFF function can not be
used, except if the hardware includes a real time clock and battery to
store the accurate time.
Note: The USB drive can also be used in combination with an internal
drive to easily update the content if there is no network connection.
4.3.1 USB Drive
To access the USB drive, simply connect it to one of the USB ports on D8.
1. Turn on the device, then boot up the D8.
2. In the file library, you can now access the drive under USB1 or USB2, depending
on which port is used.
3. File systems supported are FAT16 and FAT32.
Note: Self powered USB drives are recommended. If more than one bus powered USB
drive is connected, there might not be sufficient power to run the second drive.
Page 54
D8
Playback
4.3.2 USB Auto-Copy
The USB auto-copy function is designed to be used with an internal drive, to quickly and
easily update the content if there is no network connection for the D8. At boot up, it will
automatically copy all files from the external USB drive and store them on the internal
drive or CF card.
1. Connect the USB drive to your computer (WinXP or Vista)
2. Start the D8 Drive Tool and select the drive letter of your USB disk.
3. If the drive is not formatted using FAT32 yet, select FAT32 and choose “Format”. If
it is already formatted with FAT32, choose “Don’t Format”.
4. To erase all files on the USB drive after the copy process is done, select “Erase
USB after copy”. Without this option, the files will remain on the USB drive.
5. Click on Start to prepare the USB drive for the auto-copy function.
6. Close the D8 Drive Tool.
7. Store the files that you want to copy to the D8 on the USB drive.
8. Disconnect the USB drive from the computer and connect it to the D8.
9. Reboot the D8.
10. At boot up, it will automatically copy all files in the root directory of the USB drive
and store them on the internal drive of the D8.
11. Done, remove the USB drive from the D8.
Tip: If remote commands are stored on the USB drive, they will also be copied to the D8
and executed after the copy process is finished. Remember to remove the USB drive as
soon as all files have been copied or select “Erase USB after copy” to prevent the same
process repeating itself forever.
Note: Auto-copy only works when the drive has been prepared using the D8 Drive Tool.
Page 55
D8
Playback
4.3.3 Firmware Update with USB Auto-Copy
Prepare the USB drive as described earlier and store the firmware plus the fwupdate
command on it. At boot up, it will automatically copy the files and upgrade the firmware.
1. Prepare the USB drive as seen on the previous page.
2. Store the firmware and the fwupdate command on the USB drive.
3. Connect the USB drive to the D8 and reboot the device.
4. The files will be copied to the internal drive or CF card.
5. The firmware update will start automatically. You can now remove the USB drive.
6. When finished, it shows a message and reboots automatically after 10 seconds.
Note: Remember to remove the USB drive as soon as all files have been copied or select
“Erase USB after copy” to prevent the firmware update from repeating itself forever.
Page 56
D8
Playback
4.4 Playback Modes
The D8 offers several different play modes. Some are pre-defined, some are flexible,
some are passive and some require active user input.
Single: Plays according to one single playlist (play.lst). If no playlist is found, it stops at the
library screen. Requires play.lst.
Time: Plays according to the time. Defaults to title.lst if a gap in the time exists. Maximum
of 24 playlists per day. Requires title.lst and time based playlist (_0900_1800.lst).
Date: Plays according to the date. Stops at the library screen if no playlist is found. No
limitation for the amount of playlists. Requires playlist based on date (20070101.lst).
Date&Time: Plays according to date & time. Defaults to title.lst if a gap in the time exists.
Maximum of 24 playlists per day. Requires title.lst and playlist based on date & time
(20070101_0900_1800.lst).
Repeat: Automatically plays all compatible media files found in the root directory of the
internal drive and any attached USB drive. Repeats them continuously. Requires media
files on either the internal drive or USB drive.
Standard: Files are accessed via remote control. There is no automatic playback and the
device behaves like a standard media player. Requires media files on a HDD, a USB drive
or a shared folder via SMB.
Manual: Plays 000 file at start up. Plays 001-999 AVI files after the users input via remote
control and automatically returns to 000 file. Requires 000.avi or 000.jpg & 000.mp3 plus
AVI video clips from 001-999.
Standby: Plays 000 file at start up. Plays 001-999 AVI files after the users input via remote
control and waits for further input. Requires 000.avi or 000.jpg & 000.mp3 plus AVI video
clips from 001-999.
Page 57
D8
Playback
4.5 Playlist
The D8 supports LST playlists, to be played back automatically at boot up or at a certain
date and time. To enable this function, select one of the playlist modes from the list and
set the path to your playlist.
1. Press SETUP on your remote control to enter the D8’s setup menu.
2. In the MISC2 category, make sure the play mode is set to Standard.
3. In the MISC1 category, select one of the playlist modes.
4. Set the path to the playlist depending on where the list is stored.
5. Reboot your device and automatic playback will start immediately.
6. To turn off the playlist, press STOP to halt the playback, press SETUP to enter the
setup menu and turn off the Playlist function.
Once the playlist is enabled and in use, the user can only see the files that have been
added to the playlist. To return to the standard mode, go to the setup menu and turn the
playlist function OFF.
Note: After selecting the playlist mode, make sure to use the corresponding file names for
the playlists, or otherwise playback will not start. If the file name is not correct or the
playlist for a certain time/date is missing, the unit will stop at the library screen.
Page 58
D8
Playback
4.5.1 Creating a single Playlist
To set up your own playlist, create a new text file called “play.lst”. Fill in the path to your
files, to be used for automatic playback and store it on the hard disk or media you set up
in the previous steps.
1. Create a new text file and name it “play.lst”.
2. Add the relative path to your files. One file per line.
3. Make sure to add one empty line at the end of the list.
4. Save and store the playlist on your local drive.
Note: Only English characters are supported in the playlist and there should not be any
special characters or empty spaces in the path. Make sure to add one more empty line at
the end of the playlist. The limit is 30 bytes for the path and 70 bytes for the file name.
09:00
12:00
15:00
18:00
play.lst (same playlist every day, 24 hours a day)
4.5.2 Display Time for Images
For images, you can set a display time in seconds (5 second increments with a maximum
of 65535 seconds). Simply add a space after the file path and write the time in seconds.
Refer to the following image as an example.
Note: The display time will be added to the standard display time of 10 seconds, so if you
write 5, it will display the image for 15 seconds.
Page 59
D8
Playback
4.5.3 Playlist by Time
In order to use different playlists throughout the day without having to manually update
them, you can create up to 24 different playlists based on the time.
Example: _0900_1800.lst
1. Create a playlist as usual.
2. Rename the file from play.lst to the time when that list should be used. As an
example, for the files to be played from 9AM to 6PM, rename the file
_0900_1800.lst. Always us 4 numbers for each time with an underscore in front.
3. Create up to 24 lists and store them on the local drive in the root directory.
4. For the playlist mode on the D8, select Time.
5. Whenever the time is up, the D8 will automatically refresh the content and if
there is a specific playlist found for that time, it will rename the file to play.lst and
use it for playback during the defined period.
6. If there is a gap in between some of the time based playlists, it will automatically
use the title.lst playlist. If that does not exist, it will pause at the library screen.
Note: To use the playlist by time function, make sure the D8 has access to a NTP server to
synchronise the time. Do not let the playlists overlap themselves in time!
09:00
12:00
_0000_0900.lst _0900_1200.lst
15:00
title.lst
18:00
_1500_1800.lst
title.lst
If there is no playlist for a certain time and there is a gap until the next playlist starts, the
D8 will automatically use the title.lst playlist instead. If there is no title.lst, it will pause at
the library screen and continue playback as soon as the time is up for the next playlist.
Note: To use only one playlist throughout the day, use the single playlist mode instead.
Page 60
D8
Playback
4.5.4 Playlist by Date
In order to have different playlists throughout the week without having to manually update
them every day, you can create daily playlists based on the date.
Example: 20070101.lst (year, month, date)
1. Create a playlist as usual.
2. Rename the file from play.lst to the date when that list should be used. As an
example, for the files to be played on January 1st 2007, rename the file
20070101.lst. Always use 8 numbers for the date.
3. Create as many lists as you like and store them on the local drive in the root
directory.
4. For the playlist mode on the D8, select Date.
5. Every day at midnight, the D8 will automatically refresh the content and if there
is a specific playlist found for that day, it will rename the file to play.lst and use it for
playback throughout the day. If the unit is not running at midnight, it will refresh the
content as soon as it’s started.
Note: Always use 8 numbers for the date (example: 20070408). To use the daily playlist
function, make sure the D8 has access to a NTP server to synchronise the time and date.
2007/01/01
X
2007/01/02
20070101.lst
2007/01/03
20070102.lst
2007/01/04
X
20070104.lst
If there is no particular playlist for that day, the D8 will pause at the library screen and
continue playback as soon as it can find a new playlist for that particular day.
Page 61
D8
Playback
4.5.5 Playlist by Date&Time
In order to use different playlists throughout the day and depending on the date without
having to manually update them, you can create playlists based on the date&time.
Example: 20070101_0900_1200.lst (year, month, day, time)
1. Create a playlist as usual.
2. Rename the file from play.lst to the date&time when that list should be used. As an
example, for the files to be played from 9AM to 6PM on January 1st 2007, rename
the file 20070101_0900_1800.lst. Always us 8 numbers for the date and 4
numbers for the time with an underscore in between.
3. Create as many lists as you like but with a maximum of 24 per day and store them
on the local drive in the root directory.
4. For the playlist mode on the D8, select Date/Time.
5. Whenever the time is up, the D8 will automatically refresh the content and if
there is a specific playlist found for that date&time, it will rename the file to play.lst
and use it for playback during the defined period.
6. If there is a gap in between some of the time based playlists, it will automatically
use the title.lst playlist. If that does not exist or there is no playlist at all for that day,
it will pause at the library screen.
Note: To use the playlist by date&time function, make sure the D8 has access to a NTP
server to synchronise the date and time. Do not let the playlists overlap themselves in time!
2007/01/01
title.lst
09:00
18:00
20070101_0900_1800.lst
24:00
title.lst
2007/01/02
20070102_0000_2400.lst
If there is no playlist for a certain time and there is a gap until the next playlist starts, the
D8 will automatically use the title.lst instead. If there is no playlist on that date at all and no
title.lst, it will pause at the library screen and continue playback as soon as the time is up
for the next playlist.
Page 62
D8
Playback
4.6 Automated Play Modes
There are 3 automated play modes and a standard mode. In the standard mode, the files
can be accessed by using the remote control, like on any other media player. For
automated playback, select Repeat, Manual or Standby.
4.6.1 Standard
Default setting for the standard media player with user input via remote control. The D8
will show the main page after boot up and present the user a choice to access the files
using the file library.
4.6.2 Repeat
In this mode, the playlist function will be turned OFF. The D8 automatically plays all files
stored in the root directory of the internal drive or any attached USB drive as soon as the
unit is turned on and plays them continuously. The playback sequence will be according to
the file name and in following order from HDD to USB1 and USB2.
Reboot the device after you have enabled this function. To turn it OFF, press STOP on
your remote control to pause the playback, then press SETUP to enter the setup menu, go
back to Misc2 and change it to STANDARD.
Note: Enabling the playlist function (Misc1) will automatically reset the play mode to
STANDARD.
Page 63
D8
Playback
4.6.3 Manual & Standby
Playback mode with quick access to certain files via numeric buttons on the remote control
from 000-999. This mode can be used for kiosks and other digital signage applications,
where users may request certain information with the push of a button. Reboot the device
after you have enabled this function.
When this mode is used, the player will require a title file (000.avi or 000.jpg & 000.mp3)
and up to 999 AVI files, which are played when the numeric buttons are pressed. In
Manual mode, once the AVI file has finished playback, it will return to the title file until
another button is pressed. In Standby mode, it will wait for further user input. Those files
can either be stored on the local hard drive or the CF card.
Button
000 (title file)
001-999
File
000.avi or 000.jpg & 000.mp3
001.avi ~ 999.avi
Note: If you use the Manual or Standby mode and there is no 000 file, it will display a
message saying “No Title Files Found”. The same message will appear if the 000 file is
not an AVI or JPG&MP3 file.
Note: Make sure that there is no more than one file with the same file name!
4.6.4 Auto ON/OFF
Turning this function ON will allow you to set a time for the unit to automatically turn ON
and also a time for it to turn OFF again.
1. Press SETUP on your remote control to enter the D8’s setup menu.
2. In the MISC2 category, turn on the Auto ON/OFF function.
3. Select the ON/OFF Time and enter a time for each option.
Note: Make sure the NTP server is enabled and the D8 has a connection to the internet to
synchronise the time. If it can not connect to the internet at boot up, the system time will
be off and the Auto ON/OFF function will therefore be inaccurate.
Page 64
D8
Playback
4.7 RS-232 Commands
Some models (.e.g. D8-M3 RS232) come equipped with a RS-232 serial connection. This
input can be used to send certain commands from a touch panel, keyboard, barcode
scanner or other equipment.
In order to use this function, go to the Misc2 category in the setup menu and select either
the Manual or the Standby play mode. The RS-232 baud rate includes 3 presets (9600,
19200, 38400) and can also be set in the Misc2 category of the setup menu.
Subcommand:
The D8 media player supports six commands from M1 to M6.
Value:
The value for the volume or the file name after the command may include up to 12 bytes,
including the file extension.
M1 - Play
Function Start to play a certain file. This is the same as pressing the Enter button on
the remote control.
Example M1 abcdefgh.avi
Note
The maximum length of the file name including the extension is 12 bytes. If
the file does not exist, it will return the hexadecimal digit 32.
M2 - Pause/Continue
Function Depending on the current status, this command will either pause or continue
playback. This command does not require a value for the file name.
Example M2
M3 - Stop
Function Stop playback. This command does not require a value for the file name.
Example M3
M4 - Mute
Function Depending on the current status, this command will either mute or turn on
the volume of the audio output. This command does not require a value.
Example M4
M5 - Playback Status
Function Sending this command will return an ASCII digit to indicate if the media
player is currently playing a file or not. Number 31 indicates that a file is
playing and number 30 indicates that currently, there is no file playing.
Example M5
M6 - Volume
Function Set the volume of the audio output with a value from 00 (mute) to 32
(maximum).
Example M6 06
Page 65
D8
Playback
4.8 Scrolling Text
The D8 can display on-screen messages in the form of a scrolling text (ticker). For the D8M1, store a text file “message.txt” on the local drive and start playback. For the D8-M3,
use the configuration tool to create a bitmap image and send it to the D8.
1. Create a new text file and name it “message.txt”.
2. Write your message on a single line with a maximum of 512 English letters.
3. Upload the file to the local drive on the D8.
4. Go to the Misc3 category in the setup menu and turn on the scrolling text.
5. Play any video clip or other media file and the scrolling text will be displayed.
Note: The scrolling text message is not available during playback of ISO files. For the D8M3, use the configuration tool to create a bitmap image instead of a text message (when
using the font size 48, the message is limited to a maximum of about 128 characters).
To update the text message during playback, you can use the Configuration Tool on the
PC and send the message via local network.
1. Start the configuration tool.
2. Select the Message Control tab.
3. Type a new message in the Message text field.
4. Press the Send Message button to update the scrolling text immediately.
2
1
Note: To support Chinese characters for the D8-M1 series, use the MSD firmware,
download the font “hzx32.fnt” from our website and store it on the local drive or CF card.
The maximum amount for Chinese characters in a text message is 256.
Page 66
D8
Playback
4.9 Remote Commands
To remotely control the D8, certain basic and additional commands for maintenance, setup
and immediate updates are available. As an example, they can be used to restart the unit,
change the scrolling text or get the HDD content. The following commands are available:
[reboot] This command will reboot the device.
[downnow] This command will download files according to the down.lst file.
[downfromserver] Downloads files according to the download path (for schedule or off).
[upload] This command will upload files according to the upload.lst file.
[erasehdd] This command will erase all files stored on the local drive or CF card.
[eraseusb1] This command will erase all files stored on the attached USB drive on port 1.
[eraseusb2] This command will erase all files stored on the attached USB drive on port 2.
[delfiles] This command will erase all files listed in the delete.lst file.
[getfiles] This command will create a file index of the current files on the local HDD.
[restoreconfig] This command will upload the new settings from the config.conf file.
[saveconfig] This command will save the current settings to a config.conf file.
[osd_on] This command will turn the on-screen messages ON.
[osd_off] This command will turn the on-screen messages OFF.
[scrolling_on] This command will turn the scrolling text message ON.
[scrolling_off] This command will turn the scrolling text message OFF.
[refreshcontent] This command will refresh the playlist and file content.
[fwupdate] This command will upgrade the firmware using the latest version on the drive.
These commands can be sent to the D8 via network connection (TFTP) by using the
command console or the PC utility (Configuration Tool).
Note: For more details to TFTP and the Configuration Tool, please refer to the Appendix.
4.9.1 Creating a command file
Create the command file and transfer it via TFTP to the local drive.
1. Create a new text file.
2. Rename it reboot or any of the other commands as seen above. This file can have
the .txt extension but can also be saved without file extension.
3. Save and store it on your C: drive.
4. On a PC, go to START and RUN, then type cmd and hit Enter to bring up the DOS
command tool.
5. Make sure the tftp.exe process has access to the network and then type following
command but replace the IP address with that of your D8:
tftp -i 192.168.11.25 PUT C:\reboot /reboot
6. Your D8 should now execute the command or as seen in this example, reboot.
Note: If you are not in the same network, make sure your router is set up to forward the
traffic on port 69 to your D8 and the firewall will allow the traffic to pass through. Not all
routers support port forwarding, so you might not be able to access the D8 unless you are
on the same local network!
Page 67
D8
Playback
4.9.2 Multi command file
To change the volume, create a text file “multicmd.txt” and add either “MUTE” to mute the
sound or “Volume” plus a value from 1-32 on the first line without extra line break. Transfer
the file via TFTP or down.lst and the setting will be changed immediately.
[MUTE] Sets the audio to mute.
[Volume n] Sets the volume to a certain level (n = 1-32).
4.9.3 Playmode command file
To change the play mode without restoring the configuration, create a text file
“playmode.txt” and add one of the available play modes on the first line without extra line
break. Transfer the file via TFTP or down.lst and the setting will be changed immediately.
[Single] Sets play list to Single mode.
[Date] Sets play list to Date mode.
[Time] Sets play list to Time mode.
[DateTime] Sets play list to Date/Time mode.
[Repeat] Turns Repeat mode on.
[Stop] Stops playback.
4.9.4 Creating a file index
To maintain and update the files on the local drive via TFTP, first create a file index and
then download the list to your computer. With the help of this index, the available capacity
can be estimated and if necessary, files can be deleted with the help of the delete list.
1. Send the getfiles command to create the index. Depending on the capacity and
amount of files, this might take several seconds.
2. The index will be stored in a text file “D8files” in the root directory “/D8files”.
3. Download the “D8files” text file to your computer and open it with a text editor.
Page 68
D8
Playback
4.9.5 Creating a delete list
To remotely erase files on the local drive, create a new text file called “delete.lst”. Fill in the
path and file name to your files which you like to delete or use “*” to erase all content.
1. Create a new text file and name it “delete.lst”.
2. Add the path to your files on the local HDD. One file per line.
3. Make sure to add one empty line at the end of the list.
4. Save the file on your local drive.
5. Upload the file to the D8 via TFTP or HTTP/FTP download function and execute it
by sending the delfiles command.
Note: Only English characters are supported and there should not be any special
characters or empty spaces in the path. Make sure to add one more empty line at the end.
To delete all files in the root directory use *.*
To erase all files on the drive use *
Note: If the delete.lst has been downloaded via HTTP or FTP by adding the file to the
update.d8 list, the files will be automatically erased. If it has been uploaded via TFTP, the
“delfiles” command has to be sent to actually erase the files.
Page 69
D8
Appendix
5 Appendix
5.1 Configuration Tool
This tool was designed for quick and easy configuration of the settings of the D8, as well
as to send remote commands with a push of a button. Currently, this tool is only available
for the Windows platform, so if you are using a different Operating System, please refer to
the TFTP section or use the remote control instead. Make sure that when you upgrade the
firmware, you also download the latest version of this configuration tool.
5.1.1 Configuration
Start the configuration tool and select the Configuration tab. You can now create a new
configuration file by adjusting the settings and filling out the empty fields or open an
existing config.conf file and modify it.
Once you have made your modifications, save the configuration file to your local drive. For
organisational purposes, you can use any file name you like but when you want to upload
it to your D8, the file name has to be config.conf.
When using the backup and restore buttons in the configuration menu, only one device at
a time can be controlled. To control more than one at a time, save the config file on your
computer, then go to the Remote Command tab and use the Restore Config command.
Note: You can also edit the config.conf file with a standard text editor like Notepad.
Page 70
D8
Appendix
5.1.2 Remote Command
Start the configuration tool and select the Remote Command tab. Right click in the field on
the left hand side to add the IP address of your D8. Once listed, click on it to select the
unit and then press any of the buttons to send the command to your D8.
Important: Do not press several buttons at the same time and always wait at least
10 seconds before sending the next command!
Note: This tool is using the tftp.exe process to send the commands. Make sure your
firewall is set up to allow traffic on port 69 for this process or it will not work.
Note: If you are not in the same network, make sure your router is set up to forward the
traffic on port 69 to your D8 and the firewall will allow the traffic to pass through. Not all
routers support port forwarding, so you may not be able to access the D8 unless you are
on the same local network!
Note for Windows Vista: By default, the TFTP Client is turned off. Go to Control Panel,
Programs and Features, select Turn Windows features on or off and enable the TFTP
Client, otherwise this tool will not be able to send the remote commands.
See next page for an explanation of the individual buttons.
Page 71
D8
Appendix
Download Command
[Put Down.lst] Prompts for and uploads the download list.
[Download Now] Downloads files according to the down.lst file.
[DownFromServer] Downloads files according to the download path.
[Put Play.lst] Prompts for and uploads the play list.
[Put Upload.lst] Prompts for and uploads the upload list.
[Upload Now] Uploads files according to the upload.lst file.
Erase Command
[Erase HDD] Erases all files stored on the local drive or CF card.
[Delete Files] Uploads the delete.lst and starts the delfiles process.
File List Command
[Get HDD List] Creates file index of the current media files on the D8 and downloads the
list to your computer. Depending on the quantity, this might take a couple of seconds.
Configuration Command
[Restore Config] Uploads the config.conf file and starts the restoreconfig process.
[Backup Config] Saves current settings and downloads them to your computer.
OSD and Scrolling Command
[OSD On] Turns the on-screen messages ON.
[OSD Off] Turns the on-screen messages OFF.
[Scrolling On] Turns the scrolling text message ON.
[Scrolling Off] Turns the scrolling text message OFF.
[Volume] Changes the volume level.
[Mute] Mutes the audio output.
System Command
[Reboot] Reboots the device.
[Refresh Content] Refreshes and updates current playlist and content.
[Play List by Single] Sets playlist to Single mode.
[Play List by Date] Sets playlist to Date mode.
[Play List by Time] Sets playlist to Time mode.
[Play List by Date/Time] Sets playlist to Date/Time mode.
[Repeat Mode] Turns on the Repeat mode.
[Stop Auto Play] Stops playback.
Note: When changing the settings via remote commands, the GUI will only be updated
after a reboot. E.g.: After sending the command to set the playlist to Date mode, the GUI
will still show the previous playlist mode until the device has been rebooted.
Page 72
D8
Appendix
5.1.3 Message Control
Start the configuration tool and select the Message Control tab. Right click in the field on
the left hand side to add the IP address of your D8. Once listed, click on it to select the
unit and then send the message to update the scrolling text on the D8.
Note: Depending on the firmware, only the bitmap or text messages are supported. See
the note in the configuration tool for a list of supported firmware versions.
Bitmap Message
[Preview] Enter the text for the scrolling message and press Preview to see how it looks.
[Font Color] Select the font colour for the scrolling message.
[Background] Select the background colour for the scrolling message.
[Select Font] Select the font type and size for the scrolling message.
[Send Message] After pressing preview, press this button to upload the message.
Text Message
[Put Message] Prompts for and uploads the scrolling text message.
[Get Message] Downloads the current text message to your computer.
[Send Message] Live update the scrolling text by typing a new message in the Message
text field and pressing this button.
Page 73
D8
Appendix
5.1.4 File List Manager
The file list manager can be used to create the playlist, download, upload and delete lists.
Select the root path and add the files to the destination list. Select the list you would like to
create and then press the button at the bottom right to save the list.
Note: You can also simply create and edit the list with a text editor program.
[Root Path] Select one of the media files to add its directory to the source list.
[Add Files] Select and then add the media files to the destination list.
[Delete Files] Select and then remove the files from the destination list.
[Open D8files] Select and open the D8files directory list (useful to create a delete.lst)
[Modify] Select one of the files in the destination list, modify the path, file name or add a
delay time for JPEG images and click on “Modify” to save it.
Page 74
D8
Appendix
5.2 TFTP
Instead of sending the commands using the configuration tool, you can also send them
using the DOS command prompt. Following are a few examples and the command
structure:
tftp [-i] [D8 ip] PUT/GET [source file ] [target file]
Command
tftp
-i
D8 IP
PUT/GET
Source File
Target File
Meaning
Uses the tftp.exe process to transfer files
Binary file
Insert the IP address of your D8 here
Use PUT for uploading and GET for downloading files
Path to your source file
Path to your target file
Examples:
This will upload the reboot file stored on your C: drive to the D8 at 192.168.11.25 and
reboot the unit.
· tftp -i 192.168.11.25 PUT C:\downfromserver.txt /downfromserver.txt
This will upload the downfromserver.txt file stored on your C: drive to the D8 at
192.168.11.25 and tell it to start the download process now.
· tftp -i 192.168.11.25 GET /config.conf C:\config.conf
This will download the config.conf file from the local drive on D8 at 192.168.11.25 and
store it on your C: drive.
· tftp -i 192.168.11.25 PUT C:\config.conf /config.conf
This will upload the config.conf file stored on your C: drive to the D8 at 192.168.11.25. A
logical command to follow would be restoreconfig to upload the new settings.
Note: TFTP transfer can only be used for command files, not for the actual media files. For
media files, we recommend using the HTTP/FTP download function instead. Always send
one at the time and wait at least 10 seconds in between commands.
Page 75
D8
Appendix
5.3 Remote Control Key Functions
Item
1
2
3
4
5
6
7
8
9
10
11
12
13
14
15
16
17
18
19
20
21
22
23
24
25
26
27
28
29
30
31
32
33
34
35
36
37
38
39
40
41
42
43
44
Button
Power
1
2
3
4
5
6
7
8
9
0
CLEAR
SELECT
TV MODE
SETUP
MUTE
VOLUME
UP
DOWN
LEFT
RIGHT
ENTER
RETURN
MENU
A-B
PREV
PLAY
NEXT
REPEAT
REV
STOP
FWD
INFO
SLOW REV
PAUSE/STEP
SLOW FWD
EDIT/PROGRAM
TITLE
SUBTITLE
AUDIO
SHUFFLE
ANGLE/ROTATE
SEARCH
ZOOM
Browser Mode
Power OFF
1 - .:/@&?=$#_-+!
2 - ABC
3 - DEF
4 - GHI
5 - JKL
6 - MNO
7 - PQRS
8 - TUV
9 - WXYZ
0 - Space [ ]
Delete file or Backspace
Copy file to local HDD
Toggle video output
Enter or exit setup page
N/A
N/A
Up
Down
Left
Right
Enter/Select
Return to main screen
N/A
N/A
Previous page
N/A
Next page
N/A
N/A
N/A
N/A
N/A
N/A
N/A
N/A
N/A
N/A
N/A
N/A
N/A
N/A
N/A
N/A
Page 76
Playback Mode
Power OFF
N/A
N/A
N/A
N/A
N/A
N/A
N/A
N/A
N/A
N/A
N/A
N/A
Toggle video output
Adjust contrast & saturation
Mute sound
Volume +/Up
Down
Left
Right
Enter/Play
Return to previous screen
Chapter menu (ISO)
Set A-B points (ISO)
Previous clip
Play
Next clip
Repeat all files
Rewind
Stop playback
Forward
Display file info
Slow rewind
Play/Pause
Slow motion (MPEG)
N/A
Title menu (ISO)
Changes subtitles (ISO)
Changes audio track (ISO)
Shuffle list
N/A
Time search (FWD by time)
N/A
D8
Appendix
5.4 FAQ
Q: I’ve modified some of the settings but there seems to be no change!
A: Make sure you have saved the new settings, then exit the Setup menu and restart the
unit by turning off the power switch. Turn it back on a few seconds later.
Q: I’ve set up the scheduled download but the files are nowhere to be found!
A: The download function only works with an internal drive. Make sure that a hard drive or
CF card is installed and it is recognised by the D8 before you enable the download
function. Also check the update.d8 and down.lst file to see if all paths are correct.
Q: I’ve installed a local drive but it is not recognised by the D8!
A: Make sure the jumper is set to Master (for 3.5” IDE drives) and format the HDD using
the FAT32 file system before installing it.
Q: I’ve changed the menu language but it doesn’t work!
A: After changing the language, the corresponding font has to be stored on the local drive
and the unit has to be rebooted.
Q: What if the unit freezes or gets stuck during a download?
A: The firmware includes a software watchdog, which will reboot the device when it’s
unresponsive for more than 5 minutes. A version with a hardware watchdog is also
available on request.
Q: Can I turn off the messages like “Loading File” as an example?
A: Yes, you can turn off the on-screen messages in the setup menu. Go to the MISC3
category and turn off the OSD messages.
Q: I’ve added three files to my playlist but only two of them are displayed!
A: When you create the playlist, add one more empty line at the end of the playlist before
you save the file.
Q: I’ve enabled the Manual/Standby Play Mode and now it shows “NO TITLE FILES”!
A: This message will appear if there is no 000.avi or 000.jpg & 000.mp3 file on the local
drive. It will also appear if a numeric button is pressed but there is no such a file. Make
sure to rename your files properly and store them on the local drive, then try again.
Q: The remote commands of the Configuration Tool don’t work on Windows Vista.
A: The TFTP Client on Windows Vista is disabled by default but the Configuration Tool
needs this application to send the remote commands. Go to the Control Panel and turn on
the TFTP client, then try again.
Q: I can not set the time manually, why doesn’t it work?
A: The time can only be set manually when the NTP server is turned OFF.
Q: What is the difference between the ENG and MSD firmware?
A: The ENG firmware supports only a single zone but a higher bit rate when playing
videos. It also supports German characters for the scrolling text. The MSD firmware
supports multi-zone layouts but when using that option, videos are limited to a lower bit
rate, unless the single zone is used. It supports Chinese characters for the scrolling text.
Page 77
D8
Appendix
Q: What’s the format for the URL in the download path?
A: For the URL, use the IP address and enter the path to the folder where the update.d8
list is located. This can be either an HTTP or a FTP address. When the string [MAC] is
added, it will be replaced with the wired MAC address (one word, lower case) of the D8.
For password protected FTP accounts, use ftp://login:pass@IP/folder/.
Q: What’s the difference between downnow and downfromserver?
A: The downfromserver command will start the download function and the D8 will get the
update.d8 file via the download path that has been set in the setup menu. This will only
work when the path has been set and the mode is either OFF or set to Schedule.
When downnow is used, files are downloaded according to the down.lst list. The download
path is irrelevant, as it will only look for the down.lst list on the local drive.
Q: I can’t enter the firmware update or configuration menu because it starts to play!
A: Stop playback, go to the setup menu and turn off the playlist or repeat mode. Exit the
setup menu and you are able to use the power button and the key combination 1234 or
1111 to enter the firmware update or configuration menu.
Q: Is there a limit for the file names and length of the path or playlist?
A: Yes, the maximum is 120bytes per line, 2000 lines per file, 70bytes per file name and
30bytes for the path in the playlist.
Q: What is the correct position for the jumper at J7?
A: By default, the jumper at J7 should be set so that the pin nearest to the J7 label is not
covered. This jumper should only be changed if advised to do so by an engineer, in order
to debug the unit.
5.5 About this Manual
This manual covers all versions for the D8. Firmware, images and descriptions may
therefore slightly vary between this manual and the actual product you have.
Throughout this manual, the products are referred to as D8, unless a certain function or
feature is specific to one particular model only, in which case D8-OEM, D8-M1 or D8-M3
will be used. The Lite models do not come equipped with a network connection, so any
functions related to the network will not be applicable for the Lite series.
© Copyright 2010 by InXtron, Inc. All Rights Reserved
The information contained in this manual is believed to be accurate and reliable. inXtron assumes no
responsibility for any errors contained in this manual and reserves the right to make changes in the
specifications and/or design of this product without prior notice. The diagrams contained in this manual may
also not fully represent the product that you are using and are there for illustration purposes only. inXtron
assumes no responsibility for any differences between the product mentioned in this manual and the product
you may have.
Page 78