1
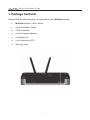
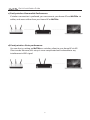
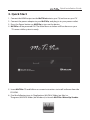
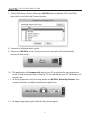
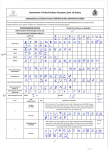
Quick
Installation
Guide
Model
McTiVia
Quick Installation Guide
Version: 1.0
Date: November 30, 2010
Copyright © AWIND 2010
Quick Installation Guide
1. Package Contents
Please check the following items are included in your McTiVia package:
�
McTiVia Windows®/Mac® device
�
Quick Installation Guide
�
2 WiFi antennae
�
Universal power adaptor
�
Installation CD
�
User’s Manual (on CD)
�
Warranty Card
1
Quick Installation Guide
2. Before you start
McTiVia is the first device that can show all content of your Windows® as well as Mac®
computers on your TV wirelessly. You can easily control up to 8 computers with your
mouse and/or keyboard. You can share any content from your computers with your
friends and family in your living room.
Four Setup Possibilities:
a) Ethernet: Best performance
Whenever possible, always use Ethernet cables to connect McTiVia device to your
home network. This setup provides best performance for both remote operation
and internet connection.
b) Use power-line modems: Good performance
If Ethernet cable is not available net to your TV, you may consider to buy a pair of
power-line modems to setup a wired connection from your home network to
McTiVia.
2
Quick Installation Guide
c) Partly wireless: Reasonable Performance
If wireless connection is preferred, you can connect your home AP and McTiVia via
cables, and access either from your home AP or McTiVia.
d) Purely wireless: Basic performance
You can also try setting up McTiVia as a wireless client to your home AP via APClient mode. However, this setup is more complicated and vulnerable to any
interference in WiFi signal.
3
Quick Installation Guide
3. Quick Start
1.
2.
3.
4.
Connect the HDMI output on the McTiVia device to your TV, and turn on your TV.
Connect the power adaptor to your McTiVia, and plug in to your power outlet.
Press the Power button on McTiVia to turn on the device.
McTiVia will be powered ON. The Main Menu as below will be shown on your
TV screen while system is ready.
5. Insert McTiVia CD and follow on-screen instructions to install software from the
CD-ROM.
6. Find the following icon in "Applications\McTiVia" folder (on Mac) or
"Programs\McTiVia" folder (on Windows) to launch McTiVia- MirrorOp Sender.
4
Quick Installation Guide
7. Search WiFi Access Point. Select your McTiVia device (default SSID is McTiVia)
from the list and click the Connect button.
8. Connect to selected access point.
9. Connect to McTiVia server. If only one server is found, it will automatically
connect to the server.
10. The application will temporarily adjust your PC resolution for best projection
result, and then project your screen to TV. You should see your PC Desktop on TV
screen now.
11. To finish projection, click the Stop button on McTiVia- MirrorOp Sender. Your
screen resolution would be restored to original one.
12. To begin projection again, click the Play button again.
5
Warranty Policy
)F ANY FAULT HAS DEVELOPED DURING THE WARRANTY PERIOD AFTER
CONFIRMATIONBY!WINDWEWILL2EPAIRTHEPRODUCTDIRECTLY
2EPLACEWITHABRANDNEWPRODUCTORREFURBISHEDITEM
!PPLICABLE TO ALL PRODUCTS WHEN SENDING THE PRODUCT FOR
SERVICESYOUNEEDTOPROVIDE
9OURNAMEADDRESSANDTELEPHONENUMBER
4HEORIGINALCOPYOFWARRANTYCERTIFICATEWHEREITMUSTBE
STAMPEDBYTHEDEALERANDPROPERLYMARKEDWITHTHEDATE
OFPURCHASEANDTHECORRECTMATCHINGSERIALNUMBER
)FTHEWARRANTYCERTIFICATEHASNOTBEENSTAMPEDBYYOUR
LOCALDEALERYOUMAYPRESENTTHEORIGINALBILLRECEIPTWHERE
IS CLEARLY PRINTED WITH DETAILS OF THE PRODUCT )F YOU ARE
UNABLE TO PROVIDE ABOVE INFORMATION7E WILL REGARD THE
WARRANTYPERIODTOSTARTFROMTHEDATEOFDISPATCHFROMTHE
FACTORY
$AMAGESCAUSEDBYACCIDENTOVERLOADINGMISUSEIMPROPERUSE
OROTHERTYPESOFDAMAGENOTRELATEDTOTHISPRODUCTQUALITYOR
DESIGN
4HE MACHINE IS DAMAGED BY UNFORESEEABLE NATURAL DISASTERS
FLOODINGFIREHAZARDEARTHQUAKETYPHOONORTHUNDERORCAUSES
DUEBYHUMANERROR
!TTEMPTTOOPENPRODUCTHOUSINGDISMANTLEATTACHOTHERITEMS
ORRETROFITWITHOUTWRITTENPERMISSIONFROM!WIND
#ONSUMABLESORCOMPONENTS
3ERIALNUMBERONTHEPRODUCTORCOMPONENTHASBEENREMOVED
ORDAMAGED
4HEPRODUCTWARRANTYISOUTDATED
#LAIMSWITHOUTPRESENTINGAWARRANTYCERTIFICATEORIFPRESENTED
BUTTHEWARRANTYCERTIFICATEISNOTPROPERLYMARKEDWITHTHEDATE
OF PURCHASE STAMPED BY THE AUTHORIZED AGENT OR THE MARKED
INFORMATIONHASBEENTEMPEREDWITH
s7EWILLNOTBERESPONSIBLEIFITSBELIEVEDTHEDAMAGEISCAUSEDBYTHECUSTOMEROROTHERPERSONNELDELIBERATELYORBYACCIDENT
s7EWILLNOTBERESPONSIBLEFORANYLOSSCAUSEDBYCONTINUOUSUSEORINABILITYTOUSETHEPRODUCT
s7EWILLNOTBERESPONSIBLEFORCOSTSDUETODAMAGEOTHERTHANREPAIRSTO!WINDPRODUCTS!NYDAMAGEORMALFUNCTIONCAUSEDTO
OTHERMACHINESLINKEDTO!WINDPRODUCTSISNOTCOVERBYTHISWARRANTY
Disclaimer
Warranty Services
The warranty does not apply to any of the following
)FTHEPRODUCTISDAMAGEDORHASMALFUNCTIONSNOTCAUSEDBYHUMANERRORPLEASECONSULTYOURPRODUCTMANUALFIRST
)FYOUREQUIRETECHNICALSUPPORTINFORMATIONPLEASEVISITOURWEBSITEATHTTPWWWAWINDINCCOM
Quick Installation Guide
Name:
Product Name:
Product No.
Warranty Card
Purchasing Date:
Serial No.
Shop:
Address:
TEL:
FAX:
Email: