1
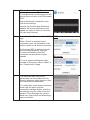
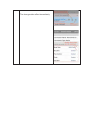
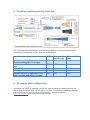
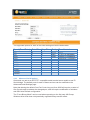
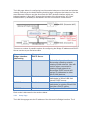
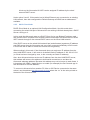
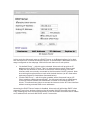
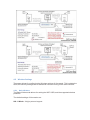
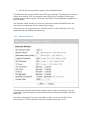
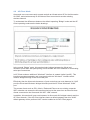
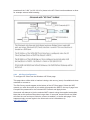
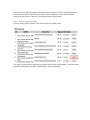
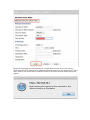
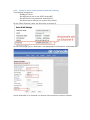
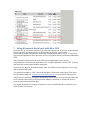
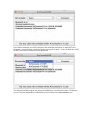
air console
User Manual
Version 2.55
sponsored by
1
Welcome to Airconsole .........................................................................................4
1.1
1.2
Airconsole Features .....................................................................................................................................4
Package Contents ..........................................................................................................................................4
2
Quick Setup ...........................................................................................................5
3
Hardware and Connectivity Overview ....................................................................9
4
Airconsole Web Configuration ...............................................................................9
4.1 Serial Settings .............................................................................................................................................. 11
4.1.1 Advanced Serial Settings.........................................................................................................................12
4.2 LAN Settings ................................................................................................................................................. 13
4.2.1 Setup Page .....................................................................................................................................................14
4.2.2 Static IP Address .........................................................................................................................................15
4.2.3 DHCP Client Mode ......................................................................................................................................16
4.2.4 DHCP Server Page ......................................................................................................................................17
4.3 Wireless Settings ........................................................................................................................................ 19
4.3.1 Basic Wireless ..............................................................................................................................................19
4.3.2 Wireless Security ........................................................................................................................................21
4.3.3 Advanced Wireless .....................................................................................................................................22
4.4 AP Client Mode ............................................................................................................................................ 23
4.4.1 AP Client Configuration ...........................................................................................................................24
4.4.2 AP Client Detailed Steps ..........................................................................................................................25
4.4.3 Access Internet via AP Client.................................................................................................................27
5
Remote Access via Cloud Service (Private Server) ................................................ 28
6
Airconsole with Android ...................................................................................... 31
6.1 Bluetooth Connection on Android ...................................................................................................... 31
6.2 Concurrent WIFI and 3G on Android – Android Tethering ...................................................... 34
6.2.1 Enable Tethering on Android ...............................................................................................................34
6.2.2 Enable AP Client on Airconsole for Android Tethering ............................................................37
7
Using Airconsole Serial port with Mac OSX .......................................................... 38
8
Other Airconsole Uses ......................................................................................... 46
8.1.1 Using Airconsole Serial port with Windows 7 Terminal Applications ..............................46
8.1.2 Connecting to Cisco USB console ports.............................................................................................46
8.1.3 Connecting to other USB Serial ports ...............................................................................................46
8.1.4 Machine to Machine Mode .....................................................................................................................46
8.2 Resetting to Factory Defaults ................................................................................................................ 47
8.2.1 Factory Reset procedure for version 1.x Firmware ....................................................................47
8.2.2 Factory Reset procedure for version 2.x Firmware ....................................................................48
9
Upgrading Airconsole Firmware ........................................................................... 48
10 Troubleshooting ................................................................................................ 49
11 Technical Information........................................................................................ 52
11.1.1
11.1.2
Airconsole Connectors ...........................................................................................................................52
Airconsole Indicator Lights .................................................................................................................52
1 Welcome to Airconsole
Thanks for purchasing Airconsole - the fastest and easiest way to get Wired Serial and Ethernet
connectivity into your Apple iPad or iPhone, Android Device or PC / Mac via WIFI and or
Bluetooth Classic or Bluetooth Low Energy.
Airconsole has been designed to work seamlessly with the Get Console 2.0 and RapidSSH iOS
applications available from the Apple iTunes App store. Get Console 2.0 and RapidSSH are
RFC2217 compliant terminal applications that offer a fully featured VT100 terminal experience
along with many advanced functions.
Airconsole can also work with other RFC2217 Terminal applications for iOS, Android, PC and
Mac OSX, however we recommend on iOS to use the Get Console application for maximum
compatibility and ease of use. On Android we recommend using our free “SerialBot” terminal app
for maximum compatibility.
1.1 Airconsole Features
Airconsole has the following supported features
1.2
Presents RS232 serial ports over WIFI or Ethernet connection to Get Console and other
RFC2217 compliant terminal applications
Presents RS232 serial ports over Bluetooth 4.0 (Low Energy) or Bluetooth 2.1 (Standard)
Bridge Wired and Wireless networks together to offer a "Pseudo-wire" Ethernet connection
to iPad and iPhone
Fully configurable Wireless security, IP routing and IP Addressing
On-demand connectivity to Cloud Service (Get Console Private Server)
Integrated 1800 mAH or 4400 mAH Lithium battery offers 5+/12+ hours of operation, or can
operate on external USB DC power via supplied micro-USB charging cable
Integrated Websockets terminal
Full Developer SDK for both iOS and Websockets
Machine-to-Machine operating modes
Package Contents
Your Airconsole package content depends on whether you ordered the Standard Kit or Pro Kit.
The Standard Kit includes:
1 x Airconsole Adaptor
1 x White Micro-USB Charging Cable
1 x Blue USB Hub to Serial Cable
1 x Airconsole Bluetooth 4.0 Dongle (maybe installed into cable)
The Pro Kit includes everything in the Standard Kit as well as:
1 x RJ45-to-DB9 Adaptor (Beige)
1 x RJ45-to-DB9 Null Adaptor (Black)
1 x Redemption Card for a 2 UDID Get Console Private Server license
The XL Kit features a larger battery unit and also has a pre-programmed NFC label attached to
the back of the unit for use with Android NFC compatible devices.
2 Quick Setup
Getting setup with Airconsole is easy - the WIFI instructions are also printed on the back
of the unit
Step
Description
1
Power on Airconsole by sliding the
Off/Charge/On slider to the “R” position.
The Airconsole takes about 20 seconds
to boot. The light on the top will
transition from Red to blinking Blue.
Once the light has been blinking blue
for about 10 seconds Airconsole is fully
operational.
Do NOT use the C position to charge
up your Airconsole. This position is
used for when using Airconsole to
charge up other devices. Use the R
position or Off Position to charge up
the Airconsole internal battery
2
Connect the supplied light blue RJ45
Serial / Bluetooth cable to the USB port
on the Airconsole adaptor, and the
RJ45 end to your serial device. If the
serial device has a DB9 connector then
use a RJ45 to DB9 adaptor to convert
to the correct presentation (Airconsole
Pro Kits ship with these DB9 adaptors
included).
Example
3a
WIFI Operation (Skip for Bluetooth)
Join your mobile/PC to the Airconsole
WIFI network. If your device asks for a
password it is 12345678. To do this go
to your iOS device settings page, select
WIFI and Choose the Airconsole-[XX]
network.
By default Airconsole acts as a DHCP
server so will give an IP address to
your iOS/PC/Android device on the
192.168.10.X network.
By Default, the Airconsole DHCP
Server does not provide a Default
gateway. This allows iPad/iPhones to
retain Internet access while still
connected to Airconsole WIFI.
However, in this mode the WIFI
connection icon in iOS may stay
“spinning” rather than change to a tick.
This is Normal.
Airconsole will still be connected to the
iPhone/iPad, and is usable from the
Get Console App.
You can change all Airconsole settings
at http://192.168.10.1/ (admin/admin)
3b
Bluetooth Low Energy Operation
To use Bluetooth Low Energy your iOS
device does not have to join Airconsole
WIFI.
Ensure Bluetooth is enabled in your
iOS device settings
Launch Get Console App, Bluetooth
adaptor will be auto-discovered and
appear as option in Quick Connection
list (see step 4 below)
4
Launch the Get Console or RapidSSH
App.
WIFI:
When “Serial” is selected as the
connection type, the Airconsole is the
default choice for all serial connections.
If Airconsole WIFI is detected as well
as Airconsole Bluetooth, then Get
Console will default to the WIFI
connection as provides for higher
speeds.
To use a supported Redpark cable
instead of Airconsole, select “Cable” in
the “Connect with” dialog.
5
The Baud rate and other serial
parameters can be modified via the
Session Manager either before or after
the connection is established.
To modify after serial session has been
made, tap the green outlined
connection manager button, and then
the settings cog icon under the serial
session. From this page the various
baud rate, flow control and bit settings
can be modified.
Bluetooth:
The changes take effect immediately.
3 Hardware and Connectivity Overview
The following table describes the connectivity options for Airconsole serial port
connectivity depending on your terminal client device
WIFI
iOS Device (iPad, iPhone, iPod
Touch) running iOS 7.0 or later
Mac running OSX version 10.8 or
later
Windows 7
Windows 8
Android Device (ie Samsung S3 or
later) running Android 4.1 or later
YES
Bluetooth 4
Low Energy
YES
Bluetooth 2.1
EDR
NO
YES
YES
NO
YES
YES
YES
NO
NO
NO
YES
Experimental
YES
4 Airconsole Web Configuration
Airconsole has a built in webpage that can be used to change the default settings, as
well as flash the device with new firmware if required. To access this webpage complete
steps 1 and 3 of the initial setup instructions above, and then browse to
http://192.168.10.1/ from any modern web browser.
The default username and password are both "admin".
From the webpage you can perform the following tasks
- Change the wireless parameters such as the SSID, the password, or the encryption
method
- Change the default serial port baud rate, data and parity bit settings and flow control.
Note that all of these settings can be also changed in Get Console, the webpage is
just used to change the default settings if using with a terminal that does not fully
support RFC2217 extensions.
- Change the IP address of the LAN that Airconsole operates on, including disabling
the built in DHCP server and enabling DHCP client or static addressing.
- Viewing the device log files
- Enable Airconsole to act as an “AP Client” to join an existing WIFI network in
addition to its own WIFI
- Enable Airconsole to concurrently share its serial port to a Get Console Private
Server directly
- Changing the administrative username and password to access the webpage
- Reset the Airconsole back to its factory settings
- Upgrade the Airconsole firmware
Each page on the Airconsole website has built in help for each of these functions on the
right hand side of the screen.
4.1 Serial Settings
The Serial page allows for the tuning of the default serial port baud rate and other
parameters. When using Airconsole with a terminal application that cannot request to
change these settings via RFC2217 method, they should be modified to the settings
required by the serial device on this webpage prior to connecting.
For applications such as Get Console, these settings on this webpage do not need to be
changed as the Get Console application will dynamically reconfigure Airconsole’s serial
settings (Baud rate, Flow Control, Data/Stop/Parity Bits etc) on each new connection.
The supported options for each of the serial settings are as the below table:
Speed (Baud Rate)
300
600
1200
2400
4800
9600
19200
38400
57600
115200
230400
Data Bits Stop Bits
8
1
7
2
Parity
None
Odd
Even
Flow Control
None
RTS/CTS Hardware
DSR/DTR Hardware
XON/XOFF Software
4.1.1 Advanced Serial Settings
Airconsole can act as an RFC2177 compatible serial terminal server and/or a raw IPSerial bridge. The default ports for each of these services can be modified on the
Advanced Serial Settings page.
Note that altering the default Com Port Control tcp port from 3696 will require a restart of
Get Console app to redetect the changed port, and will require modification of windows
and OSX driver default configuration.
The “Force Binary Mode” can be used when operating on the 3rd party HW Group
Windows driver that does not dynamically negotiate binary transfer mode.
Un-checking the “Enable Com Port Control” tick box will disable the NVT extensions
to the RFC2177 that allow for dynamic changing of baud-rate, flow control and other
serial parameters in-band without resetting the serial port.
From Airconsole version 2.03 and onwards, Airconsole also supports direct interaction
with its serial port via Websockets protocol on tcp port 8080. This port can be changed
on this Advanced Serial Settings page. Websockets provides a simple and developer
friendly method for communicating through a serial port directly from a web page or web
application. To learn more about Websockets support in Airconsole download the
Websockets SDK at www.get-console.com/airconsole Developer resources.
In firmware 2.12 and later, Airconsole supports the Bluetooth Low Energy and Bluetooth
Classic connectivity to serial ports if a USB-Bluetooth-Serial cable is present. Support is
enabled by default.
4.2 LAN Settings
The LAN page allows for configuring how Airconsole behaves on the wired and wireless
network. Note as per the below drawing that this page configures the behavior of the the
wired Ethernet LAN port and the Airconsole-XX WIFI wireless interface which are
bridged together. It does NOT change the behavior of the Airconsole’s “AP Client”
interface which (if enabled) is discussed in the AP Client section further below.
There are a number of possible options for configuring the Bridge IP address and DHCP
Server service as per the below table
Airconsole’s
Bridge interface
Addressing
Static
Airconsole act as
DHCP Server
Notes
Enabled
Static
Disabled
DHCP Client
Disabled
DHCP Client
Enabled
Default Configuration. Use when
Airconsole operating outside
existing Wired network. Use with
caution when connected to
existing Wired network as
Airconsole DHCP server will
assign IP addresses to other
Wired LAN devices
Use when Airconsole should
participate in Wired LAN that
has no DHCP server
Use when Airconsole should
participate in existing Wired LAN
that has a DHCP server
Configuration Not Possible
Each mode is discussed in the sections below
4.2.1 Setup Page
The LAN Setup page sets the IP address of the Airconsole’s Bridge interface. The 2
options are Static Assignment (Default) or DHCP Client.
4.2.2 Static IP Address
Static IP Addressing sets the Bridge IP manually. This is the factory default behavior
with the Bridge IP set to 192.168.10.1/24. This can be changed by populating new
values and clicking Apply.
For static IP addressing in a WIFI only setup, only set the IP Address and Netmask.
Note that if changing from the default 192.168.10.0 subnet, and the DHCP server feature
is also required then the DHCP server range should also be changed on the DHCP
server page as well.
Note that the static IP address allocated to Airconsole must be in the same subnet as
the addresses allocated by any DHCP located on the wired LAN network otherwise
Airconsole will not be able to communicate with clients connected wirelessly or via wired
LAN.
We recommend using Static mode in 3 situations
1) When the Wired port is not connected – Airconsole is operating in WIFI only
mode and will use the DHCP server feature to allocate IP addresses to WIFI
clients
2) When the wired port is connected however no DHCP Server is on the wired LAN.
Airconsole needs to have a statically configured IP address to integrate into an
existing statically addressed network
3) When there is DHCP server on the wired LAN but Airconsole needs static IP in a
range not assigned by the DHCP server while the wireless PC/iPad/iPhone
clients on the Airconsole-XX WIFI can be assigned IP address by the wired
network DHCP server.
Under option 2 and 3, If Airconsole has its Wired Ethernet port connected to an existing
LAN network, then also configured the Default Gateway and DNS server addresses if
available.
4.2.3 DHCP Client Mode
DHCP Client Mode is an optional LAN Configuration Mode. Use this mode when
connecting the wired LAN port of Airconsole to an existing LAN that already has a DHCP
Server running on it.
In this mode the Airconsole acts as a DHCP Client for its own Bridge IP address, and
also proxies DHCP requests from wireless clients connected to the Airconsole-XX SSID
WIFI network through to the external DHCP server on the Wired LAN network.
If the DHCP server on the wired LAN network has (and allocates) a gateway IP address
and DNS server then the Airconsole and, any client connected wirelessly to AirConsole
in this mode will be able to access the Internet via the gateway.
When working in this mode, if the Airconsole does not receive an IP address from the
wired LAN DHCP server, it will revert to its default Static IP address of 192.168.10.1/24
(or if that has been changed by user, to the currently set Static IP address).
Also, when Airconsole does receive an IP address from the wired LAN DHCP server,
this address will become the address to build serial connections to and also the
Airconsole webpage address. Because this address may not be known to web clients, it
is broadcast via mDNS / Apple Bonjour to enable (for example) the Get Console app to
find Airconsole on its new address.
To connect to Airconsole from another PC, Mac or iOS Device connected to the same
subnet, use the address http://airconsole-xx.local where the “xx” is the value printed on
the back of the Airconsole unit.
If DHCP Client is successful in obtaining IP address it will automatically disable the
DHCP server running on the Bridge IP interface (if it was enabled). This is to stop
competing DHCP servers existing on the same LAN.
4.2.4 DHCP Server Page
While the Airconsole Setup page has a static IP address set for the Bridge interface, the
DHCP Server Mode is enabled by default in the DHCP Server page.
In this mode the Airconsole acts as a DHCP Server on its Bridge interface (ie for both
the “Airconsole-XX” wireless and wired LAN port. It will allocate IP addresses from the
range configured on the webpage. Within this mode there are 2 sub options:
x
x
“No default Route” – with this option selected: Airconsole will provide an IP
address only to DHCP Clients. This is to allow devices such as iPhones and
iPads with 3G wireless to continue to access the Internet directly over that
interface while concurrently connected to the Airconsole-XX WIFI network. Note
as at writing this option does not work with Android devices (an AP client tether
workaround exists for Android as discussed below).
“Enable DNS Proxy” – with this option enabled, when Airconsole has an AP
Client interface enabled along with NAT, the Airconsole will act as a DNS proxy
to resolve external names to IP addresses on behalf of Airconsole-XX WIFI
clients. This allows these clients to access the Internet via the AP Client interface
without knowing external DNS server addresses.
Assuming the DHCP Server feature is disabled, Airconsole will still bridge DHCP client
requests (if any) from wireless clients on the Airconsole-XX WIFI through to the wired
LAN, meaning any client connected wirelessly to the Airconsole will still be able to obtain
an IP address from a wired LAN DHCP server if one exists.
4.3 Wireless Settings
The pages allows for configuring the Wireless settings of Airconsole. This includes the
SSID, the security settings and for advanced users the tuning of the radio interface.
4.3.1 Basic Wireless
The Basic Wireless tab allows for setting the WIFI SSID, and the supported wireless
protocols.
The default settings of Airconsole are:
802.11 Mode: 11b/g/n protocol support
SSID: Airconsole-XX where XX is the last 2 digits of the device mac address
Broadcast SSID: On – disable this if you do not want Airconsole to announce its SSID
to Wireless LAN. Only wireless clients that are manually configured to join the
Airconsole-XX WIFI network with the correct password will be able to join
AP Isolation: Off – enable this if you do not wish wireless clients joined to Airconsole to
be able to communicate with each other (ie only with the Airconsole itself)
Channel: Auto. By default Airconsole prefers channel 1. Other valid non-overlapping
channels include 6 and 11. For use in Australia for NBN installers, we recommend using
channel 11 as will not overlap at all with the high 2.3GHz frequency used by NBN
Antenna equipment.
ϰ͘ϯ͘ϭ͘ϭ ,dWŚLJƐŝĐĂůDŽĚĞ
The following are settings only applicable to 802.11N communication. Do not alter
these settings unless absolutely necessary.
Operating Mode: Use Mixed mode unless all clients are 802.11N capable
Channel Bandwidth: 802.11n allows for double-width channels (ie channel 1 and 6
bound together) to improve throughput. The default is 20/40 which means Airconsole will
accept 40Mhz channel connections from wireless clients that support this but also
support legacy wireless clients that support only 20mhz channels (the default for
802.11b and 802.11g). We recommend however when using with AP Client to set
this to 20Mhz only.
Guard Interval: Long or Auto. The Default is Auto. Setting Guard interval to “Long” will
improve reliability in noisy WIFI environments at the expense of throughput. Airconsole’s
Auto setting will attempt to tune the Guard Interval to maximize reliability and throughput.
4.3.2 Wireless Security
Airconsole offers 5 Security modes
x Security Disabled
x Open System – for WEP based encryption using pre-shared secrets. This is very
weak encryption for use with very old Wireless clients that do not support newer
WPA based security.
x WPA/WPA2 using TKIP for pre-shared key exchange
x WPA/WPA2 using AES for pre-shared key exchange
x
802.1X with pre shared key against remote RADIUS server
The default security mode is WPA2 with TKIP key exchange. This setting is the second
most secure setting. TKIP is less secure than AES for key exchange; however has
broader wireless client support. WPA2 still uses AES for encrypting data regardless of
key exchange.
If all wireless clients needing to connect to Airconsole support WPA2/AES then we
recommend changing the security mode to this setting.
Airconsole does not support the use of WPA2 or 802.1X with certificates. 802.1X is
supported with just Radius pre-shared key.
4.3.3 Advanced Wireless
The Advanced Wireless tab allows for setting various radio level settings. They are
provided for wireless experts to tune their Airconsole wireless performance and also
battery life.
Generally, reducing the TX power is possible to 50% or lower in low WIFI noise
environments. This will extend the Airconsole battery life by upto 1 hour.
4.4 AP Client Mode
Airconsole can now concurrently operate as both an Infrastructure AP for the AirconsoleXX SSID, and simultaneously be a Wireless Client connected to another existing
wireless network.
To understand the differences between the default operating “Bridge” mode and the AP
Client operating mode see the below drawings
In the normal “Bridge” mode, Airconsole simply bridges between the Wired and
Wireless1 ports while also participating in this network with its IP address for terminating
serial port connections.
In AP Client mode an additional “Wireless2” interface is created (called “apcli0”). This
interface operates separately and concurrently with the “Wireless1” interface which
remains bridged through to the wired LAN port.
Effectively then the Airconsole becomes a 2 port router that can route between its “LAN”
port (the Wired and Wireless1 bridged interface) and the AP Client Wireless2 “WAN”
port.
This means clients such as PC’s, Mac’s, iPads and iPhones on an existing corporate
WIFI networks can access the Airconsole serial port at the same time as other wireless
clients connected to the Airconsole-XX WIFI “LAN” network.
In addition, Airconsole will now route between its Airconsole-XX bridged network and the
AP Client network. If the AP Client interface learns a default gateway then this “WAN”
default gateway will be preferred. NAT can be enabled on the AP Client page to
translate all the “LAN” (ie 192.168.10.x) hosts to the AP Client interface address to allow
for example external web browsing.
4.4.1 AP Client Configuration
To configure AP Client use the Wireless->AP Client page.
This page takes a little while to load as is doing a site survey (scan) of available wireless
networks to connect to.
The Site Survey results appear at the bottom of the AP Client page. Select the WIFI
network you wish Airconsole to join which will populate the SSID in the top of page form.
Complete the password for the selected WIFI network and Apply button.
Airconsole will attempt to join the selected WIFI network using the supplied credentials.
Note that as this process often takes longer than 10 seconds, browsers such as Safari
will often time out and report “failed to connect to website” or similar web page. If this
happens simply connect again to the Airconsole on its LAN address (ie
http://192.168.10.1)
If successful the AP Client page will show status connected. The IP Address allocated
by the external WIFI network (assuming AP Client interface is using default DHCP
setting) will be shown on the main Airconsole home (status) page.
4.4.2 AP Client Detailed Steps
Choose existing WIFI network from Site Survey and press select
The SSID, Authentication type and encryption method are prepopulated. Tick the Enable
Wireless Client Mode and add in passphrase. Then press Apply.
Because Airconsole can only operate on a single channel at a time, if the current
Airconsole-XX WIFI network is on a different wireless channel to the selected AP Client
WIFI network, the Airconsole-XX SSID will shift to the same channel and a popup will
appear
The webpage may time out while connecting. This is normal. Refresh the connection to
the web page via refresh button on your browser. If successful the AP Client page will
show Connection Status: Connected.
Also on the Airconsole Home (Status) page the IP Address allocated to the AP Client
(WAN) interface will be visibile
4.4.3 Access Internet via AP Client
Airconsole can NAT the internal LAN through the AP Client (WAN) interface to allow
wireless clients on the Airconsole-XX WIFI network to connect to the internet via the AP
Client WIFI. This assumes that the AP Client WIFI network has Internet access. To
enable this 2 configuration changes need to be enabled
1) on the AP Client page enable NAT
2) on the LAN -> DHCP Server, enable the DNS Proxy
Any Airconsole-XX WIFI clients will need to refresh their DHCP leases after making this
change.
5 Remote Access via Cloud Service (Private Server)
In version 2.1 and later firmware, Airconsole supports direct tunneling of its serial port to
a Cloud server - Get Console Private Server (version 1.6 or above). Just as in Get
Console App, the Private Server connection does not preclude concurrent access to the
same physical serial port via a terminal client (such as Get Console, SerialBot etc) at the
same time.
Private Server support is activated on the Remote Access tab in the Airconsole web
management page.
When Airconsole remote access is set to ENABLED it will attempt to connect to the
Private Server cloud service and once successful, tunnel its serial port to Private Server
via its APClient interface, or if that has not been connected, its Bridged interface. The
Airconsole must have a valid default gateway in order to route out to the configured
Private Server IP address.
Airconsole will try every 60 seconds to make a connection to the configured Private
Server IP or hostname. Note if a hostname is specified, then the DNS server that
Airconsole is using should be able to resolve the hostname to an IP address.
If the connection to the Private Server is successful, then a session key will be shown in
the Status (Home) page of the Airconsole and also the Airconsole will be visible on the
Private Server portal page
When using Airconsole with a Private Server, a username and password as configured
on the Private Server must be entered on this page. By default this would be webadmin /
w3badm1n! which are the default credentials built into self hosted Private Server. For
Amazon EC2 hosted Private Servers, the default password is unique to each instance
and is emailed at creation time to the server owner.
If the SSL option is selected then the Private Server must have an SSL certificate
installed other than the self-signed certificate that come pre-installed with Private Server.
Once connected the serial port on the Airconsole can be directly accessed via the Web
Console as per any other Private Server shared terminal session. Apart from direct
interaction with the terminal, Private Server also allows the pushing and remote
execution of terminal scripts via the Airconsole, along with pulling of Airconsole terminal
log files.
Unlike dynamically shared Get Console terminal sessions, individual Airconsole
sessions via Private will always use the same session code. The session code will
incorporate the last 6 digits of the Airconsole MAC address.
6 Airconsole with Android
6.1 Bluetooth Connection on Android
Airconsole supports Bluetooth 2.1 EDR connections to serial ports via our free SerialBot
terminal application (version 1.7.4 and later). To use SerialBot with Airconsole over
Bluetooth complete following steps
1) Pair your Android device with Airconsole Bluetooth BEFORE launching SerialBot
application
2) Launch SerialBot app and select the “serial-bt” connection type, then type in the
baudrate-databits-parity-stopbits in format like (for example) 9600-8N1 to select
9600 baud, 8 databits, No parity, 1 stopbit
6.2 Concurrent WIFI and 3G on Android – Android Tethering
Unlike Apple iOS, Android OS does not generally allow for the WIFI radio and 3G radio
to be enabled at the same time. This means using Airconsole-WIFI from Android (ie with
our SerialBot app) while simultaneously allowing the Android device to be connected to
the Internet via 3G/4G is more difficult.
To avoid this limitation the easiest method is to connect to Airconsole using Bluetooth as
described in the preceding section, however if for some reason Bluetooth is not available
then WIFI operation while retaining Internet access via the Android devices 3G/4G radio
is still possible however requires more complex configuration of both Airconsole and
Android.
The only supported method without rooting the Android device (as at Android 4.4) is to
use the built in WIFI tethering feature available from Android 2.2 and later.
Under this operation, the Airconsole device will use its AP Client to join to the Android
WIFI network rather than the other way around. When in this mode the Android device
then maintains its 3G/4G radio connection and WIFI connection at the same time.
Android will prefer the 3G/4G network over the WIFI.
Once the Airconsole APClient is connected to the Android tethering AP, access the
serial port on Airconsole from the SerialBot app, via a telnet connection on port 3696 to
the IP address allocated to the Airconsole device by the Android. This can be found in
the tethering settings that lists all connected tethering clients. Alternatively use a
websockets client or other Airconsole supported protocol.
To make subsequent AP Client connections happen automatically from Airconsole
without any user intervention, hard code the radio channel that the Android will use its
tethering WIFI network to match Airconsole – ie Channel 1,6 or 11. So long as the
Android AP is on the same channel as Airconsole, the Airconsole will continually scan
for the AndroidAP and when available will automatically join it using the same
credentials as the previous session.
The following screenshots show the Android and Airconsole setup used to achieve a
reusable tethering configuration.
6.2.1 Enable Tethering on Android
The following screenshots:
- Enable Tethering
- Set tethering to use SSID “AndroidAP”
- Set tethering to use password “Android1234” rather than randomly generated
- Set tethering to always use channel 6
On Android general Wireless and Network Settings go to Tethering and Portable Hotspot,
then enable Portable WIFI hotspot
Under Portable WIFI settings click configure bottom right to set the SSID Name to
“AndroidAP” (often the default on Samsung devices), but also hard code password to
Android1234 rather than the randomly generated password. Also tick “Show Advanced
Options” to hardcode channel to 6 rather than Auto. Then save.
When Airconsole is connected it will show up under Connected devices with the IP
address that the Android device has allocated to Airconsole APClient interface. This is
the address that can be used in SerialBot or other apps to reach Airconsole Serial port.
6.2.2 Enable AP Client on Airconsole for Android Tethering
The following screenshots:
- Enable AP Client
- Set APClient to join to use SSID “AndroidAP”
- Set APClient to use password “Android1234”
- Set Airconsole to always use channel 6 by default
On the “Basic Wireless” page, set Airconsole to channel 6.
On AP Client page, join to “AndroidAP” with passphrase “Android1234” and enable NAT
Check AndroidAP is on Channel 6 to ensure auto-connection next time needed.
7 Using Airconsole Serial port with Mac OSX
In version 2.5 of Airconsole and later, the Mac OSX Serial port driver now supports both
Serial over WIFI and also Serial over Bluetooth Low Energy. Running the
AirconsoleOSX app will detect the Airconsole adaptor and present it as a TTY line that
any terminal application can connect to as if it is a physical serial port directly attached to
OSX.
After connection Airconsole will work with terminal applications such as the
comprehensive OSX terminal applications (for example) Macwise, SecureCRT or Zterm
that require a kernel mode installed serial port.
Airconsole can also be accessed directly from the OSX terminal using the “screen” app
that is bundled with OSX.
For serial port support in OSX, download the Mac OSX Kernel mode Serial Port driver
from the above page on www.get-console.com/airconsole and install the package file.
If WIFI serial is required (for higher speed serial connections), ensure that your Mac has
an IP network connection to the Airconsole adaptor’s Wireless or Wired LAN prior to
launching the AirConsoleOSX.app
For simple Bluetooth low energy connections, ensure that Bluetooth is enabled in your
OSX System Preferences.
In the above example, the OSX computer has detected Airconsole on both WIFI and
Bluetooth. In this situation, select the method required, or Auto – Auto will default to WIFI
as WIFI has better performance than Bluetooth.
The AirconsoleOSX program will create a NullModem-1 and an Airconsole-1 COM port.
In your Terminal Application (ie MacWise) only connect to the Airconsole-1 port
8 Using Airconsole Serial port with Windows 7 / 8
We recommend using Airconsole 2.0 on Windows via Bluetooth. This configuration is
significantly simpler than mapping a Serial Port via WIFI. Once Airconsole has been
paired with the Windows PC, Windows will create a new COM port that can then be
connected to via the Windows terminal app of your choice (ie Putty or SecureCRT).
The process under Windows is the same regardless of Windows version
1) Pair with Airconsole over Bluetooth
2) Discover the COM port number dynamically created by Windows after pairing
3) Launch a Windows terminal application (i.e. Putty) and connect to COM port
8.1 Windows Pairing
If when attempting to pair Windows comes up with a number string that has to be typed
in to pair, then just wait as no pairing number key is required and Windows will connect
anyway after a few seconds.
After adding the Airconsole device, Windows will install a new Serial port and map it to
the Bluetooth pairing. When that is complete the “Device is ready to use” message will
appear.
8.2 Discover COM port.
Before your terminal application can connect, you must discover what the COM port
number is of Airconsole. This is assigned dynamically by Windows during the previous
process.
To discover, open Control Panel ->Hardware and Sound -> Devices and Printers. Click
on Airconsole and then open the Hardware Tab. The “Standard Serial over Bluetooth
link” item will have a COM port number assigned.
8.3 Launch Terminal Application
Launch terminal application of your choice and connect to the discovered COM port. In
this example we use the free Putty terminal to connect to our discovered COM port 25.
9 Other Airconsole Uses
9.1.1 Connecting Airconsole Serial port with Windows 7 via WIFI
Airconsole can be used with Windows Terminal applications, such as puTTY or
SecureCRT. To use Airconsole with Win7 you must first install the Windows 7 Airconsole
Driver package to create a pseudo COM port that proxies the connection from your Win7
terminal application to an IP connection to the Airconsole adaptor.
To download the Windows 7 WIFI-to-COM port driver, which also includes the
installation instructions go to www.getconsole.com/airconsole
Ensure that your Windows PC is connected
to either the Airconsole Wired or Wireless
LAN network prior to launching the
AirConsoleConnect.exe program. After this
program runs it builds the virtual COM port
that your Windows 7 terminal application can
use to make serial port connections via
Airconsole.
This driver is ONLY needed for mapping
Airconsole serial ports over WIFI/IP networks.
The preferred method for connecting
Airconsole to Windows is via Bluetooth as
discussed in section 8 above.
9.1.2 Connecting to Cisco USB console
ports
Airconsole has native Cisco USB port support.
Simply replace the supplied light blue USBBluetooth-Serial ribbon cable on the Airconsole with a standard USB-to-mini-USB cable
and connect to the Cisco USB console port.
9.1.3 Connecting to other USB Serial ports
While not expressly supported, Airconsole's firmware also includes a standard linux USB
serial driver that will attempt to negotiate and build serial-over-USB connections to other
device's USB serial ports. For details on other vendor's USB based serial ports that are
known to work with Airconsole, please visit our forum at www.get-console.com/forum
9.1.4 Machine to Machine Mode
This mode is accessed in the “Remote Access” page on the Airconsole web interface.
M2M mode allows you to configure two Airconsoles to connect to each other to make a
back-to-back serial connection between 2 remote serial devices.
Configuration of M2M mode is only required on ONE Airconsole (called the Master), the
other Airconsole can have its default configuration, but its IP addresses (ie APClient, or
Bridge) must be reachable / routable from the Master Airconsole. This feature is
currently BETA.
The master Airconsole can optionally set the line properties (Baud rate etc) which will be
applied to the remote Airconsole to ensure that both serial port configurations match.
Successful connection to the remote Airconsole will be visible on the Status (home)
page.
9.2 Resetting to Factory Defaults
If you somehow lose the ability to login to the air console webpage, you can reset the
whole device back to its factory settings via the small pin-hole on the side of the unit that
is marked with "R".
9.2.1 Factory Reset procedure for version 1.x Firmware
With the unit powered on, insert a paperclip to press the reset button, and keep it
pressed on until the AirConsole starts blinking red.
The Airconsole will go through blinking red and then blue and then red again. After
around 1 minute, the air console should be slowly blinking blue again indicating that it
has returned to its factory default configuration
For Wifi access: SSID=Airconsole-XX, password 12345678
For Web console: Web address is airconsole-XX.local , Admin username and password
are "admin"
WIFI network will be on the 192.168.10.0/24 network with Airconsole set as
192.168.10.1/24 and enabled as a DHCP server).
Note for firmware 1.x that after a factory reset the SSID will always be AirConsole-XX
rather than AirConsole-A3 or what is printed on the back of the unit. You can change it to
match the SSID printed on the back of the unit via the built in webpage.
9.2.2 Factory Reset procedure for version 2.x Firmware
With the unit powered on, insert a paperclip to press the reset button, keep it pressed for
3 seconds and then release the button. On release of the button the Airconsole LED will
change to solid blue for a few seconds then the Airconsole will reboot (Red LED,
followed by slow blue blinking, followed by blue intermittent blinking)
For Wifi access: SSID=Airconsole-XX (where XX is as printed on the back of the
Airconsole), password 12345678
For Web console: Admin username and password are "admin"
WIFI network will be on the 192.168.10.0/24 network with Airconsole set as
192.168.10.1/24 and enabled as a DHCP server).
Note for firmware 2.x and later after a factory reset the SSID should remain the same
10 Upgrading Airconsole Firmware
Airconsole Firmware can be upgraded via the Admin -> Firmware Page.
Download the latest Firmware and Firmware upgrade instructions from the www.getconsole.com/airconsole webpage. The firmware instructions and firmware downloads
are on the right hand side of the page under Airconsole Resources.
11 Troubleshooting
Symptom
No light on top of unit
when powering on
Light on unit solid red or
solid blue and doesn’t
change after 1 minute.
Cant see Airconsole-XX
WIFI network from
iPad/iPhone/OSX
Possible Resolution
Airconsole ships from Cloudstore with minimal
charge. Consequently it may need charging prior to
use. Charge the battery via the supplied white micro
USB cable from any powered USB port. Full
Charging takes around 45 minutes
Your Airconsole unit is faulty or has failed during a
firmware upgrade. Please contact [email protected] for further advice and/or return
instructions.
There are a few possible reasons:
Out of range: Airconsole has a chip antenna that
works in a relatively short range (<20m). Move closer
to Airconsole unit and re-scan for WIFI networks.
SSID beacon not seen:
(iPad/iPhone) Turn WIFI on iPad / iPhone off then on
again to enable iPad/iPhone to pick up the
Airconsole-XX SSID
(OSX) Choose “Join other Network” then “Show
Networks” to rescan for Airconsole SSID
SSID hidden: If Airconsole has been configured to
hide its SSID then manually join “Other Network” in
iOS WIFI settings and enter Airconsole-xx (where xx
is the value printed on Airconsole device). On OSX
click “Join Other” from the “Find and join a Wi-Fi
network” dialog box.
Airconsole powered off: Check Airconsole is
powered on and the blue light on the top is blinking
every few seconds. If blue light is solid, or red (and
stays that way) refer to below
Connected to Airconsole-xx
WIFI but cannot connect to
Airconsole Webpage at
192.168.10.1
There are a few possible reasons:
PC/Mac/iOS Device not on same IP network as
Airconsole:
This can happen if using manual/static addressing
for your iOS/PC/Mac. Change to DHCP client on
your iOS/PC/Mac and restart its networking. It should
then obtain an address from the Airconsole DHCP
server and be on the same subnet.
Airconsole in DHCP Client / Static IP address mode:
Alternatively, if the Airconsole default settings have
been changed it may be in DHCP Client mode or
Static IP addressing mode itself. This means the
Airconsole may have an address other than the
192.168.10.1. Therefore to connect to Airconsole
you must first discover its current IP address and
place your iOS/Mac/PC onto the same IP subnet. A
quick way to do this is to discover the Airconsole
address via Bonjour (iOS/OSX) or mDNS (windows)
by pinging the “AirConsole-xx.local” address from the
command prompt – where “xx” is the actual values
as printed on the back of the Airconsole unit.
URL entered incorrect: Ensure the URL is
http://192.168.10.1 or http://airconsole-xx.local
(where xx is the actual value from back of unit)
Airconsole hasn’t fully booted yet: If top indicator
light is solid red or solid blue, wait for it to change to
blinking blue for 10 seconds before trying to connect
again.
Connected to Airconsole
WIFI but cannot connect to
serial port in Get Console
app
USB-Serial cable not connected: Get Console will
popup error if it connected to Airconsole WIFI, but
there is no Serial cable connected from Airconsole to
your serial device. Connect cable and retry the
connection.
Get Console needs to be restarted: If Get Console
was running in the background of iPhone/iPad prior
to joining to Airconsole WIFI network it may not
pickup the Airconsole Bonjour broadcast. Restart
Get Console by exiting the app (single tap home
button) and then close it down fully by doubletapping home button and finding Get Console icon
on list of background apps. Press and hold Get
Console icon on the background app list and then
close it via the “x” that appears. You can then relaunch the Get Console app from the normal app
button on your iPad/iPhone. On restart the green
“Airconsole discovered” message should appear.
iOS Device not on same IP network as Airconsole:
Follow troubleshooting steps above to ensure your
iOS device is on same IP subnet.
Airconsole Needs to be restarted: Occasionally
Airconsole may crash. Power-cycle Airconsole unit
by switch on side, wait 10 seconds until the blue light
on top is blinking again and then rejoin the WIFI and
re-attempt connection.
Get Console / Terminal App Baud Rate / Flow Control / Other Serial settings
incorrect: Check Baud rate and Flow Control settings
shows Connected to
of Serial Device match Get Console settings. The
Airconsole Serial port, but
there is no terminal output Default Get Console settings are 9600-8-N-1, but
can be changed via the “Cog” icon in the Get
Console Session Manager.
Serial device not transmitting: (in Get Console)
check status information for TX/RX counters (in Get
Console 1.x, top left hidden button where TX/RX
LED lights are shown. In Get Console 2.x press and
hold the right hand side menu slide out button).
If the RX counter shows 0 then no frames are being
received from serial device. Check serial pinouts or
flow control. If RX counter shows >0 then check
Baud Rate/Flow control and also scroll around on
Get Console screen as terminal output maybe not
where expected on screen.
(When connecting to DB9 serial port on Serial
device) Pinouts of serial device not correct for RJ45to-DB9 adaptor
Try DB9-RJ45 Null Adaptor. Often serial devices with
DB9 interfaces require a “Null Modem” DB9
connection rather than RS232 DTE connection. For
example HP Procurve switch DB9 console ports
require Null Modem. Both adaptors are available
from Get Console webshop.
Verify pinouts
Access Problem after
changing LAN mode
AirConsole web page and/or Get-Console app
intermittently working: Ensure that the IP address
assigned manually to AirConsole has not already been
assigned to another device on the network when the
wired LAN port is used
AirConsole web page and/or Get-Console app are not
accessible/working: Ensure to renew the lease for the
Wifi Connection after changing LAN mode operation e.g.
from Enable DHCP server -> Enable DHCP client. This
allows the client device to obtain an IP that is in the same
subnet as the AirConsole. Alternatively, reconnecting to
the AirConsole Wifi can resolve this problem. This will
only work provided that the AirConsole IP and the DHCP
assigned IP are in the same subnet.
AP Client “connects” but
cannot pass traffic on
802.11N dual channel
networks.
On 802.11N networks, this problem can happen when
operating in mixed 20/40mhz mode. In the basic WLAN
Settings page, set the “Channel Bandwidth” under HT
Physical Mode to be “20” rather than 20/40
12 Technical Information
12.1.1 Airconsole Connectors
USB Port
For connecting the supplied USB-Serial Cable, or for
connection directly to Cisco USB Console ports, a USBmini USB cable.
10/100 Ethernet Port
Micro USB Port
Factory Reset
The USB port also accepts FAT formatted thumb drives
for performing firmware upgrades
Use this port for connecting
a) to LAN switches to bridge the Airconsole WIFI
network into a local LAN or;
b) to Ethernet based management ports on field
equipment
The port has Auto-MDIX detection so can accept normal
or crossed-over Ethernet cables.
For charging up the Airconsole via the supplied microUSB charging cable.
For resetting Airconsole back to its factory settings.
Turn off Airconsole, press and hold the recessed reset
button via a paperclip while turning on Airconsole. Wait
until Red light stops blinking and turns solid Blue. Turn off
Airconsole, remove paperclip, and then turn Airconsole
back on. Airconsole will now have factory settings.
12.1.2 Airconsole Indicator Lights
Top Light
Indicates the Operational status of Airconsole
a) Solid red – Airconsole booting, however if remains on
for more than 20 seconds, indicates firmware error
b) Red blinking – seen during Airconsole firmware
Battery Indicator
update.
c) Solid blue – Airconsole ready to receive firmware
upgrade. If on when not performing firmware upgrade
or stays on for more than 30 seconds then unit
maybe faulty.
d) Long Blue Blinking – Airconsole is booting (version
2.0)
e) Intermittent Blue blinking – Airconsole WIFI network
has started and available to connec
Depending on model, either 3 or 4 lights indicate the
battery charge level.
- 3 or 4 Lights – near full charge 4-5 hours remaining
- 2 Lights – 60-90 minutes remaining
- 1 light – 30 minutes remaining