1
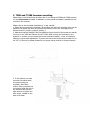
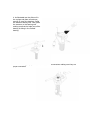
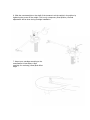
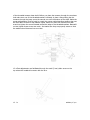
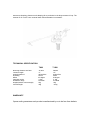
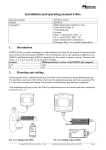
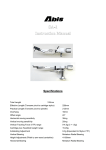
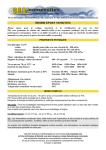
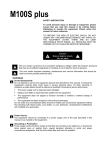
User Manual
(for T988,T1288 tonearm models)
Warnings
Do
Do
Do
Do
No
not expose the equipment to rain or moisture.
not remove the cover from the equipment.
not insert anything into the equipment through the ventilation holes.
not handle the mains lead with wet hands.
naked flame sources, such as lighted candles, should be placed on the equipment.
Table of Contents
1. Package contents
2
2. tonearm mounting
2
3. Technical data
8
4.Warranty
9
1. Package contents
The consonance T988 /T1288 tonearm is delivered in specially designed packaging to
ensure its safe transport. Please check the contents as shown in picture below and in the
list at the bottom of this page:
1.Carbon fibre arm
2. Counterweight
3. Tonearm base
4. Tonearm lift
5. Headshell
6. Anti-skate weight
7. RCA connector
8.Oil
9.1.5mm allen wrench
10.3mm allen wrench
11.Cartridge alignment gauge
2. T988 and T1288 tonearm mounting
Please keep in mind that these directions are for mounting the T988 and T1288 tonearm
on any Consonance turntable. Installation on other brand turntables is possible but not
covered in this manual.
Please refer to the turntable manufacturer´s user manual.
1. Fitting and connecting the cartridge. All cartridge with half inch mounting holes can be
fitted.Do not tighten the nuts yet.Connect the tonearm wire to the cartridge pins as
follows:white(L+),red(R+),green(R-),blue(L-).
2. Make sure that the distance from the spindle to the pivot point of the tonearm is exactly
214 mm for the T988 and 290mm for the T1288. When moving the armboard in one
direction or another you can locate the correct armboard position, a ruler is included in
helping in proper setup adjustment. If you are the owner the Consonance turntable ‘Liu’ or
the ‘LP 3.1’ the hole is already located for the proper setup position for these tonearms.
3. In this picture you must
secure the tonearm cable
connection using the
supplied 1.5mm allen
wrench. After you place the
connection inside the hole in
the tonearm base use the
allen wrench to tighten the
allen screw, located on the
side of the base.
4. As illustrated use the silicon oil in
the syringe and place a few drops,
enough to cover the bearings, inside
the tonearm bearing well. Then place
the tonearm on the bearing well
making sure that the ‘male’ part of the
bearing is sitting in the ‘female’
bearing.
5. In the next step, simply connect the two audio wire connectors making sure they are
proper connected.
6. Slide the counterweight on the shaft of the tonearm.Lock the weight in its position by
tightening the screws in the weight. This is only a temporary fixed position, the final
adjustment will be done during cartridge installation.
7. Mount your cartridge according to the
manufacturer’s instructions. Align
cartridge for overhang (16mm)and offset
angle
8. Use the scale to set tracking force (see cartridge instructions for recommended tracking
force range). Adjusting tracking force is accomplished by moving the weight towards or
away from the pivot point on the
shaft.
9. Align cartridge for overhang
(16mm)and offset angle using the
Consonance Cartridge alignment
gauge. Once done, re-check
tracking force.
10. Feed the anti-skate weight
through the anti-skate
support wand and secure it
to one of the three locations
(according to the anti-skating
adjustment for your cartridge)
on the shaft at the top of the
tonearm bell.
Note: The anti-skating force is adjusted according to the mass of the cartridge as follows:
T988’s downforce: 10-14mN,15-19mN,20mN and bigger(Groove in the stub 1st , 2st, 3st
from bearing rings).
T1288’s downforce: 8-11mN,12-14mN,15mN and bigger(Groove in the stub 1st , 2st, 3st
from bearing rings).
When tightening the counter-weight, insure that the weight is perfectly vertical
otherwise this may affect your cartridges azimuth settings.
11. VTA adjustments are accomplished by adjusting the two large washers on the bottom
of the threaded tonearm base shaft. Before you place the tonearm through the arm base
hole make sure one of the threaded washers is already in place. After placing the the
tonearm through the base, screw the second one onto the bottom of the shaft. Make the
proper adjustments (first by hand) to reach the proper vertical tracking position then use
the 3mm allen wrench to help make a tighter secure fit. After this use the 3mm allen
wrench to tighten the screws located around the edge of the threaded washers. Becareful
not too tighten these screws too much. Just make sure they are properly secure so that
the washers don’t become lose over time.
12. offset adjustments are facilitated through the small (3 mm) allen screw on the
top where the headshell connects with the arm.
13.In
addition, if you
want more damping, place as much damping oil as you desire in the large tonearm oil cup. The
amount of oil is up to your personal taste. Experimentation is necessary.
TECHNICAL SPECIFICATION
T988
Mounting distance arm base
Tonearm length
Armtube made of
Overhang
Offset
Cartridge weight
Downforce range
Weight(without counterweight)
Counterweight
214mm
9’’
carbon-fibre
16mm
23 degree
4-22g
10-35mN
52g
85g
T1288
290mm
12’’
carbon-fibre
16mm
22 degree
3-15g
10-35mN
55g
93.6g
WARRANTY
Opera audio guarantees each product manufactured by us to be free from defects
in materials and workmanship under normal use. Our obligation under this
warranty is limited to making good at our factory any part or parts thereof which
shall, within 1 year after delivery to the original purchaser, be returned to us with
transportation charges prepaid, and which an examination shall disclose to have
been thus defective; this warranty being expressly in lieu of all other warranties
expressed or implied and of all other obligations or liabilities on our part. This
warranty shall not apply to any Opera audio product which shall have been
repaired or altered outside of our factory in any way so as to affect its stability, nor
which has been subject to misuse, negligence or accident. Warranties of the
vacuum tubes are by the respective manufacturers, usually 90 days.
Please mail or e-mail the Registration Card to the address as follows:
The Opera Audio Co., Ltd.
No.2 JianXianQiaoLu
ChaoYang District
Beijing, China
Tel: 86 10 59789461
Fax: 86 10 59789465
[email protected]
www.opera-consonance.com
Registration Card
Name
Address
City
State
Zip
Email
Telephone
Model
Serial
Number
Purchase
Date
Dealer