1
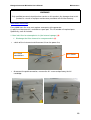
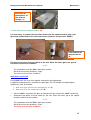
Nitrogen generator model:
MINIZEFIRO HP-LP
User’s manual
Version 1.00
Index
INDEX.................................................................................................................................................... 0
INTRODUCTION ................................................................................................................................... 1
SCOPE OF THE MANUAL ....................................................................................................................... 1
SPECIFICATIONS .................................................................................................................................. 1
NOTES ON FCC COMPLIANCE .............................................................................................................. 1
CORRECT USE ..................................................................................................................................... 2
HEALTH AND SAFETY ........................................................................................................................... 2
WARNING: NITROGEN AND OXYGEN ...................................................................................................... 2
WARNING: ELECTRICITY....................................................................................................................... 3
WARNING: SAFETY PRECAUTIONS ........................................................................................................ 3
PACKING LIST...................................................................................................................................... 4
DESCRIPTION ...................................................................................................................................... 4
INSTALLATION .................................................................................................................................... 5
RECEIVING THE GENERATOR ................................................................................................................ 5
PLACING THE GENERATOR ................................................................................................................... 5
SYMBOLS USED ON THE GENERATOR .................................................................................................... 5
GAS CONNECTIONS ............................................................................................................................. 5
INITIAL START-UP ............................................................................................................................... 6
START ................................................................................................................................................ 6
OPERATION ......................................................................................................................................... 6
MENU STRUCTURE............................................................................................................................... 7
PARAMETERS ...................................................................................................................................... 7
DIAGNOSTIC ........................................................................................................................................ 7
ALARM HISTORY .................................................................................................................................. 7
SET CLOCK ......................................................................................................................................... 7
SPECIAL FUNCTION .............................................................................................................................. 8
PRE-ALARMS AND ALARMS .............................................................................................................. 8
PRE-ALARMS....................................................................................................................................... 8
ALARMS .............................................................................................................................................. 8
MAINTENANCE .................................................................................................................................... 9
ROUTINE MAINTENANCE ....................................................................................................................... 9
CLEANING ........................................................................................................................................... 9
4000 HOURS SERVICE KITS ................................................................................................................ 10
8000 HOURS SERVICE KIT .................................................................................................................. 11
SPARE PARTS LIST........................................................................................................................... 12
LIST OF THE SPARE PARTS ................................................................................................................. 12
RETURNING THE UNIT...................................................................................................................... 12
APPENDIX A : HOW TO REPLACE THE COMPRESSORS................................................................13
Nitrogen Generator Minizefiro User’s Manual
Introduction
Introduction
Scope of the manual
This manual provides operation and maintenance instructions for model Minizefiro HP/LP
nitrogen generators.
Specifications
Specifications of the nitrogen generator
Standard nitrogen flow rate
Outlet pressure
Standard purity
Available flow rates range
Input voltage
Weight
5 l/min@5 bar at STP (*) for Minizefiro LP
1 l/min@5 bar at STP (*) for Minizefiro HP
5 bar at STP (*)
Minizefiro HP: 10 ppm
Minizefiro LP: 1%
at STP (*)
at STP (*)
1 to 5 l/min (depending by the purity)
110 V / 60 Hz
45 Kg (35 Kg without compressor)
Power consumption
Fuse
Pressure accuracy
Microprocessor controlled
display
Index of protection
Operating conditions:
- Temperature
- Relative humidity
Over voltage category
600 W
N.2 5x20 mm, 10 A, type F
0.1 bar (± 0.5 %)
Graphic display, 128 x 64 pixels
IP2x
15°C to +35°C
0-80%, non condensing
II
Pollution degree
Sound pressure level
Alarm relays
Output port
Case dimensions
230 V / 50 Hz
2
< 60 dB(A) or witout compressor
250 VAC, 12 A max
Minizefiro HP:
Swagelok for 1/8” or 3 mm
Minizefiro LP: G 1/4
diameter tube
510x550x420 mm (WxDxH)
(*) STP: Standard temperature and pressure (20°C, 1 bar)
Notes on FCC compliance
This equipment has been tested and found to comply with the limits for a Class B digital
device, pursuant to part 15 of the FCC Rules. These limits are designed to provide
reasonable protection against harmful interference in a residential installation. This
equipment generates uses and can radiate radio frequency energy and, if not installed and
used in accordance with the instructions, may cause harmful interference to radio
1
Nitrogen Generator Minizefiro User’s Manual
Introduction
communications. However, there is no guarantee that interference will not occur in a
particular installation.
If this equipment does cause harmful interference to radio or television reception, which can
be determined by turning the equipment off and on, the user is encouraged to try to correct
the interference by one or more of the following measures:
• Reorient or relocate the receiving antenna.
• Increase the separation between the equipment and receiver.
• Connect the equipment into an outlet on a circuit different from that to which the
receiver is connected.
• Consult the dealer or an experienced radio/TV technician for help.
WARNING!
Any changes or modifications to this equipment not expressly approved by the
manufacturer may void the user's authority to operate the equipment.
Correct use
Nitrogen generator is designed to produce nitrogen for laboratory use. The unit must only be
operated for this purpose, according to the specifications and instructions provided in this
manual. In particular, the following warnings must be observed at all times:
• Indoor use only!
• Never operate the unit in below-zero temperatures!
• Only operate the unit in a room with sufficient ventilation (see “Placing the
unit”)!
• Always unplug the unit from the mains power supply before accessing the
internal components for replacement!
• Only the parts described in the “Spare parts list” can be replaced by the user!
Health and safety
Correct use of the MINIZEFIRO nitrogen generator is important for your personal safety and
for trouble-free functioning of the MINIZEFIRO. Incorrect use can cause damage to the
ZEFIRO or can lead to incorrect gas supply.
Warning!
• Read this manual before you start the installation and putting into operation
of the MINIZEFIRO. Prevent accidents and damage to the MINIZEFIRO.
• Contact your supplier if you detect a problem that you cannot solve with this
manual.
• Only service-engineers, that are qualified to work on electric and pneumatic
equipment, are allowed to do the installation, maintenance and repairs.
Unqualified people are not allowed to repair the equipment. Lift the
MINIZEFIRO with a forklift. Follow the legislation and instructions for
operating the forklift.
•
Do not tamper or experiment with the equipment. Do not exceed the technical
specifications for the MINIZEFIRO.
Warning: nitrogen and oxygen!
2
Nitrogen Generator Minizefiro User’s Manual
Introduction
The MINIZEFIRO generates nitrogen as a product. Oxygen enriched air is
released as waste.
•
Nitrogen can cause suffocation!
•
Oxygen-enriched air leads to increased risk of fire in the event of contact with
inflammable products. Make sure that there is adequate ventilation at all
times!
The MINIZEFIRO is not designed for installation in an Exx-classified area.
Do not install the MINIZEFIRO in an area where explosive mixtures may
occur.
•
•
Warning: electricity
•
•
•
Only service-engineers, that are qualified to work on electric equipment, are
allowed to do the installation, maintenance and reparations.
Disconnect the main power supply before you do the maintenance or repair.
If a service-engineer has to work on the MINIZEFIRO while the electric power
it is connected, the service-engineer must be very careful with respect to the
electric hazards.
Warning: safety precautions
•
•
•
•
Make sure that the ventilation rate is sufficient in the room where the
enriched oxygen is ventilated, or lead the enriched air outside.
Keep the ambient temperature between 10 and 35 °C.
Install the peripheral equipment, piping and nitrogen storage vessels
according to standard procedures.
Do regular maintenance to the MINIZEFIRO.
3
Nitrogen Generator Minizefiro User’s Manual
Packing list
Packing list
List of items included in the shipment
Quantity
Description
1
Nitrogen generator
1
Instruction manual (cd format, pdf file)
1
Power cable
Description
The nitrogen generator produces pure nitrogen through the filtration of compressed air. The
key element of the generator is a carbon molecular sieve that is able to separate the
nitrogen molecules from the oxygen ones present in the compressed air stream. The carbon
molecular sieve tubes are self regenerating cyclic. The compressors are integral in the
generator and theirs purpose is to compress air up and force it into the tubes containing the
carbon molecular sieve.
The generated nitrogen gas is accumulated in a specific reservoir. The internal pressure is
controlled by a pressure transducer. The outlet pressure is controlled by a proportional valve.
The nitrogen then passes through outlet port at the rear.
4
Nitrogen Generator Minizefiro User’s Manual
Installation
Installation
Receiving the generator
All units have been carefully inspected before transport. Visual checks for damage and
functional tests should be performed upon receipt. Any damage must be immediately noted
and reported. The generator must only be returned according to the shipping instructions
provided.
Placing the generator
The nitrogen generator must be placed on a flat, level, vibration-free, shock-free surface. Do
not place the generator over a source of heat, as this may cause the device to overheat. The
unit should not be in contact with any other objects on any side, and the air inlet must not be
blocked. Leave at least 30 cm of free space at rear for ventilation. Do not operate the
generator in a sealed or unventilated room. Do not operate the generator at below freezing
temperatures. Operation is guaranteed at operating temperatures between +15 and
+35°C.
WARNING!
Normal precautions for any nitrogen supply should be taken when using the generator.
DO NOT use in sealed or unventilated rooms. Nitrogen can cause suffocation.
Symbols used on the generator
Earth symbol:
This symbol marks the earth connections to the chassis of the
nitrogen generator.
Electrical shock:
This symbol marks the risck of electrical shock.
Gas connections
Pure nitrogen at regulated pressure is available at the nitrogen outlet port at the rear of the
generator. This port has a thread of ¼ or 1/8” Swagelok connection and pressure at this port
is shown on the display.
WARNING!
The line from the relief port should never connect in such a way that back pressure can
develop.
5
Nitrogen Generator Minizefiro User’s Manual
Initial start up
Initial start-up
Start N2 MINIZEFIRO
- Switch on the unit.
- Press start.
- It will be at least 20 minutes before the nitrogen produced will reach the stated purity.
- The system is ready for use now.
Operation
The operating status of the unit is shown on the main screen on the graphic display. It is
possible to see the outlet pressure level of 8 bar on the display when the generator is
connected to its applications.
The main screen has three options at the bottom, corresponding to the three buttons on the
unit, which are used to run the various functions and access the configuration and
diagnostics of the unit.
OUTLET N2
PRESSURE
START/STOP
DATE/HOURS
TO GO IN THE
MENU
In the main screen, the three buttons have the following function:
Left button: start/stop;
Central button: reset the alarms;
Right button: enter menu;
In the menu, the three buttons change their function:
Left button: scroll;
Central button: select;
Right button: exit the selected menu voice;
6
Nitrogen Generator Minizefiro User’s Manual
Initial start up
Menu structure
Parameters
Item
Description
Pressure units
Sets the desired unit of measure for
the pressure
Sets the desired unit of measure for
the temperature
Sets the desired unit of measure for
the flow rate
Sets whether the unit automatically
starts production when power is
switched on.
Sets the desired contrast of the
display
Sets the alarm beep on/off
Sets the possibility to see the prealarms in the alarm history list
Temperature
units
Flow units
Auto start
Display contrast
Beeper
Pre-alarms in list
Options / Range
Default
bar / kPa/ psi
bar
°C/°F
°C
l/min-scf/min
l/min
YES / NO
NO
1-10
5
YES/NO
YES/NO
YES
NO
Diagnostic
Item
Description
Sec1 temp
Shows the instant temperature in the section 1 of the cabinet
Sec2 temp
Shows the instant temperature in the section 2 of the cabinet
Out Pres.
Shows the instant output pressure
S#1 Pres.
Shows the instant pressure in the internal reservoir
Tank Pres.
Shows the instant pressure in the external tank (if installed)
WT CMP
Shows the work time of the compressor
SRV 4000
Shows the work time for the 4000 h service
SRV 8000
Shows the work time for the 8000 h service
Alarm history
Shows the history of the alarms occurred on the unit.
Set clock
Allow the regulation of the clock of the unit. The central button of the display increases the
values and the left button passes to the next number.
7
Nitrogen Generator Minizefiro User’s Manual
Pre-alarms and alarms
Special function
Allow the activation of some special function (i.e. the reset of the working time counter of the
filter) with the digitations of a code. The central button of the display increases the values
and the left button passes to the next number.
MENU-SPECIAL FUNCTION-CODE-SCROLL
Codes:
•
•
Reset of the 4000 h work time counter: 26103
Reset of the 8000 h work time counter: 26104
Pre-alarms and alarms
There are a series of pre-alarms and alarms on the unit. When a pre-alarm starts, a sound
advertise about a problem and the type of problem is displayed on the main screen. When
an alarm starts, the unit also stops.
What do they mean and how to proceed:
Pre-alarms
•
•
•
•
•
•
•
Max pre-alarm cabinet temperature: the temperature inside the cabinet is over the
maximum limit. Check if the room temperature respects the specifications and if there
is enough space in the rear side of the unit for the ventilation. Otherwise, remove the
right panel of the machine and the cabinet panel and check if all the fans are
working. If it is all right, call the service. Press the reset button.
Min pre-alarm press. section 1: the pressure in the internal reservoir is less than the
lower limit. Call the service. Press the reset button.
Max pre-alarm oxygen (only if the optional oxygen analyzer is installed): the N2 purity
is decreasing. Call the service. Press the reset button.
Work time pre-alarm compressor: the compressors must be changed. Call the
service. Press the reset button.
Pre-alarm service 4000 h: the filter must be changed. See the maintenance section
of this manual relatively to the 4000 h service kit. Call the service to order the new kit.
Press the reset button.
Pre-alarm service 8000 h: the filter and the silencer must be changed. See the
maintenance section of this manual relatively to the 8000 h service kit. Call the
service to order the new kit. Press the reset button.
Pre-alarm clock failure: the clock is broken. Call the service. Press the reset button.
Alarms
•
•
•
•
•
Max alarm cabinet temperature: the temperature inside the cabinet is too high.
Min alarm press. section 1.the pressure in the internal reservoir is too low.
Max alarm press. section 1. the pressure in the internal reservoir is too high. Check if
the output fitting is free. If it is all right, call the service.
Min alarm press. outlet: the outlet pressure is too low.
Max alarm press. outlet: the outlet pressure is too high. Check if the output fitting is
free. If it is all right, call the service.
8
Nitrogen Generator Minizefiro User’s Manual
•
•
•
•
Maintenance
Work time alarm compressor: the compressors must be changed.
Alarm service 4000 h: the filter must be changed. See the maintenance section of
this manual.
Alarm service 8000 h: the filter and the silencer must be changed. See the
maintenance section of this manual.
Alarm EEP failure: failure of the static memory. Call the service.
Maintenance
With proper care and maintenance, your nitrogen generator should provide you with years of
trouble-free operation. There are no adjustments to be made to the generator. The only
routine service operations are those described below.
Nonetheless, the generator should be inspected approximately every 2 years. Contact your
supplier.
Routine maintenance
The following section describes the maintenance operations required for the correct
operation of the nitrogen generator.
Cleaning
The internal components of the nitrogen generator do not need to be cleaned and should not
be accessed by the user for cleaning. To clean the outside of the unit, only use a damp cloth
(no detergents, acids or aggressive or abrasive substances).
Service kits
The service kits in the Zefiro generators are every 4000h. The first starts at 4000h,
the second at 8000h and using the reset codes the cycle repeats.
The Service kit is composed by:
1- Filter element for atmospheric air (A)
2- Filter element for compressed air (B)
Filter element for
compressed air
(B)
Inlet filter for
atmospheric air
(the internal
sponge) (A)
9
Nitrogen Generator Minizefiro User’s Manual
Maintenance
WARNING!
Only qualified personnel should perform service on this product. Any damage done to this
product as a result of improper maintenance procedure will void the warranty.
4000 hours service kit
Every 4000 hours the user must replace some parts of the generator.
A specific maintenance kit is available as spare part. This kit includes all required parts.
Specifically, each kit includes:
1. New inlet filter for atmospheric air (the internal sponge) (A)
1. Exchange the filter element for compressed air (A)
•
switch off the instrument and disconnect it from the power line;
N.1 Quick
connections
•
N.1 Screw
disconnect the quick connection, unscrew the N.1 screw and pull away the full
cartdridge:
10
Nitrogen Generator Minizefiro User’s Manual
Maintenance
Inlet filter for
atmospheric air
(the internal
sponge) (A)
2. New inlet filter for compressed air (B)
It is necessary to replace the inlet filter element for the compressed air only if the
generator shows blem in the internal pressure (alarm of ‘low pressure SEC#1’)
Filter element for
compressed air
(B)
Reconnect the power line and switch on the unit. Enter the menu, go to the special
functions and insert the number:
26103
This procedure reset the 4000 h work time counter.
Go to the main menu and press “Start”.
The next service will be at 8000 h.
8000 hours service kit
Every 8000 hours the user must replace some parts of the generator.
A specific maintenance kit is available as spare part. This kit includes all required parts.
Specifically, each kit includes:
1. New inlet filter element for atmospheric air (A).
2. New inlet filter for compressed air (B).
•
•
See the 4000 h service kit (the parts to sobstitue are the same of the 4000h service kit).
Reconnect the power line and switch on the unit. Enter the menu, go to the special
functions and insert the number:
26104
This procedure reset the 8000 h work time counter.
Go to the main menu and press “Start”.
The next service will be at 4000 h.
11
Nitrogen Generator Minizefiro User’s Manual
Spare parts list
Spare parts list
The table below provides a list and description of the spare parts of the nitrogen generator.
List of the spare parts
p/n
DESCRIPTION
Z05-4000
4.000 hours maintenance kit
Z05-8000
8.000 hours maintenance kit
Z04-301
Air compressor 230V / 50-60 Hz
IMPORTANT!
The manufacturer reserves the right to change or modify its products without prior notice.
Returning the unit
In the event of any faults or damage, first notify the agent or distributor who supplied the
unit. Please also provide full details of the problem, including the model and serial number.
Instructions will then be provided for the service or the return of the unit. If the warranty has
expired, or the fault is due to misuse of the unit, all repair and shipping costs are to be paid
by the customer. All other costs are borne by the customer, except as otherwise expressly
agreed upon.
WARNING!
If the unit has to be transported, make sure to use suitable packaging.
The unit should be transported in an upright position; this warning should be reported on
the outside of the packaging.
12
Nitrogen Generator Minizefiro User’s Manual
APPENDIX A
13
Nitrogen Generator Minizefiro User’s Manual
Removal of the compressor
First switch off the instrument and disconnect it from the power line
a) Remove the front plastic pannel unscrewing partially the N.2 bottom screws of the front
panel with the wrench N.8:
Screws
b) unscrew partially the N.3 bottom screws of the left side panel with the wrench N.8 and
unscrew the N.3 rear screws of the side panel to remove the panel:
Screws
Screws
c) unscrew the N.4 screws of the metallic panel and remove it:
14
Nitrogen Generator Minizefiro User’s Manual
Screws
d) disconnect the flexible tube and the blue inlet air tube of the generator:
Quick
connection
Flexible
tube
e) disconnect the alimentation cable from the main board:
Heart
Alimentation
cable
15
Nitrogen Generator Minizefiro User’s Manual
Position of
the cable
e) Put out the compressor from the box:
16