1
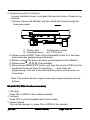
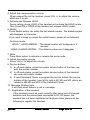
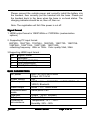
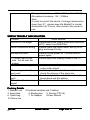
BITTEL
User Manual
Fi- H
Media
MediaFiMediaFi- W
Following description maybe difference from the real device. Please
keep the real device as the criterion. The telephone is subject to
change without notice. In order to fully use this device please read
this manual carefully.
We bring good things to Hotel/Hospitality
_______________________________________________________________________
_BITTEL
MediaFi Series
Page 1 of 19
Thank you for purchasing Bittel products.
Brief Introduction
MediaFi is a specially designed multimedia transition product, which
combines HD video/audio transition, telephone, WiFi(optional), iPod
/iPhone/iPad player, radio and alarm in one and also supports 3D. MediaFi
can transit different signals like HDMI、VGA、AV、iPod/iPhone/iPad into
1080P mode to be showed on HDTV. Telephone communication, radio,
alarm, power charging, power socket are also available for customers. We
choose the plug-play design, convenient to use, fully embodys the
humanitarian care for guests and saves space. Together with perfect
feature, such as touch Screen, backlit panel and intelligent & backlit button
indicator make MediaFi to well meet the hotel’s demand.
Functions and Features
Features::
1. Single line connection: multi-input signal with signal HDMI cable output
on TV.
2. Plug & Play: TV will automatically switch to HDMI mode and play the
video signal after Video equipments being connected with MediaFi. (the
TV should be able to cooperate with MediaFi)
3. Charging port: USB Charging connector can charge for electronic
devices and Multi-Media Chargeing Connector together with Apple
Docking and Lightning Connector can also charge for the relevant
devices.
4. Auto standby function: MediaFi can auto go into standby mode and save
energy when there is no input signal for a long time.
5. HDMI port: allowing for HDMI mode signal
6. Audio/PC (VGA) port: allowing for VGA mode signal
7. AV signal: allowing for AV mode signal
8. iPod/iPad dock: Enable Apple's devices to play audio and video files.
Press the button on MediaFi to achieve the audio file to be played on
MediaFi or on TV.
9. MediaFi auto play the latest-connected signal and will memory the order
of all the signals.
10. Switching the signals connected and auto play selected one.
11. Touch Button
12. RJ45 port: Provide connect port for high speed internet access.
_______________________________________________________________________
_BITTEL
MediaFi Series
Page 2 of 19
13. Audio play: TV can individually play the audio files on TV without video
signals.
14. Bluetooth (Optional)
15. Supporting 3D
16. WiFi (Optional)—Change the wired signal into wireless signal
17. Fashionable Led digital time clock; Combine alarm, radio, speaker in
one design.
18. Remote time cloner, convenient to calibrate the time for a number of
products a one time.
19. Telephone feature
Note: All the above functions for reference only, subject to our real
products which can be made according customers requirements.
Precautions for installation and use
1. Desk installation indications are as follows:
1) Use four screws to fix the iron base panel on the desk (the four A points)
2) Please fix the MediaFi with the iron base panel by connecting the hole
on the base of MediaFi with the hook on the iron base panel.
3) Please push MediaFi from right to left to make sure fixed tightly.
_______________________________________________________________________
_BITTEL
MediaFi Series
Page 3 of 19
2. The diameter of the cable tube should be larger than 32mm and must
make sure that all the cables should enter the box from the left.
3. The installation of must be undertaken by the professional engineer or
worker who own the experience of installing strong or weak electricity
devices. The installation should be in clear and dry environment.
4. Please thread the cables in the wall from TV to MediaFi. First, clean all
the eye-winker of the pipeline and prohibit barbarously thread cables
and protect the jack of the cables.
5. When thread the cables, please use a slime steel to guide the cables
and please keep far away from the all the signal ports. For HDMI, also
handle carefully when thread the wall and protect the jack in good
condition.
6. Must comply with the installation sequence to open the MediaFi and
please pay more attention to the circuit components and cables.
7. Please follow the installation pictures and insert all cables to the right
position and keep them in good order then fix them.
8. Please pay more attention to the cables, do not hurt them when close
the cover, check the PH plug and make sure it is in right position.
9. Fire-proof, shook-proof, clean the surface dust by soft cloth, prohibit
using chemical solvent.
10. Don’t open the MediaFi by oneself, please contact Bittel distributor or
Bittel Company at once when met trouble.
Function ports introduction
introduction::
1. MediaFi H (Corded handset)
_______________________________________________________________________
_BITTEL
MediaFi Series
Page 4 of 19
_______________________________________________________________________
_BITTEL
MediaFi Series
Page 5 of 19
1. Digital Button
2. Function buttons
3. Service Buttons
4. Message Waiting Light
5. Touch buttons for Audio Features
6. PIR Area (Passive Infrared Detector)
7. Audio, Alarm and Radio
8. Hotel’s faceplate
9. AV input port
10. Audio/PC connector
11.HDMI input port
12. iPod/iPad/iPhone Dock
13. USB Connector
14. AV button and indicator
15. PC button and indicator
16. HDMI button and indicator
17. Apple button and indicator
18. Apple Device AMP/TV Audio indicator
19. Lightning connector
20. Power adaptor’ lead wire port
21. Room Control System lead wire port
22. Multi-Feature connector
23. Mirco USB
24. iPod Dock
25. Lightning Connector
26. 3.5mm Audio input port
27. AC power socket
28. HDMI IN connector
29. HDMI output port
30. RS232 output port
31. USB port
32. WiFi Reset button
33. Radio Antenna port
34. RJ45 input port
35. To Tel port
36. Time cloner signal receiving area
37. RJ45 port
38. Cable tray
_______________________________________________________________________
_BITTEL
MediaFi Series
Page 6 of 19
39. Handset cord connector
40. Battery for clock.
2. MediaFi H (Corded handset)
_______________________________________________________________________
_BITTEL
MediaFi Series
Page 7 of 19
1. Service buttons on the handset
2. Digital Button
3. Function buttons
3. Service Buttons
4. Service buttons on the base
5. Charging and Message Indicator
6. Touch buttons for Audio Features
7. PIR Area (Passive Infrared Detector)
8. Audio, Alarm and Radio
9. Hotel’s faceplate
10. AV input port
11. Audio/PC connector
12.HDMI input port
13. iPod/iPad/iPhone Dock
14. USB Connector
15. AV button and indicator
16. PC button and indicator
17. HDMI button and indicator
18. Apple button and indicator
19. Apple Device AMP/TV Audio indicator
20. Lightning connector
21. Power adaptor’ lead wire port
_______________________________________________________________________
_BITTEL
MediaFi Series
Page 8 of 19
21. Room Control System lead wire port
23. Multi-Feature connector
24. Mirco USB
25. iPod Dock
26. Lightning Connector
27. 3.5mm Audio input port
28. AC power socket
29. HDMI IN connector
30. HDMI output port
31. RS232 output port
32. USB port
33. WiFi Reset button
34. Radio Antenna port
35. RJ45 input port
36. To Tel port
37. Time cloner signal receiving area
38. RJ45 port
39. Cable tray
40. Phone Line Jack
41. Battery for clock
User manual
Multimedia Signals Transition Part
1. Open the television
2. Standby awake:
1) Input video signal
2) Input video signal into PC’s handset jack.
3) Firstly be powered
4) Press the Bluetooth (optional)
3. TV will automatically switch to HDMI mode and play the video signal
after Video equipments being connected with MediaFi. (TV should be
own CEC feature)
4. Press the related button to achieve signal switching when there is multiinput signal
5. Play sound individually on TV: TV will play the sound when there is AV
or Audio/PC input signal; When Apple's iPod/iPhone like equipments
_______________________________________________________________________
_BITTEL
MediaFi Series
Page 9 of 19
being connected with iPhone dock, press the iPhone/iPod switch button
to achieve sound play switch between MediaFi and TV.
6. Use the TV remote control to switch back to TV mode after all the signal
being taken from MediaFi
7. USB port: Providing 5V charging power
8. iPhone/iPod/iPad play:
After awaking the MediaFi and connecting iPhone/iPod/iPad with iPhone
dock, MediaFi will auto sense iPhone/iPod/iPad and show "Line in", then
play the audio and video files on TV; Press to achieve pause and play,
press the iPhone/iPod switch button to achieve audio files to be played
between MediaFi (AMP) and TV/BEDROOM.
9. The MediaFi will auto play the latest-connected signal and will memory
the signal’s order.
10. Bluetooth feature (optional)
How to use the Digital Clock, Alarm and FM radio
1.How to play FM-Radio, iPod/iPhone, MP3
1). Audio signal input types
For iPod/ iPhone/iPad signal input, use the audio dock or the extension
cable
For audio signals from other electronic devices input, use the audio
extension cable
2). Audio playing
When connected to power, press AUDIO ON/OFF, LCD display will show
the FM-Radio, Press the TUNING+/- continually, it will search for radio
signals automatically.
Plug the iPod/ iPhone to the the dock, it will auto search and play the input signal, the LCD display will show LINE IN
To play the audio signals from other electronic devices, press
RADIO/LINE IN to choose the LINE IN state
_______________________________________________________________________
_BITTEL
MediaFi Series
Page 10 of 19
3) Press AUDIO ON/OFF to play and close the audio player. Press
RADIO/iPod/LINE IN to switch between FM-RADIO 、 iPod/ iPhone,
MP3, press VOLUME +/- to adjust the volume.
2.Hotel Mode set
When on RADIO OFF state or no audio signal input, press the TUNING
+ continually, LCD display will show ON or OFF, for ON state the
volume will be within 0-20, for the OFF state, the volume will be within 030.
3.Auto-sense for phone call state
When in FM-RADIO, iPOD/iPhone, MP3 mode, the MediaFi will pause if
there is incoming call ring or the phone is in off-hook state. When the
ringer stops flashing or the phone is in on-hook state, the MediaFi will
play the music again.
4. Time set
A. Press the VOLUME- for one seconds, the hour digits flashes, press
the TUNING+/- to add or detract the hour digits
B. Press the VOLUME- again, the minute digit flashes, press the
TUNING+/- to adjust the minute digit
C. Press the VOLUME- key or press no keys for a period time, the time
adjustment is done
D. Press the VOLUME+ continually, the phone will change between 12
hour format and 24 hour format.
5. Alarm set
A. Press the ALARM SET key, then press the UP/DOWN, change the
hour digit
B. Press the ALARM SET key again, then press the UP/DOWN, change
the minute
digit
C. Press the ALARM SET key or press no keys for a period of time, the
time set is finished
D. Press ALARM ON/OFF key to activate or cancel the alarm function,
the LCD display shows ALARM logo when in alarm function, no logo
when cancel the function.
_______________________________________________________________________
_BITTEL
MediaFi Series
Page 11 of 19
E. In RADIO OFF state or no audio signal input, press the ALARM
VOLUME key to adjust the volume of alarm, 5DB each time, from o to
20 DB, the set volume is 10DB, the alarm will stop after rings for 25
seconds.
6. The snooze function of the alarm
A. When the alarm rings, press any key to activate the snooze function,
the alarm will ring again after 10 minutes, press any key (except the
ALARM ON/OFF) or picking up the phone base to end the alarm ring
B. When playing audio signals in the audio speakers of MediaFi, if the
alarm rings, the audio speaker stops playing the audio signal
automatically.
7. Adjust the LCD display brightness
When not in alarm state, press the SNOOZE button to switch between
close, dim and light three different levels.
8. When any button is pressed, all the audio touch buttons will be lighted
which will last for One minute. The button which is pressed will flash.
9. System reset
Press the ALARM ON/OFF for two seconds, the system is reset, the
volume of audio speaker and system time all went back to normal for
easy guestroom management.
10. Multi-Feature Connector
iPad Dock can play and charge for iPhone/iPad/iPod;
Lightning Connector can charge for the iphone 5 and Mini iPad;
Micro USB can charge for the mobile phone with Micro USB connector.
11. Remote Time Control
First install two 7# 1.5V batteries into the before using it. Pay attention to the
polarity of the battery. Don’t mix the old and new batteries.
_______________________________________________________________________
_BITTEL
MediaFi Series
Page 12 of 19
1. LCD Display
——
Set DST time.
2. DST SET key
key——
——Set
——
Set time and date.
3. TIME SET key
key——
——Set
——
Adjust time and date .
4. TIME PROG key
key——
——Adjust
Adjust DST time.
5. DST PROG key ——
——Adjust
6. UP key —— Upward key.
——
Downward key.
7. DOWN key
key——
——Downward
Set time with the Remote Time Control
●Press TIME SET key, hour digits flashing, press UP/DOWN key to adjust,
●Press TIME SET key, press UP/DOWN key to adjust minute,
●Press TIME SET key, press UP/DOWN key to adjust month,
●Press TIME SET key, press UP/DOWN key to adjust day,
●Press TIME SET key, press UP/DOWN key to adjust year,
●Press TIME SET key, LCD display the time, setting finished.
Set DST area code with the Remote Time Control
●Press DST SET key, then press UP/DOWN key to set the area code:
00= DST OFF, 01=USA/Canada, 02=Europe/Russia/Swiss;
03= Mexico,
04=New Zealand
Adjust Time
● After above setting, press TIME PROG or DST PROG at the right upper direction
within 10cm near the base LCD to adjust the TIME or DST Time.
Conversion of 12- Hour Format and 24- Hour Format
●When LCD display time, press TIME SET over 2 seconds to realize the conversion.
Note: If the attached Remote Time Control is different than above image, please
according to the attached object.
How to use WiFi
1. Set the Internet
Please connect the hotel’s internet cable into the MediaFi’s AP RJ45
port. Further more on the right of the MediaFi, there is also one RJ45
port which can also supply wired internet service.
_______________________________________________________________________
_BITTEL
MediaFi Series
Page 13 of 19
2. Set WiFI
Wireless AP owns 2 LAN port. The default IP address is 10.10.10.254.
Please input the IP address in the browser and enter the management
interface. Both of the the user name and password are admin.
Wireless AP can set the wireless SSID number and connect the
wireless. LAN port’s DHCP must be closed.
e telephone
How to use th
the
MediaFi H ( With corded handset)
1. Off-Hook
Please press pick up the handset or press the ON/OFF button of the
handset when the handset is picked up but the phone is on-hook status.
2. On-hook
Please press put back the handset to the cradle or press the ON/OFF
button of the handset.
3. Flash
The default is 600ms.
4. Redial
Press Redial button can redial the last dialed number. The dialed number
will disappear in 5 minutes.
5. Service buttons
In off-hook status, please press certain service button can auto dial the
relevant number.
6. Adjust the volume
When answer the call by handset, press VOL to adjust the volume,
which are 3 levels. When put the handset back to the cradle, it will return
to low level.
7. Busy tone disconnect automatically
If the handset not on cradle after a phone call, this device can on-hook
automatically after getting busy signal within a definite time. Then the
line will connect accordingly.
8. Message waiting indicator
It will flash when there is a call or message.
_______________________________________________________________________
_BITTEL
MediaFi Series
Page 14 of 19
AC
9. Programming Service buttons
It needs Handheld cloner to program the service buttons. Please do as
followed:
1) Please connect the MediaFi with the Handheld Cloner through the
three-way socket
DC
RS232
USB
RJ45
TO TEL
AC
HDMI
HDMI
DC
RS232
USB
RJ45
TO TEL
1) Phone Jack
2)Three-way socket
3) Handheld cloner 4) TO TEL jack
2) Please press the EDIT button of the Handheld Cloner for 3 seconds
and choose the programming information.
3) Please connect the phone and pick up the handset of the MediaFi.
4) Please press * - # -8 -# of the handset
5) Please press SEND/STOP button until hear the sound of DIDI and the
Handheld Cloner will show Transmitting….. . After finish the
programming, it will show Succeed and the phone will auto enter onhook status.
Note: The product doesn’t support manually programming the service
buttons.
MediaFi W ( With Cordless handset)
1. Off-Hook
Press ON or SPKR of the cordless handset
2. On-hook
Press OFF or put the handset back to the cradle.
3. Answer phone
Pick up the handset, or press ON or SPKR of the handset.
_______________________________________________________________________
_BITTEL
MediaFi Series
Page 15 of 19
4. Adjust the communication volume
When answer the call by handset, press VOL +/- to adjust the volume,
which are 5 levels.
5. Activate and Release HOLD
During calling, press HOLD of the handset will activate the HOLD mode.
Then press ON or SPKR of the handset will release HOLD model.
6. Redial
Press Redial button can redial the last dialed number. The dialed number
will disappear in 5 minutes.
If you want to keep or cancel the redial feature, please do as followed:
On-Hook mode:
HOLD+*+HOLD+REDIAL(The dialed number will disappear in 5
minutes)
HOLD+#+HOLD+REDIAL(The dialed number won’t disappear )
7. Mute
Press Mute button to activate or release the mute mode.
8. Adjust the ringing volume
Press VOL+/- to adjust the volume.
9. Service buttons
1) In off-hook status, press the certain service button of the base can
auto dial certain number
2) In off-hook status, press the certain service button of the handset
can auto dial certain number
3) It need Handheld Cloner to program the service button, the service
buttons of the handset, from left to right is M1,M2 and M3, which are
related to M8,M9 and M10 of the Handheld Cloner.
10. Message Waiting Light
It will flash when there is a call or message.
11. Registration of the handset
If the handset cannot be used normally after being put full charged
batteries and the phone base connected to DC 9V power, the
handset has not been registered to the phone base, please do the
following to register the handset.
_______________________________________________________________________
_BITTEL
MediaFi Series
Page 16 of 19
Please connect the outside power and correctly install the battery into
the handset, then correctly put the handset into the base. Please put
the handset back to the base when the base in on-hook status. The
charging indicator should be on, then off, then on.
Note: The registration will fail if the power is cut off.
Signal format
1. HDMI output format is 1080P/60Hz or 720P/60Hz (customization
options)
2. Supporting PC input format:
800*600、1024*768、1152*864、1280*600、1280*720、1280*768、
1280*960、1280*1024、1920*1080、1920*1200。
refreshing frequency: 60Hz or 75Hz。Color quality:16bit, 32bit。
3.Supporting HDMI input format :
No. Signal Format
1
480i/480P
2
576i(720)/576P(720)
3
720P(50Hz/60Hz)
4
1080P(50Hz/60Hz)
MAIN PARAMETERS
DC power
Input :AC100V-240V/50Hz
Output :DC7.5V3A
Power Rating
6W
Video Input
HDMI(1.3),AUDIO/PC,AUDIO/VIDEO,SVIDEO, Bluetooth
Video Output
HDMI(1.3)1080P/60Hz
Communication
Serial ports /CEC
mode
USB port
Output : DC5V 2A(Max)
AC power
As local AC power
Condition of
Temperature: +5℃~+35℃
circumstance
Humidity: 25%~90%
_______________________________________________________________________
_BITTEL
MediaFi Series
Page 17 of 19
Storage temperature:-20° to 65° C (-4° to 149° F)
Atmospheric pressure:86~106Kpa
Note:
In order to protect the device, if storage temperature
lower than 5℃, please keep the MediaFi in normal
temperature for 3 hours, then connect the power to
use.
SIMPLE TROUBLE AND SOLUTION
Trouble
Solve Method
AUDIO/PC no image
Please adjust the output mode and resolution
of PC, keep it as 60Hz/75Hz
HDMI connection wrong
Please check the HDMI cable, and try to replug and keep it firmly.
Exceptional work
TV image lean to one
side , not all over the
screen
Fail to detect the signal
Phone ringer doesn't
work well
Cordless handset doesn't
work
FM radio with noise or no
signal
Please cut the power for 1 minute and repower again.
Please adjust the display format of the TV.
Please confirm the portable equipments can
output video signal
check the phone line for ill connection and
check the phones of the same line
check for registration and distance from the
phone base and the battery
Check the local radio channel
Packing Details
1. MediaFi unit 2.Cordless handset and 1 battery
3. base plate
4. Binding ties
5. Screws 3*22 (4)
6. Cable bag
7. Ac Adaptor
8.User Manual
9. Phone line
_______________________________________________________________________
_BITTEL
MediaFi Series
Page 18 of 19
Notices for Battery: (MediFi W)
Charging batteries for cordless handset:
a. If the battery over 5 months after first charging or stored without using, it
needs to be charged continually 8 hours for normal use.
b. The new battery must pass 3-4 times full charging and using to reach
the peak performance.
c. If the device is not used for long time, please unplug the battery from the
socket and stored in dry environment.
d. If the battery is not used for a long time, before using them again, it
need full charge and need several times to charge and discharge to
restore the normal function.
e. Don’t discharge the batteries by manual method.
f. Please change the battery after using for 20 months. Suggest to buy
from our factory directly. Spare battery for clock:
a).There is a button like battery in the MediaFi to ensure the normal
function of the clock.
b). If the clock doesn't show the right time, after time adjustment, it doesn't
work well again, please open the battery box to replace the battery with
3V 50mAH new battery.
c) Please put the battery's positive eletrode upside. It is suggested that
batteries be replaced by new ones every two years to ensure the
correct time display.
CONTACT BITTEL
Telephone:
(86) 633-2212125/2212113 /2212160/2212103/2212177
Internet: www.bittelgroup.com www.bittelmedia.com
Email:
[email protected]
Address:
Shandong Bittel Electronics Co. Ltd.
No. 1 Rizhao North Road, Rizhao,
Shandong, 276800, China
Copyright © 2012 Bittel Inc. All rights reserved.
_______________________________________________________________________
_BITTEL
MediaFi Series
Page 19 of 19